Stampin’ Up Enjoy Life Birthday Card

Good Tuesday morning my fellow stampers.  How are you doing today?  I hope everyone’s week has started off well.

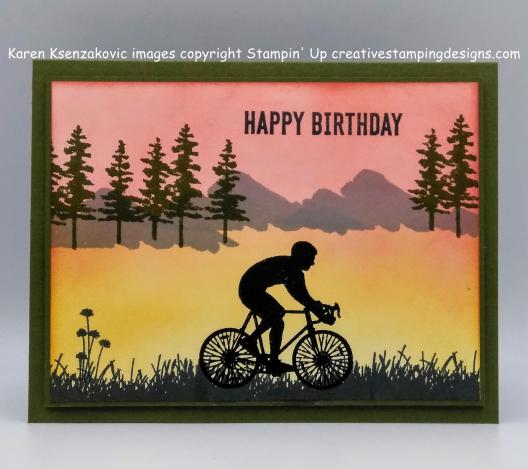
For today’s card I did some sponging and some embossing for you.  I have to admit, it took me a couple do-overs before I got this card to look like I wanted and didn’t have any mess ups.  Here’s my card.
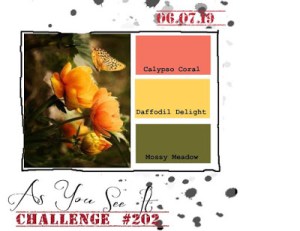
My card for today played along with 3 challenges.  First is As You See It challenge #202.  Here are their colors.
Next I played along with Inspire.Create challenge #045  Here is their theme.

I also joined in with Seize The Birthday challenge # 167.

I started with a panel of Whisper White cardstock.  Using my Stamping Sponges I first sponged the Calypso Coral Ink along the top half of the panel.  I Then sponged the Daffodil Delight Ink on the bottom half of the panel.
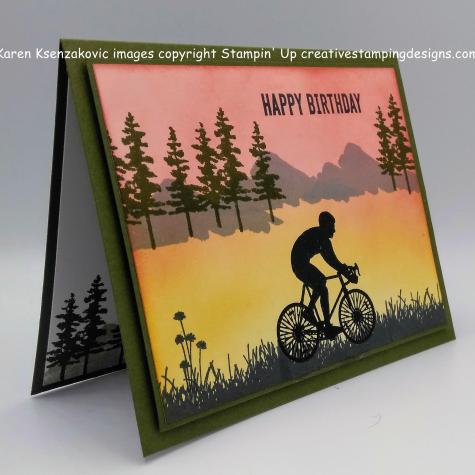
I stamped the grass and flower image from the Stampin’ Up Enjoy Life Photopolymer Stamp Set in Tuxedo Black Memento Ink on the bottom of the sponged panel.  I stamped the mountain image from the Stampin’ Up Waterfront Photopolymer Stamp Set in Smoky Slate Ink across the center of the panel.  I stamped the trees from the Waterfront stamp set in Mossy Meadow Ink in front of the mountains.  Lastly I stamped the bike rider from the Enjoy Life stamp set in Versamark Ink on the bottom of the panel and immediately sprinkled it with Black Stampin’ Emboss Powder and set it using my Heat Tool.

I stamped the sentiment from the Stampin’ Up Itty Bitty Birthdays Cling Stamp Set in Tuxedo Black Memento Ink on the top of the panel.  I adhered the artwork to a thin Mossy Meadow mat using Snail.  I then adhered it to a Mossy Meadow card base using Stampin’ Dimensionals.

On the inside I stamped the sentiment from the Enjoy Life stamp set in Mossy Meadow Ink in the center of a Whisper White panel.  I stamped the mountain image from the Waterfront stamp set in Sahara Sand Ink along the bottom of the Whisper White panel.  I stamped the trees from the Waterfront stamp set in Mossy Meadow Ink on the bottom in front of the mountains.  I adhered the Whisper White panel to the inside of the Mossy Meadow card base using Multipurpose Liquid Glue.

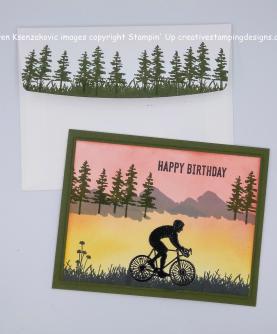
To finish my card I decorated a Medium Whisper White Envelope.  I stamped the bike rider image from the Enjoy Life stamp set in Tuxedo Black Memento Ink on the envelope front.  I stamped the grass and tree images from the Waterfront stamp set in Mossy Meadow Ink on the envelope flap.

Thank you for stopping by my blog today.  I hope you liked my card and will give it a try. Happy Stamping!!****************************************************************************************************

If you need any stamping supplies, I’d be very happy to be your Demonstrator.  Just click here to go directly to my online store or drop me an email if you have any questions. 

MY CURRENT HOST CODE IS: AHCJYGJN

For any orders $50 or more I will send you my monthly class tutorials.  Click here or go to my Customer Rewards to see what this months tutorials are.

Click here to shop the clearance rack.

Happy Stamping, Karen!

****************************************************************************************************

If you are interested in joining my team click here for details or email me.  I’d love to have you on my team.

****************************************************************************************************

Sail Into Summer – July Paper Pumpkin Kit!
This month, Paper Pumpkin is providing unprecedented catalog coordination, giving you THREE new suites that you can mix and match with July’s kit!  The three suites are:

  • Woven Threads Suite p. 13–14
  • Garden Lane Suite p. 40–41
  • Come Sail Away Suite p. 144–145

More about the July Kit:

  • Makes 9 mailable cards with envelopes (3 each of 3 designs)
  • Coordinating colors: Gold, Kraft, Mossy Meadow, Old Olive, Pear Pizzazz, Pretty Peacock, Sahara Sand, Seaside Spray, and Terracotta Tile
  • Must have an active subscription by July 10, 2019 to receive the On My Mind kit.
  • Product availability may be limited toward the end of the promotion period.

If you’re interested in subscribing to Paper Pumpkin yourself, you can either sign up for a subscription where you are billed monthly for your kit or you can purchase a prepaid subscription in my online store.  To see more information and to sign up for the monthly subscription, CLICK HERE. To see the options for prepaid subscriptions in my online store, CLICK HERE.

****************************************************************************************************

Card stock cuts for this project:

  • Mossy Meadow Cardstock 8 1/2″ X 5 1/2″ (card base scored and folded at 4 1/4″), 5 1/8″ X 3 7/8″ (artwork mat)
  • Whisper White Cardstock 5″ X 3 3/4″ (artwork), 5 1/4″ x 4″ (inner liner)

****************************************************************************************************

Product List

Stampin’ Up Over The Moon Birthday Card

Good Monday morning my fellow stampers.  How was everyone’s weekend?  Did anyone do anything exciting?  Hope all the dads out there enjoyed the day.

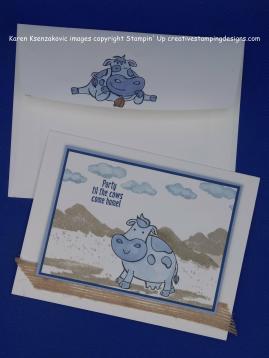
For today’s card I used the adorable new Stampin’ Up Over The Moon Cling Stamp Set from the 2019-2020 Annual Catalog.  My son’s birthday is this week.  My little preemie will be turning 24 and he’s over 6′ now.  He definitely takes after me with the height (not really).  Well, he hates puns, so that means I have to find stamp sets that have some kind of pun in them and this one fit perfectly.  Here’s my card.

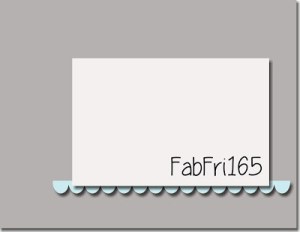
My card for today also played along with a few challenges.  First off is Fab Friday challenge #165.  Here is their sketch.

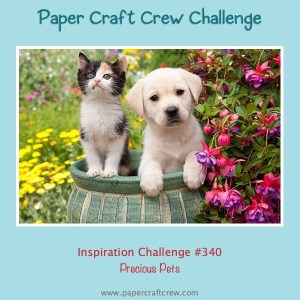
Next I played along with Paper Craft Crew challenge #340.  Here is their theme.  I’ve known people that have had cows for pets.

I also played along with Color My Heart Color Dare #347.  Here are their colors.

I started with a panel of Whisper White cardstock and stamped one of the cow images from the Over The Moon stamp set in Tuxedo Black Memento Ink.  I colored the cow in using my Seaside Spray Stampin’ Blends Markers.

Using the Masking Technique, I masked the cow with a Post-It note that I had stamped and fussy cut the cow image from.  I then stamped the mountains from the Stampin’ Up Waterfront Photopolymer Stamp Set in Sahara Sand Ink.  I stamped the sand image and dirt image from the Waterfront stamp set in Sahara Sand Ink also.  I stamped the clouds from the Stampin’ Up Above The Clouds Photopolymer Stamp Set in Seaside Spray Ink above the mountain image.  I stamped the sentiment from the Over The Moon stamp set in Blueberry Bushel Ink on the card front.

I adhered the artwork to a Blueberry Bushel mat using Snail.  I adhered the matted artwork to another mat of Seaside Spray cardstock using Multipurpose Liquid Glue. I adhered a strip of Burlap Ribbon to the bottom of the Thick Whisper White card base using Snail.  I adhered the double matted artwork to the card base using Stampin’ Dimensionals.

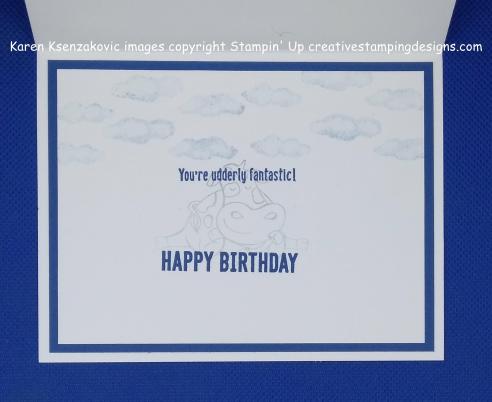
On the inside I stamped another one of the cow images from the Over The Moon stamp set in Tuxedo Black Memento Ink, stamping off 4 times so that I got a very light image.  I stamped the clouds from the Above The Clouds stamp set in Seaside Spray Ink stamping off once.  I stamped the sentiment from the Over The Moon stamp set in Blueberry Bushel Ink.  I stamped the Happy Birthday from the Stampin’ Up Itty Bitty Birthday’s Cling Stamp Set in Blueberry Bushel just below the cow image.  I adhered the Whisper White panel to a Blueberry Bushel mat using Snail and then to the inside of the Whisper White card base using Multipurpose Liquid Glue.

To finish my card I decorated a Medium Whisper White Envelope.  I stamped one of the cow images from the Over The Moon stamp set in Tuxedo Black Memento Ink on the front of the envelope.  I colored the cow in the same as I did for the card.  I stamped the clouds from the Above The Clouds stamp set in Seaside Spray Ink on the envelope front.  I stamped another one of the cow images from the Over The Moon stamp set in Tuxedo Black Memento Ink on the envelope flap and colored it in the same as I did for the card.

Than you for stopping by my blog today.  I hope you liked my card and will give it a try.  Happy Stamping!!

****************************************************************************************************

If you need any stamping supplies, I’d be very happy to be your Demonstrator.  Just click here to go directly to my online store or drop me an email if you have any questions. 

MY CURRENT HOST CODE IS: AHCJYGJN

For any orders $50 or more I will send you my monthly class tutorials.  Click here or go to my Customer Rewards to see what this months tutorials are.

Click here to shop the clearance rack.

Happy Stamping, Karen!

****************************************************************************************************

If you are interested in joining my team click here for details or email me.  I’d love to have you on my team.

****************************************************************************************************

Sail Into Summer – July Paper Pumpkin Kit!

This month, Paper Pumpkin is providing unprecedented catalog coordination, giving you THREE new suites that you can mix and match with July’s kit!  The three suites are:

  • Woven Threads Suite p. 13–14
  • Garden Lane Suite p. 40–41
  • Come Sail Away Suite p. 144–145

More about the July Kit:

  • Makes 9 mailable cards with envelopes (3 each of 3 designs)
  • Coordinating colors: Gold, Kraft, Mossy Meadow, Old Olive, Pear Pizzazz, Pretty Peacock, Sahara Sand, Seaside Spray, and Terracotta Tile
  • Must have an active subscription by July 10, 2019 to receive the On My Mind kit.
  • Product availability may be limited toward the end of the promotion period.


If you’re interested in subscribing to Paper Pumpkin yourself, you can either sign up for a subscription where you are billed monthly for your kit or you can purchase a prepaid subscription in my online store.  To see more information and to sign up for the monthly subscription, CLICK HERE. To see the options for prepaid subscriptions in my online store, CLICK HERE.

****************************************************************************************************

Card stock cuts for this project:

  • Blueberry Bushel Cardstock 3 1/4″ X4 1/2″ (artwork mat), 4″ X 5 1/4″ (inner liner mat)
  • Seaside Spray Cardstock 3 3/8″ X 4 5/8″ (artwork 2nd mat)
  • Whisper White Cardstock 3 1/8″ X 4 3/8″ (artwork), 3 3/4″ X 5″ (inner liner)
  • Thick Whisper White Cardstock 8 1/2″ X 5 1/2″ (card base scored and folded at 4 1/4″)

****************************************************************************************************

Product List

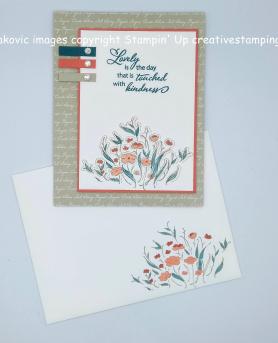
Stampin’ Up Lovely Is The Day

Good Friday morning my fellow stampers.  How was your week?  The weekend is upon us again, have you got any plans?  I’m working Saturday, but Sunday, Father’s Day, I have off.  The past couple years I’ve made my husband a Father’s Day brunch, but I’m not sure what we will be doing this year.

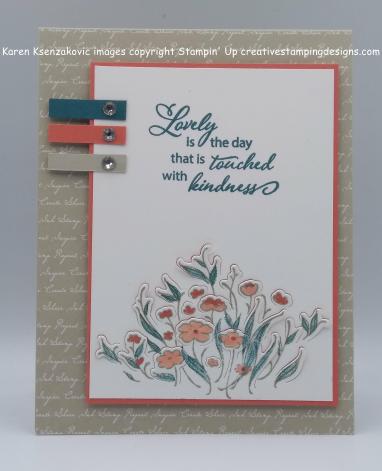
For today’s card I used another new bundle from the 2019-2020 Annual Catalog.  It’s the Lovely Is The Day Bundle.  The images in this stamp set to me are very whimsical and the Dies that goes with it are so pretty.  The one I used only partially cuts out the image.  Here’s my card.

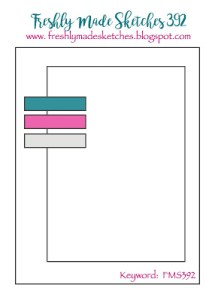
I joined in with Freshly Made Sketches challenge #392.  Here is their sketch.

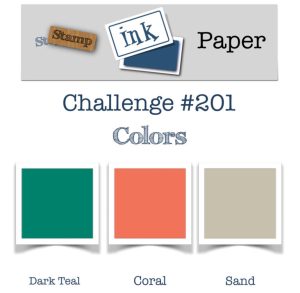
I also played along with Stamp Ink Paper challenge #201.  Here are their colors.

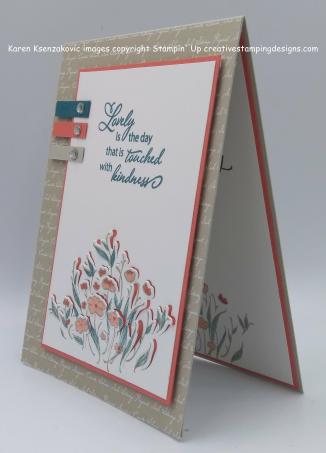
I started by adhering a panel of Sahara Sand Neutrals 6 X 6 Designer Series Paper to a Sahara Sand card base using Multipurpose Liquid Glue.  On a panel of Whisper White cardstock I stamped the floral image from the Stampin’ Up Lovely Is The Day Photopolymer Stamp Set in Sahara Sand Ink.  I stamped the leaves from Lovely Is The Day stamp set in Pretty Peacock Ink and colored the flowers in using my Calypso Coral Stampin’ Blends Markers.  Using the Lovely Leaves Die I cut the image out, which you can see only partially cuts the image.

I stamped the sentiment from the Lovely Is The Day stamp set in Pretty Peacock Ink above the floral image.  I adhered the artwork to a Calypso Coral mat using Snail.

On the left side of the artwork I adhered 3 thin strips of cardstock, one Pretty Peacock, one Calypso Coral and one Sahara Sand, using a Glue Dot.  I added a Rhinestone Basic Jewel on each one.  I adhered the matted artwork to the card front using Stampin’ Dimensionals.

On the inside I stamped the floral image from Lovely Is The Day stamp set in Sahara Sand Ink on the bottom of a Whisper White panel.  I colored the leaves in using my Pretty Peacock Stampin’ Blends Markers and the flowers in using my Calypso Coral Stampin’ Blends Markers.  I stamped the sentiment from the Lovely Is The Day stamp set in Pretty Peacock Ink above the floral image.  I adhered the Whisper White panel to a Calypso Coral mat using Snail and then to the inside of the Sahara Sand card base using Multipurpose Liquid Glue.

To finish my card I decorated a Medium Whisper White Envelope.  I stamped the floral image from the Lovely Is The Day stamp set in Sahara Sand Ink.  I colored it in the same as I did for the card.  I adhered a panel of Sahara Sand Neutrals 6 X 6 DSP to the envelope flap.

Thank you for visiting my blog today.  I hope you liked my card and will give it a try.   I hope you all have a wonderful weekend and Happy Father’s Day to any fathers out there.  Happy Stamping!!

****************************************************************************************************

If you need any stamping supplies, I’d be very happy to be your Demonstrator.  Just click here to go directly to my online store or drop me an email if you have any questions. 

MY CURRENT HOST CODE IS: AHCJYGJN

For any orders $50 or more I will send you my monthly class tutorials.  Click here or go to my Customer Rewards to see what this months tutorials are.

Click here to shop the clearance rack.

Happy Stamping, Karen!

****************************************************************************************************

If you are interested in joining my team click here for details or email me.  I’d love to have you on my team.

****************************************************************************************************

Sail Into Summer – July Paper Pumpkin Kit!

This month, Paper Pumpkin is providing unprecedented catalog coordination, giving you THREE new suites that you can mix and match with July’s kit!  The three suites are:

  • Woven Threads Suite p. 13–14
  • Garden Lane Suite p. 40–41
  • Come Sail Away Suite p. 144–145

More about the July Kit:

  • Makes 9 mailable cards with envelopes (3 each of 3 designs)
  • Coordinating colors: Gold, Kraft, Mossy Meadow, Old Olive, Pear Pizzazz, Pretty Peacock, Sahara Sand, Seaside Spray, and Terracotta Tile
  • Must have an active subscription by July 10, 2019 to receive the On My Mind kit.
  • Product availability may be limited toward the end of the promotion period.


If you’re interested in subscribing to Paper Pumpkin yourself, you can either sign up for a subscription where you are billed monthly for your kit or you can purchase a prepaid subscription in my online store.  To see more information and to sign up for the monthly subscription, CLICK HERE. To see the options for prepaid subscriptions in my online store, CLICK HERE.

****************************************************************************************************

Card stock cuts for this project:

  • Calypso Coral Cardstock 3 3/8″ X 4 5/8″ (artwork mat), 4 1/8″ X 5 3/8″ (inner liner mat), 1/4″ X 1 1/8″ (side strip)
  • Pretty Peacock Cardstock 1/4″ X 1 1/8″ (side strip)
  • Sahara Sand Cardstock 4 1/4″ X 11″ (card base scored and folded at 5 1/2″), 1/4″ X 1 1/8″ (side strip)
  • Whisper White Cardstock 3 1/4″ X 4 1/2″ (artwork), 4″ X 5 1/4″ (inner liner)
  • Neutrals 6 X 6 Designer Series Paper 4 1/4″ X 5 1/2″ (card front)

****************************************************************************************************

Product List

Stampin’ Up Woven Heirlooms Sympathy Card

Good Thursday morning my fellow stampers.  How is everyone doing today?

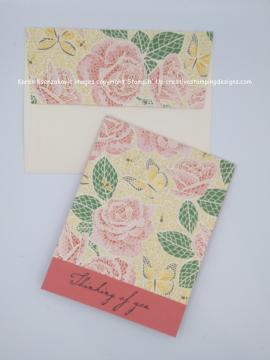
For today I have a really quick and easy card for you that showcases one of the new Designer Series Papers that just came out in the 2019-2020 Annual Catalog.  Take a look.

I started with a panel of Mosaic Mood Specialty Designer Series Paper and adhered it to a Terracotta Tile card base using Multipurpose Liquid Glue.

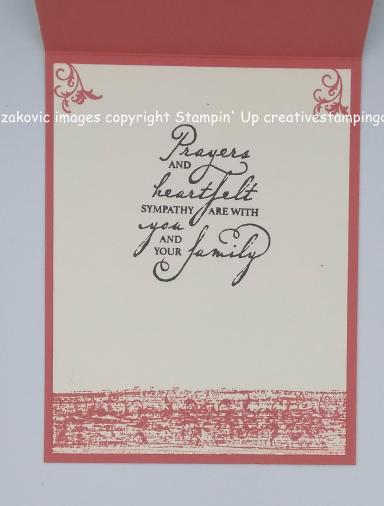
I stamped the sentiment from the Stampin’ Up Woven Heirlooms Cling Stamp Set in Early Espresso Ink along the bottom section of the card base..

It always amazes me how one small panel of DSP can make such a beautiful card.

On the inside I stamped the sentiment from the Woven Heirlooms stamp set in Early Espresso Ink in the center of a Very Vanilla panel.  I stamped the small filigree image from the Woven Heirlooms stamp set in the top two corners in Terracotta Tile Ink.  I stamped the border image from the Woven Heirlooms stamp set in Terracotta Tile Ink along the bottom of the Very Vanilla panel.  I adhered the Very Vanilla panel to the inside of the Terracotta Tile card base using Multipurpose Liquid Glue.

To finish my card I decorated a Medium Very Vanilla Envelope.  I stamped the border image from the Woven Heirlooms stamp set along the bottom front of the envelope in Terracotta Tile Ink.  I adhered a panel of the Mosaic Mood Specialty DSP to the envelope flap.  There you have it.  With a little DSP you can make the most beautiful cards ever.  You don’t need to add embellishments or anything.

Thank you for stopping by my blog today.  I hope you liked my card and will give it a try. Happy Stamping.

****************************************************************************************************

If you need any stamping supplies, I’d be very happy to be your Demonstrator.  Just click here to go directly to my online store or drop me an email if you have any questions. 

MY CURRENT HOST CODE IS: AHCJYGJN

For any orders $50 or more I will send you my monthly class tutorials.  Click here or go to my Customer Rewards to see what this months tutorials are.

Click here to shop the clearance rack.

Happy Stamping, Karen!

****************************************************************************************************

If you are interested in joining my team click here for details or email me.  I’d love to have you on my team.

****************************************************************************************************

Sail Into Summer – July Paper Pumpkin Kit!

This month, Paper Pumpkin is providing unprecedented catalog coordination, giving you THREE new suites that you can mix and match with July’s kit!  The three suites are:

  • Woven Threads Suite p. 13–14
  • Garden Lane Suite p. 40–41
  • Come Sail Away Suite p. 144–145

More about the July Kit:

  • Makes 9 mailable cards with envelopes (3 each of 3 designs)
  • Coordinating colors: Gold, Kraft, Mossy Meadow, Old Olive, Pear Pizzazz, Pretty Peacock, Sahara Sand, Seaside Spray, and Terracotta Tile
  • Must have an active subscription by July 10, 2019 to receive the On My Mind kit.
  • Product availability may be limited toward the end of the promotion period.


If you’re interested in subscribing to Paper Pumpkin yourself, you can either sign up for a subscription where you are billed monthly for your kit or you can purchase a prepaid subscription in my online store.  To see more information and to sign up for the monthly subscription, CLICK HERE. To see the options for prepaid subscriptions in my online store, CLICK HERE.

****************************************************************************************************

Card stock cuts for this project:

  • Terracotta Tile Cardstock 4 1/4″ X 11″ (card base scored and folded at 5 1/2″)
  • Very Vanilla Cardstock 4″ X 5 1/4″ (inner liner)
  • Mosaic Mood Specialty Designer Series Paper 4 1/2″ X 4 1/4″ (card front) piece for envelope flap

****************************************************************************************************

Product List

Stampin’ Up New Wonders for Amy’s Inkin’ Krew Blog Hop

Good Tuesday morning my fellow stampers. It’s the 2nd Tuesday of the month and that means it’s time for another Amy’s Inkin’ Krew Blog Hop. The 2nd Tuesday of every month this amazing group of ladies put together a blog hop and you are guaranteed to see some amazing projects. This month our theme is ‘BIRTHDAY’. We can interpret this any way we would like to. If you are starting with me, be sure to hop around to see everyone’s projects. If you’ve hopped over from Karen Finkle , welcome to my blog and thank you for stopping by.

For today’s card I used a new  Host Exclusive stamp set from the 2019-2020 Annual Catalog.  Here’s my card.

I joined in with Sunday Stamps challenge #206  Here is their sketch.

I also played along with TGIF color challenge #215  Here are their colors.

I started by adhering a panel of Granny Apple Green Brights 6 X 6 Designer Series Paper to a Night of Navy card base using Multipurpose Liquid Glue.

On a panel of Whisper White cardstock I stamped the large image from the Stampin’ Up New Wonders Cling Stamp Set in Tuxedo Black Memento Ink.  I colored the image in using my Crumb Cake, Ivory, Granny Apple Green and Pool Party Stampin’ Blends Markers.  I stamped the sentiment from the New Wonders stamp set in Night of Navy Ink on the bottom left of the artwork panel.  I adhered the artwork to a Night of Navy mat using Snail.

On a panel of Pool Party cardstock, I stamped the small leaf image from the New Wonders stamp set in Pool Party Ink on the top and bottom.  I adhered the matted artwork to the Pool Party panel using Snail and then to the card front using Stampin’ Dimensionals.

On the inside I stamped the small leaf image from the New Wonders stamp set in Granny Apple Green in across the top and bottom of a Whisper White panel.  I stamped the sentiment from the Stampin’ Up Itty Bitty Birthdays Cling Stamp Set in Night of Navy Ink in the center of the Whisper White panel.  I adhered the Whisper White panel to a Pool Party Mat using Snail.  I adhered the matted panel to the inside of the Night of Navy card base using Multipurpose Liquid Glue.

To finish my card I decorated a Medium Whisper White Envelope.  I stamped the girl image from the New Wonders stamp set in Tuxedo Black Memento Ink on the envelope front and colored it in using my Crumb Cake, Ivory and Pool Party Stampin’ Blends Markers.  I adhered a Granny Apple Green panel of the Brights 6 X 6 DSP to the envelope flap.

Thank you for stopping by my blog today.  I hope you liked my card.  Now be sure to hit Previous to hop back to Karen Finkle’s blog or hit Next to head over to Shirley Gentry’s blog. You can also click on each of the names and hop around that way. Happy Hopping!!

1. Jaimie Babarczy: 
2.  Karen Finkle: 
3.  Karen Ksenzakovic: You Are Here
4.  Shirley Gentry:
5.  Connie Troyer:
6.  Mary Deatherage:
7.  Sue Prather: 
8.  Akiko Sudano: 
9. Amy Koenders:

****************************************************************************************************

If you need any stamping supplies, I’d be very happy to be your Demonstrator.  Just click here to go directly to my online store or drop me an email if you have any questions. 

MY CURRENT HOST CODE IS: AHCJYGJN

For any orders $50 or more I will send you my monthly class tutorials.  Click here or go to my Customer Rewards to see what this months tutorials are.

Click here to shop the clearance rack.

Happy Stamping, Karen!

****************************************************************************************************

If you are interested in joining my team click here for details or email me.  I’d love to have you on my team.

****************************************************************************************************

Card stock cuts for this project:

  • Night of Navy Cardstock 8 1/2″ X 5 1/2″ (card base scored and folded at 4 1/2″), 3 1/2″ X 4 1/2″ (artwork mat)
  • Pool Party Cardstock 3 3/4″ X 4″ (card front panel), 4 1/8″ X 5 3/8″(inner liner mat)
  • Whisper Whtie Cardstock 3 1/4″ X 4 1/4″ (artwork), 4″ X 5 1/4″ (inner liner)
  • Brights 6 X 6 Designer Series Paper 4 1/4″ X 5 1/2″ (card front), piece for envelope flap

****************************************************************************************************

Product List

Stampin’ Up Bloom and Grow Birthday Card

Good Monday morning my fellow stampers.  Hope you all had a wonderful weekend.  Did anyone do anything fun?  We had our team meeting and this was the first one I was able to attend in person.  We had lunch together and had a lot of fun stamping and talking.  I got to meet some new team members, which is always fun.

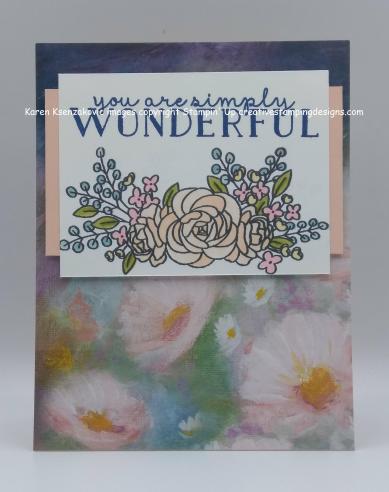
For today’s card I used another one of the new stamp sets from the 2019-2020 Annual Catalog.  It’s the Stampin’ Up Bloom & Grow Photopolymer Stamp Set.  It comes as a bundle, but I only used the stamp set today.  Here’s my card.

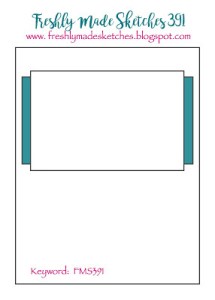
My card joined in with the Freshly Made Sketches challenge #391.  Here is their sketch.

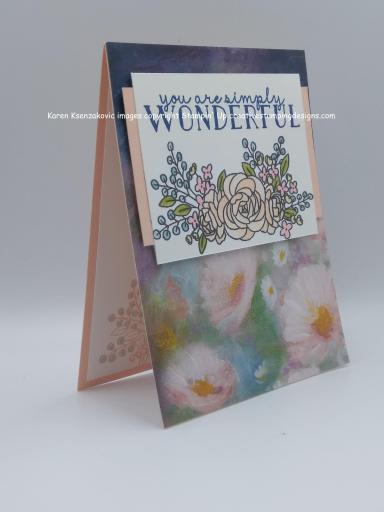
I started by adhering a panel of the beautiful Perennial Essence Designer Series Paper to a Petal Pink card base using Multipurpose Liquid Glue.

I stamped one of the floral images from the Bloom & Grow stamp set in Tuxedo Black Memento Ink on a panel of Whisper White cardstock.  I colored the image in using my Balmy Blue, Flirty Flamingo, Old Olive, Petal Pink and So Saffron Stampin’ Blends Markers.  I stamped the sentiment from the Bloom & Grow stamp set in Blueberry Bushel Ink above the floral image.

I adhered the artwork to a panel of Petal Pink cardstock using Snail then I adhered it to the card front using Stampin’ Dimensionals.

On the inside I stamped the floral image from the Bloom & Grow stamp set in Petal Pink Ink on the bottom of a Whisper White panel.  I only colored in a few of the flowers and leaves on the inside using my Stampin’ Blends Markers.  I stamped the sentiment from the Bloom & Grow stamp set in Blueberry Bushel Ink in the center of the Whisper White panel.  I adhered the Whisper White panel to the inside of the Petal Pink card base using Multipurpose Liquid Glue.

To finish my card off I decorated a Medium Whisper White Envelope.  I stamped the floral image from the Bloom & Grow stamp set in Petal Pink Ink on the envelope front and colored it in the same way I did for the inside of the card.  I adhered a panel of Perennial Essence DSP to the Envelope Flap.

Thank you for visiting my blog today.  I hope you liked my card and will give it a try.  Happy Stamping!!

****************************************************************************************************

If you need any stamping supplies, I’d be very happy to be your Demonstrator.  Just click here to go directly to my online store or drop me an email if you have any questions. 

MY CURRENT HOST CODE IS: AHCJYGJN

For any orders $50 or more I will send you my monthly class tutorials.  Click here or go to my Customer Rewards to see what this months tutorials are.

Click here to shop the clearance rack.

Happy Stamping, Karen!

****************************************************************************************************

If you are interested in joining my team click here for details or email me.  I’d love to have you on my team.

****************************************************************************************************

Share A Little Love – June Paper Pumpkin Kit!

LAST DAY TO SUBSCRIBE

Care about someone? Why not tell them?

The Paper Pumpkin June kit makes it easy for you to scatter sunshine this summer—whenever, with whomever. Not only do we give you 16 fun-sized, beach-themed cards and envelopes, but the kit also includes an exclusive carrying case so you’ll always have your cards on hand to share wherever you go. And don’t forget the exclusive stamp set and ink spot that completes every Paper Pumpkin kit!!

More about the June Kit:

  • In order to receive the June Paper Pumpkin Kit, you must have an active subscription by June 10 at 11:50 PM (MT).
  • The kit creates 16 fun-sized, beach-themed cards and envelopes.
  • Coordinating colors: Coastal Cabana, Crumb Cake, and Old Olive

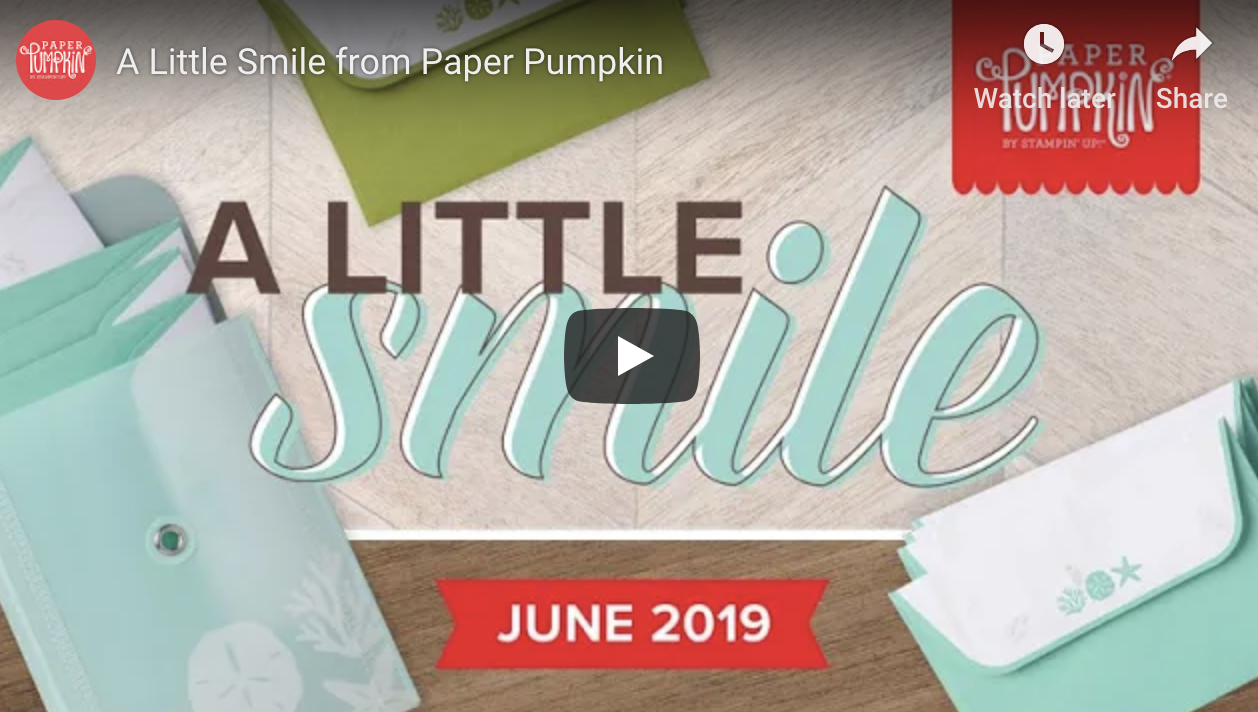
Check out the quick video created by Stampin’ Up! with some sneak peaks of the June kit!
If you’re interested in subscribing to Paper Pumpkin yourself, you can either sign up for a subscription where you are billed monthly for your kit or you can purchase a prepaid subscription in my online store.  To see more information and to sign up for the monthly subscription, click here.  To see the options for prepaid subscriptions in my online store, click here.  Let me know if you have any questions.

****************************************************************************************************

Card stock cuts for this project:

  • Petal Pink Cardstock 4 1/4″ X 11″ (card base scored and folded at 5 1/2″), 2 1/4″ X 4″ (card front panel)
  • Whisper White Cardstock 3 5/8″ X 2 3/4″ (artwork), 4″ X 5 1/4″ (inner liner)
  • Perennial Essence Designer Series Paper 4 1/4″ X 5 1/2″ (card front)

****************************************************************************************************

Product List

Stampin’ Up A Little Lace Free As A Bird

Good Friday morning my fellow stampers.  Well the weekend is upon us, so hopefully some of you will have some time to relax and have fun.  I’m looking forward to getting together with some of my team members for a meeting and stamping time.

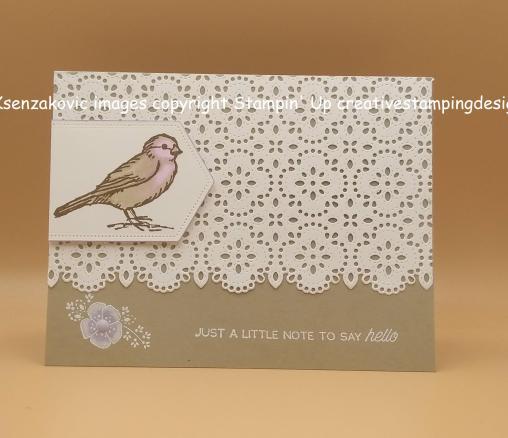
For today’s card I used another new bundle available NOW in the 2019-2020 Annual Catalog.  It’s the Stampin’ Up A Little Lace Bundle.  This new die is so elegant.  Take a look.

My card for today played along with the Watercooler Wednesday Challenge #224.  Here’s their challenge.

I started with a panel of Whisper White cardstock and ran it through my die cutting machine using the Stitched Lace Die.  I ran it through again using the edging die from the Stitched Lace Die to cut off about an inch from the bottom.

On the bottom of the Crumb Cake card base I stamped the sentiment from the Stampin’ Up A Little Lace Cling Stamp Set in Versamark Ink.  I immediately sprinkled it with my White Stampin’ Emboss Powder and set it using my Heat Tool.  I stamped the small flower image from the A Little Lace stamp set in Versamark Ink on the bottom left of the card front and immediately sprinkled it with White Stampin’ Emboss Powder and set it using my Heat Tool.

I wanted to do a little of the White Wash Technique on the small flower, so using my Aqua Painter I colored the flower in with the Whisper White Pigment Ink and let it dry completely.  Once it dried, using my Blender Pen, I colored the flower in with Purple Posy Ink.  I stamped the single bird from the Stampin’ Up Free As A Bird Cling Stamp Set in Soft Suede Ink on a small panel of Whisper White cardstock.  Using my Crumb Cake and Purple Posy Stampin’ Blends Markers, I colored the bird in.  I cut the bird out using the Stitched Nested Labels Dies. I adhered the lace panel to the Crumb Cake card base using Multipurpose Liquid Glue.  I adhered the artwork on the edge of the card base using Stampin’ Dimensionals.

On the inside I stamped the sentiment from the Free As A Bird stamp set in Crumb Cake Ink in the center of a Whisper White panel.  I stamped the edge image from the A Little Lace stamp set on either side of the Whisper White panel in Purple Posy Ink.  I adhered the Whisper White panel to a Purple Posy mat using Snail and then to the inside of the Crumb Cake card base using Multipurpose Liquid Glue.

To finish my card I decorated a Medium Whisper White Envelope.  I stamped the small flower image from the A Little Lace stamp set in Purple Posy Ink along the bottom edge of the envelope front and on the envelope flap.  The flowers on the envelope flap I colored in using my Purple Posy Stampin’ Blends Markers.

Thank you for visiting my blog today.  I hope you liked my card and will give it a try.  Happy Stamping!!

****************************************************************************************************

If you need any stamping supplies, I’d be very happy to be your Demonstrator.  Just click here to go directly to my online store or drop me an email if you have any questions. 

MY CURRENT HOST CODE IS: AHCJYGJN

For any orders $50 or more I will send you my monthly class tutorials.  Click here or go to my Customer Rewards to see what this months tutorials are.

Click here to shop the clearance rack.

Happy Stamping, Karen!

****************************************************************************************************

If you are interested in joining my team click here for details or email me.  I’d love to have you on my team.

****************************************************************************************************

Share A Little Love – June Paper Pumpkin Kit!

ONLY 3 DAYS LEFT TO SUBSCRIBE

Care about someone? Why not tell them?

The Paper Pumpkin June kit makes it easy for you to scatter sunshine this summer—whenever, with whomever. Not only do we give you 16 fun-sized, beach-themed cards and envelopes, but the kit also includes an exclusive carrying case so you’ll always have your cards on hand to share wherever you go. And don’t forget the exclusive stamp set and ink spot that completes every Paper Pumpkin kit!!

More about the June Kit:

  • In order to receive the June Paper Pumpkin Kit, you must have an active subscription by June 10 at 11:50 PM (MT).
  • The kit creates 16 fun-sized, beach-themed cards and envelopes.
  • Coordinating colors: Coastal Cabana, Crumb Cake, and Old Olive

Check out the quick video created by Stampin’ Up! with some sneak peaks of the June kit!
If you’re interested in subscribing to Paper Pumpkin yourself, you can either sign up for a subscription where you are billed monthly for your kit or you can purchase a prepaid subscription in my online store.  To see more information and to sign up for the monthly subscription, click here.  To see the options for prepaid subscriptions in my online store, click here.  Let me know if you have any questions.

****************************************************************************************************

Card stock cuts for this project:

  • Crumb Cake Cardstock 8 1/2″ x 5 1/2″ (card base scored and folded at 4 1/4″)
  • Purple Posy Cardstock 4″ X 5 1/4″ (inner liner mat)
  • Whisper White Cardstock 3 3/4″ X 5″ (inner liner), 2 1/4″ X 3″ (artwork)

****************************************************************************************************

Product List

Stampin’ Up Daisy Lane Smile

Good Thursday morning my fellow stampers.  How has you week been going?  The weekend is right around the corner.

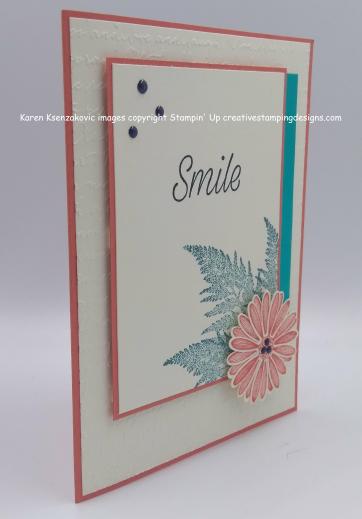
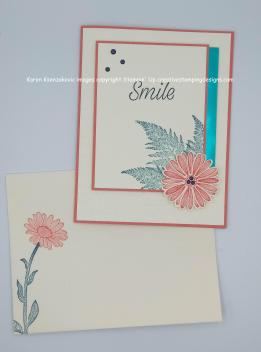
I’ve used a few new items for today’s card.  I received my Stampin’ Up order from the new 2019-2020 Annual Catalog yesterday and I couldn’t wait to play with my new items.  Here’s my card.

I joined in with  couple challenges today.  First off I played along with Paper Craft Crew Sketch Challenge #339.  Here is their sketch.

Next I played along with Color Throwdown Challenge #546.  Here are their colors.

I started by embossing a Very Vanilla card front using the new Scripty 3D Embossing Folder.  I adhered the card front to a Calypso Coral card base using Multipurpose Liquid Glue.

On a smaller panel of Very Vanilla cardstock I stamped the sentiment from the Stampin’ Up Daisy Lane Stamp Set in Night of Navy Ink.  I immediately sprinkled it with Clear Stampin’ Emboss Powder and set it using my Heat Tool.  I stamped the fern image from the Daisy Lane stamp set in Pretty Peacock Ink, stamping off once, on the bottom of the panel.  I adhered the Very Vanilla panel to a Calypso Coral mat using Snail.

I adhered a strip of the new Pretty Peacock Noble Peacock Foil Sheet to the right side of the matted artwork using Snail.  I adhered the artwork to the card front using Stampin’ Dimensionals.  On a scrap piece of Very Vanilla cardstock, I stamped the medium daisy from the Daisy Lane stamp set in Calypso Coral 3 times.  I punched the daisies out using the new Medium Daisy Punch.  I adhered the daisies together using Multipurpose Liquid glue, then adhered them to the artwork using a Stampin’ Dimensional.  I added a few Night of Navy Happiness Blooms Enamel Dots to the top of the artwork and the center of the daisy.

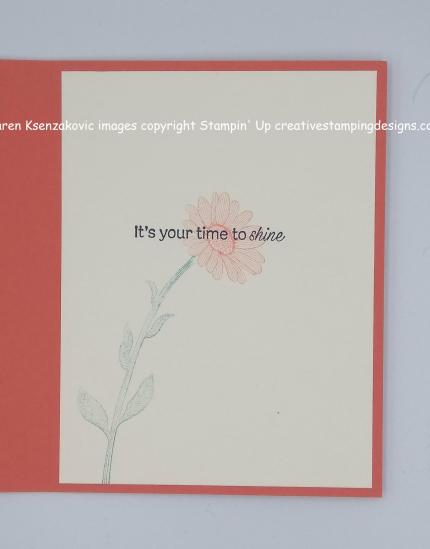
On the inside I stamped the stem from the Daisy Lane stamp set in Pretty Peacock Ink, stamping off twice, on the left side of a Very Vanilla panel.  I stamped the smaller daisy image from the Daisy Lane stamp set in Calypso Coral Ink, stamping off once, on top of the stem.  I stamped the sentiment from the Daisy Lane stamp set in Night of Navy Ink  over the top of the daisy.  I adhered the Very Vanilla panel to the inside of the Calypso Coral cad base using Multipurpose Liquid Glue.

To finish my card I decorated a Medium Very Vanilla Envelope.  I stamped the stem from the Daisy Lane stamp set in Pretty Peacock Ink on the envelope front.  I stamped the daisy from the Daisy Lane stamp set in Calypso Coral Ink on top of the stem.  I stamped the fern image from the Daisy Lane stamp set along the envelope flap, stamping off once.

Thank you for stopping by my blog today.  I hope you liked my card and will give it a try. Happy Stamping!!

****************************************************************************************************

If you need any stamping supplies, I’d be very happy to be your Demonstrator.  Just click here to go directly to my online store or drop me an email if you have any questions. 

MY CURRENT HOST CODE IS: AHCJYGJN

For any orders $50 or more I will send you my monthly class tutorials.  Click here or go to my Customer Rewards to see what this months tutorials are.

Click here to shop the clearance rack.

Happy Stamping, Karen!

****************************************************************************************************

If you are interested in joining my team click here for details or email me.  I’d love to have you on my team.

****************************************************************************************************

Share A Little Love – June Paper Pumpkin Kit!

ONLY 4 DAYS LEFT TO SUBSCRIBE

Care about someone? Why not tell them?

The Paper Pumpkin June kit makes it easy for you to scatter sunshine this summer—whenever, with whomever. Not only do we give you 16 fun-sized, beach-themed cards and envelopes, but the kit also includes an exclusive carrying case so you’ll always have your cards on hand to share wherever you go. And don’t forget the exclusive stamp set and ink spot that completes every Paper Pumpkin kit!!

More about the June Kit:

  • In order to receive the June Paper Pumpkin Kit, you must have an active subscription by June 10 at 11:50 PM (MT).
  • The kit creates 16 fun-sized, beach-themed cards and envelopes.
  • Coordinating colors: Coastal Cabana, Crumb Cake, and Old Olive

Check out the quick video created by Stampin’ Up! with some sneak peaks of the June kit!
If you’re interested in subscribing to Paper Pumpkin yourself, you can either sign up for a subscription where you are billed monthly for your kit or you can purchase a prepaid subscription in my online store.  To see more information and to sign up for the monthly subscription, click here.  To see the options for prepaid subscriptions in my online store, click here.  Let me know if you have any questions.

****************************************************************************************************

Card stock cuts for this project:

  • Calypso Coral Cardstock 8 1/2″ X 5 1/2″ (card base scored and folded at 4 1/4″), 3 1/8″ X 4 1/8″ (artwork mat)
  • Very Vanilla Cardstock 4 1/8″ X 5 3/8″ (card front), 4″ X 5 1/4″ (inner liner), 3″ X 4″ (artwork)
  • Noble Peacock Foil Sheets 1″ X 4″ (panel on right of card)

****************************************************************************************************

Product List

Stampin’ Up Bird Ballad Laser Cut Butterfly Wishes

Good Wednesday morning my fellow stampers.  The 2019-2020 Annual Catalog went live yesterday.  Did everyone start ordering from your wish list?  I placed my order and I should be receiving it this morning.  I can’t wait to start stamping and sharing with you.

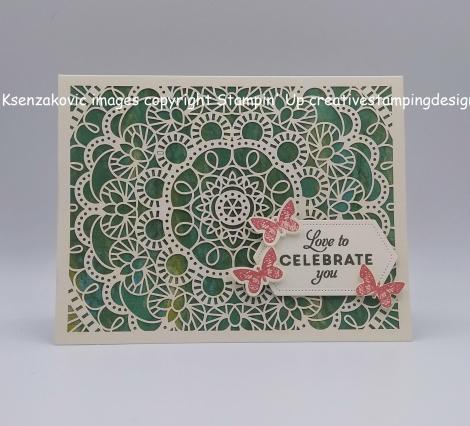
For today’s card I used the Bird Ballad Laser Cut Cards.  It’s a nice simple quick and easy card that looks like you took hours to make.  The set of cards that come in this tin would make a perfect gift for someone.  All you have to do is decorate the cards and put them back in the tin.  Tie a ribbon around the tin and you have a beautiful homemade gift. Here’s my card.

I started by adhering a panel of the Perennial Essence Designer Series Paper behind the laser cut out of the card using Multipurpose Liquid Glue.

I stamped the sentiment from the Stampin’ Up Butterfly Wishes Stamp Set in Mossy Meadow Ink on a panel of Very Vanilla cardstock.  I cut the sentiment out using the 3rd smallest Stitched Nested Labels Dies.  I adhered the sentiment to the card front using Stampin’ Dimensionals.

On a small panel of Very Vanilla cardstock I stamped 3 of the butterflies from the Butterfly Wishes stamp set in Terracotta Tile Ink.  I punched the butterflies out using the Butterfly Duet Punch and adhered the butterflies to the sentiment using Stampin’ Dimensionals.

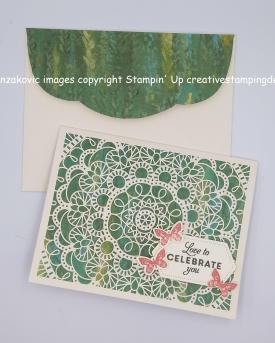
On the inside I stamped another one of the butterfly images from the Butterfly Wishes stamp set in Terracotta Tile Ink, stamping off 4 times, in the center of a Very Vanilla panel.  I stamped the sentiment from the Butterfly Wishes stamp set in Mossy Meadow Ink over the butterfly.  I adhered the Very Vanilla panel to the inside of the Bird Ballad Laser Cut Card using Multipurpose Liquid Glue.

To finish my card I decorated one of the envelopes that comes with the Bird Ballad Laser Cut Cards & Tin.  I stamped the flower and butterfly images from the Butterfly Wishes stamp set in Terracotta Tile Ink on the front of the envelope.  I adhered a piece of Perennial Essence DSP to the envelope flap.  Isn’t the scalloped edge of the envelope beautiful?

Thank you for stopping by my blog today.  I hope you liked my quick and easy card and will consider giving it a try.   Happy Stamping!!

****************************************************************************************************

If you need any stamping supplies, I’d be very happy to be your Demonstrator.  Just click here to go directly to my online store or drop me an email if you have any questions. 

MY CURRENT HOST CODE IS: AHCJYGJN

For any orders $50 or more I will send you my monthly class tutorials.  Click here or go to my Customer Rewards to see what this months tutorials are.

Click here to shop the clearance rack.

Happy Stamping, Karen!

****************************************************************************************************

If you are interested in joining my team click here for details or email me.  I’d love to have you on my team.

****************************************************************************************************

Share A Little Love – June Paper Pumpkin Kit!

ONLY 5 DAYS LEFT TO SUBSCRIBE

Care about someone? Why not tell them?

The Paper Pumpkin June kit makes it easy for you to scatter sunshine this summer—whenever, with whomever. Not only do we give you 16 fun-sized, beach-themed cards and envelopes, but the kit also includes an exclusive carrying case so you’ll always have your cards on hand to share wherever you go. And don’t forget the exclusive stamp set and ink spot that completes every Paper Pumpkin kit!!

More about the June Kit:

  • In order to receive the June Paper Pumpkin Kit, you must have an active subscription by June 10 at 11:50 PM (MT).
  • The kit creates 16 fun-sized, beach-themed cards and envelopes.
  • Coordinating colors: Coastal Cabana, Crumb Cake, and Old Olive

Check out the quick video created by Stampin’ Up! with some sneak peaks of the June kit!
If you’re interested in subscribing to Paper Pumpkin yourself, you can either sign up for a subscription where you are billed monthly for your kit or you can purchase a prepaid subscription in my online store.  To see more information and to sign up for the monthly subscription, click here.  To see the options for prepaid subscriptions in my online store, click here.  Let me know if you have any questions.

****************************************************************************************************

Card stock cuts for this project:

  • Very Vanilla Cardstock 5 1/4″ X 4″ (inner liner), 1 3/4″ X 3″ (card front sentiment), scrap for butterflies
  • Perennial Essence Designer Series Paper 5 7/16″ X 4 3/16″ (piece behind card front), piece for envelope flap

****************************************************************************************************

Product List

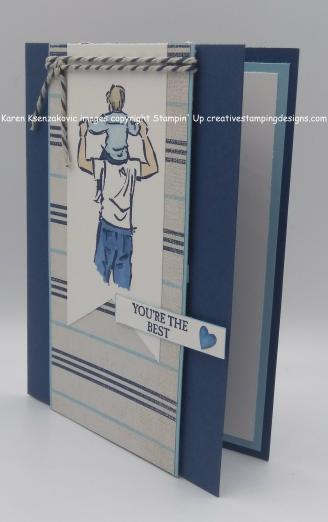
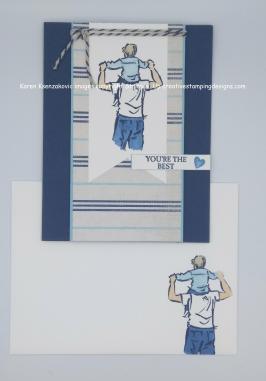
Stampin’ Up A Good Man Father’s Day Card

Good Monday morning my fellow stampers.  How was everyone’s weekend?  Did you do anything funb?

TOMORROW IS THE BIG DAY!!!  The new 2019-2020 Annual Catalog goes live. Is anyone as excited as I am???  You can order anything and everything tomorrow.  I can’t wait.  I’m hoping to be able to hop on before I have to head into work to get my order placed.  My list is so long it may send my credit card into shock.  If anyone has a list as long as mine and you are interested in an online host club, click here for more information.  Now, if there is anything you have been wanting that is retiring, today is the last day to get it.

I have a quick Father’s Day card for you today.  I used the new Stampin’ Up A Good Man Stamp Set and paired it up with some of the Come Sail Away Designer Series Paper.  I absolutely love stamp sets that have that sketched look.  Here’s my card.

My card was able to join in with a few challenges.  First is the  Festive Friday challenge #0035.  Here is their challenge.

I joined in with the Stampin’ Up! Only challenge #224.  Their challenge it Masculine

I also joined in with the Watercooler Wednesday Challenge #223.  Here is their challenge.

I started by adhering a panel of the Come Sail Away Designer Series Paper to a Balmy Blue panel using Multipurpose Liquid Glue.

On a panel of Whisper White cardstock I stamped the image of the man carrying the little boy from the Stampin’ Up A Good Man Stamp Set in Night of Navy Ink.  I colored the image in using my Balmy Blue, Crumb Cake, Ivory and Night of Navy Stampin’ Blends Markers.  Using my Triple Banner Punch I punched the bottom into a banner.  I adhered the banner to the matted DSP using Snail.  I wrapped a piece of Night of Navy/Sahara Sand Bakers Twine around the top and tied a knot.


I adhered the panel to the front of a Night of Navy card base using Stampin’ Dimensionals.  On a thins strip of Whisper White cardstock I stamped the sentiment from the A Good Man stamp set in Night of Navy Ink.  I adhered the sentiment to the card front using a Stampin’ Dimensional and a Glue Dot.  I colored one of the Heart Epoxy Droplets in using my Night of Navy Stampin’ Blends Marker then adhered it to the right of the sentiment.

On the inside I stamped the man carrying the little boy image from A Good Man stamp set in Night of Navy Ink, stamping off 4 times, in the center of a Whisper White panel.  I stamped the sentiment from A Good Man stamp set in Night of Navy Ink on top of the stamped image.  I adhered the Whisper White panel to a Balmy Blue mat using Snail and then to the inside of the Night of Navy card base using Multipurpose Liquid Glue.

To finish my card I decorated a Medium Whisper White Envelope.  I stamped the man carrying the little boy image from the A God Man stamp set in Night of Navy Ink on the envelope front.  I colored it in the same as I did for the card.  I adhered a piece of Come Sail Away DSP to the envelope flap.

Thank you for stopping by my blog today.  I hope you liked my card and will give it a try. Happy Stamping!!

****************************************************************************************************

If you need any stamping supplies, I’d be very happy to be your Demonstrator.  Just click here to go directly to my online store or drop me an email if you have any questions. 

MY CURRENT HOST CODE IS: AHCJYGJN

For any orders $50 or more I will send you my monthly class tutorials.  Click here or go to my Customer Rewards to see what this months tutorials are.

Click here to shop the clearance rack.

Happy Stamping, Karen!

****************************************************************************************************

If you are interested in joining my team click here for details or email me.  I’d love to have you on my team.

****************************************************************************************************

Share A Little Love – June Paper Pumpkin Kit!

Care about someone? Why not tell them?

The Paper Pumpkin June kit makes it easy for you to scatter sunshine this summer—whenever, with whomever. Not only do we give you 16 fun-sized, beach-themed cards and envelopes, but the kit also includes an exclusive carrying case so you’ll always have your cards on hand to share wherever you go. And don’t forget the exclusive stamp set and ink spot that completes every Paper Pumpkin kit!!

More about the June Kit:

  • In order to receive the June Paper Pumpkin Kit, you must have an active subscription by June 10 at 11:50 PM (MT).
  • The kit creates 16 fun-sized, beach-themed cards and envelopes.
  • Coordinating colors: Coastal Cabana, Crumb Cake, and Old Olive

Check out the quick video created by Stampin’ Up! with some sneak peaks of the June kit!
If you’re interested in subscribing to Paper Pumpkin yourself, you can either sign up for a subscription where you are billed monthly for your kit or you can purchase a prepaid subscription in my online store.  To see more information and to sign up for the monthly subscription, click here.  To see the options for prepaid subscriptions in my online store, click here.  Let me know if you have any questions.

****************************************************************************************************

Card stock cuts for this project:

  • Balmy Blue Cardstock 4″ X 5 1/4″ (inner liner mat), 2 7/8″ X 5 1/2″ (dsp card front mat)
  • Night of Navy Cardstock 8 1/2″ X 5 1/2″ (card base scored and folded at 4 1/4″)
  • Whisper White Cardstock 2″ X 4 1/2″ (artwork), 3/8″ X 2″ (sentiment strip), 5″ X 3 3/4″ (inner liner)

****************************************************************************************************

Product List