Good Saturday morning stamping friends, welcome to the weekend. What kind of plans do you have for the weekend? I’ll be at work all day today and it’s supposed to be a beautiful day.
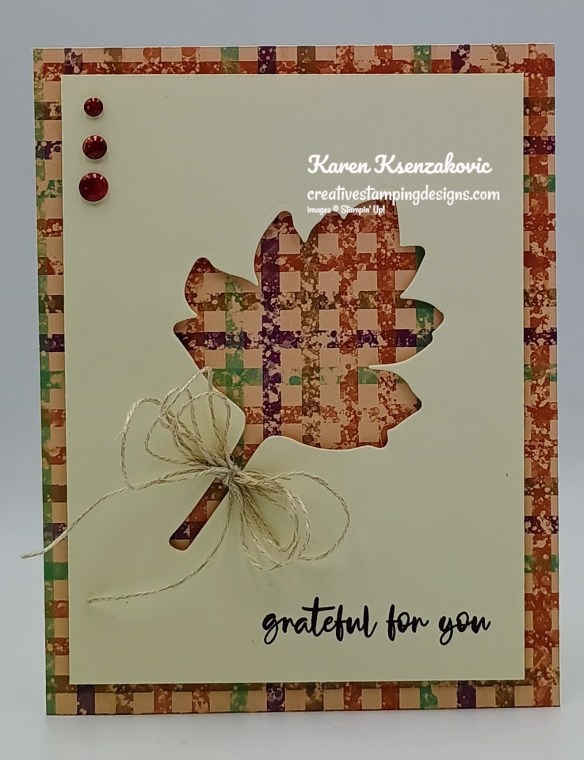
I have a quick cad for your today using the negative of a die cut. If you’d like to see a quick video of how I made this card, Click Here to go to my Instagram Reels. Here’s my card for today.
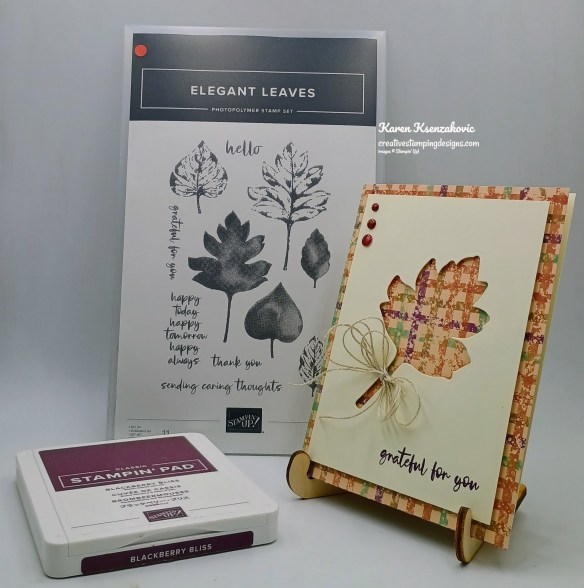
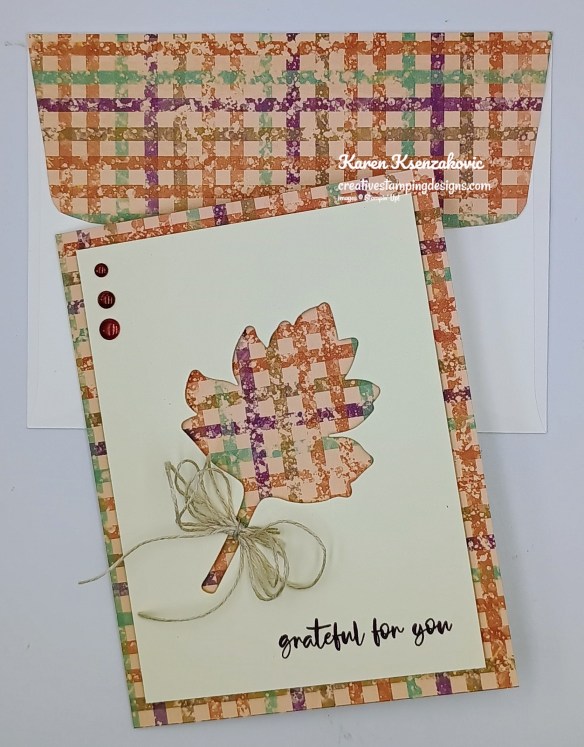
I used the Stampin’ Up! Elegant Leaves Bundle and Autumn Opulence Specialty Designer Series Paper for my card today.
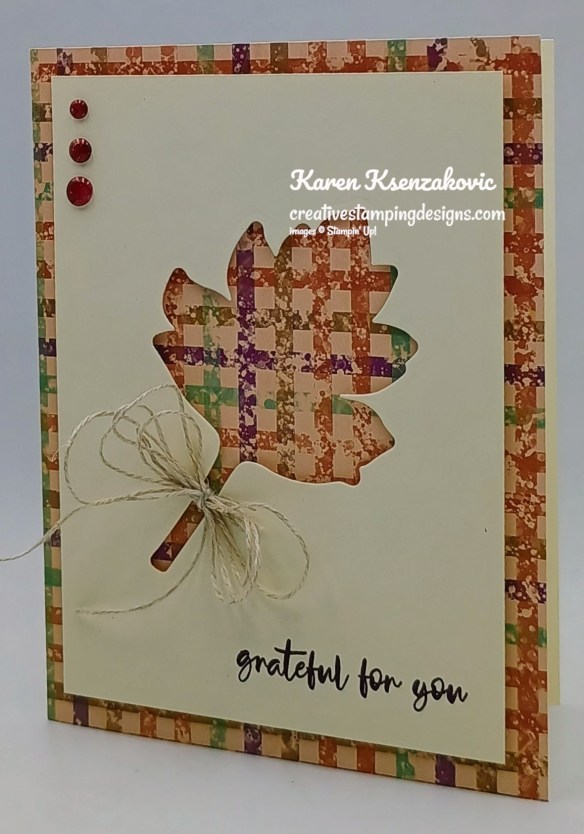
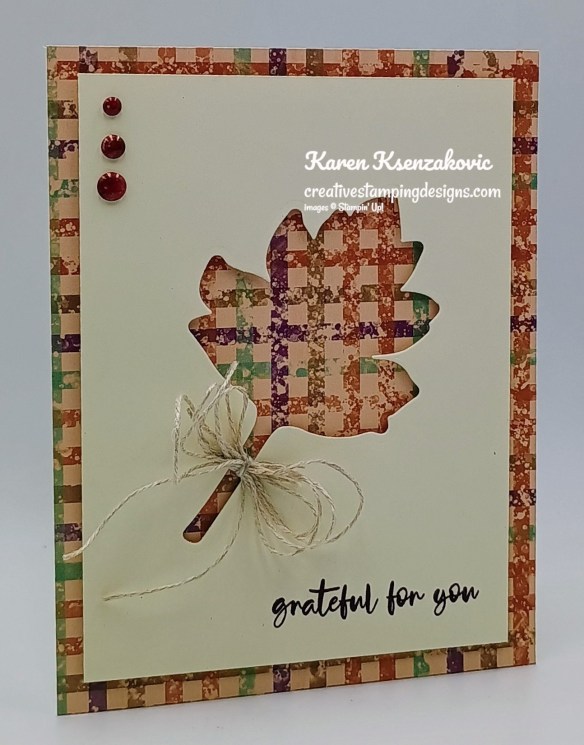
Adhere a panel of Autumn Opulence DSP to a Very Vanilla card base. Using the Elegant Leaves Dies, cut a leaf out of the center of a panel of Very Vanilla.
Stamp the sentiment from Elegant Leaves stamp set in Blackberry Bliss Ink on the bottom of the die cut panel. Adhere the die cut panel to the card font with Stampin’ Dimensionals.
Tie a multi loop bow with Linen Thread. Adhere it to the leaf stem with a Glue Dot. Color 3 Antique Pearls using Blackberry Bliss Stampin’ Blends Markers. Adhere the colored pearls to the card front.
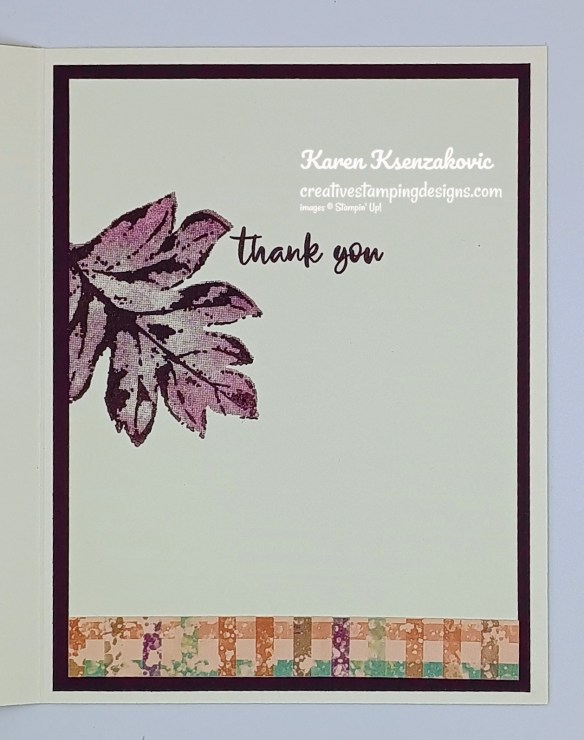
Stamp the sentiment from Elegant Leaves stamp set in Blackberry Bliss Ink on a panel of Very Vanilla. Stamp the detailed leaf image from the Elegant Leaves stamp set in Blackberry Bliss Ink on the side of the panel. Stamp the solid leaf image from the Elegant Leaves stamp set in Blackberry Bliss Ink, stamping off once on scrap paper, over the detailed leaf. Adhere a strip of Autumn Opulence DSP to the bottom of the panel. Adhere the Very Vanilla panel to a Blackberry Biss mat then to the inside of the Very Vanilla card base.
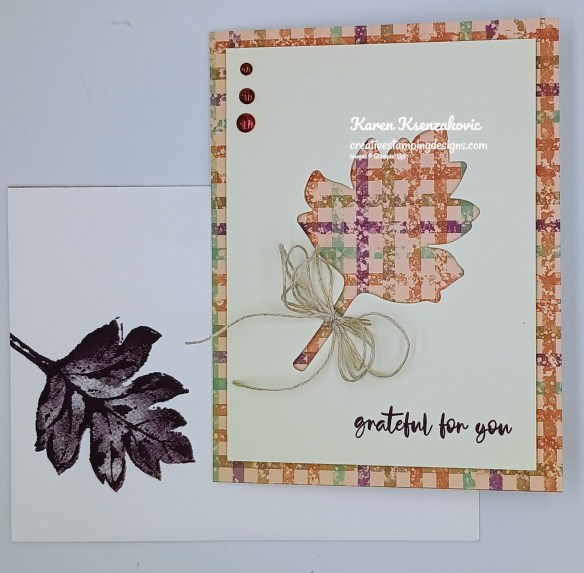
Decorate a Basic White Medium Envelope to finish the card. Stamp the detailed leaf image from Elegant Leaves stamp set in Blackberry Bliss Ink on the envelope font. Stamp the solid leaf image from Elegant Leaves stamp set in Blackberry Bliss Ink, stamping off once on scrap paper, over the top of the detailed leaf image. Adhere a panel of Autumn Opulence DSP to the envelope flap.
Thank you for stopping by my blog today. I hope you like the card and will give it a try. Happy Stamping!!
If you need any stamping supplies, I’d love to be your Demonstrator. Just click HERE to go directly to my online store or drop me an email if you have any questions.
Advent-ures In Christmas Craft Class Now Available!!
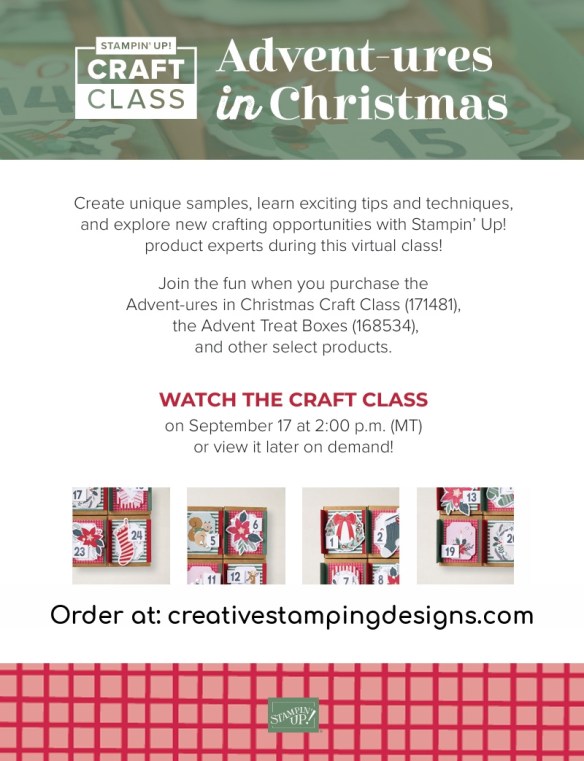
Stampin’ Up! is offering another Craft Class on September 1 (with replay available afterward if that date doesn’t work for your schedule!). This class will be an Advent Calendar Craft Class!
Here are the details:
Class: Advent-ures in Christmas Craft Class (171481)
Class Price: $30 (Advent Treat Boxes not included)
Class Purpose: Decorate a 24-box advent calendar and assemble it to fit your space and style
Product: Advent Treat Boxes (168534) – available September 1
Who: Everyone!
Available for Purchase: September 1
Available for Streaming: September 17 at 2:00 p.m. (MT)
The class will be available for purchase before and after it streams on September 17
Where: An exclusive Facebook group
Language: The class will be presented in English and will be available as a video on demand with captions in English, French, German, and Dutch shortly after the event.
You can download the flyer with the Craft Class details by clicking the image below:
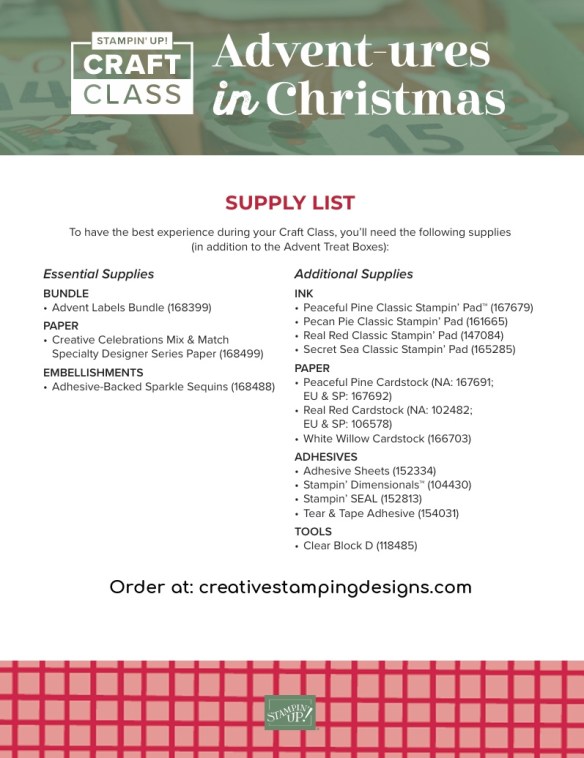
You can download the list of additional products needed to create the projects by clicking the image below:
The Advent Labels stamp set bundle will also be available to purchase as an Online Exclusive item beginning September 1, so keep an eye out for the bundle and Craft Class in the Online Store then!
Every month Stampin’ Up! will release a new item that is only available for purchase once per account. These items will be limited quantity and are likely to sell out quickly—once they’re sold out, they’re gone for good!
September Product of the Month – Luxe Foliate Specialty Designer Series Paper
Luxe Foliage 12″ x 12″ (30.5 x 30.5 cm) Specialty Designer Series Paper (168599)
With Halloween and Christmas fast approaching, don’t forget to spend some time celebrating Cardsgiving—one of our favorite unofficial holidays centered around making and gifting cards. The Luxe Foliage Designer Series Paper is perfect for all your holiday needs and beyond, with shimmering foil and beautifully-designed details perfect for creating glimmering layers or fussy cutting shining images. Whether you’re making cards for a friend or planning a Cardsgiving celebration, this paper is sure to be the star of the show.
Good Wednesday morning stamping friends. I hope you are all having a wonderful week. We’re halfway through and on our way to the weekend.
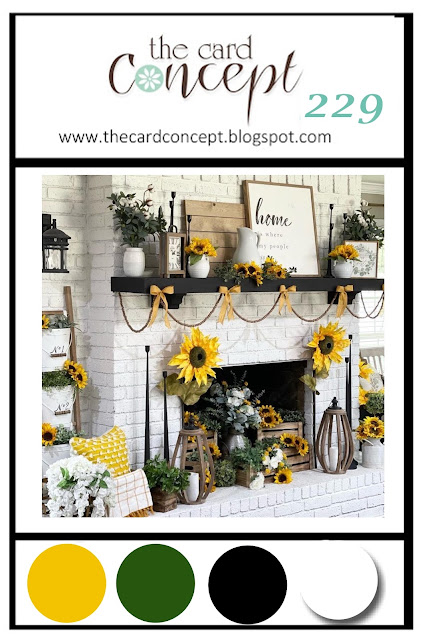
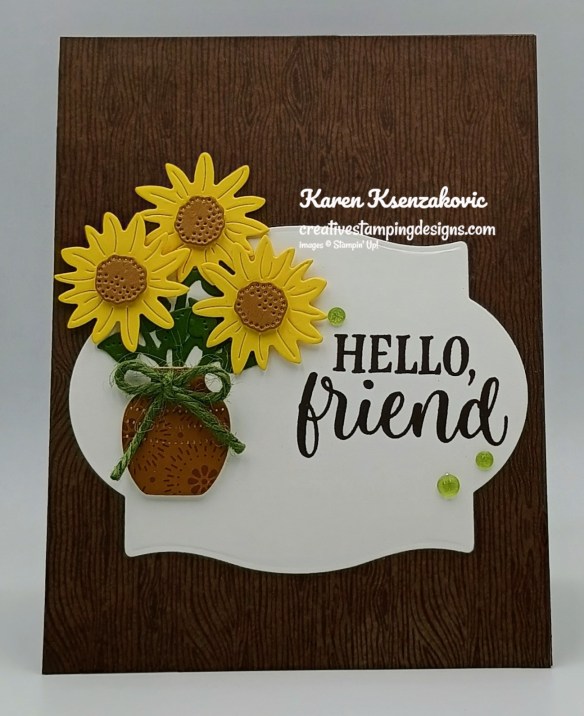
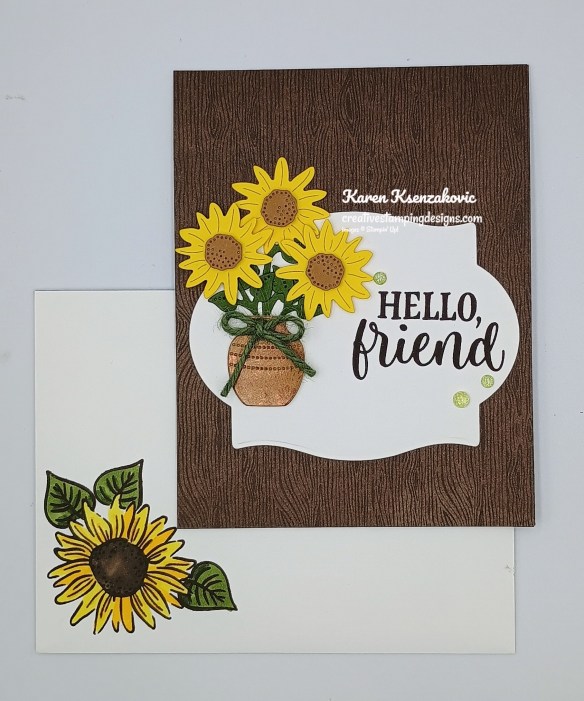
The Card Concepts is back with their Inspiration/Color Challenges and I hope you will join in. The inspiration photo #229 is Sunflower Delight. If you’d like to see a quick video of how I made this card, Click Here to go to my Instagram Reels. Here’s my card for today.
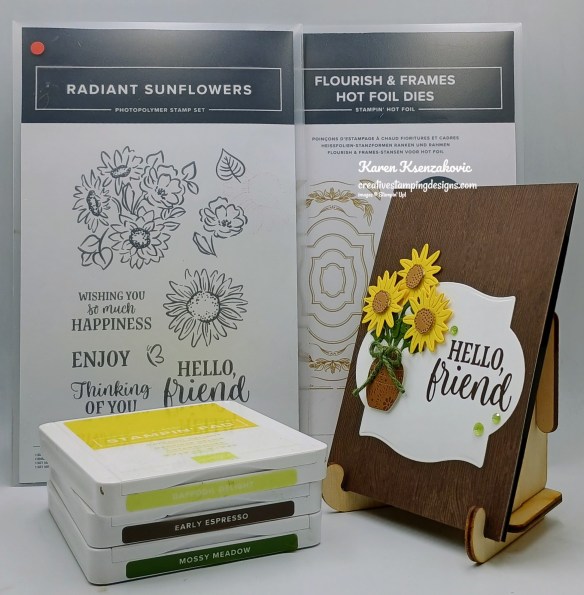
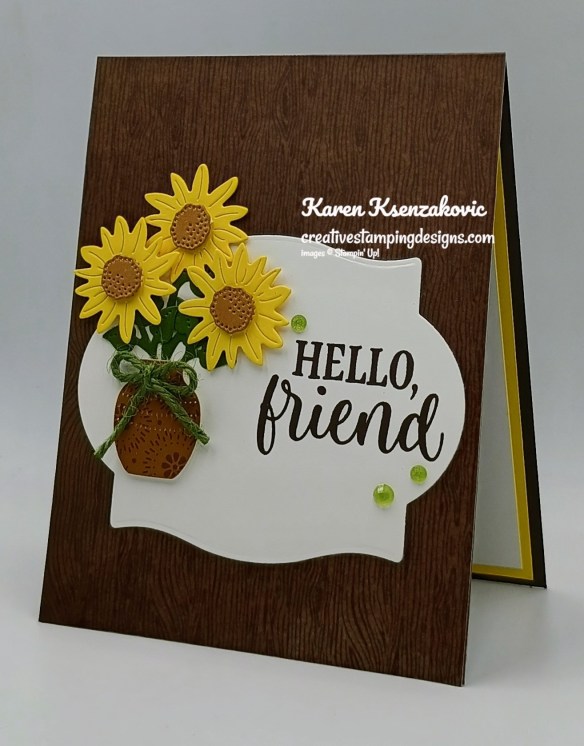
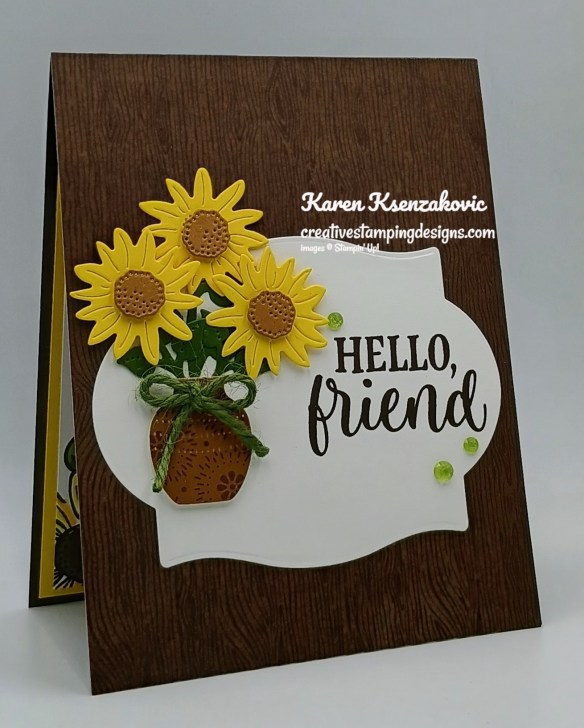
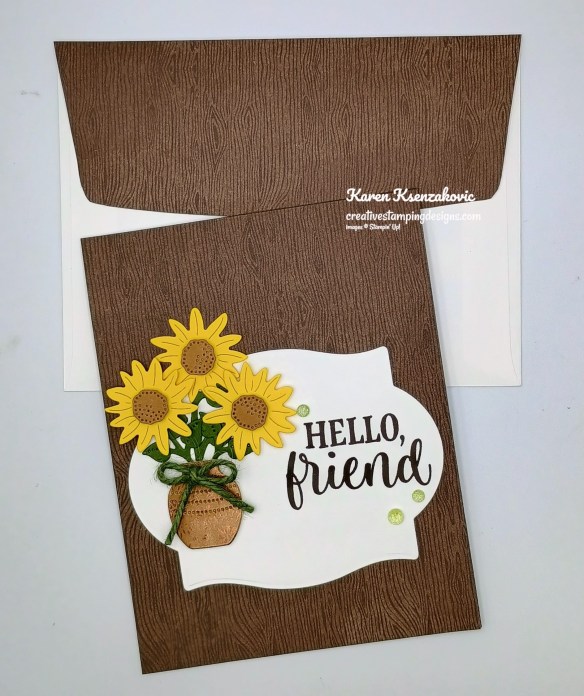
I used the Stampin’ Up! Radiant Sunflowers Bundle, the Wood Grain wonders Designer Series Paper and the Stampin’ Up! Flourish & Frames Dies for my card today. As a lot of you know I LOVE Sunflowers, and I was inspired by the overall theme along with the colors in the photo for my Clean & Layered Card.
I hope you will take a moment to visit The Card Concepts and join us for our challenge #229. How are you inspired by the photos?
Adhere a panel of Wood Grain Wonders DSP to an Early Espresso card base. Cut a panel of Basic White using the largest frame die from the Flourish & Frames Hot Foil Dies.
On the die cut frame, stamp the sentiment from Radiant Sunflowers stamp set in Early Espresso Ink on the right side. Adhere the die cut, stamped panel to the card front.
Using the Radiant Sunflowers Dies, cut the sunflowers from a panel of Daffodil Delight, stem/leaves from a panel of Mossy Meadow, flower centers from a panel of Pecan Pie and the vase from a panel of Radiant Foil. Adhere the vase to the sentiment panel wit Stampin’ Dimensionals. Adhere the stems inside the vase. Adhere the flower centers in the sunflowers with Stampin’ Dimensionals. Adhere the sunflowers to the stems. Tie a small bow with a piece of Mossy Meadow Neutral Jute and adhere it to the vase with a Glue Dot. Add a few Radiant Gems to the card front.
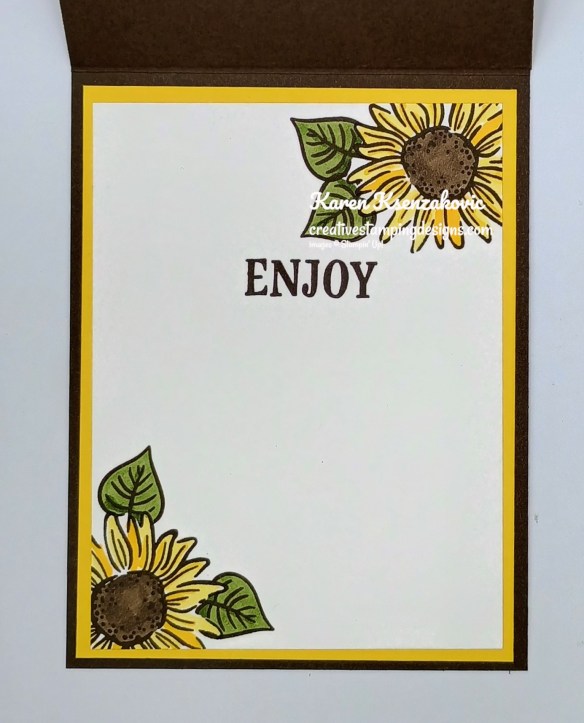
Stamp the sentiment from Radiant Sunflowers stamp set in Early Espresso Ink on a panel of Basic White. Stamp the sunflower & leaf images from Radiant Sunflowers stamp set in Early Espresso Ink on the corners of the panel. Color the images with Daffodil Delight, Mossy Meadow & Deep Stampin’ Blends Markers. Adhere the Basic Whtie panel to a Daffodil Delight mat then to the inside of the Early Espresso card base.
Decorate a Basic White Medium Envelope to complete the card. Stamp the sunflower and leaf images from the Radiant Sunflowers stamp set in Early Espresso Ink on the envelope front. Color the images with Daffodil Delight, Mossy Meadow and Deep Stampin’ Blends Markers. Adhere a panel of Wood Grain Wonders DSP to the envelope flap.
Thank you for stopping by my blog today. I hope you like the card and will give it a try. Happy Stamping!!
If you need any stamping supplies, I’d love to be your Demonstrator. Just click HERE to go directly to my online store or drop me an email if you have any questions.
Advent-ures In Christmas Craft Class Now Available!!
Stampin’ Up! is offering another Craft Class on September 1 (with replay available afterward if that date doesn’t work for your schedule!). This class will be an Advent Calendar Craft Class!
Here are the details:
Class: Advent-ures in Christmas Craft Class (171481)
Class Price: $30 (Advent Treat Boxes not included)
Class Purpose: Decorate a 24-box advent calendar and assemble it to fit your space and style
Product: Advent Treat Boxes (168534) – available September 1
Who: Everyone!
Available for Purchase: September 1
Available for Streaming: September 17 at 2:00 p.m. (MT)
The class will be available for purchase before and after it streams on September 17
Where: An exclusive Facebook group
Language: The class will be presented in English and will be available as a video on demand with captions in English, French, German, and Dutch shortly after the event.
You can download the flyer with the Craft Class details by clicking the image below:
You can download the list of additional products needed to create the projects by clicking the image below:
The Advent Labels stamp set bundle will also be available to purchase as an Online Exclusive item beginning September 1, so keep an eye out for the bundle and Craft Class in the Online Store then!
Every month Stampin’ Up! will release a new item that is only available for purchase once per account. These items will be limited quantity and are likely to sell out quickly—once they’re sold out, they’re gone for good!
September Product of the Month – Luxe Foliate Specialty Designer Series Paper
Luxe Foliage 12″ x 12″ (30.5 x 30.5 cm) Specialty Designer Series Paper (168599)
With Halloween and Christmas fast approaching, don’t forget to spend some time celebrating Cardsgiving—one of our favorite unofficial holidays centered around making and gifting cards. The Luxe Foliage Designer Series Paper is perfect for all your holiday needs and beyond, with shimmering foil and beautifully-designed details perfect for creating glimmering layers or fussy cutting shining images. Whether you’re making cards for a friend or planning a Cardsgiving celebration, this paper is sure to be the star of the show.
Good Monday morning stamping friends, welcome to a new week. I hope you all have off from work today. The store is closed today, this is one of the few days that the store closes. I spent all day yesterday cutting and packaging my shares. I’m hoping to finish them up today and have them in the mail tomorrow or Wednesday.
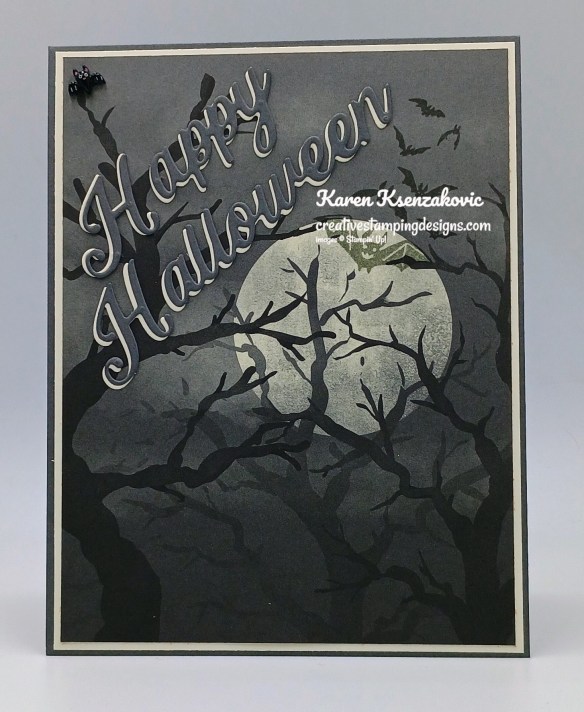
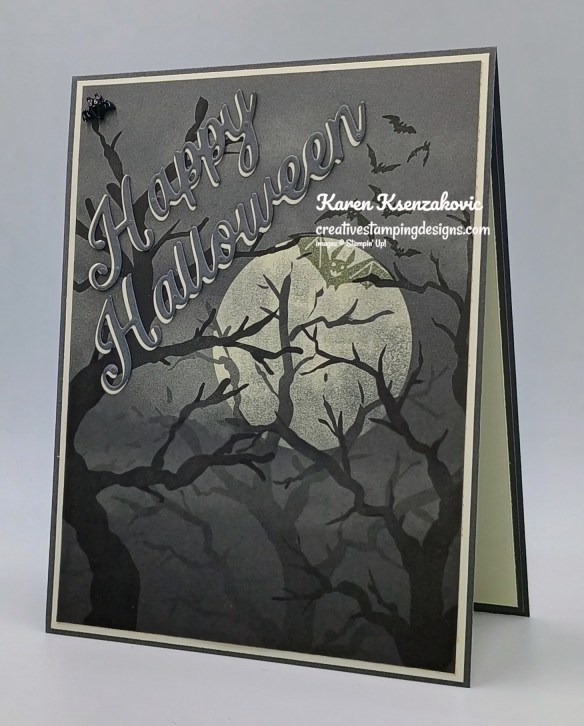
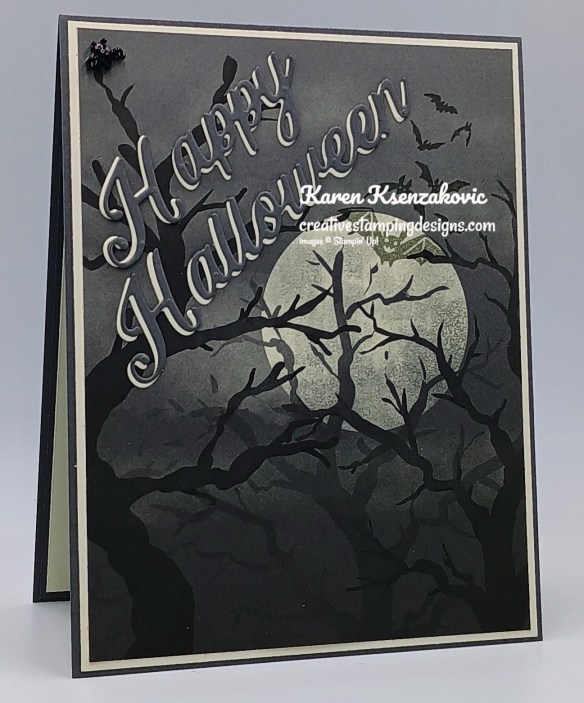
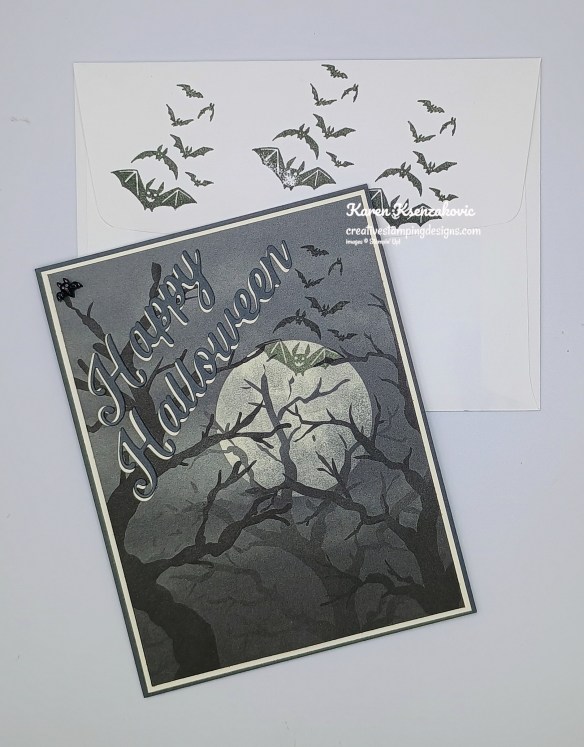
Today’s quick and easy card features the same bundle I’ve been using along with an older die set that I love and hope it stays around. If you’d like to see a quick video on how I made this card, Click Here to go to my Instagram Reels. Here’s my card for today.
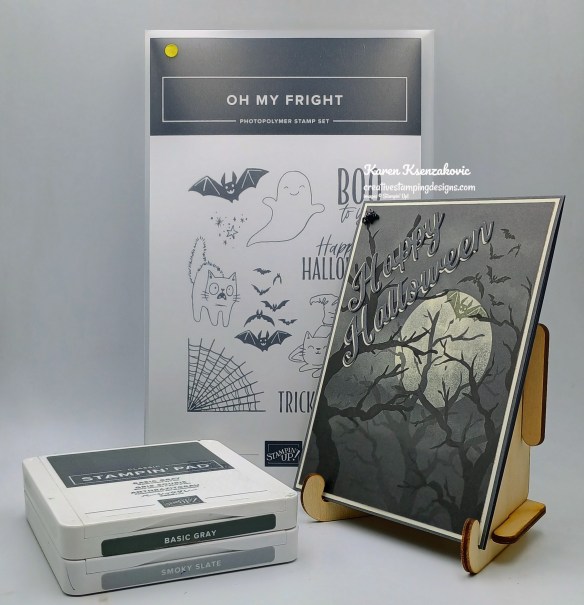
I used the Stampin’ Up! Oh My Fright Stamp Set, Words for the Season Dies and Frightfully Fun Designer Series Paper for today’s card.
Stamp the bat image from Oh MY Fright stamp set in Basic Gray Ink on the Frightfully Fun DSP card front panel.
Adhere the card front panel to a Very Vanilla mat. Adhere the layered panel to a Basic Gray card base.
Using the Words for the Season Dies, cut the sentiment from panels of Basic Gray and Very Vanilla. Adhere the Basic Gray sentiment on top of the Very Vanilla sentiment, leaving a shadow border. Adhere the sentiment to the card front. Add an Adhesive-Backed Bats, Ghosts and Dots to the card front.
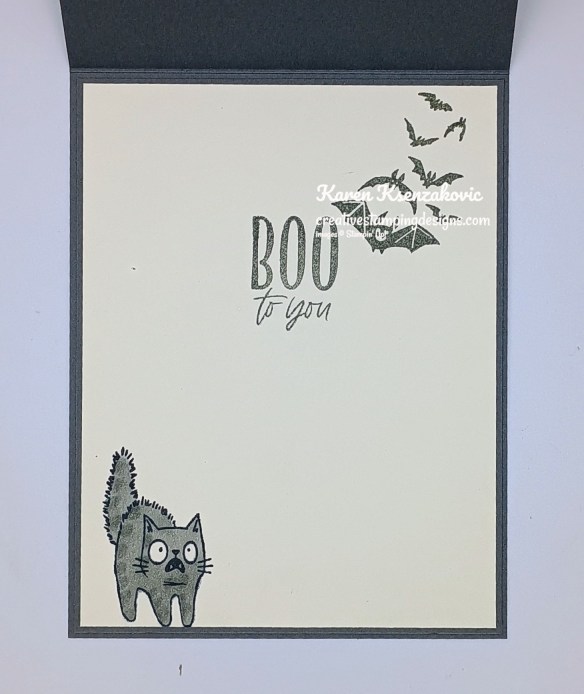
Stamp the sentiment from the Oh My Fright stamp set in Basic Gray Ink on a panel of Very Vanilla. Stamp the bat image from Oh My Fright stamp set in Basic Gray Ink by the sentiment . Stamp the scaredy cat image from Oh My Fright stamp set in black Ink on the bottom of the panel. Color the image with Smoky Slate Stampin’ Blends Markers. Adhere the Very Vanilla panel to a Basic Gray mat then to the inside of the Basic Gray card base.
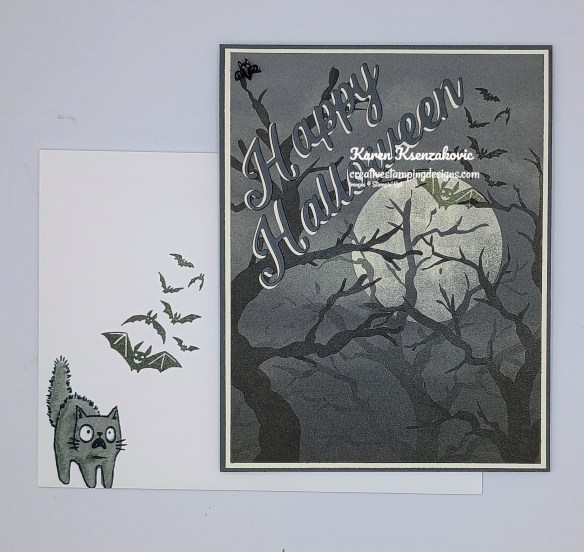
Decorate a Basic White Medium Envelope to finish your card. Stamp the scaredy cat image from the Oh My Fright stamp set in Black Ink on the envelope front. Color the image with Smoky Slate Stampin’ Blends Markers. Stamp the bat image from Oh My Fright stamp set in Basic Gray Ink on the envelope front and flap.
Thank you for stopping by my blog today. I hope you like the card and will give it a try. Happy Stamping!!
If you need any stamping supplies, I’d love to be your Demonstrator. Just click HERE to go directly to my online store or drop me an email if you have any questions.
Double Creative Stamping Designs Rewards – September 1 – 8
To kick off everything going on in September, I’m offering Double Creative Stamping Designs Rewards. THAT’S 2X THE REWARDS FOR YOU FROM ME Starting September 1 – 8 for all orders over $50 (before tax & shipping)!! How does this work? For a $50 you’ll earn 2 rewards, $100 you’ll earn 4 rewards, $150 you’ll earn 6 rewards, etc. Hurry over to my Online Store and get those orders in for those September-December Catalog, September Online Exclusives and the New Hot Foil System Products and earn those Double Rewards! This is a GREAT time to grab those Fall & Christmas products you’ve been waiting for.
Advent-ures In Christmas Craft Class Now Available!!
Stampin’ Up! is offering another Craft Class on September 1 (with replay available afterward if that date doesn’t work for your schedule!). This class will be an Advent Calendar Craft Class!
Here are the details:
Class: Advent-ures in Christmas Craft Class (171481)
Class Price: $30 (Advent Treat Boxes not included)
Class Purpose: Decorate a 24-box advent calendar and assemble it to fit your space and style
Product: Advent Treat Boxes (168534) – available September 1
Who: Everyone!
Available for Purchase: September 1
Available for Streaming: September 17 at 2:00 p.m. (MT)
The class will be available for purchase before and after it streams on September 17
Where: An exclusive Facebook group
Language: The class will be presented in English and will be available as a video on demand with captions in English, French, German, and Dutch shortly after the event.
You can download the flyer with the Craft Class details by clicking the image below:
You can download the list of additional products needed to create the projects by clicking the image below:
The Advent Labels stamp set bundle will also be available to purchase as an Online Exclusive item beginning September 1, so keep an eye out for the bundle and Craft Class in the Online Store then!
Good Sunday morning stamping friends. I hope your weekend is going well this last official weekend of the summer.
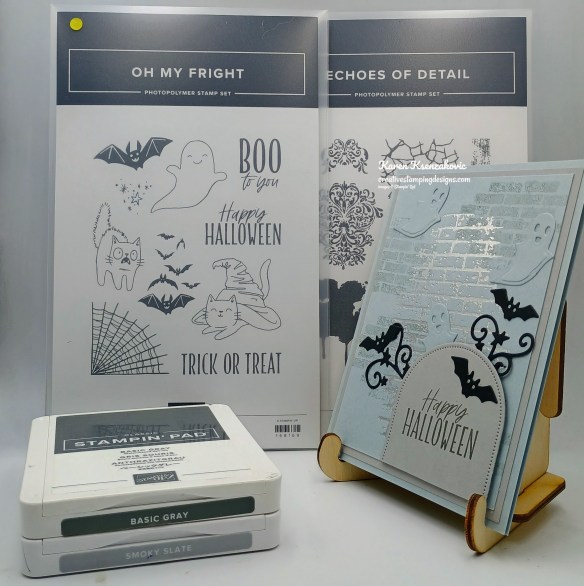
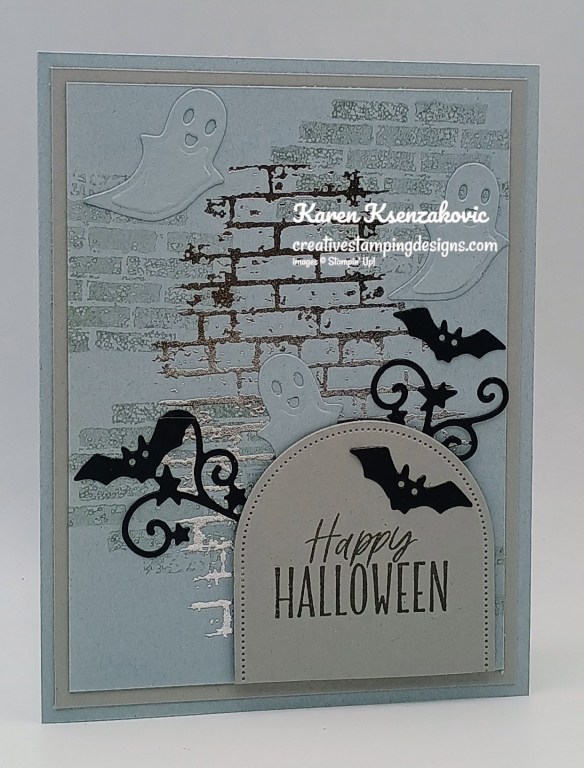
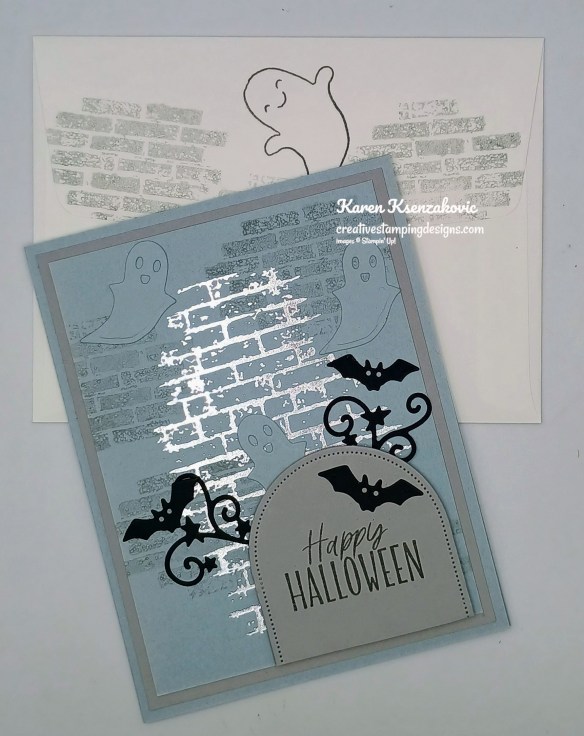
Today’s card mixes an Online Exclusive bundle with a Stampin’ Hot Foil Bundle. If you’d like to see a quick video on how I made this card, Click Here to go to my Instagram Reels. Here’s my card for today.
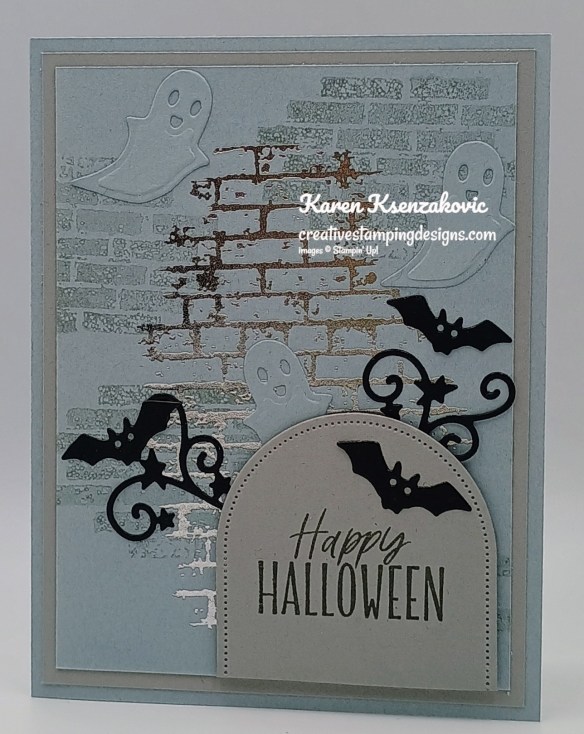
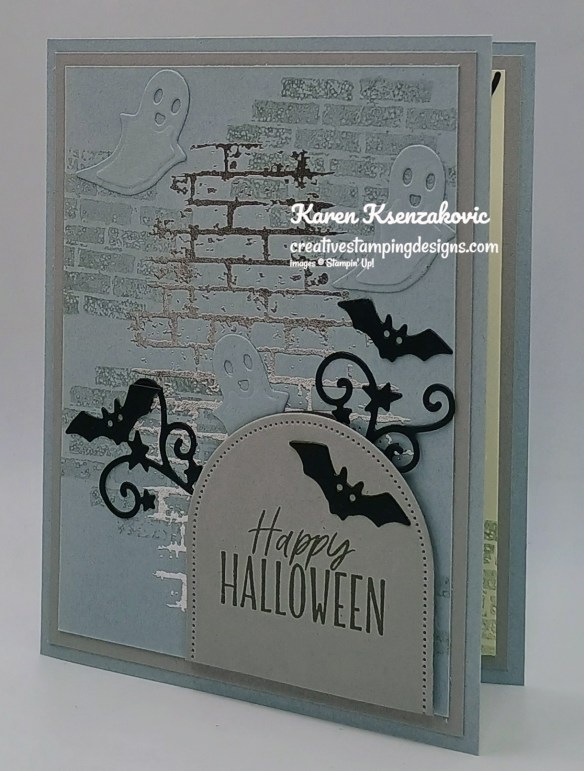
I used the Stampin’ Up! Oh My Fright Bundle, Stampin’ Up! Echoes of Details Bundle and Everyday Arches Dies for my card today.
Stamp the brick image from the Echoes of Details stamp set in Smoky Slate Ink, stamping off once on scrap paper, on the panel of Cloud Cover a few times. Following the directions of the Stampin’ Hot Foil System, foil the brick with Silver Foil.
Using the Everyday Arches Dies, cut a panel of Smoky Slate. Stamp the sentiment from Oh My Fright stamp set towards the top of the die cut in Basic Gray Ink. Adhere the die cut panel to the card front hanging off the bottom edge. Trim with Detail Scissors. Using the Oh My Fright Dies, cut the swirl & bats from a panel of Basic Black and ghosts from a panel of Cloud Cover.
Adhere the swirls, bats and ghosts to the card front. Adhere the card front to the Smoky Slate mat. Adhere the layered panel to the Cloud Cover card base.
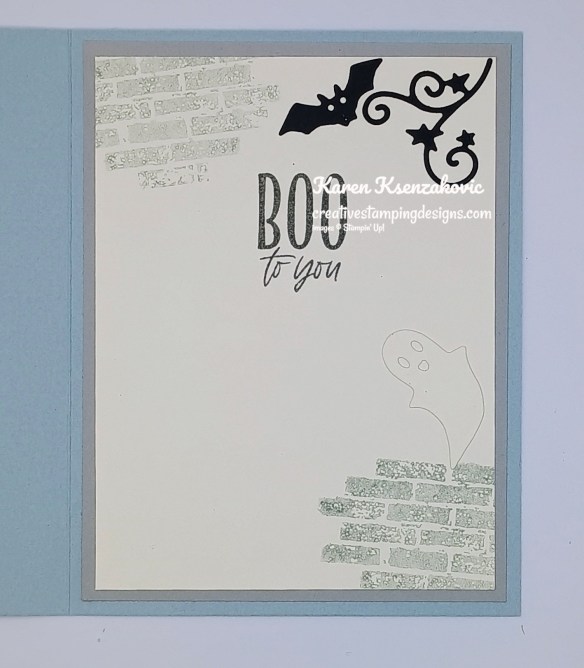
Stamp the sentiment from the Oh MY Fright stamp set in Basic Gray Ink on a panel oof Very Vanilla. Stamp the brick image from the Echoes of Detail stamp set in Smoky Slate Ink, stamping off once on scrap paper, on the topo and bottom of a panel of Very Vanilla. Adhere the die cut swirl and bat to the top of the panel. From a scrap of Very Vanilla cut the ghost die using the Oh My Fright Dies and adhere it to the side of the panel. Adhere the Very Vanilla panel to a Smoky Slate mat then to the inside of the Cloud Cover card base.
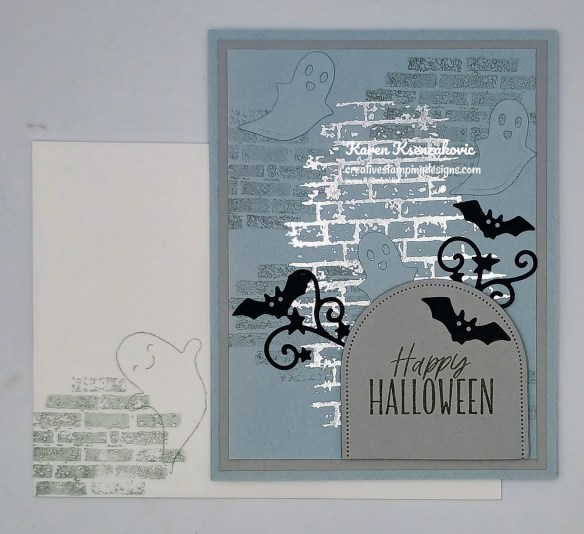
Decorate a Basic Whtie Medium Envelope to finish your card. Stamp the brick image from the Echoes of Detail stamp set in Smoky Slate Ink, stamping off once on scrap paper, on the envelope front & flap. Stamp the ghost image from the Oh My Fright stamp set in Smoky Slate Ink on the envelope front & flap.
Thank you for stopping by my blog today. I hope you like the card and will give it a try. Happy Stamping!!
If you need any stamping supplies, I’d love to be your Demonstrator. Just click HERE to go directly to my online store or drop me an email if you have any questions.
Double Creative Stamping Designs Rewards – September 1 – 8
To kick off everything going on in September, I’m offering Double Creative Stamping Designs Rewards. THAT’S 2X THE REWARDS FOR YOU FROM ME Starting September 1 – 8 for all orders over $50 (before tax & shipping)!! How does this work? For a $50 you’ll earn 2 rewards, $100 you’ll earn 4 rewards, $150 you’ll earn 6 rewards, etc. Hurry over to my Online Store and get those orders in for those September-December Catalog, September Online Exclusives and the New Hot Foil System Products and earn those Double Rewards! This is a GREAT time to grab those Fall & Christmas products you’ve been waiting for.
Advent-ures In Christmas Craft Class Now Available!!
Stampin’ Up! is offering another Craft Class on September 1 (with replay available afterward if that date doesn’t work for your schedule!). This class will be an Advent Calendar Craft Class!
Here are the details:
Class: Advent-ures in Christmas Craft Class (171481)
Class Price: $30 (Advent Treat Boxes not included)
Class Purpose: Decorate a 24-box advent calendar and assemble it to fit your space and style
Product: Advent Treat Boxes (168534) – available September 1
Who: Everyone!
Available for Purchase: September 1
Available for Streaming: September 17 at 2:00 p.m. (MT)
The class will be available for purchase before and after it streams on September 17
Where: An exclusive Facebook group
Language: The class will be presented in English and will be available as a video on demand with captions in English, French, German, and Dutch shortly after the event.
You can download the flyer with the Craft Class details by clicking the image below:
You can download the list of additional products needed to create the projects by clicking the image below:
The Advent Labels stamp set bundle will also be available to purchase as an Online Exclusive item beginning September 1, so keep an eye out for the bundle and Craft Class in the Online Store then!
Goos Saturday morning stamping friends, welcome to the holiday weekend. I hope you are making some fun plans. I’ll be working all day today, then Sunday & Monday are dedicated to cutting, sorting & packaging my product shares so I can get them out in the mail by Wednesday.
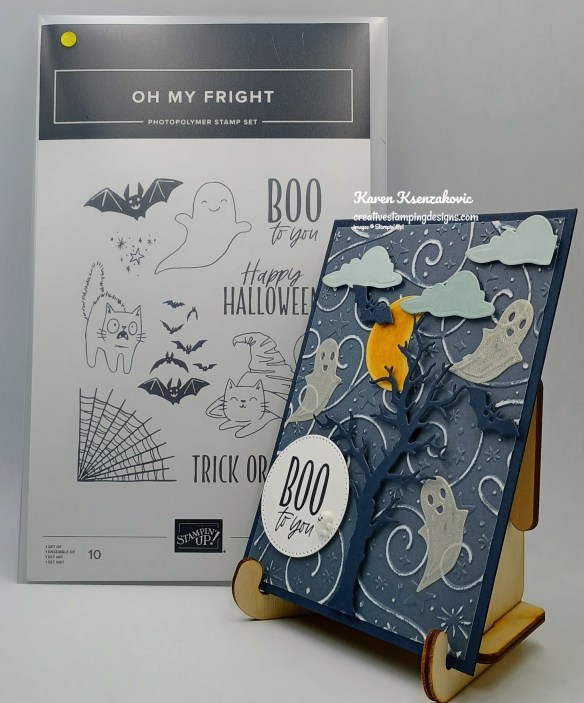
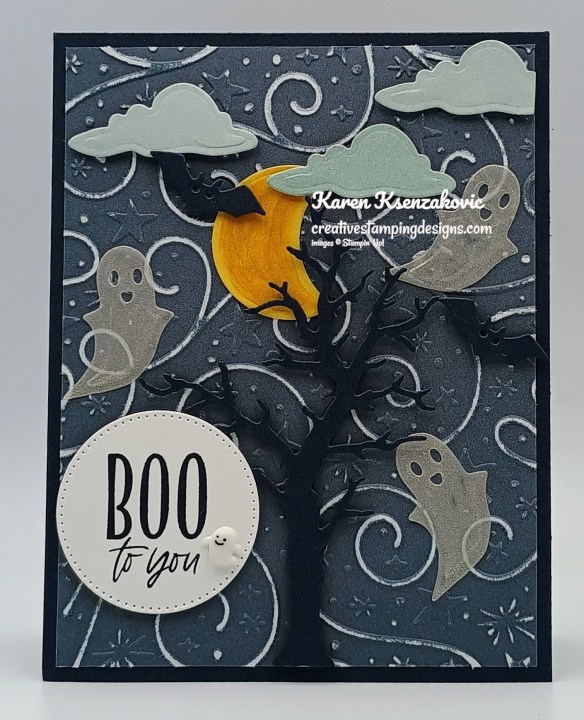
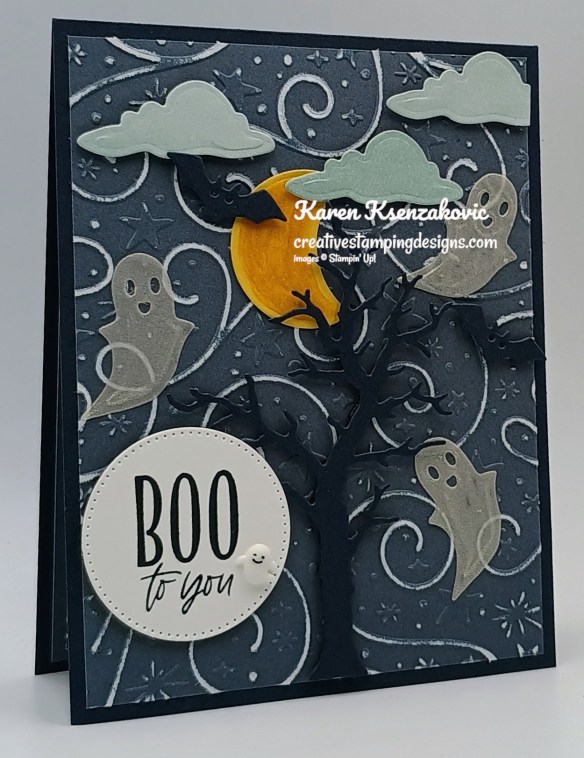
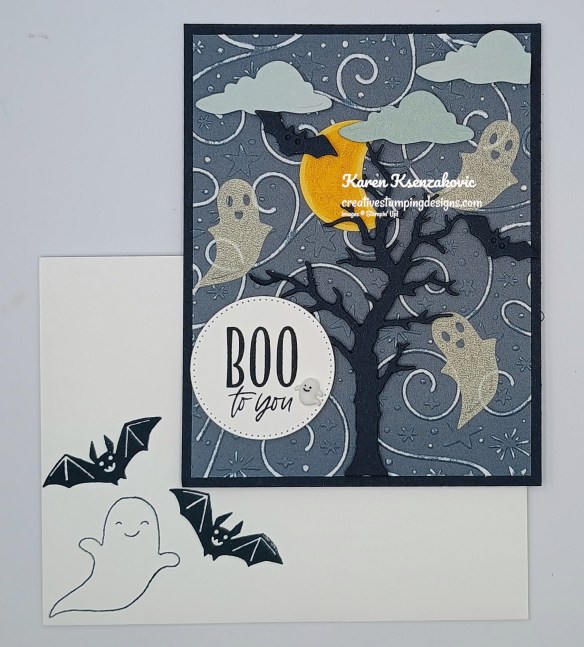
Today I have another fun Halloween card for you. I have a series of cards to give you some ideas of different designs to make. If you’d like to see a quick video on how I made this card, Click Here to go to my Instagram Reels. Here’s my card for today.
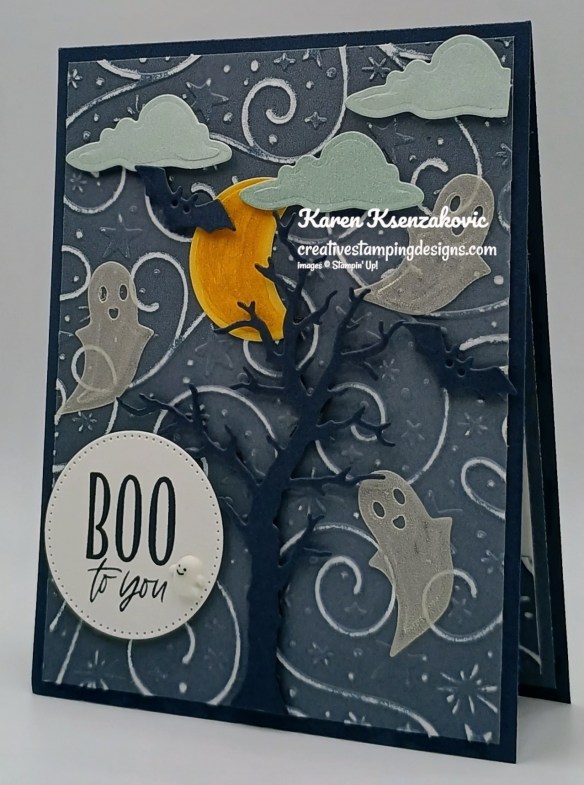
I used the Stampin’ Up! Oh My Fright Bundle along with Swirls of Magic Embossing Folder, Stylish Shapes Dies and Sunset Shimmer Vellum Specialty Paper for my card today.
Emboss a panel of Secret Sea Two-Tone using the Swirls of Magic EF. Using the Sanding Block, lightly brush over the embossed panel to bring out the white core of the paper. Adhere the embossed panel to the Secret Sea card base.
using the Oh My Fright Dies, cut the tree & bats from a panel of Secret Sea, the clouds from a panel of Cloud Cover Two-Tone, the moon from a panel of Golden Glow Two-Tone and the ghosts from a panel of Sunset Shimmer Vellum. Using the Golden Glow Shimmer Brush, bush the moon die cut. Adhere the die cuts to the card front.
Stamp the sentiment from the Oh My Fright stamp set in Secret Sea Ink. Cut the sentiment out using the Stylish Shapes Dies. Adhere the sentiment to the card front. Add a ghost from the Adhesive-Backed Bats, Ghosts & Dots.
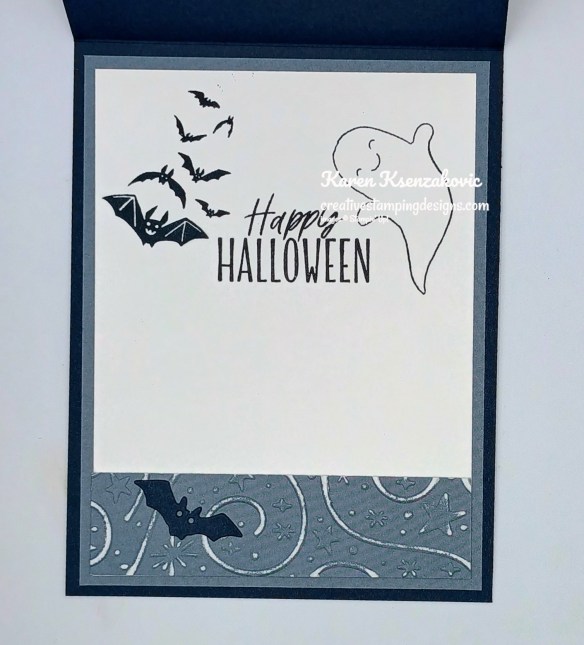
Stamp the sentient from the Oh My Fright stamp set in Secret Sea Ink on a panel of Basic White. Stamp the bat & ghost images from the Oh MY Fright stamp set on either side of the sentiment. Adhere an embossed & sanded panel of Secret Sea Two-Tone to the bottom of the panel and adhere a die cut bat to it. Adhere the Basic White panel to a Secret Sea Two-Tone mat then to the inside of the Secret Sea card base.
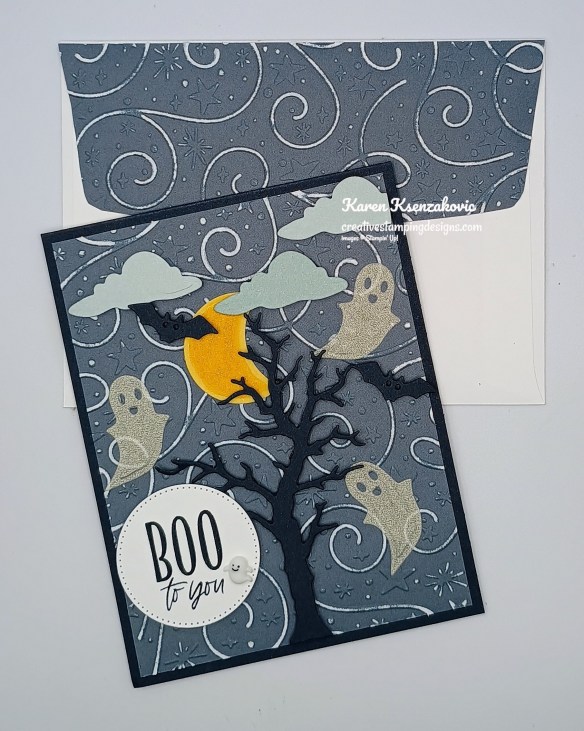
Decorate a Basic White Medium Envelope to finish your card. Stamp the ghost & bat images from the Oh My Fright stamp set in Secret Sea Ink on the envelope front. Emboss a panel of Secret Sea Two-Tone using the Swirls of Magic EF. Use the Sanding Block over the embossed panel. Adhere the embossed panel to the envelope flap.
Thank you for stopping by my blog today. I hope you like the card and will give it a try. Happy Stamping!!
If you need any stamping supplies, I’d love to be your Demonstrator. Just click HERE to go directly to my online store or drop me an email if you have any questions.
Double Creative Stamping Designs Rewards – September 1 – 8
To kick off everything going on in September, I’m offering Double Creative Stamping Designs Rewards. THAT’S 2X THE REWARDS FOR YOU FROM ME Starting September 1 – 8 for all orders over $50 (before tax & shipping)!! How does this work? For a $50 you’ll earn 2 rewards, $100 you’ll earn 4 rewards, $150 you’ll earn 6 rewards, etc. Hurry over to my Online Store and get those orders in for those September-December Catalog, September Online Exclusives and the New Hot Foil System Products and earn those Double Rewards! This is a GREAT time to grab those Fall & Christmas products you’ve been waiting for.
Advent-ures In Christmas Craft Class Now Available!!
Stampin’ Up! is offering another Craft Class on September 1 (with replay available afterward if that date doesn’t work for your schedule!). This class will be an Advent Calendar Craft Class!
Here are the details:
Class: Advent-ures in Christmas Craft Class (171481)
Class Price: $30 (Advent Treat Boxes not included)
Class Purpose: Decorate a 24-box advent calendar and assemble it to fit your space and style
Product: Advent Treat Boxes (168534) – available September 1
Who: Everyone!
Available for Purchase: September 1
Available for Streaming: September 17 at 2:00 p.m. (MT)
The class will be available for purchase before and after it streams on September 17
Where: An exclusive Facebook group
Language: The class will be presented in English and will be available as a video on demand with captions in English, French, German, and Dutch shortly after the event.
You can download the flyer with the Craft Class details by clicking the image below:
You can download the list of additional products needed to create the projects by clicking the image below:
The Advent Labels stamp set bundle will also be available to purchase as an Online Exclusive item beginning September 1, so keep an eye out for the bundle and Craft Class in the Online Store then!
Good Friday morning stamping friends, welcome to my fun fold Friday. I hope you all had a great week and are looking forward to the weekend. For the next few days I’m doing something I don’t normally do, I’m using the same suite of products. I thought it would be fun to share some Halloween cards with you since Halloween is next month and there’s a limited time to make the cards.
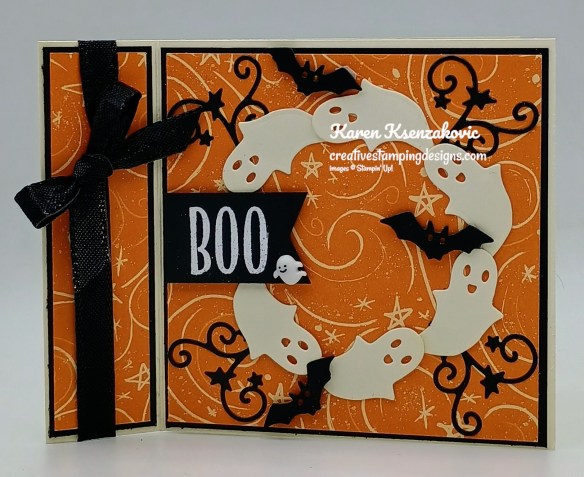
Today’s card is one that I did on my YouTube Live yesterday. If you were able to join me, thank you for hopping on. If you’d like to watch the replay and stamp along, the measurements are on the bottom of this post along with the link to my video. Here’s my card for today.
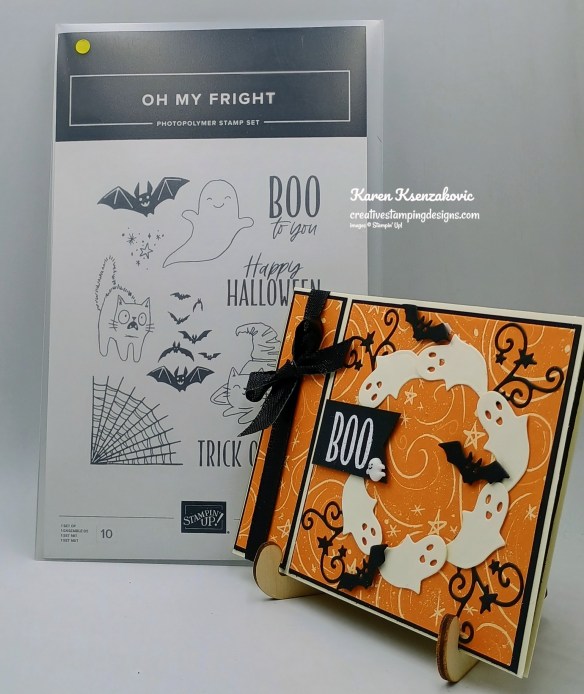
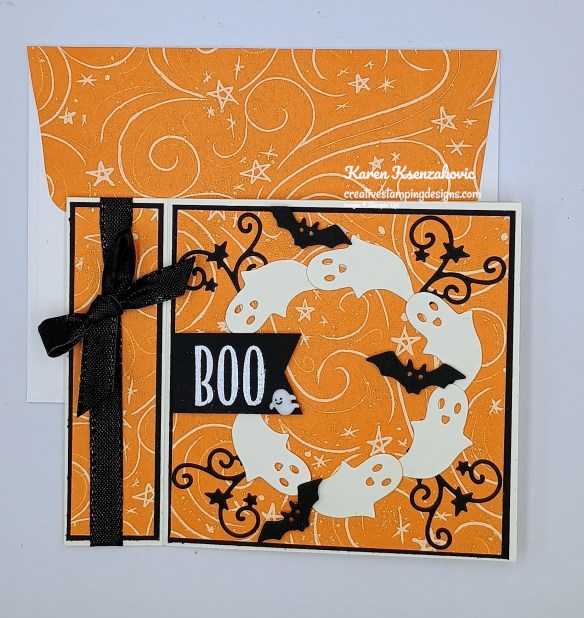
I used the Stampin’ Up! Oh My Fright Bundle and Frightfully Fun Designer Series Paper for my book fold card.
Using the Oh My Fright Dies, cut the ghosts from a panel of Very Vanilla and the bats & swirls from a panel of Basic Black..
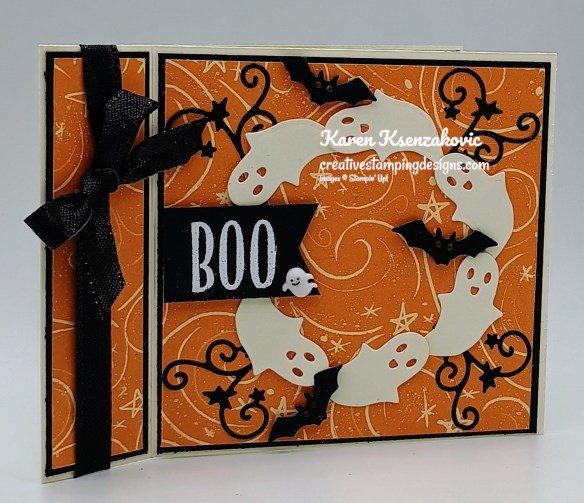
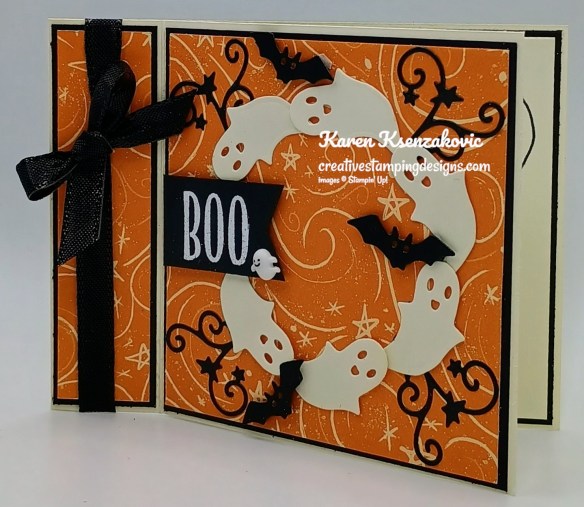
Adhere a small panel of Frightfully Fun DSP to a Basic Black mat. Adhere the layered panel between the scored card front. Wrap a piece of Black 3/8″ Iridescent Ribbon around the scored card front and tie a bow. Adhere the scored section together on the inside to make your book fold card. Adhere the larger panel of Frightfully Fun DSP to a Basic Black mat. Adhere the layered panel to the larger section of the Very Vanilla card base.
Adhere the die cut swirls to the 4 corners of the card front. Stamp the sentiment from the Oh My Fright stamp set in Versamark Ink on a panel of Basic Black. Sprinkle the sentiment with White Embossing Powder and set it with the Heat Tool. Cut the end of the sentiment into a banner with Detail Scissors. Adhere the sentiment to the card front with Stampin’ Dimensionals. Adhere the die cut ghosts in a circle to make a wreath. Adhere a few of the die cut bats with Stampin’ Dimensionals. Add a Adhesive-Backed Bat Ghost and Dots to the sentiment.
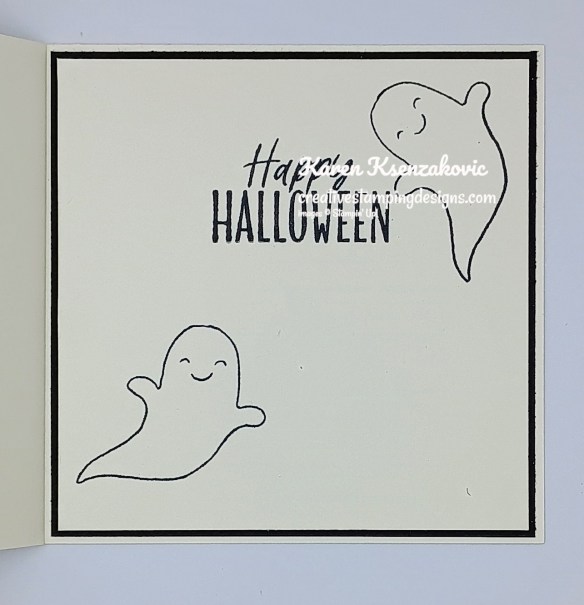
Stamp the sentiment from Oh My Fright stamp set in Black Ink on a panel of Very Vanilla. Stamp the ghost image from the Oh My Fright stamp set in Black Ink on the corners of the panel. Adhere the Very Vanilla panel to a Basic Black mat then to the inside of the Very Vanilla card base.
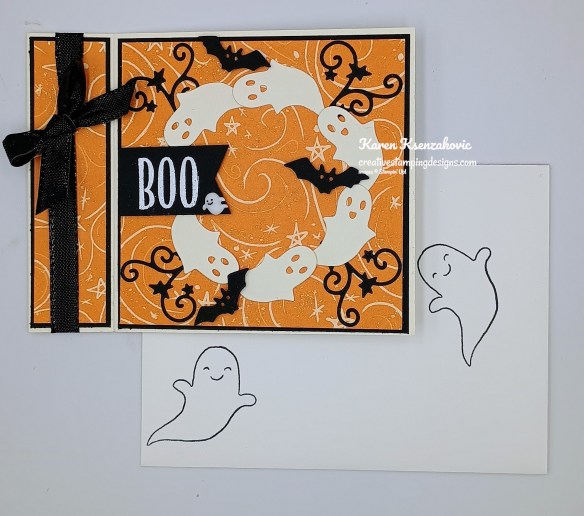
Decorate a Basic Whtie Medium Envelope to finish your card. Stamp the ghost image from the Oh My Fright stamp set in Black Ink on the envelope front. Adhere a panel of Frightfully Fun DSP to the envelope flap.
Thank you for stopping by my blog today. I hope you liked my card and will give it a try. You can watch my video on my YouTube Channel Here.
If you watch this on my YouTube channel, please remember to subscribe so that you will get notified when a new video goes live. Thank you to those that have subscribed already. Happy Stamping!!
If you need any stamping supplies, I’d love to be your Demonstrator. Just click HERE to go directly to my online store or drop me an email if you have any questions.
Double Creative Stamping Designs Rewards – September 1 – 8
To kick off everything going on in September, I’m offering Double Creative Stamping Designs Rewards. THAT’S 2X THE REWARDS FOR YOU FROM ME Starting September 1 – 8 for all orders over $50 (before tax & shipping)!! How does this work? For a $50 you’ll earn 2 rewards, $100 you’ll earn 4 rewards, $150 you’ll earn 6 rewards, etc. Hurry over to my Online Store and get those orders in for those September-December Catalog, September Online Exclusives and the New Hot Foil System Products and earn those Double Rewards! This is a GREAT time to grab those Fall & Christmas products you’ve been waiting for.
Every month Stampin’ Up! will release a new item that is only available for purchase once per account. These items will be limited quantity and are likely to sell out quickly—once they’re sold out, they’re gone for good!
September Product of the Month – Luxe Foliate Specialty Designer Series Paper
Luxe Foliage 12″ x 12″ (30.5 x 30.5 cm) Specialty Designer Series Paper (168599)
With Halloween and Christmas fast approaching, don’t forget to spend some time celebrating Cardsgiving—one of our favorite unofficial holidays centered around making and gifting cards. The Luxe Foliage Designer Series Paper is perfect for all your holiday needs and beyond, with shimmering foil and beautifully-designed details perfect for creating glimmering layers or fussy cutting shining images. Whether you’re making cards for a friend or planning a Cardsgiving celebration, this paper is sure to be the star of the show.
12 Days of Creativity Advent Calendar Now Available!
Make this festive season magical with the 12 Days of Creativity Advent Calendar. Every day of this calendar contains items that you and your customers can craft with all year long, including never-before-seen dies, paper, embellishments, and more. These products are exclusive to the calendar and can’t be purchased separately. And did we mention that these make great gifts? If someone you know is looking for the perfect present for the crafter in their life, encourage them to check out this exclusive product. But don’t wait because we only have a limited number of calendars!
Details:
For only $99 USD, this calendar comes with $130 USD worth of exclusive products.
In addition to 12 surprises inside the calendar, including Exclusive dies, paper, coloring tools, cards & envelopes, embellishments and more it also comes with an exclusive bonus stamp set.
There’s only a limited number available, so order ASAP!
Ordering Begins September 1, 2026
Item: 12 Days of Creativity Advent Calendar (168589)
Virtual Card Retreat – October 1 & 2 – Now Available to Order
This year, celebrate World Card Making Day with your fellow card makers during the Virtual Card Retreat! Experience the joy of crafting when you join this two-day virtual retreat for people who love card making and community. During the retreat, you’ll build creative confidence as you make 15 beautiful, technique-focused cards and craft along with Stampin’ Up! staff using the 2026 October Card Retreat kit. They’ll even have some fun giveaways!
The 2026 October Card Retreat Kit will be available to order beginning September 1. Be sure to order early so you can get everything in time for the retreat!
Here are the details for the 2026 October Virtual Card Retreat:
Who: Crafters who love to make cards!
When: October 1–2; We’ll craft for up to seven hours each day, starting at 2:00 p.m. (MT) both days.
Celebrate World Card Making Day (October 3) during this event!
Price of 2026 October Card Retreat kit: $165
2026 October Card Retreat Kit Available for Purchase: September 1
Where: This retreat will take place in a private Facebook Group.
Stampin’ Up! will post step-by-step instructions as well as a preparation video in this group two weeks before the retreat.
To join this group, you’ll need to fully complete the group admission form, which includes agreeing to the group rules and providing your name, the email address you used when you purchased the kit, and your 2026 October Card Retreat kit order number, which you can find in your confirmation email. With this information, the group administrator can admit you.
You can watch the live event and the on-demand videos in this group.
Registration: The 2026 October Card Retreat kit is your ticket to the retreat. There is no registration. The kit includes a card with a personalized link through which you can join the exclusive Facebook group where the live retreat will stream.
Language: This live event will be presented in English. Video recordings with English, French, German, and Dutch captioning will be available through the Facebook group within two weeks of the livestream.
If you want to see the projects that will be created during the retreat, you can see the cards in this flyer:
Visit my Online Store on September 1 to get your World Card Making Day Retreat Kit and get ready for a crafty weekend of card making October 1-2!
Click on the image above to open the flyer with the holiday related Hot Foil System Dies, Bundles and Foil colors! They’ll all be available to order beginning September 1!
Head over to my Online Store to see and order the new Stampin’ Hot Foil Products and earn those Double Creative Stamping Designs Rewards!!
Advent-ures In Christmas Craft Class Now Available!!
Stampin’ Up! is offering another Craft Class on September 1 (with replay available afterward if that date doesn’t work for your schedule!). This class will be an Advent Calendar Craft Class!
Here are the details:
Class: Advent-ures in Christmas Craft Class (171481)
Class Price: $30 (Advent Treat Boxes not included)
Class Purpose: Decorate a 24-box advent calendar and assemble it to fit your space and style
Product: Advent Treat Boxes (168534) – available September 1
Who: Everyone!
Available for Purchase: September 1
Available for Streaming: September 17 at 2:00 p.m. (MT)
The class will be available for purchase before and after it streams on September 17
Where: An exclusive Facebook group
Language: The class will be presented in English and will be available as a video on demand with captions in English, French, German, and Dutch shortly after the event.
You can download the flyer with the Craft Class details by clicking the image below:
You can download the list of additional products needed to create the projects by clicking the image below:
The Advent Labels stamp set bundle will also be available to purchase as an Online Exclusive item beginning September 1, so keep an eye out for the bundle and Craft Class in the Online Store then!
Good Wednesday morning stamping friends. We’re halfway through the week and on our way to the weekend. We are hot here in NJ with temps in the upper 90’s but dropping to the 60’s on Friday.
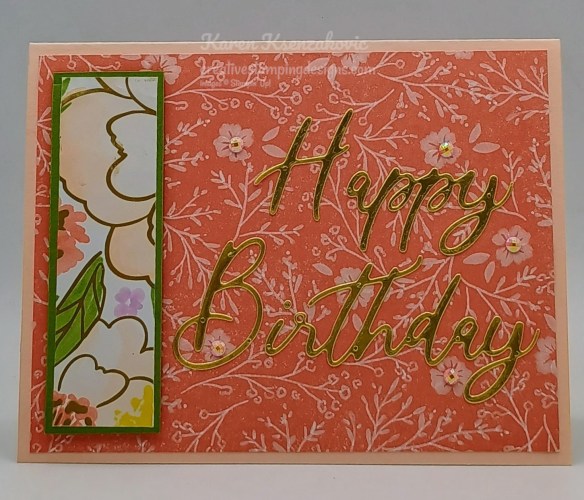
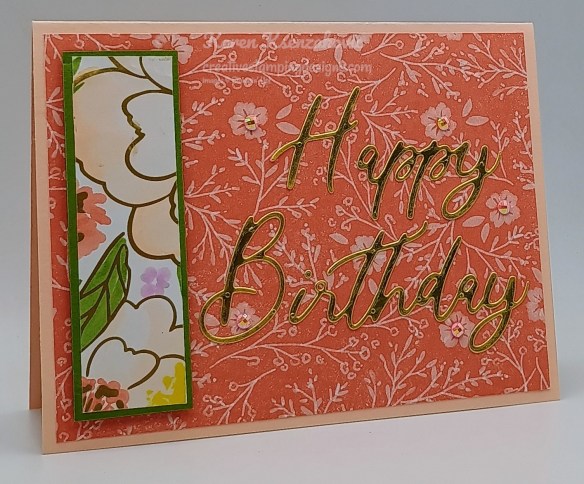
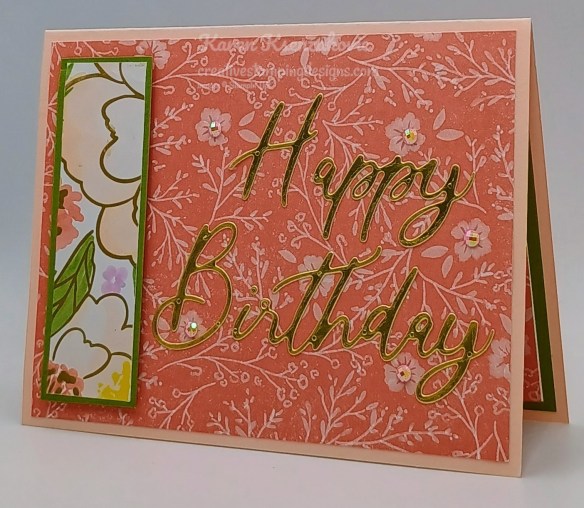
I have a quick birthday card for you today mixing older DSP and a new bundle. Here’s my card for today.
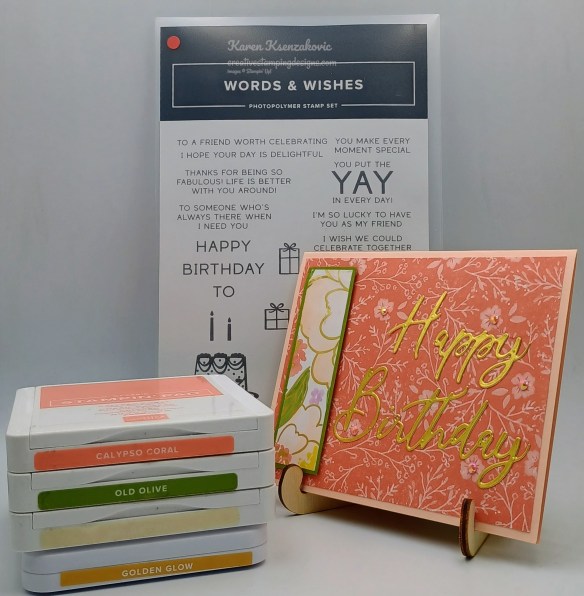
I used the Stampin’ Up! Words & Wishes Bundle and the Lovely & Beautiful specialty Designer Series Paper for my card today.
Adhere a panel of Lovely & Beautiful DSP to a Petal Pink card base.
Adhere another panel of Lovely & Beautiful DSP to an Old Olive mat. Adhere the layered panel to the card front with Stampin’ Dimensionals.
Using the Words & Wishes Dies, cut the sentiment from a panel of Gold Foil. Adhere the sentiment to the card front. Add a few Pearlized Faceted Circles to the card front.
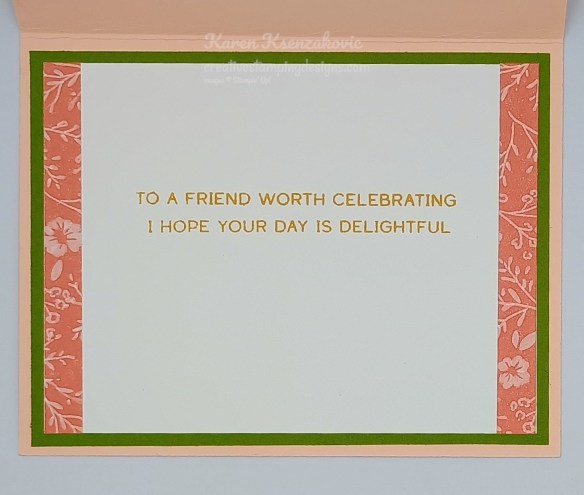
Stamp the sentiment from Words & Wishes stamp set in Golden Glow Ink on a panel of Basic White. Adhere 2 panels of Lovely & Beautiful DSP to either side of the panel. Adhere the layered panel to an Old Olive mat then to the inside of the Petal Pink card base.
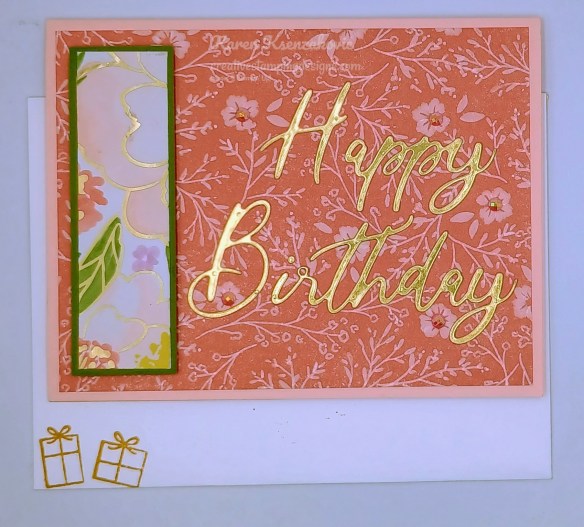
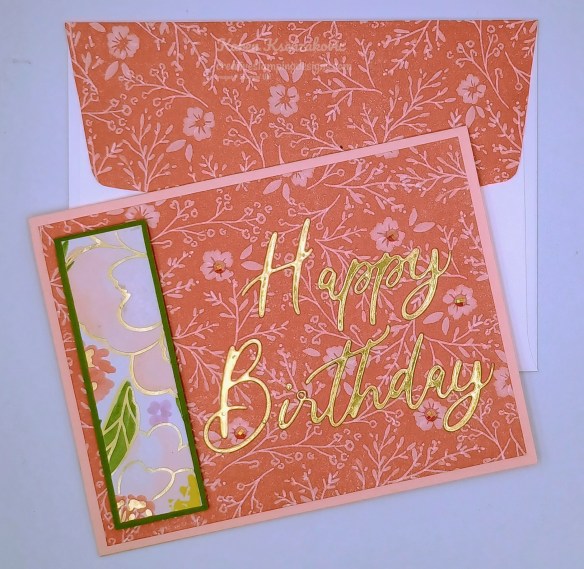
Decorate a Basic White Medium Envelope to finish your card. Stamp the present images from the Words & Wishes stamp set in golden Glow Ink on the envelope front. adhere a panel of Lovely & Beautiful DSP to the envelope flap.
Thank you for stopping by my blog today. I hope you like my card and will give it a try. Happy Stamping!!
If you need any stamping supplies, I’d love to be your Demonstrator. Just click HERE to go directly to my online store or drop me an email if you have any questions.
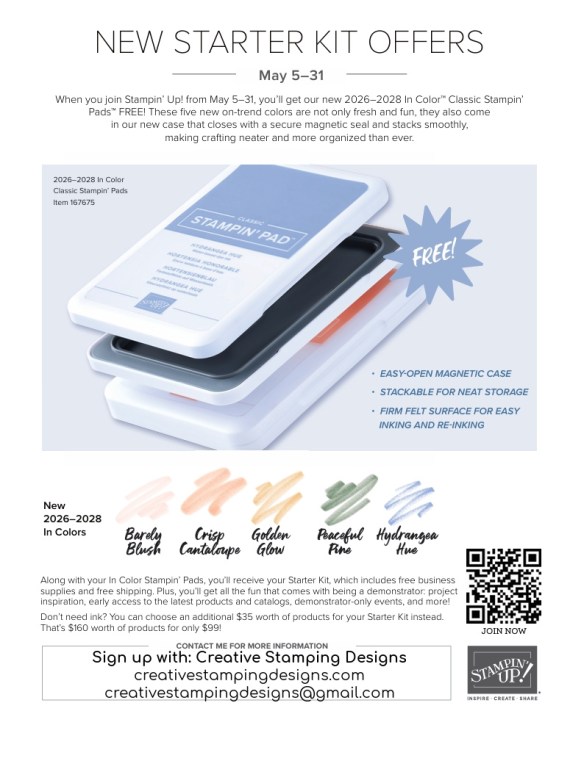
May 5-31 – Starter Kit Special – FREE In Color Ink Pads OR $35 Additional FREE Products In Your Starter Kit
Demonstrators are able to preview and preorder the new July Online Exclusives now. Did you know that you can put the July Online Exclusives in your Starter Kit? How would you like to get them at a discount too? I don’t know about you, but I LOVE discounts!!! When you purchase the Stampin’ Up! Starter Kit between May 5-31, you’ll get the new 2026–2028 In Color Stampin’ Pads FREE (that’s a $63 value) along with your Starter Kit! Or, if you’d rather have different products instead of ink pads, you can add an extra $35 worth of products to your Starter Kit!
Once you purchase the kit, but wait until May 5, you’ll enjoy all the perks that come with being a demonstrator, like a 20–25% product discount, early access to the latest products and catalogs, the chance to attend incredible training and crafting events, and so much more! Did you know that if Stampin’ Up! is having a sale, as a Demonstrator you get the additional discount on top of your 20-25% off? Also, as an extra little bonus for joining my team, you can attend all my Monthly Online Classes for FREE. There’s never an obligation to sell, you can join to enjoy the discount for yourself. Are you unsure and have questions? Contact me and we can talk. I’ll tell you exactly what to expect when you join.
Click the image below to open this flyer in full size.
Details:
Promotion Period: May 5–31
Promotion Ends: May 31 at 11:59 p.m. (MT)
When you purchase the Starter Kit from May 5–31 you will be able to choose between these two offers:
Free 2026–2028 In Color Stampin’ Pads plus the regular Starer Kit products (your choice of $125 in Stampin’ Up! merchandise) for just $99
$160 worth of products in their Starter Kit for just $99 (that’s an extra $35 value!)
New demonstrators who submit their Independent Demonstrator Agreement (IDA) before May 5 or after May 31 will not be eligible for these offers.
2 great joining offers…you can either choose to get the new In Color Ink Pads for free with your Starter Kit OR additional $35 in free merchandise with your Stater Kit!
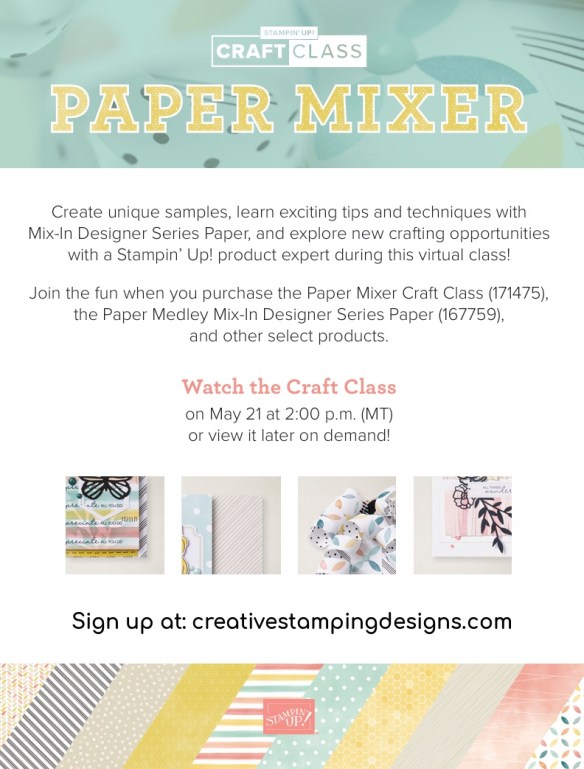
Register for New Paper Mixer Craft Class – Held May 21st
Stampin’ Up! is offering another Craft Class on May 21 (with replay available afterward if that date doesn’t work for your schedule!). This time there will be a focus on using those pretty papers!
Here are the details:
Class: Paper Mixer Craft Class (171475)
Class Price: $30 (Designer Series Paper not included)
Class Purpose: Pairing Mix-In Designer Series Paper with other Designer Series Paper
Product: Paper Medley Mix-In Designer Series Paper (167759) – a new paper pack from the upcoming May-August 2026 Catalog!
Available for Purchase: May 5
Livestream: May 21 at 2:00 p.m. (MT)
The class will be available for purchase before and after it streams on May 21
Where: An exclusive Facebook group
Language: The class will be presented in English; attendees will have access to supply lists and project instructions in English, French, German, and Dutch
Video on Demand: This class will be available as a video on demand with captions in English, French, German, and Dutch shortly after the event
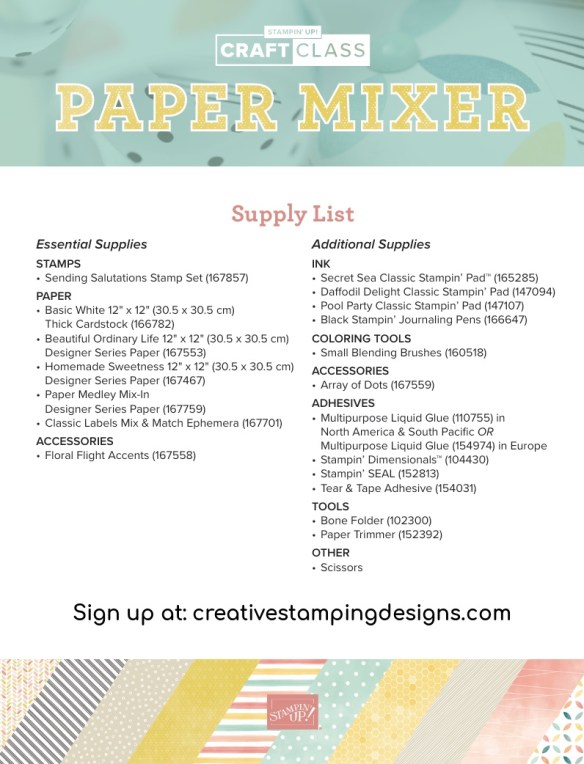
You can download the list of additional products needed to create the projects by clicking the image below:
You can purchase the class in my online store beginning May 5 and get your class and Designer Series Paper purchased so that you can join the class!
Basic White Cardstock 3 7/8″ x 5 1/8″(inner liner)
Old Olive Cardstock 1 1/8″ x 3 5/8″ (mat), 4″ x 5 1/4″(mat)
Petal Pink Cardstock 5 1/2″ x 8 1/2″(card base scored & folded at 4 1/4″)
Lovely & Beautiful Specialty Designer Series Paper 4″ x 5 1/4″(card front), 1″ x 3 1/2″(card front panel), (2) – 3/8″ x 3 7/8″ (inner liner), 2 1/4″ x 6″(envelope)
Good Tuesday morning stamping friends. I hope your week has started off well.
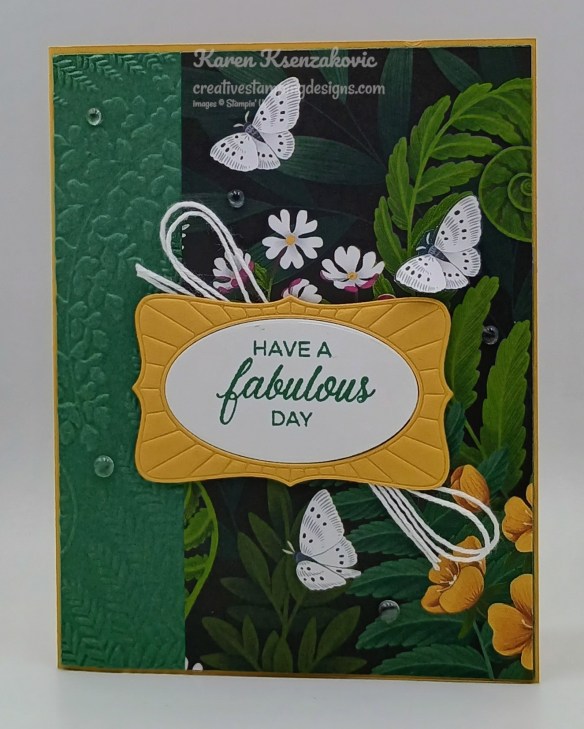
I have a quick birthday card for you today that you can change up with just using a different DSP. If you’d like to see a quick video on how I made this card, Click Here to go to my Instagram Reels. Here’s my card for today.
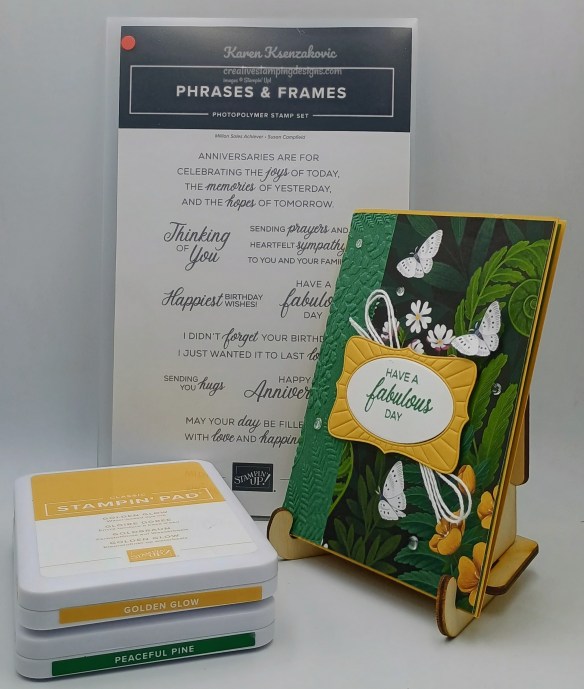
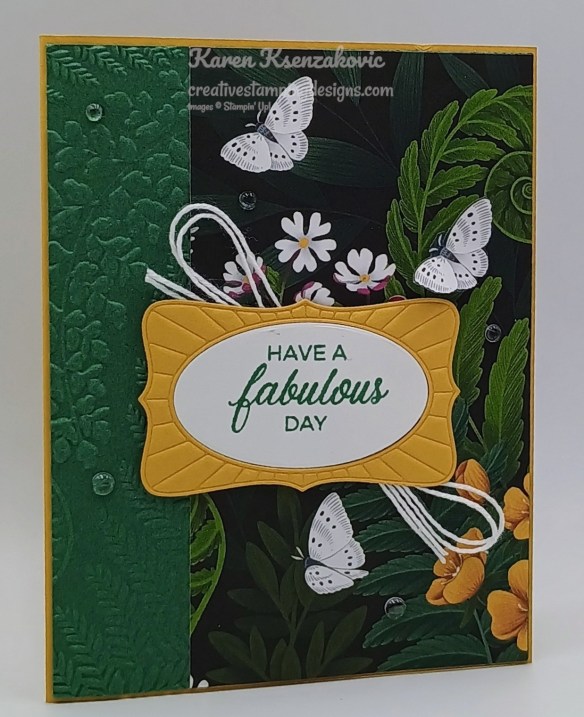
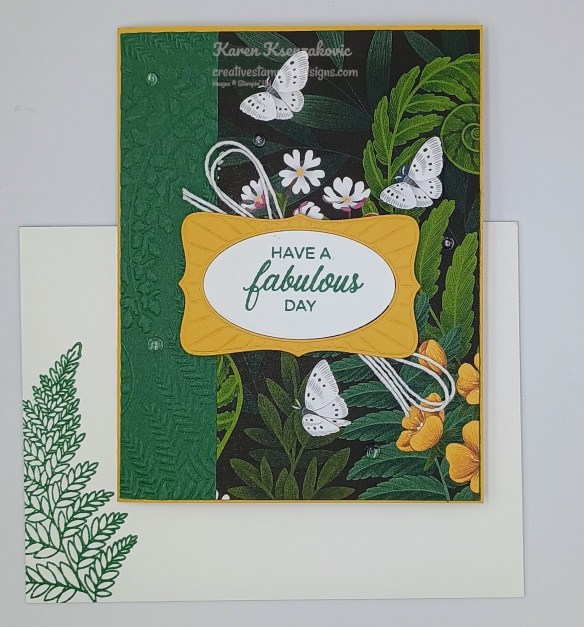
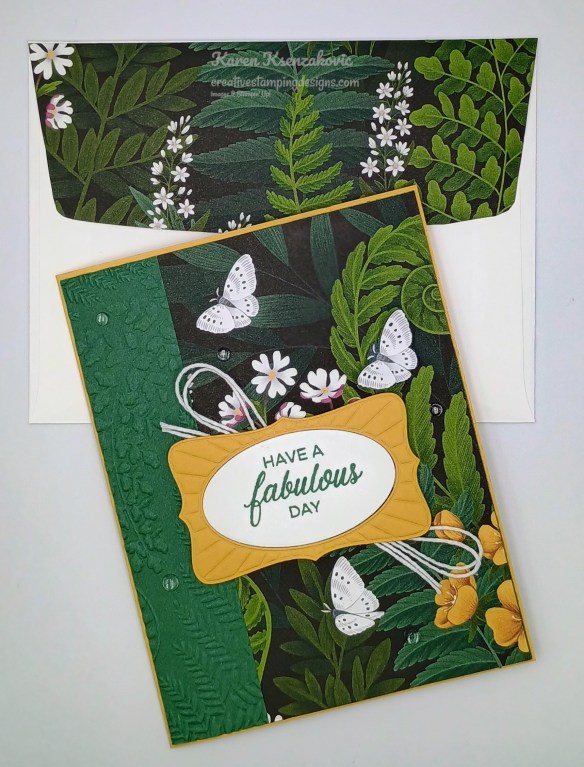
I used the Stampin’ Up! Phrases & Frames Bundle,Moonlit Flora Designer Series Paper and Fern & Flora 3D Embossing Folder for my card today.
Emboss a panel of Peaceful Pine using the Fern & Flora EF. Adhere a panel of Moonlit Flora DSP to the embossed panel. Adhere the layered panel to a Golden Glow card base.
Using the Phrases & Frames Dies, cut a panel of Golden Glow and Basic White. Leaving the die on the Golden Glow panel, run it through the Stampin’ Cut & Emboss Machine again using the Impressions Plate to get a deeper embossing on the frame. Stamp the sentiment from Phrases & Frames stamp set in Peaceful Pine Ink on the Basic White oval center.
Tie a double bow using White Baker’s Twine. Adhere the bow to the back of the sentiment Adhere the sentiment and frame to the card front using Stampin’ Dimensionals. Fussy cut one of the moths from a panel of Moonlit Flora DSP and adhere it to the card front with a Stampin’ Dimensional. Add a few Dewdrops Embellishments to the card front.
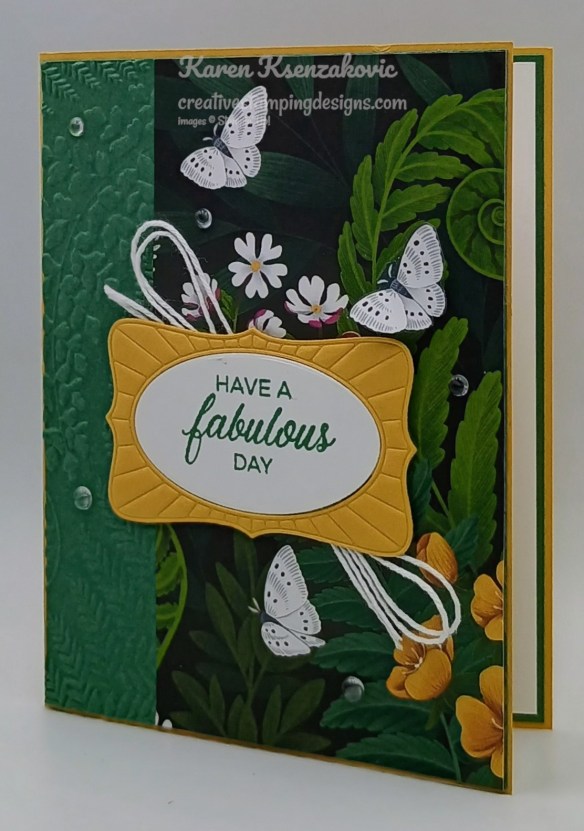
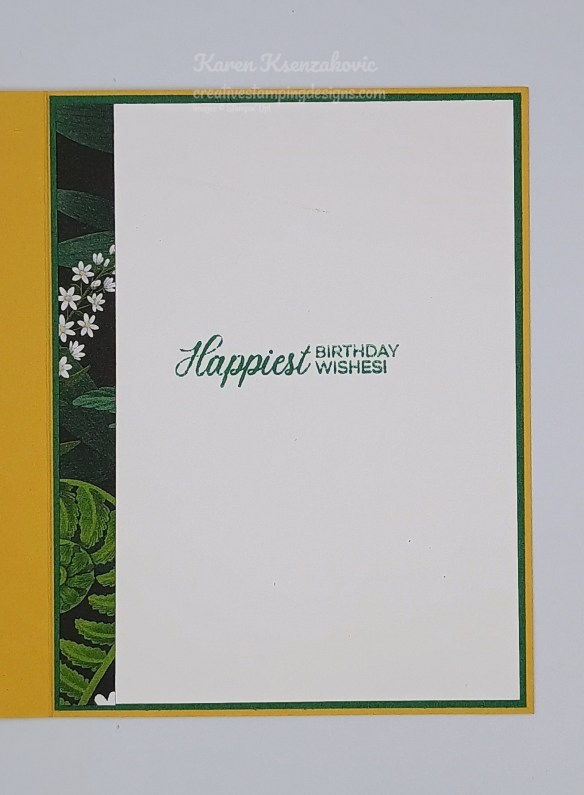
On a panel of Basic White, stamp the sentiment from the Phrases & Frames stamp set in Peaceful Pine Ink. Adhere a panel of Moonlit Flora DSP to the side of the panel. Adhere the Basic White panel to a Peaceful Pine mat then to the inside of the Golden Glow card base.
Decorate a Basic White Medium Envelope to finish your card. Stamp the large fern image from the Fern & Flora stamp set in Peaceful Pine Ink on the envelope front. Adhere a panel of Moonlit Flora DSP to the envelope flap.
Thank you for stopping by my blog today. I hope you like my card and will give it a try. Happy Stamping!!
If you need any stamping supplies, I’d love to be your Demonstrator. Just click HERE to go directly to my online store or drop me an email if you have any questions.
May 5-31 – Starter Kit Special – FREE In Color Ink Pads OR $35 Additional FREE Products In Your Starter Kit
Demonstrators are able to preview and preorder the new July Online Exclusives now. Did you know that you can put the July Online Exclusives in your Starter Kit? How would you like to get them at a discount too? I don’t know about you, but I LOVE discounts!!! When you purchase the Stampin’ Up! Starter Kit between May 5-31, you’ll get the new 2026–2028 In Color Stampin’ Pads FREE (that’s a $63 value) along with your Starter Kit! Or, if you’d rather have different products instead of ink pads, you can add an extra $35 worth of products to your Starter Kit!
Once you purchase the kit, but wait until May 5, you’ll enjoy all the perks that come with being a demonstrator, like a 20–25% product discount, early access to the latest products and catalogs, the chance to attend incredible training and crafting events, and so much more! Did you know that if Stampin’ Up! is having a sale, as a Demonstrator you get the additional discount on top of your 20-25% off? Also, as an extra little bonus for joining my team, you can attend all my Monthly Online Classes for FREE. There’s never an obligation to sell, you can join to enjoy the discount for yourself. Are you unsure and have questions? Contact me and we can talk. I’ll tell you exactly what to expect when you join.
Click the image below to open this flyer in full size.
Details:
Promotion Period: May 5–31
Promotion Ends: May 31 at 11:59 p.m. (MT)
When you purchase the Starter Kit from May 5–31 you will be able to choose between these two offers:
Free 2026–2028 In Color Stampin’ Pads plus the regular Starer Kit products (your choice of $125 in Stampin’ Up! merchandise) for just $99
$160 worth of products in their Starter Kit for just $99 (that’s an extra $35 value!)
New demonstrators who submit their Independent Demonstrator Agreement (IDA) before May 5 or after May 31 will not be eligible for these offers.
2 great joining offers…you can either choose to get the new In Color Ink Pads for free with your Starter Kit OR additional $35 in free merchandise with your Stater Kit!
Stampin’ Up! is offering another Craft Class on May 21 (with replay available afterward if that date doesn’t work for your schedule!). This time there will be a focus on using those pretty papers!
Here are the details:
Class: Paper Mixer Craft Class (171475)
Class Price: $30 (Designer Series Paper not included)
Class Purpose: Pairing Mix-In Designer Series Paper with other Designer Series Paper
Product: Paper Medley Mix-In Designer Series Paper (167759) – a new paper pack from the upcoming May-August 2026 Catalog!
Available for Purchase: May 5
Livestream: May 21 at 2:00 p.m. (MT)
The class will be available for purchase before and after it streams on May 21
Where: An exclusive Facebook group
Language: The class will be presented in English; attendees will have access to supply lists and project instructions in English, French, German, and Dutch
Video on Demand: This class will be available as a video on demand with captions in English, French, German, and Dutch shortly after the event
You can download the list of additional products needed to create the projects by clicking the image below:
You can purchase the class in my online store beginning May 5 and get your class and Designer Series Paper purchased so that you can join the class!
Good Monday morning stamping friends, welcome to a new week. How was your weekend? It’s really warming up here in NJ, at least for this week. We’re supposed to hit 100 on Wednesday. Just a quick reminder that we are more than halfway through the May, which means you have less than 2 weeks to sign up and join the Stampin’ Up! community and get those 5 new In-Color stamp pads for FREE. Details below.
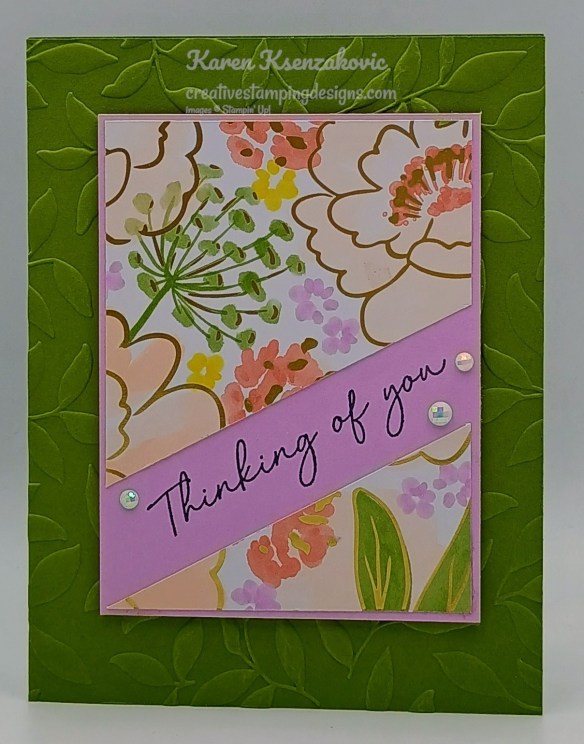
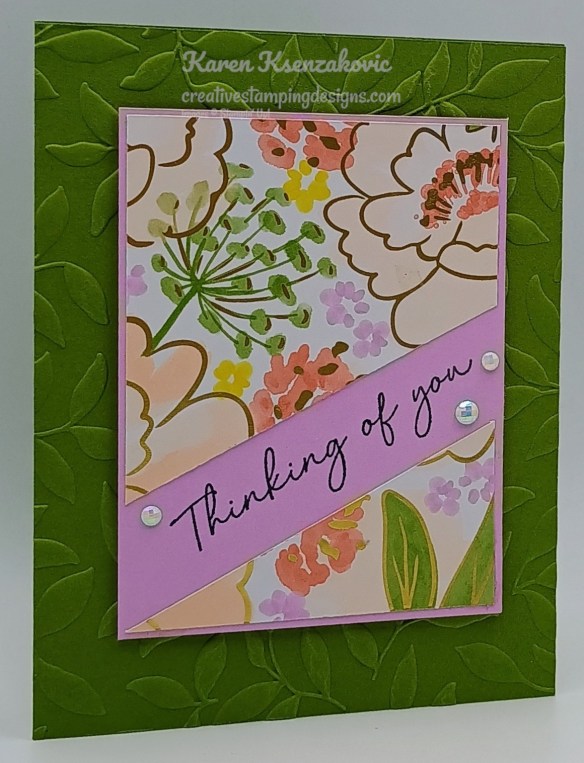
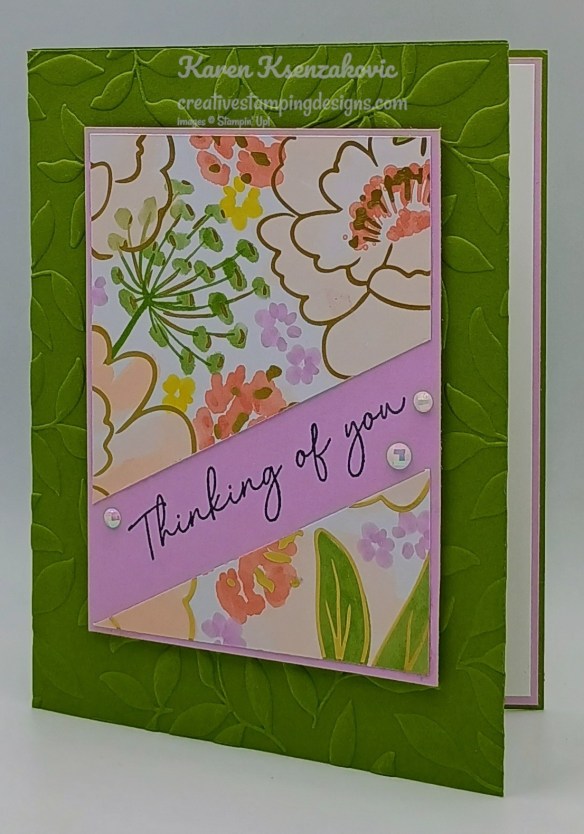
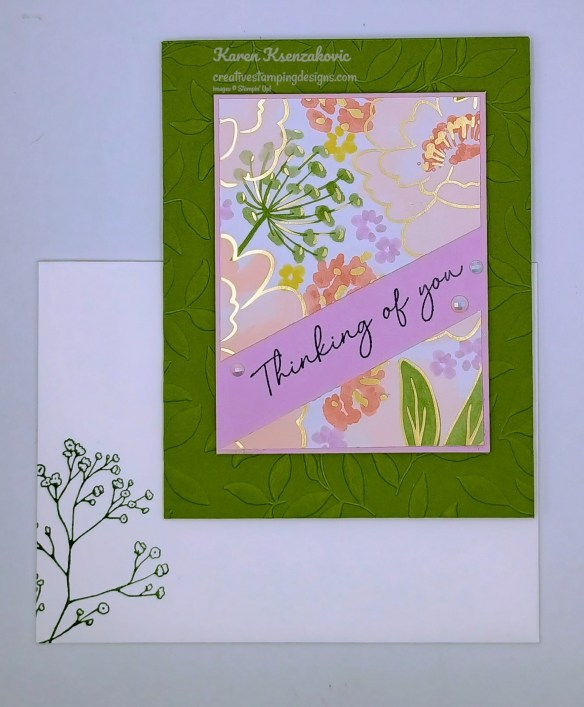
I have a quick card for you today using some older DSP and a new stamp set, which has become one of my favorites. Here’s my card for today.
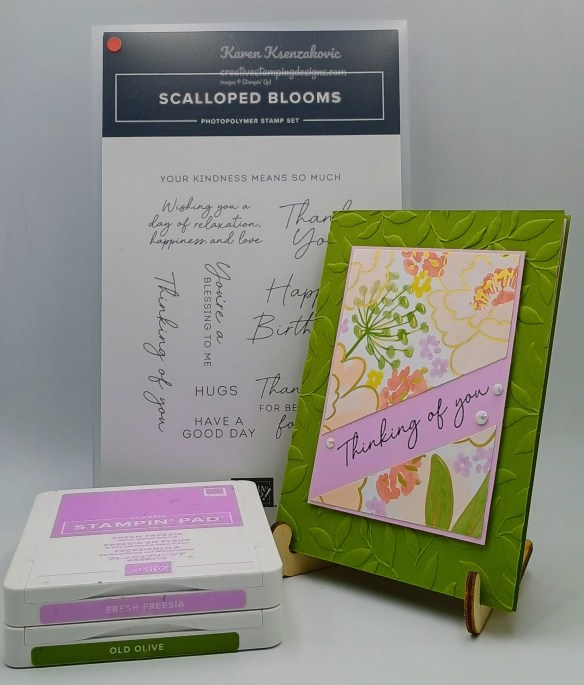
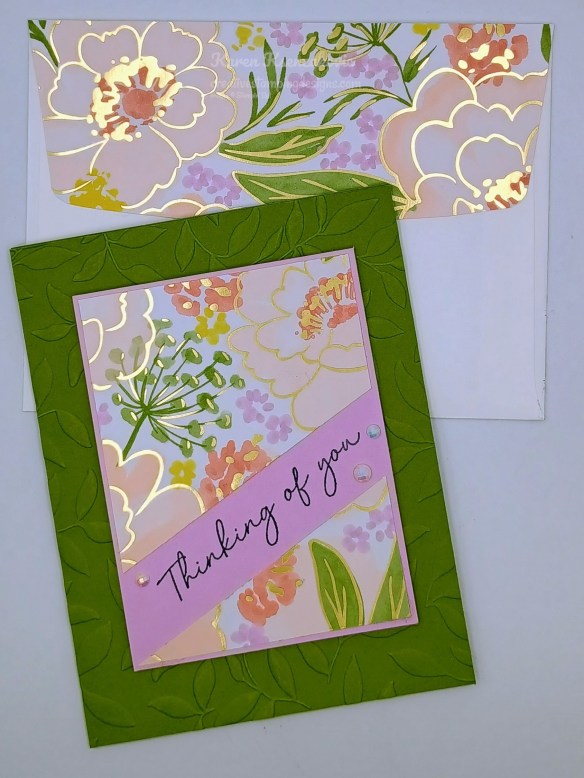
I used the Stampin’ Up! Scalloped Blooms Stamp Set, Lovely & Beautiful Specialty Designer Series Paper and Paradise Garden Hybrid Embossing Folder for my card today.
Emboss a panel of Old Olive using the Paradise Garden EF. Adhere the embossed panel to an Old Olive card base.
Cut a panel of Lovely & Beautiful DSP on an angle. Adhere the top section of the Lovely & Beautiful DSP to a Fresh Freesia mat leaving equal border around the 3 sides. Adhere the smaller section of Lovely & Beautiful DSP to the bottom of the Fresh Freesia mat leaving equal border on the sides.
Stamp the sentiment from Scalloped Blooms stamp set in Tuxedo Black Ink in the center of the DSP panels on an angle on the Fresh Freesia mat. Adhere the layered panel to the Old Olive card front with Stampin’ Dimensionals. Add a few Pearlized Faceted Circles to the card front.
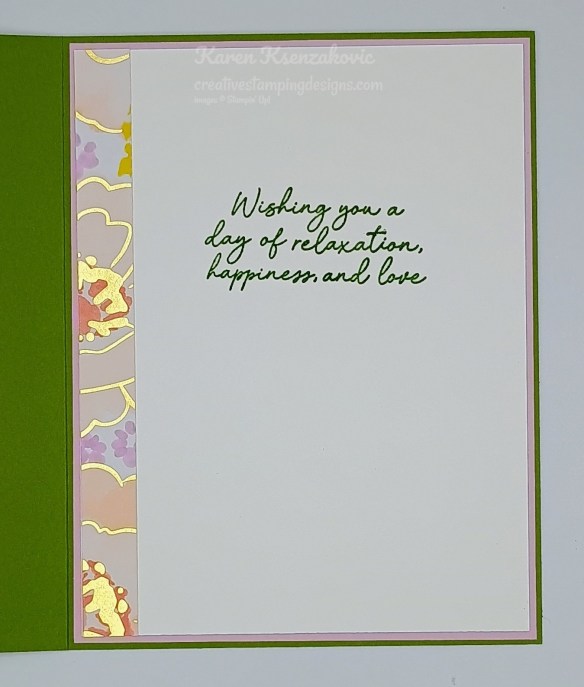
Stamp the sentiment from Scalloped Blooms stamp set in Old Olive Ink on a panel of Basic White. Adhere a panel of Lovely & Beautiful DSP to the side of the panel. Adhere the Basic White panel to a Fresh Freesia mat then to the inside of the Old Olive card base.
Decorate a Basic White Medium Envelope to finish your card. Stamp the floral image from theBeautifully Celebrated stamp set in Old Olive Ink on the envelope front. Adhere a panel of Lovely & Beautiful DSP to the envelope flap.
Thank you for stopping by my blog today. I hope you like my card and will give it a try. Happy Stamping!!
If you need any stamping supplies, I’d love to be your Demonstrator. Just click HERE to go directly to my online store or drop me an email if you have any questions.
May 5-31 – Starter Kit Special – FREE In Color Ink Pads OR $35 Additional FREE Products In Your Starter Kit
Have you been thinking about all the beautiful products you want from the new May-August 2026 catalog? How would you like to get them at a discount? I don’t know about you, but I LOVE discounts!!! When you purchase the Stampin’ Up! Starter Kit between May 5-31, you’ll get the new 2026–2028 In Color Stampin’ Pads FREE (that’s a $63 value) along with your Starter Kit! Or, if you’d rather have different products instead of ink pads, you can add an extra $35 worth of products to your Starter Kit!
Once you purchase the kit, but wait until May 5, you’ll enjoy all the perks that come with being a demonstrator, like a 20–25% product discount, early access to the latest products and catalogs, the chance to attend incredible training and crafting events, and so much more! Did you know that if Stampin’ Up! is having a sale, as a Demonstrator you get the additional discount on top of your 20-25% off? Also, as an extra little bonus for joining my team, you can attend all my Monthly Online Classes for FREE. There’s never an obligation to sell, you can join to enjoy the discount for yourself. Are you unsure and have questions? Contact me and we can talk. I’ll tell you exactly what to expect when you join.
Click the image below to open this flyer in full size.
Details:
Promotion Period: May 5–31
Promotion Ends: May 31 at 11:59 p.m. (MT)
When you purchase the Starter Kit from May 5–31 you will be able to choose between these two offers:
Free 2026–2028 In Color Stampin’ Pads plus the regular Starer Kit products (your choice of $125 in Stampin’ Up! merchandise) for just $99
$160 worth of products in their Starter Kit for just $99 (that’s an extra $35 value!)
New demonstrators who submit their Independent Demonstrator Agreement (IDA) before May 5 or after May 31 will not be eligible for these offers.
2 great joining offers…you can either choose to get the new In Color Ink Pads for free with your Starter Kit OR additional $35 in free merchandise with your Stater Kit!
Stampin’ Up! is offering another Craft Class on May 21 (with replay available afterward if that date doesn’t work for your schedule!). This time there will be a focus on using those pretty papers!
Here are the details:
Class: Paper Mixer Craft Class (171475)
Class Price: $30 (Designer Series Paper not included)
Class Purpose: Pairing Mix-In Designer Series Paper with other Designer Series Paper
Product: Paper Medley Mix-In Designer Series Paper (167759) – a new paper pack from the upcoming May-August 2026 Catalog!
Available for Purchase: May 5
Livestream: May 21 at 2:00 p.m. (MT)
The class will be available for purchase before and after it streams on May 21
Where: An exclusive Facebook group
Language: The class will be presented in English; attendees will have access to supply lists and project instructions in English, French, German, and Dutch
Video on Demand: This class will be available as a video on demand with captions in English, French, German, and Dutch shortly after the event
You can download the list of additional products needed to create the projects by clicking the image below:
You can purchase the class in my online store beginning May 5 and get your class and Designer Series Paper purchased so that you can join the class!
Good Sunday morning stamping friends. I hope you are all having a wonderful weekend. Tara and I have our Online Class today and I’m really looking forward to it.
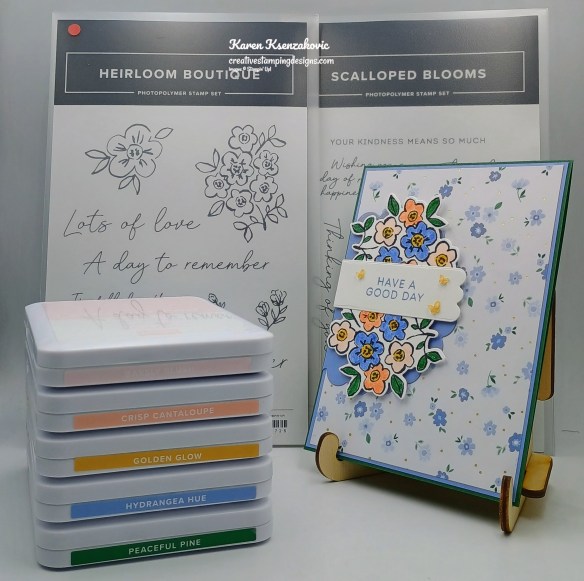
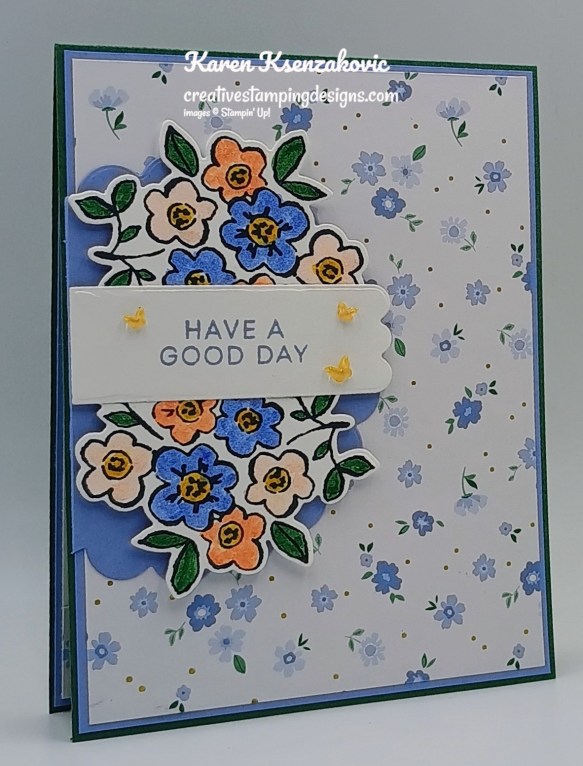
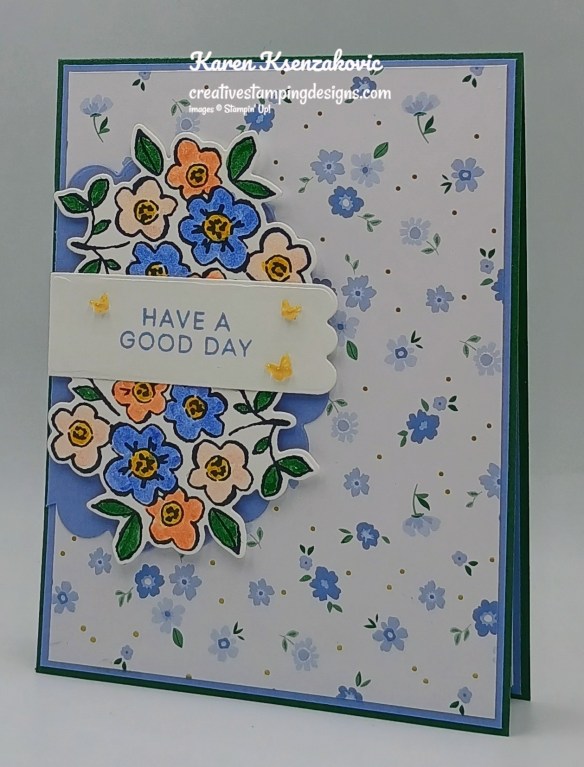
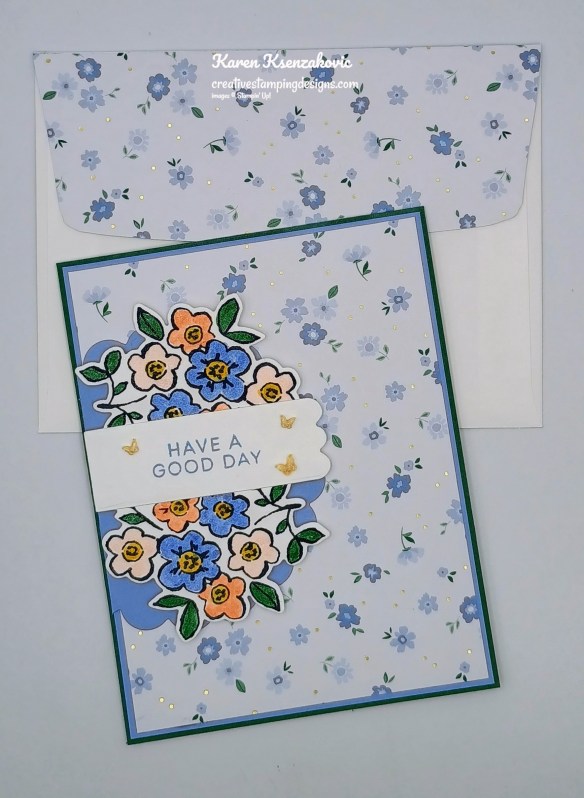
Today’s card uses all 5 of the new 2026-2028 In-Colors. Remember you can get all these stamp pads for FREE when you sign up to be a demonstrator. Details are below. If you’d like to see a quick video on how I made this card, Click Here to go to my Instagram Reels. Here’s my card for today.
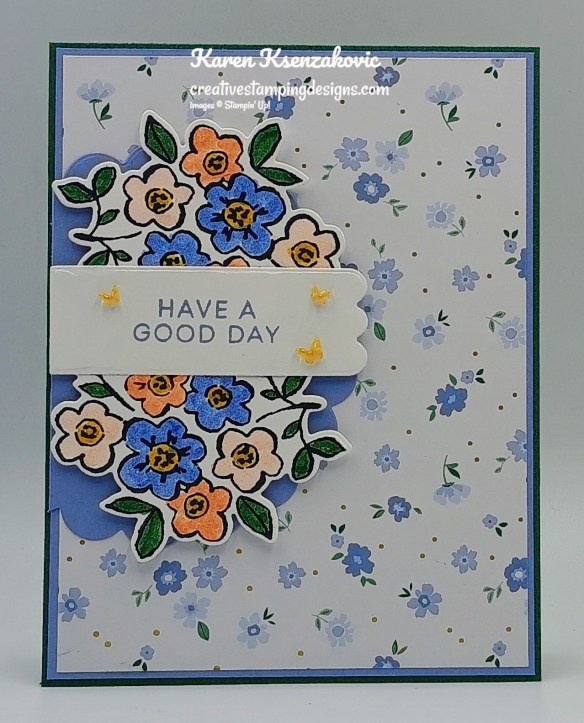
I used the Stampin’ Up! Heirloom Boutique Bundle, Stampin’ Up! Scalloped Blooms Bundle and Bloom Bouquet Specialty Designer Series Paper for my card today.
Adhere a panel of Bloom Bouquet DSP to a Hydrangea Hue mat. Cut one of the Scalloped Blooms Dies from a panel of Hydrangea Hue. Adhere the scalloped circle to the card front, hanging off the left side. Trim off excess with Paper Snips. Adhere the layered panel to the Peaceful Pine card base.
On a pane of Basic White, stamp the cluster of flowers image from the Heirloom Boutique stamp set in Tuxedo Black Ink 2 times. Color the images using the Barely Blush, Crisp Cantaloupe, Golden Glow, Hydrangea Hue and Peaceful Pine Shimmer Brushes. Cut the images out using the Heirloom Boutique Dies. Adhere the die cut images to the scalloped circle with Stampin’Dimensioals.
Cut a panel of Basic White using the Scalloped Blooms Dies. Stamp the sentiment from the Scalloped Blooms stamp set in Hydrangea Hue Ink. Adhere the sentiment to the card front with Stampin’ Dimensionals. Add a few 2026-2028 In-Color Butterflies to the card front.
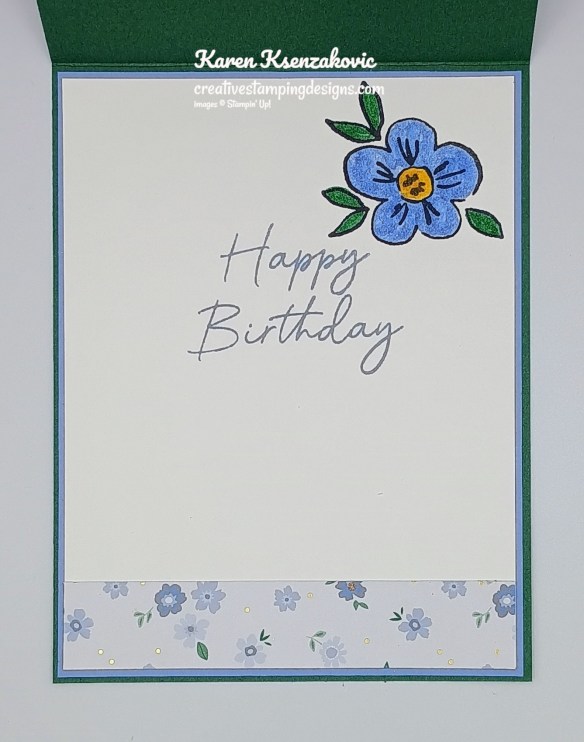
Stamp the sentiment from the Scalloped Blooms stamp set in Hydrangea Hue Ink on a panel of Basic White. Stamp the flower image from the Heirloom Boutique stamp set in Tuxedo Black Ink on the top of the panel. Color the image using Golden Glow, Hydrangea Hue and Peaceful Pine Shimmer Brushes. Adhere a panel of Bloom Bouquet DSP to the bottom of the panel. Adhere the Basic White panel to a Hydrangea Hue mat then to the inside of the Peaceful Pine card base.
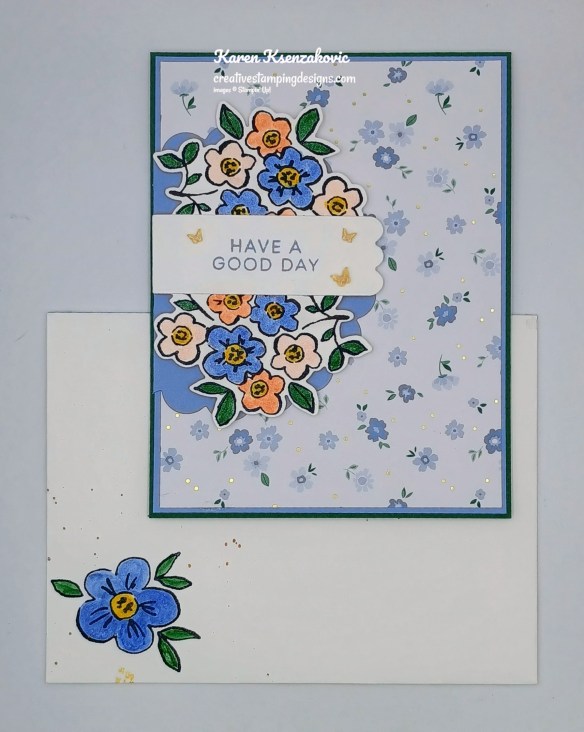
Decorate a Basic White Medium Envelope to finish your card. Stamp the single flower image from the Heirloom Boutique stamp set in tuxedo Black Ink on the envelope front. Color the image using Golden Glow, Hydrangea Hue and Peaceful Pine Shimmer Brushes. Adhere a panel of Bloom Bouquet DSP to the envelope flap.
Thank you for stopping by my blog today. I hope you like my card and will give it a try. Happy Stamping!!
If you need any stamping supplies, I’d love to be your Demonstrator. Just click HERE to go directly to my online store or drop me an email if you have any questions.
May 5-31 – Starter Kit Special – FREE In Color Ink Pads OR $35 Additional FREE Products In Your Starter Kit
Have you been thinking about all the beautiful products you want from the new May-August 2026 catalog? How would you like to get them at a discount? I don’t know about you, but I LOVE discounts!!! When you purchase the Stampin’ Up! Starter Kit between May 5-31, you’ll get the new 2026–2028 In Color Stampin’ Pads FREE (that’s a $63 value) along with your Starter Kit! Or, if you’d rather have different products instead of ink pads, you can add an extra $35 worth of products to your Starter Kit!
Once you purchase the kit, but wait until May 5, you’ll enjoy all the perks that come with being a demonstrator, like a 20–25% product discount, early access to the latest products and catalogs, the chance to attend incredible training and crafting events, and so much more! Did you know that if Stampin’ Up! is having a sale, as a Demonstrator you get the additional discount on top of your 20-25% off? Also, as an extra little bonus for joining my team, you can attend all my Monthly Online Classes for FREE. There’s never an obligation to sell, you can join to enjoy the discount for yourself. Are you unsure and have questions? Contact me and we can talk. I’ll tell you exactly what to expect when you join.
Click the image below to open this flyer in full size.
Details:
Promotion Period: May 5–31
Promotion Ends: May 31 at 11:59 p.m. (MT)
When you purchase the Starter Kit from May 5–31 you will be able to choose between these two offers:
Free 2026–2028 In Color Stampin’ Pads plus the regular Starer Kit products (your choice of $125 in Stampin’ Up! merchandise) for just $99
$160 worth of products in their Starter Kit for just $99 (that’s an extra $35 value!)
New demonstrators who submit their Independent Demonstrator Agreement (IDA) before May 5 or after May 31 will not be eligible for these offers.
2 great joining offers…you can either choose to get the new In Color Ink Pads for free with your Starter Kit OR additional $35 in free merchandise with your Stater Kit!
Stampin’ Up! is offering another Craft Class on May 21 (with replay available afterward if that date doesn’t work for your schedule!). This time there will be a focus on using those pretty papers!
Here are the details:
Class: Paper Mixer Craft Class (171475)
Class Price: $30 (Designer Series Paper not included)
Class Purpose: Pairing Mix-In Designer Series Paper with other Designer Series Paper
Product: Paper Medley Mix-In Designer Series Paper (167759) – a new paper pack from the upcoming May-August 2026 Catalog!
Available for Purchase: May 5
Livestream: May 21 at 2:00 p.m. (MT)
The class will be available for purchase before and after it streams on May 21
Where: An exclusive Facebook group
Language: The class will be presented in English; attendees will have access to supply lists and project instructions in English, French, German, and Dutch
Video on Demand: This class will be available as a video on demand with captions in English, French, German, and Dutch shortly after the event
You can download the list of additional products needed to create the projects by clicking the image below:
You can purchase the class in my online store beginning May 5 and get your class and Designer Series Paper purchased so that you can join the class!



![Elegant Leaves Bundle (English) [ 168303 ]](https://assets1.tamsnetwork.com/images/EC042017NF/168303s.jpg "Elegant Leaves Bundle (English) [ 168303 ]")
![Elegant Leaves Photopolymer Stamp Set (English) [ 168300 ]](https://assets1.tamsnetwork.com/images/EC042017NF/168300s.jpg "Elegant Leaves Photopolymer Stamp Set (English) [ 168300 ]")
![Elegant Leaves Dies [ 168302 ]](https://assets1.tamsnetwork.com/images/EC042017NF/168302s.jpg "Elegant Leaves Dies [ 168302 ]")
![Blackberry Bliss 8-1/2" X 11" Cardstock [ 133675 ]](https://assets1.tamsnetwork.com/images/EC042017NF/133675s.jpg "Blackberry Bliss 8-1/2\" X 11\" Cardstock [ 133675 ]")
![Very Vanilla 8 1/2" X 11" Cardstock [ 166784 ]](https://assets1.tamsnetwork.com/images/EC042017NF/166784s.jpg "Very Vanilla 8 1/2\" X 11\" Cardstock [ 166784 ]")
![Autumn Opulence 12" X 12" (30.5 X 30.5 Cm) Specialty Designer Series Paper [ 168336 ]](https://assets1.tamsnetwork.com/images/EC042017NF/168336s.jpg "Autumn Opulence 12\" X 12\" (30.5 X 30.5 Cm) Specialty Designer Series Paper [ 168336 ]")
![Blackberry Bliss Classic Stampin' Pad [ 147092 ]](https://assets1.tamsnetwork.com/images/EC042017NF/147092s.jpg "Blackberry Bliss Classic Stampin' Pad [ 147092 ]")
![Blackberry Bliss Stampin' Blends Combo Pack [ 154877 ]](https://assets1.tamsnetwork.com/images/EC042017NF/154877s.jpg "Blackberry Bliss Stampin' Blends Combo Pack [ 154877 ]")
![Antique Pearls [ 164679 ]](https://assets1.tamsnetwork.com/images/EC042017NF/164679s.jpg "Antique Pearls [ 164679 ]")
![Linen Thread [ 104199 ]](https://assets1.tamsnetwork.com/images/EC042017NF/104199s.jpg "Linen Thread [ 104199 ]")
![Basic White Medium Envelopes [ 159236 ]](https://assets1.tamsnetwork.com/images/EC042017NF/159236s.jpg "Basic White Medium Envelopes [ 159236 ]")
![Stampin' Cut & Emboss Machine [ 149653 ]](https://assets1.tamsnetwork.com/images/EC042017NF/149653s.jpg "Stampin' Cut & Emboss Machine [ 149653 ]")
![Mini Glue Dots [ 103683 ]](https://assets1.tamsnetwork.com/images/EC042017NF/103683s.jpg "Mini Glue Dots [ 103683 ]")
![Multipurpose Liquid Glue [ 110755 ]](https://assets1.tamsnetwork.com/images/EC042017NF/110755s.jpg "Multipurpose Liquid Glue [ 110755 ]")
![Stampin' Dimensionals [ 104430 ]](https://assets1.tamsnetwork.com/images/EC042017NF/104430s.jpg "Stampin' Dimensionals [ 104430 ]")
![Stampin' Seal [ 152813 ]](https://assets1.tamsnetwork.com/images/EC042017NF/152813s.jpg "Stampin' Seal [ 152813 ]")
![Paper Trimmer [ 152392 ]](https://assets1.tamsnetwork.com/images/EC042017NF/152392s.jpg "Paper Trimmer [ 152392 ]")
![Bone Folder [ 102300 ]](https://assets1.tamsnetwork.com/images/EC042017NF/102300s.jpg "Bone Folder [ 102300 ]")
![Detail Scissors [ 170902 ]](https://assets1.tamsnetwork.com/images/EC042017NF/170902s.jpg "Detail Scissors [ 170902 ]")
![Take Your Pick [ 144107 ]](https://assets1.tamsnetwork.com/images/EC042017NF/144107s.jpg "Take Your Pick [ 144107 ]")

![Radiant Sunflowers Bundle (English) [ 168359 ]](https://assets1.tamsnetwork.com/images/EC042017NF/168359s.jpg "Radiant Sunflowers Bundle (English) [ 168359 ]")
![Radiant Sunflowers Photopolymer Stamp Set (English) [ 168352 ]](https://assets1.tamsnetwork.com/images/EC042017NF/168352s.jpg "Radiant Sunflowers Photopolymer Stamp Set (English) [ 168352 ]")
![Radiant Sunflowers Dies [ 168358 ]](https://assets1.tamsnetwork.com/images/EC042017NF/168358s.jpg "Radiant Sunflowers Dies [ 168358 ]")
![Basic White 8 1/2" X 11" Cardstock [ 166780 ]](https://assets1.tamsnetwork.com/images/EC042017NF/166780s.jpg "Basic White 8 1/2\" X 11\" Cardstock [ 166780 ]")
![Daffodil Delight 8-1/2" X 11" Cardstock [ 119683 ]](https://assets1.tamsnetwork.com/images/EC042017NF/119683s.jpg "Daffodil Delight 8-1/2\" X 11\" Cardstock [ 119683 ]")
![Early Espresso 8-1/2" X 11" Cardstock [ 119686 ]](https://assets1.tamsnetwork.com/images/EC042017NF/119686s.jpg "Early Espresso 8-1/2\" X 11\" Cardstock [ 119686 ]")
![Mossy Meadow 8-1/2" X 11" Cardstock [ 133676 ]](https://assets1.tamsnetwork.com/images/EC042017NF/133676s.jpg "Mossy Meadow 8-1/2\" X 11\" Cardstock [ 133676 ]")
![Pecan Pie 8 1/2" X 11" Cardstock [ 161717 ]](https://assets1.tamsnetwork.com/images/EC042017NF/161717s.jpg "Pecan Pie 8 1/2\" X 11\" Cardstock [ 161717 ]")
![Wood Grain Wonders 12" X 12" (30.5 X 30.5 Cm) Designer Series Paper [ 167428 ]](https://assets1.tamsnetwork.com/images/EC042017NF/167428s.jpg "Wood Grain Wonders 12\" X 12\" (30.5 X 30.5 Cm) Designer Series Paper [ 167428 ]")
![Radiant Foils 12" X 12" (30.5 X 30.5 Cm) Specialty Designer Series Paper [ 168362 ]](https://assets1.tamsnetwork.com/images/EC042017NF/168362s.jpg "Radiant Foils 12\" X 12\" (30.5 X 30.5 Cm) Specialty Designer Series Paper [ 168362 ]")
![Early Espresso Classic Stampin' Pad [ 147114 ]](https://assets1.tamsnetwork.com/images/EC042017NF/147114s.jpg "Early Espresso Classic Stampin' Pad [ 147114 ]")
![Daffodil Delight Stampin' Blends Combo Pack [ 154883 ]](https://assets1.tamsnetwork.com/images/EC042017NF/154883s.jpg "Daffodil Delight Stampin' Blends Combo Pack [ 154883 ]")
![Mossy Meadow Stampin' Blends Combo Pack [ 154890 ]](https://assets1.tamsnetwork.com/images/EC042017NF/154890s.jpg "Mossy Meadow Stampin' Blends Combo Pack [ 154890 ]")
![Stampin’ Blends Deep Combo Pack [ 158152 ]](https://assets1.tamsnetwork.com/images/EC042017NF/158152s.jpg "Stampin’ Blends Deep Combo Pack [ 158152 ]")
![Flourish & Frames Hot Foil Dies [ 170064 ]](https://assets1.tamsnetwork.com/images/EC042017NF/170064s.jpg "Flourish & Frames Hot Foil Dies [ 170064 ]")
![Neutrals Jute Combo Pack [ 168468 ]](https://assets1.tamsnetwork.com/images/EC042017NF/168468s.jpg "Neutrals Jute Combo Pack [ 168468 ]")
![Radiant Gems [ 168363 ]](https://assets1.tamsnetwork.com/images/EC042017NF/168363s.jpg "Radiant Gems [ 168363 ]")

![Oh My Fright Bundle (English) [ 168176 ]](https://assets1.tamsnetwork.com/images/EC042017NF/168176s.jpg "Oh My Fright Bundle (English) [ 168176 ]")
![Oh My Fright Photopolymer Stamp Set (English) [ 168169 ]](https://assets1.tamsnetwork.com/images/EC042017NF/168169s.jpg "Oh My Fright Photopolymer Stamp Set (English) [ 168169 ]")
![Oh My Fright Dies [ 168175 ]](https://assets1.tamsnetwork.com/images/EC042017NF/168175s.jpg "Oh My Fright Dies [ 168175 ]")
![Basic Gray 8-1/2" X 11" Cardstock [ 121044 ]](https://assets1.tamsnetwork.com/images/EC042017NF/121044s.jpg "Basic Gray 8-1/2\" X 11\" Cardstock [ 121044 ]")
![Frightfully Fun 12" X 12" (30.5 X 30.5 Cm) Designer Series Paper [ 168168 ]](https://assets1.tamsnetwork.com/images/EC042017NF/168168s.jpg "Frightfully Fun 12\" X 12\" (30.5 X 30.5 Cm) Designer Series Paper [ 168168 ]")
![Basic Gray Classic Stampin' Pad [ 149165 ]](https://assets1.tamsnetwork.com/images/EC042017NF/149165s.jpg "Basic Gray Classic Stampin' Pad [ 149165 ]")
![Smoky Slate Stampin' Blends Combo Pack [ 154904 ]](https://assets1.tamsnetwork.com/images/EC042017NF/154904s.jpg "Smoky Slate Stampin' Blends Combo Pack [ 154904 ]")
![Words For The Season Dies (English) [ 165797 ]](https://assets1.tamsnetwork.com/images/EC042017NF/165797s.jpg "Words For The Season Dies (English) [ 165797 ]")
![Adhesive Backed Bats Ghosts & Dots [ 168180 ]](https://assets1.tamsnetwork.com/images/EC042017NF/168180s.jpg "Adhesive Backed Bats Ghosts & Dots [ 168180 ]")

![Echoes Of Detail Bundle [ 170049 ]](https://assets1.tamsnetwork.com/images/EC042017NF/170049s.jpg "Echoes Of Detail Bundle [ 170049 ]")
![Echoes Of Detail Photopolymer Stamp Set [ 170046 ]](https://assets1.tamsnetwork.com/images/EC042017NF/170046s.jpg "Echoes Of Detail Photopolymer Stamp Set [ 170046 ]")
![Echoes Of Detail Hot Foil Dies [ 170048 ]](https://assets1.tamsnetwork.com/images/EC042017NF/170048s.jpg "Echoes Of Detail Hot Foil Dies [ 170048 ]")
![Cloud Cover 8 1/2" X 11" Cardstock [ 165621 ]](https://assets1.tamsnetwork.com/images/EC042017NF/165621s.jpg "Cloud Cover 8 1/2\" X 11\" Cardstock [ 165621 ]")
![Smoky Slate 8-1/2" X 11" Cardstock [ 131202 ]](https://assets1.tamsnetwork.com/images/EC042017NF/131202s.jpg "Smoky Slate 8-1/2\" X 11\" Cardstock [ 131202 ]")
![Smoky Slate Classic Stampin' Pad [ 147113 ]](https://assets1.tamsnetwork.com/images/EC042017NF/147113s.jpg "Smoky Slate Classic Stampin' Pad [ 147113 ]")
![Everyday Arches Dies [ 164629 ]](https://assets1.tamsnetwork.com/images/EC042017NF/164629s.jpg "Everyday Arches Dies [ 164629 ]")
![Stampin' Hot Foil System Na & Craft Class [ 170009 ]](https://assets1.tamsnetwork.com/images/EC042017NF/170009s.jpg "Stampin' Hot Foil System Na & Craft Class [ 170009 ]")
![Silver Stampin' Hot Foil Rolls [ 170067 ]](https://assets1.tamsnetwork.com/images/EC042017NF/170067s.jpg "Silver Stampin' Hot Foil Rolls [ 170067 ]")

![Secret Sea 8 1/2" X 11" Cardstock [ 165624 ]](https://assets1.tamsnetwork.com/images/EC042017NF/165624s.jpg "Secret Sea 8 1/2\" X 11\" Cardstock [ 165624 ]")
![Cloud Cover 12" X 12" (30.5 X 30.5 Cm) Two Tone Cardstock [ 166708 ]](https://assets1.tamsnetwork.com/images/EC042017NF/166708s.jpg "Cloud Cover 12\" X 12\" (30.5 X 30.5 Cm) Two Tone Cardstock [ 166708 ]")
![Golden Glow 12" X 12" (30.5 X 30.5 Cm) Two Tone Cardstock [ 167695 ]](https://assets1.tamsnetwork.com/images/EC042017NF/167695s.jpg "Golden Glow 12\" X 12\" (30.5 X 30.5 Cm) Two Tone Cardstock [ 167695 ]")
![Secret Sea 12" X 12" (30.5 X 30.5 Cm) Two Tone Cardstock [ 166709 ]](https://assets1.tamsnetwork.com/images/EC042017NF/166709s.jpg "Secret Sea 12\" X 12\" (30.5 X 30.5 Cm) Two Tone Cardstock [ 166709 ]")
![Sunset Shimmer Vellum 12" X 12" (30.5 X 30.5 Cm) Specialty Paper [ 167784 ]](https://assets1.tamsnetwork.com/images/EC042017NF/167784s.jpg "Sunset Shimmer Vellum 12\" X 12\" (30.5 X 30.5 Cm) Specialty Paper [ 167784 ]")
![Secret Sea Classic Stampin' Pad [ 165285 ]](https://assets1.tamsnetwork.com/images/EC042017NF/165285s.jpg "Secret Sea Classic Stampin' Pad [ 165285 ]")
![Golden Glow Shimmer Brush [ 167662 ]](https://assets1.tamsnetwork.com/images/EC042017NF/167662s.jpg "Golden Glow Shimmer Brush [ 167662 ]")
![Swirls Of Magic Embossing Folder [ 168179 ]](https://assets1.tamsnetwork.com/images/EC042017NF/168179s.jpg "Swirls Of Magic Embossing Folder [ 168179 ]")
![Stylish Shapes Dies [ 159183 ]](https://assets1.tamsnetwork.com/images/EC042017NF/159183s.jpg "Stylish Shapes Dies [ 159183 ]")
![Sanding Blocks [ 168533 ]](https://assets1.tamsnetwork.com/images/EC042017NF/168533s.jpg "Sanding Blocks [ 168533 ]")



![Basic Black 8-1/2" X 11" Cardstock [ 121045 ]](https://assets1.tamsnetwork.com/images/EC042017NF/121045s.jpg "Basic Black 8-1/2\" X 11\" Cardstock [ 121045 ]")
![Versamark Pad [ 102283 ]](https://assets1.tamsnetwork.com/images/EC042017NF/102283s.jpg "Versamark Pad [ 102283 ]")
![Basics Wow! Embossing Powder [ 165679 ]](https://assets1.tamsnetwork.com/images/EC042017NF/165679s.jpg "Basics Wow! Embossing Powder [ 165679 ]")
![Heat Tool (Us And Canada) [ 129053 ]](https://assets1.tamsnetwork.com/images/EC042017NF/129053s.jpg "Heat Tool (Us And Canada) [ 129053 ]")
![Black 3/8" (1 Cm) Iridescent Ribbon [ 168181 ]](https://assets1.tamsnetwork.com/images/EC042017NF/168181s.jpg "Black 3/8\" (1 Cm) Iridescent Ribbon [ 168181 ]")

![Words & Wishes Bundle (English) [ 167897 ]](https://assets1.tamsnetwork.com/images/EC042017NF/167897s.jpg "Words & Wishes Bundle (English) [ 167897 ]")
![Words & Wishes Photopolymer Stamp Set (English) [ 167889 ]](https://assets1.tamsnetwork.com/images/EC042017NF/167889s.jpg "Words & Wishes Photopolymer Stamp Set (English) [ 167889 ]")
![Words & Wishes Dies (English) [ 167894 ]](https://assets1.tamsnetwork.com/images/EC042017NF/167894s.jpg "Words & Wishes Dies (English) [ 167894 ]")
![Old Olive 8-1/2" X 11" Cardstock [ 100702 ]](https://assets1.tamsnetwork.com/images/EC042017NF/100702s.jpg "Old Olive 8-1/2\" X 11\" Cardstock [ 100702 ]")
![Petal Pink 8-1/2" X 11" Cardstock [ 146985 ]](https://assets1.tamsnetwork.com/images/EC042017NF/146985s.jpg "Petal Pink 8-1/2\" X 11\" Cardstock [ 146985 ]")
![Lovely & Beautiful 12" X 12" (30.5 X 30.5 Cm) Specialty Designer Series Paper [ 166957 ]](https://assets1.tamsnetwork.com/images/EC042017NF/166957s.jpg "Lovely & Beautiful 12\" X 12\" (30.5 X 30.5 Cm) Specialty Designer Series Paper [ 166957 ]")
![Gold Foil Sheets [ 132622 ]](https://assets1.tamsnetwork.com/images/EC042017NF/132622s.jpg "Gold Foil Sheets [ 132622 ]")
![Golden Glow Classic Stampin' Pad [ 167676 ]](https://assets1.tamsnetwork.com/images/EC042017NF/167676s.jpg "Golden Glow Classic Stampin' Pad [ 167676 ]")
![Pearlized Faceted Circles [ 166978 ]](https://assets1.tamsnetwork.com/images/EC042017NF/166978s.jpg "Pearlized Faceted Circles [ 166978 ]")

![Phrases & Frames Bundle (English) [ 167587 ]](https://assets1.tamsnetwork.com/images/EC042017NF/167587s.jpg "Phrases & Frames Bundle (English) [ 167587 ]")
![Phrases & Frames Photopolymer Stamp Set (English) [ 167581 ]](https://assets1.tamsnetwork.com/images/EC042017NF/167581s.jpg "Phrases & Frames Photopolymer Stamp Set (English) [ 167581 ]")
![Phrases & Frames Dies [ 167586 ]](https://assets1.tamsnetwork.com/images/EC042017NF/167586s.jpg "Phrases & Frames Dies [ 167586 ]")
![Fern & Flora Photopolymer Stamp Set (English) [ 167739 ]](https://assets1.tamsnetwork.com/images/EC042017NF/167739s.jpg "Fern & Flora Photopolymer Stamp Set (English) [ 167739 ]")
![Golden Glow 8 1/2" X 11" Cardstock [ 167685 ]](https://assets1.tamsnetwork.com/images/EC042017NF/167685s.jpg "Golden Glow 8 1/2\" X 11\" Cardstock [ 167685 ]")
![Peaceful Pine 8 1/2" X 11" Cardstock [ 167691 ]](https://assets1.tamsnetwork.com/images/EC042017NF/167691s.jpg "Peaceful Pine 8 1/2\" X 11\" Cardstock [ 167691 ]")
![Moonlit Flora 12" X 12" (30.5 X 30.5 Cm) Designer Series Paper [ 167737 ]](https://assets1.tamsnetwork.com/images/EC042017NF/167737s.jpg "Moonlit Flora 12\" X 12\" (30.5 X 30.5 Cm) Designer Series Paper [ 167737 ]")
![Peaceful Pine Classic Stampin Pad [ 167679 ]](https://assets1.tamsnetwork.com/images/EC042017NF/167679s.jpg "Peaceful Pine Classic Stampin Pad [ 167679 ]")
![Fern & Flora 3 D Embossing Folder [ 167744 ]](https://assets1.tamsnetwork.com/images/EC042017NF/167744s.jpg "Fern & Flora 3 D Embossing Folder [ 167744 ]")
![Baker's Twine Essentials Pack [ 155475 ]](https://assets1.tamsnetwork.com/images/EC042017NF/155475s.jpg "Baker's Twine Essentials Pack [ 155475 ]")
![Dewdrops Embellishments [ 167748 ]](https://assets1.tamsnetwork.com/images/EC042017NF/167748s.jpg "Dewdrops Embellishments [ 167748 ]")
![Impressions Plate [ 167767 ]](https://assets1.tamsnetwork.com/images/EC042017NF/167767s.jpg "Impressions Plate [ 167767 ]")

![Scalloped Blooms Photopolymer Stamp Set (English) [ 167639 ]](https://assets1.tamsnetwork.com/images/EC042017NF/167639s.jpg "Scalloped Blooms Photopolymer Stamp Set (English) [ 167639 ]")
![Beautifully Celebrated Photopolymer Stamp Set (English) [ 166968 ]](https://assets1.tamsnetwork.com/images/EC042017NF/166968s.jpg "Beautifully Celebrated Photopolymer Stamp Set (English) [ 166968 ]")
![Fresh Freesia 8 1/2" X 11" Cardstock [ 155613 ]](https://assets1.tamsnetwork.com/images/EC042017NF/155613s.jpg "Fresh Freesia 8 1/2\" X 11\" Cardstock [ 155613 ]")
![Old Olive Classic Stampin' Pad [ 147090 ]](https://assets1.tamsnetwork.com/images/EC042017NF/147090s.jpg "Old Olive Classic Stampin' Pad [ 147090 ]")
![Tuxedo Black Memento Ink Pad [ 132708 ]](https://assets1.tamsnetwork.com/images/EC042017NF/132708s.jpg "Tuxedo Black Memento Ink Pad [ 132708 ]")

![Heirloom Boutique Bundle (English) [ 167731 ]](https://assets1.tamsnetwork.com/images/EC042017NF/167731s.jpg "Heirloom Boutique Bundle (English) [ 167731 ]")
![Heirloom Boutique Photopolymer Stamp Set (English) [ 167725 ]](https://assets1.tamsnetwork.com/images/EC042017NF/167725s.jpg "Heirloom Boutique Photopolymer Stamp Set (English) [ 167725 ]")
![Heirloom Boutique Dies [ 167730 ]](https://assets1.tamsnetwork.com/images/EC042017NF/167730s.jpg "Heirloom Boutique Dies [ 167730 ]")
![Scalloped Blooms Bundle (English) [ 167647 ]](https://assets1.tamsnetwork.com/images/EC042017NF/167647s.jpg "Scalloped Blooms Bundle (English) [ 167647 ]")
![Scalloped Blooms Dies [ 167646 ]](https://assets1.tamsnetwork.com/images/EC042017NF/167646s.jpg "Scalloped Blooms Dies [ 167646 ]")
![Hydrangea Hue 8 1/2" X 11" Cardstock [ 167687 ]](https://assets1.tamsnetwork.com/images/EC042017NF/167687s.jpg "Hydrangea Hue 8 1/2\" X 11\" Cardstock [ 167687 ]")
![Bloom Boutique Specialty Designer Series Paper & Sticker Sheet (English) [ 167734 ]](https://assets1.tamsnetwork.com/images/EC042017NF/167734s.jpg "Bloom Boutique Specialty Designer Series Paper & Sticker Sheet (English) [ 167734 ]")
![Hydrangea Hue Classic Stampin' Pad [ 167677 ]](https://assets1.tamsnetwork.com/images/EC042017NF/167677s.jpg "Hydrangea Hue Classic Stampin' Pad [ 167677 ]")
![Barely Blush Shimmer Brush [ 167664 ]](https://assets1.tamsnetwork.com/images/EC042017NF/167664s.jpg "Barely Blush Shimmer Brush [ 167664 ]")
![Crisp Cantaloupe Shimmer Brush [ 167661 ]](https://assets1.tamsnetwork.com/images/EC042017NF/167661s.jpg "Crisp Cantaloupe Shimmer Brush [ 167661 ]")
![Hydrangea Hue Shimmer Brush [ 167663 ]](https://assets1.tamsnetwork.com/images/EC042017NF/167663s.jpg "Hydrangea Hue Shimmer Brush [ 167663 ]")
![Peaceful Pine Shimmer Brush [ 167665 ]](https://assets1.tamsnetwork.com/images/EC042017NF/167665s.jpg "Peaceful Pine Shimmer Brush [ 167665 ]")
![2026–2028 In Color™ Butterflies [ 167656 ]](https://assets1.tamsnetwork.com/images/EC042017NF/167656s.jpg "2026–2028 In Color™ Butterflies [ 167656 ]")

 Creative Stamping Designs