
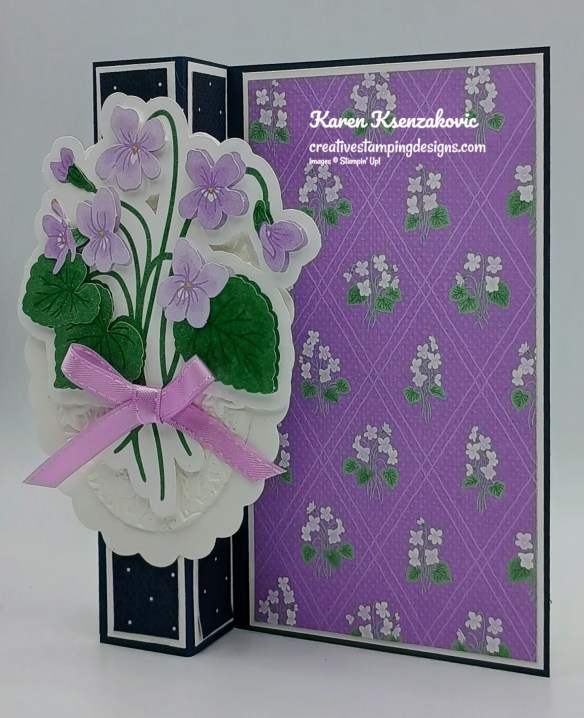
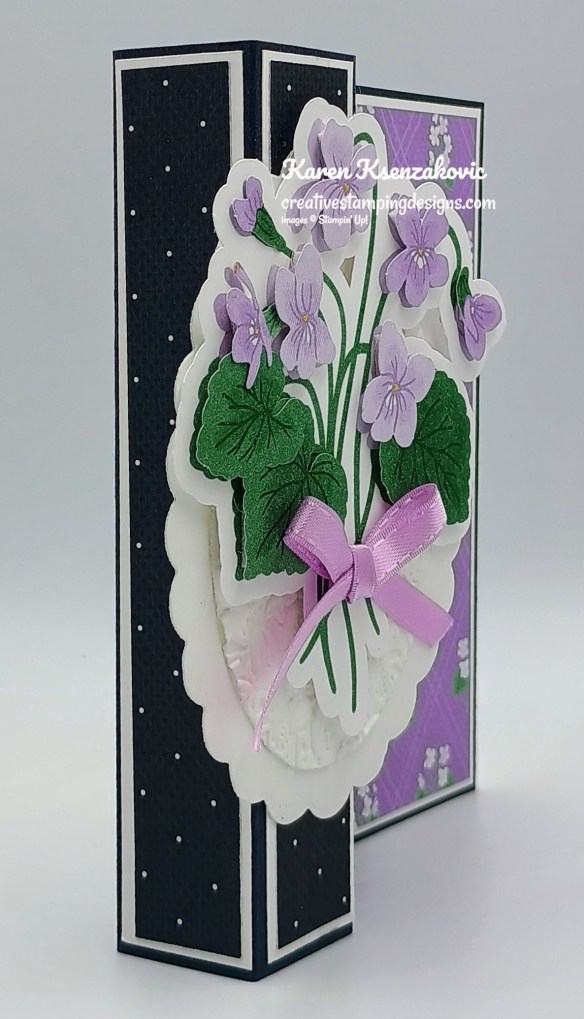
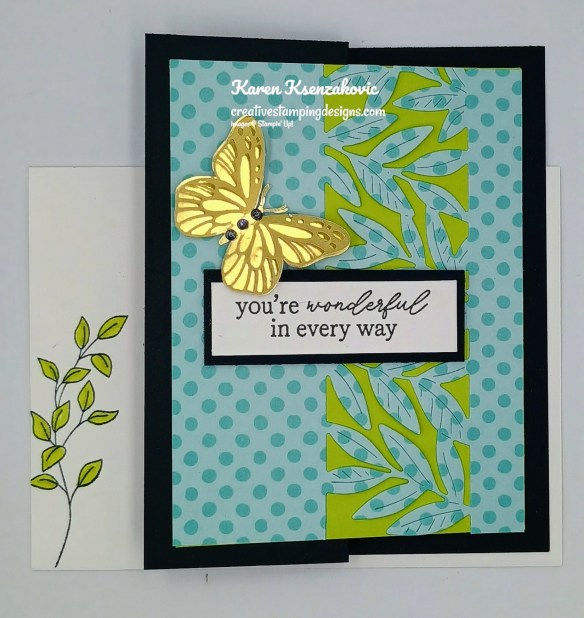
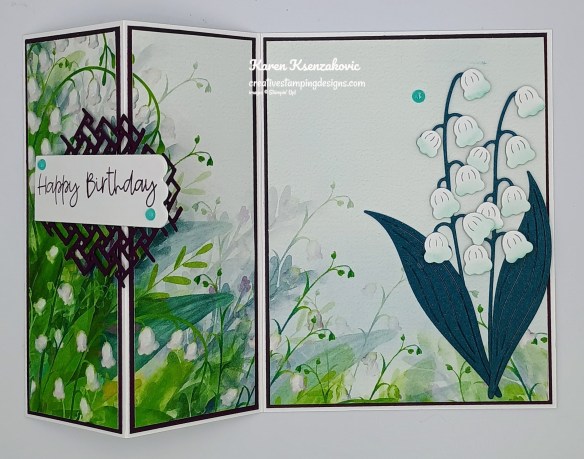
Good Friday morning stamping friends, welcome to my fun fold Friday. WOW!! We’re already halfway through July, where is the time going. I hope you all had a great week and are looking forward to the weekend.
Today’s card is one that I did on my YouTube Live yesterday. If you were able to join me, thank you for hopping on. I decided to play with the Hot Foil System live last night and it went better than I expected. This new system is so much fun to play with. If you’d like to watch the replay and stamp along, the measurements are on the bottom of this post along with the link to my video. Here’s my card for today.
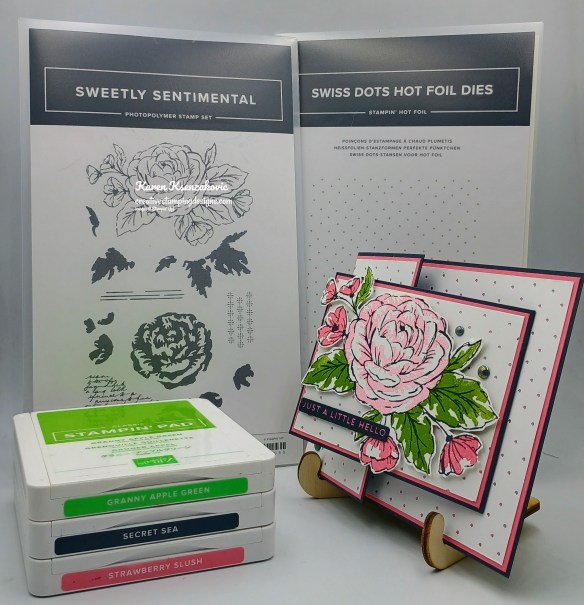
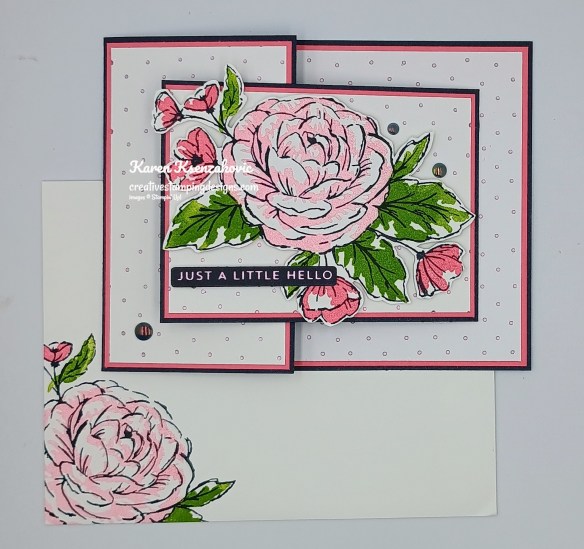
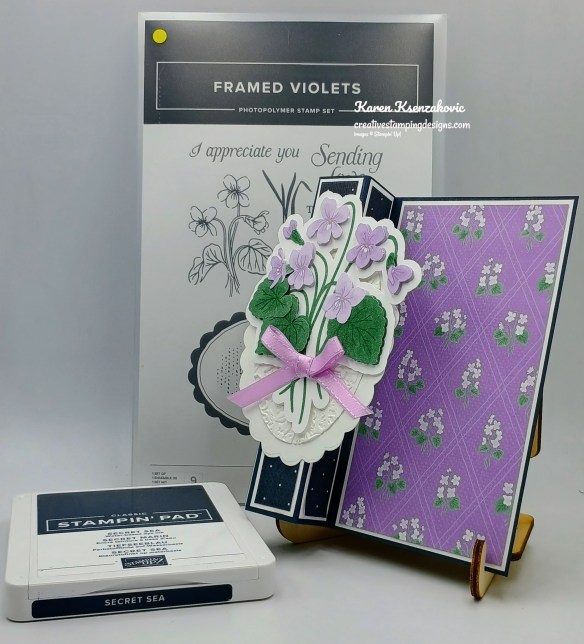
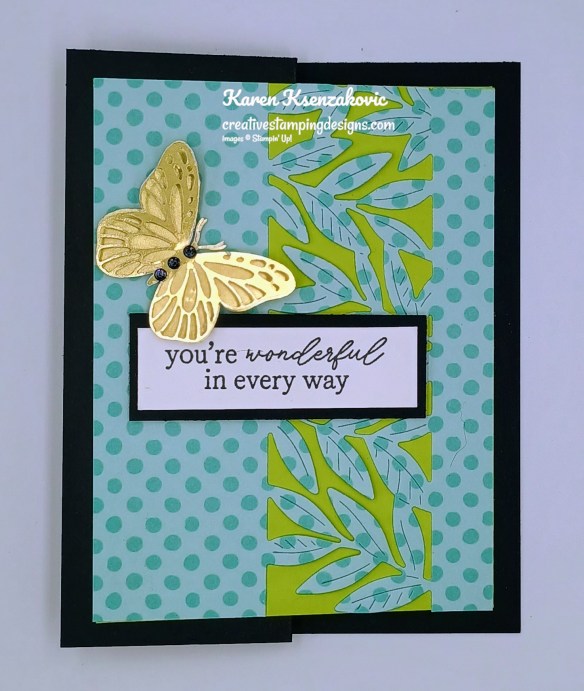
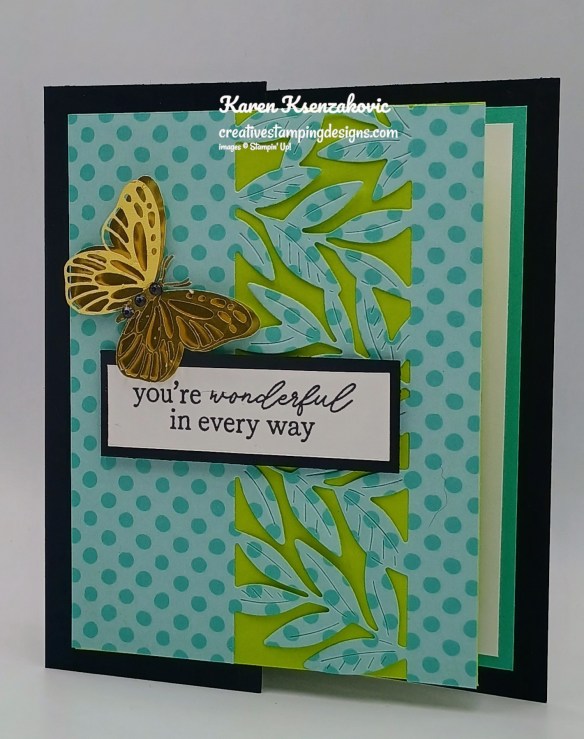
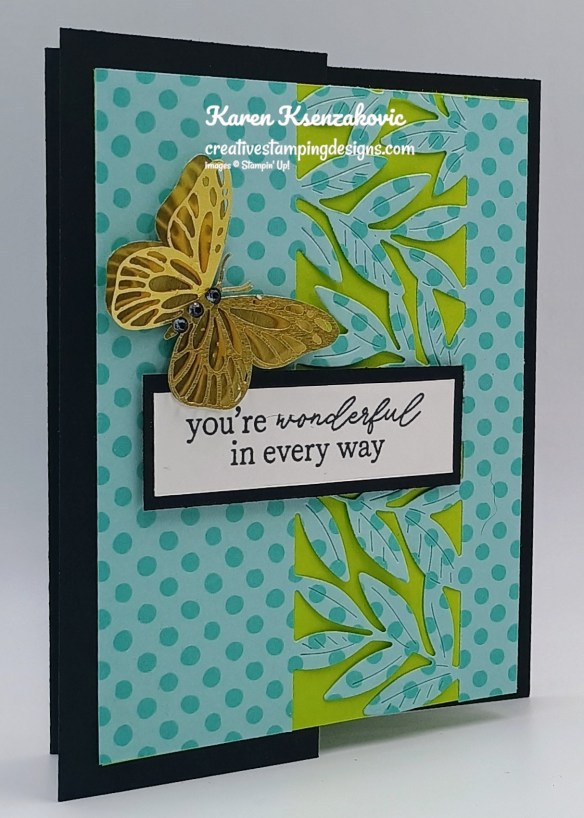
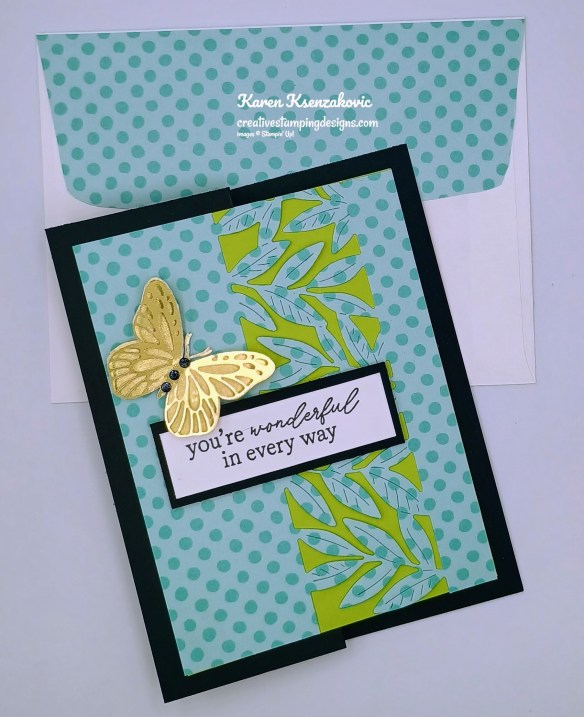
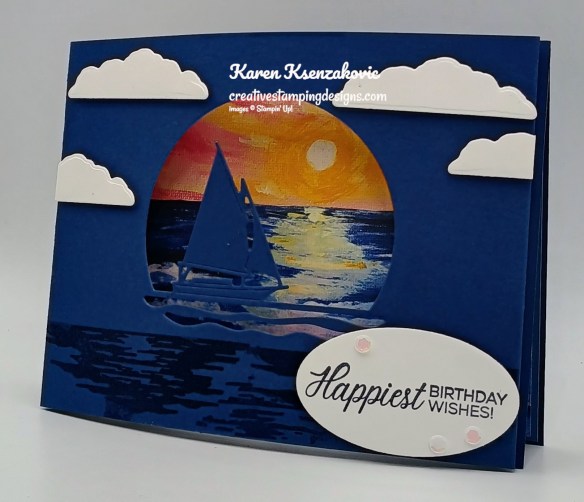
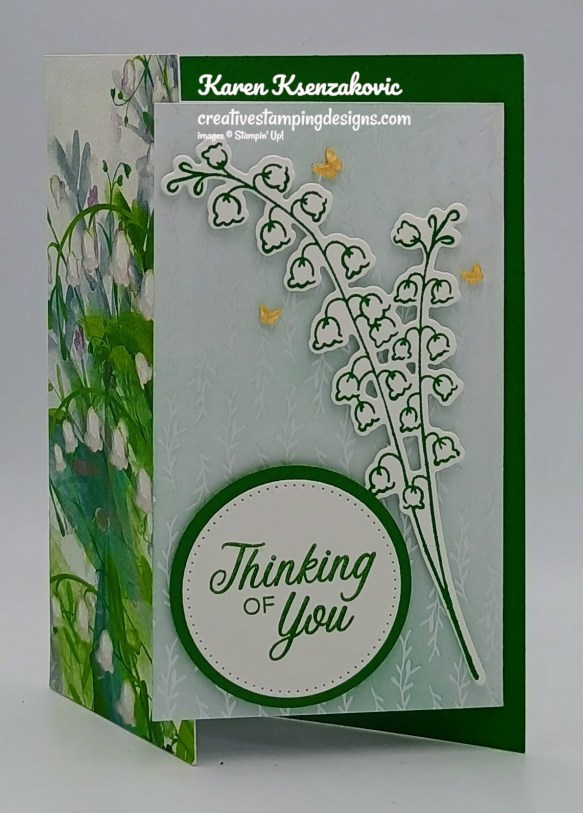
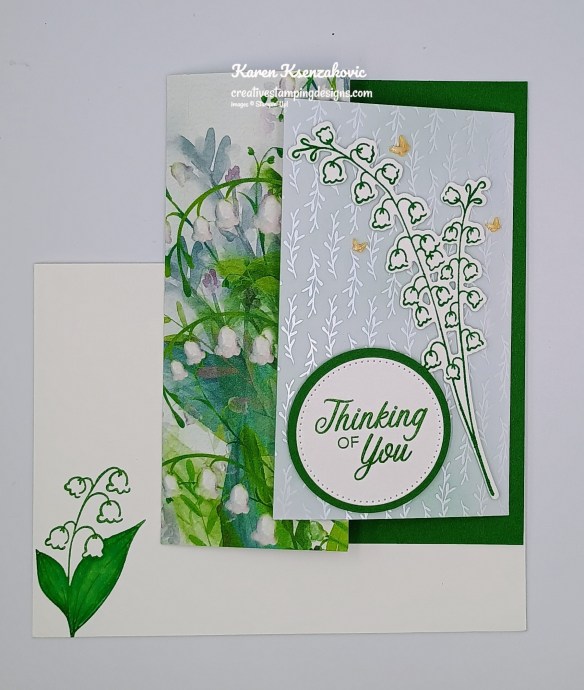
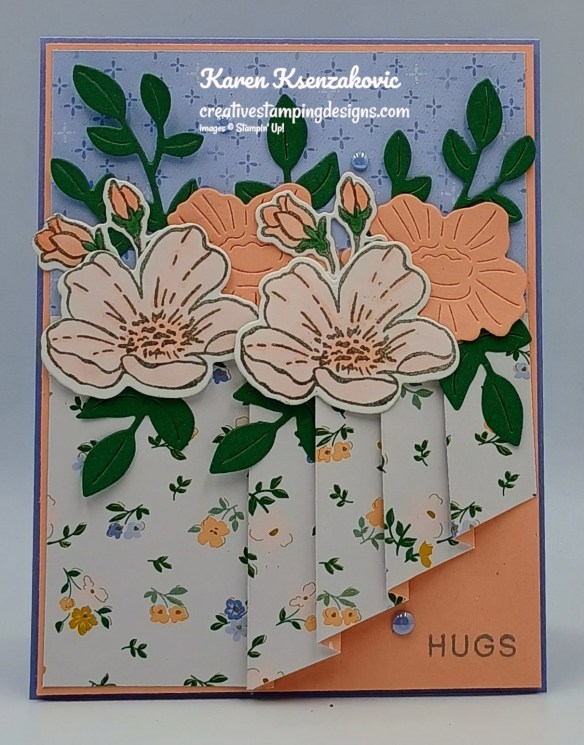
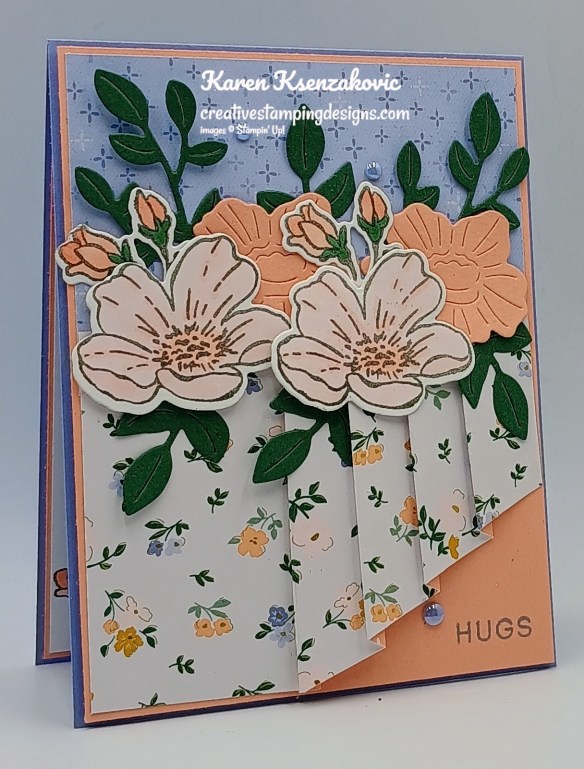
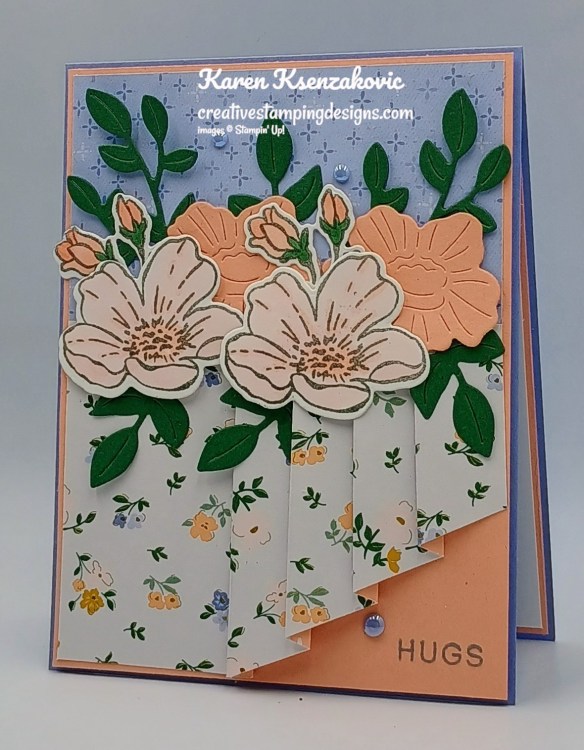
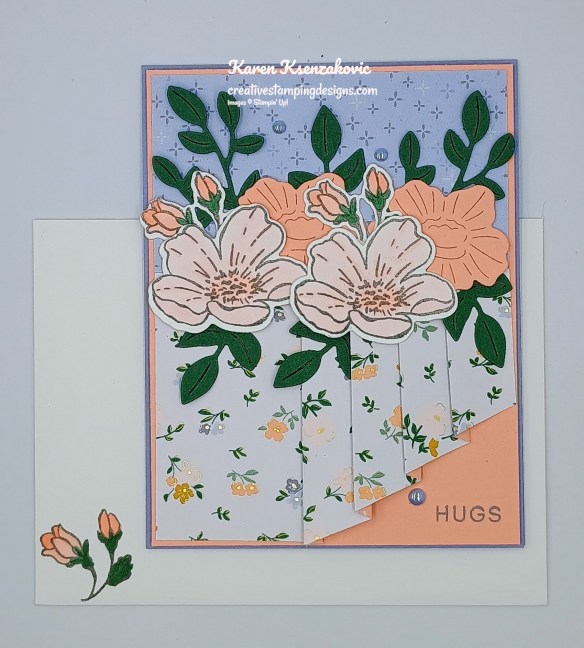
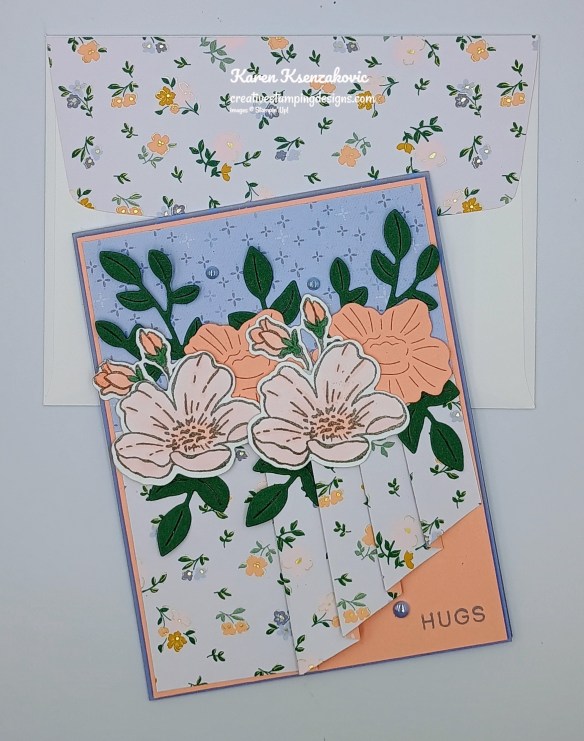
I used the Stampin’ Up! Sweetly Sentimental Bundle and Swiss Dot Hot Foil Dies for my card today.

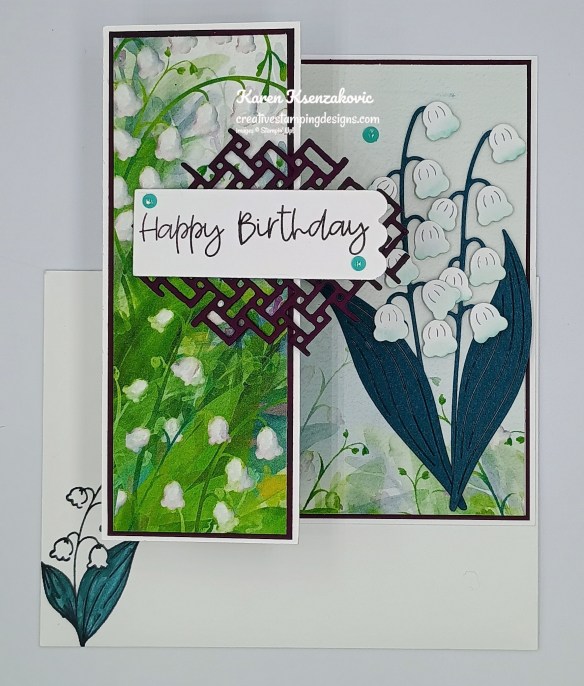
Using the Hot Foil System with Light Pink Foil and the Swiss Dot Die, foil 3 panels of Basic White. Adhere the foiled panels to Strawberry Slush mats.
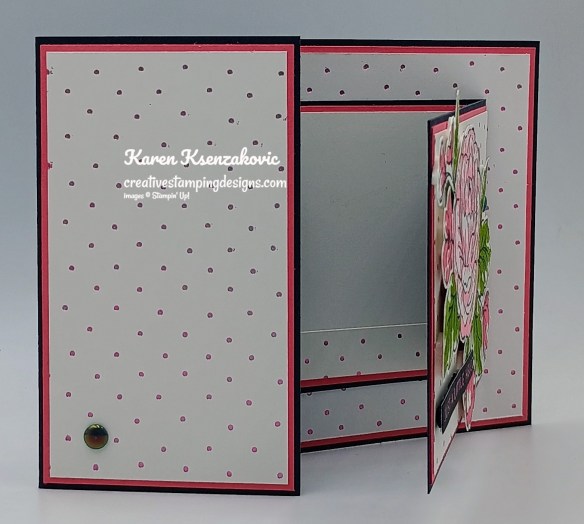
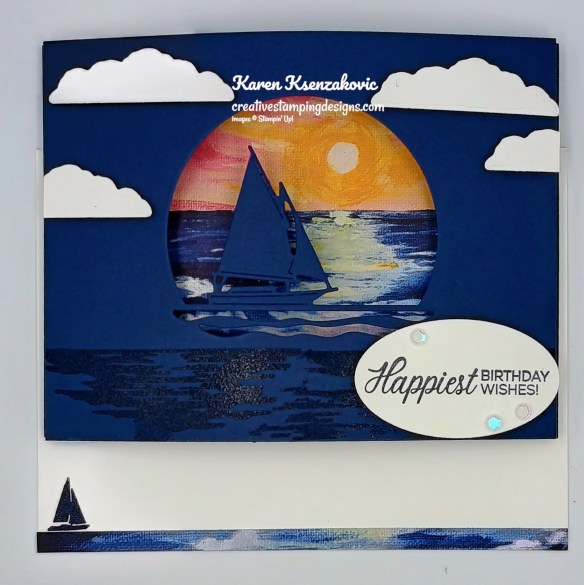
Adhere one of the layered panels to the left side of the Secret Sea card front. Adhere the larger layered panel to the back of the Secret Sea card base.
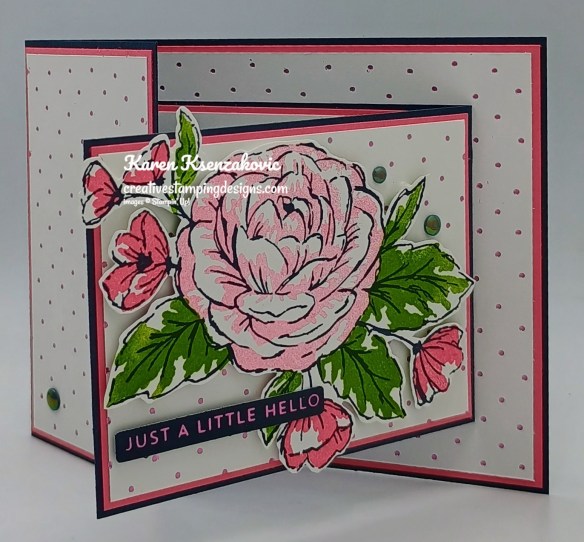
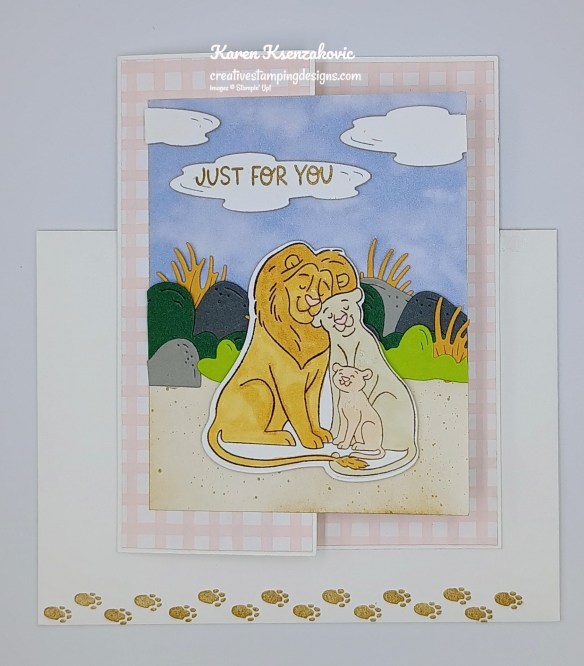
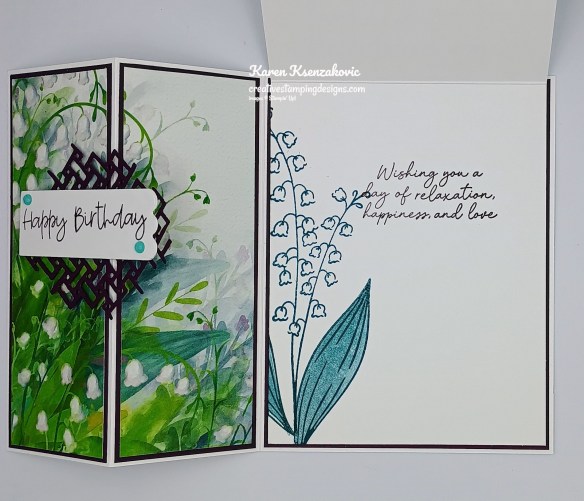
Adhere the last layered panel to the front of the small Secret Sea card front. On a panel of Basic White, stamp the large, detailed flower image from the Sweetly Sentimental stamp set in Secret Sea Ink. Stamp the large solid flower image from the Sweetly Sentimental stamp set in Strawberry Slush Ink, stamping off once on scrap paper, over the detailed image. Stamp the smaller solid flower images from the Sweetly Sentimental stamp set in Strawberry Slush Ink over the detailed image. Stamp the solid leaf images from the Sweetly Sentimental stamp set in Granny Apple Green Ink over the detailed images. Fussy cut the flower using Detail Scissors. Adhere the flower to the front of the small card base with Stampin’ Dimensionals. Hot Foil the sentiments from the Sweetly Sentimental Hot Foil Dies with the Light Pink Foil on a panel of Secret Sea Two-Tone cardstock. Cut the sentiments out using the Sweetly Sentimental Dies. Adhere the sentiment to the card front with Stampin’ Dimensionals. Add a few 2025-2027 In-Color Flat Pearls to the card front.
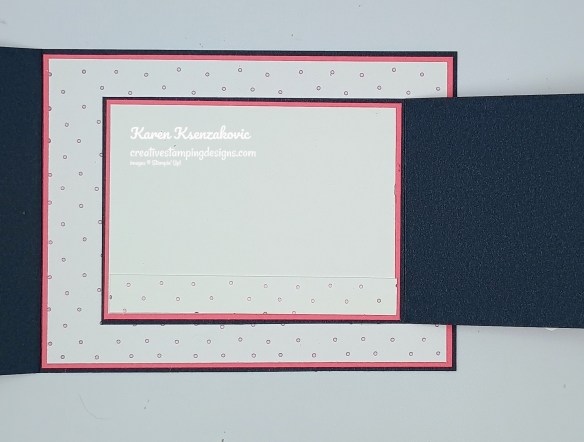
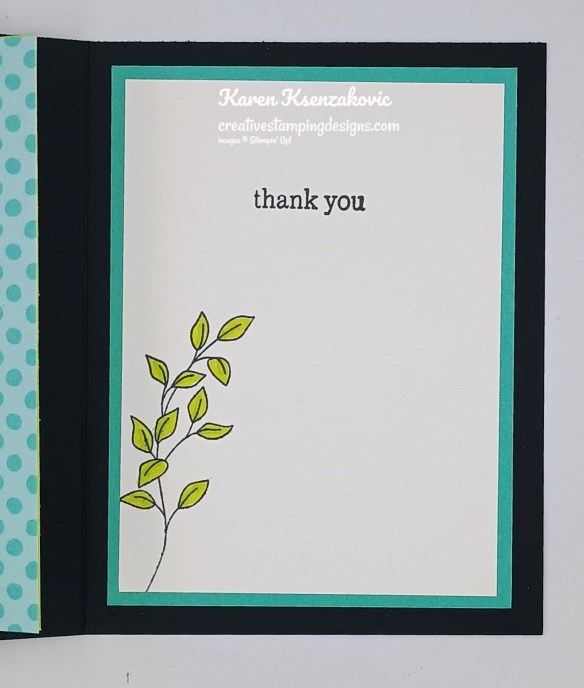
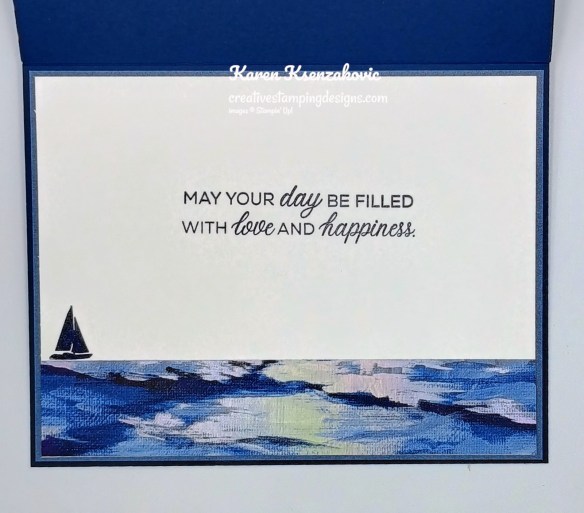
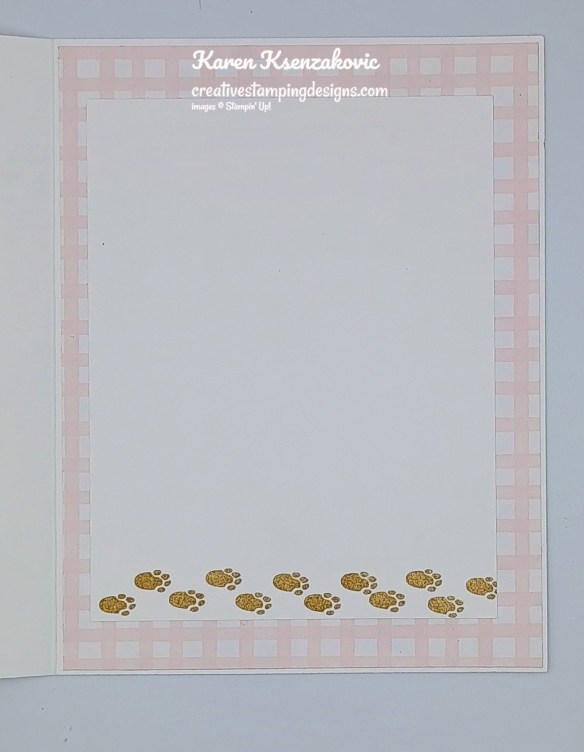
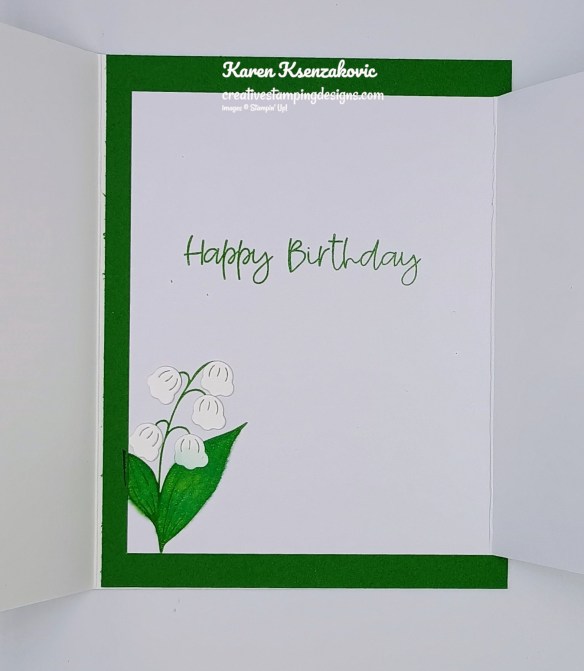
Adhere a strip of the Hot Foiled Swiss Dot Basic White panel to a Basic White panel. Adhere the Basic White panel to a Strawberry Slush mat then to the inside of the small Secret Sea card base.
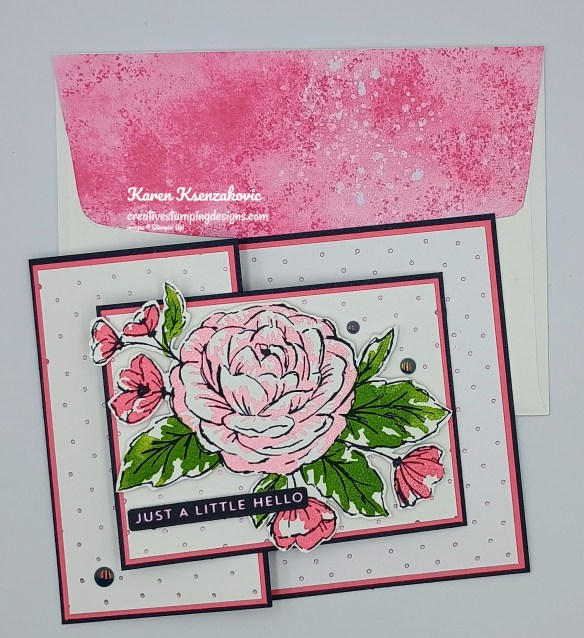
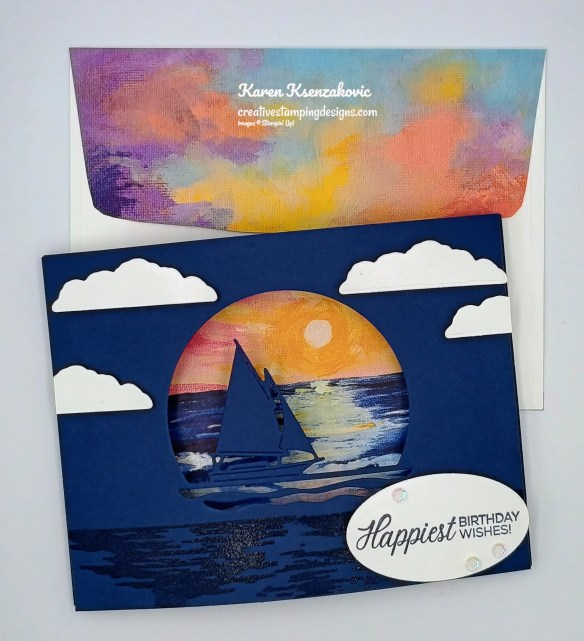
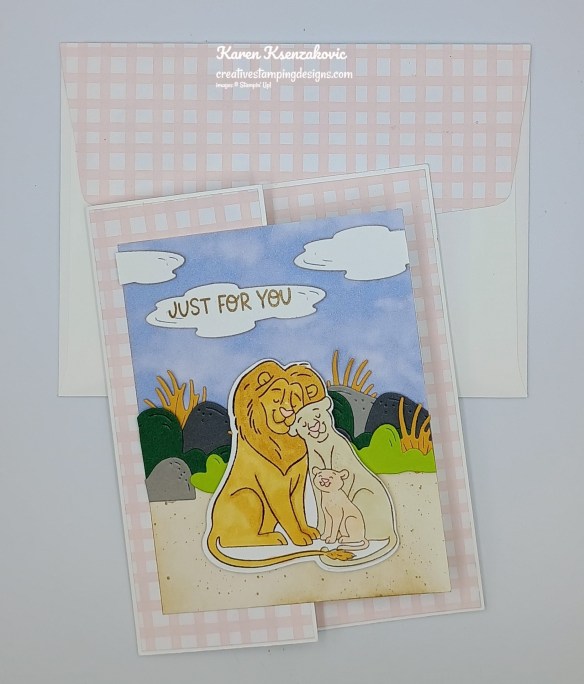
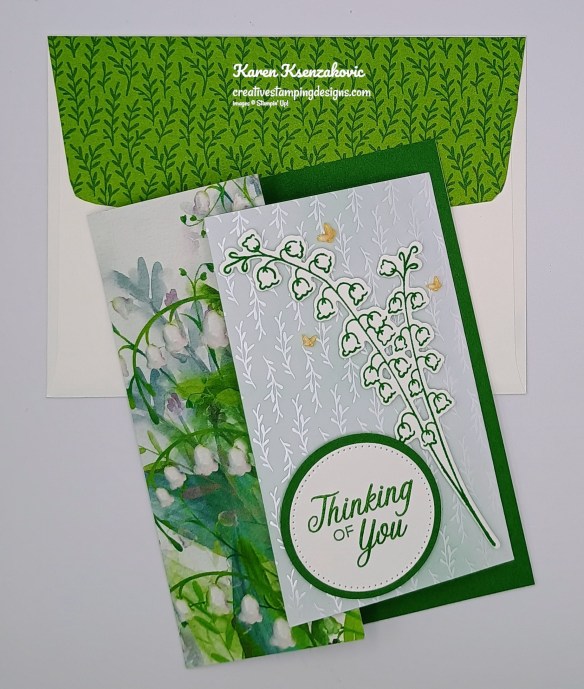
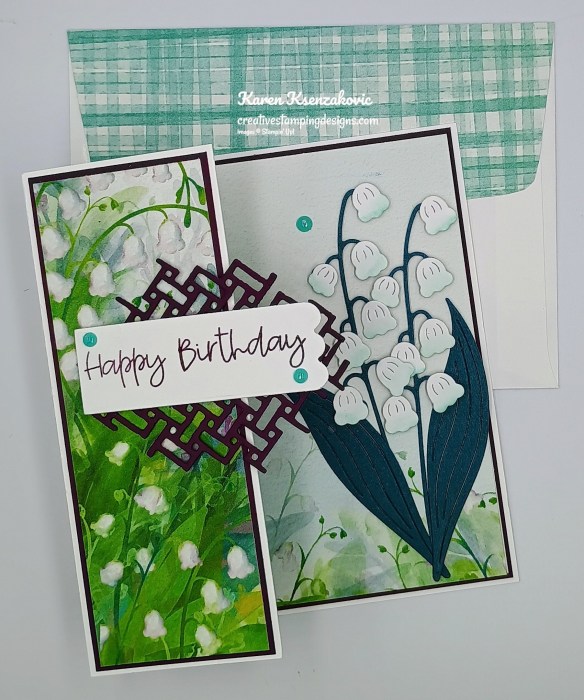
Decorate a Basic White Medium Envelope to finish your card. Stamp the large rose image from the Sweetly Sentimental stamp set in Secret Sea Ink on the envelope front. Stamp the large fill in rose image in Strawberry Slush, stamping off once on scrap paper, over the outlined image. Stamp the other solid flower image in Strawberry Slush and the leaves in Granny Apple Green Inks. Adhere a panel of 2025-2027 In-Color DSP to the envelope flap.
Thank you for stopping by my blog today. I hope you liked my card and will give it a try. You can watch my video on my YouTube Channel Here.
If you watch this on my YouTube channel, please remember to subscribe so that you will get notified when a new video goes live. Thank you to those that have subscribed already. Happy Stamping!!
*********************************************************************************************************
If you need any stamping supplies, I’d love to be your Demonstrator. Just click HERE to go directly to my online store or drop me an email if you have any questions.
*********************************************************************************************************
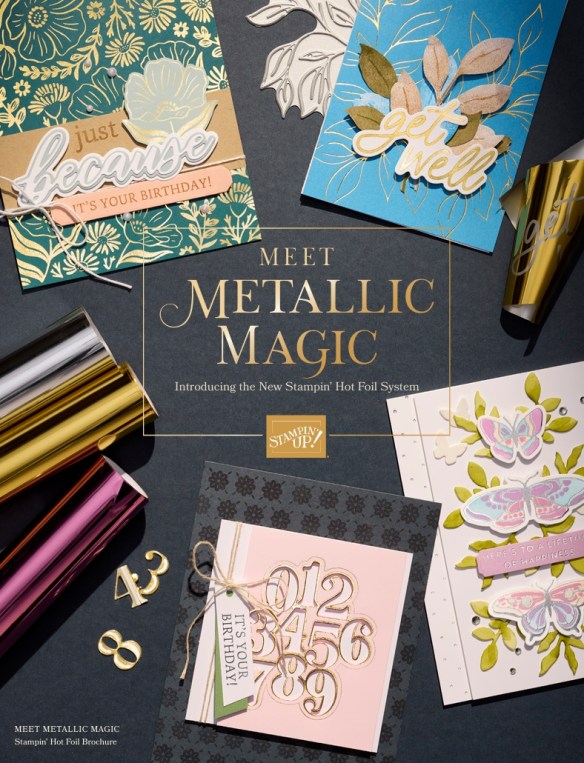
Introducing the hottest items in crafting—the new Stampin’ Hot Foil System!!

The metallic magic starts with Stampin’ Hot Foil Rolls, specially made Hot Foil dies, and the Stampin’ Hot Foil System that works with the Stampin’ Cut & Emboss Machine (sold separately). The heat of the platform transfers the foil using hot foil dies designed specifically for this system, allowing you to add dazzling details to paper and more.
WHAT IS INCLUDED WHEN YOU PURCHASE THE STAMPIN’ HOT FOIL SYSTEM?
This is everything included in the Stampin’ Hot Foil System & Craft Class:
- Metallic Magic Craft Class ($30 value—limited time only!)
- Stampin’ Hot Foil platform
- Stampin’ Hot Foil Shim & Spacer
- Stampin’ Hot Foil Magnetic Pick-Up Tool
- Silicone platform station
- Silicone cooling pad
- Power cord
- Instructions on how to use the system

The Stampin’ Cut & Emboss Machine, Stampin’ Hot Foil Rolls (the foil itself), and Hot Foil dies and bundles are sold separately.
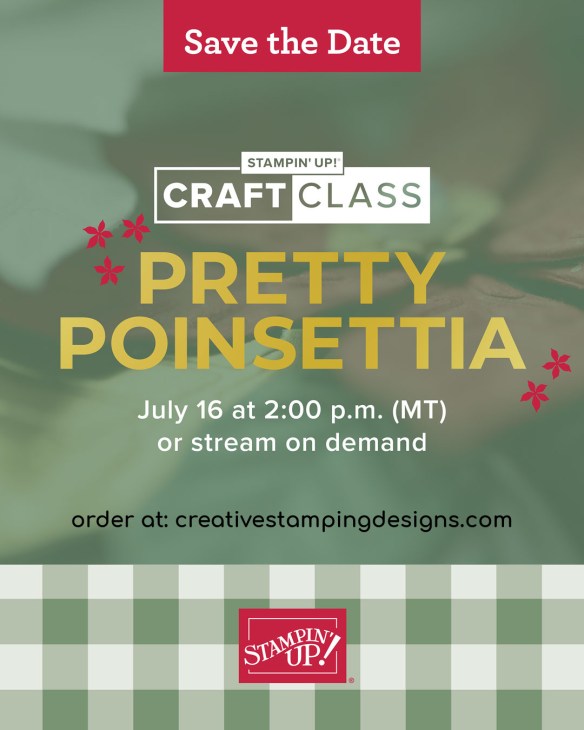
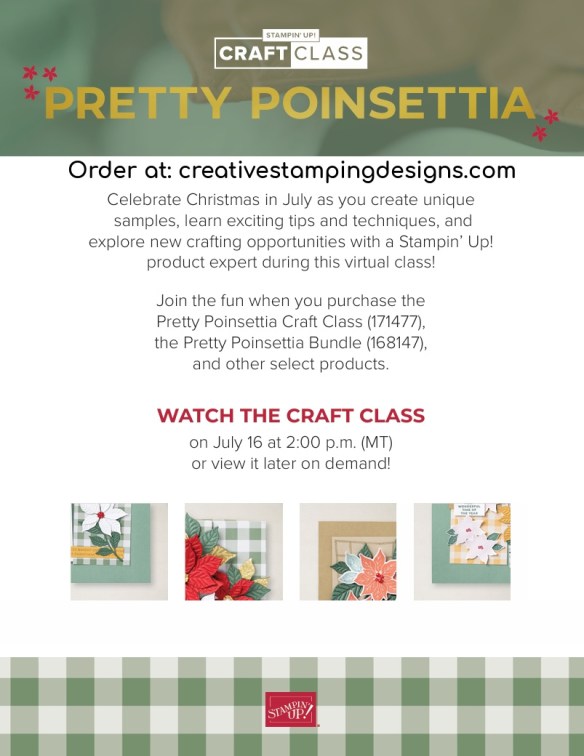
CRAFT CLASS
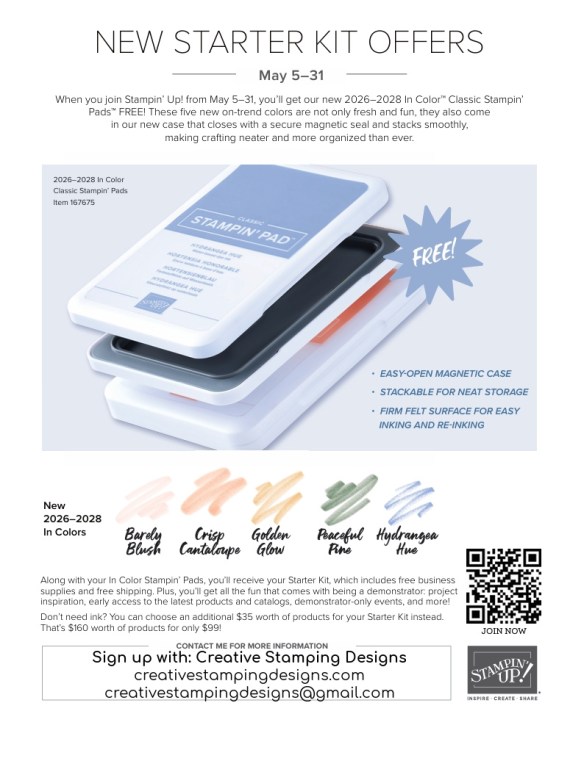
As an added bonus, everyone who purchases this system before January 4, 2027, will automatically be able to access the upcoming Metallic Magic Craft Class, a technique-centric virtual class. Attendees will make unique projects and learn crafting tips intended to elevate their hot foil crafting experience. This class is a special limited-time offer exclusive to this system and is an amazing tool when it comes to increasing skills, learning techniques, and making the most of this new product line.
You can see more details about the system, find the bundles and foil that will be available to order beginning on Friday, July 10 in this brochure:
A few notes about the new system:
- Hot Foil results are best with either White Willow or Two-Tone Cardstock. Smoother card stocks like the Two-Tone Cardstock and White Willow will achieve the best results when using the system, but you can use the regular card stocks too.
- The Hot Foil System, foil rolls and new hot foil dies and bundles will be available Friday, July 10, 2026 in the online Stampin’ Up! store.
- A FREE Hot Foil Online Class from Stampin’ Up! is included with your hot foil system purchase (a $30 value!), do not add the class separately to your cart (you’ll be charged for it if you do!). You’ll automatically get a link to it after you purchase the Stampin’ Hot Foil System.
- The Stampin’ Hot Foil system is $160. Dies & foil are sold separately.
- Stampin’ Up! has let us know that if the Stampin’ Hot Foil system goes on backorder, it may take longer than normal to restock. So if you would like to order the system, order sooner rather than later!
- IMPORTANT NOTE: Cutting dies are not designed to be used with hot foiling. You cannot die cut using foiling dies. Doing so risks damaging the dies and the system.
I’m so excited for you all to be able to order this new system! Head over to my Stampin’ Up! online store beginning July 10 to see and order the new system!
*********************************************************************************************************
New Join Experience
If you’ve been thinking about joining the Stampin’ Up! community, wait until July 10th and you can use your $125 coupon code to order the Hot Foil system!!

Stampin’ Up! is introducing a simplified join process designed to make joining faster and easier than ever before! The new process will create a more streamlined experience when you join!
As part of the new join process, all first-time demonstrators will receive a surprise Welcome Box—a gesture of appreciation and a warm welcome into the global Stampin’ Up! creative community!
How the New Process Works
Step 1: Join
New demonstrators will:
- choose a team leader.
- accept required agreements.
- enter a few personal details.
- pay the $100 join fee.
- click submit.
Step 2: Shop
Once their information has been reviewed and approved (usually very quickly), their Welcome Box ships, and the new demonstrator receives an email with:
- their demonstrator ID.
- a coupon code to begin shopping.
About the Coupon Code
- Valued at $125.
- Coupon code can be applied to any demonstrator order.
- Order CAN exceed the coupon code value (I know that many people wanted the option to be able to add more than $125 to their Starter Kit!).
- Any amount above the coupon code value:
- receives the demonstrator discount.
- counts toward the quarterly sales minimum.
- earns Stampin’ Rewards if it meets the qualifying purchase amount (as long as you’ve opted into the Stampin’ Rewards program).
Additional perk for new demonstrators
- New demonstrators may add eight free catalogs to any order!

Let me know if you have any questions about the new joining process. I’m so happy that you’ll now have the option to go over the $125 amount AND that it will automatically count toward your sales!
Why not start thinking about joining the Stampin’ Up! community. I’d love to have you on my team and July is the perfect time to sign up. Contact me at: creativestampingdesigns@gmail.com and I’d be more than happy to answer any questions you might have. We’re a very relaxed team that loves to create and share.
*********************************************************************************************************
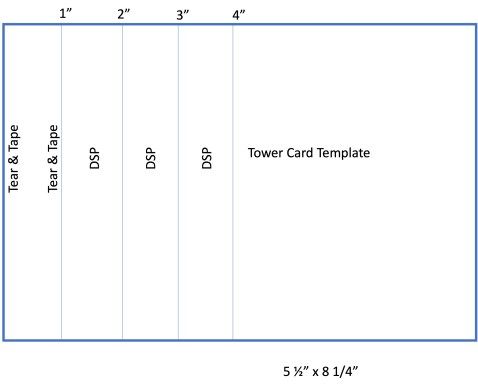
Card stock cuts for this project:
- Basic White Cardstock (2) – 2 3/4″ x 3 3/4″ (small card front & inner liner), 2 1/4″ x 4″(card front), 4″ x 5 1/4″ (back panel), 3 3/4″ x 5″(artwork)
- Secret Sea Cardstock 4 1/4″ x 8″ (card base scored & folded at 5 1/2″), 3″ x 8″ (small card base scored & folded at 4″)
- Secret Sea Two-Tone Cardstock 3 3/4″ x 5″ (sentiments)
- Strawberry Slush Cardstock 2 3/8″ x 4 1/8″ (card front mat), 4 1/8″ x 5 3/8″(back liner mat), (2) – 2 7/8″ x 3 7/8″(small card front & inner liner mats)
- 2025-2027 In-Color 6 x 6 Designer Series Paper 2 1/4″ x 6″(envelope)
*********************************************************************************************************
Product List
![Sweetly Sentimental Bundle (English) [ 170053 ]](https://assets1.tamsnetwork.com/images/EC042017NF/170053s.jpg "Sweetly Sentimental Bundle (English) [ 170053 ]")
![Sweetly Sentimental Photopolymer Stamp Set [ 170050 ]](https://assets1.tamsnetwork.com/images/EC042017NF/170050s.jpg "Sweetly Sentimental Photopolymer Stamp Set [ 170050 ]")
![Sweetly Sentimental Hot Foil Dies (English) [ 170052 ]](https://assets1.tamsnetwork.com/images/EC042017NF/170052s.jpg "Sweetly Sentimental Hot Foil Dies (English) [ 170052 ]")
![Basic White 8 1/2" X 11" Cardstock [ 166780 ]](https://assets1.tamsnetwork.com/images/EC042017NF/166780s.jpg "Basic White 8 1/2\" X 11\" Cardstock [ 166780 ]")
![Secret Sea 8 1/2" X 11" Cardstock [ 165624 ]](https://assets1.tamsnetwork.com/images/EC042017NF/165624s.jpg "Secret Sea 8 1/2\" X 11\" Cardstock [ 165624 ]")
![Strawberry Slush 8 1/2" X 11" Cardstock [ 165625 ]](https://assets1.tamsnetwork.com/images/EC042017NF/165625s.jpg "Strawberry Slush 8 1/2\" X 11\" Cardstock [ 165625 ]")
![Secret Sea 12" X 12" (30.5 X 30.5 Cm) Two Tone Cardstock [ 166709 ]](https://assets1.tamsnetwork.com/images/EC042017NF/166709s.jpg "Secret Sea 12\" X 12\" (30.5 X 30.5 Cm) Two Tone Cardstock [ 166709 ]")
![2025–2027 In Color™ 6" X 6" (15.2 X 15.2 Cm) Designer Series Paper [ 165300 ]](https://assets1.tamsnetwork.com/images/EC042017NF/165300s.jpg "2025–2027 In Color™ 6\" X 6\" (15.2 X 15.2 Cm) Designer Series Paper [ 165300 ]")
![Granny Apple Green Stampin' Pad [ 147095 ]](https://assets1.tamsnetwork.com/images/EC042017NF/147095s.jpg "Granny Apple Green Stampin' Pad [ 147095 ]")
![Secret Sea Classic Stampin' Pad [ 165285 ]](https://assets1.tamsnetwork.com/images/EC042017NF/165285s.jpg "Secret Sea Classic Stampin' Pad [ 165285 ]")
![Strawberry Slush Classic Stampin' Pad [ 165286 ]](https://assets1.tamsnetwork.com/images/EC042017NF/165286s.jpg "Strawberry Slush Classic Stampin' Pad [ 165286 ]")
![Stampin' Hot Foil System Na & Craft Class [ 170009 ]](https://assets1.tamsnetwork.com/images/EC042017NF/170009s.jpg "Stampin' Hot Foil System Na & Craft Class [ 170009 ]")
![Swiss Dots Hot Foil Die [ 170075 ]](https://assets1.tamsnetwork.com/images/EC042017NF/170075s.jpg "Swiss Dots Hot Foil Die [ 170075 ]")
![Light Pink Stampin' Hot Foil Rolls [ 170068 ]](https://assets1.tamsnetwork.com/images/EC042017NF/170068s.jpg "Light Pink Stampin' Hot Foil Rolls [ 170068 ]")
![Silver Stampin' Hot Foil Rolls [ 170067 ]](https://assets1.tamsnetwork.com/images/EC042017NF/170067s.jpg "Silver Stampin' Hot Foil Rolls [ 170067 ]")
![2025–2027 In Color™ Flat Pearls [ 165192 ]](https://assets1.tamsnetwork.com/images/EC042017NF/165192s.jpg "2025–2027 In Color™ Flat Pearls [ 165192 ]")
![Basic White Medium Envelopes [ 159236 ]](https://assets1.tamsnetwork.com/images/EC042017NF/159236s.jpg "Basic White Medium Envelopes [ 159236 ]")
![Stampin' Cut & Emboss Machine [ 149653 ]](https://assets1.tamsnetwork.com/images/EC042017NF/149653s.jpg "Stampin' Cut & Emboss Machine [ 149653 ]")
![Mini Glue Dots [ 103683 ]](https://assets1.tamsnetwork.com/images/EC042017NF/103683s.jpg "Mini Glue Dots [ 103683 ]")
![Multipurpose Liquid Glue [ 110755 ]](https://assets1.tamsnetwork.com/images/EC042017NF/110755s.jpg "Multipurpose Liquid Glue [ 110755 ]")
![Stampin' Dimensionals [ 104430 ]](https://assets1.tamsnetwork.com/images/EC042017NF/104430s.jpg "Stampin' Dimensionals [ 104430 ]")
![Stampin' Seal [ 152813 ]](https://assets1.tamsnetwork.com/images/EC042017NF/152813s.jpg "Stampin' Seal [ 152813 ]")
![Paper Trimmer [ 152392 ]](https://assets1.tamsnetwork.com/images/EC042017NF/152392s.jpg "Paper Trimmer [ 152392 ]")
![Bone Folder [ 102300 ]](https://assets1.tamsnetwork.com/images/EC042017NF/102300s.jpg "Bone Folder [ 102300 ]")
![Detail Scissors [ 170902 ]](https://assets1.tamsnetwork.com/images/EC042017NF/170902s.jpg "Detail Scissors [ 170902 ]")
![Take Your Pick [ 144107 ]](https://assets1.tamsnetwork.com/images/EC042017NF/144107s.jpg "Take Your Pick [ 144107 ]")


![Fun For Fall Bundle (English) [ 168139 ]](https://assets1.tamsnetwork.com/images/EC042017NF/168139s.jpg "Fun For Fall Bundle (English) [ 168139 ]")
![Fun For Fall Photopolymer Stamp Set (English) [ 168136 ]](https://assets1.tamsnetwork.com/images/EC042017NF/168136s.jpg "Fun For Fall Photopolymer Stamp Set (English) [ 168136 ]")
![Fun For Fall Dies [ 168138 ]](https://assets1.tamsnetwork.com/images/EC042017NF/168138s.jpg "Fun For Fall Dies [ 168138 ]")
![Darling Duckling 8 1/2" X 11" Cardstock [ 165622 ]](https://assets1.tamsnetwork.com/images/EC042017NF/165622s.jpg "Darling Duckling 8 1/2\" X 11\" Cardstock [ 165622 ]")
![Early Espresso 8-1/2" X 11" Cardstock [ 119686 ]](https://assets1.tamsnetwork.com/images/EC042017NF/119686s.jpg "Early Espresso 8-1/2\" X 11\" Cardstock [ 119686 ]")
![Everyday Essentials Mix & Match 12" X 12" (30.5 X 30.5 Cm) Designer Series Paper [ 167702 ]](https://assets1.tamsnetwork.com/images/EC042017NF/167702s.jpg "Everyday Essentials Mix & Match 12\" X 12\" (30.5 X 30.5 Cm) Designer Series Paper [ 167702 ]")
![Early Espresso Classic Stampin' Pad [ 147114 ]](https://assets1.tamsnetwork.com/images/EC042017NF/147114s.jpg "Early Espresso Classic Stampin' Pad [ 147114 ]")
![Old Olive Classic Stampin' Pad [ 147090 ]](https://assets1.tamsnetwork.com/images/EC042017NF/147090s.jpg "Old Olive Classic Stampin' Pad [ 147090 ]")
![Uninked Stampin’ Craft Pad & Whisper White Refill [ 147277 ]](https://assets1.tamsnetwork.com/images/EC042017NF/147277s.jpg "Uninked Stampin’ Craft Pad & Whisper White Refill [ 147277 ]")
![Bronze & Ivory Stampin' Blends Combo Pack [ 154922 ]](https://assets1.tamsnetwork.com/images/EC042017NF/154922s.jpg "Bronze & Ivory Stampin' Blends Combo Pack [ 154922 ]")
![Crumb Cake Stampin' Blends Combo Pack [ 154882 ]](https://assets1.tamsnetwork.com/images/EC042017NF/154882s.jpg "Crumb Cake Stampin' Blends Combo Pack [ 154882 ]")
![Darling Duckling Stampin’ Blends Combo Pack [ 165288 ]](https://assets1.tamsnetwork.com/images/EC042017NF/165288s.jpg "Darling Duckling Stampin’ Blends Combo Pack [ 165288 ]")
![Golden Glow Stampin’ Blends Combo Pack [ 167682 ]](https://assets1.tamsnetwork.com/images/EC042017NF/167682s.jpg "Golden Glow Stampin’ Blends Combo Pack [ 167682 ]")
![Misty Moonlight Stampin' Blends Combo Pack [ 153108 ]](https://assets1.tamsnetwork.com/images/EC042017NF/153108s.jpg "Misty Moonlight Stampin' Blends Combo Pack [ 153108 ]")
![Old Olive Stampin' Blends Combo Pack [ 154892 ]](https://assets1.tamsnetwork.com/images/EC042017NF/154892s.jpg "Old Olive Stampin' Blends Combo Pack [ 154892 ]")
![Pecan Pie Stampin’ Blends Combo Pack [ 161674 ]](https://assets1.tamsnetwork.com/images/EC042017NF/161674s.jpg "Pecan Pie Stampin’ Blends Combo Pack [ 161674 ]")
![Poppy Parade Stampin' Blends Combo Pack [ 154958 ]](https://assets1.tamsnetwork.com/images/EC042017NF/154958s.jpg "Poppy Parade Stampin' Blends Combo Pack [ 154958 ]")
![Smoky Slate Stampin' Blends Combo Pack [ 154904 ]](https://assets1.tamsnetwork.com/images/EC042017NF/154904s.jpg "Smoky Slate Stampin' Blends Combo Pack [ 154904 ]")
![Sunflower 3 D Embossing Folder [ 166145 ]](https://assets1.tamsnetwork.com/images/EC042017NF/166145s.jpg "Sunflower 3 D Embossing Folder [ 166145 ]")
![Earthy Matte Dots [ 167213 ]](https://assets1.tamsnetwork.com/images/EC042017NF/167213s.jpg "Earthy Matte Dots [ 167213 ]")


![Framed Violets Bundle (English) [ 168194 ]](https://assets1.tamsnetwork.com/images/EC042017NF/168194s.jpg "Framed Violets Bundle (English) [ 168194 ]")
![Framed Violets Photopolymer Stamp Set (English) [ 168187 ]](https://assets1.tamsnetwork.com/images/EC042017NF/168187s.jpg "Framed Violets Photopolymer Stamp Set (English) [ 168187 ]")
![Framed Violets Dies [ 168193 ]](https://assets1.tamsnetwork.com/images/EC042017NF/168193s.jpg "Framed Violets Dies [ 168193 ]")
![Highland Heather 8-1/2" X 11" Cardstock [ 146986 ]](https://assets1.tamsnetwork.com/images/EC042017NF/146986s.jpg "Highland Heather 8-1/2\" X 11\" Cardstock [ 146986 ]")
![Violet Dreams 12" X 12" (30.5 X 30.5 Cm) Specialty Designer Series Paper [ 168186 ]](https://assets1.tamsnetwork.com/images/EC042017NF/168186s.jpg "Violet Dreams 12\" X 12\" (30.5 X 30.5 Cm) Specialty Designer Series Paper [ 168186 ]")
![Peaceful Pine Stampin’ Blends Combo Pack [ 167668 ]](https://assets1.tamsnetwork.com/images/EC042017NF/167668s.jpg "Peaceful Pine Stampin’ Blends Combo Pack [ 167668 ]")
![Stone & Vine 3 D Embossing Folder [ 166990 ]](https://assets1.tamsnetwork.com/images/EC042017NF/166990s.jpg "Stone & Vine 3 D Embossing Folder [ 166990 ]")
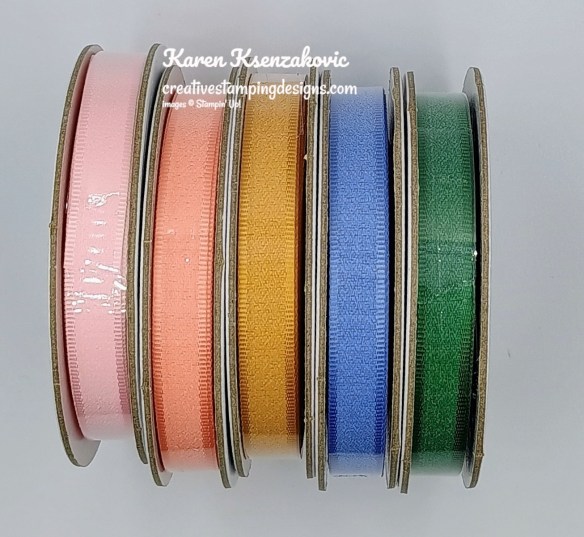
![Fresh Freesia 1/4" (6.4 Mm) Satin Ribbon [ 168199 ]](https://assets1.tamsnetwork.com/images/EC042017NF/168199s.jpg "Fresh Freesia 1/4\" (6.4 Mm) Satin Ribbon [ 168199 ]")


![Botanical Expressions Bundle (English) [ 168153 ]](https://assets1.tamsnetwork.com/images/EC042017NF/168153s.jpg "Botanical Expressions Bundle (English) [ 168153 ]")
![Botanical Expressions Photopolymer Stamp Set (English) [ 168150 ]](https://assets1.tamsnetwork.com/images/EC042017NF/168150s.jpg "Botanical Expressions Photopolymer Stamp Set (English) [ 168150 ]")
![Botanical Expressions Die [ 168152 ]](https://assets1.tamsnetwork.com/images/EC042017NF/168152s.jpg "Botanical Expressions Die [ 168152 ]")
![Framed All Around Photopolymer Stamp Set (English) [ 167221 ]](https://assets1.tamsnetwork.com/images/EC042017NF/167221s.jpg "Framed All Around Photopolymer Stamp Set (English) [ 167221 ]")
![Basic Black 8-1/2" X 11" Cardstock [ 121045 ]](https://assets1.tamsnetwork.com/images/EC042017NF/121045s.jpg "Basic Black 8-1/2\" X 11\" Cardstock [ 121045 ]")
![Coastal Cabana 8-1/2" X 11" Cardstock [ 131297 ]](https://assets1.tamsnetwork.com/images/EC042017NF/131297s.jpg "Coastal Cabana 8-1/2\" X 11\" Cardstock [ 131297 ]")
![Lemon Lime Twist 8-1/2" X 11" Cardstock [ 144245 ]](https://assets1.tamsnetwork.com/images/EC042017NF/144245s.jpg "Lemon Lime Twist 8-1/2\" X 11\" Cardstock [ 144245 ]")
![Brights Painted Patterns 12" X 12" (30.5 X 30.5 Cm) Designer Series Paper [ 167754 ]](https://assets1.tamsnetwork.com/images/EC042017NF/167754s.jpg "Brights Painted Patterns 12\" X 12\" (30.5 X 30.5 Cm) Designer Series Paper [ 167754 ]")
![Basic Black Stampin' Blends Combo Pack [ 154843 ]](https://assets1.tamsnetwork.com/images/EC042017NF/154843s.jpg "Basic Black Stampin' Blends Combo Pack [ 154843 ]")
![Lemon Lime Twist Stampin’ Blends Combo Pack [ 161682 ]](https://assets1.tamsnetwork.com/images/EC042017NF/161682s.jpg "Lemon Lime Twist Stampin’ Blends Combo Pack [ 161682 ]")
![Rhinestone Basic Jewels [ 144220 ]](https://assets1.tamsnetwork.com/images/EC042017NF/144220s.jpg "Rhinestone Basic Jewels [ 144220 ]")

![Phrases & Frames Bundle (English) [ 167587 ]](https://assets1.tamsnetwork.com/images/EC042017NF/167587s.jpg "Phrases & Frames Bundle (English) [ 167587 ]")
![Phrases & Frames Photopolymer Stamp Set (English) [ 167581 ]](https://assets1.tamsnetwork.com/images/EC042017NF/167581s.jpg "Phrases & Frames Photopolymer Stamp Set (English) [ 167581 ]")
![Phrases & Frames Dies [ 167586 ]](https://assets1.tamsnetwork.com/images/EC042017NF/167586s.jpg "Phrases & Frames Dies [ 167586 ]")
![Sunset Coast Bundle (English) [ 167781 ]](https://assets1.tamsnetwork.com/images/EC042017NF/167781s.jpg "Sunset Coast Bundle (English) [ 167781 ]")
![Sunset Coast Photopolymer Stamp Set (English) [ 167775 ]](https://assets1.tamsnetwork.com/images/EC042017NF/167775s.jpg "Sunset Coast Photopolymer Stamp Set (English) [ 167775 ]")
![Sunset Coast Dies [ 167780 ]](https://assets1.tamsnetwork.com/images/EC042017NF/167780s.jpg "Sunset Coast Dies [ 167780 ]")
![Night Of Navy 8-1/2" X 11" Cardstock [ 100867 ]](https://assets1.tamsnetwork.com/images/EC042017NF/100867s.jpg "Night Of Navy 8-1/2\" X 11\" Cardstock [ 100867 ]")
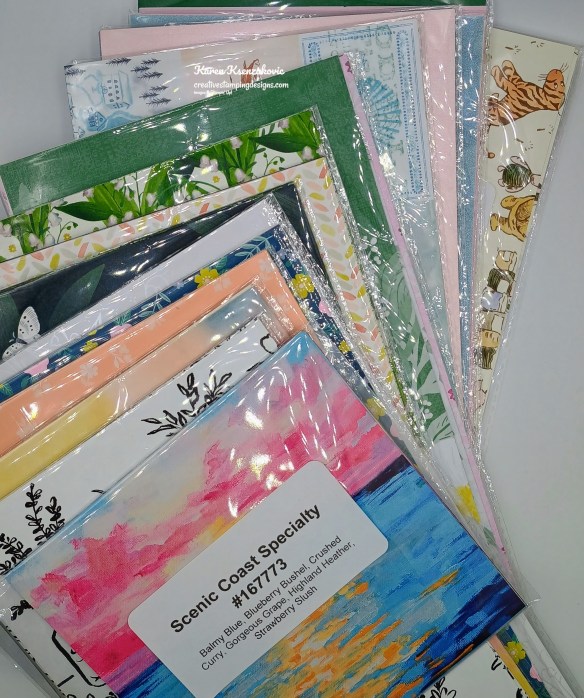
![Scenic Coast 6" X 6" (15.2 X 15.2 Cm) Specialty Designer Series Paper [ 167773 ]](https://assets1.tamsnetwork.com/images/EC042017NF/167773s.jpg "Scenic Coast 6\" X 6\" (15.2 X 15.2 Cm) Specialty Designer Series Paper [ 167773 ]")
![Night Of Navy 12" X 12" (30.5 X 30.5 Cm) Two Tone Cardstock [ 166684 ]](https://assets1.tamsnetwork.com/images/EC042017NF/166684s.jpg "Night Of Navy 12\" X 12\" (30.5 X 30.5 Cm) Two Tone Cardstock [ 166684 ]")
![Night Of Navy Classic Stampin' Pad [ 147110 ]](https://assets1.tamsnetwork.com/images/EC042017NF/147110s.jpg "Night Of Navy Classic Stampin' Pad [ 147110 ]")
![Versamark Pad [ 102283 ]](https://assets1.tamsnetwork.com/images/EC042017NF/102283s.jpg "Versamark Pad [ 102283 ]")
![Basics Wow! Embossing Powder [ 165679 ]](https://assets1.tamsnetwork.com/images/EC042017NF/165679s.jpg "Basics Wow! Embossing Powder [ 165679 ]")
![Heat Tool (Us And Canada) [ 129053 ]](https://assets1.tamsnetwork.com/images/EC042017NF/129053s.jpg "Heat Tool (Us And Canada) [ 129053 ]")
![Sunset Sparkle Sequins [ 167785 ]](https://assets1.tamsnetwork.com/images/EC042017NF/167785s.jpg "Sunset Sparkle Sequins [ 167785 ]")

![Crisp Cantaloupe 8 1/2" X 11" Cardstock [ 167693 ]](https://assets1.tamsnetwork.com/images/EC042017NF/167693s.jpg "Crisp Cantaloupe 8 1/2\" X 11\" Cardstock [ 167693 ]")
![Golden Glow 8 1/2" X 11" Cardstock [ 167685 ]](https://assets1.tamsnetwork.com/images/EC042017NF/167685s.jpg "Golden Glow 8 1/2\" X 11\" Cardstock [ 167685 ]")
![Lemon Lolly 8 1/2" X 11" Cardstock [ 161720 ]](https://assets1.tamsnetwork.com/images/EC042017NF/161720s.jpg "Lemon Lolly 8 1/2\" X 11\" Cardstock [ 161720 ]")
![Peaceful Pine 8 1/2" X 11" Cardstock [ 167691 ]](https://assets1.tamsnetwork.com/images/EC042017NF/167691s.jpg "Peaceful Pine 8 1/2\" X 11\" Cardstock [ 167691 ]")
![Pecan Pie 8 1/2" X 11" Cardstock [ 161717 ]](https://assets1.tamsnetwork.com/images/EC042017NF/161717s.jpg "Pecan Pie 8 1/2\" X 11\" Cardstock [ 161717 ]")
![Balmy Blue Classic Stampin' Pad [ 147105 ]](https://assets1.tamsnetwork.com/images/EC042017NF/147105s.jpg "Balmy Blue Classic Stampin' Pad [ 147105 ]")
![Crisp Cantaloupe Classic Stampin Pad [ 167680 ]](https://assets1.tamsnetwork.com/images/EC042017NF/167680s.jpg "Crisp Cantaloupe Classic Stampin Pad [ 167680 ]")
![Golden Glow Classic Stampin' Pad [ 167676 ]](https://assets1.tamsnetwork.com/images/EC042017NF/167676s.jpg "Golden Glow Classic Stampin' Pad [ 167676 ]")
![Barely Blush Stampin’ Blends Combo Pack [ 167667 ]](https://assets1.tamsnetwork.com/images/EC042017NF/167667s.jpg "Barely Blush Stampin’ Blends Combo Pack [ 167667 ]")
![Crisp Cantaloupe Stampin’ Blends Combo Pack [ 167669 ]](https://assets1.tamsnetwork.com/images/EC042017NF/167669s.jpg "Crisp Cantaloupe Stampin’ Blends Combo Pack [ 167669 ]")
![Granny Apple Green Stampin' Blends Combo Pack [ 154885 ]](https://assets1.tamsnetwork.com/images/EC042017NF/154885s.jpg "Granny Apple Green Stampin' Blends Combo Pack [ 154885 ]")
![Hydrangea Hue Stampin’ Blends Combo Pack [ 167666 ]](https://assets1.tamsnetwork.com/images/EC042017NF/167666s.jpg "Hydrangea Hue Stampin’ Blends Combo Pack [ 167666 ]")
![Small Blending Brushes [ 160518 ]](https://assets1.tamsnetwork.com/images/EC042017NF/160518s.jpg "Small Blending Brushes [ 160518 ]")

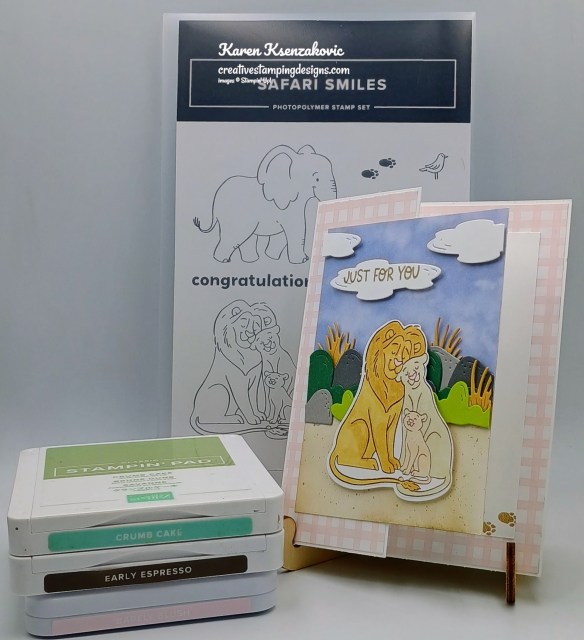
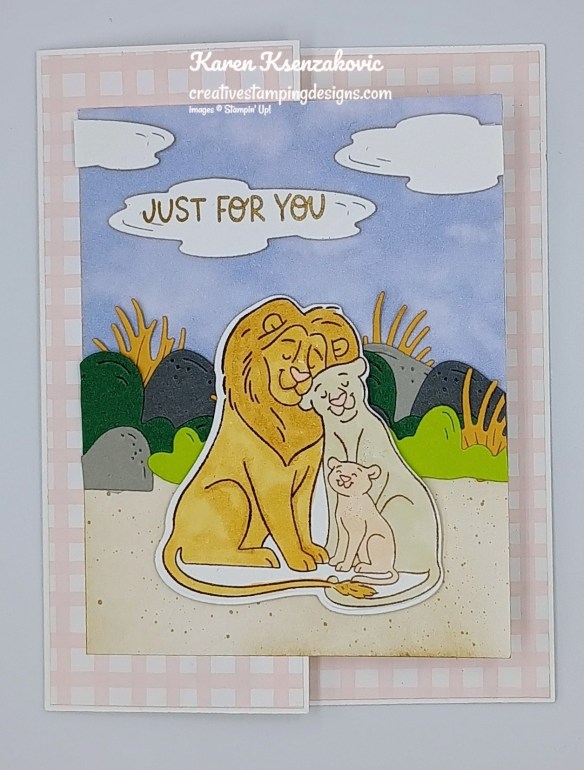
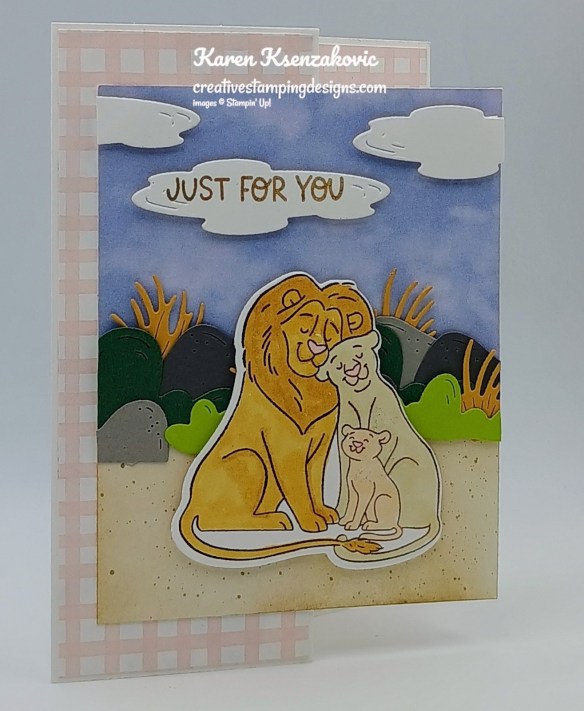
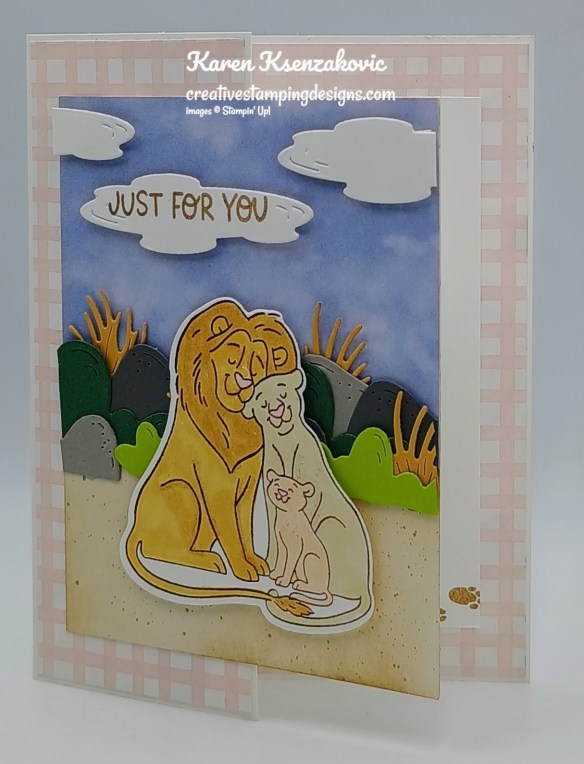
![Safari Smiles Bundle (English) [ 167578 ]](https://assets1.tamsnetwork.com/images/EC042017NF/167578s.jpg "Safari Smiles Bundle (English) [ 167578 ]")
![Safari Smiles Photopolymer Stamp Set (English) [ 167574 ]](https://assets1.tamsnetwork.com/images/EC042017NF/167574s.jpg "Safari Smiles Photopolymer Stamp Set (English) [ 167574 ]")
![Safari Smiles Dies [ 167577 ]](https://assets1.tamsnetwork.com/images/EC042017NF/167577s.jpg "Safari Smiles Dies [ 167577 ]")
![Basic Gray 8-1/2" X 11" Cardstock [ 121044 ]](https://assets1.tamsnetwork.com/images/EC042017NF/121044s.jpg "Basic Gray 8-1/2\" X 11\" Cardstock [ 121044 ]")
![Basic White 8 1/2" X 11" Thick Cardstock [ 159229 ]](https://assets1.tamsnetwork.com/images/EC042017NF/159229s.jpg "Basic White 8 1/2\" X 11\" Thick Cardstock [ 159229 ]")
![Gray Granite 8-1/2" X 11" Cardstock [ 146983 ]](https://assets1.tamsnetwork.com/images/EC042017NF/146983s.jpg "Gray Granite 8-1/2\" X 11\" Cardstock [ 146983 ]")
![Silly Old Bear 12" X 12" (30.5 X 30.5 Cm) Designer Series Paper [ 167616 ]](https://assets1.tamsnetwork.com/images/EC042017NF/167616s.jpg "Silly Old Bear 12\" X 12\" (30.5 X 30.5 Cm) Designer Series Paper [ 167616 ]")
![Crumb Cake Classic Stampin' Pad [ 147116 ]](https://assets1.tamsnetwork.com/images/EC042017NF/147116s.jpg "Crumb Cake Classic Stampin' Pad [ 147116 ]")


![Garden Green 8-1/2" X 11" Cardstock [ 102584 ]](https://assets1.tamsnetwork.com/images/EC042017NF/102584s.jpg "Garden Green 8-1/2\" X 11\" Cardstock [ 102584 ]")
![Garden Green Classic Stampin' Pad [ 147089 ]](https://assets1.tamsnetwork.com/images/EC042017NF/147089s.jpg "Garden Green Classic Stampin' Pad [ 147089 ]")
![Pool Party Classic Stampin' Pad [ 147107 ]](https://assets1.tamsnetwork.com/images/EC042017NF/147107s.jpg "Pool Party Classic Stampin' Pad [ 147107 ]")
![Shaded Spruce Stampin' Blends Combo Pack [ 154903 ]](https://assets1.tamsnetwork.com/images/EC042017NF/154903s.jpg "Shaded Spruce Stampin' Blends Combo Pack [ 154903 ]")
![Stylish Shapes Dies [ 159183 ]](https://assets1.tamsnetwork.com/images/EC042017NF/159183s.jpg "Stylish Shapes Dies [ 159183 ]")
![1 7/8" (4.8 Cm) Circle Punch [ 165259 ]](https://assets1.tamsnetwork.com/images/EC042017NF/165259s.jpg "1 7/8\" (4.8 Cm) Circle Punch [ 165259 ]")


![Boutique Blossoms Bundle [ 167654 ]](https://assets1.tamsnetwork.com/images/EC042017NF/167654s.jpg "Boutique Blossoms Bundle [ 167654 ]")
![Boutique Blossoms Photopolymer Stamp Set [ 167652 ]](https://assets1.tamsnetwork.com/images/EC042017NF/167652s.jpg "Boutique Blossoms Photopolymer Stamp Set [ 167652 ]")
![Boutique Blossoms Dies [ 167653 ]](https://assets1.tamsnetwork.com/images/EC042017NF/167653s.jpg "Boutique Blossoms Dies [ 167653 ]")
![Scalloped Blooms Photopolymer Stamp Set (English) [ 167639 ]](https://assets1.tamsnetwork.com/images/EC042017NF/167639s.jpg "Scalloped Blooms Photopolymer Stamp Set (English) [ 167639 ]")
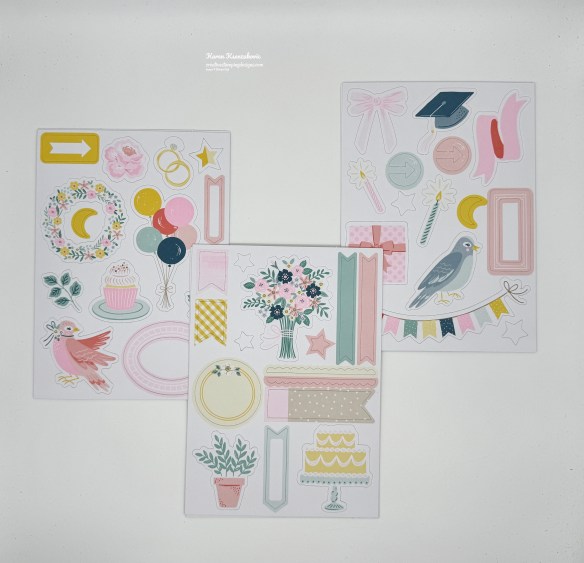
![Bloom Boutique Specialty Designer Series Paper & Sticker Sheet (English) [ 167734 ]](https://assets1.tamsnetwork.com/images/EC042017NF/167734s.jpg "Bloom Boutique Specialty Designer Series Paper & Sticker Sheet (English) [ 167734 ]")
![Basic Gray Classic Stampin' Pad [ 149165 ]](https://assets1.tamsnetwork.com/images/EC042017NF/149165s.jpg "Basic Gray Classic Stampin' Pad [ 149165 ]")
![Hydrangea Hue Classic Stampin' Pad [ 167677 ]](https://assets1.tamsnetwork.com/images/EC042017NF/167677s.jpg "Hydrangea Hue Classic Stampin' Pad [ 167677 ]")
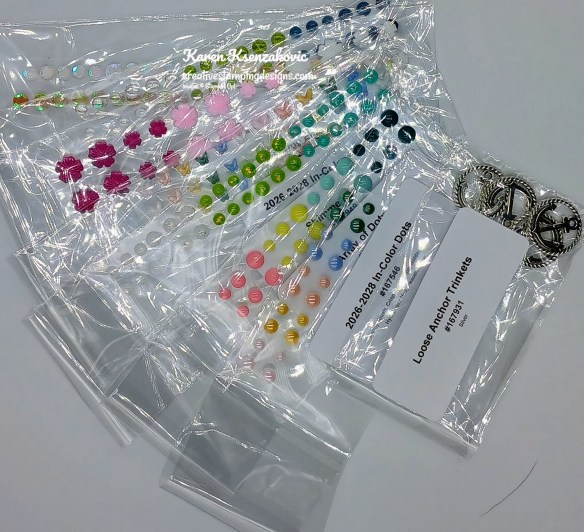
![2026–2028 In Color™ Dots [ 167546 ]](https://assets1.tamsnetwork.com/images/EC042017NF/167546s.jpg "2026–2028 In Color™ Dots [ 167546 ]")

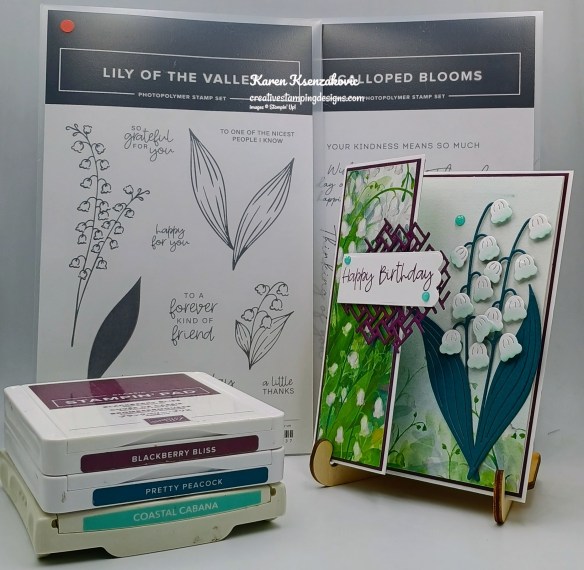
![Blackberry Bliss 8-1/2" X 11" Cardstock [ 133675 ]](https://assets1.tamsnetwork.com/images/EC042017NF/133675s.jpg "Blackberry Bliss 8-1/2\" X 11\" Cardstock [ 133675 ]")
![Pretty Peacock 8-1/2" X 11" Cardstock [ 150880 ]](https://assets1.tamsnetwork.com/images/EC042017NF/150880s.jpg "Pretty Peacock 8-1/2\" X 11\" Cardstock [ 150880 ]")
![Blackberry Bliss Classic Stampin' Pad [ 147092 ]](https://assets1.tamsnetwork.com/images/EC042017NF/147092s.jpg "Blackberry Bliss Classic Stampin' Pad [ 147092 ]")
![Coastal Cabana Classic Stampin' Pad [ 147097 ]](https://assets1.tamsnetwork.com/images/EC042017NF/147097s.jpg "Coastal Cabana Classic Stampin' Pad [ 147097 ]")
![Pretty Peacock Classic Stampin’ Pad [ 150083 ]](https://assets1.tamsnetwork.com/images/EC042017NF/150083s.jpg "Pretty Peacock Classic Stampin’ Pad [ 150083 ]")
![Tuxedo Black Memento Ink Pad [ 132708 ]](https://assets1.tamsnetwork.com/images/EC042017NF/132708s.jpg "Tuxedo Black Memento Ink Pad [ 132708 ]")
![Pretty Peacock Stampin’ Blends Combo Pack [ 161676 ]](https://assets1.tamsnetwork.com/images/EC042017NF/161676s.jpg "Pretty Peacock Stampin’ Blends Combo Pack [ 161676 ]")

