
Good Friday afternoon stamping friends and welcome to my Fun Fold Friday. How is your day going? It’s a beautiful warm day here in NJ. They said thunderstorms are coming, but so far, it’s been really nice. I’ve actually gone on a couple walks today already.
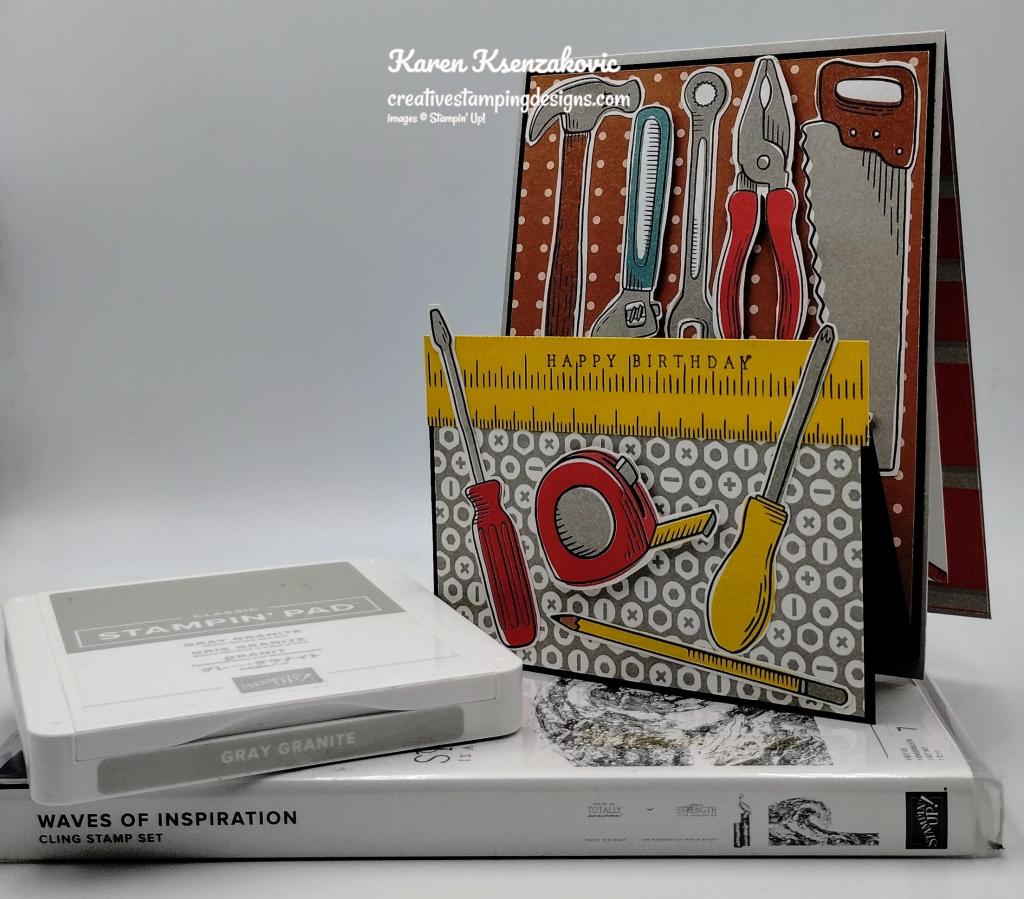
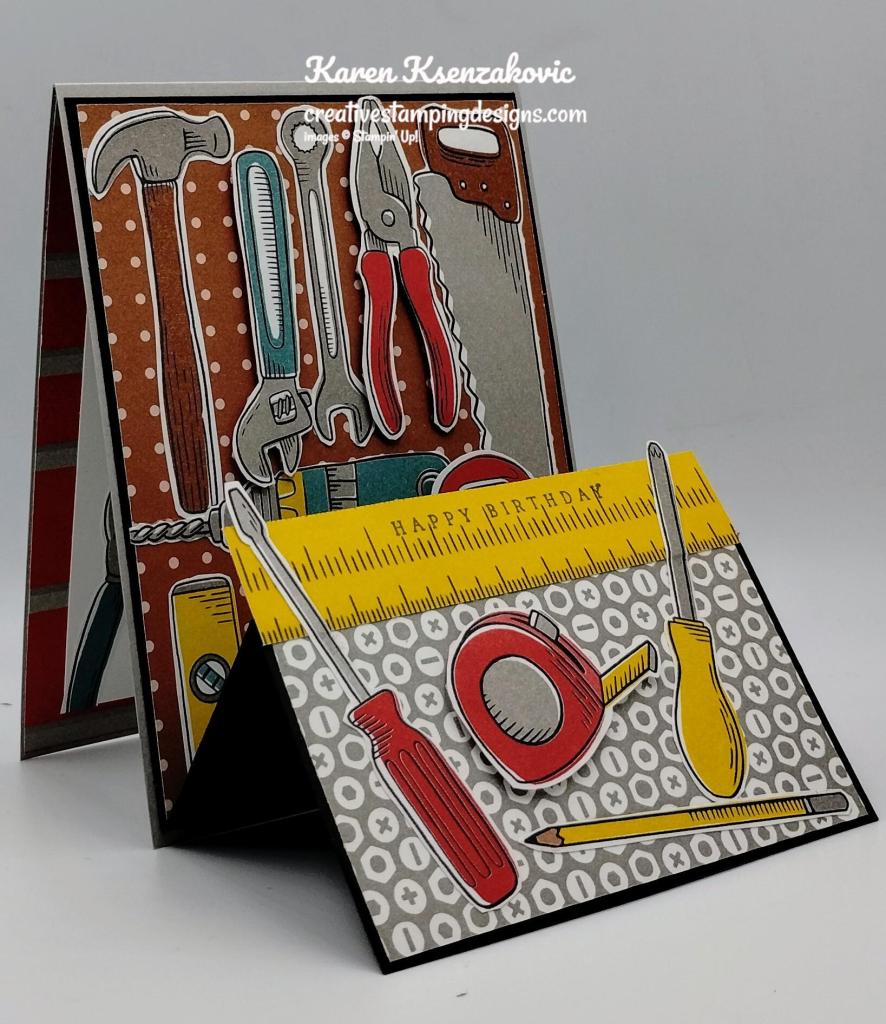
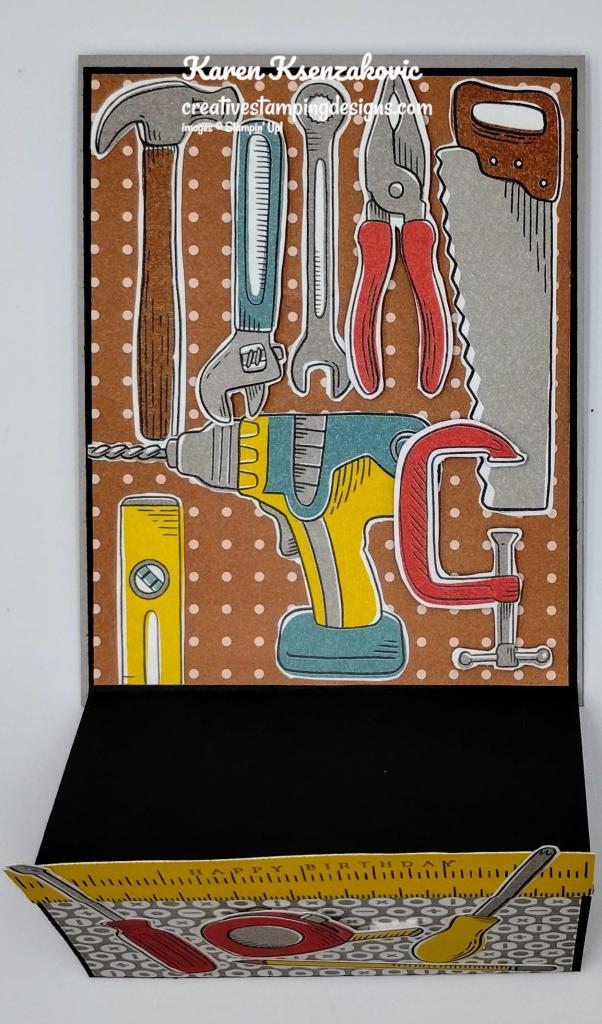
I have a sneak peek for you today of a new bundle coming on May 6th, that’s only 4 days away, YAY!! This bundle makes perfect masculine cards, but it’s great for anyone. If you’d like to see a quick video of how I made this card, Click Here to go to my Instagram Reels. Here’s my card for today.

I used the new Stampin’ Up! Online Exclusive Sunrise Sailing Bundle (available May 6th), along with the Thoughtful Journey 6 x 6 Designer Series Paper and Beautiful Butterflies Dies for my card today.

Stamp the water image from the Stampin’ Up! Sunrise Sailing Photopolymer Stamp Set in Misty Moonlight Ink on the small panel of Thoughtful Journey DSP. Emboss the small and larger panel of Thoughtful Journey DSP using the Sunrise Sailing Hybrid Embossing Folder. Adhere the panels to the Misty Moonlight card front using Liquid Glue.
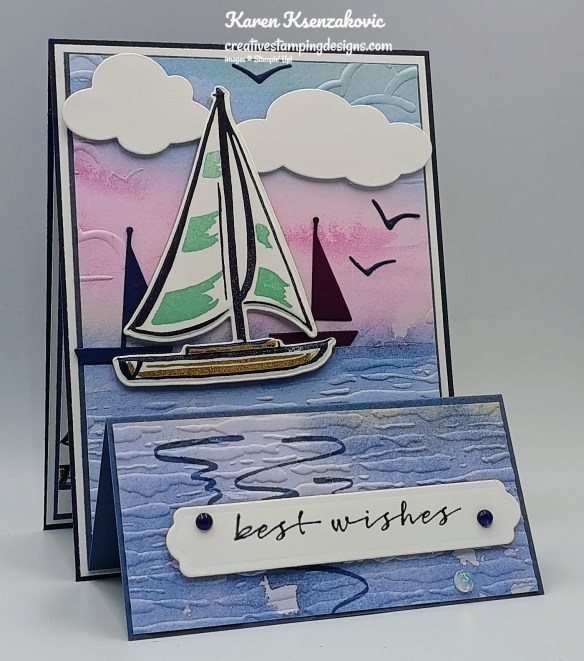
On a panel of Basic White, stamp the outline sailboat image from the Sunrise Sailing stamp set in Night of Navy Ink. Stamp the detailed sail image from the Sunrise Sailing stamp set in Pool Party Ink over the outlined sails. Stamp the detailed boat image in Crumb Cake Ink over the outlined sailboat image. Stamp the sentiment from the Sunrise Sailing stamp set in Night of Navy Ink on the side of the panel. Cut the sentiment out using the Beautiful Butterflies Dies. Cut clouds using the Sunrise Sailing Dies. Cut the sailboat out last using the Sunrise Sailing Dies and Hybrid EF. Adhere the sentiment to the bottom of the card front using Stampin’ Dimensionals. Add a few Opal Rounds Assortment.
Cut the birds and small sailboat from a panel of Night of Navy using the Sunrise Sailing Dies. Cut another small sailboat from a panel of Blackberry Bliss using the Sunrise Sailing Dies. Adhere the large sailboat over the embossed sailboat using Stampin’ Dimensionals. Adhere the 2 small sailboats using Glue dots. Adhere the Clouds using Stampin’ Dimensionals. Adhere the birds to the card front.

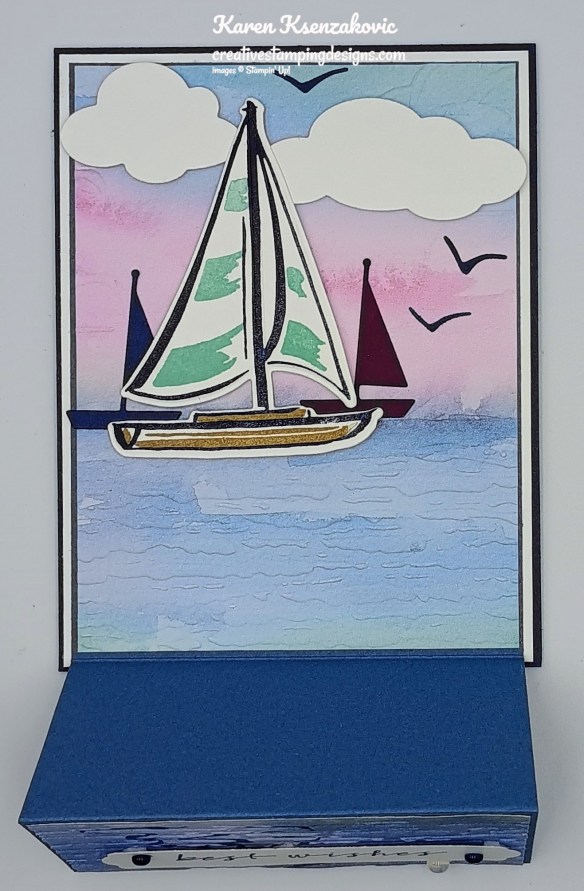
Stamp the sentiment from Sunrise Sailing stamp set in Night of Navy Ink on a panel of Basic White. Stamp the water image from Sunrise Sailing stamp set in Misty Moonlight Ink on the bottom of the panel. Stamp the outline sailboat image in Night of Navy Ink on top of the water. Stamp the detailed sail image in Pool Party Ink over the sails. Stamp the detailed boat image over the detailed image in Crumb Cake Ink. Stamp the birds in Night of Navy Ink. Adhere the Basic White panel to a Misty Moonlight mat and a Basic White mat. Adhere the layered panel to the inside of the Night of Navy card base.

Decorate a Basic White Medium Envelope to finish your card. Stamp the water, sailboat and bird images from the Sunrise Sailing stamp set on the envelope front the same as for the card. Adhere a panel of Thoughtful Journey DSP to the envelope flap.

Thank you for stopping by my blog today. I hope you like the card, and this is one of the bundles on your shopping list for May 6th. Happy Stamping!!
*********************************************************************************************************
National Scrapbooking Day May 2-3
Stampin’ Up! is so excited to celebrate National Scrapbooking Day with the crafting community around the world! For 2 days only (May 2–3) we’re offering 2x rewards on all purchases! What better way to celebrate one of our favorite crafting holidays? And the best part? This offer applies to ALL products, not just scrapbooking items!

Promotion Details:
- Earn double rewards (2x rewards) for two days only, from May 2–3!
- This offer begins at 12:00 midnight MT on May 2 and ends at 11:59 PM on May 3.
- This offer applies to ALL products (excluding existing Paper Pumpkin subscriptions).
- All orders qualify once the rewards threshold of $20 is met.
- To participate, you must have a Stampin’ Up! account and be opted in to Stampin’ Rewards.
You can shop the online store right here and earn double Stampin’ Rewards points from Stampin’ Up! on orders of $20+ May 2-3!!! Let me know if you have any questions, I’m always here to help
*********************************************************************************************************
FINAL Days to sign up for My 2025 – 2026 Annual Catalog and May Online Exclusive Designer Series Paper and Ribbon Shares
I’m offering a Designer Series Paper share from the 2025-2026 Annual Catalog, Two-Tone Cardstock Share along with the upcoming May Online Exclusives and I’d love to have you join!! I’m placing my share order early on May 6th and I’m going to use the expedited shipping option so I should be able to have the shares cut, bundled and back out to you during the week of May 12th. Wouldn’t you love to have all of the gorgeous new Designer Series Papers in the Stampin’ Up! 2025-2026 Annual Catalog and the upcoming May Online Exclusives? What is a Paper Share you ask? It’s a sample of each of the new Designer Series Papers from the Catalog and Online Exclusives. Shares give you a good working sample of all of the papers so that you can decide which ones to order in full packs! If you were to purchase all of the DSP in the new Catalog and Online Exclusives, it would cost you over $250.00 plus shipping and if you were to purchase all the ribbon it would cost you over $65.00.
New Designer Series Paper Share – $51.00 plus $9.00 for Priority Mail Shipping

How my shares work: I order full packs of all of the Designer Series Papers listed below, I cut them into 6″ X 6″ pieces (or 6″ X 12″ pieces for double shares) and give you one panel of each design from each pack on the list. I pack up the paper in a cellophane bag with labels listing the Name, Item # and Colors in the pack and mail it back out to you just as quickly as I can!
New Designer Series Paper Share – $51.00 plus $9.00 for Priority Mail shipping
You will receive one 6×6 sheet of each design from the following DSP packs (the number after the name indicates how many 6×6 sheets of that paper pack you will receive):
- 2024-2026 In Color Designer Series Paper (10)
- 2025-2027 In Color Designer Series Paper (10)
- Brights Designer Series Paper (20)
- Neutrals Designer Series Paper (20)
- Regals Designer Series Paper (20)
- Subtles Designer Series Paper (20)
- Beautiful Gallery (12)
- Boho Vibes (8)
- Celebratory Sips (6)
- Florals in Bloom (6)
- Floral Impressions (6)
- Flower Garden Foils Specialty (6)
- Irresistible Designs Specialty (3)
- Kintsugi Inspirations Specialty (6)
- Turtle-y Cute (6)
- Weekend Adventures (3)
In all, you’ll receive 162 – 6” x 6” sheets of designer or specialty paper!
Two-Tone Cardstock Share – $6 plus $9.00 Priority Mail Shipping
Have you been wanting to try the Two-Tone Cardstock but didn’t want to buy a whole pack? You can add a share of the 4 different Two-Tone Cardstock packs for an additional $6 or purchase them separately for $6 + $9 Priority Shipping
You will receive one 6×6 sheet of each color from each of the packs (the number after the name indicates how many 6×6 sheets of that paper pack you will receive):
- Celebrate Together (6)
- Memories in Bloom (6)
- Turtle-y Cute (6)
- Weekend Adventures (6)
In all, you’ll receive 24 – 6” x 6” sheets of cardstock!
If you’d like double shares of the designer paper or cardstock, I’m offering those too! I’ll cut the 12″ x 12″ sheets into 6″ × 12″ so that you’ll be able to get 3 full A2 size card fronts from each sheet and you’ll get double sheets of the 6″ x 6″ since they’re already precut.
New Ribbon Share – $20.00 plus $9.00 Priority Mail Shipping

All ribbons will come individually wrapped and labeled with the name and number of the product.
One-Fourth of a Roll of each:
- Cloud Cover 3/8″ Linen Ribbon
- Darling Duckling 3/8″ Linen Ribbon
- Secret Sea 3/8″ Linen Ribbon
- Strawberry Slush 3/8″ Linen Ribbon
- Timid Tiger 3/8″ Linen Ribbon
- Basic Beige 3/8″ Classic Ribbon
- Shaded Spruce & Soft Sea Foam 1/2″ Ribbon
- Gold Striped 3/8″ Mesh Ribbon Online Exclusive
If you’d like double shares of the Ribbon, you will be getting 1/2 of the roll or each ribbon.
Anyone is welcome to join in my shares (please note, I can only ship to addresses within the US). To make ordering the shares a little easier, I have created a form for you to submit, that way you can order any combination of shares you want. Click Here for the form. I will send out PayPal Invoices on May 4th.
Deadline to sign up for my share is Saturday May 3rd at 5:00 PM ET.
Let me know if you have any questions, I’m more than happy to help you. Thank you for joining in my Shares this year!!
*********************************************************************************************************
Designer Series Paper Online Zoom Class
Tara Carpenter and I are super excited about offering you this Free Online Zoom Class
Do you struggle with different ways to use all your Designer Series Paper? Tara and I are teaming up for a Zoom class to show you 6 different cards using just Designer Series Paper and a Sentiment. Of course, we’ll add embellishments and maybe ribbon or twine, but this class will primarily be using DSP. We have picked a pack of DSP with all the new 2025-2027 In-Colors and that’s what we will be focusing on. You can see the DSP starting on page 40 of the 2025-2026 Annual Catalog. The class will be held on Sunday May 18th from 1pm-5pm ET. The best part is you can earn this class absolutely FREE. You will cut all the cardstock and DSP of your choice prior to the class so you are ready to go. We will NOT be cutting up cardstock or DSP the day of the event. You will choose the color cardstock and your favorite DSP to use from what you purchase. Please remember to order early so that you receive it on time to prep for the class.
The class requirements:
- Visit my Online Store on or after May 6th and purchase 1 pack of Florals in Bloom 12″ x 12″ Designer Series Paper (165175), 1 pack of the 2025-2027 In-Color Cardstock Assortment Pack (165623) and 1 pack of the 2025-2027 In-Color Flat Pearls (165192)
- Once you have made your purchase Click Here to sign up
Once you sign up you will receive:
- Zoom class with complete step by step instructions to complete each card as we go.
- PDF with detailed directions and photos
- A Link to the recorded class after we are done so you can watch it again and make more cards.
When you Sign Up for the class, I will send you the complete PDF the week before the class so that you can cut up the color cardstock of your choice and the Designer Series Paper of your choice. Everyone’s card will be unique since you will pick your favorite designs of DSP and color cardstock.
The class will be held on Zoom and anyone in the United States is welcome to purchase the class and join us! If you are unable to join us for the live event, but would still like to participate in the class, we will be recording the session so you can watch the replay any time and make the cards. We will also be emailing written tutorials with instructions and cardstock cuts so that you will have a reference too.
Class Cost: This class is FREE to customers who make the purchase through my Online Store.
If you are a Demonstrator and would like to attend the class and get the PDF, there will be a $20 charge that will be billed through PayPal. I know you would like to purchase the products yourself getting your discount but still would like to attend.
Class Sign up Deadline: Sunday May 11th at 5pm ET
Click Here to register for the class now!! Let me know if you have any question
*********************************************************************************************************
If you need any stamping supplies, I’d love to be your Demonstrator. Just click HERE to go directly to my online store or drop me an email if you have any questions.
*********************************************************************************************************
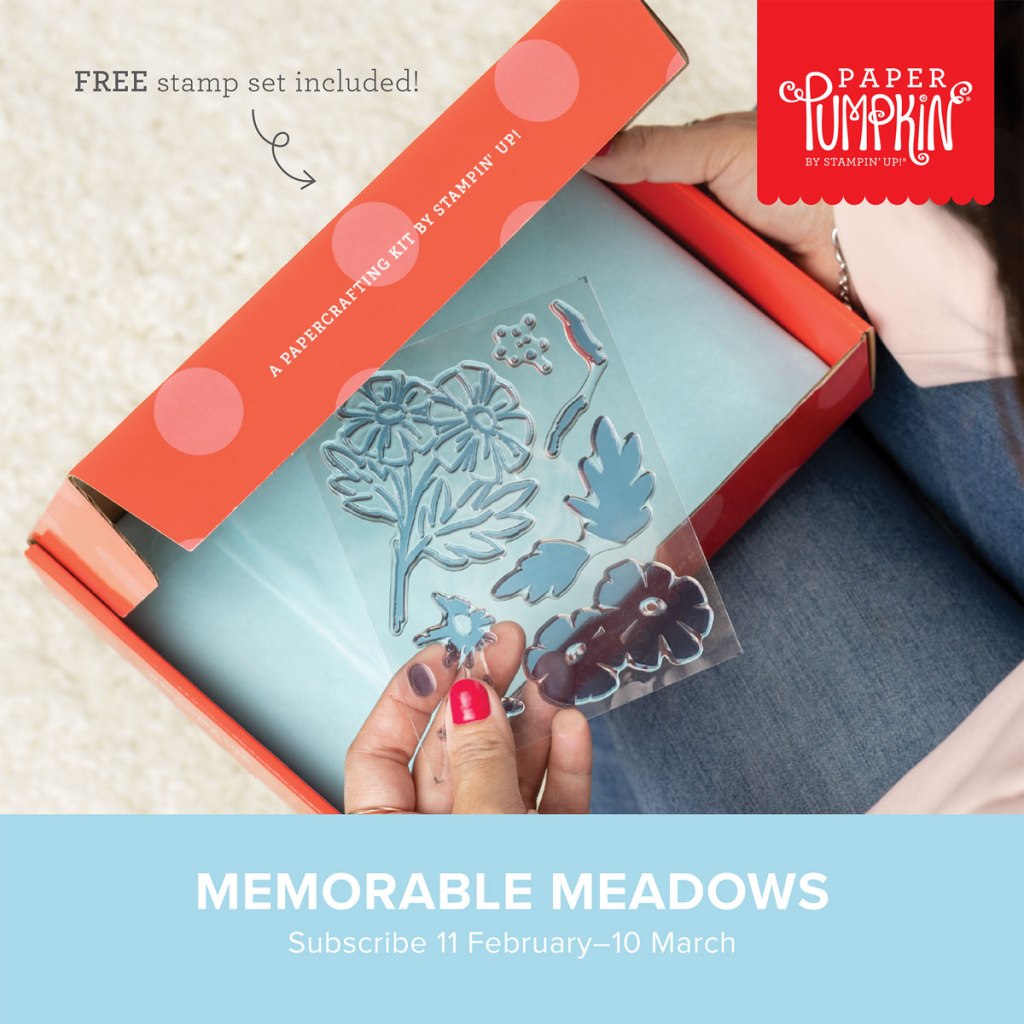
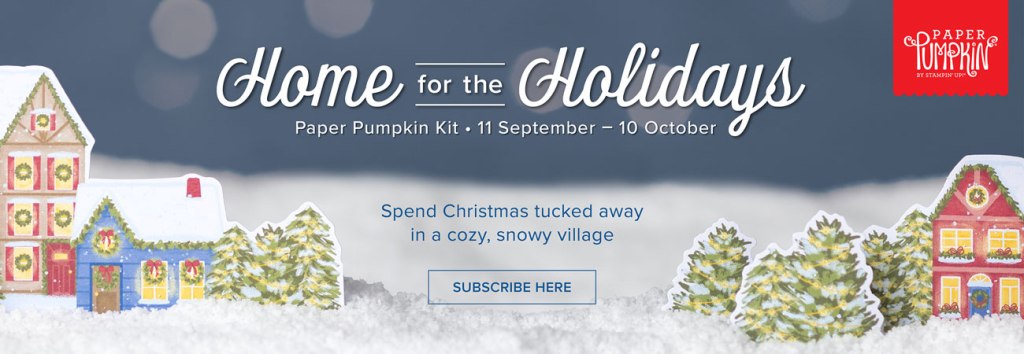
Mountain Majesties
Subscribe April 11 – May 10
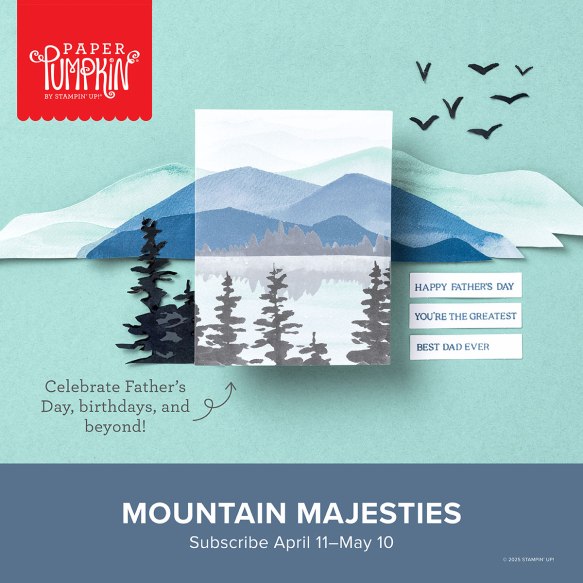
Create Father’s Day cards with layered mountain landscapes!
• Makes 9 cards: 3 each of 3 designs with 9 coordinating envelopes
• Precut vellum and paper pieces
• Watercolor card bases and coordinating envelopes
• Coordinating colors: Basic Black, Lost Lagoon, Misty Moonlight
(Classic Stampin’ Spot), Mossy Meadow, Pecan Pie, Petal Pink
Includes vellum pieces for layering and sentiments tailored to men!
Subscribe to the April Paper Pumpkin Kit between 11 April and 10 May by clicking here!
*********************************************************************************************************
Don’t miss the coordinating
Hugs Abloom Dies Add-On!

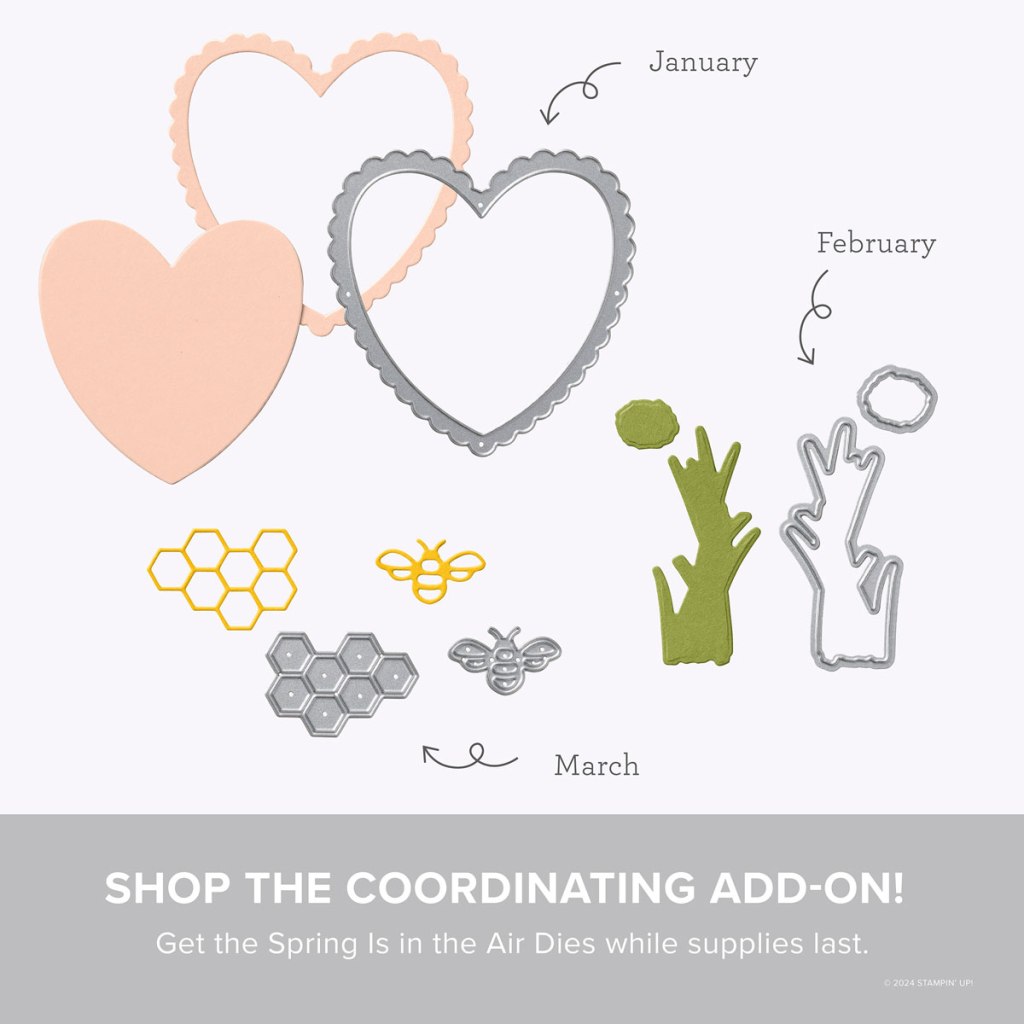
Make the most of your Paper Pumpkin kits with the Hugs Abloom Dies add-on! Quickly and cleanly cut out a flower, leaf sprig, sentiment label, or Hugs sentiment to elevate your crafting projects. These additional dies are designed to work with THREE Paper Pumpkin Kits: the Inked Occasions Paper Pumpkin Kit, the Mountain Majesties Paper Pumpkin Kit, and the Full of Charm Paper Pumpkin Kit. Pair these dies with other Stampin’ Up! products for even more creative options!
DETAILS
– 4 dies
– Largest die: 2-1/2″ x 1-1/4″ (6.4 x 3.2 cm)
– Use with a Stampin’ Cut & Emboss Machine (sold separately)
You must be a current Paper Pumpkin subscriber to purchase this item. To become a subscriber, visit www.stampinup.com/paperpumpkin.
Note: Supplies may be limited toward the end of the subscription period.
#166238 $12
*********************************************************************************************************
Card stock cuts for this project:
- Basic White Cardstock 2 – 4 1/8″ x 5 3/8″(card front & inner liner mats), 4″ x 5 1/4″(artwork), 3 7/8″ x 5 1/8″(inner liner)
- Blackberry Bliss Cardstock 1 1/2″ x 1 1/2″(sailboat)
- Misty Moonlight Cardstock 4″ x 9 1/4″(easel card front scored & folded at 2″ & 4″), 4″ x 5 1/4″(inner liner mat)
- Night of Navy Cardstock 4 1/4″ x 11″(card base scored & folded at 5 1/2″), 1 1/2″ x 3 1/4″(sailboat & birds)
- Thoughtful Journey 6 x 6 Designer Series Paper 1 7/8″ x 3 7/8″ & 3 7/8″ x 5 1/8″(card front panels), 2 1/4″ x 6″(envelope flap)
*********************************************************************************************************
Product List
![Basic White 8 1/2" X 11" Cardstock [ 166780 ]](https://assets1.tamsnetwork.com/images/EC042017NF/166780s.jpg "Basic White 8 1/2\" X 11\" Cardstock [ 166780 ]")
![Blackberry Bliss 8-1/2" X 11" Cardstock [ 133675 ]](https://assets1.tamsnetwork.com/images/EC042017NF/133675s.jpg "Blackberry Bliss 8-1/2\" X 11\" Cardstock [ 133675 ]")
![Misty Moonlight 8-1/2" X 11" Cardstock [ 153081 ]](https://assets1.tamsnetwork.com/images/EC042017NF/153081s.jpg "Misty Moonlight 8-1/2\" X 11\" Cardstock [ 153081 ]")
![Night Of Navy 8-1/2" X 11" Cardstock [ 100867 ]](https://assets1.tamsnetwork.com/images/EC042017NF/100867s.jpg "Night Of Navy 8-1/2\" X 11\" Cardstock [ 100867 ]")
![Thoughtful Journey 6" X 6" (15.2 X 15.2 Cm) Designer Series Paper [ 163303 ]](https://assets1.tamsnetwork.com/images/EC042017NF/163303s.jpg "Thoughtful Journey 6\" X 6\" (15.2 X 15.2 Cm) Designer Series Paper [ 163303 ]")
![Crumb Cake Classic Stampin' Pad [ 147116 ]](https://assets1.tamsnetwork.com/images/EC042017NF/147116s.jpg "Crumb Cake Classic Stampin' Pad [ 147116 ]")
![Misty Moonlight Classic Stampin' Pad [ 153118 ]](https://assets1.tamsnetwork.com/images/EC042017NF/153118s.jpg "Misty Moonlight Classic Stampin' Pad [ 153118 ]")
![Night Of Navy Classic Stampin' Pad [ 147110 ]](https://assets1.tamsnetwork.com/images/EC042017NF/147110s.jpg "Night Of Navy Classic Stampin' Pad [ 147110 ]")
![Pool Party Classic Stampin' Pad [ 147107 ]](https://assets1.tamsnetwork.com/images/EC042017NF/147107s.jpg "Pool Party Classic Stampin' Pad [ 147107 ]")
![Beautiful Butterflies Hybrid Embossing Folder [ 164614 ]](https://assets1.tamsnetwork.com/images/EC042017NF/164614s.jpg "Beautiful Butterflies Hybrid Embossing Folder [ 164614 ]")
![Opal Rounds Assortment [ 163298 ]](https://assets1.tamsnetwork.com/images/EC042017NF/163298s.jpg "Opal Rounds Assortment [ 163298 ]")


")
")


")
")


 Designer Series Paper")


")
")
")


 Specialty Designer Series Paper")


")
")


 Designer Series Paper")


")


 Designer Series Paper")


")


")


")
")

")
")


 Specialty Designer Series Paper")


 Glittered Ribbon")


")
")


 Specialty Designer Series Paper")
 Specialty Designer Series Paper")


