Good Tuesday morning my stamping friends welcome to Amy’s Inkin’ Krew Team Blog Hop. It’s the 2nd Tuesday of the month so that means Blog Hop Day!! If you are starting with me, be sure to hop around to see everyone’s beautiful projects. If you’ve hopped over from Mary’s blog, welcome to my blog and thank you for stopping by. The theme this month is “Halloween Fun”. If you’d like to see a quick video on how I made this card, Click Here to go to my Instagram Reels. Here’s my card for today.
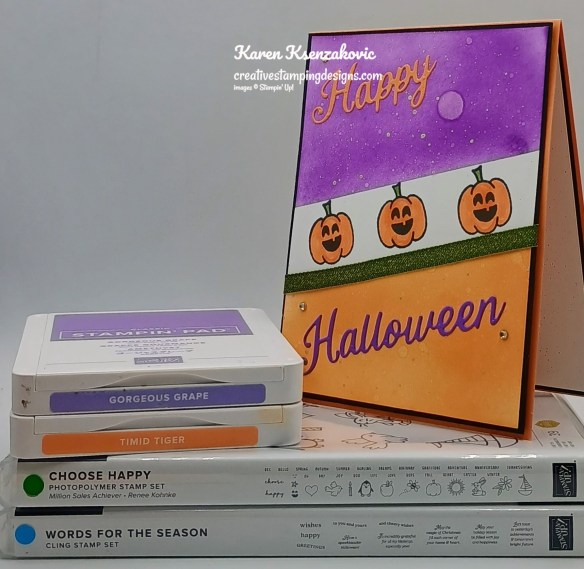
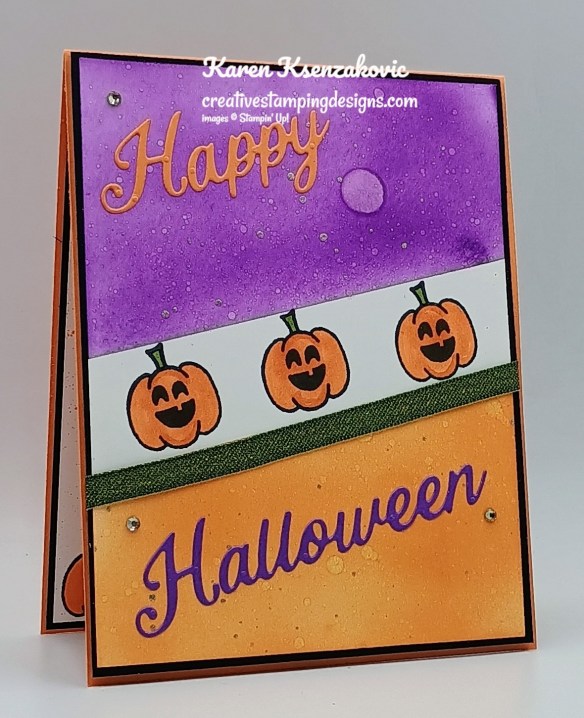
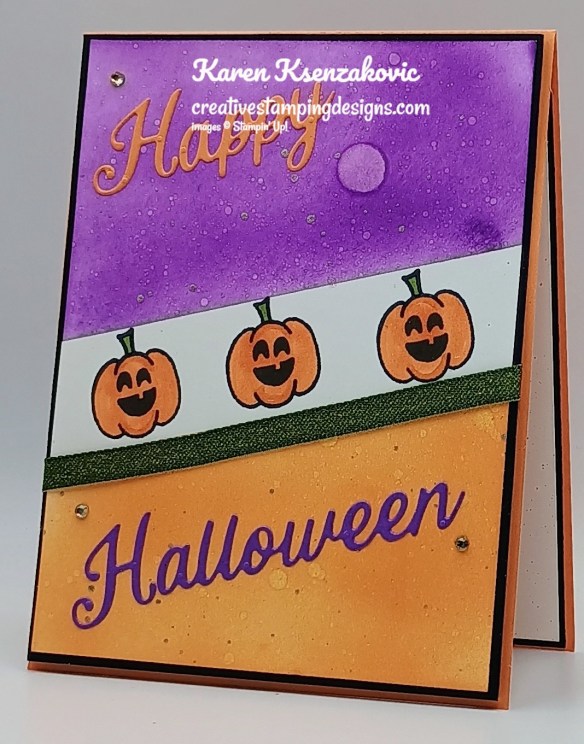
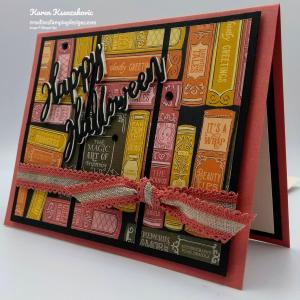
I used the Stampin’ Up! Choose Happy Photopolymer Stamp Set along with the new Stampin’ Up! Words of the Season Bundle for my card today.
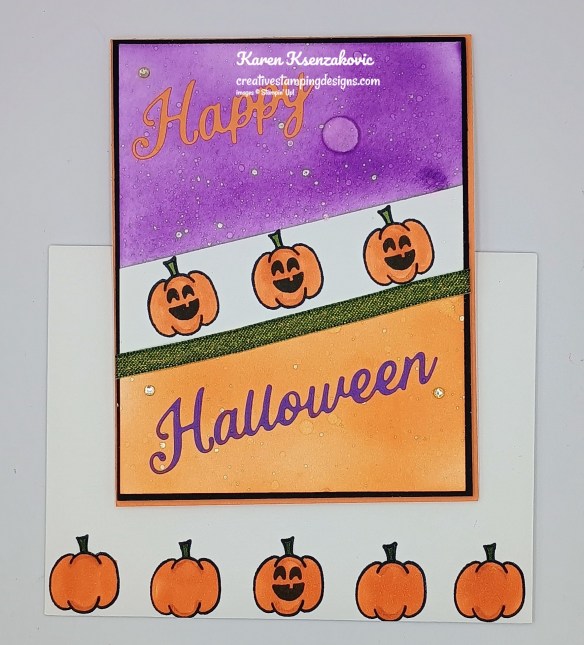
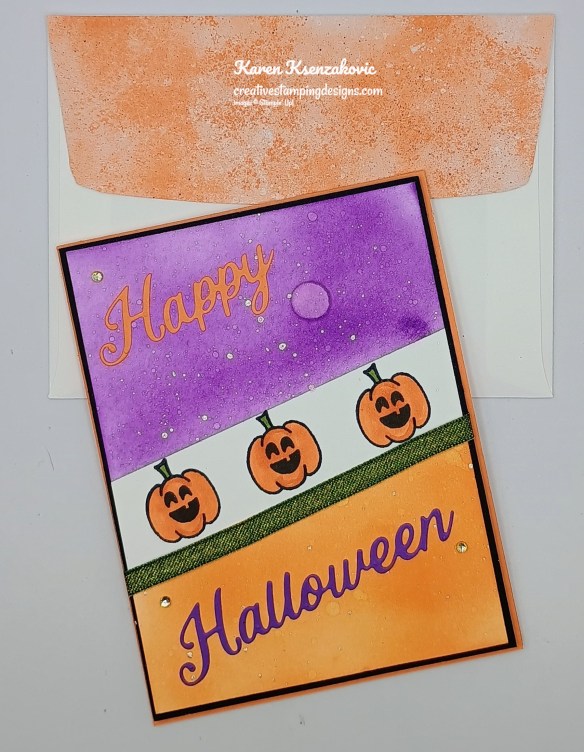
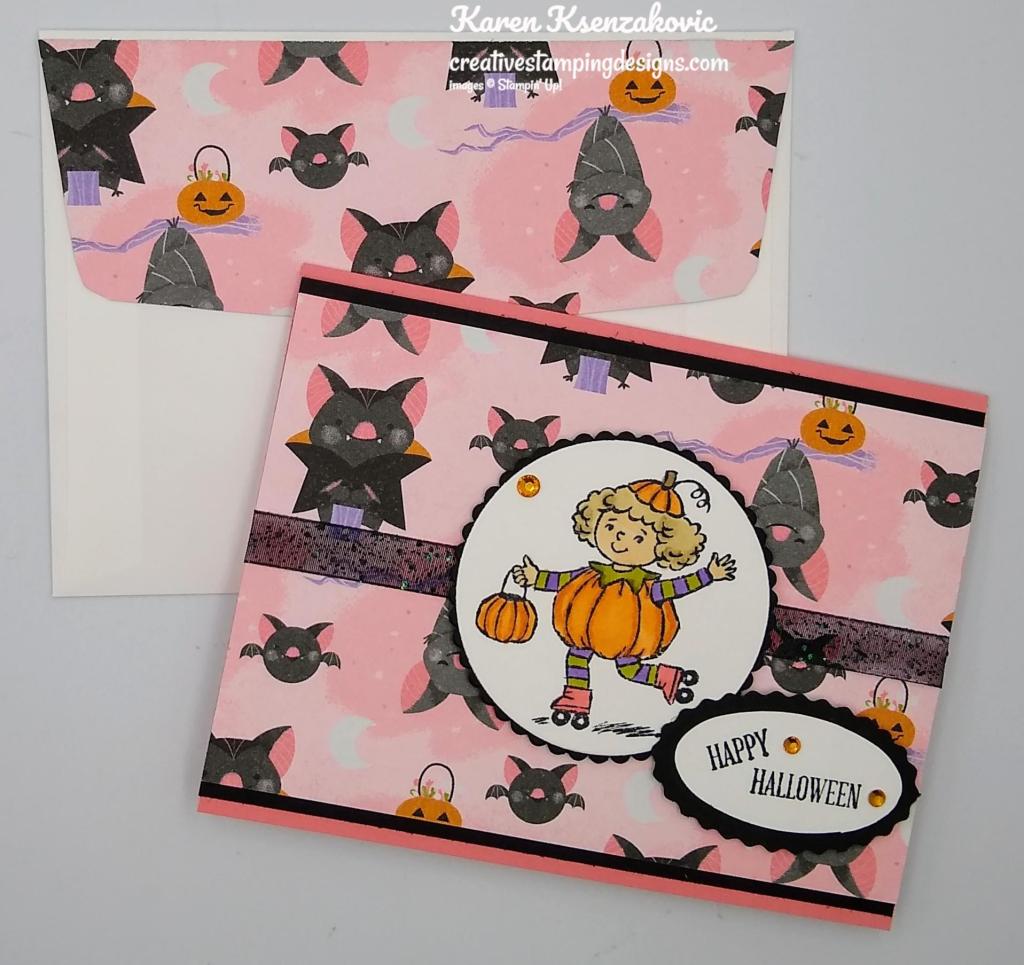
Mask off a center section of a Basic White panel with Post-It Note Tape. Using the Blending Brushes, add Gorgeous Grape Ink to the top of the panel and Timid Tiger to the bottom half of the panel. Once you have the desired color, using a Water Painter splatter water over the panel to cause water spots. Then using the Clear Wink of Stella Brush, tap on a Bone Folder to add sparkle to the top and bottom of the panel.
Remove the Post-It Note Tape from the center section. Stamp the pumpkin image from the Choose Happy stamp set in Tuxedo Black Ink 3 times. Color the images with Mossy Meadow (stems) and Timid Tiger Stampin’ Blends Markers. Stamp the Jack-O-Lantern face from the Choose Happy stamp set on the pumpkins in Tuxedo Black Ink on the pumpkins. Adhere the colored panel to a Basic Black mat with Stampin’ Seal. Wrap a piece of Mossy Meadow & Gold 1/4″ Trim around the panel below the pumpkins. Adhere the layered panel to a Timid Tiger card base with Stampin’ Dimensionals.
Using the Words for the Season Dies, cut panels of Gorgeous Grape and Timid Tiger with the Happy & Halloween dies. Adhere the sentiment to the card front. Add a few Rhinestones Basic Jewels to the card front.
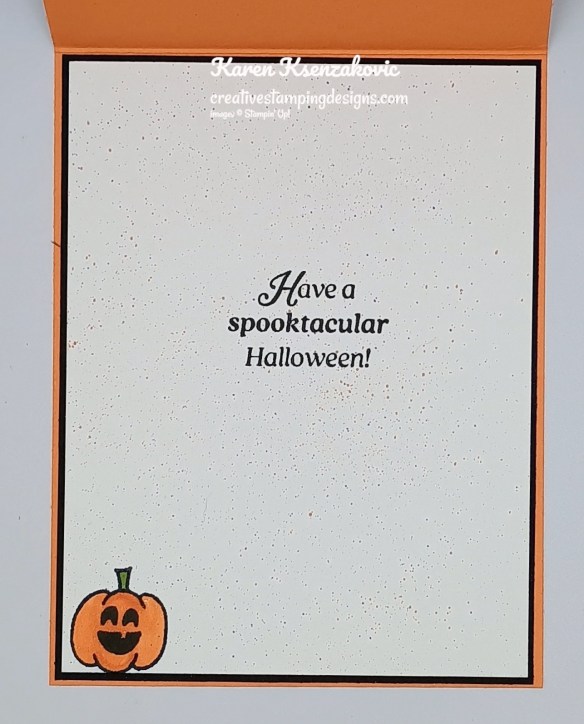
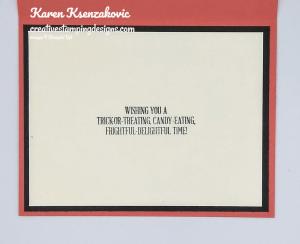
Stamp the sentiment from the Stampin’ Up! Words of the Season Cling Stamp Set in Tuxedo Black Ink on a panel of Basic White. Stamp the pumpkin image from the Choose Happy stamp set on the bottom of the panel. Color the image using the Mossy Meadow and Timid Tiger Stampin’ Blends Markers. Using the Gorgeous Grape and Timid Tiger Stampin’ Write Markers flick ink on the Basic White panel. Adhere the Basic White Panel to a Basic Black mat and then to the inside of the Timid Tiger card base.
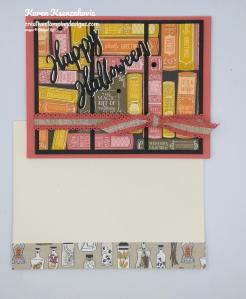
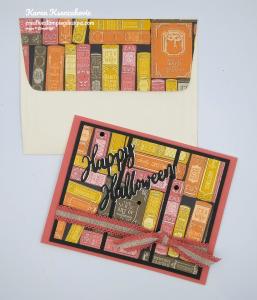
Decorate a Basic White Medium Envelope to complete the card. Stamp the pumpkin image from the Choose Happy stamp set in Tuxedo Black Ink across the bottom front of the envelope. Color the images with Mossy Meadow and Timid Tiger Stampin’ Blends Markers. Stamp the Jack-O-Lantern face from the Choose Happy stamp set in Tuxedo Black Ink on the pumpkin. Using the Gorgeous Grape Stampin’ Write Markers, flick ink on a panel of 2025-2027 In-Color Designer Series Paper. Adhere the panel of DSP to the envelope flap.
Thank you for stopping by my blog today. Now that you’ve seen my card, let’s get on with the hop! Click on the Next Blog button to move on to Tara’sproject or click the Previous Blog button to go back to see the project that Mary created. Happy Hopping.
Just in case you get lost along the way, here is a list of the team members involved in the hop today.
If you need any stamping supplies, I’d love to be your Demonstrator. Just click HERE to go directly to my online store or drop me an email if you have any questions.
Good Tuesday morning my stamping friends welcome to Amy’s Inkin’ Krew Team Blog Hop. It’s the 2nd Tuesday of the month so that means Blog Hop Day!! If you are starting with me, be sure to hop around to see everyone’s beautiful projects. If you’ve hopped over from Tara’s blog, welcome to my blog and thank you for stopping by. The theme this month is “Halloween Fun”. We can interpret this however we want. Here’s my card for today.
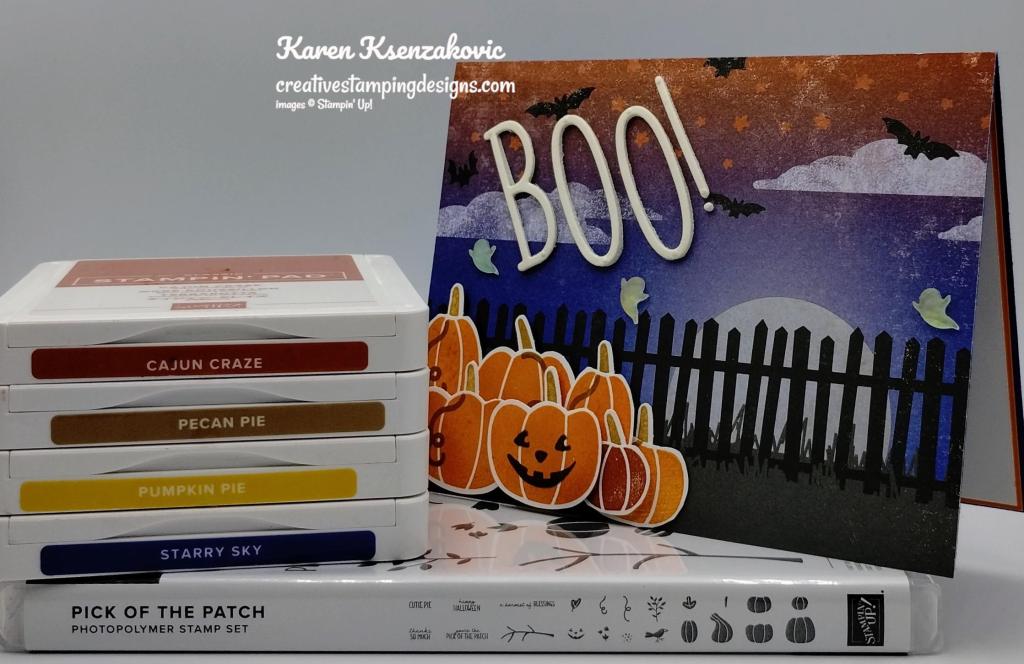
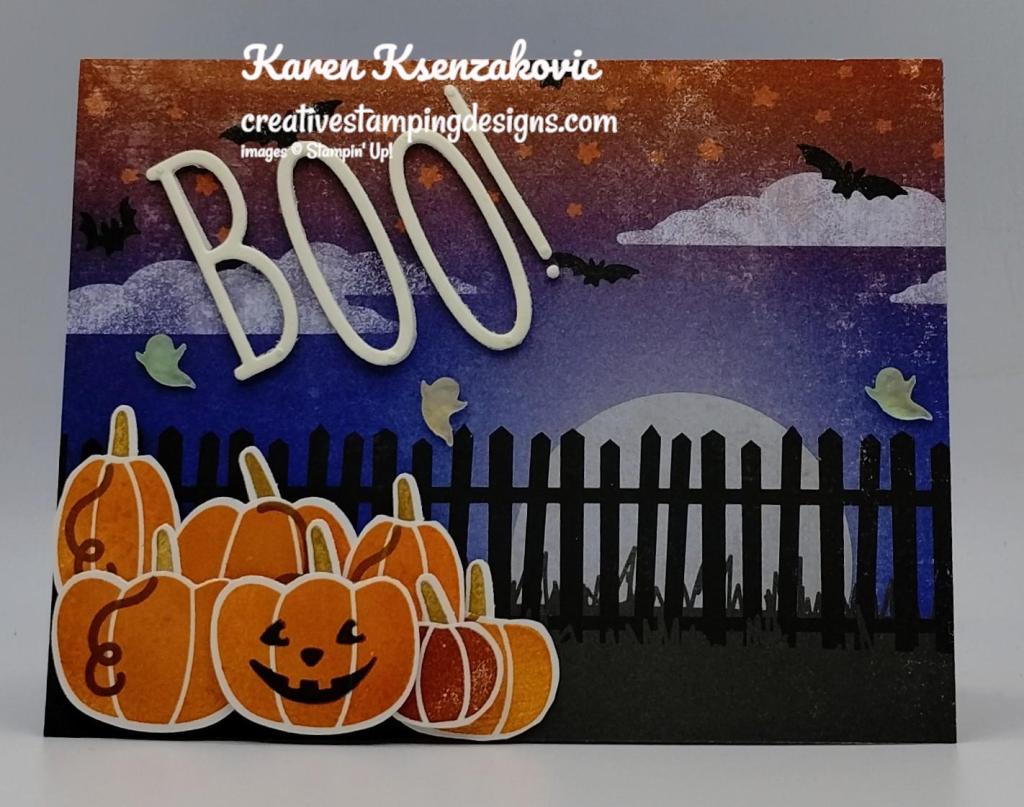
I used the Stampin’ Up! Pick of The Patch Bundle along with Them Bones Designer Series Paper and Glow-In-The-Dark Specialty Paper for my card today.
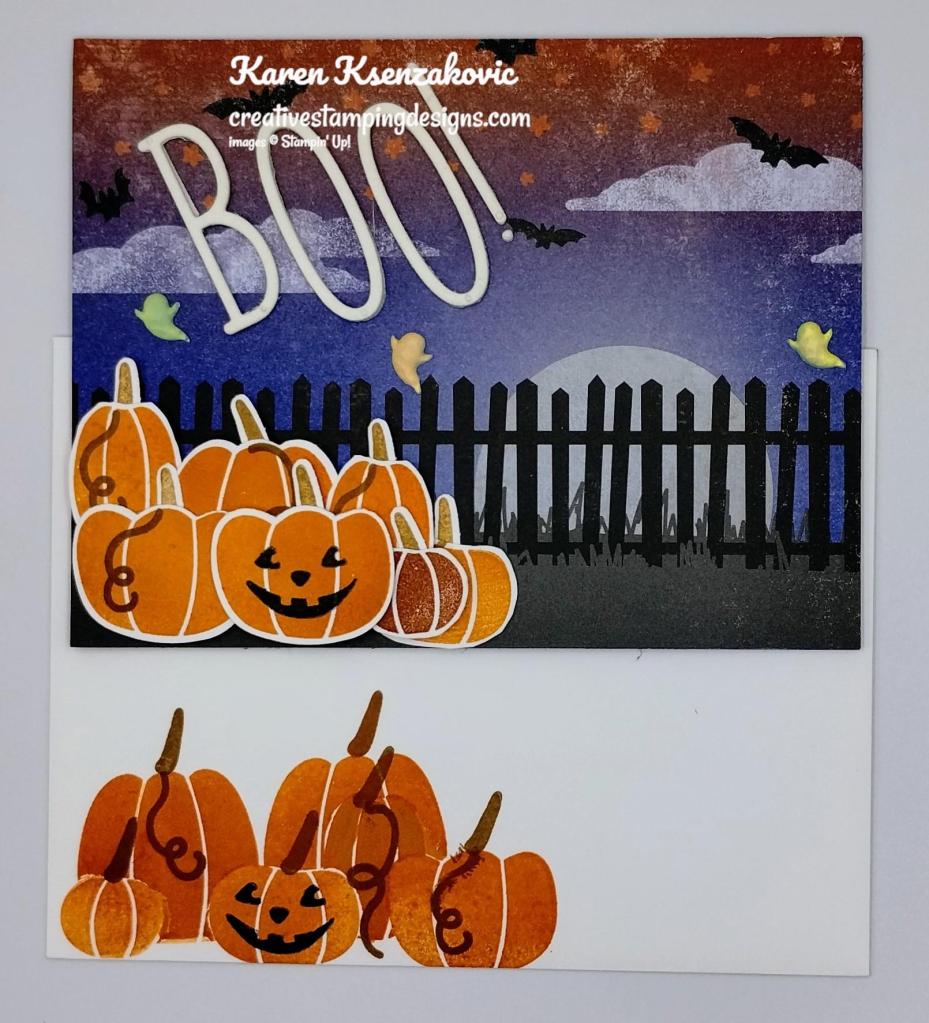
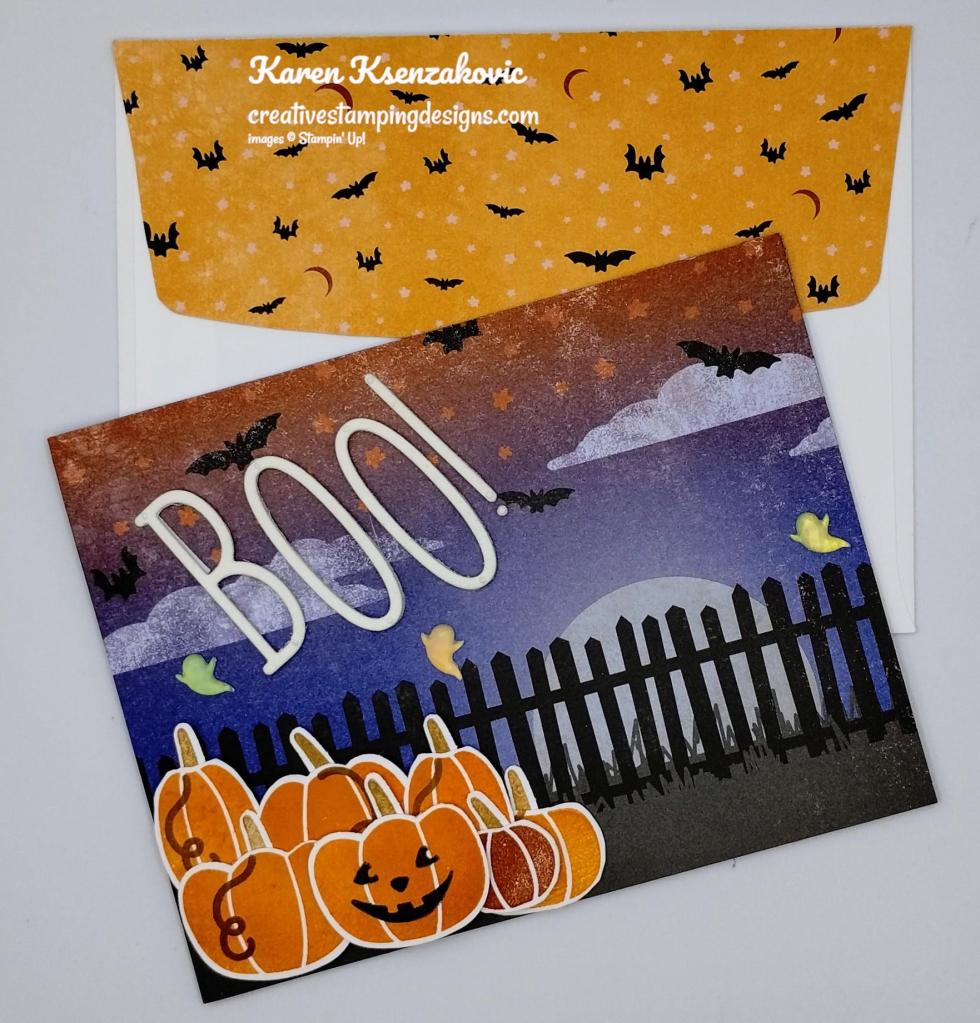
I started by adhering a panel of Them Bones DSP to a Starry Sky card base using Multipurpose Liquid Glue. On panels of Basic white, I stamped the pumpkin images from the Stampin’ Up! Pick of The Patch Photopolymer Stamp Set in Pumpkin Pie and Cajun Craze Inks. I stamped the stem image from Pick of The Patch stamp set in Pecan Pie Ink on a thins strip of Basic White. I stamped the vine images from the Pick of The Patch stamp set in Pecan Pie Ink on some of the pumpkins. I stamped the Jack-O-Lantern face from Pick of The Patch stamp set on one of the pumpkins in Tuxedo Blakc Ink.
2 of the pumpkins and the stems I punched out using the Pick of The Patch Builder Punch. The other pumpkins I fussy cut using Paper Snips. I arranged the pumpkins on the bottom of the card front using Stampin’ Dimensionals.
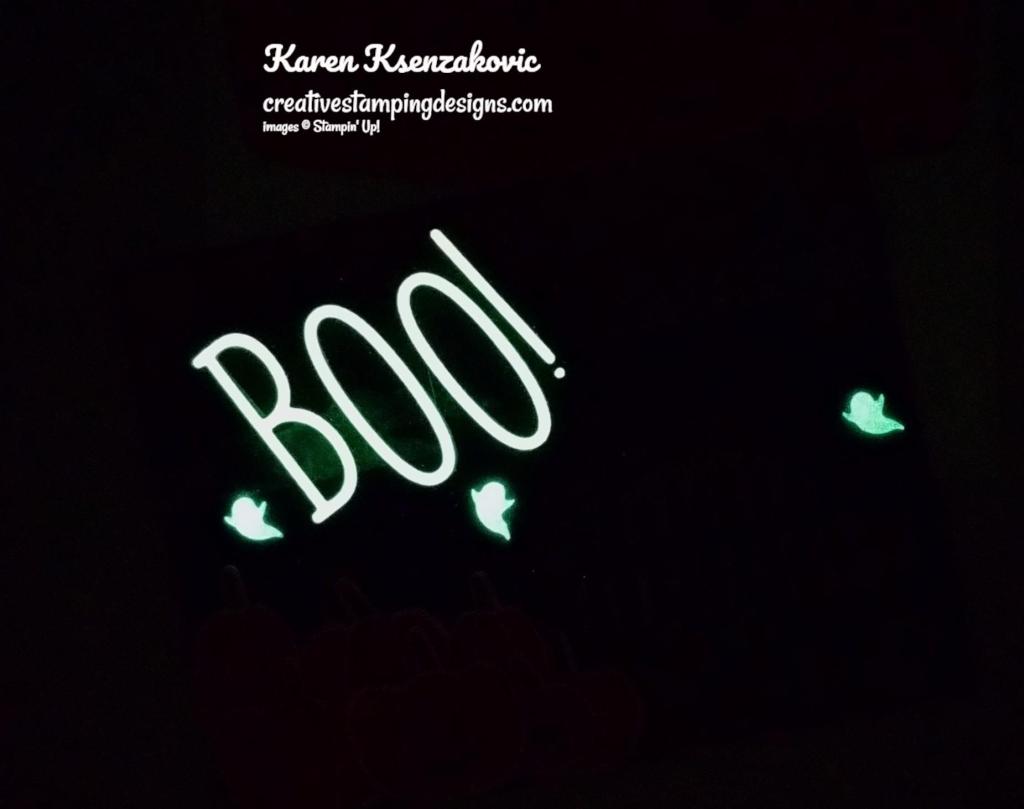
Using the Alphabet A La Mode Dies, I cut out BOO! from a panel of Glow-In-The-Dark Paper with an adhesive Foam Sheet adhered to the back. I adhered the sentiment to the card front. I added a few Glow-In-The-Dark Ghosts to the card front.
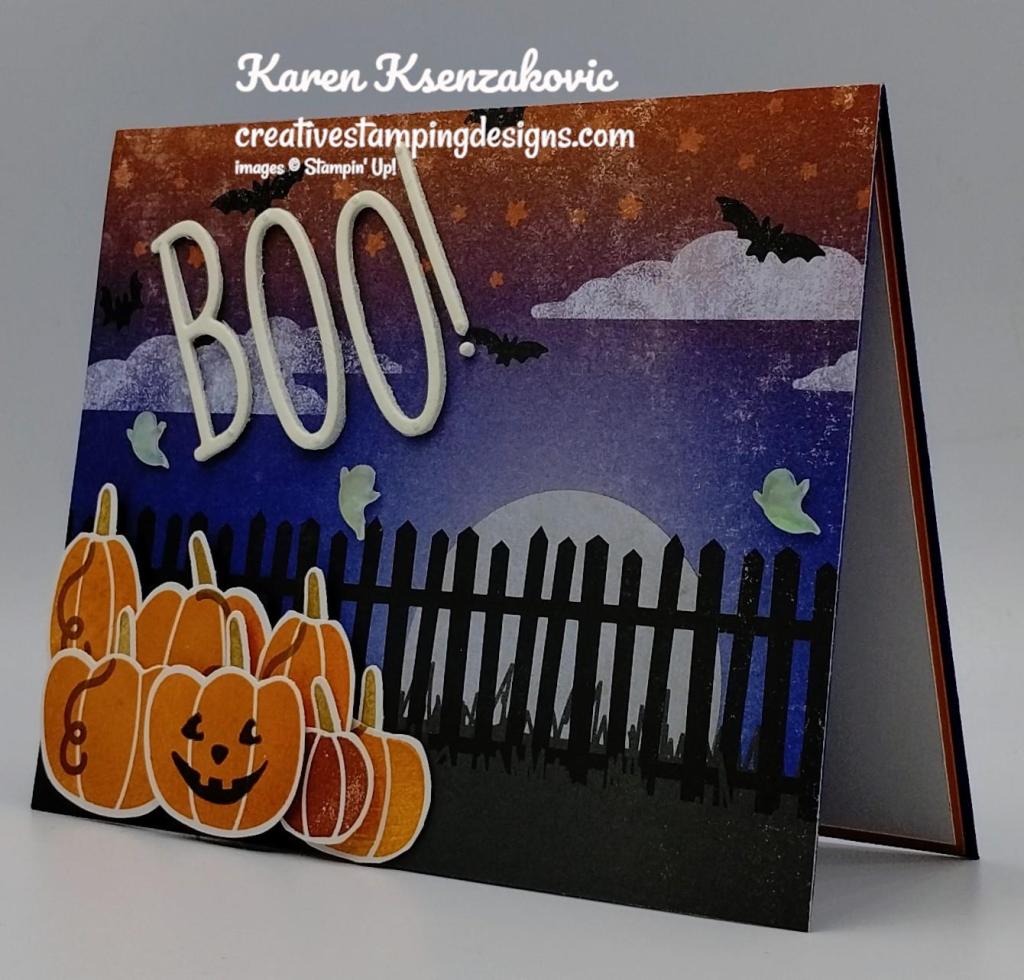
I turned the lights off when I was taking my pictures, so here’s a photo in the dark.
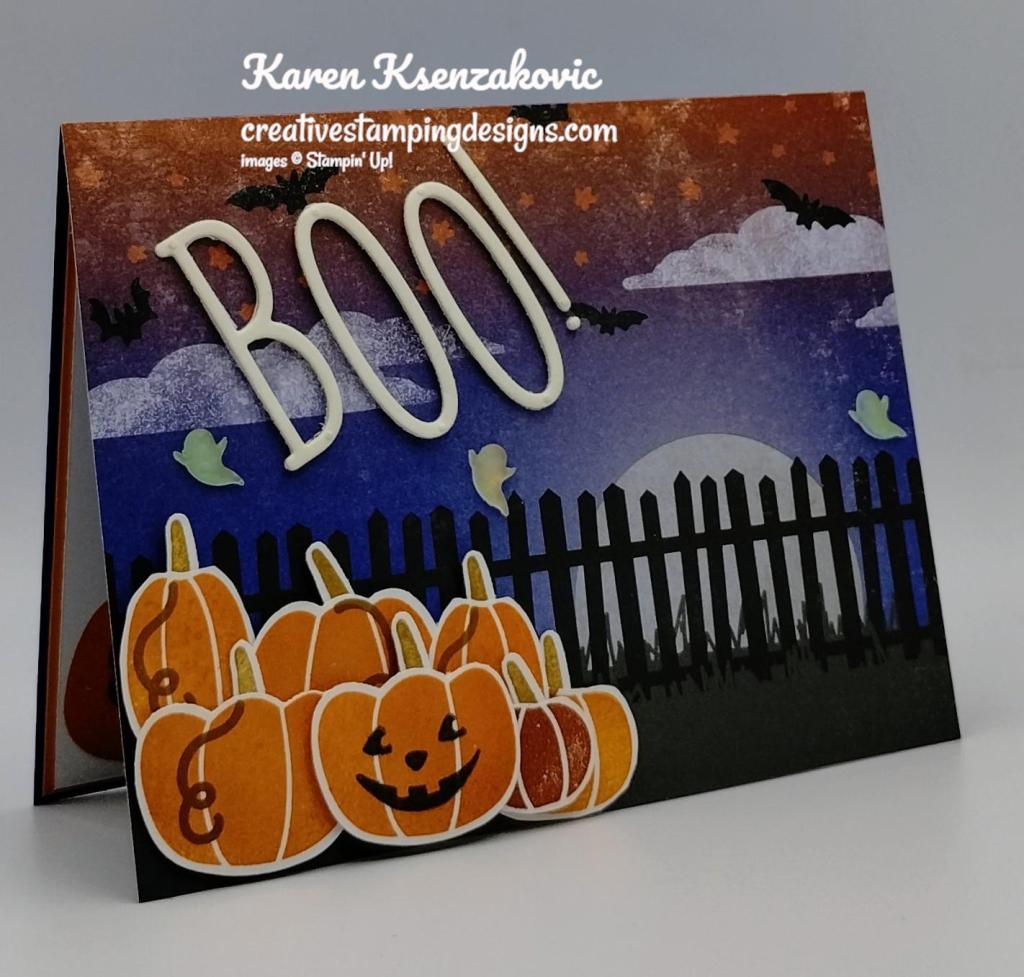
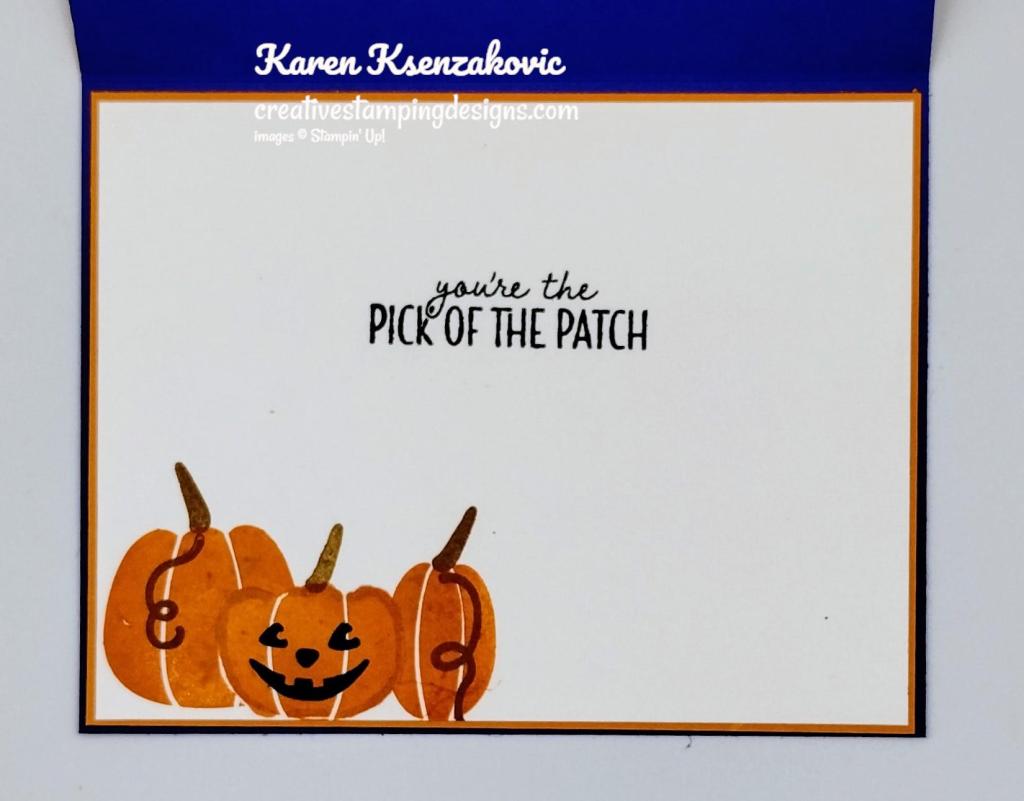
On the inside, I stamped the sentiment from the Pick of The Patch stamp set in Tuxedo Black Ink on a panel of Basic White. I stamped the pumpkin images from the Pick of The Patch stamp set on the bottom of the panel in Pumpkin Pie Ink. I adhered the Basic White panel to a Pumpkin Pie mat then to the inside of the Starry Sky card base.
To complete my card, I decorated a Basic Whtie Medium Envelope. I stamped the pumpkin images from Pick Of The Patch stamp set in Pumpkin Pie Ink on the envelope front. I adhered a panel of Them Bones DSP to the envelope flap.
Thank you for visiting by my blog today, I hope you liked my card and will give it a try. Now that you’ve seen my card, be sure to hop around to see everyone’s beautiful projects. Hit Previous to hop back to Tara’s blog or hit Next to head over to Akiko’s blog. You can also click on each of the names and hop around that way. I hope you enjoy seeing everyone’s projects. Happy Hopping!!
If you need any stamping supplies, I’d love to be your Demonstrator. Just click HERE to go directly to my online store or drop me an email if you have any questions.
MY CURRENT HOST CODE IS: P6UQN4GZ
Use this host code when placing an order with me. When you order $50 or greater you will receive a free gift from me! If your order is over $150, please do not use this code, but you’ll still get the free gift. The free gift is your choice of any 1 item valued up to $10.00 from the 2023-2024 Annual Catalog! Unfortunately, packs of cardstock are no longer an option for a free gift. Shipping has become too expensive to ship and it’s costing me as much to ship as the cardstock costs. For any orders $50 or more I will also send you my monthly class tutorials. Click HERE or go to my Customer Rewards for more details and to see what this month’s tutorials are.
Please remember to use my current Host Code and make sure that you can see my name on the final checkout page listed as your Demonstrator when you order so that you know that you’re ordering with me, and you’ll get my rewards!
In response to changing policies at Stampin’ Up – I’m adjusting my Ordering Gift policy as well. I’m having to get a little more tough on the adding of Host codes when you place your order thru my Online Store.
Not to worry – you’re still going to get that $10 ordering gift for orders of $50 (before shipping & tax) or greater. And the gift is still any 1 SU! product up to that $10 value – which includes some of our fun Host Sets!
But – if you DO NOT use the Host code for your orders of less than $150 (this is the RETAIL total before Shipping & Handling), then you’ll have two options:
You’ll need to call Stampin’ Up! (1-800-Stamp-Up) and ask them to add it for you. They’re very helpful and will get it done quickly! OR….
If your order was over the $50 threshold but under $150, then…you’ll forfeit that $10 ordering gift and rewards – this is the Bummer Option – and I REALLY don’t want to do this, SO please remember to add my Current Host Code.
Share the joy of Christmas with everyone, everywhere with the Christmas Everywhere Kit! Featuring trees from around the world, this kit comes with everything you need to quickly create 9 cards—3 each of 3 designs—so you can send the special people in your life warm Christmas wishes wherever they are!
This kit includes:
Enough supplies to create 9 cards—3 each of 3 designs
9 coordinating envelopes
Christmas Everywhere photopolymer stamp set
One Lost Lagoon Ink Spot
Printed card bases, printed die-cut labels and images with red glitter, adhesive, and a clear block
Finished card size: 5-1/2″ x 4-1/4″ (14 x 10.8 cm)
Coordinating colors: Granny Apple Green, Lost Lagoon, Pecan Pie, Pretty Peacock, Real Red
Online Exclusive New Designer Series Paper Available
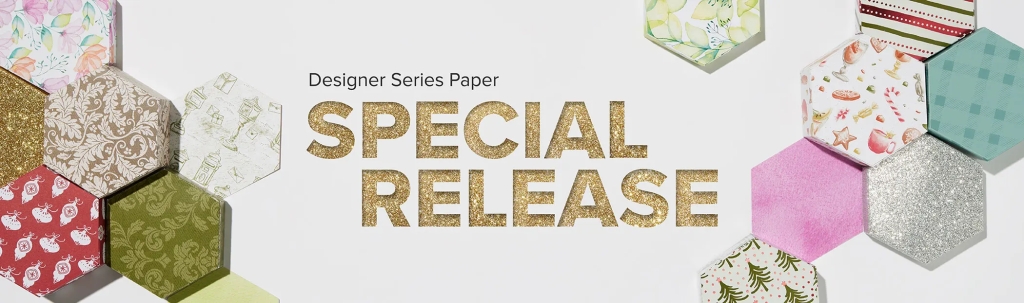
Surprise, surprise! We’re offering a special release of five beautiful new Designer Series Paper options! These papers include fabulous holiday prints, gorgeous seasonal styles, and some spectacular timeless designs.
We originally created these papers to be part of our second Sale-A-Bration offering. However, since our next release of new Online Exclusive products won’t happen until November (and you won’t be able to find any of these papers in a catalog), we’ve adjusted our strategy and decided to release these paper options starting 6 September! That way, you have the chance to get ahead on Christmas cards, seasonal crafts, and much more. These products are available while supplies last—you don’t want to miss out!
Sales Period: Starting 6 September
The special release paper options will be available in the Online Exclusives category in the online store.
Products will only be available while supplies last. Once products run out, they will no longer be visible in the online store.
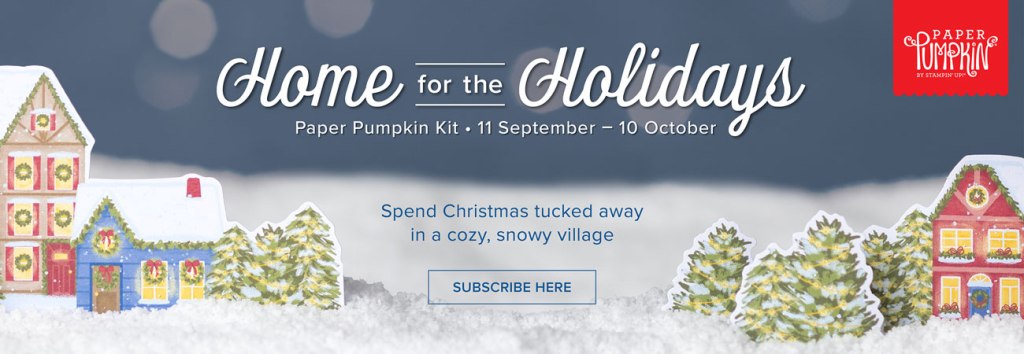
Create dazzling traditional Christmas cards with the Home for the Holidays Paper Pumpkin Kit! This kit includes eight beautiful cards—four each of two designs. Whether you want to send a few to your loved ones or fill your home with some extra special Christmas cheer, this kit has everything you need to make some sparkly, festive cards. Keep reading to learn more!
One extra fun feature of the Home for the Holidays Paper Pumpkin Kit is the bottle of glitter glue! You can use this glue to add shimmery, shiny details to the Christmas scenes on their cards. You can add some glitter to the trees, houses, snow, and more. There are endless possibilities you will have with this glue and the kit.
Bring some inspiration to your creations with the coordinating box design! This box could help create a cute village Christmas scene with your cards, and more. You could even use the box as a photo op prop! This is a fun way to make the most of the kit. Don’t let the Christmas crafts end once you finish with this kit! Since the Home for the Holidays Kit perfectly coordinates with the November Paper Pumpkin Kit, you and you will be able to extend your holiday crafting experience even further. So make sure your subscription is up to date!
This kit includes:
All the supplies you’ll need to create 8 sparkly and dazzling Christmas cards—4 each of 2 designs—and eight coordinating envelopes.
A coordinating photopolymer stamp set with endearing holiday sentiments and festive designs.
A Real Red Stampin’ Spot
A bottle of Glitter Glue
Beautiful Christmasy-themed precut pieces
Finished folded card size: 4-1/4″ x 5-1/2″ (10.8 x 14 cm)
Coordinating Stampin’ Up! colors: Balmy Blue, Blueberry Bushel, Cherry Cobbler, Crumb Cake, Crushed Curry, Daffodil Delight, Lemon Lolly, Mossy Meadow, Night of Navy, Old Olive, Pecan Pie, Real Red
Subscribe to the August Paper Pumpkin Kit between 11 September and 10 October by clicking here!
Note: Supplies may be limited toward the end of the subscription period.
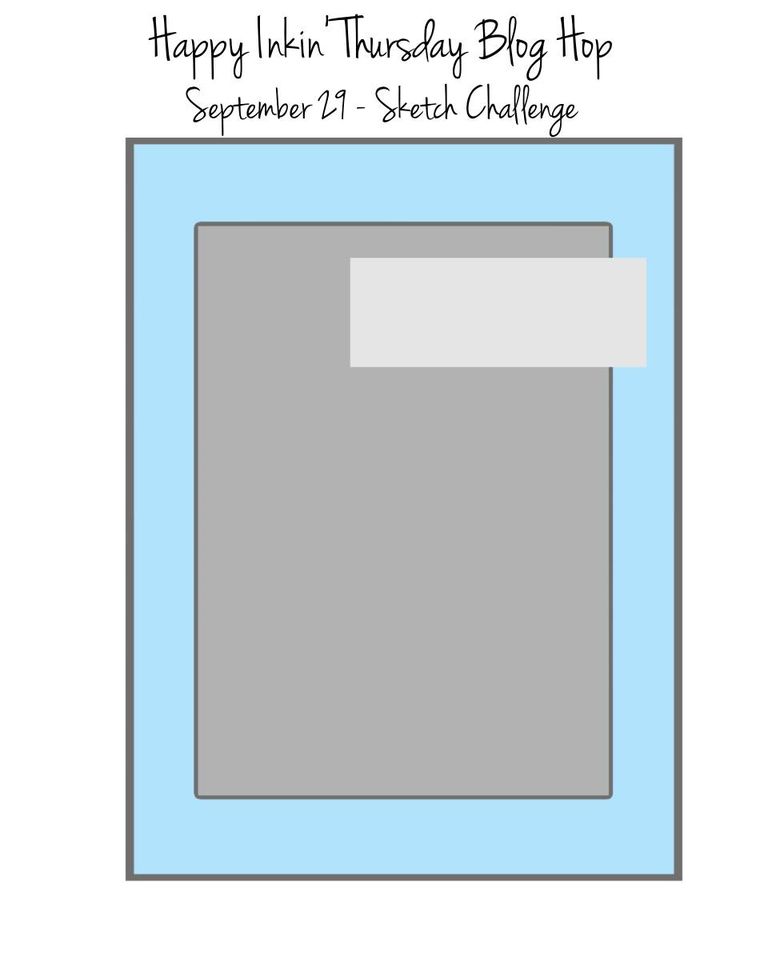
Good Thursday morning my stamping friends welcome to our Happy Inkin’ Thursday Blog Hop. I hope everyone is doing well today. I hope you will stop by everyone’s blog to see what they have created this week. If you are hopping over from Akiko’s blog, thank you for stopping by. This week we have Sketch Challenge. Here is my card using this week’s Sketch.
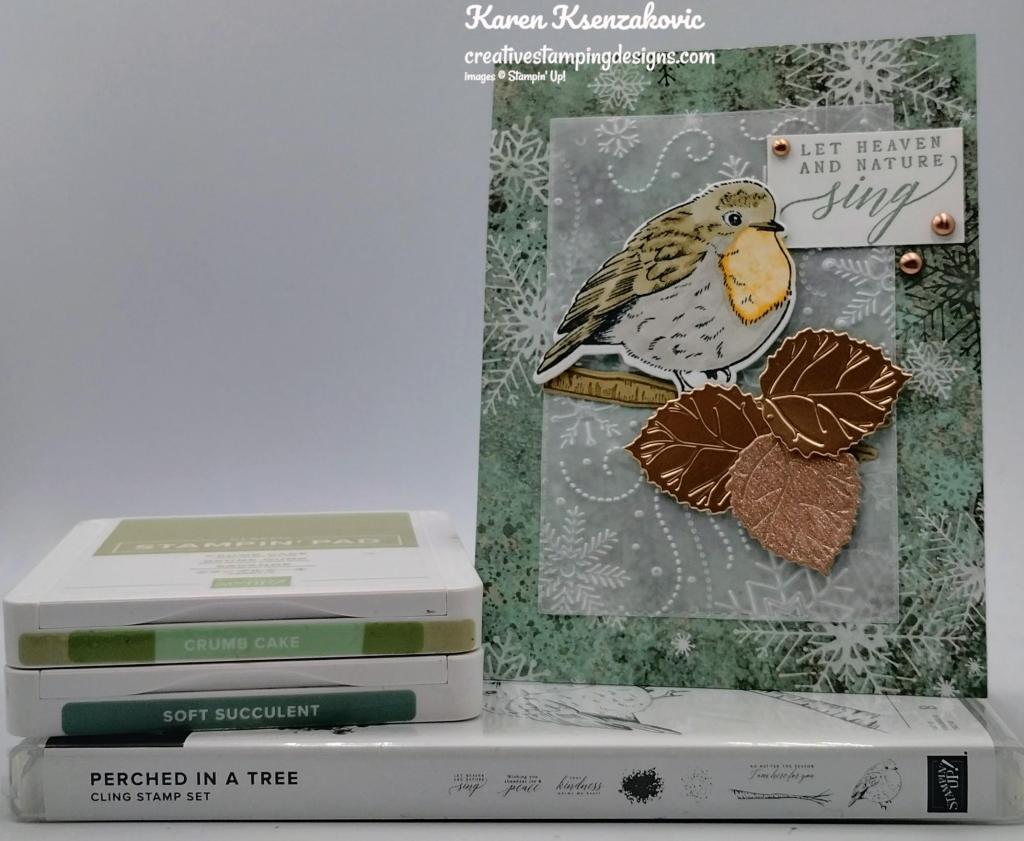
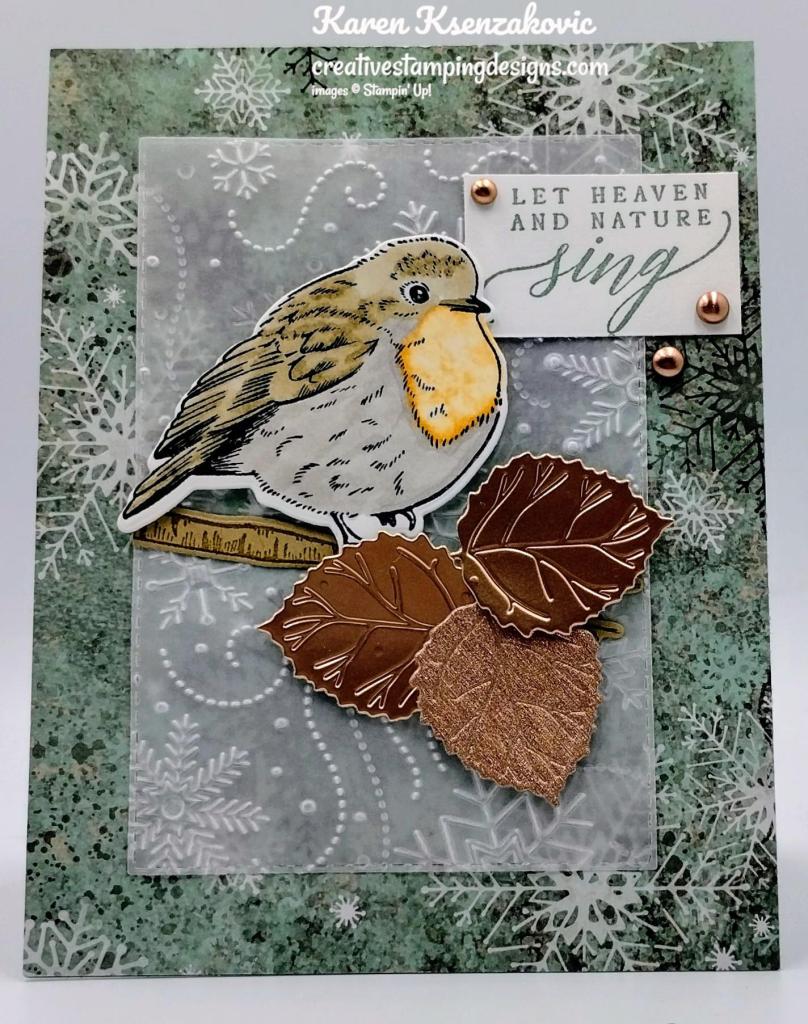
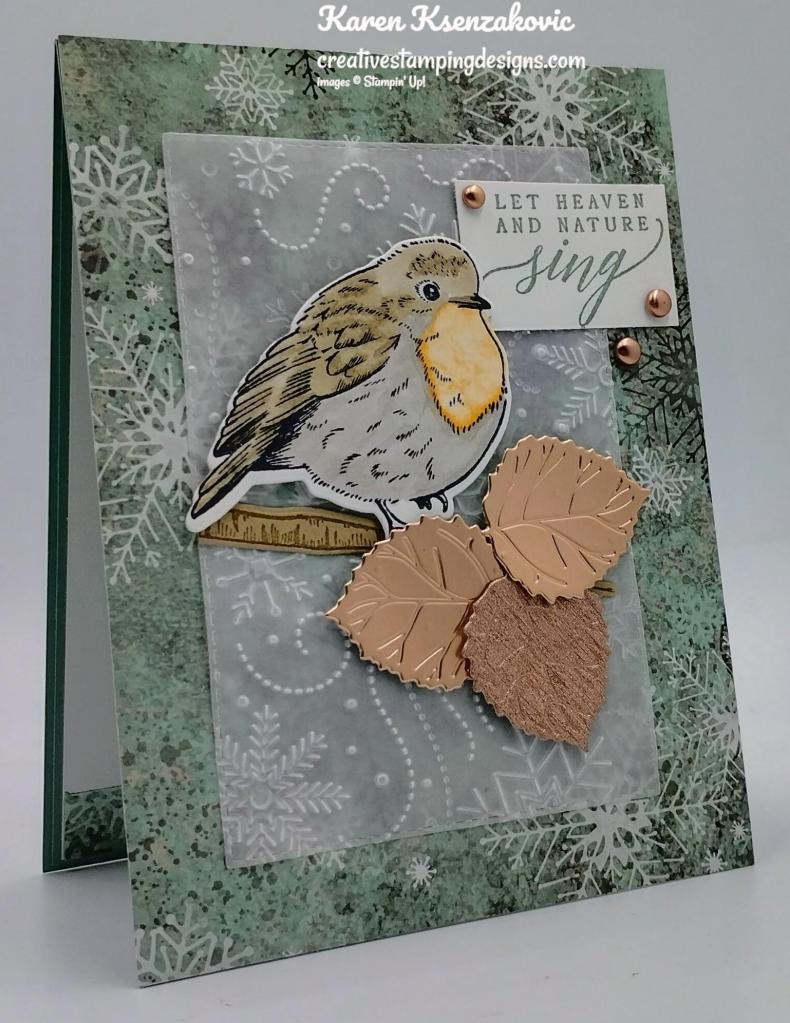
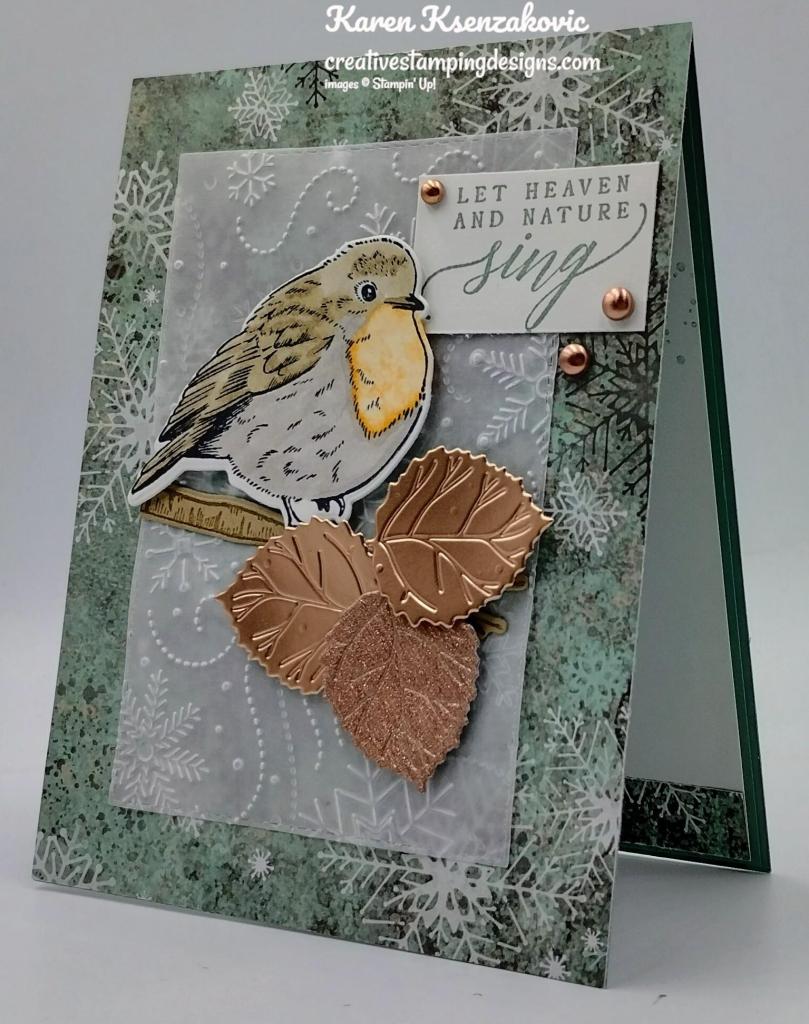
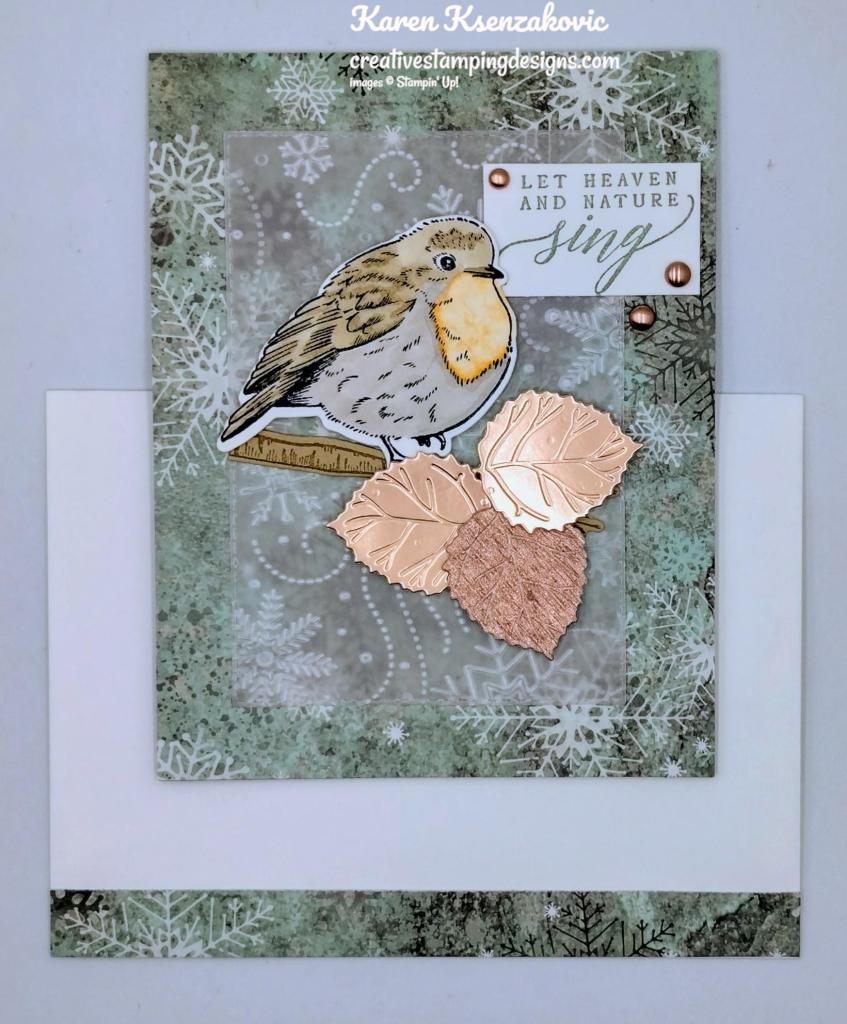
I used the Stampin’ Up! Perched In A Tree Bundle along with the Texture Chic Specialty Designer Series Paper for my card today.
Here is our sketch for this week.
I started by adhering a panel of Texture Chic DSP to a Soft Succulent card base using Multipurpose Liquid Glue. On a panel of Basic White cardstock, I stamped the bird image from the Stampin’ Up! Perched In A Tree Cling Stamp Set in Tuxedo Black Ink. I colored the image in using my Crumb Cake, Gray Granite and Pumpkin Pie Stampin’ Blends Markers. I cut the image using my Aspen Tree Dies. On a panel of Crumb Cake cardstock, I stamped the tree branch from the Perched In A Tree stamp set in Crumb Cake Ink. I cut the image using my Aspen Tree Dies. From panels of Rose Gold Specialty Paper and Gold and Rose Gold 6 X 6 Metallic Specialty Paper, I cut 3 leaves using the Aspen Tree Dies.
I embossed a panel of Vellum Paper using the Wintry 3D Embossing Folder. I adhered the branch to the Vellum using Stampin’ Seal. I adhered the bird and leaves to the branch using Stampin’ Dimensionals. I adhered the Vellum to the card front using Multipurpose Liquid Glue behind the branch and bird.
On a panel of Basic White cardstock, I stamped the sentiment from the Perched In A Tree stamp set in Soft Succulent Ink. I adhered the sentiment to the card front using Stampin’ Seal. I added a few Brushed Metallic Adhesive-Backed Dots to the card front.
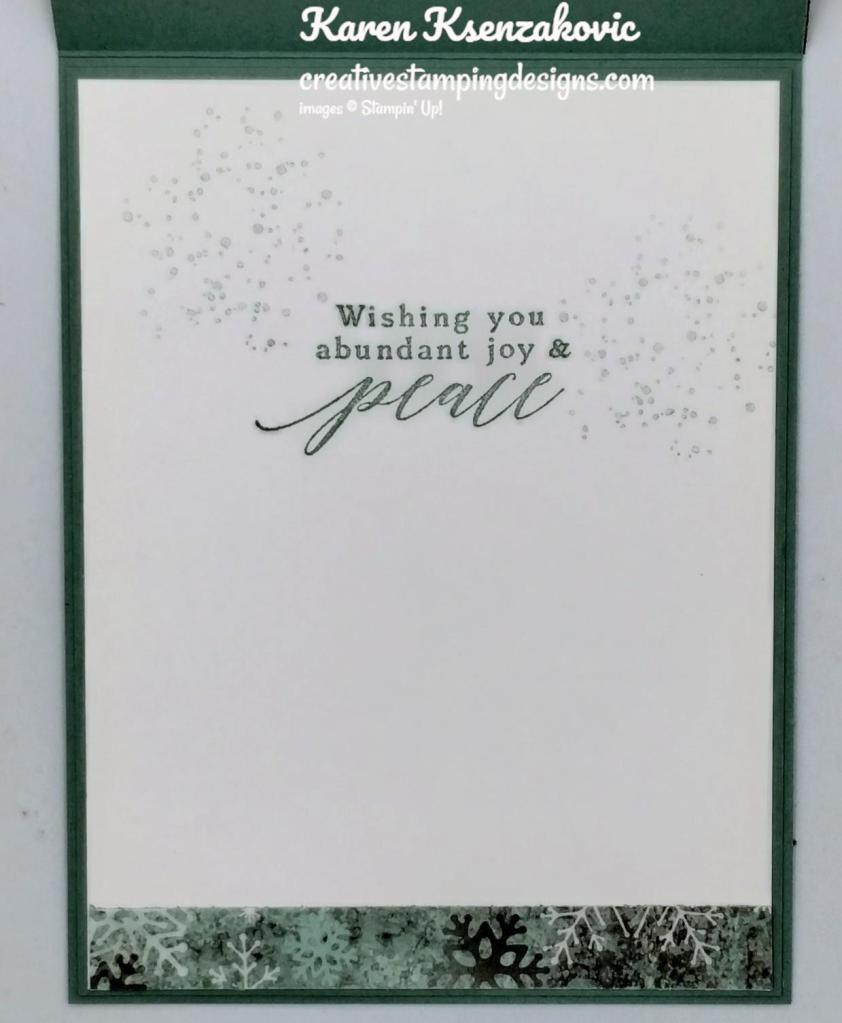
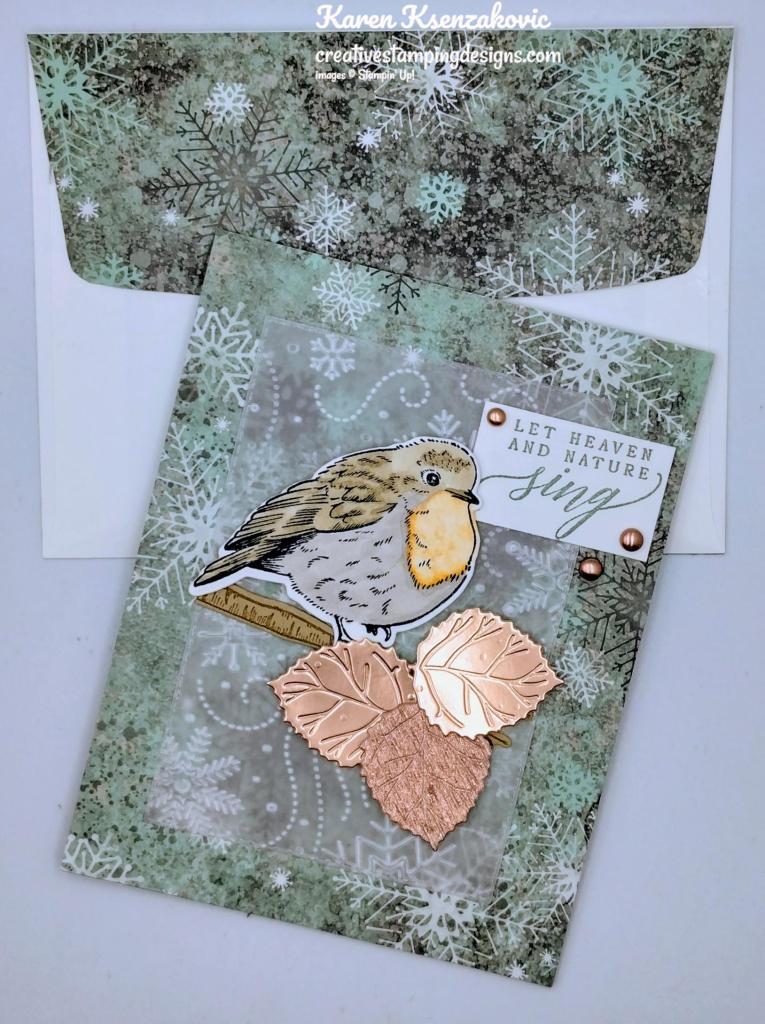
On the inside, I stamped the sentiment from the Perched In A Tree stamp set in Soft Succulent Ink on a Basic White Panel. I stamped the splatter image by the sentiment in Soft Succulent Ink, stamping off once on scrap paper. I adhered a strip of Texture Chic DSP to the bottom of the panel. I adhered the Basic White panel to a Soft Succulent mat then to the inside of the Soft Succulent card base.
To complete my card, I decorated a Basic White Medium Envelope. I adhered a strip of Texture Chic DSP to the envelope front and a panel to the envelope flap.
Thank you for stopping by my blog today. I hope you liked my card and will give it a try. Now that you’ve seen my card, take a minute to hop through and see everyone’s projects today. If you click on the Next Blog button, you’ll go to Tara’s page. Or you can just click on the names below to go directly to all their blogs! Happy Hopping!!
If you need any stamping supplies, I’d love to be your Demonstrator. Just click HERE to go directly to my online store or drop me an email if you have any questions.
MY CURRENT HOST CODE IS: 76V6XDMX
Use this host code when placing an order with me. When you order $50 or greater you will receive a free gift from me! If your order is over $150, please do not use this code, but you’ll still get the free gift. The free gift is your choice of any 1 item valued up to $10.00 from the 2022-2023 Annual Catalog or the July – December 2022 Mini Catalog!For any orders $50 or more I will also send you my monthly class tutorials. Click HERE or go to my Customer Rewards for more details and to see what this month’s tutorials are.
Please remember to use my current Host Code and make sure that you can see my name on the final checkout page listed as your Demonstrator when you order so that you know that you’re ordering with me and you’ll get my rewards!
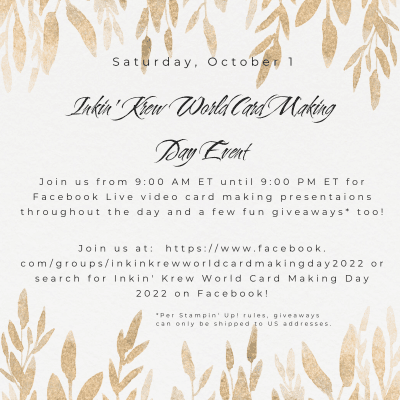
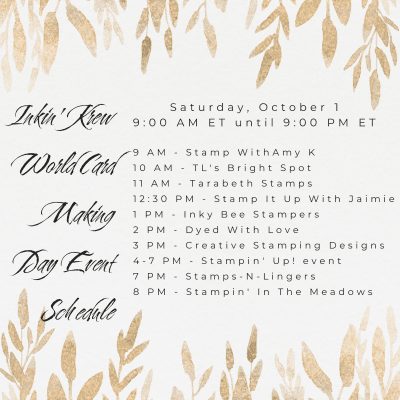
Our team is hosting an event this Saturday, October 1 for World Card Making Day! Stampin’ Up! is also hosting a 3 hours card making event on Saturday afternoon! Come join us for both events and make some cards to celebrate the day!
INKIN’ KREW WORLD CARD MAKING DAY EVENT
9 AM ET UNTIL 9 PM ET, SATURDAY, OCTOBER 1!
We’re doing it again!! Our team will be hosting a fun all-day event on Saturday, October 1 for World Card Making Day! Our event will feature card making presentations live on the event Facebook page as well as some fun giveaways!
Hop over to our event page now and request to join so that you don’t miss out on any of the fun! You can find the page right here:
Stampin’ Up! is also hosting an event online (see the details below) and we’re scheduling our event so that it runs before and after the Stampin’ Up! event! Most of us will be using one of the three bundles from the Stampin’ Up! event for our projects so you will come away from the day with tons of ideas for those three bundles!
If you’re interested, here is our schedule of live card making presentations:
All are welcome to join us! No registration required for our group, just request to join the Facebook page Here.
STAMPIN’ UP! WORLD CARD MAKING DAY EVENT
2 PM MT UNTIL 5 PM MT (4 PM ET UNTIL 7 PM ET), SATURDAY, OCTOBER 1!
FREE VIRTUAL, CRAFT-ALONG EVENT WITH STAMPIN’ UP!
Stampin’ Up! is also hosting a free, virtual card making event on October 1! In just under three hours, Stampin’ Up will make three unique cards and will share the instructions with you. Everyone is invited and welcome, and registration is not required. Mark your calendars now!
STAMPIN’ UP! WORLD CARD MAKING DAY CRAFTING EVENT DETAILS
Who: Anyone! When: October 1 from 2:00–5:00 p.m. (MT) Where: Online Price of Event: Free Registration Dates*: August 11 – October 1 (Registration is not required)
*You can still participate in the event without registering. Registration is encouraged because it’s the best way to stay up to date regarding event details.
To make the most of this experience, you can order the Cottage Rose Bundle from the 2022–2023 Annual Catalog, the Cottage Wreaths Bundle from the July–December 2022 Mini Catalog, or the Warm Welcome Bundle which you can get early from the January–June 2023 Mini Catalog!! The bundles aren’t required to attend the event, but if you’d like to make the projects presented, you’ll want to get the bundles!
If you haven’t seen the Warm Welcome bundle yet, here it is!
When you order any bundle, you’ll get a FREE gift of Iridescent Pearl Basic Jewels! (Note that even if you order all three bundles, you’ll only receive one Iridescent Pearls gift.)
Check out the Product Flyer with all the bundles’ ordering information. You can still attend this event without ordering the bundles, but it will be a lot more fun to craft together if you have one or more bundles! Order early to get your products in time for our World Card Making Day Creative Event.
Click Here to go to my Online Store to order any of these awesome bundles.
Starter Kit + Promotion From Stampin’ Up! October 4-31!!
October is a fabulous time to join Stampin’ Up! You will get even MORE FREE products in your customizable Starter Kit! Between October 4-31, when you join, you will get $155 worth of products in your Starter Kit for only $99!! Plus you’ll get free shipping and all the fun being a part of Stampin’ Up! and our Inkin’ Krew Team!
STARTER KIT+ PROMOTION DATES: OCTOBER 4-31, 2022
When you purchase your Starter Kit, you will be able to redeem $155 of Starter Kit eligible products for just $99!!
You can select any eligible Stampin’ Up! products up to the stated value of $155.
Your Starter Kit also includes business resources like catalogs, brochures, order forms, and postcards.
The Starter Kit also includes a FREE past Paper Pumpkin kit!
In addition to the amazing added value to your Starter Kit, when you join Stampin’ Up! you get to be a part of our amazing community of crafters. Plus, you get to enjoy sharing simple and fun crafting experiences with others, early access to products, and exclusive access to training events!!
There is no requirement to hold events, share online or sell in any way to others. You can join and simply get the awesome Starter Kit+ deal and then get a minimum of a 20% discount on anything that you purchase as a Demonstrator!
New demonstrators who submit their Independent Demonstrator Agreement (IDA) before October 4 or after October 31 will not be eligible for this offer.
You can check out more information about joining our team Here and more details about the benefits of being a Demonstrator and find the link to join Here.
I’d be happy to help you and talk to you about joining. Contact me at creativestampingdesigns@gmail.com and we can connect. This is such a great deal you won’t want to pass it up.
Some things are great on their own but become epic when they are paired with something else: cereal and milk, toast and butter, Fred Astaire and Ginger Rogers. We may be biased, but our favorite combo is our stamp sets and dies—and that’s what the Perfect Partners promotion is all about!
We created six new dies that coordinate with stamp sets in the 2022–2023 Annual Catalog and the July–December 2022 Mini Catalog. These coordinating dies will only be available during this promotion and will not be offered in any catalog.
These stamp sets and dies are available separately or as a bundle. By buying the bundle, you and your customers will save 10% off the retail price.
Put these wonderful stamp sets and dies together for more papercrafting fun!
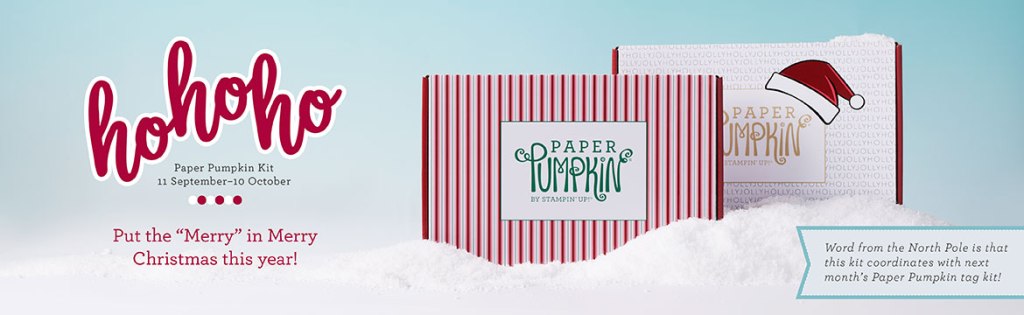
‘Tis the season to make your own Christmas cards with the Ho Ho Ho Paper Pumpkin Kit! This kit contains whimsical designs of Santa and his reindeer in a classic Christmas color palette which is sure to match various styles of holiday décor and look great on mantles everywhere. Each kit contains enough supplies to create 9 festive cards—3 each of 3 designs—and 9 coordinating envelopes. These cards are sure to bring the warm holiday spirit. And word from the North Pole is that this kit coordinates with next month’s Paper Pumpkin tag kit and the special add-on product! With so much coordination between products, you’ll have a breeze at creating a cohesive look for all your holiday gifting needs. Make this season the most wonderful time of the year for your loved ones—and for yourself!
This kit includes:
Ho Ho Ho Photopolymer Stamp Set
Early Espresso Classic Stampin’ Spot
Printed card bases
Printed envelopes
Printed die cuts
Die-cut labels
Iridescent foil die-cut snowflakes
Vellum
Vanilla expoy dots
Adhesive dots
Mini Dimensionals
Card size: 4-1/4″ x 5-1/2″ (10.8 x 14 cm)
Coordinating Stampin’ Up! colors: Bermuda Bay, Cherry Cobbler, Crumb Cake, Early Espresso, Shaded Spruce, Sweet Sorbet, Very Vanilla
Subscribe to the October Paper Pumpkin Kit between 11 September and 10 October at paperpumpkin.com!
Note: Supplies may be limited toward the end of the subscription period.
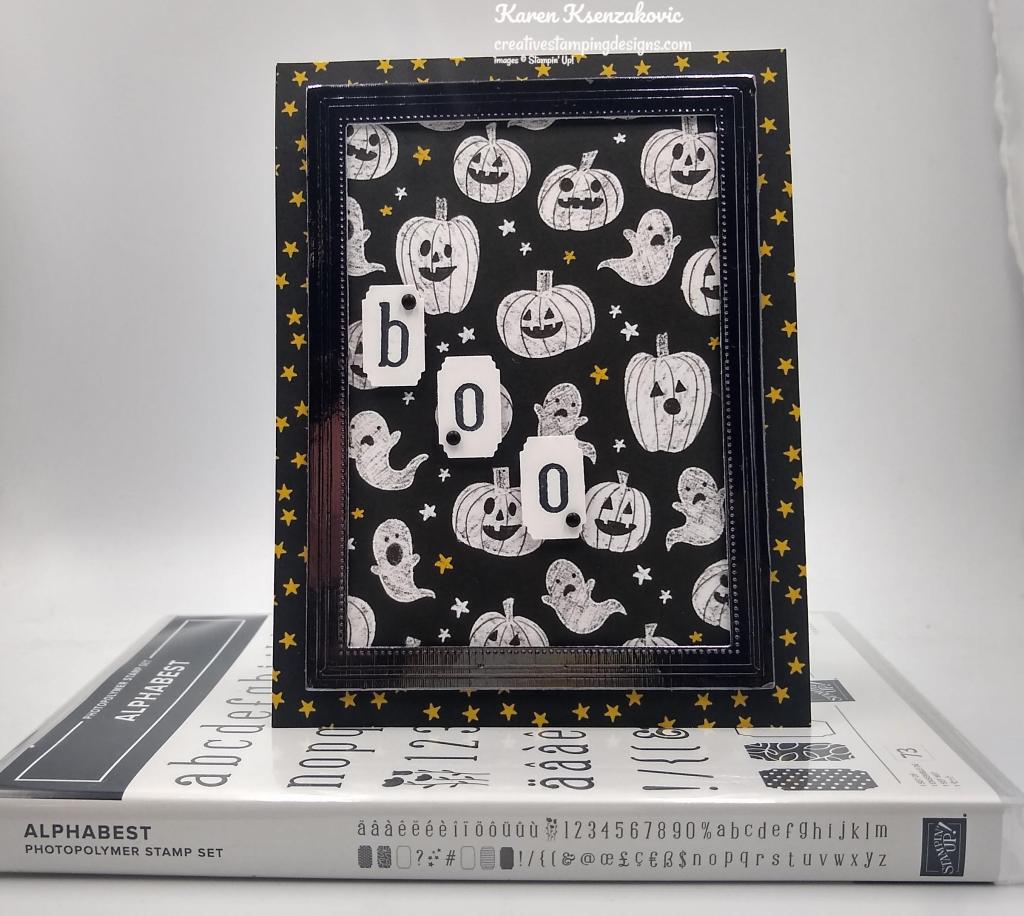
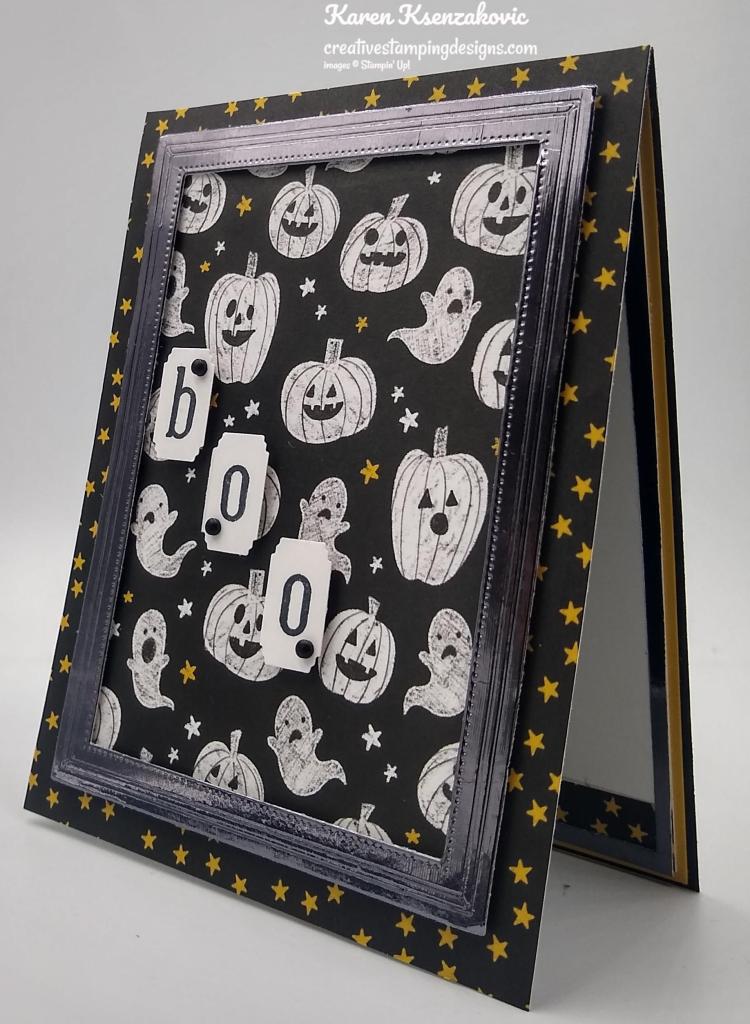
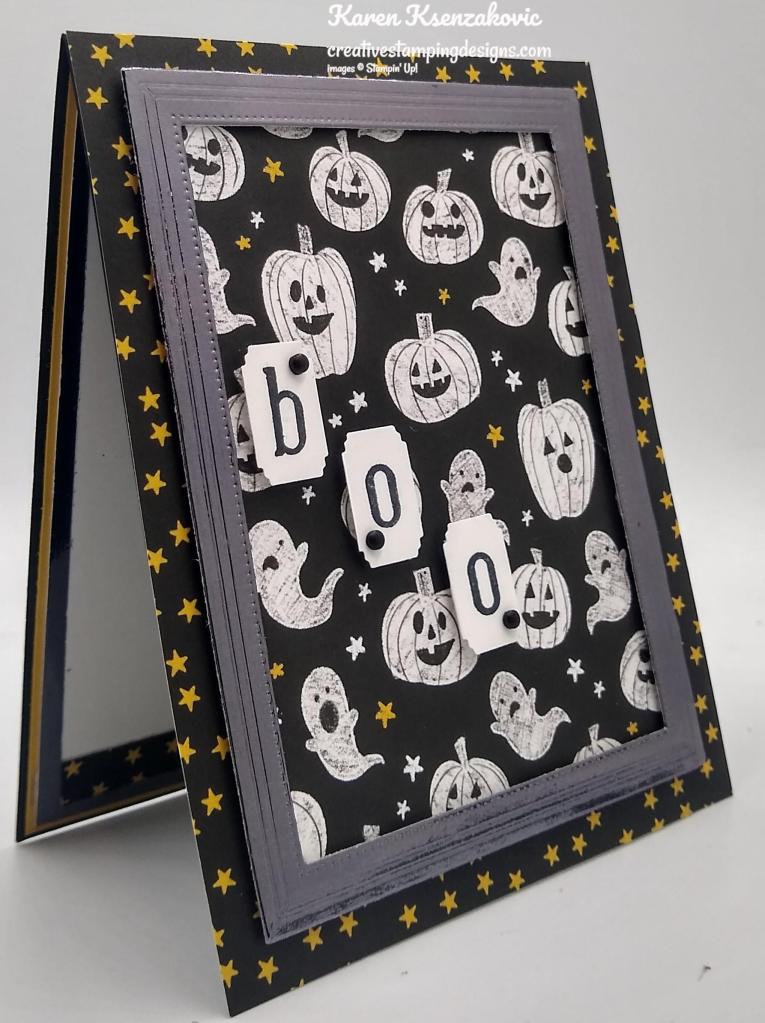
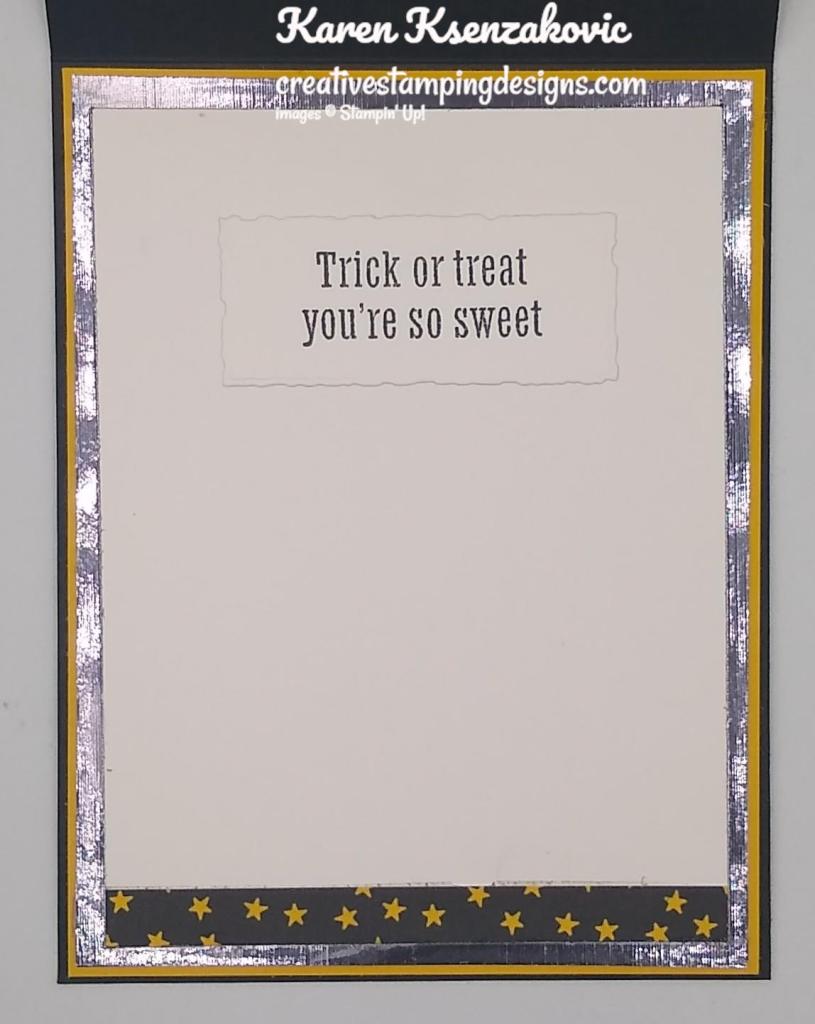
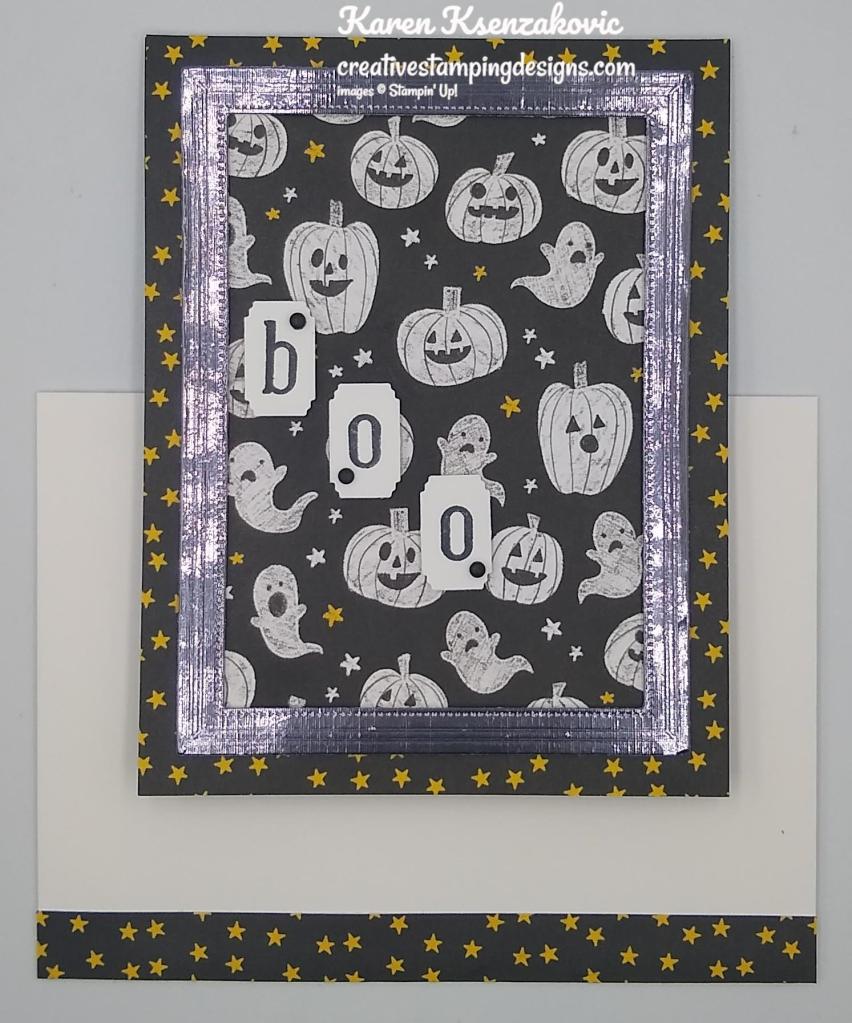
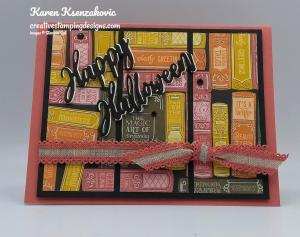
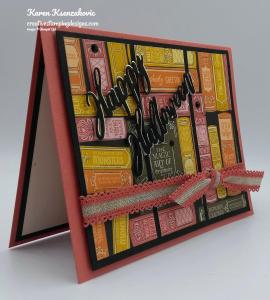
Good Tuesday morning my stamping friends. Welcome to Amy’s Inkin’ Krew Team Blog Hop. It’s the 2nd Tuesday of the month so that means Blog Hop Day!! If you are starting with me, be sure to hop around to see everyone’s beautiful projects. If you’ve hopped over from Mary’s blog, welcome to my blog and thank you for stopping by. The theme this month is “Halloween Fun”. We can interpret this however we want. I’ve made a super simple and quick card for you today featuring some of the Host DSP. Here’s my card for today.
I used the Stampi’ Up! Alphabest Bundle along with the Celebrate Everything Host Designer Series Paper for my card today.
I started by adhering a panel of Celebrate Everything DSP to a Basic Black card base using Multipurpose Liquid Glue. I adhered a smaller panel of Celebrate Everything DSP to the center of the panel.
From a panel of the Silver Foil Paper, I cut the largest die from the Fabulous Frames Dies. I adhered the frame over the smaller panel of DSP using Stampin’ Dimensionals.
On a panel of Basic White cardstock, I stamped the letters from the Stampin’ Up! Alphabest Photopolymer Stamp Set in Tuxedo Black Ink. I cut the letters out using the Best Label Punch. I adhered the letters to the card front using Stampin’ Dimensionals. I added a few Classic Matte Dots to the card front.
On the inside, I stamped the sentiment from the Stampin’ Up! Scary Cute Cling Stamp Set on a panel of Basic White cardstock. I cut the sentiment out using the Deckled Rectangle Dies so that I would have torn looking edges. I adhered the sentiment to a Basic White panel using Stampin’ Seal. I adhered a strip of the Celebrate Everything DSP to the bottom of the panel. I adhered the Basic White panel to a Crushed Curry mat and then to the inside of the Basic Black card base. I added the outline panel of the Silver Foil frame I cut using the Fabulous Frames Dies.
To complete my card, I decorated a Basic White Medium Envelope. I adhered a strip of the Celebrate Everything DSP to the envelope front and a panel to the envelope flap.
Thank you for visiting by my blog today, I hope you liked my card and will give it a try. Now that you’ve seen my card, be sure to hop around to see everyone’s beautiful projects. Hit Previous to hop back to Mary’s blog or hit Next to head over to Jillian’s blog. You can also click on each of the names and hop around that way. I hope you enjoy seeing everyone’s projects. Happy Hopping!!
If you need any stamping supplies, I’d love to be your Demonstrator. Just click HERE to go directly to my online store or drop me an email if you have any questions.
MY CURRENT HOST CODE IS: CD74ZSKH
Use this host code when placing an order with me. When you order $50 or greater you will receive a free gift from me! If your order is over $150, please do not use this code, but you’ll still get the free gift. The free gift is your choice of any 1 item valued up to $10.00 from the 2021-2022 Annual Catalog or the January – June 2022 Mini Catalog!For any orders $50 or more I will also send you my monthly class tutorials. Click HERE or go to my Customer Rewards for more details and to see what this month’s tutorials are.
Please remember to use my current Host Code and make sure that you can see my name on the final checkout page listed as your Demonstrator when you order so that you know that you’re ordering with me and you’ll get my rewards!
Every week in the month of September Stampin’ Up! will be offering a selection of discounted products. Discounts and product selection will vary from week to week.
Head over to my Online Store Here to see the Weekly Deals for this week.
New products added each week on 1, 8, 15, and 22 September.
Some things are great on their own but become epic when they are paired with something else: cereal and milk, toast and butter, Fred Astaire and Ginger Rogers. We may be biased, but our favorite combo is our stamp sets and dies—and that’s what the Perfect Partners promotion is all about!
We created six new dies that coordinate with stamp sets in the 2022–2023 Annual Catalog and the July–December 2022 Mini Catalog. These coordinating dies will only be available during this promotion and will not be offered in any catalog.
These stamp sets and dies are available separately or as a bundle. By buying the bundle, you and your customers will save 10% off the retail price.
Put these wonderful stamp sets and dies together for more papercrafting fun!
‘Tis the season to make your own Christmas cards with the Ho Ho Ho Paper Pumpkin Kit! This kit contains whimsical designs of Santa and his reindeer in a classic Christmas color palette which is sure to match various styles of holiday décor and look great on mantles everywhere. Each kit contains enough supplies to create 9 festive cards—3 each of 3 designs—and 9 coordinating envelopes. These cards are sure to bring the warm holiday spirit. And word from the North Pole is that this kit coordinates with next month’s Paper Pumpkin tag kit and the special add-on product! With so much coordination between products, you’ll have a breeze at creating a cohesive look for all your holiday gifting needs. Make this season the most wonderful time of the year for your loved ones—and for yourself!
This kit includes:
Ho Ho Ho Photopolymer Stamp Set
Early Espresso Classic Stampin’ Spot
Printed card bases
Printed envelopes
Printed die cuts
Die-cut labels
Iridescent foil die-cut snowflakes
Vellum
Vanilla expoy dots
Adhesive dots
Mini Dimensionals
Card size: 4-1/4″ x 5-1/2″ (10.8 x 14 cm)
Coordinating Stampin’ Up! colors: Bermuda Bay, Cherry Cobbler, Crumb Cake, Early Espresso, Shaded Spruce, Sweet Sorbet, Very Vanilla
Subscribe to the October Paper Pumpkin Kit between 11 September and 10 October at paperpumpkin.com!
Note: Supplies may be limited toward the end of the subscription period.
Celebrate Everything Host Designer Series Paper 4 1/4″ X 5 1/2″ (card front), 3 1/2″ X 4 3/4″ (card front panel), 1/2″ X 4″ (inner liner strip), 1/2″ X 6″ & 2 1/4″ X 6″ (envelope)
Good Sunday morning my stamping friends. I’m still here in Georgia. I’m having such an awesome time, I just want to stay here with everyone. We’ve been crafting, laughing, eating, crafting, laughing and eating and just having an awesome time. I don’t remember the last time I ate this much good food, and it’s very healthy too, lots of veggies. I’ll be leaving later tonight to head back to New Jersey. I’ll share some of the projects with you soon.
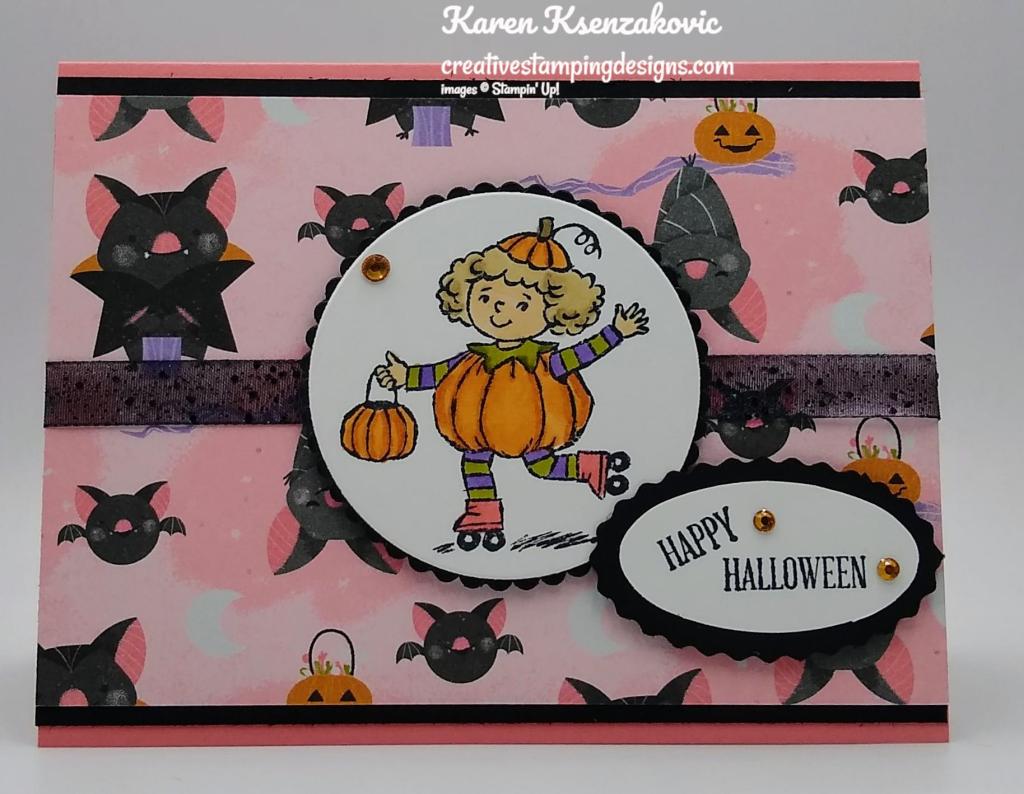
My niece asked me to make a card for her husband for his birthday. His absolute favorite holiday is Halloween. Luckily his birthday is close to Halloween too. Here’s my card for today.
I used the Stampin’ Up! Happiest of Birthdays Cling Stamp Set along with the Cute Halloween Designer Series Paper for my card today.
I started by adhering a panel of the Cute Halloween DSP to a Basic Gray card base using Stampin’ Seal. I adhered another panel of the Cute Halloween DSP to a Pumpkin Pie mat using Stampin’ Seal and then to the card front using Multipurpose Liquid Glue.
On 2 strips of Basic White cardstock I stamped the sentiment from the Happiest of Birthdays stamp set in Tuxedo Black Ink. I used some washi tape to block off the center of the sentiment since I only wanted the top and bottom. I adhered the sentiment to the card front using Stampin’ Dimensionals.
From another panel of the Cute Halloween DSP I cut out 3 of the skeleton heads using my Paper Snips and adhered them to the bottom of the card front using Stampin’ Dimensionals. I added a few Matte Black Dots to the card front.
On the inside I stamped the sentiment from the Stampin’ Up! Inspired Thoughts Cling Stamp Set in Tuxedo Black Ink on a Basic White panel. I adhered 2 strips of the Cute Halloween DSP to the top and bottom of the panel using Stampin’ Seal. I adhered the Basic White panel to a Pumpkin Pie mat using Stampin’ Seal and then to the inside of the Basic Gray card base using Multipurpose Liquid Glue.
To finish my card I decorated a Basic White Medium Envelope. I adhered a strip of the Cute Halloween DSP to the envelope front and a panel to the envelope flap.
Thank you for stopping by my blog today. I hope you like today’s card and will give it a try. Happy Stamping!1
If you need any stamping supplies, I’d love to be your Demonstrator. Just click HERE to go directly to my online store or drop me an email if you have any questions.
MY CURRENT HOST CODE IS: JAK446GF
Use this host code when you order $50 or greater and receive a free gift from me! If your order is over $150, please do not use this code, but you’ll still get the free gift. The free gift is your choice of any 1 item valued up to $10.00 from the 2020-2021 Annual Catalog or the January-June 2021 Mini Catalog!For any orders $50 or more I will also send you my monthly class tutorials. Click HERE or go to my Customer Rewards for more details and to see what this months tutorials are.
Please remember to use my current Host Code and make sure that you can see my name on the final checkout page listed as your Demonstrator when you order so that you know that you’re ordering with me and you’ll get my rewards!
Awesome Joining Promotions Until September 30, 2021
There is an AWESOME joining promotion happening! If you purchase the Starter Kit between August 3 and September 30, you’ll get to pick a FREE bundle from this list!
Frosted Gingerbread
Christmas Season
Christmas To Remember
Whimsical Trees
Peaceful Deer
Sweet Little Stockings
Penguin Place
Peaceful Cabin
Arctic Bears
Beauty Of Tomorrow
Gorgeous Leaves
Nature’s Harvest
When you purchase the Starter Kit for $99 + taxes (if applicable), the kit ships for FREE and YOU get to pick $125 in Stampin’ Up! merchandise OF YOUR CHOICE. If you purchase the kit during Sale-a-bration, you’ll get an additional FREE bundle from the select twelve listed above (with a value up to $60.25!!) with your kit! A free bundle in addition to $125 in merchandise for $99, YES PLEASE!!You will also get a past Paper Pumpkin Kit and other supplies free in your kit.
If you are planning on placing an order of $100, you might really want to consider joining. This is such an awesome joining deal, you don’t want to pass it up. There is no obligation to sell, have workshops or do Facebook lives. You can join strictly to be a ‘hobby demonstrator’ and enjoy the 20% discount. I would love to have you on my team!!!You also get to enjoy all the demonstrator perks like early ordering, sneak peeks at what’s coming and best of all the events. Why wait, this is such a great sign up promotions, join now and be a part of our awesome Stampin’ Up! family!!!
If you have any questions about joining, please drop me a note at creativestampingdesigns@gmail.com, I’d love to talk with you about it! You can find more information about joining on my blog @ creativestampingdesigns.com
When you picture a peaceful Christmas, what comes to mind? Do you see snow outside your window, softly swirling through the sky? A tree trimmed with tinsel, a fire crackling nearby? Maybe you’re dreaming of decorating a holly jolly gingerbread house. Can you catch a whiff of Christmas cookies wafting through the air?
Whatever it is you think about when Christmas comes to town, picture a peaceful Christmas with the Peaceful Christmas Paper Pumpkin Kit! This glimmering and gleaming kit is your creative kickstart to Christmas cardmaking. With sprinkles of snow, shimmering silver skies, and heartwarming holiday wishes, you’ll have enough elements and embellishments to create 10 Christmas cards and coordinating envelopes.
Speaking of coordination, make even more Christmas magic with Peaceful Place products! Our stunning Peaceful Place Suite Collection (item 156277) pairs perfectly with the kit’s components. Brew a cup of cocoa, snuggle up with a soft blanket, and prepare for a cozy craft night in!
Details:
The kit contains enough elements to create 10 Christmas cards—5 each of 2 designs—and coordinating envelopes. This all-inclusive kit includes printed card bases, die-cut paper pieces, embellishments, adhesive, and more!
October’s kit arrives in a cute collectible box covered with enchanting evergreen trees. Use this special, limited-edition box to store your holiday handicrafts, or transform it into a well-wrapped package for a present!
The kit’s contents pair perfectly with the Peaceful Place Suite Collection (item 156277). To continue your Christmas crafting, combine the kit’s components with the suite’s patterned paper, shimmery sequins, and more!
Card size: 4-1/4″ x 5-1/2″ (10.8 x 14 cm)
Envelope size: 4-1/2″ x 5-3/4″ (11.4 x 14.6 cm)
Coordinating colors: Basic Gray, Real Red, Shaded Spruce, silver foil
Subscribe to the October 2021 Paper Pumpkin Kit between 11 September and 10 October at paperpumpkin.com!
Note: Supplies may be limited toward the end of the subscription period.
Basic Gray Cardstock 8 1/2″ X 5 1/2″ (card base scored & folded at 4 1/4″)
Basic White Cardstock 1/2″ X 2″ & 1/2″ x 2 3/4″ (sentiments), 4″ X 5 1/4″ (inner liner)
Pumpkin Pie Cardstock 2 5/8″ X 5 3/8″ (dsp panel mat), 4 1/8″ X 5 3/8″ (inner liner mat)
Cute Halloween Designer Series Paper 4 1/8″ X 5 3/8″ (card front), 2 1/4″ X 5 3/8″ (card front panel), 2 – 1/2″ X 5 1/4″ (inner liner strips), 3/4″ X 6″ & 2 1/4″ X 6″ (envelope)
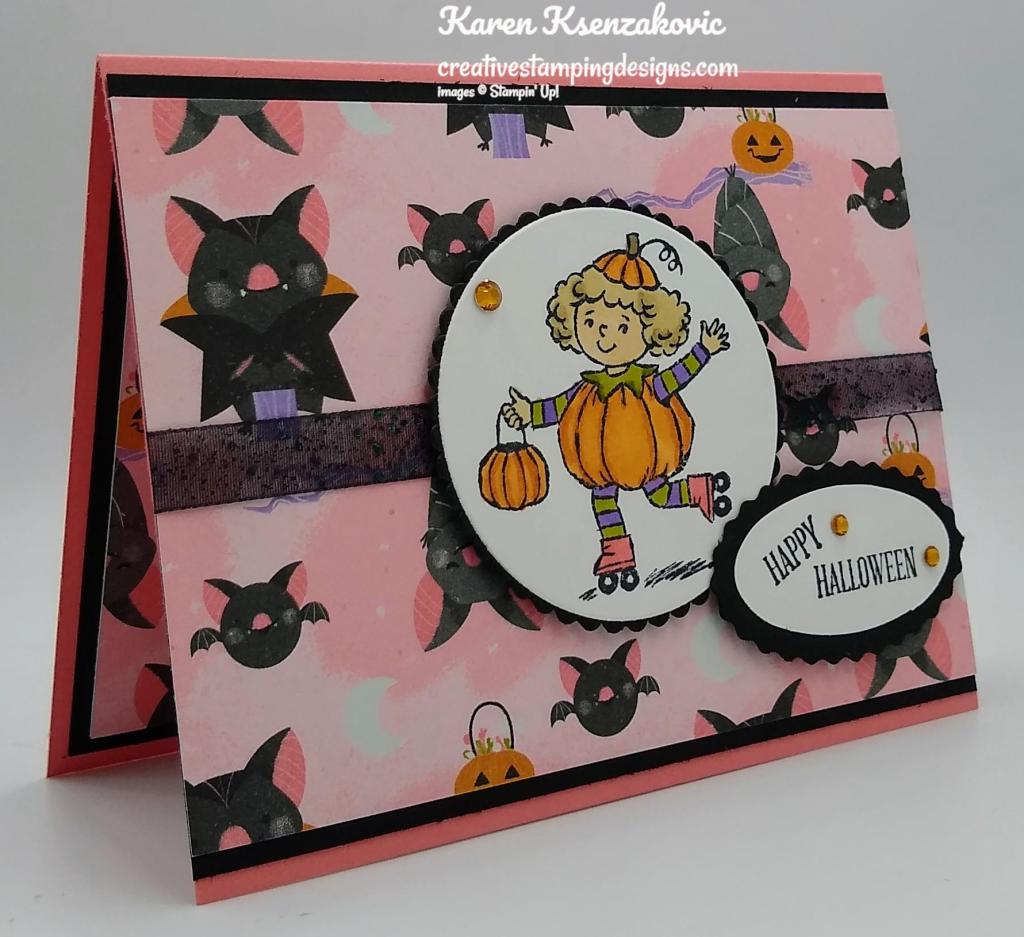
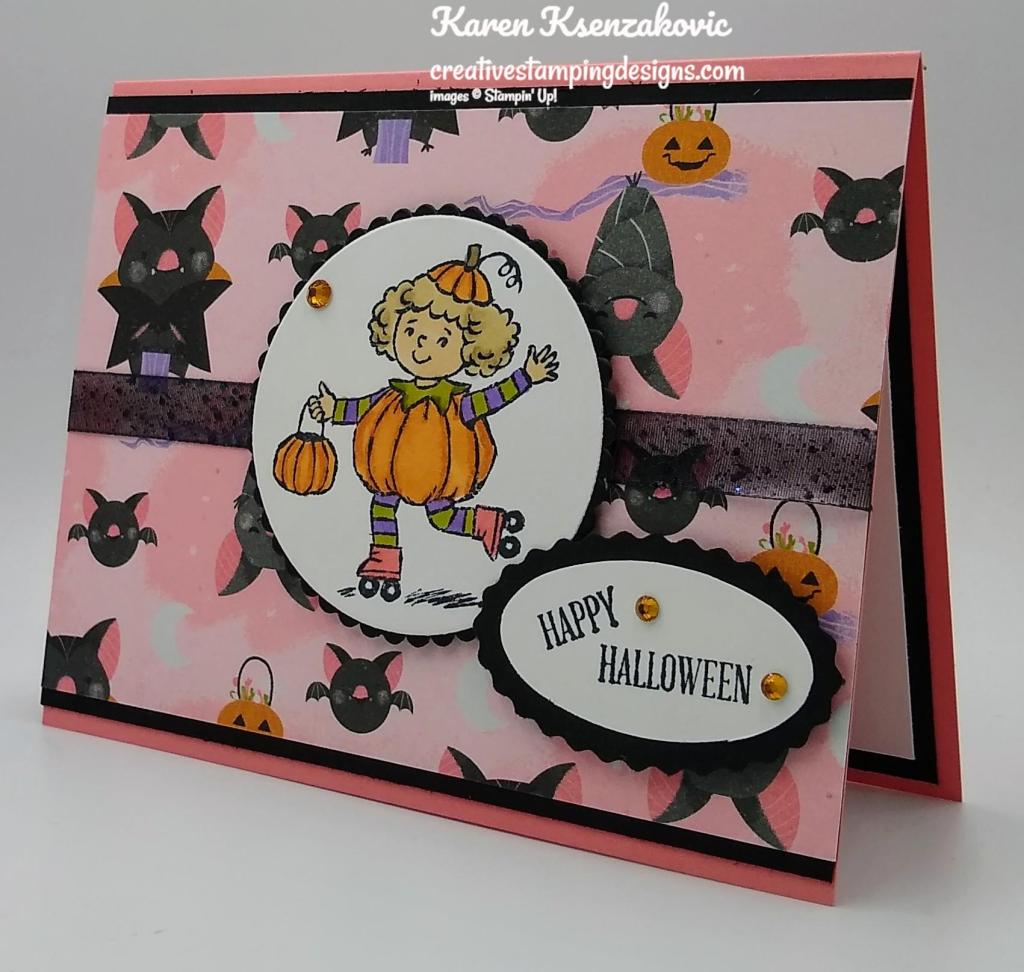
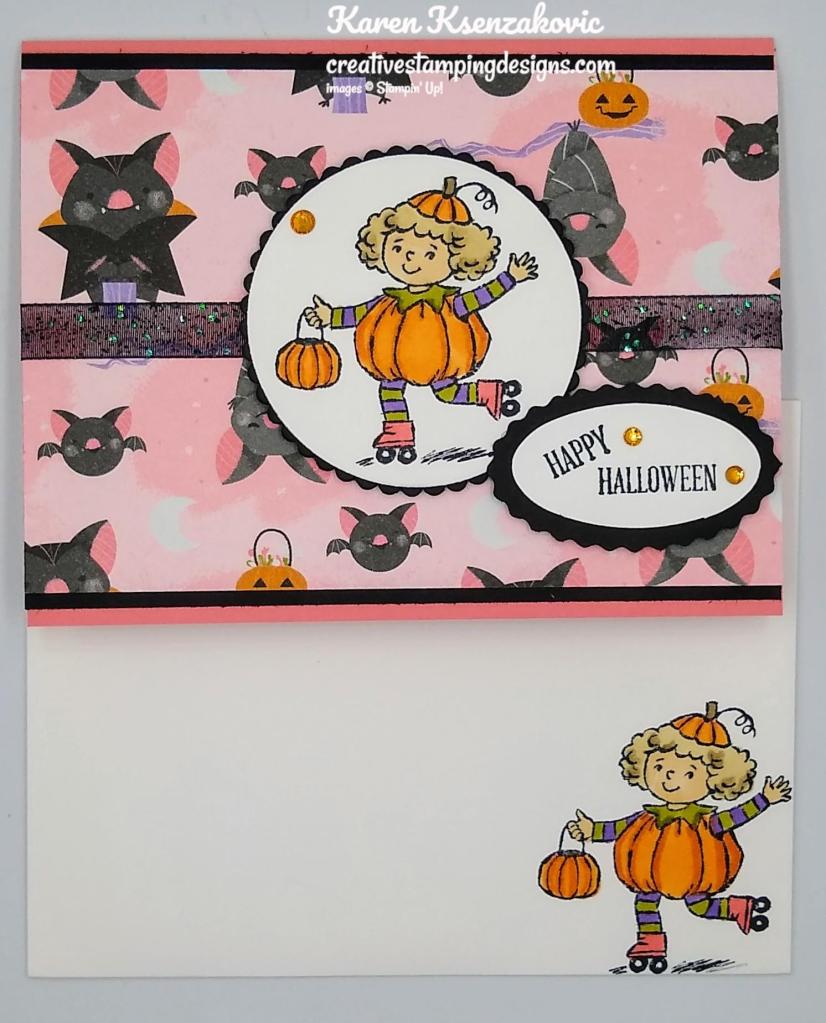
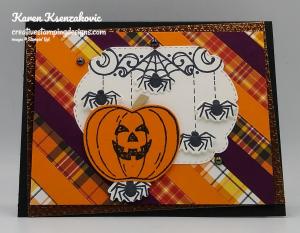
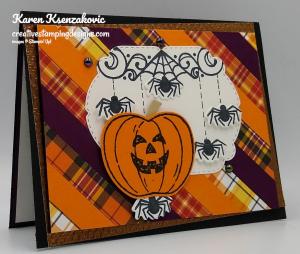
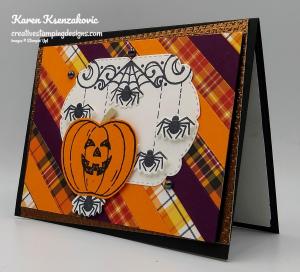
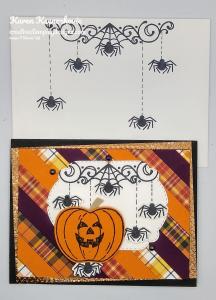
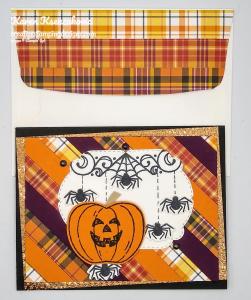
Good Tuesday morning my fellow stampers. Welcome to Amy’s Inkin’ Krew Team Blog Hop. It’s the 2nd Tuesday of the month so that means Blog Hop Day!! If you are starting with me, be sure to hop around to see everyone’s beautiful projects. If you’ve hopped over from Akiko Sudano’s blog, welcome to my blog and thank you for stopping by. The theme this month is “Halloween Fun”. We can interpret this however we want. Here’s my card for today.
I used the Stampin’ Up! Seasons of Fun Host Cling Stamp Set along with the Cute Halloween 6 X 6 Designer Series Paper for my card today.
I started by adhering a panel of Cute Halloween DSP on a Basic Black mat using Stampin’ Seal. I wrapped a piece of 3/8″ Glittered Organdy Ribbon, which I colored using my Basic Black Stampin’ Blends Marker, around the layered panel and adhered it on the back with Stampin’ Seal. I adhered the card front to a Flirty Flamingo card base using Multipurpose Liquid Glue.
On a panel of Basic White cardstock I stamped the Halloween image from the Season of Fun stamp set in Tuxedo Black Ink. I colored the image in using my Crumb Cake, Flirty Flamingo, Highland Heather, Ivory, Old Olive and Pumpkin Pie Stampin’ Blends Markers. I cut the image out using my Layered Circles Dies. I cut a scalloped circle from a panel of Basic Black cardstock using the Layered Circles Dies and adhered the artwork to it using Stampin’ Seal. I adhered the layered artwork to the card front using Stampin’ Dimensionals.
On a panel of Basic White cardstock I stamped the sentiments from the Stampin’ Up! A Wish For Everything Cling Stamp Set in Tuxedo Black Ink. Using my Double Oval Punch I punched out the sentiment. I punched out a Basic Black scalloped oval using the Double Oval Punch and adhered the sentiment to it using Stampin’ Seal. I adhered the layered sentiment to the card front using Stampin’ Dimensionals. I added a few Pumpkin Pie Holiday Rhinestone Basic Jewels to the card front.
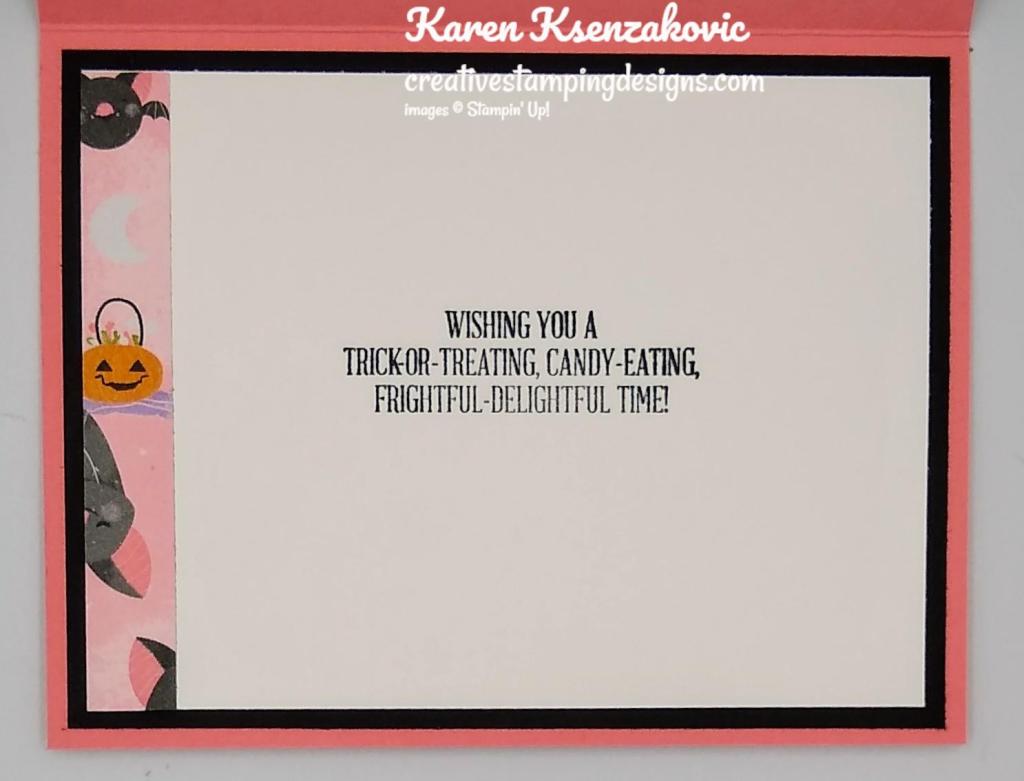
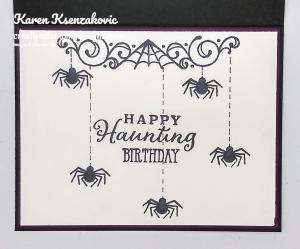
On the inside I stamped the sentiment from A Wish For Everything stamp set in Tuxedo Black Ink on a Basic White panel. I adhered a strip of the Cute Halloween DSP to the side of the panel using Stampin’ Seal. I adhered the Basic White panel to a Basic Black mat using Stampin’ Seal and then to the inside of the Flirty Flamingo card base using Multipurposed Liquid Glue.
To complete my card I decorated a Basic White Medium Envelope. I stamped the Halloween image from the Season of Fun stamp set in Tuxedo Black Ink and colored it in the same as on the card. I adhered a panel of Cute Halloween DSP to the envelope flap.
Thank you for visiting by my blog today, I hope you liked my card and will give it a try. Now that you’ve seen my card, be sure to hop around to see everyone’s beautiful projects. Hit Previous to hop back to Akiko Sudano’s blog or hit Next to head over to Donna Leonard’s blog. You can also click on each of the names and hop around that way. Happy Hopping!!
If you need any stamping supplies, I’d love to be your Demonstrator. Just click HERE to go directly to my online store or drop me an email if you have any questions.
MY CURRENT HOST CODE IS: JAK446GF
Use this host code when you order $50 or greater and receive a free gift from me! If your order is over $150, please do not use this code, but you’ll still get the free gift. The free gift is your choice of any 1 item valued up to $10.00 from the 2020-2021 Annual Catalog or the January-June 2021 Mini Catalog!For any orders $50 or more I will also send you my monthly class tutorials. Click HERE or go to my Customer Rewards for more details and to see what this months tutorials are.
Please remember to use my current Host Code and make sure that you can see my name on the final checkout page listed as your Demonstrator when you order so that you know that you’re ordering with me and you’ll get my rewards!
Awesome Joining Promotions Until September 30, 2021
There is an AWESOME joining promotion happening! If you purchase the Starter Kit between August 3 and September 30, you’ll get to pick a FREE bundle from this list!
Frosted Gingerbread
Christmas Season
Christmas To Remember
Whimsical Trees
Peaceful Deer
Sweet Little Stockings
Penguin Place
Peaceful Cabin
Arctic Bears
Beauty Of Tomorrow
Gorgeous Leaves
Nature’s Harvest
When you purchase the Starter Kit for $99 + taxes (if applicable), the kit ships for FREE and YOU get to pick $125 in Stampin’ Up! merchandise OF YOUR CHOICE. If you purchase the kit during Sale-a-bration, you’ll get an additional FREE bundle from the select twelve listed above (with a value up to $60.25!!) with your kit! A free bundle in addition to $125 in merchandise for $99, YES PLEASE!!You will also get a past Paper Pumpkin Kit and other supplies free in your kit.
If you are planning on placing an order of $100, you might really want to consider joining. This is such an awesome joining deal, you don’t want to pass it up. There is no obligation to sell, have workshops or do Facebook lives. You can join strictly to be a ‘hobby demonstrator’ and enjoy the 20% discount. I would love to have you on my team!!!You also get to enjoy all the demonstrator perks like early ordering, sneak peeks at what’s coming and best of all the events. Why wait, this is such a great sign up promotions, join now and be a part of our awesome Stampin’ Up! family!!!
If you have any questions about joining, please drop me a note at creativestampingdesigns@gmail.com, I’d love to talk with you about it! You can find more information about joining on my blog @ creativestampingdesigns.com
When you picture a peaceful Christmas, what comes to mind? Do you see snow outside your window, softly swirling through the sky? A tree trimmed with tinsel, a fire crackling nearby? Maybe you’re dreaming of decorating a holly jolly gingerbread house. Can you catch a whiff of Christmas cookies wafting through the air?
Whatever it is you think about when Christmas comes to town, picture a peaceful Christmas with the Peaceful Christmas Paper Pumpkin Kit! This glimmering and gleaming kit is your creative kickstart to Christmas cardmaking. With sprinkles of snow, shimmering silver skies, and heartwarming holiday wishes, you’ll have enough elements and embellishments to create 10 Christmas cards and coordinating envelopes.
Speaking of coordination, make even more Christmas magic with Peaceful Place products! Our stunning Peaceful Place Suite Collection (item 156277) pairs perfectly with the kit’s components. Brew a cup of cocoa, snuggle up with a soft blanket, and prepare for a cozy craft night in!
Details:
The kit contains enough elements to create 10 Christmas cards—5 each of 2 designs—and coordinating envelopes. This all-inclusive kit includes printed card bases, die-cut paper pieces, embellishments, adhesive, and more!
October’s kit arrives in a cute collectible box covered with enchanting evergreen trees. Use this special, limited-edition box to store your holiday handicrafts, or transform it into a well-wrapped package for a present!
The kit’s contents pair perfectly with the Peaceful Place Suite Collection (item 156277). To continue your Christmas crafting, combine the kit’s components with the suite’s patterned paper, shimmery sequins, and more!
Card size: 4-1/4″ x 5-1/2″ (10.8 x 14 cm)
Envelope size: 4-1/2″ x 5-3/4″ (11.4 x 14.6 cm)
Coordinating colors: Basic Gray, Real Red, Shaded Spruce, silver foil
Subscribe to the October 2021 Paper Pumpkin Kit between 11 September and 10 October at paperpumpkin.com!
Note: Supplies may be limited toward the end of the subscription period.
Good Tuesday morning my fellow stampers. Welcome to Amy’s Inkin’ Krew Team Blog Hop. It’s the 2nd Tuesday of the month so that means Blog Hop Day!! If you are starting with me, be sure to hop around to see everyone’s beautiful projects. If you’ve hopped over from Amy Koenders blog, welcome to my blog and thank you for stopping by. The theme this month is “Halloween Fun”. We can interpret this however we want. I’m not a big Halloween fan, but I had a lot of fun creating this card. Here’s my card.
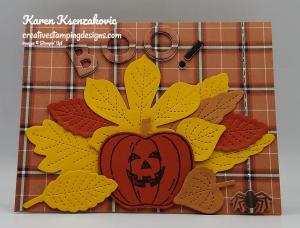
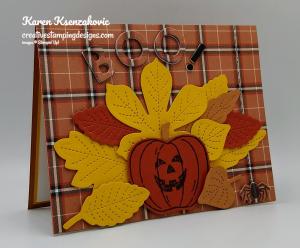
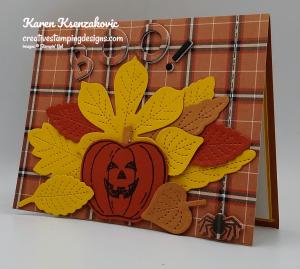
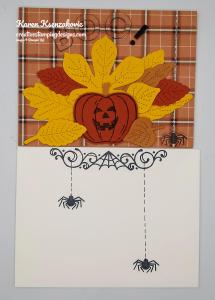
I started by cutting the ‘BOO!’ out of a panel of Plaid Tidings 6 X 6 Designer Series Paper using the Playful Alphabet Dies. I adhered the DSP panel to a Cinnamon Cider card base using Multipurpose Liquid Glue.
Using a Foam Adhesive sheet with a panel of Basic Black cardstock, I cut the ‘BOO!’ out again using the Playful Alphabet Dies and adhered it to the card front where I cut the letters out. I adhered the DSP letters on top of the Basic Black foam pieces using Multipurpose Liquid Glue making sure the plaid lines lined up. I cut the leaves from the Stitched Leaves Dies out of panels of Bumblebee, Cajun Craze and Cinnamon Cider cardstock. I ran each of the leaves through my Stampin’ Cut & Emboss Machine again adding the stitching to them from the Stitched Leaves Dies. I stamped the pumpkin image from the Stampin’ Up! Harvest Hellos Cling Stamp Set in Tuxedo Black Memento Ink on a panel of Cajun Craze cardstock. I stamped the Jack-O-Lantern face from the Harvest Hellos stamp set in the center of the pumpkin using Tuxedo Black Memento Ink. I punched the pumpkin out using my Apple Builder Punch. I cut the stem for the pumpkin out of a scrap of Cinnamon Cider cardstock using the Apple Builder Punch and adhered it to the back of the pumpkin using a Glue Dot.
I arranged the leaves and pumpkin on the card front the way I wanted and adhered the leaves using Glue Dots and Multipurpose Liquid Glue and the pumpkin using Stampin’ Dimensionals. I stamped the spider image from the Stampin’ Up! Celebration Tidings Photopolymer Stamp Set in Tuxedo Black Memento Ink on a scrap of the Plaid Tidings DSP. I cut the spider out using the Celebration Labels Dies and adhered it to the card front using Mini Stampin’ Dimensionals, matching up the lines on the plaid. Using my Basic Black Stampin’ Write Marker, I drew a line down the paper like he was coming down from his web.
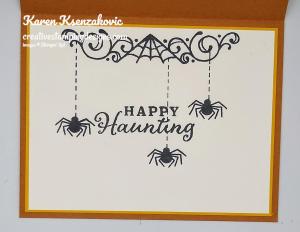
On the inside I stamped the sentiment from the Celebration Tidings stamp set in Tuxedo Black Memento Ink in the center of a Whisper White panel. I stamped the web image from the Celebration Tidings stamp set in Tuxedo Black Memento Ink on the top of the panel. I stamped the spider image from the Celebration Tidings stamp set in Tuxedo Black Memento Ink 3 times on the panel and drew lines from the web down to the spiders using my Basic Black Stampin’ Write Marker. I adhered the Whisper White panel to a Bumblebee mat using Stampin’ Seal and then to the inside of the Cinnamon Cider card base using Multipurpose Liquid Glue.
To complete my card I decorated a Medium Whisper White Envelope. I stamped the spider web from the Celebration Tidings stamp set in Tuxedo Black Memento Ink on the top of the envelope front. I stamped the spider image from the Celebration Tidings stamp set twice on the envelope front and drew lines from the web to the spiders using my Basic Black Stampin’ Write Marker. I adhered a panel of Plaid Tidings DSP to the envelope flap.
Thank you for visiting by my blog today. I hope you liked my card and will give it a try. Now that you’ve seen my card, be sure to hop around to see everyone’s beautiful projects. Hit Previous to hop back to Amy’s blog or hit Next to head over to Jaimie Babarczy’s blog. You can also click on each of the names and hop around that way. Happy Hopping!!
If you need any stamping supplies, I’d love to be your Demonstrator. Just click HERE to go directly to my online store or drop me an email if you have any questions.
MY CURRENT HOST CODE IS: G39RYMEX
Use this host code when you order $50 or greater and receive a free gift from me! If your order is over $150, please do not use this code, but you’ll still get the free gift. The free gift is your choice of any 1 item valued up to $10.00 in the 2020-2021 Annual Catalog!For any orders $50 or more I will also send you my monthly class tutorials. Click HERE or go to my Customer Rewards for more details and to see what this months tutorials are.
As the autumn season approaches, prepare to celebrate with the September Paper Pumpkin Kit! There’s so much to love about fall—some love the haunts of Halloween, many love the time to give thanks, and others love the changing colors and cooler temperatures. Whatever you love most about fall, September’s kit has everything you need to celebrate the season your way! Between a multi-occasion stamp set and enough supplies to design 20 cracker box treat packages, you can create custom fall crafts to celebrate Halloween, Thanksgiving, pumpkins, and leaves. Whether you make them all the same or mix ‘n’ match your crafts, there’s something for everyone in this kit!
September’s kit is a must-have for those who love to celebrate all things spooky. But, for those who don’t enjoy the Halloween haunts, the multi-occasion stamp set combined with a variety of die-cut and reversible paper pieces offers many ways to customize your fall crafts!
Good Sunday morning my fellow stampers. How is everyone’s weekend going? It was a gorgeous 55 degrees when I awoke this morning, but it was still dark out 😦 I have the windows open, the attic fan on and it is absolutely beautiful sunny day outside. Yesterday I went to the farm to pick sunflowers, they neglected to tell us that there were no more to pick when we asked. Instead I picked some Cockscomb, Zinnias and tomatoes. I also came home with a big bag full of basil that I spent a couple hours making pesto and freezing the containers. I think I’m set for just a little while now. Whatever basil grows now in my pots I will make pesto and use it, seems my family really likes it.
For today’s card it might look like a Halloween card, but it’s actually a birthday card. My nieces husband loves Halloween and she wanted me to make him a birthday card. They go all out with decorating for Halloween like I do for Christmas. Here’s today’s card.
I had a lot of scraps of my Plaid Tidings 6 X 6 Designer Series Paper so I decided to put it on a card. I cut 1/2″ strips of the DSP, Blackberry Bliss cardstock and Pumpkin Pie cardstock. I adhered the strips to a Basic Black panel using Stamp[in’ Seal. Once all the strips were adhered, I cut the panel down to a 3 3/4″ X 5″ panel.
I stamped the large pumpkin image from the Stampin’ Up! Harvest Hellos Cling Stamp Set in Tuxedo Black Memento Ink on a panel of Pumpkin Pie cardstock. I stamped the face in the center of the pumpkin and punched it out using my Apple Builder Punch. I cut the stem out of a scrap of Crumb Cake cardstock.
On a panel of Whisper White cardstock I stamped the spider web image from the Stampn’ Up! Celebration Tidings Photopolymer Stamp Set in Tuxedo Black Memento Ink. I cut the image out using the Celebration Labels Dies. On the same panel, I stamped multiple of the spider image from the Celebration Tidings stamp set in Tuxedo Black Memento Ink and cut them out using the Celebration Labels Dies. I drew lines coming down from the spider web using my Basic Black Stampin’ Write Marker then adhered the label to the card front using Multipurpose Liquid Glue. I adhered the pumpkin to the label using Stampin’ Dimensionals and all the spiders using Mini Stampin’ Dimensionals. I embossed a panel of the Copper Brushed Metallic cardstock using the Tasteful Textiles 3D Embossing Folder and adhered it to a Basic Black card base using Multipurpose Liquid Glue on an angle. I adhered the card front to the card base using Stampin’ Dimensionals. I added a few Iridescent Pearls to the card front and brushed the spiders with some Clear Wink of Stella.
On the inside, in Tuxedo Black Memento Ink, I stamped the spider web from the Celebration Tidings stamp set on the top of a Whisper White panel. I stamped the sentiment from the Celebration Tidings stamp set in the center of the panel and the sentiment from the Stampin’ Up! Well Said Cling Stamp Set below the 1st sentiment. I stamped the spider image from the Celebration Tidings stamp set around the sentiment and drew lines using my Basic Black Stampin’ Write Marker from the web to the spiders. I adhered the Whisper White panel to a Blackberry Bliss mat using Stampin’ Seal and then to the inside of the Basic Black card base using Multipurpose Liquid Glue.
To finish my card I decorated a Medium Whisper White Envelope. In Tuxedo Black Memento Ink, I stamped the spider web and spiders from the Celebration Tidings stamp set on the envelope front and drew lines from the web to the spiders using my Basic Black Stampin’ Write Marker. I adhered the leftover scraps of Plaid Tidings DSP to the envelope flap.
Thank you for stopping by my blog today. I hope you liked my card and will give it a try. Happy Stamping!!
If you need any stamping supplies, I’d love to be your Demonstrator. Just click HERE to go directly to my online store or drop me an email if you have any questions.
MY CURRENT HOST CODE IS: G39RYMEX
Use this host code when you order $50 or greater and receive a free gift from me! If your order is over $150, please do not use this code, but you’ll still get the free gift. The free gift is your choice of any 1 item valued up to $10.00 in the 2020-2021 Annual Catalog!For any orders $50 or more I will also send you my monthly class tutorials. Click HERE or go to my Customer Rewards for more details and to see what this months tutorials are.
Stampin’ Up! has updated the Clearance Rack with lot of new items! Head over there quickly to get your hands on some great deals. But hurry!! Clearance Rack deals are only while supplies last!
I saw some retired In Color Card Stock and accessories, lots of pretty designer papers and embellishments and punches too!
Click HERE to head over to my Online Store to start shopping.
The Stampin’ Cut & Emboss Machine (Standard Size) is now available for you to order!!!
Here are the details:
The standard machine comes with all the plates you need to get started. The preorder will not include the replacement plates, but they will be available beginning with the customer launch on September 1.
Note that the Cutting Plates and Adhesive Sheets are already available to order. The optional Impression Mats are not be available; I’ll keep you updated on their availability.
So what sets our machines apart from the rest? Here are some of our favorite features:
Durable machines with high-quality results. The solid steel construction frame and rubber feet that securely grip the work surface produce crisp, clean, precise cutting and beautifully detailed embossing.
Easy to use. The machines and tools are designed for an intuitive die-cutting and embossing experience. For example, all plates are labeled with a number and are color coded for easy reference and use when building your sandwich. And just like the name suggests, our Magnetic Cutting Plates have fully-magnetic surfaces to make it easy to securely position your dies and keep them in place.
Simple to store. The platforms on both machines fold for space-saving storage and they look pretty too–the sleek, clean design suits any crafting space.
Portable. You can use both machines at home or on the go with their folding platforms and ergonomic carrying handles.
Stampin’ Up! Get & Go Starter Kit Promotion – Sept 1-30!
Have you thought about joining our Stampin’ Up! team?
Now is an awesome time to join.
The Get & Go Starter Kit promotion gives those who sign up to be a Stampin’ Up! demonstrator additional products to help get started right away! In addition to the already great valued Starter Kit, you will receive precut paper, stamps, and embellishments!
Here are the details:
Promotion Dates: September 1–30, 2020
Joining Deadline: September 30, 2020; 11:50 PM (MT)
New demonstrators who submit their Independent Demonstrator Agreement (IDA) before 1 September or after 30 September will not be eligible for this promotion.
In addition to the regular starter kit (for $99 you choose $125 worth of products), if you join between September 1 and 30, you will also receive enough card stock pieces to make 16 cards, a pack of Rhinestone Basic Jewels, the So Much Love stamp set, and the Queen Anne’s Lace stamp set!!
8 packs of precut card stock of the coastal cabana pack will be provided, and 8 packs of precut card stock of the Granny Apple Green pack, for a total of 16 cards (packs include envelopes).
Important note: Ink, adhesive, cutting tool, and clear block for stamping must be purchased separately. However, these products may be included as part of the Starter Kit product selection.
This is such a great deal! For $99, you get to pick $125 merchandise of your choice for your Starter Kit plus you’ll get the Queen Annes’ Lace and So Much Love stamp sets, card kits to create 16 cards and a pack of Rhinestones for free!!
Drop me a note at creativestampingdesigns@gmail.com if you have questions about joining, I’m happy to talk to you about it. You can also see more information about the benefits of becoming a Stampin’ Up! Demonstrator Here
As the autumn season approaches, prepare to celebrate with the September Paper Pumpkin Kit! There’s so much to love about fall—some love the haunts of Halloween, many love the time to give thanks, and others love the changing colors and cooler temperatures. Whatever you love most about fall, September’s kit has everything you need to celebrate the season your way! Between a multi-occasion stamp set and enough supplies to design 20 cracker box treat packages, you can create custom fall crafts to celebrate Halloween, Thanksgiving, pumpkins, and leaves. Whether you make them all the same or mix ‘n’ match your crafts, there’s something for everyone in this kit!
September’s kit is a must-have for those who love to celebrate all things spooky. But, for those who don’t enjoy the Halloween haunts, the multi-occasion stamp set combined with a variety of die-cut and reversible paper pieces offers many ways to customize your fall crafts!
I’m cleaning my shelves and drawers out to make room for lots of new goodie. I have my list right HERE and I’m trying to keep it up to date. Check it out and let me know if there is anything you’d like to get. If you are looking for something and don’t see it on the list, drop me a line and I will look through my stash to see if I missed it. I have lots of older DSP too that I don’t have listed if there is any that you are looking for.
Basic Black Cardstock 8 1/2″ X 5 1/2″ (card base scored and folded at 4 1/4″), 4″ X 5 1/4″ (card front cut down to 3 3/4″ X 5″ after scraps were adhered)
Blackberry Bliss Cardstock 4 1/8″ X 5 3/8″ (inner liner mat), 1/2″ X 6″ scraps
Pumpkin Pie Cardstock 1/2″ X 6″ scraps
Whisper White Cardstock 4 1/2″ X 3 3/4″ (artwork), 4″ X 5 1/4″ (inner liner)
Brushed Metallic Cardstock 4″ X 5 1/4″ (card front panel)
Plaid Tidings 6 X 6 Designer Series Paper 1/2″ X 6″ scraps
Good Wednesday morning my fellow stampers. How is everyone doing today?
Last night I had one of my Stamp Camp Classes at my house. The ladies made 4 different cards. I tried to make it a little fun by using different designs from the Monster Bash Designer Series Paper. Everyone picked an envelope with the DSP in it not knowing what they were going to get so that everyone’s card was a little different. Here is my card for today.
I started by cutting the Monster Bash Designer Series Paper into 1 1/2″ strips. I adhered the DSP to a Basic Black card front using Multipurpose Glue. I wrapped a piece of the Terracotta Tile 1/2″ Scalloped Lined Ribbon around the card front and tied a knot. I put a small Glue Dot under the knot to hold it in place.
I cut the Happy Halloween sentiment from the Word Wishes Dies out of a piece of Basic Black and Very Vanilla cardstock. I adhered them together giving it a shadow effect. I adhered the sentiment to the card front on an angle using Stampin’ Dimensionals.
I added a few Rhinestone Basic Jewels that I had colored using my Dark Basic Black Stampin’ Blends Marker. I adhered the card front to a Terracotta Tile card base using Stampin’ Dimensionals.
On the inside I stamped the sentiment from the Stampin’ Up! A Wish For Everything Cling Stamp Set in Tuxedo Black Memento Ink in the center of a Very Vanilla panel. I adhered the Very Vanilla panel to a Basic Black mat using Snail and then to the inside of the Terracotta Tile card base using Multipurpose Liquid Glue.
To finish my card I decorated a Medium Very Vanilla Envelope. I adhered a strip of the Monster Bash DSP to the envelope bottom and a panel to the envelope flap.
Thank you for stopping by my blog today. I hope you liked my card and will give it a try. Happy Stamping!!
If you need any stamping supplies, I’d be very happy to be your Demonstrator. Just click HERE to go directly to my online store or drop me an email if you have any questions.
MY CURRENT HOST CODE IS: 3F496G6J
For any orders $50 or more I will send you my monthly class tutorials. Click HERE or go to my Customer Rewards to see what this months tutorials are.
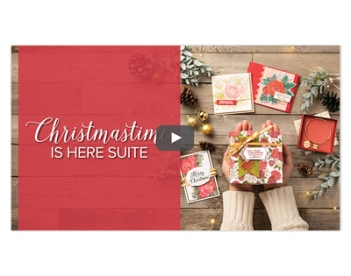
AVAILABLE NOVEMBER 1ST, THE NEW CHRISTMASTIME IS HERE SUITE
We hope you’re ready to make this holiday season magical, because the Christmastime Is Here Suite is! This exclusive, limited-time collection of festive, floral coordinating products has everything you need to share love, joy, and creativity this holiday season.
Products from the Christmastime Is Here Suite will be available while supplies last only starting November 1st, 2019
Here’s a sneak peek video of what’s included in the suite.
Good Tuesday morning my fellow stampers and welcome to Amy’s Inkin’ Krew Blog Hop.
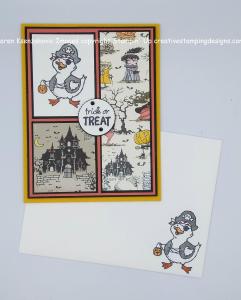
If you’ve hopped over from Mary Deatherage’s blog, welcome. If you are starting with me, be sure to hop around to see everyone’s projects. The 2nd Tuesday of each month this wonderful team puts together a blog hop and you are guaranteed to see some awesome projects. This months theme is ‘Halloween’. We can interpret this however we would like. Those of you that know me, know that I’m not a big Halloween fan, but I have to admit I had a lot of fun with this one. Here’s my card.
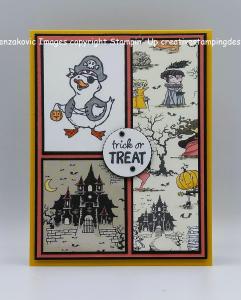
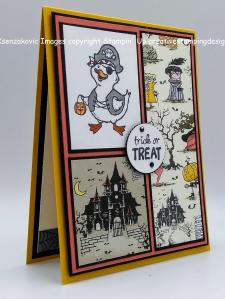
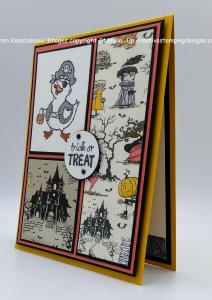
I started by adhering a panel of Terracotta Tile cardstock to a Basic Black mat using Snail. I adhered the 2 panels of Monster Bash Designer Series Paper to Basic Black mats using Snail. I adhered the 2 matted DSP’s to the card front using Multipurpose Liquid Glue.
On a small panel of Whisper White cardstock I stamped the pirate duck image from the Stampin’ Up Birds of a Feather Cling Stamp Set in Tuxedo Black Memento Ink. I colored the image in using my Light Basic Black, Pumpkin Pie, Real Red and Dark Smoky Slate Stampin’ Blends Markers. I adhered the artwork to a Basic Black mat using Snail and then to the card front using Multipurpose Liquid Glue.
I stamped the sentiment from the Birds of a Feather stamp set in Tuxedo Black Memento Ink on a scrap piece of Whisper White cardstock. I cut the sentiment out using the smallest circle from the Layering Circles Dies. I cut a Basic Black scalloped circle out using the Layering Circles Dies. I adhered the sentiment to the scalloped circle using Multipurpose Liquid Glue. I adhered the sentiment to the center of the card front using a Stampin’ Dimensional. I added a couple of the Rhinestone Basic Jewels that I colored with my Dark Basic Black Stampin’ Blends Marker. I adhered the card front to a Crushed Curry card base using Stampin’ Dimensionals.
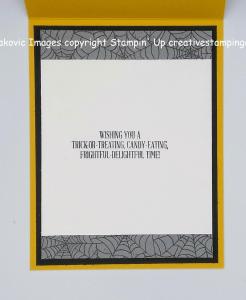
On the inside I stamped the sentiment from the Stampin’ Up A Wish for Everything Cling Stamp Set in Tuxedo Black Memento Ink in the center of a Whisper White panel. I adhered 2 strips of Monster Bash DSP to the top and bottom of the panel using Multipurpose Liquid Glue. I adhered the Whisper White panel to a Basic Black mat using Snail and then to the inside of the Crushed Curry card base using Multipurpose Liquid Glue.
To finish my card I decorated a Medium Whisper White Envelope. I stamped the pirate duck from the Birds of a Feather stamp set in Tuxedo Black Memento Ink on the envelope front. I colored the image in the same as I did for the card front. I adhered a panel of the Monster Bash DSP to the envelope flap.
Thank you for stopping by my blog today. I hope you liked my card. Now be sure to hit Previous to hop back to Mary Deatherage’s blog or hit Next to head over to Julie Johnson’s blog. You can also click on each of the names and hop around that way. Happy Hopping!!
If you need any stamping supplies, I’d be very happy to be your Demonstrator. Just click HERE to go directly to my online store or drop me an email if you have any questions.
MY CURRENT HOST CODE IS: ADFAXYQE
For any orders $50 or more I will send you my monthly class tutorials. Click HERE or go to my Customer Rewards to see what this months tutorials are.
TODAY IS YOUR LAST DAY TO SUBSCRIBE, DON’T MISS OUT!!
SUBSCRIBE TO PAPER PUMPKIN BY SEPTEMBER 10TH TO GET IN ON THE FUN
Halloween is nearly here, which means that Paper Pumpkin has been busy, busy, busy. We thought you might like “a hand” with their frightful festivities, so we designed September’s kit, Bone Appétit, with them in mind.
This kit includes 20 food-safe treat boxes, a unique and exclusive Halloween stamp set, and a spooky, special-edition box. September’s kit also gives new meaning to the word “handmade.” (Cue the scary laughter!)
This kit includes 20 food-safe treat boxes, a unique and exclusive Halloween stamp set, and a spooky, special-edition box. September’s kit also gives new meaning to the word “handmade.” (Cue the scary laughter!)
September Kit Information:
The September kit makes 20 Halloween-themed, food-safe treat boxes
Coordinating colors: Basic Black, Gorgeous Grape, Pumpkin Pie, and Whisper White
Subscribe for the September kit at paperpumpkin.com from August 11–September 10.
Supplies may be limited toward the end of the subscription period.
If you’re interested in subscribing to Paper Pumpkin, you can either sign up for a subscription where you are billed monthly for your kit or you can purchase a prepaid subscription in my online store. To see more information and to sign up for the monthly subscription, click HERE To see the options for prepaid subscriptions in my online store click HERE
BUY 3 GET 1 FREE DESIGNER SERIES PAPER IS BACK BY POPULAR DEMAND
SEPTEMBER 4, 2019 THROUGH SEPTEMBER 30, 2019
By popular demand, Stampin’ Up! is bringing back the Designer Series Paper Sale! During September (4TH–30TH), you can buy three packages of select Designer Series Paper, and get one FREE!
Here are the details:
Sale Dates: September 4–30
Order Deadline: September 30, 2019; 11:50 pm (MT)
Only Designer Series Papers listed in the table below qualify for this promotion. You may mix and match papers from any of the listed papers.
There is no limit to how many times participants can buy three packages of Designer Series Paper, and get one free during this sale.
In the online ordering system, when three qualifying Designer Series Paper packs are entered, a prompt to add a free Designer Series Paper will appear.
In the online store, if a you order four packages of the same qualifying Designer Series Paper, you will need to enter three together and then order the fourth free item separately.
Designer Series Paper ordered as part of a Starter Kit does not qualify for this sale.
Designer Series Paper ordered with Stampin’ Rewards does not qualify for this sale.
Here are the Designer Series Paper Packs included in the sale:
I have gathered up a lot of retired Stamp Sets, Embossing Folders & Dies and put a list together for anyone interested. I have single Stamp Sets along with Stamp Sets bundled with Dies or Punches. Take a look and see if there is anything that you missed out on getting and would still like. Click Here to go to my list.
Basic Black Cardstock 2- 4″ X 5 1/4″ (card front mat and inner liner mat), 2″ X 2 5/8″ (artwork mat), 1 5/8″ X 5″ (long DSP mat), 2″ X 2 1/4″ (small DSP mat)
Crushed Curry Cardstock 4 1/4″ X 11″ (card base scored and folded at 5 1/2″)
Terracotta Tile Cardstock 3 7/8″ X 5 1/8″ (card front)
Whisper White Cardstock 3 3/4″ X 5″ (inner liner), 1 7/8″ X 2 1/2″ (artwork)
Monster Bash Designer Series Paper 1 1/2″ X 4 7/8″ & 1 7/8″ X 2 1/8″(card front pieces), 1/2″ X 3 3/4″ & 5/8″ X 3 3/4″ (inner liner strips), piece for envelope flap


![Choose Happy Photopolymer Stamp Set (English) [ 163701 ]](https://assets1.tamsnetwork.com/images/EC042017NF/163701s.jpg "Choose Happy Photopolymer Stamp Set (English) [ 163701 ]")
![Basic Black 8-1/2" X 11" Cardstock [ 121045 ]](https://assets1.tamsnetwork.com/images/EC042017NF/121045s.jpg "Basic Black 8-1/2\" X 11\" Cardstock [ 121045 ]")
![Basic White 8 1/2" X 11" Cardstock [ 166780 ]](https://assets1.tamsnetwork.com/images/EC042017NF/166780s.jpg "Basic White 8 1/2\" X 11\" Cardstock [ 166780 ]")
![Gorgeous Grape 8-1/2" X 11" Cardstock [ 146987 ]](https://assets1.tamsnetwork.com/images/EC042017NF/146987s.jpg "Gorgeous Grape 8-1/2\" X 11\" Cardstock [ 146987 ]")
![Timid Tiger 8 1/2" X 11" Cardstock [ 165626 ]](https://assets1.tamsnetwork.com/images/EC042017NF/165626s.jpg "Timid Tiger 8 1/2\" X 11\" Cardstock [ 165626 ]")
![2025–2027 In Color™ 6" X 6" (15.2 X 15.2 Cm) Designer Series Paper [ 165300 ]](https://assets1.tamsnetwork.com/images/EC042017NF/165300s.jpg "2025–2027 In Color™ 6\" X 6\" (15.2 X 15.2 Cm) Designer Series Paper [ 165300 ]")
![Gorgeous Grape Classic Stampin' Pad [ 147099 ]](https://assets1.tamsnetwork.com/images/EC042017NF/147099s.jpg "Gorgeous Grape Classic Stampin' Pad [ 147099 ]")
![Timid Tiger Classic Stampin' Pad [ 165278 ]](https://assets1.tamsnetwork.com/images/EC042017NF/165278s.jpg "Timid Tiger Classic Stampin' Pad [ 165278 ]")
![Blending Brushes [ 153611 ]](https://assets1.tamsnetwork.com/images/EC042017NF/153611s.jpg "Blending Brushes [ 153611 ]")
![Tuxedo Black Memento Ink Pad [ 132708 ]](https://assets1.tamsnetwork.com/images/EC042017NF/132708s.jpg "Tuxedo Black Memento Ink Pad [ 132708 ]")
![Mossy Meadow Stampin' Blends Combo Pack [ 154890 ]](https://assets1.tamsnetwork.com/images/EC042017NF/154890s.jpg "Mossy Meadow Stampin' Blends Combo Pack [ 154890 ]")
![Timid Tiger Stampin’ Blends Combo Pack [ 165291 ]](https://assets1.tamsnetwork.com/images/EC042017NF/165291s.jpg "Timid Tiger Stampin’ Blends Combo Pack [ 165291 ]")
![Clear Wink Of Stella Glitter Brush [ 141897 ]](https://assets1.tamsnetwork.com/images/EC042017NF/141897s.jpg "Clear Wink Of Stella Glitter Brush [ 141897 ]")
![Mossy Meadow & Gold 1/4" (6.4 Mm) [ 166158 ]](https://assets1.tamsnetwork.com/images/EC042017NF/166158s.jpg "Mossy Meadow & Gold 1/4\" (6.4 Mm) [ 166158 ]")
![Rhinestone Basic Jewels [ 144220 ]](https://assets1.tamsnetwork.com/images/EC042017NF/144220s.jpg "Rhinestone Basic Jewels [ 144220 ]")
![Basic White Medium Envelopes [ 159236 ]](https://assets1.tamsnetwork.com/images/EC042017NF/159236s.jpg "Basic White Medium Envelopes [ 159236 ]")


![Take Your Pick [ 144107 ]](https://assets1.tamsnetwork.com/images/EC042017NF/144107s.jpg "Take Your Pick [ 144107 ]")


")
")


 Designer Series Paper")
 Specialty Paper")


")
")


 Specialty Designer Series Paper")
 Metallic Specialty Paper")
 Specialty Paper")


")


 Designer Series Paper")
 Specialty Pack")


")


 Designer Series Paper")


 Glittered Organdy Ribbon")


")

")
")


 Designer Series Paper")


 Scalloped Linen Ribbon")