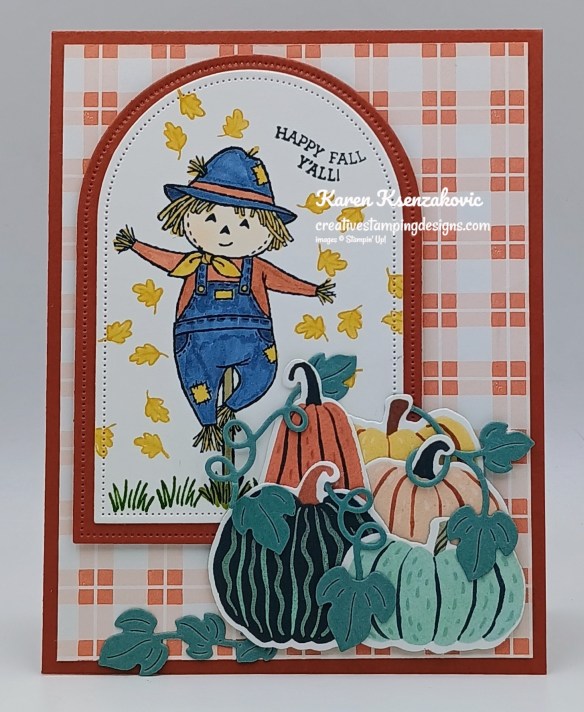
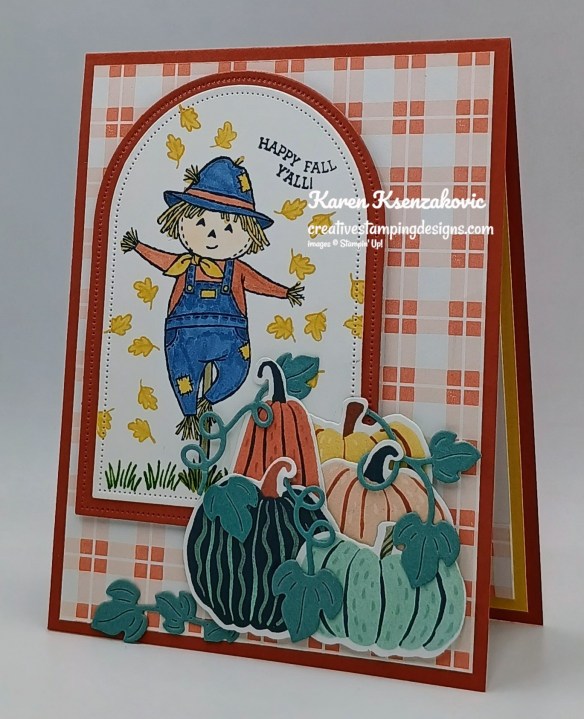
Good Thursday morning stamping friends welcome to our Happy Inkin’ Thursday Blog Hop. If you are starting with me, thank you, I hope you will stop by everyone’s blog to see the beautiful projects they have created this week. If you are hopping over from Mary’s blog, thank you for stopping by. This week we have a Theme Challenge to work with. If you’d like to see a quick video on how I made this card, Click Here to go to my Instagram Reels. Here is my card using this week’s theme.
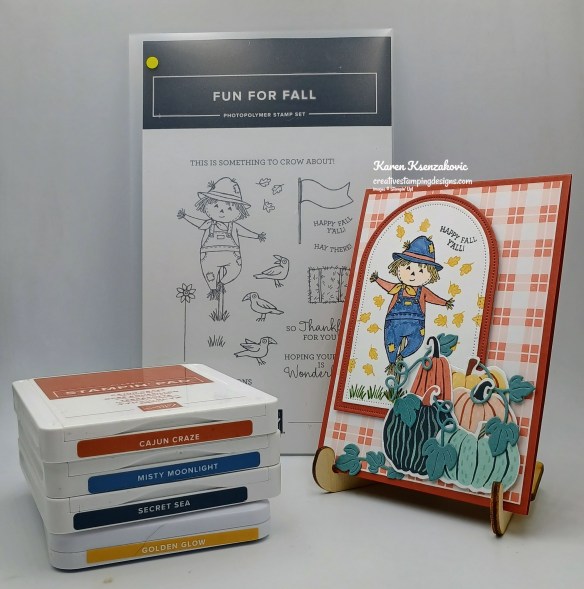
I used the Stampin’ Up! Fun For Fall Stamp Set, Painted Patch Designer Series Paper, Everyday Arches Dies and Painted Pumpkins Dies for my card today.
This is our theme for this week
Using the Everyday Arches Dies, cut a panel of Basic Whtie and Cajun Craze. Stamp the scarecrow image and sentiment from the Fun For Fall stamp set in Secret Sea Ink. Stamp the grass image from the Fun For Fall stamp set in Old Olive Ink on the bottom of the panel. Stamp the leaf image from the Fun For Fall stamp set in Golden Glow Ink around the scarecrow.
Color the images using Cajun Craze, Crumb Cake, Golden Glow, Misty Moonlight, Old Olive & Petal Pink Stampin’ Blends Markers. Adhere the Basic White die cut to the Cajun Craze die cut. Adhere the layered panel to the card front with Stampin’ Dimensionals.
Using the Painted Pumpkins Dies, cut the pumpkins from a panel of Painted Patch DSP and the tendrils from a panel of Lost Lagoon. Arrange the pumpkins together with the tendrils and adhere them to the card front with Stampin’ Dimensionals and Glue Dots.
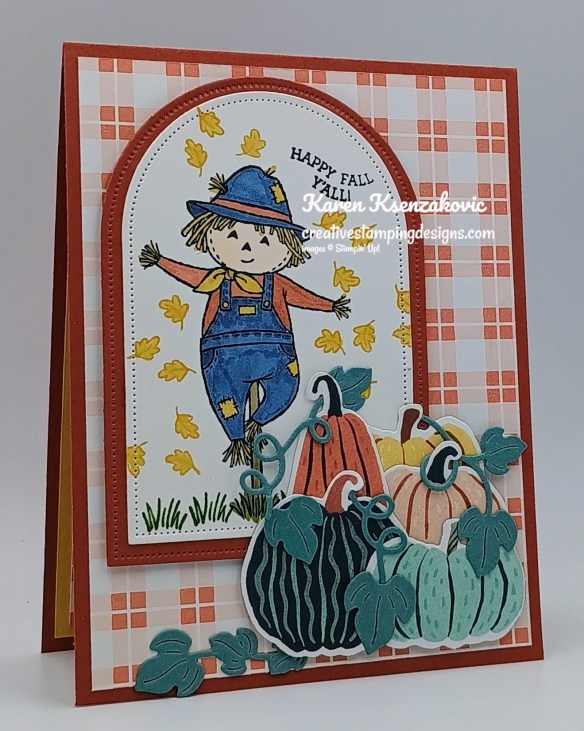
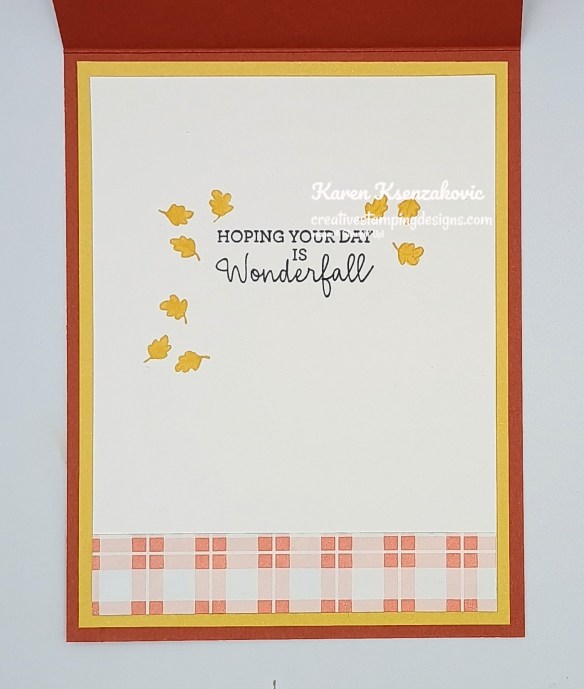
Stamp the sentiment from the Fun For Fall stamp set in Secret Sea Ink on a panel of Basic White. Stamp the leaf image from Fun For Fall stamp set in Golden Glow Ink around the sentiment. Color the leaves with Golden Glow Stampin’ Blends Markers. Adhere a panel of Painted Patch DSP to the bottom of the panel. Adhere the Basic White panel to a Golden Glow Two-Tone cardstock mat then to the inside of the Cajun Craze card base.
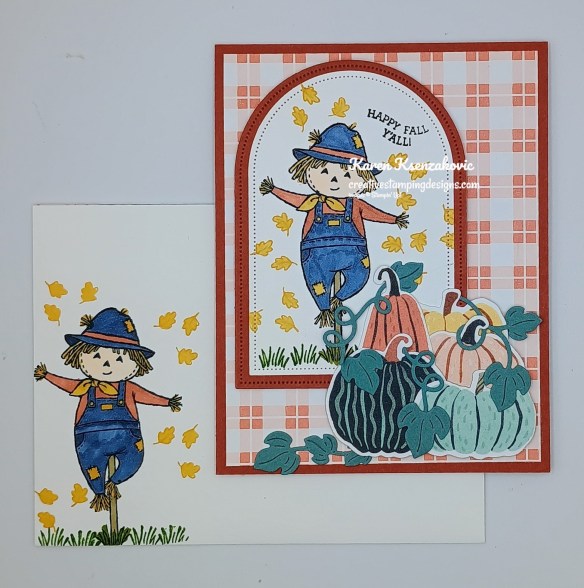
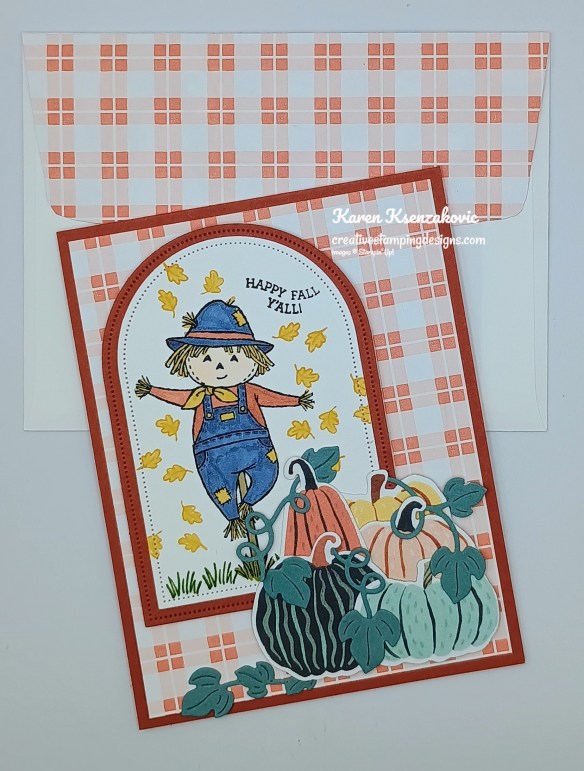
Decorate a Basic Whtie Medium Envelope to complete your card. Stamp the scarecrow image from the Fun For Fall stamp set in Secret Sea Ink on the envelope front. Stamp the grass image in Old Olive Ink and the leaves in Golden Glow Ink. Color the images using Cajun Craze, Crumb Cake, Golden Glow, Misty Moonlight, Old Olive and Petal Pink Stampin’ Blends Markers. Adhere a panel of Panted Patch DSP to the envelope flap.
Thank you for stopping by my blog today. Now that you’ve seen my card, let’s get on with the hop! Click the next button below to hop over to see what Tarahas created. Happy Hopping
Just in case you get lost along the way, here is a list of the team members involved in the hop today.
If you need any stamping supplies, I’d love to be your Demonstrator. Just click HERE to go directly to my online store or drop me an email if you have any questions.
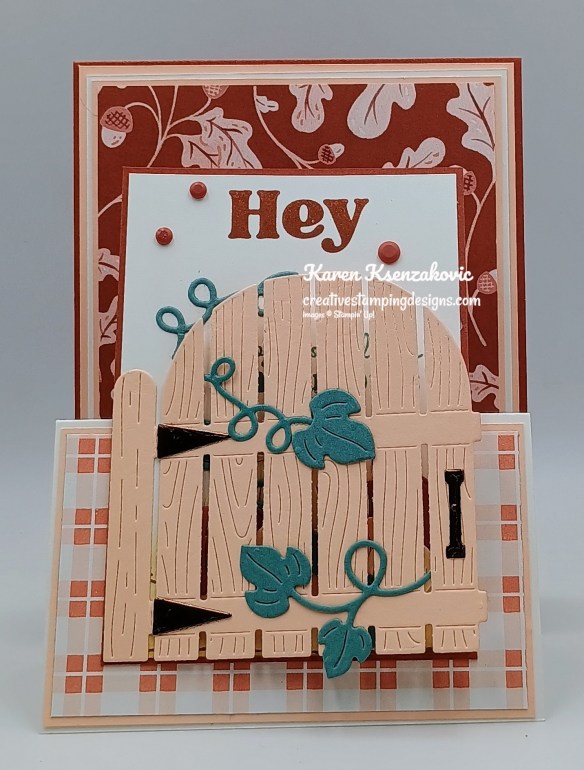
Good Thursday morning stamping friends welcome to our Happy Inkin’ Thursday Blog Hop. If you are starting with me, thank you, I hope you will stop by everyone’s blog to see the beautiful projects they have created this week. If you are hopping over from Mary’s blog, thank you for stopping by. This week we have a Theme Challenge to work with. If you’d like to see a quick video on how I made this card, Click Here to go to my Instagram Reels. Here is my card using this week’s theme.
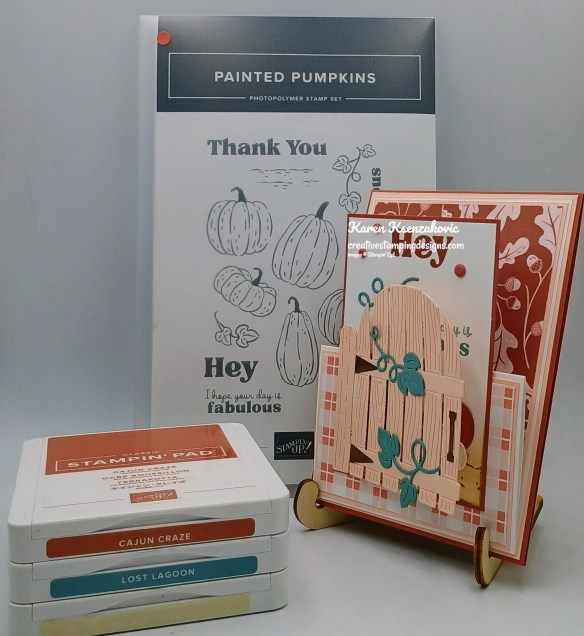
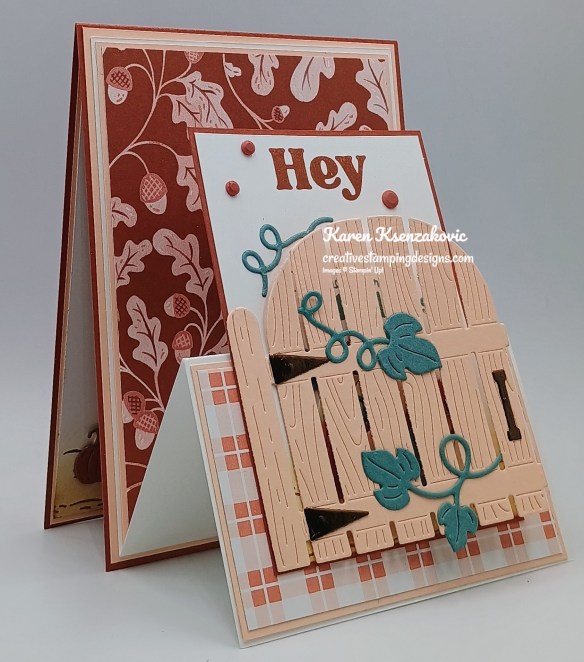
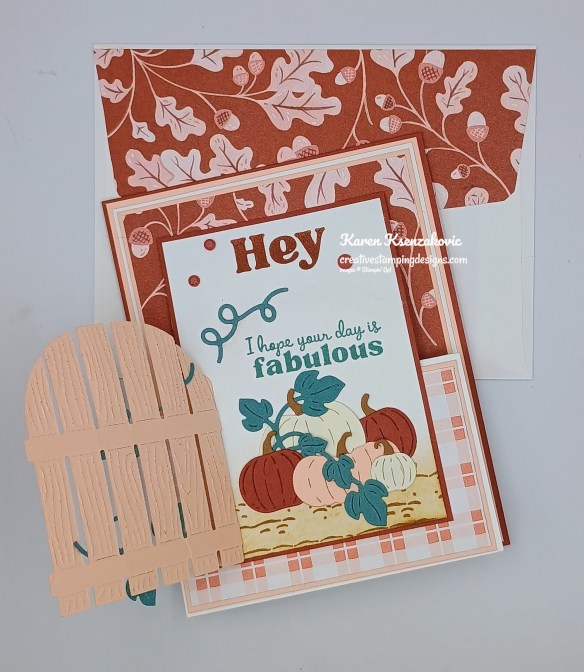
I used the Stampin Up! Painted Pumpkins Bundle, Painted Patch Designer Series Paper (both available Sept 1) along with the Stampin Up! Poetic Petals Stamp Set and Stampin’ Up! Fun For Fall Stamp Set for my card today.
This is our theme for this week. Who doesn’t love a fun fold card.
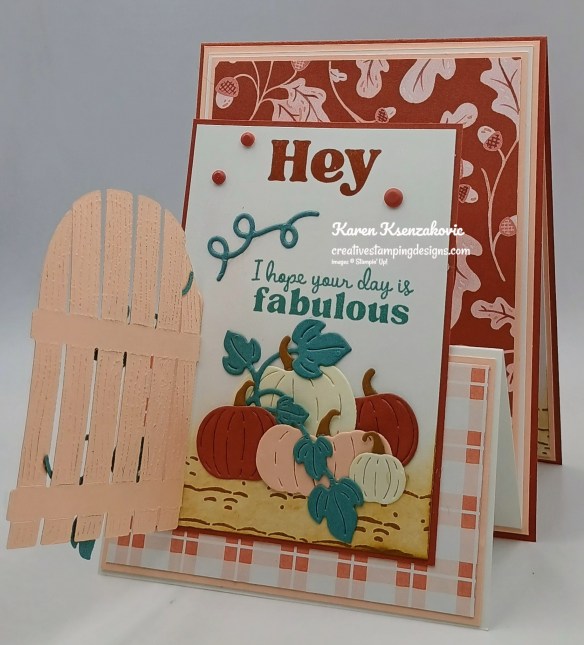
Adhere the panels of Painted Patch DSP to the coordinating Petal Pink mats. Adhere the larger layered panel to the top portion of the scored Basic White easel card base and the smaller panel to the bottom section of the Basic White easel card base. Adhere the Basic White easel card base to a Petal Pink mat. Adhere the layered panel to the front of a Cajun Craze card base.
Using the Painted Pumpkins Dies cut the gate door die from a panel of Petal Pink, multiple tendrils and leaves from a pane of Lost Lagoon and the hinges & handle from a panel of Earthen Toned Metallic paper. Adhere the hinges and handle to the front of the gate and adhere the tendrils and leave to the gate.
Using the Painted Pumpkins Dies, cut pumpkins from panels of Cajun Craze, Petal Pink and Very Vanilla and the stems from a panel of Pecan Pie. On a panel of Basic White, use the Blending Brush to add Pecan Pie Ink to the bottom of the panel. Stamp the dirt image from the Painted Pumpkins stamp set in Pecan Pie Ink over the blended section. Stamp the larger sentiment from the Painted Pumpkins stamp set in Cajun Craze Ink on the top of the Basic White panel. Adhere the die cut pumpkins, tendrils and leaves on the bottom of the panel. Stamp the sentiment from the Painted Pumpkins stamp set in Lost Lagoon Ink above the pumpkins so that it’s behind the gate when it’s closed. Adhere the Basic White panel to a Cajun Craze mat. Adhere the gate to the left side of the panel. Adhere the gated panel to the bottom of the easel card front. Add a few Painted Patch Adhesive-Backed Dots to the card front.
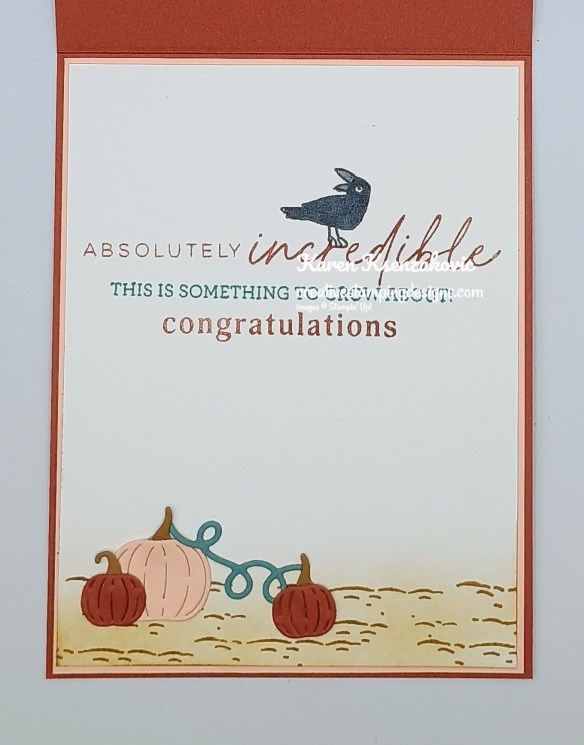
On a panel of Basic White, stamp the sentiments from Poetic Petals stamp set (available Sept 1) in Cajun Craze Ink. Stamp the sentiment from Fun For Fall stamp set in Lost Lagoon Ink between the other 2 sentiments. Stamp the crow image from Fun For Fall stamp set in Black Ink on the sentiment and color the image using Basic Black Stampin’ Blends Markers. Using the Blending Brush, add Pecan Pie Ink along the bottom of the panel. Stamp the dirt image from Painted Pumpkins stamp set in Pecan Pie Ink over the blended area. Adhere a few of the die cut pumpkins on the bottom of the panel.
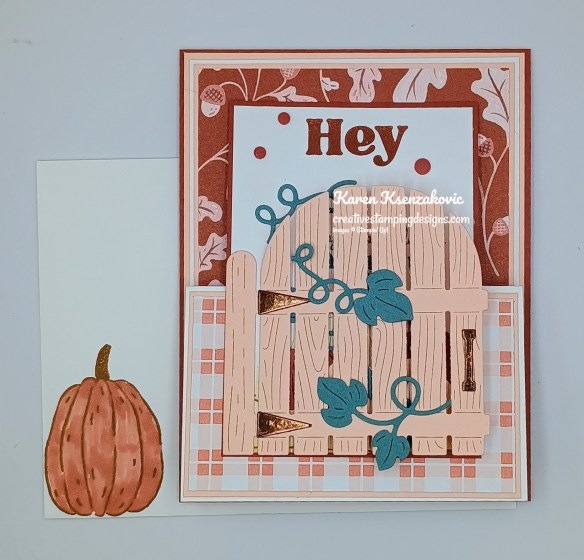
Decorate a Basic White Medium Envelope to complete your card. Stamp the pumpkin image from the Painted Pumpkins stamp set in Pecan Pie Ink on the envelope front. Color the image with Cajun Craze Stampin’ Blends Markers. Adhere a panel of Painted Patch DSP to the envelope flap.
Thank you for stopping by my blog today. Now that you’ve seen my card, let’s get on with the hop! Click the next button below to hop over to see what Tarahas created. Happy Hopping
Just in case you get lost along the way, here is a list of the team members involved in the hop today.
If you need any stamping supplies, I’d love to be your Demonstrator. Just click HERE to go directly to my online store or drop me an email if you have any questions.
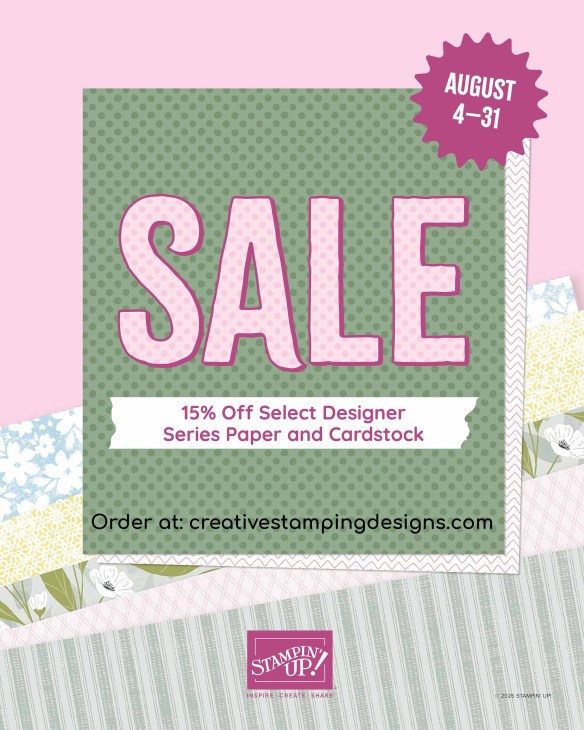
15% Off Select Designer Series Paper & Cardstock – August 4-31
Are you looking for the perfect card stock or Designer Series Paper for your next project? Stampin’ Up! has got you covered! Starting August 4, enjoy 15% off select Designer Series Paper and card stock. Stock up on your favorites or explore new colors and patterns during this sale!
Here are the sale details:
Sales Period: August 4–31
Ordering Deadline: August 31, 2026, at 11:59 p.m. (MT)
While supplies last.
You’ll find all qualifying items in one convenient location once the sale begins on August 4—it will be located in the “Designer Series Paper and Cardstock Sale” page in the online store.
Head over to my Online Store beginning August 4 to shop the sale!!
Good Tuesday morning my stamping friends welcome to Amy’s Inkin’ Krew Team Blog Hop. It’s the 2nd Tuesday of the month so that means Blog Hop Day!! If you are starting with me, be sure to hop around to see everyone’s projects. If you’ve hopped over from Tara’s blog, welcome to my blog and thank you for stopping by. The theme this month is “Fun Fold”. If you’d like to see a quick video on how I made this card, Click Here to go to my Instagram Reels. Here’s my card for today.
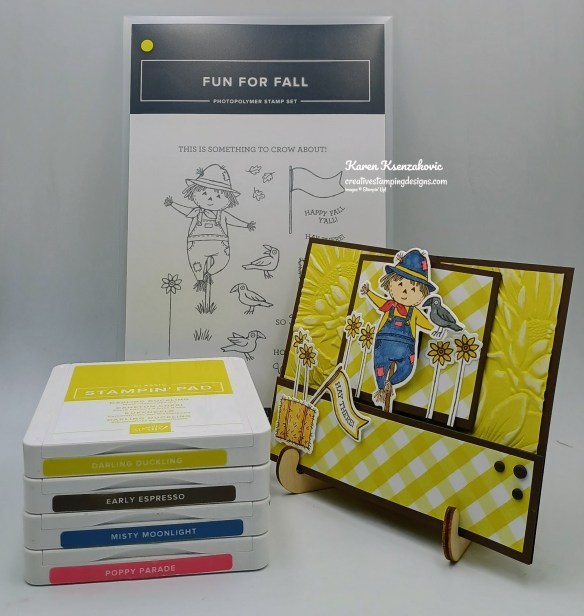
I used the Stampin’ Up! Fun For Fall Bundle, Sunflower 3D Embossing Folder and the Everyday Essentials Mix & Match Designer Series Paper for my card today.
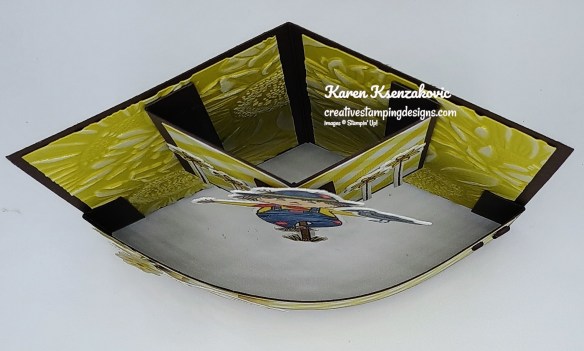
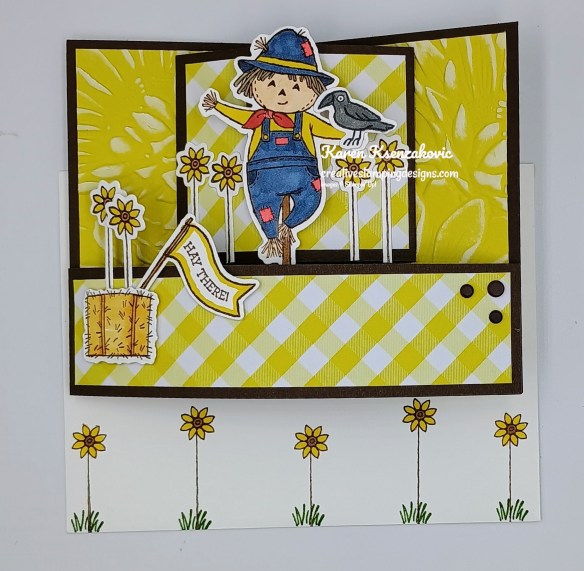
Emboss 2 panels of Darling Duckling using the Sunflower EF. Swipe across the embossed panels using the White Craft Stamp Pad. Adhere the panels to the Early Espresso card base. Adhere a panel of Everyday Essentials DSP to the Early Espresso bridge panel. Using the Bone Folder, curve the layered panel from the back. Adhere the layered panel to the bottom of the card front. Adhere a panel of the Everyday Essentials DSP to the panel of Early Espresso. Score the DSP where the Early Espresso is scored. Adhere the layered panel to the card front , lining up the score lines of the smaller panel and card base.
Here is a top view of the card base.
On a panel of Basic Whtie, stamp the scarecrow, haystack, flag and sunflower images from the Fun For Fall stamp set in Early Espresso Ink. Stamp the sentiment from the Fun For Fall stamp set in Early Espresso Ink on the flag. Stamp the crow image from the Fun For Fall stamp set in Black Ink. Color the images using Crumb Cake, Darling Duckling, Golden Glow, Ivory, Misty Moonlight, Pecan Pie, Poppy Parade, Old Olive and Smoky Slate Stampin’ Blends Markers. Using the Fun For Fall Dies, cut all the images out. Fold the 2 – 1″ pieces of Early Espresso in half and adhere them with folded edges against the score line of the center panel. Adhere the scarecrow to the 2 folded panels. Adhere the haystack, sunflowers and flag to the card front. Adhere the crow to the scarecrow’s hand with a Glue Dot. Add a few Earthy Matte Dots to the card front
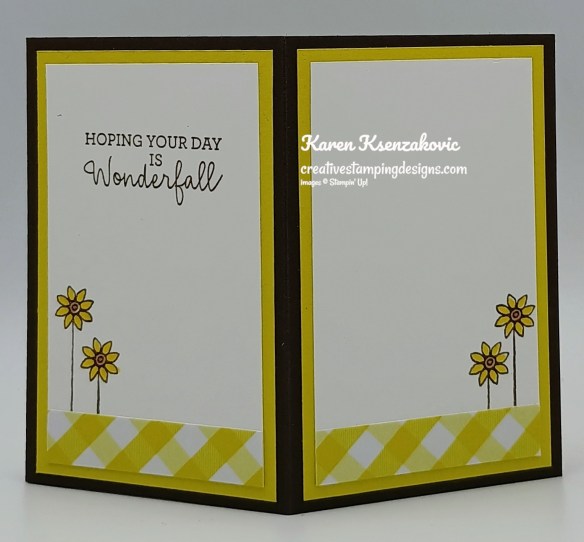
On one of the Basic White panels, stamp the sentiment from the Fun For Fall stamp set in Early Espresso Ink. Stamp the sunflower image from the Fun For Fall stamp set on the bottom of both panels of Basic White in Early Espresso Ink. Color the images with Darling Duckling and Peacn Pie Stampin’ Blends Markers. Adhere a panel of Everyday Essentials DSP to the bottom of each panel. Adhere the Basic White panels to Darling Duckling mats then to the back of the Early Espresso card base.
Decorate a Basic White Medium Envelope to complete the card. Stamp the sunflower image from the Fun For Fall stamp set in Early Espresso Ink on the envelope front. Color the images with Darling Duckling and Pecan Pie Stampin’ Blends Markers. Stamp the grass image from the Fun For Fall stamp set in Old Olive Ink at the base of each flower. Adhere a panel of Everyday Essentials DSP to the envelope flap.
Thank you for stopping by my blog today. Now that you’ve seen my card, let’s get on with the hop! Click on the Next Blog button to move on to Karen’s project. Happy Hopping.
Just in case you get lost along the way, here is a list of the team members involved in the hop today.
If you need any stamping supplies, I’d love to be your Demonstrator. Just click HERE to go directly to my online store or drop me an email if you have any questions.
Early Espresso Cardstock 4 1/4″ x 5 1/2″ (card base scored @ 2 3/4″), 1 1/2″ x 6″(bridge scored & folded at 1/2″ & 6″), 2 1/2″ x 4″ (center panel scored & folded at 1/2″, 2″ & 3 1/2″), (2) – 1″ x 1″(pop-up scored & folded at 1/2″)
Everyday Essentials Mix & Match Designer Series Paper 2 1/4″ x 2 3/4″(center panel), 1 1/4″ x 5 1/4″(bridge), (2) – 1/2″ x 2 1/4″(back panels), 2 1/4″ x 6″ (envelope)
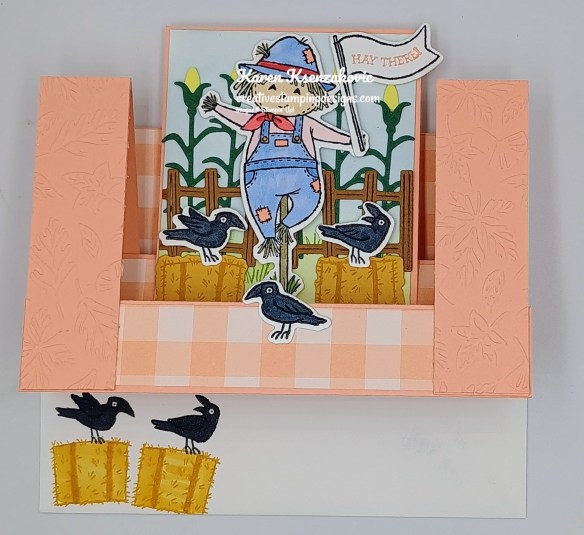
Good Friday morning stamping friends, welcome to my fun fold Friday. I hope you all had a great week and are looking forward to the weekend.
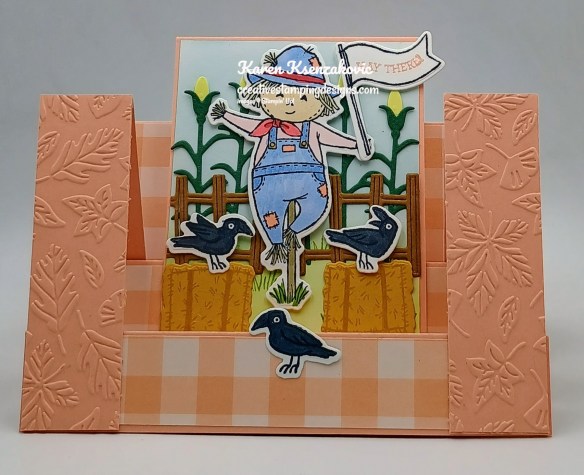
Today’s card is one that I did on my YouTube Live last night. If you were able to join me, thank you for hopping on. If you’d like to watch the replay and stamp along, the measurements are on the bottom of this post along with the link to my video. Here’s my card for today.
I used the new Stampin’ Up! Online Exclusive Fun For Fall Bundle (available July 1), along with the 2026-2028 In-Color Gingham Gallery Designer Series Paper and Seasonal Cheer Mini Embossing Folder for my card today.
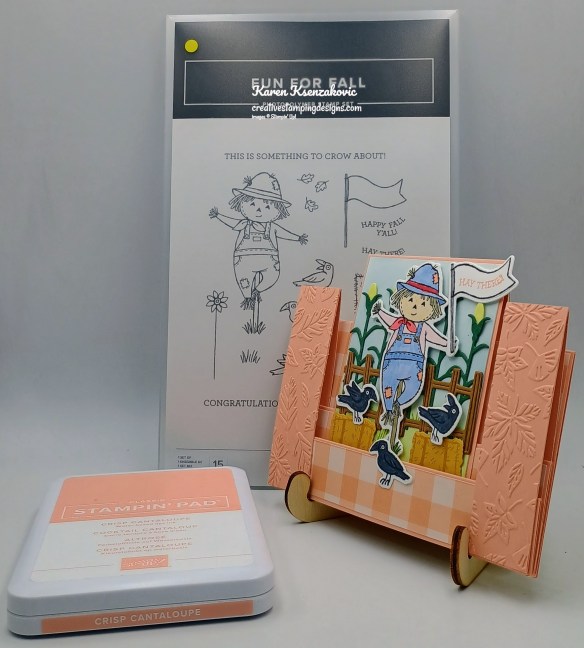
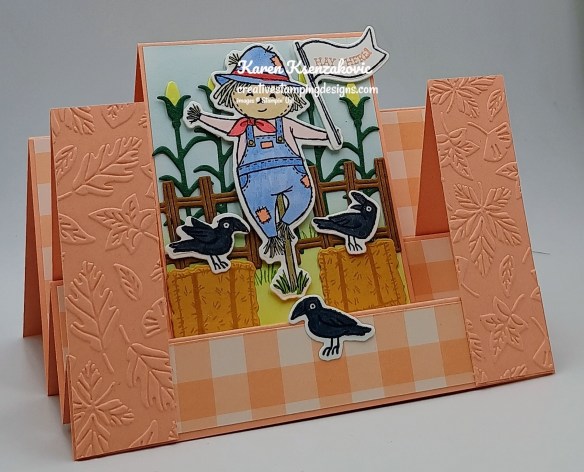
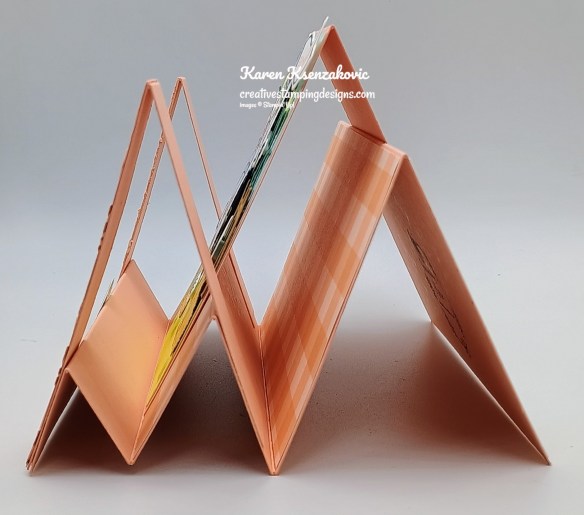
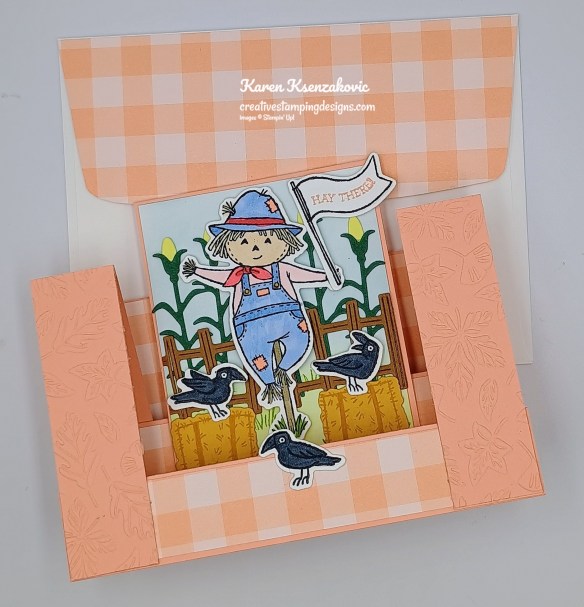
Adhere panels of Gingham Gallery DSP to the 1st, 3rd and 5th section of the Crisp Cantaloupe card base. Emboss the 2 panels of Crisp Cantaloupe with the leaf EF from the Seasonal Cheer Mini EF. Adhere the embossed panels to the front of the side step panels. Adhere the side step panels to the sides of the card base, adhering them to the bottom front and the back of the 2nd folded panel.
On a panel of Basic White, stamp the scarecrow, crows and banner images from the Fun For Fall stamp set in Black Ink. Color the images with Basic Black(crows), Barely Blush, Crisp Cantaloupe, Crumb Cake, Golden Glow, Granny Apple Green, Hydrangea Hue, Ivory and Poppy Parade Stampin’ Blends Markers. Cut the images out using the Fun For Fall Dies. Using the same dies, cut the corn stalks from a panel of Peaceful Pine, corn from a panel of Lemon Lolly and fence from a panel of Pecan Pie. Stamp the bales of hay in Golden Glow Ink on a panel of Golden Glow and cut them out using the Fun For Fall Dies. Using Blending Brushes, add Balmy Blue to the top of a Basic White panel and Granny Apple Green to the bottom of the panel. Arrange and adhere the die cut pieces to the panel. Adhere the Basic White panel to the front of the center step section. Adhere the center step to the bottom of the 2nd folded section and the back of the card base.
Here is a side view of the card.
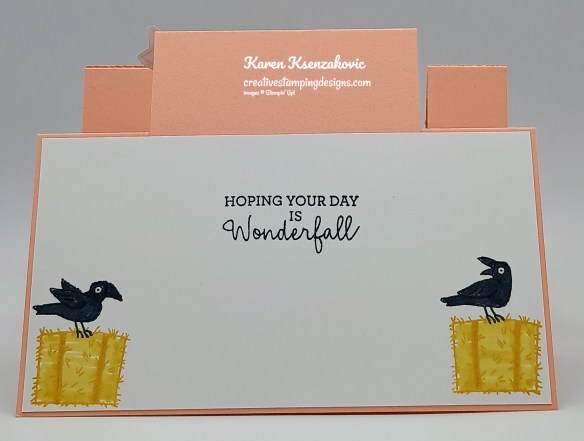
Stamp the sentiment from the Fun For Fall stamp set in Black Ink on a panel of Basic White. Stamp the hay bales image from the Fun For Fall stamp set on the bottom of the panel in Golden Glow Ink and color them with Golden Glow Stampin’ Blends Markers. Stamp the crow images from the Fun For Fall stamp set in Black Ink on top of the hay. Color them with Basic Black Stampin’ Blends Markers. Adhere the Basic White panel to the back of the card base.
Decorate a Basic White Medium Envelope to finish your card. Stamp the bales of hay image from the Fun For Fall stamp set on the envelope front in Golden Glow Ink and color them with Golden Glow Stampin’ Blends Markers. Stamp the crow images on top of the hay in Black Ink and color them with Basic Black Stampin’ Blends Markers. Adhere a panel of 2026-2028 In-Color Gingham Gallery DSP to the envelope flap.
Thank you for stopping by my blog today. I hope you liked my card and will give it a try. You can watch my video on my YouTube Channel Here.
If you watch this on my YouTube channel, please remember to subscribe so that you will get notified when a new video goes live. Thank you to those that have subscribed already. Happy Stamping!!
If you need any stamping supplies, I’d love to be your Demonstrator. Just click HERE to go directly to my online store or drop me an email if you have any questions.
Final Days to Sign Up for My July Online Exclusive Product Share
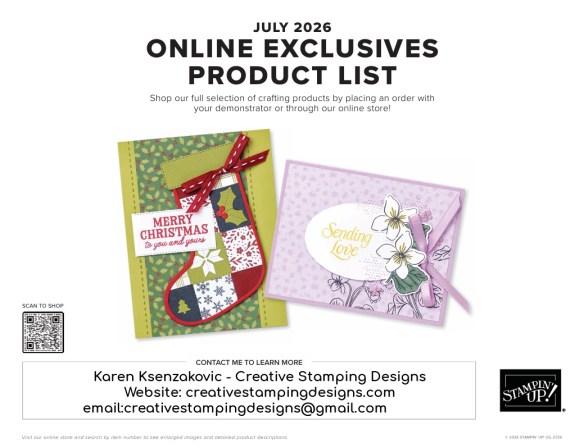
I’m offering a small product share from the upcoming July Online Exclusives. I’m offering a Paper Share and/or an Embellishment & Ribbon Share. If you click on the image below you can open the flyer with the products coming in July.
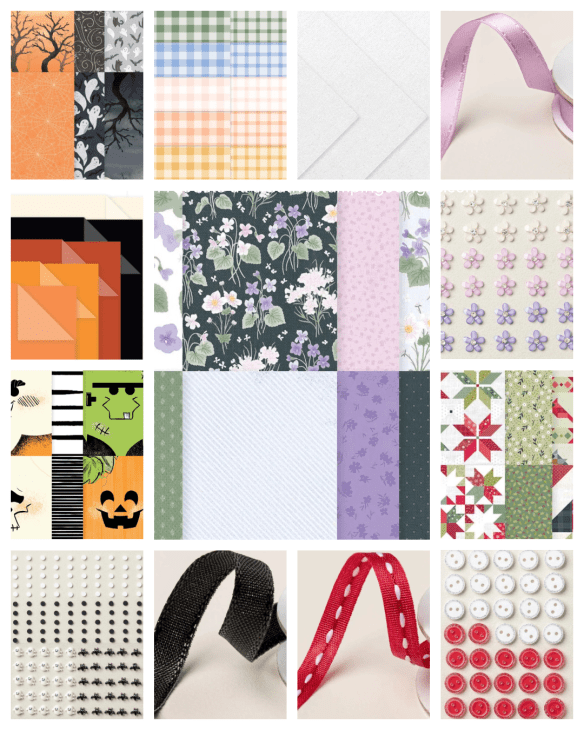
I’m offering a PaperShare and a Ribbon & Embellishment Share from the July 2026 Online Exclusives, and I’d love to have you join!! I’m placing my share order early on July 1st and I’m going to use the expedited shipping option so I should be able to have the shares cut, bundled and back out to you during the week of July 6th. Wouldn’t you love to have all of the gorgeous and fun new Papers in the upcoming July 2026 Online Exclusives? What is a Paper Share you ask? It’s a sample of each of the new Papers from the Online Exclusives. Shares give you a good working sample of all of the papers so that you can decide which ones to order in full packs! If you were to purchase all of the papers from the Online Exclusives, it would cost you over $90.00 plus shipping.
How my shares work: I order full packs of all of the Papers listed below, I cut them into 6″ X 6″ pieces (or 6″ X 12″ pieces for double shares) and give you one panel of each design from each pack on the list. I pack up the paper in a cellophane bag with labels listing the Name, Item # and Colors in the pack and mail it back out to you just as quickly as I can!
New Designer Series Paper Share – $10.50 plus $7.00 for shipping
You will receive one 6×6 sheet of each design from the following DSP packs (the number after the name indicates how many 6×6 sheets of that paper pack you will receive):
Frightfully Fun (6)
Frightfully Fun Two-Tone Cardstock (6)
Spooktacular (6×6) (4)
2026-2028 In-Color Gingham (5)
A Stitched Season (6)
Violet Dreams Specialty (5)
If you’d like double shares of the paper, I’m offering those too! I’ll cut the 12″ x 12″ sheets into 6″ × 12″ so that you’ll be able to get 3 full A2 size card fronts from each sheet and you’ll get double sheets of the 6″ x 6″ since they’re already precut.
Double Paper Share – $21.00 Plus $7.00 Shipping
Ribbon/Embellishment Share – $12.50 plus $7.00 Shipping
All ribbons and Embellishments will come individually wrapped and labeled with the name and number of the product.
One-Fourth of a Roll of each:
Black 3/8″ Iridescent Ribbon
Fresh Freesia 1/4″ Satin Ribbon
Real Red 1/4″ Stitched Ribbon
Adhesive-Backed Bats Ghosts & Dots (30)
Adhesive-Backed Blooms (15)
Adhesive-Backed Mini Christmas Buttons (10)
Double Ribbon & Embellishment Share – $25.00 Plus $7.00 Shipping and you will be getting 1/2 of the roll of each ribbon.
Anyone is welcome to join in my shares (please note, I can only ship to addresses within the US). To make ordering the shares a little easier, I have created a form for you to submit, that way you can order any combination of shares you want. Click Here for the form. I will send out PayPal Invoices on or around June 27th with a due date by June 30th.
Deadline to sign up for my share is Saturday June 27th at 5:00 PM ET.
Beginning June 30, 2026 at 4:00 PM MT, Stampin’ Up! is introducing a simplified join process designed to make joining faster and easier than ever before! The new process will create a more streamlined experience when you join!
As part of the new join process, all first-time demonstrators (beginning June 30, 2026 at 4:00 PM MT) will receive a surprise Welcome Box—a gesture of appreciation and a warm welcome into the global Stampin’ Up! creative community!
How the New Process Works
Step 1: Join
New demonstrators will:
choose a team leader.
accept required agreements.
enter a few personal details.
pay the $100 join fee.
click submit.
Step 2: Shop
Once their information has been reviewed and approved (usually very quickly), their Welcome Box ships, and the new demonstrator receives an email with:
their demonstrator ID.
a coupon code to begin shopping.
About the Coupon Code
Valued at $125.
Coupon code can be applied to any demonstrator order.
Order CAN exceed the coupon code value (I know that many people wanted the option to be able to add more than $125 to their Starter Kit!).
Any amount above the coupon code value:
receives the demonstrator discount.
counts toward the quarterly sales minimum.
earns Stampin’ Rewards if it meets the qualifying purchase amount (as long as you’ve opted into the Stampin’ Rewards program).
Additional perk for new demonstrators
New demonstrators may add eight free catalogs to any order!
Let me know if you have any questions about the new joining process. I’m so happy that you’ll now have the option to go over the $125 amount AND that it will automatically count toward your sales!
Why not start thinking about joining the Stampin’ Up! community. I’d love to have you on my team and July is the perfect time to sign up. Contact me at: creativestampingdesigns@gmail.com and I’d be more than happy to answer any questions you might have. We’re a very relaxed team that loves to create and share.
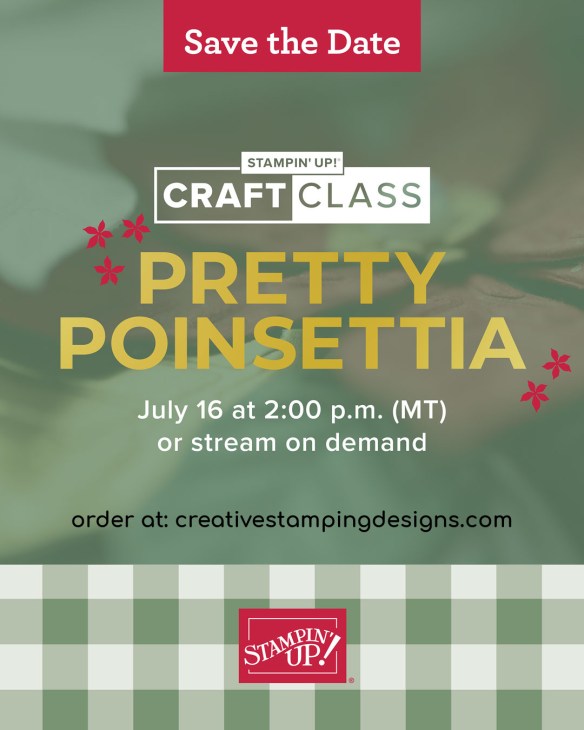
Order the Pretty Poinsettia Craft Class Starting July 1
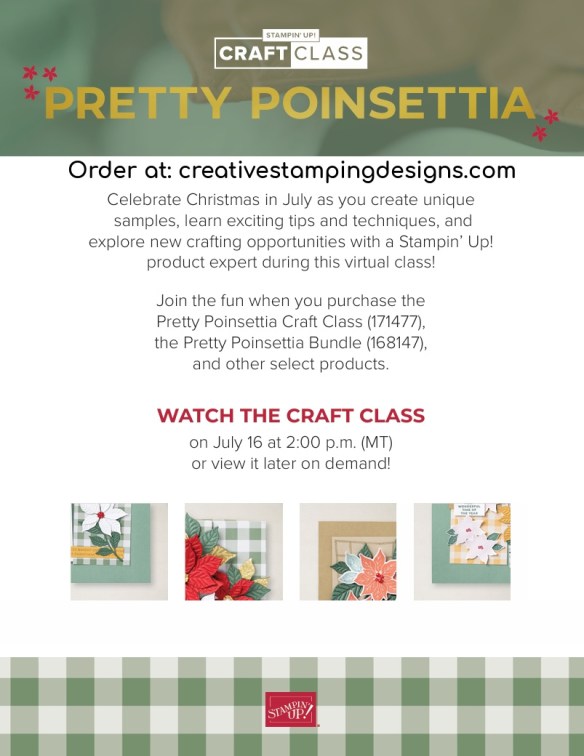
Stampin’ Up! is offering another Craft Class on July 16 (with replay available afterward if that date doesn’t work for your schedule!). This class will be a Christmas In July Class!
Here are the details:
Class: Pretty Poinsettia Craft Class (171477)
Class Price: $30 (Bundle not included)
Class Purpose: Celebrate Christmas in July when you use the Pretty Poinsettia Bundle’s Impressions dies to make crafts with astonishing detail and dimension
Product: Pretty Poinsettia Bundle (168147) – available to order beginning July 1
Available for Purchase: July 1
Available for Streaming: July 16 at 2:00 p.m. (MT)
The class will be available for purchase before and after it streams on July 16
Where: An exclusive Facebook group
Language: The class will be presented in English; attendees will have access to supply lists and project instructions in Dutch, English, French, and German
Video on Demand: This class will be available as a video on demand with captions in Dutch, English, French, and German shortly after the event
You can download the flyer with the Craft Class details by clicking the image below:
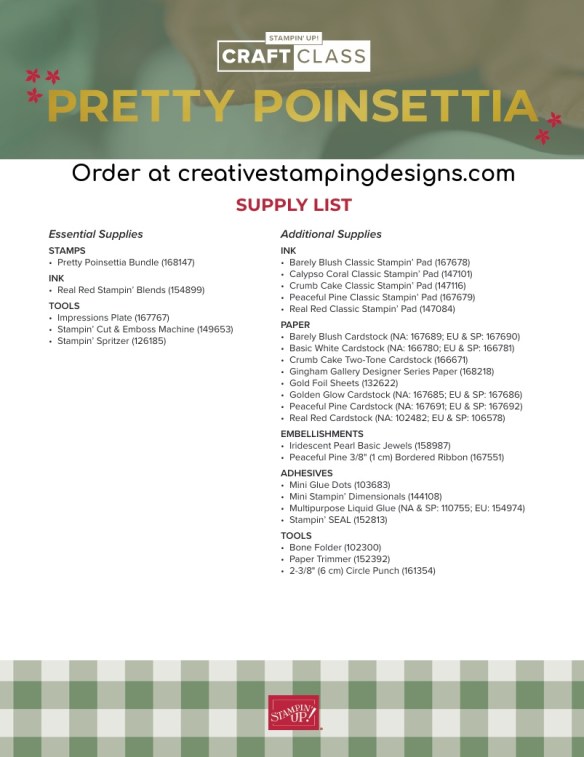
You can download the list of additional products needed to create the projects by clicking the image below:
The Pretty Poinsettia stamp set bundle will also be available to purchase as an Online Exclusive item beginning July 1, so keep an eye out for the bundle and Craft Class in the online store then!


![Fun For Fall Photopolymer Stamp Set (English) [ 168136 ]](https://assets1.tamsnetwork.com/images/EC042017NF/168136s.jpg "Fun For Fall Photopolymer Stamp Set (English) [ 168136 ]")
![Basic White 8 1/2" X 11" Cardstock [ 166780 ]](https://assets1.tamsnetwork.com/images/EC042017NF/166780s.jpg "Basic White 8 1/2\" X 11\" Cardstock [ 166780 ]")
![Cajun Craze 8-1/2" X 11" Cardstock [ 119684 ]](https://assets1.tamsnetwork.com/images/EC042017NF/119684s.jpg "Cajun Craze 8-1/2\" X 11\" Cardstock [ 119684 ]")
![Lost Lagoon 8-1/2" X 11" Cardstock [ 133679 ]](https://assets1.tamsnetwork.com/images/EC042017NF/133679s.jpg "Lost Lagoon 8-1/2\" X 11\" Cardstock [ 133679 ]")
![Painted Patch 12" X 12" (30.5 X 30.5 Cm) Designer Series Paper [ 168430 ]](https://assets1.tamsnetwork.com/images/EC042017NF/168430s.jpg "Painted Patch 12\" X 12\" (30.5 X 30.5 Cm) Designer Series Paper [ 168430 ]")
![Golden Glow 12" X 12" (30.5 X 30.5 Cm) Two Tone Cardstock [ 167695 ]](https://assets1.tamsnetwork.com/images/EC042017NF/167695s.jpg "Golden Glow 12\" X 12\" (30.5 X 30.5 Cm) Two Tone Cardstock [ 167695 ]")
![Golden Glow Classic Stampin' Pad [ 167676 ]](https://assets1.tamsnetwork.com/images/EC042017NF/167676s.jpg "Golden Glow Classic Stampin' Pad [ 167676 ]")
![Old Olive Classic Stampin' Pad [ 147090 ]](https://assets1.tamsnetwork.com/images/EC042017NF/147090s.jpg "Old Olive Classic Stampin' Pad [ 147090 ]")
![Secret Sea Classic Stampin' Pad [ 165285 ]](https://assets1.tamsnetwork.com/images/EC042017NF/165285s.jpg "Secret Sea Classic Stampin' Pad [ 165285 ]")
![Cajun Craze Stampin' Blends Combo Pack [ 154879 ]](https://assets1.tamsnetwork.com/images/EC042017NF/154879s.jpg "Cajun Craze Stampin' Blends Combo Pack [ 154879 ]")
![Crumb Cake Stampin' Blends Combo Pack [ 154882 ]](https://assets1.tamsnetwork.com/images/EC042017NF/154882s.jpg "Crumb Cake Stampin' Blends Combo Pack [ 154882 ]")
![Golden Glow Stampin’ Blends Combo Pack [ 167682 ]](https://assets1.tamsnetwork.com/images/EC042017NF/167682s.jpg "Golden Glow Stampin’ Blends Combo Pack [ 167682 ]")
![Misty Moonlight Stampin' Blends Combo Pack [ 153108 ]](https://assets1.tamsnetwork.com/images/EC042017NF/153108s.jpg "Misty Moonlight Stampin' Blends Combo Pack [ 153108 ]")
![Old Olive Stampin' Blends Markers Combo Pack [ 144597 ] (Retired)](https://assets1.tamsnetwork.com/images/EC042017NF/144597s.jpg "Old Olive Stampin' Blends Markers Combo Pack [ 144597 ] (Retired)")
![Petal Pink Stampin' Blends Combo Pack [ 154893 ]](https://assets1.tamsnetwork.com/images/EC042017NF/154893s.jpg "Petal Pink Stampin' Blends Combo Pack [ 154893 ]")
![Everyday Arches Dies [ 164629 ]](https://assets1.tamsnetwork.com/images/EC042017NF/164629s.jpg "Everyday Arches Dies [ 164629 ]")
![Painted Pumpkins Dies [ 168437 ]](https://assets1.tamsnetwork.com/images/EC042017NF/168437s.jpg "Painted Pumpkins Dies [ 168437 ]")
![Basic White Medium Envelopes [ 159236 ]](https://assets1.tamsnetwork.com/images/EC042017NF/159236s.jpg "Basic White Medium Envelopes [ 159236 ]")
![Stampin' Cut & Emboss Machine [ 149653 ]](https://assets1.tamsnetwork.com/images/EC042017NF/149653s.jpg "Stampin' Cut & Emboss Machine [ 149653 ]")
![Mini Glue Dots [ 103683 ]](https://assets1.tamsnetwork.com/images/EC042017NF/103683s.jpg "Mini Glue Dots [ 103683 ]")
![Multipurpose Liquid Glue [ 110755 ]](https://assets1.tamsnetwork.com/images/EC042017NF/110755s.jpg "Multipurpose Liquid Glue [ 110755 ]")
![Stampin' Dimensionals [ 104430 ]](https://assets1.tamsnetwork.com/images/EC042017NF/104430s.jpg "Stampin' Dimensionals [ 104430 ]")
![Stampin' Seal [ 152813 ]](https://assets1.tamsnetwork.com/images/EC042017NF/152813s.jpg "Stampin' Seal [ 152813 ]")
![Paper Trimmer [ 152392 ]](https://assets1.tamsnetwork.com/images/EC042017NF/152392s.jpg "Paper Trimmer [ 152392 ]")
![Bone Folder [ 102300 ]](https://assets1.tamsnetwork.com/images/EC042017NF/102300s.jpg "Bone Folder [ 102300 ]")
![Detail Scissors [ 170902 ]](https://assets1.tamsnetwork.com/images/EC042017NF/170902s.jpg "Detail Scissors [ 170902 ]")
![Take Your Pick [ 144107 ]](https://assets1.tamsnetwork.com/images/EC042017NF/144107s.jpg "Take Your Pick [ 144107 ]")

![Pecan Pie 8 1/2" X 11" Cardstock [ 161717 ]](https://assets1.tamsnetwork.com/images/EC042017NF/161717s.jpg "Pecan Pie 8 1/2\" X 11\" Cardstock [ 161717 ]")
![Petal Pink 8-1/2" X 11" Cardstock [ 146985 ]](https://assets1.tamsnetwork.com/images/EC042017NF/146985s.jpg "Petal Pink 8-1/2\" X 11\" Cardstock [ 146985 ]")
![Very Vanilla 8 1/2" X 11" Cardstock [ 166784 ]](https://assets1.tamsnetwork.com/images/EC042017NF/166784s.jpg "Very Vanilla 8 1/2\" X 11\" Cardstock [ 166784 ]")
![Earthen Toned Metallic 12" X 12" (30.5 X 30.5 Cm) Specialty Paper [ 165901 ]](https://assets1.tamsnetwork.com/images/EC042017NF/165901s.jpg "Earthen Toned Metallic 12\" X 12\" (30.5 X 30.5 Cm) Specialty Paper [ 165901 ]")
![Cajun Craze Classic Stampin' Pad [ 147085 ]](https://assets1.tamsnetwork.com/images/EC042017NF/147085s.jpg "Cajun Craze Classic Stampin' Pad [ 147085 ]")
![Lost Lagoon Classic Stampin' Pad [ 161678 ]](https://assets1.tamsnetwork.com/images/EC042017NF/161678s.jpg "Lost Lagoon Classic Stampin' Pad [ 161678 ]")
![Pecan Pie Classic Stampin' Pad [ 161665 ]](https://assets1.tamsnetwork.com/images/EC042017NF/161665s.jpg "Pecan Pie Classic Stampin' Pad [ 161665 ]")
![Small Blending Brushes [ 160518 ]](https://assets1.tamsnetwork.com/images/EC042017NF/160518s.jpg "Small Blending Brushes [ 160518 ]")





![Fun For Fall Bundle (English) [ 168139 ]](https://assets1.tamsnetwork.com/images/EC042017NF/168139s.jpg "Fun For Fall Bundle (English) [ 168139 ]")
![Fun For Fall Dies [ 168138 ]](https://assets1.tamsnetwork.com/images/EC042017NF/168138s.jpg "Fun For Fall Dies [ 168138 ]")
![Darling Duckling 8 1/2" X 11" Cardstock [ 165622 ]](https://assets1.tamsnetwork.com/images/EC042017NF/165622s.jpg "Darling Duckling 8 1/2\" X 11\" Cardstock [ 165622 ]")
![Early Espresso 8-1/2" X 11" Cardstock [ 119686 ]](https://assets1.tamsnetwork.com/images/EC042017NF/119686s.jpg "Early Espresso 8-1/2\" X 11\" Cardstock [ 119686 ]")
![Everyday Essentials Mix & Match 12" X 12" (30.5 X 30.5 Cm) Designer Series Paper [ 167702 ]](https://assets1.tamsnetwork.com/images/EC042017NF/167702s.jpg "Everyday Essentials Mix & Match 12\" X 12\" (30.5 X 30.5 Cm) Designer Series Paper [ 167702 ]")
![Early Espresso Classic Stampin' Pad [ 147114 ]](https://assets1.tamsnetwork.com/images/EC042017NF/147114s.jpg "Early Espresso Classic Stampin' Pad [ 147114 ]")
![Uninked Stampin’ Craft Pad & Whisper White Refill [ 147277 ]](https://assets1.tamsnetwork.com/images/EC042017NF/147277s.jpg "Uninked Stampin’ Craft Pad & Whisper White Refill [ 147277 ]")
![Bronze & Ivory Stampin' Blends Combo Pack [ 154922 ]](https://assets1.tamsnetwork.com/images/EC042017NF/154922s.jpg "Bronze & Ivory Stampin' Blends Combo Pack [ 154922 ]")
![Darling Duckling Stampin’ Blends Combo Pack [ 165288 ]](https://assets1.tamsnetwork.com/images/EC042017NF/165288s.jpg "Darling Duckling Stampin’ Blends Combo Pack [ 165288 ]")
![Old Olive Stampin' Blends Combo Pack [ 154892 ]](https://assets1.tamsnetwork.com/images/EC042017NF/154892s.jpg "Old Olive Stampin' Blends Combo Pack [ 154892 ]")
![Pecan Pie Stampin’ Blends Combo Pack [ 161674 ]](https://assets1.tamsnetwork.com/images/EC042017NF/161674s.jpg "Pecan Pie Stampin’ Blends Combo Pack [ 161674 ]")
![Poppy Parade Stampin' Blends Combo Pack [ 154958 ]](https://assets1.tamsnetwork.com/images/EC042017NF/154958s.jpg "Poppy Parade Stampin' Blends Combo Pack [ 154958 ]")
![Smoky Slate Stampin' Blends Combo Pack [ 154904 ]](https://assets1.tamsnetwork.com/images/EC042017NF/154904s.jpg "Smoky Slate Stampin' Blends Combo Pack [ 154904 ]")
![Sunflower 3 D Embossing Folder [ 166145 ]](https://assets1.tamsnetwork.com/images/EC042017NF/166145s.jpg "Sunflower 3 D Embossing Folder [ 166145 ]")
![Earthy Matte Dots [ 167213 ]](https://assets1.tamsnetwork.com/images/EC042017NF/167213s.jpg "Earthy Matte Dots [ 167213 ]")


![Crisp Cantaloupe 8 1/2" X 11" Cardstock [ 167693 ]](https://assets1.tamsnetwork.com/images/EC042017NF/167693s.jpg "Crisp Cantaloupe 8 1/2\" X 11\" Cardstock [ 167693 ]")
![Golden Glow 8 1/2" X 11" Cardstock [ 167685 ]](https://assets1.tamsnetwork.com/images/EC042017NF/167685s.jpg "Golden Glow 8 1/2\" X 11\" Cardstock [ 167685 ]")
![Lemon Lolly 8 1/2" X 11" Cardstock [ 161720 ]](https://assets1.tamsnetwork.com/images/EC042017NF/161720s.jpg "Lemon Lolly 8 1/2\" X 11\" Cardstock [ 161720 ]")
![Peaceful Pine 8 1/2" X 11" Cardstock [ 167691 ]](https://assets1.tamsnetwork.com/images/EC042017NF/167691s.jpg "Peaceful Pine 8 1/2\" X 11\" Cardstock [ 167691 ]")
![Balmy Blue Classic Stampin' Pad [ 147105 ]](https://assets1.tamsnetwork.com/images/EC042017NF/147105s.jpg "Balmy Blue Classic Stampin' Pad [ 147105 ]")
![Crisp Cantaloupe Classic Stampin Pad [ 167680 ]](https://assets1.tamsnetwork.com/images/EC042017NF/167680s.jpg "Crisp Cantaloupe Classic Stampin Pad [ 167680 ]")
![Granny Apple Green Stampin' Pad [ 147095 ]](https://assets1.tamsnetwork.com/images/EC042017NF/147095s.jpg "Granny Apple Green Stampin' Pad [ 147095 ]")
![Barely Blush Stampin’ Blends Combo Pack [ 167667 ]](https://assets1.tamsnetwork.com/images/EC042017NF/167667s.jpg "Barely Blush Stampin’ Blends Combo Pack [ 167667 ]")
![Basic Black Stampin' Blends Combo Pack [ 154843 ]](https://assets1.tamsnetwork.com/images/EC042017NF/154843s.jpg "Basic Black Stampin' Blends Combo Pack [ 154843 ]")
![Crisp Cantaloupe Stampin’ Blends Combo Pack [ 167669 ]](https://assets1.tamsnetwork.com/images/EC042017NF/167669s.jpg "Crisp Cantaloupe Stampin’ Blends Combo Pack [ 167669 ]")
![Granny Apple Green Stampin' Blends Combo Pack [ 154885 ]](https://assets1.tamsnetwork.com/images/EC042017NF/154885s.jpg "Granny Apple Green Stampin' Blends Combo Pack [ 154885 ]")
![Hydrangea Hue Stampin’ Blends Combo Pack [ 167666 ]](https://assets1.tamsnetwork.com/images/EC042017NF/167666s.jpg "Hydrangea Hue Stampin’ Blends Combo Pack [ 167666 ]")

 Creative Stamping Designs