
Good Saturday morning stamping friends, welcome to the weekend!! do you have plans in the works yet? Are you doing anything special for Mother’s Day? I’ll be working all day today and I’m planning on cutting my product shares tomorrow so I can get them packed up.
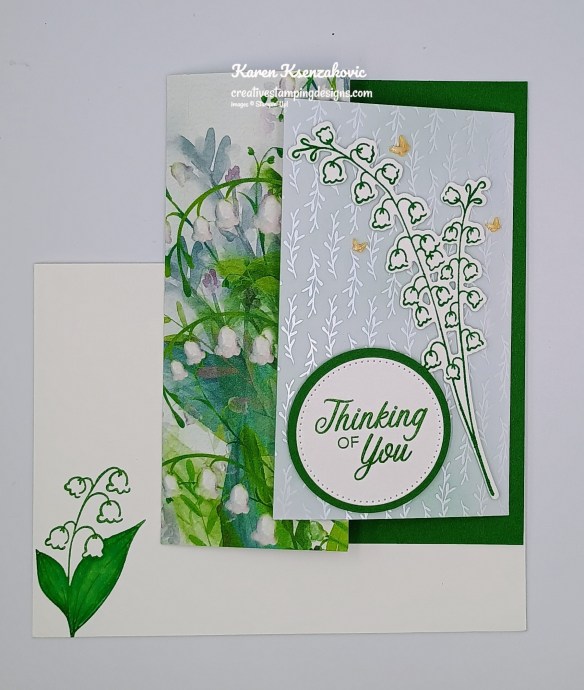
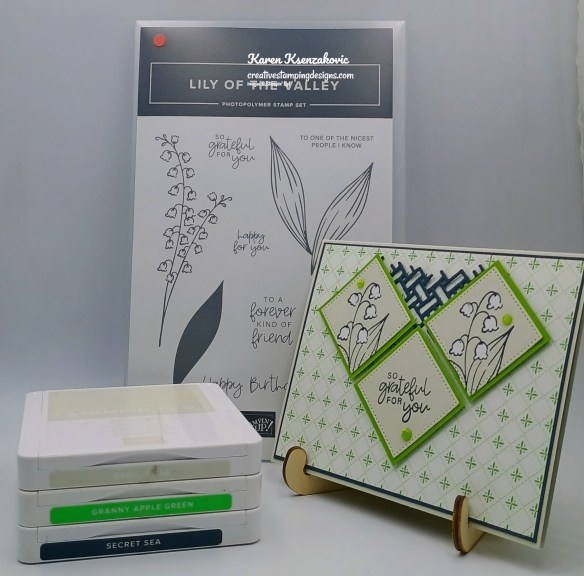
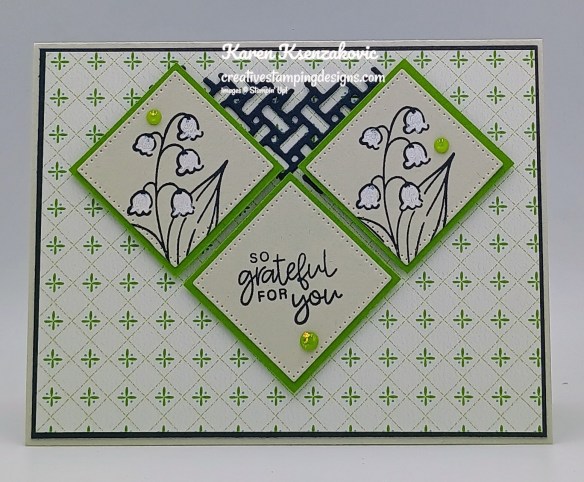
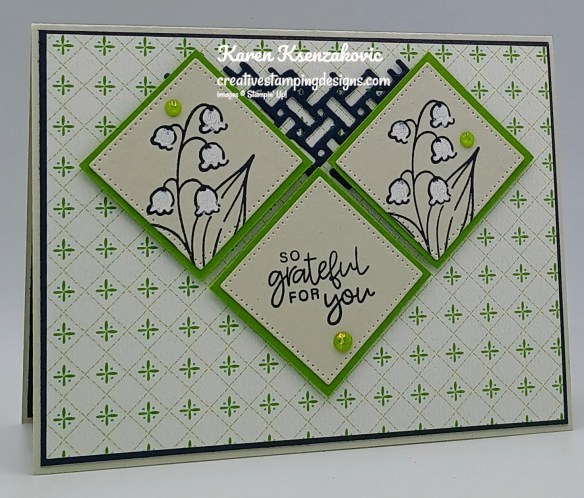
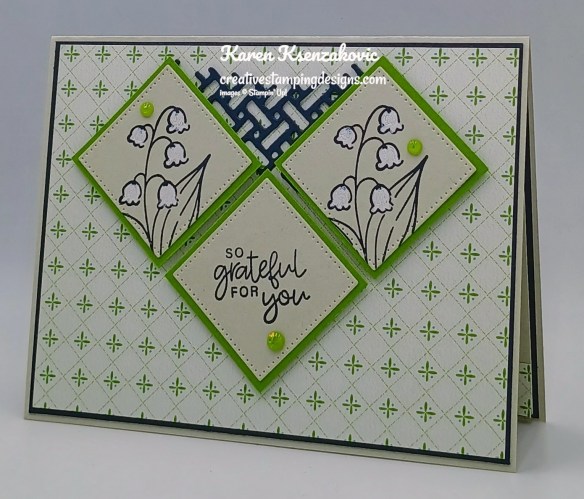
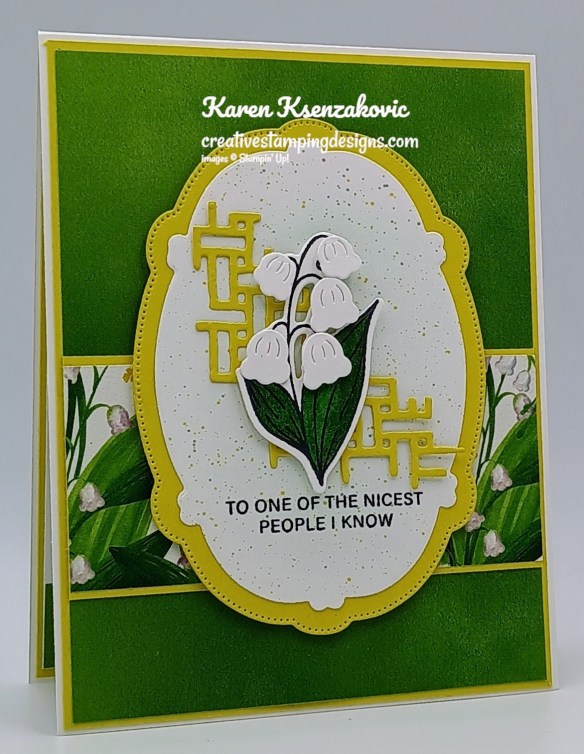
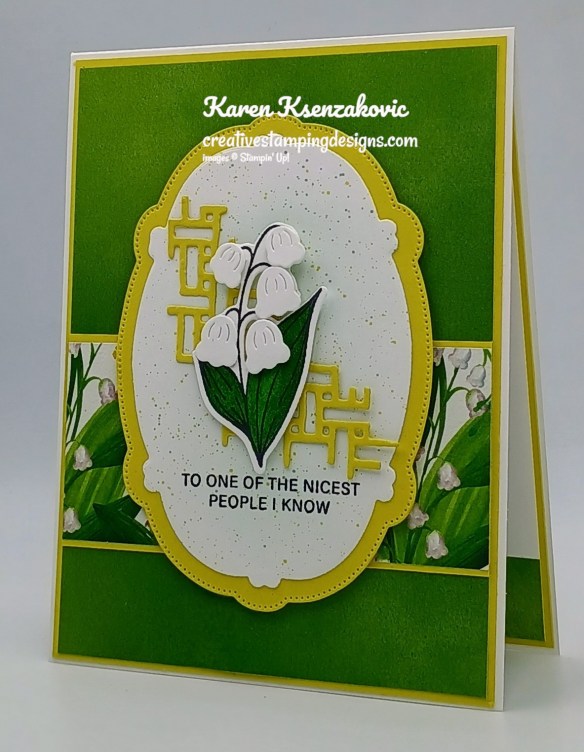
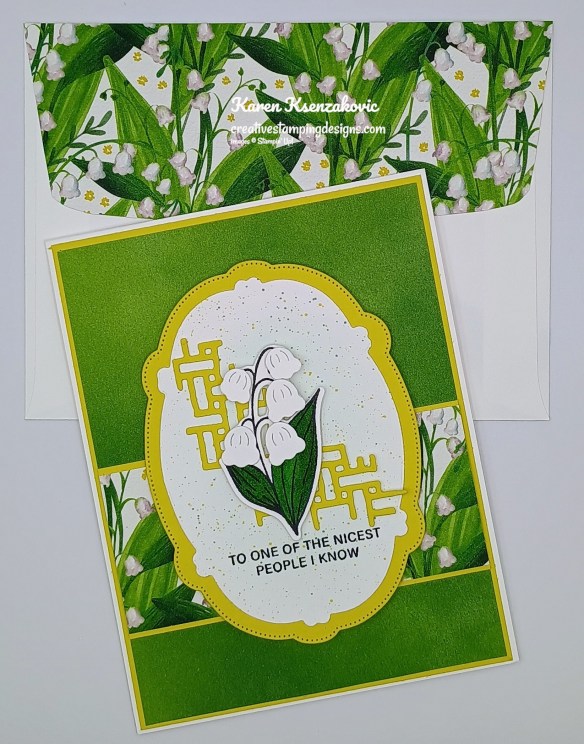
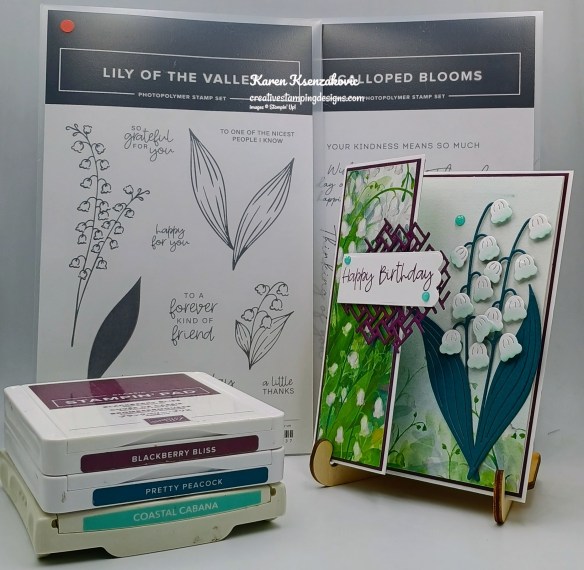
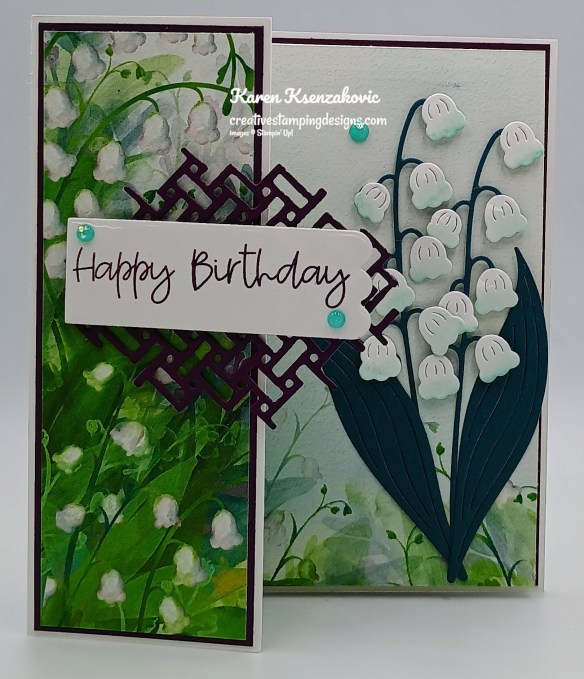
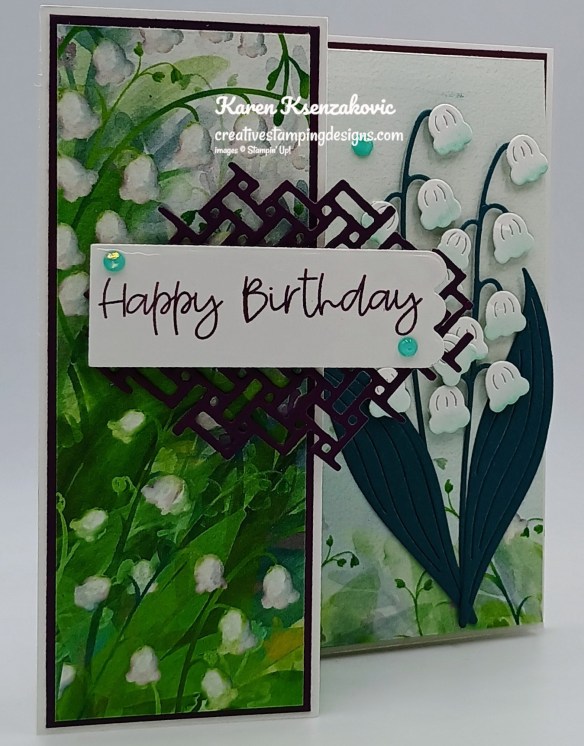
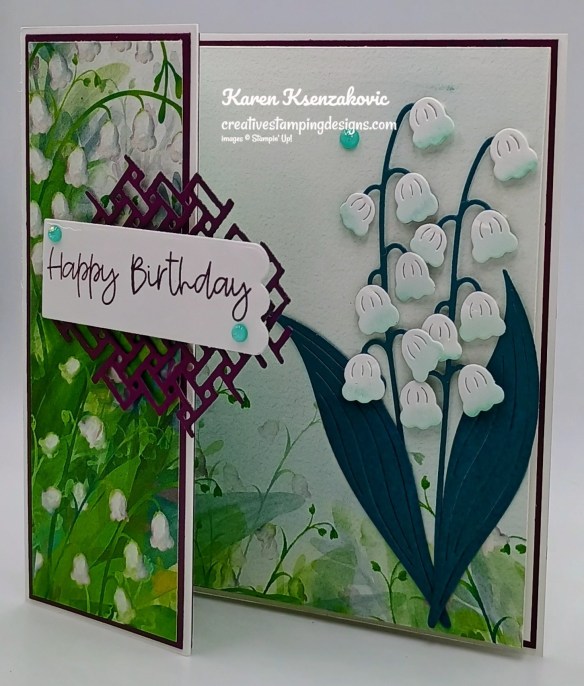
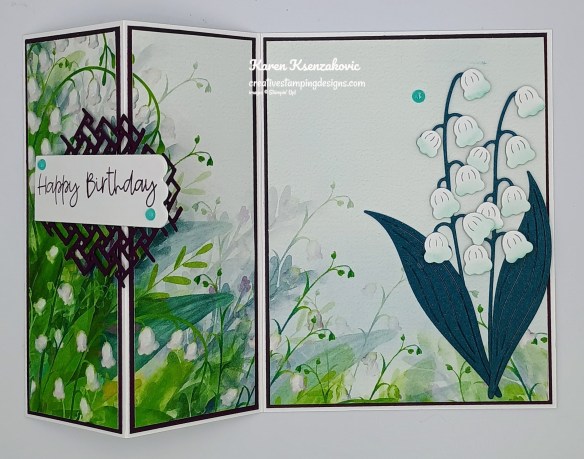
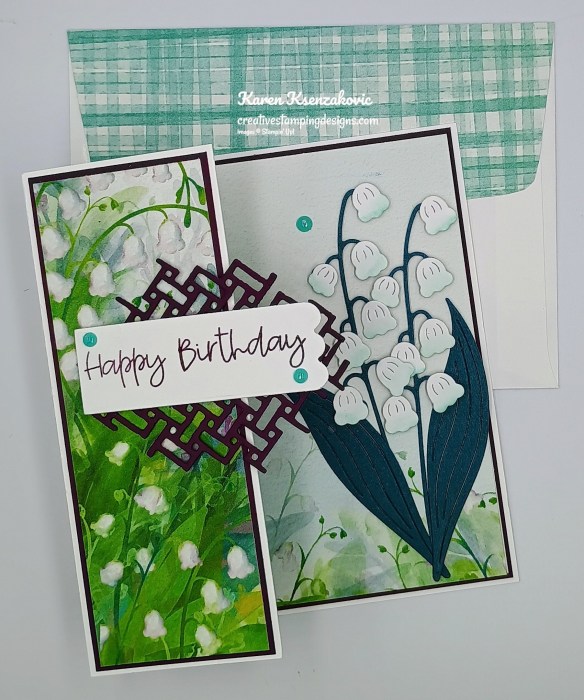
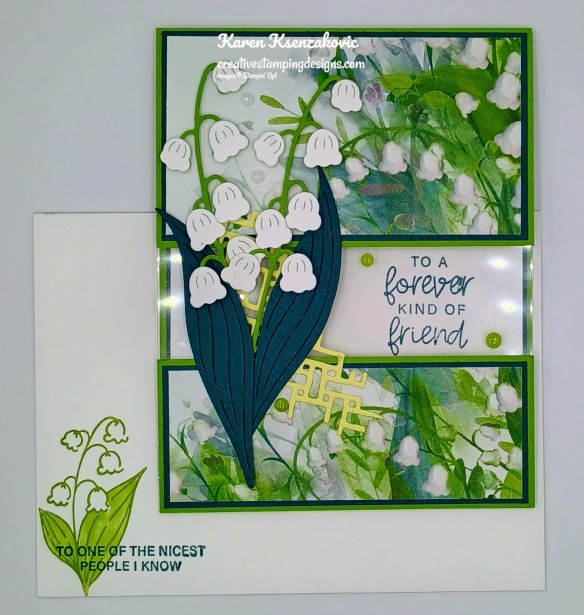
Today’s card was designed by one of our wonderful team members Rosie Kean for our team meeting last Sunday. I changed mine up a little, but it’s basically the same as hers. Here’s my card for today.

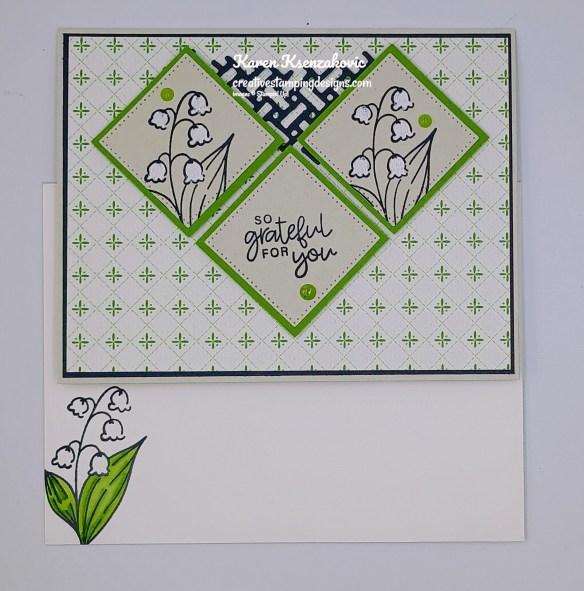
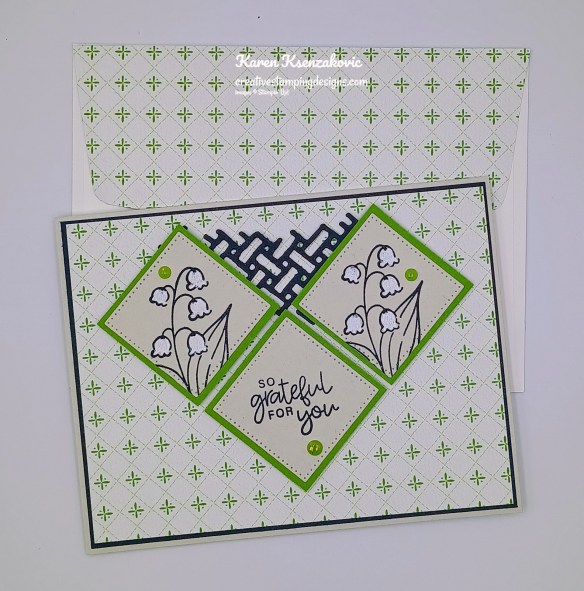
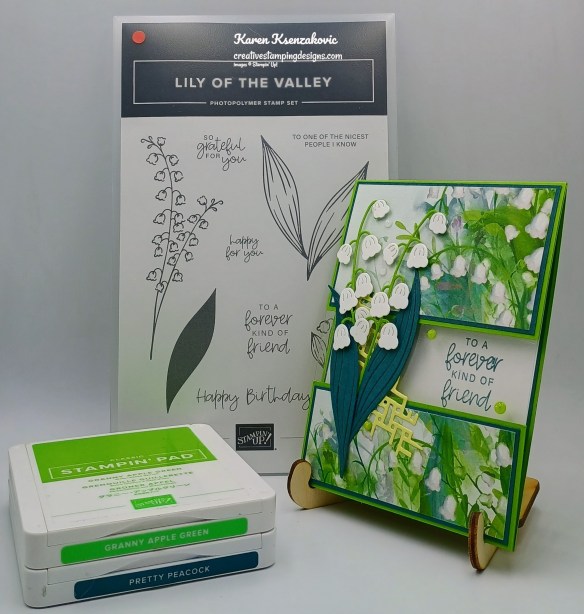
I used the Stampin’ Up! Lily of the Valley Bundle, Valley in Bloom Designer Series Paper, Luxe white Specialty Designer Series Paper, Stampin’ Up! Phrases & Frames Stamp Set, Stylish Shapes Dies and 1 7/8″ Circle Punch for my card today.
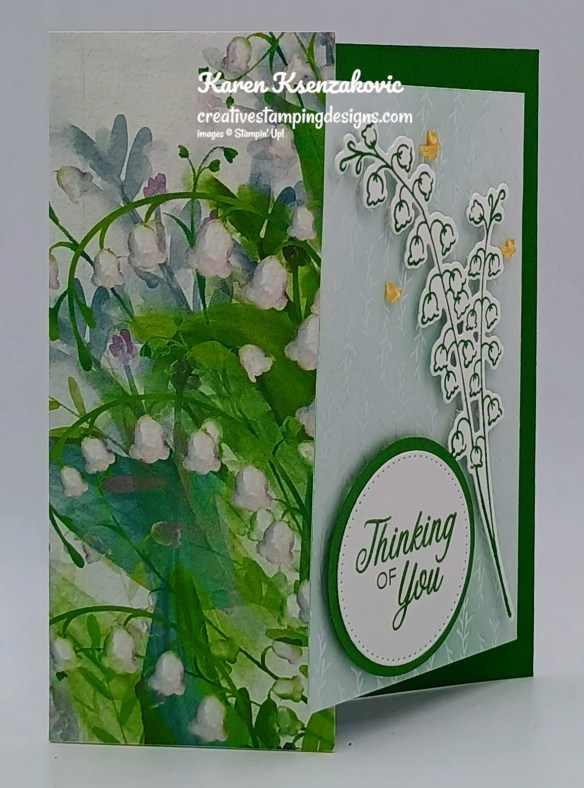
Adhere a panel of Valley in Bloom DSP to the Basic White Thick card front.
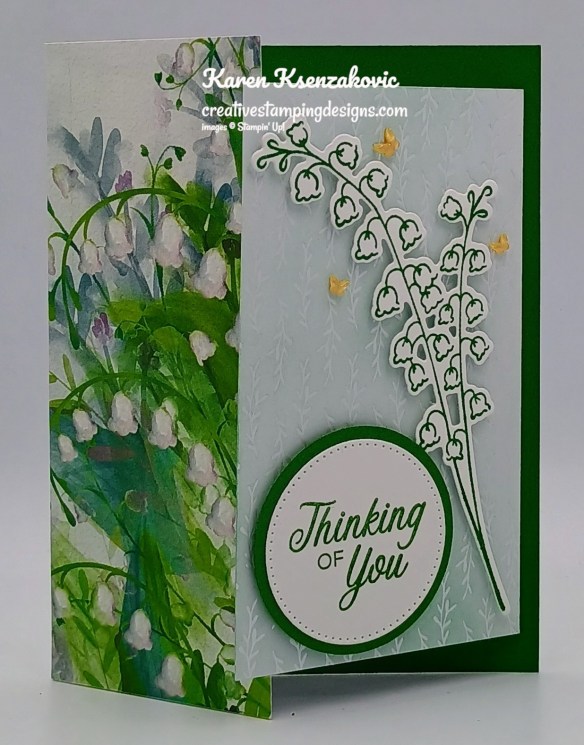
On a panel of Basic White, stamp the large floral image from the Lily of the Valley stamp set in Garden Green Ink. Stamp the sentiment from the Phrases & Frames stamp set in garden Green Ink on the same panel. cut the floral image out using the Lily of the Valley Dies and cut the sentiment out using the Stylish Shapes Dies. Using the 1 7/8″ Circle Punch, cut a panel of Garden Green for a sentiment mat.
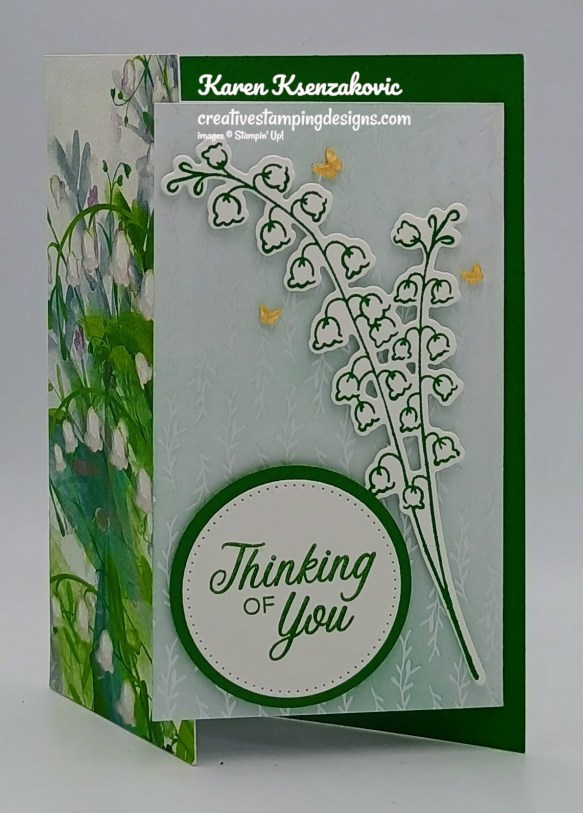
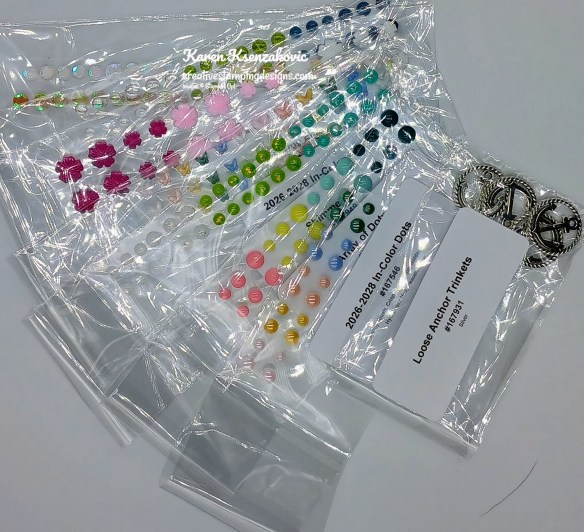
Using a Small Blending Brush, add Pool Party Ink to the front of the small Luxe White DSP card base. Adhere the floral image to the small card front with Stampin’ Dimensionals. Adhere the sentiment to the Garden Green mat then adhere the layered panel to the card front with Stampin’ Dimensionals. Add a few 2026-2028 In-Color Butterflies to the small card front.
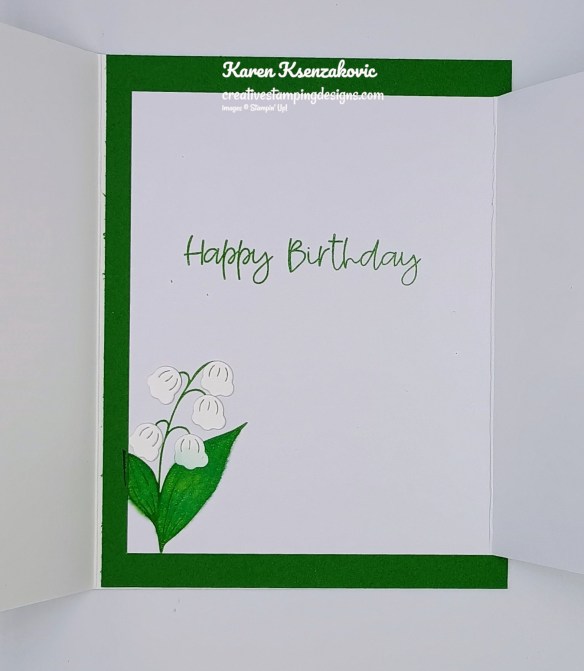
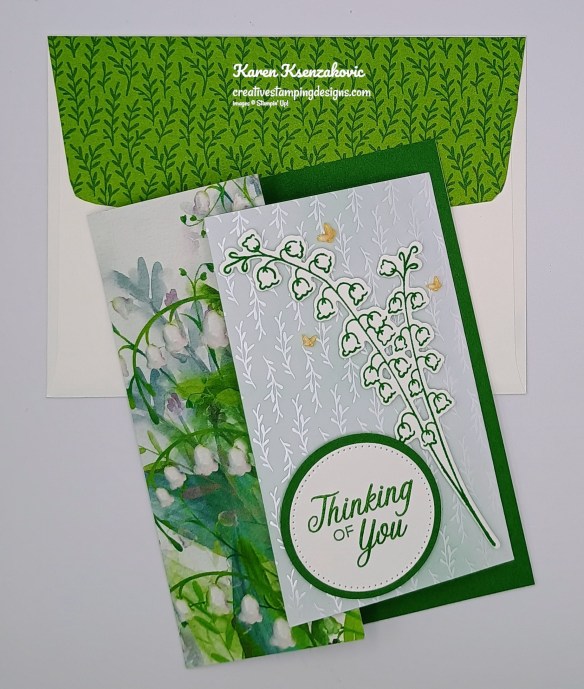
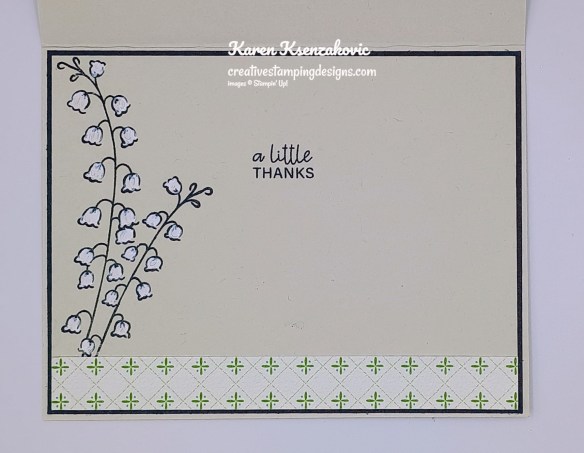
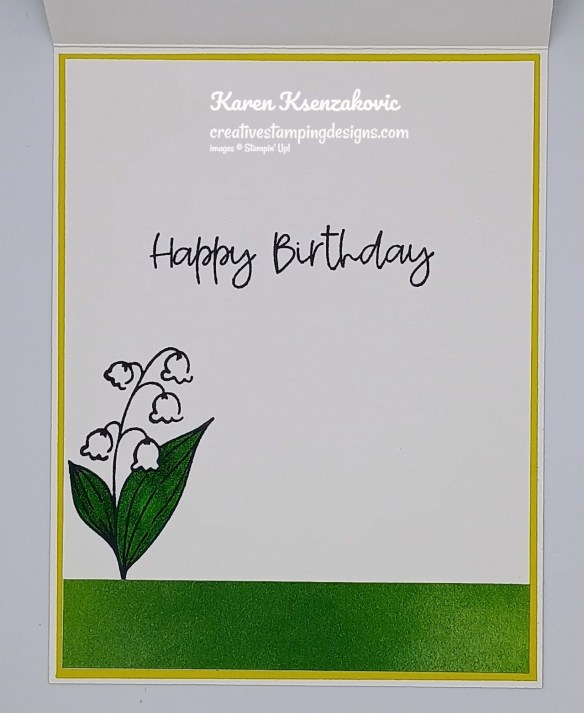
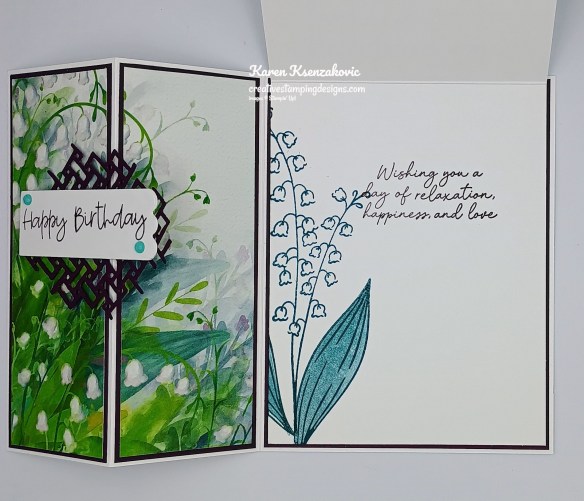
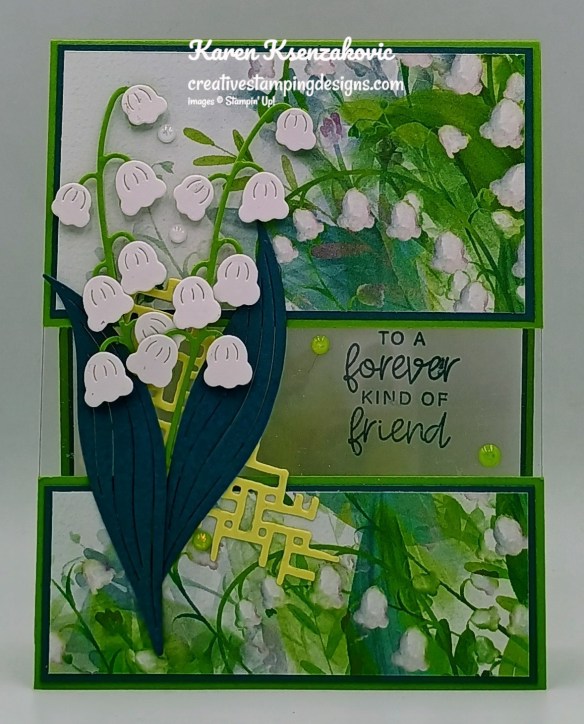
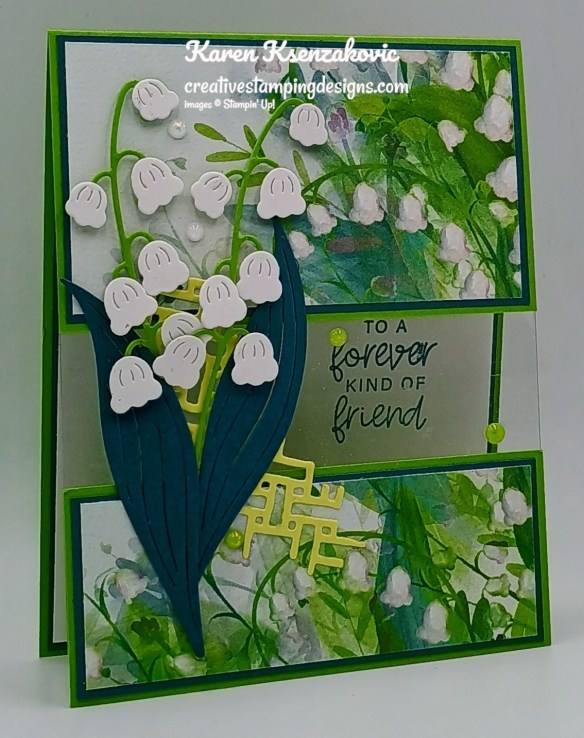
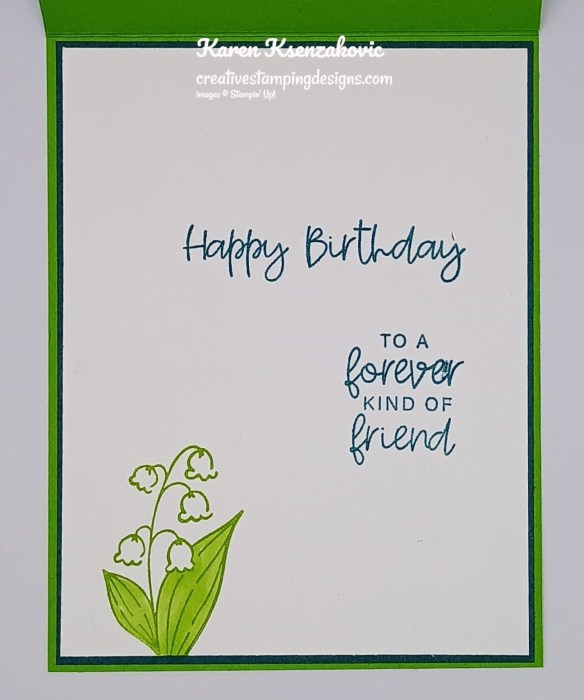
Adhere a panel of Garden Green to the inside of the Basic White Thick card base as a mat. On the inside of the Luxe White DSP card base stamp the sentiment from the Lily of the Valley stamp set in Garden Green Ink. Stamp the small floral image from the Lily of the Valley stamp set in Garden Green Ink on the bottom of the panel. Color the leaves using Shaded Spruce and Granny Apple Green Stampin’ Blends Markers. From the panel of Basic White, cut 5 of the flowers using the Lily of the Valley Dies and adhere them to the flower. Adhere the small card base to the inside of the large Basic Whtie Thick card base.
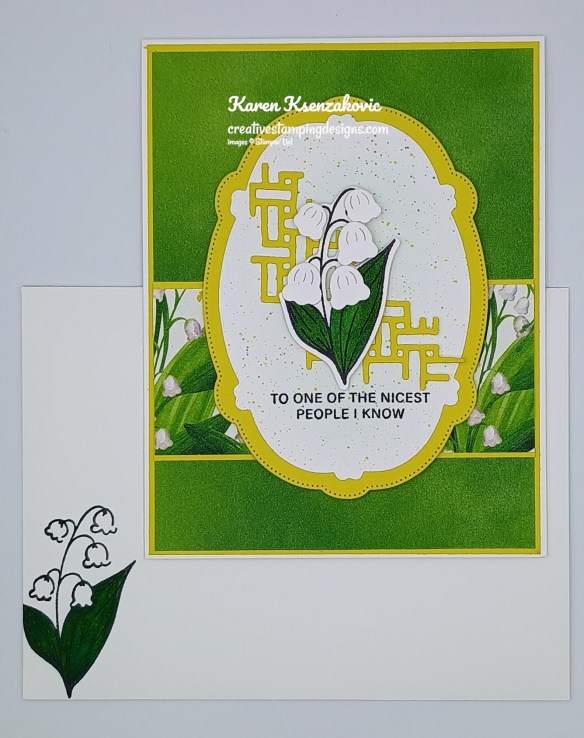
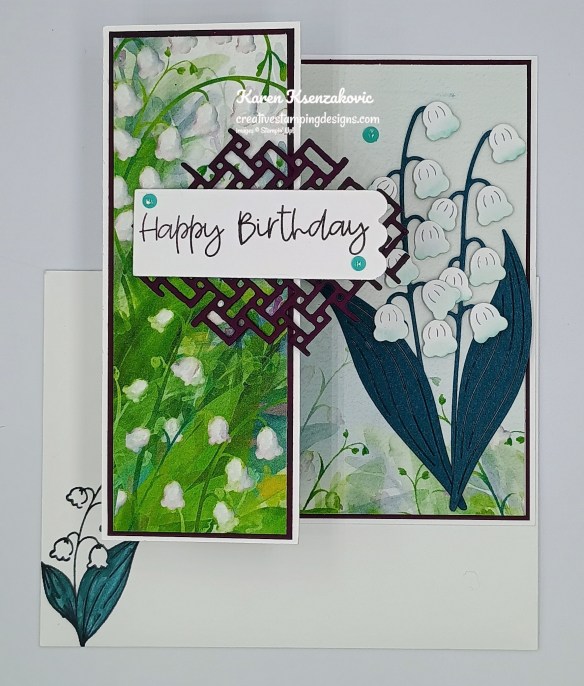
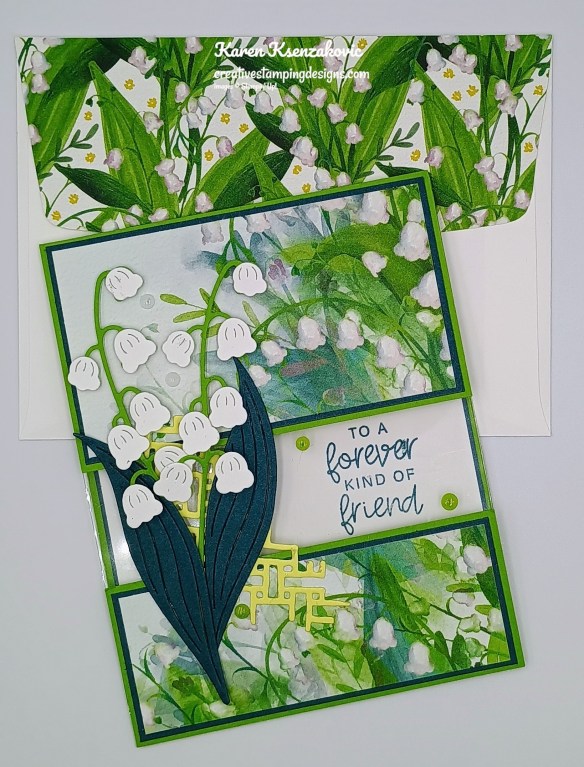
Decorate a Basic Whtie Medium Envelope to finish your card. Stamp the small floral image from the Lily of the Valley stamp set in Garden Green Ink on the envelope front. Color the leaves the same as for the card. Adhere a panel of Valley in Bloom DSP to the envelope flap.
Thank you for stopping by my blog today. I hope you like my card and will give it a try. Happy Stamping!!
*********************************************************************************************************
If you need any stamping supplies, I’d love to be your Demonstrator. Just click HERE to go directly to my online store or drop me an email if you have any questions.
*********************************************************************************************************
Registration for our May One Sheet Wonder Online Class Ends Tomorrow
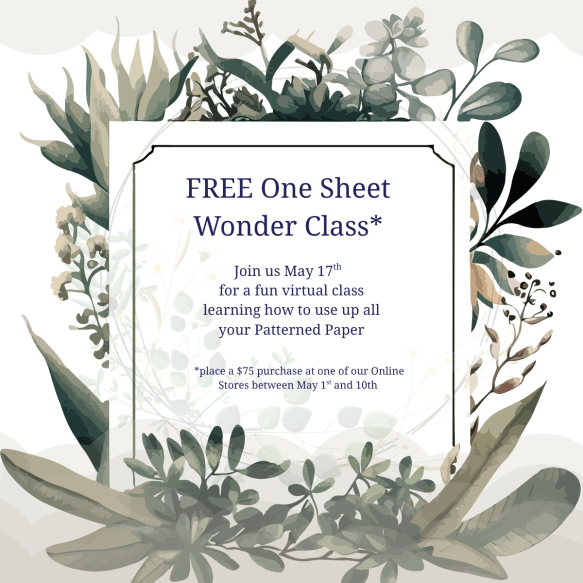
Tara Carpenter and I are teaming up to offer a fun One Sheet Wonder Online Zoom Class. We will be creating between 6-8 card fronts using a single 6 x 6 panel of Designer Series Paper. This class is free with a $75 purchase(before tax & shipping and after rewards) from my Online Store.
A week before the class I will send you the complete PDF of the cards so you can cut all your cardstock gather your supplies, so you are ready to go. We will be cutting all the Designer Series Paper live. Everyone’s cards will be unique since you will pick which color cardstock and DSP you want to use for each card.
The class will be held on Sunday May 17th from 1pm – 5pm Eastern Time via Zoom. This will allow everyone all over the United States to participate live!
I will email you the Zoom link to the class a few days before the event.
Click Here to register by filling out the Google Form
Deadline to sign up is Sunday May 10th at 5pm ET
*********************************************************************************************************
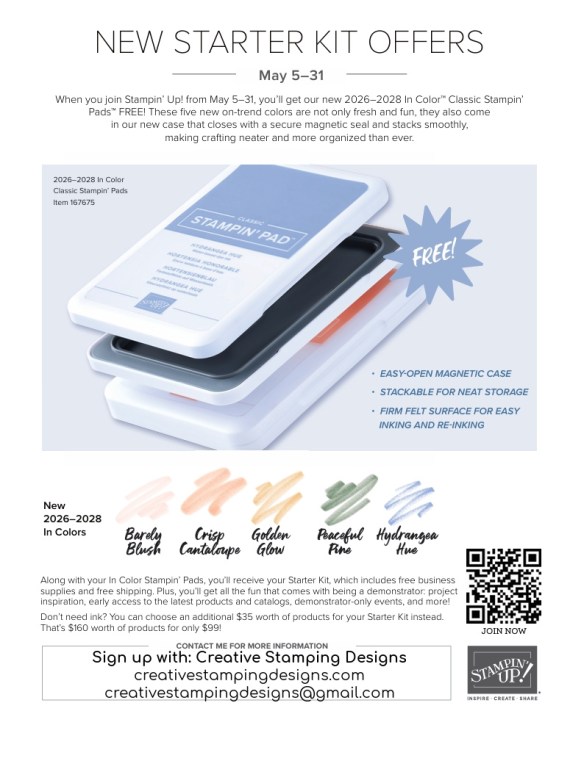
May 5-31 – Starter Kit Special – FREE In Color Ink Pads OR $35 Additional FREE Products In Your Starter Kit

Have you been thinking about all the beautiful products you want from the new May-August 2026 catalog? How would you like to get them at a discount? I don’t know about you, but I LOVE discounts!!! When you purchase the Stampin’ Up! Starter Kit between May 5-31, you’ll get the new 2026–2028 In Color Stampin’ Pads FREE (that’s a $63 value) along with your Starter Kit! Or, if you’d rather have different products instead of ink pads, you can add an extra $35 worth of products to your Starter Kit!
Once you purchase the kit, but wait until May 5, you’ll enjoy all the perks that come with being a demonstrator, like a 20–25% product discount, early access to the latest products and catalogs, the chance to attend incredible training and crafting events, and so much more! Did you know that if Stampin’ Up! is having a sale, as a Demonstrator you get the additional discount on top of your 20-25% off? Also, as an extra little bonus for joining my team, you can attend all my Monthly Online Classes for FREE. There’s never an obligation to sell, you can join to enjoy the discount for yourself. Are you unsure and have questions? Contact me and we can talk. I’ll tell you exactly what to expect when you join.
Click the image below to open this flyer in full size.
Details:
- Promotion Period: May 5–31
- Promotion Ends: May 31 at 11:59 p.m. (MT)
- When you purchase the Starter Kit from May 5–31 you will be able to choose between these two offers:
- Free 2026–2028 In Color Stampin’ Pads plus the regular Starer Kit products (your choice of $125 in Stampin’ Up! merchandise) for just $99
- $160 worth of products in their Starter Kit for just $99 (that’s an extra $35 value!)
- New demonstrators who submit their Independent Demonstrator Agreement (IDA) before May 5 or after May 31 will not be eligible for these offers.
2 great joining offers…you can either choose to get the new In Color Ink Pads for free with your Starter Kit OR additional $35 in free merchandise with your Stater Kit!
Click Here to Sign Up!
*********************************************************************************************************
The products from the May-August 2026 Catalog and May Online Exclusives are now available to order, YAY!!! To kick off the new catalog, I’m offering Double Creative Stamping Designs Rewards.

The new May-August 2026 Catalog & May Online Exclusives are now available to order. I’m offering Double Creative Stamping Designs Rewards. THAT’S 2X THE REWARDS FOR YOU FROM ME through Monday May 11 for all orders over $50 (before tax & shipping)!! How does this work? For a $50 you’ll earn 2 rewards, $100 you’ll earn 4 rewards, $150 you’ll earn 6 rewards, etc. Hurry over to my Online Store and get those orders in for those May-August Catalog & May Online Exclusives and earn those Double Rewards!!
*********************************************************************************************************
Card stock cuts for this project:
- Basic White Cardstock 3 3/4″ x 5″(die cuts)
- Basic White thick Cardstock 5 1/2″ x 6 1/2″(card base scored at 2 1/4″)
- Garden Green Cardstock 2 1/4″ x 2 1/4″(sentiment mat), 4 1/4″ x 5 1/2″(mat)
- Valley in Bloom Designer Series Paper 2 1/4″ x 5 1/2″(card front panel)m 2 1/4″ x 6″(envelope)
- Luxe White Specialty Designer Series Paper 4 3/4″ x 6 1/2″(small card base scored at 3 3/4″)
*********************************************************************************************************
Product List
![Basic White 8 1/2" X 11" Cardstock [ 166780 ]](https://assets1.tamsnetwork.com/images/EC042017NF/166780s.jpg "Basic White 8 1/2\" X 11\" Cardstock [ 166780 ]")
![Basic White 8 1/2" X 11" Thick Cardstock [ 159229 ]](https://assets1.tamsnetwork.com/images/EC042017NF/159229s.jpg "Basic White 8 1/2\" X 11\" Thick Cardstock [ 159229 ]")
![Garden Green 8-1/2" X 11" Cardstock [ 102584 ]](https://assets1.tamsnetwork.com/images/EC042017NF/102584s.jpg "Garden Green 8-1/2\" X 11\" Cardstock [ 102584 ]")
![Garden Green Classic Stampin' Pad [ 147089 ]](https://assets1.tamsnetwork.com/images/EC042017NF/147089s.jpg "Garden Green Classic Stampin' Pad [ 147089 ]")
![Pool Party Classic Stampin' Pad [ 147107 ]](https://assets1.tamsnetwork.com/images/EC042017NF/147107s.jpg "Pool Party Classic Stampin' Pad [ 147107 ]")
![Small Blending Brushes [ 160518 ]](https://assets1.tamsnetwork.com/images/EC042017NF/160518s.jpg "Small Blending Brushes [ 160518 ]")
![Granny Apple Green Stampin' Blends Combo Pack [ 154885 ]](https://assets1.tamsnetwork.com/images/EC042017NF/154885s.jpg "Granny Apple Green Stampin' Blends Combo Pack [ 154885 ]")
![Shaded Spruce Stampin' Blends Combo Pack [ 154903 ]](https://assets1.tamsnetwork.com/images/EC042017NF/154903s.jpg "Shaded Spruce Stampin' Blends Combo Pack [ 154903 ]")
![Stylish Shapes Dies [ 159183 ]](https://assets1.tamsnetwork.com/images/EC042017NF/159183s.jpg "Stylish Shapes Dies [ 159183 ]")
![1 7/8" (4.8 Cm) Circle Punch [ 165259 ]](https://assets1.tamsnetwork.com/images/EC042017NF/165259s.jpg "1 7/8\" (4.8 Cm) Circle Punch [ 165259 ]")
![Basic White Medium Envelopes [ 159236 ]](https://assets1.tamsnetwork.com/images/EC042017NF/159236s.jpg "Basic White Medium Envelopes [ 159236 ]")
![Stampin' Cut & Emboss Machine [ 149653 ]](https://assets1.tamsnetwork.com/images/EC042017NF/149653s.jpg "Stampin' Cut & Emboss Machine [ 149653 ]")
![Mini Glue Dots [ 103683 ]](https://assets1.tamsnetwork.com/images/EC042017NF/103683s.jpg "Mini Glue Dots [ 103683 ]")
![Multipurpose Liquid Glue [ 110755 ]](https://assets1.tamsnetwork.com/images/EC042017NF/110755s.jpg "Multipurpose Liquid Glue [ 110755 ]")
![Stampin' Dimensionals [ 104430 ]](https://assets1.tamsnetwork.com/images/EC042017NF/104430s.jpg "Stampin' Dimensionals [ 104430 ]")
![Stampin' Seal [ 152813 ]](https://assets1.tamsnetwork.com/images/EC042017NF/152813s.jpg "Stampin' Seal [ 152813 ]")
![Bone Folder [ 102300 ]](https://assets1.tamsnetwork.com/images/EC042017NF/102300s.jpg "Bone Folder [ 102300 ]")
![Take Your Pick [ 144107 ]](https://assets1.tamsnetwork.com/images/EC042017NF/144107s.jpg "Take Your Pick [ 144107 ]")
![Paper Trimmer [ 152392 ]](https://assets1.tamsnetwork.com/images/EC042017NF/152392s.jpg "Paper Trimmer [ 152392 ]")

![Basic Beige 8 1/2" X 11" Cardstock [ 164511 ]](https://assets1.tamsnetwork.com/images/EC042017NF/164511s.jpg "Basic Beige 8 1/2\" X 11\" Cardstock [ 164511 ]")
![Granny Apple Green 8-1/2" X 11" Cardstock [ 146990 ]](https://assets1.tamsnetwork.com/images/EC042017NF/146990s.jpg "Granny Apple Green 8-1/2\" X 11\" Cardstock [ 146990 ]")
![Secret Sea 8 1/2" X 11" Cardstock [ 165624 ]](https://assets1.tamsnetwork.com/images/EC042017NF/165624s.jpg "Secret Sea 8 1/2\" X 11\" Cardstock [ 165624 ]")
![Secret Sea Classic Stampin' Pad [ 165285 ]](https://assets1.tamsnetwork.com/images/EC042017NF/165285s.jpg "Secret Sea Classic Stampin' Pad [ 165285 ]")


![Darling Duckling 8 1/2" X 11" Cardstock [ 165622 ]](https://assets1.tamsnetwork.com/images/EC042017NF/165622s.jpg "Darling Duckling 8 1/2\" X 11\" Cardstock [ 165622 ]")
![Tuxedo Black Memento Ink Pad [ 132708 ]](https://assets1.tamsnetwork.com/images/EC042017NF/132708s.jpg "Tuxedo Black Memento Ink Pad [ 132708 ]")
![Darling Duckling Stampin’ Blends Combo Pack [ 165288 ]](https://assets1.tamsnetwork.com/images/EC042017NF/165288s.jpg "Darling Duckling Stampin’ Blends Combo Pack [ 165288 ]")

![Blackberry Bliss 8-1/2" X 11" Cardstock [ 133675 ]](https://assets1.tamsnetwork.com/images/EC042017NF/133675s.jpg "Blackberry Bliss 8-1/2\" X 11\" Cardstock [ 133675 ]")
![Pretty Peacock 8-1/2" X 11" Cardstock [ 150880 ]](https://assets1.tamsnetwork.com/images/EC042017NF/150880s.jpg "Pretty Peacock 8-1/2\" X 11\" Cardstock [ 150880 ]")
![Blackberry Bliss Classic Stampin' Pad [ 147092 ]](https://assets1.tamsnetwork.com/images/EC042017NF/147092s.jpg "Blackberry Bliss Classic Stampin' Pad [ 147092 ]")
![Coastal Cabana Classic Stampin' Pad [ 147097 ]](https://assets1.tamsnetwork.com/images/EC042017NF/147097s.jpg "Coastal Cabana Classic Stampin' Pad [ 147097 ]")
![Pretty Peacock Classic Stampin’ Pad [ 150083 ]](https://assets1.tamsnetwork.com/images/EC042017NF/150083s.jpg "Pretty Peacock Classic Stampin’ Pad [ 150083 ]")
![Pretty Peacock Stampin’ Blends Combo Pack [ 161676 ]](https://assets1.tamsnetwork.com/images/EC042017NF/161676s.jpg "Pretty Peacock Stampin’ Blends Combo Pack [ 161676 ]")


![Lemon Lolly 8 1/2" X 11" Cardstock [ 161720 ]](https://assets1.tamsnetwork.com/images/EC042017NF/161720s.jpg "Lemon Lolly 8 1/2\" X 11\" Cardstock [ 161720 ]")
![Window Sheets [ 142314 ]](https://assets1.tamsnetwork.com/images/EC042017NF/142314s.jpg "Window Sheets [ 142314 ]")
![Granny Apple Green Stampin' Pad [ 147095 ]](https://assets1.tamsnetwork.com/images/EC042017NF/147095s.jpg "Granny Apple Green Stampin' Pad [ 147095 ]")

