Stampin’ Up! Posted For You for The Happy Inkin’ Thursday Blog Hop

Good Thursday morning my stamping friends and welcome to our Happy Inkin’ Thursday Blog Hop. How is everyone doing today? It’s very cold here. We got quite a bit of snow yesterday and it’s continuing into today. Perfect day for me to be baking. If you are hopping over from Akiko, thank you for stopping by my blog. This week we have a color challenge. Be sure to take a moment to hop around to see everyone’s awesome projects.
Here are our colors for this week

Here’s my card using these colors.

I used the Stampin’ Up! Posted For You Cling Stamp Set for my card today. My design is from Try Stamping on Tuesday Challenge #486. Here is their sketch.

I started by embossing a panel of Pool Party cardstock using the Scripty 3D Embossing Folder and adhered it to a Pool Party card base using Multipurpose Liquid Glue.
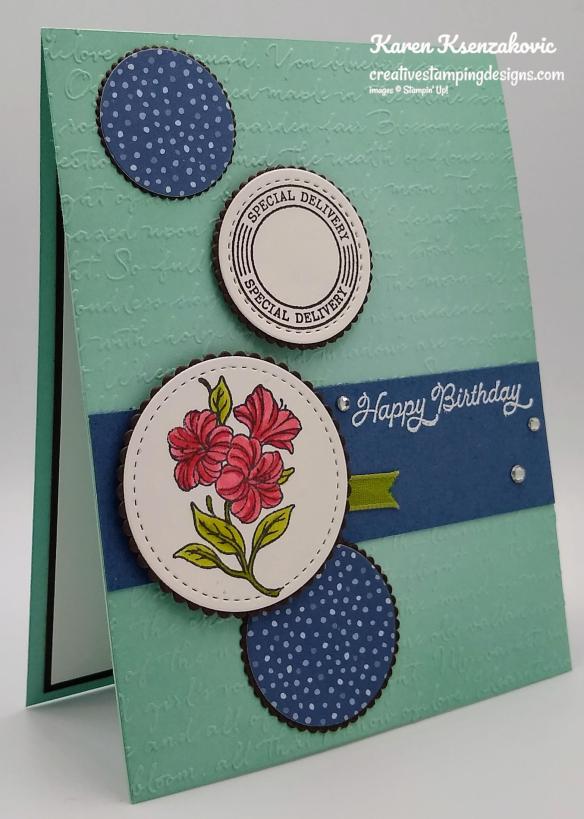
I stamped the floral image from the Posted For You stamp set in Early Espresso Ink on a panel of Whisper White cardstock. I colored the image in using my Old Olive and Poppy Parade Stampin’ Blends Markers. I stamped the round sentiment from the Posted For You stamp set in Early Espresso Ink on the same panel of Whisper White cardstock. I cut the images out using the Stitched Shapes Dies. Using the Layering Circles Die, I cut 2 circles from a panel of Flowers For Every Season 6 X 6 Designer Series Paper. I cut 4 scalloped circles from a panel of Early Espresso cardstock matching the sizes of the circles, using the Layering Circles Dies. I adhered the circles to the scalloped circles using Multipurpose Liquid Glue.

I stamped the sentiment from the Posted For You stamp set in Versamark Ink on a strip of Misty Moonlight cardstock. I immediately sprinkled it with my White Stampin’ Emboss Powder and set it using my Heat Tool. I adhered the panel of Misty Moonlight cardstock to the card front using Multipurpose Liquid Glue. I adhered a small piece of 1/4″ Old Olive Ribbon from the Ornate Garden Ribbon Combo Pack using a small amount of Stampin’ Seal. I adhered the 2 stamped circles to the card front using Stampin’ Dimensionals. I adhered the 2 DSP circles to the card front using Multipurpose Liquid Glue. I added a few Rhinestone Basic Jewels to the card front.

On the inside I stamped the sentiment from the Stampin’ Up! Peaceful Moments Cling Stamp Set in Early Espresso Ink in the center of a Whisper White panel. I stamped the floral image from the Posted For You stamp set in Pool Party Ink, stamping off once, over the sentiment. I adhered the Whisper White panel to an Early Espresso mat using Stampin’ Seal and then to the inside of the Pool Party card base using Multipurpose Liquid Glue.

To complete my card I decorated a Medium Whisper White Envelope. I stamped the floral image from the Posted For You stamp set in Early Espresso Ink on the front of the envelope. I colored the image in using my Old Olive and Poppy Parade Stampin’ Blends Markers. I adhered a panel of Flowers For Every Season DSP to the envelope flap.

Thank you for visiting my blog today. I hope you liked my card and will give it a try. Now that you’ve seen my card, take a minute to hop through all our projects today. If you click on the Next Blog button, you’ll go to Amy’s page. Or you can just click on the names below to go directly to all their blogs! Happy Hopping!!

Amy Koenders:

Mary Deatherage:

Kristi Gray:

Jaimie Babarczy:

Sue Prather:

Karen Finkle:

Akiko Sudano:

Karen Ksenzakovic: You Are Here

Julie Johnston:

*********************************************************************************************************

If you need any stamping supplies, I’d love to be your Demonstrator. Just click HERE to go directly to my online store or drop me an email if you have any questions. 

MY CURRENT HOST CODE IS: YUWDMJMT

Use this host code when you order $50 or greater and receive a free gift from me! If your order is over $150, please do not use this code, but you’ll still get the free gift. The free gift is your choice of any 1 item valued up to $10.00 in the 2020-2021 Annual Catalog!   For any orders $50 or more I will also send you my monthly class tutorials.  Click HERE or go to my Customer Rewards for more details and to see what this months tutorials are.

 Click HERE to shop the clearance rack.

Please remember to use my current Host Code and make sure that you can see my name on the final checkout page listed as your Demonstrator when you order so that you know that you’re ordering with me and you’ll get my rewards! 

Happy Stamping, Karen!

*********************************************************************************************************

Sending Hearts

Subscribe December 11-January 10 

Love is in the air! Send a little love to someone special with the Sending Hearts Paper Pumpkin Kit. From heaps of heart-shaped elements to paper pieces in red and pink, this month’s kit has everything you need to create eight adorable cards—with coordinating envelopes—for Valentine’s Day, anniversaries, and every celebration of love in between!

With the add-on to January’s sweet and sentimental kit, there’s even more love to share! The add-on—called Little Love Boxes—includes 20 tiny, printed boxes and 24 die-cut, heart-shelled snails and sentiment labels. When combined with the remaining components from the Sending Hearts kit, you can create treat packaging, additional cards, and so much more!

ABOUT THE JANUARY KIT

Details

  • Kit contains enough supplies to create eight cards—four each of two designs—and coordinating envelopes.
  • Card size: 4-1/4″ x 5-1/2″ (10.8 x 14 cm)
  • Envelope size: 4-1/2″ x 5-3/4″ (11.4 x 14.6 cm)
  • Coordinating colors: Basic Black, gold, Petal Pink, Poppy Parade, Smoky Slate, white

ABOUT THE ADD-ON

Name Little Love Boxes

Details

  • Add-on contains 20 printed mini boxes and 24 die-cut decorative pieces and sentiment labels.
  • Item number: 156842
  • Price: $8 USD/$11 CAD 
  • Available 1 January, while supplies last!

Subscribe to the January 2021 Paper Pumpkin Kit between 11 December and 10 January at paperpumpkin.com!

ADD-ON ORDERING INFORMATION

Purchase the Little Love Boxes add-on to the Sending Hearts Paper Pumpkin Kit on stampinup.com, or by placing an order through my online store. The add-on will be available starting 1 January, while supplies last. You must be a Paper Pumpkin subscriber to order the add-on.

  • Little Love Boxes (156842)
  • $8 USD | $11 CAD

Note: Add-on is not included in January’s Paper Pumpkin subscription. It must be purchased through a separate order. 

Note: Supplies may be limited toward the end of the subscription period.

*********************************************************************************************************

WHISPER WHITE CARDSTOCK PRODUCTS- AVAILABLE WHILE SUPPLIES LAST

Stampin’ Up! announced this information related to the Whisper White paper products late last evening:

Whisper White has been a Stampin’ Up! staple for so long. We love it and we know you love it, too. We are sad to announce that the supplier’s mill producing our Whisper White cardstock has permanently closed due to impacts from the COVID-19 pandemic. Unfortunately, we weren’t given much notice on this closure. This means that the technology unique to this particular supplier is now unavailable to us and we can no longer offer our Whisper White cardstock and related products, such as Whisper White Note Cards & Envelopes. Please note that this won’t affect any of our other cardstocks, this only affects Whisper White.

We know Whisper White has a huge fan base; we’re big fans, too! And we are crushed that it’s going away. Even though this decision was out of our hands, rest assured that we jumped right into action to find the best replacement paper possible. We have dedicated many hours to source and test alternative cardstock options from several suppliers to find the perfect fit that still maintains the Stampin’ Up! quality you know and trust. We are happy to share that we have found a winner for our new cardstock, Basic White!

The quality of our new Basic White was thoroughly tested by our quality assurance and product teams. It also tested very well with demonstrators and concept artists who gave it a huge thumbs up. We believe in the quality of the new Basic White cardstock and we know it will become your new crafting staple!

What does this mean for you?

With Whisper White going out of production, this means a number of Whisper White products will be affected. Below is a list of all products that will be replaced with our new Basic White cardstock. These items are now available while supplies last with an order limit of 2 per item per order.

  • Whisper White 12″ x 12″ (30.5 x 30.5 cm) Cardstock (124302)
  • Assorted Memories & More Cards & Envelopes (149710)
  • Whisper White Note Cards & Envelopes (131527)
  • Whisper White 3″ x 3″ (7.6 x 7.6 cm) Envelopes (145829)
  • Whisper White 8-1/2″ x 11″ Cardstock (100730)
  • Whisper White 8-1/2″ x 11″ Thick Cardstock (140272)
  • Whisper White Medium Envelopes (107301)

Our new Basic White products will become available to purchase as soon as we have them in stock. This means that some Whisper White and Basic White products may be available at the same time. Additionally, due to the nature of sourcing, some Basic White products may not be available before the Whisper White products sell out. Please know that we are working on getting these products available to you as fast as possible.

*********************************************************************************************************

Stampin’ Up!’s Year End Closeout Sale going on now

If you love great deals, our Giant Year-End Closeout event is the perfect time to shop. You’ll get deep discounts on your favorite products from the August–December 2020 Mini Catalog. The Year-End Closeout happens only once a year!

Year End Closeout Sale Details:

Sale Dates:  December 8, 2020 through January 4, 2021

  • No minimum purchase required.
  • Retiring items are available while supplies last.
  • Exclusions apply: Carryover items will not be discounted.
  • Due to increased shipping times and possible shipping delays during the month of December, we can’t guarantee delivery before Christmas.
  • Ordering Deadlines:  January 4, 2021 at 11:50 PM (MT)

Click here to download the full list of items that are retiring and which items are on sale starting on Tuesday, December 8!  And get your lists ready to shop early!!  The items that are retiring are only while supplies last!!  And everything on this list is retiring!!

*********************************************************************************************************

Card stock cuts for this project:

  • Early Espresso Cardstock 3 1/4″ X 4″ (scalloped circles), 4″ X 5 1/4″ (inner liner mat)
  • Misty Moonlight Cardstock 1 1/4″ x 4 1/4″ (card front panel)
  • Pool Party Cardstock 4 1/4″ X 11″ (card base scored and folded at 5 1/2″), 4 1/4″ x 5 /2″ (card front)
  • Whisper White Cardstock 2 1/4″ x 4 1/4″ (stamped circles), 3 7/8″ X 5 1/8″ (inner liner mat)
  • Flowers For Every Season 6 X 6 Designer Series Paper 2 1/4″ x 3 1/4″ (circles), 2 1/2″ X 6″ (piece for envelope flap)

*********************************************************************************************************

Product List

Stampin’ Up! Simply Succulents Sneak Peek

Good Monday morning my fellow stampers. How was everyone’s weekend? Did anyone do anything fun. Other than working, I packed up my living room and took all my pictures down from the hallways and staircases. All my furniture got moved into a POD for a couple weeks now. We’re having our floors refinished, so that means everything had to get packed and we’re moving out for a couple days. I’ll actually be coming home in the mornings to let the workers in and I’ll be staying in my basement for the day with my dog. She gets to come to the hotel to stay with us at night, I just don’t want to leave her there by herself during the day.

For today I have another sneak peek for you of a bundle coming in the January-June 2021 Mini Catalog. Here’s my card for today.

I used the new Stampin’ Up! Simply Succulents Bundle for my card. My son’s girlfriends birthday is tomorrow and she love her succulents, so when I saw this set I knew I had to buy it to make her a card. I used quite a few colors for my card along with a sneak peek of a Sale-A-Bration item coming soon.

I started by adhering a panel of In Good Taste Designer Series Paper to a Just Jade card base using Stampin’ Seal. I embossed a panel of the Oh So Ombre 6 X 6 Designer Series Paper using the Scripty 3D Embossing Folder. The Oh So Ombre DSP will be a Sale-A-Bration item available in January/February 2021. I adhered the panel to the Just Jade card base using Multipurpose Liquid Glue.

On a panel of Whisper White Cardstock I stamped 3 of the small succulent images, 1 of the larger succulent image, the flower pot image and the sentiment from the Simply Succulents stamp set (available January 5,2021) in Tuxedo Black Memento Ink. I colored the images in using my Gray Granite, Just Jade, Rococo Rose and Soft Seafoam Stampin’ Blends Markers. I cut the images out using the Potted Succulents Dies (available January 5, 2021). Using the Potted Succulents Dies, I cut one die from a panel of Pear Pizzazz cardstock and two from a panel of Pretty Peacock cardstock.

I adhered the flower pot to the card front using Multipurpose Liquid Glue. I arranged the succulents the way I wanted them and adhered them using Glue Dots and Stampin’ Dimensionals. I adhered the sentiment below the flowerpot using Stampin’ Dimensionals. I added a few of the Holiday Rhinestone Basic Jewels to my card front.

On the inside I stamped the sentiments from the Stampin’ Up! Best Year Cling Stamp Set in Tuxedo Black Memento Ink in the center of a Whisper White panel. I stamped the largest succulent image from the Simply Succulents stamp set in Just Jade Ink, stamping off twice, over the sentiment. I adhered the Whisper White panel to a Rococo Rose mat using Stampin’ Seal and then to the inside of the Just Jade card base using Multipurpose Liquid Glue.

To finish my card I decorated a Medium Whisper White Envelope. I stamped the succulent image from the Simply Succulents stamp set in Tuxedo Black Memento Ink on the envelope front and colored them in using my Just Jade and Rococo Rose Stampin’ Blends Markers. I adhered a panel of In Good Taste DSP to the envelope flap.

Thank you for stopping by my blog today, I hope you liked my card. The Simply Succulent Bundle and Oh So Ombre DSP will be available for you to purchase January 5, 2021 from the January-June 2021 Mini Catalog and the Sale-A-Bration Catalog. If you are one of my customers and have made a purchase this year, I will be sending a catalog out to you as soon as they become available. Happy Stamping!!

*********************************************************************************************************

If you need any stamping supplies, I’d love to be your Demonstrator. Just click HERE to go directly to my online store or drop me an email if you have any questions. 

MY CURRENT HOST CODE IS: 9XYYG2ZU

Use this host code when you order $50 or greater and receive a free gift from me! If your order is over $150, please do not use this code, but you’ll still get the free gift. The free gift is your choice of any 1 item valued up to $10.00 in the 2020-2021 Annual Catalog!   For any orders $50 or more I will also send you my monthly class tutorials.  Click HERE or go to my Customer Rewards for more details and to see what this months tutorials are.

 Click HERE to shop the clearance rack.

Please remember to use my current Host Code and make sure that you can see my name on the final checkout page listed as your Demonstrator when you order so that you know that you’re ordering with me and you’ll get my rewards! 

Happy Stamping, Karen!

*********************************************************************************************************

Beary Comforting

Subscribe November 11-December 10

If you haven’t heard already, Paper Pumpkin is our monthly One-Stop Box™ that offers a wide variety of unique papercrafting projects for subscribers of any skill level! These themed, all-inclusive craft kits encourage customers to explore their creativity, try new techniques, and discover their potential in papercrafting.

December’s cute and cuddly Paper Pumpkin kit—called “Beary Comforting”—is designed to uplift your loved ones as this beary tough year finally comes to a close. After a year like 2020, we all could use a big bear hug! With the help of this bear-themed kit, you can create 12 unbearably cute cards featuring warm and fuzzy friends, sweet stamps, and meaningful messages. Near or far, send your friends and family the extra comfort, love, and encouragement they need with this month’s Paper Pumpkin kit!

ABOUT THE DECEMBER KIT

Details

  • Kit contains enough supplies to create 12 cards and coordinating envelopes.
  • Card size: 4-1/4″ x 5-1/2″ (10.8 x 14 cm)
  • Envelope size: 4-1/2″ x 5-3/4″ (11.4 x 14.6 cm)
  • Coordinating colors: Basic Gray, Calypso Coral, Cinnamon Cider, Daffodil Delight, Rich Razzleberry, Soft Sea Foam, Whisper White

SUBSCRIPTION INFORMATION

Subscribe to the December 2020 Paper Pumpkin Kit between 11 November and 10 December at paperpumpkin.com!

Note: Supplies may be limited toward the end of the subscription period.

*********************************************************************************************************

FREE Bonus Quite Curvy and Curvy Christmas Project Tutorials With Videos When You Purchase The Bundle From Me!!

A group of us worked together to create five awesome tutorials using the Stampin’ Up! Curvy Celebrations special release products with video tutorials!  You can get this set of exclusive tutorials when you purchase either the Quite Curvy Variety Bundle (item 158396) or the Quite Curvy Bundle (item 156228) from me between now and January 4!

If your order is $50 or greater and includes either of these bundles, you will get this set of tutorials in addition to the monthly online class tutorials AND your $10 thank you gift!  And you’ll also earn my Creative Stamping Designs Reward Points!

*********************************************************************************************************

Card stock cuts for this project:

  • Just Jade Cardstock 4 1/4″ X 11″ (card base scored and folded at 5 1/2″)
  • Pear Pizzazz Cardstock 2 1/2″ X 2 1/2″ (succulent)
  • Pretty Peacock Cardstock 2 1/4″ X 2 1/4″ (succulents)
  • Rococo Rose Cardstock 4 1/8″ X 5 3/8″ (inner liner mat)
  • Whisper White Cardstock 3 1/2″ X 3 1/2″ (artwork), 4″ X 5 1/4″ (inner liner)
  • In Good Taste Designer Series Paper 1 3/4″ X 5 1/4″ (card front panel), 2 1/4″ X 6″ (piece for envelope flap)
  • Oh So Ombre 6 X 6 Designer Series Paper 4 3/4″ X 3 1/2″ (card front panel)

*********************************************************************************************************

Product List

Stampin’ Up! Celebration Tidings Valentine

Good Wednesday morning my fellow stampers.  We’re halfway through the week already and on the downhill to the weekend.  It’s been gorgeous weather here.  I’ve had my windows open all day and night.  After being without A/C all summer this is most welcoming.

Before I get to my card, I just wanted to let everyone know about World Card Making Day, Saturday October 3rd.  Our Inkin’ Krew Team will be doing videos all day, every hour.  I will actually be doing 2 Facebook Live videos that day.  I will post a schedule when we get closer.

Today’s card is the last card that we made on Sunday at our virtual in person team meeting.  The Stampin’ Up! Celebration Tidings Bundle has all different occasions in it.  This is such an awesome bundle to have that can be used over and over again.  It covers Halloween, Thanksgiving, Christmas and Valentine’s Day.  What’s not to love about a bundle like this.  Here’s my card which was a design by my team member Sue.  Sue only used the stamp set for her design, I did have to adjust it a little since I didn’t have some of the items she was using.

I started by embossing a Whisper White panel using the Scripty 3D Embossing Folder.  I adhered the embossed panel to a Melon Mambo card base using Multipurpose Liquid Glue.  I adhered a panel of Plaid Tidings 6 X 6 Designer Series Paper to a Seaside Spray mat using Stampin’ Seal and then to the card base using Stampin’ Dimensionals.

From another panel of the Plaid Tidings DSP I cut the stitched heart from the Stitched Be Mine Dies.  I then cut a scalloped stitched heart from the Stitched Be Mine Dies.  I adhered the 2 hearts together using Stampin’ Dimensionals around the edges on the back and adhered it to the card front.  On a piece of Whisper White cardstock I stamped the sentiment from the Stampin’ Up! Celebration Tidings Photopolymer Stamp Set in Melon Mambo Ink.

Using my Paper Snips, I cut the words out separately and adhered them to the heart using Mini Stampin’ Dimensionals.  I added some Rhinestone Basic Jewels to the heart and the card front.

On the inside I stamped the sentiment from the Stampin’ Up! Meant To Be Cling Stamp Set in Melon Mambo Ink in the center of a Whisper White panel.  I stamped the heart with the scroll from the Celebration Tidings stamp set on the top of the panel and the small hearts from the Celebration Tidings stamp set randomly around in Melon Mambo Ink.  I adhered the Whisper White panel to a Seaside Spray mat using Stampin’ Seal and then to the inside of the Melon Mambo card base using Multipurpose Liquid Glue.

To finish my card I decorated a Medium Whisper White Envelope. I stamped the heart with the scroll and the small heart from the Celebration Tidings stamp set in Melon Mambo Ink on the envelope front.  I adhered a panel of Plaid Tidings DSP to the envelope flap.

Thank you for stopping by my blog today.  I hope you liked the card and will give it a try. Happy Stamping!!

****************************************************************************************************

I’ll be making a card today on Facebook Live.  Join me at 4pm. 

****************************************************************************************************

If you need any stamping supplies, I’d love to be your Demonstrator. Just click HERE to go directly to my online store or drop me an email if you have any questions. 

MY CURRENT HOST CODE IS: G39RYMEX

Use this host code when you order $50 or greater and receive a free gift from me! If your order is over $150, please do not use this code, but you’ll still get the free gift. The free gift is your choice of any 1 item valued up to $10.00 in the 2020-2021 Annual Catalog!   For any orders $50 or more I will also send you my monthly class tutorials.  Click HERE or go to my Customer Rewards for more details and to see what this months tutorials are.

 Click HERE to shop the clearance rack.

Happy Stamping, Karen!

****************************************************************************************************

Joy To The World 

Subscribe September 11 – October 10

This holiday season, share the joy of Paper Pumpkin! The Joy to the World Paper Pumpkin Kit is an exclusive holiday kit that provides a specially-designed box, enough supplies to create eight elegant cards, and an opportunity to connect with the Stampin’ Up! global community.

With October’s magical kit, not only will you get a head start on your holiday crafting—you’ll get to create Christmas cards, share project ideas, and spread holiday cheer with Stampin’ Up! customers and demonstrators around the world! After you receive your kit,  join the Joy of Paper Pumpkin Facebook group to make the most of this month’s kit.

  • Kit contains enough supplies to create eight cards—four each of two designs—and coordinating envelopes.
  • Kit includes die-cut pieces in English, French, and German. This will allow you to create cards you can use to connect with other customers and demonstrators around the world—in their language!
    • Card size: 4-1/4″ x 5-1/2″ (10.8 x 14 cm)
    • Envelope size: 4-1/2″ x 5-3/4″ (11.4 x 14.6 cm)
  • Coordinating Colors: Cherry Cobbler, Crumb Cake, Early Espresso, Just Jade, Soft Sea Foam

The Joy to the World Paper Pumpkin Kit has been thoughtfully released in preparation for the season of spreading joy. October’s Paper Pumpkin kit was designed to bring people together—connecting them with one another and spreading joy with each other around the world! With die-cut sentiments in English, French, and German, subscribers can send holiday cheer to their friends across the globe—in their language.

To connect and spread joy with international customers and demonstrators through the Joy to the World Paper Pumpkin Kit, join our Facebook group: Joy of Paper Pumpkin! When connecting with your new friends, don’t forget to share your experience with the #joyofpaperpumpkin hashtag.

Subscribe to the October 2020 Paper Pumpkin Kit from 11 September to 10 October at paperpumpkin.com.

Note: Supplies may be limited toward the end of the subscription period.

****************************************************************************************************

The Stampin’ Cut & Emboss Machine (Standard Size) is now available for you to order!!!
Here are the details:

The standard machine comes with all the plates you need to get started. The preorder will not include the replacement plates, but they will be available beginning with the customer launch on September 1.

Note that the Cutting Plates and Adhesive Sheets are already available to order. The optional Impression Mats are not be available; I’ll keep you updated on their availability.

So what sets our machines apart from the rest? Here are some of our favorite features:

  • Durable machines with high-quality results. The solid steel construction frame and rubber feet that securely grip the work surface produce crisp, clean, precise cutting and beautifully detailed embossing.
  • Easy to use. The machines and tools are designed for an intuitive die-cutting and embossing experience. For example, all plates are labeled with a number and are color coded for easy reference and use when building your sandwich. And just like the name suggests, our Magnetic Cutting Plates have fully-magnetic surfaces to make it easy to securely position your dies and keep them in place.
  • Simple to store. The platforms on both machines fold for space-saving storage and they look pretty too–the sleek, clean design suits any crafting space.
  • Portable. You can use both machines at home or on the go with their folding platforms and ergonomic carrying handles.

****************************************************************************************************

Stampin’ Up! Get & Go Starter Kit Promotion – Sept 1-30!

Have you thought about joining our Stampin’ Up! team?

Now is an awesome time to join.

The Get & Go Starter Kit promotion gives those who sign up to be a Stampin’ Up! demonstrator additional products to help get started right away!  In addition to the already great valued Starter Kit, you will receive precut paper, stamps, and embellishments!

Here are the details:

  • Promotion Dates: September 1–30, 2020
    Joining Deadline:  September 30, 2020; 11:50 PM (MT)
  • New demonstrators who submit their Independent Demonstrator Agreement (IDA) before 1 September or after 30 September will not be eligible for this promotion.
  • In addition to the regular starter kit (for $99 you choose $125 worth of products), if you join between September 1 and 30, you will also receive enough card stock pieces to make 16 cards, a pack of Rhinestone Basic Jewels, the So Much Love stamp set, and the Queen Anne’s Lace stamp set!!
    • 8 packs of precut card stock of the coastal cabana pack will be provided, and 8 packs of precut card stock of the Granny Apple Green pack, for a total of 16 cards (packs include envelopes).
  • Important note: Ink, adhesive, cutting tool, and clear block for stamping must be purchased separately. However, these products may be included as part of the Starter Kit product selection.

This is such a great deal!  For $99, you get to pick $125 merchandise of your choice for your Starter Kit plus you’ll get the Queen Annes’ Lace and So Much Love stamp sets, card kits to create 16 cards and a pack of Rhinestones for free!!

Drop me a note at creativestampingdesigns@gmail.com if you have questions about joining, I’m happy to talk to you about it.  You can also see more information about the benefits of becoming a Stampin’ Up! Demonstrator Here

****************************************************************************************************

Card stock cuts for this project:

  • Melon Mambo Cardstock 4 1/4″ X 11″ (card base scored and folded at 5 1/2″)
  • Seaside Spray Cardstock 3 7/8″ X 5 1/8″ (card front mat), 4 1/8″ X 5 3/8″ (inner liner mat)
  • Whisper White Cardstock 4 1/8″ X 5 3/8″ (card front panel), 4″ X 4″ (scalloped heart), 1″ X 1″ (sentiment), 4″ X 5 1/4″ (inner liner)
  • Plaid Tidings 6 X 6 Designer Series Paper 3 3/4″ x 5″ (card front panel), 4″ X 4″ (stitched heart), 2 1/4″ X 6″ (piece for envelope flap)

****************************************************************************************************

Product List

Stampin’ Up! Scripty Happy Birthday To You

Good Tuesday morning my stamping friends.  How has everyone’s week started off?  Are you all still working from home and keeping Social Distancing?  I have to work today, but I’m all by myself in the office so I feel pretty safe.  Can you believe it’s the last day of March already?  I feel like I lost a whole month.

I made a Wedding/Anniversary/Birthday card for you today.  I left the sentiment wide open so I can use it for anything I need.  Here’s today’s card.

I played along with Paper Craft Crew Challenge #375.  They had a Horizontal Sketch Challenge this week.  Here is their sketch.

I also joined in with The Paper Players Tic-Tac-Toe Challenge #484.  Here is their board.  I covered 3 different directions starting at the top left corner.

I started by embossing a Soft Seafoam card front using the Scripty 3D Embossing Folder.  I adhered the card front to a Soft Seafoam card base using Multipurpose Liquid Glue. I cut a panel of Parisian Blossoms Specialty Designer Series Paper using the Stitched So Sweetly Die and adhered it to the card front using Multipurpose Liquid Glue.

On a panel of Shimmery White cardstock I stamped the cake image from the Stampin’ Up! Happy Birthday To You Cling Stamp Set, which is a Sale-A-Bration item, in Smoky Slate Ink.  I colored the image in using my Petal Pink, Purple Posy, Light Smoky Slate and Soft Seafoam Stampin’ Blends Markers.  I fussy cut the image out using my Paper Snips.  I adhered the cake image to the die cut DSP using Stampin’ Dimensionals.

On a small panel of Shimmery White cardstock I stamped the cake image from the Happy Birthday To You stamp set in Smoky Slate Ink making sure to get mainly the one flower.  I colored the flower in using my Petal Pink and Soft Seafoam Stampin’ Blends Markers and fussy cut it using my Paper Snips.  I adhered a piece of Petal Pink 1/4″ Metallic Edge Ribbon to the card front using Glue Dots.  I adhered the fussy cut flower over the ribbon using Stampin’ Dimensionals.  I added a few Champagne Rhinestone Basic Jewels to the card front.

On the inside I stamped the sentiment from the Stampin’ Up! Forever Blossoms Cling Stamp Set in Smoky Slate Ink in the center of a Whisper White panel.  I stamped the cake image from the Happy Birthday To You stamp set in Soft Seafoam Ink, stamping off once, over the sentiment.  I adhered the Whisper White panel to a Soft Seafoam mat using Snail and then to the inside of the Soft Seafoam card base using Multipurpose Liquid Glue.

To finish my card I decorated a Medium Whisper White Envelope.  I stamped the cake image from the Happy Birthday To You stamp set in Smoky Slate Ink on the envelope front.  I colored the image in using my Petal Pink, Purple Posy and Soft Seafoam Stampin’ Blends Markers.  I adhered a panel of the Parisian Blossoms Specialty DSP to the envelope flap.

Thank you for stopping by my blog today.  I hope you liked my card and will give it a try. Don’t forget, today’s the last day to order Coordination Products and to earn free Sale-A-Bration items.  If there is something you wanted, you need to get your order in now.   Happy Stamping!!

****************************************************************************************************

If you need any stamping supplies, I’d love to be your Demonstrator. Just click HERE to go directly to my online store or drop me an email if you have any questions. 

MY CURRENT HOST CODE IS: 6WETZ6WW

Use this host code when you order $50 or greater and receive a free gift from me! If your order is over $150, please do not use this code, but you’ll still get the free gift. The free gift is your choice of any item valued up to $10.00 in either the 2019-2020 Annual Catalog or the 2020 January-June Mini Catalog!   For any orders $50 or more I will also send you my monthly class tutorials.  Click HERE or go to my Customer Rewards for more details and to see what this months tutorials are.

Click HERE to shop the clearance rack.

Happy Stamping, Karen!

****************************************************************************************************

The Ornate Garden Suite will be available starting April 1st.  Don’t want to wait, you can get it now as a demonstrator.  If you are interested in joining my team, just email me at creativestampingdesigns@gmail.com and I’ll be happy to help you.  Click HERE or on the image below to see a printable PDF of all the fabulous items available in the suite.

****************************************************************************************************

APRIL 2020 PAPER PUMPKIN:  MY WONDERFUL FAMILY

SUBSCRIBE MARCH 11-APRIL 10

At Paper Pumpkin, we believe in making a difference—especially when it comes to helping you build relationships through papercrafting. For April, we created a fun, family appreciation themed card kit that would make it easy for you to share your hearts with those you love most: mom, dad, daughter, son, sister, and brother. April’s kit even includes Mother’s Day and Father’s Day sentiments, giving you the perfect way to show your appreciation for beloved parents on their special days with a beautiful, handmade card.
One more thing about this “fam-tastic” kit: The Paper Pumpkin team knows that everyone’s clan is unique. With that in mind, we provided sentiments that would include anyone in your life who feels like family; for instance, “brothers” and “sisters” who have helped you along the journey of life.

About the April Kit: 

  • Kit contains supplies for 8 cards and envelopes
  • Card size: 4-1/4″ x 5-1/2″ (10.8 x 14 cm)
  • Envelope size: 4-1/2″ x 5-3/4″ (11.4 x 14.6 cm)
  • Coordinating Colors: Crushed Curry, Early Espresso, Melon Mambo, Mint Macaron, Pear Pizzazz, Shaded Spruce, Soft Sea Foam

Subscribe for the April Paper Pumpkin kit from March 11–April 10 at paperpumpkin.com. Supplies may be limited toward the end of the subscription period

****************************************************************************************************

Card stock cuts for this project:

  • Soft Seafoam Cardstock 8 1/2″ X 5 1/2″ (card base scored and folded at 4 1/4″), 2 – 4 1/8″ X 5 3/8″ (card front and inner liner mat)
  • Whisper White Cardstock 4″ X 5 1/4″ (inner liner)
  • Shimmery White Cardstock 4″ X 3″ (artwork)
  • Parisian Blossoms Specialty Designer Series Paper 4″ X 3″ (card front panel), 2 1/4″ X 6″ (piece for envelope flap)

****************************************************************************************************

Product List

Stampin’ Up! Winds of Change Easter Card

Good Tuesday morning my stamping friends.  How has everyone’s week started off.  It’s starting to feel a lot like spring here.  This is one of the mildest winters I remember in a long time.  I blame it on my Team Leader moving to NJ from GA.  I think she brought the mild winter with her.

Today’s card is another one we are doing tonight at our card class.  My design was inspired by one of my team members Akiko Sudano.  You can see her card here. Here is my take on her card.

I started by embossing a panel of Petal Pink cardstock using the Scripty 3D Embossing Folder.  I adhered the embossed panel to a Soft Suede mat using Multipurpose Liquid Glue.  I adhered the matted panel to a Petal Pink card base using Stampin’ Dimensionals.

On a small panel of Whisper White cardstock I stamped the tulip image from the Stampin’ Up! Winds of Change Cling Stamp Set in Soft Suede Ink.  I colored the image in using my Mint Macaron and Petal Pink Stampin’ Blends Markers.  I cut the image out using my Painted Labels Dies.  I adhered the artwork to the Petal Pink card front using Multipurpose Liquid Glue.

On a thin strip of Whisper White cardstock I stamped the sentiment from the Stampin’ Up! Timeless Tulips Photopolymer Stamp Set in Soft Suede Ink.  I made the strip into a banner using my Paper Snips.  I adhered the sentiment to a  strip of Soft Suede cardstock, which I made into a banner using my Paper Snips, using Snail.  I adhered the matted banner to the card front using Mini Stampin’ Dimensionals.  I added a few Champagne Rhinestone Basic Jewels.

On the inside I stamped the sentiment from the Timeless Tulips stamp set in Soft Suede Ink in the center of a Whisper White panel.  I stamped the tulip image from the Winds of Change stamp set in Petal Pink Ink over the sentiment.  I adhered the Whisper White panel to a Soft Suede mat using Snail and then to the inside of the Petal Pink card base using Multipurpose Liquid Glue.

To finish my card I decorated a Medium Whisper White Envelope.  I stamped the tulip image from the Winds of Change stamp set in Soft Suede Ink on the envelope front.  I colored the image in using my Mint Macaron and Petal Pink Stampin’ Blends Markers.  I adhered a Petal Pink panel of the Subtle 6 X 6 Designer Series Paper to the envelope flap.

Thank you for stopping by my blog today.  I hope you liked my card and will give it a try. Happy Stamping!!

****************************************************************************************************

If you need any stamping supplies, I’d love to be your Demonstrator. Just click HERE to go directly to my online store or drop me an email if you have any questions. 

MY CURRENT HOST CODE IS: 4UXRJREH

Use this host code when you order $50 or greater and receive a free gift from me! If your order is over $150, please do not use this code, but you’ll still get the free gift. The free gift is your choice of any item valued up to $10.00 in either the 2019-2020 Annual Catalog or the 2020 January-June Mini Catalog!   For any orders $50 or more I will also send you my monthly class tutorials.  Click HERE or go to my Customer Rewards for more details and to see what this months tutorials are.

Click HERE to shop the clearance rack.

Happy Stamping, Karen!

****************************************************************************************************

BRINGING THE JOYS OF SPRING MARCH PAPER PUMPKIN KIT

Paper Pumpkin March 2020: No Matter the Weather

Cheers to seven years! This March, Paper Pumpkin has reached another exciting milestone: our seventh year of delivering fun, easy, creative projects to you. To thank everyone who has helped us along the way, we’re including an additional FREE stamp set with every March kit. This means that every subscriber will receive two stamp sets!
The March 2020 kit will arrive in an exclusive, specially-designed box that you will love! Think daffodils, raindrops, and a fresh spring vibe.

About the March Kit

  • Kit contains supplies for 12 cards and envelopes (4 cards of 3 designs)
  • Notecard size: 5″ x 3-1/2″ (12.7 x 8.9 cm)
  • Envelope size: 5-1/8″ x 3-5/8″ (13 x 9.2 cm)

Coordinating Colors: Balmy Blue, Basic Gray, Calypso Coral, Grapefruit Grove, Gray Granite, Pear Pizzazz, Petal Pink, Shaded Spruce, and So Saffron

About the FREE Stamp Set

  • The additional stamp set is a great value and coordinates with the March kit design; however, you do not need it to complete the March cards.
  • The additional stamp set is a 4×6 footprint, which is larger than most Paper Pumpkin sets and is designed for use on a variety of crafting projects.

Subscription Information

  • Subscribe for the March kit at paperpumpkin.com from February 11–March 10.
  • Supplies may be limited toward the end of each subscription period.

****************************************************************************************************

Card stock cuts for this project:

  • Petal Pink Cardstock 4 1/4″ X 11″ (card base scored and folded at 5 1/2″), 3 3/4″ X 5″ (card front)
  • Soft Suede Cardstock 3 7/8″ X 5 1/8″ (card front mat), 3/8″ X 3 1/2″ (sentiment mat), 4″ X 5 1/4″ (inner liner mat)
  • Whisper White Cardstock 2 1/2″ X 3 1/2″ (artwork), 1/4″ X 3 1/2″ (sentiment),  3 3/4″ X 5″ (inner liner)
  • Subtle 6 X 6 Designer Series Paper 2 1/4″ X 6″ (piece for envelope flap)

****************************************************************************************************

Product List

Stampin’ Up! The Gang’s All Meer for Happy Inkin’ Thursday Blog Hop

Good Thursday morning my stamping friends. Welcome to the first Happy Inkin’ Thursday Blog Hop of 2020. If you are hopping over from Akiko, thank you for stopping by. This week we had a Sketch Challenge. Be sure to hop around to see everyone’s beautiful projects. I used a FREE Sale-A-Bration stamp set for today’s card.  My daughter’s friend loves Meer Cats, so I made her a birthday card using the new set.  Here’s what I came up with for the sketch.

Here is our sketch for this week.

I started by embossing a Night of Navy card front using the Scripty 3D Embossing Folder.  I adhered the card front to the Night of Navy card base using Multipurpose Liquid Glue.

I stamped the large image from the Stampin’ Up! The Gang’s All Meer Cling Stamp Set using Soft Suede Ink in the center of a Whisper White panel.  I stamped the same image on a Post-It note and fussy cut it to do the Masking Technique.  I colored the Meer Cats in using my Crumb Cake Stampin’ Blends Markers.  I covered the image with the Post-It note and started sponging.  Using my Stamping Sponges, I started at the bottom with Old Olive Ink. I sponged Daffodil Delight above the Old Olive and Calypso Coral above that.  I continued sponging with the Flirty Flamingo, Highland Heather and Night of Navy on the top of the panel.  I adhered the artwork to an Old Olive mat using Snail.

On a thin strip of Whisper White cardstock I stamped the sentiment from The Gang’s All Meer stamp set in Night of Navy Ink.  I adhered the Whisper White strip to a Night of Navy mat using Snail and then to the artwork using Stampin’ Dimensionals.  I adhered the artwork to the card front using Stampin’ Dimensionals.

On the inside I stamped the sentiments from the Stampin’ Up! Itty Bitty Birthday’s Cling Stamp Set in Night of Navy Ink in the Center of a Whisper White panel.  I stamped the 2 small Meer Cats and the Lizard images from The Gang’s All Meer stamp set in Soft Suede Ink on the bottom of the panel.  I stamped the party hat image from The Gang’s All Meer stamp set on the 2 Meer Cats in Night of Navy Ink.  I colored the Meer Cats in using my Crumb Cake Stampin’ Blends Markers and I colored the lizard in using my Old Olive Stampin’ Blends Markers.  I adhered the Whisper White panel to an Old Olive mat using Snail and then to the inside of the Night of Navy card base using Multipurpose Liquid Glue.

To finish my card I decorated a Medium Whisper White Envelope.  I stamped the large Meer Cat image from The Gang’s All Meer stamp set on the envelope front and colored it in using my Crumb Cake Stampin’ Blends Markers.  I stamped the 2 smaller Meer Cat images from The Gang’s All Meer stamp set in Soft Suede Ink on the envelope flap and colored them in using my Crumb Cake and Old Olive Stampin’ Blends Markers.

Thank you for visiting my blog today. I hope you liked my card and will give it a try. Now that you’ve seen my card, take a minute to hop through all our projects today. If you click on the Next Blog button, you’ll go to Amy’s page. Or you can just click on the names below to go directly to all the blogs!  Happy Hopping!!

Amy Koenders:
Mary Deatherage:
Kristi Gray:
Jaimie Babarczy:
Sue Prather:
Karen Finkle: Not hopping this week
Eva Dobilas:
Akiko Sudano:
Karen Ksenzakovic: You Are Here

****************************************************************************************************

If you need any stamping supplies, I’d be very happy to be your Demonstrator. Just click HERE to go directly to my online store or drop me an email if you have any questions. 

MY CURRENT HOST CODE IS: U7DEP9F9

For any orders $50 or more I will send you my monthly class tutorials.  Click HERE or go to my Customer Rewards to see what this months tutorials are.

STAMPIN’ UP! CLEARANCE RACK UPDATE

Stampin’ Up! has updated the Clearance Rack with lot of new goodies!  Yay!!!  Head over there speedy quick to get your hands on some great deals.  But hurry!!  Clearance Rack deals are only while supplies last!

Click HERE to shop the clearance rack.

Happy Stamping, Karen!

****************************************************************************************************

I’LL BEE YOURS PAPER PUMPKIN

SUBSCRIBE TO PAPER PUMPKIN DECEMBER 11, 2019 – JANUARY 10, 2020

Paper Pumpkin’s first kit of 2020 is all about L-O-V-E. Whether you want handmade favors for Valentine’s Day, a bridal shower, or a remarkably romantic wedding, this month’s kit has everything you need to help you celebrate your favorite friendships and love stories. So make it a “LOVE”-ly year with Paper Pumpkin.

About the January Kit
Kit details: Makes 20 treat bags + 10 mini cards and envelopes
Card size: 3″ x 3″ (7.5 x 7.5 cm)
Envelope size: 3-1/8″ x 3-1/8″ (7.8 x 7.8 cm)
Bag size: 3-1/4″ x 4″ (8.2 x 10 cm)
Coordinating Stampin’ Up! colors: Crushed Curry, Highland Heather, Mint Macaron, and Rococo Rose

Coordinating Product
It’s “BEE”-yond question: You can get more from the I’ll Bee Yours kit when they buy the Heart Punch Pack (item 151292) from the 2020 January–June Mini Catalog. Both punches coordinate with the heart stamp in the kit so you can craft for love-filled occasions now . . . and later! Think: weddings, showers, birthdays, and more! See additional details about the punch pack below.
Heart Punch Pack (item 151292), $34.00 usd/$46.00 cad

Subscribe for the January kit at paperpumpkin.com from December 11–January 10.
Supplies may be limited toward the end of each subscription period.

****************************************************************************************************

LAST DAY TO TAKE ADVANTAGE OF THIS AMAZING SALE!!

Stampin’ Up!’s Year-End Closeout is here while supplies last!!  You can save on a selection of retiring and surplus items including holiday catalog items, stamp sets, and Paper Pumpkin past kits! Shop early to avoid missing out as items on the sale are only available while supplies last! Supplies are limited and popular items will sell out quickly. This amazing sale ends on January 2.

Head over to my Online store to see all the Discounted Items and Retiring Favorites Items.  You don’t want to miss out on these savings because when they are gone THEY ARE GONE!

****************************************************************************************************

Card stock cuts for this project:

  • Night of Navy Cardstock 8 1/2″ X 5 1/2″ (card base scored and folded at 4 1/4″), 4 1/8″ X 5 3/8″ (card front), 1/2″ X 2 7/8″ (sentiment mat)
  • Old Olive Cardstock 4 1/8″ X 5 3/8″ (inner liner mat), 2 9/16″ X 3 3/4″ (artwork mat)
  • Whisper White Cardstock 4″ X 5 1/4″ (inner liner), 2 7/16″ X 3 5/8″ (artwork), 7/16″ X 2 3/4″

****************************************************************************************************

Product List

Stampin’ Up! Well Written Wedding Card

Good Thursday morning my fellow stampers.  How has everyone’s week been going?  The weekend is right around the corner again and that means only 2 day’s till World Card Making Day.  Our team will be doing Facebook Live videos all day on Saturday starting at 9am and going until 9pm.  I hope you can join us, the link is listed below.  I will be doing my live video at 4pm, this will be my 1st Facebook Live.

For today’s card a friend asked me to make her a wedding card for this weekend.  I’ve seen cards made with the Puzzle Pieces Dies and I thought I’d put my own spin on it.  Here’s my card.

I played along with the Fab Friday Sketch Challenge #173.  Here is their sketch.

I started by embossing a Whisper White panel using the Scripty 3D Embossing Folder and adhered it to a Thick Whisper White card base using Multipurpose Liquid Glue.  I cut out 2 of the puzzle pieces using the Puzzle Pieces Die from a scrap of Thick Whisper White cardstock.  I wanted to make sure the puzzle pieces were a little sturdier, that’s why I used the thick cardstock.  I colored one of the pieces in using my Dark Basic Black Stampin’ Blends Marker.  I colored 3 Rhinestone Basic Jewels using my Dark Basic Black Stampin’ Blends Marker and added them to the puzzle piece, so it looked like buttons.  The other puzzle piece I left white and added Rhinestone Basic Jewels to the top to look like a necklace.

I cut the heart out of Sparkle Glimmer Paper using the Stitched Be Mine Dies.  I cut the ‘bride and groom’ sentiments out of Silver Foil Sheets using the Well Written Dies.  I adhered the puzzle pieces to the center of the heart using Stampin’ Dimensionals.  I adhered the bride on the top of the heart and groom on the bottom of the heart using Multipurpose Liquid Glue.

I adhered a piece of Silver 3/8″ Metallic-Edge Ribbon to the back of the heart using a Glue Dot.  I adhered the heart to the card front using Stampin’ Dimensionals.

On the inside I stamped the sentiment from the Stampin’ Up! Dandelion Wishes Cling Stamp Set in Tuxedo Black Memento Ink in the center of a Whisper White panel.  I stamped the heart image from the Stampin’ Up! Forever Lovely Photopolymer Stamp Set in Petal Pink Ink on either side of the sentiment.  I adhered the Whisper White panel to a Basic Black mat using Snail and then to the inside of the Thick Whisper White card base using Multipurpose Liquid Glue.

To finish my card I decorated a Medium Whisper White Envelope.  I stamped the heart image from the Forever Lovely stamp set on the envelope front and envelope flap in Petal Pink Ink.

Thank you for stopping by my blog today.  I hope you liked my card and will give it a try. Happy Stamping!!

****************************************************************************************************

If you need any stamping supplies, I’d be very happy to be your Demonstrator. Just click HERE to go directly to my online store or drop me an email if you have any questions. 

MY CURRENT HOST CODE IS: 3F496G6J

For any orders $50 or more I will send you my monthly class tutorials.  Click HERE or go to my Customer Rewards to see what this months tutorials are.

Click HERE to shop the clearance rack.

Happy Stamping, Karen!

****************************************************************************************************

INKIN’ KREW WORLD CARD MAKING DAY FACEBOOK EVENT 

SATURDAY OCTOBER 5TH

Save the date!!  You’re invited to attend a fun Facebook event on Saturday, October 5 to celebrate World Card Making Day!

Our team will be hosting a Facebook event that will run from about 9:00 AM ET until 9:00 PM ET with card making presentations and giveaways going all day long!!

I will be doing my live video at 4pm.

****************************************************************************************************

CHRISTMAS IS COMING EARLY THIS YEAR

AVAILABLE NOVEMBER 1ST, THE NEW CHRISTMASTIME IS HERE SUITE

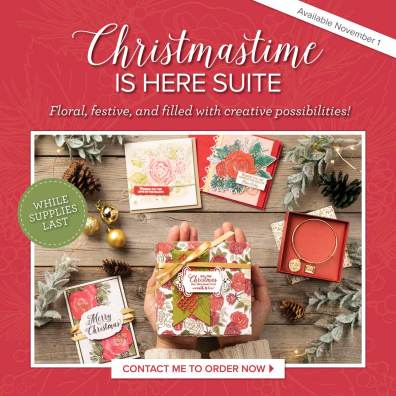
We hope you’re ready to make this holiday season magical, because the Christmastime Is Here Suite is! This exclusive, limited-time collection of festive, floral coordinating products has everything you need to share love, joy, and creativity this holiday season.

Products from the Christmastime Is Here Suite will be available while supplies last only starting November 1st, 2019

Here’s a sneak peek video of what’s included in the suite.

****************************************************************************************************

WINTER WONDERS PAPER PUMPKIN

SUBSCRIBE TO PAPER PUMPKIN BY OCTOBER 10, 2019

Paper Pumpkin wants to help you share love and joy this Christmas with a duo of delightful, special-edition kits. October’s kit includes 10 traditional cards, while November’s kit features 24 can’t-miss tags. Put them together and you have everything you need to make the season bright.

There’s something about the holidays that brings out the crafter in all of us. Even non-crafters like making simple and fun projects to celebrate the season. And since “simple and fun” is Paper Pumpkin’s middle name, we have the perfect kits for you!

In October and November we are offering back-to-back coordinating kits, one with Christmas cards, the other with Christmas tags. Both kits make it easy for you to add a handmade, personal touch to your holiday giving—without a lot of fuss. It’s Christmas made easy with Paper Pumpkin!

October Kit

Coordinating colors: Early Espresso, Pool Party, Poppy Parade, and Shaded Spruce

November Kit

Coordinating colors: Early Espresso, Pool Party, Poppy Parade, and Shaded Spruce

The October and November kits coordinate; however, each kit is all-inclusive and can stand alone.

Click Here for more information and to subscribe to Paper Pumpkin.

****************************************************************************************************

I have gathered up a lot of retired Stamp Sets, Embossing Folders & Dies  and put a list together for anyone interested.  I have single Stamp Sets along with Stamp Sets bundled with Dies or Punches.  Take a look and see if there is anything that you missed out on getting and would still like.  Click Here to go to my list.

****************************************************************************************************

Card stock cuts for this project:

  • Basid Black Cardstock 4″ X 5 1/4″ (inner liner mat)
  • Whisper White Cardstock 4 1/4″ X 5 1/2″ (card front), 3 7/8″ X 5 1/8″ (inner liner)
  • Thick Whisper White Cardstock 4 1/4″ X 11″ (card base scored and folded at 5 1/2″), scrap for puzzle pieces
  • Sparkle Glimmer Paper 4″ X 4″ (heart on card front)
  • Silver Foil Sheet 1″ X 5″ (cut out sentiment)

****************************************************************************************************

Product List

Stampin’ Up Everything Amazing Birthday Card

Good Thursday morning my fellow stampers.  How are you doing today?  The weekend is almost here again, hope you are starting to make some fun plans.

For today’s card a friend of mine asked me to make a card for a 50th birthday.  Here’s what I came up with.

I joined in with Sunday Stamps Challenge #208.  Here is their sketch.

I also played along with TGIF Challenge #219.  Here are their colors.

I started by embossing a panel of Purple Posy card stock using the Scripty 3D Embossing Folder.  I then took a piece of the Seaside Spray Scalloped Lined Ribbon and cut it in half length wise.  I adhered a piece to the top and bottom of the embossed panel using Snail.  I adhered the embossed panel to a 2019-2021 In-Color 6 X 6 Designer Series Paper Rococo Rose card front using Multipurpose Liquid Glue.

I adhered the DSP card front to a Rococo Rose card base using Multipurpose Liquid Glue.  On a panel of Whisper White cardstock I stamped the large sentiment from the Stampin’ Up Everything Amazing Photopolymer Stamp Set in VersaMark Ink.  I immediately sprinkled it with Gold Stampin’ Emboss Powder and set it using my Heat Tool.  I cut the sentiment out using the Stitched Rectangle Dies.

I stamped the 2 smaller sentiment from the Everything Amazing stamp set in Rococo Rose Ink on the lines from the large sentiment.  I stamped the floral image from Stampin’ Up Pocketful of Happiness Cling Stamp Set in Tuxedo Black Memento Ink in the top corner of the rectangle.  I colored the floral image in using my Rococo Rose and Seaside Spray Stampin’ Blends Markers.  I adhered the artwork to the card front using Stampin’ Dimensionals and added 3 gold Metallic Pearls.

On the inside I stamped the sentiment from the Stampin’ Up Itty Bitty Birthdays Cling Stamp Set in VersaMark Ink in the center of a Whisper White panel.  I immediately sprinkled it with Gold Stampin’ Emboss Powder and set it using my Heat Tool.  I stamped the floral images from the Pocketful of Happiness stamp set in Tuxedo Black Memento Ink on the top and bottom 2 corners and colored them in using my Purple Posy,  Rococo Rose and Seaside Spray Stampin’ Blends Markers.  I adhered the Whisper White panel to the inside of the Rococo Rose card base using Multipurpose Liquid Glue.

To finish my card, I decorated a Medium Whisper White Envelope.  I stamped the floral image from the Pocketful of Happiness stamp set in Tuxedo Black Memento Ink and colored them in the same as I did for the card.  I adhered a panel of the 2019-2021 In-Color 6 X 6 DSP to the envelope flap.

Thank you for visiting my blog today.  I hope you liked my card and will give it a try. Happy Stamping!!

****************************************************************************************************

ORDERING SPECIAL JULY 8, 2019 – JULY 22, 2019

WITH THE PURCHASE OF THE DAISY LANE BUNDLE #149325 

I WILL SEND YOU FREE

A PACK OF THE PERENNIAL ESSENCE FLORAL CENTERS.

****************************************************************************************************

If you need any stamping supplies, I’d be very happy to be your Demonstrator. Just click HERE to go directly to my online store or drop me an email if you have any questions. 

MY CURRENT HOST CODE IS: AVHTNTCN

For any orders $50 or more I will send you my monthly class tutorials.  Click HERE or go to my Customer Rewards to see what this months tutorials are.

STAMPS ON THE CLEARANCE RACK 

For the first time ever, Stampin’ Up! is putting stamp sets on the Clearance Rack!  This is not something they have done in the past—and they don’t know if they will do again—so pick up those deals while you can!

Click HERE to shop the clearance rack.

Happy Stamping, Karen!

****************************************************************************************************

EXTRA, EXTRA!!  JOINING PROMOTION JULY 1, 2019 – AUGUST 31, 2019

From July 1 until August 31, new demonstrators will receive an additional $30 to put toward bonus products in their Starter Kit (for a total of $155 in merchandise for $99)!!  THEN, they’ll receive a $10 coupon code the following month.  Are you interested?  Keep reading to learn more!

Dates:  July 1 – August 31 at 11:50 PM MT

Details:

  • The bonus at initial sign up allows demonstrators to pick $30 more than usual.  You will pay $99 to sign up and choose $155 worth of Stampin’ Up! products in your Starter Kit.
  • Coupon codes will be sent between the fifth and seventh business day of the following month the new demonstrator signs up.
  • The email address listed in a new demonstrator’s profile will be used to send the $10 coupon code.
  • Coupon codes may be redeemed only once.
  • Coupon codes expire October 31, 2019; after this date, they will no longer be valid.
  • New demonstrators who submit their Independent Demonstrator Agreement (IDA) before July 1 or after August 31 will not be eligible for this promotion.

If you’ve ever considered purchasing that Starter Kit, now is a great time!  We’d love to have you join and get that discount for yourself or start your own business!!

If you are interested in joining my team click here for details or email me.  I’d love to have you on my team.

****************************************************************************************************

STAMPIN’ UP BONUS DAYS ARE HERE!!

YAY!!!  The awesome Bonus Days promotion from Stampin’ Up! is back!!  For every $50 that you spend between July 1 and July 31 (before shipping and tax), you will earn a $5 Bonus Days coupon code that can be used August 1–31!

Earning Period Details – July 1-31:

  • Earning Period Deadline:  July 31, 2019, by 11:50 PM (MT)
  • An email address is required to participate; Bonus Days coupon codes can be delivered only via email.
  • If a participant earns multiple codes from a single order, they will receive one email with multiple codes. If they earn multiple codes from multiple orders, they will receive separate emails for each code earned.
  • All order types qualify for this promotion. Fax and email orders still require an email address.
  • Orders that are started before the promotion begins will not go toward earning coupon codes.
  • There is no limit to the number of coupon codes participants can earn per order or throughout the duration of the Bonus Days earning period.

Redemption Period Details – August 1-31:

  • Redemption Period Deadline: August 31, 2019, by 11:50 PM (MT)
  • There is no limit to the number of coupon codes participants can use on an order during redemption.
  • Bonus Days coupon codes may be redeemed for any product (excluding Starter Kits and Paper Pumpkin subscriptions).
    • New prepaid Paper Pumpkin codes may be discounted with Bonus Days coupon codes.
  • Bonus Days coupon codes may be redeemed one time only.

The earning period for this awesome promotion starts on July 1 and the coupons can be redeemed beginning August 1!!  Let me know if you have any questions.

****************************************************************************************************

Subscribe for the August kit from July 11–August 10

What’s the old saying? Variety is the spice of life? At Paper Pumpkin, we like to mix things up and keep our customer’s crafting experience fresh and fun. We plan each kit carefully, allowing them to check as many creative boxes as possible while keeping our projects simple—so they can explore the world of paper crafting with confidence. With this in mind, we are bringing an elegant fall gift packaging kit to Paper Pumpkin fans this August.
Now, it’s no secret that our subscribers love cardmaking. So when we offer treat or gift packaging, you generally like to make a few card alternates with the kit. That’s why THIS month we decided to bring you the best of both worlds with the Gift of Fall Add-On Bundle. This coordinating product will allow you to turn your Gift of Fall gift packaging into cards in an easy and inexpensive way.

  • The August kit includes 6 gift bags and 12 gift tags. To receive this kit you must subscribe by August 10.
  • The Gift of Fall Add-On Bundle is a separate purchase for those who would like to convert their August Paper Pumpkin kit into cards.
  • The Gift of Fall Add-On Bundle card designs offer a great sneak of the designs and elements to come in the August kit.
  • Once you have completed the August kit, you will have extra kit components so you can easily combine them with the add-on without having to purchase additional kits.
  • Just as you would with any other Stampin’ Up! product, you will need to purchase the add-on bundle via OEX or the online store. You will not be able to add it to a Paper Pumpkin subscription purchase.
  • The price for the add-on bundle is $10.00 usd/$13.00 cad and is available for Paper Pumpkin subscribers only. This add-on is available beginning August 1, while supplies last!
  • The add-on bundle is a cash and carry item
  • Click Here to subscribe. Supplies may be limited toward the end of the subscription period.  

Click HERE for a sneak peek of the August Paper Pumpkin Kit.

August Kit Information

Makes 6 fall-themed gift bags
Makes 12 fall-themed gift tags
Coordinating colors: Blackberry Bliss, Calypso Coral, Crumb Cake, Crushed Curry, Merry Merlot, Mint Macaron, Old Olive, Pretty Peacock, and Soft Suede

Add-On Information

Gift of Fall Add-On Bundle (item 152885)
Price: $10.00 usd/$13.00 cad
Includes 24 card bases of 2 different designs with coordinating envelopes (note card size)
Available August 1, while supplies last
Purchase via my online store
Not included with an August Paper Pumpkin subscription
Important note: The Gift of Fall Add-On Bundle is not needed to complete the August kit projects.

****************************************************************************************************

I have gathered up a lot of retired Stamp Sets, Embossing Folders & Dies  and put a list together for anyone interested.  I have single Stamp Sets along with Stamp Sets bundled with Dies or Punches.  Take a look and see if there is anything that you missed out on getting and would still like.  Click Here to go to my list.

****************************************************************************************************

Card stock cuts for this project:

  • Purple Posy Cardstock 1 3/4″ X 5 1/2″ (embossed layer on card front)
  • Rococo Rose Cardstock 4 1/2″ X 5 1/2″ (card base scored and folded at 4 1/4)
  • Whisper White Cardstock 4″ X 5 1/4″ (inner liner), 3 1/2″ X 5″ (rectangle artwork)
  • 2019-2021 In-Color Designer Series Paper 4 1/4″ X 5 1/2″ (card front) panel for envelope flap

****************************************************************************************************

Product List

Stampin’ Up Daisy Lane Smile

Good Thursday morning my fellow stampers.  How has you week been going?  The weekend is right around the corner.

I’ve used a few new items for today’s card.  I received my Stampin’ Up order from the new 2019-2020 Annual Catalog yesterday and I couldn’t wait to play with my new items.  Here’s my card.

I joined in with  couple challenges today.  First off I played along with Paper Craft Crew Sketch Challenge #339.  Here is their sketch.

Next I played along with Color Throwdown Challenge #546.  Here are their colors.

I started by embossing a Very Vanilla card front using the new Scripty 3D Embossing Folder.  I adhered the card front to a Calypso Coral card base using Multipurpose Liquid Glue.

On a smaller panel of Very Vanilla cardstock I stamped the sentiment from the Stampin’ Up Daisy Lane Stamp Set in Night of Navy Ink.  I immediately sprinkled it with Clear Stampin’ Emboss Powder and set it using my Heat Tool.  I stamped the fern image from the Daisy Lane stamp set in Pretty Peacock Ink, stamping off once, on the bottom of the panel.  I adhered the Very Vanilla panel to a Calypso Coral mat using Snail.

I adhered a strip of the new Pretty Peacock Noble Peacock Foil Sheet to the right side of the matted artwork using Snail.  I adhered the artwork to the card front using Stampin’ Dimensionals.  On a scrap piece of Very Vanilla cardstock, I stamped the medium daisy from the Daisy Lane stamp set in Calypso Coral 3 times.  I punched the daisies out using the new Medium Daisy Punch.  I adhered the daisies together using Multipurpose Liquid glue, then adhered them to the artwork using a Stampin’ Dimensional.  I added a few Night of Navy Happiness Blooms Enamel Dots to the top of the artwork and the center of the daisy.

On the inside I stamped the stem from the Daisy Lane stamp set in Pretty Peacock Ink, stamping off twice, on the left side of a Very Vanilla panel.  I stamped the smaller daisy image from the Daisy Lane stamp set in Calypso Coral Ink, stamping off once, on top of the stem.  I stamped the sentiment from the Daisy Lane stamp set in Night of Navy Ink  over the top of the daisy.  I adhered the Very Vanilla panel to the inside of the Calypso Coral cad base using Multipurpose Liquid Glue.

To finish my card I decorated a Medium Very Vanilla Envelope.  I stamped the stem from the Daisy Lane stamp set in Pretty Peacock Ink on the envelope front.  I stamped the daisy from the Daisy Lane stamp set in Calypso Coral Ink on top of the stem.  I stamped the fern image from the Daisy Lane stamp set along the envelope flap, stamping off once.

Thank you for stopping by my blog today.  I hope you liked my card and will give it a try. Happy Stamping!!

****************************************************************************************************

If you need any stamping supplies, I’d be very happy to be your Demonstrator.  Just click here to go directly to my online store or drop me an email if you have any questions. 

MY CURRENT HOST CODE IS: AHCJYGJN

For any orders $50 or more I will send you my monthly class tutorials.  Click here or go to my Customer Rewards to see what this months tutorials are.

Click here to shop the clearance rack.

Happy Stamping, Karen!

****************************************************************************************************

If you are interested in joining my team click here for details or email me.  I’d love to have you on my team.

****************************************************************************************************

Share A Little Love – June Paper Pumpkin Kit!

ONLY 4 DAYS LEFT TO SUBSCRIBE

Care about someone? Why not tell them?

The Paper Pumpkin June kit makes it easy for you to scatter sunshine this summer—whenever, with whomever. Not only do we give you 16 fun-sized, beach-themed cards and envelopes, but the kit also includes an exclusive carrying case so you’ll always have your cards on hand to share wherever you go. And don’t forget the exclusive stamp set and ink spot that completes every Paper Pumpkin kit!!

More about the June Kit:

  • In order to receive the June Paper Pumpkin Kit, you must have an active subscription by June 10 at 11:50 PM (MT).
  • The kit creates 16 fun-sized, beach-themed cards and envelopes.
  • Coordinating colors: Coastal Cabana, Crumb Cake, and Old Olive

Check out the quick video created by Stampin’ Up! with some sneak peaks of the June kit!
If you’re interested in subscribing to Paper Pumpkin yourself, you can either sign up for a subscription where you are billed monthly for your kit or you can purchase a prepaid subscription in my online store.  To see more information and to sign up for the monthly subscription, click here.  To see the options for prepaid subscriptions in my online store, click here.  Let me know if you have any questions.

****************************************************************************************************

Card stock cuts for this project:

  • Calypso Coral Cardstock 8 1/2″ X 5 1/2″ (card base scored and folded at 4 1/4″), 3 1/8″ X 4 1/8″ (artwork mat)
  • Very Vanilla Cardstock 4 1/8″ X 5 3/8″ (card front), 4″ X 5 1/4″ (inner liner), 3″ X 4″ (artwork)
  • Noble Peacock Foil Sheets 1″ X 4″ (panel on right of card)

****************************************************************************************************

Product List