Stampin’ Up! Enjoy The Moment Masculine Fun Fold

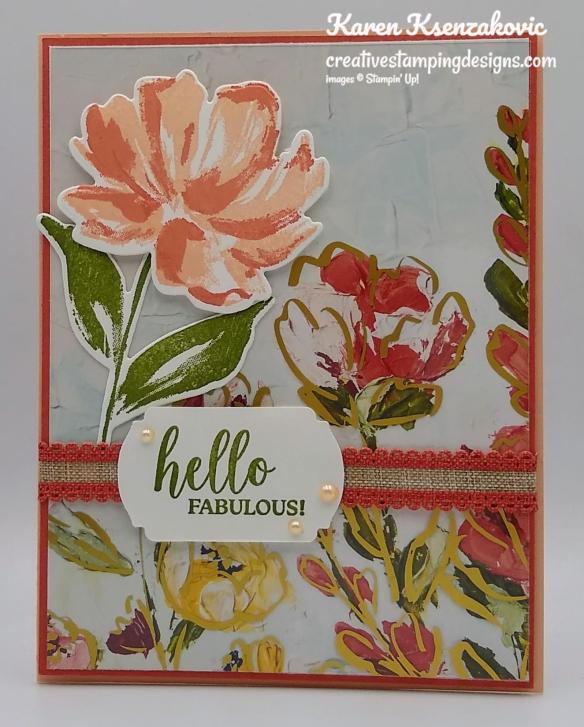
Good Tuesday morning my stamping friends. Happy June!!! How was everyone’s Memorial Day? I had my niece and her boys over for a picnic. It was nice getting together with family. I’ll be at work all day for my 1st of the month billing. I usually have off on Tuesday’s except on the last and first of the month. I do get off tomorrow though YAY!! Tonight we have our monthly Stamp Camp card class. I’m really looking forward to tonight’s class. Last month I gave everyone a stamp set and a pack of DSP and gave them homework to design and make a card to bring tonight to class. I can’t wait to see what everyone has created with the product I gave them.

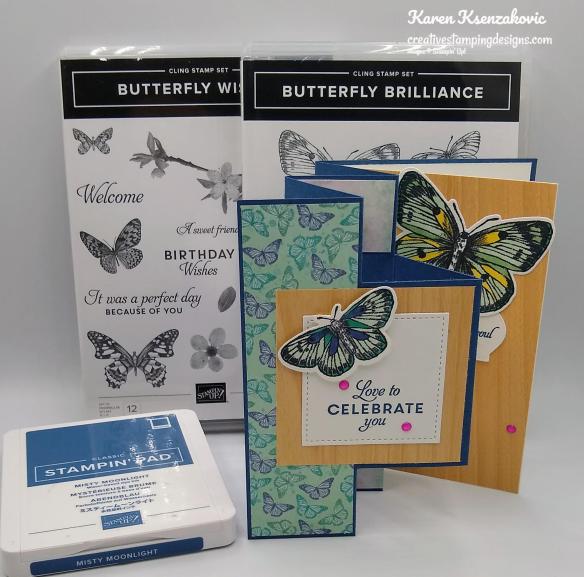
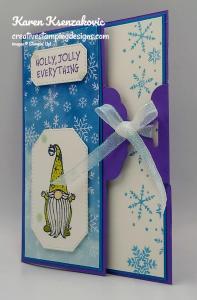
Today’s card is one that we will be making tonight at my Stamp Camp card class. Even though it’s a fun fold, it’s a simple one. I’ve made all the scores for everyone, so they just have to adhere the paper and do a little stamping. Here’s my card for today.

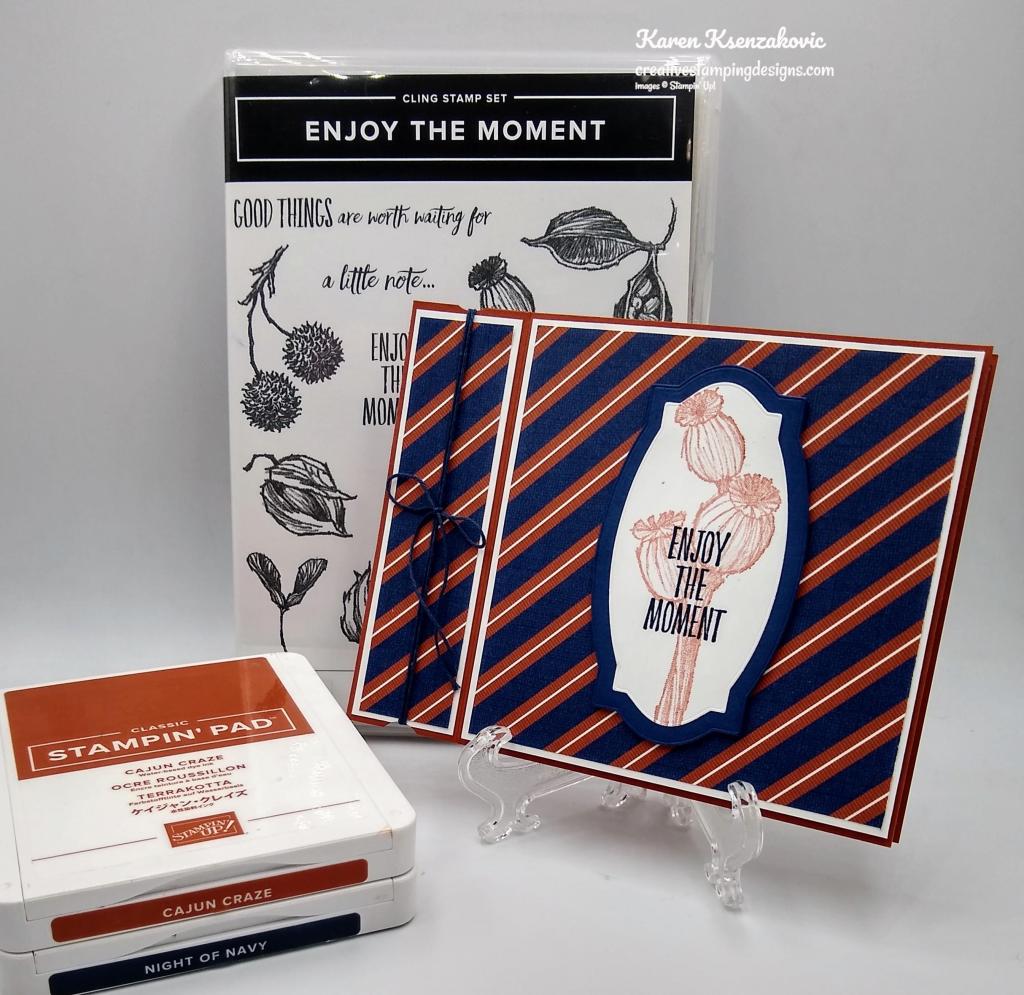
I used the Stampin’ Up! Enjoy The Moment Cling Stamp Set for my card today along with the Well Suited Designer Series Paper.

I started by adhering the end section of the card base together using Multipurpose Liquid Glue on the inside sealing front to back together.

I adhered the small panel of Well Suited DSP to a Basic White mat using Stampin’ Seal and then to the sealed side of the card base using Multipurpose Liquid Glue. I wrapped a piece of the Night of Navy Bakers Twine from the Well Suited Twine Combo Pack (this will be retiring at the end of June), around the end twice and tied a small bow.

I adhered a panel of the Well Suited DSP to a Basic White mat using Stampin’ Seal and then to the Cajun Craze card base using Stampin’ Dimensionals. On a panel of Basic White card stock I stamped the image from the Enjoy The Moment stamp set in Cajun Craze Ink, stamping off twice on scrap paper. I stamped the sentiment from the Enjoy The Moment stamp set in Night of Navy Ink over the floral image. I cut the image out using the smallest die from my Hippo & Friends Dies. I adhered the artwork to a Night of Navy mat which I cut from the next largest die from the Hippo & Friends Dies, using Stampin’ Seal. I adhered the matted panel to the card front using Stampin’ Dimensionals.

On the inside I stamped the sentiment from the Stampin’ Up! Better Places Host Cling Stamp Set in Night of Navy Ink. I adhered a strip of Well Suited DSP to the side of the panel using Stampin’ Seal. I adhered the Basic White panel to a Night of Navy mat using Stampin’ Seal and then to the inside of the Cajun Craze card base using Multipurpose Liquid Glue.

To finish my card I stamped the image from Enjoy The Moment stamp set in Cajun Craze Ink on the front of a Basic White Medium Envelope. I adhered a panel of the Well Suited DSP to the envelope flap.

Thank you for stopping by my blog today. I hope you liked my card and will give it a try. Happy Stamping!!

*********************************************************************************************************

If you need any stamping supplies, I’d love to be your Demonstrator. Just click HERE to go directly to my online store or drop me an email if you have any questions. 

MY CURRENT HOST CODE IS: DRZETK6V

Use this host code when you order $50 or greater and receive a free gift from me! If your order is over $150, please do not use this code, but you’ll still get the free gift. The free gift is your choice of any 1 item valued up to $10.00 from the 2020-2021 Annual Catalog or the January-June 2021 Mini Catalog!   For any orders $50 or more I will also send you my monthly class tutorials.  Click HERE or go to my Customer Rewards for more details and to see what this months tutorials are.

 Click HERE to shop the clearance rack.

Please remember to use my current Host Code and make sure that you can see my name on the final checkout page listed as your Demonstrator when you order so that you know that you’re ordering with me and you’ll get my rewards! 

Happy Stamping, Karen!

*********************************************************************************************************

The January–June 2021 Mini Catalog will be retiring soon! It’s always bittersweet to see a classic Stampin’ Up! catalog take a trip to retirement. But, we’re looking forward to all the new products on their way—and we hope you are, too!

Stock up on your favorite products before they’re gone for good! Save up to 50% on essential craft supplies. What are you waiting for? Start shopping! After all, this selection of Last Chance Products is only available while supplies last.

Click Here to view the PDF of the LAST CHANCE retiring items from the January -June 2021 Mini Catalog.

DETAILS

  • Each Last Chance Products promotion typically includes a Retiring List (products that will no longer be available once the catalog retires) and a Carryover List (products that will still be available once the catalog retires). For this catalog’s Last Chance Products promotion, a Carryover List will not be provided; carryover products can be viewed in the 2021–2022 Annual Catalog.
  • Discounts are not always available with the Retiring List. When they are, they will vary from one market to another depending on product performance.
  • All products are available while supplies last, and there are no purchase limits.

SALES PERIOD

  • Starts: 1 June 2021 at 1:00 PM (MT)
  • Ends: 30 June 2021 at 11:59 PM (MT)

DON’T MISS OUT ON THESE GREAT DEALS!! GET THOSE SHOPPING LISTS READY TO GO!! STOCK UP ON YOUR FAVORITE PRODUCTS BEFORE THEY’RE GONE!! Click Here to head over to my Online Store and Start Shopping Today!! Don’t forget, the last chance items are available while supplies last so shop early for the best selection! 

*********************************************************************************************************

Expressions In Color

Subscribe May11 – June 10

Dream and discover In Color! With the Expressions In Color Paper Pumpkin Kit, you’ll be introduced to our intriguing collection of In Colors for 2021–2023—and, you’ll find a familiar shade from our 2020–2022 In Color selection. This month’s ink-credible kit contains enough elements to create nine cards—and coordinating envelopes—including ink-stained paper pieces, an exclusive stamp set, and not one, but two Classic Stampin’ Spots! And, it all comes in a cute, colorful, and collectible box.

What are In Colors, anyway? In Colors consist of a limited-edition collection of colors. We come up with a new collection every year, and we release it around the same time as the release of our annual catalog! In each In Color collection, we’ll offer ink, paper, markers, and more. The catch? They’re only available to purchase for a period of two years, so stock up on your favorite In Color supplies while you can!

With the Expressions In Color kit, you can explore and experiment with our 2020–2022 and 2021–2023 In Color collections. Make a splash with awe-inspiring, ink-stained artistry!

Details

  • Kit contains enough supplies to create 9 cards—3 each of 3 designs—and coordinating envelopes. This all-inclusive kit includes printed card bases, die-cut paper pieces, embellishments, adhesive, and more!
  • Card size: 4-1/4″ x 5-1/2″ (10.8 x 14 cm)
  • Envelope size: 4-1/2″ x 5-3/4″ (11.4 x 14.6 cm)
  • Coordinating colors: Bumblebee, Evening Evergreen, Fresh Freesia, Polished Pink
  • As always, this month’s kit features an exclusive stamp set. But, this month’s kit also includes not one, but two Classic Stampin’ Spots!
  • Comes in a cute, colorful, and collectible box.
  • Coordinates with products from the Expressions in Ink Suite (US | CA) (item #155459).

Subscribe to the June 2021 Paper Pumpkin Kit—Expressions In Color—between 11 May and 10 June at paperpumpkin.com!

Note: Supplies may be limited toward the end of the subscription period.

*********************************************************************************************************

Stampin’ Up! Connect, Craft & Collect $25 Stampin’ Rewards Bonus May 4 – June 14!!

From May 4 – June 14, 2021, qualifying Stampin’ Up! orders and parties over $250 will receive $25 in BONUS Stampin’ Rewards!  YAY for more free goodies to kick off a new catalog!!

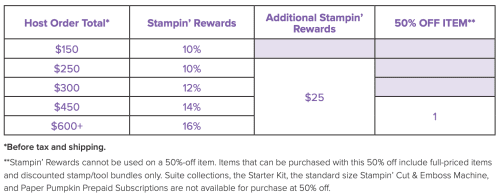
Stampin’ Rewards can be spent on any merchandise in either of the current catalogs, including the host exclusive items on pages 170-171 in the new Annual Catalog and page 88 in the January-June Mini Catalog!

PROMOTION DATES:  MAY 4 – JUNE 14, 2021

  • Workshop orders, customer orders, and online orders all qualify for the extra $25 in Stampin’ Rewards if they reach the $250 level.
  • The order must reach the qualifying amount of $250 in merchandise prior to shipping and tax.
  • The extra $25 rewards are only valid once per order no matter how high the order total.
  • Starter Kit orders do not qualify for this promotion.
  • Stampin’ Rewards can not be used on a 50% off item.
  • Deadline to submit an order and receive the extra $25 in free Stampin’ Rewards:  June 14, 2021 at 11:50 PM (MT).

If you have any questions or would like me to set up a host code for you to see if you can collect $250 in orders for yourself, please drop me a note at creativestampingdesigns@gmail.com.  I’ll be happy to do that for you!

If you have any questions, drop me a note at creativestampingdesigns@gmail.com.

*********************************************************************************************************

Card stock cuts for this project:

  • Basic White Cardstock 4 1/8″ X 4 1/8″ (card front mat), 1 1/8″ X 4 1/8″ (side panel mat), 4″ X 2″ (sentiment), 4″ X 4″ (inner liner)
  • Cajun Craze Cardstock 4 1/4″ X 11″ (card base scored and folded at 4 1/4″ & 5 1/2″)
  • Night of Navy Cardstock 4″ X 2″ (sentiment mat), 4 1/8″ X 4 1/8″ (inner liner mat)
  • Well Suited Designer Series Paper 4″ X 4″ (card front), 2 – 1″ X 4″ (side panel and inner liner strip), 2 1/2″ X 6″ (envelope flap)

*********************************************************************************************************

Product List

Stampin’ Up! Sweet Ice Cream Birthday

Good Tuesday morning my stamping friends. How has everyone’s week started off? I hope everyone has a productive week. Is everyone getting their shopping lists ready? ONE week before the new 2021-2022 Annual Catalog goes live. I can’t wait to get lots of new products.

For today I decided to play with a bundle from the January-June 2021 Mini Catalog. It’s a pretty quick card too. Here’s my card for today.

I used the Stampin’ Up! Sweet Ice Cream Bundle for my card along with the Ice Cream Corner Designer Series Paper.

I started by cutting the center of a Ice Cream Corner DSP card front using my Hippo & Friends Dies. I adhered the card front to a Blackberry Bliss card base using Stampin’ Seal.

On a panel of Basic White cardstock I stamped the ice cream cone from the Stampin’ Up! Sweet Ice Cream Photopolymer Stamp Set in Cinnamon Cider Ink, stamping off once. I stamped the detail cone image in Cinnamon Cider Ink on top of the solid image and punched the cone out using my Ice Cream Cone Builder Punch. I stamped the ice cream scoop image from the Sweet Ice Cream stamp set in Petal Pink and Pool Party Ink on a panel of Basic White cardstock and punched them out using the Ice Cream Cone Builder Punch. I stamped the sentiment from the Sweet Ice Cream stamp set in Early Espresso Ink and fussy cut it using my Paper Snips.

I adhered the Pool Party ice cream to the cone using Multipurpose Liquid Glue. I stamped the sprinkles from the Sweet Ice Cream stamp set in Early Espresso Ink on the Petal Pink ice cream and adhered it on top of the Pool Party scoop using Multipurpose Liquid Glue. I adhered the ice cream cone to the opening of the card front using Stampin’ Dimensionals. I adhered the sentiment across the bottom of the cone using Stampin’ Dimensionals only on the ends.

On the inside I stamped the sentiment from the Sweet Ice Cream stamp set in Early Espresso Ink in the center of a Basic White panel. I adhered a strip of the Ice Cream Corner DSP to the top of the panel using Stampin’ Seal. I adhered the Basic White panel to the inside of the Blackberry Bliss card base using Stampin’ Seal.

To finish my card I decorated a Basic White Medium Envelope. I adhered a strip of the Ice Cream Corner DSP to the envelope front and a panel to the envelope flap.

Thank you for stopping by my blog today. I hope you liked my card and will give it a try. Happy Stamping!!

*********************************************************************************************************

If you need any stamping supplies, I’d love to be your Demonstrator. Just click HERE to go directly to my online store or drop me an email if you have any questions. 

MY CURRENT HOST CODE IS: 9R4BQD64

Use this host code when you order $50 or greater and receive a free gift from me! If your order is over $150, please do not use this code, but you’ll still get the free gift. The free gift is your choice of any 1 item valued up to $10.00 from the 2020-2021 Annual Catalog or the January-June 2021 Mini Catalog!   For any orders $50 or more I will also send you my monthly class tutorials.  Click HERE or go to my Customer Rewards for more details and to see what this months tutorials are.

 Click HERE to shop the clearance rack.

Please remember to use my current Host Code and make sure that you can see my name on the final checkout page listed as your Demonstrator when you order so that you know that you’re ordering with me and you’ll get my rewards! 

Happy Stamping, Karen!

*********************************************************************************************************

2021-2022 Annual Catalog Designer Series Paper Share

I’m offering a Designer Series Paper share from the Stampin’ Up! 2021-2022 Annual Catalog and I’d love to have you join!! This is the final week to get in on my DSP Share.  I’m placing my share order early on May 4 and I’m going to use the expedited shipping option so I should be able to have the shares cut, bundled and back out to you during the week of May 10.

Creative Stamping Designs 2021-2022 Annual Catalog Designer Series Paper Shares

New Designer Series Paper Share – $50.00 plus $7.75 for Priority Mail shipping

You will receive one 6×6 sheet of each design from the following DSP packs (the number behind the name indicates how many 6×6 sheets of that paper pack you will receive):

  • Beauty Of The Earth – 6
  • Bloom Where You’re Planted – 6
  • Expressions In Ink Specialty – 6
  • Hand-Penned – 6
  • In The Wild – 6
  • Pansy Petals – 6
  • Simply Elegant Specialty – 6
  • Sweet Symmetry – 6
  • Tidings Of Christmas 6″ x 6″ – 6
  • You’re A Peach – 6
  • 2020-2022 In Color 6″ x 6″ – 10
  • 2021-2023 In Color 6″ x 6″ – 10
  • Brights 6″ x 6″ – 20
  • Neutrals 6″ x 6″ – 20
  • Regals 6″ x 6″ – 20
  • Subtles 6″ x 6″ – 20
  • Ombre Specialty – 4 (one of each color)
  • 2021-2023 In Color Shimmer Vellum – 5 (one of each color)
  • Gold & Rose Gold 6″ x 6″ – 2 (one of each color)
  • Linen Specialty – 1

In all, you’ll receive 172 – 6” x 6” sheets of designer or speciality paper!

Double DSP Share – $100 + $8 Shipping by Priority Mail – if you’d like double shares of the designer paper, that’s fine too.  I’ll cut the designer paper sheets into 6×12 so that you’ll be able to get 3 full A2 size card fronts from each sheet (Tidings Of Christmas, 2020-2022 In color, 2021-2023 In Color, Brights, Neutrals, Regals, Subtles and Gold & Rose Gold 6×6, you’ll get double sheets of those since they’re already precut).

FREE Gift From Me! – As a bonus for joining my share, you’ll get a sampling (12 – 6″ X 6″ sheets) of the new host exclusive Pattern Party 12″ x 12″ Designer Series Paper!

Anyone is welcome to join in my share (please note, I can only ship to addresses within the US). Email the following information to creativestampingdesigns@gmail.com.

  • Your first and last name
  • Your share selection
  • The email address that is connected to your Paypal account. I only accept Paypal for payment.  ***You do not need to have a Paypal account to pay the invoice, you can choose to pay by credit card without having a Paypal account.

Deadline to sign up for my share is Sunday, May 2 at 8:00 PM ET.

Let me know if you have any questions.  Thanks!

*********************************************************************************************************

Online Host Club Starting June 1st

Does your Wish List and 2021-2022 Annual Catalog look like mine that just about every page is marked? Do you want it all and don’t want to spend a lot of money all at once?  An Online Host Club might just be the perfect solution for you.  This is the perfect way to build up your Stampin’ Up! supplies a little at a  time and receive host benefits too. Click Here for details on joining my Online Host Club.

*********************************************************************************************************

Stampin’ Up! has updating the Clearance Rack with some new goodies over night!  Head over there quickly to get your hands on some great deals.  But hurry!!  Clearance Rack deals are only while supplies last!

CLICK HERE to head over to my online store to shop those great deals, but it must be after midnight MOUNTAIN TIME tonight!!  Have fun shopping!

*********************************************************************************************************

Batter Up!

Subscribe April 11 – May 10

Whether you’re crafting for a father, grandfather, nephew, or brother, we’ve got all your bases covered with the Batter Up! Paper Pumpkin Kit! This month’s kit is the perfect pick for making masculine masterpieces.

Then again, we know that grass-stained pants and sliding into home aren’t just for the boys—this month’s kit is a triple threat! Designed with men, sport-lovin’ ladies, and baseball fanatics in mind, anyone would bounce from their spot in the bleachers if they received a classic card from the Batter Up! kit. After all, this month’s kit was made for celebrating the all-stars, MVPs, and the greats—no matter what team they play on!

Step up to the plate, take a swing, and knock it out of the park! With the Batter Up! Paper Pumpkin Kit, it’s your turn to go to bat for all the people who’ve gone to bat for you. This month’s timeless kit with a “throwback” theme contains enough grand slam supplies to create nine cards—and coordinating envelopes—featuring classic colors, pinwheel and pinstripe patterns, and vintage-washed paper pieces. There’s no “batter” way to root, root, root for your home team and honor the all-stars in your life!

A beloved baseball-themed kit would be incomplete without the sport’s signature, sticky snack—the official bubble gum of the MLB! A favorite in the field, the Batter Up! Paper Pumpkin Kit contains a couple sticks of the chewy staple; chew while you craft, slide a piece into a card, or save it for later.

Send a seventh-inning stretch in a classic card with all-star stripes, a nostalgic nod, and a stamp set fit for an MVP! But, before you give it all you’ve got, give this month’s promotional video a watch. See what the Batter Up! kit is all about! Play ball!

Details

  • Kit contains enough supplies to create 9 cards—3 each of 3 designs—and coordinating envelopes. The all-inclusive kit includes printed card bases, die-cut paper pieces, embellishments, adhesive, and more!
    • Card size: 4-1/4″ x 5-1/2″ (10.8 x 14 cm)
    • Envelope size: 4-1/2″ x 5-3/4″ (11.4 x 14.6 cm)
  • Coordinating colors: Basic White, Bumblebee, Night of Navy, Pacific Point, Real Red, Smoky Slate, Soft Suede
  • Comes with the official bubble gum of the MLB—a ballpark favorite! Chew while you craft, slide a piece into a card, or save it for later.

Subscribe to the May 2021 Paper Pumpkin Kit between 11 April and 10 May at paperpumpkin.com!

Note: Supplies may be limited toward the end of the subscription period.

*********************************************************************************************************

Card stock cuts for this project:

  • Basic White Cardstock 2 – 4″ X 5 1/4″ (artwork & inner liner)
  • Blackberry Bliss Cardstock 8 1/2″ X 5 1/2″ (card base scored and folded at 4 1/4″)
  • Ice Cream Corner Designer Series Paper 4 1/8″ X 5 3/8″ (card front), 1/2″ X 4″ (strip on inner liner), 1/2″ X 6″ & 2 1/2″ X 6″ (envelope)

*********************************************************************************************************

Product List

Stampin’ Up! Art Gallery Quick and Easy Card Pack

Good Saturday morning my stamping friends. How has everyone’s weekend started off? I’ll be at work all day today and tomorrow. Last I heard, we will not be getting snow this weekend, but it’s still early to tell.

Today I have something a little different for you. I don’t have step by step instructions for you since I made a pack of cards. This would make a great gift for someone tied up with some ribbon or put in one of our Acetate Card Boxes and decorated. If you have any questions about any of the cards, please message me and I will explain how I made them. Here are the cards.

I used 1 sheet of the Fine Art Floral Designer Series Paper and 1 sheet of the Golden Garden Designer Series Acetate to make all 6 cards. I placed the acetate over the DSP, tacked it in a couple places using Glue Dots and cut 4″ X 5 1/4″ panels.

This card I used So Saffron and Poppy Parade cardstock and just did a simple layering. I stamped the sentiment from Stampin’ Up! Many Messages Cling Stamp Set in Soft Suede Ink and cut it our with the Messages Dies. Adhered it to Hippo and Friends die cut mat and adhered it to the card front.

This card I used Petal Pink and Terracotta Tile cardstock and just did a simple layering. I stamped the sentiment from Stampin’ Up! Dressed To Impress Photopolymer Stamp Set in Old Olive Ink and cut it our with the Label Me Fancy Punch and adhered it to the card front. Stamped the large flower from the Stampin’ Up! Art Gallery Photopolymer Stamp Set in Petal Pink & Terracotta Tile, stem in Old Olive and cut images out with Floral Gallery Dies.

This card I used Bumblebee and Old Olive cardstock and just did a simple layering. I stamped the sentiment from Stampin’ Up! Strong & Beautiful Cling Stamp Set in Old Olive Ink, cut it our with the Stitched Nested Labels Dies and adhered it to the card front. Stamped the flower from the Stampin’ Up! Art Gallery Photopolymer Stamp Set using my Bumblebee and Old Olive Stampin’ Write Markers and cut image out with Floral Gallery Dies.

This card I used Pool Party and Night of Navy cardstock and just did an angle layering. I stamped the sentiment from Stampin’ Up! Art Gallery Stamp Set in Night of Navy Ink, cut it out with the Floral Gallery Dies and the large sentiment out of Night of Navy cardstock and adhered them to the card front.

This card I used Blushing Bride and Merry Merlot cardstock and just did a simple layering. I stamped the sentiment from Stampin’ Up! Strong & Beautiful Cling Stamp Set in Merry Merlot Ink, cut it our with the Stitched Shapes Dies. I cut a scalloped mat from Merry Merlot cardstock using the Layering Ovals Dies, adhered the sentiment and adhered it to the card front.

This card I used Flirty Flamingo and Mossy Meadow cardstock and just did a simple layering. I stamped the sentiment from Stampin’ Up! Art Gallery Photopolymer Stamp Set in Mossy Meadow Ink, cut it our with the Messages Dies. I cut an oval mat using the Layering Ovals Dies, adhered the sentiment and adhered it to the card front.

Thank you for stopping by my blog today. I hope you liked my card pack and will try it. Happy Stamping!!

*********************************************************************************************************

If you need any stamping supplies, I’d love to be your Demonstrator. Just click HERE to go directly to my online store or drop me an email if you have any questions. 

MY CURRENT HOST CODE IS: 9BCVNW9D

Use this host code when you order $50 or greater and receive a free gift from me! If your order is over $150, please do not use this code, but you’ll still get the free gift. The free gift is your choice of any 1 item valued up to $10.00 from the 2020-2021 Annual Catalog or the January-June 2021 Mini Catalog!   For any orders $50 or more I will also send you my monthly class tutorials.  Click HERE or go to my Customer Rewards for more details and to see what this months tutorials are.

 Click HERE to shop the clearance rack.

Please remember to use my current Host Code and make sure that you can see my name on the final checkout page listed as your Demonstrator when you order so that you know that you’re ordering with me and you’ll get my rewards! 

Happy Stamping, Karen!

*********************************************************************************************************

Here’s To You

Subscribe February11th – March 10th

Three cheers for mountain air, a sky filled with sunshine, and finding joy in life’s journey! Adventure awaits inside this month’s majestic, mountain-themed kit. With enough elements and embellishments to create eight cards and coordinating envelopes, the Here’s to You Paper Pumpkin Kit is the perfect pick for celebrating life’s little moments and mountain-high milestones!

What makes March’s kit one-of-a-kind? The spectacular set of four free stencils—and a stamping sponge—that you’ll find inside! Pair this pack of stunning stencils with the kit’s contents to stamp a springtime scene, then store the set to stamp for any season in the future. Clean up your binoculars and dust off your hiking boots—the Here’s to You Paper Pumpkin Kit is ready to lead you on an excursion to explore your creativity!

ABOUT THE MARCH KIT

Details

  • Kit contains enough supplies to create 8 cards—4 each of 2 designs—and coordinating envelopes. The kit’s contents include printed card bases, die-cut paper pieces, embellishments, adhesive, and more!
  • Card size: 4-1/4″ x 5-1/2″ (10.8 x 14 cm)
  • Envelope size: 4-1/2″ x 5-3/4″ (11.4 x 14.6 cm)
  • Coordinating colors: Bumblebee, Calypso Coral, Old Olive, Petal Pink, Pretty Peacock, Seaside Spray
  • Includes four free stencils and a stamping sponge!
  • Arrives in a cute and collectible box.

Subscribe to the March 2021 Paper Pumpkin Kit between 11 February and 10 March at paperpumpkin.com!

Note: Supplies may be limited toward the end of the subscription period.

*********************************************************************************************************

Product List

Art Gallery Bundle


Floral Gallery Dies


Many Messages Bundle


Messages Die


$34.00


Gilded Gems


$7.00


Gold Glitter Enamel Dots


Pearl Basic Jewels


Hippo & Friends Dies


Label Me Fancy Punch


Layering Ovals Dies


Stitched Shapes Dies


Mini Glue Dots


$5.25


Multipurpose Liquid Glue


Stampin' Dimensionals


Stampin' Seal


$8.00


Bone Folder


$7.00


Paper Snips


$10.00


Paper Trimmer


$25.00


Clear Block Bundle


Stamparatus


$49.00

Stampin’ Up! Butterfly Brilliance Birthday for Fun Fold Friday

Good Friday morning my stamping friends and welcome to my Fun Fold Friday. How was everyone’s week? Is anyone doing anything for the weekend? I’ll be working all weekend at both jobs.

Today’s card I made on my Facebook Live video on Wednesday. If you were able to join me or watched the replay, thank you very much. If you’d like to watch my video and stamp along, the measurements are below along with the links to my Facebook page and my YouTube channel. Here’s my card that I made.

I used the Stampin’ Up! Butterfly Brilliance Bundle, coming March 2nd, and the Stampin’ Up! Butterfly Wishes Cling Stamp Set for my fun fold card. I played along with the Aud Sentiments Challenge #268, ‘Anything Goes + A Sentiment’. I also played along with Watercooler Wednesday Challenge #308.

I started by scoring and cutting a Misty Moonlight card base at 1 3/4″, 3 1/2″, 5 1/4″ & 7″. I lined the long edge of the card base at the 1 1/4″ mark on my trimmer and cut from the 1 3/4″ score line up to the 5 1/4″ score line. I slid the card base so the opposite long edge was lined up at the 1 1/4″ mark on my trimmer and again cut from the 1 3/4″ score line up to the 5 1/4″ score line. I folded the card like an accordion having the cut portion popping out. I stamped the butterflies from the Stampin’ Up! Butterfly Brilliance Cling Stamp (coming March 2nd) in Tuxedo Black Ink on a panel of Basic White cardstock. I cut the butterflies out using the Brilliant Wings Dies (coming March 2nd). I colored the butterflies in using my Bermuda Bay, Mint Macaron, Misty Moonlight and So Saffron Stampin’ Blends Markers.

Above is a top view of how the card base should look.

I adhered a panel of the new Butterfly Bijou 6 X 6 Designer Series Paper (coming March 2nd) to the front of the card base using Stampin’ Seal. I adhered a panel of the Natural Touch Specialty Paper (coming March 2nd) to the pop out portion overlapping the front DSP panel using Multipurpose Liquid Glue. On a panel of Basic White cardstock I stamped the sentiment from the Butterfly Wishes stamp set in Misty Moonlight Ink and cut the panel out using the 2nd largest square from the Stitched Shapes Dies. I adhered the sentiment to the card front panel using Stampin’ Seal and adhered a butterfly to it using Stampin’ Dimensionals.

I adhered 4 small panels of Butterfly Bijou DSP to the card base using Multipurpose Liquid glue.

I adhered a panel of the Butterfly Bijou DSP to the inside of the card base using Multipurpose Liquid Glue. I adhered a panel of the Natural Touch Specialty Paper to the pop out panel using Multipurpose Liquid Glue. I stamped the sentiment from the Butterfly Wishes stamp set in Misty Moonlight Ink on a panel of Basic White cardstock and adhered it to the pop out panel using Stampin’ Seal. I cut a small butterfly from another panel of Butterfly Bijou DSP using my Paper Snips and adhered it to the sentiment using Glue Dots. I adhered a panel of Natural Touch Specialty Designer Paper to the front of a small Basic White card base using Multipurpose Liquid Glue. I cut a panel of Basic White cardstock using the Hippo & Friends Dies. I stamped the sentiment from the Butterfly Wishes stamp set in Misty Moonlight Ink in the center of the die cut panel and adhered it to the 2nd card front using Stampin’ Seal.

On the inside of the small card base I stamped the sentiment from the Stampin’ Up! Punch Party Photopolymer Sale-a-bration Host Stamp Set in Misty Moonlight Ink in the center. I colored the flowers and leaves in on the sentiment using my Magenta Madness and Just Jade Stampin’ Blends Markers. I adhered a butterfly to the inside using Glue Dots. I adhered the small card base to the back of the larger card base using Stampin’ Seal. I added a few 2020-2022 In-Color Enamel Dots to the card fronts.

To finish my card I decorated a Basic White Medium Envelope. I stamped one of the butterflies from the Butterfly Brilliance stamp set in Tuxedo Black Ink on the envelope front and colored it in using my Bermuda Bay, Mint Macaron and Misty Moonlight Stampin’ Blends Markers. I adhered a panel of Butterfly Bijou to the envelope flap.

Thank you for stopping by my blog today. I hope you liked my card and will give it a try. The list of measurements are below if you’d like to stamp along while watching the video. You can watch my video on my Facebook page Here.

You can also view the video on my YouTube channel Here. Happy Stamping!!

*********************************************************************************************************

If you need any stamping supplies, I’d love to be your Demonstrator. Just click HERE to go directly to my online store or drop me an email if you have any questions. 

MY CURRENT HOST CODE IS: 9BCVNW9D

Use this host code when you order $50 or greater and receive a free gift from me! If your order is over $150, please do not use this code, but you’ll still get the free gift. The free gift is your choice of any 1 item valued up to $10.00 from the 2020-2021 Annual Catalog or the January-June 2021 Mini Catalog!   For any orders $50 or more I will also send you my monthly class tutorials.  Click HERE or go to my Customer Rewards for more details and to see what this months tutorials are.

 Click HERE to shop the clearance rack.

Please remember to use my current Host Code and make sure that you can see my name on the final checkout page listed as your Demonstrator when you order so that you know that you’re ordering with me and you’ll get my rewards! 

Happy Stamping, Karen!

*********************************************************************************************************

Here’s To You

Subscribe February11th – March 10th

Three cheers for mountain air, a sky filled with sunshine, and finding joy in life’s journey! Adventure awaits inside this month’s majestic, mountain-themed kit. With enough elements and embellishments to create eight cards and coordinating envelopes, the Here’s to You Paper Pumpkin Kit is the perfect pick for celebrating life’s little moments and mountain-high milestones!

What makes March’s kit one-of-a-kind? The spectacular set of four free stencils—and a stamping sponge—that you’ll find inside! Pair this pack of stunning stencils with the kit’s contents to stamp a springtime scene, then store the set to stamp for any season in the future. Clean up your binoculars and dust off your hiking boots—the Here’s to You Paper Pumpkin Kit is ready to lead you on an excursion to explore your creativity!

ABOUT THE MARCH KIT

Details

  • Kit contains enough supplies to create 8 cards—4 each of 2 designs—and coordinating envelopes. The kit’s contents include printed card bases, die-cut paper pieces, embellishments, adhesive, and more!
  • Card size: 4-1/4″ x 5-1/2″ (10.8 x 14 cm)
  • Envelope size: 4-1/2″ x 5-3/4″ (11.4 x 14.6 cm)
  • Coordinating colors: Bumblebee, Calypso Coral, Old Olive, Petal Pink, Pretty Peacock, Seaside Spray
  • Includes four free stencils and a stamping sponge!
  • Arrives in a cute and collectible box.

Subscribe to the March 2021 Paper Pumpkin Kit between 11 February and 10 March at paperpumpkin.com!

Note: Supplies may be limited toward the end of the subscription period.

*********************************************************************************************************

Card stock cuts for this project:

  • Basic White Cardstock 6″ X 5″ panel (butterflies), 2 3/4″ X 2 3/4″ (front sentiment), 1 1/2″ x 2 3/4″ (center sentiment), 3 1/2″ X 2″ (small card front sentiment), 7 1/4″ X 5 3/8″ (small card base scored at 3 5/8″)
  • Misty Moonlight Cardstock 5 1/2″ X 11″ (card base scored, cut and folded as listed above)
  • Butterfly Bijou 6 X 6 Designer Series Paper 2 – 1 5/8″ x 5 3/8″ & 4 – 1 5/8″ X 1 1/8″ (card base panels), 2 1/2″ X 6″ (piece for envelope flap)
  • Natural Touch Specialty Paper 2 7/8″ X 2 7/8″ (card front sentiment mat), 1 5/8″ x 2 7/8″ (center sentiment mat), 3 5/8″ x 5 3/8″ (small card front)

*********************************************************************************************************

Product List

Stampin’ Up! Back On Your Feet for The Happy Inkin’ Thursday Blog Hop

Good Thursday morning my stamping friends and welcome to our Happy Inkin’ Thursday Blog Hop. I hope everyone is doing well. If you are hopping over from Akiko, thank you for stopping by my blog. This week we have a sketch challenge. Be sure to take a moment to hop around to see everyone’s awesome projects. Here is my card for today.

I needed to make a card for a coworker that has suffered from a heart attach this past weekend. I immediately thought about the Stampin’ Up! Back On Your Feet Cling Stamp Set to go with our sketch. Here is our sketch for this weeks challenge.

I started by adhering a panel of Forever Greenery Designer Series Paper to a Pretty Peacock card base using Multipurpose Liquid Glue. I cut another panel of Forever Greenery DSP using my Stitched Rectangle Dies and adhered it to the card front using Stampin’ Seal.

I stamped the turtle image from the Back On Your Feet stamp set in Tuxedo Black Ink on a panel of Basic White cardstock. I colored the image in using my Just Jade, Mint Macaron, Pretty Peacock and Shaded Spruce Stampin’ Blends Markers. I cut the image using my Stitched Shapes Dies. I cut a scalloped square from a panel of Pretty Peacock cardstock using my Layering Squares Dies and adhered the artwork to it using Stampin’ Seal. I adhered the matted artwork to the card front using Stampin’ Dimensionals.

I stamped the sentiment from the Back On Your Feet stamp set on a panel of Basic White cardstock in Pretty Peacock Ink. I cut the sentiment out using my Hippo & Friends Dies and adhered it to the card front using Stampin’ Dimensionals. I added a few Matte Black Dots to the card front.

On the inside I stamped the sentiment from the Back On Your Feet stamp set in Pretty Peacock Ink in the center of a Basic White panel. I stamped the sloth image from the Back On Your Feet stamp set in Tuxedo Black Ink on the side of the panel and colored it in using my Crumb Cake, Ivory, Shaded Spruce and Soft Suede Stampin’ Blends Markers. I adhered the Basic White panel to a Mint Macaron mat using Stampin’ Seal and then to the inside of the Pretty Peacock card base using Multipurpose Liquid Glue.

To finish my card I decorated a Basic White Medium Envelope. I adhered a strip of Forever Greenery DSP to the envelope front and a panel to the envelope flap. I stamped the turtle image from the Back On Your Feet stamp set in Tuxedo Black Ink on the envelope front and colored it using my Just Jade, Mint Macaron, Pretty Peacock and Shaded Spruce Stampin’ Blends Markers.

Thank you for visiting my blog today. I hope you liked my card and will give it a try. Now that you’ve seen my card, take a minute to hop through all our projects today. If you click on the Next Blog button, you’ll go to Amy’s page. Or you can just click on the names below to go directly to all their blogs! Happy Hopping!!

Amy Koenders:

Mary Deatherage:

Kristi Gray:

Jaimie Babarczy:

Sue Prather:

Karen Finkle: Unable to join the hop for a bit.

Akiko Sudano:

Karen Ksenzakovic: You Are Here

Julie Johnston: Taking a break through the end of January.

*********************************************************************************************************

If you need any stamping supplies, I’d love to be your Demonstrator. Just click HERE to go directly to my online store or drop me an email if you have any questions. 

MY CURRENT HOST CODE IS: C4XDWQT6

Use this host code when you order $50 or greater and receive a free gift from me! If your order is over $150, please do not use this code, but you’ll still get the free gift. The free gift is your choice of any 1 item valued up to $10.00 from the 2020-2021 Annual Catalog or the January-June 2021 Mini Catalog!   For any orders $50 or more I will also send you my monthly class tutorials.  Click HERE or go to my Customer Rewards for more details and to see what this months tutorials are.

 Click HERE to shop the clearance rack.

Please remember to use my current Host Code and make sure that you can see my name on the final checkout page listed as your Demonstrator when you order so that you know that you’re ordering with me and you’ll get my rewards! 

Happy Stamping, Karen!

*********************************************************************************************************

Bouquet of Hope

Subscribe January 11 – February 10

What is Paper Pumpkin? Paper Pumpkin is our monthly One-Stop Box™ that offers a unique variety of paper projects for subscribers of any skill level to enjoy! These thoughtfully-themed and all-inclusive craft kits encourage you to explore your creativity, try new techniques, and discover your potential in papercrafting.

Paper Pumpkin introduces you to an impressive collection of Stampin’ Up! products, from our one-of-a-kind ink pads to our eye-catching embellishments. Plus, the carefully-chosen components of each Paper Pumpkin kit highlight the unbeatable versatility and coordination our products provide! This easy and exciting way to stock up on supplies—and create small-batch projects for occasions of any kind—inspires you to continue crafting. With Paper Pumpkin, it’s simple: share what you love, and help others enjoy creativity!

The Bouquet of Hope Paper Pumpkin Kit provides enough supplies to create nine cards and coordinating envelopes. This soft, sympathetic kit includes patterned card bases, die-cut floral elements, ribbon, embellishments, and more!

The kit’s exclusive Bouquet of Hope Stamp Set features supportive sentiments centered around comfort, care, hope, and love. Such a versatile stamp set can be used throughout the year! Sadly, there is heartache in the world all around us. We all know someone who could use a heartfelt, handmade card that gives sympathy and strength during a difficult time. This kit’s cards are a must to have on-hand!

ABOUT THE FEBRUARY KIT

Details

  • Kit contains enough supplies to create 9 cards—3 each of 3 designs—and coordinating envelopes. Kit includes card bases, decorative die-cut pieces, embellishments, and more.
  • Card size: 4-1/4″ x 5-1/2″ (10.8 x 14 cm)
  • Envelope size: 4-1/2″ x 5-3/4″ (11.4 x 14.6 cm)
  • Coordinating colors: Basic Black, Bumblebee, Just Jade, Merry Merlot, Mossy Meadow, Rococo Rose
  • Coordinates with the Flower & Field Designer Series Paper, an exclusive Sale-A-Bration item.

Subscribe to the February 2021 Paper Pumpkin Kit between 11 January and 10 February at paperpumpkin.com!

Note: Supplies may be limited toward the end of the subscription period.

COORDINATING PRODUCT

155223 | Flower & Field Designer Series Paper

  • Earn this pack of paper for FREE with a purchase of $50 USD or more during Stampin’ Up!’s Sale-A-Bration promotion! 

*********************************************************************************************************

Card stock cuts for this project:

  • Basic White Cardstock 2 1/2″ X 2 1/2″ (artwork), 2 1/2″ X 1 1/4″ (sentiment), 3 3/4″ X 5″ (inner liner)
  • Mint Macaron Cardstock 4″ x 5 1/4″ (inner liner mat)
  • Pretty Peacock Cardstock 8 1/2″ X 5 1/2″ (card base scored and folded at 4 1/4″), 2 1/2″ X 2 1/2″ (artwork mat)
  • Forever Greenery Designer Series Paper 4 1/8″ X 5 3/8″(card front), 4″ X 5″ (card front panel), 2 1/2″ X 6″ (piece for envelope flap), 1/2″ X 6″ (strip for envelope front)

*********************************************************************************************************

Product List

Stampin’ Up! Snowflake Wishes CAS

Good Tuesday morning my fellow stampers. How has everyone’s week started off? Hope you all have a productive one. It’s the 1st of the month again, so I’ll be working all day, but I think I will take tomorrow as a day for me.

For today, I have another CAS card for you using the Stampin’ Up! Snowflake Wishes Photopolymer Stamp Set. Here’s my card for today.

My design is from Atlantic Hearts Challenge #397. Here is their sketch.

I started by embossing a panel of Whisper White cardstock using the Winter Snow Embossing Folder. I cut the panel into 3 pieces,1 11/16″ X 4″ each, and adhered them to a Whisper White card front using Multipurpose Liquid Glue.

I wrapped a piece of Seaside Spray 1/4″ Metallic Ribbon around the panel adhering it on the back of the card front using Stampin’ Seal. I adhered the card front to a Seaside Spray card base using Stampin’ Dimensionals.

On a small panel of Whisper White cardstock I stamped the sentiment from the Snowflake Wishes stamp set in Misty Moonlight Ink. I stamped one of the medium snowflakes from the Snowflake Wishes stamp set in Seaside Spray Ink over the sentiment. I cut the sentiment out using my Hippo & Friends Dies and adhered it to the card front using Stampin’ Dimensionals. I added a few Blue Adhesive-Backed Gems to the sentiment panel.

On the inside I stamped the sentiment from the Snowflake Wishes stamp set in Misty Moonlight Ink. I stamped the snowflake cluster from the Snowflake Wishes stamp set on either side of the sentiment in Seaside Spray Ink. I adhered the Whisper White panel to a Seaside Spray mat using Stampin’ Seal and then to the inside of the Seaside Spray card base using Multipurpose Liquid Glue.

To finish my card I decorated a Medium Whisper White Envelope. I stamped the snowflake cluster image from the Snowflake Wishes stamp set in Seaside Spray Ink on the bottom front of the envelope and on the envelope flap.

Thank you for stopping by my blog today. I hope you liked my card and will give it a try. Happy Stamping!!

*********************************************************************************************************

This image has an empty alt attribute; its file name is banner-c.png

As a big thank you for supporting my business, I’m offering FREE STANDARD SHIPPING until Monday December 7th on orders $50 or greater to help you get those crafty friends and family members something special.

To get free shipping, you will need to:

  • Place an order at my Online Store Here between now and Monday December 7th using my Current Host Code YUWDMJMT.
  • Send me an email at creativestampingdesigns@gamil.com of how you would like your shipping charges refunded to you, PayPal or check.
  • Once your order is processed and shipped, I will refund your standard shipping charges.

Your order will also qualify for a free thank you gift from me and for my Creative Stamping Designs Reward Points!  Orders of $150+ will also qualify for Stampin’ Rewards from Stampin’ Up!! If your order is $150+, do not use my host code so that you don’t miss out on your Stampin’ Rewards from Stampin’ Up!.

Place your orders Online by Monday December 7th using my Current Host Code to qualify for my FREE STANDARD SHIPPING.

***I’ll refund your standard shipping fees either by PayPal or check, your choice, once your order is placed***

*********************************************************************************************************

Holiday Shipping Deadline!

This image has an empty alt attribute; its file name is unnamed.jpg

Stampin’ Up! shared the following information regarding the holiday shipping deadline:

The Christmas season is a busy time of year for sending and receiving packages, so naturally shipping may take longer than normal. If you are placing any orders for Christmas gifts, please submit them by December 9th. We cannot guarantee that orders placed by December 9th will arrive in time for Christmas, but orders submitted after this date are unlikely to arrive before Christmas. 

So get your orders in early to ensure delivery for the holidays! 

*********************************************************************************************************

If you need any stamping supplies, I’d love to be your Demonstrator. Just click HERE to go directly to my online store or drop me an email if you have any questions. 

MY CURRENT HOST CODE IS: YUWDMJMT

Use this host code when you order $50 or greater and receive a free gift from me! If your order is over $150, please do not use this code, but you’ll still get the free gift. The free gift is your choice of any 1 item valued up to $10.00 in the 2020-2021 Annual Catalog!   For any orders $50 or more I will also send you my monthly class tutorials.  Click HERE or go to my Customer Rewards for more details and to see what this months tutorials are.

 Click HERE to shop the clearance rack.

Please remember to use my current Host Code and make sure that you can see my name on the final checkout page listed as your Demonstrator when you order so that you know that you’re ordering with me and you’ll get my rewards! 

Happy Stamping, Karen!!

*********************************************************************************************************

Beary Comforting

Subscribe November 11-December 10

If you haven’t heard already, Paper Pumpkin is our monthly One-Stop Box™ that offers a wide variety of unique papercrafting projects for subscribers of any skill level! These themed, all-inclusive craft kits encourage customers to explore their creativity, try new techniques, and discover their potential in papercrafting.

December’s cute and cuddly Paper Pumpkin kit—called “Beary Comforting”—is designed to uplift your loved ones as this beary tough year finally comes to a close. After a year like 2020, we all could use a big bear hug! With the help of this bear-themed kit, you can create 12 unbearably cute cards featuring warm and fuzzy friends, sweet stamps, and meaningful messages. Near or far, send your friends and family the extra comfort, love, and encouragement they need with this month’s Paper Pumpkin kit!

ABOUT THE DECEMBER KIT

Details

  • Kit contains enough supplies to create 12 cards and coordinating envelopes.
  • Card size: 4-1/4″ x 5-1/2″ (10.8 x 14 cm)
  • Envelope size: 4-1/2″ x 5-3/4″ (11.4 x 14.6 cm)
  • Coordinating colors: Basic Gray, Calypso Coral, Cinnamon Cider, Daffodil Delight, Rich Razzleberry, Soft Sea Foam, Whisper White

SUBSCRIPTION INFORMATION

Subscribe to the December 2020 Paper Pumpkin Kit between 11 November and 10 December at paperpumpkin.com!

Note: Supplies may be limited toward the end of the subscription period.

*********************************************************************************************************

FREE Bonus Quite Curvy and Curvy Christmas Project Tutorials With Videos When You Purchase The Bundle From Me!!

A group of us worked together to create five awesome tutorials using the Stampin’ Up! Curvy Celebrations special release products with video tutorials!  You can get this set of exclusive tutorials when you purchase either the Quite Curvy Variety Bundle (item 158396) or the Quite Curvy Bundle (item 156228) from me between now and January 4!

If your order is $50 or greater and includes either of these bundles, you will get this set of tutorials in addition to the monthly online class tutorials AND your $10 thank you gift!  And you’ll also earn my Creative Stamping Designs Reward Points!

*********************************************************************************************************

Card stock cuts for this project:

  • Seaside Spray Cardstock 8 1/2″ X 5 1/2″ (card base scored and folded at 4 1/4″), 4 1/8″ X 5 3/8″ (inner liner mat)
  • Whisper White Cardstock 2 – 4″ X 5 1/4″ (card front panels and inner liner), 4 1/4″ X 5 1/2″ (card front), 3 1/2″ X 2″ (sentiment)

*********************************************************************************************************

Product List

Stampin’ Up! Holly Jolly Gnome for the Holidays For Fun Fold Friday

Good Friday morning my stamping friends and welcome to my Fun Fold Friday.  How was everyone’s week?  I hope you have some fun plans for the weekend.  I have off tomorrow, but I’m working on Sunday.  Years ago, when I was a child up to my early 20’s, we used to have a huge family picnic with all my mothers aunts, uncles, cousins, brother and sister.  It was so much fun, it was like a big reunion every Sunday before Labor Day.  Lots of good food (we’re all Italians so not hamburgers and hotdogs), games and catching up with family.  Unfortunately it came to an end and there are only a few people left that used to come.

Today’s card I tried something different again using one of my favorite sets from the August-December 2020 Mini Catalog.  There’s lots of pictures with details for this one.  I really need to start doing videos to explain some of these cards.  Here’s my card for today.

I absolutely LOVE this gnome set, the images are all so cute.  My colors were inspired by Color Throwdown Challenge #609.  Here are their colors.

I started by making a little mark with a pencil at the 1″ mark on the 5 1/2″ side of a panel of Gorgeous Grape cardstock.  I flipped the panel over the long way and made a pencil mark at the 1″ mark on the back of the other side.

Using my Scalloped Tag Topper Punch, I lined up the pencil mark with the inside edge of the punch and cut.  I did the same thing on the opposite side.

Once both ends were punched out, you are left with a card base that looks like this.  I scored the card base at 3 1/2″

I trimmed the side edges off so that my card base looked like this.  I have the score line to the left and I scored the right tab so that I could fold it in to meet with the left tab once the card was folded.

I adhered a panel of Snowflake Splendor Designer Series Paper to a Pacific Point mat using Stampin’ Seal and then adhered it to the front panel using Multipurpose Liquid Glue.  On a small panel of Whisper White cardstock I stamped the gnome image from the Stampin’ Up! Gnome For The Holidays Cling Stamp Set in Tuxedo Black Memento Ink.  I stamped the sentiment from the Gnome for the Holidays stamp set in Gorgeous Grape Ink on the top of the Whisper White panel.  I colored the gnome in using my Ivory and Old Olive Stampin’ Blends Markers and I used Clear Wink of Stella on the gnomes beard.  I cut the image out using my Hippo & Friends Dies and I cut the sentiment out using the smallest octagon die from the Hippo & Friends Dies.  I adhered the artwork and sentiment to the card front using Stampin’ Dimensionals.  I added a few Adhesive-Backed Snowflakes to the card front.

On the inside I stamped the snowflake cluster image from the Stampin’ Up! Snowflake Wishes Photopolymer Stamp Set in Pacific Point Ink, stamping off once, along the edge of a Whisper White panel.  I stamped the sentiment from the Gnome for the Holidays stamp set in Gorgeous Grape Ink to the left of the panel.  I adhered the Whisper White panel to a Pacific Point mat using Stampin’ Seal and then to the inside of the Gorgeous Grape card base using Multipurpose Liquid Glue.

I tied the 2 tabs together using a piece of Snowflake Splendor Ribbon and tied a small bow.

To finish my card I decorated a Medium Whisper White Envelope.  I stamped the snowflake cluster image from the Snowflake Wishes stamp set in Pacific Point Ink, stamping off once, along the bottom front of the envelope.  I adhered a panel of Snowflake Splendor DSP to the envelope flap.

Thank you for stopping by my blog today.  I hope you liked my card and will give it a try. Happy Stamping!!

****************************************************************************************************

If you need any stamping supplies, I’d love to be your Demonstrator. Just click HERE to go directly to my online store or drop me an email if you have any questions. 

MY CURRENT HOST CODE IS: G39RYMEX

Use this host code when you order $50 or greater and receive a free gift from me! If your order is over $150, please do not use this code, but you’ll still get the free gift. The free gift is your choice of any 1 item valued up to $10.00 in the 2020-2021 Annual Catalog!   For any orders $50 or more I will also send you my monthly class tutorials.  Click HERE or go to my Customer Rewards for more details and to see what this months tutorials are.

 Click HERE to shop the clearance rack.

Happy Stamping, Karen!

****************************************************************************************************

STAMPIN’ UP! CLEARANCE RACK HAS BEEN UPDATED!!!

Stampin’ Up! has updated the Clearance Rack with lot of new items!   Head over there  quickly to get your hands on some great deals.  But hurry!!  Clearance Rack deals are only while supplies last!

I saw some retired In Color Card Stock and accessories, lots of pretty designer papers and embellishments and punches too!

Click HERE to head over to my Online Store to start shopping.

****************************************************************************************************

The Stampin’ Cut & Emboss Machine (Standard Size) is now available for you to order!!!
Here are the details:

The standard machine comes with all the plates you need to get started. The preorder will not include the replacement plates, but they will be available beginning with the customer launch on September 1.

Note that the Cutting Plates and Adhesive Sheets are already available to order. The optional Impression Mats are not be available; I’ll keep you updated on their availability.

So what sets our machines apart from the rest? Here are some of our favorite features:

  • Durable machines with high-quality results. The solid steel construction frame and rubber feet that securely grip the work surface produce crisp, clean, precise cutting and beautifully detailed embossing.
  • Easy to use. The machines and tools are designed for an intuitive die-cutting and embossing experience. For example, all plates are labeled with a number and are color coded for easy reference and use when building your sandwich. And just like the name suggests, our Magnetic Cutting Plates have fully-magnetic surfaces to make it easy to securely position your dies and keep them in place.
  • Simple to store. The platforms on both machines fold for space-saving storage and they look pretty too–the sleek, clean design suits any crafting space.
  • Portable. You can use both machines at home or on the go with their folding platforms and ergonomic carrying handles.

****************************************************************************************************

Stampin’ Up! Get & Go Starter Kit Promotion – Sept 1-30!

Have you thought about joining our Stampin’ Up! team?

Now is an awesome time to join.

The Get & Go Starter Kit promotion gives those who sign up to be a Stampin’ Up! demonstrator additional products to help get started right away!  In addition to the already great valued Starter Kit, you will receive precut paper, stamps, and embellishments!

Here are the details:

  • Promotion Dates: September 1–30, 2020
    Joining Deadline:  September 30, 2020; 11:50 PM (MT)
  • New demonstrators who submit their Independent Demonstrator Agreement (IDA) before 1 September or after 30 September will not be eligible for this promotion.
  • In addition to the regular starter kit (for $99 you choose $125 worth of products), if you join between September 1 and 30, you will also receive enough card stock pieces to make 16 cards, a pack of Rhinestone Basic Jewels, the So Much Love stamp set, and the Queen Anne’s Lace stamp set!!
    • 8 packs of precut card stock of the coastal cabana pack will be provided, and 8 packs of precut card stock of the Granny Apple Green pack, for a total of 16 cards (packs include envelopes).
  • Important note: Ink, adhesive, cutting tool, and clear block for stamping must be purchased separately. However, these products may be included as part of the Starter Kit product selection.

This is such a great deal!  For $99, you get to pick $125 merchandise of your choice for your Starter Kit plus you’ll get the Queen Annes’ Lace and So Much Love stamp sets, card kits to create 16 cards and a pack of Rhinestones for free!!

Drop me a note at creativestampingdesigns@gmail.com if you have questions about joining, I’m happy to talk to you about it.  You can also see more information about the benefits of becoming a Stampin’ Up! Demonstrator Here

****************************************************************************************************

HELLO, PUMPKIN

SUBSCRIBE AUTUST 11 – SEPTEMBER 10

As the autumn season approaches, prepare to celebrate with the September Paper Pumpkin Kit! There’s so much to love about fall—some love the haunts of Halloween, many love the time to give thanks, and others love the changing colors and cooler temperatures. Whatever you love most about fall, September’s kit has everything you need to celebrate the season your way! Between a multi-occasion stamp set and enough supplies to design 20 cracker box treat packages, you can create custom fall crafts to celebrate Halloween, Thanksgiving, pumpkins, and leaves. Whether you make them all the same or mix ‘n’ match your crafts, there’s something for everyone in this kit!

September’s kit is a must-have for those who love to celebrate all things spooky. But, for those who don’t enjoy the Halloween haunts, the multi-occasion stamp set combined with a variety of die-cut and reversible paper pieces offers many ways to customize your fall crafts!

  • Kit contains enough supplies to create 20 cracker box treat packages.
  • Each cracker box treat package can be customized to celebrate Halloween, Thanksgiving, the autumn season, or all three!
  • Coordinating Colors: Bumblebee, Basic Black, Cajun Craze, Cinnamon Cider, Mossy Meadow, Old Olive, Pumpkin Pie, white

Subscribe to the September 2020 Paper Pumpkin Kit from 11 August to 10 September at paperpumpkin.com!

Note: Supplies may be limited toward the end of the subscription period.

****************************************************************************************************

I’m cleaning my shelves and drawers out to make room for lots of new goodie.  I have my list right HERE and I’m trying to keep it up to date.   Check it out and let me know if there is anything you’d like to get.  If you are looking for something and don’t see it on the list, drop me a line and I will look through my stash to see if I missed it.  I have lots of older DSP too that I don’t have listed if there is any that you are looking for.

****************************************************************************************************

Card stock cuts for this project:

  • Gorgeous Grape Cardstock 8 1/2″ x 5 1/2″ (card base scored and folded at 3 1/2″)
  • Pacific Point Cardstock 2 1/2″ x 5 3/8″ (card front mat), 4″ x 5 3/8″ (inner liner mat)
  • Whisper White Cardstock 3″ x 3″ (artwork and sentiment), 3 7/8″ X 5 1/4″ (inner liner)
  • Snowflake Splendor Designer Series Paper 2 3/8″ X 5 1/4″ (card front), 2 1/4′ X 6″ (piece for envelope flap)

****************************************************************************************************

Product List

Stampin’ Up! Autumn Country Home

Good Wednesday morning my fellow stampers.  How is everyone’s week going?  We’re halfway through the week and on our way to the 3 day weekend, for most.  Is anyone starting to make plans?

Today’s card is a pretty quick and easy one for you using a mix of Annual Catalog and Mini Catalog items.  Here’s my card for today.

My design is from Sunday Stamps Let’s Get Sketchy Challenge #238.  Here is their sketch.

My colors were inspired by CAS Colours & Sketch Challenge #386.  Here are their colors.

I also played along with The Alphabet Challenge.  Their theme is ‘K-To use Kraft Paper of Card’.

I started by adhering a panel of Brightly Gleaming Specialty Designer Series Paper to a Crumb Cake mat using Stampin’ Seal.  I embossed a strip of Crumb Cake cardstock using the Pinewood Planks 3D Embossing Folder and adhered it to the card front using Multipurpose Liquid Glue.

On a panel of Whisper White cardstock I stamped the pitcher image from the Stampin’ Up! Country Home Photopolymer Stamp Set in Tuxedo Black Memento Ink.  I stamped the floral image from the Country Home stamp set on top of the pitcher in Mossy Meadow Ink.  I colored the images in using my Gray Granite and Old Olive Stampin’ Blends Markers.  I adhered the artwork on an Old Olive mat using Stampin’ Seal and adhered it to the card front using Stampin’ Dimensionals.

I cut a small panel of Whisper White cardstock using the smallest octagon die from the Hippo & Friends Dies.  I stamped the sentiment from the Stampin’ Up! Autumn 
Goodness Photopolymer Stamp Set in Mossy Meadow Ink.  I adhered the sentiment to the card front using Stampin’ Dimensionals and Glue Dots.  I adhered the card front to a Crumb Cake card base using Stampin’ Dimensionals.  I added a few Metallic Pearls to the card front.

On the inside I stamped the sentiment from the Autumn Goodness stamp set in Mossy Meadow Ink in the center of a Whisper White panel.  I stamped the floral image from the Country Home stamp set in Mossy Meadow Ink and colored the image in using my Gray Granite and Old Olive Stampin’ Blends Markers.  I adhered the Whisper White panel to an Old Olive mat using Stampin’ Seal and then to the inside of the Crumb Cake card base using Multipurpose Liquid Glue.

To finish my card I decorated a Medium Whisper White Envelope.  I stamped the pitcher image from the Country Home stamp set on the envelope front in Tuxedo Black Memento Ink and colored it in using my Gray Granite Stampin’ Blends Markers.  I stamped the sentiment from the Country Home stamp set on the pitcher in Tuxedo Black Memento Ink.  I adhered a panel of Brightly Gleaming Specialty DSP to the envelope flap.

Thank you for stopping by my blog today.  I hope you liked my card and will give it a try. Happy Stamping!!

****************************************************************************************************

If you need any stamping supplies, I’d love to be your Demonstrator. Just click HERE to go directly to my online store or drop me an email if you have any questions. 

MY CURRENT HOST CODE IS: G39RYMEX

Use this host code when you order $50 or greater and receive a free gift from me! If your order is over $150, please do not use this code, but you’ll still get the free gift. The free gift is your choice of any 1 item valued up to $10.00 in the 2020-2021 Annual Catalog!   For any orders $50 or more I will also send you my monthly class tutorials.  Click HERE or go to my Customer Rewards for more details and to see what this months tutorials are.

 Click HERE to shop the clearance rack.

Happy Stamping, Karen!

****************************************************************************************************

STAMPIN’ UP! CLEARANCE RACK HAS BEE UPDATED!!!

Stampin’ Up! has updated the Clearance Rack with lot of new items!   Head over there  quickly to get your hands on some great deals.  But hurry!!  Clearance Rack deals are only while supplies last!

I saw some retired In Color Card Stock and accessories, lots of pretty designer papers and embellishments and punches too!

Click HERE to head over to my Online Store to start shopping.

****************************************************************************************************

The Stampin’ Cut & Emboss Machine (Standard Size) is now available for you to order!!!
Here are the details:

The standard machine comes with all the plates you need to get started. The preorder will not include the replacement plates, but they will be available beginning with the customer launch on September 1.

Note that the Cutting Plates and Adhesive Sheets are already available to order. The optional Impression Mats are not be available; I’ll keep you updated on their availability.

So what sets our machines apart from the rest? Here are some of our favorite features:

  • Durable machines with high-quality results. The solid steel construction frame and rubber feet that securely grip the work surface produce crisp, clean, precise cutting and beautifully detailed embossing.
  • Easy to use. The machines and tools are designed for an intuitive die-cutting and embossing experience. For example, all plates are labeled with a number and are color coded for easy reference and use when building your sandwich. And just like the name suggests, our Magnetic Cutting Plates have fully-magnetic surfaces to make it easy to securely position your dies and keep them in place.
  • Simple to store. The platforms on both machines fold for space-saving storage and they look pretty too–the sleek, clean design suits any crafting space.
  • Portable. You can use both machines at home or on the go with their folding platforms and ergonomic carrying handles.

****************************************************************************************************

Stampin’ Up! Get & Go Starter Kit Promotion – Sept 1-30!

Have you thought about joining our Stampin’ Up! team?

Now is an awesome time to join.

The Get & Go Starter Kit promotion gives those who sign up to be a Stampin’ Up! demonstrator additional products to help get started right away!  In addition to the already great valued Starter Kit, you will receive precut paper, stamps, and embellishments!

Here are the details:

  • Promotion Dates: September 1–30, 2020
    Joining Deadline:  September 30, 2020; 11:50 PM (MT)
  • New demonstrators who submit their Independent Demonstrator Agreement (IDA) before 1 September or after 30 September will not be eligible for this promotion.
  • In addition to the regular starter kit (for $99 you choose $125 worth of products), if you join between September 1 and 30, you will also receive enough card stock pieces to make 16 cards, a pack of Rhinestone Basic Jewels, the So Much Love stamp set, and the Queen Anne’s Lace stamp set!!
    • 8 packs of precut card stock of the coastal cabana pack will be provided, and 8 packs of precut card stock of the Granny Apple Green pack, for a total of 16 cards (packs include envelopes).
  • Important note: Ink, adhesive, cutting tool, and clear block for stamping must be purchased separately. However, these products may be included as part of the Starter Kit product selection.

This is such a great deal!  For $99, you get to pick $125 merchandise of your choice for your Starter Kit plus you’ll get the Queen Annes’ Lace and So Much Love stamp sets, card kits to create 16 cards and a pack of Rhinestones for free!!

Drop me a note at creativestampingdesigns@gmail.com if you have questions about joining, I’m happy to talk to you about it.  You can also see more information about the benefits of becoming a Stampin’ Up! Demonstrator Here

****************************************************************************************************

HELLO, PUMPKIN

SUBSCRIBE AUTUST 11 – SEPTEMBER 10

As the autumn season approaches, prepare to celebrate with the September Paper Pumpkin Kit! There’s so much to love about fall—some love the haunts of Halloween, many love the time to give thanks, and others love the changing colors and cooler temperatures. Whatever you love most about fall, September’s kit has everything you need to celebrate the season your way! Between a multi-occasion stamp set and enough supplies to design 20 cracker box treat packages, you can create custom fall crafts to celebrate Halloween, Thanksgiving, pumpkins, and leaves. Whether you make them all the same or mix ‘n’ match your crafts, there’s something for everyone in this kit!

September’s kit is a must-have for those who love to celebrate all things spooky. But, for those who don’t enjoy the Halloween haunts, the multi-occasion stamp set combined with a variety of die-cut and reversible paper pieces offers many ways to customize your fall crafts!

  • Kit contains enough supplies to create 20 cracker box treat packages.
  • Each cracker box treat package can be customized to celebrate Halloween, Thanksgiving, the autumn season, or all three!
  • Coordinating Colors: Bumblebee, Basic Black, Cajun Craze, Cinnamon Cider, Mossy Meadow, Old Olive, Pumpkin Pie, white

Subscribe to the September 2020 Paper Pumpkin Kit from 11 August to 10 September at paperpumpkin.com!

Note: Supplies may be limited toward the end of the subscription period.

****************************************************************************************************

I’m cleaning my shelves and drawers out to make room for lots of new goodie.  I have my list right HERE and I’m trying to keep it up to date.   Check it out and let me know if there is anything you’d like to get.  If you are looking for something and don’t see it on the list, drop me a line and I will look through my stash to see if I missed it.  I have lots of older DSP too that I don’t have listed if there is any that you are looking for.

****************************************************************************************************

Card stock cuts for this project:

  • Crumb Cake Cardstock 4 1/4″ X 11″ (card base scored and folded at 5 1/2″), 4 1/8″ X 5 3/8″ (card front mat), 1″ X 4″ (card front panel)
  • Old Olive Cardstock 4″ X 2 1/8″ (artwork mat), 4 1/8″ X 5 3/8″ (inner liner mat)
  • Whisper White Cardstock 3 7/8″ X 2″ (artwork), 1″ X 2″ (sentiment), 4″ X 5 1/4″ (inner liner)
  • Brightly Gleaming Specialty Designer Series Paper 4″ X 5 1/4″ (card front), 2 1/4″ X 6″ (piece for envelope flap)

****************************************************************************************************

Product List

Stampin’ Up! Beautiful Autumn for the Happy Inkin’ Thursday Blog Hop

Good Thursday morning my stamping friends and welcome to our Happy Inkin’ Thursday Blog Hop.  How is everyone doing today?  If you are hopping over from Eva, thank you for stopping by my blog. This week we had a Sketch Challenge. Be sure to take a moment to hop around to see everyone’s beautiful projects .
Here is the sketch we had to work from.

Here is my card for today using this sketch.

I started by adhering a panel of In Good Taste Designer Series Paper and a panel of Gilded Autumn Specialty Designer Series Paper to a Mint Macaron mat using Stampin’ Seal.  I wrapped a piece of the Mint Macaron 1/2″ Basket Weave Ribbon, from the Basket Weave & Metallic Ribbon Combo Pack, around the panel and tied a knot.

On a small panel of Very Vanilla cardstock I stamped the sentiment from the Stampin’ Up! Love of Leaves Photopolymer Stamp Set in Early Espresso Ink.  I cut the sentiment out using one of the ovals from the Layering Ovals Dies.  I cut a label from panel of Early Espresso cardstock using the Hippo & Friends Dies and adhered the oval to the center using Stampin’ Seal.  I adhered the sentiment to the card front using Stampin’ Dimensionals.

On a panel of Very Vanilla cardstock I stamped 6 leaves and 4 acorns from the Stampin’ Up! Beautiful Autumn Photopolymer Stamp Set .  I stamped the acorn outline images in Early Espresso Ink, the acorn top in Early Espresso Ink, stamped off once, and the acorn bottom in Crumb Cake Ink.  I stamped the leaf outline images in Cajun Craze Ink and the inside of the leaves in Cajun Craze Ink, stamped off once.  I punched all the leaves and acorns out using the Autumn Punch Pack.  I adhered the leaves and acorns to the sentiment using Glue Dots and Stampin’ Dimensionals.  I adhered the card front to an Early Espresso card base using Stampin’ Dimensionals.

On the inside I stamped the sentiment from the Love of Leaves stamp set in Early Espresso Ink in the center of a Very Vanilla panel.  I adhered the leaves and acorns that I stamped and punched from the Beautiful Autumn stamp set on either side of the sentiment using Multipurpose Liquid Glue.  I adhered the Very Vanilla panel to a Mint Macaron mat using Stampin’ Seal and then to the inside of the Early Espresso card base using Multipurpose Liquid Glue.

To finish my card I decorated a Medium Very Vanilla Envelope.  I stamped the leaf image from the Beautiful Autumn stamp set across the bottom of the envelope front in Cajun Craze Ink and the inside of the leaves in Cajun Craze Ink stamped off once.  I adhered a panel of the Gilded Autumn Specialty DSP to the envelope flap.

Thank you for visiting my blog today. I hope you liked my card and will give it a try. Now that you’ve seen my card, take a minute to hop through all our projects today. If you click on the Next Blog button, you’ll go to Amy’s page. Or you can just click on the names below to go directly to all the blogs! Happy Hopping!!

Akiko Sudano: Not hopping this week
Karen Ksenzakovic: You Are Here

****************************************************************************************************

If you need any stamping supplies, I’d love to be your Demonstrator. Just click HERE to go directly to my online store or drop me an email if you have any questions. 

MY CURRENT HOST CODE IS: 4Z2KHBVY

Use this host code when you order $50 or greater and receive a free gift from me! If your order is over $150, please do not use this code, but you’ll still get the free gift. The free gift is your choice of any 1 item valued up to $10.00 in the 2020-2021 Annual Catalog!   For any orders $50 or more I will also send you my monthly class tutorials.  Click HERE or go to my Customer Rewards for more details and to see what this months tutorials are.

 Click HERE to shop the clearance rack.

Happy Stamping, Karen!

****************************************************************************************************

WORLD’S GREATEST BY PAPER PUMPKIN

SUBSCRIBE JULY11 – AUGUST 10

With Paper Pumpkin, you are provided with everything you need to explore your creativity and discover new ways to craft. As we navigate a “new normal” in today’s world, there’s plenty of opportunity to papercraft! And, more importantly, there’s no better time than now to create something that’ll show the essential people in your life just how awesome you think they are.

Lately, it’s become especially clear who the everyday heroes are—they’ve always surrounded us! Teachers, doctors, hairdressers, nurses, delivery workers, cashiers, and even our friends, kids, and family members go above and beyond to enrich our lives. These people are truly the world’s greatest at what they do!

Celebrate and appreciate the everyday heroes in your life with the August Paper Pumpkin Kit. The cards included in this kit are specifically designed for celebrating life’s champions!

  • The intended use of this kit is to celebrate and appreciate life’s champions and everyday heroes.
  • Especially during this time, this is something anyone can do to make a difference. The August kit makes it easy!
  • Distinktive stamps are photo-realistic stamps that create an impressive detailed image with a single stamp.
  • The Distinktive stamps included in August’s kit are an especially excellent feature for new stampers still exploring their creativity!
  • Masculine card designs can be difficult to find, this kit has a real masculine feel.
  • While the elements of the August kit can be used to show appreciation for anyone, the masculine card designs are perfect for the men in your life!

About the August Kit:

  • Kit contains enough supplies to create nine cards and coordinating envelopes.
  • Card size: 4-1/4” x 5-1/2” (10.8 x 14 cm)
  • Envelope size: 4-1/2” x 5-3/4” (11.4 x 14.6 cm)
  • Coordinating Colors: Bumblebee, gold, Mint Macaron, Pacific Point, Soft Suede, white
  • The kit’s stamp set includes Distinktive stamps
  • Subscribe to the August 2020 Paper Pumpkin Kit from 11 July to 10 August at paperpumpkin.com!

Note: Supplies may be limited toward the end of the subscription period.

****************************************************************************************************

Card stock cuts for this project:

  • Early Espresso Cardstock 4 1/4″ X 11″ (card base scored and folded at 5 1/2″), 3″ X 2″ (sentiment mat)
  • Mint Macaron Cardstock 2 – 4 1/8″ X 5 3/8″ (card front mat and inner liner mat)
  • Very Vanilla Cardstock 5″ X 3″ (sentiment, leaves and acorns), 4″ X 5 1/4″ (inner liner)
  • Gilded Autumn Specialty Designer Series Paper 1 1/2″ X 5 1/4″ (card front panel), 2 1/2″ X 6″ (piece for envelope flap)
  • In Good Taste Designer Series Paper 2 1/4″ X 5 1/4″ (card front panel)

****************************************************************************************************

Product List

Stampin’ Up! Framed Flowers for Fun Fold Friday

Good Friday morning my stamping friends and welcome to my Fun Fold Friday!!  How was everyone’s week?  The weekend is upon us, do you have any plans?  I had a wonderful day at the beach yesterday.  It looked a little iffy when we first got there with the fog and clouds, but it turned out to be an absolutely gorgeous day.  The sun was shining and the water was perfect.  By the afternoon we couldn’t even sit at our blanket the sun got so hot, so we went in the ocean for over an hour.  The waves were awesome, I’m guessing because of the storm we are supposed to get today.  I only came home with a little sunburn (ok, maybe a lot) and blistered feet because of the sand being so darn hot.  The beach is my happy place and now today it’s back to reality.

I have a corner flip fold card for you today.  Here’s my card.

I played along with The Paper Players Challenge #498.  Here is their Theme.

I started by adhering a panel of Flowers For Every Season 6 X 6 Designer Series Paper to a Misty Moonlight card base using Stampin’ Seal.  I then cut my card front using my Paper Trimmer.  I placed the card front bottom edge down, at the 3″ mark on my trimmer and cut from the 2 1/2″ mark up to the 4 7/8″ mark.  I turned my card base a 1/4 turn (so the outside edge was down) and place it at the 3″ mark again on my trimmer.  I cut from the 3″ mark down to the 5/8″ mark.  I pushed the cut piece through from the bottom and flipped it around so the inside was now on the outside.

I stamped the frame image from the Stampin’ Up! Framed For You Cling Stamp Set in Cinnamon Cider Ink on a Cinnamon Cider panel.  I cut the frame out using the largest and 5th from largest squares from my Layering Squares Dies.  I adhered a small panel of Flowers For Every Season  DSP to the flipped corner using Multipurpose Liquid Glue.  I adhered the frame over the DSP using Stampin’ Dimensionals.  I added Antique Corners from the Antique Corners & Slides Elements to the 4 corners of the frame using Glue Dots.

On a panel of Whisper White cardstock I stamped the sentiment from the Stampin’ Up! Celebrate Sunflowers Cling Stamp Set in Misty Moonlight Ink.  I cut the sentiment out using my Hippo & Friends Dies.  I adhered a piece of Cinnamon Cider 2020-2022 In-Color 1/4″ Ribbon to the bottom of the card front using a Glue Dot.  I adhered the sentiment over the ribbon using Stampin’ Dimensionals.  I added a few Just Jade 2020-2022 In-Color Enamel Dots to the sentiment  and the inner liner which shows through to the card front.

On the inside I stamped the sentiment from the Celebrate Sunflowers stamp set in Misty Moonlight Ink in the center of a Whisper White panel.  I stamped the leaf images from the Celebrate Sunflowers stamp set in Just Jade Ink around the panel.  I adhered the Whisper White panel to a Cinnamon Cider mat using Stampin’ Seal and then to the inside of the Misty Moonlight card base using Multipurpose Liquid Glue.

To finish my card I decorated a Medium Whisper White Envelope.  I stamped the leaf images from the Celebrate Sunflowers stamp set in Just Jade Ink along the bottom front of the envelope.  I adhered a panel of the Flowers For Every Season DSP to the envelope flap.

Thank you for stopping by my blog today.  I hope you liked my card and will give it a try. Happy Stamping!!

****************************************************************************************************

If you need any stamping supplies, I’d love to be your Demonstrator. Just click HERE to go directly to my online store or drop me an email if you have any questions. 

MY CURRENT HOST CODE IS: FXTA29WD

Use this host code when you order $50 or greater and receive a free gift from me! If your order is over $150, please do not use this code, but you’ll still get the free gift. The free gift is your choice of any 1 item valued up to $10.00 in the 2020-2021 Annual Catalog!   For any orders $50 or more I will also send you my monthly class tutorials.  Click HERE or go to my Customer Rewards for more details and to see what this months tutorials are.

 Click HERE to shop the clearance rack.

Happy Stamping, Karen!

****************************************************************************************************

Bonus Days from Stampin’ Up! are back!!  For every $50 merchandise that you purchase between July 1 and August 3, you’ll earn a $5 coupon that can be redeemed between August 4 and 31!  

Here are the details:

  • An email address is required to participate; Bonus Days coupon codes can be delivered only via email.
  • If you earn multiple codes from a single order, you will receive one email with multiple codes.  If you earn multiple codes from multiple orders, they will receive separate emails for each code earned.
  • All order types qualify for this promotion.  Fax and email orders still require an email address.
  • Orders that are started before the promotion begins will not go toward earning coupon codes.
  • There is no limit to the number of coupon codes you can earn per order or throughout the duration of the Bonus Days earning period!!
  • Deadline for coupon earning:  August 3, 2020 at 11:50 PM (MT)

Click hereto head over to my online store to start earning those coupons now!  Don’t forget to use my current Host Code so that you will get your free gift from me, any 1 item in the catalog valued up to $10 with a qualifying order.  Detail about the free gift are here.  Let me know if you have any questions.

Get your shopping lists ready and start earning those coupons!

****************************************************************************************************

I’m cleaning my shelves and drawers out to make room for lots of new goodie.  I have my list right HERE and I’m trying to keep it up to date.   Check it out and let me know if there is anything you’d like to get.  If you are looking for something and don’t see it on the list, drop me a line and I will look through my stash to see if I missed it.  I have lots of older DSP too that I don’t have listed if there is any that you are looking for.

****************************************************************************************************

SUMMER NIGHTS BY PAPER PUMPKIN

SUBSCRIBE JUNE 11 – JULY 10

LAST DAY TO SUBSCRIBE!!

Celebrate the magic of summer nights with the Summer Nights Paper Pumpkin Kit! In this exclusive fun-filled kit, you’ll unbox enough supplies to create nine postcard-style cards, coordinating envelopes, and die-cut tealight bags. What’s even more spectacular about July’s kit is the add-on you can purchase along with it! The Summer Nights Add-On includes 24 card bases and envelopes in coordinating Summer Nights designs. This add-on is perfect for helping you expand the Summer Nights creative experience beyond the Paper Pumpkin kit. Between the add-on and the leftover supplies from your Summer Nights kit, you will be crafting a summer night worth celebrating all month long!

Don’t miss out on the fireworks, fireflies, and fun! You can subscribe to the Summer Nights Paper Pumpkin Kit between June 11 and July10, and order the Summer Nights Add-On starting 1 July; while supplies last.

Kit contains enough supplies to create nine postcards and coordinating envelopes, as well as nine die-cut tealight bags.

  • Card size: 4” x 5-1/4” (10.2 x 13.3 cm)
  • Envelope size: 4-1/2” x 5-3/4” (11.4 x 14.6 cm)

Coordinating Colors: Blackberry Bliss, Calypso Coral, Costal Cabana, Night of Navy

The Paper Pumpkin kit does not require the add-on to create completed projects.

Summer Nights Add-On

Contains 24 preprinted card bases and coordinating envelopes.

  • Card size: 4-1/4″ x 5-1/2″ (10.8 x 14 cm)
  • Envelope size: 4-1/2″ x 5-3/4″ (11.4 x 14.6 cm)

The Summer Nights Add-On is not required to complete the Paper Pumpkin kit projects.

The Summer Nights Add-On is $10.00 USD/$13.00 CAD and is only available to Paper Pumpkin subscribers. The add-on is available while supplies last, beginning July 1st!

Note: During demonstrator product testing, we learned that the Summer Nights Add-On could make at least 20 additional cards when combined with the leftover pieces from the Summer Nights kit.

Subscribe to the July 2020 Paper Pumpkin Kit from June 11 to July 10 at paperpumpkin.com!

Note: Supplies may be limited toward the end of the subscription period.

****************************************************************************************************

Card stock cuts for this project:

  • Cinnamon Cider Cardstock 3 1/2″ X 3 1/2″ (frame), 4 1/8″ X 5 3/8″ (inner liner mat)
  • Misty Moonlight Cardstock 8 1/2″ X 5 1/2″ (card base scored and folded at 4 1/4″)
  • Whisper White Cardstock 4″ X 2″ (sentiment), 4″ X 5 1/4″(inner liner)
  • Flowers For Every Season 6 X 6 Designer Series Paper 2 1/2″ X 2 1/2″ (artwork), 4 1/8″ X 5 3/8″ (card front), 2 1/4″ X 6″ (piece for envelope flap)

****************************************************************************************************

Product List