Stampin’ Up! Sparkle of The Season for Fun Fold Friday

Good Friday morning my stamping friends and welcome to my Fun Fold Friday. Does anyone have any plans for the weekend yet? I’ll be working all day Saturday and Sunday at both jobs.

Today’s card I made on my Facebook Live video on Wednesday. If you were able to join me or watched the replay, thank you. If you’d like to watch my video and stamp along, the measurements are below along with the links to my Facebook page and my YouTube channel. Here’s my card for today.

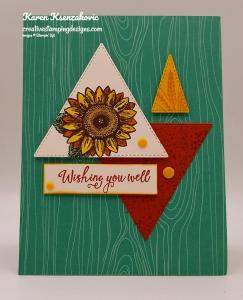
I used the Stampin’ Up! Sparkle of The Season Bundle for my card today along with the Beauty of The Earth Designer Series Paper and the Cork Specialty Paper.

I started by adhering a panel of the Cork Specialty Paper to a Misty Moonlight card base using Multipurpose Liquid Glue. I cut a panel of Cajun Craze cardstock using the Stitched Rectangle Dies and embossed it using the Brick & Mortar 3D Embossing Folder. I sponge some Cajun Craze Ink on the embossed panel using my Stamping Sponge. I adhered the embossed panel to the card front using Stampin’ Dimensionals.

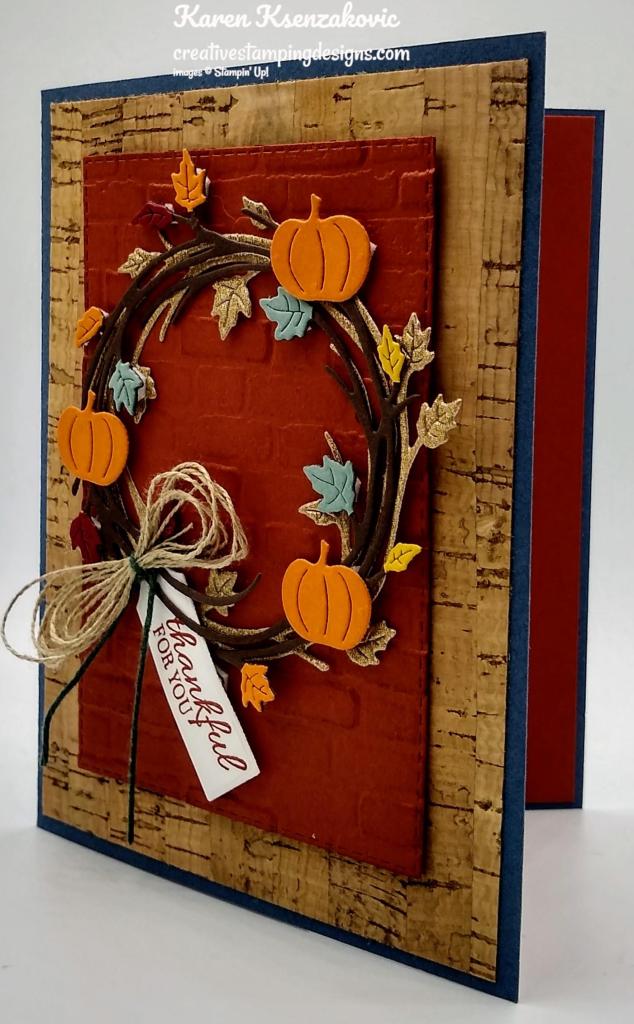
I cut out 2 of the swirly wreaths using the Seasonal Swirls Dies, 1 in Gold Metallic Specialty Paper and the other in Early Espresso cardstock. I cut multiple leaves from scraps of Bumblebee, Cherry Cobbler, Pumpkin Pie and Soft Succulent cardstocks. I cut the leaves and adhered them to the Early Espresso wreath using Multipurpose Liquid Glue. I adhered the Gold wreath to the card front using Multipurpose Liquid Glue and the Early Espresso wreath over the Gold wreath using Stampin’ Dimensionals. I cut 3 of the pumpkins from the Seasonal Swirls Dies and adhered them to the wreath using Glue Dots.

I stamped the sentiment from the Stampin’ Up! Sparkle of The Season Photopolymer Stamp Set in Cajun Craze Ink. I cut the sentiment out using the Ornate Frames Dies. I made a multiloop bow from Linen Thread and tied it with a piece of White Bakers Twine, from the Bakers Twine Essential Pack, which I colored using my Soft Succulent Stampin’ Blends Marker. I adhered the bow to the wreath using a Glue Dot and adhered the sentiment under the bow using a Glue Dot and Stampin’ Dimensional.

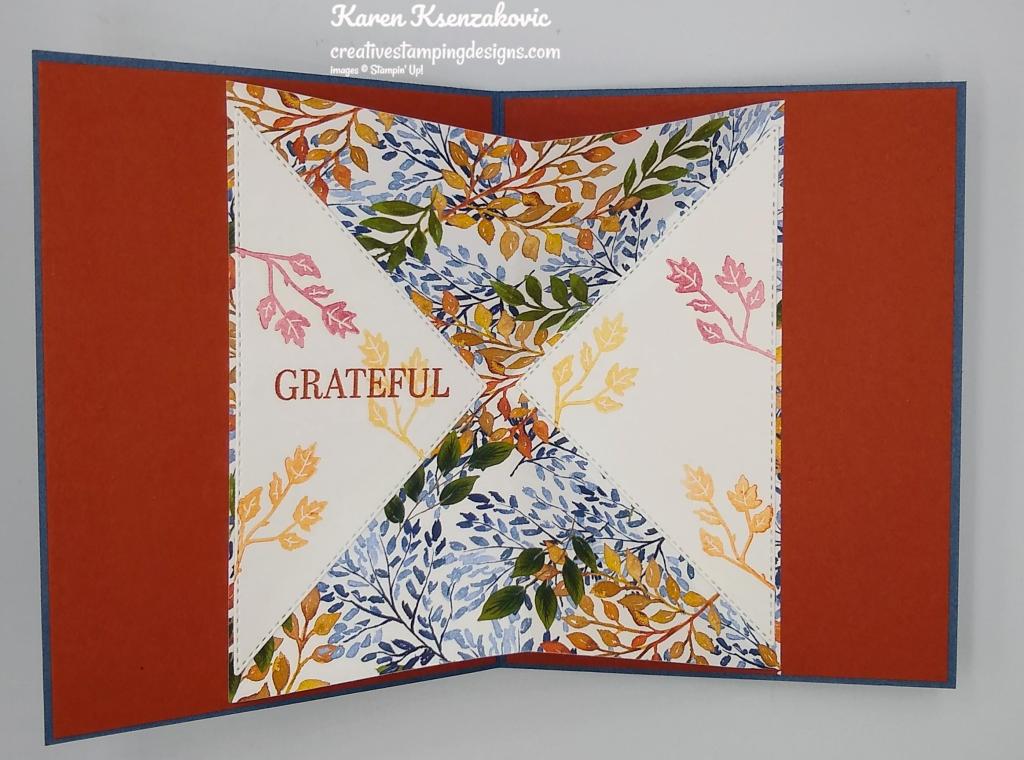
On the inside I adhered 2 panels of Cajun Craze cardstock using Multipurpose Liquid Glue. For the insert I used a panel of Beauty of The Earth DSP. I scored the panel first in half then diagonally from corner to corner both ways. The center half score line I folded as a mountain fold and the corner to corner score lines as valley folds. I adhered the panel to the inside of the card using Tear and Tape on the sides of the panel.

This is how the card will look from a top view. The top and bottom portion of the DSP will be the mountain folds.

I cut 2 of the largest triangles from the Stitched Triangle Dies from a panel of Basic White cardstock. I stamped the sentiment from the Sparkle of The Season stamp set on the left triangle in Cajun Craze Ink. I stamped the branch/leaf image from the Sparkle of The Season stamp set in Bumblebee, Cherry Cobbler and Pumpkin Pie Inks, stamping off once on both of the triangles. I adhered the triangles to the 2 sides of the DSP using Multipurpose Liquid Glue.

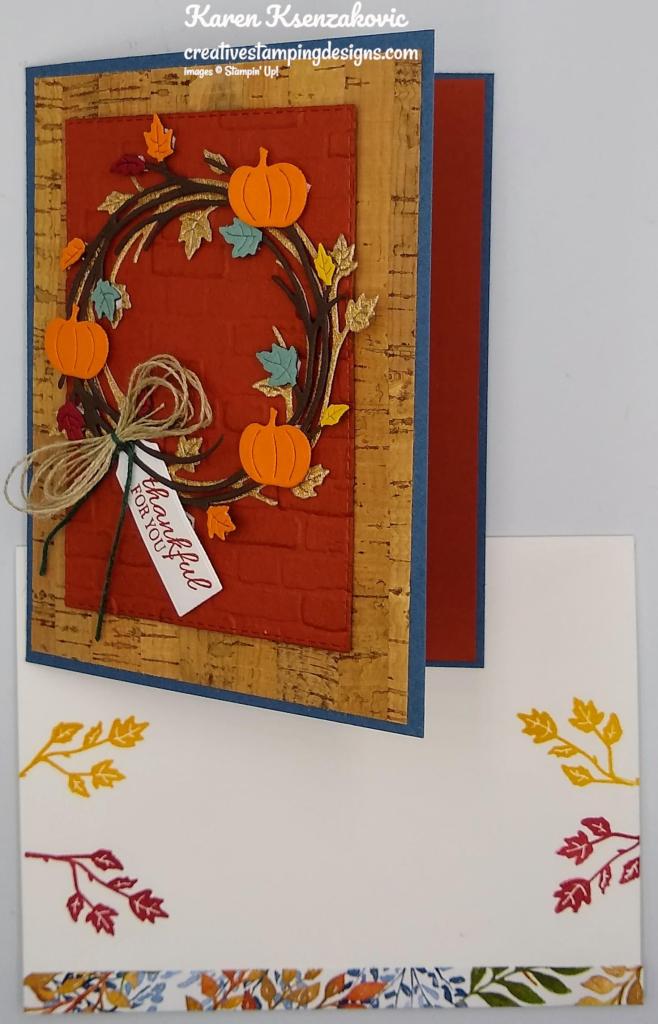
To finish my card I decorated a Basic White Medium Envelope. I adhered a strip of the Beauty of The Earth DSP to the bottom front of the envelope. I stamped the branch/leaves image from the Sparkle of The Season stamp set in Bumblebee and Cherry Cobbler Inks. I adhered a panel of the Beauty of The Earth DSP to the envelope flap.

Thank you for stopping by my blog today. I hope you liked my card and will give it a try. If you do CASE this card, please feel free to post it in the comments of my Facebook page under the post. I’d love to see your take on the card. The list of measurements are below if you’d like to stamp along while watching the video. You can watch my video on my Facebook page Here.

You can also view the video on my YouTube channel Here. Happy Stamping!!

*********************************************************************************************************

If you need any stamping supplies, I’d love to be your Demonstrator. Just click HERE to go directly to my online store or drop me an email if you have any questions. 

MY CURRENT HOST CODE IS:   US3JFJ62

Use this host code when you order $50 or greater and receive a free gift from me! If your order is over $150, please do not use this code, but you’ll still get the free gift. The free gift is your choice of any 1 item valued up to $10.00 from the 2020-2021 Annual Catalog or the January-June 2021 Mini Catalog!   For any orders $50 or more I will also send you my monthly class tutorials.  Click HERE or go to my Customer Rewards for more details and to see what this months tutorials are.

Please remember to use my current Host Code and make sure that you can see my name on the final checkout page listed as your Demonstrator when you order so that you know that you’re ordering with me and you’ll get my rewards! 

Happy Stamping, Karen!

*********************************************************************************************************

Awesome Joining Promotions Until September 30, 2021

This image has an empty alt attribute; its file name is CRw3UiG1VcNw0fLUGVJqZ-YwyPUUS6uG8wmP4PTx-IdrSjQTpH-NKMtihO-191VvLnyi4n_MrGC7EEfGuHnVm2X-oA9cb_oiKgAHZnJdAnlMVA66mu2wtYmqiqWygCR5dtYtoVNkHcCb9w7RzyU6p9P124S08o1A2FmIRA8VDYEA1jbiHaw=s0-d-e1-ft

There is an AWESOME joining promotion happening!  If you purchase the Starter Kit between August 3 and September 30, you’ll get to pick a FREE bundle from this list!

  • Frosted Gingerbread
  • Christmas Season
  • Christmas To Remember
  • Whimsical Trees
  • Peaceful Deer
  • Sweet Little Stockings
  • Penguin Place
  • Peaceful Cabin
  • Arctic Bears
  • Beauty Of Tomorrow
  • Gorgeous Leaves
  • Nature’s Harvest

When you purchase the Starter Kit for $99 + taxes (if applicable), the kit ships for FREE and YOU get to pick $125 in Stampin’ Up! merchandise OF YOUR CHOICE. If you purchase the kit during Sale-a-bration, you’ll get an additional FREE bundle from the select twelve listed above (with a value up to $60.25!!) with your kit!  A free bundle in addition to $125 in merchandise for $99, YES PLEASE!! You will also get a past Paper Pumpkin Kit and other supplies free in your kit.

If you are planning on placing an order of $100, you might really want to consider joining. This is such an awesome joining deal, you don’t want to pass it up. There is no obligation to sell, have workshops or do Facebook lives. You can join strictly to be a ‘hobby demonstrator’ and enjoy the 20% discount. I would love to have you on my team!!! You also get to enjoy all the demonstrator perks like early ordering, sneak peeks at what’s coming and best of all the events. Why wait, this is such a great sign up promotions, join now and be a part of our awesome Stampin’ Up! family!!!

If you have any questions about joining, please drop me a note at creativestampingdesigns@gmail.com, I’d love to talk with you about it! You can find more information about joining on my blog @ creativestampingdesigns.com

*********************************************************************************************************

Haunts & Harvest

Subscribe August 11 – September 10

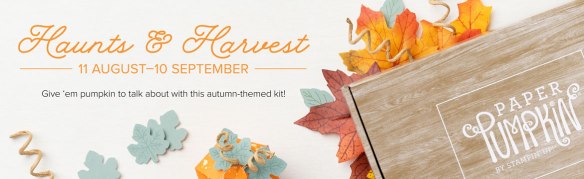
Hay, there! Experience everything the autumn season has to offer with the Haunts & Harvest Paper Pumpkin Kit! This month’s kit includes enough supplies to create 12 treat boxes—4 each of 3 designs. That means you can take your pick of apple, pumpkins, or jack-o-lantern treat boxes! Plus, the Paper Pumpkin box is designed to easily transform into a vintage wheelbarrow for you to display your harvest!

Whether you’re thinking about crisp red apples or you’re ready to carve some spooky jack-o-lanterns (or both!), the Haunts & Harvest Paper Pumpkin Kit—designed in a vivid fall palette—is a hands-on crafting experience for all autumn lovers!

Details:

  • Kit contains enough supplies to create 12 treat packages—4 each of 3 designs. The all-inclusive kit includes printed die-cut boxes, die-cut sheets, adhesive, and more!
  • Finished treat box size: 2-1/2″ x 2″ (6.4 x 5.1 cm)
  • Includes an exclusive stamp set and a Classic Stampin’ Spot
  •  Coordinating colors: Basic Black, Pale Papaya, Poppy Parade, Pumpkin Pie, Soft Succulent

Subscribe to the September 2021 Paper Pumpkin Kit between 11 August and 10 September at paperpumpkin.com!

Note: Supplies may be limited toward the end of the subscription period.

*********************************************************************************************************

Card stock cuts for this project:

  • Basic White Cardstock 4″ X 5 1/4″ (sentiment & triangles)
  • Bumblebee Cardstock scrap for leaves
  • Cajun Craze Cardstock 3 1/4″ X 5″ (card front panel), 2 – 4 1/8″ X 5 3/8″ (inner liners)
  • Cherry Cobbler Cardstock scrap for leaves
  • Early Espresso Cardstock 3 1/3″ X 3 1/2″ (wreath)
  • Misty Moonlight Cardstock 8 1/2″ X 5 1/2″ (card base scored & folded at 4 1/4″)
  • Pumpkin Pie Cardstock scrap for leaves & pumpkins
  • Soft Succulent Cardstock scrap for leaves)
  • Beauty of The Earth Designer Series Paper 5 1/4″ X 5 1/4″ (inside panel scored at 2 5/8″ & corner to corner on both sides), 3/8″ X 6″ (envelope front), 2 1/4″ X 6″ (envelope flap)
  • Cork Specialty Paper 4″ X 5 1/4″ (card front panel)
  • Gold & Rose Gold Metallic Specialty Paper 3 1/2″ X 3 1/2″ (wreath)

*********************************************************************************************************

Product List

Paper Snips

[103579]
$10.00

Stamparatus

[146276]
$49.00

Stampin’ Up! Zany Zebras Birthday

Good Sunday morning my stamping friends. How is everyone’s weekend going? I’m heading into work again today. I was hoping to have the day off, but they put me on the schedule. It’s a short day at the dog bakery though, I don’t go in until noon and I’m done by 5pm.

For today’s card a co-worker asked me to make her nieces daughter a 1st birthday card. It took me a bit to come up with something, since I thought I didn’t have anything appropriate for a 1 year old. Then I remembered and here’s what I came up with.

I used the Stampin’ Up! Zany Zebras Cling Stamp Set for my card along with a sneak peek inside of a new set coming in the January-June 2021 Mini Catalog.

I started by cutting a panel of Whisper White cardstock using the largest Stitched Triangle Dies. I stamped the adorable little zebra image from the Zany Zebras stamp set in Magenta Madness Ink on the bottom of the triangle. I added a little color to her stripes, mane and tail using my Mango Melody Stampin’ Blends Markers. I then embossed the triangle using the Subtle 3D Embossing Folder. From that same panel of Whisper White cardstock I stamped the zebra image again in Magenta Madness Ink and I stamped the sentiment from the Zany Zebras stamp set in Magenta Madness Ink. I used some washi tape to cover the happy part of the sentiment so I would just get the birthday. I cut the sentiment out using the smallest die from the Stitched So Sweetly Dies and I fussy cut the zebra using my Paper Snips, not cutting the mane or the tail. I added some color to her stripes using my Mango Melody Stampin’ Blends Markers.

I adhered the fussy cut zebra on top of the stamped zebra on the triangle using Stampin’ Dimensionals. I adhered the triangle to a Whisper White card front using Stampin’ Dimensionals. I cut all the letters and the #1 from a panel of Rainbow Glimmer Paper, which I adhered to a Foam Adhesive Sheet, using the Playful Alphabets Dies.

I cut 3 of the small balloons out using the Happy Dies one in Granny Apple Green, one in Highland Heather and one in Mango Melody. I embossed the Granny Apple Green and Highland Heather balloons using the Wrapped In Texture Embossing Folder. I cut the 3 strings and 3 bows from a panel of Magenta Madness cardstock using the Happy Dies. I adhered the strings to the back of the balloons using Glue Dots and the bows to the bottom of the balloons using a tiny amount of Multipurpose Liquid Glue. I adhered the balloons to the card front using Stampin’ Dimensionals. I adhered the #1 to the Mango Melody balloon. I adhered the letters to the card front the way I wanted them and adhered the die cut birthday under the happy using Stampin’ Dimensionals. I added some Artistry Blooms Adhesive-Backed Sequins to the card front. I adhered the card front to a Granny Apple Green mat using Stampin’ Seal and then to a Magenta Madness card base using Stampin’ Dimensionals.

On the inside I stamped a sentiment from a new set coming in the January-June 2021 Mini Catalog, the Stampin’ Up! Many Messages Cling Stamp Set. This is 1 large stamp with 19 sentiments on it. I used my Stamparatus to get just the one sentiment centered on a panel of Whisper White Cardstock. I used my Granny Apple Green Stampin’ Write Marker to ink up just the sentiment I wanted to use. I stamped the zebra image from the Zany Zebras stamp set to the side of the sentiment in Magenta Madness Ink and I stamped the party hat from the Zany Zebras stamp set in Magenta Madness Ink on the opposite side. I added color to the strips on the zebra and the pom-pom on the hat using my Mango Melody Stampin’ Blends Markers. I colored the dots on the hat in using my Granny Apple Green Stampin’ Write Marker. I stamped the grass image from the Zany Zebras stamp set under the zebra in Granny Apple Green Ink. I adhered the Whisper White panel to a Granny Apple Green mat using Stampin’ Seal and then to the inside of the Magenta Madness card base using Multipurpose Liquid Glue.

To finish my card I decorated a Medium Whisper White Envelope. I stamped the zebra image from the Zany Zebras stamp set in Magenta Madness Ink on the envelope front. I stamped the grass image from the Zany Zebras stamp set in Granny Apple Green Ink below the zebra. I added some color to the zebras stripes, mane and tail using my Mango Melody Stampin’ Blends Markers. I adhered a panel of Artistry Blooms Designer Series Paper to the envelope flap.

Thank you for stopping by my blog today. I hope you liked my card and will give it a try. Happy Stamping!!

*********************************************************************************************************

If you need any stamping supplies, I’d love to be your Demonstrator. Just click HERE to go directly to my online store or drop me an email if you have any questions. 

MY CURRENT HOST CODE IS: 9XYYG2ZU

Use this host code when you order $50 or greater and receive a free gift from me! If your order is over $150, please do not use this code, but you’ll still get the free gift. The free gift is your choice of any 1 item valued up to $10.00 in the 2020-2021 Annual Catalog!   For any orders $50 or more I will also send you my monthly class tutorials.  Click HERE or go to my Customer Rewards for more details and to see what this months tutorials are.

 Click HERE to shop the clearance rack.

Please remember to use my current Host Code and make sure that you can see my name on the final checkout page listed as your Demonstrator when you order so that you know that you’re ordering with me and you’ll get my rewards! 

Happy Stamping, Karen!

*********************************************************************************************************

Beary Comforting

Subscribe November 11-December 10

If you haven’t heard already, Paper Pumpkin is our monthly One-Stop Box™ that offers a wide variety of unique papercrafting projects for subscribers of any skill level! These themed, all-inclusive craft kits encourage customers to explore their creativity, try new techniques, and discover their potential in papercrafting.

December’s cute and cuddly Paper Pumpkin kit—called “Beary Comforting”—is designed to uplift your loved ones as this beary tough year finally comes to a close. After a year like 2020, we all could use a big bear hug! With the help of this bear-themed kit, you can create 12 unbearably cute cards featuring warm and fuzzy friends, sweet stamps, and meaningful messages. Near or far, send your friends and family the extra comfort, love, and encouragement they need with this month’s Paper Pumpkin kit!

ABOUT THE DECEMBER KIT

Details

  • Kit contains enough supplies to create 12 cards and coordinating envelopes.
  • Card size: 4-1/4″ x 5-1/2″ (10.8 x 14 cm)
  • Envelope size: 4-1/2″ x 5-3/4″ (11.4 x 14.6 cm)
  • Coordinating colors: Basic Gray, Calypso Coral, Cinnamon Cider, Daffodil Delight, Rich Razzleberry, Soft Sea Foam, Whisper White

SUBSCRIPTION INFORMATION

Subscribe to the December 2020 Paper Pumpkin Kit between 11 November and 10 December at paperpumpkin.com!

Note: Supplies may be limited toward the end of the subscription period.

*********************************************************************************************************

FREE Bonus Quite Curvy and Curvy Christmas Project Tutorials With Videos When You Purchase The Bundle From Me!!

A group of us worked together to create five awesome tutorials using the Stampin’ Up! Curvy Celebrations special release products with video tutorials!  You can get this set of exclusive tutorials when you purchase either the Quite Curvy Variety Bundle (item 158396) or the Quite Curvy Bundle (item 156228) from me between now and January 4!

If your order is $50 or greater and includes either of these bundles, you will get this set of tutorials in addition to the monthly online class tutorials AND your $10 thank you gift!  And you’ll also earn my Creative Stamping Designs Reward Points!

*********************************************************************************************************

Card stock cuts for this project:

  • Granny Apple Green Cardstock 2 – 4 1/8″ X 5 3/8″ (card front and inner liner mats), 1″ X 1″ (balloon)
  • Highland Heather Cardstock 1″ X 1″ (balloon)
  • Magenta Madness Cardstock 8 1/2″ X 5 1/2″ (card base scored and folded at 4 1/4″)
  • Mango Melody Cardstock 1″ X 1″ (balloon)
  • Whisper White Cardstock 2 – 4″ X 5 1/4″ (triangle, zebra & sentiment and one for inner liner)
  • Artistry Blooms Designer Series Paper 2 1/4″ X 6″ (piece for envelope flap)
  • Rainbow Glimmer Paper 2″ X 6″ (letters and number)

*********************************************************************************************************

Product List


Rainbow Glimmer Paper


Artistry Blooms Sequins


Happy Dies (English)


Playful Alphabet Dies


Stitched So Sweetly Dies


Stitched Triangles Dies


Foam Adhesive Sheets


Multipurpose Liquid Glue


Mini Glue Dots


$5.25


Stampin' Dimensionals


Stampin' Seal


$8.00


Bone Folder


$7.00


Paper Snips


$10.00


Paper Trimmer


$25.00


Clear Block Bundle


Stamparatus


$49.00

Stampin’ Up! Celebrate Sunflowers Together

Good Saturday morning my fellow stampers.  How has everyone’s weekend started off?  I’m at work today, but I have off tomorrow.  My daughter will be coming home tomorrow from house, cat & dog sitting.  I’ll be happy to have her home again.

For today’s card I went a little out of my comfort zone a little and tried something a little different.  Here’s my card for today.

My design is from Freshly Made Sketches  Challenge #449.  Here is their sketch.

My colors are from As You See It Sunflower Skies Challenge #232.  Here are their colors.

I also joined in with Double “D” Challenge.  Their theme is Sunflowers.

I started by adhering a panel of Bermuda Bay from the Brights 6 X 6 Designer Series Paper to a Bermuda Bay card base using Multipurpose Liquid Glue.

On a panel of Whisper White cardstock I stamped the small sunflower image from the Stampin’ Up! Celebrate Sunflowers Cling Stamp Set in Early Espresso Ink.  I colored the flower in using my Water Painter with Crushed Curry Ink and my Bermuda Bay, Cajun Craze and Crumb Cake Stampin’ Blends Markers.  I cut the image out using my Stitched Triangle Dies.  I cut another triangle the same size from a panel of Cajun Craze cardstock.  I stamped the Cajun Craze triangle using the splatter image from the Stampin’ Up! Gather Together Photopolymer Stamp Set in Cajun Craze Ink.  I stamped a small panel of Crushed Curry cardstock with the wheat image from the Gather Together stamp set in Crushed Curry Ink and cut it out using a smaller triangle from the Stitched Triangles Dies.  I adhered the Cajun Craze triangle to the card front using Stampin’ Seal.  I adhered the sunflower triangle over the Cajun Craze triangle using Stampin’ Dimensionals.  I adhered the small Crushed Curry triangle to the card front using Stampin’ Dimensionals.

On a strip of Whisper White cardstock I stamped the sentiment from the Gather Together stamp set in Cajun Craze Ink.  I sponged the edges using my Sponge Dauber with Crushed Curry Ink and adhered it to the card front using Stampin’ Dimensionals.  I added a few Crushed Curry Playing With Patterns Resin Dots to the card front.

On the inside I stamped the sentiment from the Gather Together stamp set in Cajun Craze Ink in the center of a Whisper White panel.  I stamped the small sunflower image from the Celebrate Sunflowers stamp set in Crushed Curry Ink, stamping off twice, in the center of the panel.  I adhered a strip of the Brights 6 X 6 DSP to the bottom of the panel using Stampin’ Seal.  I adhered the Whisper White panel to a Crushed Curry mat using Stampin’ Seal and then to the inside of the Bermuda Bay card base using Multipurpose Liquid Glue.

To finish my card I decorated  a Medium Whisper White Envelope.  I stamped the small sunflower image from the Celebrate Sunflowers stamp set on the envelope front and flap.  I colored the images in using my Water Painters with Crushed Curry Ink and my Bermuda Bay, Cajun Craze and Crumb Cake Stampin’ Blends Markers.

Thank you for stopping by my blog today.  I hope you liked my card and will give it a try. Happy Stamping!!

****************************************************************************************************

If you need any stamping supplies, I’d love to be your Demonstrator. Just click HERE to go directly to my online store or drop me an email if you have any questions. 

MY CURRENT HOST CODE IS: 4Z2KHBVY

Use this host code when you order $50 or greater and receive a free gift from me! If your order is over $150, please do not use this code, but you’ll still get the free gift. The free gift is your choice of any 1 item valued up to $10.00 in the 2020-2021 Annual Catalog!   For any orders $50 or more I will also send you my monthly class tutorials.  Click HERE or go to my Customer Rewards for more details and to see what this months tutorials are.

 Click HERE to shop the clearance rack.

Happy Stamping, Karen!

****************************************************************************************************

IT’S TIME TO REDEEM THOSE BONUS DAYS COUPONS YOU EARNED IN JULY!!

  • Redemption Deadline:  August 31 2020, by 11:50 PM (MT)
  • There is no limit to the number of coupon codes participants can use on an order during redemption.
  • Bonus Days coupon codes may be redeemed for any product (excluding Starter Kits and Paper Pumpkin monthly subscriptions).
    • New prepaid Paper Pumpkin codes may be discounted using Bonus Days coupon codes.
  • Bonus Days coupon codes will reduce the amount of an order.
  • Bonus Days coupon codes may be redeemed one time only.

****************************************************************************************************

HELLO, PUMPKIN

SUBSCRIBE AUTUST 11 – SEPTEMBER 10

As the autumn season approaches, prepare to celebrate with the September Paper Pumpkin Kit! There’s so much to love about fall—some love the haunts of Halloween, many love the time to give thanks, and others love the changing colors and cooler temperatures. Whatever you love most about fall, September’s kit has everything you need to celebrate the season your way! Between a multi-occasion stamp set and enough supplies to design 20 cracker box treat packages, you can create custom fall crafts to celebrate Halloween, Thanksgiving, pumpkins, and leaves. Whether you make them all the same or mix ‘n’ match your crafts, there’s something for everyone in this kit!

September’s kit is a must-have for those who love to celebrate all things spooky. But, for those who don’t enjoy the Halloween haunts, the multi-occasion stamp set combined with a variety of die-cut and reversible paper pieces offers many ways to customize your fall crafts!

  • Kit contains enough supplies to create 20 cracker box treat packages.
  • Each cracker box treat package can be customized to celebrate Halloween, Thanksgiving, the autumn season, or all three!
  • Coordinating Colors: Bumblebee, Basic Black, Cajun Craze, Cinnamon Cider, Mossy Meadow, Old Olive, Pumpkin Pie, white

Subscribe to the September 2020 Paper Pumpkin Kit from 11 August to 10 September at paperpumpkin.com!

Note: Supplies may be limited toward the end of the subscription period.

****************************************************************************************************

I’m cleaning my shelves and drawers out to make room for lots of new goodie.  I have my list right HERE and I’m trying to keep it up to date.   Check it out and let me know if there is anything you’d like to get.  If you are looking for something and don’t see it on the list, drop me a line and I will look through my stash to see if I missed it.  I have lots of older DSP too that I don’t have listed if there is any that you are looking for.

****************************************************************************************************

Card stock cuts for this project:

  • Bermuda Bay Cardstock 4 1/4″ X 11″ (card base scored and folded at 5 1/2″)
  • Cajun Craze Cardstock 3″ X 3″ (triangle)
  • Crushed Curry Cardstock 1″ X 2″ (triangle), 4 1/8″ X 5 3/8″ (inner liner mat)
  • Whisper White Cardstock 3″ X 3″ (artwork), 5/8″ X 2 3/8″ (sentiment), 4″ X 5 1/4″ (inner liner)
  • Brights 6 X 6 Designer Series Paper 4 1/4″ X 5 1/2″ (card front)

****************************************************************************************************

Product List