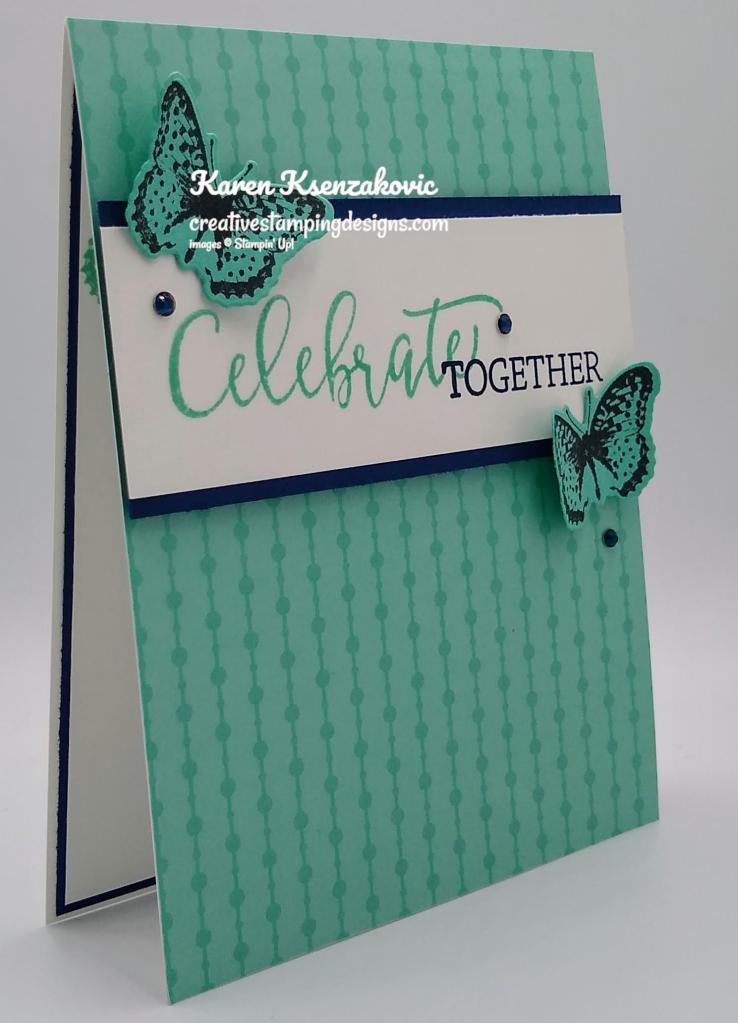
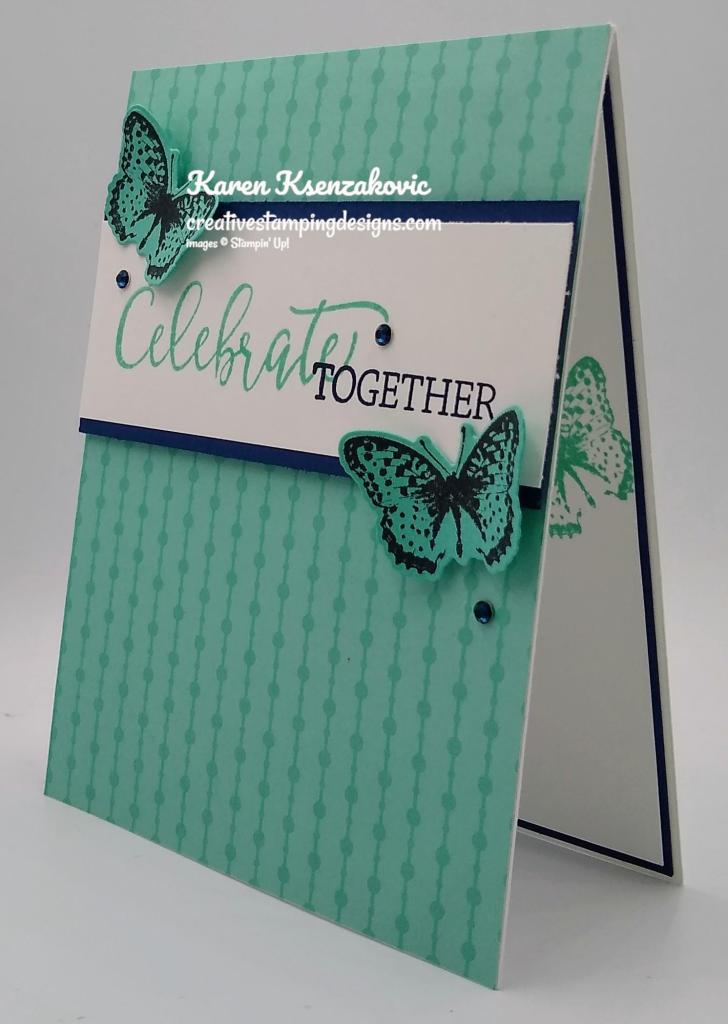
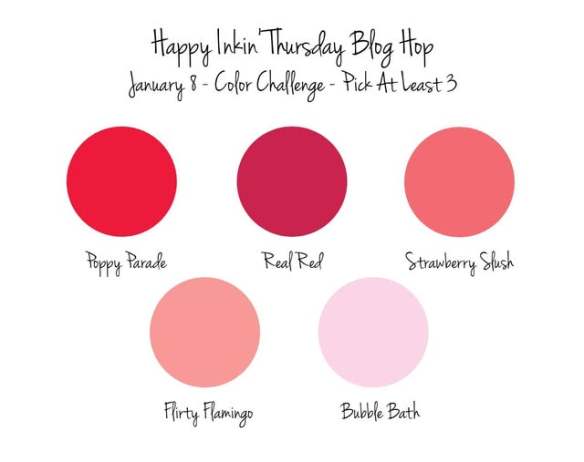
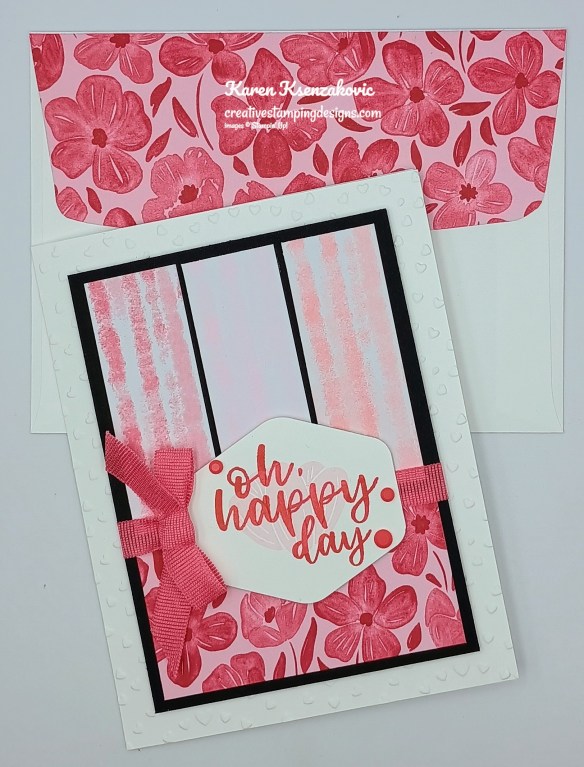
Good Thursday morning stamping friends welcome to our Happy Inkin’ Thursday Blog Hop. If you are starting with me, thank you, I hope you will stop by everyone’s blog to see what they have created this week. If you are hopping over from Mary’s blog, thank you for stopping by. This week we have Color Challenge. If you’d like to see a quick video on how I made this card, Click Here to go to my Instagram Reels. Here is my card using this week’s colors.
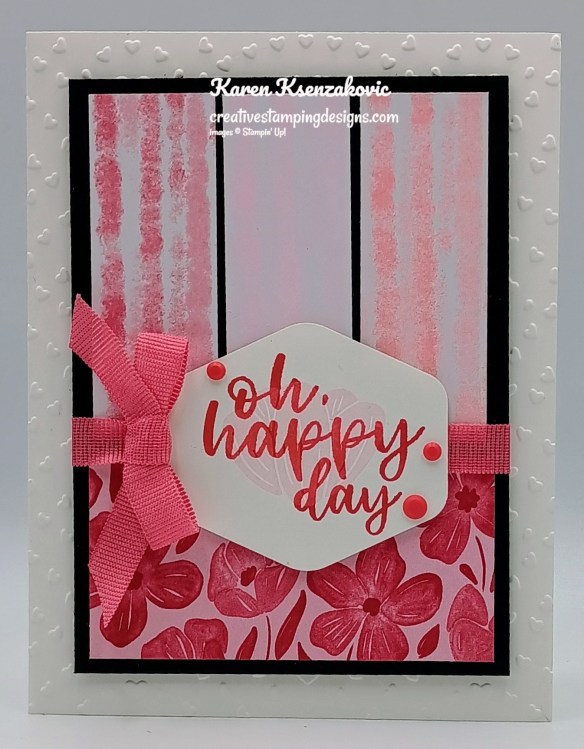
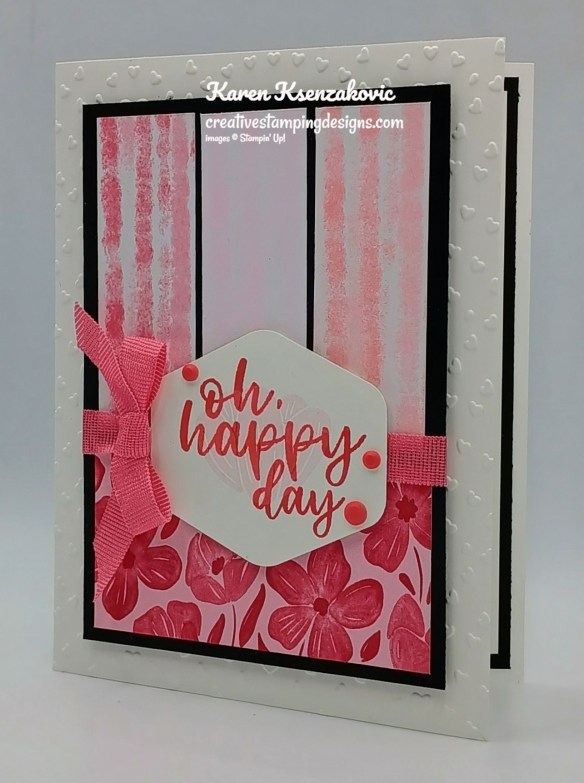
I used the new Stampin’ Up! Online Exclusive A Round of Hellos Stamp Set along with the Heartfelt Hexagon Punch, Hearts of Love 3D Embossing Folder,Brights, Regals, Subtles and 2025-2027 In-Color 6 x 6 Designer Series Paper for my card today.
These are out colors for this week.
Emboss a Basic White card front using the Hearts of Love EF. Adhere the embossed panel to the front of the Basic White card base.
Adhere the panel of Regals DSP to the bottom of a Basic Black mat. Adhere the 3 strips of the Brights, Subtle and 2025-2027 In-Color 6 X 6 DSP to the top of the panel. Wrap a piece of Strawberry Slush 3/8″ Faux Linen Ribbon around the layered panel and tie a bow. Adhere the layered panel to the Basic Whtie card front with Stampin’ Dimensionals.
On a panel of Basic White, stamp the sentiment from A Round of Hellos stamp set in Poppy Parade Ink. Stamp the flower image from A Round of Hellos stamp set in Bubble Bath Ink over the sentiment. Punch the sentiment out using the Heartfelt Hexagon Punch. Adhere the sentiment to the card front over the ribbon with Stampin’ Dimensionals. Add a few Dear Dots to the sentiment.
On a panel of Basic White, stamp the sentiment from A Round of Hellos stamp set in Poppy Parade Ink. Stamp the flower image from A Round of Hellos stamp set in Bubble Bath Ink over the sentiment. Adhere the Basic White panel to a Basic Black mat then to the inside of the Basic White card base.
Decorate a Basic White Medium Envelope to complete your card. Stamp the flower image from A Round of Hellos stamp set in Bubble Bath Ink on the envelope front in a circle. Stamp the flower image in Tuxedo Black Ink. Adhere a panel of Regals DSP to the envelope flap.
Thank you for stopping by my blog today. Now that you’ve seen my card, let’s get on with the hop! Click the next button below to hop over to see what Tara has created. Happy Hopping!
Just in case you get lost along the way, here is a list of the team members involved in the hop today.
If you need any stamping supplies, I’d love to be your Demonstrator. Just click HERE to go directly to my online store or drop me an email if you have any questions.
Good Saturday morning stamping friends and welcome to the holiday weekend. Do you have any plans in the works? I’m going to a Red Bulls soccer gamer tonight with my son. I won tickets back in April and we are finally able to cash them in. I’m really looking forward to it, I’ve been wanting to go to a game. There’s something about watching professional games in person. The energy level is so much higher than watching them on TV. We’ve been a soccer family since my son was 5 when I signed him up for soccer because it was a ‘non-contact sport’. Little did I know then that it IS a contact sport, years later and many concussions and broken bones. I was the soccer mom and when they needed a goalie for field day, I was there. He’s now 30 and is a soccer coach and is still playing.
I have another little sneak peek for you today of products that will be available starting September 3rd. My colors came from a house that’s in our town; I live in a historical town with lots of old houses. I pass this one house that’s Flirty Flamingo, Pecan Pie and a touch of Misty Moonlight. If you’d like to see a quick video of how I made this card, Click Here to go to my Instagram Reels. Here’s my card for today.
I used the new Stampin’ Up! Stay Warm Photopolymer Stamp Set along with the Stampin’ Up! Fluffy Squirrel Photopolymer Stamp Set and Traditional Labels Dies (all available September 3rd). I also used the Stampin’ Up! Just A Note Cling Stamp Set and the Brights 6 x 6 Designer Series Paper for my card today.
Adhere a panel of Brights DSP to a Pecan Pie mat with Stampin’ Seal. Adhere the layered panel to a Misty Moonlight card base with Stampin’ Seal.
On a panel of Basic White, stamp the detailed sweater image from the Stay Warm stamp set in Misty Moonlight Ink. Flip the stamp over on the block and stamp the solid sweater image from the Stay Warm stamp set in Flirty Flamingo Ink, stamping off once on scrap paper, over the detailed images. Fussy cut the sweater image using snips. On the same panel of Basic White, stamp the sentiment from the Just A Note stamp set in Pecan Pie Ink. Cut the sentiment out using the Traditional Labels Dies.
Using the Traditional Labels Dies, cut a panel of Basic White. Adhere the die cut to the card front with Stampin’ Seal. Adhere the sentiment to the top of the panel with Stampin’ Dimensionals. Adhere the sweater image over the die cut with Stampin’ Dimensionals. Add a few Two-Tone Sparkle Gems to the card front.
Stamp the sentiment from the Fluffy Squirrel stamp set in Pecan Pie Ink on a panel of Basic White. Adhere a panel of Brights DSP to the bottom of the panel. Adhere the Basic White panel to a Pecan Pie mat and a Flirty Flamingo mat then to the inside of the Misty Moonlight card base.
Decorate a Basic White Medium Envelope to finish your card. Stamp the detailed sweater image from the Stay Warm set in Misty Moonlight Ink on the envelope front. Stamp the solid sweater image from the Stay Warm stamp set in Flirty Flamingo Ink, stamping off once on scrap paper, over the detailed image. Adhere a panel of Brights DSP to the envelope flap.
Thank you for stopping by my blog today. I hope you like the card and will give it a try. Happy Stamping!!
If you need any stamping supplies, I’d love to be your Demonstrator. Just click HERE to go directly to my online store or drop me an email if you have any questions.
I’m offering a Designer Series PaperShare, Two-Tone Cardstock Share, Ribbon Share & Embellishment Share from the September-December 2025 Mini Catalog, along with the upcoming September Online Exclusives and I’d love to have you join!! I’m placing my share order early on September 3rd and I’m going to use the expedited shipping option so I should be able to have the shares cut, bundled and back out to you during the week of September 8th. Wouldn’t you love to have all of the gorgeous new Designer Series Papers in the Stampin’ Up! September – December 2025 Mini Catalog and the upcoming September Online Exclusives? What is a Paper Share you ask? It’s a sample of each of the new Designer Series Papers from the Catalog and Online Exclusives. Shares give you a good working sample of all of the papers so that you can decide which ones to order in full packs! If you were to purchase all of the DSP in the new Catalog and Online Exclusives, it would cost you over $165.00 plus shipping and if you were to purchase all the ribbon it would cost you over $75.00.
New Designer Series Paper Share – $21.00 plus $9.00 for Priority Mail Shipping
How my shares work: I order full packs of all of the Designer Series Papers listed below, I cut them into 6″ X 6″ pieces (or 6″ X 12″ pieces for double shares) and give you one panel of each design from each pack on the list. I pack up the paper in a cellophane bag with labels listing the Name, Item # and Colors in the pack and mail it back out to you just as quickly as I can!
New Designer Series Paper Share – $21.00 plus $9.00 for Priority Mail shipping
You will receive one 6×6 sheet of each design from the following DSP packs (the number after the name indicates how many 6×6 sheets of that paper pack you will receive):
All Season Velvet (3)
Autumn Toil (4)
Christmas Tags & More (8)
Earthen Toned Metallic (1)
Elegant Pine Snowflakes (6)
Gathering Together (6)
Lights of Aurora (6)
Modern Christmas (6)
North Pole Delivery (5)
Peaceful Garden (6)
Peaceful Garden Glimmer (3)
Traditions of Christmas (6)
Silent Snowflake (1)
In all, you’ll receive 61 – 6” x 6” sheets of designer or specialty paper!
Double Designer Series Paper Share – $42.00 Plus $9.00 Priority Mail Shipping
As a gift from me for ordering a Double Share of Designer Series Paper, I will include a Greetings For You Mix & Match Ephemera Pack. This gift is only for ordering a Double DSP Share.
Two-Tone Cardstock Share
Have you been wanting to try the Two-Tone Cardstock but didn’t want to buy a whole pack? You can add a share of the 4 different Two-Tone Cardstock packs for an additional $6 or purchase them separately for $6 + $9 Priority Shipping
You will receive one 6×6 sheet of each color from each of the packs (the number after the name indicates how many 6×6 sheets of that paper pack you will receive):
Keeping Traditions (6)
Peaceful Days (6)
Lovely Florals (6)
Sweet Halloween (6)
In all, you’ll receive 24 – 6” x 6” sheets of cardstock!
If you’d like double shares of the designer paper or cardstock, I’m offering those too! I’ll cut the 12″ x 12″ sheets into 6″ × 12″ so that you’ll be able to get 3 full A2 size card fronts from each sheet and you’ll get double sheets of the 6″ x 6″ since they’re already precut.
Ribbon Share – $20.00 plus $9.00 Priority Mail Shipping
All ribbons will come individually wrapped and labeled with the name and number of the product.
One-Fourth of a Roll of each:
Balmy Blue 1/2″ Sheer Ribbon
Black & White & Gold Baker’s Twine
Early Espresso & Old Olive Linen Thread
Irregular Weave 3/8″ Trim
Misty Moonlight & Silver Edged 1/2″ Ribbon
Real Red 1/2″ Shiny Ribbon
Shaded Spruce 7/8″ Ribbon
White 3/8″ Fluffy Trim
Double Ribbon Share – $40.00 Plus $9.00 Priority Mail Shipping and you will be getting 1/2 of the roll or each ribbon.
Embellishment Share – $16.00 plus $9.00 Priority Mail Shipping
I’m also offering an Embellishment Share. I will divide the embellishments up and package them in a cello bag with the name and number for easy ordering, just like I do with the paper and ribbon.
You will receive (approximate # listed:
Cajun Craze & Gold Dots (30)
Dear Dots (40)
Delightful Decorative Dots (36)
Faceted Snowflakes (42)
Frosted Iridescent Dots (40)
Hues of Blue Flowers (32)
Large Gold Hoops (2)
Streaked Dots (32)
Traditional Sparkling Sequins (48)
Double Share of the Embellishments – $32.00 plus $9.00 Priority Mail Shipping
Anyone is welcome to join in my shares (please note, I can only ship to addresses within the US). To make ordering the shares a little easier, I have created a form for you to submit, that way you can order any combination of shares you want. Click Here for the form. I will send out PayPal Invoices by September 1st.
Deadline to sign up for my share is Sunday August 31st at 5:00 PM ET.
I put together a video showing you everything included in my shares Here.
Let me know if you have any questions, I’m more than happy to help you. Thank you for joining in my Shares!!
Order your Holiday Essential Pack August 19 – August 31
I’m offering a Holiday Essential Pack to get those holiday cards started. Let’s get a head start on making those Holiday cards this year. Get all your adhesives ordered now so when the September – December 2025 Mini Catalog and September Online Exclusives go Live you’ll be ready to craft!!
Each Kit will Include Full Packs of:
Adhesive Sheets
Basic White Medium Envelope
Black Stampin’ Dimensionals Combo Pack
Liquid Glue
Mini Glue Dots
Mini Stampin’ Dimensionals
Rhinestone Basic Jewels
Stampin’ Dimensionals
Stampin’ Seal
Stampin’ Seal Refill
Tear & Tape Adhesive
If you were to order all this separately it would cost $77.50. I’m offering it for $65.00 plus $9.00 for Priority Mail Shipping. All orders must be submitted by August 31st. I’ll be placing my order at the beginning of September. Once everything arrives, I’ll package it up is a cut little bag and ship it out to you.
As an EXTRA BONUS for the 1st 10 people that order I’ll also throw in a spool of Linen Thread
Click Hereto place your order for the Essential Pack Today!!Deadline to order is Sunday August 31st
I’ve put together a short 4–5-minute video showing everything you will receive. Click Here for the video.
Starting August 5, select products that feature the new 2025–2027 In Colors™ are 15% off! This is a great opportunity to purchase new In Color products at a discount, so grab products you love—like ink, two-tone cardstock, and Designer Series Paper—and get everything you need to create projects that showcase Stampin’ Up!’s amazing color coordination!
Promotion Details:
Sales Period: August 5–31
Ordering Deadline: August 31, 2025, at 11:59 p.m. (MT)
Sale includes select inks, cardstock, Designer Series Paper, embellishments, and other products that include these new In Colors. Only products featured on the 2025–2027 In Colors page are included in this promotion.
Products are available only while supplies last.
You can find the 2025-2027 In Color sale items that will be on sale beginning August 5 right here! Get your list ready and shop early for the best selection!
Good Wednesday morning my stamping friends. How is everyone doing today? We’re halfway through the week and on our way to the weekend already.
Today’s card is for the inspiration challenge from The Card Concepts. We do a month-long challenge, so you have all month to enter multiple times. The inspiration photo #216 is Spring Celebrations. Here’s my card for today.
I used the Stampin’ Up! Arched Wishes Cling Stamp Set along with the Everyday Arches Dies, Brights 6 x 6 Designer Series Paper and the Pastel Ombre Glimmer Specialty Paper, for my Clean and Layered card today. I was inspired by the beautiful pastel colors along with the balloons, cupcakes and tropical leaves in the photo.
I hope you will take a moment to visit The Card Concepts and join us for our challenge 216. How are you inspired by the photos?
Adhere a panel of the Brights DSP to a Granny Apple Green card base using Liquid Glue. Stamp the sentiment from the Arched Wishes stamp set in Tuxedo Black Ink on a panel of Basic White. Cut the sentiment out using the 2nd largest Everyday Arches Dies. Adhere the sentiment to the card front using Stampin’ Seal.
On a panel of Basic White, stamp the cupcake image from the Arched Wishes stamp set in Tuxedo Black Ink. Color the image using Granny Apple Green, Lemon Lolly and pool Party Stampin’ Blends Markers. Fussy cut the cupcake using Paper Snips. Stamp the balloon image from the Arched Wishes stamp set in Tuxedo Black Ink 3 times on the panel of Basic White. Fussy cut the balloons using Paper Snips. Stamp the top of the balloon image on the 3 panels of Pastel Ombre Glimmer Paper in Tuxedo Black Ink. Fussy cut them using Paper Snips.
Adhere the Glimmer balloons to the 3 balloons using Stampin’ Seal. Adhere the balloons to the card front using Stampin’ Dimensionals. Stamp the astric image from the Arched Wishes stamp set in Lemon Lolly Ink on the sentiment panel. Adhere the cupcake to the card front lining up the candle with the astric, using Stampin’ Dimensionals. Add a few Rainbow Adhesive-Backed Dots to the card front.
On a panel of Basic White, stamp the sentiment from the Arched Wishes stamp set in Tuxedo Black Ink. Stamp the cupcake image from the Arched Wishes stamp set in Tuxedo Black Ink on the bottom of the panel. Color the image using Granny Apple Green, Lemon Lolly and Pool Party Stampin’ Blends Markers. Adhere a strip of Brights DSP to the top of the panel. Adhere the Basic White panel to a Granny Apple Green mat then to the inside of the Granny Apple Green card base.
Decorate a Basic White Medium Envelope to complete your card. Stamp the cupcake image from Arched Wishes stamp set in Tuxedo Black Ink on the envelope front. Color the image the same as for the card. Adhere a panel of Brights DSP to the envelope flap.
Thank you for stopping by my blog today. I hope you like my card and will give it a try. Happy Stamping!!
If you need any stamping supplies, I’d love to be your Demonstrator. Just click HERE to go directly to my online store or drop me an email if you have any questions.
MY CURRENT HOST CODE IS: Q74RCCMW
Use this host code when placing an order with me. When you order $50 or greater you will receive a free gift from me! If your order is over $150, please do not use this code, but you’ll still get the free gift. The free gift is your choice of any 1 item valued up to $10.00 from the 2024 – 2025 Annual Catalog, January – April 2025 Mini Catalog or from the Online Exclusives! For any orders $50 or more I will also send you my monthly class tutorials. Click HERE or go to my Customer Rewards for more details and to see what this month’s tutorials are.
Please remember to use my current Host Code and make sure that you can see my name on the final checkout page listed as your Demonstrator when you order so that you know that you’re ordering with me, and you’ll get my rewards!
My 2025 – 2026 Annual Catalog and May Online Exclusive Designer Series Paper and Ribbon Shares are open for ordering. You can order just the DSP share, just the ribbon share or you can order both.
I’m offering a Designer Series Paper share from the 2025-2026 Annual Catalog, Two-Tone Cardstock Share along with the upcoming May Online Exclusives and I’d love to have you join!! I’m placing my share order early on May 6th and I’m going to use the expedited shipping option so I should be able to have the shares cut, bundled and back out to you during the week of May 12th. Wouldn’t you love to have all of the gorgeous new Designer Series Papers in the Stampin’ Up! 2025-2026 Annual Catalog and the upcoming May Online Exclusives? What is a Paper Share you ask? It’s a sample of each of the new Designer Series Papers from the Catalog and Online Exclusives. Shares give you a good working sample of all of the papers so that you can decide which ones to order in full packs! If you were to purchase all of the DSP in the new Catalog and Online Exclusives, it would cost you over $250.00 plus shipping and if you were to purchase all the ribbon it would cost you over $65.00.
New Designer Series Paper Share – $51.00 plus $9.00 for Priority Mail Shipping
How my shares work: I order full packs of all of the Designer Series Papers listed below, I cut them into 6″ X 6″ pieces (or 6″ X 12″ pieces for double shares) and give you one panel of each design from each pack on the list. I pack up the paper in a cellophane bag with labels listing the Name, Item # and Colors in the pack and mail it back out to you just as quickly as I can!
New Designer Series Paper Share – $51.00 plus $9.00 for Priority Mail shipping
You will receive one 6×6 sheet of each design from the following DSP packs (the number after the name indicates how many 6×6 sheets of that paper pack you will receive):
2024-2026 In Color Designer Series Paper (10)
2025-2027 In Color Designer Series Paper (10)
Brights Designer Series Paper (20)
Neutrals Designer Series Paper (20)
Regals Designer Series Paper (20)
Subtles Designer Series Paper (20)
Beautiful Gallery (12)
Boho Vibes (8)
Celebratory Sips (6)
Florals in Bloom (6)
Floral Impressions (6)
Flower Garden Foils Specialty (6)
Irresistible Designs Specialty (3)
Kintsugi Inspirations Specialty (6)
Turtle-y Cute (6)
Weekend Adventures (3)
In all, you’ll receive 162 – 6” x 6” sheets of designer or specialty paper!
Two-Tone Cardstock Share – $6 plus $9.00 Priority Mail Shipping
Have you been wanting to try the Two-Tone Cardstock but didn’t want to buy a whole pack? You can add a share of the 4 different Two-Tone Cardstock packs for an additional $6 or purchase them separately for $6 + $9 Priority Shipping
You will receive one 6×6 sheet of each color from each of the packs (the number after the name indicates how many 6×6 sheets of that paper pack you will receive):
Celebrate Together (6)
Memories in Bloom (6)
Turtle-y Cute (6)
Weekend Adventures (6)
In all, you’ll receive 24 – 6” x 6” sheets of cardstock!
If you’d like double shares of the designer paper or cardstock, I’m offering those too! I’ll cut the 12″ x 12″ sheets into 6″ × 12″ so that you’ll be able to get 3 full A2 size card fronts from each sheet and you’ll get double sheets of the 6″ x 6″ since they’re already precut.
New Ribbon Share – $20.00 plus $9.00 Priority Mail Shipping
All ribbons will come individually wrapped and labeled with the name and number of the product.
One-Fourth of a Roll of each:
Cloud Cover 3/8″ Linen Ribbon
Darling Duckling 3/8″ Linen Ribbon
Secret Sea 3/8″ Linen Ribbon
Strawberry Slush 3/8″ Linen Ribbon
Timid Tiger 3/8″ Linen Ribbon
Basic Beige 3/8″ Classic Ribbon
Shaded Spruce & Soft Sea Foam 1/2″ Ribbon
Gold Striped 3/8″ Mesh Ribbon Online Exclusive
If you’d like double shares of the Ribbon, you will be getting 1/2 of the roll or each ribbon.
Anyone is welcome to join in my shares (please note, I can only ship to addresses within the US). To make ordering the shares a little easier, I have created a form for you to submit, that way you can order any combination of shares you want. Click Here for the form. I will send out PayPal Invoices on May 4th.
Deadline to sign up for my share is Saturday May 3rd at 5:00 PM ET.
Let me know if you have any questions, I’m more than happy to help you. Thank you for joining in my Shares this year!!
Did you miss out on retired Bundles, Stamp Sets, Dies or Embossing Folders? I’ve updated my list with products from the Online Exclusives and September – December 2024 Mini Catalog along with a few others. Click Here to go to my retirement list. If you see something you would like, send me an email at creativestampingdesigns@gmail.com and I will pull the item(s) pack it up and send you a price. Feel free to contact me if you have any questions.
Craft stunning cards with hand-painted, alcohol ink designs! • Makes 9 cards: 3 each of 3 designs with 9 coordinating envelopes • Textured gold foil on the card bases and sentiments • Precut paper pieces and butterfly embellishments • Coordinating colors: Berry Burst (Classic Stampin’ Spot), Flirty Flamingo, Fresh Freesia, Gorgeous Grape, Peach Pie, Pool Party
Cards come in a beautiful coordinating box!
Subscribe to the April Paper Pumpkin Kit between 11 March and 10 April by clicking here!
Don’t miss the coordinating Hugs Abloom Dies Add-On!
Make the most of your Paper Pumpkin kits with the Hugs Abloom Dies add-on! Quickly and cleanly cut out a flower, leaf sprig, sentiment label, or Hugs sentiment to elevate your crafting projects. These additional dies are designed to work with THREE Paper Pumpkin Kits: the Inked Occasions Paper Pumpkin Kit, the Mountain Majesties Paper Pumpkin Kit, and the Full of Charm Paper Pumpkin Kit. Pair these dies with other Stampin’ Up! products for even more creative options!
DETAILS – 4 dies – Largest die: 2-1/2″ x 1-1/4″ (6.4 x 3.2 cm) – Use with a Stampin’ Cut & Emboss Machine (sold separately)
You must be a current Paper Pumpkin subscriber to purchase this item. To become a subscriber, visit www.stampinup.com/paperpumpkin.
Note: Supplies may be limited toward the end of the subscription period.
Good Wednesday morning stamping friends. We’re halfway through the week already. Hope you are having a good week so far.
Last night was our Stamp Camp Card Class. On of the cards one of the ladies picked used the Brights DSP. I only had one of each color so everyone had a different color card. I had scrap pieces left over from their cards so I decided to make a card with them. If you’d like to see a quick video of how I made this card, Click Here to go to my Instagram Reels. Here is my card for today
I used the Stampin’ Up! Labeled With Love Bundle along with the Brights 6 X 6 Designer Series Paper for my card today.
I adhered 5 panels of Brights DSP to a Basic White card front using Liquid Glue. I adhered the layered panel to a Basic Black card base using Liquid Glue.
On a panel of Basic White, I stamped the frame image from the Stampin Up! Labeled With Love Photopolymer Stamp Set in Lemon Lie Twist Ink. I stamped the sentiment from the Labeled With Love stamp set in Tuxedo Black Ink inside the frame. I cut the sentiment out using the Labeled With Love Dies.
I adhered a piece of Black Baker’s Twine from the Baker’s Twine Essential Pack to the card front using Stampin’ Seal. I adhered the sentiment over the baker’s twine using Stampin’ Dimensionals. I added a few Transparent Adhesive-Backed Dots to the card front.
On the inside, I stamped the sentiment from the Labeled With Love stamp set in Tuxedo Black Ink. I adhered 2 more strips of Brights DSP to either side of the panel. I stamped the outline butterfly image from the Labeled With Love stamp set above the sentiment in Tuxedo Black Ink. I stamped the solid butterfly image from the Labeled With Love stamp set over the outlined image in Lemon Lime Twist Ink. I adhered the Basic White panel to a Basic White mat then to the inside of the Basic Black card base.
To finish my card, I decorated a Basic White Medium Envelope. I stamped the outline butterfly image from the Labeled With Love stamp set in Tuxedo Black Ink on the envelope front. I stamped the solid butterfly image from the Labeled With Love stamp set in Lemon Lime Twist Ink over the outlined image. I adhered a panel of the Brights DSP to the envelope flap.
Thank you for stopping by my blog today. I hope you like the card and will give it a try. Happy Stamping!!
If you need any stamping supplies, I’d love to be your Demonstrator. Just click HERE to go directly to my online store or drop me an email if you have any questions.
MY CURRENT HOST CODE IS: PKXMFP73
Use this host code when placing an order with me. When you order $50 or greater you will receive a free gift from me! If your order is over $150, please do not use this code, but you’ll still get the free gift. The free gift is your choice of any 1 item valued up to $10.00 from the 2024-2025Annual Catalog, or from the Online Exclusives! Unfortunately, packs of cardstock are no longer an option for a free gift. Shipping has become too expensive to ship and it’s costing me as much to ship as the cardstock costs. For any orders $50 or more I will also send you my monthly class tutorials. Click HERE or go to my Customer Rewards for more details and to see what this month’s tutorials are.
Please remember to use my current Host Code and make sure that you can see my name on the final checkout page listed as your Demonstrator when you order so that you know that you’re ordering with me, and you’ll get my rewards!
In response to changing policies at Stampin’ Up – I’m adjusting my Ordering Gift policy as well. I’m having to get a little more tough on the adding of Host codes when you place your order thru my Online Store.
Not to worry – you’re still going to get that $10 ordering gift for orders of $50 (before shipping & tax) or greater. And the gift is still any 1 SU! product up to that $10 value – which includes some of our fun Host Sets!
But – if you DO NOT use the Host code for your orders of less than $150 (this is the RETAIL total before Shipping & Handling), then you’ll have two options:
You’ll need to call Stampin’ Up! (1-800-Stamp-Up) and ask them to add it for you. They’re very helpful and will get it done quickly! OR….
If your order was over the $50 threshold but under $150, then…you’ll forfeit that $10 ordering gift and rewards – this is the Bummer Option – and I REALLY don’t want to do this, SO please remember to add my Current Host Code.
Starting TODAY!! 10% Off Stamp & Die Set Bundles and
Stampin’ Cut & Emboss Machines June 5-30!!
Everyone loves a good deal, which is why Stampin’ Up! is offering an additional 10% off all stamp and die bundles! Between June 5-30, take advantage of the sale and add some new bundles to your collection!! Plus, save 10% on the Stampin’ Cut & Emboss Machine and the Mini Stampin’ Cut & Emboss Machine!! These machines make the perfect crafting partner for stamp and die bundles!
PROMOTION DETAILS
Sales Period: June 5-30, 2024 Ordering Deadline: June 30, 2024 at 11:59 p.m. (MT)
Get an additional 10% discount on stamp and die bundles only. This excludes suite collections, stamp and punch bundles, bundles not yet released to customers, and any other bundles*.
Save 10% on Stampin’ Cut & Emboss Machine and Mini Stampin’ Cut & Emboss Machine (white and Boho Blue).
The 10% discount applies automatically to stamp and die bundles in all orders including Starter Kit orders placed between June 5-30, 2024.
*Please note Close to My Heart products are not included in this promotion.
YAY for a great sale!! You can see the stamp and die set bundles in the online store right Here and the Stampin’ Cut & Emboss Machines Here (note that the machines only will be on sale, the accessories are note included). Get your orders ready and save beginning June 5!
***As an added bonus, Demonstrators get the additional 10% discount on bundles and machines too! So purchase the Starter Kit in May and get the free In Color items (see the details above) and then get the additional 10% discount on top of your Demonstrator discount on bundles and machines from June 5-30!!
I have updated my Retirement List. If you missed out on something from the 2023-2024 Annual Catalog, the January – April 2024 Mini Catalog or maybe even something a little older you might want to check out my list. I’m selling my retired items at 1/2the catalog prices. Click Here to go to my Retirement List.
Subscribe to Paper Pumpkin for a monthly, all-inclusive crafting kit that’s a fun surprise! Each kit includes a photopolymer stamp set, Classic Stampin’ Spot, and step by step instructions to complete exclusive paper craft projects, including cards, tags, and gift packaging. And don’t miss the special add-on that coordinates with the next three months!
Celebrate the sweet things in life with textured, artistic cards. Featuring the new 2024–2026 In Colors!
Makes 9 cards: 3 each of 3 designs with 9 coordinating envelopes
Iridescent glimmer sentiments and precut paper pieces
Vellum accents, iridescent pearls, and linen thread
Coordinating colors: Poppy Parade, Peach Pie, Lemon Lolly, Shy Shamrock (Classic Stampin’ Spot), Pool Party, Pretty In Pink
Thanks and Beyond Add On Dies
Dies #164397 Price $12.00
This exclusive add-on coordinates with the three upcoming kits! Paper Pumpkin subscribers can purchase it beginning 11 March. The add-on is available only while supplies last, so it’s best to shop early!
Subscribe to the April Paper Pumpkin Kit between 11 March and 10 April by clicking here!
Note: Supplies may be limited toward the end of the subscription period.
Good Sunday morning stamping friends. How is everyone’s weekend going? Does anyone have plans for tomorrow yet? We’ll be having our yearly Memorial Day picnic and we’ll be celebrating my daughter’s and Coraline’s birthdays. Today is both of their birthday’s we have just always celebrated Kara’s on Memorial Day.
I have a quick and easy card for you today. I used a red, I hardly ever use red since I always get all inky from it. If you’d like to see a quick video of how I made this card, Click Here to go to my Instagram Reels. Here is my card for today.
I used the Stampin’ Up! Thoughtful Wishes Cling Stamp Set along with the Brights 6 X 6 Designer Series Paper and Scalloped Contours Dies for my card today.
I adhered a panel of Brights DSP to a Basic Black mat using Stampin’ Seal. I adhered the layered panel to a Poppy Parade card base using Stampin’ Dimensionals.
I cut a panel of Basic White using the Scalloped Contours Dies. Using Post-It Note Tape along the bottom and sides of the panel, I stamped the small flower image from the Thoughtful Wishes stamp set in Tuxedo Black Ink. I stamped the sentiment from the Thoughtful Wishes stamp set in Tuxedo Black Ink on the top of the panel. I colored the image using Granny Apple Green and Poppy Parade Stampin’ Blends Markers. I stamped teh splotch image from the Thoughtful Wishes stamp set in Poppy Parade Ink, stamping off 2 times on scrap paper first, around the flowers.
I wrapped a piece of Black Baker’s Twine around the bottom of the panel and tied a bow. I adhered the artwork to the card front using Stampin’ Dimensionals. I added a few Brushed Brass Butterflies to the card front.
On the inside, I stamped the sentiment from the Thoughtful Wishes stamp set in Tuxedo Black Ink on a panel of Basic White. I stamped the small flower image from the Thoughtful Wishes stamp set in Tuxedo Black Ink on the bottom of the panel. I colored the images using Granny Apple Green & Poppy Parade Stampin’ Blends Markers. I stamped the splotch image from the Thoughtful Wishes stamp set in Poppy Parade Ink, stamping off on scrap paper first, around the flowers. I adhered the Basic White panel to a Basic Black mat then to the inside of the Poppy Parade card base.
To finish my card, I decorated a Basic White Medium Envelope. I stamped the small flower image from the Thoughtful Wishes stamp set in Tuxedo Black Ink on the envelope front. I colored the image using Granny Apple Green and Poppy Parade Stampin’ Blends Markers. I stamped the splotch image from the Thoughtful Wishes stamp set in Poppy Parade Ink, stamping off on scrap paper first. I adhered a panel of the Brights DSP to the envelope flap.
Thank you for stopping by my blog today. I hope you like the cards and will give it a try. Happy Stamping!!
If you need any stamping supplies, I’d love to be your Demonstrator. Just click HERE to go directly to my online store or drop me an email if you have any questions.
MY CURRENT HOST CODE IS: 6C44QBJA
Use this host code when placing an order with me. When you order $50 or greater you will receive a free gift from me! If your order is over $150, please do not use this code, but you’ll still get the free gift. The free gift is your choice of any 1 item valued up to $10.00 from the 2024-2025Annual Catalog, or from the Online Exclusives! Unfortunately, packs of cardstock are no longer an option for a free gift. Shipping has become too expensive to ship and it’s costing me as much to ship as the cardstock costs. For any orders $50 or more I will also send you my monthly class tutorials. Click HERE or go to my Customer Rewards for more details and to see what this month’s tutorials are.
Please remember to use my current Host Code and make sure that you can see my name on the final checkout page listed as your Demonstrator when you order so that you know that you’re ordering with me, and you’ll get my rewards!
In response to changing policies at Stampin’ Up – I’m adjusting my Ordering Gift policy as well. I’m having to get a little more tough on the adding of Host codes when you place your order thru my Online Store.
Not to worry – you’re still going to get that $10 ordering gift for orders of $50 (before shipping & tax) or greater. And the gift is still any 1 SU! product up to that $10 value – which includes some of our fun Host Sets!
But – if you DO NOT use the Host code for your orders of less than $150 (this is the RETAIL total before Shipping & Handling), then you’ll have two options:
You’ll need to call Stampin’ Up! (1-800-Stamp-Up) and ask them to add it for you. They’re very helpful and will get it done quickly! OR….
If your order was over the $50 threshold but under $150, then…you’ll forfeit that $10 ordering gift and rewards – this is the Bummer Option – and I REALLY don’t want to do this, SO please remember to add my Current Host Code.
If you’re going to be placing an order of $125 or more, you might want to consider this Starter Kit Joining Special.
Exciting News! Between 1–31 May, anyone who becomes a Stampin’ Up! demonstrator will receive four 2024–2026 In Color products in their Starter Kit for FREE!
In addition to the 2024-2026 In-Color products, new demonstrators will pick $125 USD worth of products of their choice. That’s $207 in products for only $99 and it all ships for FREE. You will also receive free business supplies in case you want to make this a business. Not to mention all the fun that comes with being a part of our wonderful crafting community.
When you join as a new demonstrator, all In Color products will be automatically added to their Starter Kit. Click Here for a PDF printable flyer of all the products you’ll get.
STARTER KIT SPECIAL DETAILS
Promotion Start Date: May 1, 2024
Deadline to Join: May 31, 2024 at 11:59 PM MT
In addition to the regular $125 worth of products of your choice for just $99, new demonstrators will receive the following products (an $82 value!!) in their Starter Kit at no additional cost:
2024–2026 In Color Classic Stampin’ Pad Bundle
2024–2026 In Color 8-1/2″ x 11″ Card Stock
2024–2026 In Color 6″ x 6″ Designer Series Paper
2024–2026 In Color Stampin’ Write Markers
All Starter Kits ship for FREE!!
If you’d like to join our team, we’d love to have you! Once you join, you’ll get at least a 20% discount on all of your Stampin’ Up! purchases and you can preorder from the upcoming catalogs!
We welcome all types of Demonstrators from those only purchasing to get the discount for themselves to those who want to run a business and those anywhere in between! We’re a relaxed group that loves to stamp with no pressure to sell!
Demonstrators get lots of perks including at least a 20% discount on all orders that you place as a Demonstrator, invitations to Stampin’ Up! Demonstrator events and preordering from upcoming catalogs and promotions!
There is no commitment and no penalty if you decide that being a Demonstrator isn’t right for you. Why not give it a try? We have a fun Facebook page where we chat a lot and we do virtual meetings monthly and in-person meetings quarterly.
What a great time to join and get all the new 2024-2026 In-Color products. Contact me @ creativestampingdesigns@gmail.com. I would love to have you on my team. Contact me today about joining May 1st.
Subscribe to Paper Pumpkin for a monthly, all-inclusive crafting kit that’s a fun surprise! Each kit includes a photopolymer stamp set, Classic Stampin’ Spot, and step by step instructions to complete exclusive paper craft projects, including cards, tags, and gift packaging. And don’t miss the special add-on that coordinates with the next three months!
Celebrate the sweet things in life with textured, artistic cards. Featuring the new 2024–2026 In Colors!
Makes 9 cards: 3 each of 3 designs with 9 coordinating envelopes
Iridescent glimmer sentiments and precut paper pieces
Vellum accents, iridescent pearls, and linen thread
Coordinating colors: Poppy Parade, Peach Pie, Lemon Lolly, Shy Shamrock (Classic Stampin’ Spot), Pool Party, Pretty In Pink
Thanks and Beyond Add On Dies
Dies #164397 Price $12.00
This exclusive add-on coordinates with the three upcoming kits! Paper Pumpkin subscribers can purchase it beginning 11 March. The add-on is available only while supplies last, so it’s best to shop early!
Subscribe to the April Paper Pumpkin Kit between 11 March and 10 April by clicking here!
Note: Supplies may be limited toward the end of the subscription period.
Good Sunday morning my stamping friends. How is everyone’s weekend going? I’ll be at the dog bakery today hopefully playing with the fur friends that stop in. It’s supposed to be a bit warmer here today, so maybe a lot will be out for walks and will stop in.
Today I played with one of my favorite flower bundles from the January-April 2023 Mini Catalos and dies from the Annual Catalog. Here’s my card for today.
I used the Stampin’ Up! Marigold Moments Bundle and the Split Card Textures Dies for my card today.
I started by cutting a panel of Basic White cardstock using the Split Card Textures Dies. I adhered the die cut panel to a Merry Merlot card baes using Multipurpose Liquid Glue. On the top of the panel, I stamped the sentient from the Stampin’ Up! Marigold Moments Photopolymer Stap Set in Merry Merlot Ink.
On a panel of Basic White cardstock, I stamped the stem image from the Marigold Moments stamp set in Mossy Meadow Ink. I stamped the large solid flower image from the Marigold Moments stamp set in Mango Melody Ink. I stamped the large, detailed flower image from the Marigold Moments stamp set in Merry Merlot Ink over the solid image. I cut the images out using the Marigold Moments Dies.
I adhered the die cut stem and flower image to the card front using Stampin’ Dimensionals. I added a few Mango Melody Adhesive-Backed Milky Dots to the card front.
On the inside, I stamped the sentient from the Marigold Moments stamp set in Merry Merlot Ink on a Basic White panel. I stamped the small stem image from the Marigold Moments stamp set in Mossy Meadow Ink on the bottom of the panel. I stamped the small solid flower image from the Marigold Moments stamp set in Mango Melody Ink on top of the stem and the small, detailed flower image in Merry Merlot Ink on top of the solid image. I adhered the Basic White panel to a Mango Melody mat then to the inside of the Merry Merlot card base.
To finish my card, I decorated a Basic White Medium Envelope. I stamped the small stem image from the Marigold Moments stamp set on the envelope front in Mossy Meadow Ink. I stamped the small solid flower image from the Marigold Moments stamp set in Mango Melody Ink and the detailed flower image in Merry Merlot Ink. I adhered a panel of the Brights 6 X 6 Designer Series Paper to the envelope flap.
Thank you for stopping by my blog today. I hope you like my card and will give it a try. Happy Stamping!!
If you need any stamping supplies, I’d love to be your Demonstrator. Just click HERE to go directly to my online store or drop me an email if you have any questions.
MY CURRENT HOST CODE IS: BFQ24SXS
Use this host code when placing an order with me. When you order $50 or greater you will receive a free gift from me! If your order is over $150, please do not use this code, but you’ll still get the free gift. The free gift is your choice of any 1 item valued up to $10.00 from the 2022-2023 Annual Catalog or the January-April 2023 Mini Catalog! Unfortunately, packs of cardstock are no longer an option for a free gift. Shipping has become too expensive to ship and it’s costing me as much to ship as the cardstock costs. For any orders $50 or more I will also send you my monthly class tutorials. Click HERE or go to my Customer Rewards for more details and to see what this month’s tutorials are.
Please remember to use my current Host Code and make sure that you can see my name on the final checkout page listed as your Demonstrator when you order so that you know that you’re ordering with me, and you’ll get my rewards!
In response to changing policies at Stampin’ Up – I’m adjusting my Ordering Gift policy as well. I’m having to get a little more tough on the adding of Host codes when you place your order thru my Online Store.
Not to worry – you’re still going to get that $10 ordering gift for orders of $50 (before shipping & tax) or greater. And the gift is still any 1 SU! product up to that $10 value – which includes some of our fun Host Sets!
But – if you DO NOT use the Host code for your orders of less than $150 (this is the RETAIL total before Shipping & Handling), then you’ll have two options:
You’ll need to call Stampin’ Up! (1-800-Stamp-Up) and ask them to add it for you. They’re very helpful and will get it done quickly! OR….
If your order was over the $50 threshold but under $150, then…you’ll forfeit that $10 ordering gift and rewards – this is the Bummer Option – and I REALLY don’t want to do this, SO please remember to add my Current Host Code.
Stampin’ Up! has some new items to pick from at the $50 level and $100 level during Sale-a-bration! They are all items from the current catalog and they’re all available in addition to the Sale-a-bration exclusives from the Sale-a-bration 2023 Brochure!
Click Here for a printable PDF or the New Items that have been added. Head over to my Online Store to shop and pick up some of those new Sale-a-bration items that have been added.
Please note that you must use the item numbers included on the linked flyer in order to redeem these items as Sale-A-Bration items.
I wanted to let you know about something that’s coming on March 1, 2023. Stampin’ Up! is going to be having Online Exclusive Products and the first will be available starting March 1st. Click Here for a printable PDF flyer with the items that will be available. If you like what you see, there is a way you can get them NOW. If you join Stampin’ Up! before the end of February, you can either add the items to your starter kit, or you can pre-order them once you join. This is just one of the perks of being a demonstrator. I’ll have mine Monday and I can’t wait to see it all in person.
Joining Stampin’ Up! as a demonstrator offers some fabulous opportunities, including:
Becoming part of our wonderful community
Attending exclusive demonstrator-only events
Having early access to products
Receiving a copy of our catalogs early
Participating in philanthropic events
Getting a 20% discount on our magnificent coordinating products
Joining our exclusive demonstrator-only Facebook group
Having the opportunity to earn a supplemental income
Receiving training information and accessing resources to help you through your first year and beyond
Bonus: Since it’s Sale-A-Bration, now is an excellent time to join and take advantage of the Join offer!
I would LOVE to have you on my team. Don’t wait until the last minute, contact me today and we can talk about you joining!
Amazing Joining Special during Sale-a-bration January 5 – February 28
Stampin’ Up! has an amazingly awesome joining special. You get to choose what you want. All the options ship for free and include a past Paper Pumpkin Kit along with some business supplies in case you want to make this a business. There is NoObligation to sell, you do NOT have to use this as a business, you can join just to enjoy the discount for yourself. I would LOVE to have you on my team. Join as a hobby demonstrator and enjoy all the benefits.
Option #1 This exclusive Boho Blue Mini Stampin’ Cut & Emboss Machine ($63 value) + Your choice of $175 of Stampin’ Up! products for only $129.00. The Boho Blue is one of the new In-Colors coming for 2023-2025.
Option #2 The original White Mini Stampin’ Cut & Emboss Machine (a $63 value), + Your choice of $175 of Stampin’ Up! products for only $129.00
Option #3. Your choice of $175 of Stampin’ Up! products for only $99.00.
If you have a LONG shopping list, this is a great way to get everything you always want at a discount. Enjoy at least a 20% discount on the products you purchase. Why wait, this is such an awesome deal, and it only sticks around until February 28th. Join now and start enjoying that discount right away!!! Contact me at creativestampingdesigns@gmail.com and we can talk about you joining. We have people on our team from all over the United States. We get together monthly via Zoom; we have team Facebook pages where we share what we make and ask questions. This was one of the best decisions I’ve ever made, I’ve made a lot of new friends from all over.
Get ready for the latest addition to the Kits Collection by Stampin’ Up! The Wreath of Blooms Kit gives you everything you need to make your own home decor piece. Roll and shape the precut pieces and put your wreath on display!
This month’s kit includes:
One 8″ (20.3 cm) diameter chipboard wreath.
Precut paper pieces that can be rolled and shaped into three-dimensional blossoms.
Multicolored brads to keep everything together.
Thick twine to hang your wreath.
Enough adhesive* to complete the project.
Coordinating colors: Cajun Craze, Calypso Coral, Crumb Cake, Garden Green, Night of Navy, Pear Pizzazz, Petal Pink, So Saffron, white.
*Please note that you will need a hot glue gun for this project, which is not included in the kit.
Make cloudy days a little brighter with the Sunshine & Smiles Paper Pumpkin Kit! This kit includes nine sweet and sunny cards—three each of three designs. If someone you know is weathering a storm, this kit is just what you’ll need to create cards that are sure to brighten their day!
PEEK THROUGH CARDS
Catch a glimpse of sunshine through those springtime showers with this kit’s playful peek-through cards! Each card includes an open window in the front, perfect for adding a touch of dimension and layering! You and your customers will have fun crafting with these cards—rain or shine!
AND for the first time ever, we’ve got a coordinating die add-on! (Stampin’ Cut & Emboss Machine sold separately). Keep reading to learn more!
This kit includes:
Everything you need to create 9 radiant cards—3 each of 3 designs—and 9 coordinating envelopes.
A sweet springtime photopolymer stamp set.
A Mango Melody Stampin’ Spot
A fun peek-through window scene on each card!
Cute precut critters and labels, fun raindrop embellishments, and more!
Finished card size: 5-1/2″ x 4-1/4″ (14 x 10.8 cm)
Good Thursday morning my stamping friends welcome to our Happy Inkin’ Thursday Blog Hop. I hope everyone is doing well today. If you are hopping over from Akiko Sudano’s blog, thank you for stopping by. This week we have a Theme Challenge. Here is my card using this week’s Theme.
I used the Butterflies & Flowers Layering Decorative Masks along with the Stampin’ Up! Lovely You Cling Stamp Set and Brights 6 X 6 Designer Series Paper for my card today.
I started with a Basic White card front and using my Blending Brushes and the Butterflies & Flowers Masks I added Bermuda Bay Ink with the open butterfly mask on the top and bottom of the panel. I placed the detail butterfly mask over the inked image and added Pacific Point Ink. I embossed the panel using my Painted Texture 3D Embossing Folder.
I adhered a panel of the Brights DSP to a Coastal Cabana card base using Multipurpose Liquid Glue. On a strip of Basic White cardstock, I stamped the sentiment from Lovey You stamp set in Pacific Point Ink. I cut the sentiment out using my Label Me Fancy Punch. I threaded a length of White 3/8″ Glittered Organdy Ribbon through the 2 ends and adhered it to the back of the card front using Tear & Tape.
I adhered the card front to the card base using Multipurpose Liquid Glue. I added a few Coastal Cabana Playing with Patterns Resin Dots to the artwork and a couple Brushed Brass Butterflies to the punched sentiment.
On the inside I stamped the sentiment from the Through It Together stamp set in Pacific Point Ink on a Basic White panel. I stamped the flower image from the Lovely You stamp set in Bermuda Bay Ink, stamping off once on scrap paper, on either side of the sentiment. I adhered a strip of the Brights DSP to the bottom of the panel. I adhered the Basic White panel to a Bermuda Bay mat and then to the inside of the Coastal Cabana card base.
To complete my card, I decorated a Basic White Medium Envelope. I adhered a strip of the Brights DSP to the envelope front and a panel to the envelope flap.
Thank you for visiting my blog today. I hope you liked my card and will give it a try. Now that you’ve seen my card, take a minute to hop through and see everyone’s projects today. If you click on the Next Blog button, you’ll go to Tara’s page. Or you can just click on the names below to go directly to all their blogs! Happy Hopping!!
If you need any stamping supplies, I’d love to be your Demonstrator. Just click HERE to go directly to my online store or drop me an email if you have any questions.
MY CURRENT HOST CODE IS: XXM77BHN
Use this host code when placing an order with me. When you order $50 or greater you will receive a free gift from me! If your order is over $150, please do not use this code, but you’ll still get the free gift. The free gift is your choice of any 1 item valued up to $10.00 from the 2021-2022 Annual Catalog or the January – June 2022 Mini Catalog!For any orders $50 or more I will also send you my monthly class tutorials. Click HERE or go to my Customer Rewards for more details and to see what this month’s tutorials are.
Please remember to use my current Host Code and make sure that you can see my name on the final checkout page listed as your Demonstrator when you order so that you know that you’re ordering with me and you’ll get my rewards!
Today, April 21 only, Stampin’ Up! is offering FREE shipping on orders subtotaling $75USD | $100 CAD or more. This incredible deal lasts for 24 hours only!!!
FREE SHIPPING | 21 APRIL 2022
ORDERING INFORMATION:
All order types qualify for this promotion.
Free shipping applies after the qualifying amount (per market) has been met.
The minimum qualifying amount to receive free shipping is $75 USD | $100 CAD or more (before tax).
If you are using a coupon code or product credit, please remember that they are non-commissionable and will lower the order’s retail amount. The order must still meet the qualifying threshold to be eligible for free shipping.
Free shipping only applies during the 24-hour period the promotion is live in each market; this means that the order must be opened and closed on 21 April 2022.
With the exception of month-to-month Paper Pumpkin subscriptions, all Stampin’ Up! products qualify for the promotion.
Prepaid Paper Pumpkin subscriptions are eligible for FREE shipping under the same rules as all other Stampin’ Up! items during the promotion.
Month-to-month Paper Pumpkin subscriptions are NOT eligible for free shipping. Subscriptions billed and shipped this month will be charged for the normal amount ($23.50 USD | $32.50 CAD shipping included) + tax.
The free shipping promotion does not cover the additional cost for expedited shipping.
The Stampin’ Up! 2021-2022 Annual Catalog Retiring Lists have posted, and the Last Chance Products Sale has begun!
Click here for a printable PDF list of all retiring items including the discounted prices.
LAST CHANCE PRODUCTS DETAILS
All products are available while supplies last, and there are no purchase limits, so order soon (or order now so that you don’t have to worry!) to make sure that you are able to get the items that you are wanting!
Discounted items can be added to a Starter Kit and redeemed as a 50% off item or with Stampin’ Rewards.
Stamp Sets are not guaranteed during this promotion and are while supplies last.
ORDER DEADLINES: May 2, 2022, at 11:50 PM MT
The 2020-2022 In Colors – Cinnamon Cider, Just Jade, Bumblebee, Magenta Madness, and Misty Moonlight will be going away. I HIGHLY encourage you to stock up early on the 2020-2022 In-Color Cardstock, Ink Pads, and Refills as soon as possible, as these items sell out quickly!
Let me know if you have any questions. Happy shopping!
Create magic with the NEW 2022–2024 In Colors with this Paper Pumpkin kit! With vivid pops of green and red and a range of blues, these colors are perfect for fun festivities. Send your best wishes or happy moments with the large bold lettering and gorgeous gold foil details. Plus, you can also send gift cards with the included coordinating gift card holders!
ENDLESS COORDINATION
The Celebrating In Color Paper Pumpkin Kit is not just a gorgeous kit on its own, it can become a dazzling addition to all the coordinating 2022–2024 In Color products in the upcoming 2022–2023 Annual Catalog! There’s a whole new range of colors and products to mix and match with. Make sure you flip through the catalog and pick up all the coordinating products that catch your eye, and then make sure to show us what you come up with. Post your creations on social media using the hashtags #PaperPumpkin and #CelebratingInColor to ensure we see it!
That’s right! Not only does this kit come with 10 stunning cards and coordinating envelopes, it also includes 10 coordinating gift card holders as well. That means you can send your friends, family, or coworkers congratulatory words alongside a well-earned gift card to really show your appreciation for them.
As an added bonus, every May Paper Pumpkin subscriber will get the chance to win a GOLDEN Voucher worth $25 USD | $34 CAD in Stampin’ Up! products! The winners will find their Golden Voucher in their May 2022 Paper Pumpkin box. This is the perfect time to snag coordinating In Color products from the 2022–2023 Annual Catalog that will go live on 3 May 2022 in the online store!
Watch Sara in this video where she goes over her favorite features of the kit.
Good Sunday morning my stamping friends. How is everyone’s weekend going? I worked yesterday and I’m planning on staying in today. It’s cold here in NJ. I don’t mind it a little cold, but not when it makes my bones cold lol.
I played with one of the Sale-a-bration sets for my card today. It’s a set that I looked at when I first got the brochure and said “what am I going to do with that”. After playing a little with it, I like it, I have many other ideas I just have to get on a card now. Here’s my card for today.
I used the Stampin’ Up! Driving By Cling Stamp Set along with the Brights 6 X 6 Designer Series Paper for my card today.
I started by adhering Granny Apple Green and Pacific Point panels of the Brights DSP to a Smoky Slate card base. On a panel of Basic White cardstock I stamped the car image from the Driving By stamp set in Tuxedo Black Ink. I colored the image in using my Light Basic Black, Daffodil Delight and Smoky Slate Stampin’ Blends Markers. I colored the balloons in using my Wink of Stella brush and my Daffodil Delight, Granny Apple Green and Pacific Point stamp pads.
I stamped the sentiment from the Driving By stamp set in Tuxedo Black Ink above the card image. I stamped the Happy Birthday sentiment from the Stampin’ Up! Nut About Squirrels Photopolymer Stamp Set in Tuxedo Black Ink behind the card.
I adhered the Basic White panel to a Smoky Slate mat and then to the card front using Stampin’ Dimensionals.
On the inside I stamped the sentiment from the Driving By stamp set in Tuxedo Black Ink on a Basic White panel. I stamped the car image from the Driving By stamp set on the bottom of the panel in Tuxedo Black Ink. I colored the image in using my Basic Black, Granny Apple Green and Smoky Slate Stampin’ Blends Markers. I colored the balloons the same as I did for the card front. I adhered the Basic White panel to a Smoky Slate mat and then to the inside of the Smoky Slate card base.
To finish my card, I decorated a Basic White Medium Envelope. I adhered a strip of the Brights DSP to the envelope front and a panel to the envelope flap. I stamped just the balloons from the Driving By stamp set up the one side of the envelope and colored them the same as I did on the card.
Thank you for stopping by my blog today. I hope you liked my card and will give it a try. Happy Stamping!!
If you need any stamping supplies, I’d love to be your Demonstrator. Just click HERE to go directly to my online store or drop me an email if you have any questions.
MY CURRENT HOST CODE IS: 6P9HT6GS
Use this host code when placing an order with me. When you order $50 or greater you will receive a free gift from me! If your order is over $150, please do not use this code, but you’ll still get the free gift. The free gift is your choice of any 1 item valued up to $10.00 from the 2020-2021 Annual Catalog or the July-December 2021 Mini Catalog!For any orders $50 or more I will also send you my monthly class tutorials. Click HERE or go to my Customer Rewards for more details and to see what this months tutorials are.
Please remember to use my current Host Code and make sure that you can see my name on the final checkout page listed as your Demonstrator when you order so that you know that you’re ordering with me and you’ll get my rewards!
Did you see that? It’s a mischievous monkey swinging from tree to tree! What about that elephant marching through the mud? Can you catch an antelope galloping in the grass? Grab your binoculars, buckle up, and hop into our off-road truck—there’s so much to see on this safari!
Answer the call of the wild—and your creativity—with the Safari Celebration Paper Pumpkin Kit. This playful, party-themed kit includes all the goodies and gear you need to create nine cards and coordinating envelopes in safari-inspired shapes and patterns you’ll go wild for! Make every occasion a celebration with this month’s amusing animals, beautiful botanicals, and celebratory sentiments.
Don’t monkey around and miss this amazing adventure! Unleash your creativity with February’s wildly fun kit. To explore what’s inside, keep reading!
Details:
This month’s kit contains enough elements to create 9 cards—3 each of 3 designs—and 9 coordinating envelopes. This all-inclusive kit includes printed card bases, die-cut paper pieces, embellishments, adhesive, and more!
The Safari Celebration Paper Pumpkin Kit includes a Rich Razzleberry Classic Stampin’ Spot!
This kit’s stamp set is an uplifting one! Make every occasion a celebration with sentiments that say “yay!”, “fantastic!”, and other fun phrases.
Explore each of our current In Color collections with this colorful kit! Discover designs and paper pieces in Bumblebee (a 2020–2022 In Color), Fresh Freesia (a 2021–2023 In Color), and Soft Succulent (a 2021–2023 In Color).
Sale-a-bration is going on right now. Click Here for a PDF version of the Sale-a-bration brochure. This is my most favorite time of Stampin’ Up! because you get to earn FREE products. There are 7 wonderful stamp sets and 4 gorgeous packs of Designer Series Paper. You can earn all of these FREE with qualifying orders. Who doesn’t like FREE??????
When you are placing your order, don’t forget to use my Current Host Code 6P9HT6GS for all orders under $150.
If you host a party during Sale-a-bration, both you and your guests can earn FREE Sal-a-bration products! Plus, place any party or personal order of $300 or more and receive the exclusive Stampin’ Up! Calming Camellia Stamp Set for FREE! Interested? I can set up a Host Code for you and your friends/family to order with. Drop me a line at creativestampingdesigns@gmail.com. I’d be happy to talk to you about it.
Join The Stampin’ Up! Community During Sale-a-bration and get 2 FREE Stamp Sets
Starting January 4 through February 28 you can get 2 FREE STAMP SETS when you join Stampin’ Up! For just $99 you get to choose $125 of product of your choice from any of the current catalogs and you can also choose any 2 Stamp Sets of your choice (cannot be host or Sale-a-bration sets) absolutely FREE!!! You can end up with $175 in product for just $99. There is no obligation to sell, you can join as a Hobby Demonstrator. Interested??? Ask me how. I’d love to have you on my team, drop me a note at creativestampingdesigns@gmail.com I’d be more than happy to talk to you about it.
Good Sunday morning my stamping friends. How is your weekend going? Is anyone doing anything adventurous and fun?
I used another one of my favorite sets today for a CAS card. Here’s my card for today.
I used the Stampin’ Up! Joyful Life Cling Stamp Set along with the Brights 6 X 6 Designer Series Paper and the Regals 6 X 6 Designer Series Paper for my card today.
I started by embossing a Basic White card front using the Tasteful Textile 3D Embossing Folder. I adhered 2 strips of the Brights DSP in Poppy Parade and Pacific Point and 1 strip of the Garden Green Regals DSP to the card front on an angle. I adhered the card front to a Thick Basic White card base.
Using my Layering Circle Dies I cut the 3rd largest circle and the coordinating scallop circle from a panel of Basic White cardstock. I stamped the image from the Joyful Life stamp set in Tuxedo Black Ink on the circle. I colored the image in using my Crumb Cake, Ivory, Poppy Parade and Smoky Slate Stampin’ Blends Markers and my Garden Green Stampin’ Write Marker. On a scrap of the Pacific Point Brights DSP I stamped the same image from the Joyful Life stamp set in Tuxedo Black Ink and fussy cut the apron out using my Paper Snips and adhered it to the stamped image. I adhered the circle to the scalloped circle and then to the card front.
On a scrap of Basic White cardstock I stamped the sentiment from the Joyful Life stamp set in Tuxedo Black Ink and fussy cut it using my Paper Snips. I adhered the sentiment to the top of the card front.
On the inside I stamped the sentiment from the Stampin‘ Up! Sunny Sentiments Cling Stamp Set in Tuxedo Black Ink on a Basic White panel. I adhered 2 strips of the Garden Green Regals DSP to the corners of the panel. I adhered the Basic White panel to a Garden Green mat and then to the inside of the Thick Basic White card base.
To finish my card I decorated a Basic White Medium Envelope. I adhered a strip of the Brights DSP to the envelope front and a panel to the envelope flap.
Thank you for stopping by my blog today. I hope you liked my card and will give it a try. Happy Stamping!!
If you need any stamping supplies, I’d love to be your Demonstrator. Just click HERE to go directly to my online store or drop me an email if you have any questions.
MY CURRENT HOST CODE IS: BM9R7DQX
Use this host code when you order $50 or greater and receive a free gift from me! If your order is over $150, please do not use this code, but you’ll still get the free gift. The free gift is your choice of any 1 item valued up to $10.00 from the 2020-2021 Annual Catalog or the January-June 2021 Mini Catalog!For any orders $50 or more I will also send you my monthly class tutorials. Click HERE or go to my Customer Rewards for more details and to see what this months tutorials are.
Please remember to use my current Host Code and make sure that you can see my name on the final checkout page listed as your Demonstrator when you order so that you know that you’re ordering with me and you’ll get my rewards!
Stampin’ Up! has added more items to their Clearance Rack. All items are **While Supplies Last**. So don’t wait if there is something you’ve been wanting, grab it while you can.
Santa’s back in a fun and easy tag kit to spruce up your Christmas gifting! The Love, Santa Tag Kit has everything you need to create 12 whimsically designed tags.
That means you’ll find printed die-cut tags and labels, sequin embellishments, pink and white baker’s twine, an exclusive stamp set, a Night of Navy Classic Stampin’ Spot, and more in this all-inclusive kit! You can sleigh ride right in without the prep work.
This is the kit exclusive photopolymer stamp set called Love, Santa!
Kit contains enough supplies to create 12 tags—3 each of 4 designs.
Includes printed die-cut tags, decorative die cuts, adhesive, embellishments, and pink baker’s twine.
Features an exclusive stamp set and a Night of Navy Classic Stampin’ Spot.
Finished tag size: approximately 2-1/2″ x 4-3/4″ (6.4 x 12.1 cm)
Coordinating colors: Bumblebee, Just Jade, Night of Navy, Polished Pink, Poppy Parade
158375 LOVE, SANTA TAG KIT $19.00 USD | $26.00 CAD
Available in English (158375) and French (158376).
Love, Santa Treat Bags – Also Available
And to make Christmas gifting even easier, the Love, Santa Treat Bags (available for purchase separately) are food-safe cellophane bags that coordinate with the Love, Santa tags! The treat bags come in a pack of 12—3 each of 4 festive designs.
That’s right—figuring out how to dress up your gifts this year is no longer a “Claus” for concern! But don’t relax too soon as these products are based on availability!
12 treat bags
3 each of 4 designs
4″ x 9-1/2″ (10.2 x 24.1 cm)
Food safe
158381 LOVE, SANTA TREAT BAGS $7.00 USD | $9.50https://www.youtube.com/embed/p6QuK9rDDSY?version=3&rel=1&showsearch=0&showinfo=1&iv_load_policy=1&fs=1&hl=en&autohide=2&wmode=transparent
Watch this video for more details about the new Christmas Whimsy Kit!
Click on the image for a flyer of all the items coming November 2nd. Want to get it early??? Demonstrators can preorder the items. Contact me at creativestampingdesigns@gmail.com and I’d be happy to talk to you about joining.
When you picture a peaceful Christmas, what comes to mind? Do you see snow outside your window, softly swirling through the sky? A tree trimmed with tinsel, a fire crackling nearby? Maybe you’re dreaming of decorating a holly jolly gingerbread house. Can you catch a whiff of Christmas cookies wafting through the air?
Whatever it is you think about when Christmas comes to town, picture a peaceful Christmas with the Peaceful Christmas Paper Pumpkin Kit! This glimmering and gleaming kit is your creative kickstart to Christmas cardmaking. With sprinkles of snow, shimmering silver skies, and heartwarming holiday wishes, you’ll have enough elements and embellishments to create 10 Christmas cards and coordinating envelopes.
Speaking of coordination, make even more Christmas magic with Peaceful Place products! Our stunning Peaceful Place Suite Collection (item 156277) pairs perfectly with the kit’s components. Brew a cup of cocoa, snuggle up with a soft blanket, and prepare for a cozy craft night in!
Details:
The kit contains enough elements to create 10 Christmas cards—5 each of 2 designs—and coordinating envelopes. This all-inclusive kit includes printed card bases, die-cut paper pieces, embellishments, adhesive, and more!
October’s kit arrives in a cute collectible box covered with enchanting evergreen trees. Use this special, limited-edition box to store your holiday handicrafts, or transform it into a well-wrapped package for a present!
The kit’s contents pair perfectly with the Peaceful Place Suite Collection (item 156277). To continue your Christmas crafting, combine the kit’s components with the suite’s patterned paper, shimmery sequins, and more!
Card size: 4-1/4″ x 5-1/2″ (10.8 x 14 cm)
Envelope size: 4-1/2″ x 5-3/4″ (11.4 x 14.6 cm)
Coordinating colors: Basic Gray, Real Red, Shaded Spruce, silver foil
Subscribe to the October 2021 Paper Pumpkin Kit between 11 September and 10 October at paperpumpkin.com!
Note: Supplies may be limited toward the end of the subscription period.
Good Sunday morning my stamping friends. How is everyone’s weekend going? I was at the Ace yesterday working and it was crazy busy. Everyone buying clean up supplies. It’s sad driving around my areas with all the debris and everyone’s belongings outside on the curb that has been destroyed. We’ve had a lot of loss in our town, between the house that exploded a block away from me and a building collapsed in our town, cars abandoned everywhere. It’s very sad. I’ll be in town today working at the dog bakery, that always brings a smile to me.
I have a CAS card for you today using some sets from the 2021-2022 Annual Catalog. Here’s my card for today.
I used the Stampin’ Up! Create With Friends Photopolymer Stamp Set and the Stampin’ Up! Positive Thoughts Cling Stamp Set for my card today.
I started by adhering a panel of the Brights 6 X 6 Designer Series Paper to a Thick Basic White card base using Multipurpose Liquid Glue.
On a panel of Basic White cardstock I stamped the sentiments from the Create With Friends stamp set in Coastal Cabana and Night of Navy Inks. I adhered the Basic White panel to a Night of Navy mat using Stampin’ Seal and then to the card front using Stampin’ Dimensionals.
I stamped the butterfly image from the Positive Thoughts stamp set twice on a panel on Coastal Cabana card stock in Night of Navy Ink and cut the images out using my Nature’s Thoughts Dies. I adhered the butterflies to the card front using Glue Dots and Stampin’ Dimensionals. I added a few Night of Navy rhinestones from the Holiday Rhinestones Basic Jewels to the card front.
On the inside I stamped the sentiment from the Positive Thoughts stamp set in Night of Navy Ink on a panel of Basic White cardstock. I stamped the butterfly image from the Positive Thoughts stamp set in Coastal Cabana Ink on the panel. I adhered the Basic White panel to a Night of Navy mat using Stampin’ Seal and then to the inside of the Thick Basic White card base using Multipurpose Liquid Glue.
To finish my card I decorated a Basic White Medium Envelope. I stamped the butterfly image from the Positive Thoughts stamp set in Coastal Cabana Ink on the envelope front. I adhered a panel of the Brights DSP to the envelope flap.
Thank you for stopping by my blog today. I hope you liked my CAS card and will give it a try. Happy Stamping!!
If you need any stamping supplies, I’d love to be your Demonstrator. Just click HERE to go directly to my online store or drop me an email if you have any questions.
MY CURRENT HOST CODE IS: JAK446GF
Use this host code when you order $50 or greater and receive a free gift from me! If your order is over $150, please do not use this code, but you’ll still get the free gift. The free gift is your choice of any 1 item valued up to $10.00 from the 2020-2021 Annual Catalog or the January-June 2021 Mini Catalog!For any orders $50 or more I will also send you my monthly class tutorials. Click HERE or go to my Customer Rewards for more details and to see what this months tutorials are.
Please remember to use my current Host Code and make sure that you can see my name on the final checkout page listed as your Demonstrator when you order so that you know that you’re ordering with me and you’ll get my rewards!
Awesome Joining Promotions Until September 30, 2021
There is an AWESOME joining promotion happening! If you purchase the Starter Kit between August 3 and September 30, you’ll get to pick a FREE bundle from this list!
Frosted Gingerbread
Christmas Season
Christmas To Remember
Whimsical Trees
Peaceful Deer
Sweet Little Stockings
Penguin Place
Peaceful Cabin
Arctic Bears
Beauty Of Tomorrow
Gorgeous Leaves
Nature’s Harvest
When you purchase the Starter Kit for $99 + taxes (if applicable), the kit ships for FREE and YOU get to pick $125 in Stampin’ Up! merchandise OF YOUR CHOICE. If you purchase the kit during Sale-a-bration, you’ll get an additional FREE bundle from the select twelve listed above (with a value up to $60.25!!) with your kit! A free bundle in addition to $125 in merchandise for $99, YES PLEASE!!You will also get a past Paper Pumpkin Kit and other supplies free in your kit.
If you are planning on placing an order of $100, you might really want to consider joining. This is such an awesome joining deal, you don’t want to pass it up. There is no obligation to sell, have workshops or do Facebook lives. You can join strictly to be a ‘hobby demonstrator’ and enjoy the 20% discount. I would love to have you on my team!!!You also get to enjoy all the demonstrator perks like early ordering, sneak peeks at what’s coming and best of all the events. Why wait, this is such a great sign up promotions, join now and be a part of our awesome Stampin’ Up! family!!!
If you have any questions about joining, please drop me a note at creativestampingdesigns@gmail.com, I’d love to talk with you about it! You can find more information about joining on my blog @ creativestampingdesigns.com
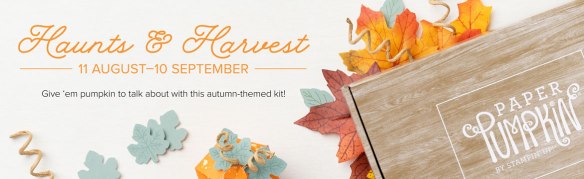
Hay, there! Experience everything the autumn season has to offer with the Haunts & Harvest Paper Pumpkin Kit! This month’s kit includes enough supplies to create 12 treat boxes—4 each of 3 designs. That means you can take your pick of apple, pumpkins, or jack-o-lantern treat boxes! Plus, the Paper Pumpkin box is designed to easily transform into a vintage wheelbarrow for you to display your harvest!
Whether you’re thinking about crisp red apples or you’re ready to carve some spooky jack-o-lanterns (or both!), the Haunts & Harvest Paper Pumpkin Kit—designed in a vivid fall palette—is a hands-on crafting experience for all autumn lovers!
Details:
Kit contains enough supplies to create 12 treat packages—4 each of 3 designs. The all-inclusive kit includes printed die-cut boxes, die-cut sheets, adhesive, and more!
Finished treat box size: 2-1/2″ x 2″ (6.4 x 5.1 cm)
Includes an exclusive stamp set and a Classic Stampin’ Spot


![Basic Black 8-1/2" X 11" Cardstock [ 121045 ]](https://assets1.tamsnetwork.com/images/EC042017NF/121045s.jpg "Basic Black 8-1/2\" X 11\" Cardstock [ 121045 ]")
![Basic White 8 1/2" X 11" Cardstock [ 166780 ]](https://assets1.tamsnetwork.com/images/EC042017NF/166780s.jpg "Basic White 8 1/2\" X 11\" Cardstock [ 166780 ]")
![Basic White 8 1/2" X 11" Thick Cardstock [ 159229 ]](https://assets1.tamsnetwork.com/images/EC042017NF/159229s.jpg "Basic White 8 1/2\" X 11\" Thick Cardstock [ 159229 ]")
![Brights 6" X 6" (15.2 X 15.2 Cm) Designer Series Paper [ 165301 ]](https://assets1.tamsnetwork.com/images/EC042017NF/165301s.jpg "Brights 6\" X 6\" (15.2 X 15.2 Cm) Designer Series Paper [ 165301 ]")
![Regals 6" X 6" (15.2 X 15.2 Cm) Designer Series Paper [ 165304 ]](https://assets1.tamsnetwork.com/images/EC042017NF/165304s.jpg "Regals 6\" X 6\" (15.2 X 15.2 Cm) Designer Series Paper [ 165304 ]")
![Subtles 6" X 6" (15.2 X 15.2 Cm) Designer Series Paper [ 165306 ]](https://assets1.tamsnetwork.com/images/EC042017NF/165306s.jpg "Subtles 6\" X 6\" (15.2 X 15.2 Cm) Designer Series Paper [ 165306 ]")
![2025–2027 In Color™ 6" X 6" (15.2 X 15.2 Cm) Designer Series Paper [ 165300 ]](https://assets1.tamsnetwork.com/images/EC042017NF/165300s.jpg "2025–2027 In Color™ 6\" X 6\" (15.2 X 15.2 Cm) Designer Series Paper [ 165300 ]")
![Bubble Bath Classic Stampin' Pad [ 161664 ]](https://assets1.tamsnetwork.com/images/EC042017NF/161664s.jpg "Bubble Bath Classic Stampin' Pad [ 161664 ]")
![Poppy Parade Classic Stampin' Pad [ 119782 ] (Retired)](https://assets1.tamsnetwork.com/images/EC042017NF/119782s.jpg "Poppy Parade Classic Stampin' Pad [ 119782 ] (Retired)")
![Tuxedo Black Memento Ink Pad [ 132708 ]](https://assets1.tamsnetwork.com/images/EC042017NF/132708s.jpg "Tuxedo Black Memento Ink Pad [ 132708 ]")
![Strawberry Slush 3/8" (1 Cm) Faux Linen Ribbon [ 165274 ]](https://assets1.tamsnetwork.com/images/EC042017NF/165274s.jpg "Strawberry Slush 3/8\" (1 Cm) Faux Linen Ribbon [ 165274 ]")
![Dear Dots [ 165848 ]](https://assets1.tamsnetwork.com/images/EC042017NF/165848s.jpg "Dear Dots [ 165848 ]")
![Basic White Medium Envelopes [ 159236 ]](https://assets1.tamsnetwork.com/images/EC042017NF/159236s.jpg "Basic White Medium Envelopes [ 159236 ]")


![Tear & Tape Adhesive [ 154031 ]](https://assets1.tamsnetwork.com/images/EC042017NF/154031s.jpg "Tear & Tape Adhesive [ 154031 ]")

![Take Your Pick [ 144107 ]](https://assets1.tamsnetwork.com/images/EC042017NF/144107s.jpg "Take Your Pick [ 144107 ]")


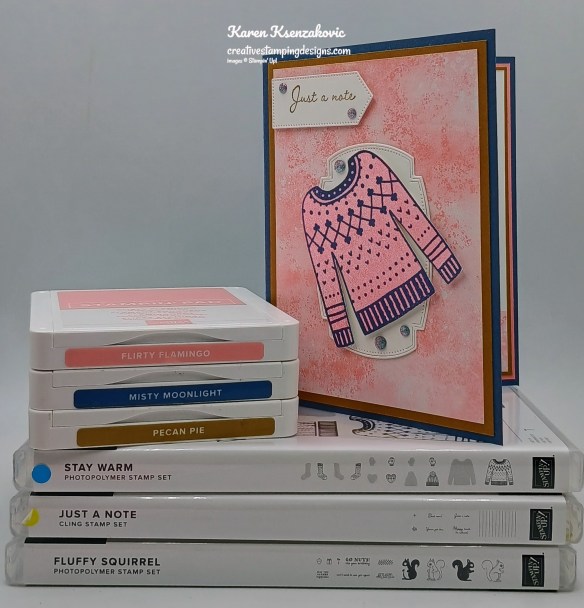

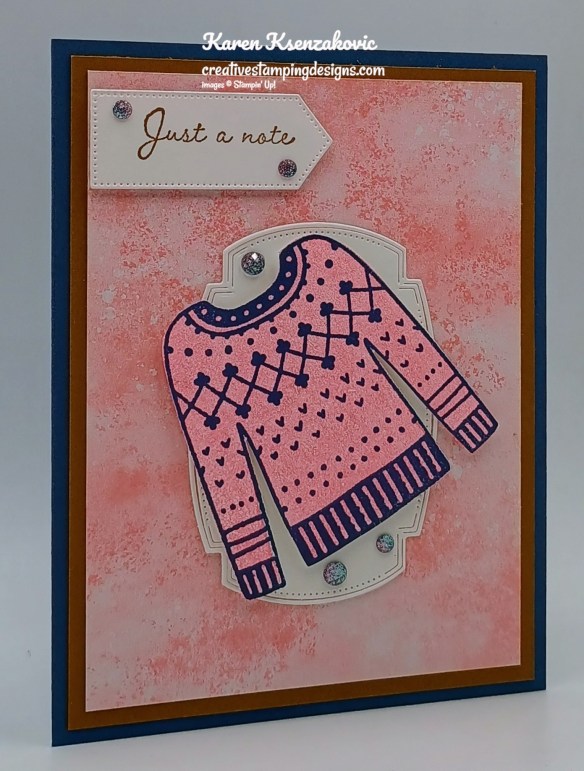
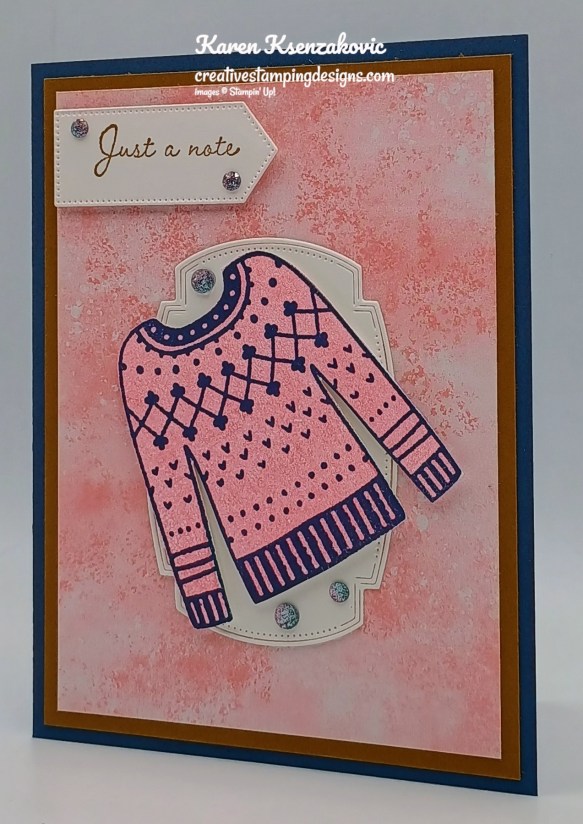
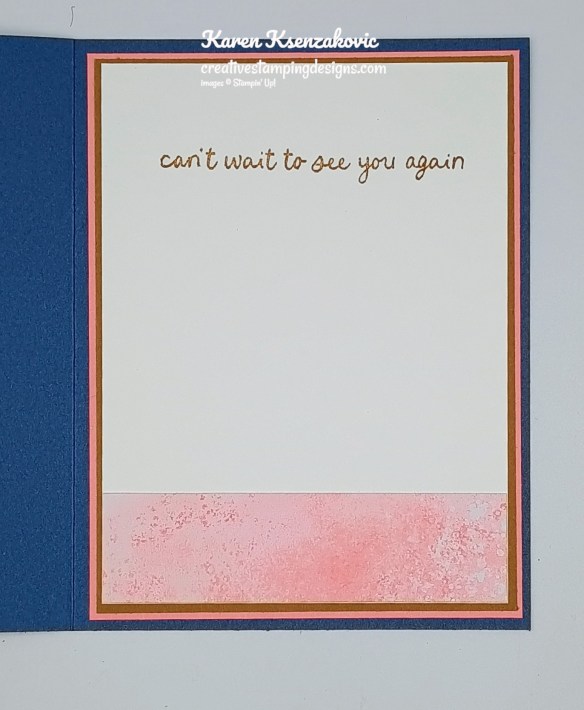
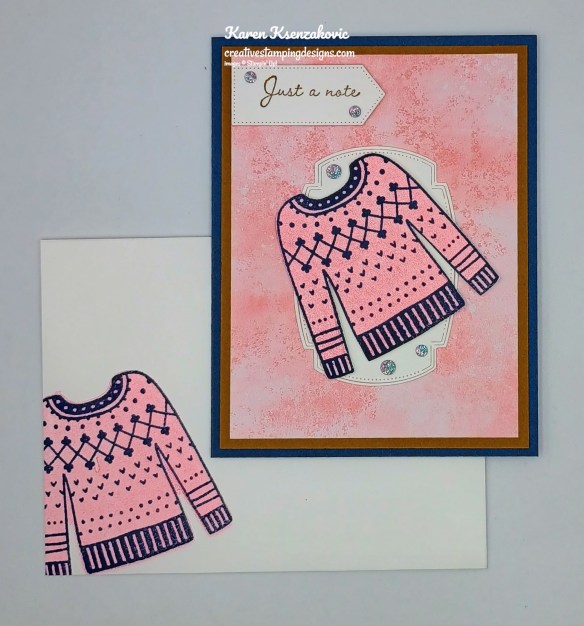
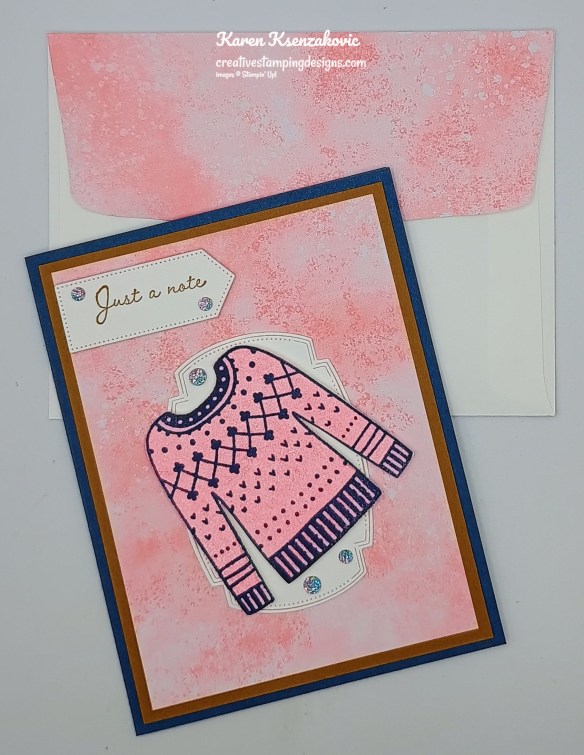

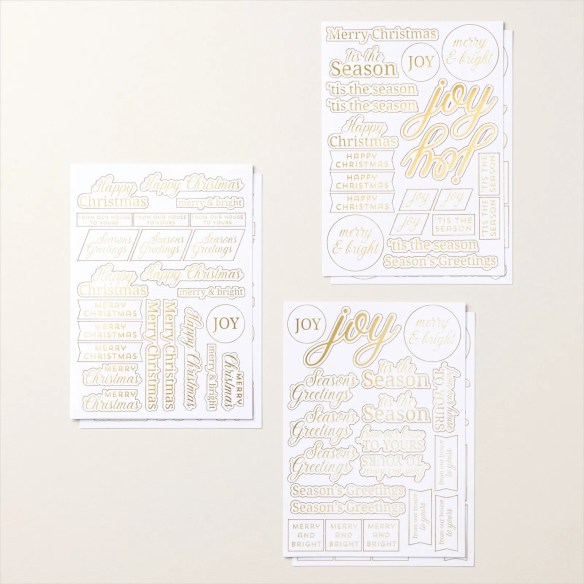

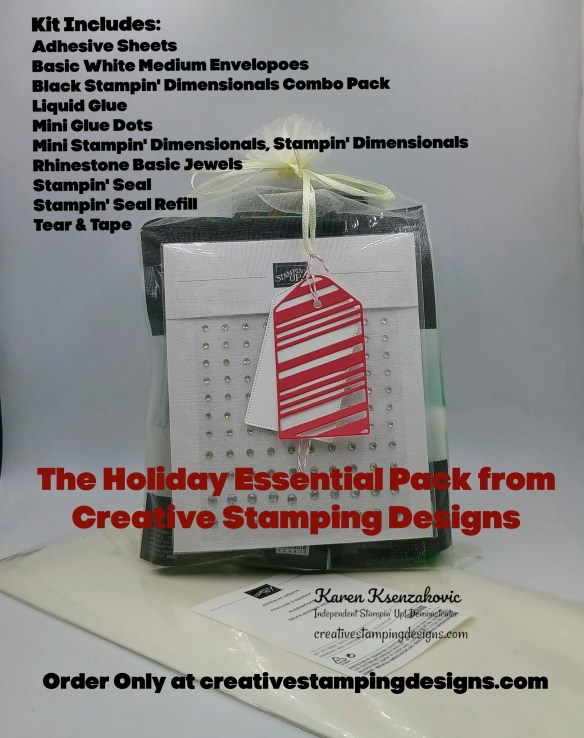
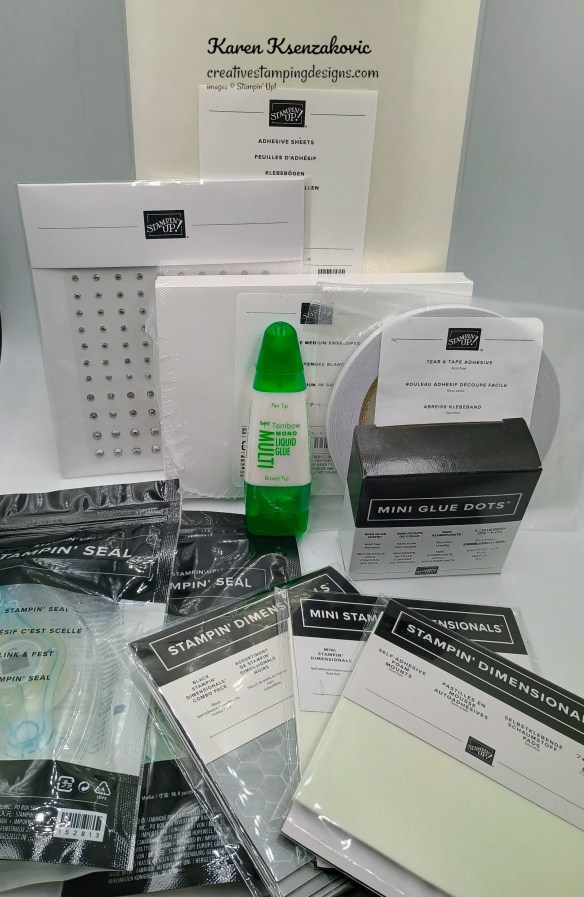
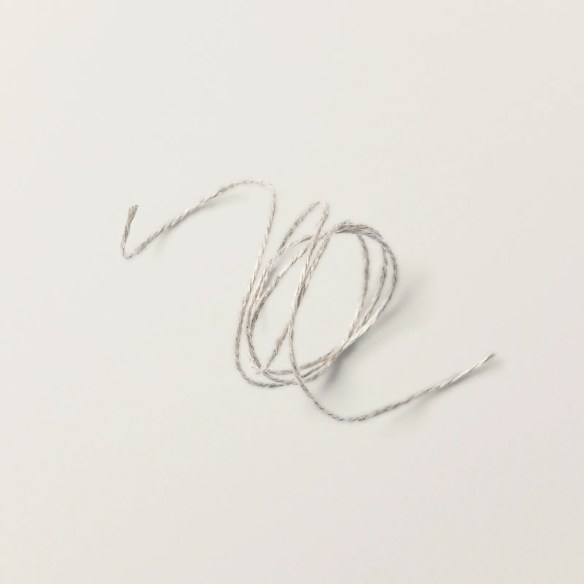
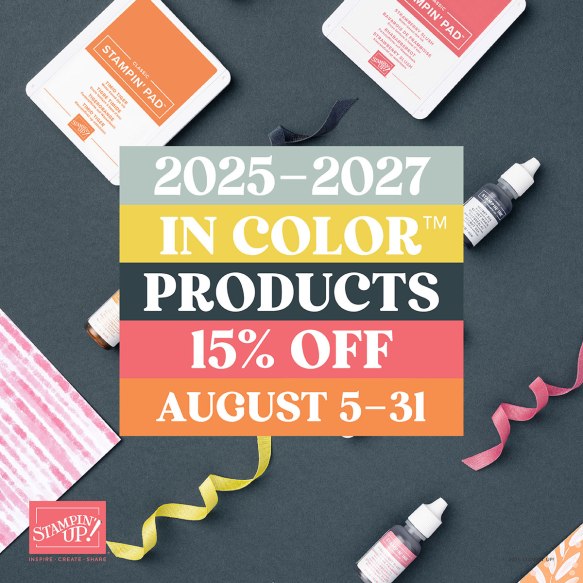
![Just A Note Cling Stamp Set (English) [ 166098 ]](https://assets1.tamsnetwork.com/images/EC042017NF/166098s.jpg "Just A Note Cling Stamp Set (English) [ 166098 ]")
![Flirty Flamingo 8-1/2" X 11" Cardstock [ 141416 ]](https://assets1.tamsnetwork.com/images/EC042017NF/141416s.jpg "Flirty Flamingo 8-1/2\" X 11\" Cardstock [ 141416 ]")
![Misty Moonlight 8-1/2" X 11" Cardstock [ 153081 ]](https://assets1.tamsnetwork.com/images/EC042017NF/153081s.jpg "Misty Moonlight 8-1/2\" X 11\" Cardstock [ 153081 ]")
![Pecan Pie 8 1/2" X 11" Cardstock [ 161717 ]](https://assets1.tamsnetwork.com/images/EC042017NF/161717s.jpg "Pecan Pie 8 1/2\" X 11\" Cardstock [ 161717 ]")
![Flirty Flamingo Classic Stampin' Pad [ 147052 ]](https://assets1.tamsnetwork.com/images/EC042017NF/147052s.jpg "Flirty Flamingo Classic Stampin' Pad [ 147052 ]")
![Misty Moonlight Classic Stampin' Pad [ 153118 ]](https://assets1.tamsnetwork.com/images/EC042017NF/153118s.jpg "Misty Moonlight Classic Stampin' Pad [ 153118 ]")
![Pecan Pie Classic Stampin' Pad [ 161665 ]](https://assets1.tamsnetwork.com/images/EC042017NF/161665s.jpg "Pecan Pie Classic Stampin' Pad [ 161665 ]")
![Two Tone Sparkle Gems [ 164633 ]](https://assets1.tamsnetwork.com/images/EC042017NF/164633s.jpg "Two Tone Sparkle Gems [ 164633 ]")


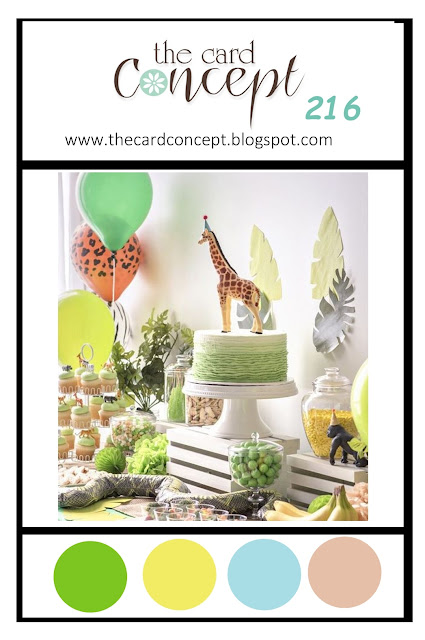
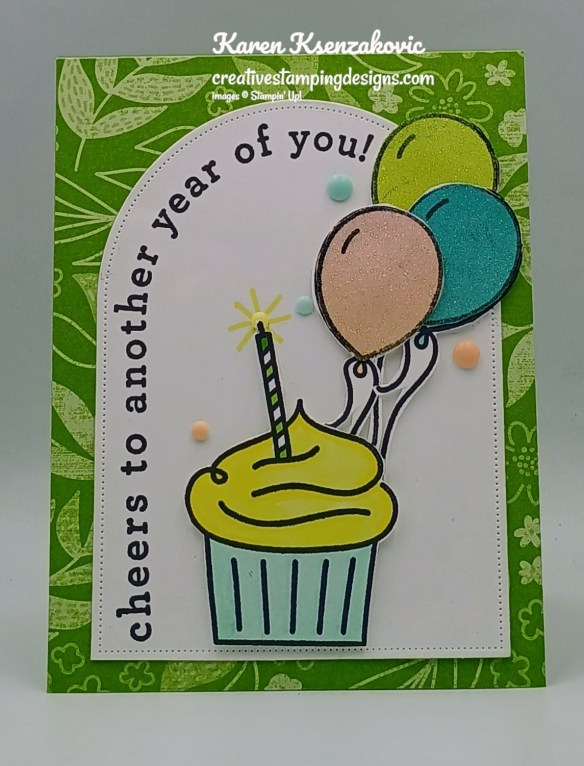


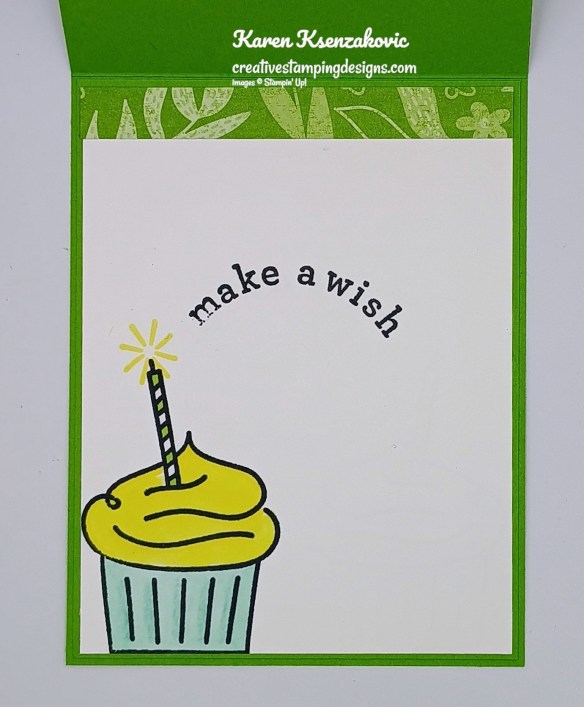


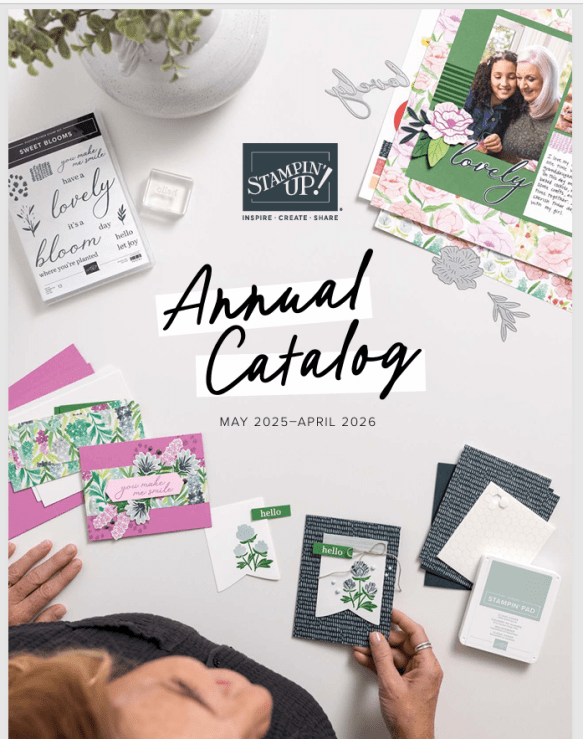

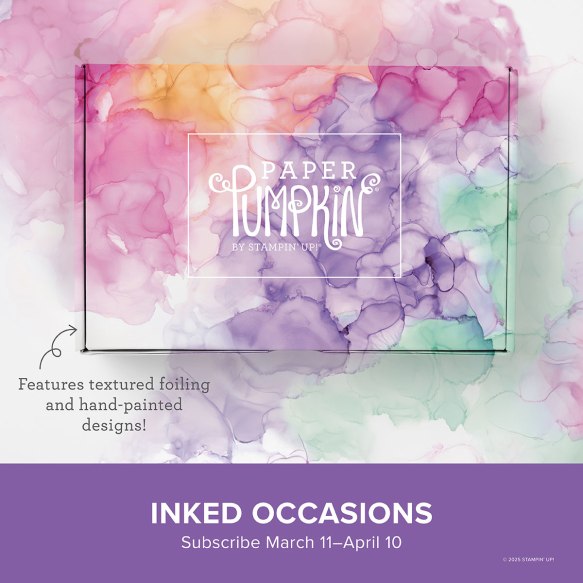

![Arched Wishes Cling Stamp Set (English) [ 165428 ]](https://assets1.tamsnetwork.com/images/EC042017NF/165428s.jpg "Arched Wishes Cling Stamp Set (English) [ 165428 ]")
![Granny Apple Green 8-1/2" X 11" Cardstock [ 146990 ]](https://assets1.tamsnetwork.com/images/EC042017NF/146990s.jpg "Granny Apple Green 8-1/2\" X 11\" Cardstock [ 146990 ]")
![Pastel Ombre Glimmer 12" X 12" (30.5 X 30.5 Cm) Specialty Paper [ 164851 ]](https://assets1.tamsnetwork.com/images/EC042017NF/164851s.jpg "Pastel Ombre Glimmer 12\" X 12\" (30.5 X 30.5 Cm) Specialty Paper [ 164851 ]")
![Brights 6" X 6" (15.2 X 15.2 Cm) Designer Series Paper [ 163775 ]](https://assets1.tamsnetwork.com/images/EC042017NF/163775s.jpg "Brights 6\" X 6\" (15.2 X 15.2 Cm) Designer Series Paper [ 163775 ]")
![Lemon Lolly Classic Stampin' Pad [ 161666 ]](https://assets1.tamsnetwork.com/images/EC042017NF/161666s.jpg "Lemon Lolly Classic Stampin' Pad [ 161666 ]")
![Granny Apple Green Stampin' Blends Combo Pack [ 154885 ]](https://assets1.tamsnetwork.com/images/EC042017NF/154885s.jpg "Granny Apple Green Stampin' Blends Combo Pack [ 154885 ]")
![Lemon Lolly Stampin’ Blends Combo Pack [ 161673 ]](https://assets1.tamsnetwork.com/images/EC042017NF/161673s.jpg "Lemon Lolly Stampin’ Blends Combo Pack [ 161673 ]")
![Pool Party Stampin' Blends Combo Pack [ 154894 ]](https://assets1.tamsnetwork.com/images/EC042017NF/154894s.jpg "Pool Party Stampin' Blends Combo Pack [ 154894 ]")
![Everyday Arches Dies [ 164629 ]](https://assets1.tamsnetwork.com/images/EC042017NF/164629s.jpg "Everyday Arches Dies [ 164629 ]")
![Rainbow Adhesive Backed Dots [ 162758 ]](https://assets1.tamsnetwork.com/images/EC042017NF/162758s.jpg "Rainbow Adhesive Backed Dots [ 162758 ]")


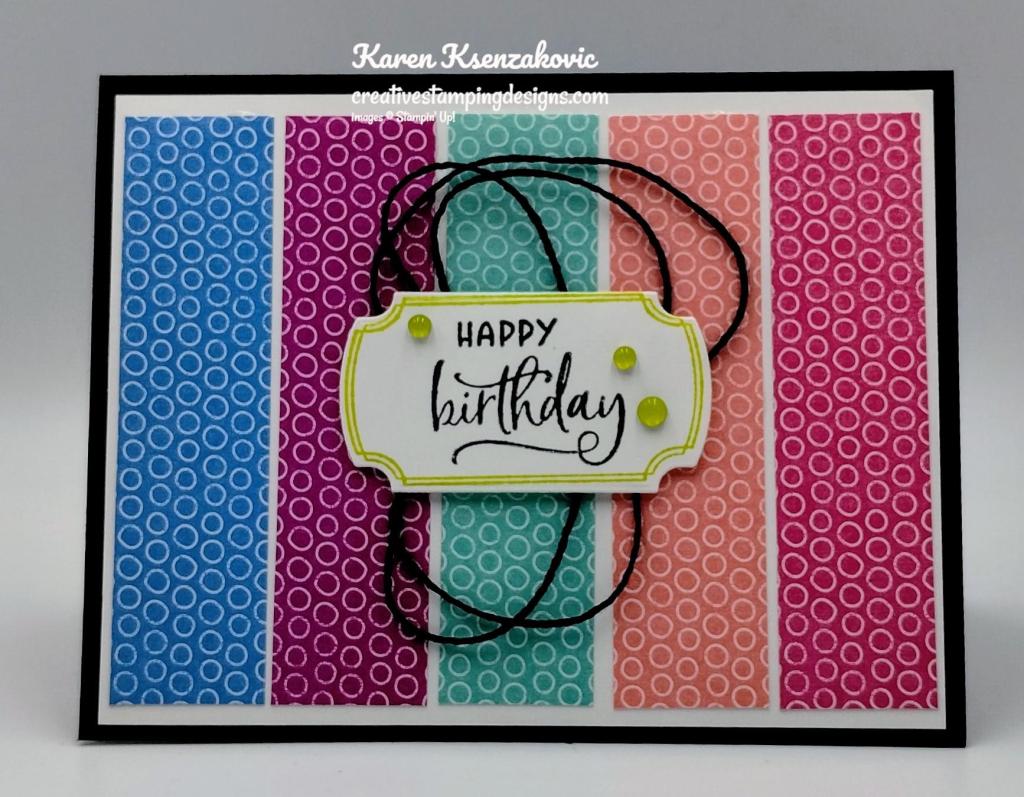


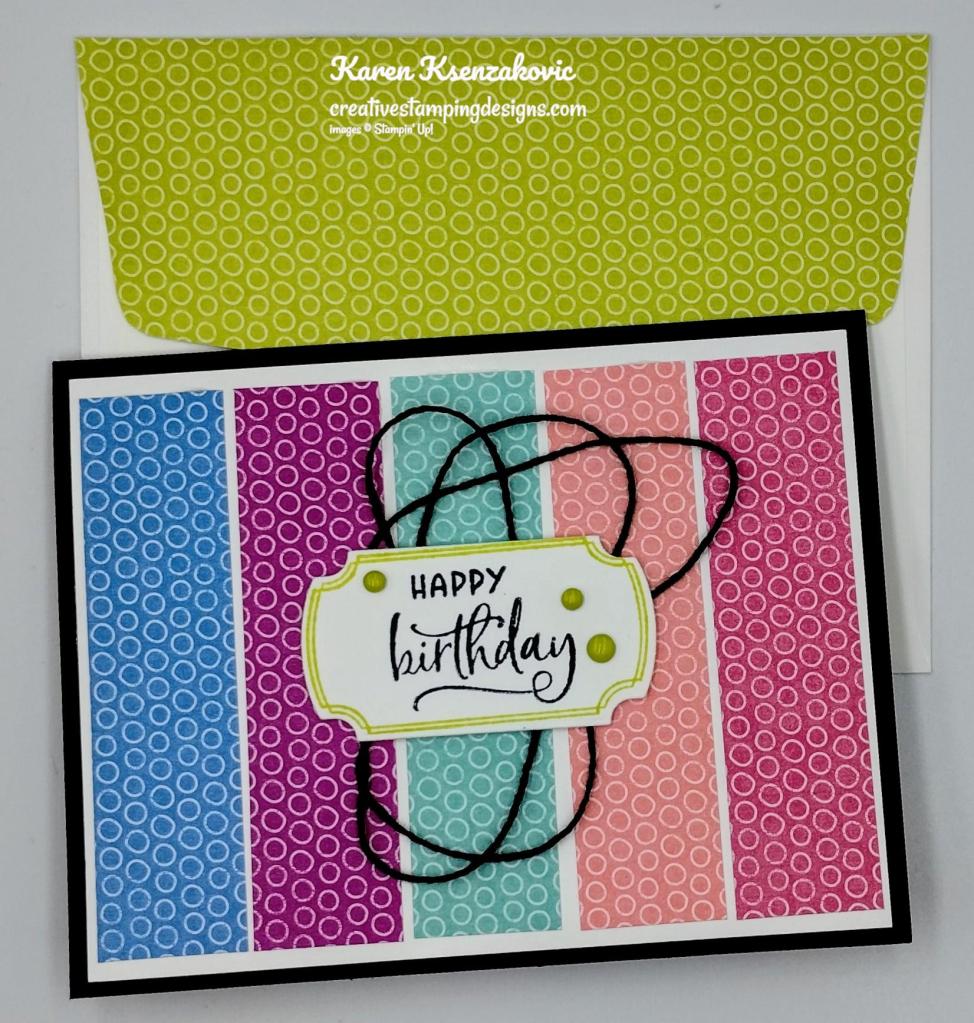


")
")


 Designer Series Paper")


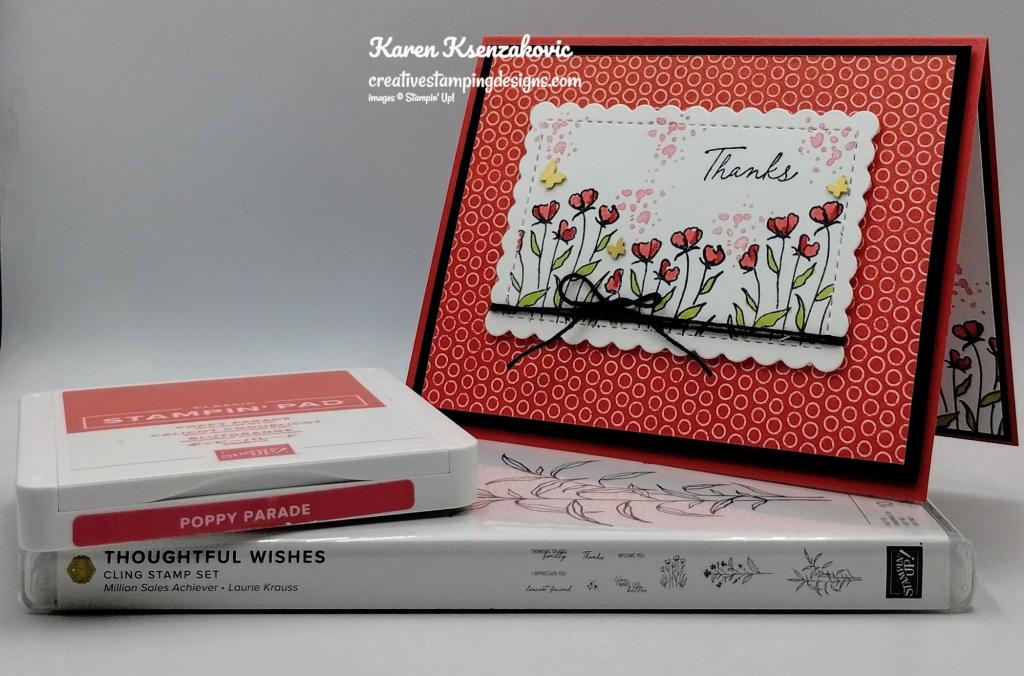
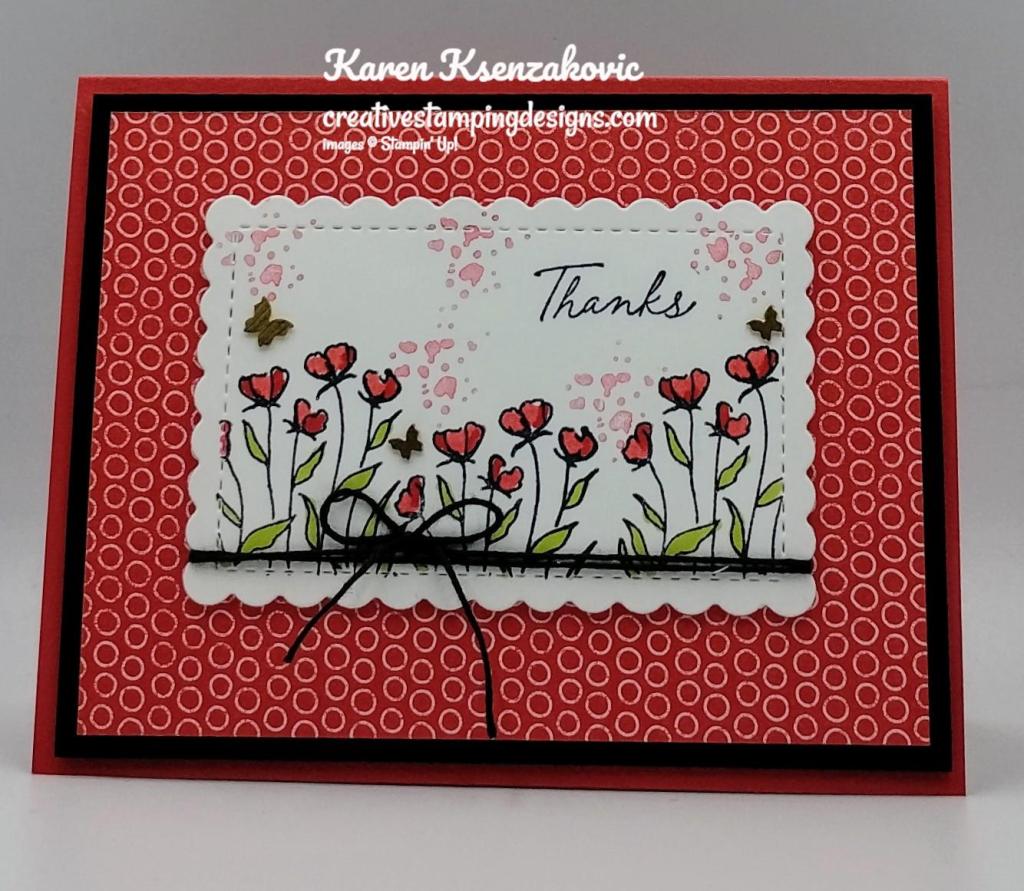
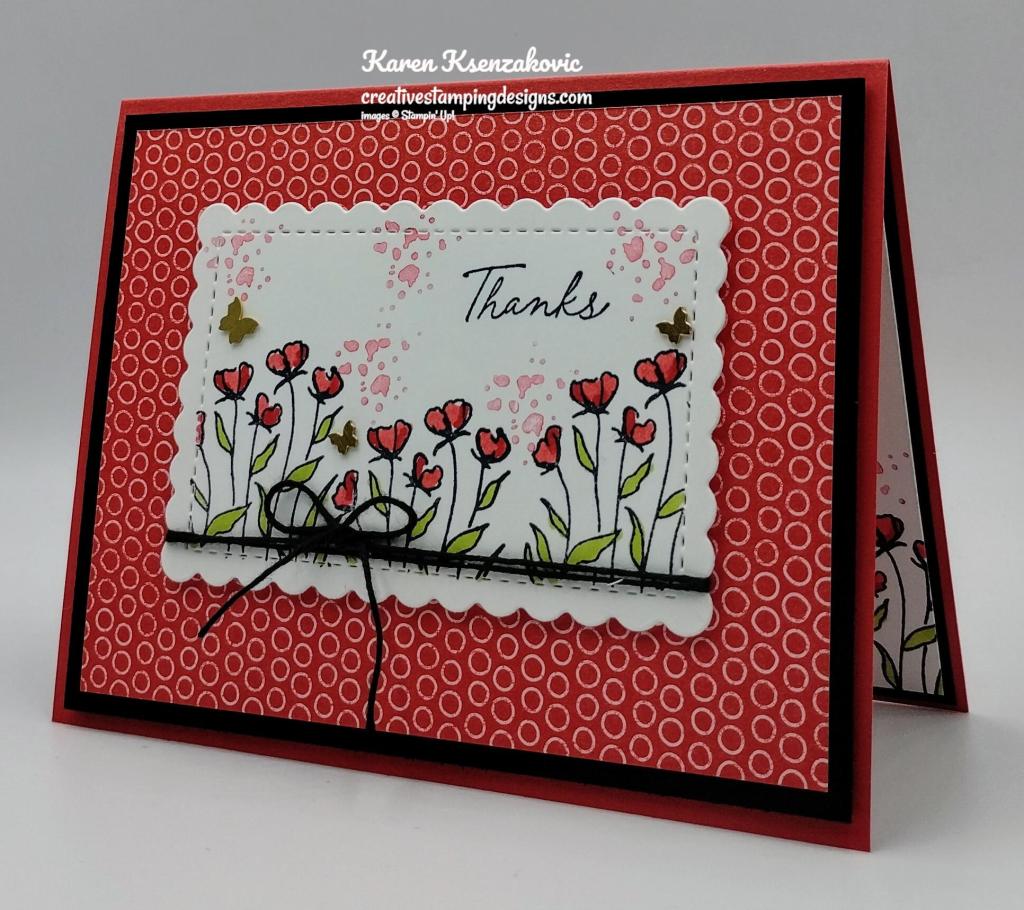
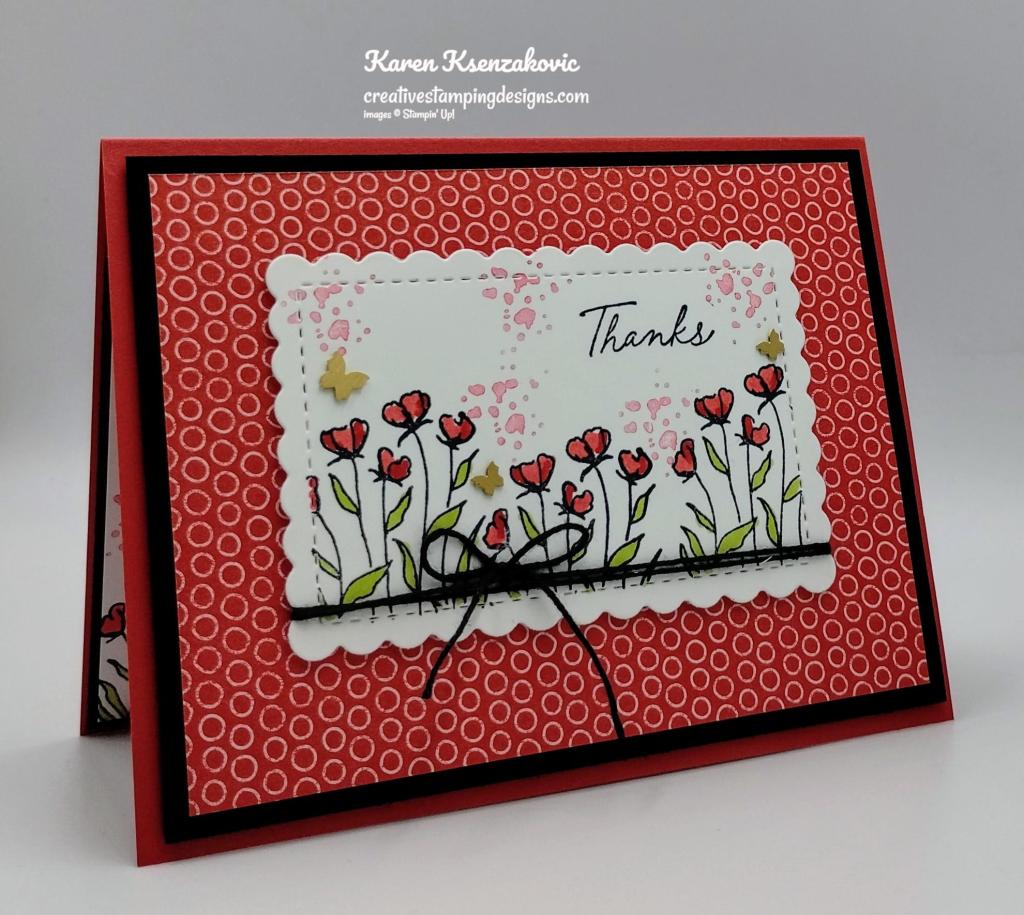
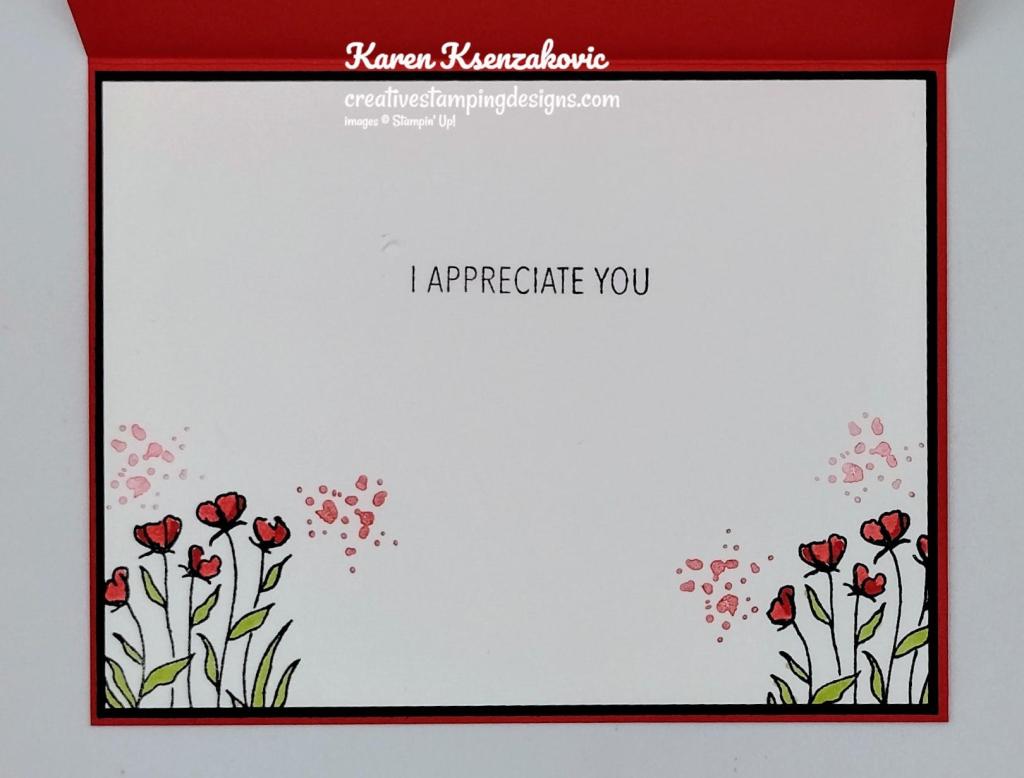
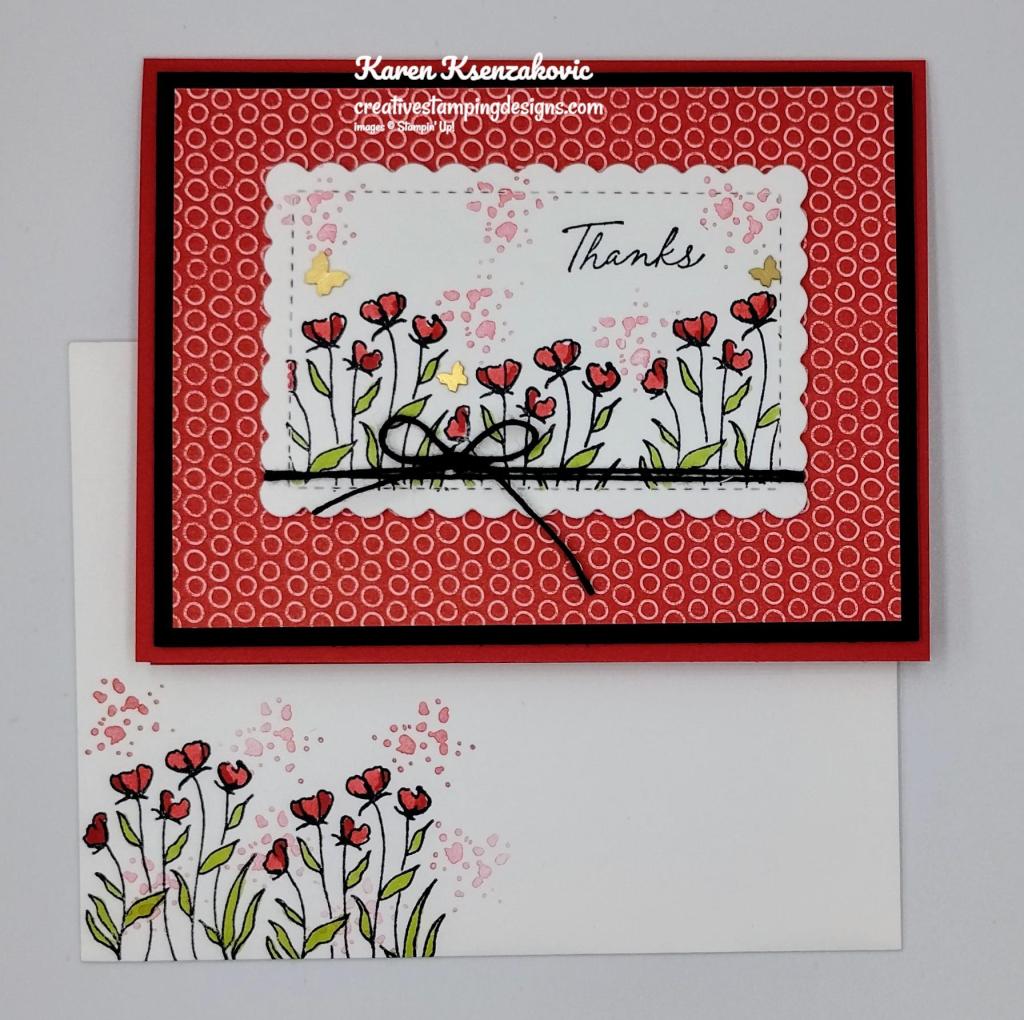
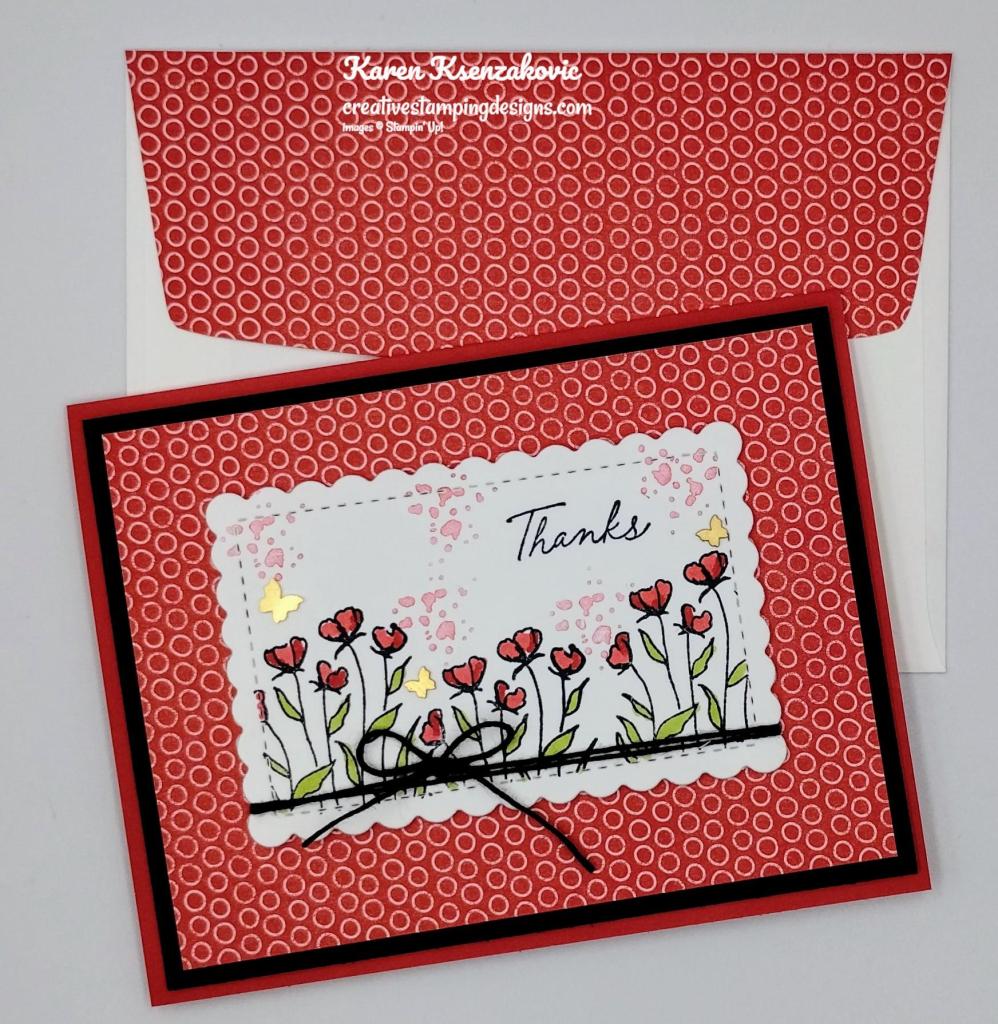

")


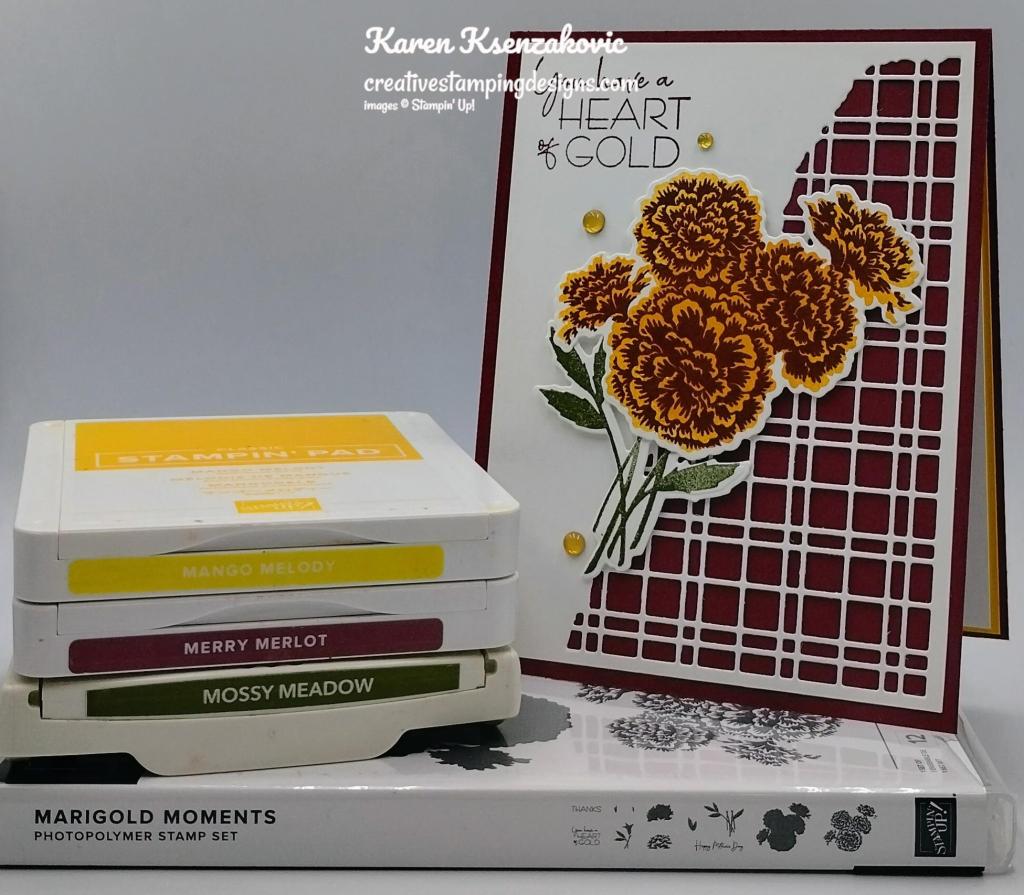

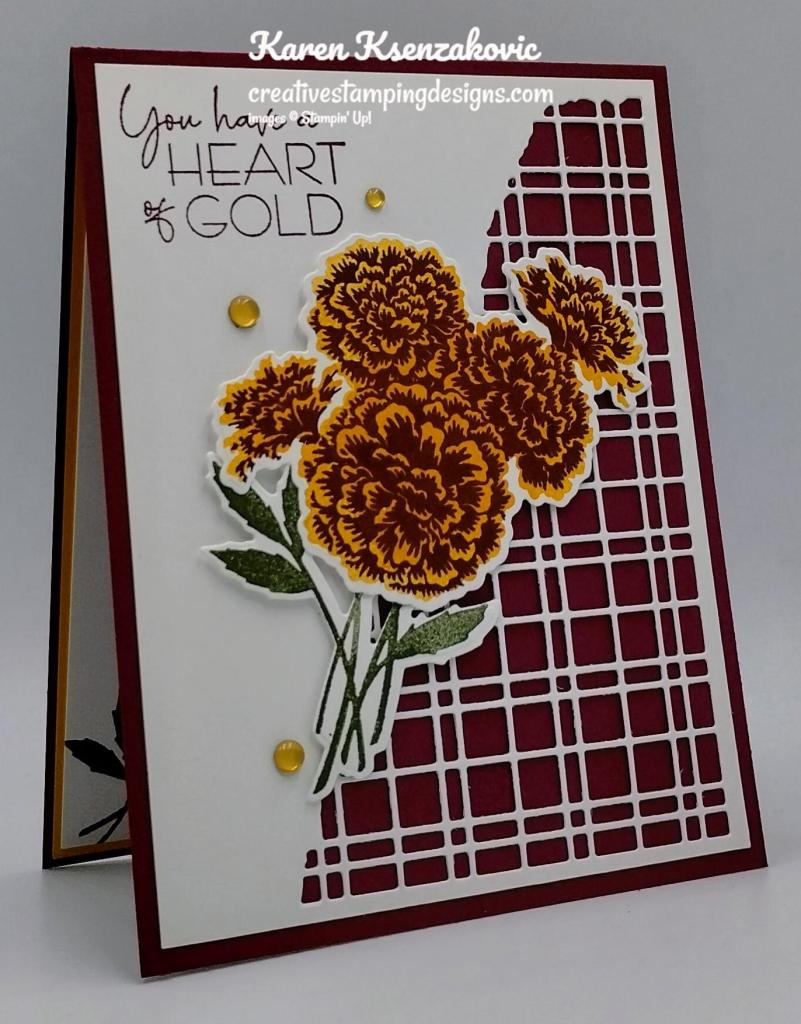

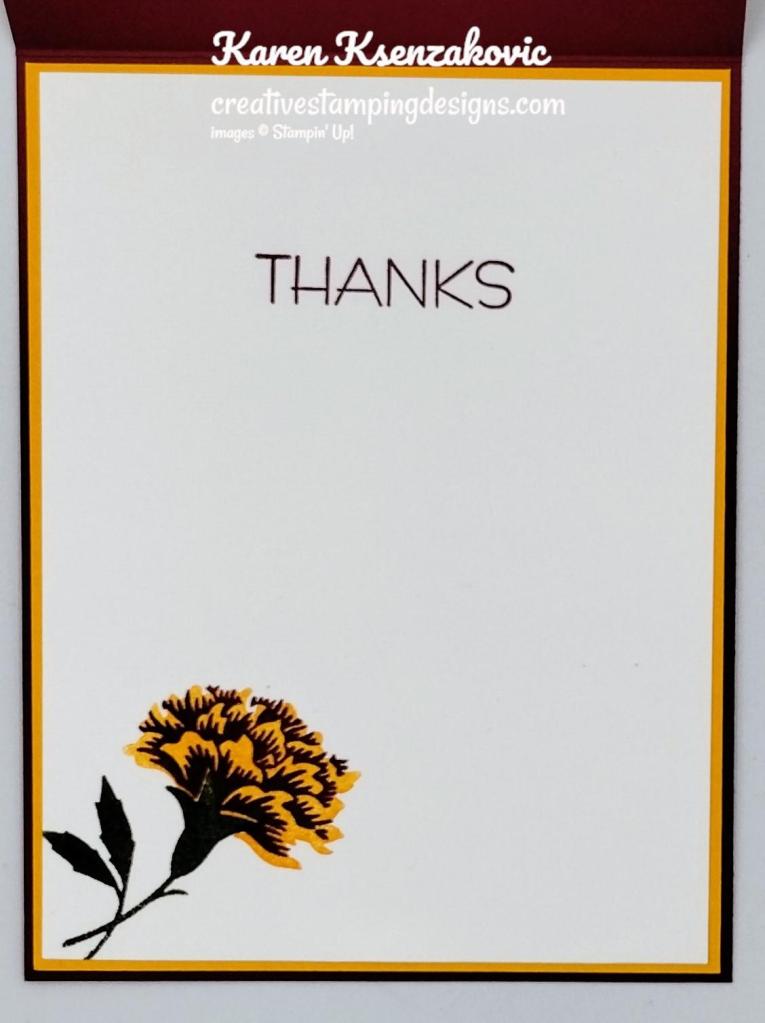


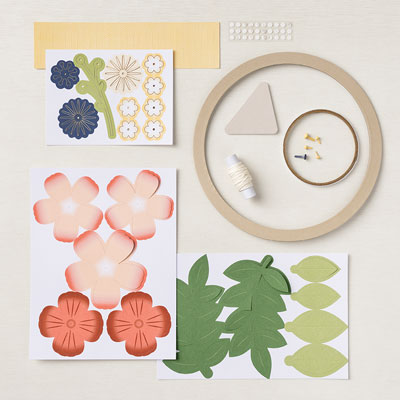

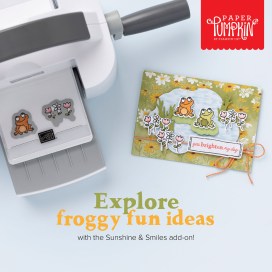
")
")


 Designer Series Paper")


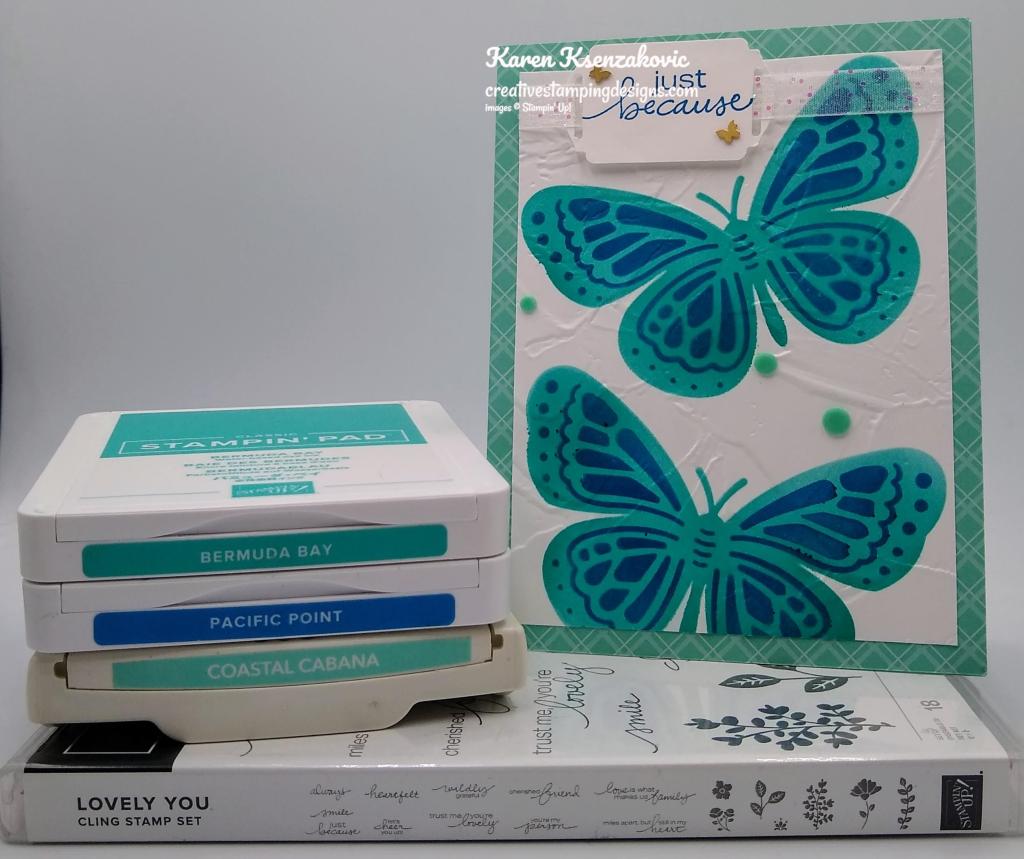
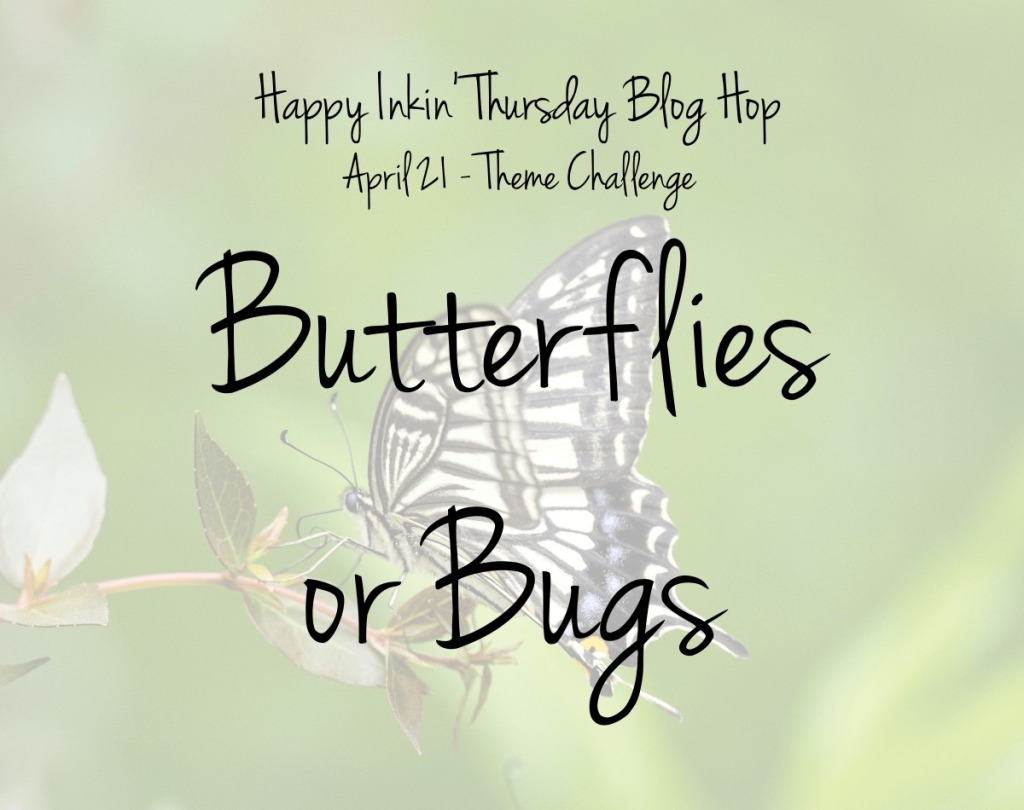

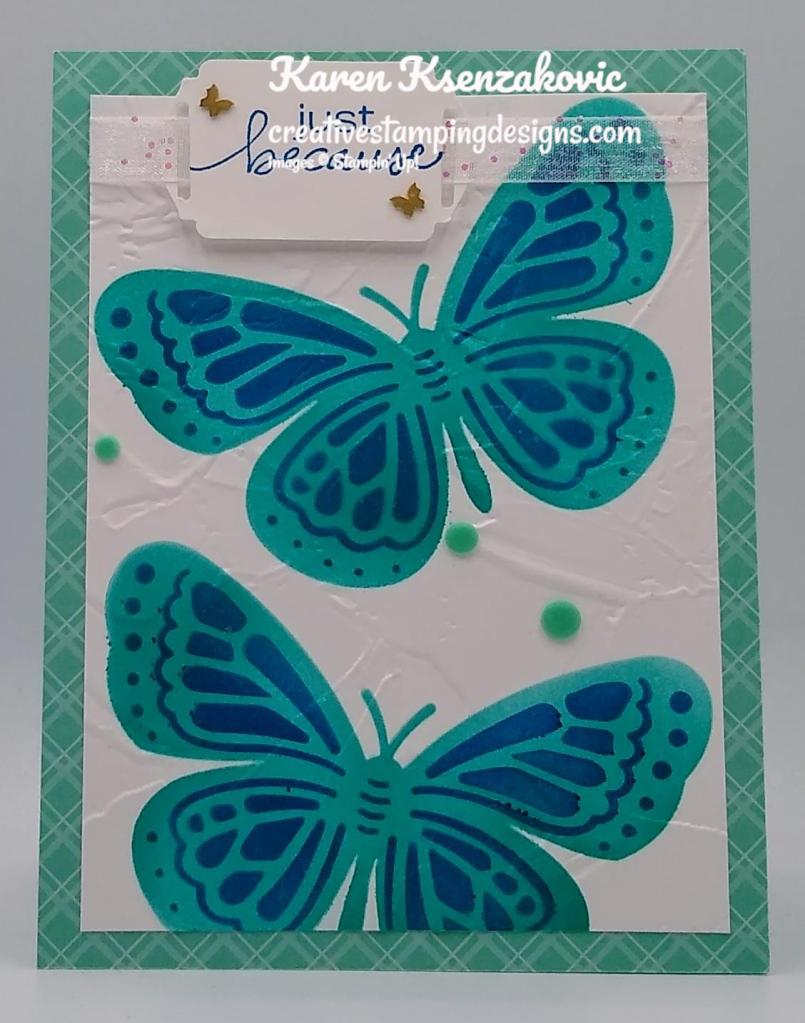

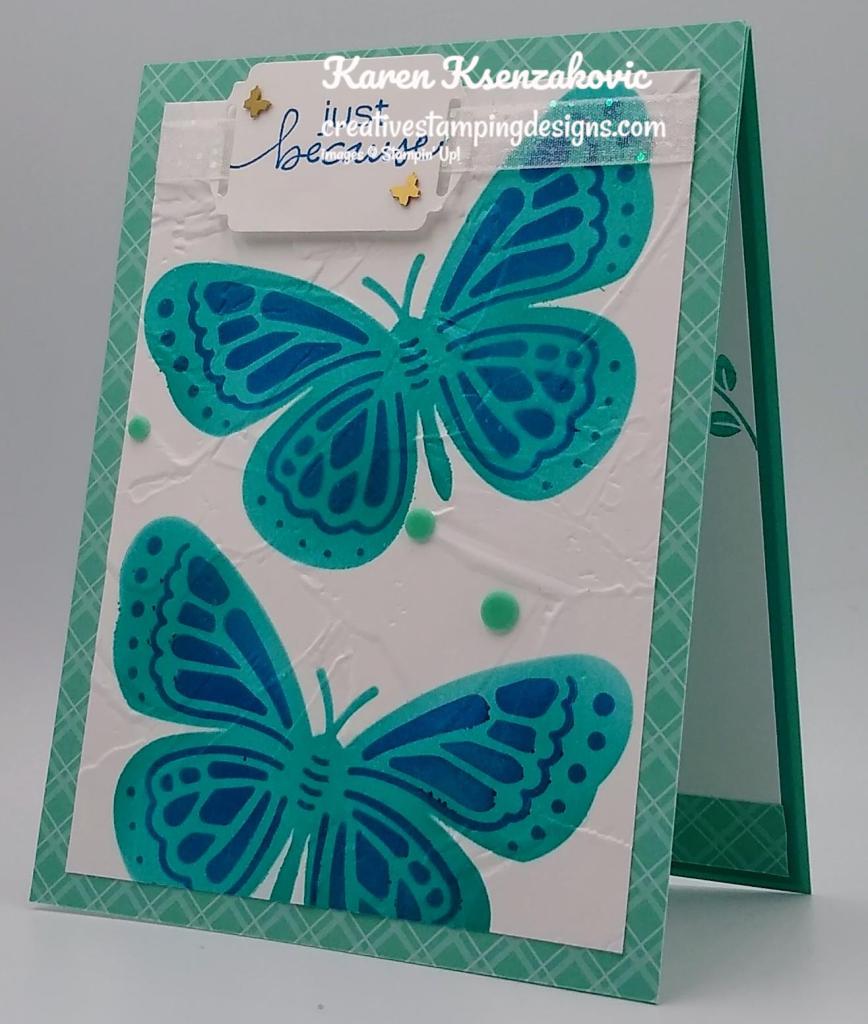
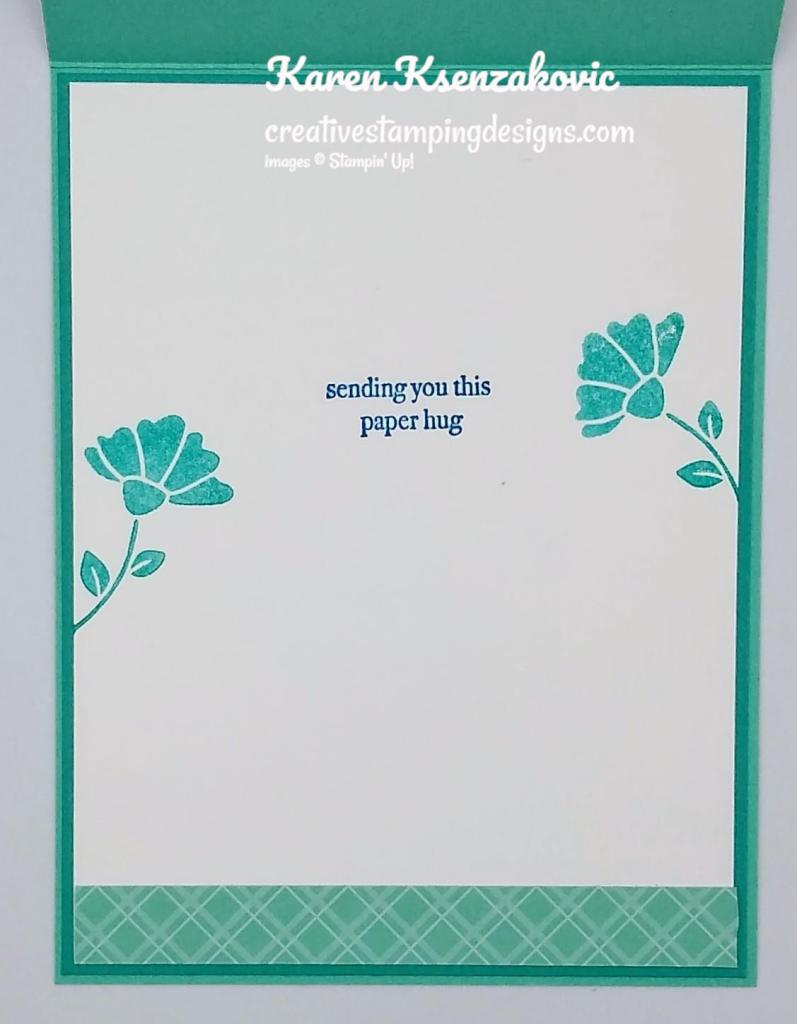


")
")


 Designer Series Paper")


 Glittered Organdy Ribbon")


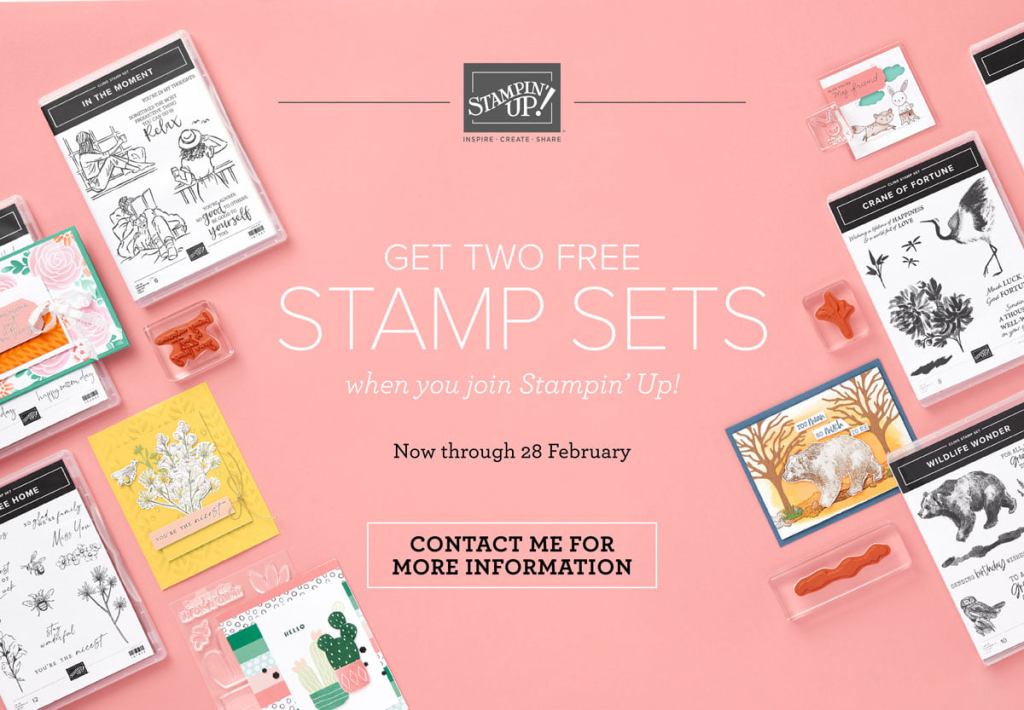
")
")


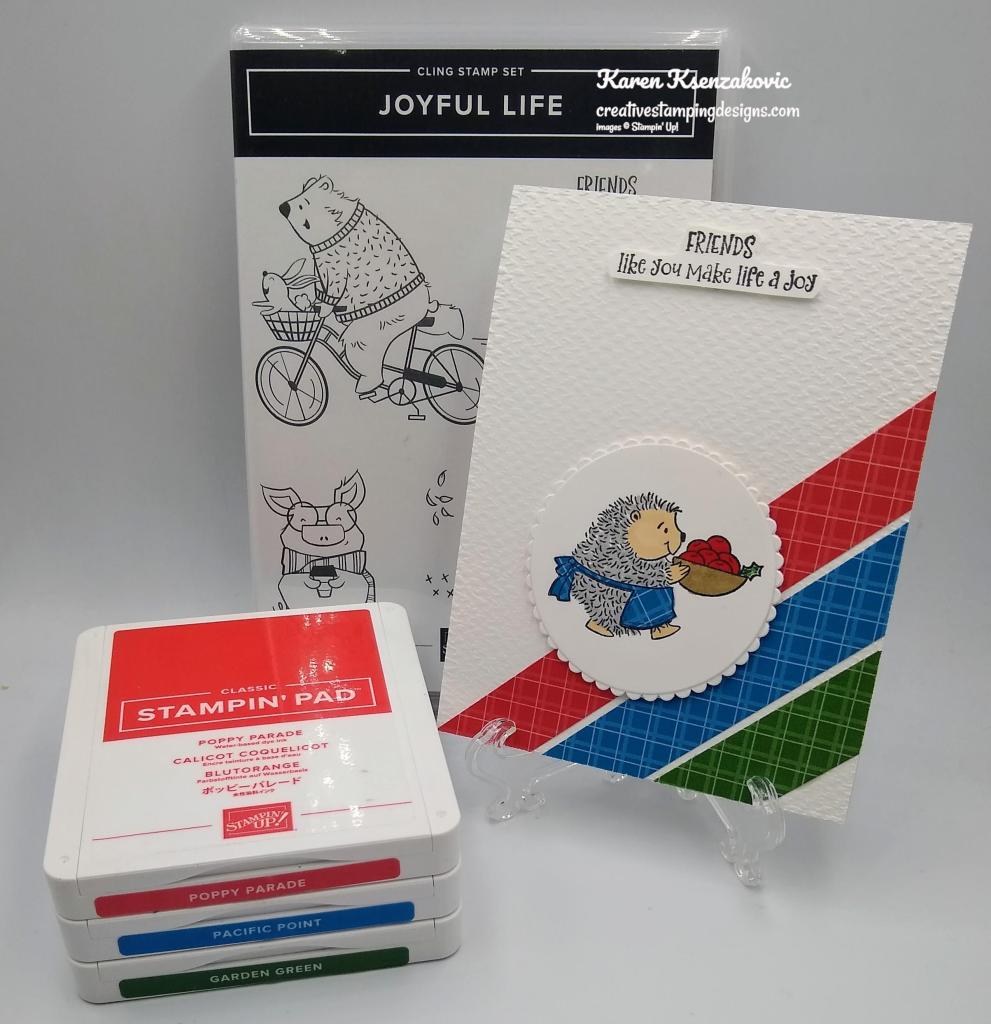
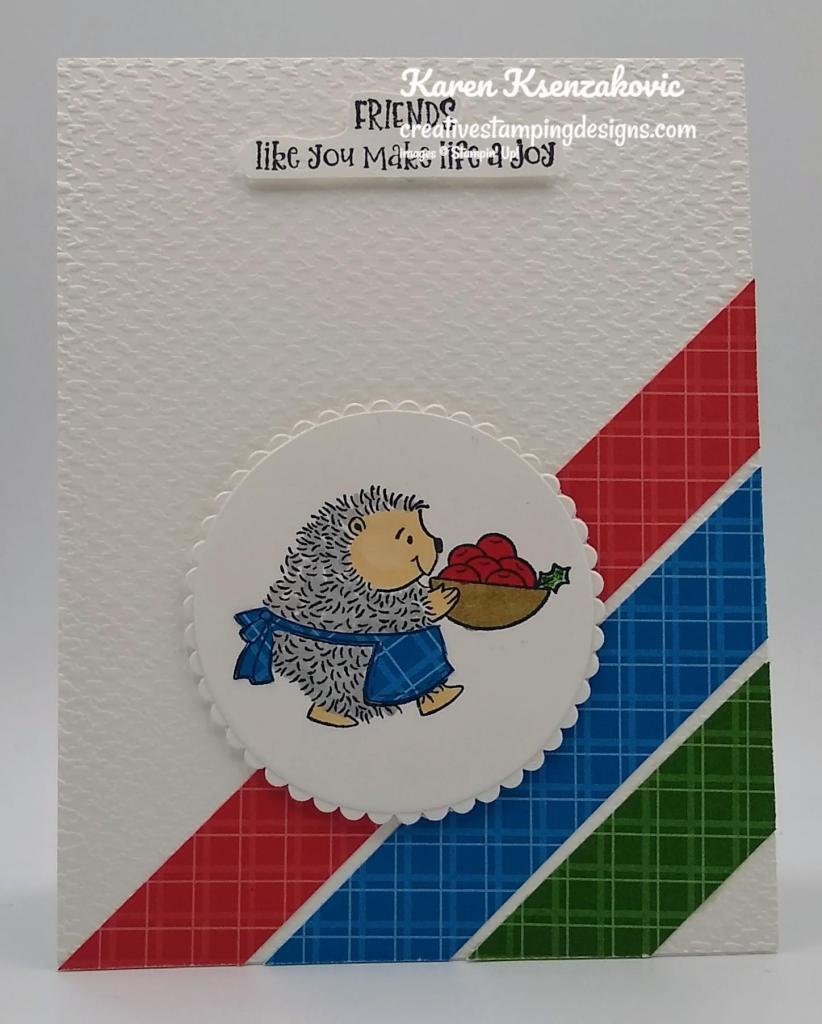
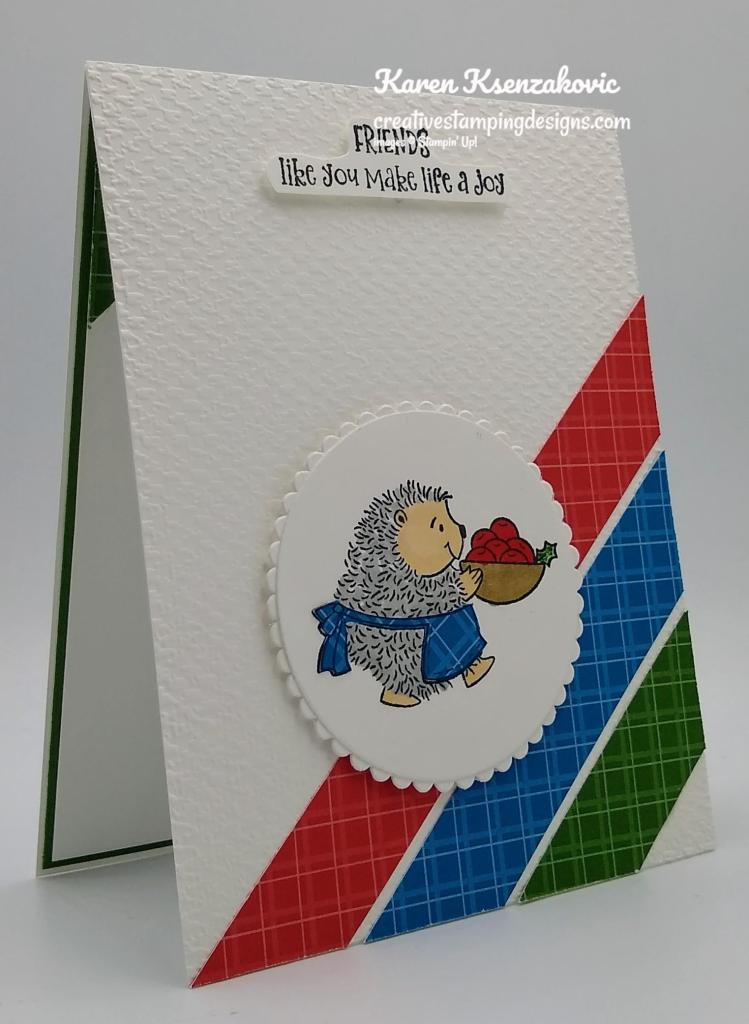


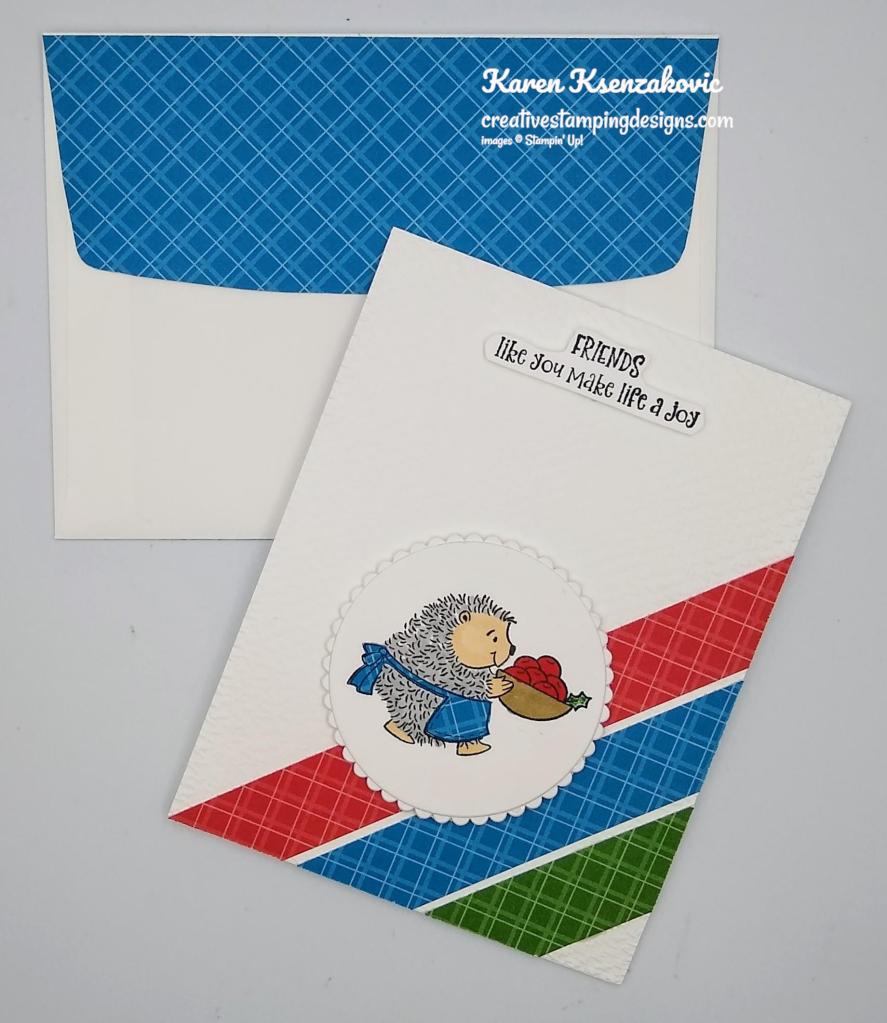


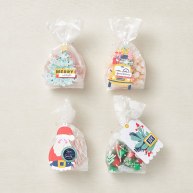


")


 Designer Series Paper")