
Good Friday morning my stamping friends and welcome to my Fun Fold Friday. How was everyone’s week? Is anyone doing anything fun this weekend? I’ll be working both days again. Ever since my daughter said that she wanted to go apple picking I have been working extra.
Today’s card I made Wednesday on my Facebook Live Video. If you were able to join me live or you watched the replay, thank you very much. If you’d like to view my video either on Facebook or YouTube, the links are below. Here’s my card for today.

The Stampin’ Up! Dragonfly Garden Bundle will be available for purchase in the January-June 2021 Mini Catalog. The Stampin’ Up! Quite Curvy Bundle will be available November 3rd.

I started by scoring and folded a Misty Moonlight card base at 1 1/2″ & 4 1/4″. I folded the card base in half and then folded the 1 1/2″ fold back. I adhered the larger of the 3 Dandy Garden 6 X 6 Designer Series Paper panels to the front fold of the card base using Stampin’ Seal.
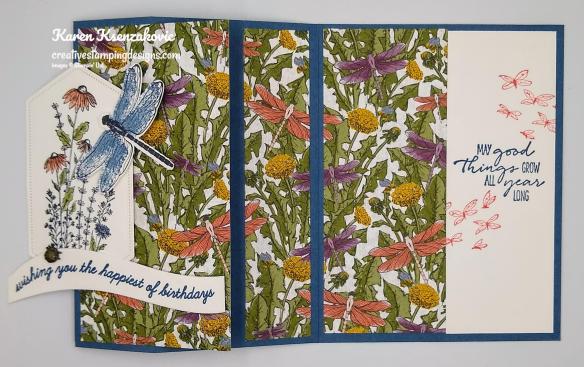
I adhered the other 2 panels of the Dandy Garden DSP to the inside of the card base using Multipurpose Liquid Glue. On the inside Whisper White panel, I stamped the sentiment from the Stampin’ Up! Dragonfly Garden Cling Stamp Set in Misty Moonlight Ink. I stamped the tiny dragonfly image from the Dragonfly Garden stamp set in Calypso Coral Ink above and below the sentiment. I adhered the Whisper White panel using Multipurpose Liquid Glue.

On a panel of Whisper White cardstock I stamped the floral image from the Dragonfly Garden stamp set in Tuxedo Black Memento Ink. I colored some of the image in using my Calypso Coral, Misty Moonlight and Mossy Meadow Stampin’ Blends Markers. I cut the image out using the 2nd largest Stitched Nested Labels Dies and adhered it to the card front using Stampin’ Dimensionals, hanging off the left side. On another panel of Whisper White cardstock I stamped the dragonfly image from the Dragonfly Garden stamp set in Tuxedo Black Memento Ink and stamped the wing fill color in Misty Moonlight Ink, stamping off once. I adhered the dragonfly to the artwork using Stampin’ Dimensionals.
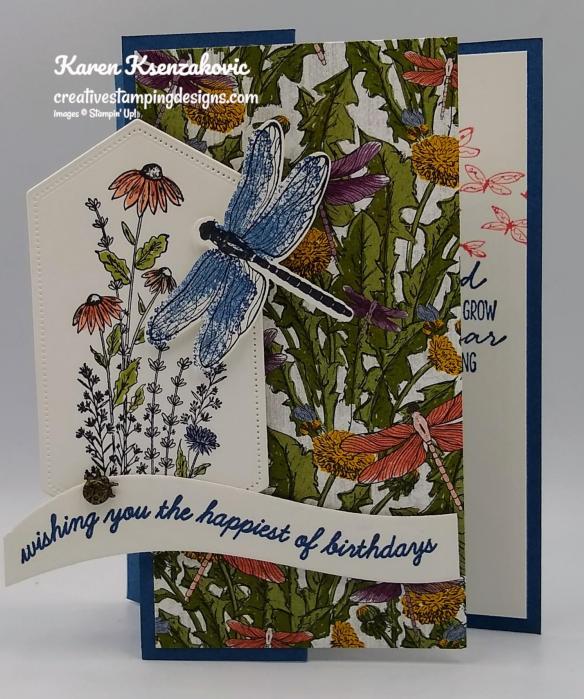
I cut a panel of Whisper White cardstock using my Curvy Dies then stamped the sentiment from the Stampin’ Up! Quite Curvy Photopolymer Stamp Set in Misty Moonlight Ink. I adhered the sentiment to the card front using Stampin’ Dimensionals on the right side and a Glue Dot on the artwork. I added a couple of the adorable Ladybug Trinkets to the sentiment and the card base using Glue Dots.

To finish my card I decorated a Medium Whisper White Envelope. I stamped the tiny dragonfly image from the Dragonfly Garden stamp set in Calypso Coral Ink along the bottom front of the envelope.

I adhered another design from the Dandy Garden 6 X 6 DSP to the envelope flap.
Thank you for stopping by my blog today, I hope you liked my card. The list of measurements are below if you’d like to stamp along while watching the video. Items used won’t be available until January 5th, but you can use any DSP and stamp set to recreate this card. You can watch it on my Facebook page Here.
You can also view the video on my YouTube channel Here. Happy Stamping!!
*********************************************************************************************************
If you need any stamping supplies, I’d love to be your Demonstrator. Just click HERE to go directly to my online store or drop me an email if you have any questions.
MY CURRENT HOST CODE IS: RUW6PQNH
Use this host code when you order $50 or greater and receive a free gift from me! If your order is over $150, please do not use this code, but you’ll still get the free gift. The free gift is your choice of any 1 item valued up to $10.00 in the 2020-2021 Annual Catalog! For any orders $50 or more I will also send you my monthly class tutorials. Click HERE or go to my Customer Rewards for more details and to see what this months tutorials are.
Click HERE to shop the clearance rack.
Happy Stamping, Karen!
*********************************************************************************************************
Final Week to take advantage of this awesome deal!!!
We all love gorgeous Designer Series Paper, and during this incredible sale, you can enjoy a 15% discount on select papers from our current catalogs!
Stampin’ Up! has such beautiful Designer Series Paper and they’re putting a select list of those papers on sale for 15% off during the month of October!! Now is a great time to stock up and save on some of the most popular paper designs…including papers from the August-December 2020 Mini Catalog!!
SALE DETAILS:
- Sales Period: October 1-31
- All order types qualify for this promotion.
- There is no limit to how many packages of Designer Series Paper may be purchased during this promotion.
- Only select Designer Series Papers are available at a 15% discount during this promotion.
- Orders must be placed—and closed—during the promotion period for the 15% discount to apply.
- Designer Series Paper ordered as part of a Starter Kit or with Stampin’ Rewards qualify for the 15% discount
- Sale Ends October 31, 2020 at 11:50 PM MT
The designer papers included in this sale are shown Click on the image below to open up the full-size printable PDF:

Get your lists ready to start shopping now – October 31st!
*********************************************************************************************************
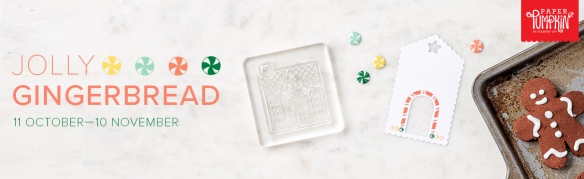
Jolly Gingerbread
Subscribe October 11 – November 10
Paper Pumpkin is our monthly subscription service that offers unique papercrafting projects for crafters of any skill level! In these all-inclusive kits, subscribers receive pre-cut paper pieces, embellishments, ink, and an exclusive stamp set designed to encourage them to explore their creativity. As their subscription continues, subscribers will have a collection of cards—and other creations—for a variety of occasions, in addition to a stockpile of supplies!
So, what’s in store for this month’s Paper Pumpkin kit? November’s cute, gingerbread-themed kit contains enough supplies to create one-of-a-kind Christmas crafts! Whether it’s a gift card carrier, traditional card, or tasty-looking tag, this sweet and seasonal kit is the key to heartfelt holiday gifting. With curly cutouts, sugary stickers, and delicious die-cut designs in a special-edition box, a jolly holiday will be on its way with this kit!
Details About The November Kit:
- Kit contains enough supplies to create 15 gift card carriers and coordinating envelopes.
- Kit contents can also be used to design traditional holiday cards, gift tags, and other paper projects.
- Contents arrive in a collectible, special-edition box!
- Project size: 2-1/4″ x 4″
- Envelope size: 2-3/4″ x 4-3/8″
- Coordinating colors: Cinnamon Cider, Daffodil Delight, Calypso Coral, Mint Macaron, Shaded Spruce, Blushing Bride, and Whisper White
Subscribe to the November 2020 Paper Pumpkin Kit from 11 October to 10 November at paperpumpkin.com!
Note: Supplies may be limited toward the end of the subscription period.
*********************************************************************************************************
Curvy Celebrations will be available for purchase November 3rd. Click Here for a full size printable PDF.

*********************************************************************************************************
Card stock cuts for this project:
- Misty Moonlight Cardstock 8 1/2″ X 5 1/2″ (card base scored at 1 1/2″ & 4 1/4″)
- Whisper White Cardstock 2 3/4″ x 5 1/5″ (artwork), 1 1/4″ X 4 1/4″ (sentiment strip cut down to 4″ after cut with dies), 1 3/4″ X 3″ (dragonfly), 1 7/8″ x 5 1/4″ (inner liner)
- Dandy Garden 6 X 6 Designer Series Paper 5 1/4″ X 6″ cut to 2 3/4″, 1 1/8″ & 2 1/8″, 2 1/4″ X 6″(piece for envelope flap)
*********************************************************************************************************
Product List


")
")

")


")


")
")


 Designer Series Paper")


")


")


")
")


 Shimmer Ribbon")


")


 Designer Series Paper")


")


")
