Stampin’ Up! Cottage Rose for Fun Fold Friday

Good Friday morning my stamping friends welcome to my Fun Fold Friday. How was everyone’s week? Does anyone have plans for the weekend? I’m working tomorrow, but I do have Sunday off.

Today’s card I made on my Facebook Live video on Wednesday. If you were able to join me or watched the replay, thank you. If you’d like to watch my video and stamp along, the measurements are below along with the links to my Facebook page and my YouTube channel. Here is my card for today.

Stampin' Up! Cottage Rose Fun Fold 1 creativestampingdesigns.com

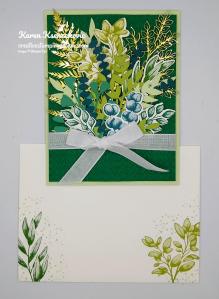
I used the Stampin’ Up! Cottage Rose Bundle along with the Forever Flourishing Dies, Split Card Textures Dies, Brick & Mortar 3D Embossing Folder and Fancy Flora 6 X 6 Designer Series Paper for my easel card today.

Stampin' Up! Cottage Rose Fun Fold 2 creativestampingdesigns.com

I started by cutting a panel of Basic White cardstock using the Split Card Textures Dies. I then embossed the panel using the Brick & Mortar 3D Embossing Folder. I adhered a panel of the Fancy Flora DSP to the back of the panel using Multipurpose Liquid Glue.

Stampin' Up! Cottage Rose Fun Fold 3 creativestampingdesigns.com

On a panel of Basic White cardstock, I stamped the large flower image from the Stampin’ Up! Cottage Rose Cling Stamp Set in Soft Suede Ink. I colored the image using my Calypso Coral, Petal Pink and Soft Succulent Stampin’ Blends Markers. I cut the image our using the Cottage Flowers Dies. Using the Cottage Flowers Dies, I cut the 2 stemmed flowers from a panel of Calypso Coral cardstock. Using the Forever Flourishing Dies I cut the large leaf die from a panel of Soft Succulent cardstock, the medium leaf die from a panel of Soft Sea Foam cardstock and the eucalyptus die from a panel of Evening Evergreen cardstock. I adhered the flower to the embossed card front using Stampin’ Dimensionals. I adhered the leaf dies under the flower using Multipurpose Liquid Glue.

Stampin' Up! Cottage Rose Fun Fold 4 creativestampingdesigns.com

I scored & folded the Petal Pink card base as listed below. I adhered the Petal Pink card front mat to the bottom portion of the of the card base using Stampin’ Seal +. I adhered the card front to the mat using Multipurpose Liquid Glue. I added a Dragonfly Trinket to the top of the card front using Multipurpose Liquid Glue.

Stampin' Up! Cottage Rose Fun Fold 5 creativestampingdesigns.com

On the inside, I stamped the rose image from the Cottage Rose stamp set on the top of a Basic White panel in Soft Suede Ink. I colored the image using my Calypso Coral, Petal Pink and Soft Succulent Stampin’ Blends Markers. I stamped the sentiment from the Cottage Rose stamp set below the rose in Soft Suede Ink. I adhered the Basic White panel to a Calypso Coral mat then to the inside of the Petal Pink card base. On a panel of Basic White cardstock, I stamped the sentiment from the Cottage Rose stamp set in Soft Suede Ink and cut it out using the Lasting Label Punch. I adhered the punched-out sentiment to the bottom of the Basic White panel using Stampin’ Dimensionals where I wanted the easel to stop. I added a few Elegant Faceted Gems to the inside panel.

Stampin' Up! Cottage Rose Fun Fold 6 creativestampingdesigns.com

To finish my card, I decorated a Basic White Medium Envelope. I stamped the rose image from the Cottage Rose stamp set in Soft Suede Ink on the envelope front. I colored the image using my Calypso Coral, Petal Pink and Soft Succulent Stampin’ Blends Markers. I adhered a panel of Fancy Flora DSP to the envelope flap.

Stampin' Up! Cottage Rose Fun Fold 7 creativestampingdesigns.com

Thank you for stopping by my blog today. I hope you liked my card and will give it a try. I hope you will CASE this card and please feel free to post it in the comments of my Facebook page under my post. I’d love to see your take on the card. The list of measurements are below if you’d like to stamp along while watching the video. You can watch my video on my Facebook page Here.

You can also view the video on my YouTube channel Here. If you watch this on my YouTube channel, please remember to subscribe so that you will get notified when a new video goes live. I’m hoping to start doing YouTube lives soon, thanks to all that have subscribed. Happy Stamping!!

*********************************************************************************************************

If you need any stamping supplies, I’d love to be your Demonstrator. Just click HERE to go directly to my online store or drop me an email if you have any questions. 

MY CURRENT HOST CODE IS:    BFQ24SXS

Use this host code when placing an order with me. When you order $50 or greater you will receive a free gift from me! If your order is over $150, please do not use this code, but you’ll still get the free gift. The free gift is your choice of any 1 item valued up to $10.00 from the 2022-2023 Annual Catalog or the January-April 2023 Mini Catalog!  Unfortunately, packs of cardstock are no longer an option for a free gift. Shipping has become too expensive to ship and it’s costing me as much to ship as the cardstock costs. For any orders $50 or more I will also send you my monthly class tutorials.  Click HERE or go to my Customer Rewards for more details and to see what this month’s tutorials are.

Please remember to use my current Host Code and make sure that you can see my name on the final checkout page listed as your Demonstrator when you order so that you know that you’re ordering with me, and you’ll get my rewards! 

Happy Stamping, Karen

*********************************************************************************************************

In response to changing policies at Stampin’ Up – I’m adjusting my Ordering Gift policy as well.  I’m having to get a little more tough on the adding of Host codes when you place your order thru my Online Store.

Not to worry – you’re still going to get that $10 ordering gift for orders of $50 (before shipping & tax) or greater.  And the gift is still any 1 SU! product up to that $10 value – which includes some of our fun Host Sets!

But – if you DO NOT use the Host code for your orders of less than $150 (this is the RETAIL total before Shipping & Handling), then you’ll have two options:

  1. You’ll need to call Stampin’ Up! (1-800-Stamp-Up) and ask them to add it for you. They’re very helpful and will get it done quickly!  OR….
  2. If your order was over the $50 threshold but under $150, then…you’ll forfeit that $10 ordering gift and rewards – this is the Bummer Option – and I REALLY don’t want to do this, SO please remember to add my Current Host Code.

*********************************************************************************************************

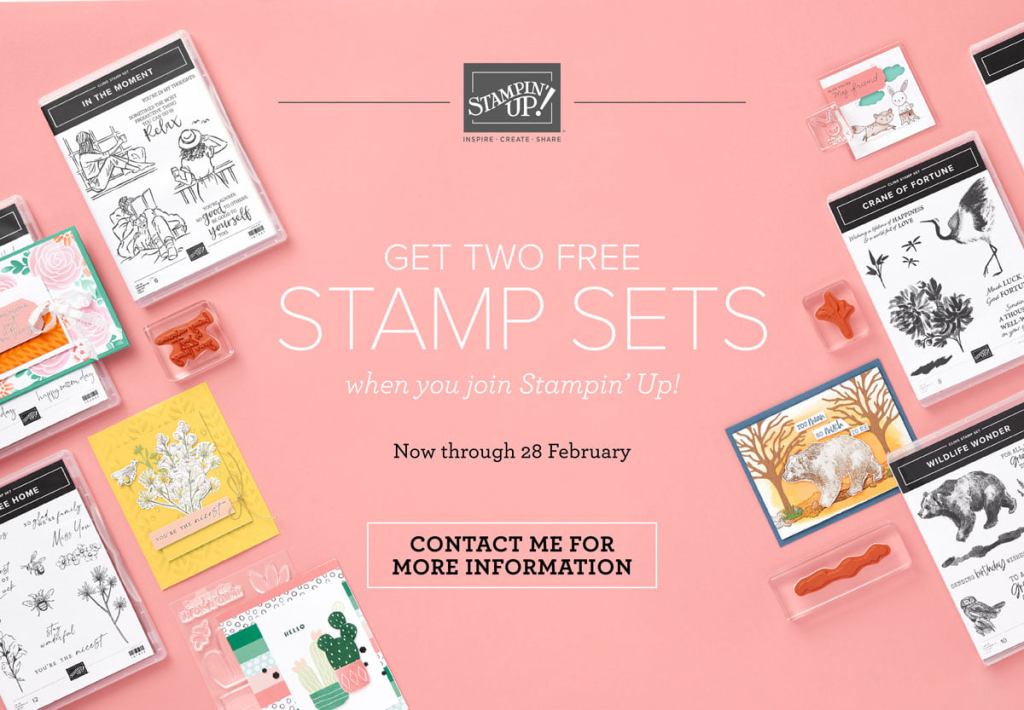
Coming on March 1, 2023, Stampin’ Up! is going to be having Online Exclusive Products and the first will be available starting March 1st. Click Here for a printable PDF flyer with the items that will be available. If you like what you see, there is a way you can get them NOW. If you join Stampin’ Up! before the end of February, you can either add the items to your starter kit, or you can pre-order them once you join. This is just one of the perks of being a demonstrator.

Final Days of Stampin’ Up!’s Amazing Joining Special – Ends February 28

Stampin’ Up! has an amazingly awesome joining special. You get to choose what you want. All the options ship for free and include a past Paper Pumpkin Kit along with some business supplies in case you want to make this a business. There is No Obligation to sell, you do NOT have to use this as a business, you can join just to enjoy the discount for yourself. I would LOVE to have you on my team. Join as a hobby demonstrator and enjoy all the benefits of a business demonstrator.

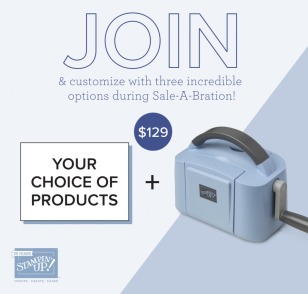
Option #1 This exclusive Boho Blue Mini Stampin’ Cut & Emboss Machine ($63 value) + Your choice of $175 of Stampin’ Up! products for only $129.00. The Boho Blue is one of the new In-Colors coming for 2023-2025.

Option #2 The original White Mini Stampin’ Cut & Emboss Machine (a $63 value), + Your choice of $175 of Stampin’ Up! products for only $129.00

Option #3. Your choice of $175 of Stampin’ Up! products for only $99.00.

If you have a LONG shopping list, this is a great way to get everything you always want at a discount. Enjoy at least a 20% discount on the products you purchase. Why wait, this is such an awesome deal, and it only sticks around until February 28th. Join now and start enjoying that discount right away!!! Contact me at creativestampingdesigns@gmail.com and we can talk about you joining. We have people on our team from all over the United States. We get together monthly via Zoom; we have team Facebook pages where we share what we make and ask questions. This was one of the best decisions I’ve ever made, I’ve made a lot of new friends from all over.

*********************************************************************************************************

Ten Years Of Growth

Subscribe February 11 – March 10

It’s Paper Pumpkin’s 10-year anniversary and we want to celebrate how much we’ve grown! This month’s kit is all about happy greetings, organic and botanical designs digitally painted by our in-house artists, along with all-occasion sentiments to celebrate the happy moments in life and recognize the people around you who help you grow! 

And as part of our anniversary celebration, the March Paper Pumpkin Kit includes a FREE GIFT featuring a plant and pot builder to make all your projects plant-astic!

This kit includes:

  • All the supplies you need to create 9 cards: 3 each of 3 designs; and coordinating envelopes.
  • An all-occasion stamp set to recognize the people in your life who help you grow with greetings and beautiful botanical images.
  • 1 Polished Pink Classic Stampin’ Spot
  • Paper pieces and embellishments with digitally-painted designs and images.
  • Mini Stampin’ Dimensionals.
  • 1 FREE additional stamp set, which includes a plant and pot builder to make plant-astic projects!

Completed card size: 5-1/2″ x 4-1/4″ (14 x 10.8 cm)

Coordinating Stampin’ Up! colors: Shaded Spruce, Garden Green, Coastal Cabana, Orchid Oasis, Fresh Freesia, Polished Pink, Crumb Cake

Subscribe to the March Paper Pumpkin Kit between 11 February 2023 and 10 March 2023 by clicking here!

Note: Supplies may be limited toward the end of the subscription period.

*********************************************************************************************************

Card stock cuts for this project:

  • Basic White Cardstock 3 – 4″ X 5 1/4″ (card front, artwork & inner liner)
  • Calypso Coral Cardstock 2 1/4″ X 4 1/4″ (flowers), 4 1/8″ X 5 3/8″ (inner liner mat)
  • Evening Evergreen Cardstock 1″ X 5 1/2″ (sprigs)
  • Petal Pink Cardstock 4 1/4″ X 11″ (card base scored & folded at 2 3/4″ & 5 1/2″), 4 1/8″ X 5 3/8″ (card front mat)
  • Soft Sea Foam Cardstock 3″ X 4″ (leafy die)
  • Soft Succulent Cardstock 2 1/2″ X 2 1/2″ (leafy die)
  • Fancy Flora 6 X 6 Designer Series Paper 3 3/4″ X 5 1/5″ (card front panel), 2 1/4″ X 6″ (envelope flap)

*********************************************************************************************************

Product List

Stampin’ Up! Forever Blossoms for The Card Concepts

Good Wednesday morning my stamping friends. We’re halfway through the week already and on our way to the weekend. I hope you are starting to make some plans.

It’s time for another inspiration challenge for The Card Concepts. The inspiration photo is Love is in The Air.  Here is my card that was inspired from the challenge photo.

I used the Stampin’ Up! Forever Blossoms Cling Stamp Set for my clean and layered card. I was inspired by the Heart Wreath and Colors from the photo.

I hope you will take a moment to visit The Card Concepts and join us for our challenge #168.  How are you inspired by this photo?

I started by embossing a Basic White card front using the Brick & Mortar 3D Embossing Folder and adhered it to a Basic White Thick card base.

I cut the heart from a panel of Basic White cardstock using the Bouquet of Love Dies. This heart was used as my template for making the wreath. I cut 4 of the largest leaf dies from the Forever Flourishing Dies from a panel of Garden Green cardstock. I cut the leaves apart from the stem using my Paper Snips. I cut the larger flowers from panels of Flirty Flamingo and Petal Pink using my Cherry Blossoms Dies. I cut the tiny flowers from the panel of Petal Pink using my Bouquet of Love Dies.

I stamped the center of the heart with the sentiment from the Forever Blossoms stamp set in Flirty Flamingo Ink. I arranged the leaf dies around the heart the way I wanted them using Multipurpose Liquid Glue. I arranged the larger flowers in a cluster on one side of the heart adhering some of them with Glue Dots and some with Stampin’ Dimensionals. I adhered a few small flowers on the wreath using Multipurpose Liquid Glue. I adhered the wreath to the card front using Stampin’ Dimensionals. I added a few Rhinestone Basic Jewels to the wreath.

On the inside I stamped the sentiment from the Stampin’ Up! Love & Happiness Cling Stamp Set in Flirty Flamingo Ink on a Basic White panel. I stamped the leaf images from the Forever Blossoms stamp set on the bottom of the panel in Garden Green Ink. I adhered the extra die cut flowers using Glue Dots on top of the leaves. I adhered the Basic White panel to the inside of the Basic White Thick card base.

To complete my card, I decorated a Basic White Medium Envelope. I stamped the flower images from the Forever Blossoms stamp set on the envelope front and flap in Flirty Flamingo and Petal Pink Inks. I masked the flowers and stamped the leaf images from the Forever Blossoms stamp set around the flowers in Garden Green Ink.

Thank you for stopping by my blog today. I hope you liked my card and will give it a try. Happy stamping!!

*********************************************************************************************************

Join me today at 4:00pm on my Facebook Live.

I’m planning to go live on my Facebook page with a project today at 4pm ET.  Please join me if you can, to see what card I will be making today.

*********************************************************************************************************

If you need any stamping supplies, I’d love to be your Demonstrator. Just click HERE to go directly to my online store or drop me an email if you have any questions. 

MY CURRENT HOST CODE IS:   739EQ2NM

Use this host code when placing an order with me. When you order $50 or greater you will receive a free gift from me! If your order is over $150, please do not use this code, but you’ll still get the free gift. The free gift is your choice of any 1 item valued up to $10.00 from the 2020-2021 Annual Catalog or the July-December 2021 Mini Catalog!   For any orders $50 or more I will also send you my monthly class tutorials.  Click HERE or go to my Customer Rewards for more details and to see what this months tutorials are.

Please remember to use my current Host Code and make sure that you can see my name on the final checkout page listed as your Demonstrator when you order so that you know that you’re ordering with me and you’ll get my rewards! 

Happy Stamping, Karen

*********************************************************************************************************

Join The Stampin’ Up! Community During Sale-a-bration and get 2 FREE Stamp Sets

Now through February 28 you can get 2 FREE STAMP SETS when you join Stampin’ Up! For just $99 you get to choose $125 of product of your choice from any of the current catalogs and you can also choose any 2 Stamp Sets of your choice (cannot be host or Sale-a-bration sets) absolutely FREE!!! You can end up with $175 in product for just $99. There is no obligation to sell, you can join as a Hobby Demonstrator. Interested??? Ask me how. I’d love to have you on my team, drop me a note at creativestampingdesigns@gmail.com I’d be more than happy to talk to you about it.

Here is what $172.00 worth of product looks like and you can get it for just $99 and it ships for FREE. Stampin’ Up! also throws in a past Paper Pumpkin kit, catalogs and other material. We have an awesome team and I’d love to have you join us. Contact me and we can talk.

*********************************************************************************************************

Available February 1 – May 2

Loving hands and heartfelt words are the best way to show you care. With hand designs that illustrate coming together in friendship and solidarity, the All Together Collection will help you create cardmaking and paper crafting projects that reflect the people you know and love. 

The All Together Collection includes early-release products from the 2022–2023 Annual Catalog—an exciting new range of natural Stampin’ Blends—and exclusive products you can’t get anywhere else! Come together to create projects inspired by you.  

  • The Here Together Stamp Set, Here for You Dies, Here Together, and the All Together Collection are available in English and French.
  • Items available during this promotion can be added to demonstrator, customer, workshop, and online orders.
  • No limits apply during the customer sales period.
  • Qualifying orders are eligible for Stampin’ Rewards. (Except for the All Together Collection)
  • All Together items can be added to a starter kit.
  • The following exclusive products are only available while supplies last:
    • Here for You Dies
    • Here Together Bundle
    • All Together Collection

To see a printable PDF flyer Click Here.

*********************************************************************************************************

Sale-a-bration January 4 – February 28!!!

Sale-a-bration is going on right now. Click Here for a PDF version of the Sale-a-bration brochure. This is my most favorite time of Stampin’ Up! because you get to earn FREE products. There are 7 wonderful stamp sets and 4 gorgeous packs of Designer Series Paper. You can earn all of these FREE with qualifying orders. Who doesn’t like FREE??????

When you are placing your order, don’t forget to use my Current Host Code 739EQ2NM for all orders under $150.

*********************************************************************************************************

Host A Party During Sale-a-bration

If you host a party during Sale-a-bration, both you and your guests can earn FREE Sal-a-bration products! Plus, place any party or personal order of $300 or more and receive the exclusive Stampin’ Up! Calming Camellia Stamp Set for FREE! Interested? I can set up a Host Code for you and your friends/family to order with. Drop me a line at creativestampingdesigns@gmail.com. I’d be happy to talk to you about it.

*********************************************************************************************************

Safari Celebration

Subscribe January 11 – February 10

Did you see that? It’s a mischievous monkey swinging from tree to tree! What about that elephant marching through the mud? Can you catch an antelope galloping in the grass? Grab your binoculars, buckle up, and hop into our off-road truck—there’s so much to see on this safari!

Answer the call of the wild—and your creativity—with the Safari Celebration Paper Pumpkin Kit. This playful, party-themed kit includes all the goodies and gear you need to create nine cards and coordinating envelopes in safari-inspired shapes and patterns you’ll go wild for! Make every occasion a celebration with this month’s amusing animals, beautiful botanicals, and celebratory sentiments.

Don’t monkey around and miss this amazing adventure! Unleash your creativity with February’s wildly fun kit. To explore what’s inside, keep reading!

Details:

  • This month’s kit contains enough elements to create 9 cards—3 each of 3 designs—and 9 coordinating envelopes. This all-inclusive kit includes printed card bases, die-cut paper pieces, embellishments, adhesive, and more!
  • The Safari Celebration Paper Pumpkin Kit includes a Rich Razzleberry Classic Stampin’ Spot!
  • This kit’s stamp set is an uplifting one! Make every occasion a celebration with sentiments that say “yay!”, “fantastic!”, and other fun phrases.
  • Explore each of our current In Color collections with this colorful kit! Discover designs and paper pieces in Bumblebee (a 2020–2022 In Color), Fresh Freesia (a 2021–2023 In Color), and Soft Succulent (a 2021–2023 In Color).
  • Card size: 4-1/4″ x 5-1/2″ (10.8 x 14 cm)
  • Envelope size: 4-1/2″ x 5-3/4″ (11.4 x 14.6 cm)
  • Coordinating colors: Bumblebee, Fresh Freesia, Pear Pizzazz, Rich Razzleberry, Soft Succulent, Soft Suede

Subscribe to the February 2022 Paper Pumpkin Kit between 11 January and 10 February at paperpumpkin.com!

Note: Supplies may be limited toward the end of the subscription period.

*********************************************************************************************************

Card stock cuts for this project:

  • Basic White Cardstock 2 – 4″ X 5 1/4″ (card front & inner liner), 3 1/4″ x 2 3/4″ (heart & sentiment)
  • Basic White Thick Cardstock 4 1/4″ x 11″ (card base scored & folded at 5 1/2″)
  • Flirty Flamingo Cardstock 5 1/4″ X 1″ (flowers)
  • Garden Green Cardstock 5 1/2″ X 6″ (greenery)
  • Petal Pink Cardstock 5 1/4″ x 2″ (flowers)

*********************************************************************************************************

Product List

Stampin’ Up! Forever Fern

Good Wednesday morning my stamping friends. We’re halfway through the week and heading towards the weekend. How is your week going?

It’s time for another inspiration challenge for The Card Concept. For the next 2 weeks we have a Luck of The Irish challenge. Here is my card that was inspired from the challenge photo.

I used multiple stamp sets for today’s card, but mainly the Stampin’ Up! Forever Fern Bundle and the Stampin’ Up! Daisy Lane Cling Stamp Set. I was inspired by the colors and the bouquet of flowers for my collage card.

I hope you will take a moment to visit The Card Concept and join us this week to play along with our challenge #150. How are you inspired by this photo?

I started by adhering a panel of In Good Taste Designer Series Paper to a Thick Basic White Card base using Multipurpose Liquid Glue. I adhered another darker panel of In Good Taste DSP to the card front using Stampin’ Seal.

On a panel of Basic White cardstock I stamped multiple fern images from the Stampin’ Up! Forever Fern Cling Stamp Set in Garden Green, Just Jade and Pear Pizzazz Inks. I cut the images out using the Forever Flourishing Dies. I punched 9 daisies using the Medium Daisy Punch and adhered them together in sets of 3 using tiny amounts of Multipurpose Liquid Glue. I stamped the flower pot from the Stampin’ Up! Simply Succulents Cling Stamp Set and stamped the sentiment from the Daisy Lane stamp set in Tuxedo Black Ink. I cut the flower pot and sentiment out using the Potted Succulents Dies and colored the flower pot in using my Shaded Spruce Stampin’ Blends Markers. Using my Forever Flourishing Dies I cut other fern and leaf images from the Just Jade, Pear Pizzazz, Pretty Peacock, Shaded Spruce and Soft Seafoam panels of cardstock. Using the tiny flower dies from the Wreath Builder Dies I cut out 12 flowers from the panel of So Saffron cardstock. I cut the tiny flowers using the Confetti Flowers Border Punch from the panel of So Saffron cardstock.

I flipped the flower pot upside down and adhered a piece of the 1/4″ Early Espresso Faux Suede Trim with an Antique Slide from the Antique Corners & Slides Embellishments around the pot adhering it in the back with Glue Dots. I adhered the flower pot to the card front using Stampin’ Dimensionals. I adhered the pieces of fern and flowers to the card front arranging them how I liked using Glue Dots, Multipurpose Liquid Glue and Stampin’ Dimensionals. I adhered the sentiment to the bottom of the card front using Stampin’ Dimensionals.

On the inside I stamped the sentiment and small daisy image from the Daisy Lane stamp set in the center of a Basic White panel in Tuxedo Black Ink. I colored the daisy centers in using my Daffodil Delight Stampin’ Blends Markers. I adhered the Basic White panel to a Pretty Peacock mat using Stampin’ Seal and then to the inside of the Thick Basic White card base using Stampin’ Seal.

To complete my card I decorated a Basic White Medium Envelope. I stamped some of the fern images from the Forever Fern stamp set on the envelope front and adhered a panel of In Good Taste DSP to the envelope flap.

Thank you for stopping by my blog today. I hope you liked my card and will give it a try. Happy Stamping!!

*********************************************************************************************************

If you need any stamping supplies, I’d love to be your Demonstrator. Just click HERE to go directly to my online store or drop me an email if you have any questions. 

MY CURRENT HOST CODE IS: 2QRN664Q

Use this host code when you order $50 or greater and receive a free gift from me! If your order is over $150, please do not use this code, but you’ll still get the free gift. The free gift is your choice of any 1 item valued up to $10.00 from the 2020-2021 Annual Catalog or the January-June 2021 Mini Catalog!   For any orders $50 or more I will also send you my monthly class tutorials.  Click HERE or go to my Customer Rewards for more details and to see what this months tutorials are.

 Click HERE to shop the clearance rack.

Please remember to use my current Host Code and make sure that you can see my name on the final checkout page listed as your Demonstrator when you order so that you know that you’re ordering with me and you’ll get my rewards! 

Happy Stamping, Karen!

*********************************************************************************************************

Available Now!!!

Bring in the beauty of nature with the artistic designs of the Butterfly Brilliance Bundle and coordinating designer series paper, along with textured specialty paper that will put a pop of brilliance on every project. The Butterfly Brilliance Collection will be available March2 — May 3, 2021.

*********************************************************************************************************

The 2019-2021 In-Colors will be retiring soon. See the complete list of items in my online store Here.

*********************************************************************************************************

Here’s To You

Subscribe February11th – March 10th

Three cheers for mountain air, a sky filled with sunshine, and finding joy in life’s journey! Adventure awaits inside this month’s majestic, mountain-themed kit. With enough elements and embellishments to create eight cards and coordinating envelopes, the Here’s to You Paper Pumpkin Kit is the perfect pick for celebrating life’s little moments and mountain-high milestones!

What makes March’s kit one-of-a-kind? The spectacular set of four free stencils—and a stamping sponge—that you’ll find inside! Pair this pack of stunning stencils with the kit’s contents to stamp a springtime scene, then store the set to stamp for any season in the future. Clean up your binoculars and dust off your hiking boots—the Here’s to You Paper Pumpkin Kit is ready to lead you on an excursion to explore your creativity!

ABOUT THE MARCH KIT

Details

  • Kit contains enough supplies to create 8 cards—4 each of 2 designs—and coordinating envelopes. The kit’s contents include printed card bases, die-cut paper pieces, embellishments, adhesive, and more!
  • Card size: 4-1/4″ x 5-1/2″ (10.8 x 14 cm)
  • Envelope size: 4-1/2″ x 5-3/4″ (11.4 x 14.6 cm)
  • Coordinating colors: Bumblebee, Calypso Coral, Old Olive, Petal Pink, Pretty Peacock, Seaside Spray
  • Includes four free stencils and a stamping sponge!
  • Arrives in a cute and collectible box.

Subscribe to the March 2021 Paper Pumpkin Kit between 11 February and 10 March at paperpumpkin.com!

Note: Supplies may be limited toward the end of the subscription period.

*********************************************************************************************************

Card stock cuts for this project:

  • Basic White Cardstock 8 1/2″ X 11″ (flowers, fern and inner liner)
  • Thick Basic White Cardstock 4 1/4″ X 11″ (card base scored and folded at 5 1/2″)
  • Just Jade Cardstock 2 1/2″ X 3″ (fern)
  • Pear Pizzazz Cardstock 5″ x 2″ (leaves die)
  • Pretty Peacock Cardstock 1″ x 4″ (eucalyptus)
  • Shaded Spruce Cardstock 3″ X 4 1/2″ (fern), 4 1/8″ x 5 3/8″ (inner liner mat)
  • Soft Sea Foam Cardstock 3″ X 4 1/2″ (fern)
  • So Saffron Cardstock 2″ X 5 1/2″ (tiny flowers)
  • In Good Taste Designer Series Paper 4 1/4″ X 5 1/2″ (card front), 3 3/4″ X 5″ (card front panel), 2 1/2″ X 6″ (envelope flap)

*********************************************************************************************************

Product List

Paper Snips

$10.00

Stamparatus

$49.00

Stampin’ Up! Forever Fern Wedding for Fun Fold Friday

Good Friday morning my stamping friends and welcome to my Fun Fold Friday.  How was everyone’s week?  We’re upon the weekend and it’s supposed to be another beautiful one here. Love these cool mornings and warmer afternoons.

Today’s fun fold card is one that I made on Wednesday afternoon on my Facebook Live video.  If you were able to join me or you watched the replay, thank you very much.  If you’d like to view my video either on Facebook or YouTube, the link is below.  I needed another wedding card for my boss from my family, here’s what I came up with.   I’m calling it a folded gate fold with a belly band.

I started by scoring and folding my Thick Whisper White card base at 1 1/4″, 3 3/8″, 7 5/8″ & 9 3/4″.  I adhered 4 panels of Peony Garden Designer Series Paper to 4 Gray Granite mats using Stampin’ Seal.

I adhered 2 of the matted panels to the outside panels of the card base and 2 to the inside panels of the card base using Multipurpose Liquid glue.

I embossed 2 panels of Gray Granite cardstock using the Dainty Diamonds 3D Embossing Folder and adhered them to the narrow front panels of the card base using Multipurpose Liquid Glue.

For the belly band, I adhered a panel of Petal Pink cardstock to a panel of Gray Granite cardstock using Multipurpose Liquid Glue.  I wrapped the belly band around the card and adhered it using Tear & Tape. I wrapped a piece of 1/4″ Gray Granite Shimmer Ribbon around the belly band securing it down with Glue Dots.  On a panel of Whisper White cardstock I stamped the sentiment from the Stampin’ Up! Forever Fern Cling Stamp Set in Gray Granite Ink.  I stamped one of the leaf images from the Forever Fern stamp set in Soft Seafoam Ink, stamping off once,  on either side of the sentiment.  I cut the sentiment out using the frame die from the Wild Rose Dies.  I cut 2 of the largest fern dies from the Forever Flourishing Dies from a panel of Vellum cardstock and adhered them to the belly band using Glue Dots.  I adhered the die cut sentiment to the belly band using Stampin’ Dimensionals.  I added a few Elegant Faceted Gems to the sentiment die.

On the inside I stamped the sentiments from the Stampin’ Up! Path of Petals Photopolymer Stamp Set in Gray Granite Ink in the center of a Whisper White Panel.  I stamped the leaf image from the Forever Fern stamp set in Soft Seafoam Ink on the bottom of the panel.  I adhered the Whisper White panel to a Gray Granite mat using Stampin’ Seal and then to the inside of the Thick Whisper White card base using Multipurpose Liquid Glue.

To finish my card I decorated a Medium Whisper White Envelope.  I stamped the leaf image from the Forever Fern stamp set in Soft Seafoam on the envelope front once full strength and once stamped off.  I adhered a panel of Peony Garden DSP to the envelope flap.

Thank you for stopping by my blog today.  I hope you liked my card and will give it a try.  The list of supplies are below along with the measurements if you’d like to stamp along while watching the video.  You can watch it on my Facebook page Here.

You can also view the video on my YouTube channel Here.  Happy Stamping!!

****************************************************************************************************

If you need any stamping supplies, I’d love to be your Demonstrator. Just click HERE to go directly to my online store or drop me an email if you have any questions. 

MY CURRENT HOST CODE IS: G39RYMEX

Use this host code when you order $50 or greater and receive a free gift from me! If your order is over $150, please do not use this code, but you’ll still get the free gift. The free gift is your choice of any 1 item valued up to $10.00 in the 2020-2021 Annual Catalog!   For any orders $50 or more I will also send you my monthly class tutorials.  Click HERE or go to my Customer Rewards for more details and to see what this months tutorials are.

 Click HERE to shop the clearance rack.

Happy Stamping, Karen!

****************************************************************************************************

World Card Making Day, Saturday October 3rd.  Our Inkin’ Krew Team will be doing videos all day, every hour.  I will actually be doing 2 Facebook Live videos that day.  I will post a schedule when we get closer.

****************************************************************************************************

Joy To The World 

Subscribe September 11 – October 10

This holiday season, share the joy of Paper Pumpkin! The Joy to the World Paper Pumpkin Kit is an exclusive holiday kit that provides a specially-designed box, enough supplies to create eight elegant cards, and an opportunity to connect with the Stampin’ Up! global community.

With October’s magical kit, not only will you get a head start on your holiday crafting—you’ll get to create Christmas cards, share project ideas, and spread holiday cheer with Stampin’ Up! customers and demonstrators around the world! After you receive your kit,  join the Joy of Paper Pumpkin Facebook group to make the most of this month’s kit.

  • Kit contains enough supplies to create eight cards—four each of two designs—and coordinating envelopes.
  • Kit includes die-cut pieces in English, French, and German. This will allow you to create cards you can use to connect with other customers and demonstrators around the world—in their language!
    • Card size: 4-1/4″ x 5-1/2″ (10.8 x 14 cm)
    • Envelope size: 4-1/2″ x 5-3/4″ (11.4 x 14.6 cm)
  • Coordinating Colors: Cherry Cobbler, Crumb Cake, Early Espresso, Just Jade, Soft Sea Foam

The Joy to the World Paper Pumpkin Kit has been thoughtfully released in preparation for the season of spreading joy. October’s Paper Pumpkin kit was designed to bring people together—connecting them with one another and spreading joy with each other around the world! With die-cut sentiments in English, French, and German, subscribers can send holiday cheer to their friends across the globe—in their language.

To connect and spread joy with international customers and demonstrators through the Joy to the World Paper Pumpkin Kit, join our Facebook group: Joy of Paper Pumpkin! When connecting with your new friends, don’t forget to share your experience with the #joyofpaperpumpkin hashtag.

Subscribe to the October 2020 Paper Pumpkin Kit from 11 September to 10 October at paperpumpkin.com.

Note: Supplies may be limited toward the end of the subscription period.

****************************************************************************************************

Stampin’ Up! Get & Go Starter Kit Promotion – Sept 1-30!

Have you thought about joining our Stampin’ Up! team?

Now is an awesome time to join.

The Get & Go Starter Kit promotion gives those who sign up to be a Stampin’ Up! demonstrator additional products to help get started right away!  In addition to the already great valued Starter Kit, you will receive precut paper, stamps, and embellishments!

Here are the details:

  • Promotion Dates: September 1–30, 2020
    Joining Deadline:  September 30, 2020; 11:50 PM (MT)
  • New demonstrators who submit their Independent Demonstrator Agreement (IDA) before 1 September or after 30 September will not be eligible for this promotion.
  • In addition to the regular starter kit (for $99 you choose $125 worth of products), if you join between September 1 and 30, you will also receive enough card stock pieces to make 16 cards, a pack of Rhinestone Basic Jewels, the So Much Love stamp set, and the Queen Anne’s Lace stamp set!!
    • 8 packs of precut card stock of the coastal cabana pack will be provided, and 8 packs of precut card stock of the Granny Apple Green pack, for a total of 16 cards (packs include envelopes).
  • Important note: Ink, adhesive, cutting tool, and clear block for stamping must be purchased separately. However, these products may be included as part of the Starter Kit product selection.

This is such a great deal!  For $99, you get to pick $125 merchandise of your choice for your Starter Kit plus you’ll get the Queen Annes’ Lace and So Much Love stamp sets, card kits to create 16 cards and a pack of Rhinestones for free!!

Drop me a note at creativestampingdesigns@gmail.com if you have questions about joining, I’m happy to talk to you about it.  You can also see more information about the benefits of becoming a Stampin’ Up! Demonstrator Here

****************************************************************************************************

Card stock cuts for this project:

  • Gray Granite Cardstock 4 – 2″ X 5 3/8″ (dsp mats), 2 – 1 1/8″ X 5 3/8″ (narrow front panels), 4 1/8″ X 5 3/8″ (inner liner mat), 1″ X 9 3/4″ (belly band mat)
  • Petal Pink Cardstock 3/4″ X 9 3/4″ (belly band)
  • Whisper White Cardstock 3″ X 4″ (sentiment), 4″ X 5 1/4″ (inenr liner)
  • Thick Whisper White Cardstock 11″ X 5 1/2″ (card base scored and folded at 1 1/4″, 3 3/8″, 7 5/8″ & 9 3/4″)
  • Peony Garden Designer Series Paper 4 – 1 7/8″ X 5 1/4″ (card base panels), 2 1/4″ X 6″ (piece for envelope flap)
  • Vellum Cardstock 3″ X 6″ (fern die cuts)

****************************************************************************************************

Product List

Stampin’ Up! Gather Together for Amy’s Inkin’ Krew Team Blog Hop

Good Tuesday morning my fellow stampers. Welcome to Amy’s Inkin’ Krew Team Blog Hop. It’s the 2nd Tuesday of the month so that means Blog Hop Day!! If you are starting with me, be sure to hop around to see everyone’s beautiful projects. If you’ve hopped over from Amy Koenders blog, welcome to my blog and thank you for stopping by. The theme this month is “Fall Frenzy”.  We can interpret this however we want.  I decided to use non-traditional colors for my card today.  I saw these colors together with some fall decorations and loved it.  Here’s my card.

I started by embossing the top of a Sahara Sand card front using the Stitched Leaves Dies.  I adhered the card front to a Brass Foil Sheet mat using Stampin’ Seal and then to a Misty Moonlight card base using Multipurpose Liquid Glue.

Using the Forever Flourishing Dies I cut panels of Brass Foil Sheet, Brushed Metallic Sheet, Pretty Peacock & Seaside Spray using different dies.  Using the Stitched Leaves Dies and Nature’s Roots Dies I cut leaves out of a panel of Misty Moonlight cardstock.  I stamped the 2 pumpkin images from the Stampin’ Up! Gather Together Photopolymer Stamp Set in Pumpkin Pie Ink on a panel of Pumpkin Pie cardstock.  I cut the pumpkins out using the Gathered Leaves Dies.

I arranged the leaves and pumpkins the way I wanted them on my Silicone Sheet and adhered them together using Glue Dots, Multipurpose Liquid Glue and the pumpkins with Stampin’ Dimensionals.  I adhered the collage to the card front using Stampin’ Dimensionals.  I stamped the sentiment from the Gather Together stamp set in Misty Moonlight Ink on a thin strip of Sahara Sand cardstock.  I adhered the sentiment to the top center of the card front using Stampin’ Dimensionals.  I added a few Gilded Gems to the card front.

On the inside I stamped the sentiment from the Gather Together stamp set in Misty Moonlight Ink in the center of a Whisper White panel.  I stamped the 2 pumpkin images from the Gather Together stamp set in Pumpkin Pie Ink on the bottom of the panel and colored them in using my Crumb Cake and Pumpkin Pie Stampin’ Blends Markers.  I adhered the Whisper White panel to a Sahara Sand mat using Stampin’ Seal and then to the inside of the Misty Moonlight card base using Multipurpose Liquid Glue.

To finish my card I decorated a Medium Whisper White Envelope.  I stamped the pumpkin image from the Gather Together stamp set in Pumpkin Pie Ink on the bottom front of the envelope.  I colored the image in using my Crumb Cake and Pumpkin Pie Stampin’ Blends Markers.  I adhered a panel of Misty Moonlight 2020-2022 In-Color 6 X 6 Designer Series Paper to the envelope flap.

Thank you for visiting by my blog today. I hope you liked my card and will give it a try. Now that you’ve seen my card, be sure to hop around to see everyone’s beautiful projects. Hit Previous to hop back to Amy’s blog or hit Next to head over to Terry Lynn’s blog. You can also click on each of the names and hop around that way. Happy Hopping!!

  1. Karen Ksenzakovic – You Are Here
  2. Terry Lynn Bright –
  3. Mary Deatherage –
  4. Leslie Larkin –
  5. Akiko Sudano –
  6. Julie Johnston –
  7. Jaimie Babarczy –
  8. Sue Prather –
  9. Donna Leonard –
  10. Nicole Bloxom –
  11. Amy Koenders –

****************************************************************************************************

If you need any stamping supplies, I’d love to be your Demonstrator. Just click HERE to go directly to my online store or drop me an email if you have any questions. 

MY CURRENT HOST CODE IS: 4Z2KHBVY

Use this host code when you order $50 or greater and receive a free gift from me! If your order is over $150, please do not use this code, but you’ll still get the free gift. The free gift is your choice of any 1 item valued up to $10.00 in the 2020-2021 Annual Catalog!   For any orders $50 or more I will also send you my monthly class tutorials.  Click HERE or go to my Customer Rewards for more details and to see what this months tutorials are.

 Click HERE to shop the clearance rack.

Happy Stamping, Karen!

****************************************************************************************************

IT’S TIME TO REDEEM THOSE BONUS DAYS COUPONS YOU EARNED IN JULY!!

  • Redemption Deadline:  August 31 2020, by 11:50 PM (MT)
  • There is no limit to the number of coupon codes participants can use on an order during redemption.
  • Bonus Days coupon codes may be redeemed for any product (excluding Starter Kits and Paper Pumpkin monthly subscriptions).
    • New prepaid Paper Pumpkin codes may be discounted using Bonus Days coupon codes.
  • Bonus Days coupon codes will reduce the amount of an order.
  • Bonus Days coupon codes may be redeemed one time only.

****************************************************************************************************

Card stock cuts for this project:

  • Brass Foil Sheet 4 1/8″ X 5 3/8″ (card front mat), 3″ X 3″(forever flourishing die)
  • Brushed Metallic Sheet 4 1/4″ X 1″ (forever flourishing die)
  • Misty Moonlight Cardstock 4 1/4″ X 11″ (card base scored and folded at 5 1/2″), 3 1/2″ X 5 1/2″ (leaves)
  • Pretty Peacock Cardstock 1″ X 4″ (forever flourishing die)
  • Pumpkin Pie Cardstock 2″ X 3″ (pumpkins)
  • Sahara Sand Cardstock 4″ X 5″ (card front), 4 1/8″ X 5 3/8″ (inner liner mat)
  • Seaside Spray Cardstock 3″ X 3″ (forever flourishing die)
  • Whisper White Cardstock 4′ X 5 1/4″ (inner liner)
  • 2020-2022 In-Color 6 X 6 Designer Series Paper 2 1/4″ X 6″ (envelope flap)

****************************************************************************************************

Product List

Stampin’ Up! Forever Fern Friendship

Good Monday morning my stamping friends.  How was everyone’s weekend?  Did anyone do anything fun?  It was a pretty quiet weekend other than work.  Mu husband got out taxes done finally, nothing like waiting till the last minute.

For today’s card I have a bit of a collage card for you.  I was playing around with the Forever Flourish Dies and here’s what I came up with.

My card played along with Festive Friday Challenge # FF0063.  Here is their Inspo List. I have the Friendship Sentiment (on the inside), Green, Ribbon, Die Cuts and Embossing.

I started by cutting the different flourishes from the Forever Flourishing Dies from panels of Just Jade, Pear Pizzazz, Pretty Peacock and Soft Seafoam.  Some I cut 1 of, some 2 and some 4.

I stamped some of the leaf images from the Stampin’ Up! Forever Fern Cling Stamp Set on a panel of Whisper White cardstock in Garden Green, Pear Pizzazz, Pretty Peacock and Shaded Spruce.  I cut all those images out using the Forever Flourishing Dies.  I arranged all the greenery the way I liked it on my E Clear Acrylic Block.  I place the F Clear Acrylic Block on top of them and flipped it over, removed the E Block and adhered Stampin’ Dimensionals and Glue Dots around holding the pieces together.  I knew I wouldn’t be able to remember how I arranged them that’s why I did it that way.

I embossed a Shaded Spruce card  front using the Greenery Embossing Folder.  I embossed 1/2 the cardstock and then lined it up and embossed the other 1/2.  I adhered 2 of the Forever Gold Laser-Cut Specialty Paper to the card front using Glue Dots.  I adhered the collage of greenery on top of the laser-cut pieces using the Stampin’ Dimensionals.  I wrapped a piece of the Whisper White 1/2″ Faux Linen Ribbon, from the Flowers For Every Season Ribbon Combo Pack, around the card front and tied a bow.  I adhered the card front to a Soft Sea Foam card base using Stampin’ Dimensionals.

On the inside I stamped the sentiment from the Forever Fern stamp set in Shaded Spruce Ink in the center of a Whisper White panel.  I stamped one of the leafy images from Forever Fern stamp set in Pear Pizzazz Ink on the bottom right of the panel and the eucalyptus image in Pretty Peacock Ink on the other side.  I stamped the splatter image from the Forever Fern stamp set in Soft Sea Foam Ink around the leaves and sentiment.  I adhered the Whisper White panel to a Shaded Spruce mat using Stampin’ Seal and then to the inside of the Soft Sea Foam card base using Multipurpose Liquid Glue.

To finish my card I decorated a Medium Whisper White Envelope.  I stamped the leaf images from the Forever Fern stamp set in Garden Green, Pear Pizzazz, Pretty Peacock and Shaded Spruce Inks on the envelope front and envelope flap.  I stamped the splatter image from the Forever Fern stamp set in Soft Sea Foam Ink around the leaf images.

Thank you for stopping by my blog today.  I hope you liked my card and will give it a try. Happy Stamping!!

****************************************************************************************************

If you need any stamping supplies, I’d love to be your Demonstrator. Just click HERE to go directly to my online store or drop me an email if you have any questions. 

MY CURRENT HOST CODE IS: FXTA29WD

Use this host code when you order $50 or greater and receive a free gift from me! If your order is over $150, please do not use this code, but you’ll still get the free gift. The free gift is your choice of any 1 item valued up to $10.00 in the 2020-2021 Annual Catalog!   For any orders $50 or more I will also send you my monthly class tutorials.  Click HERE or go to my Customer Rewards for more details and to see what this months tutorials are.

 Click HERE to shop the clearance rack.

Happy Stamping, Karen!

****************************************************************************************************

Bonus Days from Stampin’ Up! are back!!  For every $50 merchandise that you purchase between July 1 and August 3, you’ll earn a $5 coupon that can be redeemed between August 4 and 31!  

Here are the details:

  • An email address is required to participate; Bonus Days coupon codes can be delivered only via email.
  • If you earn multiple codes from a single order, you will receive one email with multiple codes.  If you earn multiple codes from multiple orders, they will receive separate emails for each code earned.
  • All order types qualify for this promotion.  Fax and email orders still require an email address.
  • Orders that are started before the promotion begins will not go toward earning coupon codes.
  • There is no limit to the number of coupon codes you can earn per order or throughout the duration of the Bonus Days earning period!!
  • Deadline for coupon earning:  August 3, 2020 at 11:50 PM (MT)

Click hereto head over to my online store to start earning those coupons now!  Don’t forget to use my current Host Code so that you will get your free gift from me, any 1 item in the catalog valued up to $10 with a qualifying order.  Detail about the free gift are here.  Let me know if you have any questions.

Get your shopping lists ready and start earning those coupons!

****************************************************************************************************

WORLD’S GREATEST BY PAPER PUMPKIN

SUBSCRIBE JULY11 – AUGUST 10

With Paper Pumpkin, you are provided with everything you need to explore your creativity and discover new ways to craft. As we navigate a “new normal” in today’s world, there’s plenty of opportunity to papercraft! And, more importantly, there’s no better time than now to create something that’ll show the essential people in your life just how awesome you think they are.

Lately, it’s become especially clear who the everyday heroes are—they’ve always surrounded us! Teachers, doctors, hairdressers, nurses, delivery workers, cashiers, and even our friends, kids, and family members go above and beyond to enrich our lives. These people are truly the world’s greatest at what they do!

Celebrate and appreciate the everyday heroes in your life with the August Paper Pumpkin Kit. The cards included in this kit are specifically designed for celebrating life’s champions!

  • The intended use of this kit is to celebrate and appreciate life’s champions and everyday heroes.
  • Especially during this time, this is something anyone can do to make a difference. The August kit makes it easy!
  • Distinktive stamps are photo-realistic stamps that create an impressive detailed image with a single stamp.
  • The Distinktive stamps included in August’s kit are an especially excellent feature for new stampers still exploring their creativity!
  • Masculine card designs can be difficult to find, this kit has a real masculine feel.
  • While the elements of the August kit can be used to show appreciation for anyone, the masculine card designs are perfect for the men in your life!

About the August Kit:

  • Kit contains enough supplies to create nine cards and coordinating envelopes.
  • Card size: 4-1/4” x 5-1/2” (10.8 x 14 cm)
  • Envelope size: 4-1/2” x 5-3/4” (11.4 x 14.6 cm)
  • Coordinating Colors: Bumblebee, gold, Mint Macaron, Pacific Point, Soft Suede, white
  • The kit’s stamp set includes Distinktive stamps
  • Subscribe to the August 2020 Paper Pumpkin Kit from 11 July to 10 August at paperpumpkin.com!

Note: Supplies may be limited toward the end of the subscription period.

****************************************************************************************************

I’m cleaning my shelves and drawers out to make room for lots of new goodie.  I have my list right HERE and I’m trying to keep it up to date.   Check it out and let me know if there is anything you’d like to get.  If you are looking for something and don’t see it on the list, drop me a line and I will look through my stash to see if I missed it.  I have lots of older DSP too that I don’t have listed if there is any that you are looking for.

****************************************************************************************************

Card stock cuts for this project:

  • Just Jade Cardstock 2 1/2″ X 2 1/2″ (flourishing dies)
  • Pear Pizzazz Cardstock 2 3/4″ X 3 3/4″ (flourishing dies)
  • Pretty Peacock Cardstock 4 1/4″ X 1 3/4″(flourishing dies)
  • Shaded Spruce Cardstock 2 – 4″ X 5 1/4″ (card front and inner liner mat)
  • Soft Sea Foam Cardstock 1 1/4″ X 5 1/2″ (flourishing dies), 8 1/2″ X 5 1/2″ (card base scored and folded at 4 1/4″)
  • Whisper White Cardstock 5 1/2″ X 5″ (greenery), 3 3/4″ X 5″ (inner liner)

****************************************************************************************************

Product List

Forever Fern Hello Friendship

Good Wednesday morning my stamping friends.  We’re halfway through the week already and more that halfway through the month.  Time is really flying by lately.

I have one more card for you today that we made at our team meeting on Sunday.  This one was designed by our fabulous team leader Amy Koenders.  She designs the most beautiful cards and loves to use woodgrain paper.  Here’s my card for today.

I started by adhering a panel of In Good Taste Designer Series Paper to an Early Espresso mat using Stampin’ Seal.

From the Just Jade panel I used the largest die from the Forever Flourishing Dies.  I cut 2 of the eucalyptus dies from the Forever Flourishing Dies out of the Pretty Peacock panel.  I stamped 2 of the leaf images from the Stampin’ Up! Forever Fern Cling Stamp Set in Shaded Spruce Ink on a small panel of Whisper White cardstock.  I stamped the medium and small leaf images from the Forever Fern stamp set in Just Jade Ink on the Whisper White panel.  I cut all the images out using the Forever Flourishing Dies.  Amy used the Gold Hoops Embellishments for her card which I didn’t have, so I decided to use the Gold 1/16″ trim from the Forever Greenery Trim Combo Pack.  I adhered a piece of the gold trim on the card front using Glue Dots and then started layering all the greenery the way I wanted on top of it adhering everything down with Glue Dots or Stampin’ Dimensionals.

On the Whisper White panel I stamped the sentiment from the Forever Fern stamp set in Cinnamon Cider Ink and cut it out using the smallest rectangle from the Stitched Rectangle Dies.  I adhered the sentiment to the card front using Stampin’ Dimensionals.  I adhered the card front to an Early Espresso card base using Stampin’ Dimensionals and added a few Gold Glitter Enamel Dots to the card front.

On the inside I stamped the sentiment from the Forever Fern stamp set in Cinnamon Cider Ink in the center of a Whisper White panel.  I stamped the leaf images from the Forever Fern stamp set around the edges in Just Jade and Shaded Spruce Inks.  I adhered the Whisper White panel to an Early Espresso mat using Stampin’ Seal and then to the inside of the Early Espresso card base using Multipurpose Liquid Glue.

To finish my card I decorated a Medium Whisper White Envelope.  I stamped the leaf images from the Forever Fern stamp set in Just Jade and Shaded Spruce Inks on the front of the envelope. I adhered a panel of In Good Taste DSP to the envelope flap.

Thank you for stopping by my blog today.  I hope you liked the card we made from our team meeting and will give it a try.  We’d love to have you join us at our meeting.  If you’re interested in joining our team, I’d be happy to talk to you about it, just drop me a line.  Happy Stamping!!

****************************************************************************************************

DON’T FORGET I’M GIVING AWAY SOME BLOG CANDY TO CELEBRATE MY 500TH BLOG POST AND TOMORROW IS THE LAST DAY.  FOR A CHANCE TO WIN CLICK HERE TO LEAVE A COMMENT TELLING ME YOUR FAVORITE BUNDLE, SUITE OR STAMP SET IN THE NEW 2020-2021 ANNUAL CATALOG.

****************************************************************************************************

If you need any stamping supplies, I’d love to be your Demonstrator. Just click HERE to go directly to my online store or drop me an email if you have any questions. 

MY CURRENT HOST CODE IS: RBBKEF3W

Use this host code when you order $50 or greater and receive a free gift from me! If your order is over $150, please do not use this code, but you’ll still get the free gift. The free gift is your choice of any item valued up to $10.00 in either the 2019-2020 Annual Catalog or the 2020 January-June Mini Catalog!   For any orders $50 or more I will also send you my monthly class tutorials.  Click HERE or go to my Customer Rewards for more details and to see what this months tutorials are.

 Click HERE to shop the clearance rack.

Happy Stamping, Karen!

****************************************************************************************************

SUMMER NIGHTS BY PAPER PUMPKIN

SUBSCRIBE JUNE 11 – JULY 10

Celebrate the magic of summer nights with the Summer Nights Paper Pumpkin Kit! In this exclusive fun-filled kit, you’ll unbox enough supplies to create nine postcard-style cards, coordinating envelopes, and die-cut tealight bags. What’s even more spectacular about July’s kit is the add-on you can purchase along with it! The Summer Nights Add-On includes 24 card bases and envelopes in coordinating Summer Nights designs. This add-on is perfect for helping you expand the Summer Nights creative experience beyond the Paper Pumpkin kit. Between the add-on and the leftover supplies from your Summer Nights kit, you will be crafting a summer night worth celebrating all month long!

Don’t miss out on the fireworks, fireflies, and fun! You can subscribe to the Summer Nights Paper Pumpkin Kit between June 11 and July10, and order the Summer Nights Add-On starting 1 July; while supplies last.

Kit contains enough supplies to create nine postcards and coordinating envelopes, as well as nine die-cut tealight bags.

  • Card size: 4” x 5-1/4” (10.2 x 13.3 cm)
  • Envelope size: 4-1/2” x 5-3/4” (11.4 x 14.6 cm)

Coordinating Colors: Blackberry Bliss, Calypso Coral, Costal Cabana, Night of Navy

The Paper Pumpkin kit does not require the add-on to create completed projects.

Summer Nights Add-On

Contains 24 preprinted card bases and coordinating envelopes.

  • Card size: 4-1/4″ x 5-1/2″ (10.8 x 14 cm)
  • Envelope size: 4-1/2″ x 5-3/4″ (11.4 x 14.6 cm)

The Summer Nights Add-On is not required to complete the Paper Pumpkin kit projects.

The Summer Nights Add-On is $10.00 USD/$13.00 CAD and is only available to Paper Pumpkin subscribers. The add-on is available while supplies last, beginning July 1st!

Note: During demonstrator product testing, we learned that the Summer Nights Add-On could make at least 20 additional cards when combined with the leftover pieces from the Summer Nights kit.

Subscribe to the July 2020 Paper Pumpkin Kit from June 11 to July 10 at paperpumpkin.com!

Note: Supplies may be limited toward the end of the subscription period.

****************************************************************************************************

STAMPIN’ UP! PICK A FREE BUNDLE STARTER KIT PROMOTION

Wow!!!  Stampin’ Up! is offering an AWESOME promotion if you join during the month of June!!  You get to pick a FREE bundle of your choice with your Starter Kit Purchase!!

Here are the details:

  • Joining promotion dates:  June 3–30, 2020
  • New demonstrators who submit their Independent Demonstrator Agreement (IDA) before June 3 or after June 30 will not be eligible for this promotion.
  • When you purchase your Starter Kit for $99, you get to select $125 worth of products of your choice for your Starter Kit PLUS you get to select ONE stamp and punch bundle (p. 168–169) or ONE stamp and die bundle (p. 173-179) from the new 2020–2021 Annual Catalog—in addition to your regular Starter Kit for FREE.  And your Starter Kit always ships for free…double bonus!!

Once you join, you’ll get at least a 20% discount on all products that you purchase plus you get to preorder from the upcoming catalogs a month before they go live for customer ordering!!  There is no requirement to sell and there is no commitment beyond your Starter Kit purchase.  Why not give it a try?  🙂

You can see more details about joining and about our team here on my blog here.  You can also see more information about the benefits of becoming a Stampin’ Up! Demonstrator here.

That is such a great deal!!  If you’ve been considering joining, June will be a great time to jump in!  Drop me an email at creativestampingdesigns@gmail.com

****************************************************************************************************

STAMPIN’ UP! ANNUAL KICK OFF CELEBRATION

EXTRA HOST REWARDS FOR YOU!!

The brand new 2020–2021 Stampin’ Up! Annual Catalog is going live on June 3 2020, and Stampin’ Up! is having a celebration!

Anyone who places an order of $250+ or holds a party with $250+ in sales during the month of June will receive $25 in extra Stampin’ Rewards!!  So that means that you’ll earn $50 in Stampin’ Rewards with any order or party of $250+ that is submitted between June 3 and June 30! Yay!!!!

Here are the details:

  • Customer, workshop and online order types all qualify for this promotion.
  • Starter Kit orders do not qualify for this promotion.  But you CAN use your host cash toward the purchase of your Starter Kit, ask me for details!
  • Paper Pumpkin prepaid subscriptions count toward a qualifying purchase. Month-to-month subscriptions do not qualify for this promotion.
  • The qualifying amount must be reached with merchandise prior to shipping and tax.
  • The $25 additional Stampin’ Rewards for this promotion will only be awarded once per order/party.
  • Order Deadline:  June 30, 2020; 11:50 PM (MT)

Drop me a note if you’d like to set up a catalog party!  I can set up a host code for you and you can have your stamping friends place orders with your host code.  If your party reaches $250 in sales, you’ll get that extra $25 in host cash when we close out your party!   If you’re interested, ask me for details!

Let me know if you have any questions.  Have fun making your shopping list!

****************************************************************************************************

Card stock cuts for this project:

  • Early Espresso Cardstock 4 1/4″ X 11″ (card base scored and folded at 5 1/2″), 4″ X 5 1/4″ (card front mat), 4 1/8″ X 5 3/8″ (inner liner mat)
  • Just Jade Cardstock 3″ X 4″ (die cut)
  • Pretty Peacock Cardstock 1 1/2″ X 2 1/2″ (die cut)
  • Whisper White Cardstock 4″ X 4″ (die cuts), 4″ X 5 1/4″ (inner liner)
  • In Good Taste Designer Series Paper 3 7/8″ X 5 1/8″ (card front), 2 1/4″ X 6″ (piece for envelope flap)

****************************************************************************************************

Product List

Stampin’ Up! Forever Fern Birthday for Fun Fold Friday

Good Friday morning my fellow stampers and welcome to my Fun Fold Friday.  How was everyone’s week?  Are you ready for the weekend?  I was suppose to have off this Sunday, but my boss asked me if I could come in to relieve my cashiers for a lunch break.  Of course I said yes, but I told him to make it worth my while, I was going to go in the office to get a little work done.  Weekends have been beyond crazy busy in the store and we are still kind of in lock down here.  I can’t image what it’s going to be like when things open up again.

For today’s card I was playing around with some of the new items in the 2020-2021 Annual Catalog.  Here’s what I came up with.

My design is from Sunday Stamps Sketch Challenge #232.  Here is their sketch.

I also joined in with Always Fun Challenge #165.  They have a theme challenge and it’s “Layers”.

I played along with Cardz 4 Galz Challenge #123.  Their challenge is ‘More Than One Score (Fold)’.

I also joined in with Just Add Ink Challenge #508.  Here is their challenge.

I started by adhering the 2 panels of Forever Greenery Designer Series Paper to the front of the card base using the new Stampin’ Seal.  I embossed the small panel of Soft Sea Foam cardstock using the Greenery Embossing Folder and adhered it to the front of the smaller card base using Multipurpose Liquid Glue.

I stamped the 2 similar fern images from the Stampin’ Up! Forever Fern Cling Stamp Set in Soft Sea Foam Ink on a panel of Whisper White cardstock.  I cut the images out using the Forever Flourishing Dies.  On a small panel of Whisper White cardstock, which I cut using the 5th from the largest Layering Squares Dies, I stamped one of the larger fern images from the Forever Fern stamp set in Pear Pizzazz Ink.  I stamped the splatter image from the Forever Fern stamp set in Pretty Peacock Ink around the Pear Pizzazz image multiple times.  From a panel of Pretty Peacock cardstock I cut 2 of the eucalyptus images using the Forever Flourishing Dies.  I cut 1 of the leafy images from the Forever Flourishing Dies from a panel of Pear Pizzazz cardstock.

I cut the 2nd & 3rd largest squares from the Stitched Shapes Dies from a panel of Pretty Peacock cardstock.  I adhered the Whisper White square to the larger stitched square using Stampin’ Seal.  I adhered one of the Forever Gold Laser Cut Specialty Paper fern pieces to the artwork using a tiny amount of Multipurpose Liquid Glue.  I arranged and adhered all the other fern/leaf/eucalyptus pieces using Multipurpose Liquid Glue and Glue Dots.  I stamped the splatter image from the Forever Fern stamp set in Pretty Peacock Ink on the small stitched square panel and adhered it to the small card front using Glue Dots.  I adhered the artwork above the small square, overlapping it, using Stampin’ Dimensionals.  I made a multiloop bow out of Linen Thread and tied it off using the Gold Trim from the Forever Greenery Trim Combo Pack.  I adhered the bow to the bottom corner of the artwork using a Glue Dot.  On a strip of Pretty Peacock cardstock, I stamped the sentiment from the Stampin’ Up! Itty Bitty Birthdays Cling Stamp Set in Versamark Ink.  I immediately sprinkled it with my White Embossing Powder and set it using my Heat Tool.  I cut the sentiment out using the smallest rectangle from the Stitched Rectangle Dies. I adhered the sentiment to the small card front using Stampin’ Dimensionals.  I added a few Gold Glitter Enamel Dots to the card front.

I adhered the small card base to the left gate fold of the Pretty Peacock card base using Multipurpose Liquid Glue.

On the inside I stamped the sentiment from the Stampin’ Up! Friend Like You Photopolymer Stamp Set in Pretty Peacock Ink in the center of a Whisper White panel.  I stamped the leafy image from the Forever Fern stamp set in Soft Sea Foam Ink on the bottom of the panel.  I adhered the Whisper White panel to a Soft Sea Foam mat using Stampin’ Seal and then to the inside of the Pretty Peacock card base using Multipurpose Liquid Glue.

To finish my card I decorated a Medium Whisper White Envelope.  I stamped the leafy image from the Forever Fern stamp set in Soft Sea Foam Ink on the bottom of the envelope front.  I stamped the splatter image from the Forever Fern stamp set in Pretty Peacock Ink around the leafy image.  I adhered a panel of Forever Greenery DSP to the envelope flap.

Thank you for stopping by my blog today.  I hope you liked my card and will give it a try. Happy Stamping!!

****************************************************************************************************

If you need any stamping supplies, I’d love to be your Demonstrator. Just click HERE to go directly to my online store or drop me an email if you have any questions. 

MY CURRENT HOST CODE IS: RBBKEF3W

Use this host code when you order $50 or greater and receive a free gift from me! If your order is over $150, please do not use this code, but you’ll still get the free gift. The free gift is your choice of any item valued up to $10.00 in either the 2019-2020 Annual Catalog or the 2020 January-June Mini Catalog!   For any orders $50 or more I will also send you my monthly class tutorials.  Click HERE or go to my Customer Rewards for more details and to see what this months tutorials are.

 Click HERE to shop the clearance rack.

Happy Stamping, Karen!

****************************************************************************************************

STAMPIN’ UP! PICK A FREE BUNDLE STARTER KIT PROMOTION

Wow!!!  Stampin’ Up! is offering an AWESOME promotion if you join during the month of June!!  You get to pick a FREE bundle of your choice with your Starter Kit Purchase!!

Here are the details:

  • Joining promotion dates:  June 3–30, 2020
  • New demonstrators who submit their Independent Demonstrator Agreement (IDA) before June 3 or after June 30 will not be eligible for this promotion.
  • When you purchase your Starter Kit for $99, you get to select $125 worth of products of your choice for your Starter Kit PLUS you get to select ONE stamp and punch bundle (p. 168–169) or ONE stamp and die bundle (p. 173-179) from the new 2020–2021 Annual Catalog—in addition to your regular Starter Kit for FREE.  And your Starter Kit always ships for free…double bonus!!

Once you join, you’ll get at least a 20% discount on all products that you purchase plus you get to preorder from the upcoming catalogs a month before they go live for customer ordering!!  There is no requirement to sell and there is no commitment beyond your Starter Kit purchase.  Why not give it a try?  🙂

You can see more details about joining and about our team here on my blog here.  You can also see more information about the benefits of becoming a Stampin’ Up! Demonstrator here.

That is such a great deal!!  If you’ve been considering joining, June will be a great time to jump in!  Drop me an email at creativestampingdesigns@gmail.com

****************************************************************************************************

STAMPIN’ UP! ANNUAL KICK OFF CELEBRATION

EXTRA HOST REWARDS FOR YOU!!

The brand new 2020–2021 Stampin’ Up! Annual Catalog is going live on June 3 2020, and Stampin’ Up! is having a celebration!

Anyone who places an order of $250+ or holds a party with $250+ in sales during the month of June will receive $25 in extra Stampin’ Rewards!!  So that means that you’ll earn $50 in Stampin’ Rewards with any order or party of $250+ that is submitted between June 3 and June 30! Yay!!!!

Here are the details:

  • Customer, workshop and online order types all qualify for this promotion.
  • Starter Kit orders do not qualify for this promotion.  But you CAN use your host cash toward the purchase of your Starter Kit, ask me for details!
  • Paper Pumpkin prepaid subscriptions count toward a qualifying purchase. Month-to-month subscriptions do not qualify for this promotion.
  • The qualifying amount must be reached with merchandise prior to shipping and tax.
  • The $25 additional Stampin’ Rewards for this promotion will only be awarded once per order/party.
  • Order Deadline:  June 30, 2020; 11:50 PM (MT)

Drop me a note if you’d like to set up a catalog party!  I can set up a host code for you and you can have your stamping friends place orders with your host code.  If your party reaches $250 in sales, you’ll get that extra $25 in host cash when we close out your party!   If you’re interested, ask me for details!

Let me know if you have any questions.  Have fun making your shopping list!

****************************************************************************************************

JUNE 2020 PAPER PUMPKIN BOX OF SUNSHINE

Subscribe May 11 – June 10

This exclusive Sara-inspired Paper Pumpkin kit is here to help you #sharesunshine. It includes supplies for eight handmade cards and is specially designed to help you create a box full of cheer. Once you’ve made all the cards, use any leftover pieces to decorate the box. Fill it with yellow goodies, add the included adhesive label, address it to someone special, and brighten their life with a little sunshine!

It’s a one-of-a-kind kit, inspired by Sara and her #sharesunshine passion.  It provides a unique crafting experience with the added Box of Sunshine element.

  • Kit contains supplies for 8 cards and envelopes (2 cards of 4 designs)
    • Card size: 4-1/4″ x 5-1/2″ (10.8 x 14 cm)
    • Envelope size: 4-1/2″ x 5-3/4″ (11.4 x 14.6 cm)

Coordinating Colors: Basic Black, Bumblebee, Crushed Curry, Poppy Parade, Shaded Spruce, White, and Gold

This kit includes extra pieces and stickers (including a sticker label) to help you create cards AND a Box of Sunshine filled with treats and goodies to send to a friend. (Treats not included.)

  • Subscribe for the June kit from 11 May–10 June at paperpumpkin.com.
  • Supplies may be limited toward the end of each subscription period.

****************************************************************************************************

Card stock cuts for this project:

  • Pretty Peacock Cardstock 8 1/2″ X 5 1/2″ (card base scored and folded at 2 1/8″ & 6 3/8″), 5″ X 3 1/4″ (squares & eucalyptus), 1″ X 3 1/4″ (sentiment)
  • Pear Pizzazz Cardstock 1 1/4″ X 3″ (greenery on artwork)
  • Soft Sea Foam Cardstock 2 1/2″ X 11″ (overlap card scored and folded at 5 1/2″), 4 1/8″ X 5 3/8″ (inner liner mat)
  • Whisper White Cardstock 2″ X 2″ (artwork), 4′ X 5 1/4″ (inner liner)
  • Forever Greenery Designer Series Paper 2 – 2″ X 5 3/8″ (card front panels), 2 1/4″ X 6″ (piece for envelope flap)
  • Forever Fold Specialty Designer Series Paper

****************************************************************************************************

Product List

Paper Snips

$10.00

Stamparatus

$49.00