Good Sunday morning my fellow stampers. How is everyone’s weekend going? We had a rainy day yesterday, but today is sunny, cold and windy. I’m looking forward to our quarterly ‘In-Person” team meeting today virtually. I always have so much fun at our meetings getting together with my team members, talking and laughing. Hopefully by the next meeting we will be able to really meet in person again.
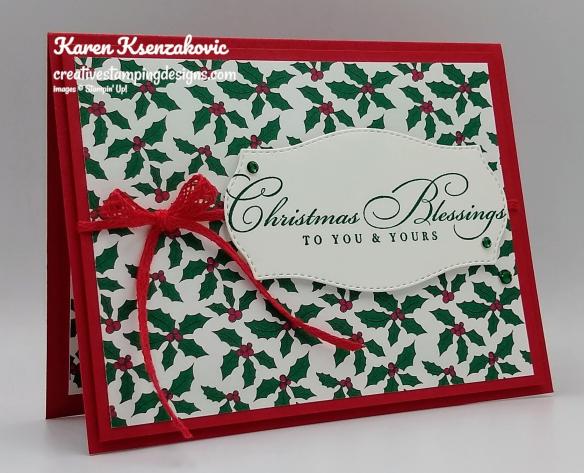
Just when I thought I was done with my Christmas cards, my aunt asked to make 7 special cards for her. She said she would rather buy them from me than the store, which I was honored about. I used the Stampin’ Up! Warm & Toasty Cling Stamp Set for today’s.

My design is from Try Stamping On Tuesday Challenge #485. Here is their sketch.

My colors were inspired by The Color Throwdown Challenge #622. Here are their colors.

I also played along with the Paper Players Theme Challenge #520. Here is their theme.


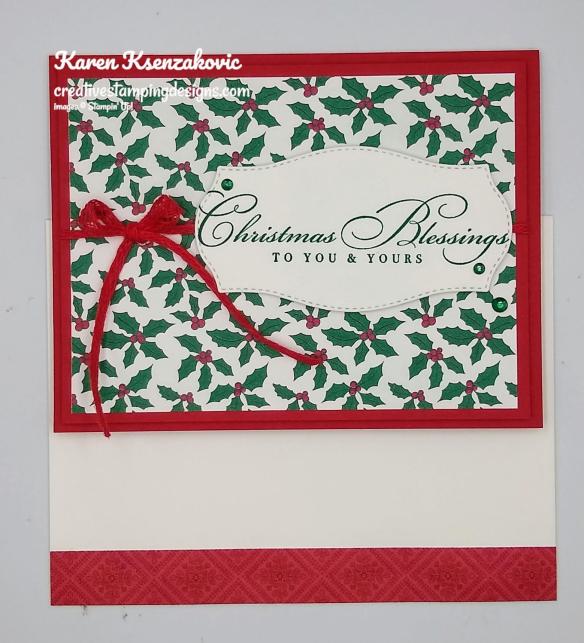
I started by embossing panels of Cherry Cobbler and Real Red cardstock using the Wrapped In Texture Embossing Folder and adhering them to a Crumb Cake card front using Multipurpose Liquid Glue. I adhered a panel of ‘Tis The Season 6 X 6 Designer Series Paper in the center of the embossed panels using Multipurpose Liquid Glue. I adhered the card front to a Crumb Cake card base using Multipurpose Liquid Glue.

On a panel of Very Vanilla cardstock I stamped the adorable deer from the Warm & Toasty stamp set in Tuxedo Black Memento Ink. I colored the image in using my Cherry Cobbler, Crumb Cake, Ivory and Real Red Stampin’ Blends Markers. I cut the image out using my Stitched Nested Labels Dies and adhered it to the card front using Stampin’ Dimensionals.

On a strip of Very Vanilla cardstock I stamped the sentiment from the Warm & Toasty stamp set in Tuxedo Black Memento Ink. I cut the end into a banner and adhered it to the card front using Stampin’ Dimensionals and a Glue Dot on the end overlapping the artwork.

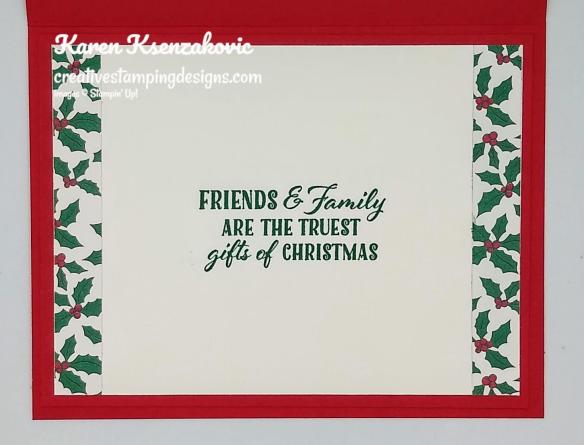
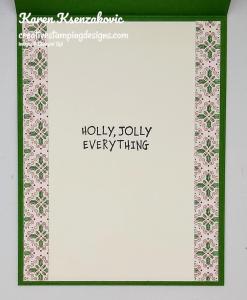
I did not stamp a sentiment on the inside yet. This one is for her Great Grandson and I need to see what she wants. I stamped the deer image from the Warm & Toasty stamp set on the bottom of the Very Vanilla panel and colored it in using my Cherry Cobbler, Crumb Cake, Ivory and Real Red Stampin’ Blends Markers. I adhered the Very Vanilla panel to a Cherry Cobbler mat using Stampin’ Seal and then to the inside of the Crumb Cake card base using Multipurpose Liquid Glue.

To finish my card I decorated a Medium Very Vanilla Envelope. I stamped the deer image from the Warm & Toasty stamp set on the envelope front and colored it in using my Cherry Cobbler, Crumb Cake, Ivory and Real Red Stampin’ Blends Markers. I adhered a panel of the ‘Tis The Season DSP to the envelope flap.

Thank you for stopping by my blog today. I hope you liked my card and will give it a try. Happy Stamping!!
*********************************************************************************************************
Stampin’ Up!’s Year End Closeout Sale is starting Tuesday December 8th!!! As a bonus, I’m extending my free shipping until Tuesday December 8th, YAY!!

If you love great deals, our Giant Year-End Closeout event is the perfect time to shop. You’ll get deep discounts on your favorite products from the August–December 2020 Mini Catalog. The Year-End Closeout happens only once a year, so get your shopping lists ready for Tuesday, December 8!
Year End Closeout Sale Details:
Sale Dates: December 8, 2020 through January 4, 2021
- No minimum purchase required.
- Retiring items are available while supplies last.
- Exclusions apply: Carryover items will not be discounted.
- Due to increased shipping times and possible shipping delays during the month of December, we can’t guarantee delivery before Christmas.
- Ordering Deadlines: January 4, 2021 at 11:50 PM (MT)
Click here to download the full list of items that are retiring and which items are on sale starting on Tuesday, December 8! And get your lists ready to shop early!! The items that are retiring are only while supplies last!! And everything on this list is retiring!!
*********************************************************************************************************
AS AN EXTRA BONUS FROM ME, I’VE DECIDED TO EXTEND MY FREE SHIPPING UNTIL TUESDAY DECEMBER 8TH @ 11:55PM ET
So get those shopping lists ready and order EARLY!! You don’t want to miss out on items you’ve been wanting.

As a big thank you for supporting my business, I’m offering FREE STANDARD SHIPPING until Tuesday December 8th on orders $50 or greater to help you get those crafty friends and family members something special.
To get free shipping, you will need to:
- Place an order at my Online Store Here between now and Monday December 7th using my Current Host Code YUWDMJMT.
- Send me an email at creativestampingdesigns@gamil.com of how you would like your shipping charges refunded to you, PayPal or check.
- Once your order is processed and shipped, I will refund your standard shipping charges.
Your order will also qualify for a free thank you gift from me and for my Creative Stamping Design Reward Points! Orders of $150+ will also qualify for Stampin’ Rewards from Stampin’ Up!! If your order is $150+, do not use my host code so that you don’t miss out on your Stampin’ Rewards from Stampin’ Up!.
Place your orders on my Online Store Here by Tuesday December 8th using my Current Host Code to qualify for my FREE STANDARD SHIPPING.
***I’ll refund your standard shipping fees either by PayPal or check, your choice, once your order is placed***
*********************************************************************************************************
Holiday Shipping Deadline!

Stampin’ Up! shared the following information regarding the holiday shipping deadline:
The Christmas season is a busy time of year for sending and receiving packages, so naturally shipping may take longer than normal. If you are placing any orders for Christmas gifts, please submit them by December 9th. We cannot guarantee that orders placed by December 9th will arrive in time for Christmas, but orders submitted after this date are unlikely to arrive before Christmas.
So get your orders in early to ensure delivery for the holidays!
*********************************************************************************************************
If you need any stamping supplies, I’d love to be your Demonstrator. Just click HERE to go directly to my online store or drop me an email if you have any questions.
MY CURRENT HOST CODE IS: YUWDMJMT
Use this host code when you order $50 or greater and receive a free gift from me! If your order is over $150, please do not use this code, but you’ll still get the free gift. The free gift is your choice of any 1 item valued up to $10.00 in the 2020-2021 Annual Catalog! For any orders $50 or more I will also send you my monthly class tutorials. Click HERE or go to my Customer Rewards for more details and to see what this months tutorials are.
Click HERE to shop the clearance rack.
Please remember to use my current Host Code and make sure that you can see my name on the final checkout page listed as your Demonstrator when you order so that you know that you’re ordering with me and you’ll get my rewards!
Happy Stamping, Karen!
*********************************************************************************************************
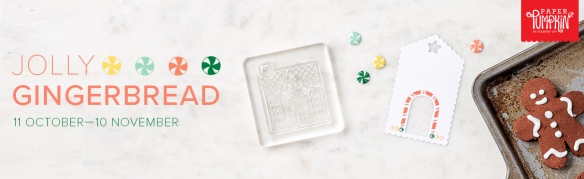
Beary Comforting
Subscribe November 11-December 10 Only 5 days left to subscribe
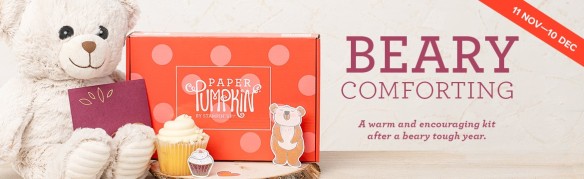
If you haven’t heard already, Paper Pumpkin is our monthly One-Stop Box™ that offers a wide variety of unique papercrafting projects for subscribers of any skill level! These themed, all-inclusive craft kits encourage customers to explore their creativity, try new techniques, and discover their potential in papercrafting.
December’s cute and cuddly Paper Pumpkin kit—called “Beary Comforting”—is designed to uplift your loved ones as this beary tough year finally comes to a close. After a year like 2020, we all could use a big bear hug! With the help of this bear-themed kit, you can create 12 unbearably cute cards featuring warm and fuzzy friends, sweet stamps, and meaningful messages. Near or far, send your friends and family the extra comfort, love, and encouragement they need with this month’s Paper Pumpkin kit!
ABOUT THE DECEMBER KIT
Details
- Kit contains enough supplies to create 12 cards and coordinating envelopes.
- Card size: 4-1/4″ x 5-1/2″ (10.8 x 14 cm)
- Envelope size: 4-1/2″ x 5-3/4″ (11.4 x 14.6 cm)
- Coordinating colors: Basic Gray, Calypso Coral, Cinnamon Cider, Daffodil Delight, Rich Razzleberry, Soft Sea Foam, Whisper White
SUBSCRIPTION INFORMATION
Subscribe to the December 2020 Paper Pumpkin Kit between 11 November and 10 December at paperpumpkin.com!
Note: Supplies may be limited toward the end of the subscription period.
*********************************************************************************************************
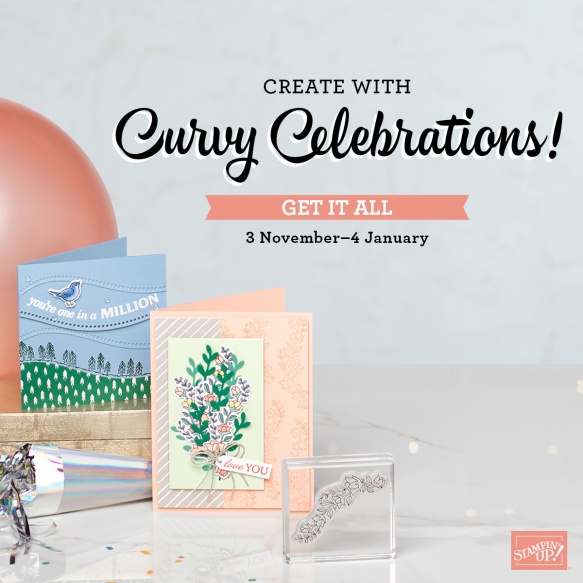
FREE Bonus Quite Curvy and Curvy Christmas Project Tutorials With Videos When You Purchase The Bundle From Me!!
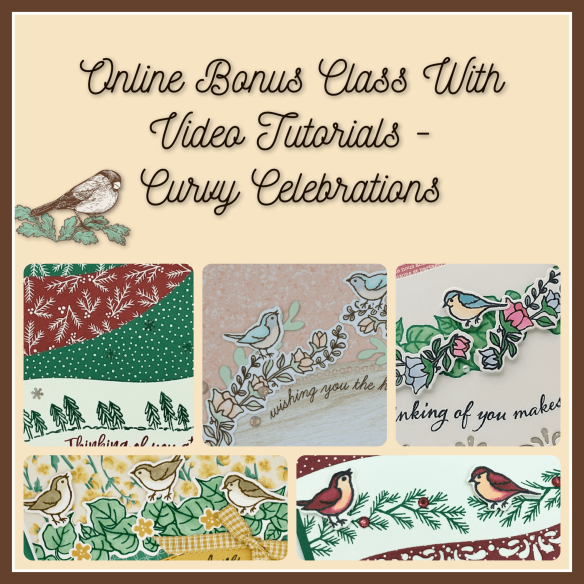
A group of us worked together to create five awesome tutorials using the Stampin’ Up! Curvy Celebrations special release products with video tutorials! You can get this set of exclusive tutorials when you purchase either the Quite Curvy Variety Bundle (item 158396) or the Quite Curvy Bundle (item 156228) from me between now and January 4!
If your order is $50 or greater and includes either of these bundles, you will get this set of tutorials in addition to the monthly online class tutorials AND your $10 thank you gift! And you’ll also earn my Creative Stamping Designs Reward Points!
*********************************************************************************************************
Card stock cuts for this project:
- Cherry Cobbler Cardstock 1/2″ X 5 3/8″ (strip on card front), 4 1/8″ X 5 3/8″ (inner liner mat)
- Crumb Cake Cardstock 8 1/2″ X 5 1/2″ (card base scored and folded at 4 1/4″), 4 1/8″ X 5 3/8″ (card front)
- Real Red Cardstock 2″ x 5 3/8″ (card front panel)
- Very Vanilla Cardstock 2 1/2″ X 4 1/4″ (artwork), 1/2″ X 2 1/2″ (sentiment), 4″ X 5 1/4″ (inner liner)
- ‘Tis The Season 6 X 6 Designer Serie Paper 1 1/2″ X 5 3/8″ (card front panel), 2 1/4″ X 6″ (piece for envelope flap)
*********************************************************************************************************
Product List


 Designer Series Paper")


")


")


")
")


")

 Braided Linen Trim")


")