Stampin’ Up! Snowman Season Birthday for Fun Fold Friday

Good Friday morning my fellow stampers and welcome to my Fun Fold Friday. How was everyone’s week? I can’t believe that Christmas is just 1 week away. I’ve mailed my cards and I’ve got my cookie batters mixed and by the time you read this I will have probably baked off a few of them. Shopping and wrapping is another story. I’ll get it done, I hope.

Today’s card I made on my Facebook Live video on Wednesday. If you were able to join me or watched the replay, thank you very much. If you’d like to watch my video and stamp along, the measurements are below along with the links to my Facebook page and my YouTube channel. Here’s my card that I made.

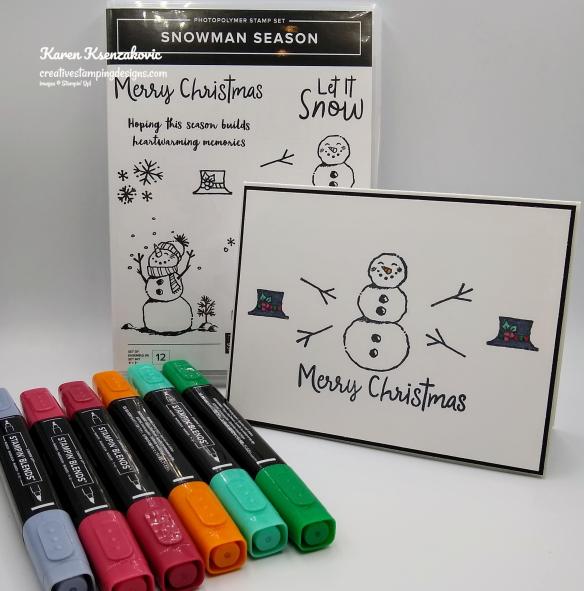
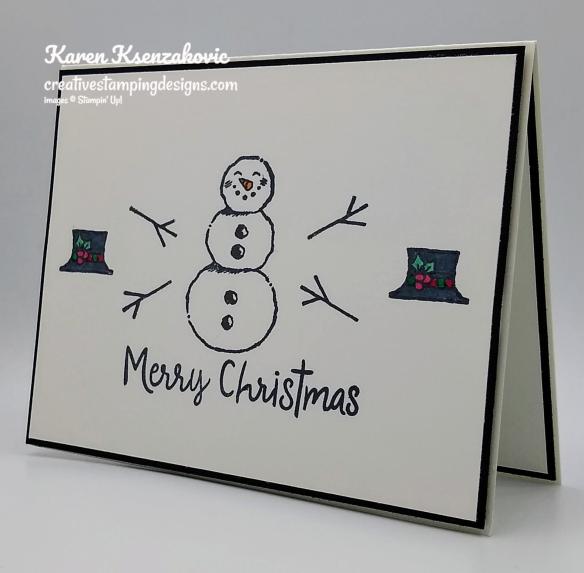
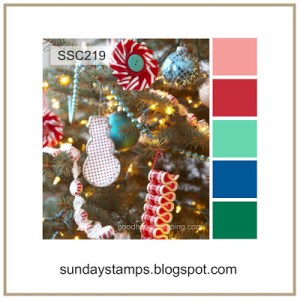
I used the Stampin’ Up Snowman Season Photopolymer Stamp Set from the 2020-2021 Annual Catalog and the Stampin’ Up! Approaching Perfection Cling Stamp Set from the Sale-A-Bration Catalog coming January 5, 2021. I played along with Cardz 4 Guyz Challenge #260. The theme is ‘Snowman/Men’.

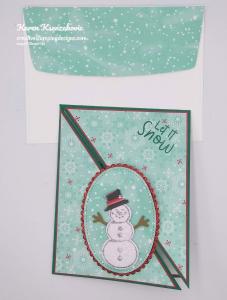
I started by adhering a panel of the Snowflake Splendor Designer Series Paper to a Misty Moonlight mat using Stampin’ Seal and then to a Crumb Cake card base using Multipurpose Liquid Glue.

I wrapped a piece of the Misty Moonlight 1/4″ 2020-2022 In-Color Ribbon around the card front and tied a knot. I added a Glue Dot to hold the knot in place.

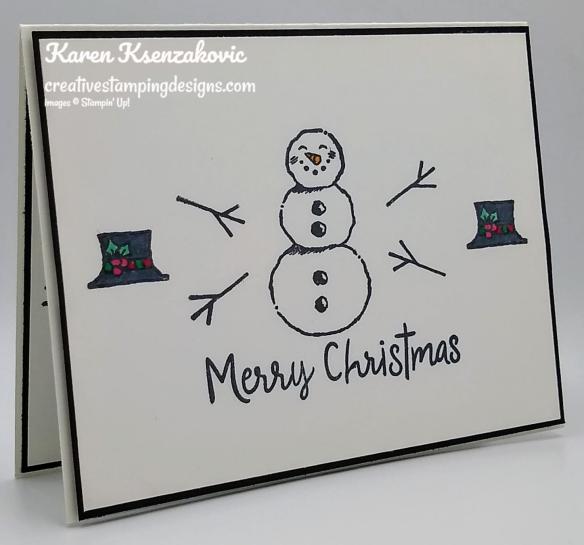
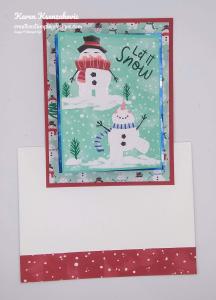
On a small panel of Whisper White cardstock I stamped the snowman image from the Snowman Season stamp set in Crumb Cake Ink. I colored the nose, scarf and hat in using my Just Jade, Misty Moonlight and Pumpkin Pie Stampin’ Blends Markers. I stamped the sentiment from the Approaching Perfection stamp set on the top of the panel in Misty Moonlight Ink. I adhered the artwork to a Misty Moonlight mat using Stampin’ Seal and then to the overlapping card front using Multipurpose Liquid Glue. I added some Adhesive-
Backed Snowflakes
where the stamped snowflakes are. I adhered the small card front to the back of the card base, centering in, using Multipurpose Liquid Glue.

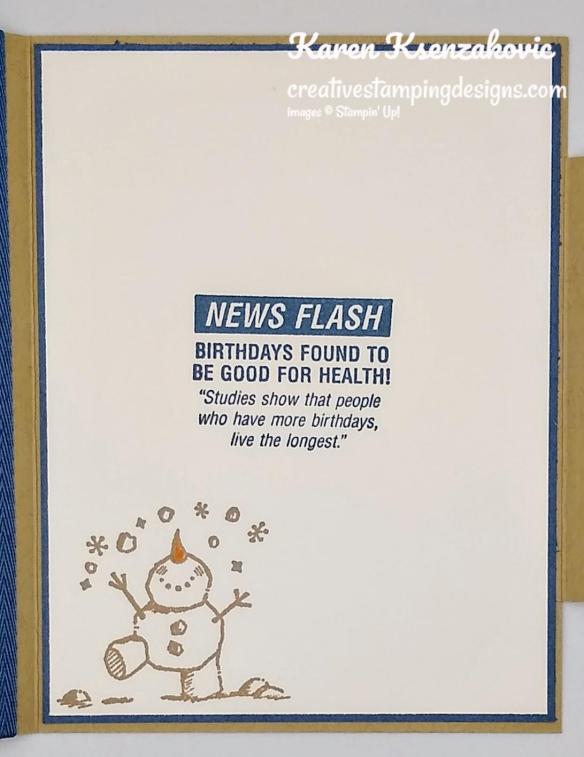
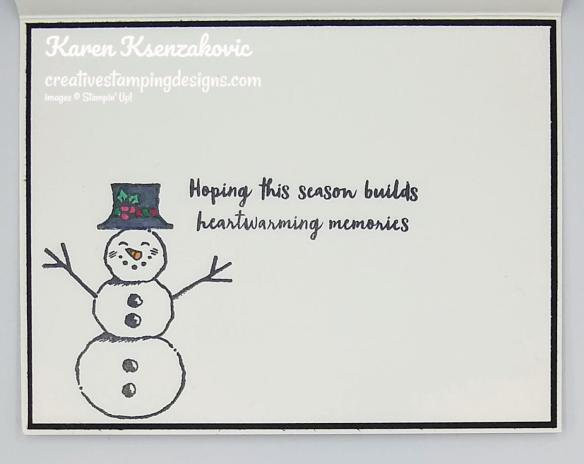
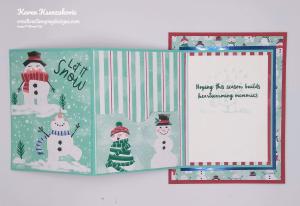
On the inside I stamped the sentiment from the Approaching Perfection stamp set in Misty Moonlight Ink in the center of a Whisper White panel. I stamped another one of the snowman images from the Snowman Season stamp set in Crumb Cake Ink on the bottom of the panel. I adhered the Whisper White panel to a Misty Moonlight mat using Stampin’ Seal and then to the Crumb Cake card base using Multipurpose Liquid Glue, over the small card base tab.

To finish my card I decorated a Medium Whisper White Envelope. I stamped the small snowman image from the Snowman Season stamp set in Crumb Cake Ink on the envelope front. I adhered a panel of the Snowflake Splendor DSP to the envelope flap.

Thank you for stopping by my blog today. I hope you liked my card and will give it a try. The list of measurements are below if you’d like to stamp along while watching the video. You can watch my video on my Facebook page Here.

You can also view the video on my YouTube channel Here. Happy Stamping!!

*********************************************************************************************************

If you need any stamping supplies, I’d love to be your Demonstrator. Just click HERE to go directly to my online store or drop me an email if you have any questions. 

MY CURRENT HOST CODE IS: YUWDMJMT

Use this host code when you order $50 or greater and receive a free gift from me! If your order is over $150, please do not use this code, but you’ll still get the free gift. The free gift is your choice of any 1 item valued up to $10.00 in the 2020-2021 Annual Catalog!   For any orders $50 or more I will also send you my monthly class tutorials.  Click HERE or go to my Customer Rewards for more details and to see what this months tutorials are.

 Click HERE to shop the clearance rack.

Please remember to use my current Host Code and make sure that you can see my name on the final checkout page listed as your Demonstrator when you order so that you know that you’re ordering with me and you’ll get my rewards! 

Happy Stamping, Karen!

*********************************************************************************************************

Sending Hearts

Subscribe December 11-January 10 

Love is in the air! Send a little love to someone special with the Sending Hearts Paper Pumpkin Kit. From heaps of heart-shaped elements to paper pieces in red and pink, this month’s kit has everything you need to create eight adorable cards—with coordinating envelopes—for Valentine’s Day, anniversaries, and every celebration of love in between!

With the add-on to January’s sweet and sentimental kit, there’s even more love to share! The add-on—called Little Love Boxes—includes 20 tiny, printed boxes and 24 die-cut, heart-shelled snails and sentiment labels. When combined with the remaining components from the Sending Hearts kit, you can create treat packaging, additional cards, and so much more!

ABOUT THE JANUARY KIT

Details

  • Kit contains enough supplies to create eight cards—four each of two designs—and coordinating envelopes.
  • Card size: 4-1/4″ x 5-1/2″ (10.8 x 14 cm)
  • Envelope size: 4-1/2″ x 5-3/4″ (11.4 x 14.6 cm)
  • Coordinating colors: Basic Black, gold, Petal Pink, Poppy Parade, Smoky Slate, white

ABOUT THE ADD-ON

Name Little Love Boxes

Details

  • Add-on contains 20 printed mini boxes and 24 die-cut decorative pieces and sentiment labels.
  • Item number: 156842
  • Price: $8 USD/$11 CAD 
  • Available 1 January, while supplies last!

Subscribe to the January 2021 Paper Pumpkin Kit between 11 December and 10 January at paperpumpkin.com!

ADD-ON ORDERING INFORMATION

Purchase the Little Love Boxes add-on to the Sending Hearts Paper Pumpkin Kit on stampinup.com, or by placing an order through my online store. The add-on will be available starting 1 January, while supplies last. You must be a Paper Pumpkin subscriber to order the add-on.

  • Little Love Boxes (156842)
  • $8 USD | $11 CAD

Note: Add-on is not included in January’s Paper Pumpkin subscription. It must be purchased through a separate order. 

Note: Supplies may be limited toward the end of the subscription period.

*********************************************************************************************************

WHISPER WHITE CARDSTOCK PRODUCTS- AVAILABLE WHILE SUPPLIES LAST

Stampin’ Up! announced this information related to the Whisper White paper products late last evening:

Whisper White has been a Stampin’ Up! staple for so long. We love it and we know you love it, too. We are sad to announce that the supplier’s mill producing our Whisper White cardstock has permanently closed due to impacts from the COVID-19 pandemic. Unfortunately, we weren’t given much notice on this closure. This means that the technology unique to this particular supplier is now unavailable to us and we can no longer offer our Whisper White cardstock and related products, such as Whisper White Note Cards & Envelopes. Please note that this won’t affect any of our other cardstocks, this only affects Whisper White.

We know Whisper White has a huge fan base; we’re big fans, too! And we are crushed that it’s going away. Even though this decision was out of our hands, rest assured that we jumped right into action to find the best replacement paper possible. We have dedicated many hours to source and test alternative cardstock options from several suppliers to find the perfect fit that still maintains the Stampin’ Up! quality you know and trust. We are happy to share that we have found a winner for our new cardstock, Basic White!

The quality of our new Basic White was thoroughly tested by our quality assurance and product teams. It also tested very well with demonstrators and concept artists who gave it a huge thumbs up. We believe in the quality of the new Basic White cardstock and we know it will become your new crafting staple!

What does this mean for you?

With Whisper White going out of production, this means a number of Whisper White products will be affected. Below is a list of all products that will be replaced with our new Basic White cardstock. These items are now available while supplies last with an order limit of 2 per item per order.

  • Whisper White 12″ x 12″ (30.5 x 30.5 cm) Cardstock (124302)
  • Assorted Memories & More Cards & Envelopes (149710)
  • Whisper White Note Cards & Envelopes (131527)
  • Whisper White 3″ x 3″ (7.6 x 7.6 cm) Envelopes (145829)
  • Whisper White 8-1/2″ x 11″ Cardstock (100730)
  • Whisper White 8-1/2″ x 11″ Thick Cardstock (140272)
  • Whisper White Medium Envelopes (107301)

Our new Basic White products will become available to purchase as soon as we have them in stock. This means that some Whisper White and Basic White products may be available at the same time. Additionally, due to the nature of sourcing, some Basic White products may not be available before the Whisper White products sell out. Please know that we are working on getting these products available to you as fast as possible.

*********************************************************************************************************

Stampin’ Up!’s Year End Closeout Sale going on now

If you love great deals, our Giant Year-End Closeout event is the perfect time to shop. You’ll get deep discounts on your favorite products from the August–December 2020 Mini Catalog. The Year-End Closeout happens only once a year!

Year End Closeout Sale Details:

Sale Dates:  December 8, 2020 through January 4, 2021

  • No minimum purchase required.
  • Retiring items are available while supplies last.
  • Exclusions apply: Carryover items will not be discounted.
  • Due to increased shipping times and possible shipping delays during the month of December, we can’t guarantee delivery before Christmas.
  • Ordering Deadlines:  January 4, 2021 at 11:50 PM (MT)

Click here to download the full list of items that are retiring and which items are on sale starting on Tuesday, December 8!  And get your lists ready to shop early!!  The items that are retiring are only while supplies last!!  And everything on this list is retiring!!

*********************************************************************************************************

FREE Bonus Quite Curvy and Curvy Christmas Project Tutorials With Videos When You Purchase The Bundle From Me!!

This image has an empty alt attribute; its file name is curvy-celebrations-onlline-class.png

A group of us worked together to create five awesome tutorials using the Stampin’ Up! Curvy Celebrations special release products with video tutorials!  You can get this set of exclusive tutorials when you purchase either the Quite Curvy Variety Bundle (item 158396) or the Quite Curvy Bundle (item 156228) from me between now and January 4!

If your order is $50 or greater and includes either of these bundles, you will get this set of tutorials in addition to the monthly online class tutorials AND your $10 thank you gift!  And you’ll also earn my Creative Stamping Designs Reward Points!

*********************************************************************************************************

Card stock cuts for this project:

  • Crumb Cake Cardstock 5 1/2″ X 7″ (card base scored and folded at 4 1/4″), 3 1/2″ X 3 1/2″ (small card base scored and folded at 3/4″)
  • Misty Moonlight Cardstock 2 5/8″ X 5 3/8″ (dsp mat), 2 5/8″ x 3 3/8″ (artwork mat), 4 1/8″ X 5 3/8″ (inner liner mat)
  • Whisper White Cardstock 2 1/2″ X 3 1/4″ (artwork), 4″ X 5 1/4″ (inner liner)
  • Snowflake Splendor Designer Series Paper 2 1/2″ X 5 1/4″ (card front panel), 2 1/4″ X 6″ (piece for envelope flap)

*********************************************************************************************************

Product List

Stampin’ Up! Snowman Season CAS

Good Monday morning my stamping friends. How was everyone’s weekend? Are you ready to tackle another week? I can’t believe we’re through another month already. I’m running out of time to finish my Christmas cards. I’m hoping to get them in the mail by the weekend.

I have another Clean and Simple card for you today. Once again I only used Stamp, Ink and Paper, no embellishments this time just a mat. This is another perfect card if you are a beginner stamper. I used 1 color ink and just a few Stampin’ Blends Markers. I pulled out a set from the 2020-2021 Annual Catalog, Stampin’ Up! Snowman Season Photopolymer Stamp Set. Here’s my card for today.

I played along with the CAS Colours & Sketches Challenge #398. Here is their sketch.

I started with a Whisper White card front and stamped all my images from the Snowman Season stamp set in Tuxedo Black Memento Ink. First I stamped the snowman in the center of the panel. Next I stamped the branch arm images on either side of the snowman image. Last, I stamped the hat image on both ends. I stamped the sentiment from the Snowman Season stamp set in Tuxedo Black Memento Ink below the snowman.

I colored both hats using my Basic Black, Cherry Cobbler and Shaded Spruce Stampin’ Blends Markers. I colored the snowman’s carrot nose using my Pumpkin Pie Stampin’ Blends Marker.

I adhered the card front to a Basic Black mat using Stampin’ Seal and then to a Thick Whisper White card base using Stampin’ Dimensionals.

On the inside I stamped the sentiment from the Snowman Season stamp set in Tuxedo Black Memento Ink in the center of a Whisper White panel. I stamped the snowman image, branch arms and hat images from the Snowman Season stamp set all in Tuxedo Black Memento Ink on the bottom of the panel. I colored the image in using my Basic Black, Cherry Cobbler, Pumpkin Pie and Shaded Spruce Stampin’ Blends Markers. I adhered the Whisper White panel to a Basic Black mat using Stampin’ Seal and then to the inside of the Thick Whisper White card base using Multipurpose Liquid Glue.

To finish my card I decorated a Medium Whisper White Envelope. I stamped the branch arms and hat from the Snowman Season stamp set in Tuxedo Black Memento Ink on the envelope front. I stamped the snowman, branch arms and hat images from the Snowman Season stamp set on the envelope flap. I colored the images in using my Basic Black, Cherry Cobbler, Pumpkin Pie and Shaded Spruce Stampin’ Blends Markers.

Thank you for stopping by my blog today. I hope you liked my card and will give it a try. Happy Stamping!!

*********************************************************************************************************

If you need any stamping supplies, I’d love to be your Demonstrator. Just click HERE to go directly to my online store or drop me an email if you have any questions. 

MY CURRENT HOST CODE IS: 9XYYG2ZU

Use this host code when you order $50 or greater and receive a free gift from me! If your order is over $150, please do not use this code, but you’ll still get the free gift. The free gift is your choice of any 1 item valued up to $10.00 in the 2020-2021 Annual Catalog!   For any orders $50 or more I will also send you my monthly class tutorials.  Click HERE or go to my Customer Rewards for more details and to see what this months tutorials are.

 Click HERE to shop the clearance rack.

Please remember to use my current Host Code and make sure that you can see my name on the final checkout page listed as your Demonstrator when you order so that you know that you’re ordering with me and you’ll get my rewards! 

Happy Stamping, Karen!

*********************************************************************************************************

Beary Comforting

Subscribe November 11-December 10

If you haven’t heard already, Paper Pumpkin is our monthly One-Stop Box™ that offers a wide variety of unique papercrafting projects for subscribers of any skill level! These themed, all-inclusive craft kits encourage customers to explore their creativity, try new techniques, and discover their potential in papercrafting.

December’s cute and cuddly Paper Pumpkin kit—called “Beary Comforting”—is designed to uplift your loved ones as this beary tough year finally comes to a close. After a year like 2020, we all could use a big bear hug! With the help of this bear-themed kit, you can create 12 unbearably cute cards featuring warm and fuzzy friends, sweet stamps, and meaningful messages. Near or far, send your friends and family the extra comfort, love, and encouragement they need with this month’s Paper Pumpkin kit!

ABOUT THE DECEMBER KIT

Details

  • Kit contains enough supplies to create 12 cards and coordinating envelopes.
  • Card size: 4-1/4″ x 5-1/2″ (10.8 x 14 cm)
  • Envelope size: 4-1/2″ x 5-3/4″ (11.4 x 14.6 cm)
  • Coordinating colors: Basic Gray, Calypso Coral, Cinnamon Cider, Daffodil Delight, Rich Razzleberry, Soft Sea Foam, Whisper White

SUBSCRIPTION INFORMATION

Subscribe to the December 2020 Paper Pumpkin Kit between 11 November and 10 December at paperpumpkin.com!

Note: Supplies may be limited toward the end of the subscription period.

*********************************************************************************************************

FREE Bonus Quite Curvy and Curvy Christmas Project Tutorials With Videos When You Purchase The Bundle From Me!!

A group of us worked together to create five awesome tutorials using the Stampin’ Up! Curvy Celebrations special release products with video tutorials!  You can get this set of exclusive tutorials when you purchase either the Quite Curvy Variety Bundle (item 158396) or the Quite Curvy Bundle (item 156228) from me between now and January 4!

If your order is $50 or greater and includes either of these bundles, you will get this set of tutorials in addition to the monthly online class tutorials AND your $10 thank you gift!  And you’ll also earn my Creative Stamping Designs Reward Points!

*********************************************************************************************************

Card stock cuts for this project:

  • Basic Black Cardstock 2 – 4 1/8″ X 5 3/8″ (card front and inner liner mats)
  • Whisper White Cardstock 2 – 4″ X 5 1/4″ (card front and inner liner)
  • Thick Whisper White Cardstock 8 1/2″ X 5 1/2″ (card base scored and folded at 4 1/4″)

*********************************************************************************************************

Product List

Stampin’ Up! Snowman Season Video Tutorial

Good Sunday morning my stamping friends. How is everyone’s weekend going? Were you able to join my team yesterday on our World Card Making Day Facebook live videos? It was so much fun watching and stamping along with my fellow team members.

Today’s card is from the 1st video I did yesterday. If you were able to watch live, thank you so much. If not you can watch the replay on the World Card Making Day Facebook page, my Facebook page of my YouTube Channel. Links are all below. Here’s my card for today.

My design is from Mojo Monday Sketch #546. Here is their sketch.

I also played along with Watercooler Wednesday Anything Goes Challenge #291.

I joined in with Jingle Bells Dashing Through The Snow Challenge.

I started by embossing a panel of Snowflake Splendor Designer Series Paper using the Winter Snow Embossing Folder. I adhered it to a Thich Whisper White card base using Multipurpose Liquid Glue.

I stamped the sentiment from the Stampin’ Up! Snowman Season Photopolymer Stamp Set in Smoky Slate Ink on the small square panel of Snowflake Splendor DSP. I adhered the 2 rectangle panels and the sentiment panel of Snowflake Splendor DSP to Silver Foil mats using Stampin’ Seal. I adhered the matted panels to the card front using Multipurpose Liquid Glue.

I stamped the snowman image from the Snowman Season stamp set in Smoky Slate Ink on a small panel of Whisper White cardstock. I colored the image in using my Highland Heather, Pool Party, Pumpkin Pie and Color Lifter Stampin’ Blends Markers and cut the image out using the 2nd largest circle from the Stitched Shapes Dies. I cut the matching scalloped circle from the Layering Circle Dies from a panel of Silver Foil paper and adhered the artwork to it using Stampin’ Seal. I adhered the artwork to the card front using Stampin’ Dimensionals. I added a few Adhesive-Backed Snowflakes to the card front.

On the inside I stamped the sentiment from the Snowman Season stamp set in Smoky Slate Ink in the center of a Whisper White panel. I stamped the snowflake image from the Snowman Season stamp set around the sentiment in Pool Party Ink, stamping off once. I adhered the Whisper White panel to a Pool Party mat using Stampin’ Seal and then to the inside of the Thick Whisper White card base using Multipurpose Liquid Glue.

To complete my card I decorated a Medium Whisper White Envelope. I stamped the snowflake image from the Snowman Season stamp set in Pool Party Ink on the bottom of the envelope.

I adhered a panel of Snowflake Splendor DSP to the envelope flap.

Thank you for stopping by my blog today. I hope you liked my card and will give it a try. The list of supplies are below along with the measurements if you’d like to stamp along while watching the video.  You can watch it on our Inkin’ World Card Making Day Facebook page Here. Or my Facebook page Here.

You can also watch the video on my YouTube Channel Here. Happy Stamping!!

****************************************************************************************************

If you need any stamping supplies, I’d love to be your Demonstrator. Just click HERE to go directly to my online store or drop me an email if you have any questions. 

MY CURRENT HOST CODE IS: RUW6PQNH

Use this host code when you order $50 or greater and receive a free gift from me! If your order is over $150, please do not use this code, but you’ll still get the free gift. The free gift is your choice of any 1 item valued up to $10.00 in the 2020-2021 Annual Catalog!   For any orders $50 or more I will also send you my monthly class tutorials.  Click HERE or go to my Customer Rewards for more details and to see what this months tutorials are.

 Click HERE to shop the clearance rack.

Happy Stamping, Karen!

****************************************************************************************************

Going on Now!!!

We all love gorgeous Designer Series Paper, and during this incredible sale, you can enjoy a 15% discount on select papers from our current catalogs! 

Stampin’ Up! has such beautiful Designer Series Paper and they’re putting a select list of those papers on sale for 15% off during the month of October!!  Now is a great time to stock up and save on some of the most popular paper designs…including papers from the August-December 2020 Mini Catalog!!

SALE DETAILS:

  • Sales Period:  October 1-31
  • All order types qualify for this promotion.
  • There is no limit to how many packages of Designer Series Paper may be purchased during this promotion.
  • Only select Designer Series Papers are available at a 15% discount during this promotion.
  • Orders must be placed—and closed—during the promotion period for the 15% discount to apply.
  • Designer Series Paper ordered as part of a Starter Kit or with Stampin’ Rewards qualify for the 15% discount
  • Sale Ends October 31, 2020 at 11:50 PM MT

The designer papers included in this sale are shown   Click on the image below to open up the full-size printable PDF:

Get your lists ready to start shopping on October 1st – October 31st! 

****************************************************************************************************

Joy To The World 

Subscribe September 11 – October 10

This holiday season, share the joy of Paper Pumpkin! The Joy to the World Paper Pumpkin Kit is an exclusive holiday kit that provides a specially-designed box, enough supplies to create eight elegant cards, and an opportunity to connect with the Stampin’ Up! global community.

With October’s magical kit, not only will you get a head start on your holiday crafting—you’ll get to create Christmas cards, share project ideas, and spread holiday cheer with Stampin’ Up! customers and demonstrators around the world! After you receive your kit,  join the Joy of Paper Pumpkin Facebook group to make the most of this month’s kit.

  • Kit contains enough supplies to create eight cards—four each of two designs—and coordinating envelopes.
  • Kit includes die-cut pieces in English, French, and German. This will allow you to create cards you can use to connect with other customers and demonstrators around the world—in their language!
    • Card size: 4-1/4″ x 5-1/2″ (10.8 x 14 cm)
    • Envelope size: 4-1/2″ x 5-3/4″ (11.4 x 14.6 cm)
  • Coordinating Colors: Cherry Cobbler, Crumb Cake, Early Espresso, Just Jade, Soft Sea Foam

The Joy to the World Paper Pumpkin Kit has been thoughtfully released in preparation for the season of spreading joy. October’s Paper Pumpkin kit was designed to bring people together—connecting them with one another and spreading joy with each other around the world! With die-cut sentiments in English, French, and German, subscribers can send holiday cheer to their friends across the globe—in their language.

To connect and spread joy with international customers and demonstrators through the Joy to the World Paper Pumpkin Kit, join our Facebook group: Joy of Paper Pumpkin! When connecting with your new friends, don’t forget to share your experience with the #joyofpaperpumpkin hashtag.

Subscribe to the October 2020 Paper Pumpkin Kit from 11 September to 10 October at paperpumpkin.com.

Note: Supplies may be limited toward the end of the subscription period.

****************************************************************************************************

Card stock cuts for this project:

  • Pool Party Cardstock 4 1/8″ X 5 3/8″ (inner liner
  • Whisper White Cardstock 3″ X 3″ (artwork), 4″ X 5 1/4″ (inner liner)
  • Thick Whisper White Cardstock 4 1/4″ X 11″ (card base scored and folded at 5 1/2″)
  • Silver Foil Sheet 1 1/4″ X 4 1/4″, 3/4″ x 4″, 1 7/8″ x 1 7/8″ (card front dsp mats), 2 3/4″ X 2 3/4″ (scalloped circle)
  • Snowflake Splendor Designer Series Paper 4″ x 5 1/4″ (card front), 1 1/8″ X 4 1/8″, 5/8″ X 3 7/8″, 1 7/8″ x 1 7/8″ (card front panels), 2 1/4″ X 6″ (piece for envelope flap)

*********************************************************************************************************

Product List

Stampin’ Up! Let It Snow Gift Card Holder for Fun Fold Friday

Good Friday morning my fellow stampers and welcome to my Fun Fold Friday.  How was everyone’s week?  Hope you had a productive one.  The weekend is here already and the countdown has begun.  This will probably be my last Christmas card for you.  I think I’m all caught up and ready to start writing them out and get them in the mail.  Have you gotten all your Christmas cards made yet?  I have to work on Saturday, but   I’m looking forward to Sunday we have our in person team meeting.  I always have so much fun getting together with my team members and stamping.  Amy always has some beautiful projects for us to make.  We have a nice lunch together, take care of some business and then we get to stamp and create.

For today’s card I have a Gift Card Holder for you.  Seems that a lot of gift cards are given out around this time.  My niece always asks me to make her one or two for her boys teachers, so I’m always looking for new ideas.  My card for today uses up a lot of Designer Series Paper.  Those that read my blog from Tuesday know that I had hand surgery.  This card was NOT made ahead of time (guess I wasn’t thinking).  I did a better job doing all the fussy cutting for this card with my hands all bandaged up that I do without.  Once I got those Paper Snips on my fingers properly, I went to town cutting.   Here’s my card for today.

My colors were inspired by Sunday Stamps Challenge #219.  Here are their colors.

I also played along with “Just Us Girls” Challenge #516.  Here is their theme.

I joined in with Cardz 4 Galz Challenge #112.  Their theme is ‘Cute Christmas’.

I started by adhering a panel of the Let It Snow Specialty Designer Series Paper to a Real Red card base using Snail.  I adhered a panel of Blueberry Bushel Noble Peacock Foil Sheets to the center of the card base using Multipurpose Liquid glue and set it aside.

I folded the Coastal Cabana card base into a Z-Fold card.  I adhered the smaller panels of the Let It Snow DSP to 5 of the 6 sides.  I did not adhere a piece to the back which will be getting adhered to the larger card base.   I fussy cut some of the snowmen from one of the panels of Let It Snow DSP using my Paper Snips.

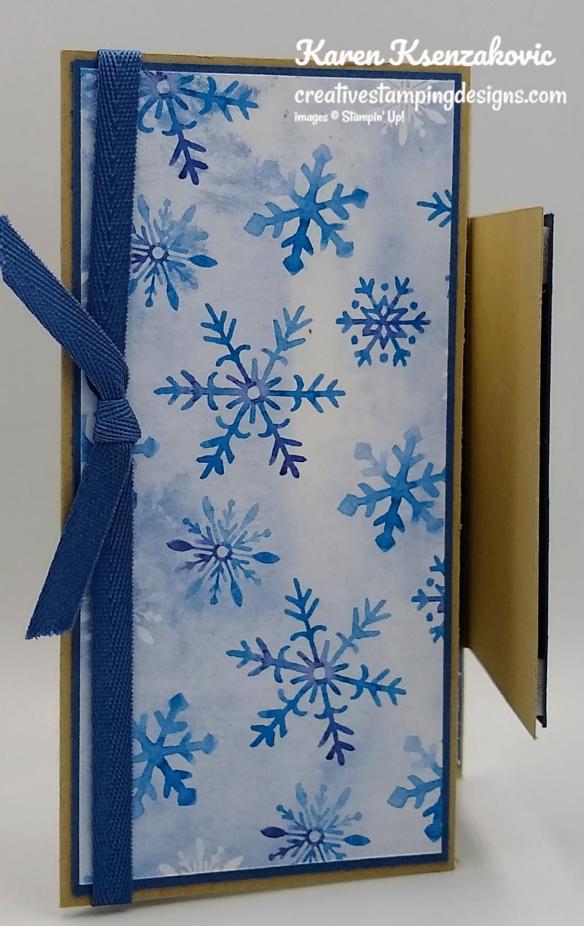
On the front of the Z-Fold I adhered 2 of the fussy cut snowmen using Multipurpose Liquid Glue.  I stamped the sentiment from the Stampin’ Up! Snowman Season Photopolymer Stamp Set on the DSP in Shaded Spruce Ink. I immediately sprinkled it with Clear Stampin’ Emboss Powder and set it using my Heat Tool.  You can emboss any color when you use your ink and the Clear Stampin’ Emboss Powder.  I just love the way an embossed sentiment looks, so I do this a lot.

When you open the card to the right I had adhered 2 panels of the Let It Snow DSP.  I adhered another one of the fussy cut snowmen using Multipurpose Liquid Glue.  I stamped the sentiment from the Stampin’ Up! Itty Bitty Christmas Cling Stamp Set in Shaded Spruce Ink.  I immediately sprinkled it with my Clear Emboss Powder and set it using my Heat Tool.

When you open the Z-Fold to the left you get the inside of the card.  On the back panel I stamped the sentiment from the Snowman Season stamp set in Shaded Spruce Ink on a Whisper White panel.  I stamped the small snowman image from the Snowman Season stamp set in Coastal Cabana ink, stamping off once, over the sentiment.  I adhered the Whisper White panel to the card base using Multipurpose Liquid Glue.  I took a 2″ piece of Let It Snow DSP and using the 1″ Circle Punch, I cut a half circle in the center of the panel.  I adhered the small panel to the center using Tear & Tape Adhesive.  The gift card will slide in and out real easily.  I adhered the Z-Fold card to the card base using Tear & Tape Adhesive.  I used the Tear & Tape because I figured the card is going to get opened and closed a lot and I really wanted to make sure it sticks well.

To finish my card I decorated a Medium Whisper White Envelope.  I adhered a strip of Let It Snow DSP to the front of the envelope and a panel to the envelope flap.

Thank you for stopping by my blog today.  I hope you liked my gift card holder and will give it a try.  It’s a pretty quick and easy card once you get all your DSP cut up.  Happy Stamping!!

****************************************************************************************************

If you need any stamping supplies, I’d be very happy to be your Demonstrator. Just click HERE to go directly to my online store or drop me an email if you have any questions. 

MY CURRENT HOST CODE IS: NVSKQ72X

For any orders $50 or more I will send you my monthly class tutorials.  Click HERE or go to my Customer Rewards to see what this months tutorials are.

Click HERE to shop the clearance rack.

Happy Stamping, Karen!

****************************************************************************************************

Stampin’ Up!’s Year-End Closeout is here while supplies last!!  You can save on a selection of retiring and surplus items including holiday catalog items, stamp sets, and Paper Pumpkin past kits! Shop early to avoid missing out as items on the sale are only available while supplies last! Supplies are limited and popular items will sell out quickly. This amazing sale ends on January 2.

Head over to my Online store to see all the Discounted Items and Retiring Favorites Items.  You don’t want to miss out on these savings because when they are gone THEY ARE GONE!

****************************************************************************************************

SOMETHING FOR EVERYTHING PAPER PUMPKIN 
SUBSCRIBE TO PAPER PUMPKIN BY DECEMBER 10, 2019

December’s Something for Everything kit includes a super-versatile stamp set complete with 13 sentiments that can be used for occasions ranging from wedding, to get well, birthdays, and more! Plus, the three full-sized card designs (four of each) are gorgeous AND multiuse.  Paper Pumpkin’s December kit makes it easier than ever to give a handmade card to a friend—no matter what the occasion!

This is an all-card kit, with 13 sentiments to cover tons of occasions from weddings, get well, birthday, and more, this set does it all.

Kit details: Makes 12 cards and envelopes

Card size: 4 1/4″ x 5-1/2″ (10.8 x 14 cm)

Envelope size: 4-1/2″ x 5-3/4″ (11.4 x 14.6 cm)

Coordinating colors: Crushed Curry, Grapefruit Grove, Old Olive, Shaded Spruce, Terracotta Tile

  • Subscribe for the December kit at paperpumpkin.com from November 11–December 10.
  • Supplies may be limited toward the end of each subscription period.

Interested in subscribing to Paper Pumpkin?  You can either sign up for a subscription where you are billed monthly for your kit or you can purchase a prepaid subscription in my online store. To see more information and to sign up for the monthly subscription,  Click Here. To see the options for prepaid subscriptions in my online store, Click Here.

****************************************************************************************************

Card stock cuts for this project:

  • Coastal Cabana Cardstock 4 1/4″ X 9 3/4″ (center card base scored and folded at 3 1/4″ & 6 1/2″)
  • Real Red Cardstock 4 1/4″ X 5 1/2″ (back card base)
  • Whisper White Cardstock 2 7/8″ x 3 7/8″ (inner liner)
  • Noble Peacock Foil Sheets 3 1/2″ X 4 1/2″ (center card base mat)
  • Let It Snow Specialty Designer Series Paper 5 – 3 1/8″ X 4 1/8″ (pieces for each of the center card base), 3″ x 2″ (gift card slot), 4″ X 5 1/4″ (back card base front), piece for envelope flap

****************************************************************************************************

Product List

Stampin’ Up! Let It Snow For Happy Inkin’ Thursday Blog Hop

Good Thursday morning my stamping friends. Welcome to the Happy Inkin’ Thursday Blog Hop. If you are hopping over from Akiko, thank you for stopping by. This week we had a Sketch Challenge. Be sure to hop around to see everyone’s beautiful projects. I’m continuing with my quick and easy cards for this week.  Here’s what I came up with for the sketch.

Here is out sketch for this week.

I started by adhering a panel of Let It Snow Specialty Designer Series Paper to a Thick Whisper White card base using Multipurpose Liquid Glue.

I adhered a thin panel of the Let It Snow Specialty DSP to a Real Red Mat using Snail.  I adhered the matted DSP to the bottom of the card front using Multipurpose Liquid Glue.

I stamped the sentiment from the Stampin’ Up! Snowman Season Photopolymer Stamp Set on a small panel of Whisper White cardstock in Coastal Cabana Ink.  I punched the sentiment out using the Pretty Label Punch.  Using the Pretty Label Punch I punched out 2 more labels in Real Red cardstock.  I adhered the 2 labels to the back of the Whisper White label using Multipurpose Liquid Glue, arranging it so that it framed the Whisper White label.  I cut the snowflakes in Sparkle Glimmer Paper using the Christmas Layers Dies.  I snipped the snowflakes in half and arranged them so that they came out on either side of the sentiment.  I adhered the snowflakes to the card front using Glue Dots and Multipurpose Liquid Glue.  I adhered the sentiment over the snowflakes using Stampin’ Dimensionals.

On the inside I stamped the sentiment from the Snowman Season stamp set in Coastal Cabana Ink in the center of a Whisper White panel.  I stamped the snowflake image from the Snowman Season stamp set in Coastal Cabana Ink on either side of the sentiment.  I stamped the small snowman image from the Snowman Season stamp set in Coastal Cabana Ink, stamping off once, over the sentiment.  I adhered a thin strip of Let It Snow DSP to the bottom of the Whisper White panel using Snail  I adhered the Whisper White panel to a Real Red mat using Snail and then to the inside of the Thick Whisper White card base using Multipurpose Liquid Glue.

To finish my card I decorated a Medium Whisper White Envelope.  I adhered a strip of the Let It Snow DSP to the envelope front and a panel to the envelope flap.

Thank you for stopping by my blog today.  I hope you liked my card and will give it a try. Now that you’ve seen my card, take a minute to hop through all our projects today. If you click on the Next Blog button, you’ll go right to Amy’s page. Or you can just click on the names below to go directly to all the blogs! Happy Hopping!!

Karen Ksenzakovic: You are here

****************************************************************************************************

If you need any stamping supplies, I’d be very happy to be your Demonstrator. Just click HERE to go directly to my online store or drop me an email if you have any questions. 

MY CURRENT HOST CODE IS: NVSKQ72X

For any orders $50 or more I will send you my monthly class tutorials.  Click HERE or go to my Customer Rewards to see what this months tutorials are.

Click HERE to shop the clearance rack.

Happy Stamping, Karen!

****************************************************************************************************

Stampin’ Up!’s Year-End Closeout is here while supplies last!!  You can save on a selection of retiring and surplus items including holiday catalog items, stamp sets, and Paper Pumpkin past kits! Shop early to avoid missing out as items on the sale are only available while supplies last! Supplies are limited and popular items will sell out quickly. This amazing sale ends on January 2.

Head over to my Online store to see all the Discounted Items and Retiring Favorites Items.  You don’t want to miss out on these savings because when they are gone THEY ARE GONE!

****************************************************************************************************

SOMETHING FOR EVERYTHING PAPER PUMPKIN 
SUBSCRIBE TO PAPER PUMPKIN BY DECEMBER 10, 2019

December’s Something for Everything kit includes a super-versatile stamp set complete with 13 sentiments that can be used for occasions ranging from wedding, to get well, birthdays, and more! Plus, the three full-sized card designs (four of each) are gorgeous AND multiuse.  Paper Pumpkin’s December kit makes it easier than ever to give a handmade card to a friend—no matter what the occasion!

This is an all-card kit, with 13 sentiments to cover tons of occasions from weddings, get well, birthday, and more, this set does it all.

Kit details: Makes 12 cards and envelopes

Card size: 4 1/4″ x 5-1/2″ (10.8 x 14 cm)

Envelope size: 4-1/2″ x 5-3/4″ (11.4 x 14.6 cm)

Coordinating colors: Crushed Curry, Grapefruit Grove, Old Olive, Shaded Spruce, Terracotta Tile

  • Subscribe for the December kit at paperpumpkin.com from November 11–December 10.
  • Supplies may be limited toward the end of each subscription period.

Interested in subscribing to Paper Pumpkin?  You can either sign up for a subscription where you are billed monthly for your kit or you can purchase a prepaid subscription in my online store. To see more information and to sign up for the monthly subscription,  Click Here. To see the options for prepaid subscriptions in my online store, Click Here.

****************************************************************************************************

Card stock cuts for this project:

  • Real Red Cardstock 4″ X 5 1/4″ (inner liner mat), 7/8″ X 5 1/2″ (strip on front mat), 2″ X 6″ (pretty label punch)
  • Whisper White Cardstock 2″ X 3″ (sentiment), 3 7/8″ X 5 1/8″ (inner liner)
  • Thick Whisper White Cardstock 8 1/2″ X 5 1/2″(card base scored and folded at 4 1/4″)
  • Let It Snow Specialty Designer Series Paper 4 1/4″ X 5 1/2″ (card front), 3/4″ X 5 1/2″ (strip on front), 1/4″ X 5 1/8″ (strip on inner liner), 1″ X 6″ (strip on envelope front), 2 1/4”X 6″ (envelope flap)
  • Sparkle Glimmer Paper 3 1/4″ X 2 3/4″ (card front snowflakes)

****************************************************************************************************

Product List

Stampin’ Up! Snowman Season Let Snow For Fun Fold Friday

Good Friday morning my fellow stampers and welcome to my Fun Fold Friday.  How was everyone’s week?  Does anyone have any plans for the weekend, since it’s here already?  I’m leaving today for Hartford, CT for OnStage.  If you follow me on Facebook, I will be posting some new sneak peaks.  I can’t wait to meet up with my fellow team members and to get my hands on the new Occasions Catalog.  I will be sharing all that I am allowed with you next week and on my Facebook page.

For today’s card I’ve made a double triangle fun fold.  Here’s my card.

The colors of my card were inspired by Hand Stamped Sentiments Color Challenge #327.  Here are their colors.

I started with a full sheet of Shaded Spruce cardstock.  I scored it at 4 1/4″ along the 8 1/2″ side and 5 1/2″ along the 11″ side.  I lined the cardstock up in my Paper Trimmer on a diagonal and cut.  You are now able to make 2 cards with this panel.  I folded on the 2 fold lines having the 2 triangles meeting in the center of the card.  I adhered a panel of Let It Snow Specialty Designer Series Paper to each of the Real Red mats using Multipurpose Liquid Glue.  I adhered the matted DSP panels to each of the triangles of the Shaded Spruce card base.

I adhered a panel of the Let It Snow Specialty DSP, which I cut using the largest oval from the Stitched Shapes Dies, to a scallop oval cut from the Layering Ovals Dies in Real Red Glimmer Paper using Multipurpose Liquid Glue.  On a panel of Sparkle Glimmer Paper I stamped the snowman image from the Stampin’ Up! Snowman Season Photopolymer Stamp Set in Tuxedo Black Memento Ink.  I punched the snowman out using the Snowman Builder Punch.  I punched the snowman’s arms out of Soft Suede cardstock using the Snowman Builder Punch.  I adhered the arms to the back of the snowman using Glue Dots.  I adhered the snowman to the center of the oval using Stampin’ Dimensionals.   Using the Snowman Builder Punch again, I punched out a hat from the Let It Snow Specialty DSP and adhered it to the top of the snowman using a Stampin’ Dimensional.  I adhered the oval to the card front using Stampin’ Dimensionals only on the left side of the oval.

On the top right side of the card front I stamped the sentiment from the Snowman Season stamp set in Shaded Spruce Ink and immediately sprinkled it with my Clear Stampin’ Emboss Powder and set it using my Heat Tool.

On the inside I stamped the sentiment from the Snowman Season stamp set in Shaded Spruce Ink in the center of a Whisper White panel.  I stamped another one of the snowman images from the Snowman Season stamp set in Tuxedo Black Memento Ink.  I adhered the Whisper White panel to a Real Red mat using Snail and then adhered it to the inside of the Shaded Spruce card base using Multipurpose Liquid Glue.

To finish my card I decorated a Medium Whisper White Envelope.  I stamped the snowman image from the Snowman Season stamp set in Tuxedo Black Memento Ink on the envelope front.  I adhered a panel of the Let It Snow Specialty DSP to the envelope flap.

Thank you for stopping by my blog today.  I hope you liked my card and will give it a try. Happy Stamping!!

****************************************************************************************************

If you need any stamping supplies, I’d be very happy to be your Demonstrator. Just click HERE to go directly to my online store or drop me an email if you have any questions. 

MY CURRENT HOST CODE IS: DDDXNW6A 

For any orders $50 or more I will send you my monthly class tutorials.  Click HERE or go to my Customer Rewards to see what this months tutorials are.

Click HERE to shop the clearance rack.

Happy Stamping, Karen!

****************************************************************************************************

AVAILABLE NOW WHILE SUPPLIES LAST ONLY 

DON’T MISS OUT ON THIS BEAUTIFUL SUITE

THE NEW CHRISTMASTIME IS HERE SUITE

We hope you’re ready to make this holiday season magical, because the Christmastime Is Here Suite is! This exclusive, limited-time collection of festive, floral coordinating products has everything you need to share love, joy, and creativity this holiday season.

Here’s a video of what’s included in the suite.

****************************************************************************************************

Card stock cuts for this project:

  • Real Red Cardstock 4′ X 5 1/4″ (card front mat cut on a diagonal), 4 1/8″ X 5 3/8″ (inner liner mat)
  • Shaded Spruce Cardstock 8 1/2″ X 11″ (card base scored at 4 1/4″ & 5 1/2″ cut on a diagonal)
  • Whisper White Cardstock 4″ X 5 1/4″ (inner liner)
  • Let It Snow Specialty Designer Series Paper 3 7/8″ X 5 1/8″ (card front cut on a diagonal), 3 1/2″ X 2 1/2″ (stitched oval), piece for envelope flap
  • Real Red Glimmer Paper 3 3/4″ X 2 3/4″ (scallop mat)
  • Sparkle Glimmer Paper 2″ X 3″ (snowman)

****************************************************************************************************

Product List

Stampin’ Up! Snowman Season for Happy Inkin’ Thursday Blog Hop

Happy Halloween my fellow stampers!  It’s time for our Happy Inkin’ Thursday Blog Hop.  This week we have a color challenge.  I can’t wait to see what everyone created with these colors.  Here is what I came up with.

Here are our colors for this week.

My card played along with the Fab Friday Sketch Challenge #175.  Here is their sketch.

I started by adhering a panel of the Let It Snow Specialty Designer Series Paper to a Shaded Spruce card base using Multipurpose Liquid Glue.

On a small panel of Whisper White cardstock I stamped the snowman image from the Stampin’ Up! Snowman Season Photopolymer Stamp Set.  I stamped the main part of the image in Tuxedo Black Memento Ink, the tree and pompom on his hat I colored with my Shaded Spruce Stampin’ Write Marker and the tree trunk I colored with my Soft Suede Stampin’ Write Marker.  I colored the snowman’s nose, hat and scarf in using my Real Red and Shaded Spruce Stampin’ Blends Markers.  I cut the image out using the 2nd largest circle from the Stitched Shapes Dies.  I adhered the stitched circle to a scalloped circle cut from my Layering Circles Dies in Real Red Glimmer Paper using Multipurpose Liquid Glue.  I adhered the matted artwork to the card front using Stampin’ Dimensionals.

On a strip of Shaded Spruce cardstock I stamped the sentiment from the Snowman Season stamp set in Versamark Ink.  I immediately sprinkled it with White Stampin’ Emboss Powder and set it using my Heat Tool.  I adhered the sentiment to the card front using Stampin’ Dimensionals and a Glue Dot.  I adhered a strip of Real Red Glimmer Paper under the sentiment using Snail.  I added a few Red Rhinestone Basic Jewels to the card front.

On the inside I stamped the sentiment from the Snowman Season stamp set in Shaded Spruce Ink in the center of a Whisper White panel.  I stamped the snowflake image from the Snowman Season stamp set on either side of the sentiment in Coastal Cabana Ink and once over the sentiment in Coastal Cabana Ink stamping off once.  I added 2 thin strips of the Let It Snow Specialty DSP to either side of the panel using Snail.  I adhered the Whisper White panel to the inside of the Shaded Spruce card base using Multipurpose Liquid Glue.

To finish my card I decorated a Medium Whisper White Envelope.  I stamped the snowman image from the Snowman Season stamp set in Tuxedo Black Memento Ink on the envelope front and colored it in the same as I did for the artwork.  I adhered a panel of the Let It Snow Specialty DSP to the envelope flap.

Thank you for visiting my blog today.  I hope you liked my card and will give it a try. Now that you’ve seen my card, take a minute to hop through all our projects today.  If you click on the Next Blog button, you’ll go right to Amy’s page. Or you can just click on the names below to go directly to all the blogs!  Happy Hopping!!

Karen Ksenzakovic: You Are Here

****************************************************************************************************

If you need any stamping supplies, I’d be very happy to be your Demonstrator. Just click HERE to go directly to my online store or drop me an email if you have any questions. 

MY CURRENT HOST CODE IS: DDDXNW6A 

For any orders $50 or more I will send you my monthly class tutorials.  Click HERE or go to my Customer Rewards to see what this months tutorials are.

Click HERE to shop the clearance rack.

Happy Stamping, Karen!

****************************************************************************************************

CHRISTMAS IS COMING EARLY THIS YEAR

AVAILABLE NOVEMBER 1ST, THE NEW CHRISTMASTIME IS HERE SUITE

We hope you’re ready to make this holiday season magical, because the Christmastime Is Here Suite is! This exclusive, limited-time collection of festive, floral coordinating products has everything you need to share love, joy, and creativity this holiday season.

Products from the Christmastime Is Here Suite will be available while supplies last only starting November 1st, 2019

Here’s a sneak peek video of what’s included in the suite.

****************************************************************************************************

WINTER WONDERS PAPER PUMPKIN PART TWO
SUBSCRIBE TO PAPER PUMPKIN BY NOVEMBER 10, 2019

The holiday season will be here before we know it. And along with putting up the Christmas tree and spending snowy nights by the fire, Paper Pumpkin subscribers will be looking forward to opening their holiday kit. Christmastime papercrafting with Paper Pumpkin has become an annual tradition!
So to deliver more of what subscribers love this holiday season, in November Stampin’ Up! is offering Christmas tags kit. This kit makes it easy to add a handmade, personal touch to your holiday giving—without a lot of fuss. It’s Christmas made easy with Paper Pumpkin!

November Kit
Kit details: Makes 24 holiday-themed gift tags of 4 various sizes and designs.
Coordinating colors: Early Espresso, Pool Party, Poppy Parade, and Shaded Spruce

Subscribe for the November kit at paperpumpkin.com from October 11th – November 10th.

The October and November kits coordinate; however, each kit is all-inclusive and can stand alone.

If you’re interested in subscribing to Paper Pumpkin, you can either sign up for a subscription where you are billed monthly for your kit or you can purchase a prepaid subscription in my online store. To see more information and to sign up for the monthly subscription,  Click Here. To see the options for prepaid subscriptions in my online store, Click Here.

****************************************************************************************************

Card stock cuts for this project:

  • Shaded Spruce Cardstock 8 1/2″ X 5 1/2″ (card base scored and folded at 4 1/4″), 3 1/4″ X 5/8″ (sentiment strip)
  • Whisper White Cardstock 4″ X 5 1/4″ (inner liner), 3″ X 3″ (artwork)
  • Let It Snow Specialty Designer Series Paper 4 1/8″ X 5 3/8″ (card front), 2 – 1/4″ X 4″ strips for inner liner,  piece for envelope flap
  • Real Red Glimmer Paper 3″ X 3″ (scallop mat for artwork), 2 1/2″ X 1/2″ (strip under sentiment)

****************************************************************************************************

Product List