
Good Monday morning my fellow stampers. How was everyone’s weekend? Were you able to join us for our Facebook live videos? We all had a lot of fun making them. I did my first ever video and I have to admit, I had fun with it. If you were able to watch, thank you very much.
For today I have the 2 cards from the video for you. Both cards are the same style just different color bases and Designer Series Paper. My directions are the same for both cards just the different colors. Here are my cards.


My card played along with the Just Add Ink Challenge #477. Here is their sketch.

I started by embossing the Cherry Cobbler and Shaded Spruce card fronts using the Winter Knit 3D Embossing Folder. I adhered the Let It Snow Specialty Designer Series Paper on the Coastal Cabana mat and the Wrapped In Plaid Designer Series Paper on the Gold Foil Sheet using Multipurpose Liquid Glue. I adhered the matted DSP to each of the card fronts using Multipurpose Liquid Glue.


I cut out Flirty Flamingo, Night of Navy, Real Red and Shaded Spruce cups using the Cup of Cheer Dies. On the Night of Navy mug I cut out the stripes from the Cup of Cheer Dies in Shaded Spruce cardstock and adhered them to the cup using Fine Tip Glue Pen. For the Flirty Flamingo cup I cut out a snowflake from the Seasonal Layers Dies in Sparkle Glimmer Paper and adhered it to the cup using Multipurpose Liquid Glue.


For the Real Red and Shaded Spruce cups I stamped them both using sentiments from the Stampin’ Up! Cup of Christmas Photopolymer Stamp Set with Versamark Ink. I sprinkled the Real Red one with Shimmer White Stampin’ Emboss Powder and the Shaded Spruce one with Gold Stampin’ Emboss Powder. I immediately used my Heat Tool to set them. I adhered the cups to the card fronts using Stampin’ Dimensionals. I cut out the steam with a scroll die from the Christmas Cardinal Dies in Smoky Slate cardstock. I adhered them to the cups using my Fine Tip Glue Pen. I adhered the Cherry Cobbler card front to the Cherry Cobbler card base and the Shaded Spruce card front to the Shaded Spruce card base using Stampin’ Dimensionals.


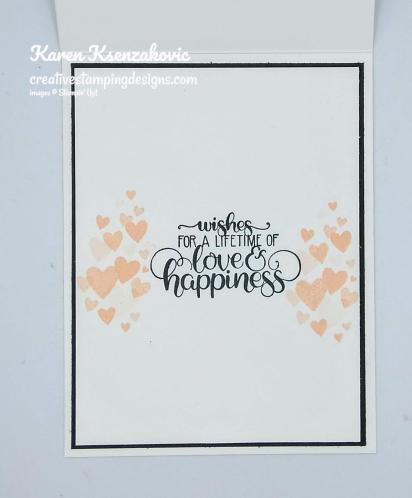
On the insides I stamped one of the Whisper White panels in the center with the sentiment from the Cup of Christmas stamp set in Night of Navy Ink. I stamped the holly image from the Cup of Christmas stamp set on either side of the sentiment in Shaded Spruce Ink. On the other Whisper White panel in the center I stamped the sentiment from the Stampin’ Up! Frosted Foliage Cling Stamp Set in Shaded Spruce Ink. I stamped the snowflake image from the Frosted Foliage stamp set in Coastal Cabana Ink, stamping off once, on either side of the sentiment. I adhered the one stamped with the Night of Navy sentiment to the Shaded Spruce mat and the one stamped with the Shaded Spruce sentiment to the Coastal Cabana mat using Snail. I adhered the Shaded Spruce matted sentiment to the inside of the Cherry Cobbler card base and the Coastal Cabana matted sentiment to the inside of the Shaded Spruce card base using Multipurpose Liquid Glue.


To finish my cards I decorated a Medium Whisper White Envelope. I stamped the polka dot cup image from the Cup of Christmas stamp set in Shaded Spruce Ink on the envelope front. I adhered a panel of the Wrapped in Plaid DSP to the envelope flap.


For the other Medium Whisper White Envelope I stamped the snowflake image from the Frosted Foliage stamp set in Coastal Cabana Ink on the envelope front. I adhered a panel of Let it Snow Specialty DSP to the envelope flap.
Thank you for stopping by my blog today. I hope you liked my cards and will give them a try. Let me know which one you like better. The list of supplies are below along with the measurements if you’d like to stamp along while watching the video. You can watch it on my Facebook page Here.
You can also view the video on my YouTube channel Here. Happy Stamping!!
****************************************************************************************************
If you need any stamping supplies, I’d be very happy to be your Demonstrator. Just click HERE to go directly to my online store or drop me an email if you have any questions.
MY CURRENT HOST CODE IS: 3F496G6J
For any orders $50 or more I will send you my monthly class tutorials. Click HERE or go to my Customer Rewards to see what this months tutorials are.
Click HERE to shop the clearance rack.
Happy Stamping, Karen!
****************************************************************************************************
CHRISTMAS IS COMING EARLY THIS YEAR
AVAILABLE NOVEMBER 1ST, THE NEW CHRISTMASTIME IS HERE SUITE

We hope you’re ready to make this holiday season magical, because the Christmastime Is Here Suite is! This exclusive, limited-time collection of festive, floral coordinating products has everything you need to share love, joy, and creativity this holiday season.
Products from the Christmastime Is Here Suite will be available while supplies last only starting November 1st, 2019
Here’s a sneak peek video of what’s included in the suite.

****************************************************************************************************
WINTER WONDERS PAPER PUMPKIN
SUBSCRIBE TO PAPER PUMPKIN BY OCTOBER 10, 2019
Paper Pumpkin wants to help you share love and joy this Christmas with a duo of delightful, special-edition kits. October’s kit includes 10 traditional cards, while November’s kit features 24 can’t-miss tags. Put them together and you have everything you need to make the season bright.
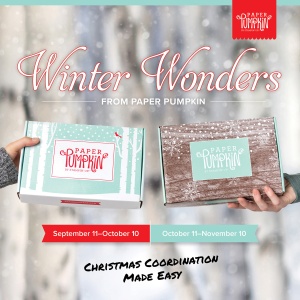
There’s something about the holidays that brings out the crafter in all of us. Even non-crafters like making simple and fun projects to celebrate the season. And since “simple and fun” is Paper Pumpkin’s middle name, we have the perfect kits for you!
In October and November we are offering back-to-back coordinating kits, one with Christmas cards, the other with Christmas tags. Both kits make it easy for you to add a handmade, personal touch to your holiday giving—without a lot of fuss. It’s Christmas made easy with Paper Pumpkin!
October Kit
Coordinating colors: Early Espresso, Pool Party, Poppy Parade, and Shaded Spruce
November Kit
Coordinating colors: Early Espresso, Pool Party, Poppy Parade, and Shaded Spruce
The October and November kits coordinate; however, each kit is all-inclusive and can stand alone.
Click Here for more information and to subscribe to Paper Pumpkin.
****************************************************************************************************

I have gathered up a lot of retired Stamp Sets, Embossing Folders & Dies and put a list together for anyone interested. I have single Stamp Sets along with Stamp Sets bundled with Dies or Punches. Take a look and see if there is anything that you missed out on getting and would still like. Click Here to go to my list.
****************************************************************************************************
Card cuts and Products are for both cards
Card stock cuts for this project:
- Cherry Cobbler Cardstock 8 1/2″ X 5 1/2″ (card base for scored and folded at 4 1/4″), 4 1/4″ X 5 1/2″ (card front)
- Coastal Cabana Cardstock 4 1/8″ X 5 3/8″ (inner liner mat), 2 1/8″ X 4 1/4″ (card front DSP mat)
- Flirty Flamingo Cardstock 2 1/4″ X 2 3/4″ (mug)
- Night of Navy Cardstock 2 1/4″ X 2 3/4″ (mug)
- Real Red Cardstock 2 1/4″ X 2 3/4″ (mug)
- Shaded Spruce Cardstock 4 1/4″ X 11″ (card base scored and folded at 5 1/2″), 4 1/4″ X 5 1/2″ (card front), 4 1/8″ X 5 3/8″ (inner liner mat), 2 1/4″ X 2 3/4″ (mug), 2 1/4″ X 2 1/4″ (stripes on night of navy mug)
- Smoky Slate Cardstock 3″ X 6″ (steam die from mugs)
- Whisper White Cardstock 2 – 4″ X 5 1/4″ (inner liners)
- Let It Snow Specialty Designer Series Paper 2″ X 4 1/4″ (card front strip), piece for envelope flap
- Wrapped In Plaid Designer Series Paper 2″ X 4 1/4″ (card front strip), piece for envelope flap
****************************************************************************************************
Product List
")
")

")


 Specialty Designer Series Paper")


 My colors were inspired by


 I played along with a couple challenges today. I joined in with the


 Designer Series Paper")


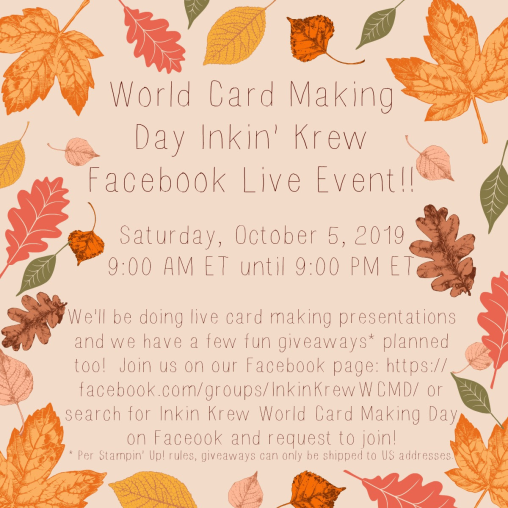
 Save the date!! You’re invited to attend a fun Facebook event on Saturday, October 5 to celebrate World Card Making Day!


")


")
")


