Stampin’ Up Woven Heirlooms Sympathy

Good Thursday morning my fellow stampers.  How has everyone’s week been?  The weekend is right around the corner, I hope you are starting to make some fun plans.

For today I have a quick and easy card for you, despite the layers.  These cards unfortunately I always like to have on hand.  Here’s my card.

My card played along with a few challenges today.  I joined in with TGIF Color Challenge #228.  Here are their colors.

I played along with Mojo Monday Sketch Challenge #522.  Here is their sketch.

I also played along with Inspire. Create. Theme Challenge #051.  Here is their theme.

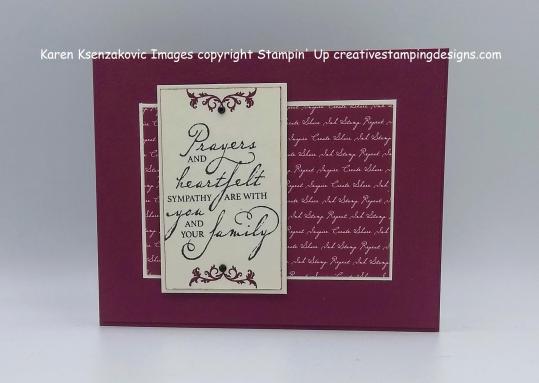
I started by embossing a panel of Merry Merlot cardstock with my Subtle 3D Embossing Folder.  I adhered the card front to a Merry Merlot card base using Multipurpose Liquid Glue.

I adhered a panel of Merry Merlot Neutrals 6 X 6 Designer Series Paper to a Very Vanilla mat using Snail.  I adhered the matted DSP to the card front using Multipurpose Liquid Glue.

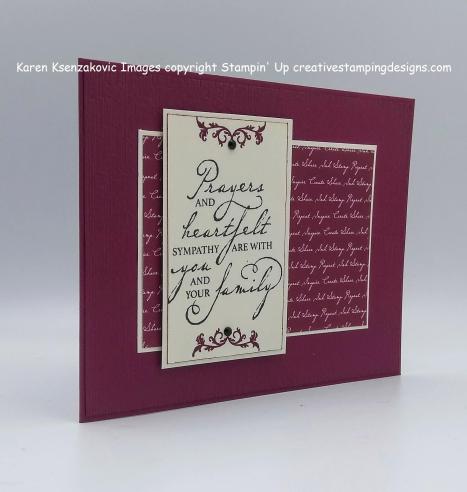
On a small panel of Very Vanilla cardstock I stamped the sentiment from the Stampin’ Up Woven Heirlooms Cling Stamp Set in Tuxedo Black Memento Ink.  I stamped the scroll image from the Woven Heirlooms stamp set in Merry Merlot Ink on the top and bottom of the panel.  I adhered the sentiment panel to a Very Vanilla mat using Snail.  I adhered the matted sentiment to the card front using Stampin’ Dimensionals.  I colored 2 Rhinestone Basic Jewels using my Dark Basic Black Stampin’ Blend Marker and adhered them to the scroll image.

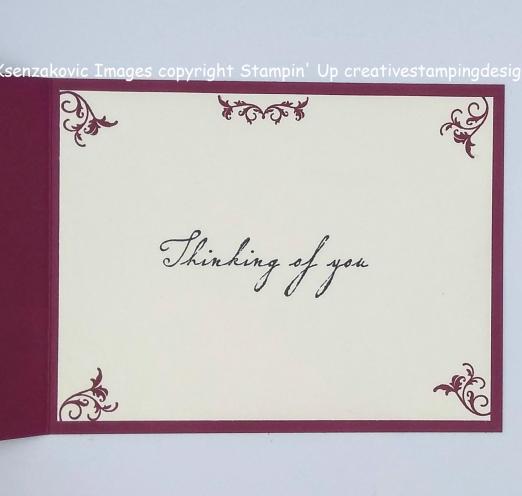
On the inside I stamped the sentiment from the Woven Heirlooms stamp set in Tuxedo Black Memento Ink to the center of a Very Vanilla panel.  I stamped the scroll images from the Woven Heirlooms stamp set in Merry Merlot Ink around the Very Vanilla panel.  I adhered the Very Vanilla panel to the inside of the Merry Merlot card base using Multipurpose Liquid Glue.

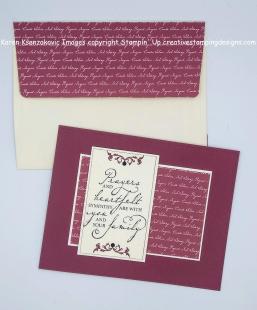
To finish my card I decorated a Medium Very Vanilla Envelope.  I adhered a panel of the Merry Merlot Neutrals 6 X 6 DSP to the envelope flap and the front of the envelope.

Thank you for stopping by my blog today.  I hope you liked my card and will give it a try. Happy Stamping!!

****************************************************************************************************

If you need any stamping supplies, I’d be very happy to be your Demonstrator. Just click HERE to go directly to my online store or drop me an email if you have any questions. 

MY CURRENT HOST CODE IS: ADFAXYQE

For any orders $50 or more I will send you my monthly class tutorials.  Click HERE or go to my Customer Rewards to see what this months tutorials are.

Click HERE to shop the clearance rack.

Happy Stamping, Karen!

****************************************************************************************************

BUY 3 GET 1 FREE DESIGNER SERIES PAPER IS BACK BY POPULAR DEMAND

SEPTEMBER 4, 2019 THROUGH SEPTEMBER 30, 2019

By popular demand, Stampin’ Up! is bringing back the Designer Series Paper Sale! During September (4TH–30TH), you can buy three packages of select Designer Series Paper, and get one FREE!

Here are the details:

  • Sale Dates:  September 4–30
    • Order Deadline:  September 30, 2019; 11:50 pm (MT)
  • Only Designer Series Papers listed in the table below qualify for this promotion. You may mix and match papers from any of the listed papers.
  • There is no limit to how many times participants can buy three packages of Designer Series Paper, and get one free during this sale.
  • In the online ordering system, when three qualifying Designer Series Paper packs are entered, a prompt to add a free Designer Series Paper will appear.
  • In the online store, if a you order four packages of the same qualifying Designer Series Paper, you will need to enter three together and then order the fourth free item separately.
  • Designer Series Paper ordered as part of a Starter Kit does not qualify for this sale.
  • Designer Series Paper ordered with Stampin’ Rewards does not qualify for this sale.

Here are the Designer Series Paper Packs included in the sale:

ITEM PAGE DESCRIPTION PRICE
149100 166 PERENNIAL ESSENCE DESIGNER SERIES PAPER $11.50
149443 166 SEE A SILHOUETTE DESIGNER SERIES PAPER $11.50
149481 167 COME SAIL AWAY DESIGNER SERIES PAPER $11.50
149484 165 MAGNOLIA LANE DESIGNER SERIES PAPER $11.50
149488 165 GARDEN LANE DESIGNER SERIES PAPER $11.50
149489 165 FOLLOW YOUR ART DESIGNER SERIES PAPER $11.50
149497 165 WOVEN THREADS DESIGNER SERIES PAPER $11.50
149589 166 DINOROAR DESIGNER SERIES PAPER $11.50
149592 166 BIRD BALLAD DESIGNER SERIES PAPER $11.50
149500 167 PRESSED PETALS SPECIALTY DESIGNER SERIES PAPER $14.50

****************************************************************************************************

I have gathered up a lot of retired Stamp Sets, Embossing Folders & Dies  and put a list together for anyone interested.  I have single Stamp Sets along with Stamp Sets bundled with Dies or Punches.  Take a look and see if there is anything that you missed out on getting and would still like.  Click Here to go to my list.

****************************************************************************************************

Card stock cuts for this project:

  • Merry Merlot Cardstock 4 1/4″ X 11″ (card base scored and folded at 5 1/2″), 4 1/8″ X 5 3/8″ (card front)
  • Very Vanilla Cardstock4″ X 2 3/4″ (card front DSP mat), 2″ X 3 1/4″ (artwork mat), 1 7/8″ X 3 1/8″ (artwork), 4″ X 5 1/4″ (inner liner)
  • Neutrals 6 X 6 Designer Series Paper 3 7/8″ X 2 5/8″ (panel on card front)

****************************************************************************************************

Product List

Stampin’ Up Winter Woods Friendly Silhouette Card

Good Wednesday morning my fellow stampers.  How has everyone’s wee been going?  We’re already halfway through.  Did you all have a chance to hop around yesterday with Amy’s Inkin’ Krew Blog Hop and see all the beautiful projects my team members made? If not, you can still go back to yesterday’s blog and hop around.

For today’s card I did a technique that I haven’t done before (at least I don’t think I have.  I used my Sponge Brayer to make the background on my card.  I usually do the sponging technique using my Stamping Sponges, but I thought I’d try something new.  Here’s my card.

My card played along with a couple challenges today.  1st off I joined in with As You See It Challenge #208.  Their challenge is a Night Glow Color Challenge.  Here are their colors.

Nest I played along with Fab Friday Challenge #171.  Here is their sketch

I also played along with Always Fun Challenge #127.  They have a Theme challenge this week.  Their theme is “Create a Scene”.

I started by using my Sponge Brayer and adding color slowly to a panel of Whisper White cardstock.  I started with the bottom and added Mango Melody Ink.  I worked my way up and next used Coastal Cabana Ink.  On the top of the panel I used my Sponge Brayer with Pretty Peacock Ink.  After I was done adding the amount of color that I wanted, I stamped the multiple tree image from the Stampin’ Up Winter Woods Cling Stamp Set in Tuxedo Black Memento Ink in the center of the panel.

I cut 2 of the trees out from the In The Woods Dies from Basic Black cardstock and adhered them to either side of my card front using my Fine Tip Glue Pen.  I then cut the grassy cat tail die from the Friendly Silhouettes Dies out of Basic Black cardstock and adhered it to my card front using my Fine Tip Glue Pen.  I adhered the card front to a Coastal Cabana mat using Snail

I stamped the sentiment from the Stampin’ Up Gather Together Photopolymer Stamp Set in Pretty Peacock Ink on a Whisper White panel.  I adhered the sentiment strip to a thin Mango Melody strip of cardstock using Snail.  I adhered the sentiment to the card front using Stampin’ Dimensionals.  I added a Coastal Cabana Glimmer Enamel Dot to the sentiment.  I made a tiny bow from the Pretty Peacock/Old Olive 3/8″ Reversible Ribbon and adhered it to the sentiment using a Glue Dot.  I adhered the card front to a Pretty Peacock card base using Stampin’ Dimensionals.

On the inside I stamped the tree image from the Winter Woods stamp set in Tuxedo Black Memento Ink on either side of a Whisper White panel.  I stamped the sentiment from the Stampin’ Up Friend Like You Photopolymer Stamp Set in the center of the panel in Pretty Peacock Ink.  I adhered the Whisper White panel to the inside of the Pretty Peacock card base using Multipurpose Liquid Glue.

To finish my card I decorated a Medium Whisper White Envelope. I stamped the tree image from the Winter Woods stamp set on either side of the envelope front and on the envelope flap in Tuxedo Black Memento Ink.

Thank you for stopping by my blog today.  I hope you liked my card and will give it a try. Happy Stamping!!

****************************************************************************************************

If you need any stamping supplies, I’d be very happy to be your Demonstrator. Just click HERE to go directly to my online store or drop me an email if you have any questions. 

MY CURRENT HOST CODE IS: ADFAXYQE

For any orders $50 or more I will send you my monthly class tutorials.  Click HERE or go to my Customer Rewards to see what this months tutorials are.

Click HERE to shop the clearance rack.

Happy Stamping, Karen!

****************************************************************************************************

BUY 3 GET 1 FREE DESIGNER SERIES PAPER IS BACK BY POPULAR DEMAND

SEPTEMBER 4, 2019 THROUGH SEPTEMBER 30, 2019

By popular demand, Stampin’ Up! is bringing back the Designer Series Paper Sale! During September (4TH–30TH), you can buy three packages of select Designer Series Paper, and get one FREE!

Here are the details:

  • Sale Dates:  September 4–30
    • Order Deadline:  September 30, 2019; 11:50 pm (MT)
  • Only Designer Series Papers listed in the table below qualify for this promotion. You may mix and match papers from any of the listed papers.
  • There is no limit to how many times participants can buy three packages of Designer Series Paper, and get one free during this sale.
  • In the online ordering system, when three qualifying Designer Series Paper packs are entered, a prompt to add a free Designer Series Paper will appear.
  • In the online store, if a you order four packages of the same qualifying Designer Series Paper, you will need to enter three together and then order the fourth free item separately.
  • Designer Series Paper ordered as part of a Starter Kit does not qualify for this sale.
  • Designer Series Paper ordered with Stampin’ Rewards does not qualify for this sale.

Here are the Designer Series Paper Packs included in the sale:

ITEM PAGE DESCRIPTION PRICE
149100 166 PERENNIAL ESSENCE DESIGNER SERIES PAPER $11.50
149443 166 SEE A SILHOUETTE DESIGNER SERIES PAPER $11.50
149481 167 COME SAIL AWAY DESIGNER SERIES PAPER $11.50
149484 165 MAGNOLIA LANE DESIGNER SERIES PAPER $11.50
149488 165 GARDEN LANE DESIGNER SERIES PAPER $11.50
149489 165 FOLLOW YOUR ART DESIGNER SERIES PAPER $11.50
149497 165 WOVEN THREADS DESIGNER SERIES PAPER $11.50
149589 166 DINOROAR DESIGNER SERIES PAPER $11.50
149592 166 BIRD BALLAD DESIGNER SERIES PAPER $11.50
149500 167 PRESSED PETALS SPECIALTY DESIGNER SERIES PAPER $14.50

****************************************************************************************************

I have gathered up a lot of retired Stamp Sets, Embossing Folders & Dies  and put a list together for anyone interested.  I have single Stamp Sets along with Stamp Sets bundled with Dies or Punches.  Take a look and see if there is anything that you missed out on getting and would still like.  Click Here to go to my list.

****************************************************************************************************

Card stock cuts for this project:

  • Coastal Cabana Cardstock 2 – 4 1/8″ X 5 3/8″ (artwork mat and inner liner mat)
  • Mango Melody Cardstock 1/4″ X 3″ (strip under sentiment)
  • Pretty Peacock Cardstock 4 1/4″ X 11″ (card base scored and folded at 5 1/2″
  • Whisper White Cardstock 2 – 4″ X 5 1/4″ (card front and inner liner), 5/8″ X 2 1/2″ (sentiment)

****************************************************************************************************

Product List

Stampin’ Up Animal Outings for Fun Fold Friday

Good Friday morning my fellow stampers and welcome to my Fun Fold Friday.  The weekend is here already, has anyone had a chance to make plans?  I feel like the weekend snuck up very quickly.  Gotta love these 4 day weeks.

For today’s card I was asked to make a baby shower card for a friend.  I had to put my thinking cap on for a bit to come up with an idea.  I don’t really have any ‘baby’ stamp sets, but then I remembered the one set that I have that would be perfect.  I made a ‘Z-Fold’ card for you, but my measurements are a little different than normal.  Here’s my card.

My card was able to join in with a few challenges today.  First off I played along with Global Design Project Color Challenge #205.  I thought these colors were perfect for a baby shower card (mom to be knows it’s a girl).  Here are their colors.

Next I played along with Atlantic Hearts Sketch Challenge #332.  With a little work I made this work as a fun fold.  Here is their sketch.

I also joined in with Watercooler Wednesday Challenge #237.  They have a theme challenge and I thought how much more feminine could a baby shower card be.  Here is their challenge.

I started by stamping the momma kangaroo image from the Stampin’ Up Animal Outing Cling Stamp Set in Soft Suede Ink on a small panel of Whisper White cardstock.  I colored the image in using my Rococo Rose and So Saffron Stampin’ Blends Markers.  I cut the image out using my Animal Friends Dies.  I cut out a stitched square from Rococo Rose cardstock using the Stitched Shapes Dies.  I cut out a scalloped square from So Saffron cardstock using my Layering Squares Dies.  I adhered the stitched square to the scalloped square using Multipurpose Liquid Glue.  I adhered the kangaroo to the square using Stampin’ Dimensionals.

I adhered a strip of Rococo Rose card stock to the folded edge using Snail.  I adhered the artwork to the folded edge using Stampin’ Dimensionals only on one half.  I stamped the sentiment from the Stampin’ Up Itty Bitty Greetings Cling Stamp Set in Rococo Rose Ink on a thin strip of Whisper White cardstock.  I punched the sentiment out using the Classic Label Punch and I cut the one edge straight using my Paper Snips.  I adhered the sentiment to the card front using a Glue Dot and Mini Stampin’ Dimensional.  I attached a small bow made from Whisper White Solid Bakers Twine with a Glue Dot.

I wrapped a piece of the Rococo Rose 1/2″ Scalloped Linen Ribbon around the left side of the card.

On the inside I adhered a panel of the Mint Macaron Gingham from the Subtle 6 X 6 Designer Series Paper using Snail.  I adhered a Whisper White panel to a Rococo Rose mat using Snail and then to the inside of the Mint Macaron card base using Multipurpose Liquid Glue.  I did not stamp a sentiment on the inside because my friend wants to write something herself.

To finish my card I decorated a Medium Whisper White Envelope.  I stamped the kangaroo image from the Animal Outing stamp set in Soft Suede Ink on the envelope front.  I colored the image in using my Rococo Rose and So Saffron Stampin’ Blends Markers.  I adhered a panel of So Saffron Gingham from the Subtle 6 X 6 DSP on the envelope flap.

Thank you for stopping by my blog today.  I hope you liked my card and will give it a try. Happy Stamping!!

****************************************************************************************************

If you need any stamping supplies, I’d be very happy to be your Demonstrator. Just click HERE to go directly to my online store or drop me an email if you have any questions. 

MY CURRENT HOST CODE IS: ADFAXYQE

For any orders $50 or more I will send you my monthly class tutorials.  Click HERE or go to my Customer Rewards to see what this months tutorials are.

Click HERE to shop the clearance rack.

Happy Stamping, Karen!

***************************************************************************************************

BONE APPETIT PAPER PUMPKIN

ONLY 4 DAYS LEFT TO SUBSCRIBE

SUBSCRIBE TO PAPER PUMPKIN BY SEPTEMBER 10TH TO GET IN ON THE FUN

Halloween is nearly here, which means that Paper Pumpkin has been busy, busy, busy. We thought you might like “a hand” with their frightful festivities, so we designed September’s kit, Bone Appétit, with them in mind.

This kit includes 20 food-safe treat boxes, a unique and exclusive Halloween stamp set, and a spooky, special-edition box. September’s kit also gives new meaning to the word “handmade.” (Cue the scary laughter!)

This kit includes 20 food-safe treat boxes, a unique and exclusive Halloween stamp set, and a spooky, special-edition box. September’s kit also gives new meaning to the word “handmade.” (Cue the scary laughter!)

September Kit Information:
The September kit makes 20 Halloween-themed, food-safe treat boxes
Coordinating colors: Basic Black, Gorgeous Grape, Pumpkin Pie, and Whisper White
Subscribe for the September kit at paperpumpkin.com from August 11–September 10.
Supplies may be limited toward the end of the subscription period.

If you’re interested in subscribing to Paper Pumpkin, you can either sign up for a subscription where you are billed monthly for your kit or you can purchase a prepaid subscription in my online store. To see more information and to sign up for the monthly subscription, click HERE To see the options for prepaid subscriptions in my online store click HERE

****************************************************************************************************

BUY 3 GET 1 FREE DESIGNER SERIES PAPER IS BACK BY POPULAR DEMAND

SEPTEMBER 4, 2019 THROUGH SEPTEMBER 30, 2019

By popular demand, Stampin’ Up! is bringing back the Designer Series Paper Sale! During September (4TH–30TH), you can buy three packages of select Designer Series Paper, and get one FREE!

Here are the details:

  • Sale Dates:  September 4–30
    • Order Deadline:  September 30, 2019; 11:50 pm (MT)
  • Only Designer Series Papers listed in the table below qualify for this promotion. You may mix and match papers from any of the listed papers.
  • There is no limit to how many times participants can buy three packages of Designer Series Paper, and get one free during this sale.
  • In the online ordering system, when three qualifying Designer Series Paper packs are entered, a prompt to add a free Designer Series Paper will appear.
  • In the online store, if a you order four packages of the same qualifying Designer Series Paper, you will need to enter three together and then order the fourth free item separately.
  • Designer Series Paper ordered as part of a Starter Kit does not qualify for this sale.
  • Designer Series Paper ordered with Stampin’ Rewards does not qualify for this sale.

Here are the Designer Series Paper Packs included in the sale:

ITEM PAGE DESCRIPTION PRICE
149100 166 PERENNIAL ESSENCE DESIGNER SERIES PAPER $11.50
149443 166 SEE A SILHOUETTE DESIGNER SERIES PAPER $11.50
149481 167 COME SAIL AWAY DESIGNER SERIES PAPER $11.50
149484 165 MAGNOLIA LANE DESIGNER SERIES PAPER $11.50
149488 165 GARDEN LANE DESIGNER SERIES PAPER $11.50
149489 165 FOLLOW YOUR ART DESIGNER SERIES PAPER $11.50
149497 165 WOVEN THREADS DESIGNER SERIES PAPER $11.50
149589 166 DINOROAR DESIGNER SERIES PAPER $11.50
149592 166 BIRD BALLAD DESIGNER SERIES PAPER $11.50
149500 167 PRESSED PETALS SPECIALTY DESIGNER SERIES PAPER $14.50


****************************************************************************************************

I have gathered up a lot of retired Stamp Sets, Embossing Folders & Dies  and put a list together for anyone interested.  I have single Stamp Sets along with Stamp Sets bundled with Dies or Punches.  Take a look and see if there is anything that you missed out on getting and would still like.  Click Here to go to my list.

****************************************************************************************************

Card stock cuts for this project:

  • Mint Macaron Cardstock 5 1/2″ X 8 1/2″ (card base scored and folded at 4 1/4″ & 1 3/4″)
  • Rococo Rose Cardstock 2 1/8″ X 5 1/8″ (inner liner mat), 2 1/2″ X 2 1/2″ (stitched square), 1/2″ X 5 1/2″ (strip on card front)
  • So Saffron Cardstock 2 1/2″ X 2 1/2″ (scalloped square)
  • Whisper White Cardstock 2″ X 5″ (inner liner)
  • Subtle 6 X 6 Designer Series Paper 4 1/8″ X 5 3/8″ (inside card base)

****************************************************************************************************

Product List

Stampin’ Up Harvest Hellos Thank You

Good Thursday morning my fellow stampers.  How is everyone’s week going?  The weekend is approaching very quickly, hope you’re ready.

For today’s card I played with a bundle I played with last week, the Harvest Hellos Bundle.  Last week I made a card using the apple, this week I made the apple into a pumpkin.  This bundle is so cute.  All you have to do is turn the stem a different way and you have either an apple or a pumpkin.  Here’s my card.

I played along with CAS(E) This Sketch Challenge #337.  Here is their sketch.

I started by embossing a small Basic Black panel using the Subtle 3D Embossing Folder.  I adhered the embossed strip to a panel of Monster Base Designer Series Paper using Snail.  I cut out the largest circle from the Stitched Shapes Dies in Very Vanilla cardstock and sponged the edges with my Soft Suede Ink.  I cut a smaller circle out of the Monster Bash DSP using my Layering Circles Dies and adhered it to the stitched circle using Multipurpose Liquid Glue.  I adhered the circle to the card front using Stampn’ Dimensionals having it hang off the left edge.  I cut it even with the card front using my Paper Snips.  I adhered the card front to a Soft Suede card base using Multipurpose Liquid Glue.

On a small panel of Pumpkin Pie cardstock I stamped the pumpkin image from the Stampin’ Up Harvest Hellos Cling Stamp Set in Pumpkin Pie Ink.  I stamped the Jack-O-Lantern face from the Harvest Hellos stamp set on my pumpkin in Tuxedo Black Memento Ink.  I punched the pumpkin out using my Apple Builder Punch.  I punched the stem out using the Apple Builder Punch from a scrap of Soft Suede cardstock.  I adhered the stem to the pumpkin using a Glue Dot.  I adhered the pumpkin to the card front using Stampin’ Dimensionals.

I added a few Pumpkin Pie Holiday Rhinestone Basic Jewels to the Basic Black strip on the card front.

On the inside I stamped the pumpkin image from the Harvest Hellos stamp set in Pumpkin Pie Ink to the center of a Very Vanilla panel stamping off once.  I stamped the sentiment from the Stampin’ Up A Big Thank You Photopolymer Stamp Set in Soft Suede Ink over the pumpkin image.  I adhered the Very Vanilla panel to the inside of the Soft Suede card base using Multipurpose Liquid Glue.

To finish my card I decorated a Medium Very Vanilla Envelope.  I stamped the pumpkin image from the Harvest Hellos stamp set in Pumpkin Pie Ink on the envelope front.  I stamped the Jack-O-Lantern face from the Harvest Hellos stamp set in Tuxedo Black Memento Ink inside the pumpkin image.  I stamped the pumpkin stem from the Harvest Hellos stamp set in Soft Suede Ink on top of the pumpkin.  I adhered a panel of Monster Bash DSP to the envelope flap.

Thank you for visiting my blog today.  I hope you liked my card and will give it a try.  Just a reminder, the 2019 Holiday Catalog is now live and you can order this Harvest Hellos Bundle with a 10% discount.  Happy Stamping!!

****************************************************************************************************

If you need any stamping supplies, I’d be very happy to be your Demonstrator. Just click HERE to go directly to my online store or drop me an email if you have any questions. 

MY CURRENT HOST CODE IS: ADFAXYQE

For any orders $50 or more I will send you my monthly class tutorials.  Click HERE or go to my Customer Rewards to see what this months tutorials are.

Click HERE to shop the clearance rack.

Happy Stamping, Karen!

***************************************************************************************************

BONE APPETIT PAPER PUMPKIN

ONLY 5 DAYS LEFT TO SUBSCRIBE

SUBSCRIBE TO PAPER PUMPKIN BY SEPTEMBER 10TH TO GET IN ON THE FUN

Halloween is nearly here, which means that Paper Pumpkin has been busy, busy, busy. We thought you might like “a hand” with their frightful festivities, so we designed September’s kit, Bone Appétit, with them in mind.

This kit includes 20 food-safe treat boxes, a unique and exclusive Halloween stamp set, and a spooky, special-edition box. September’s kit also gives new meaning to the word “handmade.” (Cue the scary laughter!)

This kit includes 20 food-safe treat boxes, a unique and exclusive Halloween stamp set, and a spooky, special-edition box. September’s kit also gives new meaning to the word “handmade.” (Cue the scary laughter!)

September Kit Information:
The September kit makes 20 Halloween-themed, food-safe treat boxes
Coordinating colors: Basic Black, Gorgeous Grape, Pumpkin Pie, and Whisper White
Subscribe for the September kit at paperpumpkin.com from August 11–September 10.
Supplies may be limited toward the end of the subscription period.

If you’re interested in subscribing to Paper Pumpkin, you can either sign up for a subscription where you are billed monthly for your kit or you can purchase a prepaid subscription in my online store. To see more information and to sign up for the monthly subscription, click HERE To see the options for prepaid subscriptions in my online store click HERE

****************************************************************************************************

BUY 3 GET 1 FREE DESIGNER SERIES PAPER IS BACK BY POPULAR DEMAND

SEPTEMBER 4, 2019 THROUGH SEPTEMBER 30, 2019

By popular demand, Stampin’ Up! is bringing back the Designer Series Paper Sale! During September (4TH–30TH), you can buy three packages of select Designer Series Paper, and get one FREE!

Here are the details:

  • Sale Dates:  September 4–30
    • Order Deadline:  September 30, 2019; 11:50 pm (MT)
  • Only Designer Series Papers listed in the table below qualify for this promotion. You may mix and match papers from any of the listed papers.
  • There is no limit to how many times participants can buy three packages of Designer Series Paper, and get one free during this sale.
  • In the online ordering system, when three qualifying Designer Series Paper packs are entered, a prompt to add a free Designer Series Paper will appear.
  • In the online store, if a you order four packages of the same qualifying Designer Series Paper, you will need to enter three together and then order the fourth free item separately.
  • Designer Series Paper ordered as part of a Starter Kit does not qualify for this sale.
  • Designer Series Paper ordered with Stampin’ Rewards does not qualify for this sale.

Here are the Designer Series Paper Packs included in the sale:

ITEM PAGE DESCRIPTION PRICE
149100 166 PERENNIAL ESSENCE DESIGNER SERIES PAPER $11.50
149443 166 SEE A SILHOUETTE DESIGNER SERIES PAPER $11.50
149481 167 COME SAIL AWAY DESIGNER SERIES PAPER $11.50
149484 165 MAGNOLIA LANE DESIGNER SERIES PAPER $11.50
149488 165 GARDEN LANE DESIGNER SERIES PAPER $11.50
149489 165 FOLLOW YOUR ART DESIGNER SERIES PAPER $11.50
149497 165 WOVEN THREADS DESIGNER SERIES PAPER $11.50
149589 166 DINOROAR DESIGNER SERIES PAPER $11.50
149592 166 BIRD BALLAD DESIGNER SERIES PAPER $11.50
149500 167 PRESSED PETALS SPECIALTY DESIGNER SERIES PAPER $14.50


****************************************************************************************************

I have gathered up a lot of retired Stamp Sets, Embossing Folders & Dies  and put a list together for anyone interested.  I have single Stamp Sets along with Stamp Sets bundled with Dies or Punches.  Take a look and see if there is anything that you missed out on getting and would still like.  Click Here to go to my list.

****************************************************************************************************

Card stock cuts for this project:

  • Basic Black Cardstock 1 1/4″ X 4 1/4″ (strip on card front)
  • Pumpkin Pie Cardstock 3″ X 3″ (pumpkin)
  • Soft Suede Cardstock 8 1/2″ X 5 1/2″ (card base scored and folded at 4 1/4″)
  • Very Vanilla Cardstock 4″ X 5 1/4″ (inner liner), 3″ X 3″ (stitched circle)
  • Monster Bash Designer Series Paper 4 1/4″ X 5 1/2″ (card front), 3″ X 3″ (card front circle), piece for envelope flap

****************************************************************************************************

Product List

Stampin’ Up Harvest Ride With Me

Good Wednesday morning my fellow stampers.  This week is flying by.  I can’t believe we’re halfway through already.  Does everyone know what today is?  The new 2019 Holiday Catalog goes live TODAY!!

For today’s card I played with the new Stampin’ Up Ride With Me Photopolymer Stamp Set.  I didn’t think I would like this set, but I’m really liking it and I’m not a truck person.  Here’s my card.

I joined in with a couple challenges today.  First off is the CAS Colours & Sketches Challenge #337.  Here are their colors.

Next I joined in with the Paper Players Theme Challenge #457.  Here is their theme.

I also played along with Sunday Stamps Challenge #212.  Here is their sketch.

I started by stamping a Garden Green card front using the Stampin’ Up Birch Cling Stamp with Soft Suede Ink.  I adhered a strip of Pumpkin Pie Gingham Regals 6 X 6 Designer Series Paper to the right side of the panel using Multipurpose Liquid Glue.

On a small panel of Very Vanilla cardstock I stamped the truck image from the Ride With Me stamp set in Early Espresso Ink.  I stamped the pumpkin image from the Ride With Me stamp set in Early Espresso Ink on the truck.  I colored the images in using my Light Basic Black, Pumpkin Pie and Soft Suede Stampin’ Blends Markers.  I colored the leaves of the pumpkins in using my Garden Green Stampin’ Write Marker.  I cut the image out using the largest oval from the Layering Ovals Dies.  I adhered the artwork to the card front using Snail.

I stamped the sentiment from the Ride With Me stamp set in Early Espresso Ink on a strip of Very Vanilla cardstock.  I adhered a piece of the 5/8″ Burlap Ribbon to the card front using Glue Dots.  I adhered the sentiment strip over the burlap ribbon using Stampin’ Dimensionals.  I adhered the card front to a Garden Green card base using Stampin’ Dimensionals.

On the inside I stamped the sentiment from the Stampin’ Up A Wish for Everything Cling Stamp Set in Early Espresso Ink in the center of a Very Vanilla panel.  I stamped the pumpkin image from the Ride With Me stamp set in Early Espresso Ink along the bottom of the panel and colored them in using my Pumpkin Pie Stampin’ Blends Markers and my Garden Green Stampin’ Write Marker.  I adhered the Very Vanilla panel to a Pumpkin Pie mat using Snail and then to the inside of the Garden Green card base using Multipurpose Liquid Glue.

To finish my card I decorated a Medium Very Vanilla Envelope.  I adhered a strip of the Pumpkin Pie Gingham Regals 6 X 6 DSP to the envelope front and a panel to the envelope flap.

Thank you for stopping by my blog today.  I hope you liked my card and will give it a try. Happy Stamping!!

****************************************************************************************************

If you need any stamping supplies, I’d be very happy to be your Demonstrator. Just click HERE to go directly to my online store or drop me an email if you have any questions. 

MY CURRENT HOST CODE IS: ADFAXYQE

For any orders $50 or more I will send you my monthly class tutorials.  Click HERE or go to my Customer Rewards to see what this months tutorials are.

Click HERE to shop the clearance rack.

Happy Stamping, Karen!

***************************************************************************************************

BONE APPETIT PAPER PUMPKIN

SUBSCRIBE TO PAPER PUMPKIN BY SEPTEMBER 10TH TO GET IN ON THE FUN

Halloween is nearly here, which means that Paper Pumpkin has been busy, busy, busy. We thought you might like “a hand” with their frightful festivities, so we designed September’s kit, Bone Appétit, with them in mind.

This kit includes 20 food-safe treat boxes, a unique and exclusive Halloween stamp set, and a spooky, special-edition box. September’s kit also gives new meaning to the word “handmade.” (Cue the scary laughter!)

This kit includes 20 food-safe treat boxes, a unique and exclusive Halloween stamp set, and a spooky, special-edition box. September’s kit also gives new meaning to the word “handmade.” (Cue the scary laughter!)

September Kit Information:
The September kit makes 20 Halloween-themed, food-safe treat boxes
Coordinating colors: Basic Black, Gorgeous Grape, Pumpkin Pie, and Whisper White
Subscribe for the September kit at paperpumpkin.com from August 11–September 10.
Supplies may be limited toward the end of the subscription period.

If you’re interested in subscribing to Paper Pumpkin, you can either sign up for a subscription where you are billed monthly for your kit or you can purchase a prepaid subscription in my online store. To see more information and to sign up for the monthly subscription, click HERE To see the options for prepaid subscriptions in my online store click HERE

****************************************************************************************************

BUY 3 GET 1 FREE DESIGNER SERIES PAPER IS BACK BY POPULAR DEMAND

SEPTEMBER 4, 2019 THROUGH SEPTEMBER 30, 2019

By popular demand, Stampin’ Up! is bringing back the Designer Series Paper Sale! During September (4TH–30TH), you can buy three packages of select Designer Series Paper, and get one FREE!

Here are the details:

  • Sale Dates:  September 4–30
    • Order Deadline:  September 30, 2019; 11:50 pm (MT)
  • Only Designer Series Papers listed in the table below qualify for this promotion. You may mix and match papers from any of the listed papers.
  • There is no limit to how many times participants can buy three packages of Designer Series Paper, and get one free during this sale.
  • In the online ordering system, when three qualifying Designer Series Paper packs are entered, a prompt to add a free Designer Series Paper will appear.
  • In the online store, if a you order four packages of the same qualifying Designer Series Paper, you will need to enter three together and then order the fourth free item separately.
  • Designer Series Paper ordered as part of a Starter Kit does not qualify for this sale.
  • Designer Series Paper ordered with Stampin’ Rewards does not qualify for this sale.

Here are the Designer Series Paper Packs included in the sale:

ITEM PAGE DESCRIPTION PRICE
149100 166 PERENNIAL ESSENCE DESIGNER SERIES PAPER $11.50
149443 166 SEE A SILHOUETTE DESIGNER SERIES PAPER $11.50
149481 167 COME SAIL AWAY DESIGNER SERIES PAPER $11.50
149484 165 MAGNOLIA LANE DESIGNER SERIES PAPER $11.50
149488 165 GARDEN LANE DESIGNER SERIES PAPER $11.50
149489 165 FOLLOW YOUR ART DESIGNER SERIES PAPER $11.50
149497 165 WOVEN THREADS DESIGNER SERIES PAPER $11.50
149589 166 DINOROAR DESIGNER SERIES PAPER $11.50
149592 166 BIRD BALLAD DESIGNER SERIES PAPER $11.50
149500 167 PRESSED PETALS SPECIALTY DESIGNER SERIES PAPER $14.50


****************************************************************************************************

I have gathered up a lot of retired Stamp Sets, Embossing Folders & Dies  and put a list together for anyone interested.  I have single Stamp Sets along with Stamp Sets bundled with Dies or Punches.  Take a look and see if there is anything that you missed out on getting and would still like.  Click Here to go to my list.

****************************************************************************************************

Card stock cuts for this project:

  • Garden Green Cardstock 8 1/2″ X 5 1/2″ (card base scored and folded at 4 1/4″), 4″ X 5 1/4″ (card front)
  • Pumpkin Pie Cardstock 4 1/8″ X 5 3/8″ (inner liner mat)
  • Very Vanilla Cardstock 4″ X 5 1/4″ (inner liner), 4 1/2″ X 3 1/4″ (artwork), 1/2″ X 2″ (sentiment strip)
  • Regals 6 X 6 Designer Series Paper 3/4″ X 4″ (strip on card front), panel for envelope flap

****************************************************************************************************

Product List

Stampin’ Up Gather Together

Good Tuesday morning my fellow stampers.  How was your Labor Day?  Hope you all had a relaxing day.

For today’s card I used a bundle from the new 2019 Holiday Catalog which goes live TOMORROW!!  Here’s my card.

My card joined in with a few challenges today.  First off is CAS On Sunday challenge #162.  There theme is ‘Use a Stencil’.

Next is Just Add Ink Sketch Challenge #472.  Here is their sketch.

I also joined in with TGIF Product Spotlight Challenge #227.  Here is their spotlight product.

I started by sponging the trees using the Basic Pattern Decorative Masks and Soft Suede Ink on a Whisper White panel with my Stamping Sponges.

I adhered a panel of Come To Gather Designer Series Paper to the stenciled Whisper White panel using Glue Dots.  I cut it even with the card front.  I adhered a panel of Old Olive cardstock over the DSP using Snail and cut it even with the card front.   Using Versamark Ink I stamped the sentiment from the Stampin’ Up Gather Together Photopolymer Stamp Set on the bottom of the Old Olive panel.  I immediately sprinkled it with White Stampin’ Emboss Powder and set it with my Heat Tool.

Using Versamark Ink I stamped the leaf image from the Gather Together stamp set on a Cajun Craze panel. I immediately sprinkled it with Copper Stampin’ Emboss Powder and set it using my Heat Tool. I cut the leaf out using my Gathered Leaves Dies. I adhered the leaf to the card front using Stampin’ Dimensionals.  I adhered the card front to an Old Olive card base using Stampin’ Dimensionals.

On the inside I stamped the sentiment from the Gather Together stamp set in Cajun Craze Ink in the center of a Whisper White panel.  I stamped the pumpkin images from the Gather Together stamp set in Cajun Craze Ink on the bottom of the panel.  I colored the pumpkins in using my Cajun Craze and Pumpkin Pie Stampin’ Blends Markers.  I stamped the wheat image from the Gather Together stamp set in Old Olive Ink on the bottom of the panel.  I adhered the Whisper White panel to a Cajun Craze Mat using Snail and then to the inside of the Old Olive card base using Multipurpose Liquid Glue.

To finish my card I decorated a Medium Wisper White Envelope.  I stamped the leaf image from the Gather Together stamp set in Cajun Craze Ink on the envelope front.  I colored the leaf in using my Cajun Craze Stampin’ Blends Makers.  I adhered a panel of the Come To Gather DSP to the envelope flap.

Thank you for stopping by my blog today.  I hope you liked my card and will give it a try.. Happy Stamping!!

****************************************************************************************************

If you need any stamping supplies, I’d be very happy to be your Demonstrator. Just click HERE to go directly to my online store or drop me an email if you have any questions. 

MY CURRENT HOST CODE IS: ADFAXYQE

For any orders $50 or more I will send you my monthly class tutorials.  Click HERE or go to my Customer Rewards to see what this months tutorials are.

Click HERE to shop the clearance rack.

Happy Stamping, Karen!

***************************************************************************************************

LAST DAY TO GET IN ON MY SHARE

I’m doing a 2019 Holiday Catalog Designer Series Paper share.  Click here for more information and if you’d like to get in on it.

****************************************************************************************************

BONE APPETIT PAPER PUMPKIN

SUBSCRIBE TO PAPER PUMPKIN BY SEPTEMBER 10TH TO GET IN ON THE FUN

Halloween is nearly here, which means that Paper Pumpkin has been busy, busy, busy. We thought you might like “a hand” with their frightful festivities, so we designed September’s kit, Bone Appétit, with them in mind.

This kit includes 20 food-safe treat boxes, a unique and exclusive Halloween stamp set, and a spooky, special-edition box. September’s kit also gives new meaning to the word “handmade.” (Cue the scary laughter!)

This kit includes 20 food-safe treat boxes, a unique and exclusive Halloween stamp set, and a spooky, special-edition box. September’s kit also gives new meaning to the word “handmade.” (Cue the scary laughter!)

September Kit Information:
The September kit makes 20 Halloween-themed, food-safe treat boxes
Coordinating colors: Basic Black, Gorgeous Grape, Pumpkin Pie, and Whisper White
Subscribe for the September kit at paperpumpkin.com from August 11–September 10.
Supplies may be limited toward the end of the subscription period.

If you’re interested in subscribing to Paper Pumpkin, you can either sign up for a subscription where you are billed monthly for your kit or you can purchase a prepaid subscription in my online store. To see more information and to sign up for the monthly subscription, click HERE To see the options for prepaid subscriptions in my online store click HERE

****************************************************************************************************

BUY 3 GET 1 FREE DESIGNER SERIES PAPER IS BACK BY POPULAR DEMAND

SEPTEMBER 4, 2019 THROUGH SEPTEMBER 30, 2019

By popular demand, Stampin’ Up! is bringing back the Designer Series Paper Sale! During September (4TH–30TH), you can buy three packages of select Designer Series Paper, and get one FREE!

Here are the details:

  • Sale Dates:  September 4–30
    • Order Deadline:  September 30, 2019; 11:50 pm (MT)
  • Only Designer Series Papers listed in the table below qualify for this promotion. You may mix and match papers from any of the listed papers.
  • There is no limit to how many times participants can buy three packages of Designer Series Paper, and get one free during this sale.
  • In the online ordering system, when three qualifying Designer Series Paper packs are entered, a prompt to add a free Designer Series Paper will appear.
  • In the online store, if a you order four packages of the same qualifying Designer Series Paper, you will need to enter three together and then order the fourth free item separately.
  • Designer Series Paper ordered as part of a Starter Kit does not qualify for this sale.
  • Designer Series Paper ordered with Stampin’ Rewards does not qualify for this sale.

Here are the Designer Series Paper Packs included in the sale:

ITEM PAGE DESCRIPTION PRICE
149100 166 PERENNIAL ESSENCE DESIGNER SERIES PAPER $11.50
149443 166 SEE A SILHOUETTE DESIGNER SERIES PAPER $11.50
149481 167 COME SAIL AWAY DESIGNER SERIES PAPER $11.50
149484 165 MAGNOLIA LANE DESIGNER SERIES PAPER $11.50
149488 165 GARDEN LANE DESIGNER SERIES PAPER $11.50
149489 165 FOLLOW YOUR ART DESIGNER SERIES PAPER $11.50
149497 165 WOVEN THREADS DESIGNER SERIES PAPER $11.50
149589 166 DINOROAR DESIGNER SERIES PAPER $11.50
149592 166 BIRD BALLAD DESIGNER SERIES PAPER $11.50
149500 167 PRESSED PETALS SPECIALTY DESIGNER SERIES PAPER $14.50

GET YOUR LIST READY TO ORDER ON SEPTEMBER 4TH


****************************************************************************************************

I have gathered up a lot of retired Stamp Sets, Embossing Folders & Dies  and put a list together for anyone interested.  I have single Stamp Sets along with Stamp Sets bundled with Dies or Punches.  Take a look and see if there is anything that you missed out on getting and would still like.  Click Here to go to my list.

****************************************************************************************************

Card stock cuts for this project:

  • Cajun Craze Cardstock 4 1/8″ X 5 3/8″ (card front mat), 4″ X 5 1/4″ (inner liner mat)
  • Old Olive Cardstock 8 1/2″ X 5 1/2″ (card base scored nd folded at 4 1/4″), 3 1/2″ X 3″ (card front)
  • Whisper White Cardstock 4″ X 5 1/4″ (artwork), 3 7/8″ X 5 1/8″ (inner liner)
  • Come To Gather Designer Series Paper 4″ X 4 1/4″ (card front), piece for envelope flap

****************************************************************************************************

Product List

Stampin’ Up New Wonders for Fun Fold Friday

Good Friday morning my fellow stampers and welcome to Fun Fold Friday.  Hope you are all ready for the weekend, it’s suppose to be beautiful weather this weekend here.

I needed a card for a sweet little girls birthday and I though I would try a new fun fold today that I’ve never made before.  I’m really having fun playing around with new folds for my cards.  I hope you are trying them along with me. I thought I would use one of my favorite Host sets for my card which I think is perfect for a little girl.  Here’s my card for today.

The colors for my card were inspired by Fab Friday Challenge #170.  Here are their colors.

I started by adhering a panel of the Bird Ballad Designer Series Paper to the folded side of my Grapefruit Grove card front using Multipurpose Liquid Glue.  I colored a piece of the Silver 3/8″ Metallic Edged Ribbon using my Light Petal Pink Stampin’ Blends Marker.  I wrapped the ribbon around the left side of the card front and tied a bow.

On a small panel of Whisper White cardstock I stamped the fairy image from the Stampin’ Up Host Exclusive New Wonders Cling Stamp Set in Tuxedo Black Memento Ink.  I stamped the sentiment from the Stampin’ Up Magical Mermaid Cling Stamp Set in Blueberry Bushel Ink under the fairy image.  I colored the fairy image in using my Call Me Clover, Crumb Cake, Ivory and Petal Pink Stampin’ Blends Markers.  I adhered the artwork to a Call Me Clover mat using Snail.  I then adhered the matted artwork to the small Grapefruit Grove card front panel using Multipurpose Liquid Glue.  I adhered a few of the Blueberry Bushel Noble Peacock Rhinestones to the artwork along with a Clear Rhinestone Basic Jewel.

On the inside I stamped the sentiments from the Stampin’ Up Itty Bitty Birthdays Cling Stamp Set in Blueberry Bushel Ink to the center of a Whisper White panel.  I stamped another one of the fairy images from the New Wonders stamp set in Tuxedo Black Memento Ink above the sentiment on the Whisper White panel.  I colored the fairy image in using my Crumb Cake, Ivory and Petal Pink Stampin’ Blends Markers.  Now to assemble.  I adhered the 3/4″ folded edge to the back of the Whisper White panel so that the artwork folded over the inside of my card, using Multipurpose Liquid Glue.  I adhered the Whisper White panel to a Call Me Clover mat using Snail and then to the inside of the Grapefruit Grove card base using Multipurpose Liquid Glue.

To finish my card off, I decorated a Medium Whisper White Envelope.  I stamped a fairy image from the New Wonders stamp set in Tuxedo Black Memento Ink on the envelope front and colored it in the same as I did for the card.  I adhered a panel of the Bird Ballad DSP to the envelope flap.

Thank you for stopping by my blog today.  I hope you liked my card and will give it a try.  Happy Stamping!!

****************************************************************************************************

If you need any stamping supplies, I’d be very happy to be your Demonstrator. Just click HERE to go directly to my online store or drop me an email if you have any questions. 

MY CURRENT HOST CODE IS: 66KPP6BN

For any orders $50 or more I will send you my monthly class tutorials.  Click HERE or go to my Customer Rewards to see what this months tutorials are.

Click HERE to shop the clearance rack.

Happy Stamping, Karen!

***************************************************************************************************

I’m doing a 2019 Holiday Catalog Designer Series Paper share.  Click here for more information and if you’d like to get in on it.

****************************************************************************************************

STAMPIN’ UP BONUS DAYS – COUPON REDEMTION GOING ON NOW!!

IF YOU HAVE QUESTIONS ON HOW TO REDEEM THEM, PLEASE CONTACT ME.

****************************************************************************************************

EXTRA, EXTRA!!  JOINING PROMOTION JULY 1, 2019 – AUGUST 31, 2019

From July 1 until August 31, new demonstrators will receive an additional $30 to put toward bonus products in their Starter Kit (for a total of $155 in merchandise for $99)!!  THEN, they’ll receive a $10 coupon code the following month.  Are you interested?  Keep reading to learn more!

Dates:  July 1 – August 31 at 11:50 PM MT

Details:

  • The bonus at initial sign up allows demonstrators to pick $30 more than usual.  You will pay $99 to sign up and choose $155 worth of Stampin’ Up! products in your Starter Kit.
  • Coupon codes will be sent between the fifth and seventh business day of the following month the new demonstrator signs up.
  • The email address listed in a new demonstrator’s profile will be used to send the $10 coupon code.
  • Coupon codes may be redeemed only once.
  • Coupon codes expire October 31, 2019; after this date, they will no longer be valid.
  • New demonstrators who submit their Independent Demonstrator Agreement (IDA) before July 1 or after August 31 will not be eligible for this promotion.

If you’ve ever considered purchasing that Starter Kit, now is a great time!  We’d love to have you join and get that discount for yourself or start your own business!!

If you are interested in joining my team click HERE for details or email me.  I’d love to have you on my team.

***************************************************************************************************

BONE APPETIT PAPER PUMPKIN

SUBSCRIBE TO PAPER PUMPKIN BY SEPTEMBER 10TH TO GET IN ON THE FUN

Halloween is nearly here, which means that Paper Pumpkin has been busy, busy, busy. We thought you might like “a hand” with their frightful festivities, so we designed September’s kit, Bone Appétit, with them in mind.

This kit includes 20 food-safe treat boxes, a unique and exclusive Halloween stamp set, and a spooky, special-edition box. September’s kit also gives new meaning to the word “handmade.” (Cue the scary laughter!)

This kit includes 20 food-safe treat boxes, a unique and exclusive Halloween stamp set, and a spooky, special-edition box. September’s kit also gives new meaning to the word “handmade.” (Cue the scary laughter!)

September Kit Information:
The September kit makes 20 Halloween-themed, food-safe treat boxes
Coordinating colors: Basic Black, Gorgeous Grape, Pumpkin Pie, and Whisper White
Subscribe for the September kit at paperpumpkin.com from August 11–September 10.
Supplies may be limited toward the end of the subscription period.

If you’re interested in subscribing to Paper Pumpkin, you can either sign up for a subscription where you are billed monthly for your kit or you can purchase a prepaid subscription in my online store. To see more information and to sign up for the monthly subscription, click HERE To see the options for prepaid subscriptions in my online store click HERE

****************************************************************************************************

I have gathered up a lot of retired Stamp Sets, Embossing Folders & Dies  and put a list together for anyone interested.  I have single Stamp Sets along with Stamp Sets bundled with Dies or Punches.  Take a look and see if there is anything that you missed out on getting and would still like.  Click Here to go to my list.

****************************************************************************************************

Card stock cuts for this project:

  • Call Me Clover Cardstock 4 1/8″ X 5 3/8″ (Inner liner mat), 3 3/8″ X 2 5/8″ (artwork mat)
  • Grapefruit Grove Cardstock 5 1/2″ X 7″ (card base scored and folded at 4 1/4″), 3 1/2″ X 3 1/2″ (small card front scored and folded at 3/4″)
  • Whisper White Cardstock 4″ X 5 1/4″ (inner liner), 3 1/4″ X 2 1/2″(artwork)
  • Bird Ballad Designer Series Paper 2 5/8″ X 5 3/8″ (small panel card front)

****************************************************************************************************

Product List

Stampin’ Up Seasonal Wreaths Sneak Peek Birthday Card

Good Thursday morning my fellow stampers.  The weekend is just about here.  Is anyone starting to make plans?  I’ll be working all weekend, but today I’ll be having fun walking around the Philadelphia Zoo.  Hopefully it won’t be too hot for the animals to be out.

For today’s card I used a new set in the up coming 2019 Holiday Catalog.  Take a look.

My colors were inspired by The Color Throwdown Challenge #557.  Here are their colors.

My sketch is from the Freshly Made Sketches Challenge #400.  Here is their sketch.

I started by embossing a Highland Heather card front using the Country Floral 3D Embossing Folder.  I adhered the embossed panel to a Highland Heather card front using Multipurpose Liquid Glue.

On a small panel of Whisper White cardstock I stamped the floral image from the Stampin’ Up Seasonal Wreaths Photopolymer Stamp Set twice in Tuxedo Black Memento Ink.  I colored the image in using my Balmy Blue, Bermuda Bay, Highland Heather and So Saffron Stampin’ Blends Markers.  I cut the image out using the Stitched Rectangle Dies and adhered it to a Whisper White mat using Snail.  Using the next size up Stitched Rectangle Die I cut a piece of So Saffron Subtle 6″ X 6″ Designer Series Paper and adhered it onto a So Saffron mat using Snail.  I adhered the artwork to the top of the matted DSP hanging off the right side using Snail and then adhered it to my card front using Stampin’ Dimensionals.

On a small piece of Whisper White cardstock I stamped the sentiment from the Seasonal Wreaths stamp set in Balmy Blue Ink.  I cut the sentiment out using the oval from my Stitched Shapes Dies.  I cut the scalloped Balmy Blue mat out using my Layering Ovals Dies and adhered the sentiment to the mat using Snail.  I adhered the matted sentiment to the card front using Stampin’ Dimensionals and a Glue Dot.  I added a few Pearl Basic Jewels to the card front.

On the inside I stamped the sentiment from the Seasonal Wreaths stamp set in Balmy Blue Ink in the center of a Whisper White panel.  I stamped the larger floral image from the Seasonal Wreaths stamp set in Tuxedo Black Memento Ink in the 2 corners.  I stamped the smaller flower from the Seasonal Wreaths stamp set in Tuxedo Black Memento Ink on either side of the sentiment.  I colored all the flowers in using my Balmy Blue, Bermuda Bay, Highland Heather and So Saffron Stampin’ Blends Markers.  I adhered the Whisper White panel to a So Saffron mat using Snail and then to the inside of my Highland Heather card base using Multipurpose Liquid Glue.

To finish my card I decorated a Medium Whisper White Envelope.  I stamped the floral image from the Seasonal Wreaths stamp set in Tuxedo Black Memento Ink on the envelope front and colored it in the same as I did for my card.  I adhered a panel of the So Saffron Subtle 6″ X 6″ DSP to the envelope flap.

Thank you for visiting my blog today.  I hope you liked my card.  This stamp set will be available on September 4th for purchase.

Happy Stamping!!

****************************************************************************************************

If you need any stamping supplies, I’d be very happy to be your Demonstrator. Just click HERE to go directly to my online store or drop me an email if you have any questions. 

MY CURRENT HOST CODE IS: 66KPP6BN

For any orders $50 or more I will send you my monthly class tutorials.  Click HERE or go to my Customer Rewards to see what this months tutorials are.

Click HERE to shop the clearance rack.

Happy Stamping, Karen!

***************************************************************************************************

I’m doing a 2019 Holiday Catalog Designer Series Paper share.  Click here for more information and if you’d like to get in on it.

****************************************************************************************************

STAMPIN’ UP BONUS DAYS – COUPON REDEMTION GOING ON NOW!!

IF YOU HAVE QUESTIONS ON HOW TO REDEEM THEM, PLEASE CONTACT ME.

****************************************************************************************************

EXTRA, EXTRA!!  JOINING PROMOTION JULY 1, 2019 – AUGUST 31, 2019

From July 1 until August 31, new demonstrators will receive an additional $30 to put toward bonus products in their Starter Kit (for a total of $155 in merchandise for $99)!!  THEN, they’ll receive a $10 coupon code the following month.  Are you interested?  Keep reading to learn more!

Dates:  July 1 – August 31 at 11:50 PM MT

Details:

  • The bonus at initial sign up allows demonstrators to pick $30 more than usual.  You will pay $99 to sign up and choose $155 worth of Stampin’ Up! products in your Starter Kit.
  • Coupon codes will be sent between the fifth and seventh business day of the following month the new demonstrator signs up.
  • The email address listed in a new demonstrator’s profile will be used to send the $10 coupon code.
  • Coupon codes may be redeemed only once.
  • Coupon codes expire October 31, 2019; after this date, they will no longer be valid.
  • New demonstrators who submit their Independent Demonstrator Agreement (IDA) before July 1 or after August 31 will not be eligible for this promotion.

If you’ve ever considered purchasing that Starter Kit, now is a great time!  We’d love to have you join and get that discount for yourself or start your own business!!

If you are interested in joining my team click HERE for details or email me.  I’d love to have you on my team.

***************************************************************************************************

BONE APPETIT PAPER PUMPKIN

SUBSCRIBE TO PAPER PUMPKIN BY SEPTEMBER 10TH TO GET IN ON THE FUN

Halloween is nearly here, which means that Paper Pumpkin has been busy, busy, busy. We thought you might like “a hand” with their frightful festivities, so we designed September’s kit, Bone Appétit, with them in mind.

This kit includes 20 food-safe treat boxes, a unique and exclusive Halloween stamp set, and a spooky, special-edition box. September’s kit also gives new meaning to the word “handmade.” (Cue the scary laughter!)

This kit includes 20 food-safe treat boxes, a unique and exclusive Halloween stamp set, and a spooky, special-edition box. September’s kit also gives new meaning to the word “handmade.” (Cue the scary laughter!)

September Kit Information:
The September kit makes 20 Halloween-themed, food-safe treat boxes
Coordinating colors: Basic Black, Gorgeous Grape, Pumpkin Pie, and Whisper White
Subscribe for the September kit at paperpumpkin.com from August 11–September 10.
Supplies may be limited toward the end of the subscription period.

If you’re interested in subscribing to Paper Pumpkin, you can either sign up for a subscription where you are billed monthly for your kit or you can purchase a prepaid subscription in my online store. To see more information and to sign up for the monthly subscription, click HERE To see the options for prepaid subscriptions in my online store click HERE

****************************************************************************************************

I have gathered up a lot of retired Stamp Sets, Embossing Folders & Dies  and put a list together for anyone interested.  I have single Stamp Sets along with Stamp Sets bundled with Dies or Punches.  Take a look and see if there is anything that you missed out on getting and would still like.  Click Here to go to my list.

****************************************************************************************************

Card stock cuts for this project:

  • Balmy Blue Cardstock 2″ X 3″ (scalloped oval sentiment mat)
  • Highland Heather Cardstock 4 1/4″ X 11″ (card base scored and folded at 5 1/2″), 4 1/8″ X 5 3/8″ (card front)
  • So Saffron Cardstock 3 13/16″ X 1 13/16″ (card front DSP mat), 4″ X 5 1/4″ (inner liner mat)
  • Whisper White Cardstock 3 3/8″ X 1 3/8″ (artwork mat), 2″ X 3″ (sentiment), 4″ X 2″ (artwork)
  • Subtle 6″ X 6″ Designer Series Paper 2″ X 4″ (card front stitched rectangle), piece for envelope flap

****************************************************************************************************

Product List

Stampin’ Up Happy Tails Pet Sympathy Card

Good Monday morning my fellow stampers.  How was everyone’s weekend?  Anyone do anything fun?  I worked, but not my normal job.  I got to work at the Hungry Hound Dog Bakery we have here in town.  It’s so much fun working there, the puppies come in to visit and spend their money on treats and toys.  We bake all our own treats on the premises and they are delicious, I’ve tried quite a few.  They are all made with human edible products that are animal safe.

My card for today is NOT one I like to make.  My daughter’s best friend’s dog died last week.  It was a sudden thing, she wasn’t even sick and so very sad.  Her dog was the only dog my dog would tolerate staying in the same room with.  My dog is petrified of other dogs since she was attached when by one when she was a little puppy.  She doesn’t mind them through a fence, that she likes.  We are all going to miss JJ tremendously.   Here’s my card for today.

My card played along with CAS Colours & Sketches Challenge #334.  Here is their sketch.

My colors were inspired by Hand Stamped Sentiments Challenge #321.  Here are their colors.  Aren’t they gorgeous together.

I started by adhering a panel of the Come To Gather Designer Series Paper to a Pretty Peacock mat using Snail.  I adhered the card front to a Soft Suede card base using Stampin’ Dimensionals.

I stamped the dog image from the Happy Tails Photopolymer Stamp Set on a scrap of Whisper White cardstock in Soft Suede Ink and colored her in using my Light Soft Suede Stampin’ Blends Marker.  I punched the dog out using my Dog Builder Punch.

On a small panel of Whisper White cardstock I stamped the outline image of the dog house from the Happy Tails stamp set in Cherry Cobbler Ink.  I stamped the 2nd step of the dog house from the Happy Tails stamp set in Cherry Cobbler Ink, stamping off once, on top of the 1st one.  I adhered the Whisper White panel to a Pretty Peacock mat using Snail.  I adhered the punched out dog to the Whisper White panel using Stampin’ Dimensionals.  I colored the heart, which punched out when I punched the dog out, with my Dark Cherry Cobbler Stampin’ Blends Marker and adhered it to the dog using a Glue Dog.  I adhered the artwork to the card front using Multipurpose Liquid Glue.  I stamped the sentiment from the Happy Tails stamp set on a thin strip of Whisper White cardstock in Cherry Cobbler Ink.  I stamped the pawprints from the Happy Tails stamp set on either side of the sentiment in Soft Suede Ink.  I adhered the sentiment strip to a Pretty Peacock mat using Snail and then to the card front using Stampin’ Dimensionals and a Glue Dot.

On the inside I stamped the sentiment from Happy Tails stamp set in Cherry Cobbler Ink in the center of a Whisper Whist panel.  I stamped the paw print image from the Happy Tails stamp set in Soft Suede Ink on the bottom left of the panel.  I adhered the Whisper White panel to a Pretty Peacock mat using Snail and then to the inside of my Soft Suede card base using Multipurpose Liquid Glue.

To finish my card I decorated a Medium Whisper White Envelope.  I stamped the dog image from the Happy Tails stamp set in Soft Suede Ink on the front of the envelope and colored it in the same as I did for the card.  I stamped the paw print image from the Happy Tails stamp set in Soft Suede Ink on the envelope front too.  I adhered a panel of Come To Gather DSP to the envelope flap.

Thank you for visiting my blog today.  I hope you liked my card and will give it a try.  Happy Stamping!!

****************************************************************************************************

If you need any stamping supplies, I’d be very happy to be your Demonstrator. Just click HERE to go directly to my online store or drop me an email if you have any questions. 

MY CURRENT HOST CODE IS: 66KPP6BN

For any orders $50 or more I will send you my monthly class tutorials.  Click HERE or go to my Customer Rewards to see what this months tutorials are.

Click HERE to shop the clearance rack.

Happy Stamping, Karen!

***************************************************************************************************

I’m doing a 2019 Holiday Catalog Designer Series Paper share.  Click here for more information and to join in.

****************************************************************************************************

STAMPIN’ UP BONUS DAYS – COUPON REDEMTION GOING ON NOW!!

IF YOU HAVE QUESTIONS ON HOW TO REDEEM THEM, PLEASE CONTACT ME.

****************************************************************************************************

EXTRA, EXTRA!!  JOINING PROMOTION JULY 1, 2019 – AUGUST 31, 2019

From July 1 until August 31, new demonstrators will receive an additional $30 to put toward bonus products in their Starter Kit (for a total of $155 in merchandise for $99)!!  THEN, they’ll receive a $10 coupon code the following month.  Are you interested?  Keep reading to learn more!

Dates:  July 1 – August 31 at 11:50 PM MT

Details:

  • The bonus at initial sign up allows demonstrators to pick $30 more than usual.  You will pay $99 to sign up and choose $155 worth of Stampin’ Up! products in your Starter Kit.
  • Coupon codes will be sent between the fifth and seventh business day of the following month the new demonstrator signs up.
  • The email address listed in a new demonstrator’s profile will be used to send the $10 coupon code.
  • Coupon codes may be redeemed only once.
  • Coupon codes expire October 31, 2019; after this date, they will no longer be valid.
  • New demonstrators who submit their Independent Demonstrator Agreement (IDA) before July 1 or after August 31 will not be eligible for this promotion.

If you’ve ever considered purchasing that Starter Kit, now is a great time!  We’d love to have you join and get that discount for yourself or start your own business!!

If you are interested in joining my team click HERE for details or email me.  I’d love to have you on my team.

***************************************************************************************************

BONE APPETIT PAPER PUMPKIN

SUBSCRIBE TO PAPER PUMPKIN BY SEPTEMBER 10TH TO GET IN ON THE FUN

Halloween is nearly here, which means that Paper Pumpkin has been busy, busy, busy. We thought you might like “a hand” with their frightful festivities, so we designed September’s kit, Bone Appétit, with them in mind.

This kit includes 20 food-safe treat boxes, a unique and exclusive Halloween stamp set, and a spooky, special-edition box. September’s kit also gives new meaning to the word “handmade.” (Cue the scary laughter!)

This kit includes 20 food-safe treat boxes, a unique and exclusive Halloween stamp set, and a spooky, special-edition box. September’s kit also gives new meaning to the word “handmade.” (Cue the scary laughter!)

September Kit Information:
The September kit makes 20 Halloween-themed, food-safe treat boxes
Coordinating colors: Basic Black, Gorgeous Grape, Pumpkin Pie, and Whisper White
Subscribe for the September kit at paperpumpkin.com from August 11–September 10.
Supplies may be limited toward the end of the subscription period.

If you’re interested in subscribing to Paper Pumpkin, you can either sign up for a subscription where you are billed monthly for your kit or you can purchase a prepaid subscription in my online store. To see more information and to sign up for the monthly subscription, click HERE To see the options for prepaid subscriptions in my online store click HERE

****************************************************************************************************

I have gathered up a lot of retired Stamp Sets, Embossing Folders & Dies  and put a list together for anyone interested.  I have single Stamp Sets along with Stamp Sets bundled with Dies or Punches.  Take a look and see if there is anything that you missed out on getting and would still like.  Click Here to go to my list.

****************************************************************************************************

Card stock cuts for this project:

  • Pretty Peacock Cardstock 4 1/8″ X 5 3/8″ (card front mat), 3 1/8″ X 2 5/8″ (artwork mat), 4″ X 5 1/4″ (inner liner mat)
  • Soft Suede Cardstock 8 1/2″ X 5 1/2″ (card base scored and folded at 4 1/4″)
  • Whisper White Cardstock 3″ X 2 1/2″ (artwork), 3 3/4″ X 5″ (inner liner)
  • Come To Gather Designer Series Paper 4″ X 5 1/4″ (card front) piece for envelope

****************************************************************************************************

Product List

Stampin’ Up Floral Essence Swirly Frames Birthday Card

Good Thursday morning my fellow stampers.  How is everyone doing today? Hope everyone’s week is moving along smoothly.

I have a pretty easy card for you today, though it does look a little involved, it’s not.  I’ve used a few different stamp sets for you today.  Here’s my card.

To my surprise, my card played along with a few different challenges today.  First off is TGIF Sketch Challenge #224.  Here is their sketch.

Next is Inspire. Create Colour Challenge #049.  Here are their colors.

I was also able to join in with “Just Us Girls” Trend Week Challenge #500.  Here is their theme.

I started by adhering the small Whisper White panel to the Pool Party card front with the tiniest amount of Snail just to hold it in place.  I then randomly stamped the large and small circle images from the Stampin’ Up Swirly Frames Photopolymer Stamp Set in Basic Gray Ink on the 2 panels overlapping some of the circles.  I adhered the Whisper White panel to a Basic Gray mat using Snail.  I then adhered the matted panel to the card front using Multipurpose Liquid glue matching the circles.

On a scrap of Mango Melody cardstock I stamped the flower image from the Stampin’ Up Floral Essence Photopolymer Stamp Set in Mango Melody Ink twice.  I punched the flowers out using the Perennial Flower Punch.  I adhered the flowers together using a Glue Dot and adhered it to the artwork panel using a Stampin’ Dimensional.  I stamped the leaf image from the Floral Essence stamp set 3 times in Pool Party Ink on a scrap of Pool Party cardstock and punched them out using the Leaf Punch.  I adhered the leaves under the flower using Glue Dots.

On a small strip of Whisper White cardstock I stamped the sentiment from the Stampin’ Up Itty Bitty Birthdays Stamp Set in Basic Gray Ink.  I adhered the sentiment strip to a Basic Gray mat using Snail.  I adhered the sentiment to the card front using Stampin’ Dimensionals.  I adhered the card front to a Basic Gray card base using Stampin’ Dimensionals.  I colored a few Clear Rhinestone Basic Jewels using my Mango Melody Stampin’ Blends Markers.  I adhered the colored rhinestones to the card front.

On the inside I stamped another flower image from the Floral Essence stamp set in Basic Gray Ink on the top and bottom of a Whisper White panel.  I stamped the leaf image from the Floral Essence stamp set in Pool Party Ink around the flowers.  I colored the flowers in using my Mango Melody Stampin’ Blends Markers.  I stamped the inside of the flowers with the flower center image from the Floral Essence stamp set in Basic Gray Ink stamping off once.  I stamped the sentiment from the Floral Essence stamp set in Basic Gray Ink in the center of the panel.  I adhered the Whisper White panel to the inside of the Basic Gray card base using Multipurpose Liquid Glue.

To finish my card I decorated a Medium Whisper White Envelope.  I stamped the flower image from the Floral Essence stamp set in Basic Gray Ink on the envelope front.  I stamped the leaves from the Floral Essence stamp set in Pool Party Ink around the flowers.  I colored the flowers in the same as I did for the card.  I stamped the small circle image from the Swirly Frames stamp set in Basic Gray Ink on the envelope flap.

Thank you for stopping by my blog today.  I hope you liked my card and will give it a try. Happy Stamping!!

****************************************************************************************************

If you need any stamping supplies, I’d be very happy to be your Demonstrator. Just click HERE to go directly to my online store or drop me an email if you have any questions. 

MY CURRENT HOST CODE IS: 66KPP6BN

For any orders $50 or more I will send you my monthly class tutorials.  Click HERE or go to my Customer Rewards to see what this months tutorials are.

Click HERE to shop the clearance rack.

Happy Stamping, Karen!

***************************************************************************************************

I’m doing a 2019 Holiday Catalog Designer Series Paper share.  Click here for more information.

****************************************************************************************************

STAMPIN’ UP BONUS DAYS – COUPON REDEMTION GOING ON NOW!!

IF YOU HAVE QUESTIONS ON HOW TO REDEEM THEM, PLEASE CONTACT ME.

****************************************************************************************************

EXTRA, EXTRA!!  JOINING PROMOTION JULY 1, 2019 – AUGUST 31, 2019

From July 1 until August 31, new demonstrators will receive an additional $30 to put toward bonus products in their Starter Kit (for a total of $155 in merchandise for $99)!!  THEN, they’ll receive a $10 coupon code the following month.  Are you interested?  Keep reading to learn more!

Dates:  July 1 – August 31 at 11:50 PM MT

Details:

  • The bonus at initial sign up allows demonstrators to pick $30 more than usual.  You will pay $99 to sign up and choose $155 worth of Stampin’ Up! products in your Starter Kit.
  • Coupon codes will be sent between the fifth and seventh business day of the following month the new demonstrator signs up.
  • The email address listed in a new demonstrator’s profile will be used to send the $10 coupon code.
  • Coupon codes may be redeemed only once.
  • Coupon codes expire October 31, 2019; after this date, they will no longer be valid.
  • New demonstrators who submit their Independent Demonstrator Agreement (IDA) before July 1 or after August 31 will not be eligible for this promotion.

If you’ve ever considered purchasing that Starter Kit, now is a great time!  We’d love to have you join and get that discount for yourself or start your own business!!

If you are interested in joining my team click HERE for details or email me.  I’d love to have you on my team.

****************************************************************************************************

I have gathered up a lot of retired Stamp Sets, Embossing Folders & Dies  and put a list together for anyone interested.  I have single Stamp Sets along with Stamp Sets bundled with Dies or Punches.  Take a look and see if there is anything that you missed out on getting and would still like.  Click Here to go to my list.

****************************************************************************************************

Card stock cuts for this project:

  • Basic GrayCardstock 8 1/2″ X 5 1/2″ (card base scored and folded at 4 1/4″), 2 3/8″ X 3 3/4″ (artwork mat), 1/2″ X 2″ (sentiment mat)
  • Mango Melody Cardstock scraps for flowers
  • Pool Party Cardstock 4 1/8″ X 5 3/8″ (card front), scraps for leaves
  • Whisper White Cardstock 2 1/4″ X 3 1/2″ (artwork), 11 7/8″ X 7/16″ (sentiment strip), 4″ X 5 1/4″ (inner liner)

****************************************************************************************************

Product List