Stampin’ Up! Poinsettia Petals CAS

Good Monday morning my fellow stampers.  I hope you all have the day off for Labor Day.  I will decide by noon if I am going to go into work or not.  My boss is going to text me when he goes in so I can meet him if I decide to work.  Is anyone doing anything fun today?  Anyone going to or having a picnic?  Even though summer still has a few weeks left, this seems like the end of summer to me.  I do like autumn, but I love the summer months where our days seem longer and it stays light outside later.

For today I have a clean & simple Christmas card for you.  Here’s my card.

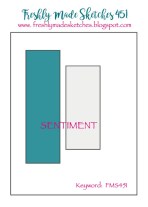
My design is from Freshly Made Sketches #451.  Here is their sketch.
I started by adhering a panel of Plush Poinsettia Specialty Paper to a Thick Very Vanilla card base using Stampin’ Seal.

I cut 2 panels of Poinsettia Place Designer Series Paper using the Stitched Rectangle Dies.  I adhered them to Soft Suede mats using Stampin’ Seal and then to the card front using Multipurpose Liquid Glue.
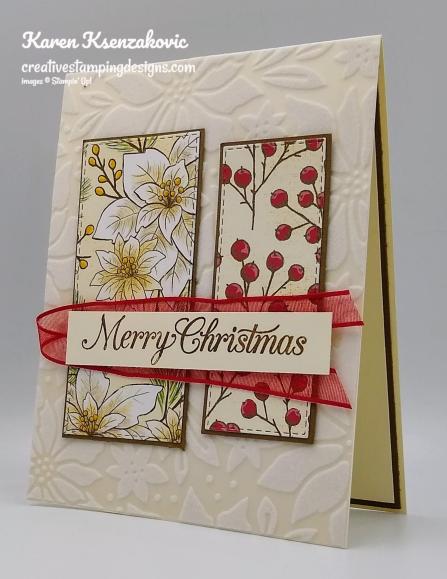
I stamped the sentiment from the Stampin’ Up! Poinsettia Petals Photopolymer Stamp Set in Soft Suede Ink on a strip of Very Vanilla cardstock.  I adhered a piece of Real Red 3/8″ Sheer Ribbon using a couple Glue Dots and adhered the sentiment on top of the ribbon using Stampin’ Dimensionals.

On the inside I stamped the sentiment from the Poinsettia Petals stamp set in Soft Suede Ink in the center of a Very Vanilla panel.  I stamped the flower image from the Poinsettia Petals stamp set on the top and bottom corners of the panel in Soft Suede Ink, stamped off once.  I adhered the Very Vanilla panel to a Soft Suede mat using Stampin’ Seal and then to the inside of the Thick Very Vanilla card base using Multipurpose Liquid Glue.
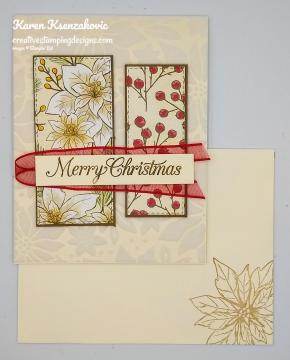
To finish my card I decorated a Medium Very Vanilla Envelope.  I stamped the flower image from the Poinsettia Petals stamp set in Soft Suede Ink, stamping off once, on the envelope front.  I adhered a panel of Poinsettia Place DSP to the envelope flap.

Thank you for stopping by my blog today.  I hope you liked my card and will give it a try. Happy Stamping!!

****************************************************************************************************

If you need any stamping supplies, I’d love to be your Demonstrator. Just click HERE to go directly to my online store or drop me an email if you have any questions. 

MY CURRENT HOST CODE IS: G39RYMEX

Use this host code when you order $50 or greater and receive a free gift from me! If your order is over $150, please do not use this code, but you’ll still get the free gift. The free gift is your choice of any 1 item valued up to $10.00 in the 2020-2021 Annual Catalog!   For any orders $50 or more I will also send you my monthly class tutorials.  Click HERE or go to my Customer Rewards for more details and to see what this months tutorials are.

 Click HERE to shop the clearance rack.

Happy Stamping, Karen!

****************************************************************************************************

STAMPIN’ UP! CLEARANCE RACK HAS BEEN UPDATED!!!

Stampin’ Up! has updated the Clearance Rack with lot of new items!   Head over there  quickly to get your hands on some great deals.  But hurry!!  Clearance Rack deals are only while supplies last!

I saw some retired In Color Card Stock and accessories, lots of pretty designer papers and embellishments and punches too!

Click HERE to head over to my Online Store to start shopping.

****************************************************************************************************
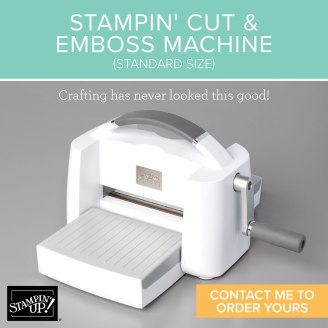
The Stampin’ Cut & Emboss Machine (Standard Size) is now available for you to order!!!
Here are the details:

The standard machine comes with all the plates you need to get started. The preorder will not include the replacement plates, but they will be available beginning with the customer launch on September 1.

Note that the Cutting Plates and Adhesive Sheets are already available to order. The optional Impression Mats are not be available; I’ll keep you updated on their availability.

So what sets our machines apart from the rest? Here are some of our favorite features:

  • Durable machines with high-quality results. The solid steel construction frame and rubber feet that securely grip the work surface produce crisp, clean, precise cutting and beautifully detailed embossing.
  • Easy to use. The machines and tools are designed for an intuitive die-cutting and embossing experience. For example, all plates are labeled with a number and are color coded for easy reference and use when building your sandwich. And just like the name suggests, our Magnetic Cutting Plates have fully-magnetic surfaces to make it easy to securely position your dies and keep them in place.
  • Simple to store. The platforms on both machines fold for space-saving storage and they look pretty too–the sleek, clean design suits any crafting space.
  • Portable. You can use both machines at home or on the go with their folding platforms and ergonomic carrying handles.

****************************************************************************************************

Stampin’ Up! Get & Go Starter Kit Promotion – Sept 1-30!

Have you thought about joining our Stampin’ Up! team?

Now is an awesome time to join.
The Get & Go Starter Kit promotion gives those who sign up to be a Stampin’ Up! demonstrator additional products to help get started right away!  In addition to the already great valued Starter Kit, you will receive precut paper, stamps, and embellishments!

Here are the details:

  • Promotion Dates: September 1–30, 2020
    Joining Deadline:  September 30, 2020; 11:50 PM (MT)
  • New demonstrators who submit their Independent Demonstrator Agreement (IDA) before 1 September or after 30 September will not be eligible for this promotion.
  • In addition to the regular starter kit (for $99 you choose $125 worth of products), if you join between September 1 and 30, you will also receive enough card stock pieces to make 16 cards, a pack of Rhinestone Basic Jewels, the So Much Love stamp set, and the Queen Anne’s Lace stamp set!!
    • 8 packs of precut card stock of the coastal cabana pack will be provided, and 8 packs of precut card stock of the Granny Apple Green pack, for a total of 16 cards (packs include envelopes).
  • Important note: Ink, adhesive, cutting tool, and clear block for stamping must be purchased separately. However, these products may be included as part of the Starter Kit product selection.

This is such a great deal!  For $99, you get to pick $125 merchandise of your choice for your Starter Kit plus you’ll get the Queen Annes’ Lace and So Much Love stamp sets, card kits to create 16 cards and a pack of Rhinestones for free!!

Drop me a note at creativestampingdesigns@gmail.com if you have questions about joining, I’m happy to talk to you about it.  You can also see more information about the benefits of becoming a Stampin’ Up! Demonstrator Here

****************************************************************************************************

HELLO, PUMPKIN

SUBSCRIBE AUTUST 11 – SEPTEMBER 10
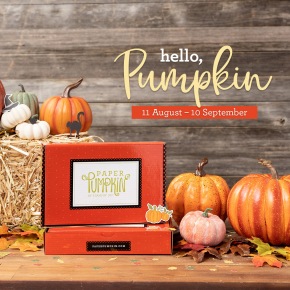
As the autumn season approaches, prepare to celebrate with the September Paper Pumpkin Kit! There’s so much to love about fall—some love the haunts of Halloween, many love the time to give thanks, and others love the changing colors and cooler temperatures. Whatever you love most about fall, September’s kit has everything you need to celebrate the season your way! Between a multi-occasion stamp set and enough supplies to design 20 cracker box treat packages, you can create custom fall crafts to celebrate Halloween, Thanksgiving, pumpkins, and leaves. Whether you make them all the same or mix ‘n’ match your crafts, there’s something for everyone in this kit!

September’s kit is a must-have for those who love to celebrate all things spooky. But, for those who don’t enjoy the Halloween haunts, the multi-occasion stamp set combined with a variety of die-cut and reversible paper pieces offers many ways to customize your fall crafts!

  • Kit contains enough supplies to create 20 cracker box treat packages.
  • Each cracker box treat package can be customized to celebrate Halloween, Thanksgiving, the autumn season, or all three!
  • Coordinating Colors: Bumblebee, Basic Black, Cajun Craze, Cinnamon Cider, Mossy Meadow, Old Olive, Pumpkin Pie, white

Subscribe to the September 2020 Paper Pumpkin Kit from 11 August to 10 September at paperpumpkin.com!

Note: Supplies may be limited toward the end of the subscription period.

****************************************************************************************************

I’m cleaning my shelves and drawers out to make room for lots of new goodie.  I have my list right HERE and I’m trying to keep it up to date.   Check it out and let me know if there is anything you’d like to get.  If you are looking for something and don’t see it on the list, drop me a line and I will look through my stash to see if I missed it.  I have lots of older DSP too that I don’t have listed if there is any that you are looking for.

****************************************************************************************************

Card stock cuts for this project:

  • Soft Suede Cardstock 1 3/4″ X 3 3/4″ & 1 3/8″ X 3 3/8″ (dsp card front panel mats), 4 1/8″ X 5 3/8″ (inner liner mat)
  • Very Vanilla Cardstock 5/8″ X 3 1/2″ (sentiment), 4″ X 5 1/4″ (inner liner)
  • Thick Very Vanilla Cardstock 4 1/4″ X 11″ (card base scored and folded at 5 1/2″)
  • Plush Poinsettia Specialty Paper 4 1/4″ X 5 1/2″ (card front)
  • Poinsettia Place Designer Series Paper 1 3/4″ X 3 1/2″ & 2″ X 4″ (stitched rectangles), 2 1/4″ X 6″ (piece for envelope flap)

****************************************************************************************************

Product List

Stampin’ Up! Celebration Tidings Haunted Birthday

Good Sunday morning my fellow stampers.  How is everyone’s weekend going?  It was a gorgeous 55 degrees when I awoke this morning, but it was still dark out 😦  I have the windows open, the attic fan on and it is absolutely beautiful sunny day outside.   Yesterday I went to the farm to pick sunflowers, they neglected to tell us that there were no more to pick when we asked.  Instead I picked some Cockscomb, Zinnias and tomatoes.  I also came home with  a big bag full of basil that I spent a couple hours making pesto and freezing the containers.  I think I’m set for just a little while now.  Whatever basil grows now in my pots I will make pesto and use it, seems my family really likes it.

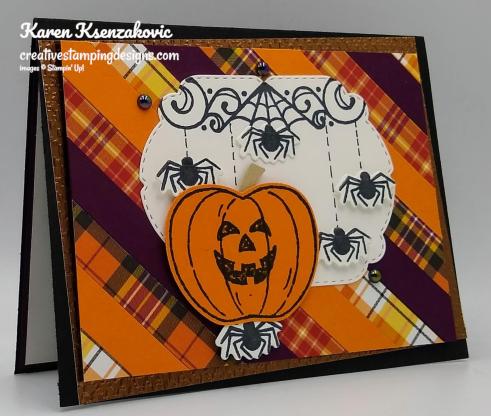
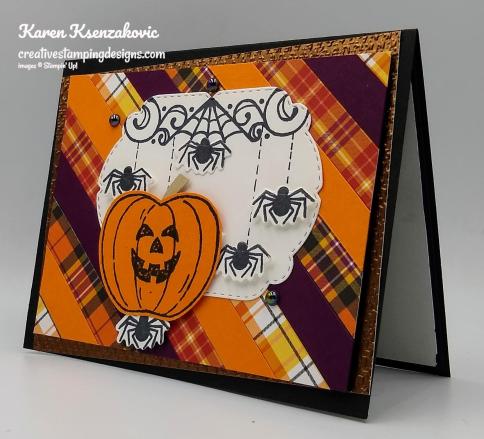
For today’s card it might look like a Halloween card, but it’s actually a birthday card.  My nieces husband loves Halloween and she wanted me to make him a birthday card.  They go all out with decorating for Halloween like I do for Christmas.  Here’s today’s card.

I had a lot of scraps of my Plaid Tidings 6 X 6 Designer Series Paper so I decided to put it on a card.  I cut 1/2″ strips of the DSP, Blackberry Bliss cardstock and Pumpkin Pie cardstock.  I adhered the strips to a Basic Black panel using Stamp[in’ Seal.  Once all the strips were adhered, I cut the panel down to a 3 3/4″ X 5″ panel.

I stamped the large pumpkin image from the Stampin’ Up! Harvest Hellos Cling Stamp Set in Tuxedo Black Memento Ink on a panel of Pumpkin Pie cardstock.  I stamped the face in the center of the pumpkin and punched it out using my Apple Builder Punch.  I cut the stem out of a scrap of Crumb Cake cardstock.

On a panel of Whisper White cardstock I stamped the spider web image from the Stampn’ Up! Celebration Tidings Photopolymer Stamp Set in Tuxedo Black Memento Ink.  I cut the image out using the Celebration Labels Dies.  On the same panel, I stamped multiple of the spider image from the Celebration Tidings stamp set in Tuxedo Black Memento Ink and cut them out using the Celebration Labels Dies.  I drew lines coming down from the spider web using my Basic Black Stampin’ Write Marker then adhered the label to the card front using Multipurpose Liquid Glue.  I adhered the pumpkin to the label using Stampin’ Dimensionals and all the spiders using Mini Stampin’ Dimensionals.  I embossed a panel of the Copper Brushed Metallic cardstock using the  Tasteful Textiles 3D Embossing Folder and adhered it to a Basic Black card base using Multipurpose Liquid Glue on an angle.  I adhered the card front to the card base using Stampin’ Dimensionals.  I added a few Iridescent Pearls to the card front and brushed the spiders with some Clear Wink of Stella.

On the inside, in Tuxedo Black Memento Ink, I stamped  the spider web from the Celebration Tidings stamp set on the top of a Whisper White panel.  I stamped the sentiment from the Celebration Tidings stamp set in the center of the panel and the sentiment from the Stampin’ Up! Well Said Cling Stamp Set below the 1st sentiment.  I stamped the spider image from the Celebration Tidings stamp set around the sentiment and drew lines using my Basic Black Stampin’ Write Marker from the web to the spiders.  I adhered the Whisper White panel to a Blackberry Bliss mat using Stampin’ Seal and then to the inside of the Basic Black card base using Multipurpose Liquid Glue.

To finish my card I decorated a Medium Whisper White Envelope.  In Tuxedo Black Memento Ink, I stamped the spider web and spiders from the Celebration Tidings stamp set on the envelope front and drew lines from the web to the spiders using my Basic Black Stampin’ Write Marker.  I adhered the leftover scraps of Plaid Tidings DSP to the envelope flap.

Thank you for stopping by my blog today.  I hope you liked my card and will give it a try. Happy Stamping!!

****************************************************************************************************

If you need any stamping supplies, I’d love to be your Demonstrator. Just click HERE to go directly to my online store or drop me an email if you have any questions. 

MY CURRENT HOST CODE IS: G39RYMEX

Use this host code when you order $50 or greater and receive a free gift from me! If your order is over $150, please do not use this code, but you’ll still get the free gift. The free gift is your choice of any 1 item valued up to $10.00 in the 2020-2021 Annual Catalog!   For any orders $50 or more I will also send you my monthly class tutorials.  Click HERE or go to my Customer Rewards for more details and to see what this months tutorials are.

 Click HERE to shop the clearance rack.

Happy Stamping, Karen!

****************************************************************************************************

STAMPIN’ UP! CLEARANCE RACK HAS BEEN UPDATED!!!

Stampin’ Up! has updated the Clearance Rack with lot of new items!   Head over there  quickly to get your hands on some great deals.  But hurry!!  Clearance Rack deals are only while supplies last!

I saw some retired In Color Card Stock and accessories, lots of pretty designer papers and embellishments and punches too!

Click HERE to head over to my Online Store to start shopping.

****************************************************************************************************

The Stampin’ Cut & Emboss Machine (Standard Size) is now available for you to order!!!
Here are the details:

The standard machine comes with all the plates you need to get started. The preorder will not include the replacement plates, but they will be available beginning with the customer launch on September 1.

Note that the Cutting Plates and Adhesive Sheets are already available to order. The optional Impression Mats are not be available; I’ll keep you updated on their availability.

So what sets our machines apart from the rest? Here are some of our favorite features:

  • Durable machines with high-quality results. The solid steel construction frame and rubber feet that securely grip the work surface produce crisp, clean, precise cutting and beautifully detailed embossing.
  • Easy to use. The machines and tools are designed for an intuitive die-cutting and embossing experience. For example, all plates are labeled with a number and are color coded for easy reference and use when building your sandwich. And just like the name suggests, our Magnetic Cutting Plates have fully-magnetic surfaces to make it easy to securely position your dies and keep them in place.
  • Simple to store. The platforms on both machines fold for space-saving storage and they look pretty too–the sleek, clean design suits any crafting space.
  • Portable. You can use both machines at home or on the go with their folding platforms and ergonomic carrying handles.

****************************************************************************************************

Stampin’ Up! Get & Go Starter Kit Promotion – Sept 1-30!

Have you thought about joining our Stampin’ Up! team?

Now is an awesome time to join.

The Get & Go Starter Kit promotion gives those who sign up to be a Stampin’ Up! demonstrator additional products to help get started right away!  In addition to the already great valued Starter Kit, you will receive precut paper, stamps, and embellishments!

Here are the details:

  • Promotion Dates: September 1–30, 2020
    Joining Deadline:  September 30, 2020; 11:50 PM (MT)
  • New demonstrators who submit their Independent Demonstrator Agreement (IDA) before 1 September or after 30 September will not be eligible for this promotion.
  • In addition to the regular starter kit (for $99 you choose $125 worth of products), if you join between September 1 and 30, you will also receive enough card stock pieces to make 16 cards, a pack of Rhinestone Basic Jewels, the So Much Love stamp set, and the Queen Anne’s Lace stamp set!!
    • 8 packs of precut card stock of the coastal cabana pack will be provided, and 8 packs of precut card stock of the Granny Apple Green pack, for a total of 16 cards (packs include envelopes).
  • Important note: Ink, adhesive, cutting tool, and clear block for stamping must be purchased separately. However, these products may be included as part of the Starter Kit product selection.

This is such a great deal!  For $99, you get to pick $125 merchandise of your choice for your Starter Kit plus you’ll get the Queen Annes’ Lace and So Much Love stamp sets, card kits to create 16 cards and a pack of Rhinestones for free!!

Drop me a note at creativestampingdesigns@gmail.com if you have questions about joining, I’m happy to talk to you about it.  You can also see more information about the benefits of becoming a Stampin’ Up! Demonstrator Here

****************************************************************************************************

HELLO, PUMPKIN

SUBSCRIBE AUTUST 11 – SEPTEMBER 10

As the autumn season approaches, prepare to celebrate with the September Paper Pumpkin Kit! There’s so much to love about fall—some love the haunts of Halloween, many love the time to give thanks, and others love the changing colors and cooler temperatures. Whatever you love most about fall, September’s kit has everything you need to celebrate the season your way! Between a multi-occasion stamp set and enough supplies to design 20 cracker box treat packages, you can create custom fall crafts to celebrate Halloween, Thanksgiving, pumpkins, and leaves. Whether you make them all the same or mix ‘n’ match your crafts, there’s something for everyone in this kit!

September’s kit is a must-have for those who love to celebrate all things spooky. But, for those who don’t enjoy the Halloween haunts, the multi-occasion stamp set combined with a variety of die-cut and reversible paper pieces offers many ways to customize your fall crafts!

  • Kit contains enough supplies to create 20 cracker box treat packages.
  • Each cracker box treat package can be customized to celebrate Halloween, Thanksgiving, the autumn season, or all three!
  • Coordinating Colors: Bumblebee, Basic Black, Cajun Craze, Cinnamon Cider, Mossy Meadow, Old Olive, Pumpkin Pie, white

Subscribe to the September 2020 Paper Pumpkin Kit from 11 August to 10 September at paperpumpkin.com!

Note: Supplies may be limited toward the end of the subscription period.

****************************************************************************************************

I’m cleaning my shelves and drawers out to make room for lots of new goodie.  I have my list right HERE and I’m trying to keep it up to date.   Check it out and let me know if there is anything you’d like to get.  If you are looking for something and don’t see it on the list, drop me a line and I will look through my stash to see if I missed it.  I have lots of older DSP too that I don’t have listed if there is any that you are looking for.

****************************************************************************************************

Card stock cuts for this project:

  • Basic Black Cardstock 8 1/2″ X 5 1/2″ (card base scored and folded at 4 1/4″), 4″ X 5 1/4″ (card front cut down to 3 3/4″ X 5″ after scraps were adhered)
  • Blackberry Bliss Cardstock 4 1/8″ X 5 3/8″ (inner liner mat), 1/2″ X 6″  scraps
  • Pumpkin Pie Cardstock 1/2″ X 6″ scraps
  • Whisper White Cardstock 4 1/2″ X 3 3/4″ (artwork), 4″ X 5 1/4″ (inner liner)
  • Brushed Metallic Cardstock 4″ X 5 1/4″ (card front panel)
  • Plaid Tidings 6 X 6 Designer Series Paper 1/2″ X 6″ scraps

****************************************************************************************************

Product List

Stampin’ Up! Hello FALL CAS

Good Saturday morning my fellow stampers.  How is everyone doing today?  We’re into our 3 day weekend, hope you are doing something fun.  I have off today, but have to work tomorrow.  Our store is closed on Monday, but I may go in to get my paperwork done without being interrupted with the phones.  I’ll decide Monday morning what I want to do.

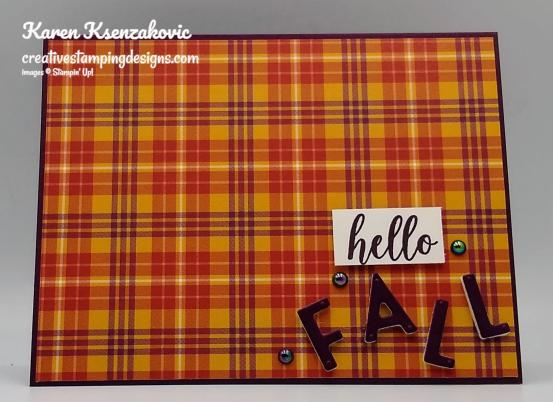
I have a clean and simple fun card for you today that was also quick and easy.  Take a look.

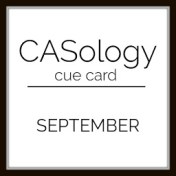
I played along with CASology Challenge #373.  Here is their cue card.

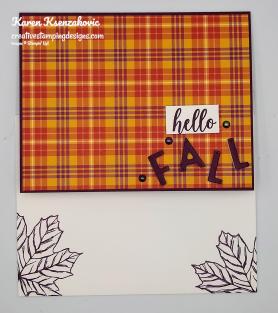
I started by adhering a panel of Plaid Tidings 6 X 6 Designer Series Paper to a Blackberry Bliss card base using Stampin’ Seal.

Using the Playful Alphabet Dies, I cut the letters ‘FALL’ from a panel of Blackberry Bliss cardstock which was adhered to a Foam Adhesive Sheet.  I adhered the letters to the bottom of the card front.

On a small panel of Whisper White cardstock I stamped the sentiment from the Stampin’ Up! Dressed To Impress Photopolymer Stamp Set in Blackberry Bliss Ink.   I adhered the sentiment above the letters using Stampin’ Dimensionals.  I added a few Iridescent Pearls to the card front.

On the inside I stamped the leaf image from the Stampin’ Up! Gather Together Photopolymer Stamp Set in Blackberry Bliss Ink, stamping off 3 times, in the center of a Whisper White panel.  I stamped the sentiment from the Gather Together stamp set in Blackberry Bliss Ink over the leave in the center of the panel.  I adhered the Whisper White panel to the inside of the Blackberry Bliss card base using Multipurpose Liquid Glue.

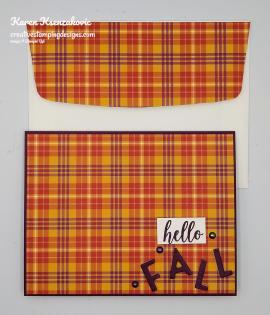
To finish my card I decorated a Medium Whisper White Envelope.  I stamped the leaf image from Gather Together stamp set in Blackberry Bliss Ink on the envelope front.  I adhered a panel of Plaid Tidings DSP to the envelope flap.

Thank you for stopping by my blog today.  I hope you liked my card and will give it a try. Happy Stamping!!

****************************************************************************************************

If you need any stamping supplies, I’d love to be your Demonstrator. Just click HERE to go directly to my online store or drop me an email if you have any questions. 

MY CURRENT HOST CODE IS: G39RYMEX

Use this host code when you order $50 or greater and receive a free gift from me! If your order is over $150, please do not use this code, but you’ll still get the free gift. The free gift is your choice of any 1 item valued up to $10.00 in the 2020-2021 Annual Catalog!   For any orders $50 or more I will also send you my monthly class tutorials.  Click HERE or go to my Customer Rewards for more details and to see what this months tutorials are.

 Click HERE to shop the clearance rack.

Happy Stamping, Karen!

****************************************************************************************************

STAMPIN’ UP! CLEARANCE RACK HAS BEEN UPDATED!!!

Stampin’ Up! has updated the Clearance Rack with lot of new items!   Head over there  quickly to get your hands on some great deals.  But hurry!!  Clearance Rack deals are only while supplies last!

I saw some retired In Color Card Stock and accessories, lots of pretty designer papers and embellishments and punches too!

Click HERE to head over to my Online Store to start shopping.

****************************************************************************************************

The Stampin’ Cut & Emboss Machine (Standard Size) is now available for you to order!!!
Here are the details:

The standard machine comes with all the plates you need to get started. The preorder will not include the replacement plates, but they will be available beginning with the customer launch on September 1.

Note that the Cutting Plates and Adhesive Sheets are already available to order. The optional Impression Mats are not be available; I’ll keep you updated on their availability.

So what sets our machines apart from the rest? Here are some of our favorite features:

  • Durable machines with high-quality results. The solid steel construction frame and rubber feet that securely grip the work surface produce crisp, clean, precise cutting and beautifully detailed embossing.
  • Easy to use. The machines and tools are designed for an intuitive die-cutting and embossing experience. For example, all plates are labeled with a number and are color coded for easy reference and use when building your sandwich. And just like the name suggests, our Magnetic Cutting Plates have fully-magnetic surfaces to make it easy to securely position your dies and keep them in place.
  • Simple to store. The platforms on both machines fold for space-saving storage and they look pretty too–the sleek, clean design suits any crafting space.
  • Portable. You can use both machines at home or on the go with their folding platforms and ergonomic carrying handles.

****************************************************************************************************

Stampin’ Up! Get & Go Starter Kit Promotion – Sept 1-30!

Have you thought about joining our Stampin’ Up! team?

Now is an awesome time to join.

The Get & Go Starter Kit promotion gives those who sign up to be a Stampin’ Up! demonstrator additional products to help get started right away!  In addition to the already great valued Starter Kit, you will receive precut paper, stamps, and embellishments!

Here are the details:

  • Promotion Dates: September 1–30, 2020
    Joining Deadline:  September 30, 2020; 11:50 PM (MT)
  • New demonstrators who submit their Independent Demonstrator Agreement (IDA) before 1 September or after 30 September will not be eligible for this promotion.
  • In addition to the regular starter kit (for $99 you choose $125 worth of products), if you join between September 1 and 30, you will also receive enough card stock pieces to make 16 cards, a pack of Rhinestone Basic Jewels, the So Much Love stamp set, and the Queen Anne’s Lace stamp set!!
    • 8 packs of precut card stock of the coastal cabana pack will be provided, and 8 packs of precut card stock of the Granny Apple Green pack, for a total of 16 cards (packs include envelopes).
  • Important note: Ink, adhesive, cutting tool, and clear block for stamping must be purchased separately. However, these products may be included as part of the Starter Kit product selection.

This is such a great deal!  For $99, you get to pick $125 merchandise of your choice for your Starter Kit plus you’ll get the Queen Annes’ Lace and So Much Love stamp sets, card kits to create 16 cards and a pack of Rhinestones for free!!

Drop me a note at creativestampingdesigns@gmail.com if you have questions about joining, I’m happy to talk to you about it.  You can also see more information about the benefits of becoming a Stampin’ Up! Demonstrator Here

****************************************************************************************************

HELLO, PUMPKIN

SUBSCRIBE AUTUST 11 – SEPTEMBER 10

As the autumn season approaches, prepare to celebrate with the September Paper Pumpkin Kit! There’s so much to love about fall—some love the haunts of Halloween, many love the time to give thanks, and others love the changing colors and cooler temperatures. Whatever you love most about fall, September’s kit has everything you need to celebrate the season your way! Between a multi-occasion stamp set and enough supplies to design 20 cracker box treat packages, you can create custom fall crafts to celebrate Halloween, Thanksgiving, pumpkins, and leaves. Whether you make them all the same or mix ‘n’ match your crafts, there’s something for everyone in this kit!

September’s kit is a must-have for those who love to celebrate all things spooky. But, for those who don’t enjoy the Halloween haunts, the multi-occasion stamp set combined with a variety of die-cut and reversible paper pieces offers many ways to customize your fall crafts!

  • Kit contains enough supplies to create 20 cracker box treat packages.
  • Each cracker box treat package can be customized to celebrate Halloween, Thanksgiving, the autumn season, or all three!
  • Coordinating Colors: Bumblebee, Basic Black, Cajun Craze, Cinnamon Cider, Mossy Meadow, Old Olive, Pumpkin Pie, white

Subscribe to the September 2020 Paper Pumpkin Kit from 11 August to 10 September at paperpumpkin.com!

Note: Supplies may be limited toward the end of the subscription period.

****************************************************************************************************

I’m cleaning my shelves and drawers out to make room for lots of new goodie.  I have my list right HERE and I’m trying to keep it up to date.   Check it out and let me know if there is anything you’d like to get.  If you are looking for something and don’t see it on the list, drop me a line and I will look through my stash to see if I missed it.  I have lots of older DSP too that I don’t have listed if there is any that you are looking for.

****************************************************************************************************

Card stock cuts for this project:

  • Blackberry Bliss Cardstock 8 1/2″ X 5 1/2″ (card base scored and folded at 4 1/4″), 2″ X 3″ (letters)
  • Whisper White Cardstock 5/8″ X 1 1/4″ (sentiment), 4″ X 5 1/4″ (inner liner)
  • Plaid Tidings 6 X 6 Designer Series Paper 4 1/8″ X 5 3/8″ (card front), 2 1/4″ X 6″ (piece for envelope flap)

****************************************************************************************************

Product List

Stampin’ Up! Holly Jolly Gnome for the Holidays For Fun Fold Friday

Good Friday morning my stamping friends and welcome to my Fun Fold Friday.  How was everyone’s week?  I hope you have some fun plans for the weekend.  I have off tomorrow, but I’m working on Sunday.  Years ago, when I was a child up to my early 20’s, we used to have a huge family picnic with all my mothers aunts, uncles, cousins, brother and sister.  It was so much fun, it was like a big reunion every Sunday before Labor Day.  Lots of good food (we’re all Italians so not hamburgers and hotdogs), games and catching up with family.  Unfortunately it came to an end and there are only a few people left that used to come.

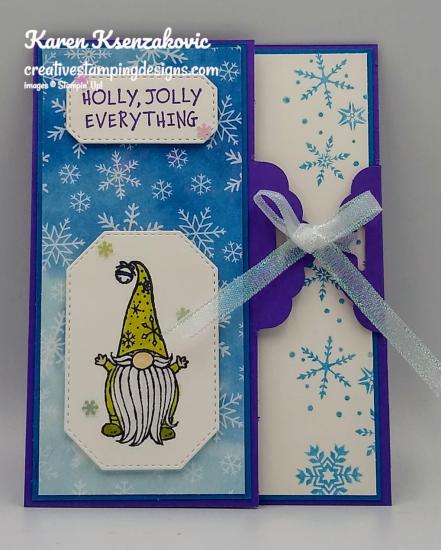
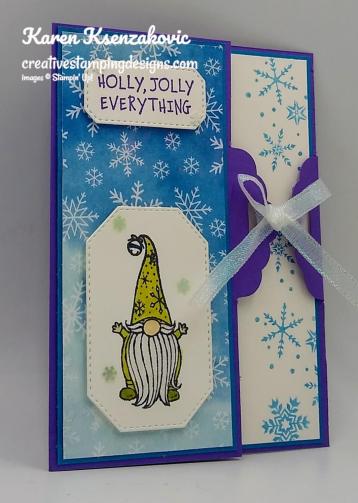
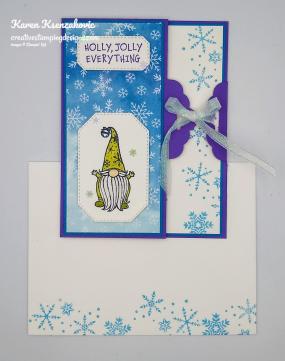
Today’s card I tried something different again using one of my favorite sets from the August-December 2020 Mini Catalog.  There’s lots of pictures with details for this one.  I really need to start doing videos to explain some of these cards.  Here’s my card for today.

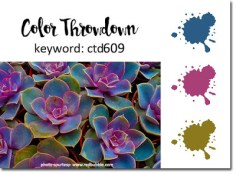
I absolutely LOVE this gnome set, the images are all so cute.  My colors were inspired by Color Throwdown Challenge #609.  Here are their colors.

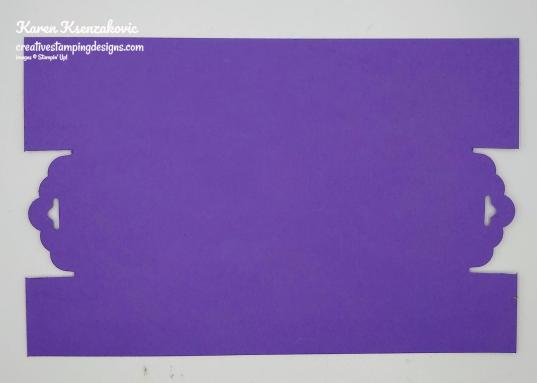
I started by making a little mark with a pencil at the 1″ mark on the 5 1/2″ side of a panel of Gorgeous Grape cardstock.  I flipped the panel over the long way and made a pencil mark at the 1″ mark on the back of the other side.

Using my Scalloped Tag Topper Punch, I lined up the pencil mark with the inside edge of the punch and cut.  I did the same thing on the opposite side.

Once both ends were punched out, you are left with a card base that looks like this.  I scored the card base at 3 1/2″

I trimmed the side edges off so that my card base looked like this.  I have the score line to the left and I scored the right tab so that I could fold it in to meet with the left tab once the card was folded.

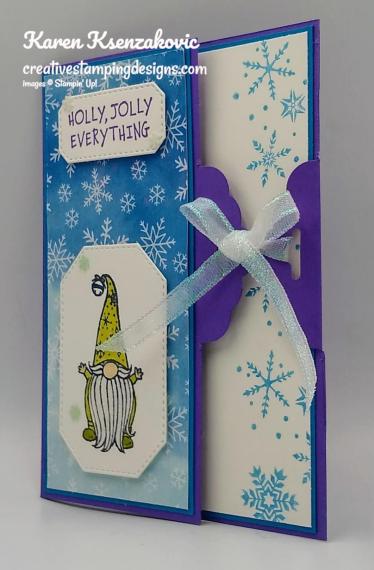
I adhered a panel of Snowflake Splendor Designer Series Paper to a Pacific Point mat using Stampin’ Seal and then adhered it to the front panel using Multipurpose Liquid Glue.  On a small panel of Whisper White cardstock I stamped the gnome image from the Stampin’ Up! Gnome For The Holidays Cling Stamp Set in Tuxedo Black Memento Ink.  I stamped the sentiment from the Gnome for the Holidays stamp set in Gorgeous Grape Ink on the top of the Whisper White panel.  I colored the gnome in using my Ivory and Old Olive Stampin’ Blends Markers and I used Clear Wink of Stella on the gnomes beard.  I cut the image out using my Hippo & Friends Dies and I cut the sentiment out using the smallest octagon die from the Hippo & Friends Dies.  I adhered the artwork and sentiment to the card front using Stampin’ Dimensionals.  I added a few Adhesive-Backed Snowflakes to the card front.

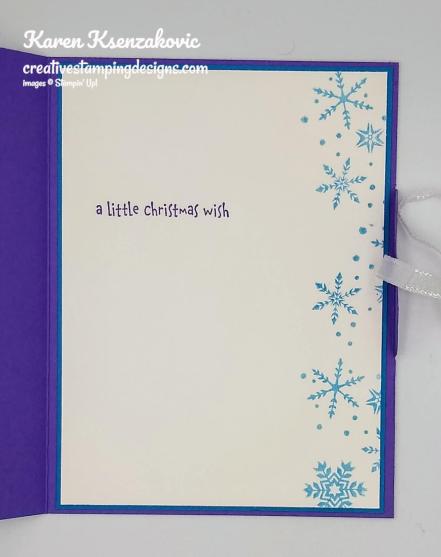
On the inside I stamped the snowflake cluster image from the Stampin’ Up! Snowflake Wishes Photopolymer Stamp Set in Pacific Point Ink, stamping off once, along the edge of a Whisper White panel.  I stamped the sentiment from the Gnome for the Holidays stamp set in Gorgeous Grape Ink to the left of the panel.  I adhered the Whisper White panel to a Pacific Point mat using Stampin’ Seal and then to the inside of the Gorgeous Grape card base using Multipurpose Liquid Glue.

I tied the 2 tabs together using a piece of Snowflake Splendor Ribbon and tied a small bow.

To finish my card I decorated a Medium Whisper White Envelope.  I stamped the snowflake cluster image from the Snowflake Wishes stamp set in Pacific Point Ink, stamping off once, along the bottom front of the envelope.  I adhered a panel of Snowflake Splendor DSP to the envelope flap.

Thank you for stopping by my blog today.  I hope you liked my card and will give it a try. Happy Stamping!!

****************************************************************************************************

If you need any stamping supplies, I’d love to be your Demonstrator. Just click HERE to go directly to my online store or drop me an email if you have any questions. 

MY CURRENT HOST CODE IS: G39RYMEX

Use this host code when you order $50 or greater and receive a free gift from me! If your order is over $150, please do not use this code, but you’ll still get the free gift. The free gift is your choice of any 1 item valued up to $10.00 in the 2020-2021 Annual Catalog!   For any orders $50 or more I will also send you my monthly class tutorials.  Click HERE or go to my Customer Rewards for more details and to see what this months tutorials are.

 Click HERE to shop the clearance rack.

Happy Stamping, Karen!

****************************************************************************************************

STAMPIN’ UP! CLEARANCE RACK HAS BEEN UPDATED!!!

Stampin’ Up! has updated the Clearance Rack with lot of new items!   Head over there  quickly to get your hands on some great deals.  But hurry!!  Clearance Rack deals are only while supplies last!

I saw some retired In Color Card Stock and accessories, lots of pretty designer papers and embellishments and punches too!

Click HERE to head over to my Online Store to start shopping.

****************************************************************************************************

The Stampin’ Cut & Emboss Machine (Standard Size) is now available for you to order!!!
Here are the details:

The standard machine comes with all the plates you need to get started. The preorder will not include the replacement plates, but they will be available beginning with the customer launch on September 1.

Note that the Cutting Plates and Adhesive Sheets are already available to order. The optional Impression Mats are not be available; I’ll keep you updated on their availability.

So what sets our machines apart from the rest? Here are some of our favorite features:

  • Durable machines with high-quality results. The solid steel construction frame and rubber feet that securely grip the work surface produce crisp, clean, precise cutting and beautifully detailed embossing.
  • Easy to use. The machines and tools are designed for an intuitive die-cutting and embossing experience. For example, all plates are labeled with a number and are color coded for easy reference and use when building your sandwich. And just like the name suggests, our Magnetic Cutting Plates have fully-magnetic surfaces to make it easy to securely position your dies and keep them in place.
  • Simple to store. The platforms on both machines fold for space-saving storage and they look pretty too–the sleek, clean design suits any crafting space.
  • Portable. You can use both machines at home or on the go with their folding platforms and ergonomic carrying handles.

****************************************************************************************************

Stampin’ Up! Get & Go Starter Kit Promotion – Sept 1-30!

Have you thought about joining our Stampin’ Up! team?

Now is an awesome time to join.

The Get & Go Starter Kit promotion gives those who sign up to be a Stampin’ Up! demonstrator additional products to help get started right away!  In addition to the already great valued Starter Kit, you will receive precut paper, stamps, and embellishments!

Here are the details:

  • Promotion Dates: September 1–30, 2020
    Joining Deadline:  September 30, 2020; 11:50 PM (MT)
  • New demonstrators who submit their Independent Demonstrator Agreement (IDA) before 1 September or after 30 September will not be eligible for this promotion.
  • In addition to the regular starter kit (for $99 you choose $125 worth of products), if you join between September 1 and 30, you will also receive enough card stock pieces to make 16 cards, a pack of Rhinestone Basic Jewels, the So Much Love stamp set, and the Queen Anne’s Lace stamp set!!
    • 8 packs of precut card stock of the coastal cabana pack will be provided, and 8 packs of precut card stock of the Granny Apple Green pack, for a total of 16 cards (packs include envelopes).
  • Important note: Ink, adhesive, cutting tool, and clear block for stamping must be purchased separately. However, these products may be included as part of the Starter Kit product selection.

This is such a great deal!  For $99, you get to pick $125 merchandise of your choice for your Starter Kit plus you’ll get the Queen Annes’ Lace and So Much Love stamp sets, card kits to create 16 cards and a pack of Rhinestones for free!!

Drop me a note at creativestampingdesigns@gmail.com if you have questions about joining, I’m happy to talk to you about it.  You can also see more information about the benefits of becoming a Stampin’ Up! Demonstrator Here

****************************************************************************************************

HELLO, PUMPKIN

SUBSCRIBE AUTUST 11 – SEPTEMBER 10

As the autumn season approaches, prepare to celebrate with the September Paper Pumpkin Kit! There’s so much to love about fall—some love the haunts of Halloween, many love the time to give thanks, and others love the changing colors and cooler temperatures. Whatever you love most about fall, September’s kit has everything you need to celebrate the season your way! Between a multi-occasion stamp set and enough supplies to design 20 cracker box treat packages, you can create custom fall crafts to celebrate Halloween, Thanksgiving, pumpkins, and leaves. Whether you make them all the same or mix ‘n’ match your crafts, there’s something for everyone in this kit!

September’s kit is a must-have for those who love to celebrate all things spooky. But, for those who don’t enjoy the Halloween haunts, the multi-occasion stamp set combined with a variety of die-cut and reversible paper pieces offers many ways to customize your fall crafts!

  • Kit contains enough supplies to create 20 cracker box treat packages.
  • Each cracker box treat package can be customized to celebrate Halloween, Thanksgiving, the autumn season, or all three!
  • Coordinating Colors: Bumblebee, Basic Black, Cajun Craze, Cinnamon Cider, Mossy Meadow, Old Olive, Pumpkin Pie, white

Subscribe to the September 2020 Paper Pumpkin Kit from 11 August to 10 September at paperpumpkin.com!

Note: Supplies may be limited toward the end of the subscription period.

****************************************************************************************************

I’m cleaning my shelves and drawers out to make room for lots of new goodie.  I have my list right HERE and I’m trying to keep it up to date.   Check it out and let me know if there is anything you’d like to get.  If you are looking for something and don’t see it on the list, drop me a line and I will look through my stash to see if I missed it.  I have lots of older DSP too that I don’t have listed if there is any that you are looking for.

****************************************************************************************************

Card stock cuts for this project:

  • Gorgeous Grape Cardstock 8 1/2″ x 5 1/2″ (card base scored and folded at 3 1/2″)
  • Pacific Point Cardstock 2 1/2″ x 5 3/8″ (card front mat), 4″ x 5 3/8″ (inner liner mat)
  • Whisper White Cardstock 3″ x 3″ (artwork and sentiment), 3 7/8″ X 5 1/4″ (inner liner)
  • Snowflake Splendor Designer Series Paper 2 3/8″ X 5 1/4″ (card front), 2 1/4′ X 6″ (piece for envelope flap)

****************************************************************************************************

Product List

Stampin’ Up! Beautiful Autumn Hello for The Happy Inkin’ Thursday Blog Hop

Good Thursday morning my stamping friends and welcome to our Happy Inkin’ Thursday Blog Hop.  How is everyone doing today?  We have a couple new hoppers with our group. Welcome Julie Johnson and Nicole Bloxom, so excited that you joined us.  If you are hopping over from Akiko, thank you for stopping by my blog. This week we have sketch challenge. Be sure to take a moment to hop around to see everyone’s beautiful projects .
Here is the fun sketch we had to work from.

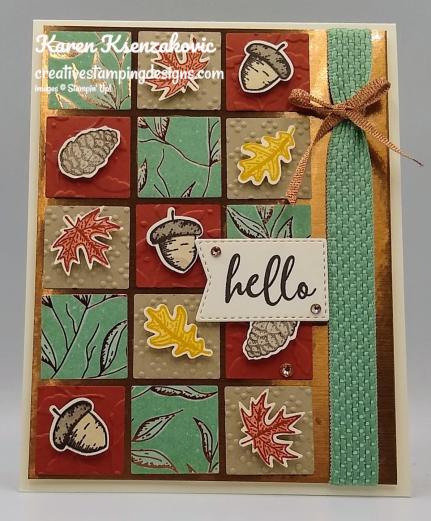
Here is my card using this sketch.

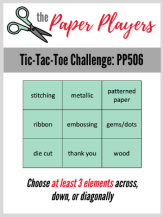
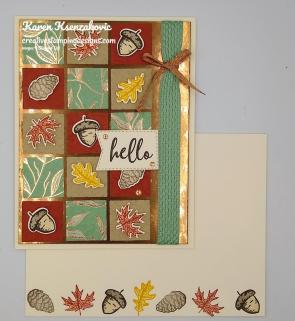
I played along with the Paper Players Tic Tac Toe Challenge #506.  I went across the top. Here is their board.

I also joined in with Cardz 4 Galz Challenge #129. Their theme is ‘Just Saying Hello’.

I started by cutting 5 each of the smallest square from the Layering Squares Dies in Cajun Craze Cardstock, Crumb Cake Cardstock and Gilded Autumn Specialty Designer Series Paper.  I embossed the Cajun Craze squares using the Meadow Moments Embossing Folder and I embossed the Crumb Cake squares using the Wrapped In Texture Embossing Folder.

I arranged the squares on a panel of Copper Brushed Metallic Paper and adhered them using Multipurpose Liquid Glue.  On a panel of Very Vanilla cardstock I stamped 3 of the outline maple leaf image from the Stampin’ Up! Beautiful Autumn Photopolymer Stamp Set in Cajun Craze Ink and the fill image of the maple leaf in Cajun Craze Ink, stamped off once, over the outline image.  I stamped 2 of the outline oak leaf image from the Beautiful Autumn stamp set in Bumblebee Ink and the fill image of the oak leaf in Bumblebee Ink, stamped off once, over the outlined image.  I stamped 3 of the acorn outline image from the Beautiful Autumn stamp set in Early Espresso Ink.  I stamped the fill images of the acorn in Early Espresso Ink, stamped off once, for the top and Crumb Cake Ink, stamped off once, for the bottom.  I stamped 2 of the pinecone outline image from the Beautiful Autumn stamp set in Early Espresso Ink, stamped off once, and the fill image from the pinecone image in Early Espresso Ink, stamped off twice, over the outlined image.  Using the Autumn Punch Pack I punched out the acorns, maple leaves and oak leaves, I fussy cut the pinecones using my Paper Snips.

I adhered the acorns, leaves and pinecones on the card front using Stampin’ Dimensionals in each cardstock square.  I wrapped a piece of Mint Macaron Basket Weave Ribbon from the Basket Weave & Metallic Ribbon Combo Pack, around the metallic card front adhering it in the back using Stampin’ Seal.  I wrapped a piece of the Metallic ribbon from the Basket Weave & Metallic Ribbon Combo Pack around the basket weave ribbon and tied a bow.  I stamped the sentiment from the Stampin’ Up! To A Wild Rose Photopolymer Stamp Set in Early Espresso Ink on a panel of Very Vanilla cardstock.  I cut the sentiment out using my Tasteful Labels Dies.  I adhered the sentiment to the card front using Stampin’ Dimensionals.  I adhered the card front to a Very Vanilla card base using Stampin’ Dimensionals.  I added a few Champagne Rhinestone Basic Jewels to the sentiment and card front.

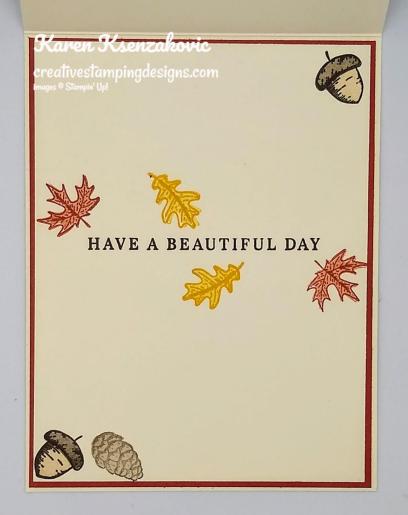
On the inside I stamped the sentiment from the Beautiful Autumn stamp set in Early Espresso Ink in the center of a Very Vanilla panel.  I stamped the acorn, leaves and pinecone images from the Beautiful Autumn stamp set around the sentiment the same as I did for the card front.  I adhered the Very Vanilla panel to a Cajun Craze mat using Stampin’ Seal and then to the inside of the Very Vanilla card base using Multipurpose Liquid Glue.

To complete my card I decorated a Medium Very Vanilla Envelope.  I stamped the acorn, leaves and pinecone images from the Beautiful Autumn stamp set on the bottom front of the envelope the same as I did for the card front.  I adhered a panel of the Gilded Autumn Specialty Designer Series Paper to the envelope flap.

Thank you for visiting my blog today. I hope you liked my card and will give it a try. Now that you’ve seen my card, take a minute to hop through all our projects today. If you click on the Next Blog button, you’ll go to Julie’s page. Or you can just click on the names below to go directly to all their blogs! Happy Hopping!!

Eva Dobilas: Not hopping this week
Karen Ksenzakovic:  You Are Here
Nicole Bloxom: Not quite ready to start hopping with us yet…will let us know when she’s ready.

****************************************************************************************************

If you need any stamping supplies, I’d love to be your Demonstrator. Just click HERE to go directly to my online store or drop me an email if you have any questions. 

MY CURRENT HOST CODE IS: G39RYMEX

Use this host code when you order $50 or greater and receive a free gift from me! If your order is over $150, please do not use this code, but you’ll still get the free gift. The free gift is your choice of any 1 item valued up to $10.00 in the 2020-2021 Annual Catalog!   For any orders $50 or more I will also send you my monthly class tutorials.  Click HERE or go to my Customer Rewards for more details and to see what this months tutorials are.

 Click HERE to shop the clearance rack.

Happy Stamping, Karen!

****************************************************************************************************

HELLO, PUMPKIN

SUBSCRIBE AUTUST 11 – SEPTEMBER 10

As the autumn season approaches, prepare to celebrate with the September Paper Pumpkin Kit! There’s so much to love about fall—some love the haunts of Halloween, many love the time to give thanks, and others love the changing colors and cooler temperatures. Whatever you love most about fall, September’s kit has everything you need to celebrate the season your way! Between a multi-occasion stamp set and enough supplies to design 20 cracker box treat packages, you can create custom fall crafts to celebrate Halloween, Thanksgiving, pumpkins, and leaves. Whether you make them all the same or mix ‘n’ match your crafts, there’s something for everyone in this kit!

September’s kit is a must-have for those who love to celebrate all things spooky. But, for those who don’t enjoy the Halloween haunts, the multi-occasion stamp set combined with a variety of die-cut and reversible paper pieces offers many ways to customize your fall crafts!

  • Kit contains enough supplies to create 20 cracker box treat packages.
  • Each cracker box treat package can be customized to celebrate Halloween, Thanksgiving, the autumn season, or all three!
  • Coordinating Colors: Bumblebee, Basic Black, Cajun Craze, Cinnamon Cider, Mossy Meadow, Old Olive, Pumpkin Pie, white

Subscribe to the September 2020 Paper Pumpkin Kit from 11 August to 10 September at paperpumpkin.com!

Note: Supplies may be limited toward the end of the subscription period.

****************************************************************************************************

Card stock cuts for this project:

  • Cajun Craze Cardstock 1 1/4″ X 5 1/2″ (squares), 4 1/8″ X 5 3/8″ (inner liner mat)
  • Crumb Cake Cardstock 1 1/4″ X 5 1/2″ (squares)
  • Very Vanilla Cardstock 4 1/4″ X 11″ (card base scored and folded at 5 1/2″), 1 1/4″ X 7″ (acorns, leaves & pinecones), 1 1/2″ X 2″ (sentiment), 4″ X 5 1/4″ (inner liner)
  • Brushed Metallic Paper 4″ X 5 1/4″ (card front)
  • Gilded Autumn Specialty Designer Series Paper 1 1/4″ x 5 1/2″ (squares), 2 1/4″ X 6″ (piece for envelope flap)

****************************************************************************************************

Product List

Stampin’ Up! Autumn Country Home

Good Wednesday morning my fellow stampers.  How is everyone’s week going?  We’re halfway through the week and on our way to the 3 day weekend, for most.  Is anyone starting to make plans?

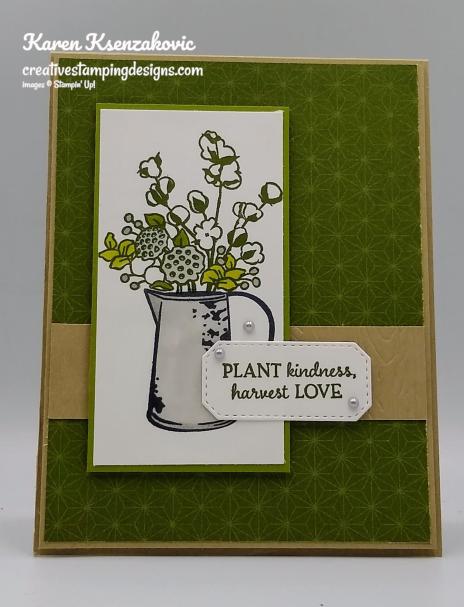
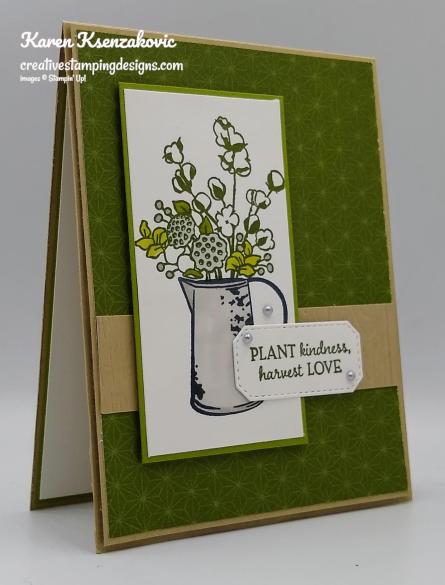
Today’s card is a pretty quick and easy one for you using a mix of Annual Catalog and Mini Catalog items.  Here’s my card for today.

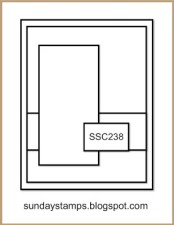
My design is from Sunday Stamps Let’s Get Sketchy Challenge #238.  Here is their sketch.

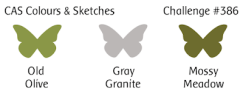
My colors were inspired by CAS Colours & Sketch Challenge #386.  Here are their colors.

I also played along with The Alphabet Challenge.  Their theme is ‘K-To use Kraft Paper of Card’.

I started by adhering a panel of Brightly Gleaming Specialty Designer Series Paper to a Crumb Cake mat using Stampin’ Seal.  I embossed a strip of Crumb Cake cardstock using the Pinewood Planks 3D Embossing Folder and adhered it to the card front using Multipurpose Liquid Glue.

On a panel of Whisper White cardstock I stamped the pitcher image from the Stampin’ Up! Country Home Photopolymer Stamp Set in Tuxedo Black Memento Ink.  I stamped the floral image from the Country Home stamp set on top of the pitcher in Mossy Meadow Ink.  I colored the images in using my Gray Granite and Old Olive Stampin’ Blends Markers.  I adhered the artwork on an Old Olive mat using Stampin’ Seal and adhered it to the card front using Stampin’ Dimensionals.

I cut a small panel of Whisper White cardstock using the smallest octagon die from the Hippo & Friends Dies.  I stamped the sentiment from the Stampin’ Up! Autumn 
Goodness Photopolymer Stamp Set in Mossy Meadow Ink.  I adhered the sentiment to the card front using Stampin’ Dimensionals and Glue Dots.  I adhered the card front to a Crumb Cake card base using Stampin’ Dimensionals.  I added a few Metallic Pearls to the card front.

On the inside I stamped the sentiment from the Autumn Goodness stamp set in Mossy Meadow Ink in the center of a Whisper White panel.  I stamped the floral image from the Country Home stamp set in Mossy Meadow Ink and colored the image in using my Gray Granite and Old Olive Stampin’ Blends Markers.  I adhered the Whisper White panel to an Old Olive mat using Stampin’ Seal and then to the inside of the Crumb Cake card base using Multipurpose Liquid Glue.

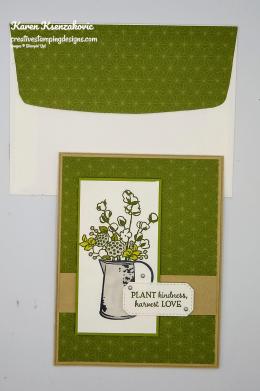
To finish my card I decorated a Medium Whisper White Envelope.  I stamped the pitcher image from the Country Home stamp set on the envelope front in Tuxedo Black Memento Ink and colored it in using my Gray Granite Stampin’ Blends Markers.  I stamped the sentiment from the Country Home stamp set on the pitcher in Tuxedo Black Memento Ink.  I adhered a panel of Brightly Gleaming Specialty DSP to the envelope flap.

Thank you for stopping by my blog today.  I hope you liked my card and will give it a try. Happy Stamping!!

****************************************************************************************************

If you need any stamping supplies, I’d love to be your Demonstrator. Just click HERE to go directly to my online store or drop me an email if you have any questions. 

MY CURRENT HOST CODE IS: G39RYMEX

Use this host code when you order $50 or greater and receive a free gift from me! If your order is over $150, please do not use this code, but you’ll still get the free gift. The free gift is your choice of any 1 item valued up to $10.00 in the 2020-2021 Annual Catalog!   For any orders $50 or more I will also send you my monthly class tutorials.  Click HERE or go to my Customer Rewards for more details and to see what this months tutorials are.

 Click HERE to shop the clearance rack.

Happy Stamping, Karen!

****************************************************************************************************

STAMPIN’ UP! CLEARANCE RACK HAS BEE UPDATED!!!

Stampin’ Up! has updated the Clearance Rack with lot of new items!   Head over there  quickly to get your hands on some great deals.  But hurry!!  Clearance Rack deals are only while supplies last!

I saw some retired In Color Card Stock and accessories, lots of pretty designer papers and embellishments and punches too!

Click HERE to head over to my Online Store to start shopping.

****************************************************************************************************

The Stampin’ Cut & Emboss Machine (Standard Size) is now available for you to order!!!
Here are the details:

The standard machine comes with all the plates you need to get started. The preorder will not include the replacement plates, but they will be available beginning with the customer launch on September 1.

Note that the Cutting Plates and Adhesive Sheets are already available to order. The optional Impression Mats are not be available; I’ll keep you updated on their availability.

So what sets our machines apart from the rest? Here are some of our favorite features:

  • Durable machines with high-quality results. The solid steel construction frame and rubber feet that securely grip the work surface produce crisp, clean, precise cutting and beautifully detailed embossing.
  • Easy to use. The machines and tools are designed for an intuitive die-cutting and embossing experience. For example, all plates are labeled with a number and are color coded for easy reference and use when building your sandwich. And just like the name suggests, our Magnetic Cutting Plates have fully-magnetic surfaces to make it easy to securely position your dies and keep them in place.
  • Simple to store. The platforms on both machines fold for space-saving storage and they look pretty too–the sleek, clean design suits any crafting space.
  • Portable. You can use both machines at home or on the go with their folding platforms and ergonomic carrying handles.

****************************************************************************************************

Stampin’ Up! Get & Go Starter Kit Promotion – Sept 1-30!

Have you thought about joining our Stampin’ Up! team?

Now is an awesome time to join.

The Get & Go Starter Kit promotion gives those who sign up to be a Stampin’ Up! demonstrator additional products to help get started right away!  In addition to the already great valued Starter Kit, you will receive precut paper, stamps, and embellishments!

Here are the details:

  • Promotion Dates: September 1–30, 2020
    Joining Deadline:  September 30, 2020; 11:50 PM (MT)
  • New demonstrators who submit their Independent Demonstrator Agreement (IDA) before 1 September or after 30 September will not be eligible for this promotion.
  • In addition to the regular starter kit (for $99 you choose $125 worth of products), if you join between September 1 and 30, you will also receive enough card stock pieces to make 16 cards, a pack of Rhinestone Basic Jewels, the So Much Love stamp set, and the Queen Anne’s Lace stamp set!!
    • 8 packs of precut card stock of the coastal cabana pack will be provided, and 8 packs of precut card stock of the Granny Apple Green pack, for a total of 16 cards (packs include envelopes).
  • Important note: Ink, adhesive, cutting tool, and clear block for stamping must be purchased separately. However, these products may be included as part of the Starter Kit product selection.

This is such a great deal!  For $99, you get to pick $125 merchandise of your choice for your Starter Kit plus you’ll get the Queen Annes’ Lace and So Much Love stamp sets, card kits to create 16 cards and a pack of Rhinestones for free!!

Drop me a note at creativestampingdesigns@gmail.com if you have questions about joining, I’m happy to talk to you about it.  You can also see more information about the benefits of becoming a Stampin’ Up! Demonstrator Here

****************************************************************************************************

HELLO, PUMPKIN

SUBSCRIBE AUTUST 11 – SEPTEMBER 10

As the autumn season approaches, prepare to celebrate with the September Paper Pumpkin Kit! There’s so much to love about fall—some love the haunts of Halloween, many love the time to give thanks, and others love the changing colors and cooler temperatures. Whatever you love most about fall, September’s kit has everything you need to celebrate the season your way! Between a multi-occasion stamp set and enough supplies to design 20 cracker box treat packages, you can create custom fall crafts to celebrate Halloween, Thanksgiving, pumpkins, and leaves. Whether you make them all the same or mix ‘n’ match your crafts, there’s something for everyone in this kit!

September’s kit is a must-have for those who love to celebrate all things spooky. But, for those who don’t enjoy the Halloween haunts, the multi-occasion stamp set combined with a variety of die-cut and reversible paper pieces offers many ways to customize your fall crafts!

  • Kit contains enough supplies to create 20 cracker box treat packages.
  • Each cracker box treat package can be customized to celebrate Halloween, Thanksgiving, the autumn season, or all three!
  • Coordinating Colors: Bumblebee, Basic Black, Cajun Craze, Cinnamon Cider, Mossy Meadow, Old Olive, Pumpkin Pie, white

Subscribe to the September 2020 Paper Pumpkin Kit from 11 August to 10 September at paperpumpkin.com!

Note: Supplies may be limited toward the end of the subscription period.

****************************************************************************************************

I’m cleaning my shelves and drawers out to make room for lots of new goodie.  I have my list right HERE and I’m trying to keep it up to date.   Check it out and let me know if there is anything you’d like to get.  If you are looking for something and don’t see it on the list, drop me a line and I will look through my stash to see if I missed it.  I have lots of older DSP too that I don’t have listed if there is any that you are looking for.

****************************************************************************************************

Card stock cuts for this project:

  • Crumb Cake Cardstock 4 1/4″ X 11″ (card base scored and folded at 5 1/2″), 4 1/8″ X 5 3/8″ (card front mat), 1″ X 4″ (card front panel)
  • Old Olive Cardstock 4″ X 2 1/8″ (artwork mat), 4 1/8″ X 5 3/8″ (inner liner mat)
  • Whisper White Cardstock 3 7/8″ X 2″ (artwork), 1″ X 2″ (sentiment), 4″ X 5 1/4″ (inner liner)
  • Brightly Gleaming Specialty Designer Series Paper 4″ X 5 1/4″ (card front), 2 1/4″ X 6″ (piece for envelope flap)

****************************************************************************************************

Product List

Stampin’ Up! Updates

Good Tuesday morning my stamping friends and Happy September!!!  How is everyone dong today?

AVAILABLE STARTING TODAY!!!

The Stampin’ Cut & Emboss Machine (Standard Size) is now available for to order!!!
Here are the details:

  • Demonstrator preorder (standard machine only): August 4, 2020
  • Customer launch (standard machine and replacement plates): September 1, 2020
  • The new Magnetic Cutting Plate will be available for everyone to order starting on September 1!

The standard machine comes with all the plates you need to get started. The preorder will not include the replacement plates, but they will be available beginning with the customer launch on September 1.

Note that the Cutting Plates and Adhesive Sheets are already available to order. The optional Impression Mats will not be available on the demonstrator preorder or by the customer launch; I’ll keep you updated on their availability.

If you needed another reason to join as a Demonstrator…you can preorder the awesome new Stampin’ Cut & Emboss Machine early in August!  Drop me a note at creativestampingdesigns@gmail.com if you have questions about joining.  I’m happy to talk with you about it!

So what sets our machines apart from the rest? Here are some of our favorite features:

  • Durable machines with high-quality results. The solid steel construction frame and rubber feet that securely grip the work surface produce crisp, clean, precise cutting and beautifully detailed embossing.
  • Easy to use. The machines and tools are designed for an intuitive die-cutting and embossing experience. For example, all plates are labeled with a number and are color coded for easy reference and use when building your sandwich. And just like the name suggests, our Magnetic Cutting Plates have fully-magnetic surfaces to make it easy to securely position your dies and keep them in place.
  • Simple to store. The platforms on both machines fold for space-saving storage and they look pretty too–the sleek, clean design suits any crafting space.
  • Portable. You can use both machines at home or on the go with their folding platforms and ergonomic carrying handles.

****************************************************************************************************

Stampin’ Up! Get & Go Starter Kit Promotion – Sept 1-30!

Have you thought about joining our Stampin’ Up! team?

Now is a great time to join.

The Get & Go Starter Kit promotion gives those who sign up to be a Stampin’ Up! demonstrator additional products to help get started right away!  In addition to the already great valued Starter Kit, you will receive precut paper, stamps, and embellishments to use in your first event!

Here are the details:

  • Promotion Dates: September 1–30, 2020
    Joining Deadline:  September 30, 2020; 11:50 PM (MT)
  • New demonstrators who submit their Independent Demonstrator Agreement (IDA) before 1 September or after 30 September will not be eligible for this promotion.
  • In addition to the regular starter kit (for $99 you choose $125 worth of products), if you join between September 1 and 30, you will also receive enough card stock pieces to make 16 cards, a pack of Rhinestone Basic Jewels, the So Much Love stamp set, and the Queen Anne’s Lace stamp set!!
    • 8 packs of precut card stock of the coastal cabana pack will be provided, and 8 packs of precut card stock of the Granny Apple Green pack, for a total of 16 cards (packs include envelopes).
  • Important note: Ink, adhesive, cutting tool, and clear block for stamping must be purchased separately. However, these products may be included as part of the Starter Kit product selection.

This is such a great deal!  For $99, you get to pick $125 merchandise of your choice for your Starter Kit plus you’ll get the Queen Annes’ Lace and So Much Love stamp sets, card kits to create 16 cards and a pack of Rhinestones for free!!

Drop me a note at creativestampingdesigns@gmail.com if you have questions about joining, I’m happy to talk to you about it.  You can also see more information about the benefits of becoming a Stampin’ Up! Demonstrator Here

****************************************************************************************************

STAMPIN’ UP! CLEARANCE RACK HAS BEE UPDATED!!!

Stampin’ Up! has updated the Clearance Rack with lot of new items!   Head over there  quickly to get your hands on some great deals.  But hurry!!  Clearance Rack deals are only while supplies last!

I saw some retired In Color Card Stock and accessories, lots of pretty designer papers and embellishments and punches too!

Click HERE to head over to my Online Store to start shopping.

****************************************************************************************************

HELLO, PUMPKIN

SUBSCRIBE AUTUST 11 – SEPTEMBER 10

As the autumn season approaches, prepare to celebrate with the September Paper Pumpkin Kit! There’s so much to love about fall—some love the haunts of Halloween, many love the time to give thanks, and others love the changing colors and cooler temperatures. Whatever you love most about fall, September’s kit has everything you need to celebrate the season your way! Between a multi-occasion stamp set and enough supplies to design 20 cracker box treat packages, you can create custom fall crafts to celebrate Halloween, Thanksgiving, pumpkins, and leaves. Whether you make them all the same or mix ‘n’ match your crafts, there’s something for everyone in this kit!

September’s kit is a must-have for those who love to celebrate all things spooky. But, for those who don’t enjoy the Halloween haunts, the multi-occasion stamp set combined with a variety of die-cut and reversible paper pieces offers many ways to customize your fall crafts!

  • Kit contains enough supplies to create 20 cracker box treat packages.
  • Each cracker box treat package can be customized to celebrate Halloween, Thanksgiving, the autumn season, or all three!
  • Coordinating Colors: Bumblebee, Basic Black, Cajun Craze, Cinnamon Cider, Mossy Meadow, Old Olive, Pumpkin Pie, white

Subscribe to the September 2020 Paper Pumpkin Kit from 11 August to 10 September at paperpumpkin.com!

Note: Supplies may be limited toward the end of the subscription period.

****************************************************************************************************

I’m cleaning my shelves and drawers out to make room for lots of new goodie.  I have my list right HERE and I’m trying to keep it up to date.   Check it out and let me know if there is anything you’d like to get.  If you are looking for something and don’t see it on the list, drop me a line and I will look through my stash to see if I missed it.  I have lots of older DSP too that I don’t have listed if there is any that you are looking for.

****************************************************************************************************

If you need any stamping supplies, I’d love to be your Demonstrator. Just click HERE to go directly to my online store or drop me an email if you have any questions. 

MY CURRENT HOST CODE IS: G39RYMEX

Use this host code when you order $50 or greater and receive a free gift from me! If your order is over $150, please do not use this code, but you’ll still get the free gift. The free gift is your choice of any 1 item valued up to $10.00 in the 2020-2021 Annual Catalog!   For any orders $50 or more I will also send you my monthly class tutorials.  Click HERE or go to my Customer Rewards for more details and to see what this months tutorials are.

 Click HERE to shop the clearance rack.

Happy Stamping, Karen!


Stampin’ Up! Peaceful Boughs Triple Time

Good Monday morning my fellow stampers.  How was everyone’s weekend?  Hope you had nice weather and were able to do something fun.  I was able to go out for a nice long walk yesterday, it was absolutely beautiful.  I believe  it was only in the mid to upper 70’s.  Another week starting and I hope it’s a productive one for you.  I have to work today and tomorrow since it’s the last day of the month and the 1st.  Seems like the 1st comes around really fast lately.

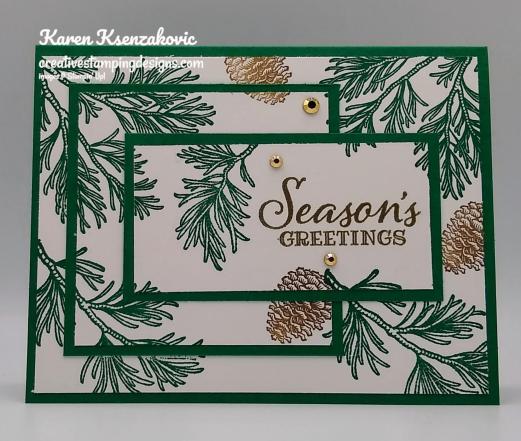
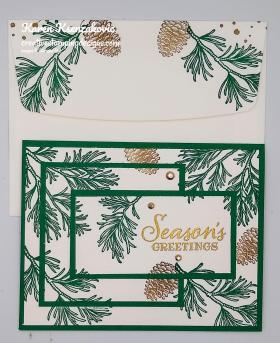
I have a triple time stamping card for you today, but I changed the layout a bit.  Here’s my card for today.

I started by stamping the sentiment from the Stampin’ Up! Peaceful Boughs Cling Stamp Set in Versamark Ink on the smallest Whisper White panel.  I immediately sprinkled it with my Gold Stampin’ Emboss Powder and set it using my Heat Tool.

I lined up the Whisper White panels the way I wanted them and put a tiny amount of adhesive just to hold them from moving.  I stamped the boughs from the Peaceful Boughs stamp set in Shaded Spruce Ink around the panels.  I then stamped the pinecone image from the Peaceful Boughs around the panels in Soft Suede Ink.

I adhered the largest Whisper White panel to a Shaded Spruce card base using Stampin’ Seal.  I adhered the other 2 Whisper White panels to Shaded Spruce mats using Stampin’ Seal.  Lining up the boughs, I adhered the square panel to the card front then the rectangle panel on top of the square using Multipurpose Liquid Glue.  I added a few Gilded Gems to the card front.

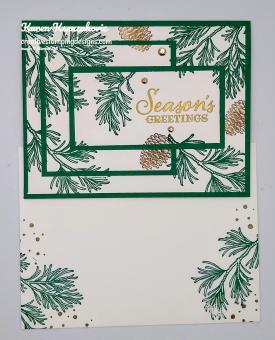
On the inside I stamped the sentiment from the Peaceful Boughs stamp set in Soft Suede Ink in the center of a Whisper White panel.  I stamped the boughs from the Peaceful Boughs stamp set in Shaded Spruce Ink, stamping off twice, on the top of the panel hanging down over the sentiment.  I stamped the splatter image, (or snowflake, not sure what it is), from the Peaceful Boughs stamp set in Soft Suede Ink, stamping off twice, around the boughs.  I adhered the Whisper White panel to a Soft Suede mat using Stampin’ Seal and then to the inside of the Shaded Spruce card base using Multipurpose Liquid Glue.

To finish my card I decorated a Medium Whisper White Envelope.  I stamped the pine boughs from the Peaceful Boughs stamp set in Shaded Spruce Ink on the envelope front and flap.  I stamped the splatter image from the Peaceful Boughs stamp set in Soft Suede Ink around the pine boughs.  I stamped a couple pine cones from the Peaceful Boughs stamp set on the envelope flap.

Thank you so much for stopping by today.  I hope you liked my card and will try it. Happy Stamping!!

****************************************************************************************************

If you need any stamping supplies, I’d love to be your Demonstrator. Just click HERE to go directly to my online store or drop me an email if you have any questions. 

MY CURRENT HOST CODE IS: G39RYMEX

Use this host code when you order $50 or greater and receive a free gift from me! If your order is over $150, please do not use this code, but you’ll still get the free gift. The free gift is your choice of any 1 item valued up to $10.00 in the 2020-2021 Annual Catalog!   For any orders $50 or more I will also send you my monthly class tutorials.  Click HERE or go to my Customer Rewards for more details and to see what this months tutorials are.

 Click HERE to shop the clearance rack.

Happy Stamping, Karen!

****************************************************************************************************

LAST DAY TO REDEEM!!!

IT’S TIME TO REDEEM THOSE BONUS DAYS COUPONS YOU EARNED IN JULY!!

  • Redemption Deadline:  August 31 2020, by 11:50 PM (MT)
  • There is no limit to the number of coupon codes participants can use on an order during redemption.
  • Bonus Days coupon codes may be redeemed for any product (excluding Starter Kits and Paper Pumpkin monthly subscriptions).
    • New prepaid Paper Pumpkin codes may be discounted using Bonus Days coupon codes.
  • Bonus Days coupon codes will reduce the amount of an order.
  • Bonus Days coupon codes may be redeemed one time only.

****************************************************************************************************

HELLO, PUMPKIN

SUBSCRIBE AUTUST 11 – SEPTEMBER 10

As the autumn season approaches, prepare to celebrate with the September Paper Pumpkin Kit! There’s so much to love about fall—some love the haunts of Halloween, many love the time to give thanks, and others love the changing colors and cooler temperatures. Whatever you love most about fall, September’s kit has everything you need to celebrate the season your way! Between a multi-occasion stamp set and enough supplies to design 20 cracker box treat packages, you can create custom fall crafts to celebrate Halloween, Thanksgiving, pumpkins, and leaves. Whether you make them all the same or mix ‘n’ match your crafts, there’s something for everyone in this kit!

September’s kit is a must-have for those who love to celebrate all things spooky. But, for those who don’t enjoy the Halloween haunts, the multi-occasion stamp set combined with a variety of die-cut and reversible paper pieces offers many ways to customize your fall crafts!

  • Kit contains enough supplies to create 20 cracker box treat packages.
  • Each cracker box treat package can be customized to celebrate Halloween, Thanksgiving, the autumn season, or all three!
  • Coordinating Colors: Bumblebee, Basic Black, Cajun Craze, Cinnamon Cider, Mossy Meadow, Old Olive, Pumpkin Pie, white

Subscribe to the September 2020 Paper Pumpkin Kit from 11 August to 10 September at paperpumpkin.com!

Note: Supplies may be limited toward the end of the subscription period.

****************************************************************************************************

I’m cleaning my shelves and drawers out to make room for lots of new goodie.  I have my list right HERE and I’m trying to keep it up to date.   Check it out and let me know if there is anything you’d like to get.  If you are looking for something and don’t see it on the list, drop me a line and I will look through my stash to see if I missed it.  I have lots of older DSP too that I don’t have listed if there is any that you are looking for.

****************************************************************************************************

Card stock cuts for this project:

  • Shaded Spruce Cardstock 8 1/2″ X 5 1/2″ (card base scored and folded at 4 1/4″), 3 1/4″ X 3 1/4″ & 2″ X 3 3/4″ (card front mats)
  • Soft Suede Cardstock 4 1/8″ X 5 3/8″ (inner liner mat)
  • Whisper White Cardstock 2 – 4″ X 5 1/4″ (card front and inner liner), 3″ X 3″ & 1 3/4″ X 3 1/2″ (card front panels)

****************************************************************************************************

Product List

Stampin’ Up! In The Pines Christmas

Good Sunday morning my fellow stampers.  How is everyone’s weekend going?  Hope you are enjoying some fun activities.

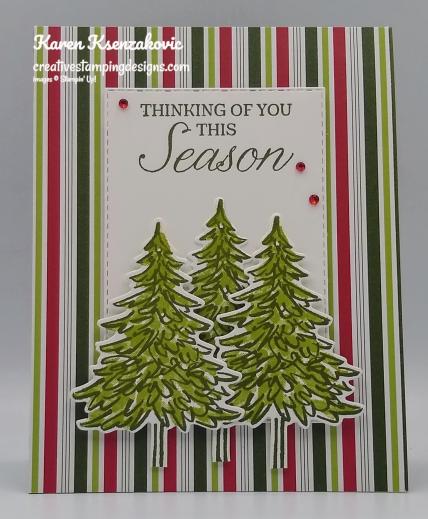
I have another quick and easy card for you today using one of the new bundles from the August – December 2020 Mini Catalog.  Here’s today’s card.

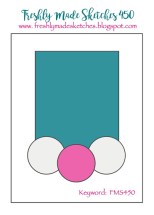
My design is from Freshly Made Sketches #450.  Here is their sketch.

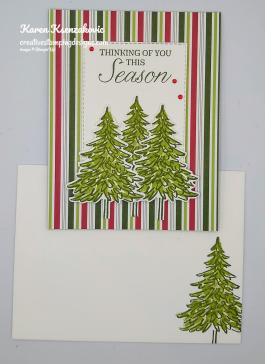
I started by adhering a panel of Heartwarming Hugs Designer Series Paper to a Mossy Meadow card base using Multipurpose Liquid Glue.

On a panel of Whisper White cardstock I stamped the outline tree image from the Stampin’ Up! In The Pines Photopolymer Stamp Set in Mossy Meadow Ink.  I stamped the fill image from the In The Pines stamp set in Pear Pizzazz Ink over the outlined images.  I cut the 3 trees out using my Pine Woods Dies.  On a panel of
Whisper White cardstock I stamped the sentiment from the Stampin’ Up! Winter Woods Cling Stamp Set in Mossy Meadow Ink.  I cut the sentiment out using my Stitched Rectangle Dies, making sure the sentiment was at the top of the rectangle.

I adhered the trees to the bottom of the rectangle using Multipurpose Liquid Glue for the bottom one and Stampin’ Dimensionals for the top 2.  I adhered the artwork to the card front using Stampin’ Dimensionals.  I added a few Red Rhinestone Basic Jewels to the artwork.

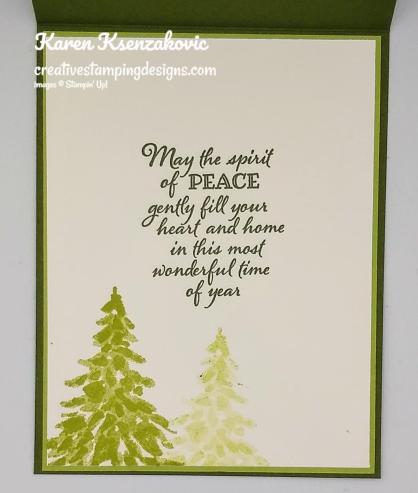
On the inside I stamped the sentiment from the Stampin’ Up! Peaceful Boughs Cling Stamp Set in Mossy Meadow Ink in the center of a Whisper White panel.  I stamped the fill image of the tree from the In The Pines stamp set in Pear Pizzazz Ink on the bottom of the panel, one full strength and the 2nd stamping off once.

To complete my card I decorated a Medium Whisper White Envelope.  I stamped the outline tree image from the In The Pines stamp set in Mossy Meadow Ink on the envelope front.  I stamped the fill image tree from In The Pines stamp set over the outline image in Pear Pizzazz Ink.  I adhered a panel of Heartwarming Hugs DSP to the envelope flap.

Thank you for stopping by my blog today.  I hope you liked my card and will give it a try. Happy Stamping!!

****************************************************************************************************

If you need any stamping supplies, I’d love to be your Demonstrator. Just click HERE to go directly to my online store or drop me an email if you have any questions. 

MY CURRENT HOST CODE IS: 4Z2KHBVY

Use this host code when you order $50 or greater and receive a free gift from me! If your order is over $150, please do not use this code, but you’ll still get the free gift. The free gift is your choice of any 1 item valued up to $10.00 in the 2020-2021 Annual Catalog!   For any orders $50 or more I will also send you my monthly class tutorials.  Click HERE or go to my Customer Rewards for more details and to see what this months tutorials are.

 Click HERE to shop the clearance rack.

Happy Stamping, Karen!

****************************************************************************************************

LAST 2 DAYS TO REDEEM YOUR COUPONS

IT’S TIME TO REDEEM THOSE BONUS DAYS COUPONS YOU EARNED IN JULY!!

  • Redemption Deadline:  August 31 2020, by 11:50 PM (MT)
  • There is no limit to the number of coupon codes participants can use on an order during redemption.
  • Bonus Days coupon codes may be redeemed for any product (excluding Starter Kits and Paper Pumpkin monthly subscriptions).
    • New prepaid Paper Pumpkin codes may be discounted using Bonus Days coupon codes.
  • Bonus Days coupon codes will reduce the amount of an order.
  • Bonus Days coupon codes may be redeemed one time only.

****************************************************************************************************

HELLO, PUMPKIN

SUBSCRIBE AUTUST 11 – SEPTEMBER 10

As the autumn season approaches, prepare to celebrate with the September Paper Pumpkin Kit! There’s so much to love about fall—some love the haunts of Halloween, many love the time to give thanks, and others love the changing colors and cooler temperatures. Whatever you love most about fall, September’s kit has everything you need to celebrate the season your way! Between a multi-occasion stamp set and enough supplies to design 20 cracker box treat packages, you can create custom fall crafts to celebrate Halloween, Thanksgiving, pumpkins, and leaves. Whether you make them all the same or mix ‘n’ match your crafts, there’s something for everyone in this kit!

September’s kit is a must-have for those who love to celebrate all things spooky. But, for those who don’t enjoy the Halloween haunts, the multi-occasion stamp set combined with a variety of die-cut and reversible paper pieces offers many ways to customize your fall crafts!

  • Kit contains enough supplies to create 20 cracker box treat packages.
  • Each cracker box treat package can be customized to celebrate Halloween, Thanksgiving, the autumn season, or all three!
  • Coordinating Colors: Bumblebee, Basic Black, Cajun Craze, Cinnamon Cider, Mossy Meadow, Old Olive, Pumpkin Pie, white

Subscribe to the September 2020 Paper Pumpkin Kit from 11 August to 10 September at paperpumpkin.com!

Note: Supplies may be limited toward the end of the subscription period.

****************************************************************************************************

I’m cleaning my shelves and drawers out to make room for lots of new goodie.  I have my list right HERE and I’m trying to keep it up to date.   Check it out and let me know if there is anything you’d like to get.  If you are looking for something and don’t see it on the list, drop me a line and I will look through my stash to see if I missed it.  I have lots of older DSP too that I don’t have listed if there is any that you are looking for.

****************************************************************************************************

Card stock cuts for this project:

  • Mossy Meadow Cardstock 4 1/4″ X 11″ (card base scored and folded at 5 1/2″)
  • Pear Pizzazz Cardstock 4 1/8″ X 5 3/8″ (inner liner mat)
  • Whisper White Cardstock 4 1/2″ X 3″ (rectangle), 5″ X 5″ (trees), 4″ x 5 1/4″ (inner liner)
  • Heartwarming Hugs Designer Series Paper 4 1/4″ X 5 1/2″ (card front), 2 1/4″ X 6″ (piece for envelope flap)

****************************************************************************************************

Product List

Stampin’ Up! Flowering Blooms Sympathy CAS

Good Saturday morning my stamping friends.  How is everyone feeling today?  Is anyone doing anything fun this weekend?  I’m working today and I’m not sure what tomorrow will bring.

I have a Clean & Simple card for you today.  A friend of mine asked me to make her a pack of Sympathy cards so she could have them on hand.  She knows a lot of people and is pretty well known in our area.  I actually needed a sympathy card last week and realized I don’t have any in my stash, guess I need to make some for me also.  Here’s my card for today.

I started by stamping the rose image from the Stampin’ Up! Flowering Blooms Cling Stamp Set in Basic Gray Ink on a Whisper White panel.

I stamped the sentiment from the Stampin’ Up! Touched My Heart Cling Stamp Set, (which is a host set), next to the flowers on the bottom of the panel in Basic Gray Ink.  I embossed the panel using the Subtle 3D Embossing Folder to give it a little texture.

I adhered the artwork to a Smoky Slate mat using Multipurpose Liquid Glue and then to a Basic Gray card base using Stampin’ Dimensionals.  I added a few Elegant Faceted Gems to the card front.

On the inside I stamped the rose image from the Flowering Blooms stamp set in Basic Gray Ink, stamping off twice, in the center of a Whisper White panel.  I stamped the sentiment from the Stampin’ Up! Path of Petals Photopolymer Stamp Set in Basic Gray Ink over the flower image.  I adhered the Whisper White panel to a Smoky Slate mat using Stampin’ Seal and then to the inside of the Basic Gray card base using Multipurpose Liquid Glue.

To finish my card I decorated a Medium Whisper White Envelope.  I stamped the rose image from the Flowering Blooms stamp set in Basic Gray Ink on the envelope front and flap.

Thank you for stopping by my blog today.  I hope you liked my card and will give it a try. Happy Stamping!!

****************************************************************************************************

If you need any stamping supplies, I’d love to be your Demonstrator. Just click HERE to go directly to my online store or drop me an email if you have any questions. 

MY CURRENT HOST CODE IS: 4Z2KHBVY

Use this host code when you order $50 or greater and receive a free gift from me! If your order is over $150, please do not use this code, but you’ll still get the free gift. The free gift is your choice of any 1 item valued up to $10.00 in the 2020-2021 Annual Catalog!   For any orders $50 or more I will also send you my monthly class tutorials.  Click HERE or go to my Customer Rewards for more details and to see what this months tutorials are.

 Click HERE to shop the clearance rack.

Happy Stamping, Karen!

****************************************************************************************************

IT’S TIME TO REDEEM THOSE BONUS DAYS COUPONS YOU EARNED IN JULY!!

  • Redemption Deadline:  August 31 2020, by 11:50 PM (MT)
  • There is no limit to the number of coupon codes participants can use on an order during redemption.
  • Bonus Days coupon codes may be redeemed for any product (excluding Starter Kits and Paper Pumpkin monthly subscriptions).
    • New prepaid Paper Pumpkin codes may be discounted using Bonus Days coupon codes.
  • Bonus Days coupon codes will reduce the amount of an order.
  • Bonus Days coupon codes may be redeemed one time only.

****************************************************************************************************

HELLO, PUMPKIN

SUBSCRIBE AUTUST 11 – SEPTEMBER 10

As the autumn season approaches, prepare to celebrate with the September Paper Pumpkin Kit! There’s so much to love about fall—some love the haunts of Halloween, many love the time to give thanks, and others love the changing colors and cooler temperatures. Whatever you love most about fall, September’s kit has everything you need to celebrate the season your way! Between a multi-occasion stamp set and enough supplies to design 20 cracker box treat packages, you can create custom fall crafts to celebrate Halloween, Thanksgiving, pumpkins, and leaves. Whether you make them all the same or mix ‘n’ match your crafts, there’s something for everyone in this kit!

September’s kit is a must-have for those who love to celebrate all things spooky. But, for those who don’t enjoy the Halloween haunts, the multi-occasion stamp set combined with a variety of die-cut and reversible paper pieces offers many ways to customize your fall crafts!

  • Kit contains enough supplies to create 20 cracker box treat packages.
  • Each cracker box treat package can be customized to celebrate Halloween, Thanksgiving, the autumn season, or all three!
  • Coordinating Colors: Bumblebee, Basic Black, Cajun Craze, Cinnamon Cider, Mossy Meadow, Old Olive, Pumpkin Pie, white

Subscribe to the September 2020 Paper Pumpkin Kit from 11 August to 10 September at paperpumpkin.com!

Note: Supplies may be limited toward the end of the subscription period.

****************************************************************************************************

I’m cleaning my shelves and drawers out to make room for lots of new goodie.  I have my list right HERE and I’m trying to keep it up to date.   Check it out and let me know if there is anything you’d like to get.  If you are looking for something and don’t see it on the list, drop me a line and I will look through my stash to see if I missed it.  I have lots of older DSP too that I don’t have listed if there is any that you are looking for.

****************************************************************************************************

Card stock cuts for this project:

  • Basic Gray Cardstock 4 1/4″ X 11″ (card base scored and folded at 5 1/2″)
  • Smoky Slate Cardstock 2 – 4″ X 5 1/4″ (card front and inner liner mats)
  • Whisper White Cardstock 2 – 3 3/4″ X 5″ (card front and inner liner)

****************************************************************************************************

Product List