Stampin’ Up! Wrapped in Plaid Winter Woods

Good Wednesday morning my fellow stampers.  Happy half way through  the work week day!!  Hope everyone’s week is moving right along.  Other than my surgery getting delayed for 3 hours yesterday, everything went well.  I got to be awake for the whole thing and was able to ask the doctor questions as he was performing the surgery.    The first hand wasn’t too bad, but by the time he started the second the numbness was wearing off.  He did numb it up again though.  Having a bit of trouble using my finger now, but I’ll figure out how and keep moving right along.

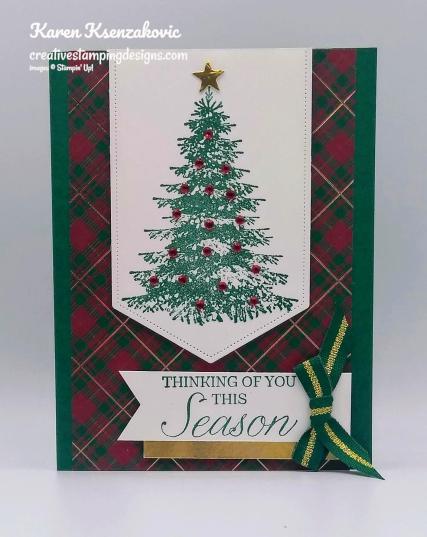
For today’s card I used a stamp set from the Annual Catalog which I absolutely love.    Here’s my card.
My colors were inspired by CAS Colours & Sketches Challenge #350.  Here are their colors.

I started by adhering a panel of Wrapped In Plaid Specialty Designer Series Paper to a Shaded Spruce card base using Multipurpose Liquid Glue.

On a panel of Whisper White cardstock I stamped the tree image from the Stampin’ Up Winter Woods Cling Stamp Set in Shaded Spruce Ink.  I cut the image out using the largest Stitched Nested Labels Dies and cut the top section off.  I adhered the artwork to the top of the card front using Stampin’ Dimensionals.  I needed a star for the top of the tree, so I grabbed the Stitched Stars Dies and cut a small star out of a scrap of Gold Foil Sheet.  I adhered the star to the top of the tree using a Glue dot.  I added Red Rhinestone Basic Jewels all over the tree.
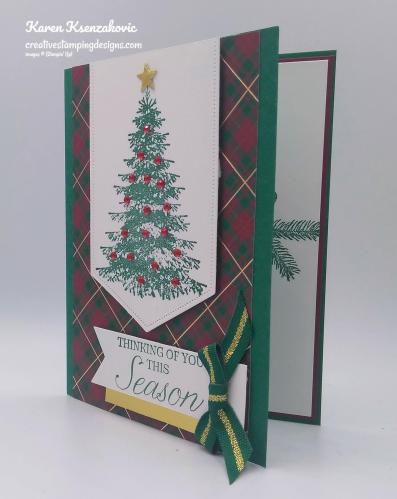
On a strip of Whisper White cardstock I stamped the sentiment from the Winter Woods stamp set in Shaded Spruce Ink.  I made a banner out of the strip using my Banner Triple Punch.  I adhered a small strip of a Gold Foil Sheet to the bottom of the banner using Snail and adhered it to the bottom of the card front using Stampin’ Dimensionals.  I tied a small bow from the Shaded Spruce/Gold 3/8″ Striped Ribbon and adhered it to the end of the banner using a Glue Dot.
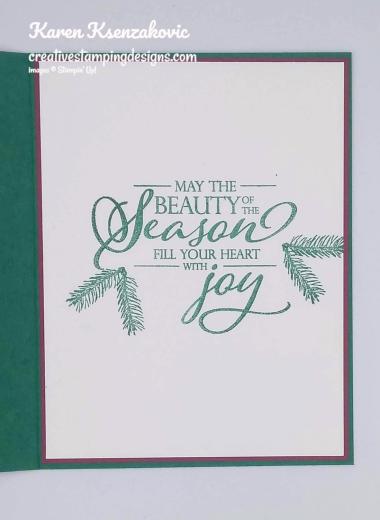
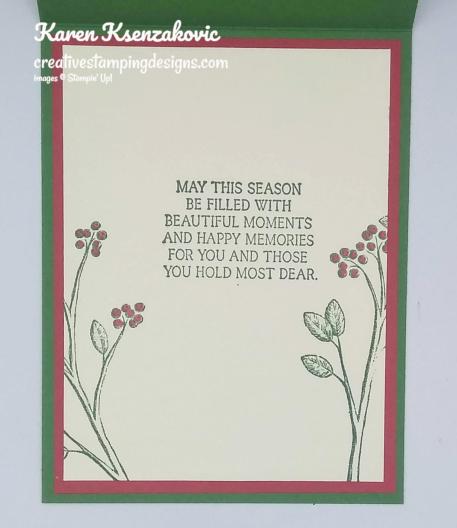
On the inside I stamped the sentiment from the Stampin’ Up Merry Christmas To All Photopolymer Stamp Set in Shaded Spruce Ink in the center of a Whisper White panel.  I stamped the pine bough image from the Winter Woods stamp set in Shaded Spruce Ink on either side of the sentiment.  I adhered the Whisper White panel to a Cherry Cobbler mat using Snail and then to the inside of the Shaded Spruce card base using Multipurpose Liquid Glue.
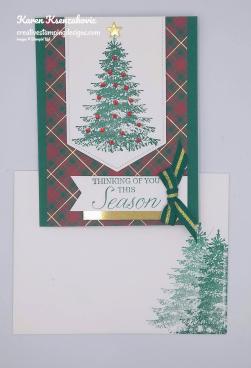
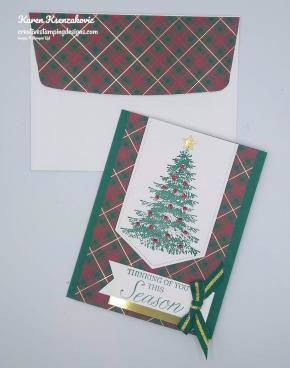
To finish my card I decorated a Medium Whisper White Envelope.  I stamped the tree image from the Winter Woods stamp set in Shaded Spruce Ink on the envelope front. I stamped one in full strength and another stamped off.  I adhered a panel of the Wrapped In Plaid Specialty DSP to the envelope flap.

Thank you for stopping by my blog today.  I hope you liked my card and will give it a try. Happy Stamping!!

****************************************************************************************************

If you need any stamping supplies, I’d be very happy to be your Demonstrator. Just click HERE to go directly to my online store or drop me an email if you have any questions. 

MY CURRENT HOST CODE IS: NVSKQ72X

For any orders $50 or more I will send you my monthly class tutorials.  Click HERE or go to my Customer Rewards to see what this months tutorials are.

Click HERE to shop the clearance rack.

Happy Stamping, Karen!

****************************************************************************************************

Stampin’ Up!’s Year-End Closeout is here while supplies last!!  You can save on a selection of retiring and surplus items including holiday catalog items, stamp sets, and Paper Pumpkin past kits! Shop early to avoid missing out as items on the sale are only available while supplies last! Supplies are limited and popular items will sell out quickly. This amazing sale ends on January 2.

Head over to my Online store to see all the Discounted Items and Retiring Favorites Items.  You don’t want to miss out on these savings because when they are gone THEY ARE GONE!

****************************************************************************************************

SOMETHING FOR EVERYTHING PAPER PUMPKIN 
SUBSCRIBE TO PAPER PUMPKIN BY DECEMBER 10, 2019
December’s Something for Everything kit includes a super-versatile stamp set complete with 13 sentiments that can be used for occasions ranging from wedding, to get well, birthdays, and more! Plus, the three full-sized card designs (four of each) are gorgeous AND multiuse.  Paper Pumpkin’s December kit makes it easier than ever to give a handmade card to a friend—no matter what the occasion!

This is an all-card kit, with 13 sentiments to cover tons of occasions from weddings, get well, birthday, and more, this set does it all.

Kit details: Makes 12 cards and envelopes

Card size: 4 1/4″ x 5-1/2″ (10.8 x 14 cm)

Envelope size: 4-1/2″ x 5-3/4″ (11.4 x 14.6 cm)

Coordinating colors: Crushed Curry, Grapefruit Grove, Old Olive, Shaded Spruce, Terracotta Tile

  • Subscribe for the December kit at paperpumpkin.com from November 11–December 10.
  • Supplies may be limited toward the end of each subscription period.
Interested in subscribing to Paper Pumpkin?  You can either sign up for a subscription where you are billed monthly for your kit or you can purchase a prepaid subscription in my online store. To see more information and to sign up for the monthly subscription,  Click Here. To see the options for prepaid subscriptions in my online store, Click Here.

****************************************************************************************************

Card stock cuts for this project:

  • Cherry Cobbler Cardstock 4 1/8″ X 5 3/8″ (inner liner mat)
  • Shaded Spruce Cardstock 8 1/2″ X 5 1/2″ (card base scored and folded at 4 1/4″)
  • Whisper White Cardstock 4″ X 5 1/4″ (inner liner), 1″ X 3 1/8″ (card front banner), 3″ X 5″ (artwork)
  • Gold Foil Sheets 3/8″ X 2 5/8″ (strip under banner)
  • Wrapped In Plaid Specialty Designer Series Paper 3 3/4″ X 5 1/2″(card front)

****************************************************************************************************

Product List

Stampin’ Up! Christmas Tidings With a Sneak Peek

Good Tuesday morning my stamping friends.  How has everyone’s week started?  I hope everyone is doing well and finishing up all your cards to get in the mail early.  I’m having a class tonight and the ladies will be making a few more Christmas cards to add to their stash.  They may even be making this one.  Before my class though I will be gong in for surgery.  I’ve had trigger finger in both of my hands and I just couldn’t stand the pain anymore or the locking of my fingers.  I am having both hands operated on at the same time, I must be nuts.  I was told that I am to use my hands immediately, so I figured why not have a class.  The first thing my daughter said when I told her I was having surgery was ” so you’ll be ok to bake cookies this year then right?”.  You can see where her priorities are, lol.

So today I have a card that looks more involved than it really is.  Once you get the couple pieces cut out, it goes together really quick.  I was very hesitant about getting the Toile Tiding Designer Series Paper, I wasn’t sure I was going to like it.  It’s only 2 colors + Very Vanilla, Garden Green on one side and Real Red on the other.  I’m so happy I bought it, I really love the designs on this paper.  Once again I was inspired by one of my team members, Akiko, who made this card for our weekly blog hop a couple weeks ago.  Here is her card.  Here’s my take on it.

I started by cutting a circle in a Very Vanilla card front using the 2nd largest circle from the Layering Circles Dies.  As in my description, I have a little sneak peek of something coming January 3, 2020 in the new Mini Catalog (formally known as the occasions catalog).  I embossed the Very Vanilla panel using the new Parisian Flourish 3D Embossing Folder, isn’t it just gorgeous.  Using the largest scallop circle from the Layering Circles Dies, I cut a piece of Real Red cardstock.  I used the 2nd largest circle die from the Layering Circles Dies to cut the inside of the scallop circle to make a frame.  I adhered the scallop frame to the Very Vanilla card front using Multipurpose Liquid Glue.  I cut a panel of Toile Tidings DSP using the largest circle die from the Layering Circles Dies making sure to get the image I wanted in the circle.  I adhered the Toile Tidings DSP circle behind the Very Vanilla panel using Stampin’ Dimensionals.

I wrapped a piece of Garden Green 3/8″ Double-Stitched Ribbon around the panel and tied a knot.  I adhered the Very Vanilla panel to a Garden Green card base using Stampin’ Dimensionals.

On a scrap of Very Vanilla cardstock I stamped the sentiment from the Stampin’ Up! Toile Christmas Cling Stamp Set in Garden Green Ink. I cut the sentiment out using the Christmas Cardinal Dies. I adhered the cut sentiment to the card front using Stampin’ Dimensionals.  I added a few Real Red Toile Tidings Glitter Enamel Dots to the card front.

On the inside I stamped the sentiment from the Toile Christmas stamp set in Garden Green Ink in the center of a Very Vanilla panel.  I stamped the branch image from the Toile Christmas stamp set on either side of the panel in Garden Green Ink.  I colored the berries on the branches in using my Real Red Stampin’ Blends Markers.  I adhered the Very Vanilla panel to a Real Red mat using Snail and then to the inside of the Garden Green card base using Multipurpose Liquid Glue.

To finish my card I decorated a Medium Very Vanilla Envelope.  I stamped the branch image from the Toile Christmas stamp set in Garden Green Ink on the envelope front.  I colored the berries on the branch in using my Real Red Stampin’ Blends Marker.  I adhered a panel of the Toile Tidings DSP to the envelope flap.

Thank you for visiting my blog today.  I hope you liked my card and will give it a try. Happy Stamping!!

****************************************************************************************************

If you need any stamping supplies, I’d be very happy to be your Demonstrator. Just click HERE to go directly to my online store or drop me an email if you have any questions. 

MY CURRENT HOST CODE IS: NVSKQ72X

For any orders $50 or more I will send you my monthly class tutorials.  Click HERE or go to my Customer Rewards to see what this months tutorials are.

Click HERE to shop the clearance rack.

Happy Stamping, Karen!

****************************************************************************************************

SOMETHING FOR EVERYTHING PAPER PUMPKIN 
SUBSCRIBE TO PAPER PUMPKIN BY DECEMBER 10, 2019

December’s Something for Everything kit includes a super-versatile stamp set complete with 13 sentiments that can be used for occasions ranging from wedding, to get well, birthdays, and more! Plus, the three full-sized card designs (four of each) are gorgeous AND multiuse.  Paper Pumpkin’s December kit makes it easier than ever to give a handmade card to a friend—no matter what the occasion!

This is an all-card kit, with 13 sentiments to cover tons of occasions from weddings, get well, birthday, and more, this set does it all.

Kit details: Makes 12 cards and envelopes

Card size: 4 1/4″ x 5-1/2″ (10.8 x 14 cm)

Envelope size: 4-1/2″ x 5-3/4″ (11.4 x 14.6 cm)

Coordinating colors: Crushed Curry, Grapefruit Grove, Old Olive, Shaded Spruce, Terracotta Tile

  • Subscribe for the December kit at paperpumpkin.com from November 11–December 10.
  • Supplies may be limited toward the end of each subscription period.

Interested in subscribing to Paper Pumpkin?  You can either sign up for a subscription where you are billed monthly for your kit or you can purchase a prepaid subscription in my online store. To see more information and to sign up for the monthly subscription,  Click Here. To see the options for prepaid subscriptions in my online store, Click Here.

****************************************************************************************************

Card stock cuts for this project:

  • Garden Green Cardstock 4 1/4″ X 11″ (card base scored and folded at 5 1/2″)
  • Real Red Cardstock 4″ X 5 1/4″ (inner liner mat), 3 1/2″ X 3 1/2″ (scallop frame)
  • Very Vanilla Cardstock 4″ X 5 1/4″ (card front), 3 3/4″ X 5″ (inner liner)
  • Toile Tidings Designer Series Paper

****************************************************************************************************

Product List

Stampin’ Up! Night Before Christmas Wish for Everything

Good Monday morning my fellow stampers and Happy December!!  How was everyone’s long weekend?  Did anyone brave going out on Black Friday to start their holiday shopping? I definitely did NOT.  I stayed in and got my house decorated for Christmas.  This has been a tradition of mine for years to decorate the weekend after Thanksgiving.  I decorate the inside and my husband does the outside.  Sometimes I think he is trying to compete with Christmas Vacation though.  I didn’t decorate as much this year as I normally do.  Christmas usually explodes in my house, going all out decorating every room to the fullest.  We are leaving for a vacation (finally after 5 years) on January 6th and I will need to pack up everything before I leave, I don’t want to have to come home to having to pack up Christmas.

For this week, I’m doing some pretty quick and easy cards for you.  We’re getting to crunch time to finish up Christmas cards, so I figured I give you some quick ones using up a lot of DSP.  Today’s card was inspired by my upline Jaimie.  I’ve had this piece of DSP and didn’t know how to use it without ruining the beautiful picture, Jaimie made a card last week using this paper and I loved it.  Here’s today’s card.

This is one of the cards we are going to make at my Stamp Camp this week.  I started by cutting the panel of Night Before Christmas Designer Series Paper in half so that I could make 2 cards from this one piece.  Now everyone knows that I don’t make any 2 cards the same, but when I’m having a class everyone else makes my card.

I adhered the Night Before Christmas DSP to a Very Vanilla mat using Snail.  I adhered the matted DSP to a Night of Navy card front using Multipurpose Liquid Glue.  I cut the Merry Christmas sentiment out of a scrap of Very Vanilla cardstock using the Word Wishes Dies.  I adhered the sentiment to the card front using Multipurpose Liquid Glue.

They are a little difficult to see, but I added a few Gold Glitter Enamel Dots to the card front to add a little glimmer.

On the inside I stamped the sentiment from the Stampin’ Up! A Wish For Everything Cling Stamp Set in Night of Navy Ink in the center of a Very Vanilla panel.  I stamped the tree image from the Stampin’ Up Winter Woods Cling Stamp Set off to the side in Old Olive Ink.  I adhered the Very Vanilla panel to the inside of the Night of Navy card base using Multipurpose Liquid Glue.

To finish my card I decorated a Medium Very Vanilla Envelope.  I stamped the tree image from the Winter Woods stamp set in Old Olive Ink on the envelope front.  I adhered a panel of the Night Before Christmas DSP to the envelope flap.

Thank you for stopping by my blog today.  I hope you liked my card and will give it a try. Happy Stamping!!

****************************************************************************************************

If you need any stamping supplies, I’d be very happy to be your Demonstrator. Just click HERE to go directly to my online store or drop me an email if you have any questions. 

MY CURRENT HOST CODE IS: NVSKQ72X

For any orders $50 or more I will send you my monthly class tutorials.  Click HERE or go to my Customer Rewards to see what this months tutorials are.

Click HERE to shop the clearance rack.

Happy Stamping, Karen!

****************************************************************************************************

SOMETHING FOR EVERYTHING PAPER PUMPKIN 
SUBSCRIBE TO PAPER PUMPKIN BY DECEMBER 10, 2019

December’s Something for Everything kit includes a super-versatile stamp set complete with 13 sentiments that can be used for occasions ranging from wedding, to get well, birthdays, and more! Plus, the three full-sized card designs (four of each) are gorgeous AND multiuse.  Paper Pumpkin’s December kit makes it easier than ever to give a handmade card to a friend—no matter what the occasion!

This is an all-card kit, with 13 sentiments to cover tons of occasions from weddings, get well, birthday, and more, this set does it all.

Kit details: Makes 12 cards and envelopes

Card size: 4 1/4″ x 5-1/2″ (10.8 x 14 cm)

Envelope size: 4-1/2″ x 5-3/4″ (11.4 x 14.6 cm)

Coordinating colors: Crushed Curry, Grapefruit Grove, Old Olive, Shaded Spruce, Terracotta Tile

  • Subscribe for the December kit at paperpumpkin.com from November 11–December 10.
  • Supplies may be limited toward the end of each subscription period.

Interested in subscribing to Paper Pumpkin?  You can either sign up for a subscription where you are billed monthly for your kit or you can purchase a prepaid subscription in my online store. To see more information and to sign up for the monthly subscription,  Click Here. To see the options for prepaid subscriptions in my online store, Click Here.

****************************************************************************************************

Card stock cuts for this project:

  • Night of Navy Cardstock 4 1/4″ X 11″ (card base scored and folded at 5 1/2″)
  • Very Vanilla Cardstock 3 1/4″ X 5 1/2″ (card front mat), 4″ X 5 1/4″ (inner liner)
  • Night Before Christmas Designer Series Paper 3″ X 5 1/2″(card front), piece for envelope flap

****************************************************************************************************

Product List

Stampin’ Up! Sweet Christmas Wishes

Good Wednesday morning my stamping friends.  How is everyone doing today?  Is everyone ready for a long weekend?  I’ll be baking apple and pumpkin pies today and making a pumpkin swirl cheesecake.  I’ll make my homemade cranberry sauce and make sure the turkey is  cleaned and ready for the grill in the morning.  How about all of you, what do you have to prepare for Thanksgiving dinner?

For today’s card I used some DSP and embossing folder and some dies.  Take a look.

My design was inspired by Try Stamping on Tuesday Challenge #436.  Here is their sketch.

I started by embossing a Poppy Parade card front using the Winter Knit 3D Embossing Folder.  I adhered the card front to a Poppy Parade card base using Multipurpose Liquid Glue.

I adhered 2 panels of Night Before Christmas Designer Series Paper to the card front using Multipurpose Liquid Glue.  I cut a stitched circle using the Stitched Shapes Dies from a piece of Crumb Cake cardstock.  I cut a circle a little smaller than the stitched circle using the Layering Circle Dies out of Pretty Peacock cardstock.  I stamped the sentiment from the Stampin’ Up! Cup of Christmas Photopolymer Stamp Set in Poppy Parade Ink on a panel of Very Vanilla cardstock.  I cut the sentiment out using a smaller circle from the Stitched Shapes Dies.

I adhered the sentiment to the Pretty Peacock mat using Snail.  I adhered the matted sentiment to the stitched Crumb Cake circle using Stampin’ Dimensionals and then to the card front using Stampin’ Dimensionals.

On the inside I stamped the sentiment from the Cup of Christmas stamp set in Poppy Parade Ink in the center of a Very Vanilla panel.  I adhered the Very Vanilla panel to a Pretty Peacock mat using Snail and then to the inside of the Poppy Parade card base using Multipurpose Liquid Glue.  I added a candy cane which I cut and put together using the Cup of Cheer Dies.  I cut the base in Very Vanilla and the top in Poppy Parade.

To finish my card I decorated a Medium Very Vanilla Envelope.  I stamped the cup image from the Cup of Christmas stamp set in Poppy Parade Ink on the front of the envelope.  I stamped the sentiment from the Cup of Christmas stamp set inside the cup in Poppy Parade Ink.  I adhered a panel of the Night Before Christmas DSP to the envelope flap.

Thank you for  visiting my blog today.  I hope you liked my card and will give it a try. Happy Stamping!!

****************************************************************************************************

If you need any stamping supplies, I’d be very happy to be your Demonstrator. Just click HERE to go directly to my online store or drop me an email if you have any questions. 

MY CURRENT HOST CODE IS: DDDXNW6A 

For any orders $50 or more I will send you my monthly class tutorials.  Click HERE or go to my Customer Rewards to see what this months tutorials are.

Click HERE to shop the clearance rack.

Happy Stamping, Karen!

****************************************************************************************************

AVAILABLE NOW WHILE SUPPLIES LAST ONLY 

DON’T MISS OUT ON THIS BEAUTIFUL SUITE

THE NEW CHRISTMASTIME IS HERE SUITE

We hope you’re ready to make this holiday season magical, because the Christmastime Is Here Suite is! This exclusive, limited-time collection of festive, floral coordinating products has everything you need to share love, joy, and creativity this holiday season.

Here’s a video of what’s included in the suite.

****************************************************************************************************

SOMETHING FOR EVERYTHING PAPER PUMPKIN 
SUBSCRIBE TO PAPER PUMPKIN BY DECEMBER 10, 2019

December’s Something for Everything kit includes a super-versatile stamp set complete with 13 sentiments that can be used for occasions ranging from wedding, to get well, birthdays, and more! Plus, the three full-sized card designs (four of each) are gorgeous AND multiuse.  Paper Pumpkin’s December kit makes it easier than ever to give a handmade card to a friend—no matter what the occasion!

This is an all-card kit, with 13 sentiments to cover tons of occasions from weddings, get well, birthday, and more, this set does it all.

Kit details: Makes 12 cards and envelopes

Card size: 4 1/4″ x 5-1/2″ (10.8 x 14 cm)

Envelope size: 4-1/2″ x 5-3/4″ (11.4 x 14.6 cm)

Coordinating colors: Crushed Curry, Grapefruit Grove, Old Olive, Shaded Spruce, Terracotta Tile

  • Subscribe for the December kit at paperpumpkin.com from November 11–December 10.
  • Supplies may be limited toward the end of each subscription period.

Interested in subscribing to Paper Pumpkin?  You can either sign up for a subscription where you are billed monthly for your kit or you can purchase a prepaid subscription in my online store. To see more information and to sign up for the monthly subscription,  Click Here. To see the options for prepaid subscriptions in my online store, Click Here.

****************************************************************************************************

Card stock cuts for this project:

  • Crumb Cake Cardstock 3″ X 3″ (stitched circle)
  • Poppy Parade Cardstock 8 1/2″ X 5 1/2″ (card base scored and folded at 4 1/4″), 4 1/8″ X 5 3/8″ (card front)
  • Pretty Peacock Cardstock 2 1/2″ X 2 1/2″ (sentiment mat), 4 1/8″ X 5 3/8″ (inner liner mat)
  • Very Vanilla Cardstock 4″ X 5 1/4″ (inner liner), 2 1/4″ X 2 1/4″ (sentiment)
  • Night Before Christmas Designer Series Paper 3 3/4″ X 3″ & 1 3/4″ X 5″ (card front pieces), piece for envelope flap

****************************************************************************************************

Product List

Stampin’ Up! Wonderful Time of the Year CAS Card

Good Monday morning my stamping friends.  How was everyone’s weekend?  Is anyone starting to prepare for Thanksgiving?  I picked up my turkey this weekend and some of the ingredients for the trimmings.  I can’t believe we’re at the end of November already.  This month has really flown by.

For today I have a quick and easy card for you again.  Once again I let the beautiful designer series paper do most of the work for me.  Ok, so yellow is not my favorite color, but I do love the holly in this paper and I was pretty happy with how it came out. Here’s my card.

I started by adhering a panel of the Night Before Christmas Designer Series Paper to an Old Olive mat using Snail.  I adhered a Cherry Cobbler strip near the bottom of the card front using Multipurpose Liquid Glue.  I adhered the card front to a Cherry Cobbler card base using Multipurpose Liquid Glue.

On a small panel of Whisper White cardstock I stamped the sentiment from the Stampin’ Up! Free Skate Cling Stamp Set in Old Olive Ink.  I cut the sentiment out using the oval from the Stitched Shapes Dies.  I adhered the stitched oval to an Old Olive scallop oval which I cut using the Layering Ovals Dies.  I adhered the sentiment to the card front using Stampin’ Dimensionals.

On a scrap of Whisper White cardstock I stamped the holly image from the Free Skate stamp set.  I colored the holly in using my Old Olive Stampin’ Blends Markers and I colored the berries in using my Cherry Cobbler Stampin’ Blends Markers.  I cut the holly out using my Detailed Skates Dies and adhered it to the sentiment oval using a Glue Dot.  I added a couple Mini Stampin’ Dimensionals under the holly leaves to support them.

On the inside I stamped the holly image from the Free Skate stamp set in all 4 corners of a Whisper White panel.  I colored them in using my Cherry Cobbler and Old Olive Stampin’ Blends Markers.  I stamped the sentiment from the Stampin’ Up! Greatest Part of Christmas Host Cling Stamp Set in the center of the Whisper White panel using Old Olive Ink.  I adhered the Whisper White panel to an Old Olive mat using Snail and then to the inside of the Cherry Cobbler card base using Multipurpose Liquid Glue.

To finish my card I decorated a Medium Whisper White Envelope.  I stamped the holly image from the Free Skate stamp set on the bottom front of the envelope.  I colored them in using my Cherry Cobbler and Old Olive Stampin’ Blends Markers.  I adhered a panel of the Night Before Christmas DSP to the envelope flap.

Thank you for stopping by my blog today.  I hope you liked my card and will give it a try. Happy Stamping!!

****************************************************************************************************

If you need any stamping supplies, I’d be very happy to be your Demonstrator. Just click HERE to go directly to my online store or drop me an email if you have any questions. 

MY CURRENT HOST CODE IS: DDDXNW6A 

For any orders $50 or more I will send you my monthly class tutorials.  Click HERE or go to my Customer Rewards to see what this months tutorials are.

Click HERE to shop the clearance rack.

Happy Stamping, Karen!

****************************************************************************************************

AVAILABLE NOW WHILE SUPPLIES LAST ONLY 

DON’T MISS OUT ON THIS BEAUTIFUL SUITE

THE NEW CHRISTMASTIME IS HERE SUITE

We hope you’re ready to make this holiday season magical, because the Christmastime Is Here Suite is! This exclusive, limited-time collection of festive, floral coordinating products has everything you need to share love, joy, and creativity this holiday season.

Here’s a video of what’s included in the suite.

****************************************************************************************************

SOMETHING FOR EVERYTHING PAPER PUMPKIN 
SUBSCRIBE TO PAPER PUMPKIN BY DECEMBER 10, 2019

December’s Something for Everything kit includes a super-versatile stamp set complete with 13 sentiments that can be used for occasions ranging from wedding, to get well, birthdays, and more! Plus, the three full-sized card designs (four of each) are gorgeous AND multiuse.  Paper Pumpkin’s December kit makes it easier than ever to give a handmade card to a friend—no matter what the occasion!

This is an all-card kit, with 13 sentiments to cover tons of occasions from weddings, get well, birthday, and more, this set does it all.

Kit details: Makes 12 cards and envelopes

Card size: 4 1/4″ x 5-1/2″ (10.8 x 14 cm)

Envelope size: 4-1/2″ x 5-3/4″ (11.4 x 14.6 cm)

Coordinating colors: Crushed Curry, Grapefruit Grove, Old Olive, Shaded Spruce, Terracotta Tile

  • Subscribe for the December kit at paperpumpkin.com from November 11–December 10.
  • Supplies may be limited toward the end of each subscription period.

Interested in subscribing to Paper Pumpkin?  You can either sign up for a subscription where you are billed monthly for your kit or you can purchase a prepaid subscription in my online store. To see more information and to sign up for the monthly subscription,  Click Here. To see the options for prepaid subscriptions in my online store, Click Here.

****************************************************************************************************

Card stock cuts for this project:

  • Cherry Cobbler Cardstock 4 1/4″ X 11″ (card base scored and folded at 5 1/2″), 1″ X 4 1/8″ (strip on card front)
  • Old Olive Cardstock 2 – 4 1/8″ X 5 3/8″ (card front mat and inner liner mat), 2″ X 3″ (scallop oval)
  • Whisper Whtie Cardstock 4″ X 5 1/4″ (inner liner)
  • Night Before Christmas Designer Series Paper 4″ X 5 1/4″ (card front), piece for envelope flap

****************************************************************************************************

Product List

Stampin’ Up! Beauty and Joy for Happy Inkin’ Thursday Blog Hop

Good Thursday morning my stamping friends. Welcome to the Happy Inkin’ Thursday Blog Hop. If you are hopping over from Akiko, thank you for stopping by. This week we had a Sketch Challenge. Be sure to hop around to see everyone’s beautiful projects. Here’s what I came up with for the sketch.

Here is our sketch for this week.

I started by embossing Cherry Cobbler card front using the Brick & Mortar 3D Embossing Folder.  I sponged the top with Whisper White Craft Ink to give it a little shading.

On a panel of Whisper White cardstock I stamped the flowerpot image from the Stampin’ Up! Beauty & Joy Photopolymer Stamp Set in Crumb Cake Ink.  I stamped the tree trunk image from the Beauty & Joy stamp set in Soft Suede Ink in the flowerpot.  I stamped the holly image from the Beauty & Joy stamp set on the tree trunk in Shaded Spruce Ink.  I cut the artwork out using the largest circle from the Stitched Shapes Dies.  On a scrap piece of Whisper White cardstock I stamped the holly image from the Beauty & Joy stamp set again in Shaded Spruce Ink and fussy cut the image out using my Paper Snips.  My upline made a similar card last week and she inspired me to stamp the holly separate and fussy cut it.  I adhered the fussy cut holly to the stamped image using Stampin’ Dimensionals.  I added some Red Rhinestone Basic Jewels to the holly and a Star Design Element to the top of the tree.

On a strip of Shaded Spruce cardstock I stamped the sentiment from the Stampin’ Up! Greatest Part of Christmas Cling Host Stamp Set in Versamark Ink.  I immediately sprinkled it with White Stampin’ Emboss Powder and set it using my Heat Tool.  I adhered the sentiment strip to a strip of a Copper Foil Sheet using Snail.  I adhered the artwork to the card front using Multipurpose Liquid Glue.  I adhered the sentiment over the artwork using Stampin’ Dimensionals.  I adhered the card front to a Cherry Cobbler card base using Multipurpose Liquid Glue.

On the inside I stamped the sentiment from the Greatest Part of Christmas stamp set in Shaded Spruce Ink in the center of a Whisper White panel.  I stamped the tree trunk image from the Beauty & Joy stamp set in Soft Suede Ink on the bottom of the panel.  I stamped the holly image from the Beauty & Joy stamp set in Shaded Spruce Ink over the tree trunk.  I stamped the berry image from the Beauty & Joy stamp set in Cherry Cobbler Ink over the holly.  I stamped the star image from the Beauty & Joy stamp set in Daffodil Delight Ink on the top of the tree.  I adhered the Whisper White panel to a Shaded Spruce mat using Snail and then to the inside of the Cherry Cobbler card base using Multipurpose Liquid Glue.

To finish my card I decorated a Medium Whisper White Envelope.  I stamped the holly tree image from the Beauty & Joy stamp set on the envelope front the same as I did for the card.  It’s hard to see, but I embossed the envelope flap using the Brick & Mortar 3D Embossing Folder.

Thank you for visiting my blog today. I hope you liked my card and will give it a try. Now that you’ve seen my card, take a minute to hop through all our projects today. If you click on the Next Blog button, you’ll go right to Amy’s page. Or you can just click on the names below to go directly to all the blogs! Happy Hopping!!

Kristi Gray:  I will be in Disney  World this week (squeal) and will not be hopping.
Karen Ksenzakovic:

****************************************************************************************************

If you need any stamping supplies, I’d be very happy to be your Demonstrator. Just click HERE to go directly to my online store or drop me an email if you have any questions. 

MY CURRENT HOST CODE IS: DDDXNW6A 

For any orders $50 or more I will send you my monthly class tutorials.  Click HERE or go to my Customer Rewards to see what this months tutorials are.

Click HERE to shop the clearance rack.

Happy Stamping, Karen!

****************************************************************************************************

IN’ UP! ONLINE EXTRAVAGANZA NOVEMBER 20-22!!

Three days of savings with the Stampin’ Up! Online Extravaganza! For three days only, you can get these deals from Stampin’ Up!:

15% off Ink pads and Cardstock in:

  • Neutrals Collection
  • Regals Collection
  • 2018–2020 In Colors
  • 2019–2021 In Colors (except Purple Posy)

Take Additional 5% off the original 10% discount:

  • 8 bundles
  • Neutrals Classic Stampin’ Pads Assortment
  • Regals Classic Stampin’ Pads Assortment
  • 2018–2020 In Colors Classic Stampin’ Pads Assortment

Online Extravaganza Details:

  • Dates:  November 20–22, 2019
  • Order Deadline:  November 22, 2019; 11:50 PM (MT)
  • All order types qualify for this promotion!
  • Promotion includes items from the 2019–2020 annual catalog only.
  • Discounts apply to promotion items only.
  • Ordering information can be found in the flyer below.
  • No limits apply.
  • Discounted pricing for items featured in this promotion will be available ONLY during the sales period. No exceptions.
  • If you purchased a product offered in the promotion prior to the sale, we will not be offering exchanges or credits.
  • In the event that we run out of any item offered, promotional pricing will be honored on items backordered, up to the point it reaches the backorder limit. If you try to order an item that is not available, you will receive a notification informing you it is currently unavailable. Once an item reaches the backorder limit and is not orderable, it will no longer be available during the promotion and will not be available to order until additional inventory arrives.

Click the image below to open up the full size flyer with all of the discounted items and the pricing.

****************************************************************************************************

AVAILABLE NOW WHILE SUPPLIES LAST ONLY 

DON’T MISS OUT ON THIS BEAUTIFUL SUITE

THE NEW CHRISTMASTIME IS HERE SUITE

We hope you’re ready to make this holiday season magical, because the Christmastime Is Here Suite is! This exclusive, limited-time collection of festive, floral coordinating products has everything you need to share love, joy, and creativity this holiday season.

Here’s a video of what’s included in the suite.

****************************************************************************************************

SOMETHING FOR EVERYTHING PAPER PUMPKIN 
SUBSCRIBE TO PAPER PUMPKIN BY DECEMBER 10, 2019

December’s Something for Everything kit includes a super-versatile stamp set complete with 13 sentiments that can be used for occasions ranging from wedding, to get well, birthdays, and more! Plus, the three full-sized card designs (four of each) are gorgeous AND multiuse.  Paper Pumpkin’s December kit makes it easier than ever to give a handmade card to a friend—no matter what the occasion!

This is an all-card kit, with 13 sentiments to cover tons of occasions from weddings, get well, birthday, and more, this set does it all.

Kit details: Makes 12 cards and envelopes

Card size: 4 1/4″ x 5-1/2″ (10.8 x 14 cm)

Envelope size: 4-1/2″ x 5-3/4″ (11.4 x 14.6 cm)

Coordinating colors: Crushed Curry, Grapefruit Grove, Old Olive, Shaded Spruce, Terracotta Tile

  • Subscribe for the December kit at paperpumpkin.com from November 11–December 10.
  • Supplies may be limited toward the end of each subscription period.

Interested in subscribing to Paper Pumpkin?  You can either sign up for a subscription where you are billed monthly for your kit or you can purchase a prepaid subscription in my online store. To see more information and to sign up for the monthly subscription,  Click Here. To see the options for prepaid subscriptions in my online store, Click Here.

****************************************************************************************************

Card stock cuts for this project:

  • Cherry Cobbler Cardstock 4 1/4″ X 11″ (card base scored and folded at 5 1/2″), 4 1/4″ X 5 1/2″ (card front )
  • Shaded Spruce Cardstock 1/2″ X 2 7/8″ (sentiment strip), 4 1/8″ X 5 3/8″ (inner liner mat)
  • Whisper White Cardstock 3 1/2″ X 3 1/2″ (artwork), 4″ X 5 1/4″ (inner liner)
  • Copper Foil Sheet 1/2′ X 3 1/4″ (strip under sentiment)

****************************************************************************************************

Product List

Stampin’ Up! Natures Beauty Quick and Easy Card

Good Tuesday morning my fellow stampers.  How is everyone doing today?  Hope your week is starting out well.

I have a really quick and easy card for you today.  Once again I let the Designer Series Paper do the work for me.  Here’s my card.

I adhered a panel of Feels Like Frost Specialty Designer Series Paper to a Night of Navy card base using Multipurpose Liquid Glue.  On a small panel of Gray Granite I stamped the deer image from the Stampin’ Up! Nature’s Beauty Cling Stamp Set in Gray Granite Ink.  I fussy cut the deer using my Paper Snips.  I adhered the deer to the card front using Stampin’ Dimensionals.

On a small piece of Whisper White cardstock I stamped the sentiment from the Stampin’ Up! Rustic Retreat Cling Stamp Set in Night of Navy Ink.  I cut the sentiment out using the Layering Circle Dies.  I cut a scallop circle out of a Silver Foil Sheet using the Layering Circle Dies and adhered the sentiment to the scallop circle using Multipurpose Liquid Glue.  I adhered the matted sentiment to the card front using Stampin’ Dimensionals.

I added a few Rhinestone Basic Jewels to the card front to add a little extra sparkle.

On the inside I stamped the sentiments from the Stampin’ Up! Itty Bitty Christmas Cling Stamp Set in Night of Navy Ink in the center of a Whisper White panel.  I stamped the grass image from the Nature’s Beauty stamp set in Gray Granite Ink on the bottom of the panel.  I adhered the Whisper White panel to the inside of the Night of Navy card base using Multipurpose Liquid Glue.

To finish my card I decorated a Medium Whisper White Envelope.  I stamped the deer image from the Nature’s Beauty stamp set in Gray Granite Ink on the envelope front.  I adhered a piece of the Feels Like Frost Specialty DSP to the envelope flap.

Thank you for stopping by my blog today.  I hope you liked my quick and easy card and will give it a try.  This pack of DSP makes the most gorgeous cards with very little effort. Happy Stamping!!

****************************************************************************************************

If you need any stamping supplies, I’d be very happy to be your Demonstrator. Just click HERE to go directly to my online store or drop me an email if you have any questions. 

MY CURRENT HOST CODE IS: DDDXNW6A 

For any orders $50 or more I will send you my monthly class tutorials.  Click HERE or go to my Customer Rewards to see what this months tutorials are.

Click HERE to shop the clearance rack.

Happy Stamping, Karen!

****************************************************************************************************

STAMPIN’ UP! ONLINE EXTRAVAGANZA COMING NOVEMBER 20-22!!

Three days of savings with the Stampin’ Up! Online Extravaganza! For three days only, you can get these deals from Stampin’ Up!:

15% off Ink pads and Cardstock in:

  • Neutrals Collection
  • Regals Collection
  • 2018–2020 In Colors
  • 2019–2021 In Colors (except Purple Posy)

Take Additional 5% off the original 10% discount:

  • 8 bundles
  • Neutrals Classic Stampin’ Pads Assortment
  • Regals Classic Stampin’ Pads Assortment
  • 2018–2020 In Colors Classic Stampin’ Pads Assortment

Online Extravaganza Details:

  • Dates:  November 20–22, 2019
  • Order Deadline:  November 22, 2019; 11:50 PM (MT)
  • All order types qualify for this promotion!
  • Promotion includes items from the 2019–2020 annual catalog only.
  • Discounts apply to promotion items only.
  • Ordering information can be found in the flyer below.
  • No limits apply.
  • Discounted pricing for items featured in this promotion will be available ONLY during the sales period. No exceptions.
  • If you purchased a product offered in the promotion prior to the sale, we will not be offering exchanges or credits.
  • In the event that we run out of any item offered, promotional pricing will be honored on items backordered, up to the point it reaches the backorder limit. If you try to order an item that is not available, you will receive a notification informing you it is currently unavailable. Once an item reaches the backorder limit and is not orderable, it will no longer be available during the promotion and will not be available to order until additional inventory arrives.

Click the image below to open up the full size flyer with all of the discounted items and the pricing.

****************************************************************************************************

SOMETHING FOR EVERYTHING PAPER PUMPKIN 
SUBSCRIBE TO PAPER PUMPKIN BY DECEMBER 10, 2019

December’s Something for Everything kit includes a super-versatile stamp set complete with 13 sentiments that can be used for occasions ranging from wedding, to get well, birthdays, and more! Plus, the three full-sized card designs (four of each) are gorgeous AND multiuse.  Paper Pumpkin’s December kit makes it easier than ever to give a handmade card to a friend—no matter what the occasion!

This is an all-card kit, with 13 sentiments to cover tons of occasions from weddings, get well, birthday, and more, this set does it all.

Kit details: Makes 12 cards and envelopes

Card size: 4 1/4″ x 5-1/2″ (10.8 x 14 cm)

Envelope size: 4-1/2″ x 5-3/4″ (11.4 x 14.6 cm)

Coordinating colors: Crushed Curry, Grapefruit Grove, Old Olive, Shaded Spruce, Terracotta Tile

  • Subscribe for the December kit at paperpumpkin.com from November 11–December 10.
  • Supplies may be limited toward the end of each subscription period.

Interested in subscribing to Paper Pumpkin?  You can either sign up for a subscription where you are billed monthly for your kit or you can purchase a prepaid subscription in my online store. To see more information and to sign up for the monthly subscription,  Click Here. To see the options for prepaid subscriptions in my online store, Click Here.

****************************************************************************************************

AVAILABLE NOW WHILE SUPPLIES LAST ONLY 

DON’T MISS OUT ON THIS BEAUTIFUL SUITE

THE NEW CHRISTMASTIME IS HERE SUITE

We hope you’re ready to make this holiday season magical, because the Christmastime Is Here Suite is! This exclusive, limited-time collection of festive, floral coordinating products has everything you need to share love, joy, and creativity this holiday season.

Here’s a video of what’s included in the suite.

****************************************************************************************************

Card stock cuts for this project:

  • Gray Granite Cardstock 2″ X 3″ (deer)
  • Night of Navy Cardstock 4 1/4″ X 11″ (card base scored and folded at 5 1/2″)
  • Whisper White Cardstock 4″ X 5 1/4″ (inner liner), 2″ X 2″ (sentiment circle)
  • Feels Like Frost Specialty Designer Series Paper 4 1/8″ X 5 3/8″ (card front), piece for envelope flap
  • Silver Foil Sheet 2″ X 2″ (scallop circle mat)

****************************************************************************************************

Product List

Stampin’ Up! Snowman Season Let Snow For Fun Fold Friday

Good Friday morning my fellow stampers and welcome to my Fun Fold Friday.  How was everyone’s week?  Does anyone have any plans for the weekend, since it’s here already?  I’m leaving today for Hartford, CT for OnStage.  If you follow me on Facebook, I will be posting some new sneak peaks.  I can’t wait to meet up with my fellow team members and to get my hands on the new Occasions Catalog.  I will be sharing all that I am allowed with you next week and on my Facebook page.

For today’s card I’ve made a double triangle fun fold.  Here’s my card.

The colors of my card were inspired by Hand Stamped Sentiments Color Challenge #327.  Here are their colors.

I started with a full sheet of Shaded Spruce cardstock.  I scored it at 4 1/4″ along the 8 1/2″ side and 5 1/2″ along the 11″ side.  I lined the cardstock up in my Paper Trimmer on a diagonal and cut.  You are now able to make 2 cards with this panel.  I folded on the 2 fold lines having the 2 triangles meeting in the center of the card.  I adhered a panel of Let It Snow Specialty Designer Series Paper to each of the Real Red mats using Multipurpose Liquid Glue.  I adhered the matted DSP panels to each of the triangles of the Shaded Spruce card base.

I adhered a panel of the Let It Snow Specialty DSP, which I cut using the largest oval from the Stitched Shapes Dies, to a scallop oval cut from the Layering Ovals Dies in Real Red Glimmer Paper using Multipurpose Liquid Glue.  On a panel of Sparkle Glimmer Paper I stamped the snowman image from the Stampin’ Up! Snowman Season Photopolymer Stamp Set in Tuxedo Black Memento Ink.  I punched the snowman out using the Snowman Builder Punch.  I punched the snowman’s arms out of Soft Suede cardstock using the Snowman Builder Punch.  I adhered the arms to the back of the snowman using Glue Dots.  I adhered the snowman to the center of the oval using Stampin’ Dimensionals.   Using the Snowman Builder Punch again, I punched out a hat from the Let It Snow Specialty DSP and adhered it to the top of the snowman using a Stampin’ Dimensional.  I adhered the oval to the card front using Stampin’ Dimensionals only on the left side of the oval.

On the top right side of the card front I stamped the sentiment from the Snowman Season stamp set in Shaded Spruce Ink and immediately sprinkled it with my Clear Stampin’ Emboss Powder and set it using my Heat Tool.

On the inside I stamped the sentiment from the Snowman Season stamp set in Shaded Spruce Ink in the center of a Whisper White panel.  I stamped another one of the snowman images from the Snowman Season stamp set in Tuxedo Black Memento Ink.  I adhered the Whisper White panel to a Real Red mat using Snail and then adhered it to the inside of the Shaded Spruce card base using Multipurpose Liquid Glue.

To finish my card I decorated a Medium Whisper White Envelope.  I stamped the snowman image from the Snowman Season stamp set in Tuxedo Black Memento Ink on the envelope front.  I adhered a panel of the Let It Snow Specialty DSP to the envelope flap.

Thank you for stopping by my blog today.  I hope you liked my card and will give it a try. Happy Stamping!!

****************************************************************************************************

If you need any stamping supplies, I’d be very happy to be your Demonstrator. Just click HERE to go directly to my online store or drop me an email if you have any questions. 

MY CURRENT HOST CODE IS: DDDXNW6A 

For any orders $50 or more I will send you my monthly class tutorials.  Click HERE or go to my Customer Rewards to see what this months tutorials are.

Click HERE to shop the clearance rack.

Happy Stamping, Karen!

****************************************************************************************************

AVAILABLE NOW WHILE SUPPLIES LAST ONLY 

DON’T MISS OUT ON THIS BEAUTIFUL SUITE

THE NEW CHRISTMASTIME IS HERE SUITE

We hope you’re ready to make this holiday season magical, because the Christmastime Is Here Suite is! This exclusive, limited-time collection of festive, floral coordinating products has everything you need to share love, joy, and creativity this holiday season.

Here’s a video of what’s included in the suite.

****************************************************************************************************

Card stock cuts for this project:

  • Real Red Cardstock 4′ X 5 1/4″ (card front mat cut on a diagonal), 4 1/8″ X 5 3/8″ (inner liner mat)
  • Shaded Spruce Cardstock 8 1/2″ X 11″ (card base scored at 4 1/4″ & 5 1/2″ cut on a diagonal)
  • Whisper White Cardstock 4″ X 5 1/4″ (inner liner)
  • Let It Snow Specialty Designer Series Paper 3 7/8″ X 5 1/8″ (card front cut on a diagonal), 3 1/2″ X 2 1/2″ (stitched oval), piece for envelope flap
  • Real Red Glimmer Paper 3 3/4″ X 2 3/4″ (scallop mat)
  • Sparkle Glimmer Paper 2″ X 3″ (snowman)

****************************************************************************************************

Product List

Stampin’ Up! Rustic Retreat for Happy Inkin’ Thursday Blog Hop

Good Thursday morning my fellow stampers. Welcome to the Happy Inkin’ Thursday Blog Hop. If you are hopping over from Akiko, thank you for stopping by. This week we had a Color Challenge and the colors screamed rustic to me.  Be sure to hop around to see everyone’s beautiful projects. Here’s my card using our colors.

Here are our colors for this week.

My design was inspired by the Paper Craft Cres Challenge #358.  Here is their sketch.

I started by stamping the sentiment from the Stampin’ Up! Rustic Retreat Cling Stamp Set in Early Espresso Ink on the top of the Crumb Cake card front.  I embossed the  Crumb Cake card front using the Pinewood Planks 3D Embossing Folder.  I adhered the card front to a Cherry Cobbler card base using Multipurpose Liquid Glue.

I stamped a small panel of Cherry Cobbler cardstock using the Stampin’ Up Buffalo Check Cling Background Stamp in Early Espresso Ink.  I cut the panel out using the Stitched Rectangle Dies.  I stamped the cabin image from the Rustic Retreat stamp set in Early Espresso Ink on a small Crumb Cake panel.  I cut the image out using a smaller Stitched Rectangle Die.  I adhered the artwork to the Buffalo Check stamped Cherry Cobbler panel using Snail.  I stamped the bear image from the Rustic Retreat stamp set in Early Espresso Ink on a scrap of Crumb Cake cardstock and fussy cut the image out using my Paper Snips.  I adhered the bear to the corner of the artwork using a Glue Dot.

I adhered a strip of Early Espresso cardstock to the card front using Multipurpose Liquid Glue.  I adhered a piece of the 3/8″ Magnolia Lane Linen Ribbon with White Edge on the Early Espresso strip using Snail.  I adhered the matted artwork to the card front using Stampin’ Dimensionals, making sure to add a couple Mini Stampin’ Dimensionals under the bear to secure it.

On the inside I stamped the cabin image from the Rustic Retreat stamp set in Early Espresso Ink in the center of a Whisper White panel stamping off 3 times.  I stamped the sentiment from the Stampin’ Up! Peaceful Boughs Cling Stamp Set in Early Espresso Ink over the cabin image.  I stamped the bear and deer image from the Rustic Retreat stamp set in Early Espresso Ink on the bottom of the panel stamping off once.  I adhered the Whisper White panel to an Early Espresso mat using Snail and then to the inside of the Cherry Cobbler card base using Multipurpose Liquid Glue.

To finish my card I decorated a Medium Whisper White Envelope.  I stamped the tree image from the Rustic Retreat stamp set in Early Espresso Ink along the bottom front of the envelope.  I stamped the cabin and bear image from the Rustic Retreat stamp set in Early Espresso Ink on the envelope flap.

Thank you for visiting my blog today. I hope you liked my card and will give it a try. Now that you’ve seen my card, take a minute to hop through all our projects today. If you click on the Next Blog button, you’ll go right to Amy’s page. Or you can just click on the names below to go directly to all the blogs! Happy Hopping!!

Karen Ksenzakovic: You are here

****************************************************************************************************

If you need any stamping supplies, I’d be very happy to be your Demonstrator. Just click HERE to go directly to my online store or drop me an email if you have any questions. 

MY CURRENT HOST CODE IS: DDDXNW6A 

For any orders $50 or more I will send you my monthly class tutorials.  Click HERE or go to my Customer Rewards to see what this months tutorials are.

Click HERE to shop the clearance rack.

Happy Stamping, Karen!

****************************************************************************************************

AVAILABLE NOW WHILE SUPPLIES LAST ONLY 

DON’T MISS OUT ON THIS BEAUTIFUL SUITE

THE NEW CHRISTMASTIME IS HERE SUITE

We hope you’re ready to make this holiday season magical, because the Christmastime Is Here Suite is! This exclusive, limited-time collection of festive, floral coordinating products has everything you need to share love, joy, and creativity this holiday season.

Here’s a video of what’s included in the suite.

****************************************************************************************************

Card stock cuts for this project:

  • Cherry Cobbler Cardstock 8 1/2″ X 5 1/2″ (card base scored and folded at 4 1/4″), 4″ X 3″ (artwork mat)
  • Crumb Cake Cardstock 4 1/8″ X 5 3/8″ (card front), 2″ X 3 1/4″ (artwork)
  • Early Espresso Cardstock 4″ X 1″ (card front strip), 4 1/8″ X 5 3/8″ (inner liner mat)
  • Whisper White Cardstock 4″ X 5 1/4″ (inner liner)

****************************************************************************************************

Product List

Stampin’ Up! Merriest Wishes Penguin

Good Wednesday morning my fellow stampers.  How is everyone doing today? We’re halfway through the week already and only 2 more days and I leave for OnStage.  I’m so looking forward to meeting up with my team members for some stamping time and socializing.  I can’t wait to get my hands on the new Occasions Catalog and be able to share some new things with you.

Today’s card is one that we made at our last Stamp Camp last week.  I wanted to have a variety of cards for the ladies to make.  Here’s my card.

I started by adhering a panel of Let It Snow Specialty Designer Series paper to a Real Red Mat using Multipurpose Liquid Glue.  I adhered the matted panel to a Real Red card base using Stampin’ Dimensionals.

On a small panel of Whisper White cardstock I stamped one of the penguin images from the Stampin’ Up!  Playful Penguins Cling Stamp Set in Tuxedo Black Memento Ink.  I cut the image out using the oval from the Stitched Shapes Dies.  I adhered it to a Real Red Glimmer Paper scalloped mat which I cut out using  the Layering Ovals Dies using Multipurpose Liquid Glue. On a scrap piece of Whisper White cardstock I stamped the bow tie image from the Playful Penguins stamp set in Real Red Ink.  I fussy cut the bow tie using my Paper Snips and adhered it to the penguin using a Glue Dot.  I adhered the matted artwork to the card front using Stampin’ Dimensionals.

I stamped the sentiment from the Playful Penguins stamp set in Real Red Ink on a strip of Whisper White cardstock.  I cut the strip into a banner using the Banner Triple Punch.  I adhered a strip of Shaded Spruce cardstock below the matted artwork using Snail and adhered the sentiment banner on the card front using Stampin’ Dimensionals.  I added a Red Rhinestone Basic Jewel to the right of the sentiment.

On the inside I stamped the sentiment from the Playful Penguins stamp set in Real Red Ink in the center of a Whisper White panel.   I stamped the penguin image from the Playful Penguins stamp set in Tuxedo Black Memento Ink on the bottom of the panel.  I adhered the Whisper White panel to the inside of the Real Red card base using Multipurpose Liquid Glue.

To finish my card I decorated a Medium Whisper White Envelope.  I stamped the penguin image from the Playful Penguins stamp set in Tuxedo Black Memento Ink on the envelope front.  I adhered a piece of Let It Snow Specialty DSP to the envelope flap.

Thank you for stopping by my blog today.  I hope you liked my card and will give it a try. Happy Stamping!!

****************************************************************************************************

If you need any stamping supplies, I’d be very happy to be your Demonstrator. Just click HERE to go directly to my online store or drop me an email if you have any questions. 

MY CURRENT HOST CODE IS: DDDXNW6A 

For any orders $50 or more I will send you my monthly class tutorials.  Click HERE or go to my Customer Rewards to see what this months tutorials are.

Click HERE to shop the clearance rack.

Happy Stamping, Karen!

****************************************************************************************************

AVAILABLE NOW WHILE SUPPLIES LAST ONLY 

DON’T MISS OUT ON THIS BEAUTIFUL SUITE

THE NEW CHRISTMASTIME IS HERE SUITE

We hope you’re ready to make this holiday season magical, because the Christmastime Is Here Suite is! This exclusive, limited-time collection of festive, floral coordinating products has everything you need to share love, joy, and creativity this holiday season.

Here’s a video of what’s included in the suite.

****************************************************************************************************

Card stock cuts for this project:

  • Real Red Cardstock 8 1/2″ X 5 1/2″ (card base scored and folded at 4 1/4″), 4 1/8″ X 5 3/8″ (card front mat)
  • Shaded Spruce Cardstock 3″ X 5/8″ (card front strip)
  • Whisper White Cardstock 4″ X 5 1/4″ (inner liner), 1″ X 3″ (sentiment banner), 3 1/2″ X 2 1/2″ (artwork)
  • Let It Snow Specialty Designer Series Paper 4″ X 5 1/4″ (card front), piece for envelope flap
  • Real Red Glimmer Paper 3 1/2″ X 2 1/2″ (artwork mat)

****************************************************************************************************

Product List