Stampin’ Up! Joyful Life for Fun Fold Friday

Good Friday morning my stamping friends. Welcome to my Fun Fold Friday. How was everyone’s week? Does anyone have plans for the weekend? I’ll be working half day tomorrow and all day Sunday too. Tomorrow is our World Card Making Day Facebook event. Please join us if you can. There will be live videos starting at 9am and the last one is at 5pm.

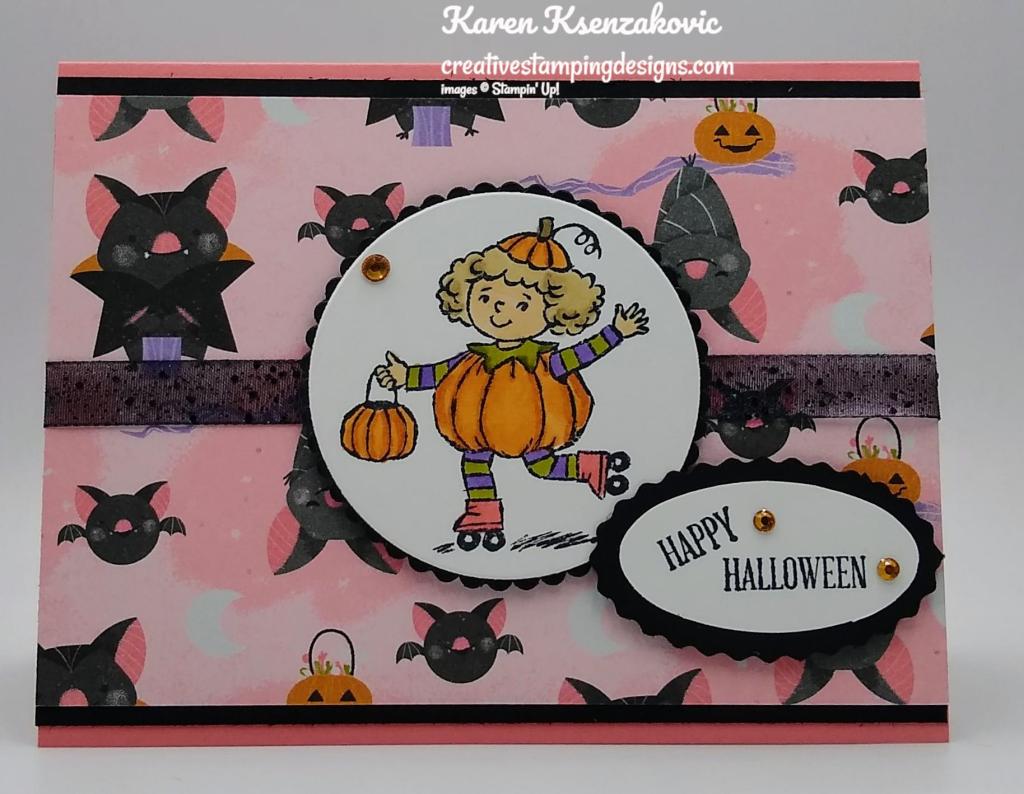
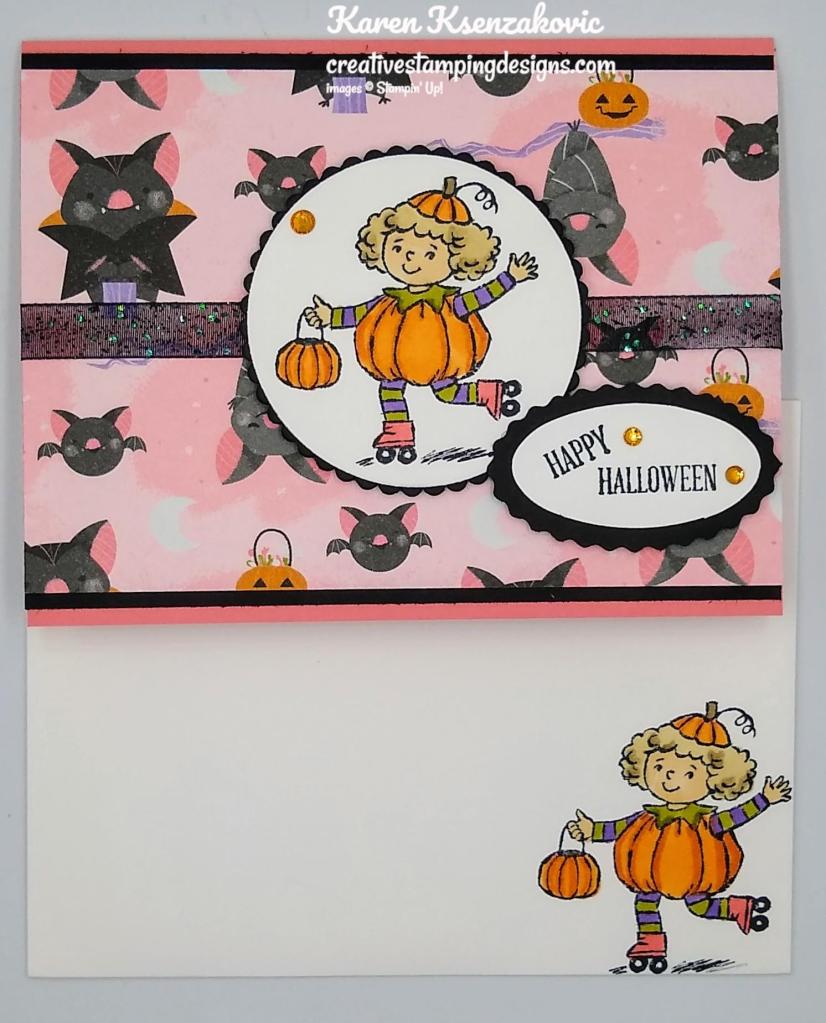
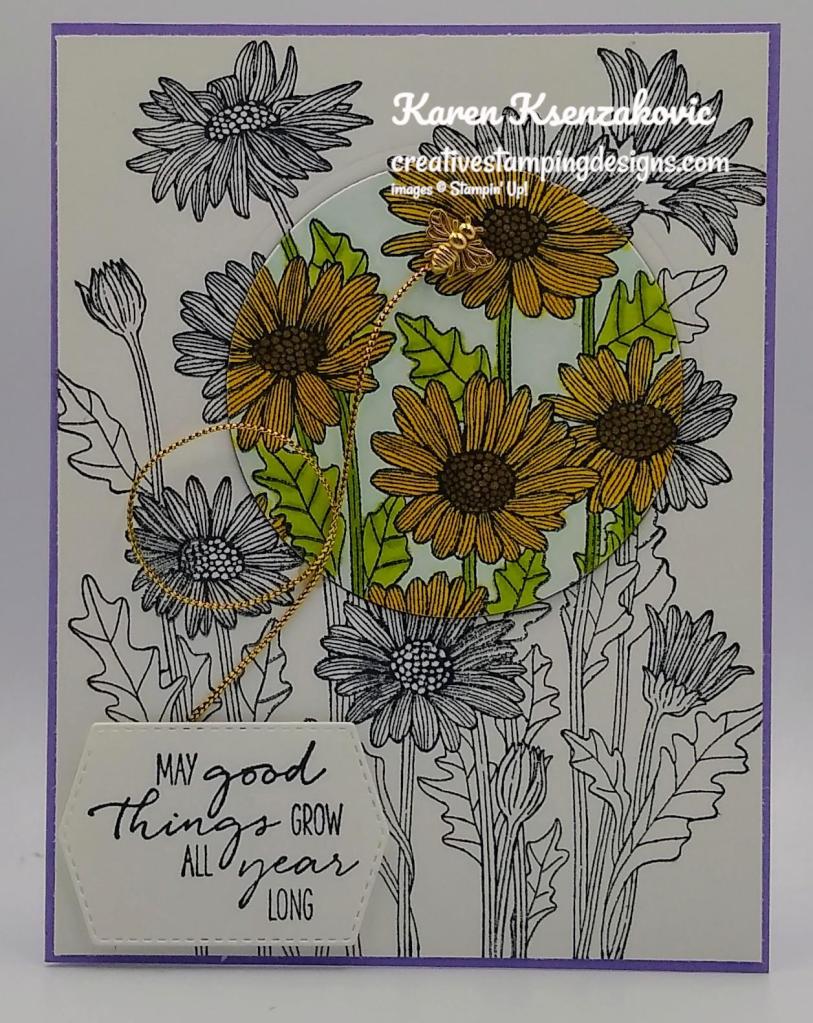
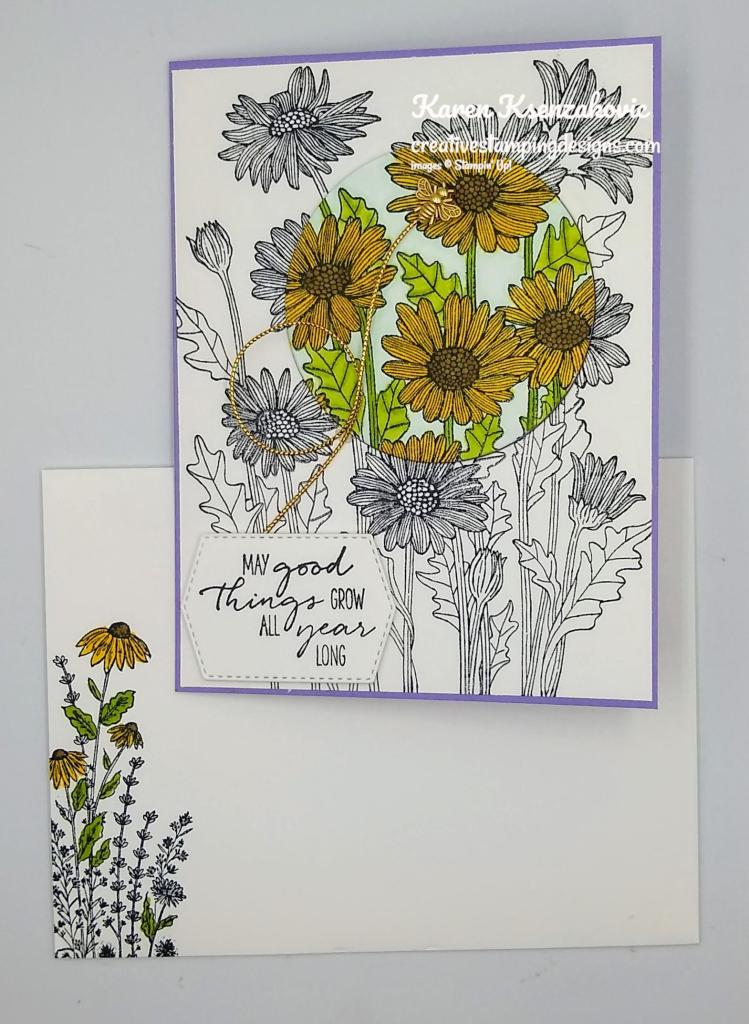
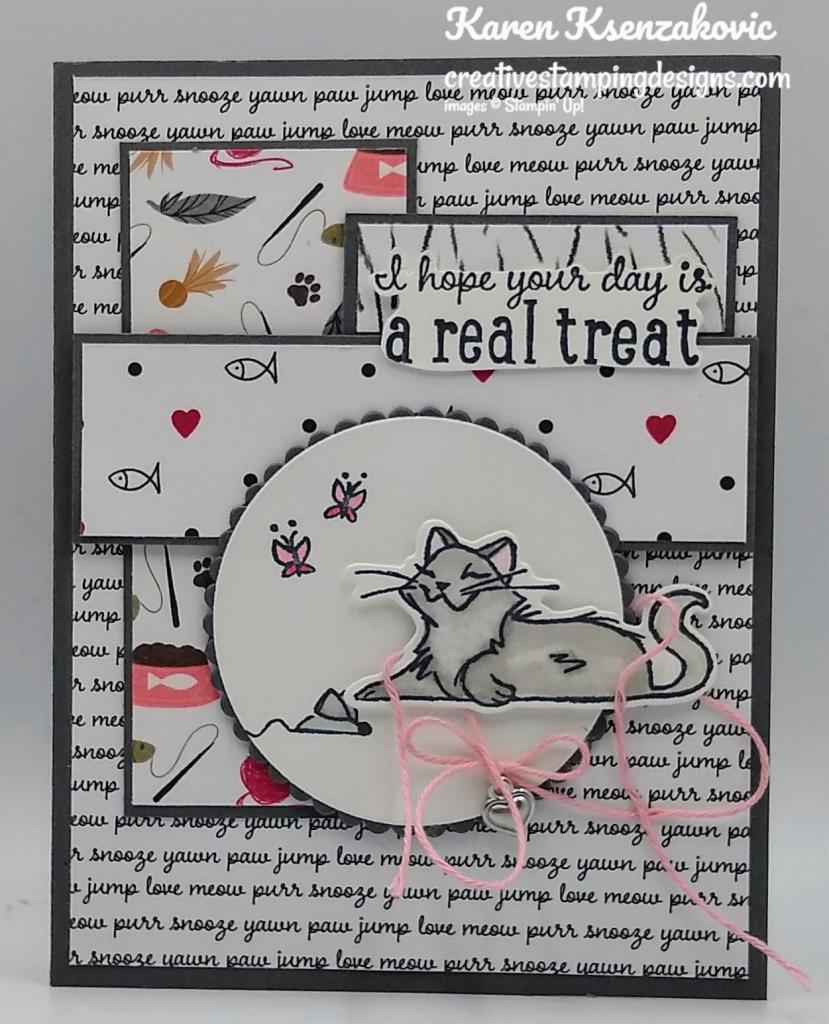
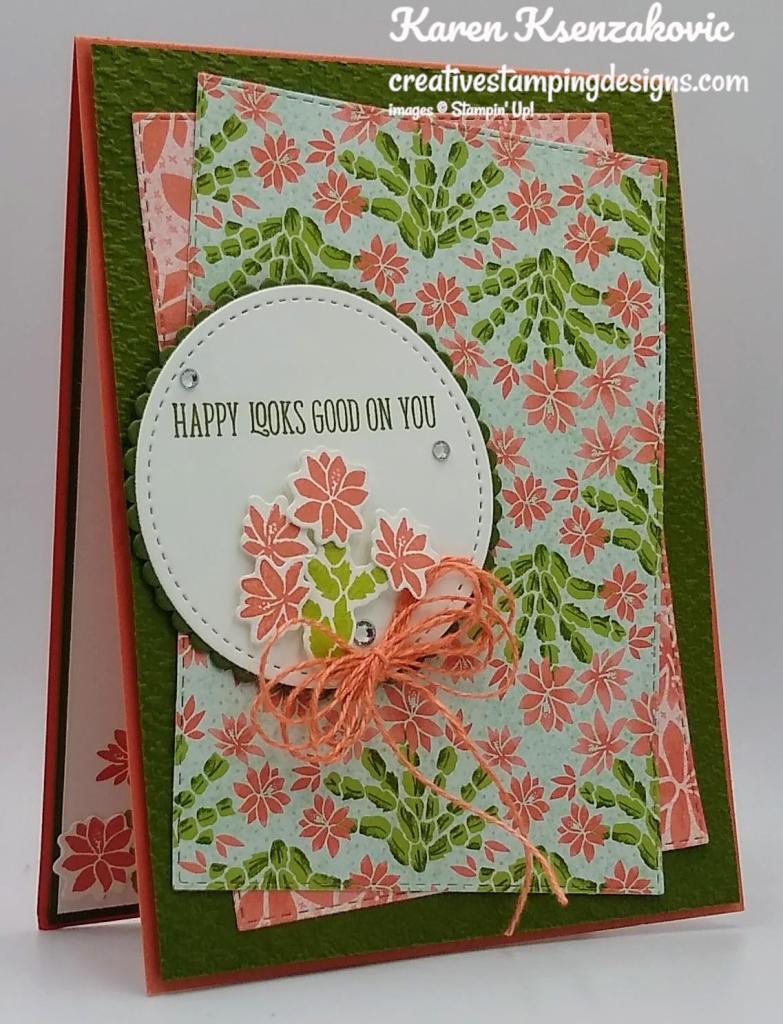
Today’s card I made on my Facebook Live video on Wednesday. If you were able to join me or watched the replay, thank you. If you’d like to watch my video and stamp along, the measurements are below along with the links to my Facebook page and my YouTube channel. Here’s my card for today.

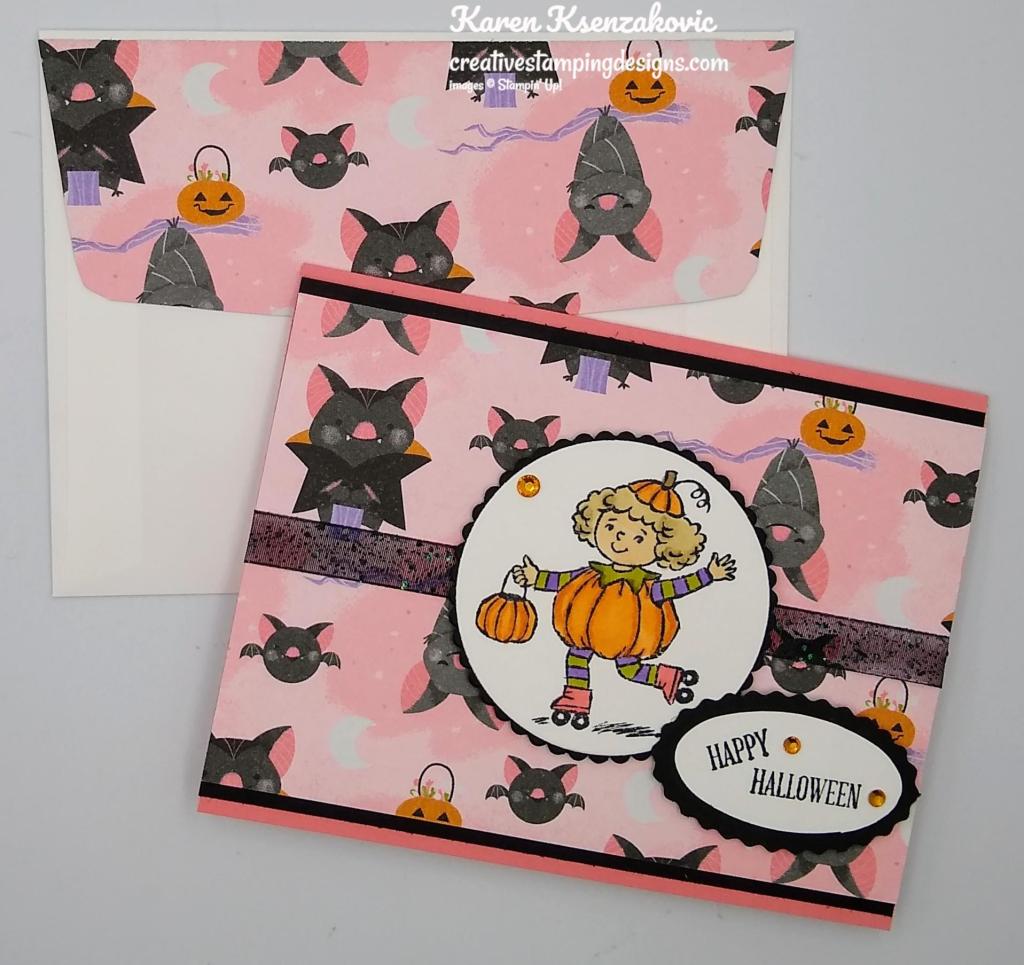
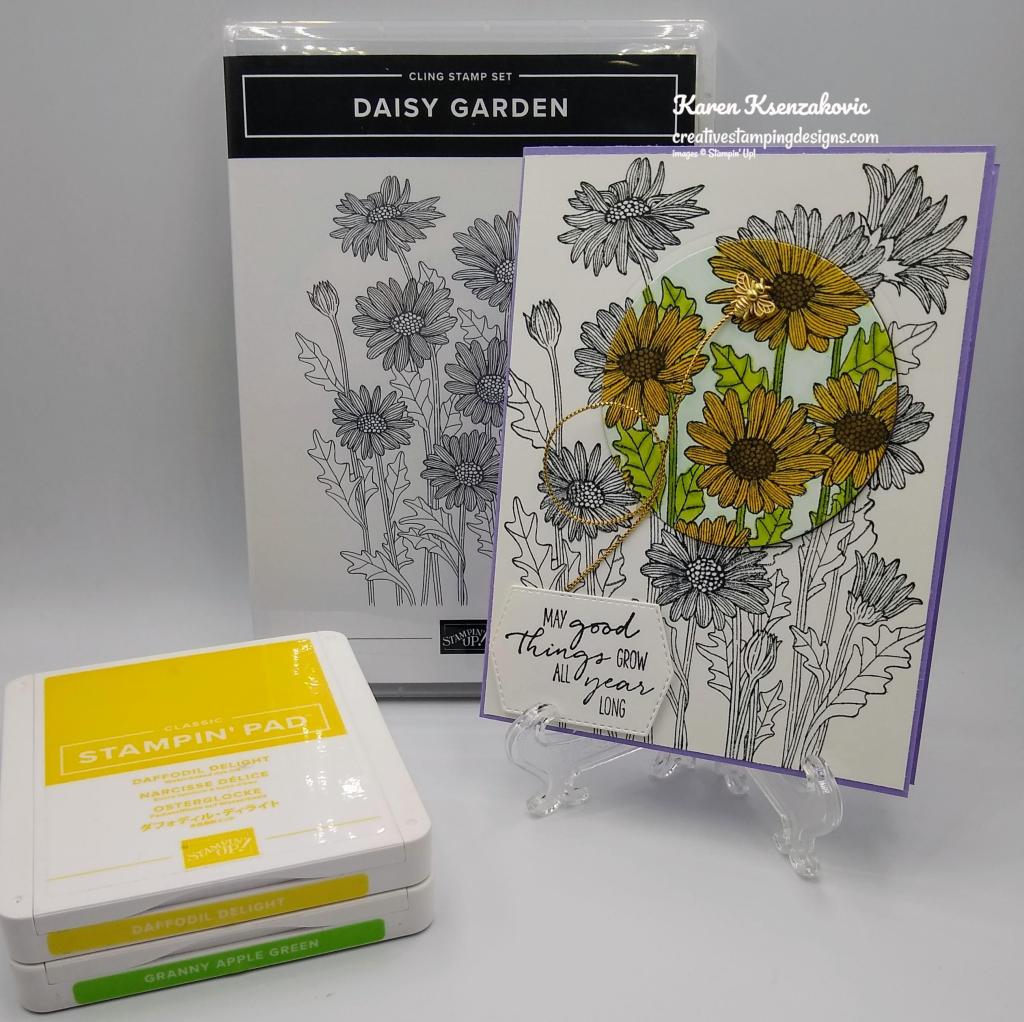
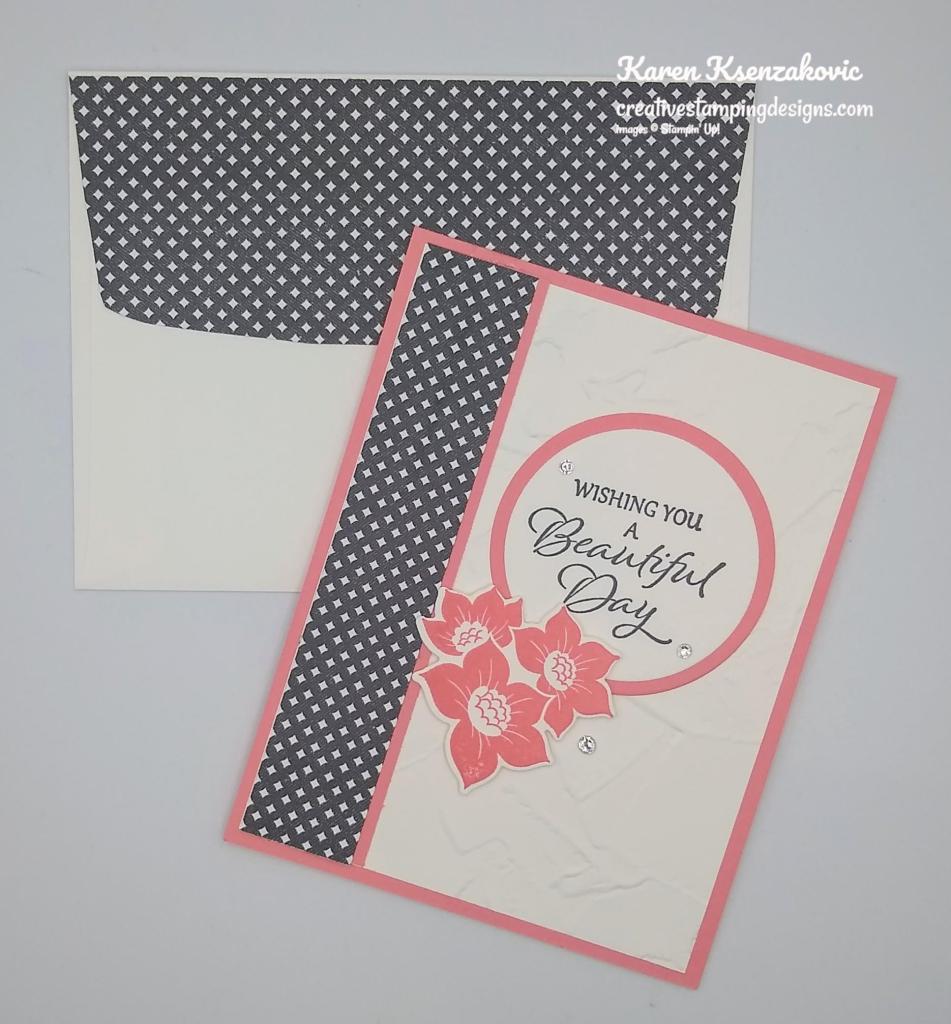
I used the Stampin’ Up! Joyful Life Cling Stamp Set along with the 2020-2022 In-Color 6 X 6 Designer Series Paper for my card today.

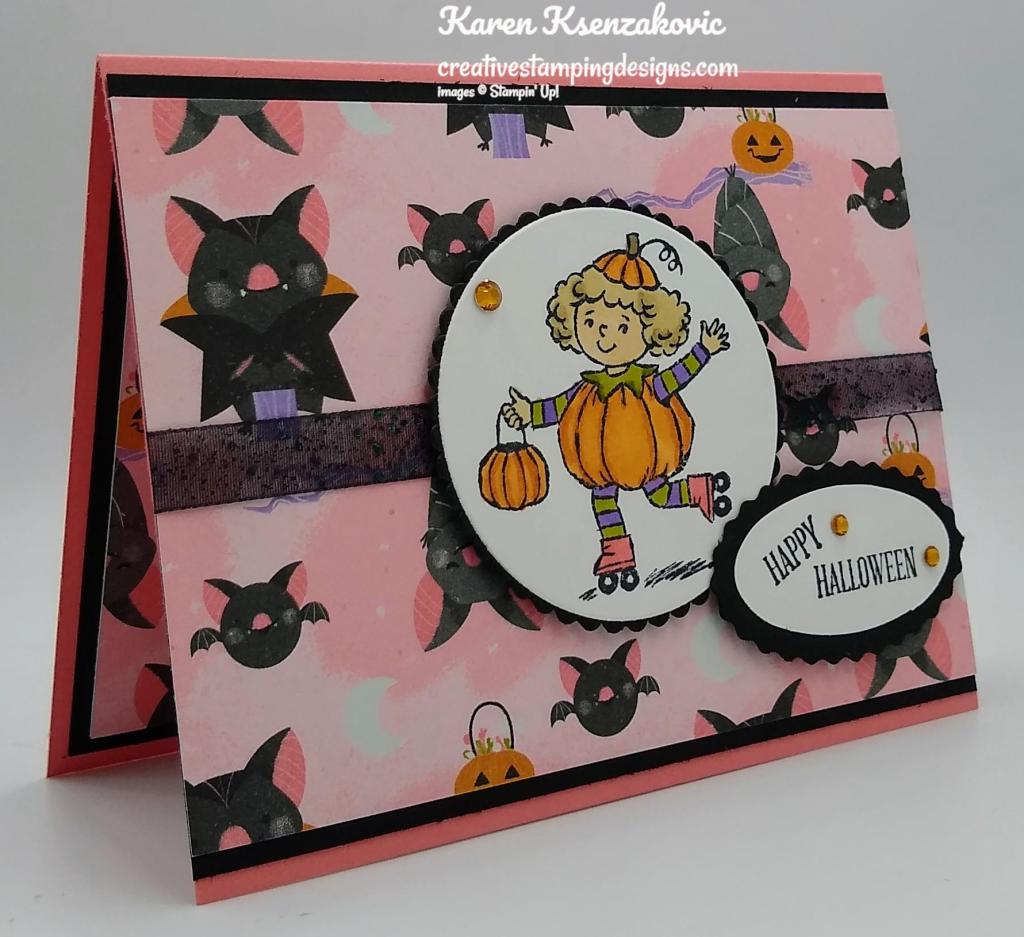
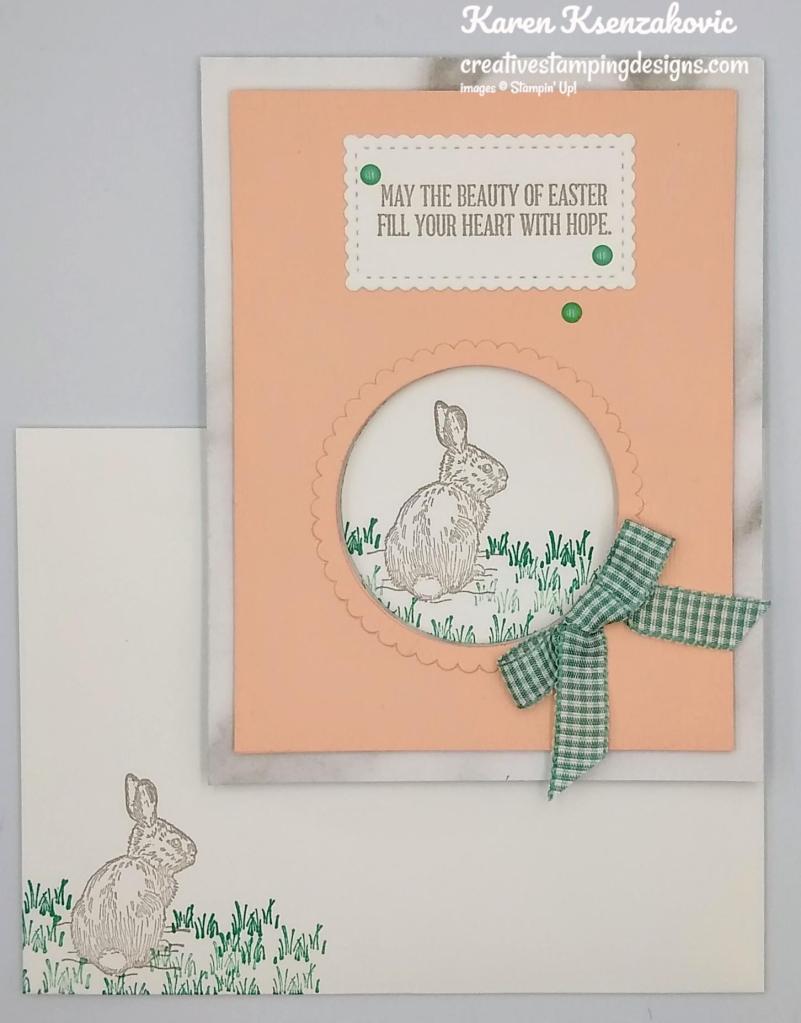
I started by adhering a panel of Bumblebee 2020-2022 In-Color DSP to the front of a Merry Merlot card base using Multipurpose Liquid Glue. Using my 3rd largest Layering Circle Dies, I cut the card base and card front together.

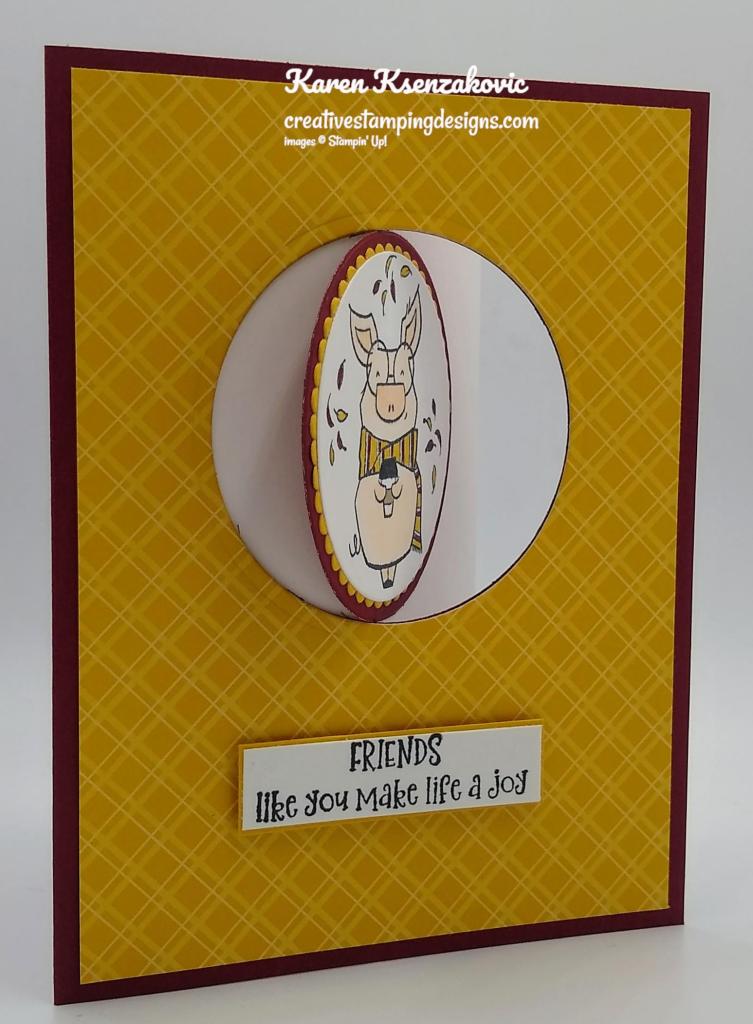
On a strip of Basic White cardstock I stamped the sentiment from the Joyful Life stamp set in Tuxedo Black Ink. I adhered the sentiment strip to a Bumblebee mat using Stampin’ Seal and then to the card front using Stampin’ Dimensionals.

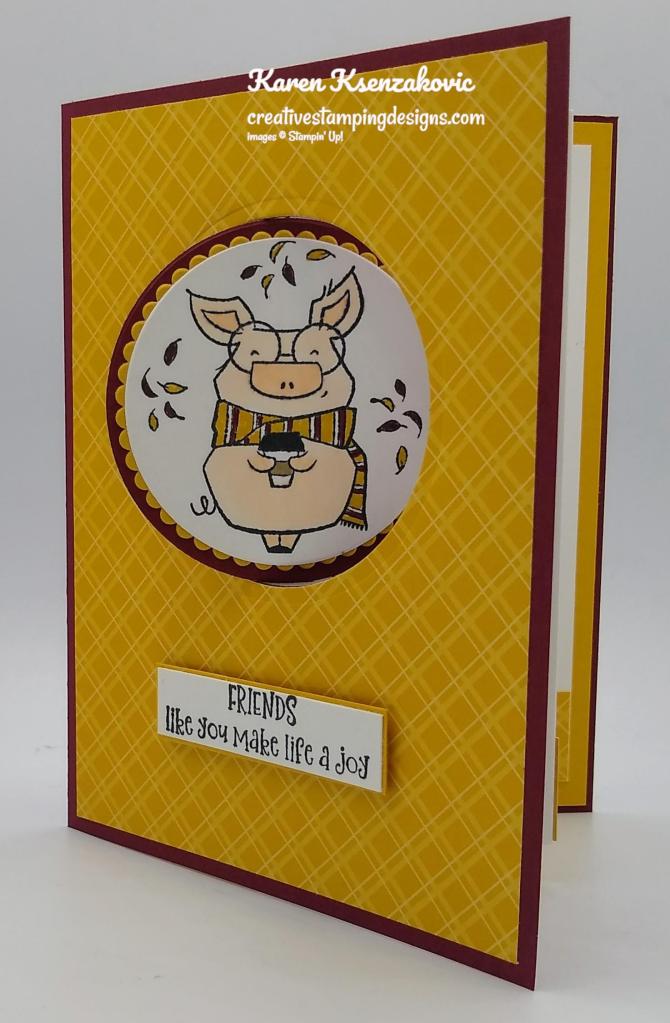
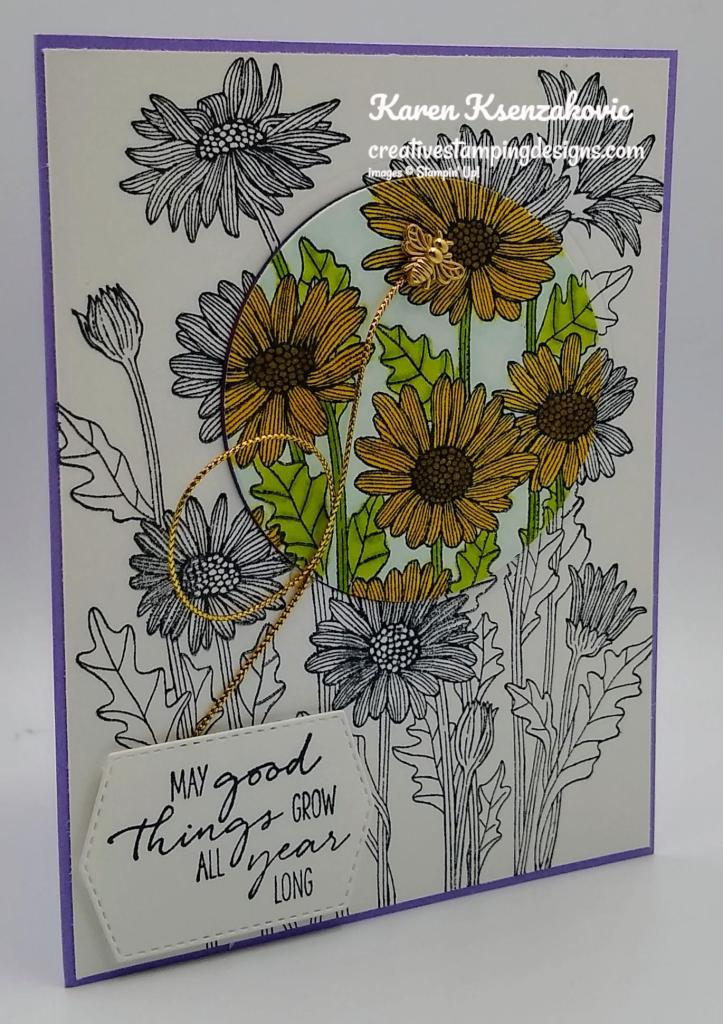
On a small panel of Basic White cardstock I stamped the pig and leaf images from Joyful Life stamp set in Tuxedo Black Ink. I cut the image out using the 4th largest Layered Circles Dies. I colored the image using my Crumb Cake and Petal Pink Stampin’ Blends Markers and my Bumblebee and Merry Merlot Stampin’ Write Markers. I adhered the artwork to a Bumblebee scalloped circle using Stampin’ Seal and then to the Merry Merlot circle that I cut from the card base, using Stampin ‘ Seal.

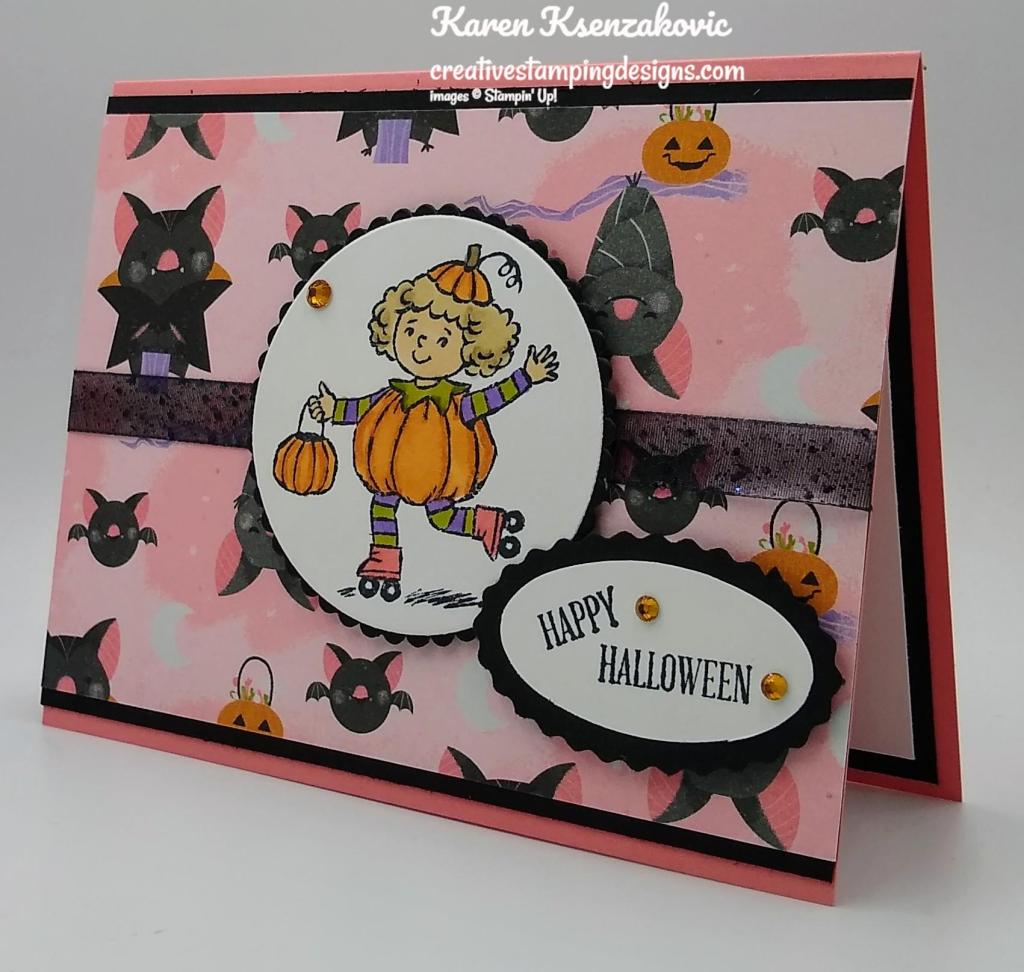
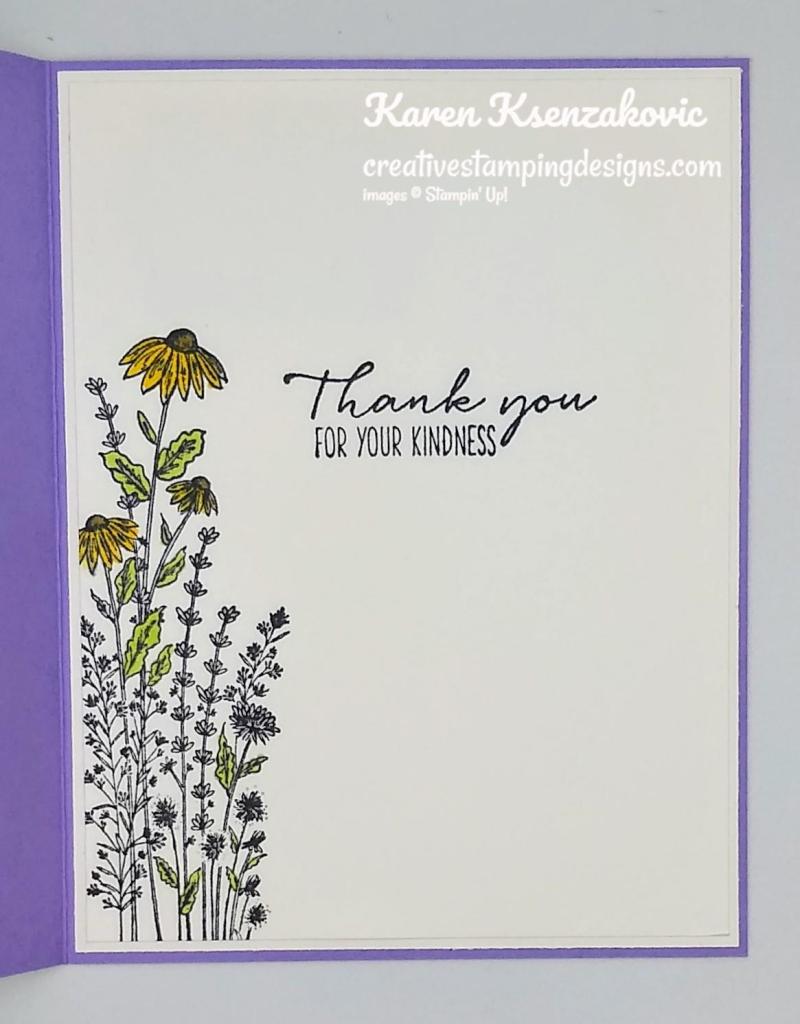
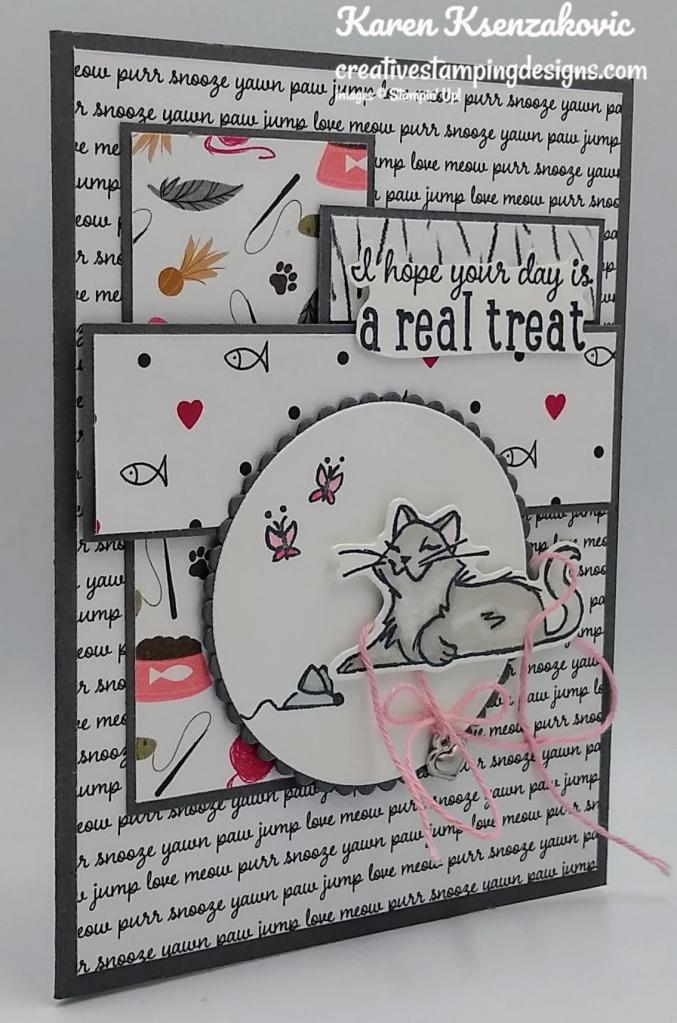
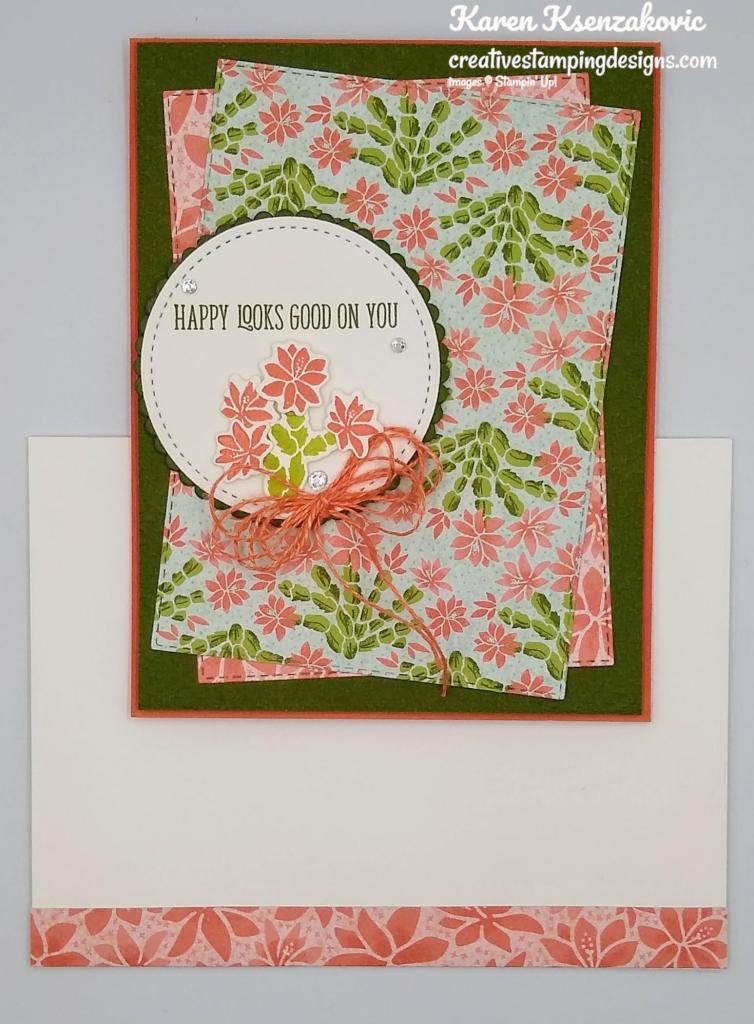
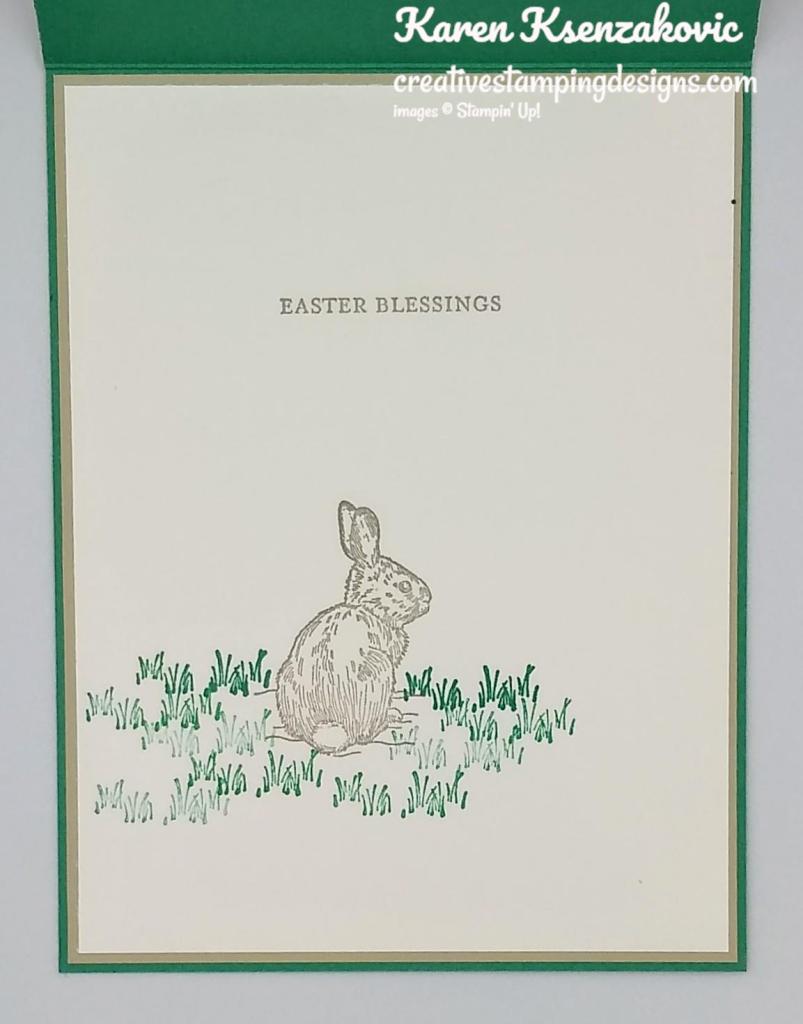
For the inside I scored a panel of Basic White cardstock at 2″, 4″ & 6″. The 2″ & 4″ score lines are folded at a mountain fold and the 6″ score line is a valley fold.

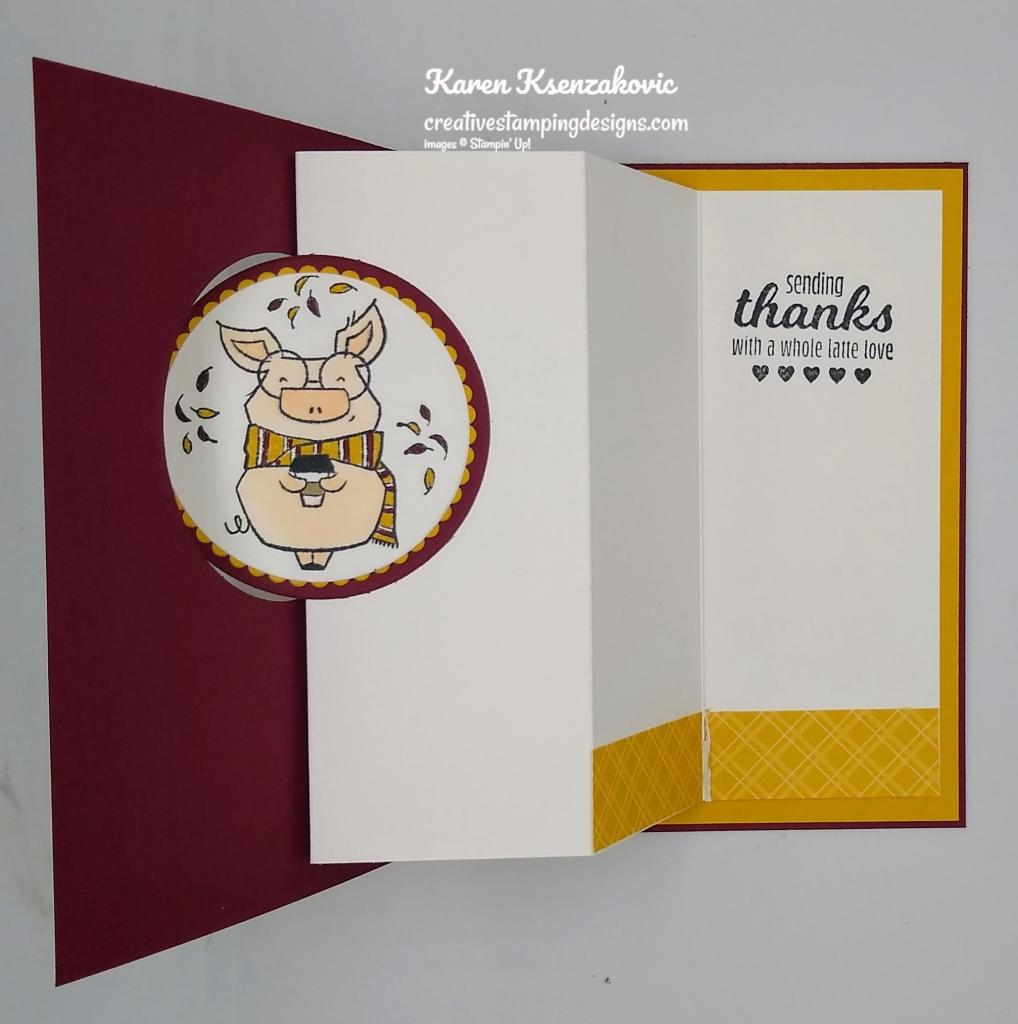
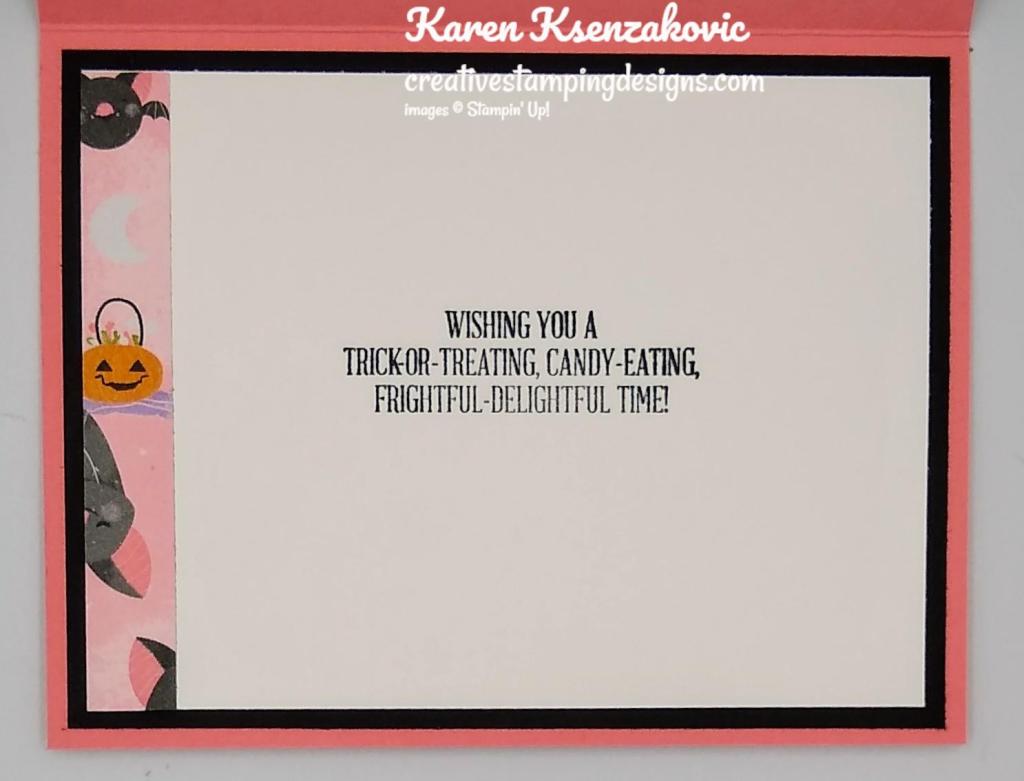
I stamped the sentiment from the Stampin’ Up! Brew Some Fun Cling Stamp Set in Tuxedo Black Ink on the back section of the folded panel. I adhered the Basic White panel to the inside of the Merry Merlot card base using Multipurpose Liquid Glue. I adhered the front section of the Basic White panel to the front of the Merry Merlot card base using Multipurpose Liquid Glue on the top, left side and the bottom of the 2″ front section. I adhered the layered artwork through the front opening of the card using Multipurpose Liquid Glue only on the back of the right side.

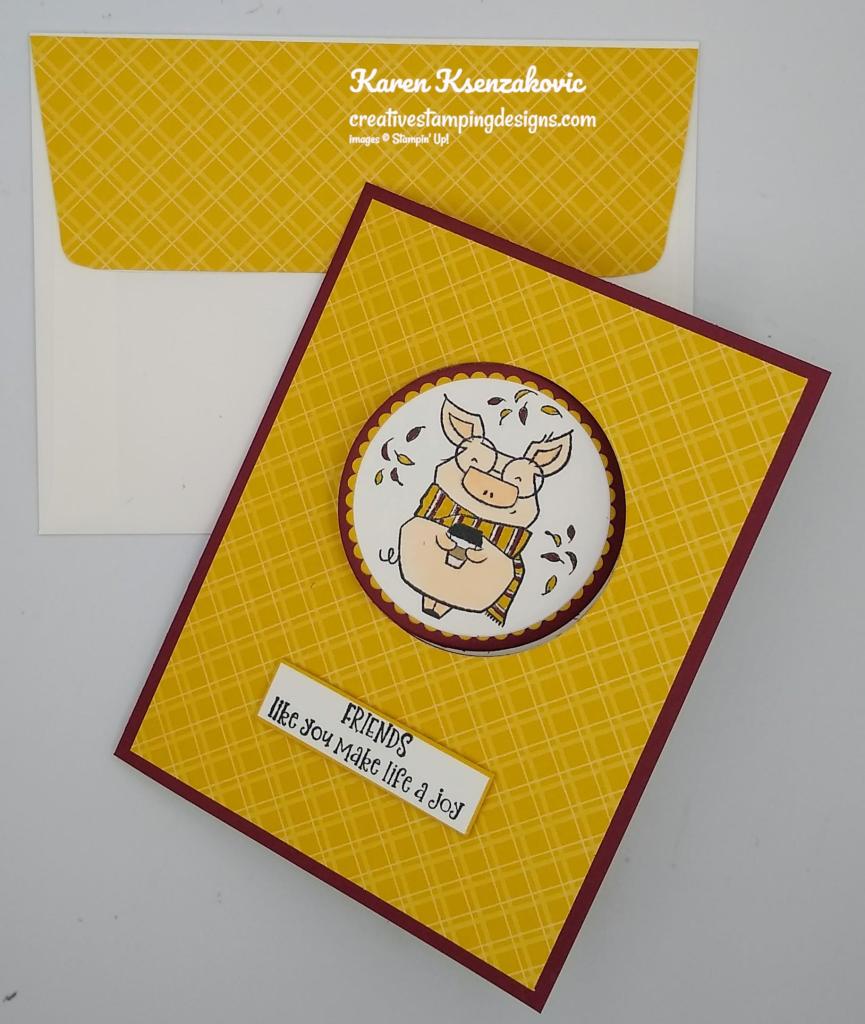
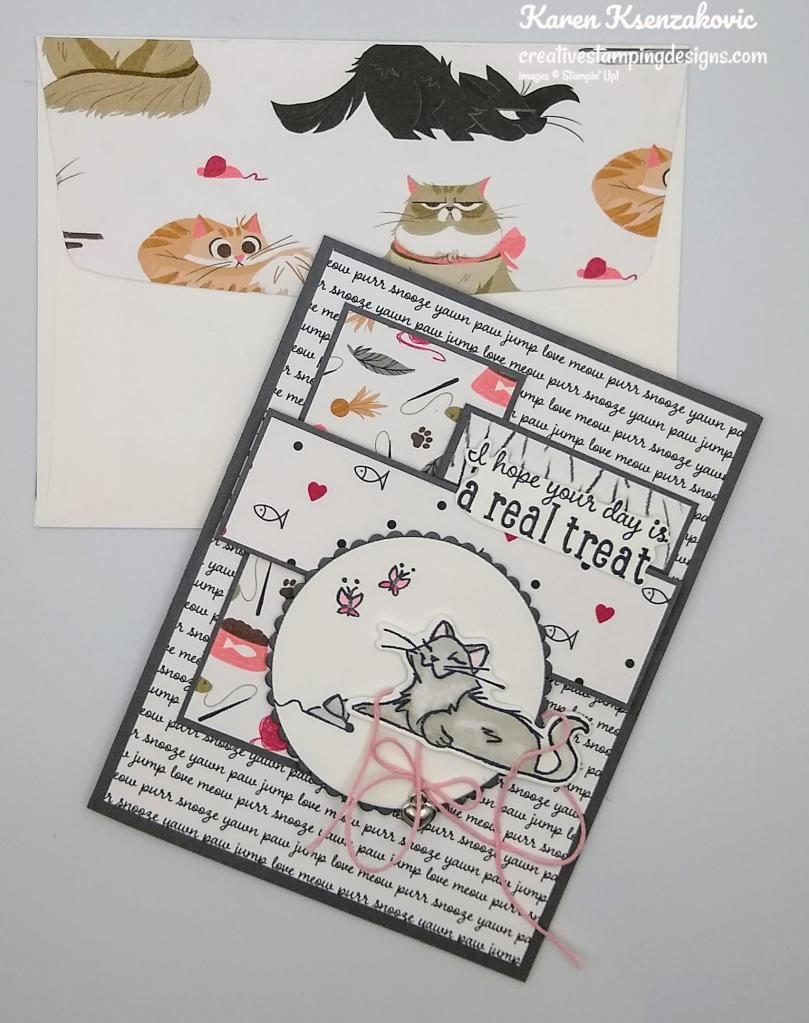
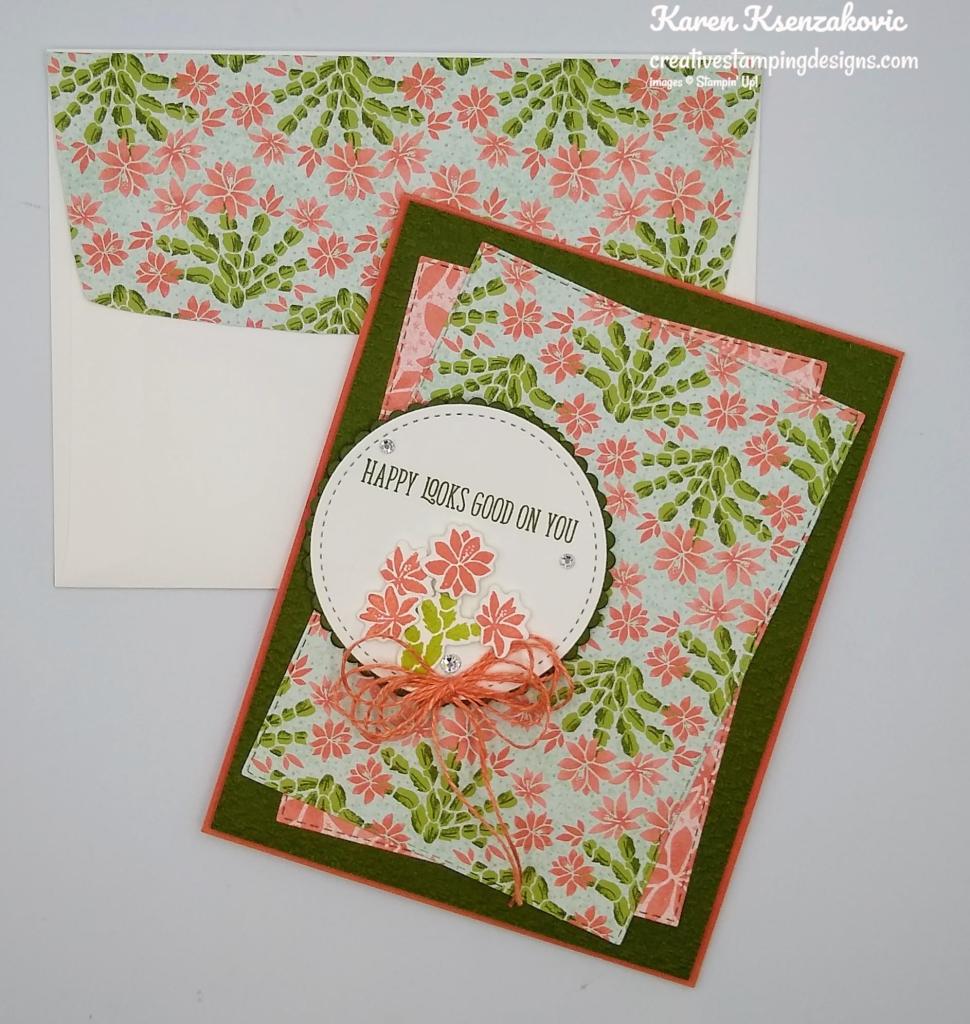
To finish my card I decorated a Basic White Medium Envelope. I stamped the pig and leaf images from the Joyful Life stamp set on the envelope front and colored it in the same as I did for the card. I adhered a panel of the Bumblebee 2020-2022 In-Color DSP to the envelope flap.

Thank you for stopping by my blog today. I hope you liked my card and will give it a try. If you do CASE this card, please feel free to post it in the comments of my Facebook page under the post. I’d love to see your take on the card. The list of measurements are below if you’d like to stamp along while watching the video. You can watch my video on my Facebook page Here.

You can also view the video on my YouTube channel Here. Happy Stamping!!

*********************************************************************************************************

If you need any stamping supplies, I’d love to be your Demonstrator. Just click HERE to go directly to my online store or drop me an email if you have any questions. 

MY CURRENT HOST CODE IS:   BM9R7DQX

Use this host code when you order $50 or greater and receive a free gift from me! If your order is over $150, please do not use this code, but you’ll still get the free gift. The free gift is your choice of any 1 item valued up to $10.00 from the 2020-2021 Annual Catalog or the January-June 2021 Mini Catalog!   For any orders $50 or more I will also send you my monthly class tutorials.  Click HERE or go to my Customer Rewards for more details and to see what this months tutorials are.

Please remember to use my current Host Code and make sure that you can see my name on the final checkout page listed as your Demonstrator when you order so that you know that you’re ordering with me and you’ll get my rewards! 

Happy Stamping, Karen!

*********************************************************************************************************

Peaceful Christmas

Subscribe September 11 – October 10


When you picture a peaceful Christmas, what comes to mind? Do you see snow outside your window, softly swirling through the sky? A tree trimmed with tinsel, a fire crackling nearby? Maybe you’re dreaming of decorating a holly jolly gingerbread house. Can you catch a whiff of Christmas cookies wafting through the air?

Whatever it is you think about when Christmas comes to town, picture a peaceful Christmas with the Peaceful Christmas Paper Pumpkin Kit! This glimmering and gleaming kit is your creative kickstart to Christmas cardmaking. With sprinkles of snow, shimmering silver skies, and heartwarming holiday wishes, you’ll have enough elements and embellishments to create 10 Christmas cards and coordinating envelopes.

Speaking of coordination, make even more Christmas magic with Peaceful Place products! Our stunning Peaceful Place Suite Collection (item 156277) pairs perfectly with the kit’s components. Brew a cup of cocoa, snuggle up with a soft blanket, and prepare for a cozy craft night in!

Details:

  • The kit contains enough elements to create 10 Christmas cards—5 each of 2 designs—and coordinating envelopes. This all-inclusive kit includes printed card bases, die-cut paper pieces, embellishments, adhesive, and more!
  • October’s kit arrives in a cute collectible box covered with enchanting evergreen trees. Use this special, limited-edition box to store your holiday handicrafts, or transform it into a well-wrapped package for a present!
  • The kit’s contents pair perfectly with the Peaceful Place Suite Collection (item 156277). To continue your Christmas crafting, combine the kit’s components with the suite’s patterned paper, shimmery sequins, and more!
  • Card size: 4-1/4″ x 5-1/2″ (10.8 x 14 cm)
  • Envelope size: 4-1/2″ x 5-3/4″ (11.4 x 14.6 cm)
  • Coordinating colors: Basic Gray, Real Red, Shaded Spruce, silver foil

Subscribe to the October 2021 Paper Pumpkin Kit between 11 September and 10 October at paperpumpkin.com!

Note: Supplies may be limited toward the end of the subscription period.

*********************************************************************************************************

Card stock cuts for this project:

  • Basic White Cardstock 1/2″ X 2″ (sentiment), 8″ X 5″ (inner panel scored at 2″, 4″ & 6″)
  • Bumblebee Cardstock 9/16″ x 2 1/16″ (sentiment mat), 3″ X 3″ (artwork mat), 4 1/8″ X 5 3/8″ (inner liner mat)
  • Merry Merlot Cardstock 8 1/2″ X 5 1/2″ (card base scored & folded at 4 1/4″)
  • 2020-2022 In-Color 6 X 6 Designer Series Paper 4″ X 5 1/4″ (card front), 2 – 3/4″ X 2″ (inner liner strips), 2″ X 6″ (envelope flap)

*********************************************************************************************************

Product List

Stampin’ Up! Seasons of Fun for Amy’s Inkin Krew Team Blog Hop

Good Tuesday morning my fellow stampers. Welcome to Amy’s Inkin’ Krew Team Blog Hop. It’s the 2nd Tuesday of the month so that means Blog Hop Day!! If you are starting with me, be sure to hop around to see everyone’s beautiful projects. If you’ve hopped over from Akiko Sudano’s blog, welcome to my blog and thank you for stopping by. The theme this month is “Halloween Fun”.  We can interpret this however we want.  Here’s my card for today.

I used the Stampin’ Up! Seasons of Fun Host Cling Stamp Set along with the Cute Halloween 6 X 6 Designer Series Paper for my card today.

I started by adhering a panel of Cute Halloween DSP on a Basic Black mat using Stampin’ Seal. I wrapped a piece of 3/8″ Glittered Organdy Ribbon, which I colored using my Basic Black Stampin’ Blends Marker, around the layered panel and adhered it on the back with Stampin’ Seal. I adhered the card front to a Flirty Flamingo card base using Multipurpose Liquid Glue.

On a panel of Basic White cardstock I stamped the Halloween image from the Season of Fun stamp set in Tuxedo Black Ink. I colored the image in using my Crumb Cake, Flirty Flamingo, Highland Heather, Ivory, Old Olive and Pumpkin Pie Stampin’ Blends Markers. I cut the image out using my Layered Circles Dies. I cut a scalloped circle from a panel of Basic Black cardstock using the Layered Circles Dies and adhered the artwork to it using Stampin’ Seal. I adhered the layered artwork to the card front using Stampin’ Dimensionals.

On a panel of Basic White cardstock I stamped the sentiments from the Stampin’ Up! A Wish For Everything Cling Stamp Set in Tuxedo Black Ink. Using my Double Oval Punch I punched out the sentiment. I punched out a Basic Black scalloped oval using the Double Oval Punch and adhered the sentiment to it using Stampin’ Seal. I adhered the layered sentiment to the card front using Stampin’ Dimensionals. I added a few Pumpkin Pie Holiday Rhinestone Basic Jewels to the card front.

On the inside I stamped the sentiment from A Wish For Everything stamp set in Tuxedo Black Ink on a Basic White panel. I adhered a strip of the Cute Halloween DSP to the side of the panel using Stampin’ Seal. I adhered the Basic White panel to a Basic Black mat using Stampin’ Seal and then to the inside of the Flirty Flamingo card base using Multipurposed Liquid Glue.

To complete my card I decorated a Basic White Medium Envelope. I stamped the Halloween image from the Season of Fun stamp set in Tuxedo Black Ink and colored it in the same as on the card. I adhered a panel of Cute Halloween DSP to the envelope flap.

Thank you for visiting by my blog today, I hope you liked my card and will give it a try. Now that you’ve seen my card, be sure to hop around to see everyone’s beautiful projects. Hit Previous to hop back to Akiko Sudano’s blog or hit Next to head over to Donna Leonard’s blog. You can also click on each of the names and hop around that way. Happy Hopping!!

  1. Karen Ksenzakovic You Are Here
  2. Jillian Good
  3. Jaimie Babarczy
  4. Karen Finkle
  5. Mary Deatherage
  6. Tara Carpenter
  7. Donna Leonard
  8. Akiko Sudano
  9. Terry Lynn Bright
  10. Sue Prather
  11. Amy Koenders

*********************************************************************************************************

If you need any stamping supplies, I’d love to be your Demonstrator. Just click HERE to go directly to my online store or drop me an email if you have any questions. 

MY CURRENT HOST CODE IS:   JAK446GF

Use this host code when you order $50 or greater and receive a free gift from me! If your order is over $150, please do not use this code, but you’ll still get the free gift. The free gift is your choice of any 1 item valued up to $10.00 from the 2020-2021 Annual Catalog or the January-June 2021 Mini Catalog!   For any orders $50 or more I will also send you my monthly class tutorials.  Click HERE or go to my Customer Rewards for more details and to see what this months tutorials are.

Please remember to use my current Host Code and make sure that you can see my name on the final checkout page listed as your Demonstrator when you order so that you know that you’re ordering with me and you’ll get my rewards! 

Happy Stamping, Karen!

*********************************************************************************************************

Awesome Joining Promotions Until September 30, 2021

This image has an empty alt attribute; its file name is CRw3UiG1VcNw0fLUGVJqZ-YwyPUUS6uG8wmP4PTx-IdrSjQTpH-NKMtihO-191VvLnyi4n_MrGC7EEfGuHnVm2X-oA9cb_oiKgAHZnJdAnlMVA66mu2wtYmqiqWygCR5dtYtoVNkHcCb9w7RzyU6p9P124S08o1A2FmIRA8VDYEA1jbiHaw=s0-d-e1-ft

There is an AWESOME joining promotion happening!  If you purchase the Starter Kit between August 3 and September 30, you’ll get to pick a FREE bundle from this list!

  • Frosted Gingerbread
  • Christmas Season
  • Christmas To Remember
  • Whimsical Trees
  • Peaceful Deer
  • Sweet Little Stockings
  • Penguin Place
  • Peaceful Cabin
  • Arctic Bears
  • Beauty Of Tomorrow
  • Gorgeous Leaves
  • Nature’s Harvest

When you purchase the Starter Kit for $99 + taxes (if applicable), the kit ships for FREE and YOU get to pick $125 in Stampin’ Up! merchandise OF YOUR CHOICE. If you purchase the kit during Sale-a-bration, you’ll get an additional FREE bundle from the select twelve listed above (with a value up to $60.25!!) with your kit!  A free bundle in addition to $125 in merchandise for $99, YES PLEASE!! You will also get a past Paper Pumpkin Kit and other supplies free in your kit.

If you are planning on placing an order of $100, you might really want to consider joining. This is such an awesome joining deal, you don’t want to pass it up. There is no obligation to sell, have workshops or do Facebook lives. You can join strictly to be a ‘hobby demonstrator’ and enjoy the 20% discount. I would love to have you on my team!!! You also get to enjoy all the demonstrator perks like early ordering, sneak peeks at what’s coming and best of all the events. Why wait, this is such a great sign up promotions, join now and be a part of our awesome Stampin’ Up! family!!!

If you have any questions about joining, please drop me a note at creativestampingdesigns@gmail.com, I’d love to talk with you about it! You can find more information about joining on my blog @ creativestampingdesigns.com

*********************************************************************************************************

Peaceful Christmas

Subscribe September 11 – October 10


When you picture a peaceful Christmas, what comes to mind? Do you see snow outside your window, softly swirling through the sky? A tree trimmed with tinsel, a fire crackling nearby? Maybe you’re dreaming of decorating a holly jolly gingerbread house. Can you catch a whiff of Christmas cookies wafting through the air?

Whatever it is you think about when Christmas comes to town, picture a peaceful Christmas with the Peaceful Christmas Paper Pumpkin Kit! This glimmering and gleaming kit is your creative kickstart to Christmas cardmaking. With sprinkles of snow, shimmering silver skies, and heartwarming holiday wishes, you’ll have enough elements and embellishments to create 10 Christmas cards and coordinating envelopes.

Speaking of coordination, make even more Christmas magic with Peaceful Place products! Our stunning Peaceful Place Suite Collection (item 156277) pairs perfectly with the kit’s components. Brew a cup of cocoa, snuggle up with a soft blanket, and prepare for a cozy craft night in!

Details:

  • The kit contains enough elements to create 10 Christmas cards—5 each of 2 designs—and coordinating envelopes. This all-inclusive kit includes printed card bases, die-cut paper pieces, embellishments, adhesive, and more!
  • October’s kit arrives in a cute collectible box covered with enchanting evergreen trees. Use this special, limited-edition box to store your holiday handicrafts, or transform it into a well-wrapped package for a present!
  • The kit’s contents pair perfectly with the Peaceful Place Suite Collection (item 156277). To continue your Christmas crafting, combine the kit’s components with the suite’s patterned paper, shimmery sequins, and more!
  • Card size: 4-1/4″ x 5-1/2″ (10.8 x 14 cm)
  • Envelope size: 4-1/2″ x 5-3/4″ (11.4 x 14.6 cm)
  • Coordinating colors: Basic Gray, Real Red, Shaded Spruce, silver foil

Subscribe to the October 2021 Paper Pumpkin Kit between 11 September and 10 October at paperpumpkin.com!

Note: Supplies may be limited toward the end of the subscription period.

*********************************************************************************************************

Card stock cuts for this project:

  • Basic Black Cardstock 4″ X 5 1/2″ (card front mat), 3″ X 3″ (scalloped circle), 1 1/2″ X 2 1/2″ (scalloped oval mat), 4″ X 5 1/4″ (inner liner mat)
  • Basic White Cardstock 3″ X 3″ (artwork), 1 1/2″ x 2 1/2″ (sentiment), 3 3/4″ X 5″ (inner liner)
  • Flirty Flamingo Designer Series Paper 8 1/2″ X 5 1/2″ (card base scored & folded at 4 1/4″)
  • Cute Halloween 6 X 6 Designer Series Paper 3 3/4″ X 5 1/2″ (card front), 1/2″ x 3 3/4′ (inner liner strip), 2 1/4″ x 6″ (envelope flap)

*********************************************************************************************************

Product List

Stampin’ Up! Jar of Flowers

Good Monday morning my stamping friends. How was everyone’s weekend? Hope you were able to take some time for yourself.

Today’s card I used an older set from the 2021-2022 Annual Catalog, using all the new 2021-2023 in-Colors. Here’s my card for today.

I used the Stampin’ Up! Jar of Flowers Photopolymer Stamp Set for today’s card.

My design is from the Just Add Ink Challenge #558.

I also played along with Inspire. Create Challenge #092.

I started by adhering a panel of the 2021-2023 In-Color 6 X 6 Designer Series Paper to a Soft Succulent card base using Stampin’ Seal. I embossed a panel of Basic White cardstock using the Macramé 3D Embossing Folder and adhered it to an Evening Evergreen mat using Multipurpose Liquid Glue. I adhered the matted panel to the card front using Stampin’ Dimensionals.

On a panel of Basic White cardstock I stamped the flower image from the Jar Of Flowers stamp set in Tuxedo Black Ink. I colored the image in using my Evening Evergreen, Fresh Freesia, Pale Papaya, Polished Pink and Soft Succulent Stampin’ Blends Markers. I cut the image out using my Layering Circles Dies. I cut a scalloped circle from a panel of Evening Evergreen cardstock using my Layering Circles Dies and adhered the artwork to the scalloped mat using Stampin’ Seal then to the embossed panel using Multipurpose Liquid Glue.

I made a small bow using the Fresh Freesia 3/8″ Open Weave Ribbon and adhered it to the artwork using a Glue Dot. I added a few 2021-2023 In-Color Jewels to the card front.

On the inside I stamped the sentiment from the Stampin’ Up! Encircled In Friendship Cling Stamp Set in Tuxedo Black Ink in the center of a Basic White panel. I adhered a strip of the 2021-2023 In-Color DSP to the bottom of the panel. I adhered the Basic White panel to an Evening Evergreen mat using Stampin’ Seal and then to the inside of the Soft Succulent card base using Multipurpose Liquid Glue.

To finish my card I decorated a Basic White Medium Envelope. I stamped the flower image from the Jar Of Flowers stamp set on the envelope front and colored it the same as I did for the card. I adhered a panel of the 2021-2023 In-Color DSP to the envelope flap.

Thank you for stopping by my blog today. I hope you liked my card and will give it a try. Happy Stamping!!

*********************************************************************************************************

If you need any stamping supplies, I’d love to be your Demonstrator. Just click HERE to go directly to my online store or drop me an email if you have any questions. 

MY CURRENT HOST CODE IS:  DRZETK6V

Use this host code when you order $50 or greater and receive a free gift from me! If your order is over $150, please do not use this code, but you’ll still get the free gift. The free gift is your choice of any 1 item valued up to $10.00 from the 2020-2021 Annual Catalog or the January-June 2021 Mini Catalog!   For any orders $50 or more I will also send you my monthly class tutorials.  Click HERE or go to my Customer Rewards for more details and to see what this months tutorials are.

 Click HERE to shop the clearance rack.

Please remember to use my current Host Code and make sure that you can see my name on the final checkout page listed as your Demonstrator when you order so that you know that you’re ordering with me and you’ll get my rewards! 

Happy Stamping, Karen!

*********************************************************************************************************

Stampin’ Up! Connect, Craft & Collect $25 Stampin’ Rewards Bonus!!

This offer ends TODAY, Monday June 14th

From May 4 – June 14, 2021, qualifying Stampin’ Up! orders and parties over $250 will receive $25 in BONUS Stampin’ Rewards!  YAY for more free goodies to kick off a new catalog!!

Stampin’ Rewards can be spent on any merchandise in either of the current catalogs, including the host exclusive items on pages 170-171 in the new Annual Catalog and page 88 in the January-June Mini Catalog!

PROMOTION DATES:  MAY 4 – JUNE 14, 2021

  • Workshop orders, customer orders, and online orders all qualify for the extra $25 in Stampin’ Rewards if they reach the $250 level.
  • The order must reach the qualifying amount of $250 in merchandise prior to shipping and tax.
  • The extra $25 rewards are only valid once per order no matter how high the order total.
  • Starter Kit orders do not qualify for this promotion.
  • Stampin’ Rewards can not be used on a 50% off item.
  • Deadline to submit an order and receive the extra $25 in free Stampin’ Rewards:  June 14, 2021 at 11:50 PM (MT).

If you have any questions or would like me to set up a host code for you to see if you can collect $250 in orders for yourself, please drop me a note at creativestampingdesigns@gmail.com.  I’ll be happy to do that for you!

If you have any questions, drop me a note at creativestampingdesigns@gmail.com.

*********************************************************************************************************

The Adventure Begins

Subscribe June 11 – July 10

Life is full of big adventures that are best experienced together! This month’s The Adventure Begins Paper Pumpkin Kit helps you celebrate those exciting new chapters in the most creative of ways with enough supplies to create twelve motivating cards—plus coordinating envelopes—all featuring the exciting colors of nature.

Like the still moments before a great adventure, the kit’s designs contain a quiet energy that hint at all the grand possibilities of what is yet to come. Share this kit with your family and friends about to embark on a new journey and make connections while you explore and discover new levels of your creativity!

Details

  • Contains enough supplies to create twelve cards and coordinating envelopes.
  • Card size: 4-1/4” x 5-1/2” (10.8 x 14cm)
  • Envelope size: 4-1/2” x 5-3/4” (11.4 x 14.6 cm)
  • Comes with a Stampin’ Spot plus an exclusive Stamp Set.
  • Includes inspirational sentiments and adventure-themed imagery featuring these nature-inspired coordinating colors: Basic Black, Basic White, Bermuda Bay, Crushed Curry, Early Espresso, Flirty Flamingo, Garden Green, Granny Apple Green, Mango Melody, Night of Navy.

Subscribe to the July 2021 Paper Pumpkin Kit between 11 June and 10 July at paperpumpkin.com!

Note: Supplies may be limited toward the end of the subscription period.

*********************************************************************************************************

The January–June 2021 Mini Catalog will be retiring soon! It’s always bittersweet to see a classic Stampin’ Up! catalog take a trip to retirement. But, we’re looking forward to all the new products on their way—and we hope you are, too!

Stock up on your favorite products before they’re gone for good! Save up to 50% on essential craft supplies. What are you waiting for? Start shopping! After all, this selection of Last Chance Products is only available while supplies last.

Click Here to view the PDF of the LAST CHANCE retiring items from the January -June 2021 Mini Catalog.

DETAILS

  • Each Last Chance Products promotion typically includes a Retiring List (products that will no longer be available once the catalog retires) and a Carryover List (products that will still be available once the catalog retires). For this catalog’s Last Chance Products promotion, a Carryover List will not be provided; carryover products can be viewed in the 2021–2022 Annual Catalog.
  • Discounts are not always available with the Retiring List. When they are, they will vary from one market to another depending on product performance.
  • All products are available while supplies last, and there are no purchase limits.

SALES PERIOD

  • Starts: 1 June 2021 at 1:00 PM (MT)
  • Ends: 30 June 2021 at 11:59 PM (MT)

DON’T MISS OUT ON THESE GREAT DEALS!! GET THOSE SHOPPING LISTS READY TO GO!! STOCK UP ON YOUR FAVORITE PRODUCTS BEFORE THEY’RE GONE!! Click Here and head over to my Online Store and Start Shopping!!Don’t forget, the last chance items are available while supplies last so shop early for the best selection! 

*********************************************************************************************************

Introducing The Kits Collection

I’m excited to share with you a new line of creative products called the Kits Collection by Stampin’ Up! They’ve designed beautiful kits and done all the designing and cutting for you – so card making is easier than ever!  Stampin’ Up! has taken the guess work out of creativity and done the hard parts, and you get to do the fun stuff: craft! Each kit is all-inclusive and includes step-by-step instructions, the predesigned projects, preprinted pieces, and even the adhesives you need to complete the projects.

There’s a wide variety of kits for all different occasions, and new kits are being added regularly, so be sure to check back often! This collection even includes 4 kits that don’t require stamping.  This makes a perfect gift for that special someone in your life who wants to be crafty but doesn’t feel confident to stamp!  You can shop the current selection at www.stampinup.com/kits. But hurry! Kits are available only while supplies last! 

Pick the kit that’s right for you.

*********************************************************************************************************

The first Stampin’ Up! value statement is this: we care about people first. What does that look like? Caring about people first means treating others with kindness, respect, and equal consideration. It means working together towards a common goal, helping each other through life’s challenges, and celebrating one another’s accomplishments. It means including others, even when we disagree, have contrasting life experiences, or simply see things differently. Caring about people first is our greatest strength!

In honor of this value—and in the spirit of World Diversity Day—we’d like to celebrate what makes us unique through what brings us together: creativity! The United Through Creativity Digital Download features inclusive, multicultural, and multilingual sentiments and illustrations that represent the multiple markets Stampin’ Up! engages with. And, it’s FREE for all!

We hope you’ll join us in celebrating our one-of-a-kind community through the unifying force of creativity!

  • The elements featured in the United Through Creativity Digital Download were created in the spirit of World Diversity Day—a day for each of us to join together and understand the value of cultural diversity throughout the world. And, to celebrate our unique community of crafters!
  • We celebrate the diversity of the Stampin’ Up! family every day! In the United Through Creativity Digital Download, you’ll see a variety of illustrations, sentiments, and other elements that represent each of our marvelous markets and more.
  • Print your favorite pieces and use them to create cards, scrapbook pages, and other paper projects! We hope you’ll enjoy celebrating diversity, connection, community, and creativity with this sweet selection of inclusive, multicultural, and multilingual elements.
  • Don’t be shy—share what you’ve made! When sharing to social media, use the hashtags #UnitedThroughCreativity and #DiversityDay. We can’t wait to see your creations!
  • Speaking of sharing, spread the word! Let’s celebrate what makes us unique through what brings us together: creativity!
  • Click on the image below for your free Digital Download

*********************************************************************************************************

Card stock cuts for this project:

  • Basic White Cardstock 3″ X 4 1/4″ (embossed panel), 3″ X 3″ (artwork), 4″ X 5 1/4″ (inner liner)
  • Evening Evergreen Cardstock 3 1/8″ X 4 3/8″ (embossed panel mat), 3″ x 3″ (artwork mat), 4 1/8″ X 5 3/8″ (inner liner mat)
  • Soft Succulent Cardstock 4 1/4″ X 11″ (card base scored and folded at 5 1/2″)
  • 2021-2023 In-Color 6X6 Designer Series Paper 4″ X 5 1/4″ (card front), 2 1/2″ X 6″ (envelope flap)

*********************************************************************************************************

Product List

Stampin’ Up! Daisy Garden

Good Wednesday morning my stamping friends. We’re halfway through the week and on the downhill to the weekend. Is anyone starting to make plans?

It’s time for another inspiration challenge for The Card Concept. For the next 2 weeks we have a Garden Pleasures challenge. Here is my card that was inspired from the challenge photo.

I used the new Stampin’ Up! Daisy Garden Cling Stamp Set and the Stampin’ Up! Dragonfly Garden Cling Stamp Set for Spotlight Technique card. I was inspired by the cheerful flowers and colors along with the beehive in the inspiration photo.

I hope you will take a moment to visit The Card Concept and join us this week to play along with our challenge #155. How are you inspired by this photo?

I started by stamping the daisy image from the Daisy Garden stamp set in Tuxedo Black Ink on a panel of Basic White cardstock. I picked a spot in the center of the photo and cut it out using my Layering Circles Dies. I adhered the Basic White panel (without the center circle) to a Highland Heather card base using Multipurpose Liquid Glue. I colored just the circle I cut our using my Daffodil Delight, Granny Apple Green, Pool Party and Soft Suede Stampin’ Blends Markers. I adhered the circle to the card front using Stampin’ Dimensionals making sure to line up the flowers and leaves.

On a small panel of Basic White cardstock I stamped the sentiment from the Stampin’ Up! Dragonfly Garden Cling Stamp Set in Tuxedo Black Ink. I cut the sentiment out using my Tasteful Labels Dies and adhered it to the card front using Stampin’ Dimensionals.

I adhered a length of the Gold Simply Elegant Trim to the card front using a Glue Dot and adhered one of the Bumblebee Trinkets to the end of it on a flower using a Glue Dot.

On the inside I stamped the sentiment from the Dragonfly Garden stamp set in Tuxedo Black Ink in the center of a Basic White panel. I stamped the wildflower image from the Dragonfly Garden stamp set in Tuxedo Black Ink on the side of the panel and colored it in using my Daffodil Delight, Granny Apple Green and Soft Suede Stampin’ Blends Markers. I adhered the Basic White panel to a Basic White mat using Stampin’ Seal and then to the inside of the Highland Heather card base using Stampin’ Seal.

To complete my card I stamped the wildflower image from the Dragonfly Garden stamp set on a Basic White Medium Envelope front and envelope flap. I colored the images in using my Daffodil Delight, Granny Apple Green and Soft Suede Stampin’ Blends Markers.

Thank you for stopping by my blog today. I hope you liked my card and will give it a try. Happy Stamping!!

****************************************************************************************************

Join me today at 4pm on my Facebook Live.

I’m planning to go live on my Facebook page with a project today at 4:00pm ET.  Please join me to see what card I will be making today.

*********************************************************************************************************

If you need any stamping supplies, I’d love to be your Demonstrator. Just click HERE to go directly to my online store or drop me an email if you have any questions. 

MY CURRENT HOST CODE IS: QH7JDXHB

Use this host code when you order $50 or greater and receive a free gift from me! If your order is over $150, please do not use this code, but you’ll still get the free gift. The free gift is your choice of any 1 item valued up to $10.00 from the 2020-2021 Annual Catalog or the January-June 2021 Mini Catalog!   For any orders $50 or more I will also send you my monthly class tutorials.  Click HERE or go to my Customer Rewards for more details and to see what this months tutorials are.

 Click HERE to shop the clearance rack.

Please remember to use my current Host Code and make sure that you can see my name on the final checkout page listed as your Demonstrator when you order so that you know that you’re ordering with me and you’ll get my rewards! 

Happy Stamping, Karen!

*********************************************************************************************************

Stampin’ Up! Join + Promotion May 4-31 Going on NOW!!

May is a fabulous time to join Stampin’ Up! because you’ll get even MORE FREE products in your customizable Starter Kit!  From May 4–31, you will get $125 USD  $155 worth of products for only $99 + free business supplies + free shipping + all the fun being a part of Stampin’ Up!!

PROMOTION DATES: 4–31 MAY 2021

  • New demonstrators who purchase their Starter Kit between May 4 and May 31 will be able to redeem $155 of Starter Kit eligible products for $99.
  • New demonstrators who submit their Independent Demonstrator Agreement (IDA) before May 4 or after May 31 will not be eligible for this offer.
  • A new demonstrator can select any eligible Stampin’ Up! products up to the stated value.
  •  The Starter Kit also includes business resources like catalogs, brochures, order forms, and postcards at no additional charge.
  • The Starter Kit also includes a FREE past Paper Pumpkin kit.
  • The Starter Kit promotion begins May 4.
  • Deadline to purchase the Starter Kit and receive the extra $30 in free products:  May 31, 2021 at 11:50 PM (MT).

In addition to the amazing added value to the Starter Kit, when you join Stampin’ Up! you get to be a part of our amazing community of crafters!  Plus, you get to enjoy sharing simple and fun crafting experiences with others, early access to products, and exclusive access to training events!  Demonstrators also get at least a 20% discount on all of the products that they purchase and there is no requirement to sell to anyone.  There is no risk and no penalty if you decide that being a Demonstrator isn’t right for you.  With this great deal, there is no reason not to join in May!!

If you have any questions about joining or being a Stampin’ Up! Demonstrator, please drop me a note at creativestampingdesigns@gmail.com. If you want to read more about becoming a Demonstrator and the benefits of joining, head over to my Stampin’ Up! page HERE. I’d LOVE to have you on my team!!

*********************************************************************************************************

Expressions In Color

Subscribe May11 – June 10

Dream and discover In Color! With the Expressions In Color Paper Pumpkin Kit, you’ll be introduced to our intriguing collection of In Colors for 2021–2023—and, you’ll find a familiar shade from our 2020–2022 In Color selection. This month’s ink-credible kit contains enough elements to create nine cards—and coordinating envelopes—including ink-stained paper pieces, an exclusive stamp set, and not one, but two Classic Stampin’ Spots! And, it all comes in a cute, colorful, and collectible box.

What are In Colors, anyway? In Colors consist of a limited-edition collection of colors. We come up with a new collection every year, and we release it around the same time as the release of our annual catalog! In each In Color collection, we’ll offer ink, paper, markers, and more. The catch? They’re only available to purchase for a period of two years, so stock up on your favorite In Color supplies while you can!

With the Expressions In Color kit, you can explore and experiment with our 2020–2022 and 2021–2023 In Color collections. Make a splash with awe-inspiring, ink-stained artistry!

Details

  • Kit contains enough supplies to create 9 cards—3 each of 3 designs—and coordinating envelopes. This all-inclusive kit includes printed card bases, die-cut paper pieces, embellishments, adhesive, and more!
  • Card size: 4-1/4″ x 5-1/2″ (10.8 x 14 cm)
  • Envelope size: 4-1/2″ x 5-3/4″ (11.4 x 14.6 cm)
  • Coordinating colors: Bumblebee, Evening Evergreen, Fresh Freesia, Polished Pink
  • As always, this month’s kit features an exclusive stamp set. But, this month’s kit also includes not one, but two Classic Stampin’ Spots!
  • Comes in a cute, colorful, and collectible box.
  • Coordinates with products from the Expressions in Ink Suite (US | CA) (item #155459).

Subscribe to the June 2021 Paper Pumpkin Kit—Expressions In Color—between 11 May and 10 June at paperpumpkin.com!

Note: Supplies may be limited toward the end of the subscription period.

*********************************************************************************************************

Stampin’ Up! Connect, Craft & Collect $25 Stampin’ Rewards Bonus May 4 – June 14!!

From May 4 – June 14, 2021, qualifying Stampin’ Up! orders and parties over $250 will receive $25 in BONUS Stampin’ Rewards!  YAY for more free goodies to kick off a new catalog!!

Stampin’ Rewards can be spent on any merchandise in either of the current catalogs, including the host exclusive items on pages 170-171 in the new Annual Catalog and page 88 in the January-June Mini Catalog!

PROMOTION DATES:  MAY 4 – JUNE 14, 2021

  • Workshop orders, customer orders, and online orders all qualify for the extra $25 in Stampin’ Rewards if they reach the $250 level.
  • The order must reach the qualifying amount of $250 in merchandise prior to shipping and tax.
  • The extra $25 rewards are only valid once per order no matter how high the order total.
  • Starter Kit orders do not qualify for this promotion.
  • Stampin’ Rewards can not be used on a 50% off item.
  • Deadline to submit an order and receive the extra $25 in free Stampin’ Rewards:  June 14, 2021 at 11:50 PM (MT).

If you have any questions or would like me to set up a host code for you to see if you can collect $250 in orders for yourself, please drop me a note at creativestampingdesigns@gmail.com.  I’ll be happy to do that for you!

Looking For The BEST Deal???

Join during May AND then place an order of $250+!!  You can “double dip” and get $30 additional free merchandise with your Starter Kit AND $25 extra in host cash to spend when you place orders of $250+ before June 14!!

If you have any questions, drop me a note at creativestampingdesigns@gmail.com.

*********************************************************************************************************

I still have a couple openings for my Online Host Club Starting June 1st.

If you are interested in joining in, please send me a note to creativestampingdesigns@gmail.com by May 20th

Does your Wish List and 2021-2022 Annual Catalog look like mine that just about every page is marked? Do you want it all and don’t want to spend a lot of money all at once?  An Online Host Club might just be the perfect solution for you.  This is the perfect way to build up your Stampin’ Up! supplies a little at a  time and receive host benefits too. Click Here for details on joining my Online Host Club.

*********************************************************************************************************

Card stock cuts for this project:

  • Basic White Cardstock 2 – 4 1/8″ X 5 3/8″ (card front and inner liner mat), 4″ X 5 1/4″ (inner liner), 2″ X 2 1/2″ (sentiment)
  • Highland Heather Cardstock 8 1/2″ X 5 1/2″(card base scored and folded at 4 1/4″)

*********************************************************************************************************

Product List

Stampin’ Up! Tranquil Thoughts Mother’s Day

Good Wednesday morning my stamping friends. How is everyone doing today? We’re halfway through the week and on our way to the weekend. Hope you are starting to make plans.

Today’s card is another we made at our class last Monday. This one was a little different. I didn’t show the ladies the card. I handed them an envelope with all the card pieces cut out and gave them 2 stamp sets to choose from to work with and told them to create. One of them had Poppy Parade cardstock and ink and the other had Melon Mambo cardstock and ink. I used Flirty Flamingo for mine. Everyone had the same pieces of True Love Designer Series Paper to use. Unfortunately I forgot to take pictures of the card designs they came up with. None were like mine. Here’s my card for today.

My card used the Stampin’ Up! Tranquil Thoughts Bundle. This bundle will be retiring soon, so if it’s one that you like now’s the time to grab it.

I started by embossing a Basic White card front using the Painted Texture 3D Embossing Folder. Everyone had the same embossed panel to start with. I adhered s strip of Flirty Flamingo cardstock to the back of the strip of True Love DSP using Stampin’ Seal and adhered it to the card front using Multipurpose Liquid Glue.

On a panel of Basic White cardstock I stamped the flower image from the Tranquil Thoughts stamp set in Flirty Flamingo Ink and cut it our using my Tranquil Dies.

I stamped the sentiment from the Tranquil Thoughts stamp set in Tuxedo Black Ink on the Basic White panel and cut it out using the Layering Circle Dies. I cut a panel of Flirty Flamingo cardstock using the next size up Layering Circle Dies and adhered the sentiment to the mat using Stampin’ Seal. I adhered the sentiment to the card front using Multipurpose Liquid Glue. I adhered the flowers to the side of the sentiment using Stampin’ Dimensionals. I adhered the card front to a Flirty Flamingo card base using Multipurpose Liquid Glue. I added a few Rhinestone Basic Jewels to the card front.

On the inside I stamped the sentiment from the Stampin’ Up! Strong & Beautiful Stamp Set in Tuxedo Black Ink in the center of a Basic White panel. I stamped the flower image from the Tranquil Thoughts stamp set in Flirty Flamingo Ink on the bottom of the panel. I adhered the Basic White panel to a Flirty Flamingo mat using Stampin’ Seal and then to the inside of the Flirty Flamingo card base using Stampin’ Seal.

To finish my card I decorated a Basic White Medium Envelope. I stamped the flower image from the Tranquil Thoughts stamp set in Flirty Flamingo Ink on the envelope front. I adhered a panel of the True Love DSP to the envelope flap.

Thank you for stopping by my blog today. I hope you liked my card and will give it a try. Happy Stamping!!

****************************************************************************************************

Join me today at 4pm on my Facebook Live.

I’m planning to go live on my Facebook page with a project today at 4:00pm ET.  Please join me to see what card I will be making today.

*********************************************************************************************************

If you need any stamping supplies, I’d love to be your Demonstrator. Just click HERE to go directly to my online store or drop me an email if you have any questions. 

MY CURRENT HOST CODE IS: 9R4BQD64

Use this host code when you order $50 or greater and receive a free gift from me! If your order is over $150, please do not use this code, but you’ll still get the free gift. The free gift is your choice of any 1 item valued up to $10.00 from the 2020-2021 Annual Catalog or the January-June 2021 Mini Catalog!   For any orders $50 or more I will also send you my monthly class tutorials.  Click HERE or go to my Customer Rewards for more details and to see what this months tutorials are.

 Click HERE to shop the clearance rack.

Please remember to use my current Host Code and make sure that you can see my name on the final checkout page listed as your Demonstrator when you order so that you know that you’re ordering with me and you’ll get my rewards! 

Happy Stamping, Karen!

*********************************************************************************************************

Stampin’ Up! has updating the Clearance Rack with some new goodies over night!  Head over there quickly to get your hands on some great deals.  But hurry!!  Clearance Rack deals are only while supplies last!

CLICK HERE to head over to my online store to shop those great deals, but it must be after midnight MOUNTAIN TIME tonight!!  Have fun shopping!

*********************************************************************************************************

Batter Up!

Subscribe April 11 – May 10

Whether you’re crafting for a father, grandfather, nephew, or brother, we’ve got all your bases covered with the Batter Up! Paper Pumpkin Kit! This month’s kit is the perfect pick for making masculine masterpieces.

Then again, we know that grass-stained pants and sliding into home aren’t just for the boys—this month’s kit is a triple threat! Designed with men, sport-lovin’ ladies, and baseball fanatics in mind, anyone would bounce from their spot in the bleachers if they received a classic card from the Batter Up! kit. After all, this month’s kit was made for celebrating the all-stars, MVPs, and the greats—no matter what team they play on!

Step up to the plate, take a swing, and knock it out of the park! With the Batter Up! Paper Pumpkin Kit, it’s your turn to go to bat for all the people who’ve gone to bat for you. This month’s timeless kit with a “throwback” theme contains enough grand slam supplies to create nine cards—and coordinating envelopes—featuring classic colors, pinwheel and pinstripe patterns, and vintage-washed paper pieces. There’s no “batter” way to root, root, root for your home team and honor the all-stars in your life!

A beloved baseball-themed kit would be incomplete without the sport’s signature, sticky snack—the official bubble gum of the MLB! A favorite in the field, the Batter Up! Paper Pumpkin Kit contains a couple sticks of the chewy staple; chew while you craft, slide a piece into a card, or save it for later.

Send a seventh-inning stretch in a classic card with all-star stripes, a nostalgic nod, and a stamp set fit for an MVP! But, before you give it all you’ve got, give this month’s promotional video a watch. See what the Batter Up! kit is all about! Play ball!

https://youtube.com/watch?v=1N1XRlNLaJk%3Fversion%3D3%26rel%3D1%26showsearch%3D0%26showinfo%3D1%26iv_load_policy%3D1%26fs%3D1%26hl%3Den%26autohide%3D2%26wmode%3Dtransparent

Details

  • Kit contains enough supplies to create 9 cards—3 each of 3 designs—and coordinating envelopes. The all-inclusive kit includes printed card bases, die-cut paper pieces, embellishments, adhesive, and more!
    • Card size: 4-1/4″ x 5-1/2″ (10.8 x 14 cm)
    • Envelope size: 4-1/2″ x 5-3/4″ (11.4 x 14.6 cm)
  • Coordinating colors: Basic White, Bumblebee, Night of Navy, Pacific Point, Real Red, Smoky Slate, Soft Suede
  • Comes with the official bubble gum of the MLB—a ballpark favorite! Chew while you craft, slide a piece into a card, or save it for later.

Subscribe to the May 2021 Paper Pumpkin Kit between 11 April and 10 May at paperpumpkin.com!

Note: Supplies may be limited toward the end of the subscription period.

*********************************************************************************************************

Card stock cuts for this project:

  • Basic White Cardstock 3 – 4″ X 5 1/4″ (card front, inner liner & artwork)
  • Flirty Flamingo Cardstock 4 1/4″ X 11″ (card base scored and folded at 5 1/2″), 1/2″ X 5 1/4″ (card front strip), 3′ X 3″ (sentiment mat), 4 1/8″ X 5 3/8″ (inner liner mat)
  • True Love Designer Series Paper 1″ X 5 1/4″ (card front panel), 2 1/2″ X 6″ (envelope flap)

*********************************************************************************************************

Product List

Stampin’ Up! Friends Are Like Seashells Sailing Home for The Happy Inkin’ Thursday Blog Hop

Good Thursday morning my stamping friends! Welcome to our Happy Inkin’ Thursday Blog Hop. I hope everyone is doing well today. If you are hopping over from Akiko, thank you for stopping by my blog. This week we have a Sketch Challenge. Be sure to take a moment to hop around to see everyone’s amazing projects. Here is my card using this weeks sketch.

I used the Stampin’ Up! Friends Are Like Seashells Bundle and the Stampin’ Up! Sailing Home Bundle.

I started by adhering a panel of Sea & Sand Designer Series Paper to a Misty Moonlight card base, only around the edges, with Stampin’ Seal. Using my Layering Circles Dies, I cut a circle out of the center of the card front.

On a panel of Basic White cardstock I stamped the lighthouse image from the Stampin’ Up! Sailing Home Cling Stamp Set in Sahara Sand Ink. I stamped the starfish image from the Stampin’ Up! Friends Are Like Seashells Photopolymer Stamp Set in Cinnamon Cider Ink and colored it in using my Cinnamon Cider Stampin’ Blends Markers. I cut the images out using my Smooth Sailing Dies and my Seaside Shells Dies. I stamped the seaweed images from the Friends Are Like Seashells stamp set, Just Jade on Just Jade card stock and Soft Sea Foam on Soft Sea Foam cardstock and cut the images out using my Seaside Shells Dies. I cut the larger seaweed image from a panel of Pear Pizzazz cardstock using my Smooth Sailing Dies. I stamped a couple of the small seashells from the Friends Are Like Seashells stamp set on scraps of Sand & Sea DSP and cut them out using the Seaside Shells Dies.

I adhered the lighthouse to the card front using Multipurpose Liquid Glue just on the bottom. On a strip of Basic White cardstock I stamped the sentiment from the Friends Are Like Seashells stamp set in Misty Moonlight Ink. I adhered the sentiment to a Misty Moonlight mat using Stampin’ Seal and then to the card front across the circle, using Glue Dots. I arranged the seaweed and shells on the side of the circle and adhered them down using Multipurpose Liquid Glue and Stampin’ Dimensionals.

On the inside I stamped the sentiment from the Friends Are Like Seashells stamp set in Misty Moonlight Ink on the top of a panel of Sand & Sea DSP and adhered it to the inside of the Misty Moonlight card base using Stampin’ Seal. On the panel of Basic white cardstock I stamped the larger sailboat from the Sailing Home stamp set in Misty Moonlight and the smaller sailboat in Basic Gray Inks and cut them out using my Smooth Sailing Dies. I cut another circle from a panel of Basic White cardstock using my Layering Circles Dies. I stamped the cloud image from the Stampin’ Up! Mountain Air Photopolymer Stamp Set in Misty Moonlight Ink, stamping off twice, on the top of the circle. I stamped the bird image from the Sailing Home stamp set in Basic Gray Ink. I adhered the circle to the center of the inside of the card base using Multipurpose Liquid Glue. I adhered the sailboats to the bottom of the circle using Multipurpose Liquid Glue, making sure to be able to see them through the card front.

To complete my card I decorated a Basic White Medium Envelope. I stamped the lighthouse image from the Sailing Home stamp set in Sahara Sand Ink on the envelope front. I adhered a panel of the Sand & Sea DSP to the envelope flap.

Thank you for visiting my blog today. I hope you liked my card and will give it a try. Now that you’ve seen my card, take a minute to hop through all our projects today. If you click on the Next Blog button, you’ll go to Amy’s page. Or you can just click on the names below to go directly to all their blogs! Happy Hopping!!

Amy Koenders:

Mary Deatherage:

Kristi Gray:

Jaimie Babarczy:

Karen Finkle:

Karen Ksenzakovic: You Are Here

*********************************************************************************************************

If you need any stamping supplies, I’d love to be your Demonstrator. Just click HERE to go directly to my online store or drop me an email if you have any questions. 

MY CURRENT HOST CODE IS: 9R4BQD64

Use this host code when you order $50 or greater and receive a free gift from me! If your order is over $150, please do not use this code, but you’ll still get the free gift. The free gift is your choice of any 1 item valued up to $10.00 from the 2020-2021 Annual Catalog or the January-June 2021 Mini Catalog!   For any orders $50 or more I will also send you my monthly class tutorials.  Click HERE or go to my Customer Rewards for more details and to see what this months tutorials are.

 Click HERE to shop the clearance rack.

Please remember to use my current Host Code and make sure that you can see my name on the final checkout page listed as your Demonstrator when you order so that you know that you’re ordering with me and you’ll get my rewards! 

Happy Stamping, Karen!

*********************************************************************************************************

Stampin’ Up! has updating the Clearance Rack with some new goodies over night!  Head over there quickly to get your hands on some great deals.  But hurry!!  Clearance Rack deals are only while supplies last!

CLICK HERE to head over to my online store to shop those great deals, but it must be after midnight MOUNTAIN TIME tonight!!  Have fun shopping!

*********************************************************************************************************

Batter Up!

Subscribe April 11 – May 10

Whether you’re crafting for a father, grandfather, nephew, or brother, we’ve got all your bases covered with the Batter Up! Paper Pumpkin Kit! This month’s kit is the perfect pick for making masculine masterpieces.

Then again, we know that grass-stained pants and sliding into home aren’t just for the boys—this month’s kit is a triple threat! Designed with men, sport-lovin’ ladies, and baseball fanatics in mind, anyone would bounce from their spot in the bleachers if they received a classic card from the Batter Up! kit. After all, this month’s kit was made for celebrating the all-stars, MVPs, and the greats—no matter what team they play on!

Step up to the plate, take a swing, and knock it out of the park! With the Batter Up! Paper Pumpkin Kit, it’s your turn to go to bat for all the people who’ve gone to bat for you. This month’s timeless kit with a “throwback” theme contains enough grand slam supplies to create nine cards—and coordinating envelopes—featuring classic colors, pinwheel and pinstripe patterns, and vintage-washed paper pieces. There’s no “batter” way to root, root, root for your home team and honor the all-stars in your life!

A beloved baseball-themed kit would be incomplete without the sport’s signature, sticky snack—the official bubble gum of the MLB! A favorite in the field, the Batter Up! Paper Pumpkin Kit contains a couple sticks of the chewy staple; chew while you craft, slide a piece into a card, or save it for later.

Send a seventh-inning stretch in a classic card with all-star stripes, a nostalgic nod, and a stamp set fit for an MVP! But, before you give it all you’ve got, give this month’s promotional video a watch. See what the Batter Up! kit is all about! Play ball!

Details

  • Kit contains enough supplies to create 9 cards—3 each of 3 designs—and coordinating envelopes. The all-inclusive kit includes printed card bases, die-cut paper pieces, embellishments, adhesive, and more!
    • Card size: 4-1/4″ x 5-1/2″ (10.8 x 14 cm)
    • Envelope size: 4-1/2″ x 5-3/4″ (11.4 x 14.6 cm)
  • Coordinating colors: Basic White, Bumblebee, Night of Navy, Pacific Point, Real Red, Smoky Slate, Soft Suede
  • Comes with the official bubble gum of the MLB—a ballpark favorite! Chew while you craft, slide a piece into a card, or save it for later.

Subscribe to the May 2021 Paper Pumpkin Kit between 11 April and 10 May at paperpumpkin.com!

Note: Supplies may be limited toward the end of the subscription period.

*********************************************************************************************************

Card stock cuts for this project:

  • Basic White Cardstock 5 1/4″ X 5 1/4″ (artwork), 3/8″ X 3 1/2″ (sentiment)
  • Just Jade Cardstock 1 3/4″ X 1 3/4″ (seaweed)
  • Misty Moonlight Cardstock 8 1/2″ X 5 1/2″ (card base scored and folded at 4 1/4″)
  • Pear Pizzazz Cardstock 4″ X 2″ (seaweed)
  • Soft Sea Foam Cardstock 1 3/4″ X 1 3/4″ (seaweed)
  • Sand & Sea Designer Series Paper 2 – 4 1/8″ X 5 3/8″ (card front & inner liner), 2 1/2″ X 6″ (envelope flap)

*********************************************************************************************************

Product List

Sailing Home Bundle

Sailing Home Bundle
[151066]
$50.25

Paper Snips

[103579]
$10.00

Stamparatus

[146276]
$49.00

Stampin’ Up! Pampered Pet Cat Birthday

Good Saturday morning my stamping friends. Hope your having a good start to your weekend. I’m off this weekend. Both my jobs are closed tomorrow and I took off today to prep for our Easter brunch tomorrow. We started doing brunch a few years ago and everyone seems to love it. It is a lot more work that dinner though. I finished all my Easter Egg bread baking last night. I forgot how long of a process it is to make, but WELL worth it.

For today I have a birthday card for my niece who will be turning 40 tomorrow, on Easter. Her and I have always been so close, she’s like a daughter to me. I don’t know what I would ever do without her, she’s that great. She loves animals, but really loves her dog and cats so I thought I’d make her a cat card this year. I used the Stampin’ Up! Pampered Pets Bundle for my card today along with the Playful Pets Designer Series Paper. Here’s my card for today.

My design is from Mojo Monday Sketch #556. I love layered cards and this one has a lot of layers.

I started by adhering a panel of Playful Pets DSP to a Basic Gray card base using Stampin’ Seal. I adhered panels of Playful Pets DSP to Basic Gray mats using Stampin’ Seal and adhered them to the card front using Multipurpose Liquid Glue.

I cut a circle from a panel of Basic White cardstock using my Layering Circles Dies. I cut a coordinating scalloped circle from a panel of Basic Gray cardstock using my Layering Circles Dies. I stamped the butterfly and mouse images from the Stampin’ Up! Pampered Pets Cling Stamp Set in Tuxedo Black Ink. On a small panel of Basic White cardstock I stamped the cat image from the Pampered Pets stamp set in Tuxedo Black Ink. I colored the images in using my Flirty Flamingo, Gray Granite, Real Red and Smoky Slate Stampin’ Blends Markers. I cut the cat image out using my Pets Dies and adhered it to the circle using Stampin’ Dimensionals. I adhered the Basic White circle to the scalloped circle using Stampin’ Seal and adhered it to the card front using Stampin’ Dimensionals.

On a scrap of Basic White cardstock I stamped the sentiment from the Pampered Pets stamp set in Tuxedo Black Ink. I fussy cut the sentiment and adhered it to the card front using Stampin’ Dimensionals. I threaded one of the Playful Pets Trinkets using the Snail Mail Twine and tied a bow. I left very long tails on the bow so I could wrap it around the cat. I adhered the heart to the card front using a Glue Dot.

On the inside I stamped the sentiment from the Stampin’ Up! Family Party Photopolymer Stamp Set in Tuxedo Black Ink on a Basic White panel. I stamped the cat image on the bottom of the panel in Tuxedo Black Ink and colored it in using my Flirty Flamingo and Gray Granite Stampin’ Blends Markers. I adhered a strip of the Playful Pets DSP to the bottom of the panel. I adhered the Basic White panel to a Real Red mat using Stampin’ Seal and then to the inside of the Basic Gray card base using Multipurpose Liquid Glue.

To finish my card I decorated a Basic White Medium Envelope. I stamped the cat image from the Pampered Pets stamp set in Tuxedo Black Ink on the envelope front and colored it in using my Flirty Flamingo and Gray Granite Stampin’ Blends Markers. I adhered a strip of the Playful Pets DSP on the envelope front and a panel of the envelope flap.

Thank you for stopping by my blog today. I hope you liked my card and will give it a try. Happy Stamping!!

*********************************************************************************************************

If you need any stamping supplies, I’d love to be your Demonstrator. Just click HERE to go directly to my online store or drop me an email if you have any questions. 

MY CURRENT HOST CODE IS: 9R4BQD64

Use this host code when you order $50 or greater and receive a free gift from me! If your order is over $150, please do not use this code, but you’ll still get the free gift. The free gift is your choice of any 1 item valued up to $10.00 from the 2020-2021 Annual Catalog or the January-June 2021 Mini Catalog!   For any orders $50 or more I will also send you my monthly class tutorials.  Click HERE or go to my Customer Rewards for more details and to see what this months tutorials are.

 Click HERE to shop the clearance rack.

Please remember to use my current Host Code and make sure that you can see my name on the final checkout page listed as your Demonstrator when you order so that you know that you’re ordering with me and you’ll get my rewards! 

Happy Stamping, Karen!

*********************************************************************************************************

IT’S THE LAST-CHANCE PRODUCTS SALE

If you love great deals, Stampin’ Up!’s Last-Chance Products Sale is the perfect time to shop. You’ll get deep discounts on your favorite products from the 2020–2021 Annual Catalog—and as an extra bonus—you’ll get a peek at the list of items carrying over to the other catalogs. Many items will sell out fast, so don’t delay—shop early for the best selection!

Sales Period: March 24, 1:00 PM (MT) – May 3, 2021, 11:59 PM (MT)

  • Only select items in the 2020–2021 Annual Catalog will be discounted.
  • Sale applies to all order types except host items (see Last-Chance Products List for items on sale).
  • No minimum purchase is required.
  • Retiring items are available while supplies last.
  • Items and discounts may vary by market (depending on inventory levels).
  • Exclusions apply: Carryover items and some retiring items will not be discounted.
  • Ordering Deadline for retiring products:  May 3, 2021 at 11:59 PM (MT)

Here are the official retiring lists from Stampin’ Up!.

Head over to my online store to pick up those retiring items now!  They’re only available while supplies last from now through May 3!

*********************************************************************************************************

So Cool

Subscribe March 11 – April 10

  • The So Cool Paper Pumpkin Kit is a little taste of summer fun, with enough supplies to make 12 colorful, shaped cards with coordinating envelopes. Six card bases are popsicle shaped, the other six are semicircles: three watermelons and three rainbows. All of the cards are splashed with cheerful, vivid watercolor images. The kit also includes two full-size, matching sticker sheets, die-cut accents, fun embellishments, and more.
  • This kit was designed with kids in mind, as a way to spark their creative imagination and introduce them to papercrafting.
  • The So Cool Kit makes a great gift! It’s an even better way to enjoy some quality time with those special little ones in life.
  • Even though the So Cool Kit was designed with kids in mind, these fun-shaped cards, featuring vivid watercolors, are versatile enough to gift to kids of all ages—the young in years and the young at heart. They’re a great way to send some “sunshine in a card!” Who wouldn’t love that?
  • The kit’s exclusive So Cool Stamp Set is versatile, offering sentiments that can be used for multiple occasions such as birthdays, congrats, cheer, and more! It’s a great addition to any crafter’s collection.

Details

  • Kit includes enough supplies to make 12 fresh, fun-shaped cards—6 popsicles and 6 blank semicircles to color—and coordinating envelopes. Kit includes card bases, 2 full sticker sheets, decorative die-cut pieces, embellishments, and more.
  • Envelope size: 4-1/2″ x 5-3/4″ (11.4 x 14.6 cm)
  • Coordinating colors: Blackberry Bliss, Bermuda Bay, Bumblebee, Cinnamon Cider, Old Olive, Terracotta Tile
  • Coordinates with the Ice Cream Corner Suite from our January–June 2021 Mini Catalog.

Subscribe to the April Paper Pumpkin Kit between 11 March and 10 April at paperpumpkin.com!

Note: Supplies may be limited toward the end of the subscription period.

THERE’S MORE TO LOVE IN THE COORDINATING ICE CREAM CORNER SUITE!

154567

154567
ICE CREAM CORNER DESIGNER SERIES PAPER

Keep the creative fun going by pairing the So Cool Kit with the Ice Cream Corner Designer Series Paper (154567) featured in our 2021 January–June Mini Catalog. It’s a great way to use the kit’s stamps, ink, stickers, and more to further indulge your craving for summer fun. Plus, the paper is part of the matching Ice Cream Corner Suite, so there’s virtually no end to the possibilities!

Coordinating colors: Bermuda Bay, Blackberry Bliss, Cinnamon Cider, Old Olive, Petal Pink, Pool Party, Purple Posy, So Saffron, Soft Sea Foam, Terracotta Tile

Click this link to view the suite and start shopping.

*********************************************************************************************************

Card stock cuts for this project:

  • Basic Gray Cardstock 8 1/2″X 5 1/2″ (card base scored and folded at 4 1/4″), 1 3/4″ x 4″, 1 1/4″ X 4″, 3/4″ X 2 1/2″, 3″ X 3″ (card front dsp mats and scalloped circle)
  • Basic White Cardstock 3″ X 3″ (artwork), 2″ X 3″ (cat), 4″ x 5 1/4″ (inner liner)
  • Real Red Cardstock 4 1/8″ X 5 3/8″ (inner liner mat)
  • Playful Pets Designer Series Paper 4″ X 5 1/4″ (card front), 1 5/8″ x 3 7/8″, 1 1/8″ x 3 7/8″, 5/8″ x 2 1/8″ (card front panels), 1/2″ x 6″ (envelope front), 2 1/2″ X 6″ (envelope flap)

*************************************************************************************************************

Product List

Stampin’ Up! Flowering Cactus for The Happy Inkin’ Thursday Blog Hop

Good Thursday morning my stamping friends Happy April!!! Welcome to our Happy Inkin’ Thursday Blog Hop. I hope everyone is doing well today. If you are hopping over from Akiko, thank you for stopping by my blog. This week we have a Sketch Challenge. Be sure to take a moment to hop around to see everyone’s amazing projects. Here is my card using this weeks sketch.

I used the Stampin’ Up! Flowering Cactus Product Medley for my card. This is such a great group of products, I’m going to be sorry to see it retire.

I started by embossing a Mossy Meadow card front using the Tasteful Textile 3D Embossing Folder. I adhered the card front to Calypso Coral card base using Stampin’ Dimensionals.

I cut 2 panel of the Flowering Cactus Designer Series Paper using my Stitched Rectangle Dies. I adhered the 2 panels together on an angle using Stampin’ Seal then adhered them to the card front using Multipurpose Liquid Glue.

I cut a panel of Basic White cardstock using the Stitched Shapes Dies. I stamped the sentiment from the Flowering Cactus stamp set on the stitched circle in Mossy Meadow Ink. From a panel of Mossy Meadow cardstock I cut a coordinating scalloped circle from the Layering Circles Dies and adhered the stitched circle to it using Stampin’ Seal. On a panel of Basic White cardstock I stamped the small cactus image from the Flowering Cactus stamp set in Pear Pizzazz Ink. I stamped the small double flower image in Calypso Coral Ink 3 times. I cut the images out using my Flowering Cactus Dies. I adhered the flowers to the cactus using Glue Dots. I adhered the cactus to the bottom of the stitched circle using Stampin’ Dimensionals. I tied a multi loop bow using the Calypso Coral twine from the Product Medley, and adhered it to the bottom of the stitched circle using a Glue Dot. I adhered the circle to the card front using Stampin’ Dimensionals. I added a few Rhinestone Basic Jewels to the card front.

On the inside I stamped the sentiment from the Flowering Cactus stamp set in Mossy Meadow Ink in the center of the Basic White panel. I stamped the small cactus from the Flowering Cactus stamp set in Pear Pizzazz Ink on the bottom of the panel twice. I stamped 1 set of the flowers on each cactus in Calypso Coral Ink and adhered another flower which I had cut out using Multipurpose Liquid Glue. I adhered the Basic White panel to a Mossy Meadow mat using Stampin’ Seal and then to the inside of the Calypso Coral card base using Multipurpose Liquid Glue.

To complete my card I decorated a Basic White Medium Envelope. I adhered a strip of the Flowering Cactus DSP to the envelope front and a panel to the envelope flap.

Thank you for visiting my blog today. I hope you liked my card and will give it a try. Now that you’ve seen my card, take a minute to hop through all our projects today. If you click on the Next Blog button, you’ll go to Amy’s page. Or you can just click on the names below to go directly to all their blogs! Happy Hopping!!

Amy Koenders:

Mary Deatherage:

Kristi Gray:

Jaimie Babarczy:

Sue Prather:

Karen Finkle:

Akiko Sudano:

Karen Ksenzakovic: You Are Here

*********************************************************************************************************

If you need any stamping supplies, I’d love to be your Demonstrator. Just click HERE to go directly to my online store or drop me an email if you have any questions. 

MY CURRENT HOST CODE IS: 9R4BQD64

Use this host code when you order $50 or greater and receive a free gift from me! If your order is over $150, please do not use this code, but you’ll still get the free gift. The free gift is your choice of any 1 item valued up to $10.00 from the 2020-2021 Annual Catalog or the January-June 2021 Mini Catalog!   For any orders $50 or more I will also send you my monthly class tutorials.  Click HERE or go to my Customer Rewards for more details and to see what this months tutorials are.

 Click HERE to shop the clearance rack.

Please remember to use my current Host Code and make sure that you can see my name on the final checkout page listed as your Demonstrator when you order so that you know that you’re ordering with me and you’ll get my rewards! 

Happy Stamping, Karen!

*********************************************************************************************************

IT’S THE LAST-CHANCE PRODUCTS SALE

If you love great deals, Stampin’ Up!’s Last-Chance Products Sale is the perfect time to shop. You’ll get deep discounts on your favorite products from the 2020–2021 Annual Catalog—and as an extra bonus—you’ll get a peek at the list of items carrying over to the other catalogs. Many items will sell out fast, so don’t delay—shop early for the best selection!

Sales Period: March 24, 1:00 PM (MT) – May 3, 2021, 11:59 PM (MT)

  • Only select items in the 2020–2021 Annual Catalog will be discounted.
  • Sale applies to all order types except host items (see Last-Chance Products List for items on sale).
  • No minimum purchase is required.
  • Retiring items are available while supplies last.
  • Items and discounts may vary by market (depending on inventory levels).
  • Exclusions apply: Carryover items and some retiring items will not be discounted.
  • Ordering Deadline for retiring products:  May 3, 2021 at 11:59 PM (MT)

Here are the official retiring lists from Stampin’ Up!.

Head over to my online store to pick up those retiring items now!  They’re only available while supplies last from now through May 3!

*********************************************************************************************************

So Cool

Subscribe March 11 – April 10

  • The So Cool Paper Pumpkin Kit is a little taste of summer fun, with enough supplies to make 12 colorful, shaped cards with coordinating envelopes. Six card bases are popsicle shaped, the other six are semicircles: three watermelons and three rainbows. All of the cards are splashed with cheerful, vivid watercolor images. The kit also includes two full-size, matching sticker sheets, die-cut accents, fun embellishments, and more.
  • This kit was designed with kids in mind, as a way to spark their creative imagination and introduce them to papercrafting.
  • The So Cool Kit makes a great gift! It’s an even better way to enjoy some quality time with those special little ones in life.
  • Even though the So Cool Kit was designed with kids in mind, these fun-shaped cards, featuring vivid watercolors, are versatile enough to gift to kids of all ages—the young in years and the young at heart. They’re a great way to send some “sunshine in a card!” Who wouldn’t love that?
  • The kit’s exclusive So Cool Stamp Set is versatile, offering sentiments that can be used for multiple occasions such as birthdays, congrats, cheer, and more! It’s a great addition to any crafter’s collection.

Details

  • Kit includes enough supplies to make 12 fresh, fun-shaped cards—6 popsicles and 6 blank semicircles to color—and coordinating envelopes. Kit includes card bases, 2 full sticker sheets, decorative die-cut pieces, embellishments, and more.
  • Envelope size: 4-1/2″ x 5-3/4″ (11.4 x 14.6 cm)
  • Coordinating colors: Blackberry Bliss, Bermuda Bay, Bumblebee, Cinnamon Cider, Old Olive, Terracotta Tile
  • Coordinates with the Ice Cream Corner Suite from our January–June 2021 Mini Catalog.

Subscribe to the April Paper Pumpkin Kit between 11 March and 10 April at paperpumpkin.com!

Note: Supplies may be limited toward the end of the subscription period.

THERE’S MORE TO LOVE IN THE COORDINATING ICE CREAM CORNER SUITE!

154567

154567
ICE CREAM CORNER DESIGNER SERIES PAPER

Keep the creative fun going by pairing the So Cool Kit with the Ice Cream Corner Designer Series Paper (154567) featured in our 2021 January–June Mini Catalog. It’s a great way to use the kit’s stamps, ink, stickers, and more to further indulge your craving for summer fun. Plus, the paper is part of the matching Ice Cream Corner Suite, so there’s virtually no end to the possibilities!

Coordinating colors: Bermuda Bay, Blackberry Bliss, Cinnamon Cider, Old Olive, Petal Pink, Pool Party, Purple Posy, So Saffron, Soft Sea Foam, Terracotta Tile

Click this link to view the suite and start shopping.

*********************************************************************************************************

Card stock cuts for this project:

  • Basic White Cardstock 4 1/4″ X 3″ (circle, cactus and flowers), 4″ X 5 1/4″ (inner liner)
  • Calypso Coral Cardstock 4 1/4″ X 11″ (card base scored and folded at 5 1/2″)
  • Mossy Meadow Cardstock 2 – 4 1/8″ X 5 3/8″ (card front and inner liner mat)
  • Flowering Cactus Designer Series Paper 2 – 4″ X 5″ (card front panels), 1/2″ X 6″ & 2 1/2″ X 6″ (envelope)

*********************************************************************************************************

Product List

Stampin’ Up! Nature’s Beauty Peek-A-Boo Card

Good Wednesday morning my stamping friends. We’re halfway through the week and heading towards the weekend.

It’s time for another inspiration challenge for The Card Concept. For the next 2 weeks we have a Celebrate Easter challenge. Here is my card that was inspired from the challenge photo.

I used the Stampin’ Up! Nature’s Beauty Cling Stamp Set . I was inspired by the colors in the photo along with the little bunnies on the bottom for my clean and layered card today.

I hope you will take a moment to visit The Card Concept and join us this week to play along with our challenge #152. How are you inspired by this photo?

I started by adhering a panel of Peony Garden Designer Series Paper to a Just Jade card base using Stampin’ Seal. I placed a Petal Pink card front on the card base and using my Layering Circle Dies I ran it through my Stampin’ Cut & Emboss Machine. I cut another panel of Petal Pink cardstock using my Layering Circle Dies and made a scalloped frame for the card front.

I embossed the card front using the Subtle 3D Embossing Folder. I adhered the scalloped frame on the card front using Multipurpose Liquid Glue. On a panel of Basic White cardstock I stamped the sentiment from the Stampin’ Up! A Wish For Everything Cling Stamp Set in Gray Granite Ink and cut it out using my Stitched So Sweetly Dies. I adhered the sentiment to the card front using Multipurpose Liquid Glue.

I adhered the card front to the card base using Stampin’ Dimensionals. I made a bow using the Just Jade Gingham Ribbon from the Flowers For Every Season Ribbon Combo Pack and adhered it the the scalloped frame using Glue Dots. I added a few Just Jade 2020-2022 In-Color Enamel Dots to the card front.

On the inside I stamped the bunny image from the Nature’s Beauty stamp set in Gray Granite Ink making sure it would be seen through the circle on the card front. I stamped the grass image from the Nature’s Beauty stamp set around the bunny in Just Jade Ink, some full strength and some stamped off. I stamped the sentiment from the Stampin’ Up! Itty Bitty Greetings Cling Stamp Set in Gray Granite Ink towards the top of the panel. I adhered the Basic White panel to a Gray Granite mat using Stampin’ Seal and then to the inside of the Just Jade card base using Multipurpose Liquid Glue.

To complete my card I decorated a Basic White Medium Envelope. I stamped the bunny image from the Nature’s Beauty stamp set in Gray Granite Ink on the envelope front. I stamped the grass image around the bunny in Just Jade Ink. I adhered a panel of the Peony Garden DSP to the envelope flap.

Thank you for stopping by my blog today. I hope you liked my card and will give it a try. Happy Stamping!!

****************************************************************************************************

Join me today at 4pm on my Facebook Live.

I’m planning to go live on my Facebook page with a project today at 4:00pm ET.  Please join me to see what card I will be making today.

*********************************************************************************************************

If you need any stamping supplies, I’d love to be your Demonstrator. Just click HERE to go directly to my online store or drop me an email if you have any questions. 

MY CURRENT HOST CODE IS: 9R4BQD64

Use this host code when you order $50 or greater and receive a free gift from me! If your order is over $150, please do not use this code, but you’ll still get the free gift. The free gift is your choice of any 1 item valued up to $10.00 from the 2020-2021 Annual Catalog or the January-June 2021 Mini Catalog!   For any orders $50 or more I will also send you my monthly class tutorials.  Click HERE or go to my Customer Rewards for more details and to see what this months tutorials are.

 Click HERE to shop the clearance rack.

Please remember to use my current Host Code and make sure that you can see my name on the final checkout page listed as your Demonstrator when you order so that you know that you’re ordering with me and you’ll get my rewards! 

Happy Stamping, Karen!

*********************************************************************************************************

IT’S THE LAST-CHANCE PRODUCTS SALE

If you love great deals, Stampin’ Up!’s Last-Chance Products Sale is the perfect time to shop. You’ll get deep discounts on your favorite products from the 2020–2021 Annual Catalog—and as an extra bonus—you’ll get a peek at the list of items carrying over to the other catalogs. Many items will sell out fast, so don’t delay—shop early for the best selection!

Sales Period: March 24, 1:00 PM (MT) – May 3, 2021, 11:59 PM (MT)

  • Only select items in the 2020–2021 Annual Catalog will be discounted.
  • Sale applies to all order types except host items (see Last-Chance Products List for items on sale).
  • No minimum purchase is required.
  • Retiring items are available while supplies last.
  • Items and discounts may vary by market (depending on inventory levels).
  • Exclusions apply: Carryover items and some retiring items will not be discounted.
  • Ordering Deadline for retiring products:  May 3, 2021 at 11:59 PM (MT)

Here are the official retiring lists from Stampin’ Up!.

Head over to my online store to pick up those retiring items now!  They’re only available while supplies last from now through May 3!

*********************************************************************************************************

So Cool

Subscribe March 11 – April 10

  • The So Cool Paper Pumpkin Kit is a little taste of summer fun, with enough supplies to make 12 colorful, shaped cards with coordinating envelopes. Six card bases are popsicle shaped, the other six are semicircles: three watermelons and three rainbows. All of the cards are splashed with cheerful, vivid watercolor images. The kit also includes two full-size, matching sticker sheets, die-cut accents, fun embellishments, and more.
  • This kit was designed with kids in mind, as a way to spark their creative imagination and introduce them to papercrafting.
  • The So Cool Kit makes a great gift! It’s an even better way to enjoy some quality time with those special little ones in life.
  • Even though the So Cool Kit was designed with kids in mind, these fun-shaped cards, featuring vivid watercolors, are versatile enough to gift to kids of all ages—the young in years and the young at heart. They’re a great way to send some “sunshine in a card!” Who wouldn’t love that?
  • The kit’s exclusive So Cool Stamp Set is versatile, offering sentiments that can be used for multiple occasions such as birthdays, congrats, cheer, and more! It’s a great addition to any crafter’s collection.

Details

  • Kit includes enough supplies to make 12 fresh, fun-shaped cards—6 popsicles and 6 blank semicircles to color—and coordinating envelopes. Kit includes card bases, 2 full sticker sheets, decorative die-cut pieces, embellishments, and more.
  • Envelope size: 4-1/2″ x 5-3/4″ (11.4 x 14.6 cm)
  • Coordinating colors: Blackberry Bliss, Bermuda Bay, Bumblebee, Cinnamon Cider, Old Olive, Terracotta Tile
  • Coordinates with the Ice Cream Corner Suite from our January–June 2021 Mini Catalog.

Subscribe to the April Paper Pumpkin Kit between 11 March and 10 April at paperpumpkin.com!

Note: Supplies may be limited toward the end of the subscription period.

THERE’S MORE TO LOVE IN THE COORDINATING ICE CREAM CORNER SUITE!

154567

154567
ICE CREAM CORNER DESIGNER SERIES PAPER

Keep the creative fun going by pairing the So Cool Kit with the Ice Cream Corner Designer Series Paper (154567) featured in our 2021 January–June Mini Catalog. It’s a great way to use the kit’s stamps, ink, stickers, and more to further indulge your craving for summer fun. Plus, the paper is part of the matching Ice Cream Corner Suite, so there’s virtually no end to the possibilities!

Coordinating colors: Bermuda Bay, Blackberry Bliss, Cinnamon Cider, Old Olive, Petal Pink, Pool Party, Purple Posy, So Saffron, Soft Sea Foam, Terracotta Tile

Click this link to view the suite and start shopping.

*********************************************************************************************************

Card stock cuts for this project:

  • Basic White Cardstock 3″ X 1 1/2″ (sentiment). 4″ X 5 1/4″ (inner liner)
  • Gray Granite Cardstock 4 1/8″ X 5 3/8″ (inner liner mat)
  • Just Jade Cardstock 4 1/4″ X 11″ (card base scored and folded at 5 1/2″)
  • Petal Pink Cardstock 3 3/4″ X 5″ (card front), 3″ X 3″ (scallop frame)
  • Peony Garden Designer Series Paper 4 1/4″ X 5 1/2″ (card front panel), 2 1/2″ X 6″ (envelope flap)

*********************************************************************************************************

Product List

Stampin’ Up! A Touch Of Ink Thank You

Good Saturday morning my fellow stampers and welcome to the weekend. Does anyone have any plans? I’ll be at work all day today and tomorrow. Tomorrow is the last day of the month so I have to close out the books. Hopefully it will be a short day. Speaking of the last day of the month, Sale-A-Bration ends tomorrow. Don’t miss out on those awesome stamp sets and Designer Series Paper.

For today I used one more of the Sale-A-Bration stamp sets and DSP for my card. Even though Sale-A-Bration was 2 months, I feel like I didn’t have enough time to play with everything. Here’s my card for today.

I used the beautiful Stampin’ Up! A Touch Of Ink Photopolymer Stamp Set for my card along with the gorgeous Oh So Ombre 6 X 6 Designer Series Paper.

I started by adhering a panel of the Oh So Ombre DSP to a Basic White mat using Stampin’ Seal. I adhered the matted panel to a Blackberry Bliss card base using Multipurpose Liquid Glue.

On another strip of the Oh So Ombre DSP I stamped the sentiment from A Touch Of Ink stamp set in Tuxedo Black Ink on the lightest end of the paper. I cut the strip into a banner using my Banner Triple Punch and adhered it to the card front using Multipurpose Liquid Glue.

On a panel of Basic White cardstock I stamped the outline flower, outline leaves and the outline hummingbird images from A Touch Of Ink stamp set in Tuxedo Black Ink. I colored the images in using my Daffodil Delight, Granny Apple Green, Just Jade, Poppy Parade, Purple Posy and Soft Suede Stampin’ Blends Markers. I cut the image out using largest circle from my Stitched Shapes Dies. I cut the largest scalloped circle from the Layering Circle Dies from a panel of Basic White cardstock and adhered the artwork to the scalloped circle using Stampin’ Seal. I adhered the matted artwork to the card front using Stampin’ Dimensionals. I added a few Purple Posy Playing With Patterns Resin Dots to the card front.

On the inside I stamped the sentiment from the Stampin’ Up! Ornate Thanks Photopolymer Stamp Set in tuxedo Black Ink towards the top of a Basic White panel. I stamped the leaves image from A Touch Of Ink stamp set in Tuxedo Black Ink in the corner of the panel and colored them in using my Just Jade Stampin’ Blends Markers. I adhered the Basic White panel to an Oh So Ombre mat using Stampin’ Seal and then to the inside of the Blackberry Bliss card base using Stampin’ Seal.

To finish my card I decorated a Basic White Medium Envelope. I stamped the outlined flower and outlined leaves images from A Touch Of Ink stamp set on the envelope front. I colored the images in using my Daffodil Delight, Just Jade and Purple Posy Stampin’ Blends Markers. I adhered a panel of the Oh So Ombre DSP to the envelope flap.

Thank you for stopping by my blog today. I hope you liked my card and will give it a try. Happy Stamping!!

*********************************************************************************************************

If you need any stamping supplies, I’d love to be your Demonstrator. Just click HERE to go directly to my online store or drop me an email if you have any questions. 

MY CURRENT HOST CODE IS: 9BCVNW9D

Use this host code when you order $50 or greater and receive a free gift from me! If your order is over $150, please do not use this code, but you’ll still get the free gift. The free gift is your choice of any 1 item valued up to $10.00 from the 2020-2021 Annual Catalog or the January-June 2021 Mini Catalog!   For any orders $50 or more I will also send you my monthly class tutorials.  Click HERE or go to my Customer Rewards for more details and to see what this months tutorials are.

 Click HERE to shop the clearance rack.

Please remember to use my current Host Code and make sure that you can see my name on the final checkout page listed as your Demonstrator when you order so that you know that you’re ordering with me and you’ll get my rewards! 

Happy Stamping, Karen!

*********************************************************************************************************

Final Days of Sale-A-Bration!! Only 1 Day Left!

Have you gotten all the FREE items you wanted!

This image has an empty alt attribute; its file name is 122020_sab_jan_us-en.jpg

Stampin’ Up!’s Sale-a-bration event is happening now!!  It will look a little different…it runs from January 5 through February 28 and there will be a second Sale-a-bration event later this year, but the shop, host and join benefits are still a part of the event!!

During Sale-A-Bration, you can earn FREE products. For every $50 or $100 you spend, you can choose between two purchasing levels of free products!  There are 8 free products available to pick from at the $50 level and 2 free products to pick from at the $100 level!

Stampin’ Up! is offering an exclusive host stamp set called Punch Party and you can get it for FREE with an order of $300 or greater placed during Sale-a-bration or by hosting a workshop with orders totaling $300 or greater during Sale-a-bration!  You can see the stamp set below.  You can read more details and find the list of punches that it coordinates with on page 17 in the Sale-a-bration Brochure.

This image has an empty alt attribute; its file name is stampin-up-party-punch-photopolymer-stamp-set-creativestampingdesigns.com_-2.jpg

If you’re interested in setting up a host code for yourself to see if you can collect orders totaling $300+ from yourself and your stamping friends, email me at creativestampingdesigns@gmail.com. I’d be happy to get you set up.

*********************************************************************************************************

Coming Soon!!!

Bring in the beauty of nature with the artistic designs of the Butterfly Brilliance Bundle and coordinating designer series paper, along with textured specialty paper that will put a pop of brilliance on every project. The Butterfly Brilliance Collection will be available March2 — May 3, 2021. Want it early??? This could be part of your starter kit for joining Stampin’ Up!

Final Days to Join and get Your 5 FREE Packs of Designer Series Paper

There’s no better time to join Stampin’ Up! than during Sale-A-Bration.   Stampin’ Up! has this AMAZING offer of five packs of 6″ x 6″ Designer Series Paper from the upcoming 2021-2022 Annual Catalog with your Starter Kit if you join during Sale-a-bration! You can not buy this DSP now, so why not get it FREE!. For $99 you get to choose $125 worth of products that will ship for free and Stampin’ Up! will also send you 5 packs, that’s 200 sheets of paper a $57.50 value, absolutely FREE. This offer ends February 28, 2021!!

This image has an empty alt attribute; its file name is 20201_sab_p16-2.jpg

Here are the details:

  • Starter Kit Price:  $99 + tax and it ships for free!
  • Starter Kit includes:
    • $125 in Stampin’ Up! merchandise of your choice from the current Annual Catalog, 2021 Mini Catalog or the online store (includes clearance rack items!).
    • 5 free packs of 6″ x 6″ Designer Series Paper (200 sheets in total!!) from the upcoming 2021-2022 Annual Catalog.  The packs are: Brights, Neutrals, Regals, Subtles & 2020-2022 In Colors…that’s $57.50 in free designer paper with your kit!!
    • 8 Annual Catalogs, 8 Mini Catalogs and 8 Sale-a-bration Brochures and a few additional business supplies.
  • You’ll get the following perks from Stampin’ Up! when you join:
    • At least a 20% discount on everything that you order as a Demonstrator!
    • Early peeks at new release items and preorders for new items for about a month before they are available to purchase!
    • The ability to attend Demonstrator exclusive Stampin’ Up! events!
    • No pressure to sell to anyone, hold classes or workshops or run a business.  You can simply order for yourself and get the discount!  And as long as you have at least $300 in sales per quarter, you’ll continue as an active Demonstrator and continue to get the discount.  If you aren’t able to maintain the $300 per quarter minimums, you simply go back to being a customer, no commitment required and no penalty if you decide that being a Demonstrator isn’t right for you.

Whether you’d like to start a business or would simply like to be a hobby demonstrator and get the great discount, I am here to help support you in any way that I can!

*********************************************************************************************************

The 2019-2021 In-Colors will be retiring soon. Why not stock up now and earn some free Sale-A-Bration items. See the complete list of items in my online store Here.

*********************************************************************************************************

Here’s To You

Subscribe February11th – March 10th

Three cheers for mountain air, a sky filled with sunshine, and finding joy in life’s journey! Adventure awaits inside this month’s majestic, mountain-themed kit. With enough elements and embellishments to create eight cards and coordinating envelopes, the Here’s to You Paper Pumpkin Kit is the perfect pick for celebrating life’s little moments and mountain-high milestones!

What makes March’s kit one-of-a-kind? The spectacular set of four free stencils—and a stamping sponge—that you’ll find inside! Pair this pack of stunning stencils with the kit’s contents to stamp a springtime scene, then store the set to stamp for any season in the future. Clean up your binoculars and dust off your hiking boots—the Here’s to You Paper Pumpkin Kit is ready to lead you on an excursion to explore your creativity!

ABOUT THE MARCH KIT

Details

  • Kit contains enough supplies to create 8 cards—4 each of 2 designs—and coordinating envelopes. The kit’s contents include printed card bases, die-cut paper pieces, embellishments, adhesive, and more!
  • Card size: 4-1/4″ x 5-1/2″ (10.8 x 14 cm)
  • Envelope size: 4-1/2″ x 5-3/4″ (11.4 x 14.6 cm)
  • Coordinating colors: Bumblebee, Calypso Coral, Old Olive, Petal Pink, Pretty Peacock, Seaside Spray
  • Includes four free stencils and a stamping sponge!
  • Arrives in a cute and collectible box.

Subscribe to the March 2021 Paper Pumpkin Kit between 11 February and 10 March at paperpumpkin.com!

Note: Supplies may be limited toward the end of the subscription period.

*********************************************************************************************************

Card stock cuts for this project:

  • Basic White Cardstock 2 – 4″ X 5 1/4″ (card front mat and inner liner), 2 – 3 1/2″ X 3 1/2″ (artwork and scalloped mat)
  • Blackberry Bliss Cardstock 4 1/4″ X 11″ (card base scored and folded at 5 1/2″)
  • Oh So Ombre 6 X 6 Designer Series Paper 3 7/8″ X 5 1/8″ (card front), 1 3/4″ X 4″ (banner), 2 1/2″ X 6″ (envelope flap)

*********************************************************************************************************

Product List