Stampin’ Up! Pampered Pet Cat Birthday

Good Saturday morning my stamping friends. Hope your having a good start to your weekend. I’m off this weekend. Both my jobs are closed tomorrow and I took off today to prep for our Easter brunch tomorrow. We started doing brunch a few years ago and everyone seems to love it. It is a lot more work that dinner though. I finished all my Easter Egg bread baking last night. I forgot how long of a process it is to make, but WELL worth it.

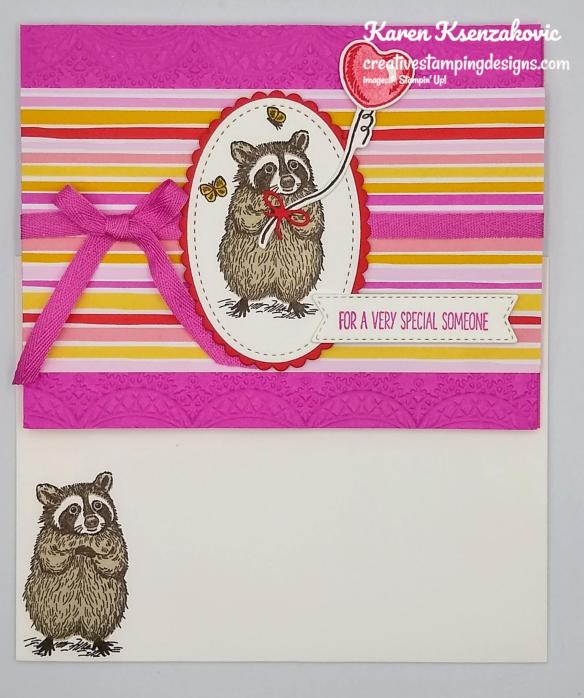
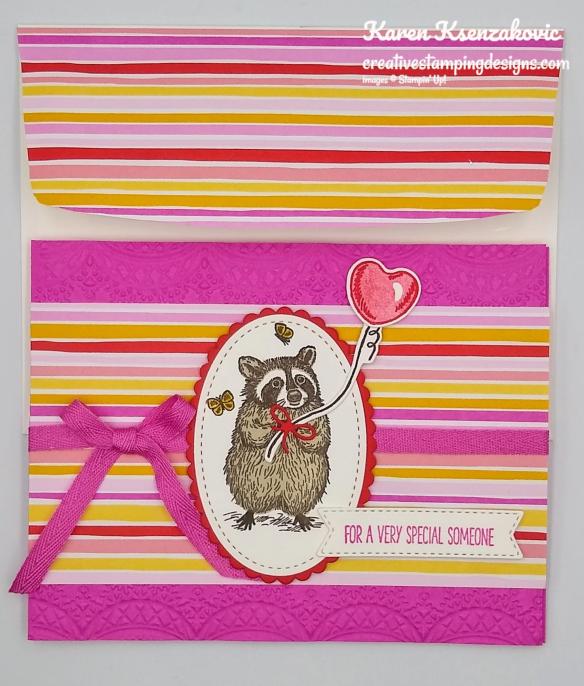
For today I have a birthday card for my niece who will be turning 40 tomorrow, on Easter. Her and I have always been so close, she’s like a daughter to me. I don’t know what I would ever do without her, she’s that great. She loves animals, but really loves her dog and cats so I thought I’d make her a cat card this year. I used the Stampin’ Up! Pampered Pets Bundle for my card today along with the Playful Pets Designer Series Paper. Here’s my card for today.

My design is from Mojo Monday Sketch #556. I love layered cards and this one has a lot of layers.

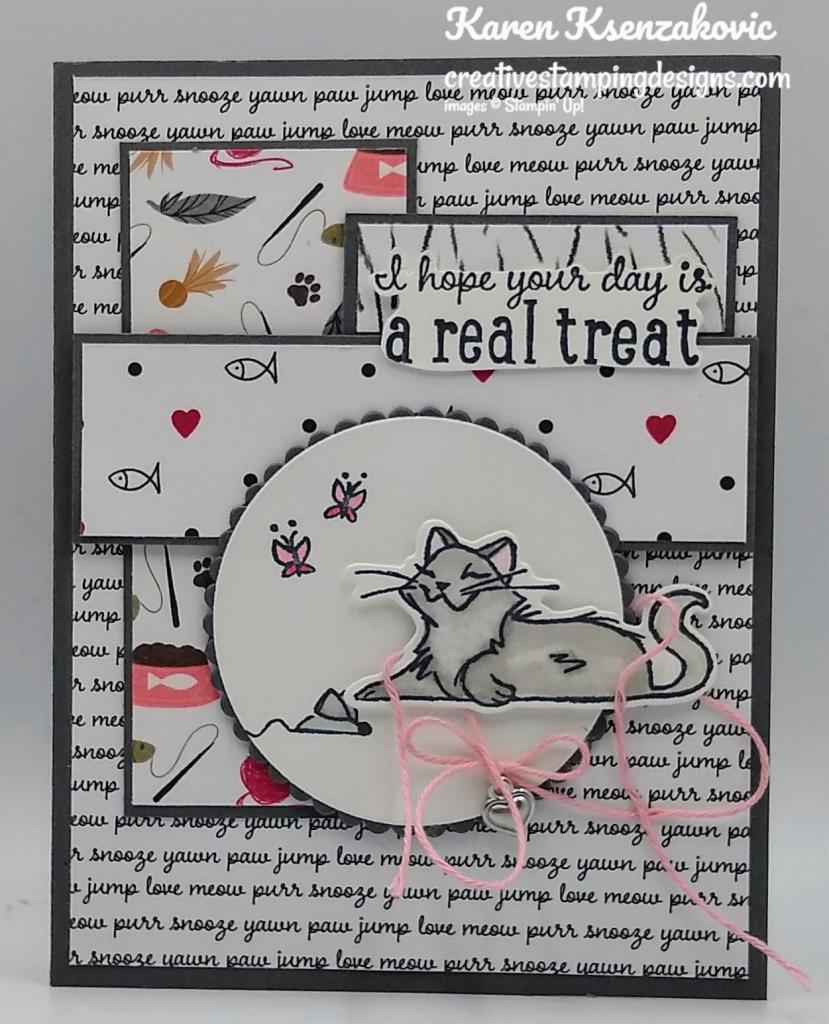
I started by adhering a panel of Playful Pets DSP to a Basic Gray card base using Stampin’ Seal. I adhered panels of Playful Pets DSP to Basic Gray mats using Stampin’ Seal and adhered them to the card front using Multipurpose Liquid Glue.

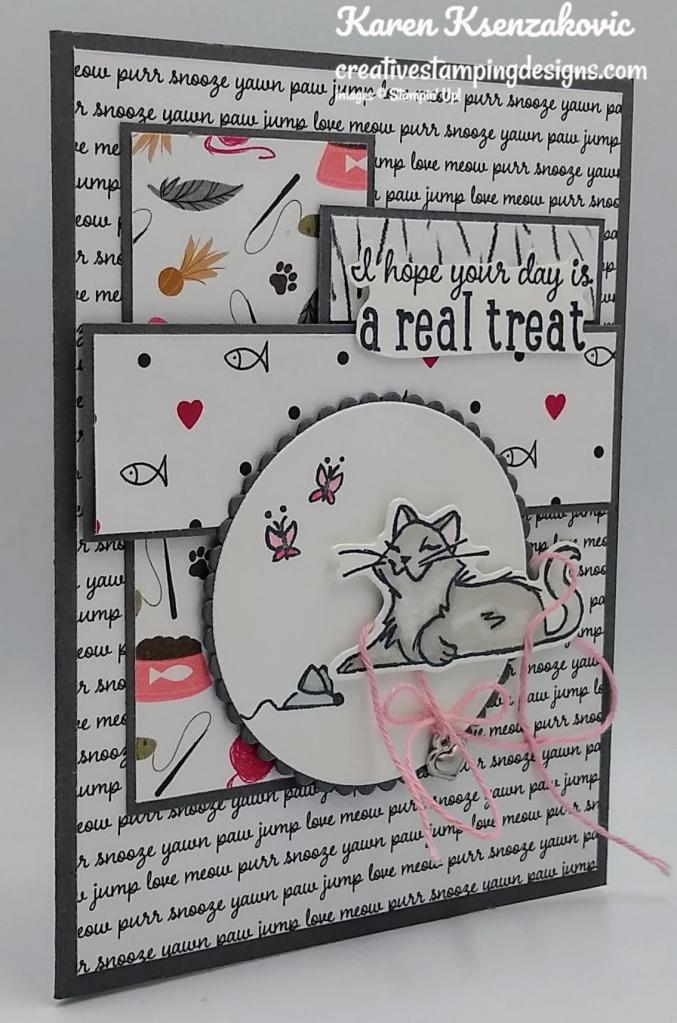
I cut a circle from a panel of Basic White cardstock using my Layering Circles Dies. I cut a coordinating scalloped circle from a panel of Basic Gray cardstock using my Layering Circles Dies. I stamped the butterfly and mouse images from the Stampin’ Up! Pampered Pets Cling Stamp Set in Tuxedo Black Ink. On a small panel of Basic White cardstock I stamped the cat image from the Pampered Pets stamp set in Tuxedo Black Ink. I colored the images in using my Flirty Flamingo, Gray Granite, Real Red and Smoky Slate Stampin’ Blends Markers. I cut the cat image out using my Pets Dies and adhered it to the circle using Stampin’ Dimensionals. I adhered the Basic White circle to the scalloped circle using Stampin’ Seal and adhered it to the card front using Stampin’ Dimensionals.

On a scrap of Basic White cardstock I stamped the sentiment from the Pampered Pets stamp set in Tuxedo Black Ink. I fussy cut the sentiment and adhered it to the card front using Stampin’ Dimensionals. I threaded one of the Playful Pets Trinkets using the Snail Mail Twine and tied a bow. I left very long tails on the bow so I could wrap it around the cat. I adhered the heart to the card front using a Glue Dot.

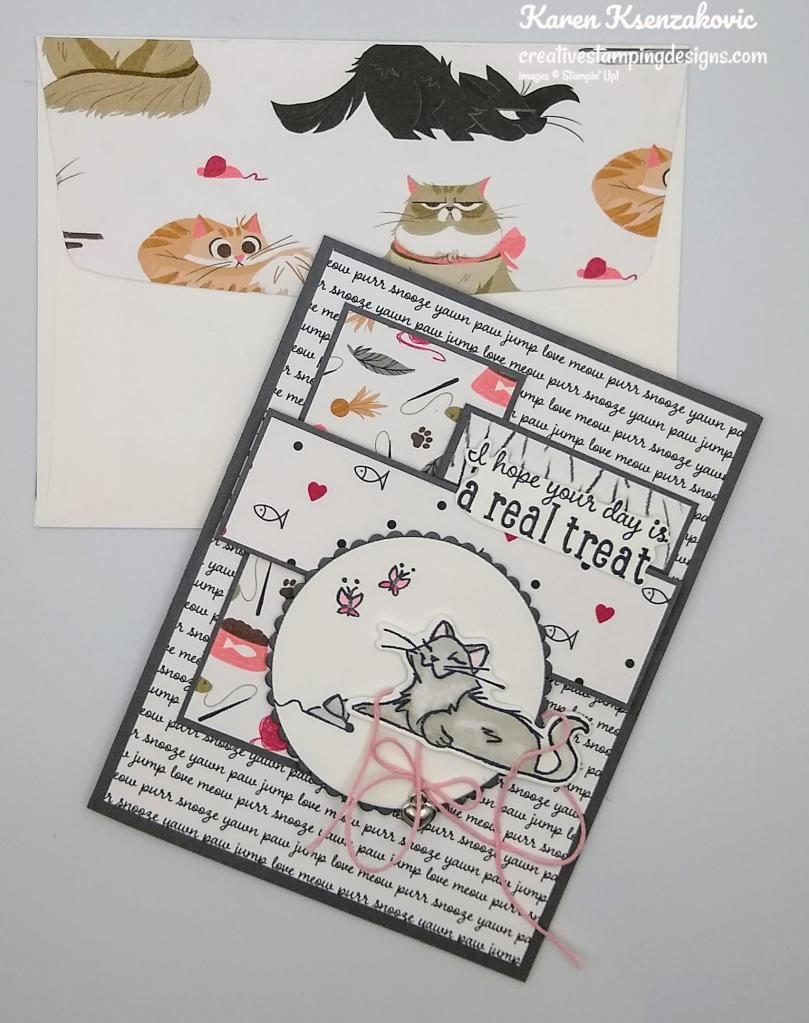
On the inside I stamped the sentiment from the Stampin’ Up! Family Party Photopolymer Stamp Set in Tuxedo Black Ink on a Basic White panel. I stamped the cat image on the bottom of the panel in Tuxedo Black Ink and colored it in using my Flirty Flamingo and Gray Granite Stampin’ Blends Markers. I adhered a strip of the Playful Pets DSP to the bottom of the panel. I adhered the Basic White panel to a Real Red mat using Stampin’ Seal and then to the inside of the Basic Gray card base using Multipurpose Liquid Glue.

To finish my card I decorated a Basic White Medium Envelope. I stamped the cat image from the Pampered Pets stamp set in Tuxedo Black Ink on the envelope front and colored it in using my Flirty Flamingo and Gray Granite Stampin’ Blends Markers. I adhered a strip of the Playful Pets DSP on the envelope front and a panel of the envelope flap.

Thank you for stopping by my blog today. I hope you liked my card and will give it a try. Happy Stamping!!

*********************************************************************************************************

If you need any stamping supplies, I’d love to be your Demonstrator. Just click HERE to go directly to my online store or drop me an email if you have any questions. 

MY CURRENT HOST CODE IS: 9R4BQD64

Use this host code when you order $50 or greater and receive a free gift from me! If your order is over $150, please do not use this code, but you’ll still get the free gift. The free gift is your choice of any 1 item valued up to $10.00 from the 2020-2021 Annual Catalog or the January-June 2021 Mini Catalog!   For any orders $50 or more I will also send you my monthly class tutorials.  Click HERE or go to my Customer Rewards for more details and to see what this months tutorials are.

 Click HERE to shop the clearance rack.

Please remember to use my current Host Code and make sure that you can see my name on the final checkout page listed as your Demonstrator when you order so that you know that you’re ordering with me and you’ll get my rewards! 

Happy Stamping, Karen!

*********************************************************************************************************

IT’S THE LAST-CHANCE PRODUCTS SALE

If you love great deals, Stampin’ Up!’s Last-Chance Products Sale is the perfect time to shop. You’ll get deep discounts on your favorite products from the 2020–2021 Annual Catalog—and as an extra bonus—you’ll get a peek at the list of items carrying over to the other catalogs. Many items will sell out fast, so don’t delay—shop early for the best selection!

Sales Period: March 24, 1:00 PM (MT) – May 3, 2021, 11:59 PM (MT)

  • Only select items in the 2020–2021 Annual Catalog will be discounted.
  • Sale applies to all order types except host items (see Last-Chance Products List for items on sale).
  • No minimum purchase is required.
  • Retiring items are available while supplies last.
  • Items and discounts may vary by market (depending on inventory levels).
  • Exclusions apply: Carryover items and some retiring items will not be discounted.
  • Ordering Deadline for retiring products:  May 3, 2021 at 11:59 PM (MT)

Here are the official retiring lists from Stampin’ Up!.

Head over to my online store to pick up those retiring items now!  They’re only available while supplies last from now through May 3!

*********************************************************************************************************

So Cool

Subscribe March 11 – April 10

  • The So Cool Paper Pumpkin Kit is a little taste of summer fun, with enough supplies to make 12 colorful, shaped cards with coordinating envelopes. Six card bases are popsicle shaped, the other six are semicircles: three watermelons and three rainbows. All of the cards are splashed with cheerful, vivid watercolor images. The kit also includes two full-size, matching sticker sheets, die-cut accents, fun embellishments, and more.
  • This kit was designed with kids in mind, as a way to spark their creative imagination and introduce them to papercrafting.
  • The So Cool Kit makes a great gift! It’s an even better way to enjoy some quality time with those special little ones in life.
  • Even though the So Cool Kit was designed with kids in mind, these fun-shaped cards, featuring vivid watercolors, are versatile enough to gift to kids of all ages—the young in years and the young at heart. They’re a great way to send some “sunshine in a card!” Who wouldn’t love that?
  • The kit’s exclusive So Cool Stamp Set is versatile, offering sentiments that can be used for multiple occasions such as birthdays, congrats, cheer, and more! It’s a great addition to any crafter’s collection.

Details

  • Kit includes enough supplies to make 12 fresh, fun-shaped cards—6 popsicles and 6 blank semicircles to color—and coordinating envelopes. Kit includes card bases, 2 full sticker sheets, decorative die-cut pieces, embellishments, and more.
  • Envelope size: 4-1/2″ x 5-3/4″ (11.4 x 14.6 cm)
  • Coordinating colors: Blackberry Bliss, Bermuda Bay, Bumblebee, Cinnamon Cider, Old Olive, Terracotta Tile
  • Coordinates with the Ice Cream Corner Suite from our January–June 2021 Mini Catalog.

Subscribe to the April Paper Pumpkin Kit between 11 March and 10 April at paperpumpkin.com!

Note: Supplies may be limited toward the end of the subscription period.

THERE’S MORE TO LOVE IN THE COORDINATING ICE CREAM CORNER SUITE!

154567

154567
ICE CREAM CORNER DESIGNER SERIES PAPER

Keep the creative fun going by pairing the So Cool Kit with the Ice Cream Corner Designer Series Paper (154567) featured in our 2021 January–June Mini Catalog. It’s a great way to use the kit’s stamps, ink, stickers, and more to further indulge your craving for summer fun. Plus, the paper is part of the matching Ice Cream Corner Suite, so there’s virtually no end to the possibilities!

Coordinating colors: Bermuda Bay, Blackberry Bliss, Cinnamon Cider, Old Olive, Petal Pink, Pool Party, Purple Posy, So Saffron, Soft Sea Foam, Terracotta Tile

Click this link to view the suite and start shopping.

*********************************************************************************************************

Card stock cuts for this project:

  • Basic Gray Cardstock 8 1/2″X 5 1/2″ (card base scored and folded at 4 1/4″), 1 3/4″ x 4″, 1 1/4″ X 4″, 3/4″ X 2 1/2″, 3″ X 3″ (card front dsp mats and scalloped circle)
  • Basic White Cardstock 3″ X 3″ (artwork), 2″ X 3″ (cat), 4″ x 5 1/4″ (inner liner)
  • Real Red Cardstock 4 1/8″ X 5 3/8″ (inner liner mat)
  • Playful Pets Designer Series Paper 4″ X 5 1/4″ (card front), 1 5/8″ x 3 7/8″, 1 1/8″ x 3 7/8″, 5/8″ x 2 1/8″ (card front panels), 1/2″ x 6″ (envelope front), 2 1/2″ X 6″ (envelope flap)

*************************************************************************************************************

Product List

Stampin’ UP! Snailed It for Fun Fold Friday

Good Friday morning my stamping friends and welcome to my Fun Fold Friday. How was everyone’s week? Is anyone doing anything for the weekend? I’ll be at work all weekend, as usual.

Today’s card I made on my Facebook Live video on Wednesday. If you were able to join me or watched the replay, thank you very much. If you’d like to watch my video and stamp along, the measurements are below along with the links to my Facebook page and my YouTube channel. Here’s my card that I made.

I used the Stampin’ Up! Snailed It Bundle and Snail Mail Designer Series Paper for my card today. It’s such a fun bundle to play with.

I started by adhering a panel of Snail Mail DSP to a Real Red card base using Stampin’ Seal. Using my Paper Trimmer I lined the outside edge of the card at the 3″ mark. I placed the blade at the 3″ mark on the ruler and cut down to the 5/8″ mark. I turned the card base so the bottom is lined up on the trimmer and the side is at the 3″ mark. I place the blade at the 3 5/8″ mark and cut down to the 1 1/4″ mark. I carefully flipped the cut panel around.

I adhered a small panel of Snail Mail DSP to a Bermuda Bay mat using Stampin’ Seal and then to the flipped corner using Stampin’ Seal. On a small panel of Bermuda Bay cardstock I stamped the image from the Stampin’ Up! Snailed It Cling Stamp Set in Tuxedo Black Ink. I cut the image out using the Rectangle Postage Stamp Punch and adhered it the the corner section using Stampin Dimensionals. I added a Resin Heart Embellishment to the punched image.

I fussy cut the snail from another panel of the Snail Mail DSP and adhered it to the corner of the flip fold using Stampin’ Dimensionals.

On the inside I stamped the sentiments from the Stampin’ Up! Punch Party Sale-A-Bration Host Photopolymer Stamp Set and the Stampin’ Up! Family Party Photopolymer Stamp Set in Tuxedo Black Ink on a Basic White panel. I stamped one of the snail images from the Snailed It stamp set in Tuxedo Black Ink. I colored the image in using my Bermuda Bay, Petal Pink and Real Red Stampin’ Blends Markers. I adhered a panel of the Snail Mail DSP to the inside of the Real Red card base using Stampin’ Seal. I adhered the Basic White panel to the DSP a little off centered so you can’t see it when the card is closed. I cut out 2 mushrooms using the Snail dies, one in Bermuda Bay and one in Real Red cardstocks. I switched the dots on each mushroom and adhered them to the inside panel using Glue Dots.

To finish my card I decorated a Basic White Medium Envelope. I stamped the snail image from the Snailed It stamp set on the envelope front in Tuxedo Black Ink and colored it in using my Bermuda Bay, Petal Pink and Real Red Stampin’ Blends Markers. I adhered a panel of Snail Mail DSP to the envelope flap.

Thank you for stopping by my blog today. I hope you liked my card and will give it a try. The list of measurements are below if you’d like to stamp along while watching the video. You can watch my video on my Facebook page Here.

You can also view the video on my YouTube channel Here. Happy Stamping!!

*********************************************************************************************************

If you need any stamping supplies, I’d love to be your Demonstrator. Just click HERE to go directly to my online store or drop me an email if you have any questions. 

MY CURRENT HOST CODE IS: C4XDWQT6

Use this host code when you order $50 or greater and receive a free gift from me! If your order is over $150, please do not use this code, but you’ll still get the free gift. The free gift is your choice of any 1 item valued up to $10.00 from the 2020-2021 Annual Catalog or the January-June 2021 Mini Catalog!   For any orders $50 or more I will also send you my monthly class tutorials.  Click HERE or go to my Customer Rewards for more details and to see what this months tutorials are.

 Click HERE to shop the clearance rack.

Please remember to use my current Host Code and make sure that you can see my name on the final checkout page listed as your Demonstrator when you order so that you know that you’re ordering with me and you’ll get my rewards! 

Happy Stamping, Karen!

*********************************************************************************************************

Bouquet of Hope

Subscribe January 11 – February 10

What is Paper Pumpkin? Paper Pumpkin is our monthly One-Stop Box™ that offers a unique variety of paper projects for subscribers of any skill level to enjoy! These thoughtfully-themed and all-inclusive craft kits encourage you to explore your creativity, try new techniques, and discover your potential in papercrafting.

Paper Pumpkin introduces you to an impressive collection of Stampin’ Up! products, from our one-of-a-kind ink pads to our eye-catching embellishments. Plus, the carefully-chosen components of each Paper Pumpkin kit highlight the unbeatable versatility and coordination our products provide! This easy and exciting way to stock up on supplies—and create small-batch projects for occasions of any kind—inspires you to continue crafting. With Paper Pumpkin, it’s simple: share what you love, and help others enjoy creativity!

The Bouquet of Hope Paper Pumpkin Kit provides enough supplies to create nine cards and coordinating envelopes. This soft, sympathetic kit includes patterned card bases, die-cut floral elements, ribbon, embellishments, and more!

The kit’s exclusive Bouquet of Hope Stamp Set features supportive sentiments centered around comfort, care, hope, and love. Such a versatile stamp set can be used throughout the year! Sadly, there is heartache in the world all around us. We all know someone who could use a heartfelt, handmade card that gives sympathy and strength during a difficult time. This kit’s cards are a must to have on-hand!

ABOUT THE FEBRUARY KIT

Details

  • Kit contains enough supplies to create 9 cards—3 each of 3 designs—and coordinating envelopes. Kit includes card bases, decorative die-cut pieces, embellishments, and more.
  • Card size: 4-1/4″ x 5-1/2″ (10.8 x 14 cm)
  • Envelope size: 4-1/2″ x 5-3/4″ (11.4 x 14.6 cm)
  • Coordinating colors: Basic Black, Bumblebee, Just Jade, Merry Merlot, Mossy Meadow, Rococo Rose
  • Coordinates with the Flower & Field Designer Series Paper, an exclusive Sale-A-Bration item.

Subscribe to the February 2021 Paper Pumpkin Kit between 11 January and 10 February at paperpumpkin.com!

Note: Supplies may be limited toward the end of the subscription period.

COORDINATING PRODUCT

155223 | Flower & Field Designer Series Paper

  • Earn this pack of paper for FREE with a purchase of $50 USD or more during Stampin’ Up!’s Sale-A-Bration promotion! 

*********************************************************************************************************

Card stock cuts for this project:

  • Basic White Cardstock 4 1/2″ X 3 1/4″ (inner liner)
  • Bermuda Bay Cardstock 2 7/8″ X 2 7/8″ (corner panel mat), 1 1/4″ X 1 1/4″ (artwork)
  • Real Red Cardstock 4 1/4″ X 11″ (card base scored and folded at 5 1/2″)
  • Snail Mail Designer Series Paper 4″ X 5 1/4″ (card front), 2 3/4″ X 2 3/4″ (corner panel), 4 1/8″ X 5 3/8″ (inner liner mat), 2 1/2″ X 6″ (piece for envelope flap)

*********************************************************************************************************

Product List

Stampin’ Up! Special Someone Valentine

Good Saturday morning my stamping friends. How is everyone’s weekend starting off? I actually have the day off, which is very unusual for a weekend with me. I was able to get my entire house undecorated yesterday except for my tree. My husband will be taking that down today, I can’t touch it since I’m allergic to it. I always hate undecorating and having to pack everything away. The good part is, I’ll be bringing out all my snowmen and winter decorations soon, once I give the house a good cleaning.

For today’s card the owner of where I get my hair done asked me to make her a few Valentine’s cards. She wants one for each of her grandchildren and one for her husband. Here’s the 1st one I made for her granddaughter.

I used the Stampin’ Up! Special Someone Photopolymer Stamp Set for my card.

I started by embossing a panel of Magenta Madness using the Lace 3D Embossing Folder. I adhered a panel of Flowers For Every Season 6 X 6 Designer Series Paper to the panel using Multipurpose Liquid Glue. I wrapped a piece of Magenta Madness 1/4″ 2020-2022 In-Color Ribbon around the panel and tied a bow. I adhered the card front to a Magenta Madness card base using Stampin’ Dimensionals.

On a panel of Basic White cardstock I stamped the outline raccoon image from the Special Someone stamp set in Early Espresso Ink. I stamped the fill image in Sahara Sand Ink over the outline image. I stamped a couple of the butterflies from the Special Someone stamp set in Early Espresso Ink by the raccoon and colored them in using my Bumblebee Stampin’ Write Marker. I cut the racoon out using the Stitched Shapes Dies. On the same panel I stamped the heart balloon outline image from the Special Someone stamp set in Poppy Parade Ink. I stamped the heart balloon fill image over the outline image in Poppy Parade Ink, stamping off once. I stamped the string image in Early Espresso Ink. I cut the balloon and string out using the Special Day Dies. Using the Layering Ovals Dies I cut the scalloped oval from a panel of Poppy Parade cardstock. I adhered the raccoon image to the scalloped oval using Stampin’ Seal and adhered it to the card front over the ribbon using Stampin’ Dimensionals. I adhered the balloon to the string using a Glue Dot and adhered it to the raccoon using a Glue Dot. I had cut a tiny bow from a scrap of Poppy Parade using the Special Day Dies and adhered it to the string by the raccoons paws using a Glue Dot.

On a strip of Basic White cardstock I stamped the sentiment from the Special Someone stamp set in Magenta Madness Ink. I cut the sentiment out using the Tasteful Labels Dies and adhered it to the card front using Stampin’ Dimensionals.

On the inside I stamped the sentiments from the Stampin’ Up! Family Party Photopolymer Stamp Set and the Stampin’ Up! A Wish For Everything Cling Stamp Set in Magenta Madness Ink on a Basic White panel. I stamped the outline balloon image from the Special Someone stamp set in Poppy Parade Ink in 2 of the corners. I stamped the balloon fill image over the outline image in Poppy Parade Ink, stamped off once. I stamped a couple of the butterfly images from the Special Someone stamp set in Early Espresso Ink by the sentiment. I colored the butterflies in using my Bumblebee Stampin’ Write Marker. I adhered the Basic White panel to a Poppy Parade mat using Stampin’ Seal and then to the inside of the Magenta Madness card base using Multipurpose Liquid Glue.

To finish my card I decorated a Basic White Medium Envelope. I stamped the outline raccoon image from the Special Someone stamp set in Early Espresso Ink on the envelope front. I stamped the raccoon fill image over the outline image in Sahara Sand Ink. I adhered a panel of the Flowers For Every Season DSP to the envelope flap.

Thank you for stopping by my blog today. I hope you liked my card and will give it a try. Happy Stamping!!

*********************************************************************************************************

If you need any stamping supplies, I’d love to be your Demonstrator. Just click HERE to go directly to my online store or drop me an email if you have any questions. 

MY CURRENT HOST CODE IS: C4XDWQT6

Use this host code when you order $50 or greater and receive a free gift from me! If your order is over $150, please do not use this code, but you’ll still get the free gift. The free gift is your choice of any 1 item valued up to $10.00 from the 2020-2021 Annual Catalog or the January-June 2021 Mini Catalog!   For any orders $50 or more I will also send you my monthly class tutorials.  Click HERE or go to my Customer Rewards for more details and to see what this months tutorials are.

 Click HERE to shop the clearance rack.

Please remember to use my current Host Code and make sure that you can see my name on the final checkout page listed as your Demonstrator when you order so that you know that you’re ordering with me and you’ll get my rewards! 

Happy Stamping, Karen!

*********************************************************************************************************

To kick off the ordering, I’m offering a double Creative Stamping Reward point ordering special!!

You’ll get DOUBLE Creative Stamping Reward points for every order of $50 or greater (before shipping and taxes) through, Monday, January 11!!  Plus you’ll earn a free Sale-A-Bration goody from Stampin’ Up! for every $50 in merchandise that you order too! 

Don’t forget to add the Host Code above if your order is under $150 to get your free thank you gift.  Please don’t add the host code to orders over $150, you automatically get the free thank you gift and Stampin’ Rewards/Host Cash from Stampin’ Up!  For more information about my Creative Stamping Reward points (my buyer reward program), Click Here.

Click Here to head over to my online store to start shopping now!

*********************************************************************************************************

Sending Hearts

TOMORROW, JANUARY 10TH, IS THE LAST DAY TO SUBSCRIBE

Love is in the air! Send a little love to someone special with the Sending Hearts Paper Pumpkin Kit. From heaps of heart-shaped elements to paper pieces in red and pink, this month’s kit has everything you need to create eight adorable cards—with coordinating envelopes—for Valentine’s Day, anniversaries, and every celebration of love in between!

With the add-on to January’s sweet and sentimental kit, there’s even more love to share! The add-on—called Little Love Boxes—includes 20 tiny, printed boxes and 24 die-cut, heart-shelled snails and sentiment labels. When combined with the remaining components from the Sending Hearts kit, you can create treat packaging, additional cards, and so much more!

ABOUT THE JANUARY KIT

Details

  • Kit contains enough supplies to create eight cards—four each of two designs—and coordinating envelopes.
  • Card size: 4-1/4″ x 5-1/2″ (10.8 x 14 cm)
  • Envelope size: 4-1/2″ x 5-3/4″ (11.4 x 14.6 cm)
  • Coordinating colors: Basic Black, gold, Petal Pink, Poppy Parade, Smoky Slate, white

ABOUT THE ADD-ON

Name Little Love Boxes

Details

  • Add-on contains 20 printed mini boxes and 24 die-cut decorative pieces and sentiment labels.
  • Item number: 156842
  • Price: $8 USD/$11 CAD 
  • Available 1 January, while supplies last!

Subscribe to the January 2021 Paper Pumpkin Kit between 11 December and 10 January at paperpumpkin.com!

ADD-ON ORDERING INFORMATION

Purchase the Little Love Boxes add-on to the Sending Hearts Paper Pumpkin Kit on stampinup.com, or by placing an order through my online store. The add-on will be available starting 1 January, while supplies last. You must be a Paper Pumpkin subscriber to order the add-on.

  • Little Love Boxes (156842)
  • $8 USD | $11 CAD

Note: Add-on is not included in January’s Paper Pumpkin subscription. It must be purchased through a separate order. 

Note: Supplies may be limited toward the end of the subscription period.

*********************************************************************************************************

Card stock cuts for this project:

  • Magenta Madness Cardstock 8 1/2″ X 5 1/2″ (card base scored and folded at 4 1/4″), 4 1/4″ X 5 1/2″ (card front)
  • Poppy Parade Cardstock 2 1/4″ X 3 1/4″ (scalloped oval), 4 1/8″ X 5 3/8″ (inner liner mat)
  • Basic White Cardstock 3 1/2″ X 3 1/4″(artwork & sentiment), 4″ X 5 1/4″ (inner liner)
  • Flowers For Every Season 6 X 6 Designer Series Paper 3″ X 5 1/2″ (card front panel), 2 1/2″ X 6″ (piece for envelope flap)

*********************************************************************************************************

Product List