Stampin’ Up Friend Like You Inside Out card for Fun Fold Friday

Good Friday morning my stamping friends and welcome to my Fun Fold Friday. How was everyone’s week? Are you ready for the weekend? I’ll be working both days this weekend again. Saturday at the hardware store and Sunday at the dog bakery. Of course it’s suppose to be a beautiful weekend so I’m sure both places will be crazy busy.

Today’s card I made on my Facebook Live video on Wednesday. If you were able to join me or watched the replay, thank you. If you’d like to watch my video and stamp along, the measurements are below along with the links to my Facebook page and my YouTube channel. Here’s my card for today.

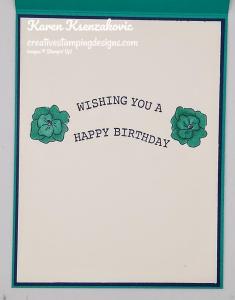
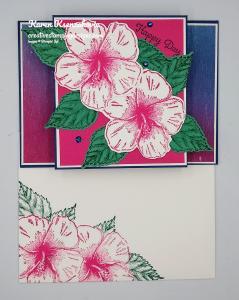
I used the Stampin’ Up! Friend Like You Photopolymer Stamp Set along with the Artistry Blooms Designer Series Paper for my card today.

I started by adhering a panel of Artistry Blooms DSP to a Night of Navy mat using Stampin’ Seal. I stamped the sentiment from the Friend Like You stamp set in Granny Apple Green Ink on a panel of Basic White cardstock which I cut using the Tasteful Labels Dies. I stamped the dragonfly image from the Friend Like You stamp set in Night of Navy Ink on the side of the sentiment. I adhered the sentiment to the card front using Stampin’ Dimensionals. I added a few Artistry Blooms Adhesive-Backed Sequins to the card front. I tied a small bow using the 1/8″ Night of Navy ribbon from the Playing With Patterns Ribbon Combo Pack and adhered it to the sentiment using a Glue Dot.

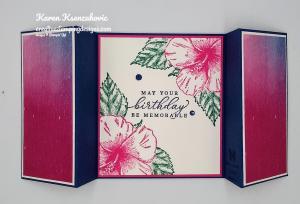
For the card base I scored a 9 1/2″ X 5 1/2″ panel of Thick Basic White cardstock at 4 1/4″, 4 3/4″ and 5 1/4″. I folded the card base in half on the 4 3/4″ score line. I folded the card base back on the 4 1/4″ & 5 1/4″ score lines. I adhered the center together using Tear & Tape.

On one side of the inside (which will be the outside), I adhered a panel of Artistry Blooms DSP using Multipurpose Liquid glue. On a panel of Basic White cardstock I stamped the sentiment from Friend Like You stamp set in Night of Navy Ink in the center of the panel. I stamped the grass image from the Friend Like You stamp set in Granny Apple Green Ink on the bottom of the panel. I stamped the dragonfly mage from the Friend Like You stamp set in Night of Navy Ink. I adhered the Basic White panel on top of the Artistry Blooms DSP using Stampin’ Seal.

On the other side of the inside I adhered another panel of Artistry Blooms DSP using Multipurpose Liquid Glue. On a panel of Basic White cardstock I stamped the sentiment from the Friend Like You stamp set in Night of Navy Ink. I stamped the palm tree image from the Friend Like You stamp set on the bottom of the panel using Soft Suede and Granny Apple Green Ink. I adhered the Basic White panel on top of the Artistry Blooms DSP using Stampin’ Seal.

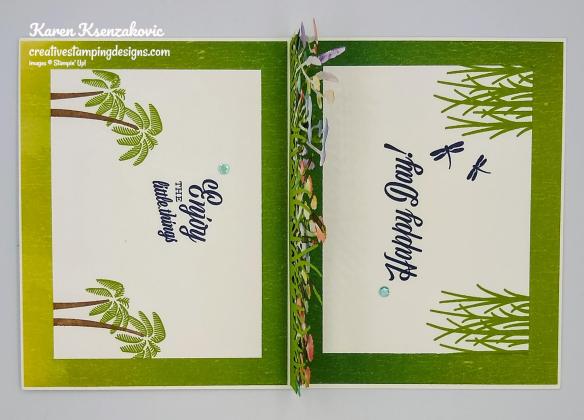
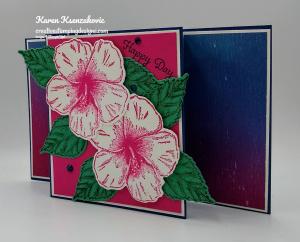
Using my Friendly Silhouette Dies and cut 2 of the floral dies from a panel of Basic White cardstock and one of the cattail dies from a panel of Granny Apple Green cardstock. I colored the cattails in using my Soft Suede Stampin’ Blends Markers. I colored the floral dies in using my Bermuda Bay, Calypso Coral, Daffodil Delight, Flirty Flamingo, Granny Apple Green, Highland Heather, Poppy Parade and Seaside Spray Stampin’ Blends Markers. I adhered the cattail die behind one of the floral dies using Glue Dots. I adhered the floral die to one side of the raised cardstock using Multipurpose Liquid glue. I adhered the double die to the back side of the raised cardstock using Multipurpose Liquid Glue making sure it is facing forward. I added a couple Artistry Blooms Adhesive-Backed Sequins to both of the Basic White panels by the sentiments.

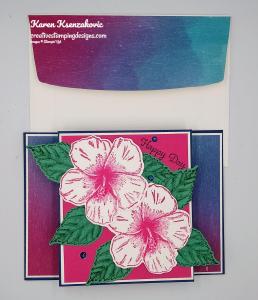
To finish my card I decorated a Basic White Medium Envelope. I stamped the palm trees and dragonflies images from the Friend Like You on the envelope front in Granny Apple Green, Night of Navy and Soft Suede Inks. I adhered a panel of the Artistry Blooms DSP to the envelope flap.

Thank you for stopping by my blog today. I hope you liked my card and will give it a try. The list of measurements are below if you’d like to stamp along while watching the video. You can watch my video on my Facebook page Here.

You can also view the video on my YouTube channel  Here. Happy Stamping!!

*********************************************************************************************************

If you need any stamping supplies, I’d love to be your Demonstrator. Just click HERE to go directly to my online store or drop me an email if you have any questions. 

MY CURRENT HOST CODE IS: 2QRN664Q

Use this host code when you order $50 or greater and receive a free gift from me! If your order is over $150, please do not use this code, but you’ll still get the free gift. The free gift is your choice of any 1 item valued up to $10.00 from the 2020-2021 Annual Catalog or the January-June 2021 Mini Catalog!   For any orders $50 or more I will also send you my monthly class tutorials.  Click HERE or go to my Customer Rewards for more details and to see what this months tutorials are.

 Click HERE to shop the clearance rack.

Please remember to use my current Host Code and make sure that you can see my name on the final checkout page listed as your Demonstrator when you order so that you know that you’re ordering with me and you’ll get my rewards! 

Happy Stamping, Karen!

*********************************************************************************************************

Available Now!!!

Bring in the beauty of nature with the artistic designs of the Butterfly Brilliance Bundle and coordinating designer series paper, along with textured specialty paper that will put a pop of brilliance on every project. The Butterfly Brilliance Collection will be available March2 — May 3, 2021.

*********************************************************************************************************

The 2019-2021 In-Colors will be retiring soon. See the complete list of items in my online store Here.
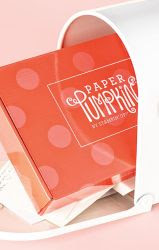
*********************************************************************************************************

Here’s To You

Subscribe February11th – March 10th

Three cheers for mountain air, a sky filled with sunshine, and finding joy in life’s journey! Adventure awaits inside this month’s majestic, mountain-themed kit. With enough elements and embellishments to create eight cards and coordinating envelopes, the Here’s to You Paper Pumpkin Kit is the perfect pick for celebrating life’s little moments and mountain-high milestones!

What makes March’s kit one-of-a-kind? The spectacular set of four free stencils—and a stamping sponge—that you’ll find inside! Pair this pack of stunning stencils with the kit’s contents to stamp a springtime scene, then store the set to stamp for any season in the future. Clean up your binoculars and dust off your hiking boots—the Here’s to You Paper Pumpkin Kit is ready to lead you on an excursion to explore your creativity!

ABOUT THE MARCH KIT

Details

  • Kit contains enough supplies to create 8 cards—4 each of 2 designs—and coordinating envelopes. The kit’s contents include printed card bases, die-cut paper pieces, embellishments, adhesive, and more!
  • Card size: 4-1/4″ x 5-1/2″ (10.8 x 14 cm)
  • Envelope size: 4-1/2″ x 5-3/4″ (11.4 x 14.6 cm)
  • Coordinating colors: Bumblebee, Calypso Coral, Old Olive, Petal Pink, Pretty Peacock, Seaside Spray
  • Includes four free stencils and a stamping sponge!
  • Arrives in a cute and collectible box.

Subscribe to the March 2021 Paper Pumpkin Kit between 11 February and 10 March at paperpumpkin.com!

Note: Supplies may be limited toward the end of the subscription period.

*********************************************************************************************************

Card stock cuts for this project:

  • Basic White Cardstock 4″ x 2 1/4″ (sentiment), 2 – 3 1/4″ X 4 1/2″ (inner liners), 2 – 2 1/2″ X 6″ (floral die)
  • Granny Apple Green Cardstock 2 1/2″ X 6″ (cattail die)
  • Night of Navy Cardstock 4 1/8″ X 5 3/8″ (card front mat)
  • Thick Basic White Cardstock 9 1/2″ X 5 1/2″ (card base scored and folded at 4 1/4″, 4 3/4″ & 5 1/4″)
  • Artistry Blooms Designer Series Paper 4″ X 5 1/4″ (card front), 2 – 4 1/8″ X 5 3/8″ (inner liners), 2 – 3/8″ x 5 3/8″ (top pieces of card base ), 2 1/2″ X 6″ (envelope flap)

*********************************************************************************************************

Product List

Paper Snips

$10.00

Stampin’ Up! Christmas Means More Elf

Good Tuesday morning my stamping friends. How has everyone’s week started off? I’ve got a busy couple days with work then I start my yearly Christmas baking on Wednesday night. Perfect time to be baking since we are expecting a pretty big snow storm. Last I heard they are predicting 12″-18″ of snow, but I always wait since they are seldom correct. Guess we’ll have a white Christmas this year. I normally have off today, but I felt bad that I couldn’t work this Thursday or Friday and I know how busy the dog bakery is right now, so I told them I could work today.

I have one final super fun Christmas card for you today. All my cards have now been mailed and I think I’m done for the season. I’ve been wanting to make this one and I have someone special in mind that I want to send it to. I forgot how much fun these cards are to make. Here’s my final Christmas card for the season (I hope).

I used the retiring Stampin’ Up! Christmas Means More Photopolymer Stamp Set for the inside of my card. The outside is all cut and punched pieces. I’ve seen a card similar made by Rachel Tessman, I added my own twist to it.

I started by embossing a Granny Apple Green card front using the Tasteful Textiles 3D Embossing Folder. I cut a panel of the Brushed Metallic cardstock using the Ornate Layers Dies. I sponged the edges of a panel of Granny Apple Green cardstock using Granny Apple Green Ink and my Stamping Sponge. I scored the center of the panel, folded it in half and sponged the inside edges with the Granny Apple Green Ink. I adhered the sponged panel to the center of the Brushed Metallic die using Multipurpose Liquid Glue and adhered it to the card front using Multipurpose Liquid Glue.

I took a strip of Basic Black cardstock and adhered a rectangle of Brushed Metallic cardstock in the center using Stampin’ Seal. I cut a smaller rectangle of Basic Black cardstock and adhered it in the center of the Brushed Metallic using Multipurpose Liquid Glue. I adhered the belt to the card front using Stampin’ Dimensionals.

I cut 2 trees from a panel of Whisper White cardstock using the Pine Tree Punch and embossed them using the Wrapped In Texture Embossing Folder. I adhered the trees to the top of the card front using Glue Dots, having them over lap on the score line of the center Granny Apple Green piece. I adhered the card front to a Granny Apple Green card base using Stampin’ Dimensionals.

On the inside I stamped the sentiment from the Christmas Means More stamp set in Granny Apple Green Ink in the center of a Whisper White panel. I adhered the Whisper White panel to a Brushed Metallic mat using Stampin’ Seal then to a Basic Black mat using Stampin’ Seal. I adhered the matted panel to the inside of the Granny Apple Green card base using Multipurpose Liquid Glue.

To finish my card I decorated a Medium Whisper White Envelope. I stamped the feather image from the Stampin’ Up! Tasteful Touches Cling Stamp Set in Real Red Ink on the envelope front. I adhered a strip of Daffodil Delight cardstock to the bottom of the envelope front. If you know the movie Elf he wears a green hat with a yellow rim and red feather. I adhered a panel of Artistry Blooms Designer Series Paper to the envelope flap.

Thank you for stopping by my blog today. I hope you liked my card and will give it a try. Happy Stamping!!

*********************************************************************************************************

If you need any stamping supplies, I’d love to be your Demonstrator. Just click HERE to go directly to my online store or drop me an email if you have any questions. 

MY CURRENT HOST CODE IS: YUWDMJMT

Use this host code when you order $50 or greater and receive a free gift from me! If your order is over $150, please do not use this code, but you’ll still get the free gift. The free gift is your choice of any 1 item valued up to $10.00 in the 2020-2021 Annual Catalog!   For any orders $50 or more I will also send you my monthly class tutorials.  Click HERE or go to my Customer Rewards for more details and to see what this months tutorials are.

 Click HERE to shop the clearance rack.

Please remember to use my current Host Code and make sure that you can see my name on the final checkout page listed as your Demonstrator when you order so that you know that you’re ordering with me and you’ll get my rewards! 

Happy Stamping, Karen!

*********************************************************************************************************

Sending Hearts

Subscribe December 11-January 10 

Love is in the air! Send a little love to someone special with the Sending Hearts Paper Pumpkin Kit. From heaps of heart-shaped elements to paper pieces in red and pink, this month’s kit has everything you need to create eight adorable cards—with coordinating envelopes—for Valentine’s Day, anniversaries, and every celebration of love in between!

With the add-on to January’s sweet and sentimental kit, there’s even more love to share! The add-on—called Little Love Boxes—includes 20 tiny, printed boxes and 24 die-cut, heart-shelled snails and sentiment labels. When combined with the remaining components from the Sending Hearts kit, you can create treat packaging, additional cards, and so much more!

ABOUT THE JANUARY KIT

Details

  • Kit contains enough supplies to create eight cards—four each of two designs—and coordinating envelopes.
  • Card size: 4-1/4″ x 5-1/2″ (10.8 x 14 cm)
  • Envelope size: 4-1/2″ x 5-3/4″ (11.4 x 14.6 cm)
  • Coordinating colors: Basic Black, gold, Petal Pink, Poppy Parade, Smoky Slate, white

ABOUT THE ADD-ON

Name Little Love Boxes

Details

  • Add-on contains 20 printed mini boxes and 24 die-cut decorative pieces and sentiment labels.
  • Item number: 156842
  • Price: $8 USD/$11 CAD 
  • Available 1 January, while supplies last!

Subscribe to the January 2021 Paper Pumpkin Kit between 11 December and 10 January at paperpumpkin.com!

ADD-ON ORDERING INFORMATION

Purchase the Little Love Boxes add-on to the Sending Hearts Paper Pumpkin Kit on stampinup.com, or by placing an order through my online store. The add-on will be available starting 1 January, while supplies last. You must be a Paper Pumpkin subscriber to order the add-on.

  • Little Love Boxes (156842)
  • $8 USD | $11 CAD

Note: Add-on is not included in January’s Paper Pumpkin subscription. It must be purchased through a separate order. 

Note: Supplies may be limited toward the end of the subscription period.

*********************************************************************************************************

WHISPER WHITE CARDSTOCK PRODUCTS- AVAILABLE WHILE SUPPLIES LAST

Stampin’ Up! announced this information related to the Whisper White paper products late last evening:

Whisper White has been a Stampin’ Up! staple for so long. We love it and we know you love it, too. We are sad to announce that the supplier’s mill producing our Whisper White cardstock has permanently closed due to impacts from the COVID-19 pandemic. Unfortunately, we weren’t given much notice on this closure. This means that the technology unique to this particular supplier is now unavailable to us and we can no longer offer our Whisper White cardstock and related products, such as Whisper White Note Cards & Envelopes. Please note that this won’t affect any of our other cardstocks, this only affects Whisper White.

We know Whisper White has a huge fan base; we’re big fans, too! And we are crushed that it’s going away. Even though this decision was out of our hands, rest assured that we jumped right into action to find the best replacement paper possible. We have dedicated many hours to source and test alternative cardstock options from several suppliers to find the perfect fit that still maintains the Stampin’ Up! quality you know and trust. We are happy to share that we have found a winner for our new cardstock, Basic White!

The quality of our new Basic White was thoroughly tested by our quality assurance and product teams. It also tested very well with demonstrators and concept artists who gave it a huge thumbs up. We believe in the quality of the new Basic White cardstock and we know it will become your new crafting staple!

What does this mean for you?

With Whisper White going out of production, this means a number of Whisper White products will be affected. Below is a list of all products that will be replaced with our new Basic White cardstock. These items are now available while supplies last with an order limit of 2 per item per order.

  • Whisper White 12″ x 12″ (30.5 x 30.5 cm) Cardstock (124302)
  • Assorted Memories & More Cards & Envelopes (149710)
  • Whisper White Note Cards & Envelopes (131527)
  • Whisper White 3″ x 3″ (7.6 x 7.6 cm) Envelopes (145829)
  • Whisper White 8-1/2″ x 11″ Cardstock (100730)
  • Whisper White 8-1/2″ x 11″ Thick Cardstock (140272)
  • Whisper White Medium Envelopes (107301)

Our new Basic White products will become available to purchase as soon as we have them in stock. This means that some Whisper White and Basic White products may be available at the same time. Additionally, due to the nature of sourcing, some Basic White products may not be available before the Whisper White products sell out. Please know that we are working on getting these products available to you as fast as possible.

*********************************************************************************************************

Stampin’ Up!’s Year End Closeout Sale going on now

If you love great deals, our Giant Year-End Closeout event is the perfect time to shop. You’ll get deep discounts on your favorite products from the August–December 2020 Mini Catalog. The Year-End Closeout happens only once a year!

Year End Closeout Sale Details:

Sale Dates:  December 8, 2020 through January 4, 2021

  • No minimum purchase required.
  • Retiring items are available while supplies last.
  • Exclusions apply: Carryover items will not be discounted.
  • Due to increased shipping times and possible shipping delays during the month of December, we can’t guarantee delivery before Christmas.
  • Ordering Deadlines:  January 4, 2021 at 11:50 PM (MT)

Click here to download the full list of items that are retiring and which items are on sale starting on Tuesday, December 8!  And get your lists ready to shop early!!  The items that are retiring are only while supplies last!!  And everything on this list is retiring!!

*********************************************************************************************************

FREE Bonus Quite Curvy and Curvy Christmas Project Tutorials With Videos When You Purchase The Bundle From Me!!

This image has an empty alt attribute; its file name is curvy-celebrations-onlline-class.png

A group of us worked together to create five awesome tutorials using the Stampin’ Up! Curvy Celebrations special release products with video tutorials!  You can get this set of exclusive tutorials when you purchase either the Quite Curvy Variety Bundle (item 158396) or the Quite Curvy Bundle (item 156228) from me between now and January 4!

If your order is $50 or greater and includes either of these bundles, you will get this set of tutorials in addition to the monthly online class tutorials AND your $10 thank you gift!  And you’ll also earn my Creative Stamping Designs Reward Points!

*********************************************************************************************************

Card stock cuts for this project:

  • Basic Black Cardstock 1 1/4″ X 4 1/4″ & 1 1/4″ X 1 3/4″ (belt), 4 1/8″ X 5 3/8″ (inner liner mat)
  • Daffodil Delight Cardstock 3/4″ X 6″ (envelope strip)
  • Granny Apple Green Cardstock 4 1/4″ X 11″ (card base scored and folded at 5 1/2″), 4 1/4″ X 5 1/2″ (card front)
  • Whisper White Cardstock 2 1/2″ X 3 1/2″ (tree collar), 3 7/8″ X 5 1/8″ (inner liner)
  • Brushed Metallic Cardstock 2″ X 5″ (card front panel), 1/1/2″ X 2″ (buckle), 4″ X 5 1/4″ (inner liner mat)
  • Artistry Blooms Designer Series Paper 2 1/4″ X 6″ (piece for envelope flap)

*********************************************************************************************************

Product List

Stampin’ Up! Dragonfly Garden Sneak Peek Thank You

Good Tuesday morning my stamping friends. How has everyone’s week started off? I hope you are all having a productive one. We’re having a rainy week here in NJ, Autumn is in full bloom here also. Leaves have changed and are starting to cover the ground. Most of the trees that is. We have one in our front yard and one in our backyard that haven’t even begun to show signs of changing color let alone drop their leaves. They usually wait till we get all the raking done and the leaves are picked up to drop their leaves. It’s almost like they are watching us and laughing at us.

I have another sneak peek for you to day at the stamp set coming in the January-June 2021 Mini Catalog. Here’s my card for today.

I used the Stampin’ Up! Dragonfly Garden Bundle for you again. I’m really loving this set. My colors were inspired by Fab Friday Challenge #200. Here are their colors. I know the colors probably scream Halloween to you, but I saw them as flowers and dragonflies.

I started by adhering a panel of In Good Taste Designer Series Paper to an Artistry Blooms Designer Series Paper card front using Multipurpose Liquid Glue. I wrapped a piece of 1/2″ Whisper White Faux Linen Ribbon from the Flowers For Every Season Ribbon Combo Pack around the card front and tied a bow. I adhered the card front to a Garden Green card base using Stampin’ Dimensionals.

On a panel of Whisper White cardstock I stamped the wild flower image from the Stampin’ Up! Dragonfly Garden Cling Stamp Set (available January 5, 2021), in Tuxedo Black Memento Ink. I colored the image in using my Granny Apple Green, Highland Heather and Pumpkin Pie Stampin’ Blends Markers. I cut the image out using the 2nd largest square from the Stitched Shapes Dies and adhered it to the card front using Stampin’ Dimensionals. I stamped the dragonfly image from the Dragonfly Garden stamp set in Tuxedo Black Memento Ink on a panel of Whisper White cardstock and colored the wings in using my Pumpkin Pie Stampin’ Blends Markers. I cut the image out using my Dragonflies Punch and brushed the wings using my Clear Wink of Stella. I adhered the dragonfly to the bottom of the floral image using Stampin’ Dimensionals.

On a strip of Whisper White cardstock I stamped the sentiment from the Dragonfly Garden stamp set in Tuxedo Black Memento Ink and cut it into a banner using my Banner Pick A Punch. I adhered the banner to the top of the card front using Stampin’ Dimensionals. I added a few Pumpkin Pie Holiday Rhinestone Basic Jewels to the card front.

On the inside I stamped the sentiment from the Stampin’ Up! Ornate Thanks Photopolymer Stamp Set in Tuxedo Black Memento Ink in the center of a Whisper White panel. I stamped the dragonfly image from the Dragonfly Garden stamp set in Tuxedo Black Memento Ink on either side of the panel and colored them in using my Highland Heather and Pumpkin Pie Stampin’ Blends Markers. I adhered the Whisper White panel to a Granny Apple Green mat using Stampin’ Seal and then to the inside of the Garden Green card base using Multipurpose Liquid Glue.

To finish my card I decorated a Medium Whisper White Envelope. I stamped the dragonfly image from the Dragonfly Garden stamp set twice on the envelope front and colored them in using my Highland Heather and Pumpkin Pie Stampin’ Blends Markers.

I adhered a panel of the In Good Taste DSP to the envelope flap.

Thank you for stopping by my blog today. I hope you liked my card. The stamp set and punch used will be available to you January 5, 2021 from the January-June 2021 Mini Catalog. The DSP used is available now at a discounted price, but only until Saturday October 31, 2020.

*********************************************************************************************************

If you need any stamping supplies, I’d love to be your Demonstrator. Just click HERE to go directly to my online store or drop me an email if you have any questions. 

MY CURRENT HOST CODE IS: RUW6PQNH

Use this host code when you order $50 or greater and receive a free gift from me! If your order is over $150, please do not use this code, but you’ll still get the free gift. The free gift is your choice of any 1 item valued up to $10.00 in the 2020-2021 Annual Catalog!   For any orders $50 or more I will also send you my monthly class tutorials.  Click HERE or go to my Customer Rewards for more details and to see what this months tutorials are.

 Click HERE to shop the clearance rack.

Happy Stamping, Karen!

*********************************************************************************************************

Last days to take advantage of this awesome offer!!!

We all love gorgeous Designer Series Paper, and during this incredible sale, you can enjoy a 15% discount on select papers from our current catalogs! 

Stampin’ Up! has such beautiful Designer Series Paper and they’re putting a select list of those papers on sale for 15% off during the month of October!!  Now is a great time to stock up and save on some of the most popular paper designs…including papers from the August-December 2020 Mini Catalog!!

SALE DETAILS:

  • Sales Period:  October 1-31
  • All order types qualify for this promotion.
  • There is no limit to how many packages of Designer Series Paper may be purchased during this promotion.
  • Only select Designer Series Papers are available at a 15% discount during this promotion.
  • Orders must be placed—and closed—during the promotion period for the 15% discount to apply.
  • Designer Series Paper ordered as part of a Starter Kit or with Stampin’ Rewards qualify for the 15% discount
  • Sale Ends October 31, 2020 at 11:50 PM MT

The designer papers included in this sale are shown   Click on the image below to open up the full-size printable PDF:

Offer Ends – October 31st! 

*********************************************************************************************************

Jolly Gingerbread

Subscribe October 11 – November 10

Paper Pumpkin is our monthly subscription service that offers unique papercrafting projects for crafters of any skill level! In these all-inclusive kits, subscribers receive pre-cut paper pieces, embellishments, ink, and an exclusive stamp set designed to encourage them to explore their creativity. As their subscription continues, subscribers will have a collection of cards—and other creations—for a variety of occasions, in addition to a stockpile of supplies!


So, what’s in store for this month’s Paper Pumpkin kit? November’s cute, gingerbread-themed kit contains enough supplies to create one-of-a-kind Christmas crafts! Whether it’s a gift card carrier, traditional card, or tasty-looking tag, this sweet and seasonal kit is the key to heartfelt holiday gifting. With curly cutouts, sugary stickers, and delicious die-cut designs in a special-edition box, a jolly holiday will be on its way with this kit!

Details About The November Kit:

  • Kit contains enough supplies to create 15 gift card carriers and coordinating envelopes.
  • Kit contents can also be used to design traditional holiday cards, gift tags, and other paper projects.
  • Contents arrive in a collectible, special-edition box!
  • Project size: 2-1/4″ x 4″
  • Envelope size: 2-3/4″ x 4-3/8″
  • Coordinating colors: Cinnamon Cider, Daffodil Delight, Calypso Coral, Mint Macaron, Shaded Spruce, Blushing Bride, and Whisper White

Subscribe to the November 2020 Paper Pumpkin Kit from 11 October to 10 November at paperpumpkin.com!

Note: Supplies may be limited toward the end of the subscription period.

********************************************************************************************************

PAPER PUMPKIN PAST KITS AND REFILLS AVAILABLE AGAIN SOON!

While constructing the new online store, Stampin’ Up! was required to temporarily suspend the offering of past kits and refills from Paper Pumpkin.  The online store functionality that allows them to offer these products is nearly ready to launch.  Paper Pumpkin Past Kits and Refills will be available once again beginning 26 October!!

On 26 October, available products will include the September Refills and October Refills!  Yay!  The cute fall treat boxes and the Christmas card kit refills will be there!  These products will only be available while supplies last and require a Paper Pumpkin subscription to order.

Once the Paper Pumpkin Past Kits and Refills have been made available again, Stampin’ Up! will continue to release new past kit and refill products each month as inventory and demand allow.  If you’re interested in purchasing these products, they’re typically released—if available—on the 4th Monday of each month.  So keep checking the online store for more refills and past kits!

*********************************************************************************************************

Curvy Celebrations will be available for purchase November 3rd. Click Here for a full size printable PDF.

*********************************************************************************************************

Card stock cuts for this project:

  • Garden Green Cardstock 8 1/2″ X 5 1/2″ (card base scored and folded at 4 1/4″)
  • Granny Apple Green Cardstock 4 1/8″ X 5 3/8″ (inner liner mat)
  • Whisper White Cardstock 2 1/2″ X 2 1/2″ (stitched square), 2″ X 2″ (dragonfly), 1/2″ X 2 1/2″ (sentiment), 4″ X 5 1/4′ (inner liner)
  • Artistry Blooms Designer Series Paper 4″ X 5 1/4″ (card front)
  • In Good Taste Designer Series Paper 3 3/4″ X 4″ (card front panel), 2 1/4″ X 6″ (piece for envelope flap)

*********************************************************************************************************

Product List

Stampin’ Up! Hand-Drawn Blooms Birthday

Good Saturday morning my stamping friends.  Hope your weekend is starting out good.  I have the day off, but have to go in tomorrow.  We had a great time yesterday at Crystal Cave.  My nephews loved it, especially the older one.  He loves collecting rocks and looking at that kind of stuff.  After the cave tour we went on a little hike, it was a little sticky out but it was still early enough that it hadn’t gotten too hot yet.  There were 8 of us that went and it was such a fun day.  I love spending time with my older nephew, niece and her boys along with my daughter and husband.

For today I used another new stamp from the 2020-2021 Annual Catalog.  One of my customers/friend let me borrow it since I wasn’t sure if I wanted to purchase it yet.  It comes in a bundle, but I only used the stamp for today.  I don’t know about you, but I have the sets that I know I have to have immediately and then the ones that I’m not positive about.  Here’s my card for today.

My design is from Global Design Project #250.  Here is their sketch.

I started by adhering a panel of Artistry Blooms Designer Series Paper to a Night of Navy mat using Stampin’ Seal.  I adhered the matted panel to a Bermuda Bay card base using Multipurpose Liquid Glue.

On a panel of Crumb Cake cardstock I stamped the large floral and the stem images from the Stampin’ Up! Hand-Drawn Blooms Cling Stamp Set in Versamark Ink.   I immediately sprinkled it with my White Stampin’ Emboss Powder and set it using my Heat Tool.  I colored only a couple of the flowers in using my Coastal Cabana Stampin’ Write Marker.  I adhered the artwork to a Night of Navy mat using Stampin’ Seal.

I adhered the matted artwork to the card front using Stampin’ Dimensionals.  I tied a small bow using the 1/4″ Coastal Cabana Ribbon from the Playing With Patterns Ribbon Combo Pack and adhered it to the artwork using glue Dots.  On a strip of Whisper White cardstock I stamped the sentiment from the Stampin’ Up! Many Mates Cling Stamp Set in Night of Navy Ink.  I cut the strip into a banner using my Paper Snips and edged the strip using my Night of Navy Stampin’ Write Marker.  I adhered the sentiment to the card front using Stampin’ Dimensionals and Glue Dots.  I added a few Coastal Cabana Artistry Blooms Adhesive-Backed Sequins to the artwork.

On the inside I stamped the sentiment and one of the small flower images from the Hand-Drawn Blooms stamp set in Night of Navy Ink in the center of a Whisper White panel.  I colored the flowers in using my Bermuda Bay Stampin’ Blends Markers.  I adhered the Whisper White panel to a Night of Navy mat using Stampin’ Seal and then to the inside of the Bermuda Bay card base using Multipurpose Liquid Glue.

To finish my card I decorated a Medium Whisper White Envelope.  I stamped the large floral image from the Hand-Drawn Blooms stamp set in Night of Navy Ink partially on both sides of the envelope front.  I colored only a couple of the flowers in using my Coastal Cabana Stampin’ Write Marker.  I adhered a panel of the Artistry Blooms DSP to the envelope flap.

Thank you for stopping by my blog today.  I hope you liked my card and will give it a try. Happy Stamping!!

****************************************************************************************************

If you need any stamping supplies, I’d love to be your Demonstrator. Just click HERE to go directly to my online store or drop me an email if you have any questions. 

MY CURRENT HOST CODE IS: FXTA29WD

Use this host code when you order $50 or greater and receive a free gift from me! If your order is over $150, please do not use this code, but you’ll still get the free gift. The free gift is your choice of any 1 item valued up to $10.00 in the 2020-2021 Annual Catalog!   For any orders $50 or more I will also send you my monthly class tutorials.  Click HERE or go to my Customer Rewards for more details and to see what this months tutorials are.

 Click HERE to shop the clearance rack.

Happy Stamping, Karen!

****************************************************************************************************

LAST WEEK FOR BONUS DAYS!! DON’T MISS OUT!!

Bonus Days from Stampin’ Up! are back!!  For every $50 merchandise that you purchase between July 1 and August 3, you’ll earn a $5 coupon that can be redeemed between August 4 and 31!  

Here are the details:

  • An email address is required to participate; Bonus Days coupon codes can be delivered only via email.
  • If you earn multiple codes from a single order, you will receive one email with multiple codes.  If you earn multiple codes from multiple orders, they will receive separate emails for each code earned.
  • All order types qualify for this promotion.  Fax and email orders still require an email address.
  • Orders that are started before the promotion begins will not go toward earning coupon codes.
  • There is no limit to the number of coupon codes you can earn per order or throughout the duration of the Bonus Days earning period!!
  • Deadline for coupon earning:  August 3, 2020 at 11:50 PM (MT)

Click hereto head over to my online store to start earning those coupons now!  Don’t forget to use my current Host Code so that you will get your free gift from me, any 1 item in the catalog valued up to $10 with a qualifying order.  Detail about the free gift are here.  Let me know if you have any questions.

Get your shopping lists ready and start earning those coupons!

****************************************************************************************************

WORLD’S GREATEST BY PAPER PUMPKIN

SUBSCRIBE JULY11 – AUGUST 10

With Paper Pumpkin, you are provided with everything you need to explore your creativity and discover new ways to craft. As we navigate a “new normal” in today’s world, there’s plenty of opportunity to papercraft! And, more importantly, there’s no better time than now to create something that’ll show the essential people in your life just how awesome you think they are.

Lately, it’s become especially clear who the everyday heroes are—they’ve always surrounded us! Teachers, doctors, hairdressers, nurses, delivery workers, cashiers, and even our friends, kids, and family members go above and beyond to enrich our lives. These people are truly the world’s greatest at what they do!

Celebrate and appreciate the everyday heroes in your life with the August Paper Pumpkin Kit. The cards included in this kit are specifically designed for celebrating life’s champions!

  • The intended use of this kit is to celebrate and appreciate life’s champions and everyday heroes.
  • Especially during this time, this is something anyone can do to make a difference. The August kit makes it easy!
  • Distinktive stamps are photo-realistic stamps that create an impressive detailed image with a single stamp.
  • The Distinktive stamps included in August’s kit are an especially excellent feature for new stampers still exploring their creativity!
  • Masculine card designs can be difficult to find, this kit has a real masculine feel.
  • While the elements of the August kit can be used to show appreciation for anyone, the masculine card designs are perfect for the men in your life!

About the August Kit:

  • Kit contains enough supplies to create nine cards and coordinating envelopes.
  • Card size: 4-1/4” x 5-1/2” (10.8 x 14 cm)
  • Envelope size: 4-1/2” x 5-3/4” (11.4 x 14.6 cm)
  • Coordinating Colors: Bumblebee, gold, Mint Macaron, Pacific Point, Soft Suede, white
  • The kit’s stamp set includes Distinktive stamps
  • Subscribe to the August 2020 Paper Pumpkin Kit from 11 July to 10 August at paperpumpkin.com!

Note: Supplies may be limited toward the end of the subscription period.

****************************************************************************************************

I’m cleaning my shelves and drawers out to make room for lots of new goodie.  I have my list right HERE and I’m trying to keep it up to date.   Check it out and let me know if there is anything you’d like to get.  If you are looking for something and don’t see it on the list, drop me a line and I will look through my stash to see if I missed it.  I have lots of older DSP too that I don’t have listed if there is any that you are looking for.

****************************************************************************************************

Card stock cuts for this project:

  • Bermuda Bay Cardstock 4 1/4″ X 11″ (card base scored and folded at 5 1/2″)
  • Crumb Cake Cardstock 3 1/4″ X 4 1/2″ (artwork)
  • Night of Navy Cardstock 3 3/4′ X 5″ (dsp mat for card front), 3 3/8″ X 4 5/8″ (artwork mat), 4 1/8″ X 5 3/8″ (inner liner mat)
  • Whisper White Cardstock 2″ X 3/8″ (sentiment strip), 4″ X 5 1/4″ (inner liner)
  • Artistry Blooms Designer Series Paper 3 5/8″ X 4 7/8″ (card front), 2 1/4″ X 6″ (piece for envelope flap)

****************************************************************************************************

Product List

Stampin’ Up! Timeless Tropical Hello for Fun Fold Friday

Good Friday morning my stamping friends and welcome to my Fun Fold Friday.  How was everyone’s week?  Does anyone have plans for the weekend?  I had a nice surprise yesterday at work.  I was saying good bye and said that I’d see everyone Saturday, turns out I have off, YAY!!!  I do have to work Sunday though.  I’m on the road early this morning, we left the house at 7am to take my little nephews to Crystal Cave in Kutztown, PA.  I’m very excited about bringing them.  I’ve heard that it’s only around 56 degrees in the cave, so I’m dressing for outside but bringing a sweatshirt for inside.  I can’t wait to see all the crystals inside the cave.

For today I have an easy Fun Fold for you and my card was inspired by some flowers in my garden again. After everything that happen with my dog the other day, I woke up to these beauties.

Here is my card for today.

I started by scoring and folding a Night of Navy card base at 2 1/4″, 3 5/8″, 7 3/8″ & 8 3/4″.  Your card base will look like photo below.

I adhered 2 panels of the Artistry Blooms Designer Series Paper to Whisper White mats using Stampin’ Seal.  I adhered the matted DSP to the side panels of the Night of Navy card base using Multipurpose Liquid Glue.  On a panel of Whisper White cardstock I stamped the hibiscus image from the Stampin’ Up! Timeless Tropical Cling Stamp Set in Melon Mambo Ink twice and cut the images out using my In The Tropics Dies.  On a panel of Just Jade cardstock I stamped the leaf image from the Timeless Tropics stamp set in Shaded Spruce Ink 6 times and cut the images out using my In The Tropics Dies.

I stamped the sentiment from the Stampin’ Up! Itty Bitty Birthdays Cling Stamp Set in Night of Navy Ink on a panel of Melon Mambo cardstock.  I adhered the Melon Mambo cardstock to a Whisper White mat using Stampin’ Seal.  I adhered the die cut hibiscus using Stampin’ Dimensionals to the card front.  I adhered the die cut leaves under the hibiscus images using Glue Dots.  I adhered the card front to the Night of Navy card base using Multipurpose Liquid Glue.  I added a few Night of Navy Holiday Rhinestone Basic Jewels to the card front.

On the back (inside) of the card I stamped the sentiment from the Timeless Tropical stamp set in Night of Navy Ink in the center of a Whisper White panel.  I stamped the hibiscus image from the Timeless Tropical stamp set in Melon Mambo Ink on the 2 corners of the panel.  I stamped the leaf image from the Timeless Tropical stamp set around the hibiscus.  I adhered the Whisper White panel to a Melon Mambo mat using Stampin’ Seal and then to the back of the Night of Navy card base using Multipurpose Liquid Glue.  I adhered 2 panels of the Artistry Blooms DSP to Whisper White mats using Stampin’ Seal and then to the 2 side panels of the Night of Navy card base using Multipurpose Liquid Glue.  I added a couple Night of Navy Holiday Rhinestone Basic Jewels to the sentiment panel.

To finish my card I decorated a Medium Whisper White Envelope.  I stamped the Hibiscus image from the Timeless Tropical stamp set in Melon Mambo Ink on the front of the envelope.  I stamped the leaf image from the Timeless Tropical stamp set in Shaded Spruce Ink around the hibiscus.  I adhered a panel of Artistry Blooms DSP to the envelope flap.

Thank you for stopping by my blog today.  I hope you liked my card and will give it a try. Happy Stamping!!

****************************************************************************************************

If you need any stamping supplies, I’d love to be your Demonstrator. Just click HERE to go directly to my online store or drop me an email if you have any questions. 

MY CURRENT HOST CODE IS: FXTA29WD

Use this host code when you order $50 or greater and receive a free gift from me! If your order is over $150, please do not use this code, but you’ll still get the free gift. The free gift is your choice of any 1 item valued up to $10.00 in the 2020-2021 Annual Catalog!   For any orders $50 or more I will also send you my monthly class tutorials.  Click HERE or go to my Customer Rewards for more details and to see what this months tutorials are.

 Click HERE to shop the clearance rack.

Happy Stamping, Karen!

****************************************************************************************************

LAST WEEK FOR BONUS DAYS!! DON’T MISS OUT!!

Bonus Days from Stampin’ Up! are back!!  For every $50 merchandise that you purchase between July 1 and August 3, you’ll earn a $5 coupon that can be redeemed between August 4 and 31!  

Here are the details:

  • An email address is required to participate; Bonus Days coupon codes can be delivered only via email.
  • If you earn multiple codes from a single order, you will receive one email with multiple codes.  If you earn multiple codes from multiple orders, they will receive separate emails for each code earned.
  • All order types qualify for this promotion.  Fax and email orders still require an email address.
  • Orders that are started before the promotion begins will not go toward earning coupon codes.
  • There is no limit to the number of coupon codes you can earn per order or throughout the duration of the Bonus Days earning period!!
  • Deadline for coupon earning:  August 3, 2020 at 11:50 PM (MT)

Click hereto head over to my online store to start earning those coupons now!  Don’t forget to use my current Host Code so that you will get your free gift from me, any 1 item in the catalog valued up to $10 with a qualifying order.  Detail about the free gift are here.  Let me know if you have any questions.

Get your shopping lists ready and start earning those coupons!

****************************************************************************************************

WORLD’S GREATEST BY PAPER PUMPKIN

SUBSCRIBE JULY11 – AUGUST 10

With Paper Pumpkin, you are provided with everything you need to explore your creativity and discover new ways to craft. As we navigate a “new normal” in today’s world, there’s plenty of opportunity to papercraft! And, more importantly, there’s no better time than now to create something that’ll show the essential people in your life just how awesome you think they are.

Lately, it’s become especially clear who the everyday heroes are—they’ve always surrounded us! Teachers, doctors, hairdressers, nurses, delivery workers, cashiers, and even our friends, kids, and family members go above and beyond to enrich our lives. These people are truly the world’s greatest at what they do!

Celebrate and appreciate the everyday heroes in your life with the August Paper Pumpkin Kit. The cards included in this kit are specifically designed for celebrating life’s champions!

  • The intended use of this kit is to celebrate and appreciate life’s champions and everyday heroes.
  • Especially during this time, this is something anyone can do to make a difference. The August kit makes it easy!
  • Distinktive stamps are photo-realistic stamps that create an impressive detailed image with a single stamp.
  • The Distinktive stamps included in August’s kit are an especially excellent feature for new stampers still exploring their creativity!
  • Masculine card designs can be difficult to find, this kit has a real masculine feel.
  • While the elements of the August kit can be used to show appreciation for anyone, the masculine card designs are perfect for the men in your life!

About the August Kit:

  • Kit contains enough supplies to create nine cards and coordinating envelopes.
  • Card size: 4-1/4” x 5-1/2” (10.8 x 14 cm)
  • Envelope size: 4-1/2” x 5-3/4” (11.4 x 14.6 cm)
  • Coordinating Colors: Bumblebee, gold, Mint Macaron, Pacific Point, Soft Suede, white
  • The kit’s stamp set includes Distinktive stamps
  • Subscribe to the August 2020 Paper Pumpkin Kit from 11 July to 10 August at paperpumpkin.com!

Note: Supplies may be limited toward the end of the subscription period.

****************************************************************************************************

I’m cleaning my shelves and drawers out to make room for lots of new goodie.  I have my list right HERE and I’m trying to keep it up to date.   Check it out and let me know if there is anything you’d like to get.  If you are looking for something and don’t see it on the list, drop me a line and I will look through my stash to see if I missed it.  I have lots of older DSP too that I don’t have listed if there is any that you are looking for.

****************************************************************************************************

Card stock cuts for this project:

  • Just Jade Cardstock 2 1/2″ X 6″ (die cut leaves)
  • Melon Mambo Cardstock 4″ X 3 1/2″ (card front), 4 1/8″ X 3 5/8″ (inner liner mat)
  • Night of Navy Cardstock 4 1/4″ X 11″ (card base scored and folded at 2 1/4″, 3 5/8″, 7 3/8″ & 8 3/4″)
  • Whisper White Cardstock 4 – 2 1/8″ X 4 1/8″ (side panel dsp mats), 4 1/8″ X 3 1/2″ (card front mat), 3 1/2″ X 4″ (inner liner), 4″ X 5 1/2″ (flowers)
  • Artistry Blooms Designer Series Paper 4 – 2″ X 4″ (side panels), 2 1/4″ X 6″ (piece for envelope flap)

****************************************************************************************************

Product List

Stampin’ Up! Cute Fruit for Happy Inkin’ Thursday Blog Hop

Good Thursday morning my stamping friends and welcome to our Happy Inkin’ Thursday Blog Hop.  How is everyone doing today?  If you are hopping over from Akiko, thank you for stopping by my blog. This week we had a Sketch Challenge. Be sure to take a moment to hop around to see everyone’s beautiful projects .
Here is the sketch we had to work from.

Here’s my card using this sketch.

I started by adhering a panel of Artistry Bloom Designer Series Paper to a Whisper White card base using Stampin’ Seal.

I adhered 3 panels of Basic Black cardstock to a Granny Apple Green panel using Multipurpose Liquid Glue.  I embossed the panel using my Tasteful Textile 3D Embossing Folder.  On a panel of Whisper White cardstock I stamped the banana and pineapple bottom images from the Stampin’ Up! Cute Fruit Photopolymer Stamp Set in Daffodil Delight Ink.  I stamped the pineapple top and the watermelon rind images from the Cute Fruit stamp set in Granny Apple Green Ink.  I stamped the watermelon image from the Cute Fruit stamp set inside the rind image in Melon Mambo Ink.  I stamped all the face images from the Cute Fruit stamp set on the fruit in Tuxedo Black Memento Ink.  I fussy cut all the fruit using my Paper Snips.

I adhered all the cut fruit image to the Basic Black panels using Stampin’ Dimensionals.  I adhered the artwork panel to the card front using Stampin’ Dimensionals.  On a thin strip of Whisper White cardstock I stamped the sentiment from the Cute Fruit stamp set in Tuxedo Black Memento Ink.  I adhered the sentiment across the fruit images using Stampin’ Dimensionals and Glue Dots.  I added a few Rhinestone Basic Jewels to the card front.

On the inside I stamped the sentiment from the Cute Fruit stamp set in Tuxedo Black Memento Ink in the center of a Whisper White panel.  I stamped the watermelon rind image from the Cute Fruit stamp set in Granny Apple Green Ink on the panel.  I stamped the watermelon image from the Cute Fruit stamp set inside the rind in Melon Mambo Ink.  I adhered the Whisper White panel to a Granny Apple Green mat using Stampin’ Seal and then to the inside of the Whisper White card base using Multipurpose Liquid Glue.

To finish my card I decorated a Medium Whisper White Envelope.  I stamped the pineapple bottom and banana images from the Cute Fruit stamp set in Daffodil Delight Ink on the envelope front.  I stamped the pineapple top image from the Cute Fruit stamp set in Granny Apple Green Ink.  I stamped the face images from the Cute Fruit stamp set in Tuxedo Black Memento Ink on the fruit.  I adhered a panel of the Artistry Blooms DSP to the envelope flap.

Thank you for visiting my blog today. I hope you liked my card and will give it a try. Now that you’ve seen my card, take a minute to hop through all our projects today. If you click on the Next Blog button, you’ll go to Amy’s page. Or you can just click on the names below to go directly to all the blogs! Happy Hopping!!

Karen Ksenzakovic: You Are Here

****************************************************************************************************

If you need any stamping supplies, I’d love to be your Demonstrator. Just click HERE to go directly to my online store or drop me an email if you have any questions. 

MY CURRENT HOST CODE IS: RBBKEF3W

Use this host code when you order $50 or greater and receive a free gift from me! If your order is over $150, please do not use this code, but you’ll still get the free gift. The free gift is your choice of any item valued up to $10.00 in either the 2019-2020 Annual Catalog or the 2020 January-June Mini Catalog!   For any orders $50 or more I will also send you my monthly class tutorials.  Click HERE or go to my Customer Rewards for more details and to see what this months tutorials are.

 Click HERE to shop the clearance rack.

Happy Stamping, Karen!

****************************************************************************************************

SUMMER NIGHTS BY PAPER PUMPKIN

SUBSCRIBE JUNE 11 – JULY 10

Celebrate the magic of summer nights with the Summer Nights Paper Pumpkin Kit! In this exclusive fun-filled kit, you’ll unbox enough supplies to create nine postcard-style cards, coordinating envelopes, and die-cut tealight bags. What’s even more spectacular about July’s kit is the add-on you can purchase along with it! The Summer Nights Add-On includes 24 card bases and envelopes in coordinating Summer Nights designs. This add-on is perfect for helping you expand the Summer Nights creative experience beyond the Paper Pumpkin kit. Between the add-on and the leftover supplies from your Summer Nights kit, you will be crafting a summer night worth celebrating all month long!

Don’t miss out on the fireworks, fireflies, and fun! You can subscribe to the Summer Nights Paper Pumpkin Kit between June 11 and July10, and order the Summer Nights Add-On starting 1 July; while supplies last.

Kit contains enough supplies to create nine postcards and coordinating envelopes, as well as nine die-cut tealight bags.

  • Card size: 4” x 5-1/4” (10.2 x 13.3 cm)
  • Envelope size: 4-1/2” x 5-3/4” (11.4 x 14.6 cm)

Coordinating Colors: Blackberry Bliss, Calypso Coral, Costal Cabana, Night of Navy

The Paper Pumpkin kit does not require the add-on to create completed projects.

Summer Nights Add-On

Contains 24 preprinted card bases and coordinating envelopes.

  • Card size: 4-1/4″ x 5-1/2″ (10.8 x 14 cm)
  • Envelope size: 4-1/2″ x 5-3/4″ (11.4 x 14.6 cm)

The Summer Nights Add-On is not required to complete the Paper Pumpkin kit projects.

The Summer Nights Add-On is $10.00 USD/$13.00 CAD and is only available to Paper Pumpkin subscribers. The add-on is available while supplies last, beginning July 1st!

Note: During demonstrator product testing, we learned that the Summer Nights Add-On could make at least 20 additional cards when combined with the leftover pieces from the Summer Nights kit.

Subscribe to the July 2020 Paper Pumpkin Kit from June 11 to July 10 at paperpumpkin.com!

Note: Supplies may be limited toward the end of the subscription period.

****************************************************************************************************

STAMPIN’ UP! PICK A FREE BUNDLE STARTER KIT PROMOTION

Wow!!!  Stampin’ Up! is offering an AWESOME promotion if you join during the month of June!!  You get to pick a FREE bundle of your choice with your Starter Kit Purchase!!

Here are the details:

  • Joining promotion dates:  June 3–30, 2020
  • New demonstrators who submit their Independent Demonstrator Agreement (IDA) before June 3 or after June 30 will not be eligible for this promotion.
  • When you purchase your Starter Kit for $99, you get to select $125 worth of products of your choice for your Starter Kit PLUS you get to select ONE stamp and punch bundle (p. 168–169) or ONE stamp and die bundle (p. 173-179) from the new 2020–2021 Annual Catalog—in addition to your regular Starter Kit for FREE.  And your Starter Kit always ships for free…double bonus!!

Once you join, you’ll get at least a 20% discount on all products that you purchase plus you get to preorder from the upcoming catalogs a month before they go live for customer ordering!!  There is no requirement to sell and there is no commitment beyond your Starter Kit purchase.  Why not give it a try?  🙂

You can see more details about joining and about our team here on my blog here.  You can also see more information about the benefits of becoming a Stampin’ Up! Demonstrator here.

That is such a great deal!!  If you’ve been considering joining, June will be a great time to jump in!  Drop me an email at creativestampingdesigns@gmail.com

****************************************************************************************************

STAMPIN’ UP! ANNUAL KICK OFF CELEBRATION

EXTRA HOST REWARDS FOR YOU!!

The brand new 2020–2021 Stampin’ Up! Annual Catalog is going live on June 3 2020, and Stampin’ Up! is having a celebration!

Anyone who places an order of $250+ or holds a party with $250+ in sales during the month of June will receive $25 in extra Stampin’ Rewards!!  So that means that you’ll earn $50 in Stampin’ Rewards with any order or party of $250+ that is submitted between June 3 and June 30! Yay!!!!

Here are the details:

  • Customer, workshop and online order types all qualify for this promotion.
  • Starter Kit orders do not qualify for this promotion.  But you CAN use your host cash toward the purchase of your Starter Kit, ask me for details!
  • Paper Pumpkin prepaid subscriptions count toward a qualifying purchase. Month-to-month subscriptions do not qualify for this promotion.
  • The qualifying amount must be reached with merchandise prior to shipping and tax.
  • The $25 additional Stampin’ Rewards for this promotion will only be awarded once per order/party.
  • Order Deadline:  June 30, 2020; 11:50 PM (MT)

Drop me a note if you’d like to set up a catalog party!  I can set up a host code for you and you can have your stamping friends place orders with your host code.  If your party reaches $250 in sales, you’ll get that extra $25 in host cash when we close out your party!   If you’re interested, ask me for details!

Let me know if you have any questions.  Have fun making your shopping list!

****************************************************************************************************

Card stock cuts for this project:

  • Basic Black Cardstock 3 – 1 1/2′ X 2 3/4″ (card front panels)
  • Granny Apple Green Cardstock 3 1/4″ X 5 1/2″ (card front panel), 4 1/8″ X 5 3/8″ (inner liner mat)
  • Whisper White Cardstock 8 1/2″ X 5 1/2″ (card base scored and folded at 4 1/4″), 1/2″ x 3 14″ (sentiment strip), 3 1/2″ X 4″ (artwork), 4″ X 5 1/4″ (inner liner)
  • Artistry Blooms Designer Series Paper 4 1/4″ X 5 1/2″ (card front), 2 1/4′ X 6″ (piece for envelope flap)

****************************************************************************************************

Product List