Stampin’ Up! Best Dressed Peaceful Moments

Good Monday morning my stamping friends.  How was everyone’s weekend?  Did anyone do anything fun?  We had a little bit of snow here, but by Sunday afternoon it was gone.  Every winter I ask for one big snow storm, not these little ones that the snow disappears in a day.  I like to get one storm with about 1-2 feet of snow, enough that I just have to stay in for a day and craft.  Last year we never got one, just extremely cold.

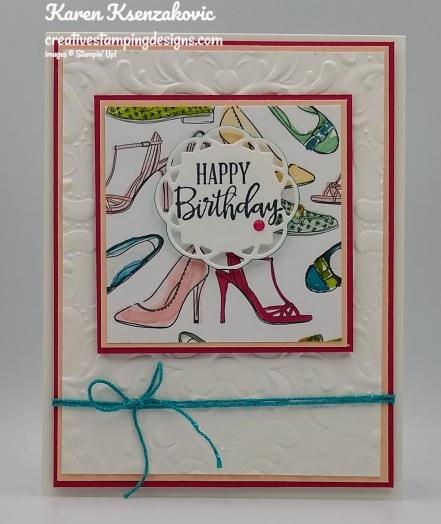
For today’s card I used some of the new Designer Series Paper from the 2020 January-June Mini Catalog and an embellishment from the Sale-A-Bration Catalog.  Here’s my card.
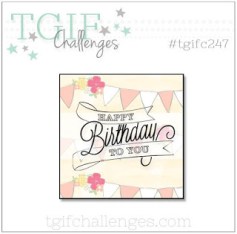
I joined in with TGIF Challenge #247.  Here is their theme.
I started by adhering a panel of the Best Dressed 6X6 Designer Series Paper to a Petal Pink mat using Snail.  I then adhered it to a Lovely Lipstick mat using Snail.
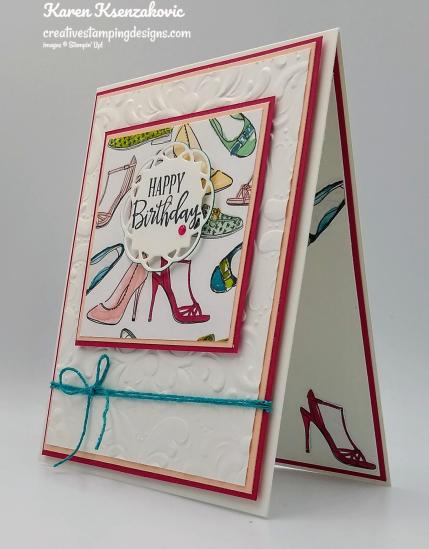
I embossed a panel of Whisper White cardstock using the Parisian Flourish 3D Embossing Folder.  I adhered the embossed panel to a Petal Pink mat using Multipurpose Liquid Glue.  I then adhered it to a Lovely Lipstick mat using Snail.  I wrapped a piece of Bermuda Bay Bakers Twine from the Sale-A-Bration Metallic Baker’s Twine & Sequins Combo Pack around the matted card front twice and tied a bow.  I adhered the card front to a Whisper White card base using Stampin’ Dimensionals.
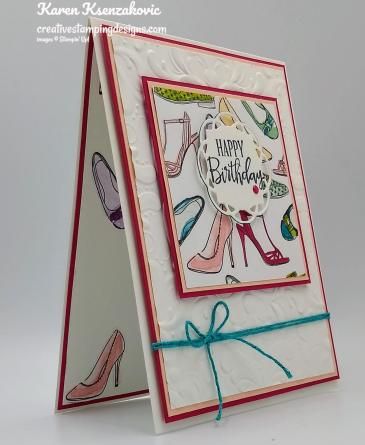
On a small panel of Whisper White cardstock I stamped the sentiment from the Stampin’ Up! Peaceful Moments Cling Stamp Set in Tuxedo Black Memento Ink.  I cut the sentiment out using the Painted Labels Dies.  I edged the die cut sentiment using my Bermuda Bay Stampin’ Write Marker.  I adhered the sentiment to the artwork using Mini Stampin’ Dimensionals.  I adhered the artwork to the card front using Stampin’ Dimensionals and added a Lovely Lipstick Happiness Blooms Enamel Dot to the sentiment.
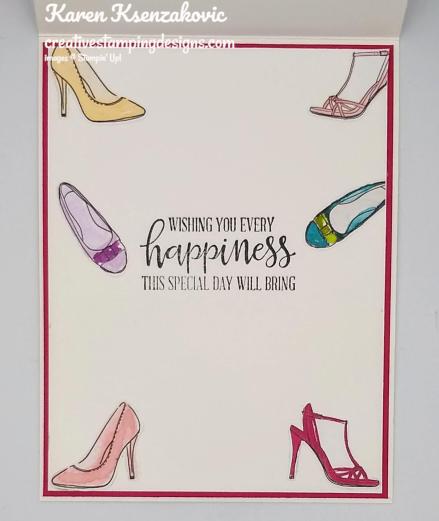
On the inside I stamped the sentiment from the Peaceful Moments stamp set in Tuxedo Black Memento Ink in the center of a Whisper White panel.  I fussy cut some of the shoes from the Best Dressed 6 X 6 DSP and adhered them to the panel using Multipurpose Liquid Glue.  I adhered the Whisper White panel to a Lovely Lipstick mat using Snail and then to the inside of the Whisper White card base using Multipurpose Liquid Glue.
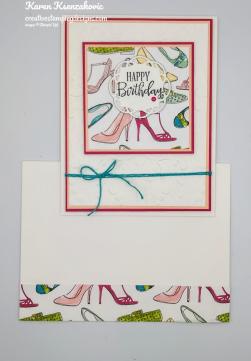
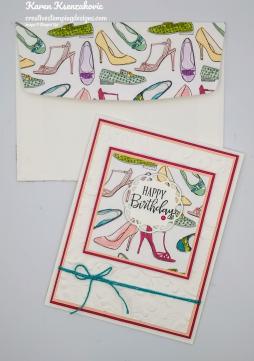
To finish my card I decorated a Medium Whisper White Envelope.  I adhered a strip of the Best Dressed 6 X 6 DSP to the bottom of the envelope front and a panel to the envelope flap.

Thank you for stopping by my blog today.  I hope you liked my card and will give it a try. Happy Stamping!!

****************************************************************************************************

1 WEEK ORDERING BONUS SPECIAL FROM THE

2020 JANUARY TO JUNE MINI CATALOG, FROM ME!!
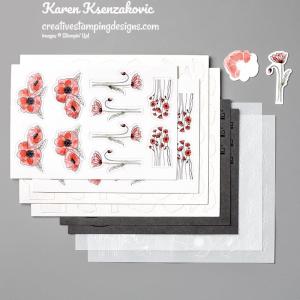
I will send you FREE the Peaceful Poppies Elements with the purchase of the Stampin’ Up! Painted Poppies Cling Stamp Set or Painted Poppies Bundle.  This is only available from me starting today, Friday January 17, 2020 through Friday January 24, 2020.  This is in addition to my other rewards you can find here.  If you purchase the Painted Poppies Bundle you not only receive the free gifts from me, you also get 10% off the bundle and qualify for a Sale-A-Bration item.   You might not want to pass this offer up!!

****************************************************************************************************

If you need any stamping supplies, I’d love to be your Demonstrator. Just click HERE to go directly to my online store or drop me an email if you have any questions. 

MY CURRENT HOST CODE IS: U7DEP9F9

Use this host code when you order $50 or greater and receive a free gift from me! If your order is over $150, please do not use this code, but you’ll still get the free gift. The free gift is your choice of any item valued up to $10.00 in either the 2019-2020 Annual Catalog or the 2020 January-June Mini Catalog!   For any orders $50 or more I will also send you my monthly class tutorials.  Click HERE or go to my Customer Rewards for more details and to see what this months tutorials are.

Click HERE to shop the clearance rack.

Happy Stamping, Karen!

****************************************************************************************************

CELEBRATE A LOVELY DAY WITH FEBRUARY’S PAPER PUMPKIN KIT
February’s Paper Pumpkin kit is coming, and love is in the air! The Lovely Day kit is versatile, elegant, and the perfect way to help you celebrate birthdays and other grand occasions.

The Lovely Day Paper Pumpkin kit coordinates perfectly with the Happy Birthday to You Stamp Set (item 152308), which is available as part of Stampin’ Up!’s Sale-A-Bration promotion. You can get it for FREE by reaching the qualifying purchase amount of $50 usd/$60 cad by March 31, 2020.

About the February Kit:

  1. Kit details: Makes nine cards and envelopes
  2. Card size: 4-1/4” x 5-1/2” (10.8 x 14 cm)
  3. Envelope size: 4-1/2” x 5-3/4” (11.4 x 14.6 cm)
  4. Coordinating Stampin’ Up! colors: Petal Pink, Pool Party, Pretty Peacock, Rich Razzleberry, Rococo Rose, and Old Olive

Subscribe for the February kit at paperpumpkin.com from January 11 to February 10, 2020.
Supplies may be limited toward the end of each subscription period.

****************************************************************************************************

Card stock cuts for this project:

  • Lovely Lipstick Cardstock 3″ X 3″ (artwork mat), 4″ X 5 1/4″ (card front mat), 4 1/8″ X 5 3/8″ (inner liner mat)
  • Petal Pink Cardstock 2 7/8″ X 2 7/8″ (artwork mat), 3 7/8″ X 5 1/8″ (card front mat)
  • Whisper White Cardstock 3 3/4″ X 5″ (card front), 4″ X 5 1/4″ (inner liner), 2″ X 2″ (sentiment)
  • Best Dressed 6 X 6 Designer Series Paper 2 3/4″ X 2 3/4″ (artwork), 2 1/4″ X 6″ (envelope flap)

****************************************************************************************************

Product List

Stampin’ Up! Purple Painted Poppies

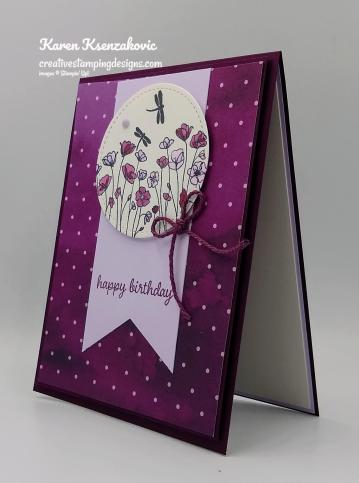
Good Monday morning my stamping friends.  How was everyone’s weekend?  Did anyone do anything fun?  We spent Saturday at Hollywood Studios again and Sunday we went to Animal Kingdom.  Today we are heading to Magic Kingdom once again and will be leaving for home late tonight.  My husband booked an early morning flight coming so that we would get a full day in and a late night flight leaving so we would get another full day in.  I have gone on more rides this past week than I’ve gone on my entire life.  I don’t normally go on rides, but we were all having such a great time, I figured why not.  Like my niece told me “You only live once”.   I’m gong to need a vacation after this.  We will be arriving home early tomorrow morning (2am early) and 3 of the 4 of us have gotten sick.  I know where we’ll be heading tomorrow 😦  I don’t know about you, but the last place I want to be when I’m sick is on a plane.

I have a Clean and Simple card for you today,  Here’s my card.

I started by adhering a panel of the Peaceful Poppies Designer Series Paper to a Blackberry Bliss mat using Snail.  I just love the color variations in this paper.  I adhered the matted DSP to a Blackberry Bliss card base using Stampin’ Dimensionals.

On a panel of Whisper White cardstock I stamped the small poppy image from the Stampin’ Up! Painted Poppies Cling Stamp Set in Tuxedo Black Memento Ink.  I colored the image in using my Blackberry Bliss, Purple Posy and Rich Razzleberry Stampin’ Blends Markers.  I stamped the dragonfly image from the Stampin’ Up! Friend Like You Photopolymer Stamp Set in Tuxedo Black Memento Ink above the poppies.  I cut the image out using the 2nd largest circle from the Stitched Shapes Dies.

I cut a strip of Purple Posy cardstock using the Banner Triple Punch. I stamped the sentiment from the Stampin’ Up! Timeless Tulips Cling Stamp Set in Blackberry Bliss Ink on the bottom of the banner.  I adhered the banner to the card front using Snail.  I adhered the artwork to the top of the banner using Stampin’ Dimensionals.  I added a Purple Posy 2019-2021 In-Color Faceted Dot to the artwork.  I tied a small bow using the Blackberry Bliss Nature’s Twine and adhered it to the card front using a Glue Dot.

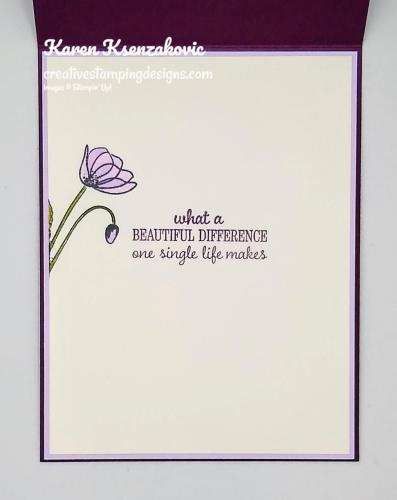
On the inside I stamped the sentiment from the Timeless Tulips stamp set in Blackberry Bliss Ink in the center of a Whisper White panel.  I stamped the stemmed flower image from the Painted Poppies stamp set in Tuxedo Black Memento Ink to the left side of the panel.  I colored the image in using my Old Olive and Purple Posy Stampin’ Blends Markers.  I adhered the Whisper White panel to a Purple Posy mat using Snail and then to the inside of the Blackberry Bliss card base using Multipurpose Liquid Glue.

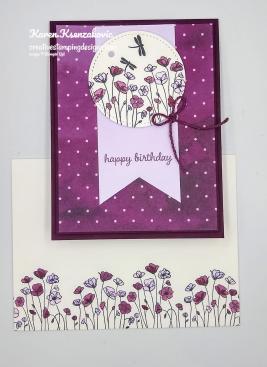
To finish my card I decorated a Medium Whisper White Envelope.  I stamped the small poppy image from the Painted Poppies stamp set in Tuxedo Black Memento Ink 3 times across the bottom of the envelope front.  I colored the image in using my Blackberry Bliss, Purple Posy and Rich Razzleberry Stampin’ Blends Markers.  I adhered a panel of the Peaceful Poppies DSP to the envelope flap.

Thank you for stopping by my blog today.  I hope you liked my card and will give it a try. Happy Stamping!!

****************************************************************************************************

If you need any stamping supplies, I’d love to be your Demonstrator. Just click HERE to go directly to my online store or drop me an email if you have any questions. 

MY CURRENT HOST CODE IS: U7DEP9F9

Use this host code when you order $50 or greater and receive a free gift from me! If your order is over $150, please do not use this code, but you’ll still get the free gift. The free gift is your choice of any item valued up to $10.00 in either the 2019-2020 Annual Catalog or the 2020 January-June Mini Catalog!   For any orders $50 or more I will also send you my monthly class tutorials.  Click HERE or go to my Customer Rewards for more details and to see what this months tutorials are.

Click HERE to shop the clearance rack.

Happy Stamping, Karen!

****************************************************************************************************

Card stock cuts for this project:

  • Blackberry Bliss Cardstock 4 1/4″ X 11″ (card base scored and folded at 5 1/2″), 4″ X 5 1/4″ (card front mat)
  • Purple Posy Cardstock 4 1/8″ X 5 3/8″ (inner liner mat), 2″ X 5″ (card front banner)
  • Whisper White Cardstock 4″ X 5 1/4″ (inner liner), 3″ X 3″ (artwork)
  • Peaceful Poppies Designer Series Paper 3 7/8″ X 5 1/8″ (card front), 2 1/2″ X 6″ (piece for envelope flap)

****************************************************************************************************

Product List

Stampin’ Up Blue Wild Rose for Fun Fold Friday

Good Friday morning my fellow stampers and welcome to my Fun Fold Friday.  How was everyone’s week?  The weekend is upon us, have you made any plans yet?  Today we’re off to Epcot after a quick stop at Hollywood Studios again. The new Star Wars – Rise of the Resistance ride broke right when we got on yesterday (after waiting 9 hours for our que and over an hour on line).  We were rushed on to a ship, flown into space and taken by the Storm Troopers and it broke 😦   They gave us a ticket to go back to Hollywood Studios today and Fast Pass to go back on that ride.  I thought it was going to be a laid back day walking around Epcot, but plans have changed.  I’m sure I’ll be getting another 10 miles+ of walking in again.  My son wants to bring my daughter drinking around the world at Epcot,  guess I’m going to be the designated one to get everyone back to the hotel safely.  My daughter turned 21 last May and does not drink, this should be interesting.  I know we have Mission Space and Test Track on the agenda at Epcot for today.  My husband hasn’t mentioned Soaring yet.  That one got me a little nauseous last time we were here.  We’ll see what happens, just give me the Dramamine.

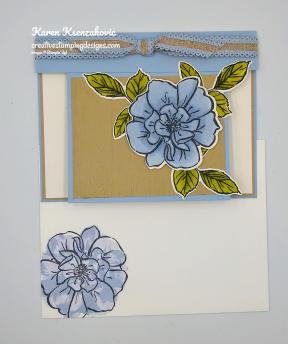
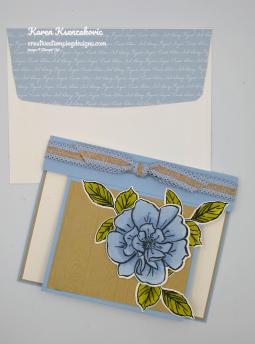
I have another new to me Overlay Fun Fold for you today using the beautiful Stampin’ Up To A Wild Rose Bundle.  I saw this card done by Lisa Curcio and thought I would CASE it. Here’s my card.

I started by scoring and folding a Seaside Spray card base.  The card base is 5 1/4″ X 5 1/2″  You need to score it so that you have a 4 1/4″ X 5 1/2″ card base.  I embossed a panel of Crumb Cake cardstock using the Pinewood Planks 3D Embossing Folder.  I adhered the 4″ X 4″ Seaside Spray panel under the fold of the card base using Multipurpose Liquid Glue, lining up the bottom edges.  I adhered the embossed Crumb Cake panel to the card front using Multipurpose Liquid Glue.

On a 5″ X 4 1/2″ panel of Shimmery White cardstock I stamped the outlined rose image once and the outlined leaf image3 times from the Stampin’ Up! To A Wild Rose Cling Stamp Set in Tuxedo Black Memento Ink.  I colored the rose image in using my Seaside Spray Stampin’ Blends Markers.  I colored the leaf images in using my Old Olive Stampin’ Blends Markers.  I cut the images out using my Wild Rose Dies.

I adhered the rose to the card front using Stampin’ Dimensionals.  I adhered the leaves under the rose using Glue Dots.  I wrapped a piece of Seaside Spray 1/2″ Scalloped Linen Ribbon around the top of the card front and tied a square knot.  I’m not sure if I am going to use this card for Birthday, Mother’s Day, or any other occasion, so I didn’t put a sentiment on the front panel yet.  Once I decide I will stamp and punch a sentiment and adhere it with Stampin’ Dimensionals.

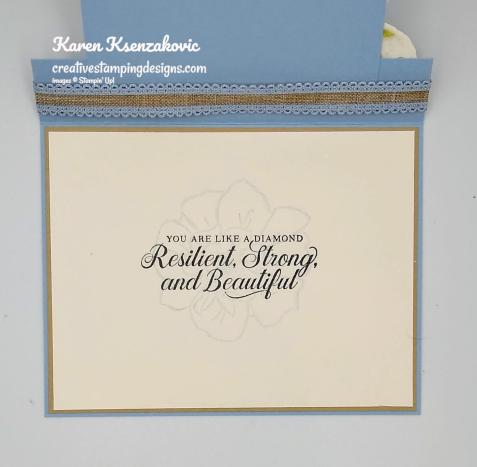
On the inside I stamped the outlined rose image from To A Wild Rose stamp set in Seaside Spray Ink, stamping off once, to the center of a Shimmery White panel.  I stamped the sentiment from the Stampin’ Up! Strong & Beautiful Cling Stamp Set in Tuxedo Black Memento Ink over the rose image.  I adhered the Shimmery White panel to a Crumb Cake mat using Snail and then to the inside of the Seaside Spray card base using Multipurpose Liquid Glue.

To finish my card I decorated a Medium Whisper White Envelope.  I stamped the outlined rose image from the To A Wild Rose stamp set on the envelope front.  I stamped the fill image from To A Wild Rose stamp set over the outlined image in Seaside Spray Ink, stamping off once.  I stamped the detail fill image from To A Wild Rose stamp set in Seaside Spray Ink over the other image.  I adhered a panel of the Seaside Spray 2019-2021 In-Color Designer Series Paper to the envelope flap.

Thank you for stopping by my blog today.  I hope you liked my fun fold card and will give it a try.  I hope you all have a wonderful weekend.  we’ll be spending it at Animal Kingdom and Hollywood Studios again.  Happy Stamping!!

****************************************************************************************************

If you need any stamping supplies, I’d love to be your Demonstrator. Just click HERE to go directly to my online store or drop me an email if you have any questions. 

MY CURRENT HOST CODE IS: U7DEP9F9

Use this host code when you order $50 or greater and receive a free gift from me! If your order is over $150, please do not use this code, but you’ll still get the free gift. The free gift is your choice of any item valued up to $10.00 in either the 2019-2020 Annual Catalog or the 2020 January-June Mini Catalog!   For any orders $50 or more I will also send you my monthly class tutorials.  Click HERE or go to my Customer Rewards for more details and to see what this months tutorials are.

Click HERE to shop the clearance rack.

Happy Stamping, Karen!

****************************************************************************************************

TODAY IS THE LAST DAY TO SUBSCRIBE

I’LL BEE YOURS PAPER PUMPKIN

SUBSCRIBE TO PAPER PUMPKIN DECEMBER 11, 2019 – JANUARY 10, 2020

Paper Pumpkin’s first kit of 2020 is all about L-O-V-E. Whether you want handmade favors for Valentine’s Day, a bridal shower, or a remarkably romantic wedding, this month’s kit has everything you need to help you celebrate your favorite friendships and love stories. So make it a “LOVE”-ly year with Paper Pumpkin.

About the January Kit
Kit details: Makes 20 treat bags + 10 mini cards and envelopes
Card size: 3″ x 3″ (7.5 x 7.5 cm)
Envelope size: 3-1/8″ x 3-1/8″ (7.8 x 7.8 cm)
Bag size: 3-1/4″ x 4″ (8.2 x 10 cm)
Coordinating Stampin’ Up! colors: Crushed Curry, Highland Heather, Mint Macaron, and Rococo Rose

Coordinating Product
It’s “BEE”-yond question: You can get more from the I’ll Bee Yours kit when they buy the Heart Punch Pack (item 151292) from the 2020 January–June Mini Catalog. Both punches coordinate with the heart stamp in the kit so you can craft for love-filled occasions now . . . and later! Think: weddings, showers, birthdays, and more! See additional details about the punch pack below.
Heart Punch Pack (item 151292), $34.00 usd/$46.00 cad

Subscribe for the January kit at paperpumpkin.com from December 11–January 10.
Supplies may be limited toward the end of each subscription period.

****************************************************************************************************

Card stock cuts for this project:

  • Crumb Cake Cardstock 3″ X 3 3/4″ (card front), 4 1/8″ X 5 3/8″ (inner liner mat)
  • Seaside Spray Cardstock 5 1/4″ X 5 1/2″ (card base scored and folded at 4 1/4″), 4″ X 4″ (card front)
  • Shimmery White Cardstock 4″ X 5 1/4″ (inner liner), 5″ X 4 1/2″ (panel for rose and leaves)
  • 2019-2021 In-Color Designer Series Paper 2 1/2″ X 6″ (panel for envelope flap)

****************************************************************************************************

Product List

Stampin’ Up! Honey Bee Hello

Good Wednesday morning from Disney World my fellow stampers.  How is everyone’s week going?  We made it here safely and we’re out and running already.  Yesterday we had a pretty laid back day, only a little over 14,000 steps and 6 1/2 miles walked.  We’re heading over to Magic Kingdom today, so I’m sure there will be more miles covered.  My 24 year old son is so excited to go on the Buzz Light Year Space Ranger Spin (so he can beat all of us), Pirates of the Caribbean and Haunted Mansion.  There’s something about Disney that brings the child back out of you.

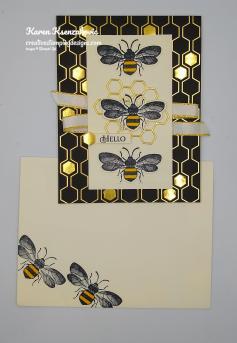
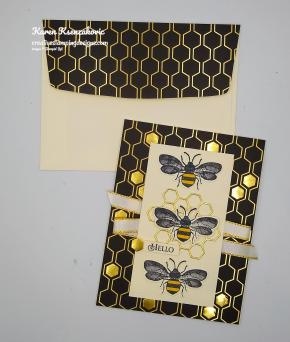
I have an adorable card for you today, at least I think it is.  I used the new Stampin’ Up! Honey Bee Bundle from page 30 of the new 2020 January-June Mini Catalog with the coordinating Designer Series Paper from the Sale-A-Bration Catalog.  I actually CASEd the card from the Sale-A-Bration catalog.  Here’s my card.

I started by adhering a panel of the Golden Honey Specialty Designer Series Paper to a Thick Very Vanilla card base using Snail.  Using the Detailed Bee Dies I cut the honeycomb out of a Gold Foil Sheet.  I adhered some of the honey pieces to the card front using Glue Dots.

On a small strip of Very Vanilla cardstock I stamped 3 large bees from the Stampin’ Up! Honey Bee Cling Stamp Set in Tuxedo Black Memento Ink.  I cut the bees out using the Detailed Bee Dies.  I colored the stripes on the bees in using my Dark Daffodil Delight Stampin’ Blends Marker.  I went over the wings of the bees using my Clear Wink of Stella Glitter Brush.  I adhered the honeycomb to a Very Vanilla panel, which I embossed using the Subtle 3D Embossing Folder, using a tiny amount of Multipurpose Liquid Glue.  I adhered the top and bottom bee to the panel using Glue Dots and the bee on the honeycomb using Stampin’ Dimensionals.  On a very thin strip of Very Vanilla cardstock I stamped the sentiment from the Honey Bee stamp set in Tuxedo Black Memento Ink.  I adhered the sentiment to the very vanilla panel using Mini Stampin’ Dimensionals.  I added one of the honey pieces to the end of the strip using a Glue Dot.

I adhered a piece of 3/8″ Gold Metallic Edge Ribbon to the card front using Snail.  I adhered the artwork to the card front using Stampin’ Dimensionals.

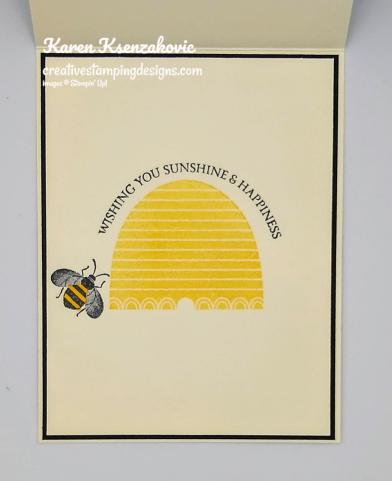
On the inside I stamped the bee hive from the Honey Bee stamp set in So Saffron Ink in the center of a Very Vanilla panel.  I stamped the smaller bee image from the Honey Bee stamp set in Tuxedo Black Memento Ink next to the hive.  I stamped the sentiment from the Honey Bee stamp set above the hive in Tuxedo Black Memento Ink.  I colored the stripes on the bee in using my Dark Daffodil Delight Stampin’ Blends Marker.  I used my Clear Wink of Stella Glitter Brush on the bees wings.  I adhered the Very Vanilla panel to a Basic Black mat using Snail and then to the inside of the Thick Very Vanilla card base using Multipurpose Liquid Glue.

To finish my card I decorated a Medium Very Vanilla Envelope.  I stamped the large bee image from the Honey Bee stamp set twice in Tuxedo Black Memento Ink on the envelope front.  I colored the stripes on the bees in using my Dark Daffodil Delight Stampin’ Blends Marker and the wings on the bee using my Clear Wink of Stella Glitter Brush.  I adhered a panel of Golden Honey Specialty DSP to the envelope flap

Thank you for stopping by my blog today.  I hope you liked my card and will give it a try. Happy Stamping!!

****************************************************************************************************

If you need any stamping supplies, I’d love to be your Demonstrator. Just click HERE to go directly to my online store or drop me an email if you have any questions. 

MY CURRENT HOST CODE IS: U7DEP9F9

Use this host code when you order $50 or greater and receive a free gift from me! If your order is over $150, please do not use this code, but you’ll still get the free gift. The free gift is your choice of any item valued up to $10.00 in either the 2019-2020 Annual Catalog or the 2020 January-June Mini Catalog!   For any orders $50 or more I will also send you my monthly class tutorials.  Click HERE or go to my Customer Rewards for more details and to see what this months tutorials are.

Click HERE to shop the clearance rack.

Happy Stamping, Karen!

****************************************************************************************************

ONLY 2 DAYS LEFT TO SUBSCRIBE

I’LL BEE YOURS PAPER PUMPKIN

SUBSCRIBE TO PAPER PUMPKIN DECEMBER 11, 2019 – JANUARY 10, 2020

Paper Pumpkin’s first kit of 2020 is all about L-O-V-E. Whether you want handmade favors for Valentine’s Day, a bridal shower, or a remarkably romantic wedding, this month’s kit has everything you need to help you celebrate your favorite friendships and love stories. So make it a “LOVE”-ly year with Paper Pumpkin.

About the January Kit
Kit details: Makes 20 treat bags + 10 mini cards and envelopes
Card size: 3″ x 3″ (7.5 x 7.5 cm)
Envelope size: 3-1/8″ x 3-1/8″ (7.8 x 7.8 cm)
Bag size: 3-1/4″ x 4″ (8.2 x 10 cm)
Coordinating Stampin’ Up! colors: Crushed Curry, Highland Heather, Mint Macaron, and Rococo Rose

Coordinating Product
It’s “BEE”-yond question: You can get more from the I’ll Bee Yours kit when they buy the Heart Punch Pack (item 151292) from the 2020 January–June Mini Catalog. Both punches coordinate with the heart stamp in the kit so you can craft for love-filled occasions now . . . and later! Think: weddings, showers, birthdays, and more! See additional details about the punch pack below.
Heart Punch Pack (item 151292), $34.00 usd/$46.00 cad

Subscribe for the January kit at paperpumpkin.com from December 11–January 10.
Supplies may be limited toward the end of each subscription period.

****************************************************************************************************

Card stock cuts for this project:

  • Basic Black Cardstock 4 1/8″ X 5 3/8″ (inner liner mat)
  • Very Vanilla Cardstock 4 1/2″ X 2 1/2″ (artwork), 4″ X 5 1/4″ (inner liner), 4″ X 2 1/4″ (strip for bees), 1/4″ X 1 1/4″ (sentiment strip)
  • Thick Very Vanilla Cardstock 4 1/4″ X 11″ (card base scored and folded at 5 1/2″)
  • Golden Honey Specialty Designer Series Paper 4 1/4″ X 5 1/2″ (card front), 2 1/2″ X 6″ (envelope flap)

****************************************************************************************************

Product List

Stampin’ Up! Timeless Tulips

Good Monday morning my stamping friends.  How was everyone’s weekend?  Have you all recovered from the holidays?  I’m still trying, but it’s hard with not having much down time.  I’ve been running around all weekend in between working to pick things up and pack for vacation.  We are finally going on vacation as a family for the 1st time in 18 years.  We leave tomorrow morning for my favorite place, Disney World.  I feel like such a kid all excited.  I think it will be a lot of fun going with 4 adults.  Last time we were there, my son was 6 and my daughter was 3.  I’m not a big ride person, but my husband has booked me with quite a few fast passes on rides.  We’ll see what happens.

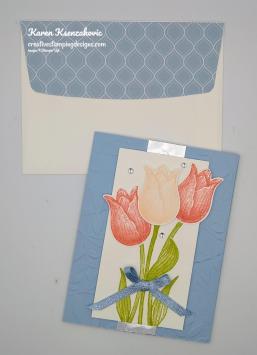
For today’s card I used one of the new sets from the 2020 January-June Mini Catalog from page 43, the Stampin’ Up! Timeless Tulips Bundle.  Here’s my card.

I started by embossing a Seaside Spray card front using the Layered Leaves 3D Embossing Folder.  I adhered the card front to a Seaside Spray card base using Multipurpose Liquid Glue.  I adhered a strip of Silver Foil Sheet down the middle of the card front using Multipurpose Liquid Glue.

On a small panel of Whisper White cardstock I stamped 3 stems from the Stampin’ Up! Timeless Tulips Photopolymer Stamp Set in Pear Pizzazz Ink.  I stamped 2 of the leaf image from the Timeless Tulips stamp set in Pear Pizzazz Ink on the stems.  On a strip of Whisper White cardstock I stamped the large tulip image from the Timeless Tulips stamp set twice in Calypso Coral Ink and once in Petal Pink Ink.  I stamped one of the leaf images from the Timeless Tulips stamp set in Pear Pizzazz Ink on the strip of cardstock also.  I punched the tulips out and the leaf out using the Tulip Builder Punch.

I adhered the punched out tulips to the stems on the Whisper White panel.  I adhered the Calypso Coral tulips using Glue Dots and the Petal Pink tulip using Stampin’ Dimensionals.  I tied a small bow using the 1/4″ Seaside Spray Metallic Ribbon and adhered it to the stems using a Glue Dot.  I added a few Clear Epoxy Droplets to the artwork.  I adhered the artwork to the card front using Stampin’ Dimensionals.

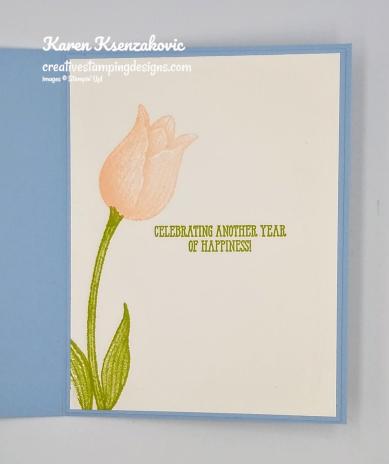
On the inside I stamped the sentiment from the Stampin’ Up! Well Said Cling Stamp Set in Pear Pizzazz Ink in the center of a Whisper White panel.  I stamped the stem image and 2 leaf images from the Timeless Tulips stamp set on the side of the panel in Pear Pizzazz Ink.  I stamped the large tulip image from the Timeless Tulips stamp set in Petal Pink Ink on the stem.  I adhered the Whisper White panel to a Seaside Spray mat using Snail and then to the inside of the Seaside Spray card base using Multipurpose Liquid Glue.

To finish my card I decorated a Medium Whisper White Envelope.  I stamped 3 stems and leaves from the Timeless Tulips stamp set in Pear Pizzazz Ink on the envelope front.  I stamped the smallest tulip image from the Timeless Tulips stamp set on the stems, 2 in Calypso Coral Ink and one in Petal Pink Ink.  I adhered a panel of the 2019-2021 In-Color Designer Series Paper to the envelope flap.

Thank you for stopping by my blog today.  I hope you liked my card and will give it a try. Happy Stamping!!

****************************************************************************************************

If you need any stamping supplies, I’d love to be your Demonstrator. Just click HERE to go directly to my online store or drop me an email if you have any questions. 

MY CURRENT HOST CODE IS: U7DEP9F9

Use this host code when you order $50 or greater and receive a free gift from me! If your order is over $150, please do not use this code, but you’ll still get the free gift. The free gift is your choice of any item valued up to $10.00 in either the 2019-2020 Annual Catalog or the 2020 January-June Mini Catalog!   For any orders $50 or more I will also send you my monthly class tutorials.  Click HERE or go to my Customer Rewards for more details and to see what this months tutorials are.

Click HERE to shop the clearance rack.

Happy Stamping, Karen!

****************************************************************************************************

I’LL BEE YOURS PAPER PUMPKIN

SUBSCRIBE TO PAPER PUMPKIN DECEMBER 11, 2019 – JANUARY 10, 2020

Paper Pumpkin’s first kit of 2020 is all about L-O-V-E. Whether you want handmade favors for Valentine’s Day, a bridal shower, or a remarkably romantic wedding, this month’s kit has everything you need to help you celebrate your favorite friendships and love stories. So make it a “LOVE”-ly year with Paper Pumpkin.

About the January Kit
Kit details: Makes 20 treat bags + 10 mini cards and envelopes
Card size: 3″ x 3″ (7.5 x 7.5 cm)
Envelope size: 3-1/8″ x 3-1/8″ (7.8 x 7.8 cm)
Bag size: 3-1/4″ x 4″ (8.2 x 10 cm)
Coordinating Stampin’ Up! colors: Crushed Curry, Highland Heather, Mint Macaron, and Rococo Rose

Coordinating Product
It’s “BEE”-yond question: You can get more from the I’ll Bee Yours kit when they buy the Heart Punch Pack (item 151292) from the 2020 January–June Mini Catalog. Both punches coordinate with the heart stamp in the kit so you can craft for love-filled occasions now . . . and later! Think: weddings, showers, birthdays, and more! See additional details about the punch pack below.
Heart Punch Pack (item 151292), $34.00 usd/$46.00 cad

Subscribe for the January kit at paperpumpkin.com from December 11–January 10.
Supplies may be limited toward the end of each subscription period.

****************************************************************************************************

Card stock cuts for this project:

  • Seaside Spray Cardstock 8 1/2″ X 5 1/2″ (card base scored and folded at 4 1/4″), 4 1/4′ X 5 1/2″ (card front), 4 1/8″ X 5 3/8″ (inner liner mat)
  • Whisper White Cardstock 2 5/8″ X 4 7/8″ (artwork), 1 1/2″ X 6″ (panel for tulips and leaf to be punched), 4′ X 5 1/4″ (inner liner)
  • Silver Foil Sheet 1 1/8″ X 5 1/2″ (strip on card front)
  • 2019-2021 In-Color Designer Series Paper 2 1/2″ X 6″ (envelope flap panel)

****************************************************************************************************

Product List

Stampin’ Up Tropical Oasis Pocketful of Happiness for Fun Fold Friday

Good Friday morning my stamping friends and welcome to the first Fun Fold Friday of 2020.  Well, today is the day everyone has been waiting for, the New January-June 2020 Mini Catalog is live.  I hope you all have your shopping lists ready, I know I do.  I can’t wait to get my hands on some of the new items.  Don’t forget for every $50 order you get to pick a free item from the Sale-A-Bration Catalog too.  I just love this time of year.  Who doesn’t like FREE!!  Along with the free Sale-A-Bration item you get to pick one free item from me worth up to $10 from any current catalog and you receive one Sand Dollar Reward.

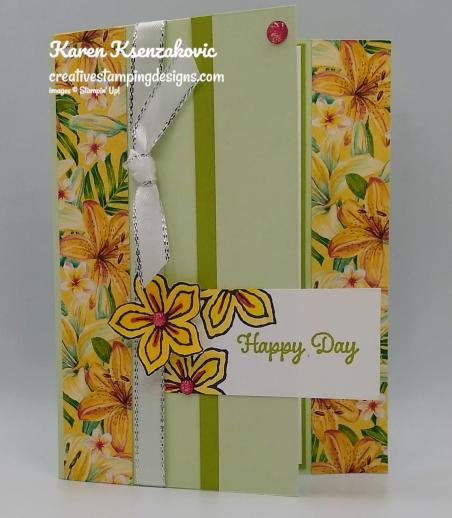
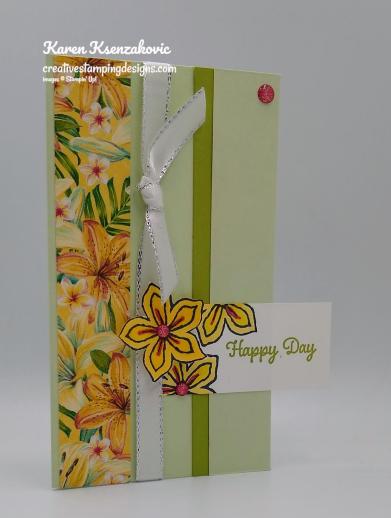
For today I have a really quick fun fold for you.  I used a little new and a little old.  Here’s my card.

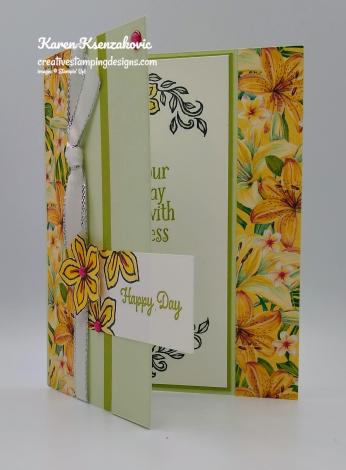
I started by folding my Soft Seafoam card base at 4 1/4″ and I folded the 1″ side back.  I adhered a thin strip of Pear Pizzazz cardstock to the back of the 1″ edge using Snail.  I adhered the 1″ folded piece down using Multipurpose Liquid Glue. I adhered one of the 1″ strips of Tropical Oasis Designer Series Paper just a smidge over from left folded edge of the card front using Snail.  I absolutely love this DSP.  This piece especially reminds me of my Tiger Lily Garden that blooms beautifully in the summer.

I adhered the other 1″ strip of Tropical Oasis DSP to the right edge of the inside of the card base using Snail.

On a small panel of Whisper White cardstock I stamped the sentiment from the Stampin’ Up! Itty Bitty Birthdays Cling Stamp Set in Pear Pizzazz Ink to the right of the panel.  I stamped the flower from the Stampin’ Up! Pocketful of Happiness Cling Stamp Set in Tuxedo Black Memento Ink to the left of the sentiment twice, stamping them both off the paper.  I colored the flowers in using my Lovely Lipstick, Mango Melody and So Saffron Stampin’ Blends Markers.  I adhered the sentiment to the right folded edge using Multipurpose Liquid Glue so that it hung over the edge.  I wrapped a piece of 3/8″ Silver Metallic Edge Ribbon around the card front and tied a knot.  On a scrap piece of Whisper White cardstock I stamped the flower from the Pocketful of Happiness stamp set in Tuxedo Black Memento Ink and colored it in using my Lovely Lipstick, Mango Melody and So Saffron Stampin’ Blends Markers.  I fussy cut the flower using my Paper Snips and adhered it to the left edge of the sentiment using a Stampin’ Dimensional.  I added a few Melon Mambo Glitter Enamel Dots to the flowers and card front.

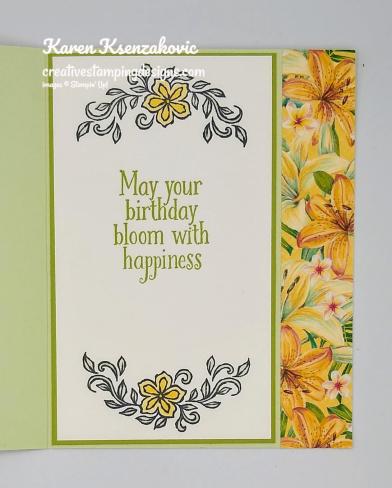
On the inside I stamped the smaller flower image from the Pocketful of Happiness stamp set in Tuxedo Black Memento Ink on the top and bottom of a Whisper White panel.  I colored the images in using my So Saffron and Soft Seafoam Stampin’ Blends Markers.  I stamped the sentiment from the Pocketful of Happiness stamp set in Pear Pizzazz Ink in the center of the Whisper White panel.  I adhered the Whisper White panel to a Pear Pizzazz mat using Snail and then to the inside of the Soft Seafoam card base using Multipurpose Liquid Glue.

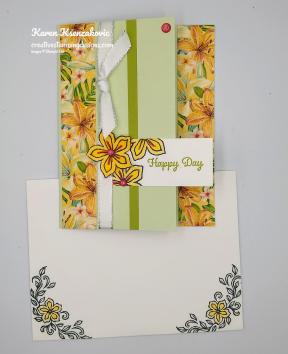
To finish my card I decorated a Medium Whisper White Envelope.  I stamped the small flower image from the Pocketful of Happiness stamp set on the envelope front twice.  I colored the images in using my So Saffron and Soft Seafoam Stampin’ Blends Markers.  I adhered a panel of Tropical Oasis DSP to the envelope flap.

Thank you for stopping by my blog today.  I hope you liked my card and will give it a try. Happy Stamping!!

****************************************************************************************************

If you need any stamping supplies, I’d love to be your Demonstrator. Just click HERE to go directly to my online store or drop me an email if you have any questions. 

MY CURRENT HOST CODE IS: U7DEP9F9

Use this host code when you order $50 or greater and receive a free gift from me! If your order is over $150, please do not use this code, but you’ll still get the free gift. The free gift is your choice of any item valued up to $10.00 in either the 2019-2020 Annual Catalog or the 2020 January-June Mini Catalog!   For any orders $50 or more I will also send you my monthly class tutorials.  Click HERE or go to my Customer Rewards for more details and to see what this months tutorials are.

STAMPIN’ UP! CLEARANCE RACK UPDATE

Stampin’ Up! has updated the Clearance Rack with lot of new goodies!  Yay!!!  Head over there speedy quick to get your hands on some great deals.  But hurry!!  Clearance Rack deals are only while supplies last!

Click HERE to shop the clearance rack.

Happy Stamping, Karen!

****************************************************************************************************

I’LL BEE YOURS PAPER PUMPKIN

SUBSCRIBE TO PAPER PUMPKIN DECEMBER 11, 2019 – JANUARY 10, 2020

Paper Pumpkin’s first kit of 2020 is all about L-O-V-E. Whether you want handmade favors for Valentine’s Day, a bridal shower, or a remarkably romantic wedding, this month’s kit has everything you need to help you celebrate your favorite friendships and love stories. So make it a “LOVE”-ly year with Paper Pumpkin.

About the January Kit
Kit details: Makes 20 treat bags + 10 mini cards and envelopes
Card size: 3″ x 3″ (7.5 x 7.5 cm)
Envelope size: 3-1/8″ x 3-1/8″ (7.8 x 7.8 cm)
Bag size: 3-1/4″ x 4″ (8.2 x 10 cm)
Coordinating Stampin’ Up! colors: Crushed Curry, Highland Heather, Mint Macaron, and Rococo Rose

Coordinating Product
It’s “BEE”-yond question: You can get more from the I’ll Bee Yours kit when they buy the Heart Punch Pack (item 151292) from the 2020 January–June Mini Catalog. Both punches coordinate with the heart stamp in the kit so you can craft for love-filled occasions now . . . and later! Think: weddings, showers, birthdays, and more! See additional details about the punch pack below.
Heart Punch Pack (item 151292), $34.00 usd/$46.00 cad

Subscribe for the January kit at paperpumpkin.com from December 11–January 10.
Supplies may be limited toward the end of each subscription period.

****************************************************************************************************

Card stock cuts for this project:

  • Pear Pizzazz Cardstock 1/2″ X 5 1/2″ (strip on card front), 3 1/8″ X 5 3/8″ (inner liner mat)
  • Soft Seafoam Cardstock 8 1/2″ X 5 1/2″ (card base scored and folded at 1″ & 4 1/4″)
  • Tropical Oasis Designer Series Paper 2 – 1″ X 5 1/2″ (strips on card front and inside), 2 1/2″ X 6″ (envelope flap)

****************************************************************************************************

Product List


Stampin’ Up! The Gang’s All Meer for Happy Inkin’ Thursday Blog Hop

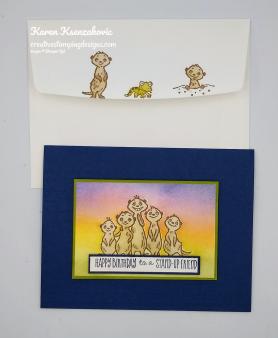
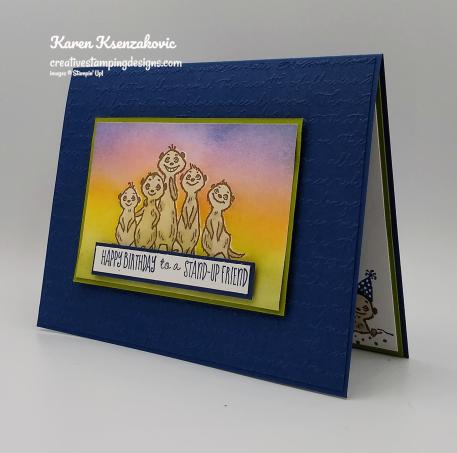
Good Thursday morning my stamping friends. Welcome to the first Happy Inkin’ Thursday Blog Hop of 2020. If you are hopping over from Akiko, thank you for stopping by. This week we had a Sketch Challenge. Be sure to hop around to see everyone’s beautiful projects. I used a FREE Sale-A-Bration stamp set for today’s card.  My daughter’s friend loves Meer Cats, so I made her a birthday card using the new set.  Here’s what I came up with for the sketch.

Here is our sketch for this week.

I started by embossing a Night of Navy card front using the Scripty 3D Embossing Folder.  I adhered the card front to the Night of Navy card base using Multipurpose Liquid Glue.

I stamped the large image from the Stampin’ Up! The Gang’s All Meer Cling Stamp Set using Soft Suede Ink in the center of a Whisper White panel.  I stamped the same image on a Post-It note and fussy cut it to do the Masking Technique.  I colored the Meer Cats in using my Crumb Cake Stampin’ Blends Markers.  I covered the image with the Post-It note and started sponging.  Using my Stamping Sponges, I started at the bottom with Old Olive Ink. I sponged Daffodil Delight above the Old Olive and Calypso Coral above that.  I continued sponging with the Flirty Flamingo, Highland Heather and Night of Navy on the top of the panel.  I adhered the artwork to an Old Olive mat using Snail.

On a thin strip of Whisper White cardstock I stamped the sentiment from The Gang’s All Meer stamp set in Night of Navy Ink.  I adhered the Whisper White strip to a Night of Navy mat using Snail and then to the artwork using Stampin’ Dimensionals.  I adhered the artwork to the card front using Stampin’ Dimensionals.

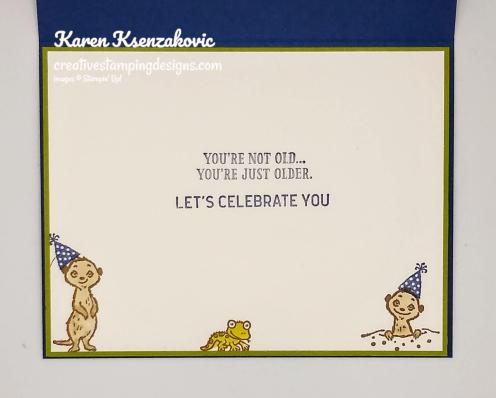
On the inside I stamped the sentiments from the Stampin’ Up! Itty Bitty Birthday’s Cling Stamp Set in Night of Navy Ink in the Center of a Whisper White panel.  I stamped the 2 small Meer Cats and the Lizard images from The Gang’s All Meer stamp set in Soft Suede Ink on the bottom of the panel.  I stamped the party hat image from The Gang’s All Meer stamp set on the 2 Meer Cats in Night of Navy Ink.  I colored the Meer Cats in using my Crumb Cake Stampin’ Blends Markers and I colored the lizard in using my Old Olive Stampin’ Blends Markers.  I adhered the Whisper White panel to an Old Olive mat using Snail and then to the inside of the Night of Navy card base using Multipurpose Liquid Glue.

To finish my card I decorated a Medium Whisper White Envelope.  I stamped the large Meer Cat image from The Gang’s All Meer stamp set on the envelope front and colored it in using my Crumb Cake Stampin’ Blends Markers.  I stamped the 2 smaller Meer Cat images from The Gang’s All Meer stamp set in Soft Suede Ink on the envelope flap and colored them in using my Crumb Cake and Old Olive Stampin’ Blends Markers.

Thank you for visiting my blog today. I hope you liked my card and will give it a try. Now that you’ve seen my card, take a minute to hop through all our projects today. If you click on the Next Blog button, you’ll go to Amy’s page. Or you can just click on the names below to go directly to all the blogs!  Happy Hopping!!

Amy Koenders:
Mary Deatherage:
Kristi Gray:
Jaimie Babarczy:
Sue Prather:
Karen Finkle: Not hopping this week
Eva Dobilas:
Akiko Sudano:
Karen Ksenzakovic: You Are Here

****************************************************************************************************

If you need any stamping supplies, I’d be very happy to be your Demonstrator. Just click HERE to go directly to my online store or drop me an email if you have any questions. 

MY CURRENT HOST CODE IS: U7DEP9F9

For any orders $50 or more I will send you my monthly class tutorials.  Click HERE or go to my Customer Rewards to see what this months tutorials are.

STAMPIN’ UP! CLEARANCE RACK UPDATE

Stampin’ Up! has updated the Clearance Rack with lot of new goodies!  Yay!!!  Head over there speedy quick to get your hands on some great deals.  But hurry!!  Clearance Rack deals are only while supplies last!

Click HERE to shop the clearance rack.

Happy Stamping, Karen!

****************************************************************************************************

I’LL BEE YOURS PAPER PUMPKIN

SUBSCRIBE TO PAPER PUMPKIN DECEMBER 11, 2019 – JANUARY 10, 2020

Paper Pumpkin’s first kit of 2020 is all about L-O-V-E. Whether you want handmade favors for Valentine’s Day, a bridal shower, or a remarkably romantic wedding, this month’s kit has everything you need to help you celebrate your favorite friendships and love stories. So make it a “LOVE”-ly year with Paper Pumpkin.

About the January Kit
Kit details: Makes 20 treat bags + 10 mini cards and envelopes
Card size: 3″ x 3″ (7.5 x 7.5 cm)
Envelope size: 3-1/8″ x 3-1/8″ (7.8 x 7.8 cm)
Bag size: 3-1/4″ x 4″ (8.2 x 10 cm)
Coordinating Stampin’ Up! colors: Crushed Curry, Highland Heather, Mint Macaron, and Rococo Rose

Coordinating Product
It’s “BEE”-yond question: You can get more from the I’ll Bee Yours kit when they buy the Heart Punch Pack (item 151292) from the 2020 January–June Mini Catalog. Both punches coordinate with the heart stamp in the kit so you can craft for love-filled occasions now . . . and later! Think: weddings, showers, birthdays, and more! See additional details about the punch pack below.
Heart Punch Pack (item 151292), $34.00 usd/$46.00 cad

Subscribe for the January kit at paperpumpkin.com from December 11–January 10.
Supplies may be limited toward the end of each subscription period.

****************************************************************************************************

LAST DAY TO TAKE ADVANTAGE OF THIS AMAZING SALE!!

Stampin’ Up!’s Year-End Closeout is here while supplies last!!  You can save on a selection of retiring and surplus items including holiday catalog items, stamp sets, and Paper Pumpkin past kits! Shop early to avoid missing out as items on the sale are only available while supplies last! Supplies are limited and popular items will sell out quickly. This amazing sale ends on January 2.

Head over to my Online store to see all the Discounted Items and Retiring Favorites Items.  You don’t want to miss out on these savings because when they are gone THEY ARE GONE!

****************************************************************************************************

Card stock cuts for this project:

  • Night of Navy Cardstock 8 1/2″ X 5 1/2″ (card base scored and folded at 4 1/4″), 4 1/8″ X 5 3/8″ (card front), 1/2″ X 2 7/8″ (sentiment mat)
  • Old Olive Cardstock 4 1/8″ X 5 3/8″ (inner liner mat), 2 9/16″ X 3 3/4″ (artwork mat)
  • Whisper White Cardstock 4″ X 5 1/4″ (inner liner), 2 7/16″ X 3 5/8″ (artwork), 7/16″ X 2 3/4″

****************************************************************************************************

Product List

Stampin’ Up! Honey Bee Sneak Peek

Good Tuesday morning my fellow stampers.  Merry Christmas Eve.  I hope you have all your shopping done, gifts wrapped, decorating done and meals planned.  Believe it or not, I got it all done.  This was a little more last minute that I’m used to, I’m usually much more organized with this kind of stuff.  Time got the best of me this year.  By the time you read this I will already be starting our Christmas Eve Dinner.  My family does the feast of the 7 fishes.  I took over doing it many years ago and I have my whole family over tonight for dinner and to start the celebration of Christmas.  I haven’t gotten anyone to help me out with cleaning all the fish, but  I do get help with the cooking.  Everyone starts coming over at 2pm and we get started with our celebration.  Tomorrow will be a nice quiet, relaxing day spent with just my family opening some gifts, watching some Christmas movies, having a nice Christmas meal, playing games and maybe I’ll even get some craft time in.  A good day to just unwind after all the Hussle and bustle.

For today’s card I have a sneak peek from the upcoming January-June 2020 Mini Catalog and the Sale-A-Bration Catalog.  Only 10 days left till the catalogs go live.  I hope you are getting your shopping lists ready, I know I have mine ready to go.  Here’s my card.

My design was inspired by the Fab Friday Challenge #179.  Here is their sketch.

I started by cutting a panel of the Golden Honey Specialty Designer Series Paper using the largest Rectangle Stitched Dies.  I cut the inside out to make a frame of the panel using the 3rd largest Rectangle Stitched Die.  I adhered the frame to the front of a Basic Black card base using Multipurpose Liquid Glue.  You can get this Golden Honey Specialty DSP FREE with a qualifying purchase from the Sale-A-Bration catalog starting January 3, 2020.  With the purchase of the Stampin’ Up! Honey Bee Bundle and something else small you can earn this beautiful paper.

On a panel of Whisper White cardstock I stamped the bee hive image from the Stampin’ Up! Honey Bee Cling Stamp Set.  I inked the stamp up with Daffodil Delight Ink and using my Sponge Dauber I edged the stamp with Calypso Coral Ink before stamping.  I stamped the sentiment from the Honey Bee stamp set in Tuxedo Black Memento Ink around the bee hive image.  I stamped the small bee image from the Honey Bee stamp set in Smoky Slate Ink above the bee hive.  On a small panel of  Whisper White cardstock I stamped each of the flower images from the Honey Bee stamp set.  I colored the stamps in using my Calypso Coral and Garden Green Stampin’ Write Markers.  I cut the images out using the Detailed Bee Dies.  I stamped the large bee image from the Honey Bee stamp set in Smoky Slate Ink on a small panel of Vellum cardstock.  I cut the bee out using my Detailed Bee Dies.  I colored the small bee image and the vellum  bee image in using my Basic Black and Daffodil Delight Stampin’ Blends Markers.

I cut the artowrk out using the Rectangle Stitched Dies.  I adhered the vellum bee to the artwork using a Glue Dot.  I adhered the flowers on the bottom of the artwork using Glue Dots.  I adhered the artwork to the center of the frame using Stampin’ Dimensionals.  I added a few Rhinestone Basic Jewels.

On the inside of a Whisper White panel I stamped the sentiment from the Honey Bee stamp set in Tuxedo Black Memento Ink in the center.  I stamped the flower images from the Honey Bee stamp set  on either side of the sentiment.  I colored them in the same as I did for the artwork.  I stamped a couple of the small bees from the Honey Bee stamp set on the panel in Smoky Slate Ink.  I adhered the Whisper White panel to a Daffodil Delight mat using Snail and then to the inside of the Basic Black card base using Multipurpose Liquid Glue.

To finish my card I decorated a Medium Whisper White Envelope.  I stamped the bee hive image from the Honey Bee stamp set on the envelope front colored the same as I did for the card front.  I stamped a small bee from the Honey Bee stamp set in Smoky Slate Ink next to the hive.  I adhered a panel of the Golden Honey Specialty DSP to the envelope flap.  I stamped a couple of the small bee images from the Honey Bee stamp set on the DSP on the envelope flap.  If you look at them close up, they look like they are behind the honey comb.  I stamped the flower images from the Honey Bee stamp set on the bottom of the envelope back colored the same as I did for the card front.

Thank you for visiting my blog today.  I hope you liked my card and will give it a try. Happy Stamping!!

****************************************************************************************************

If you need any stamping supplies, I’d be very happy to be your Demonstrator. Just click HERE to go directly to my online store or drop me an email if you have any questions. 

MY CURRENT HOST CODE IS: NVSKQ72X

For any orders $50 or more I will send you my monthly class tutorials.  Click HERE or go to my Customer Rewards to see what this months tutorials are.

STAMPIN’ UP! CLEARANCE RACK UPDATE

Stampin’ Up! has updated the Clearance Rack with lot of new goodies!  Yay!!!  Head over there speedy quick to get your hands on some great deals.  But hurry!!  Clearance Rack deals are only while supplies last!

Click HERE to shop the clearance rack.

Happy Stamping, Karen!

****************************************************************************************************

I’LL BEE YOURS PAPER PUMPKIN

SUBSCRIBE TO PAPER PUMPKIN DECEMBER 11, 2019 – JANUARY 10, 2020

Paper Pumpkin’s first kit of 2020 is all about L-O-V-E. Whether you want handmade favors for Valentine’s Day, a bridal shower, or a remarkably romantic wedding, this month’s kit has everything you need to help you celebrate your favorite friendships and love stories. So make it a “LOVE”-ly year with Paper Pumpkin.

About the January Kit
Kit details: Makes 20 treat bags + 10 mini cards and envelopes
Card size: 3″ x 3″ (7.5 x 7.5 cm)
Envelope size: 3-1/8″ x 3-1/8″ (7.8 x 7.8 cm)
Bag size: 3-1/4″ x 4″ (8.2 x 10 cm)
Coordinating Stampin’ Up! colors: Crushed Curry, Highland Heather, Mint Macaron, and Rococo Rose

Coordinating Product
It’s “BEE”-yond question: You can get more from the I’ll Bee Yours kit when they buy the Heart Punch Pack (item 151292) from the 2020 January–June Mini Catalog. Both punches coordinate with the heart stamp in the kit so you can craft for love-filled occasions now . . . and later! Think: weddings, showers, birthdays, and more! See additional details about the punch pack below.
Heart Punch Pack (item 151292), $34.00 usd/$46.00 cad

Subscribe for the January kit at paperpumpkin.com from December 11–January 10.
Supplies may be limited toward the end of each subscription period.

****************************************************************************************************

Stampin’ Up!’s Year-End Closeout is here while supplies last!!  You can save on a selection of retiring and surplus items including holiday catalog items, stamp sets, and Paper Pumpkin past kits! Shop early to avoid missing out as items on the sale are only available while supplies last! Supplies are limited and popular items will sell out quickly. This amazing sale ends on January 2.

Head over to my Online store to see all the Discounted Items and Retiring Favorites Items.  You don’t want to miss out on these savings because when they are gone THEY ARE GONE!

****************************************************************************************************

Card stock cuts for this project:

  • Basic Black Cardstock 8 1/2″ X 5 1/2″ (card base scored and folded at 4 1/4″)
  • Daffodil Delight Cardstock 4 1/8″ X 5 3/8″ (inner liner mat)
  • Whisper White Cardstock 4″ X 5 1/4″ (inner liner), 3″ X 4 1/4″ (artwork), 3″ X 2 1/2″ (flowers)
  • Golden Honey Specialty Designer Series Paper 4 1/4″ X 5 1/2″ (card front frame), 2 1/4″ X 6″ (panel for envelope flap)

****************************************************************************************************

Product List

Stampin’ Up! Rustic Winter Woods Birthday

Good Monday morning my fellow stampers.  How was everyone’s weekend?  Did anyone do anything exciting or fun?  I was at work, but had a great time.  I love working during the holiday season, watching everyone rush around trying to get all their gifts.  In the mean time, I still have shopping to get done myself, UGH!!

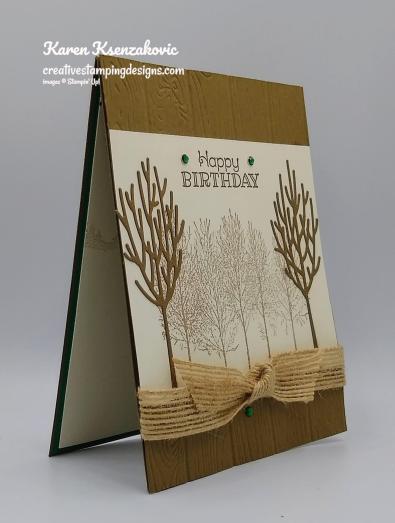
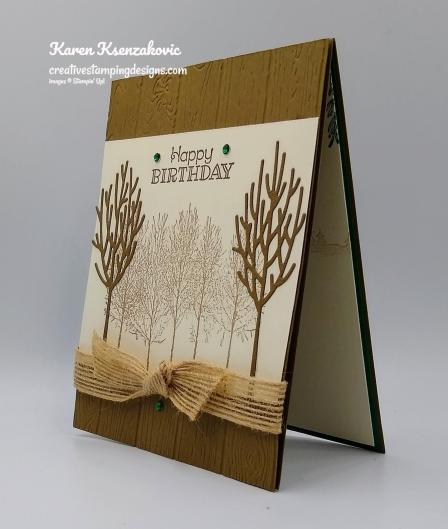
I have a masculine birthday card for you today.  Here’s my card.

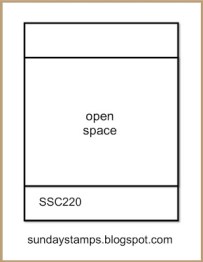
My design was inspired by Sunday Stamps Challenge #220.  Here is their sketch.

I started by embossing a Soft Suede card front using the Pinewood Planks 3D Embossing Folder.

I stamped the tree image from the Stampin’ Up! Winter Woods Cling Stamp Set in Crumb Cake Ink on a Very Vanilla panel.  I cut 2 of the trees out of Soft Suede cardstock  using the In The Woods Dies.  I adhered the trees on either side of the Very Vanilla panel using Multipurpose Liquid Glue.  I stamped the sentiment from the Stampin’ Up Rustic Retreat Cling Stamp Set in Soft Suede Ink on the top of the artwork.

I adhered the artwork to the card front using Multipurpose Liquid Glue.  I wrapped a piece of 5/8″ Burlap Ribbon around the card front and tied a knot.  I added a Glue Dot under the knot to keep it in place.  I adhered the card front to a Soft Suede card base using Stampin’ Dimensionals.  I added a few Shaded Spruce Holiday Rhinestone Basic Jewels to the card front.

On  the inside I stamped the cottage image from the Rustic Retreat stamp set in Crumb Cake Ink, stamping off once, to the center of a Very Vanilla panel.  I stamped the trees on either side of the cottage in Crumb Cake Ink, stamping off once.  I stamped the sentiment from the Rustic Retreat stamp set in Soft Suede Ink over the cottage image.  I stamped the pine boughs image from the Rustic Retreat stamp set in Shaded Spruce Ink on the top of the Very Vanilla panel.  I adhered the Very Vanilla panel to a Shaded Spruce mat using Snail and then to the inside of the Soft Suede card base using Multipurpose Liquid Glue.

To finish my card I decorated a Medium Very Vanilla Envelope.  I stamped the cottage image from the Rustic Retreat stamp set on the envelope front in Crumb Cake Ink.  I stamped the trees on either side of the cottage in Crumb Cake Ink.  I stamped the pine boughs image from the Rustic Retreat stamp set in Shaded Spruce Ink along each side of the envelope front.  I stamped the tree image from the Winter Woods stamp set in Crumb Cake Ink on the envelope flap.

Thank you for stopping by my blog today.  I hope you liked my card and will give it a try. Happy Stamping!!

****************************************************************************************************

If you need any stamping supplies, I’d be very happy to be your Demonstrator. Just click HERE to go directly to my online store or drop me an email if you have any questions. 

MY CURRENT HOST CODE IS: NVSKQ72X

For any orders $50 or more I will send you my monthly class tutorials.  Click HERE or go to my Customer Rewards to see what this months tutorials are.

STAMPIN’ UP! CLEARANCE RACK UPDATE

Stampin’ Up! has updated the Clearance Rack with lot of new goodies!  Yay!!!  Head over there speedy quick to get your hands on some great deals.  But hurry!!  Clearance Rack deals are only while supplies last!

Click HERE to shop the clearance rack.

Happy Stamping, Karen!

****************************************************************************************************

I’LL BEE YOURS PAPER PUMPKIN

SUBSCRIBE TO PAPER PUMPKIN DECEMBER 11, 2019 – JANUARY 10, 2020

Paper Pumpkin’s first kit of 2020 is all about L-O-V-E. Whether you want handmade favors for Valentine’s Day, a bridal shower, or a remarkably romantic wedding, this month’s kit has everything you need to help you celebrate your favorite friendships and love stories. So make it a “LOVE”-ly year with Paper Pumpkin.

About the January Kit
Kit details: Makes 20 treat bags + 10 mini cards and envelopes
Card size: 3″ x 3″ (7.5 x 7.5 cm)
Envelope size: 3-1/8″ x 3-1/8″ (7.8 x 7.8 cm)
Bag size: 3-1/4″ x 4″ (8.2 x 10 cm)
Coordinating Stampin’ Up! colors: Crushed Curry, Highland Heather, Mint Macaron, and Rococo Rose

Coordinating Product
It’s “BEE”-yond question: You can get more from the I’ll Bee Yours kit when they buy the Heart Punch Pack (item 151292) from the 2020 January–June Mini Catalog. Both punches coordinate with the heart stamp in the kit so you can craft for love-filled occasions now . . . and later! Think: weddings, showers, birthdays, and more! See additional details about the punch pack below.
Heart Punch Pack (item 151292), $34.00 usd/$46.00 cad

Subscribe for the January kit at paperpumpkin.com from December 11–January 10.
Supplies may be limited toward the end of each subscription period.

****************************************************************************************************

Stampin’ Up!’s Year-End Closeout is here while supplies last!!  You can save on a selection of retiring and surplus items including holiday catalog items, stamp sets, and Paper Pumpkin past kits! Shop early to avoid missing out as items on the sale are only available while supplies last! Supplies are limited and popular items will sell out quickly. This amazing sale ends on January 2.

Head over to my Online store to see all the Discounted Items and Retiring Favorites Items.  You don’t want to miss out on these savings because when they are gone THEY ARE GONE!

****************************************************************************************************

Card stock cuts for this project:

  • Shaded Spruce Cardstock 4 1/8″ X 5 3/8″ (inner liner mat)
  • Soft Suede Cardstock 4 1/4″ X 11″ (card base scored and folded at 5 1/2″), 4 1/4″ X 5 1/2″ (card front), 2″ X 4″ (panel for trees)
  • Very Vanilla Cardstock 4″ X 5 1/4″ (inner liner), 4 1/4′ X 3 1/2″ (artwork)

****************************************************************************************************

Product List

Stampin’ Up! Itty Bitty Mosaic Birthday for Fun Fold Friday

Good Friday morning my stamping friends and welcome to my Fun Fold Friday.  How was everyone’s week?  Has anyone had time to go out shopping this week?  I still haven’t had time and with all the crazy drivers out, I’m not sure I want to even go out.  I’m hoping to get to the store today at one point in between watching my little nephews and going to work.

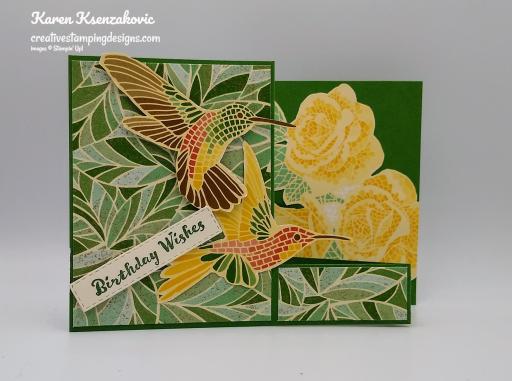
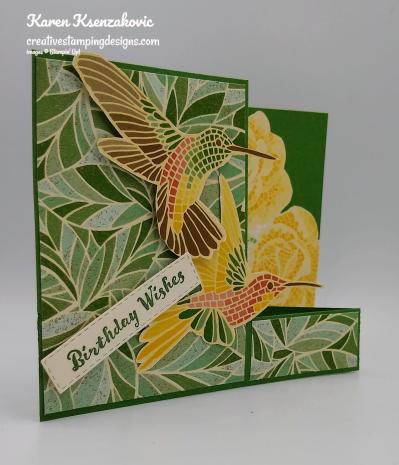
For today’s fun fold this one might be a little tough to explain.  I’m going to do my best and if anyone has any questions, please contact me and I will try to explain a little better.  My niece wanted me to make her father-in-law a birthday card using the Stampin’ Up! Mosaic Mood Specialty Designer Series Paper.  I made this card, but told her it’s way to feminine to give to him.  Here’s my card.

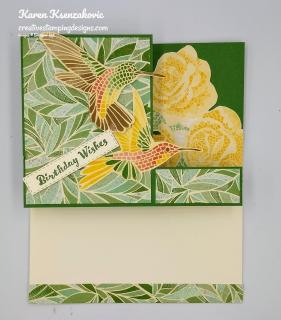
I started with a panel of Garden Green cardstock and made the following scores on it.  I scored at 3 1/4″ down to 1″ from the bottom, 6″ down to 1″ from the bottom and 5 1/2″ up 1″ from the bottom.  I turned the cardstock in my Paper Trimmer and cut from 3 1/4″ to 8 1/4″, 1″ from the bottom.  I realized after I was finished with the card that I forgot to take a picture to show you how it should look.

I adhered a panel of the Mosaic Mood Specialty Designer Series Paper to the front of the card using Multipurpose Liquid Glue.  I adhered the smaller of the 2 strips to the front card strip using Multipurpose Liquid Glue.  I fussy cut 2 of the humming birds out of the Mosaic Mood Specialty DSP and adhered them to the card front.  I adhered the bottom one using Glue Dots and the top one using Stampin’ Dimensionals.  I stamped the sentiment from the Stampin’ Up! Itty Bitty Birthdays Cling Stamp Set in Garden Green Ink on a scrap of Very Vanilla cardstock.  I cut the sentiment out using the smallest Rectangle Stitched Die and adhered it to the card front using Stampin’ Dimensionals.
I fussy cut some yellow roses from the Mosaic Mood Specialty DSP and adhered it to the back panel of the card base using Multipurpose Liquid Glue and trimmed any extra that was hanging over.

On the inside I stamped the sentiment from the Stampin’ Up! Well Said Cling Stamp Set in the center of a Very Vanilla panel.  I adhered the Very Vanilla panel to the inside of the Garden Green card base using Multipurpose Liquid Glue.

To finish my card I decorated a Medium Very Vanilla Envelope.  I adhered a strip of the Mosaic Mood Specialty DSP to the envelope front using Multipurpose Liquid Glue and a panel to the envelope flap using Multipurpose Liquid Glue.

Thank you for stopping by my blog today.  I hope you enjoyed my card and will give it a try.  Hope you all have a wonderful weekend  Happy Stamping!!

****************************************************************************************************

If you need any stamping supplies, I’d be very happy to be your Demonstrator. Just click HERE to go directly to my online store or drop me an email if you have any questions. 

MY CURRENT HOST CODE IS: NVSKQ72X

For any orders $50 or more I will send you my monthly class tutorials.  Click HERE or go to my Customer Rewards to see what this months tutorials are.

STAMPIN’ UP! CLEARANCE RACK UPDATE

Stampin’ Up! has updated the Clearance Rack with lot of new goodies!  Yay!!!  Head over there speedy quick to get your hands on some great deals.  But hurry!!  Clearance Rack deals are only while supplies last!
Click HERE to shop the clearance rack.

Happy Stamping, Karen!

****************************************************************************************************

I’LL BEE YOURS PAPER PUMPKIN

SUBSCRIBE TO PAPER PUMPKIN DECEMBER 11, 2019 – JANUARY 10, 2020

Paper Pumpkin’s first kit of 2020 is all about L-O-V-E. Whether you want handmade favors for Valentine’s Day, a bridal shower, or a remarkably romantic wedding, this month’s kit has everything you need to help you celebrate your favorite friendships and love stories. So make it a “LOVE”-ly year with Paper Pumpkin.
About the January Kit
Kit details: Makes 20 treat bags + 10 mini cards and envelopes
Card size: 3″ x 3″ (7.5 x 7.5 cm)
Envelope size: 3-1/8″ x 3-1/8″ (7.8 x 7.8 cm)
Bag size: 3-1/4″ x 4″ (8.2 x 10 cm)
Coordinating Stampin’ Up! colors: Crushed Curry, Highland Heather, Mint Macaron, and Rococo Rose

Coordinating Product
It’s “BEE”-yond question: You can get more from the I’ll Bee Yours kit when they buy the Heart Punch Pack (item 151292) from the 2020 January–June Mini Catalog. Both punches coordinate with the heart stamp in the kit so you can craft for love-filled occasions now . . . and later! Think: weddings, showers, birthdays, and more! See additional details about the punch pack below.
Heart Punch Pack (item 151292), $34.00 usd/$46.00 cad

Subscribe for the January kit at paperpumpkin.com from December 11–January 10.
Supplies may be limited toward the end of each subscription period.

****************************************************************************************************

Stampin’ Up!’s Year-End Closeout is here while supplies last!!  You can save on a selection of retiring and surplus items including holiday catalog items, stamp sets, and Paper Pumpkin past kits! Shop early to avoid missing out as items on the sale are only available while supplies last! Supplies are limited and popular items will sell out quickly. This amazing sale ends on January 2.

Head over to my Online store to see all the Discounted Items and Retiring Favorites Items.  You don’t want to miss out on these savings because when they are gone THEY ARE GONE!

****************************************************************************************************

Card stock cuts for this project:

  • Garden Green Cardstock 4 1/4″ X 11″ (card base scored and folded as described above)
  • Very Vanilla Cardstock 2 5/8″ X 3 1/8″ (inner liner)
  • Mosaic Mood Specialty Designer Series Paper 3 1/8″ X 4 1/8″ (card front), 2 1/8″ X 3/4″ (card front strip), 2 5/8″ X 3/4″ (inner strip), 1/2″ X 6″ (strip on envelope front), 2 1/4″ X 6″ (envelope flap), fussy cut piece for roses

****************************************************************************************************

Product List