
Good Monday morning stamping friends and welcome to a new week. I had a bit of a busy weekend, so I was slacking in posting. How was everyone’s long weekend? Did anyone get their holiday shopping started or done? How about decorated for the Christmas? I got most of my decorating done. I still have a little bit to get finished. I’m hoping tonight when I get home from work to set up a Christmas tree in my crafting studio. My goal is to get my entire house decorated before my next Stamp Camp Class next week. The only thing that won’t be done is our main tree in the living room. We get a live tree there and don’t get it until about 2 weeks before Christmas.
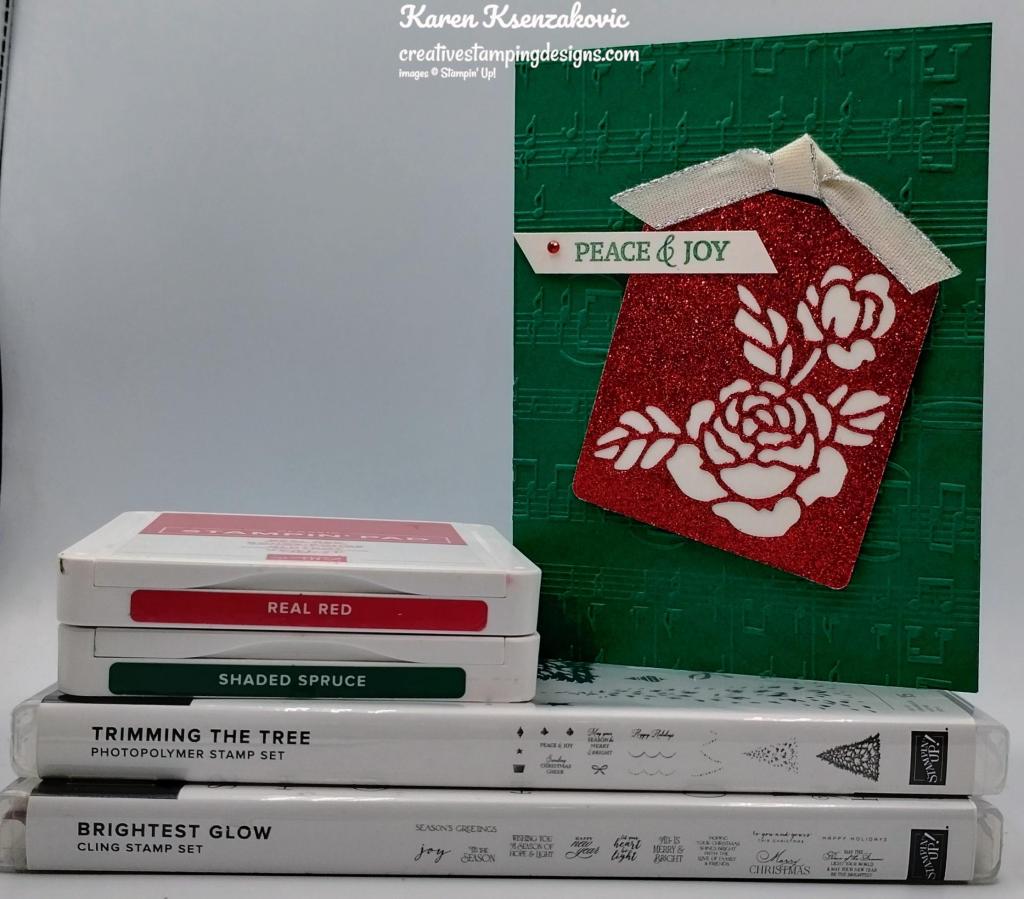
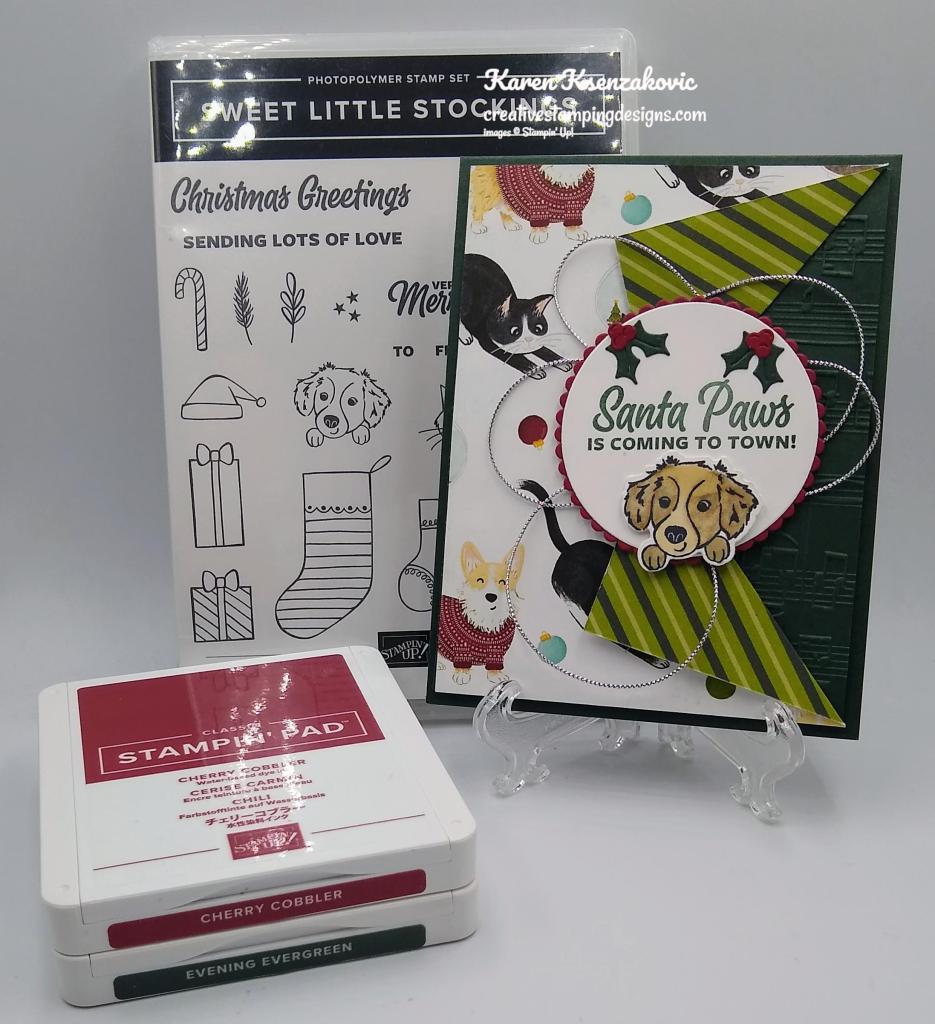
Today’s card quick Christmas card using a bundle that will be retiring soon. If this is one that you like, now is the time to grab it. I was hoping this would carry over since I like it so much. If you’d like to see a quick video of how I made my card, Click Here for my Instagram Reel. Here’s my card for today.
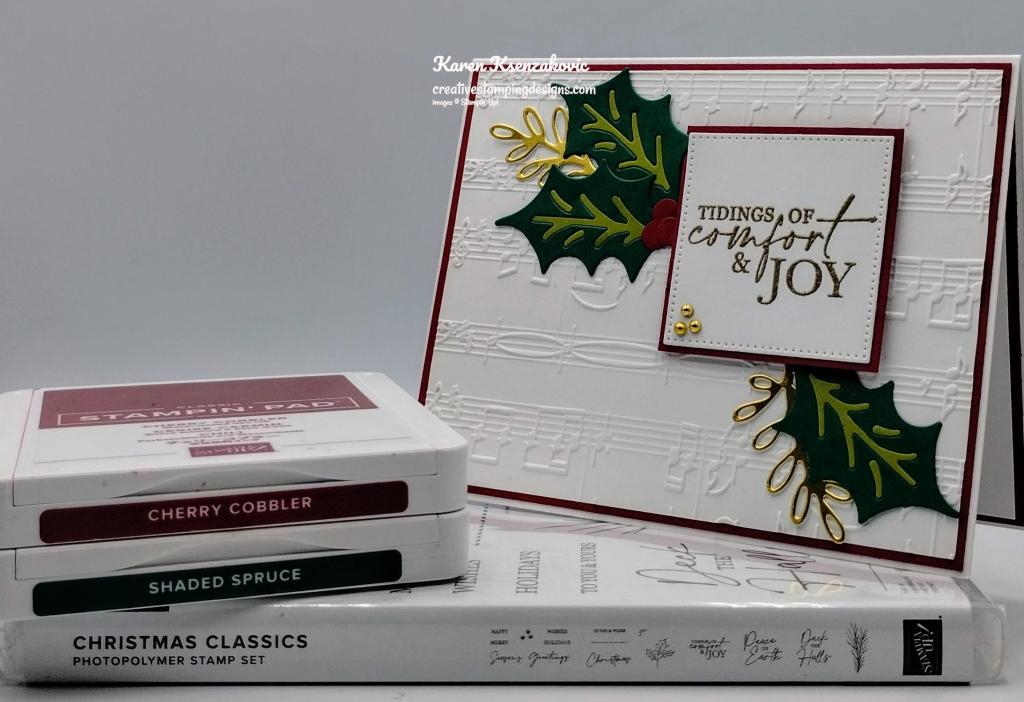
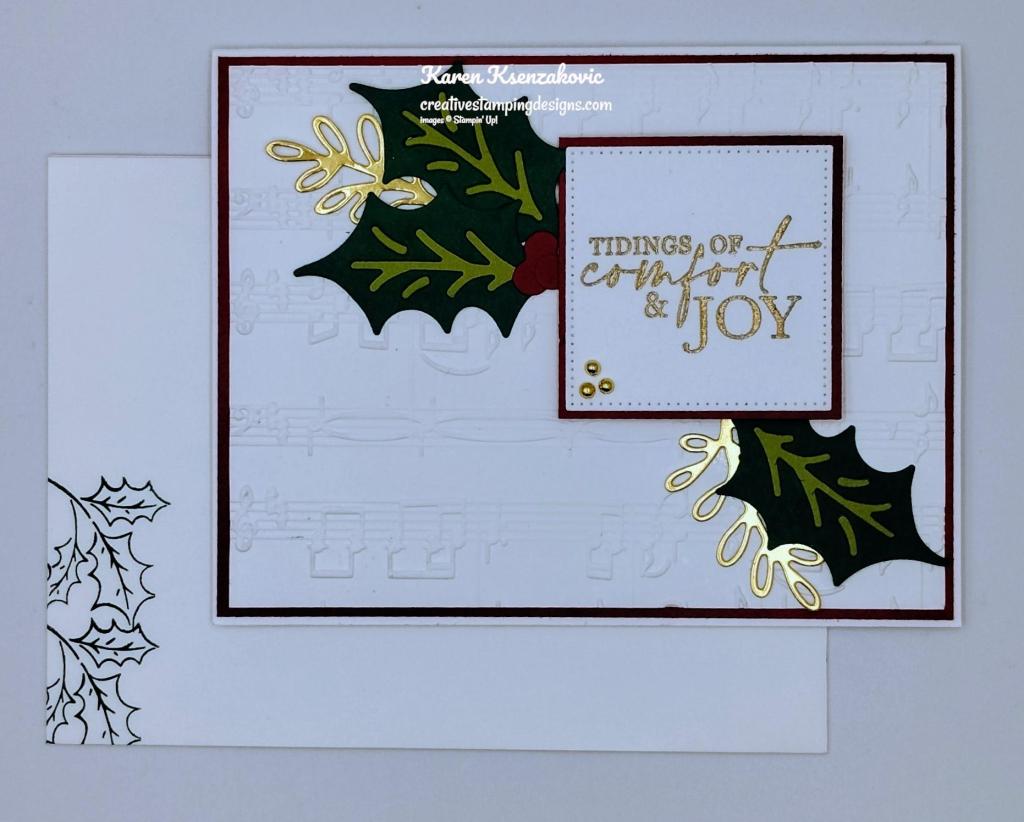
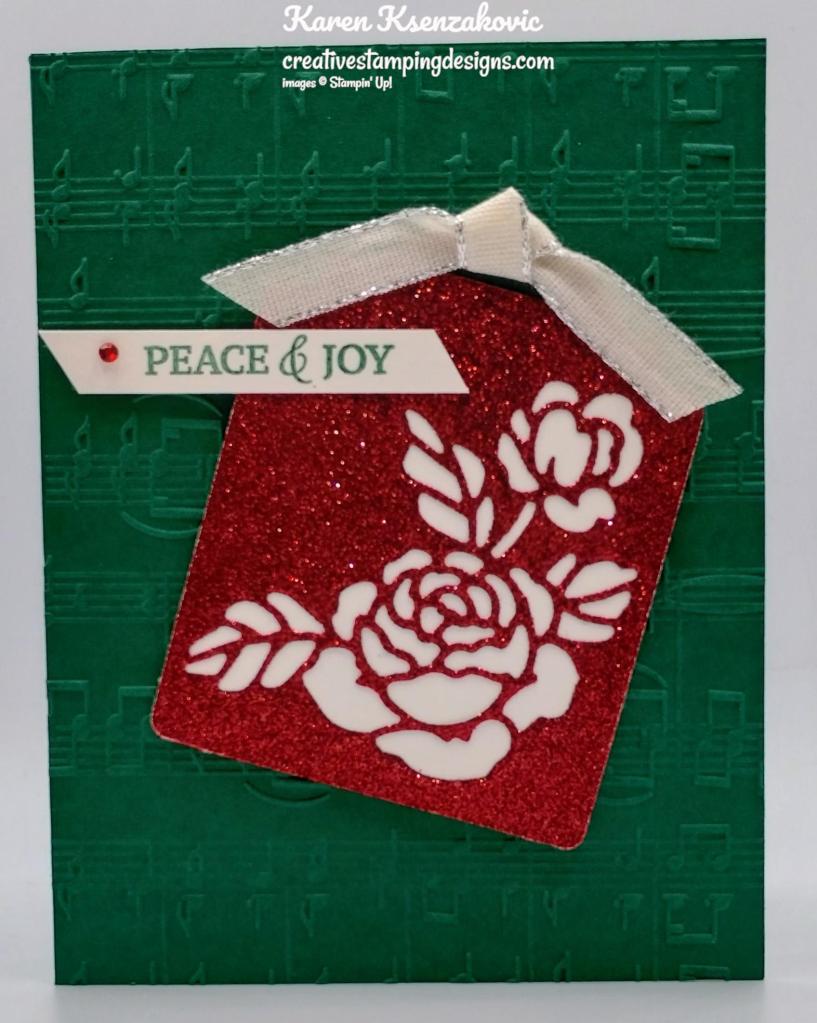
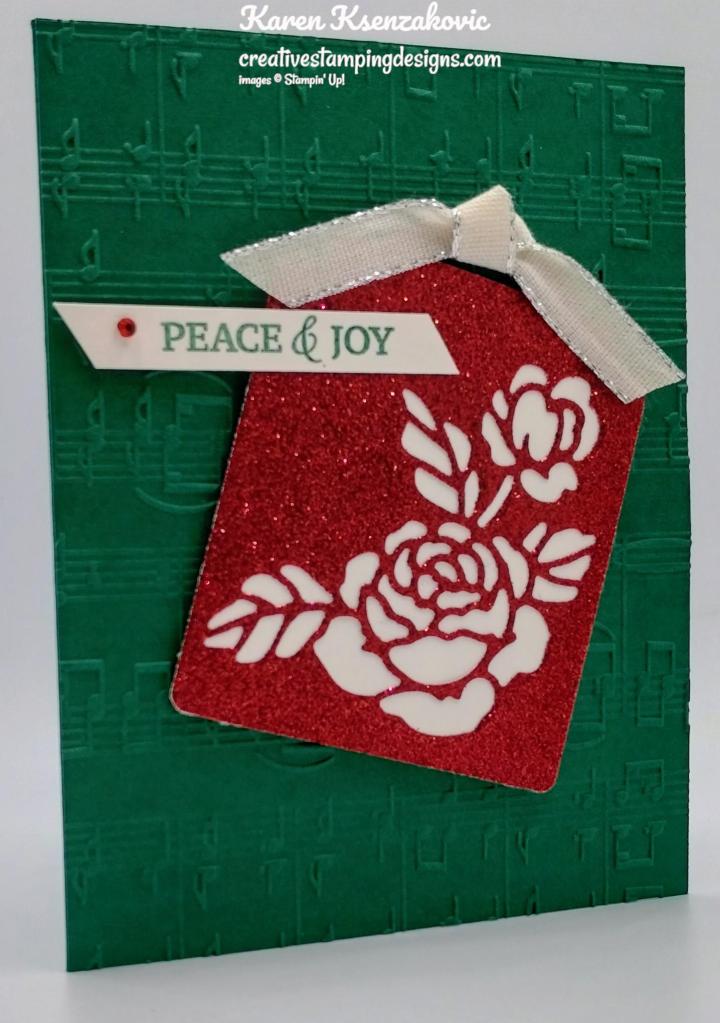
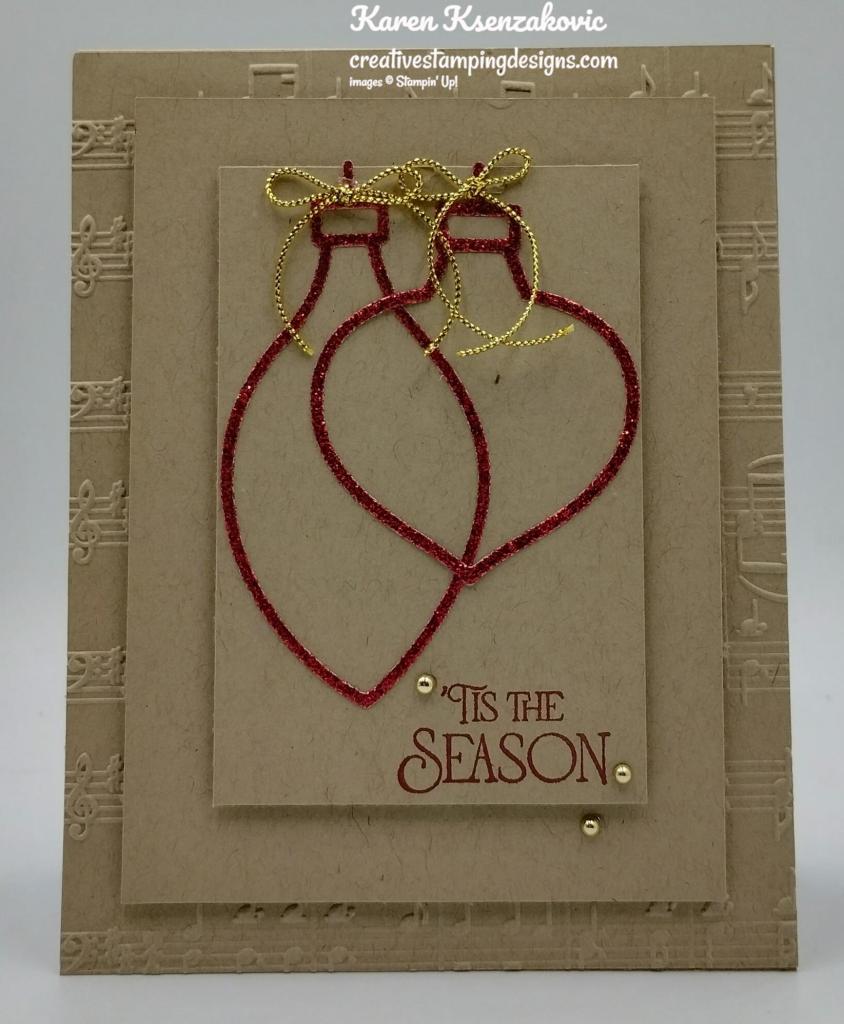
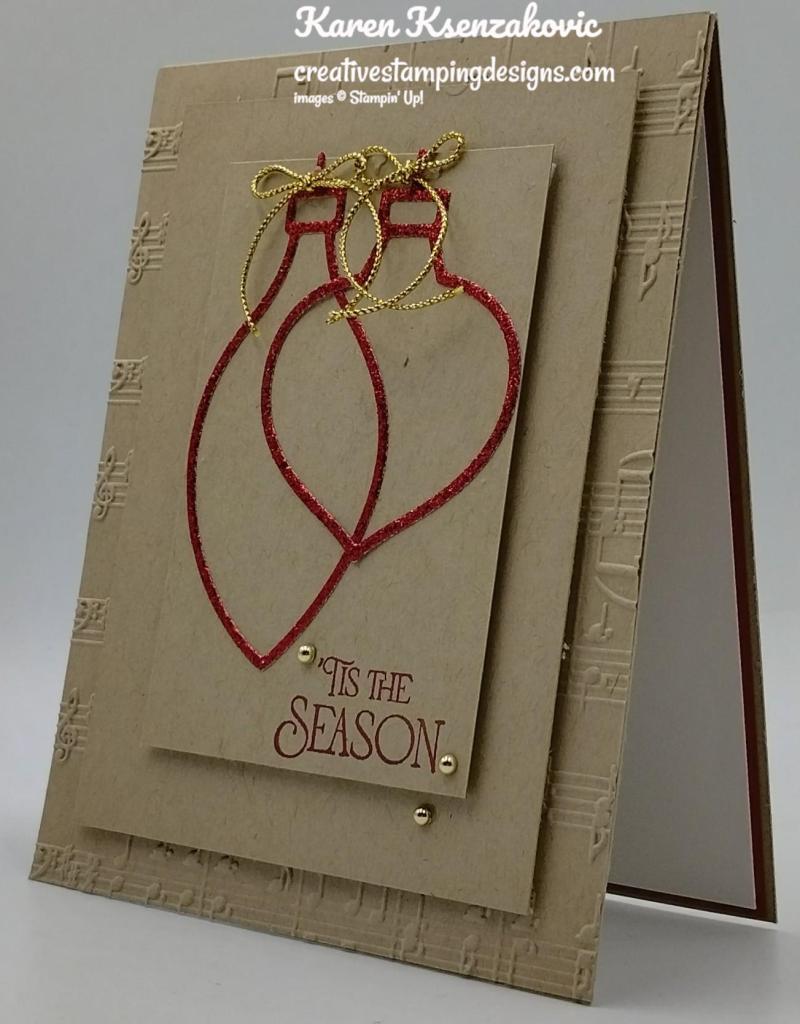
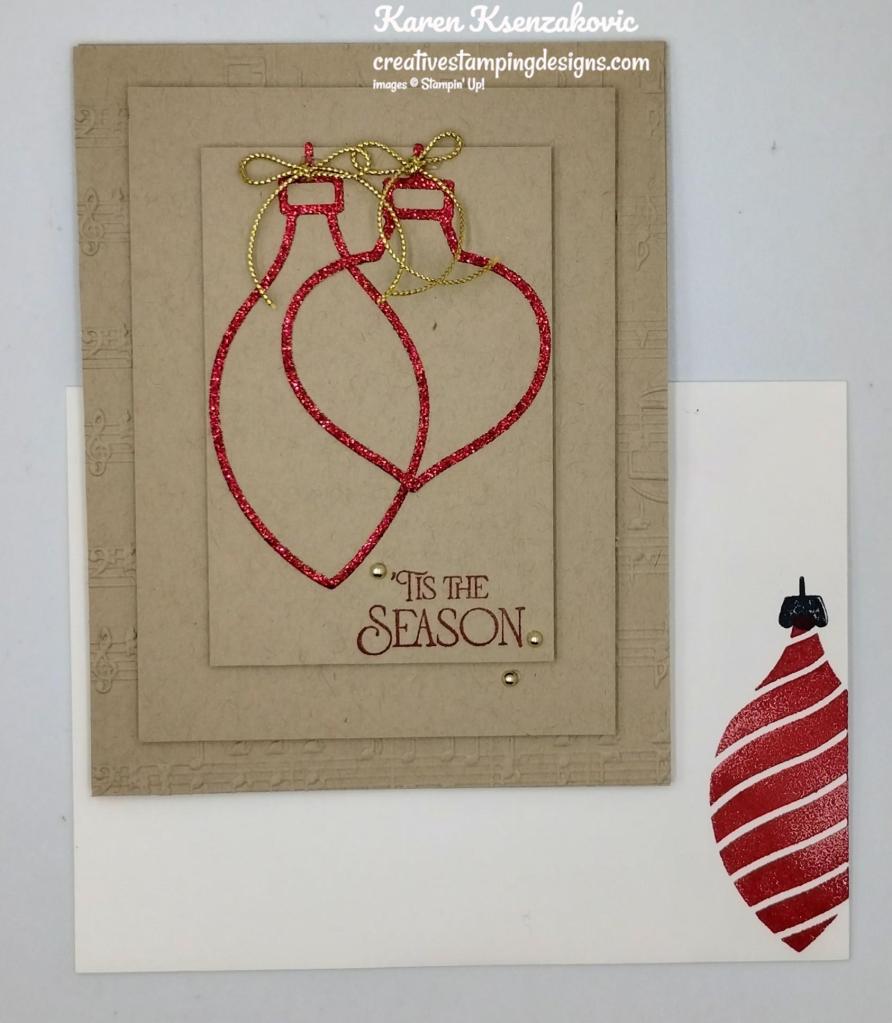
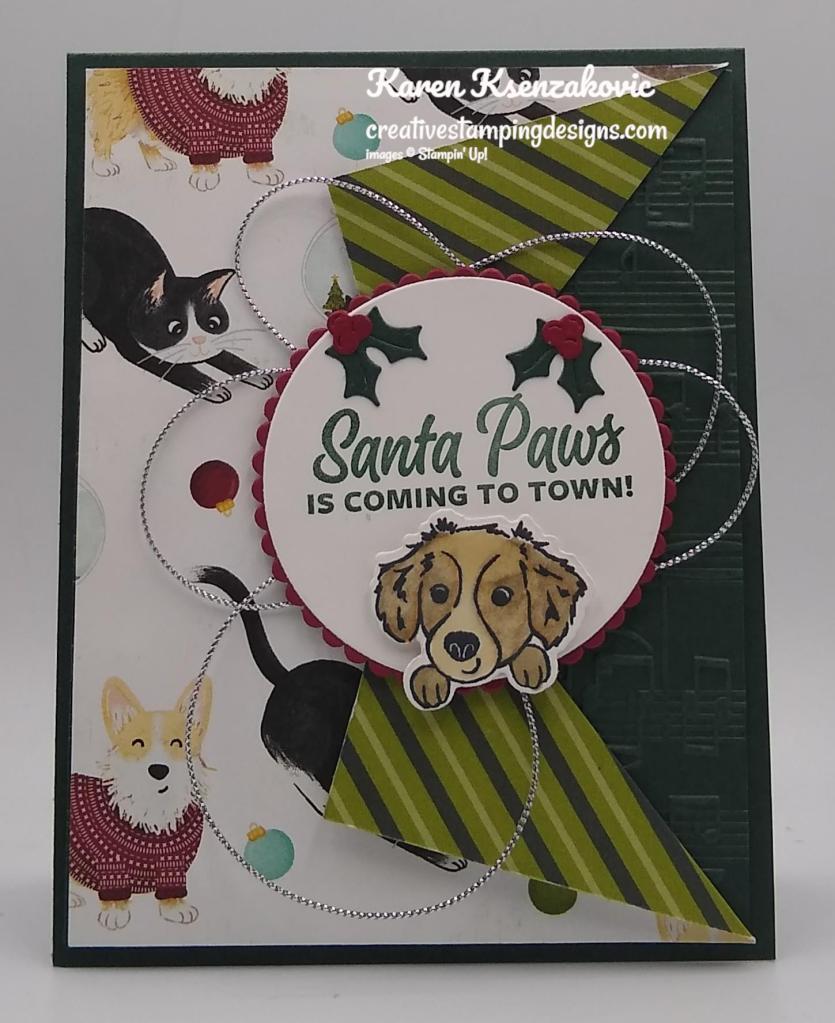
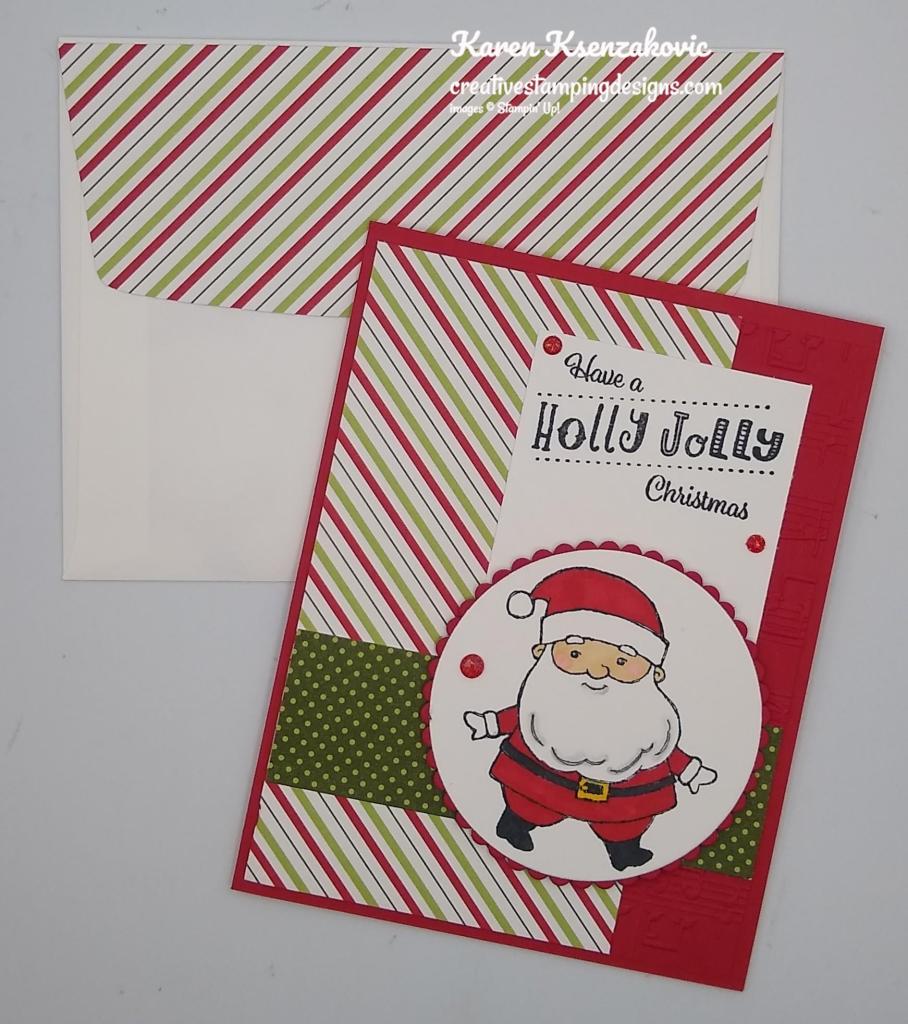
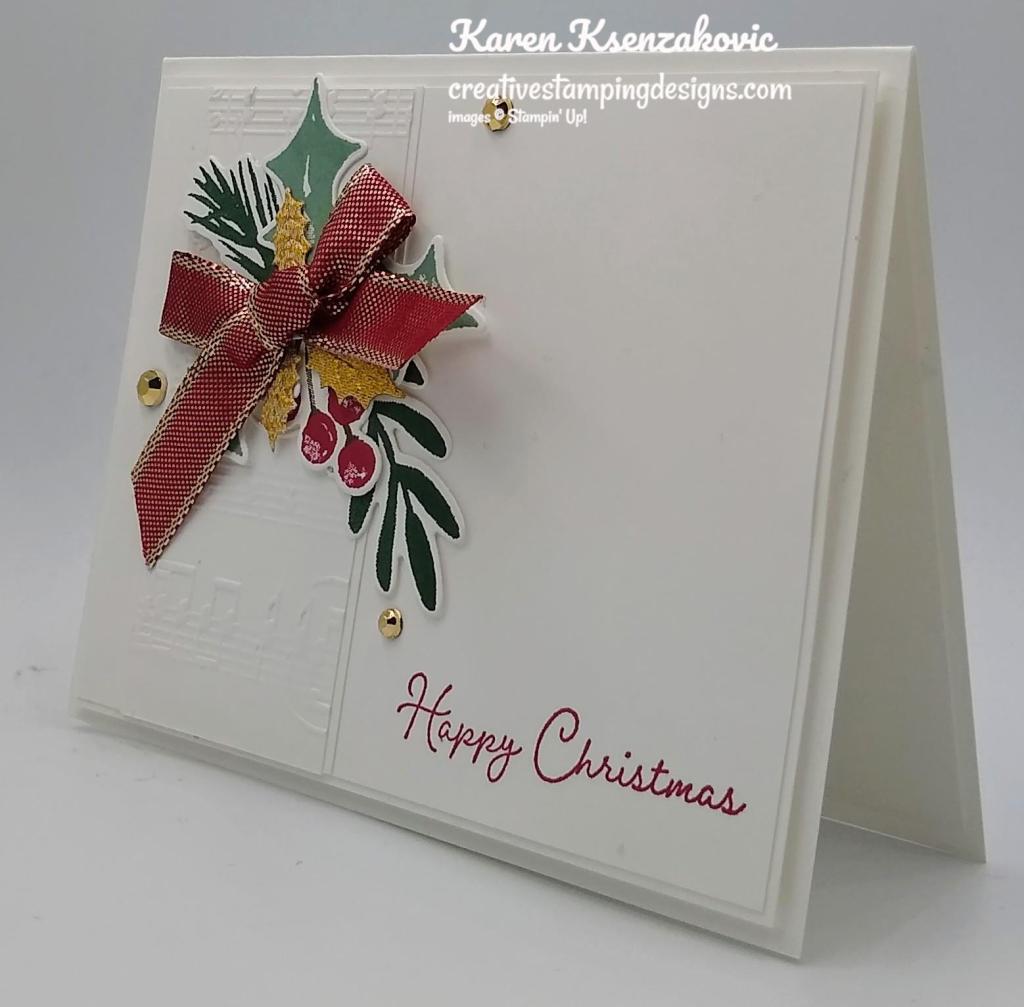
I used the Stampin’ Up! Christmas Classics Bundle along with the Merry Melody 3D Embossing Folder for my card today.
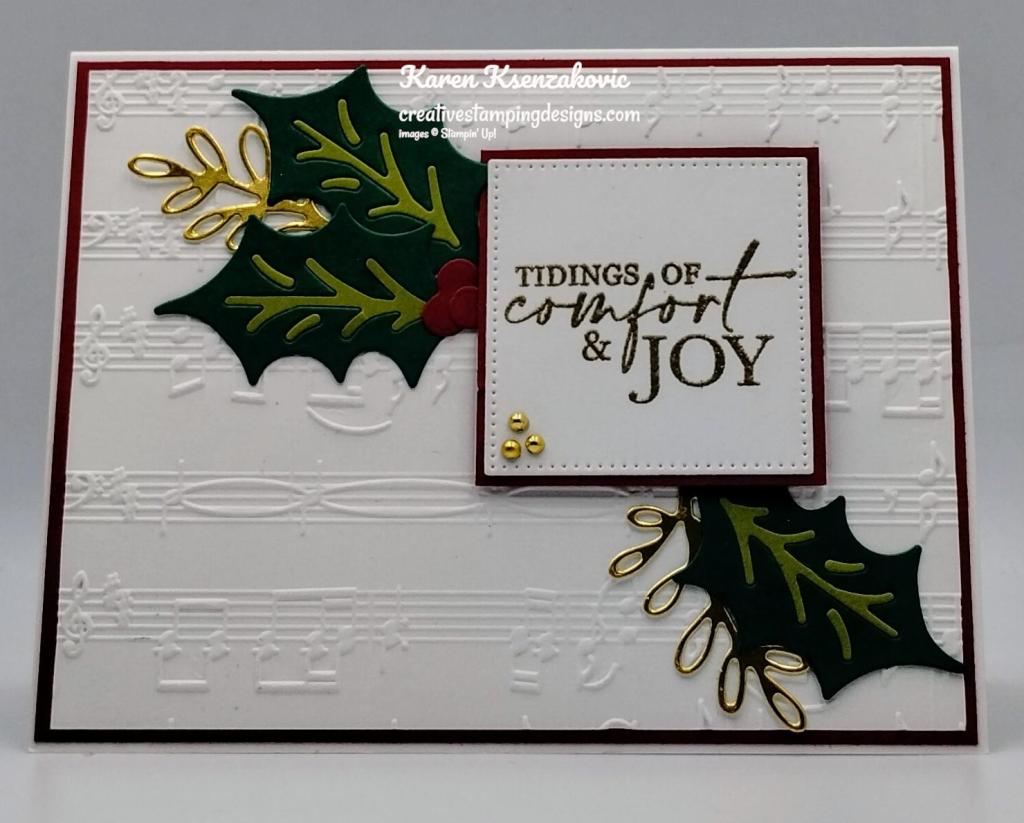
I started by embossing a Basic White card front using the Merry Melody EF. I adhered the embossed panel to a Cherry Cobbler mat using Liquid Glue. I adhered the layered panel to the front of a Basic White Thick card base using Liquid Glue.
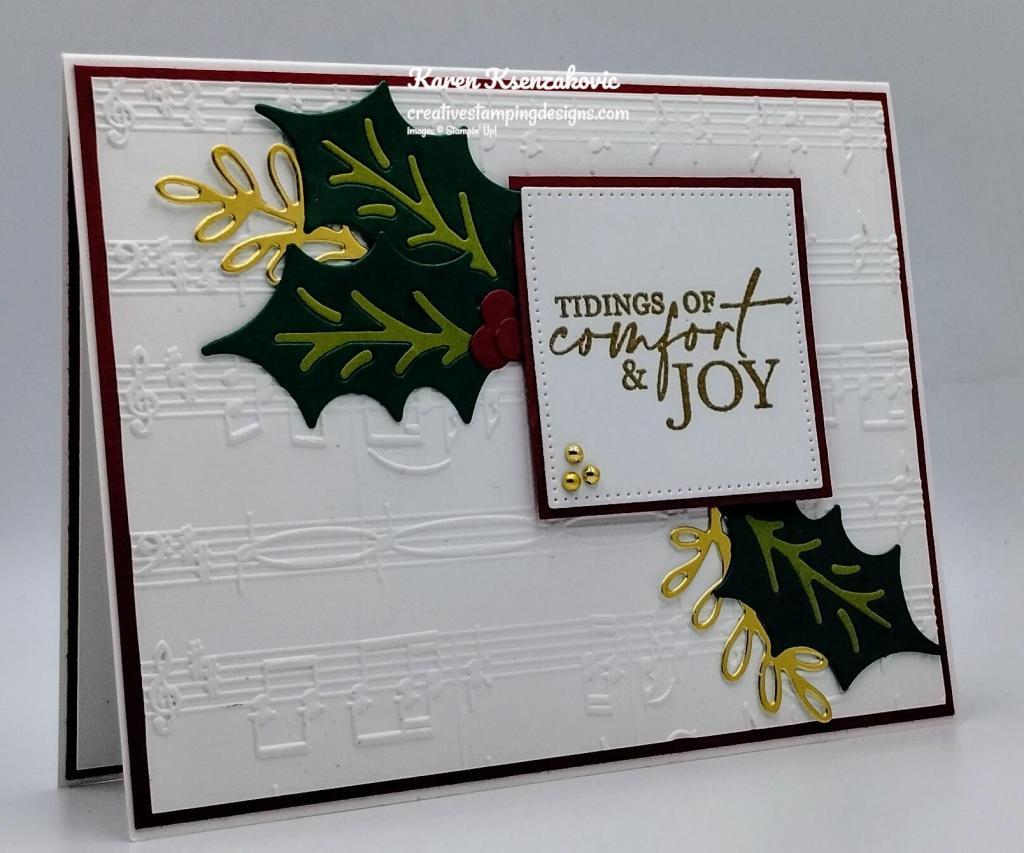
Using the Christmas Classics Dies, I cut 3 holly leaves from a panel of Shaded Spruck, the holly veins from a panel of Old Olive, 2 sprigs from a panel of Gold Foil and the berries from a panel of Cherry Cobbler. I adhered a piece of Tear and Tape to the back of the holly leaves and adhered the Old Olive veins to the center of the Shaded Spruce holly leaves.
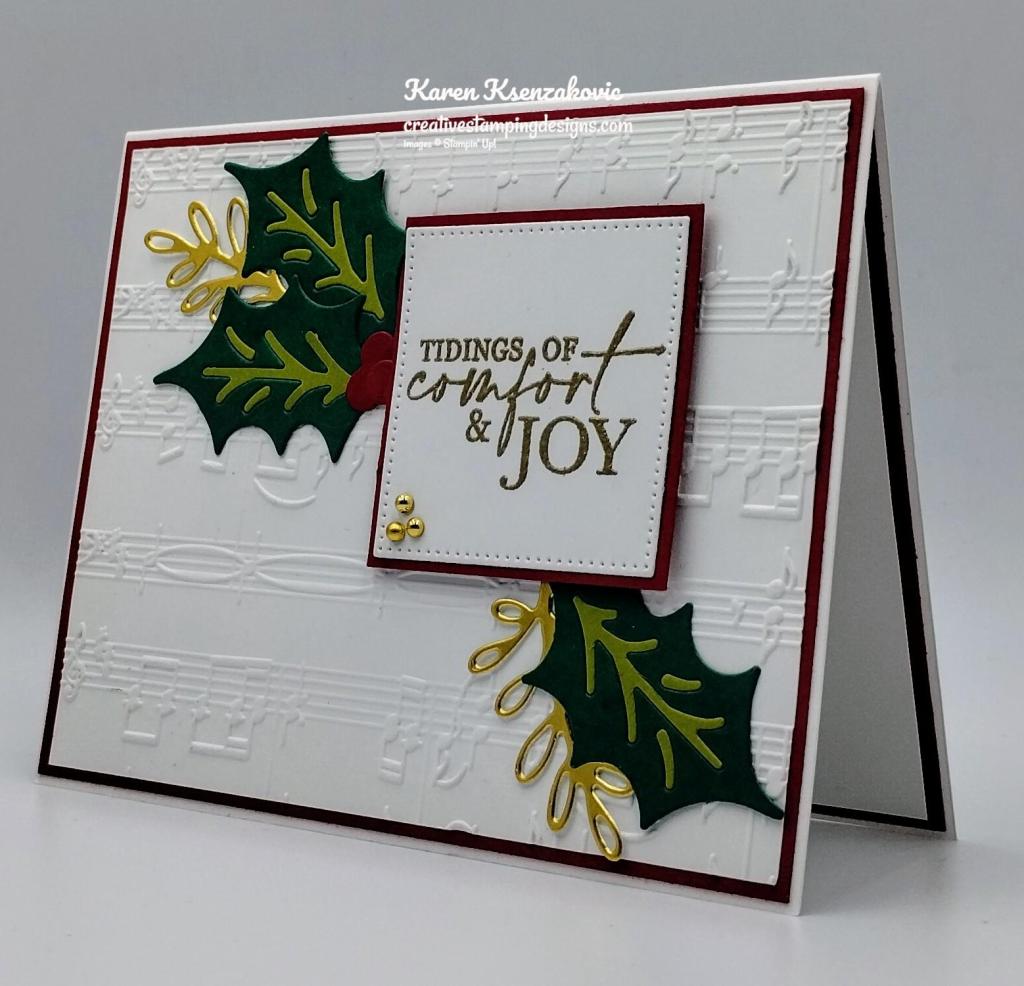
On a panel of Basic White, I stamped the sentiment from the Stampin’ Up! Christmas Classics Photopolymer Stamp Set in Versamark Ink. I sprinkled it with Gold Embossing Powder and set it using the Heat Tool. I cut the sentiment using the Stylish Shapes Dies. I adhered the sentiment to a Cherry Cobbler mat using Stampin’ Seal. I adhered the layered sentiment to the card front using Stampin’ Dimensionals. I adhered the holly leaves, sprigs and berries under the sentiment using Liquid Glue. I added a few gold Festive Pearls to the card front.
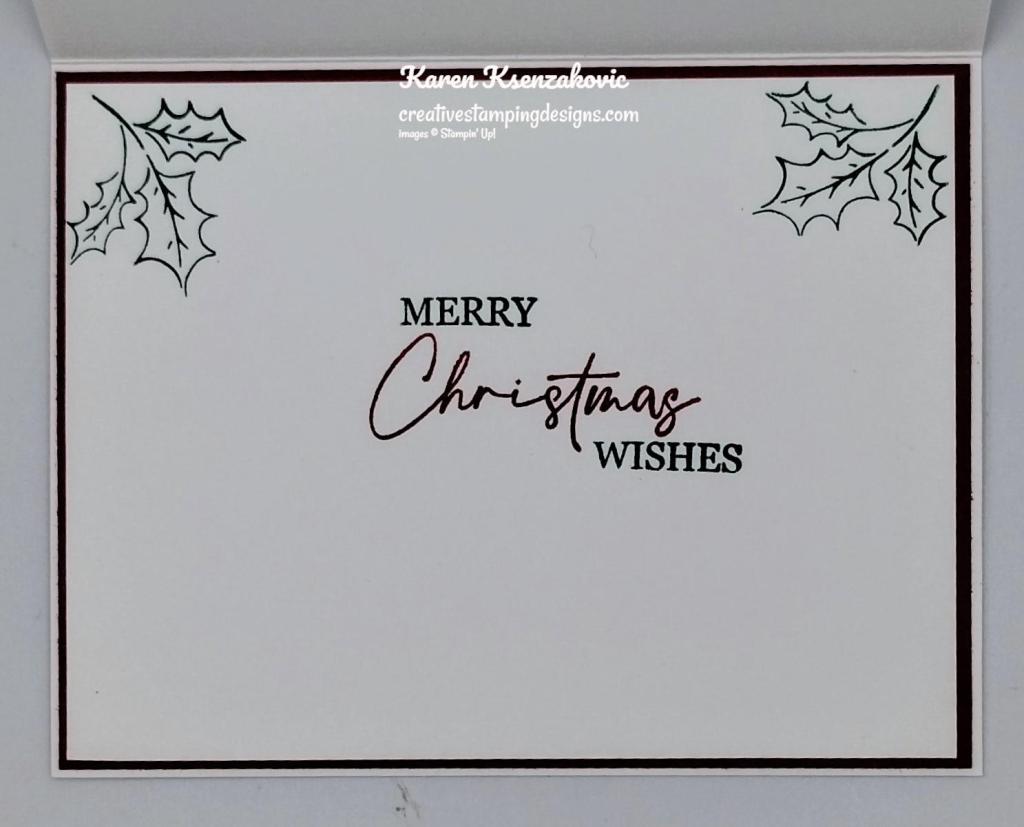
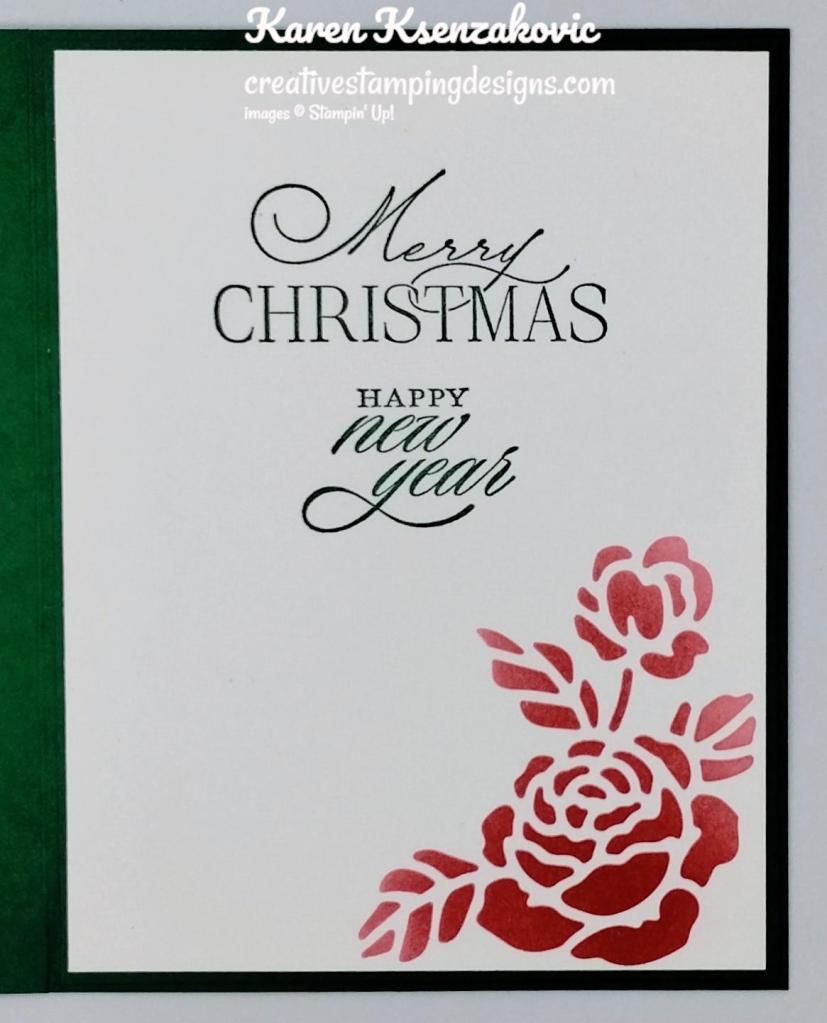
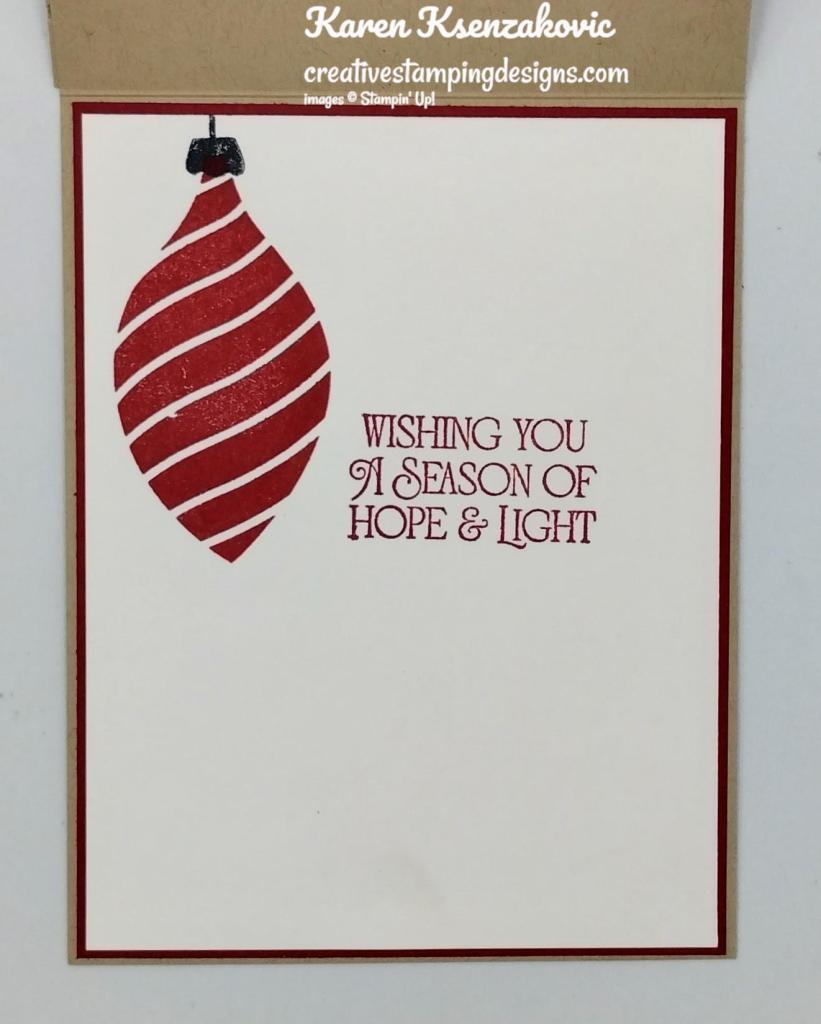
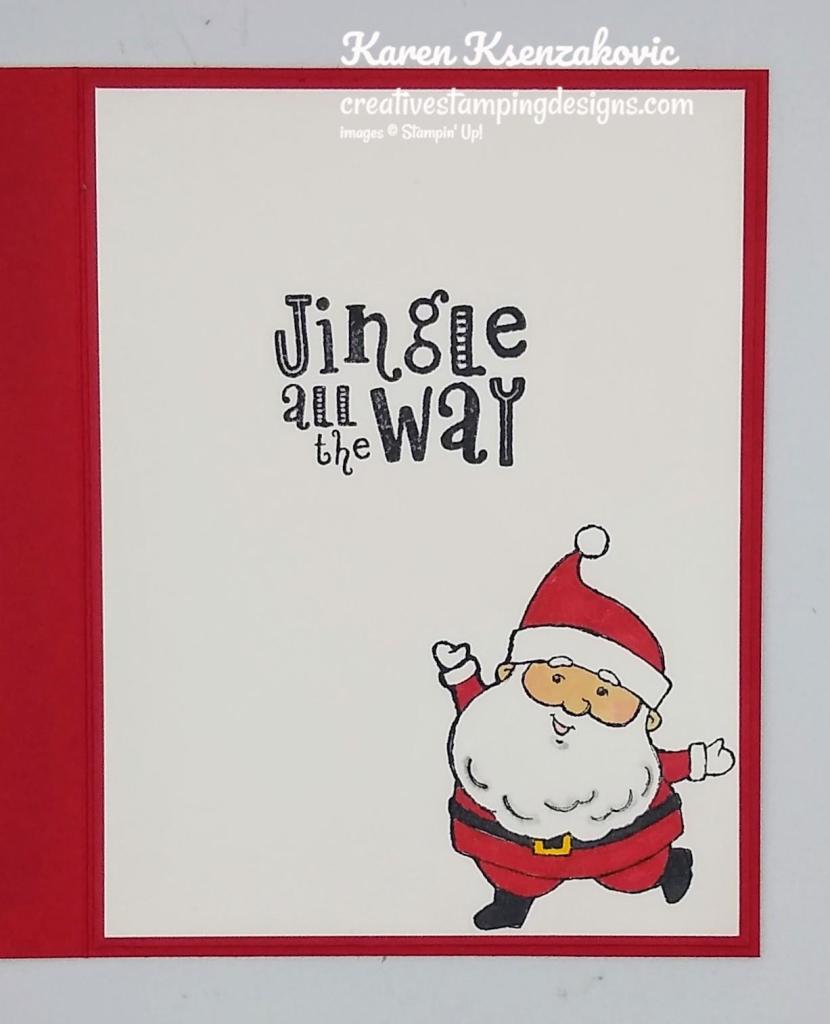
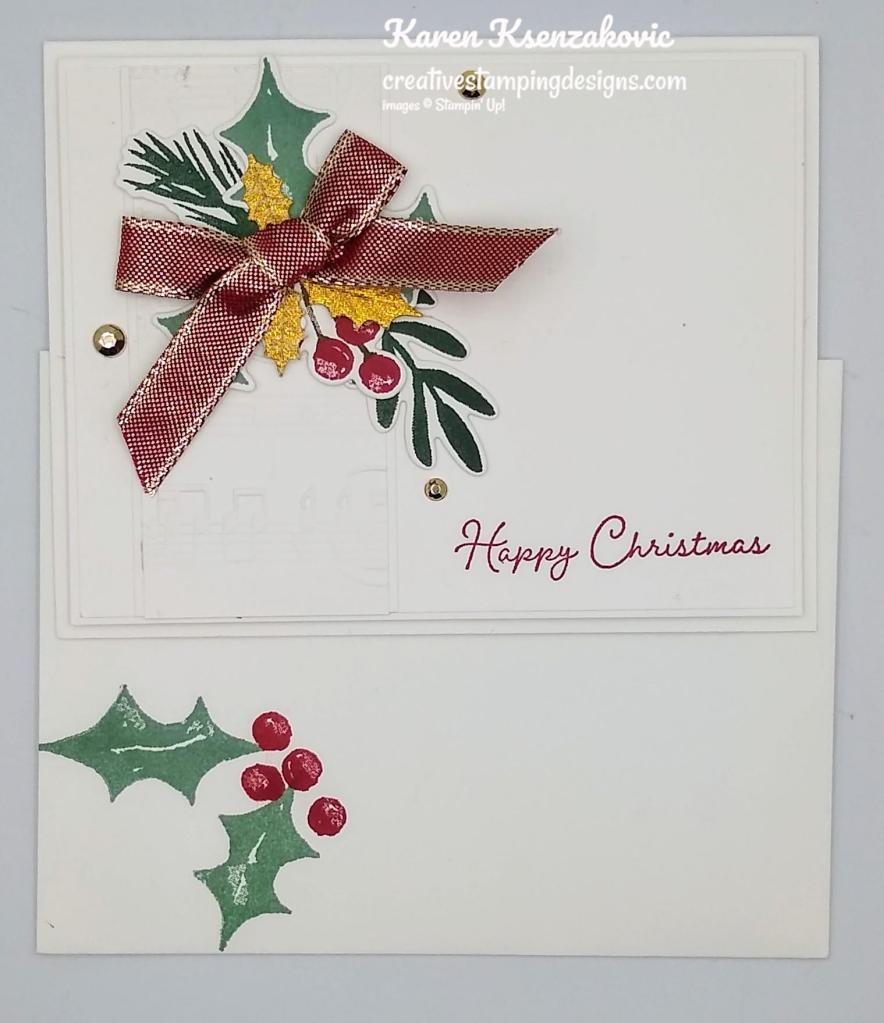
On the inside, I stamped the Christmas sentiment from the Christmas Classics stamp set in Cherry Cobbler Ink on a panel of Basic White. I stamped the Merry & Wishes sentiments from the Christmas Classics stamp set in Shaded Spruce Ink above and below the other sentiment. I stamped the holly leaf image from the Christmas Classics stamp set in Shaded Spruce Ink on the top of the panel. I adhered the Basic Whit panel to a Cherry Cobbler mat then to the inside of the Basic White Thick card base.
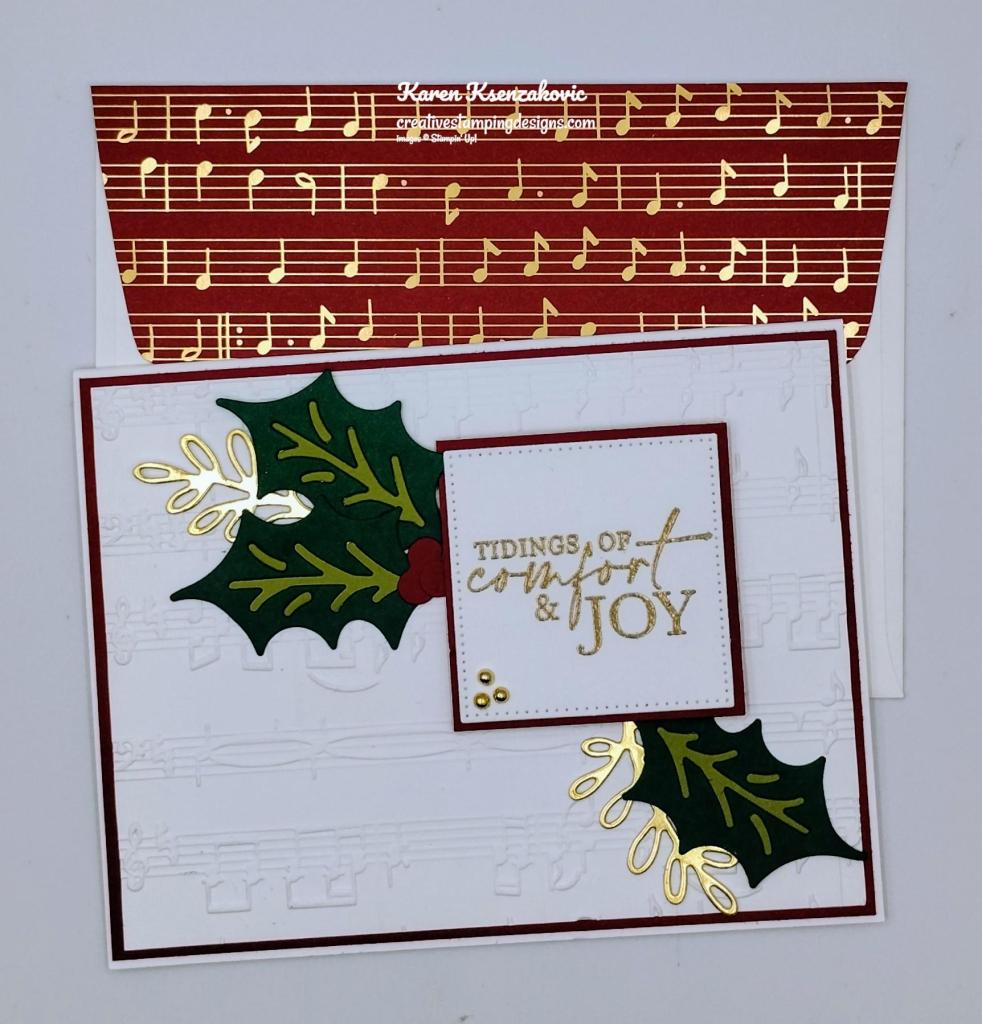
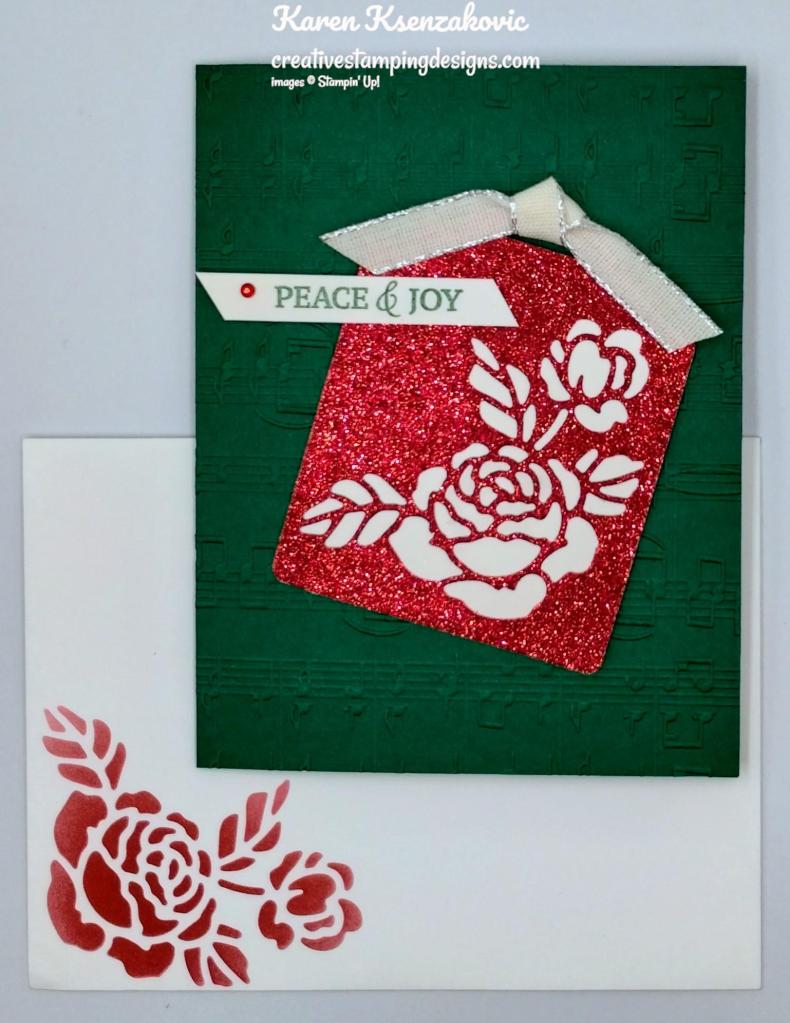
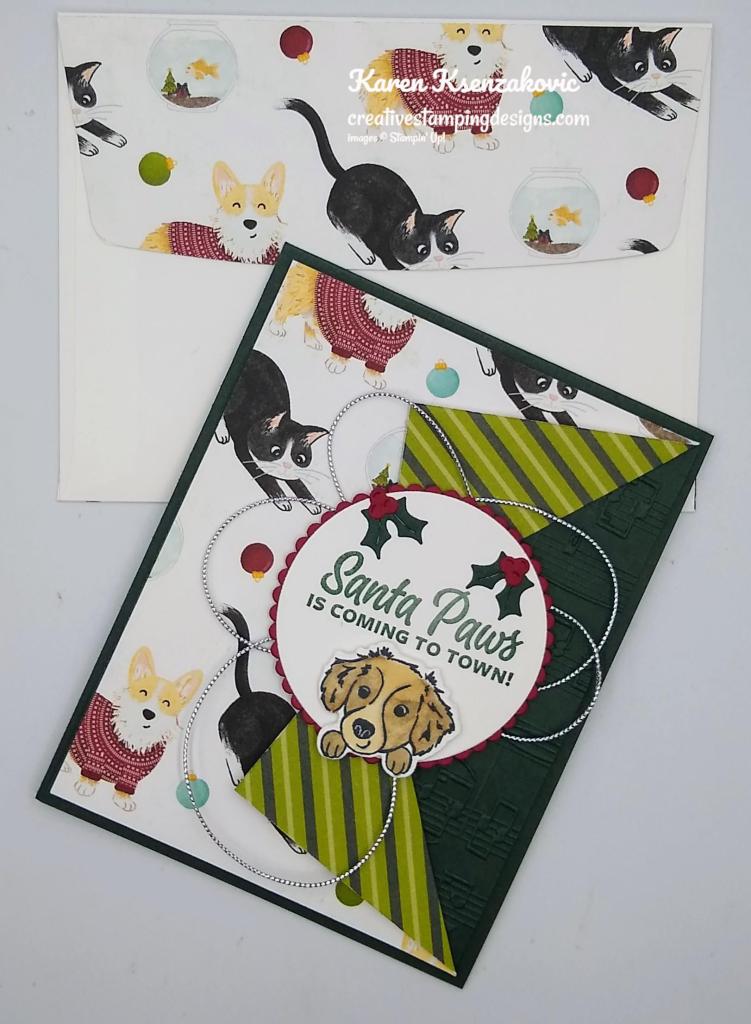
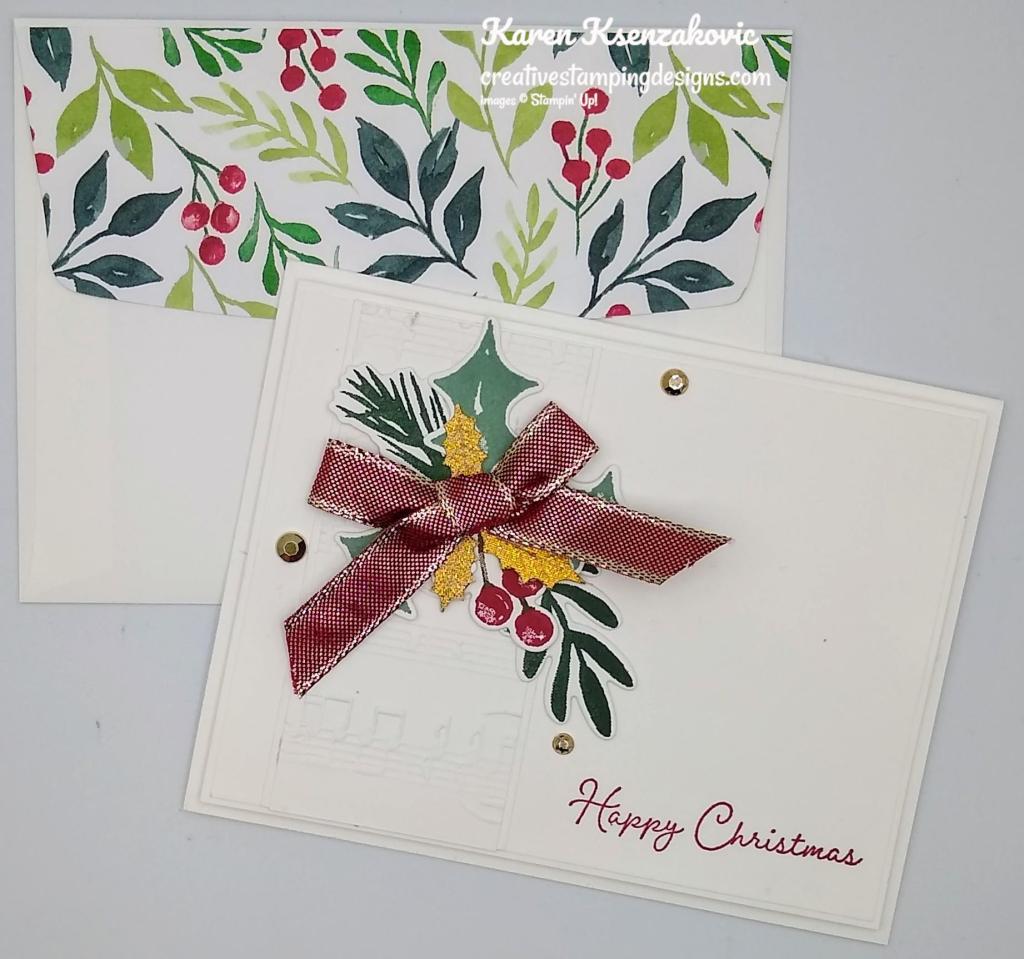
To finish my card, I decorated a Basic White Medium Envelope. I stamped the holly leaf image from the Christmas Classics stamp set in Shaded Spruce Ink on the envelope front. I adhered a panel of Joyful Specialty Designer Series Paper to the envelope flap.
Thank you for stopping by my blog today. I hope you like the card, and you will give it a try. Happy Stamping!!
*********************************************************************************************************
If you need any stamping supplies, I’d love to be your Demonstrator. Just click HERE to go directly to my online store or drop me an email if you have any questions.
MY CURRENT HOST CODE IS: BX4UV6HE
Use this host code when placing an order with me. When you order $50 or greater you will receive a free gift from me! If your order is over $150, please do not use this code, but you’ll still get the free gift. The free gift is your choice of any 1 item valued up to $10.00 from the 2023-2024 Annual Catalog! Unfortunately, packs of cardstock are no longer an option for a free gift. Shipping has become too expensive to ship and it’s costing me as much to ship as the cardstock costs. For any orders $50 or more I will also send you my monthly class tutorials. Click HERE or go to my Customer Rewards for more details and to see what this month’s tutorials are.
Please remember to use my current Host Code and make sure that you can see my name on the final checkout page listed as your Demonstrator when you order so that you know that you’re ordering with me, and you’ll get my rewards!
Happy Stamping, Karen
*********************************************************************************************************
In response to changing policies at Stampin’ Up – I’m adjusting my Ordering Gift policy as well. I’m having to get a little more tough on the adding of Host codes when you place your order thru my Online Store.
Not to worry – you’re still going to get that $10 ordering gift for orders of $50 (before shipping & tax) or greater. And the gift is still any 1 SU! product up to that $10 value – which includes some of our fun Host Sets!
But – if you DO NOT use the Host code for your orders of less than $150 (this is the RETAIL total before Shipping & Handling), then you’ll have two options:
- You’ll need to call Stampin’ Up! (1-800-Stamp-Up) and ask them to add it for you. They’re very helpful and will get it done quickly! OR….
- If your order was over the $50 threshold but under $150, then…you’ll forfeit that $10 ordering gift and rewards – this is the Bummer Option – and I REALLY don’t want to do this, SO please remember to add my Current Host Code.
*********************************************************************************************************
January-April 2024 Mini Catalog Paper Shares Ordering Is Open
Do you want all of the gorgeous new Designer Series Papers in the Stampin’ Up! January-April 2024 Mini Catalog but can’t afford everything? I’m doing a Designer Series Paper Share! What is a Paper Share you ask? It’s a sample of each of the new Designer Series Papers from the Stampin’ Up! January-April 2024 Minil Catalog. If you were to purchase all of the DSP in the new Mini Catalog, it would cost you $108.00 plus shipping.
New Designer Series Paper Share – $15.00 plus $8.50 for Priority Mail Shipping
I’m offering a Designer Series Paper share from the Stampin’ Up! January-April 2024 Mini Catalog and I’d love to have you join!! I’m placing my share order early on January 4th. I’m going to use the expedited shipping option so I should be able to have the shares cut, bundled and back out to you during the week of January 15th.
How my shares work: I order full packs of all of the Designer Series Papers listed below, I cut them into 6″ x 6″ pieces (or 6″ x 12″ pieces for double shares) and give you one panel of each design from each pack on the list. I pack up the paper in a cellophane bag with labels listing the Name, Item # and Colors in the pack and mail it back out to you just as quickly as I can! Shares give you a good working sample of all of the papers so that you can decide which ones to order in full packs!
New Designer Series Paper Share – $15.00 plus $8.50 for Priority Mail shipping
You will receive one 6×6 sheet of each design from the following DSP packs (the number after the name indicates how many 6×6 sheets of that paper pack you will receive):
- Bee Mine – 6
- Forever Love – 6
- Just Kiddin’ -6
- Light Than Air 6″ X 6″ – 8
- Nature’s Sweetest – 6
- Perennial Lavender – 6
- Poetic Expressions – 6
- Rock & Roll – 6
In all, you’ll receive 50 – 6” x 6” sheets of designer or specialty paper!
Double DSP Share – $30 + $8.50 Shipping by Priority Mail – if you’d like double shares of the designer paper, I’m offering those too! I’ll cut the 12″ x 12″ designer paper sheets into 6″ × 12″ so that you’ll be able to get 3 full A2 size card fronts from each sheet and you’ll get double sheets of the 6″ x 6″ since they’re already precut.
As a Thank you gift for joining in on my paper share, I will be including a sampling of some of the new Sale-a-bration DSP that will be available with qualifying orders. I believe there are 5 different DSPs in the Sale-a-bration catalog. I’m not sure yet which ones I’ll be including, it might be 1, 3 or all 5.
Anyone is welcome to join in my share (please note, I can only ship to addresses within the US). If you’d like to join, email the following information to creativestampingdesigns@gmail.com
- Your first and last name
- Your mailing address for paper to be shipped to.
- The email address that is connected to your PayPal account or let me know if you’d like to use Zelle. I will accept Zelle or PayPal for payment. ***You do not need to have a PayPal account to pay the invoice, you can choose to pay by credit card without having a PayPal account. If you’d like to use Zelle, email me and I’ll give you the number associated with my account.
Deadline to sign up for my share is Tuesday, January 2nd at 5:00 PM ET.
Let me know if you have any questions. Thanks!
*********************************************************************************************************
January – April 2024 Mini Catalog and Sale-a-bration Coming Soon

With the Retiring List posted and the Last Chance Sale going on that means a new catalog will be arriving soon. Are you a current customer of mine? If you have placed an order with me in the past year of $50 or more, you will automatically be receiving a copy of the catalogs as soon as I receive them. I’ll be ordering them the beginning of December and will ship them out to you as soon as I get them.
If you are not a customer of mine and would like to be, place an order from my Online Store and a catalog will be on its way to you as soon as I receive them. If you are not sure, please feel free to drop me a line at creativestampingdesigns@gmail.com and I will be happy to let you know.
*********************************************************************************************************
Stampin’ Up! September-December 2023 Mini Catalog Retiring List and Last Chance Products Sale Going On

The September -December 2023 Mini Catalog will be coming to an end soon. It’s always a bittersweet time when a catalog ends and we have to say goodbye to items we love. It’s also an exciting time because a new catalog will be starting.
Starting November 21, 2023 through January 3, 2024 some of your favorite Stampin’ Up! products from the mini catalog will be on sale for up to 60% off. Click Here to view the Last Chance Products in a printable PDF.
You can find the items that will be carrying over from the September -December 2023 Mini Catalog by Clicking Here.
Get those shopping lists ready and start shopping early so you don’t miss out on items you’ve been wanting. Don’t forget the retiring items are only available While Supplies Last!!
*********************************************************************************************************
New Online Exclusives Now Available

Go check out my Online Store for the NEW Online Exclusive products available. Get those orders placed early so you don’t miss out on the pretty new suite and new bundles.
*********************************************************************************************************
All The Best
Subscribe November 11 – December 10

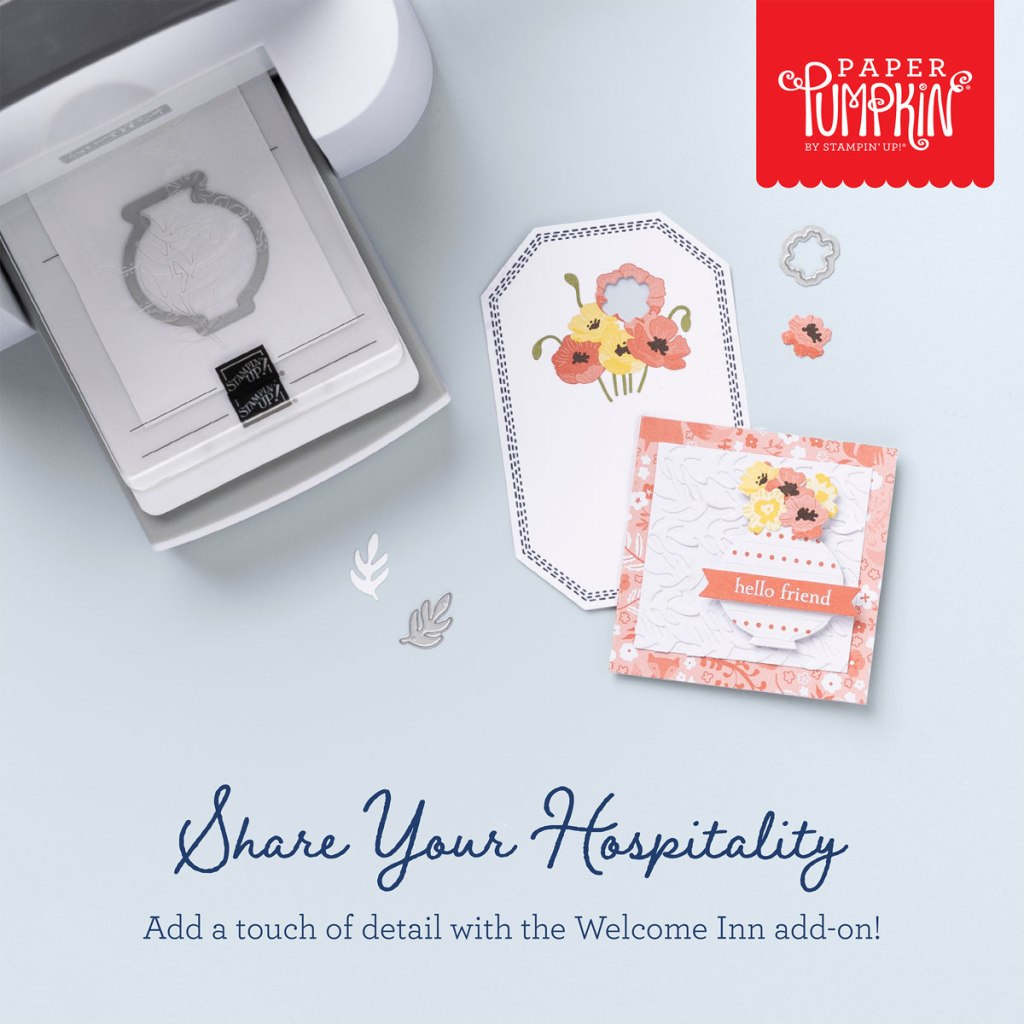
Send a wish to all your loved ones with the December Paper Pumpkin Kit! It comes with nine card fronts, three each of three designs, and nine coordinating envelopes. It has paper pieces detailed with gold foil, embellishments, an all-occasion stamp set, and an acetate box where you can store your finished cards! You can gift the kit itself or the finished product in the acetate box; either way, it’s the perfect last-minute gift for any occasion.
The paper pieces in the December Paper Pumpkin kit have gold foil detailing. Whether it’s an elegant boarder, or woven into the floral artwork, it’s a detail that will surely catch your recipient’s eye! It’s the perfect way to take any paper craft to the next level.
The beauty of the December Paper Pumpkin Kit lies in the hand drawn artwork. The bright blue skies and elegant yellow flowers compliment the different design elements perfectly. It’s a simple yet sophisticated design that will catch any recipient’s eye!
This kit includes:
- 9 cards; 3 each of 3 designs.
- 9 coordinating envelopes.
- 1 Acetate box to fit cards and envelopes from the kit.
- 1 Pebbled Path Stampin’ Spot.
- 1 photopolymer stamp set.
- Embellishments.
- Specialty gold foil die cuts.
- Enough adhesive to finish the project.
- Finished card size: 4-1/4″ x 5-1/2″ (10.8 x 14 cm)
- Coordinating Stampin’ Up! colors: Balmy Blue, Crushed Curry, gold foil, Old Olive, Pebbled Path
Subscribe to the November Paper Pumpkin Kit between 11 November and 10 December by clicking here!
Note: Supplies may be limited toward the end of the subscription period.
*********************************************************************************************************
Card stock cuts for this project:
- Basic White Cardstock 2 – 4″ X 5 1/4″ (card front& inner liner), 2 1/2″ X 2 1/2″ (sentiment)
- Basic White Thick Cardstock 5 1/2″ X 8 1/2 ” (card base scored & folded at 4 1/4″)
- Cherry Cobbler Cardstock 2 – 4 1/8″ X 5 3/8″ (card front & inner liner mat), 2 1/16″ X 2 1/16″ (sentiment mat), 1″ X 1″ (berries)
- Old Olive Cardstock 1 1/4″ X 3″ (holly leaf veins)
- Shaded Spruce Cardstock 1 3/4″ X 5 1/2″ (holly leaves)
- Gold Foil Paper 2: X 3: (sprig)
- Joyful Specialty Designer Series Paper 2 1/4″ X 6″ (envelope flap)
*********************************************************************************************************
Product List
")
")


 Specialty Designer Series Paper")


")


")
")


")
")
 Glimmer Paper")

 Designer Series Paper")


 Metallic Edge Cotton Ribbon")


")
")


")
")


 Designer Series Paper")


")


")


 Designer Series Paper")


 Metallic Ribbon")


