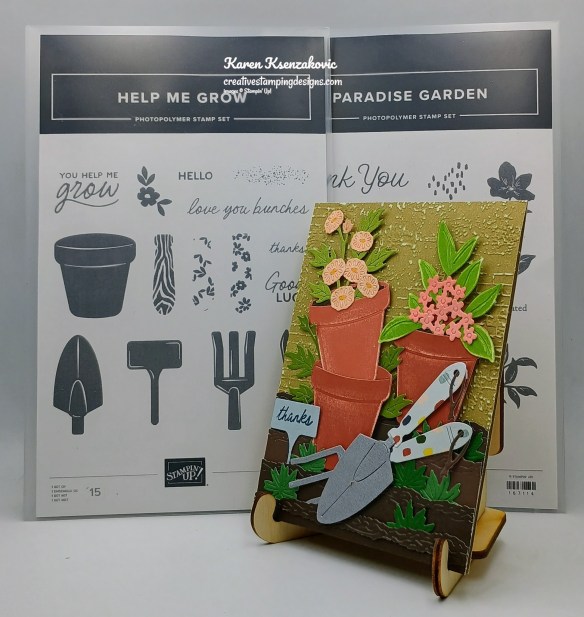
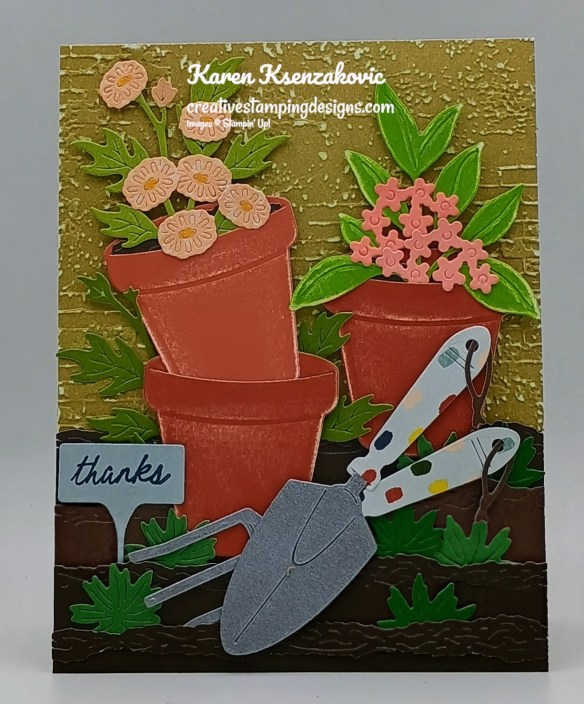
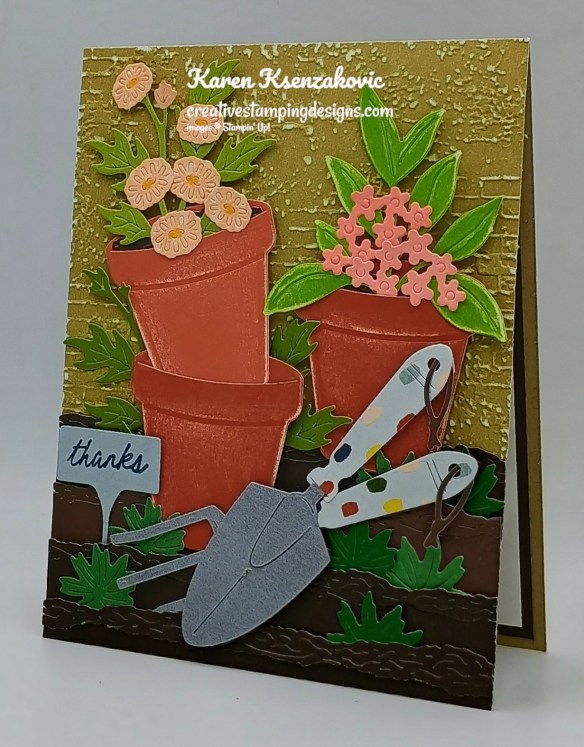
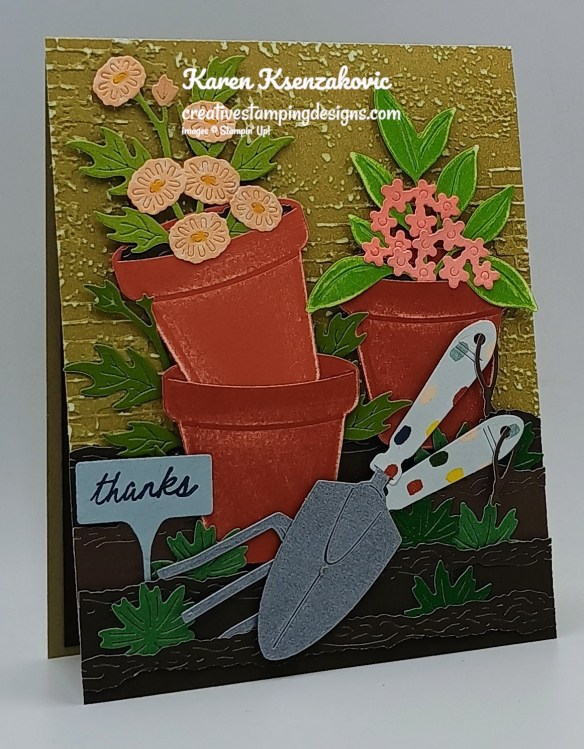
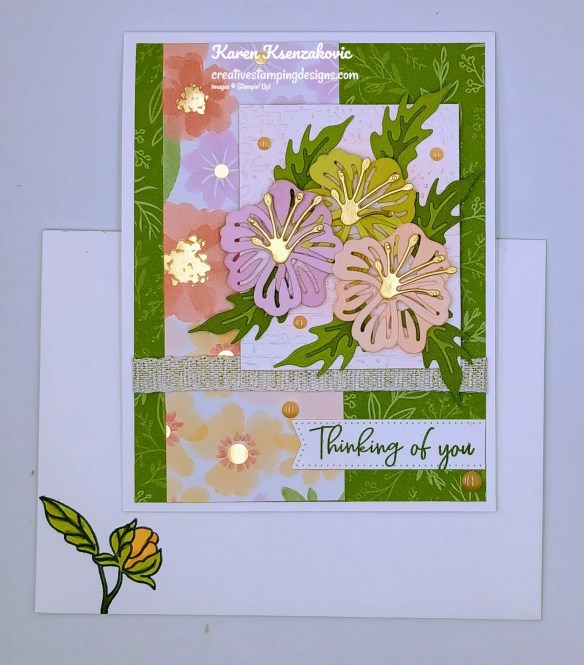
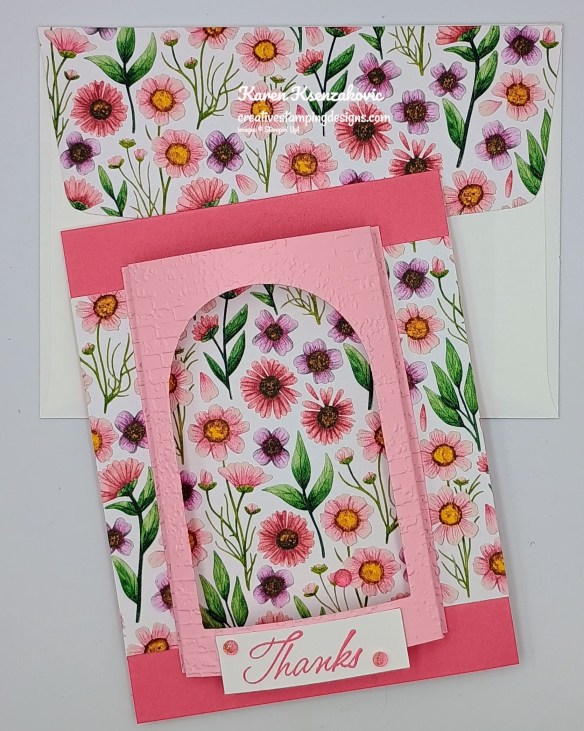
Good Tuesday morning my stamping friends welcome to Amy’s Inkin’ Krew Team Blog Hop. It’s the 2nd Tuesday of the month so that means Blog Hop Day!! If you are starting with me, be sure to hop around to see everyone’s beautiful projects. If you’ve hopped over from Amy’s blog, welcome to my blog and thank you for stopping by. The theme this month is “Celebrate Spring”. I had so much fun playing with this bundle and it’s perfect for those that like to garden. I think everyone needs this set to create with. Here’s my card for today.
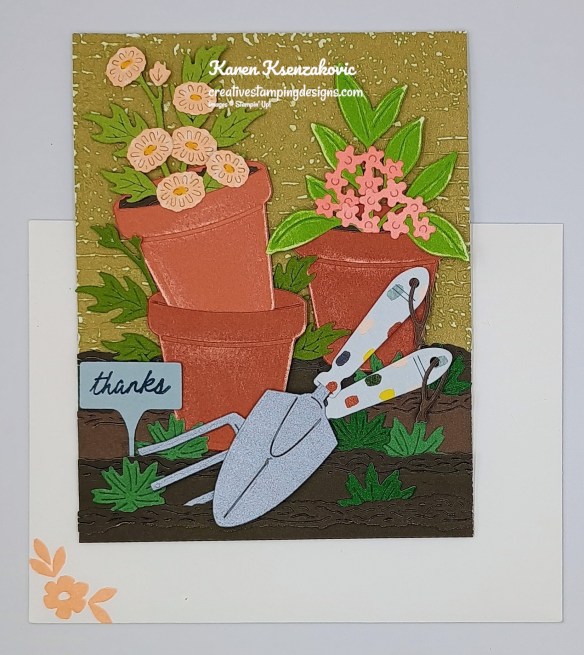
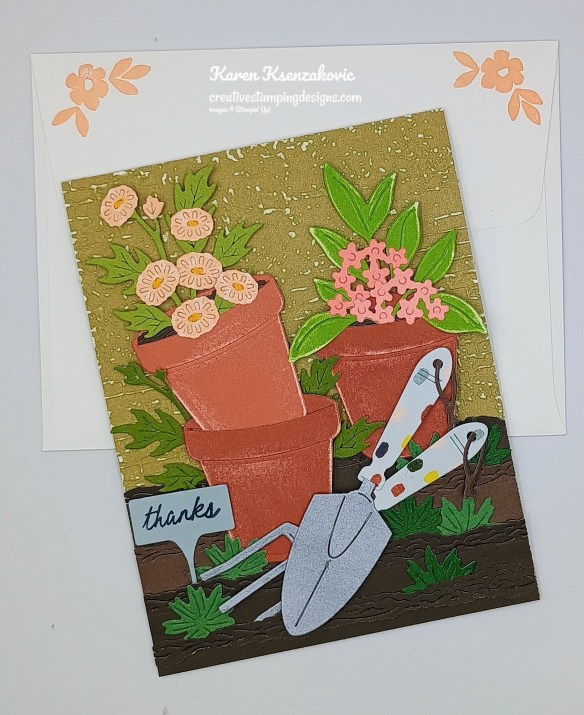
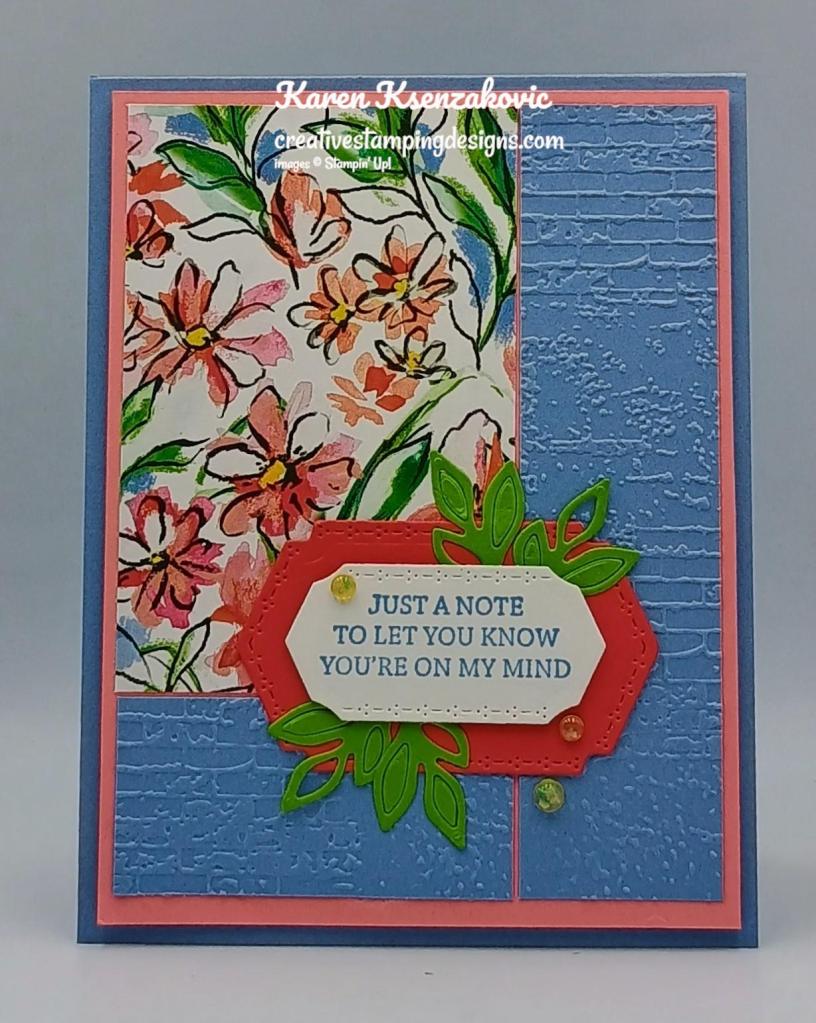
I used the Stampin’ Up! Help Me Grow Bundle, Exposed Brick 3D Embossing Folder and the Stampin’ Up! Paradise Garden Stamp Set for my fun card today.
emboss a panel of Crumb Cake Two-Tone cardstock using the Exposed Brick EF. Use a sanding block to go over the embossed panel. Adhere the embossed panel to the top of a Crumb Cak card base. Cut a panel of Early Espresso Two-Tone cardstock using the dirt edge die from the Help Me Grow Dies multiple times. Layer the panels on the bottom of the card base, not putting glue in the centers.
From panels of the Two-Tone cardstock listed below, die cut the flowerpots, greenery and flowers using the Help Me Grow Dies. Go over some of the die cut images with the Sanding Block. Cut the tool handles from a panel of Boho Vibes DSP along with the larger flowers. Cut the tools from a panel of the new Lunar Lustre Paper.
Adhere the die cut pieces on the card front adhering them with Glue Dots and Stampin’ Dimensionals. From a panel of Cloud Cover, cut the sign die using the Help Me Grow Dies. Stamp the sentiment from Help Me Grow stamp set on the sign in Secret Sea Ink. Adhere the sign to the card front, tucking it in the dirt, with Stampin’ Dimensionals.
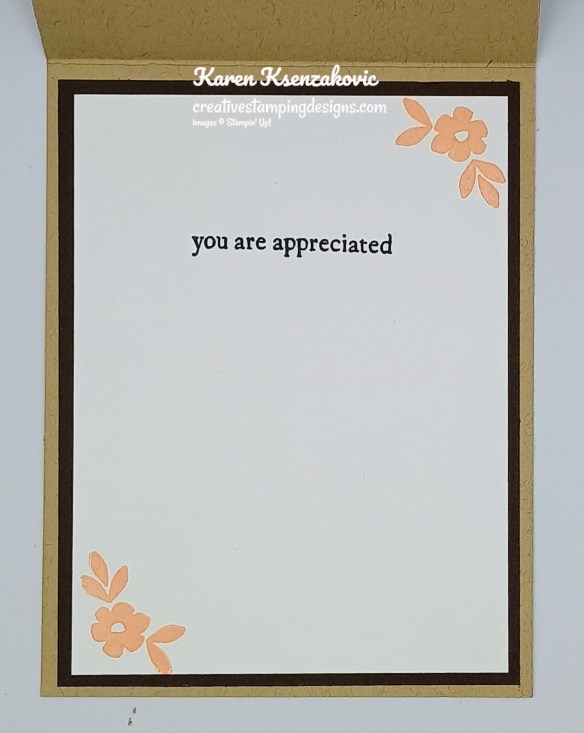
On a panel of Basic White, stamp the sentiment from the Paradise Garden stamp set in Secret Sea Ink. Stamp the small flower image from the Help Me Grow stamp set in Petal Pink Ink on the corners of the panel. Adhere the Basic White panel to an Early Espresso mat then to the inside of the Crumb Cake card base.
Decorate a Basic White Medium Envelope to complete your card. Stamp the small flower image from the Help Me Grow stamp set in Petal Pink Ink on the envelope front and flap.
Thank you for stopping by my blog today. Now that you’ve seen my card, let’s get on with the hop! Click on the Next Blog button to move on to AnnLouise’s project. Happy Hopping.
Just in case you get lost along the way, here is a list of the team members involved in the hop today.
If you need any stamping supplies, I’d love to be your Demonstrator. Just click HERE to go directly to my online store or drop me an email if you have any questions.
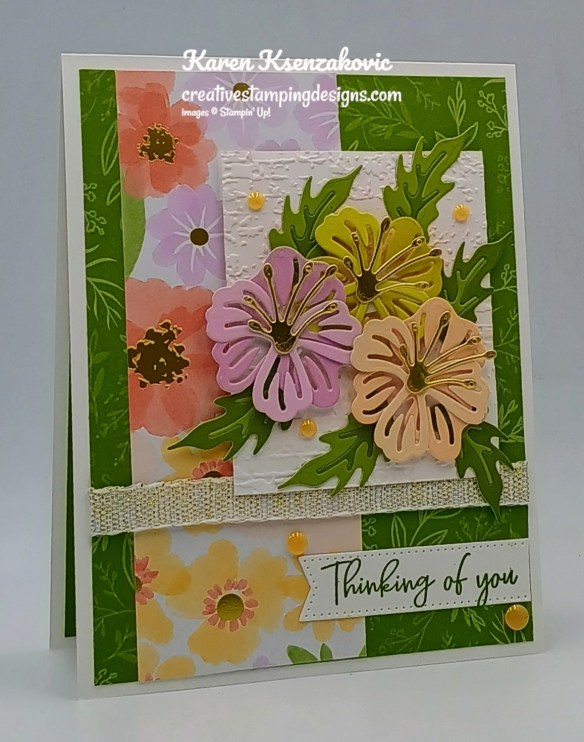
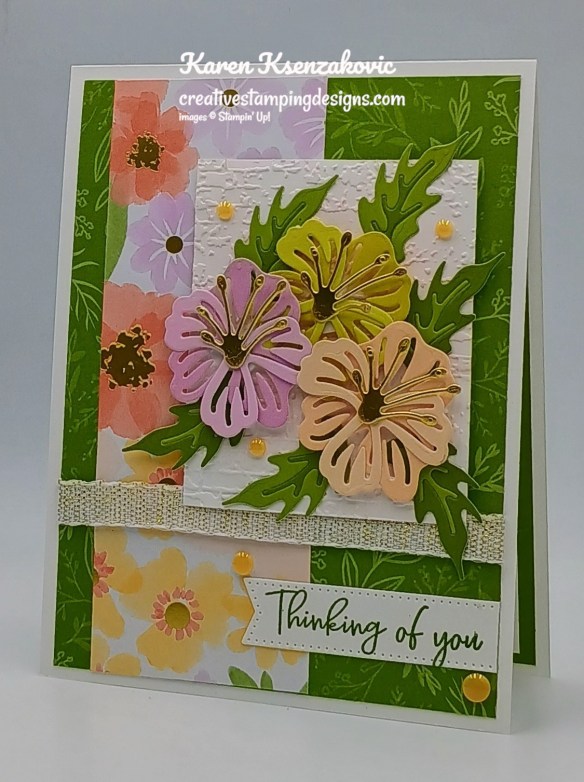
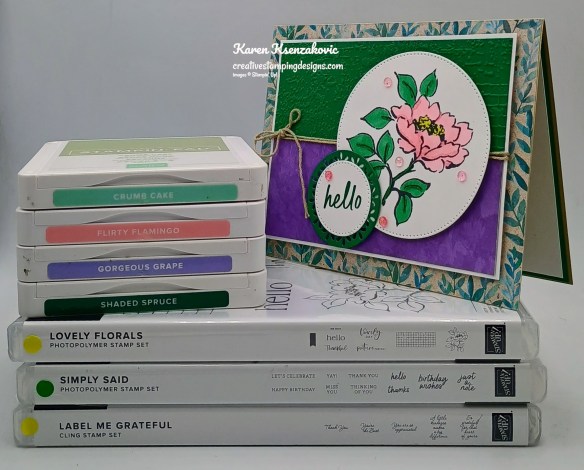
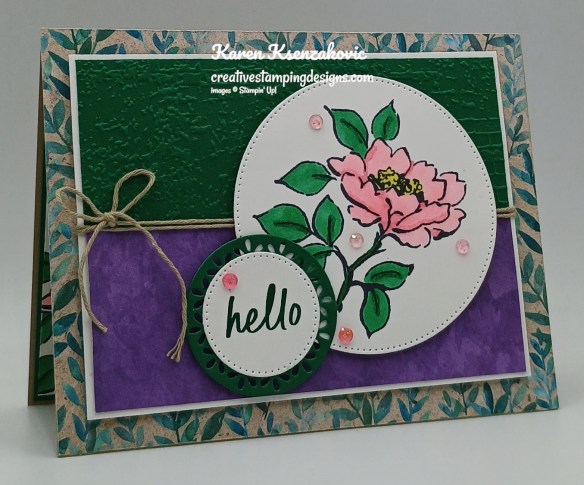
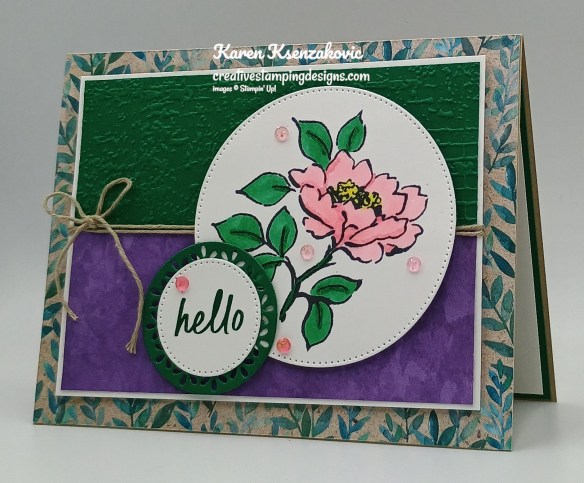
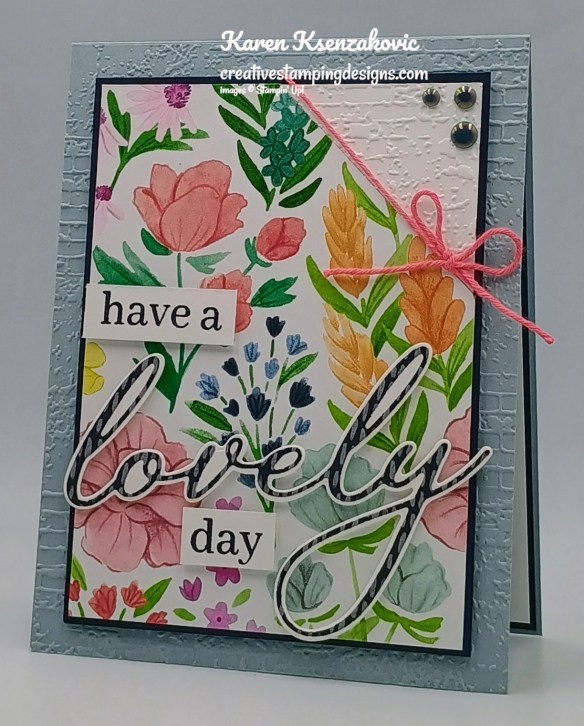
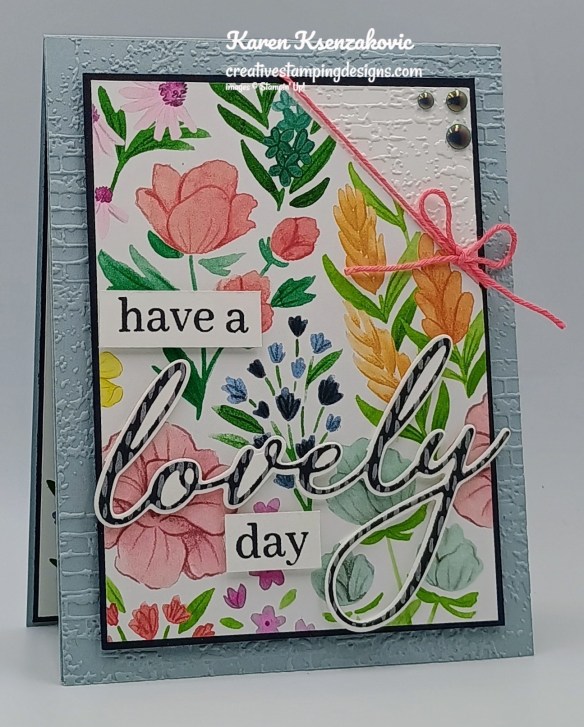
Good Thursday morning stamping friends welcome to our Happy Inkin’ Thursday Blog Hop. If you are starting with me, thank you, I hope you will stop by everyone’s blog to see the awesome projects they have created this week. If you are hopping over from Mary’s blog, thank you for stopping by. This week we have a Color Challenge to work with. If you’d like to see a quick video on how I made this card, Click Here to go to my Instagram Reels. Here is my card using this week’s colors.
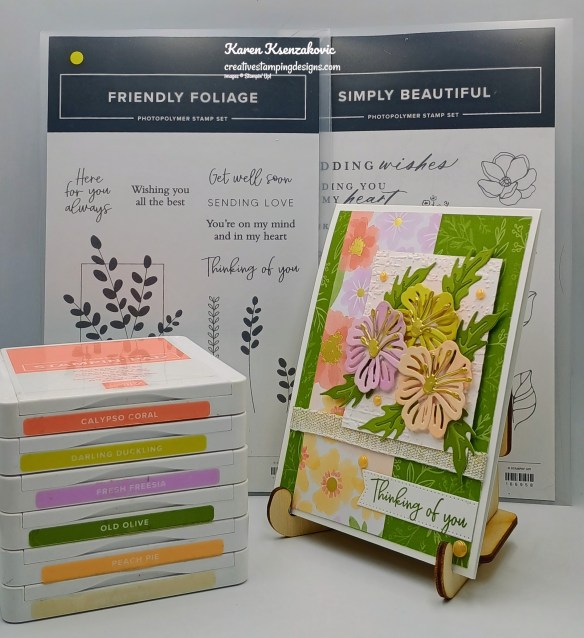
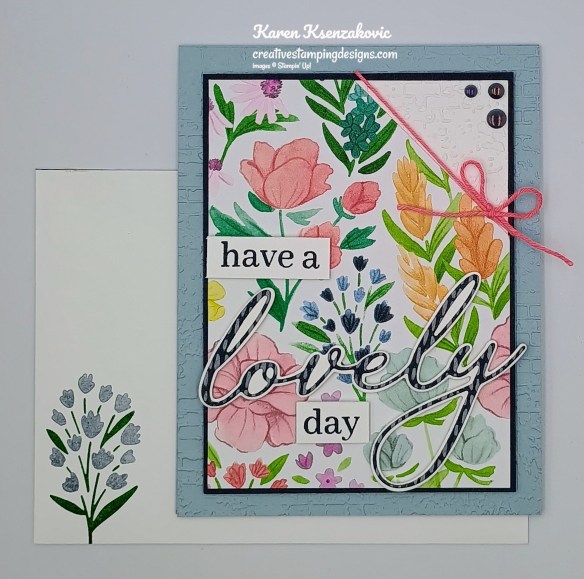
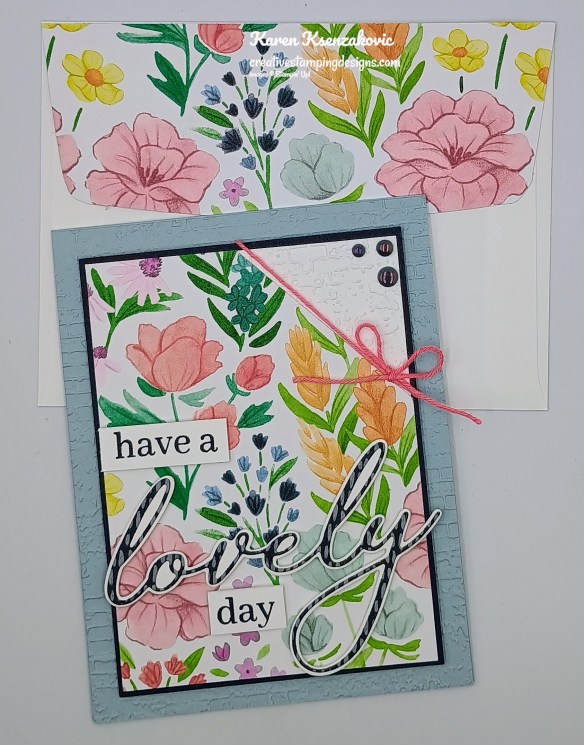
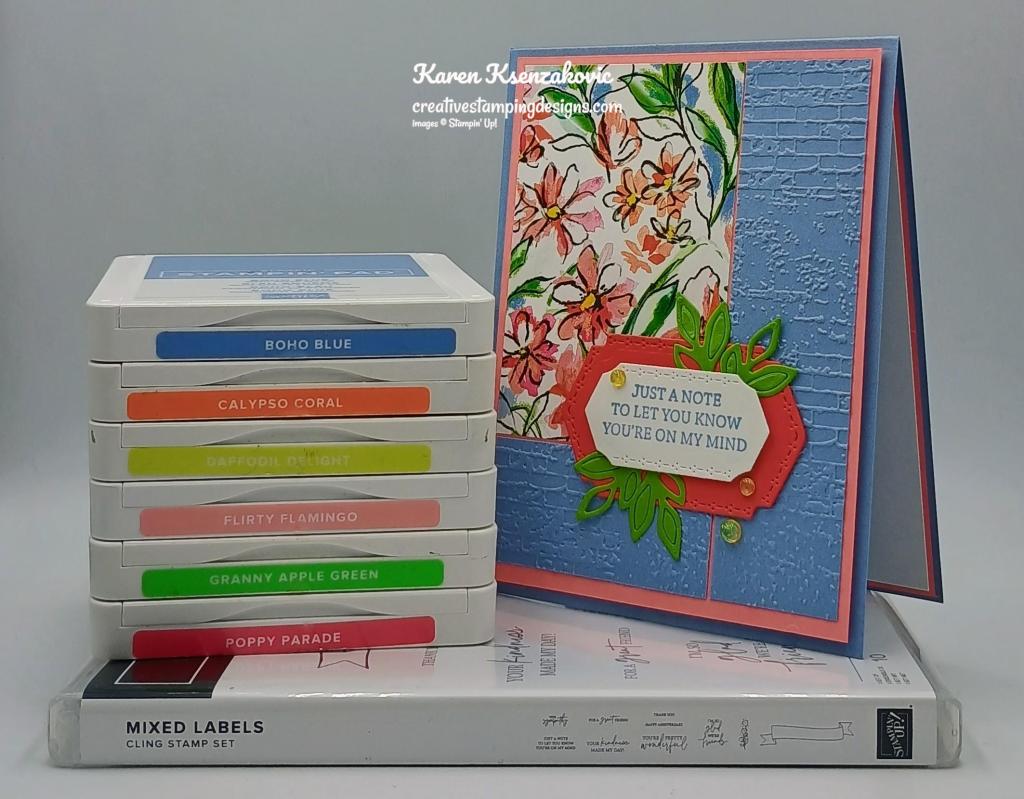
I used the Stampin’ Up! Friendly Foliage Stamp Set along with the Lovely & Beautiful Specialty Designer Series Paper, Exposed Brick 3D Embossing Folder, Stylish Shapes Dies and Stampin’ Up! Simply Beautiful Bundle for my card today.
There are out colors for this week
Adhere a panel of Lovely & Beautiful DSP to another panel of Lovely & Beautiful DSP. Wrap a piece of Gold White 3/8″ Ribbon around the layered panel and adhere it on the back. Adhere the layered panel to a Basic White thick card base.
Emboss a panel of Basic Whtie using the Exposed Brick EF. Using the Simply Beautiful Dies, cut the leaves from a panel of Two-Tone Old Olive cardstock, the flowers from panels of Two-Tone Darling Duckling, Two-Tone Fresh Freesia and Two-Tone Petal Pink cardstocks, and the flower centers from Gold Foil paper. Adhere the flower and leaf pieces together.
Adhere the flowers to the embossed panel with Stampin’ Dimensionals. Adhere the leaves under the flowers. Adhere the artwork panel to the card front with Stampin’ Dimensionals. Stamp the sentiment from Friendly Foliage stamp set in Old Olive Ink on a panel of Basic White. Cut the sentiment out using the Stylish Shapes Dies. Adhere the sentiment to the card front. Add a few 2024-2026 In-Color Flat Pearls to the card front.
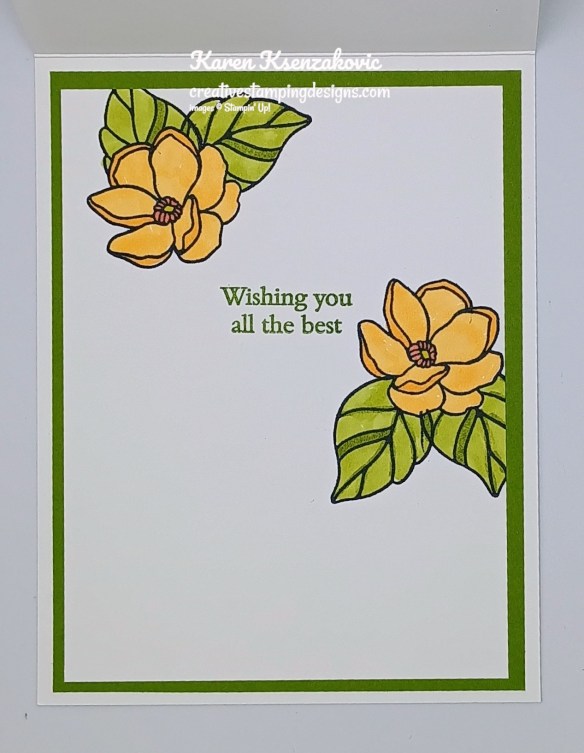
Stamp the sentiment from the Friendly Foliage stamp set in Old Olive Ink on a panel of Basic White. Stamp the small flower and leaf images from the Simply Beautiful stamp set in Tuxedo Black Ink next to the sentiment. Color the images with Old Olive and Peach Pie Stampin’ Blends Markers. Adhere the Basic Whtie panel to an Old Olive mat then to the inside of the Basic Whtie Thick card base.
To complete your card, decorate a Basic White Medium Envelope. Stamp the small flower image from the Simply Beautiful stamp set in Tuxedo Black Ink on the envelope front. Color the image using Old Olive and Peach Pie Stampin’ Blends Markers. Adhere a panel of Lovely & Beautiful DSP to the envelope flap.
Thank you for stopping by my blog today. Now that you’ve seen my card, let’s get on with the hop! Click the next button below to hop over to see what Tara has created. Happy Hopping
Just in case you get lost along the way, here is a list of the team members involved in the hop today.
If you need any stamping supplies, I’d love to be your Demonstrator. Just click HERE to go directly to my online store or drop me an email if you have any questions.
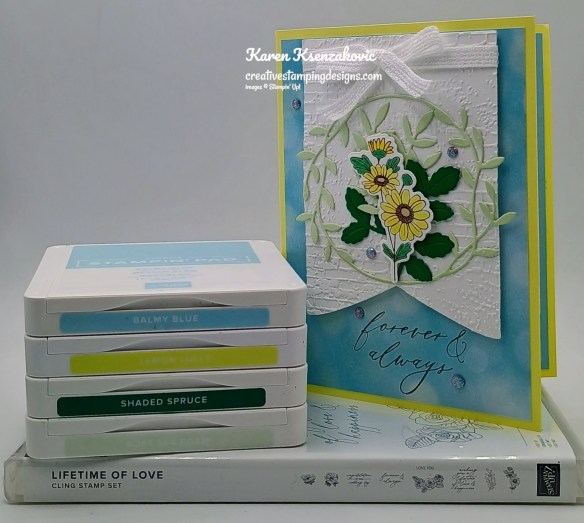
Good Saturday morning stamping friends and welcome to the weekend!! What are you all doing this weekend? I’ll be working all day today.
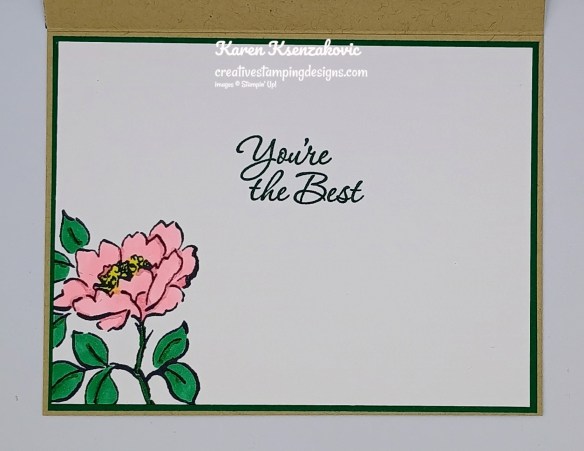
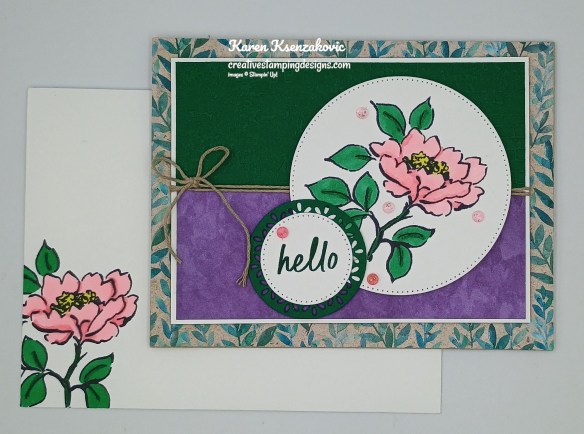
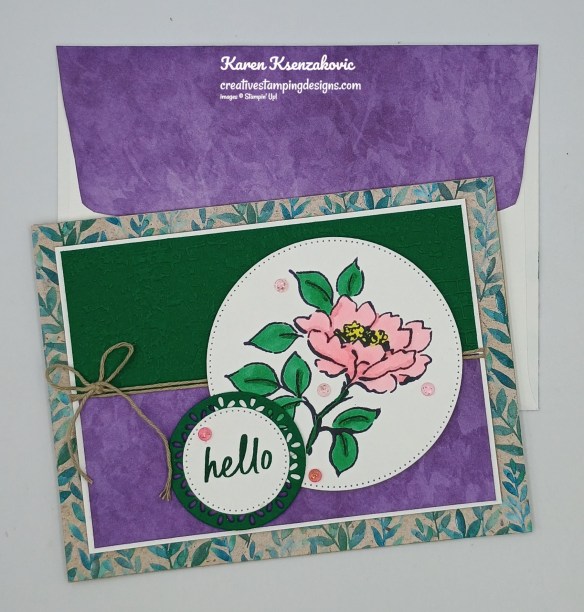
Today’s card was made during our mystery stamping at our Tuesday night meeting. Jaimie sent us the measurements and talked us through assembling it. I decided to mix some new and old products together. Here’s my card for today.
I used the new Stampin’ Up! Online Exclusive Lovely Florals Photopolymer Stamp Set (available Sept 3rd) along with the Perennial Lavender Designer Series Paper, Exposed Brick 3D Embossing Folder, Stampin’ Up! Simply Said Photopolymer Stamp Set, Stylish Shapes Dies, Spotlight on Nature Dies and Stampin’ Up! Online Exclusive Label Me Grateful Cling Stamp Set for my card today.
Adhere the panel of Perennial Lavender DSP to the Crumb Cake card base. Adhere the smaller panel of Perennial Lavender DSP to the Basic White mat. Emboss the panel of Shaded Spruce using the Exposed Brick EF. Adhere the embossed panel to the Basic White mat.
Wrap a piece of Crumb Cake Baker’s Twine around the layered panel 2 times and tie a bow. Adhere the layered panel to the card front with Stampin’ Dimensionals. From a panel of Basic White, cut the largest and 4th largest circle from the Stylish Shapes Dies. Cut the 2nd smallest Spotlight on Nature Die from the panel of Shaded Spruce. On the small Basic White circle, stamp the sentiment from Simply Said stamp set in Shaded Spruce Ink. Adhere the sentiment to the Shaded Spruce die cut circle.
On the large die cut circle, stamp the flower image from the Lovely Florals stamp set in Tuxedo Black Ink. Color the image with Flirty Flamingo, Lemon Lolly and Shaded Spruce Stampin’ Blends Markers. Adhere the large die cut circle to the card front with Stampin’ Dimensionals. Adhere the sentiment to the card front, overlapping the large circle, with Stampin’ Dimensionals. Add a few Strawberry Slush & Pretty in Pink Gems to the card front.
On a panel of Basic White, stamp the sentiment from the Label Me Grateful stamp set in Shaded Spruce Ink. Stamp the floral image from the Lovely Florals stamp set in Tuxedo Black Ink on the bottom of the panel. Color the image with Flirty Flamingo, Lemon Lolly and Shaded Spruce Stampin’ Blends Markers. Adhere the Basic White panel to a Shaded Spruce mat then to the inside of the Crumb Cake card base.
Finish the card by decorating a Basic White Medium Envelope. Stamp the floral image from the Lovely Florals stamp set in Tuxedo Black Ink on the envelope front. color the image the same as for the card. Adhere a panel of Perennial Lavender DSP to the envelope flap.
Thank you for stopping by my blog today. I hope you like the card and will give it a try. Happy Stamping!!
If you need any stamping supplies, I’d love to be your Demonstrator. Just click HERE to go directly to my online store or drop me an email if you have any questions.
My September – December 2025 Mini Catalog and September Online Exclusive Designer Series Paper, Ribbon and Embellishment Shares are open for ordering. You can order just the DSP share, just the Two-Tone cardstock share, just the Ribbon share or just the Embellishment share, or you can it all!!
I’m offering a Designer Series PaperShare, Two-Tone Cardstock Share, Ribbon Share & Embellishment Share from the September-December 2025 Mini Catalog, along with the upcoming September Online Exclusives and I’d love to have you join!! I’m placing my share order early on September 3rd and I’m going to use the expedited shipping option so I should be able to have the shares cut, bundled and back out to you during the week of September 8th. Wouldn’t you love to have all of the gorgeous new Designer Series Papers in the Stampin’ Up! September – December 2025 Mini Catalog and the upcoming September Online Exclusives? What is a Paper Share you ask? It’s a sample of each of the new Designer Series Papers from the Catalog and Online Exclusives. Shares give you a good working sample of all of the papers so that you can decide which ones to order in full packs! If you were to purchase all of the DSP in the new Catalog and Online Exclusives, it would cost you over $165.00 plus shipping and if you were to purchase all the ribbon it would cost you over $75.00.
New Designer Series Paper Share – $21.00 plus $9.00 for Priority Mail Shipping
How my shares work: I order full packs of all of the Designer Series Papers listed below, I cut them into 6″ X 6″ pieces (or 6″ X 12″ pieces for double shares) and give you one panel of each design from each pack on the list. I pack up the paper in a cellophane bag with labels listing the Name, Item # and Colors in the pack and mail it back out to you just as quickly as I can!
New Designer Series Paper Share – $21.00 plus $9.00 for Priority Mail shipping
You will receive one 6×6 sheet of each design from the following DSP packs (the number after the name indicates how many 6×6 sheets of that paper pack you will receive):
All Season Velvet (3)
Autumn Toil (4)
Christmas Tags & More (8)
Earthen Toned Metallic (1)
Elegant Pine Snowflakes (6)
Gathering Together (6)
Lights of Aurora (6)
Modern Christmas (6)
North Pole Delivery (5)
Peaceful Garden (6)
Peaceful Garden Glimmer (3)
Traditions of Christmas (6)
Silent Snowflake (1)
In all, you’ll receive 61 – 6” x 6” sheets of designer or specialty paper!
Double Designer Series Paper Share – $42.00 Plus $9.00 Priority Mail Shipping
As a gift from me for ordering a Double Share of Designer Series Paper, I will include a Greetings For You Mix & Match Ephemera Pack. This gift is only for ordering a Double DSP Share.
Two-Tone Cardstock Share
Have you been wanting to try the Two-Tone Cardstock but didn’t want to buy a whole pack? You can add a share of the 4 different Two-Tone Cardstock packs for an additional $6 or purchase them separately for $6 + $9 Priority Shipping
You will receive one 6×6 sheet of each color from each of the packs (the number after the name indicates how many 6×6 sheets of that paper pack you will receive):
Keeping Traditions (6)
Peaceful Days (6)
Lovely Florals (6)
Sweet Halloween (6)
In all, you’ll receive 24 – 6” x 6” sheets of cardstock!
If you’d like double shares of the designer paper or cardstock, I’m offering those too! I’ll cut the 12″ x 12″ sheets into 6″ × 12″ so that you’ll be able to get 3 full A2 size card fronts from each sheet and you’ll get double sheets of the 6″ x 6″ since they’re already precut.
Ribbon Share – $20.00 plus $9.00 Priority Mail Shipping
All ribbons will come individually wrapped and labeled with the name and number of the product.
One-Fourth of a Roll of each:
Balmy Blue 1/2″ Sheer Ribbon
Black & White & Gold Baker’s Twine
Early Espresso & Old Olive Linen Thread
Irregular Weave 3/8″ Trim
Misty Moonlight & Silver Edged 1/2″ Ribbon
Real Red 1/2″ Shiny Ribbon
Shaded Spruce 7/8″ Ribbon
White 3/8″ Fluffy Trim
Double Ribbon Share – $40.00 Plus $9.00 Priority Mail Shipping and you will be getting 1/2 of the roll or each ribbon.
Embellishment Share – $16.00 plus $9.00 Priority Mail Shipping
I’m also offering an Embellishment Share. I will divide the embellishments up and package them in a cello bag with the name and number for easy ordering, just like I do with the paper and ribbon.
You will receive (approximate # listed:
Cajun Craze & Gold Dots (30)
Dear Dots (40)
Delightful Decorative Dots (36)
Faceted Snowflakes (42)
Frosted Iridescent Dots (40)
Hues of Blue Flowers (32)
Large Gold Hoops (2)
Streaked Dots (32)
Traditional Sparkling Sequins (48)
Double Share of the Embellishments – $32.00 plus $9.00 Priority Mail Shipping
Anyone is welcome to join in my shares (please note, I can only ship to addresses within the US). To make ordering the shares a little easier, I have created a form for you to submit, that way you can order any combination of shares you want. Click Here for the form. I will send out PayPal Invoices by September 1st.
Deadline to sign up for my share is Sunday August 31st at 5:00 PM ET.
I put together a video showing you everything included in my shares Here.
Let me know if you have any questions, I’m more than happy to help you. Thank you for joining in my Shares!!
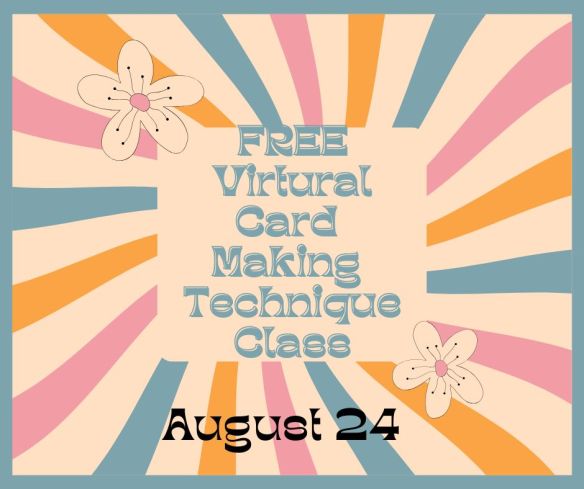
Final Days to Register for our August Online Technique Class
Tara Carpenter, Nicole Bloxom and I are teaming up to offer a fun Technique Online Zoom Class. We will be creating 6 different cards using 6 different techniques. This class is free with a $50 purchase from my Online Store. We will supply a list of supplies we are going to be using in the next couple days. We decided to open registration early so you can take advantage of the Free Shipping and my Double Rewards and also earn a free class.
The class requirements and What You Will Receive:
Visit my Online Store and place a $50 or more order before tax and shipping.
Zoom class with complete step by step instructions to complete each card as we go.
PDF with detailed directions and photos
A Link to the recorded class after we are done so you can watch it again and make more cards.
Here is a list of just some of the items that Tara, Nicole and I will be using.
Charming Day Bundle
Elements of Text stamp set
Artistic Leaves Stamp Set
Two-Tone Cardstock
Fluid 100 Watercolor Paper
Iridescent Treat Bags
Stampin’ Spritzer
Wow Basics Embossing Powder
Heat Tool
Floral Charm DSP
Adhesive Sheets
Stylish Shapes Dies
A week before the class I will send you the complete PDF of the cards so you can cut all your cardstock and gather your supplies, so you are ready to go. We will NOT be cutting cardstock live. Everyone’s cards will be unique since you will pick which color cardstock and ink you want to use for each card.
The class will be held on Sunday August 24th from 1pm – 5pm Eastern Time via Zoom. This will allow everyone all over the United States to participate live!
I will email you the Zoom link to the class a few days before the event.
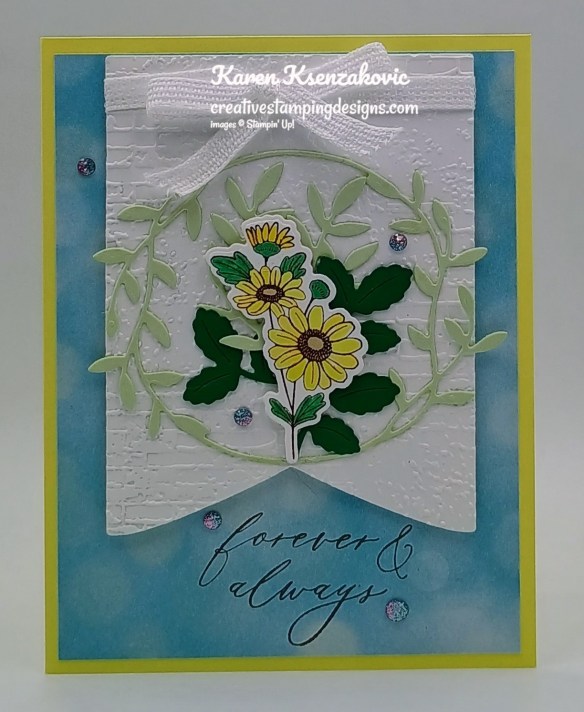
Good Saturday morning stamping friends and welcome to the weekend. I hope you have some plans for the weekend in the work. I actually have off today. I’ll be spending the day celebrating my son and his fiancé at their engagement party. They are making a whole day of it at this quaint brewery. They wanted to keep it simple since that’s who they are. It will be a whole day of everyone coming and going and just getting together to celebrate and meet each other. We took care of ordering A LOT of pizzas. My daughter made about 80 cupcakes yesterday and they came out beautiful. I made caprese appetizer bites using my home-grown tomatoes and basil with a balsamic glaze. I’m looking forward to a fun day meeting everyone and it looks like the weather is going to cooperate with us.
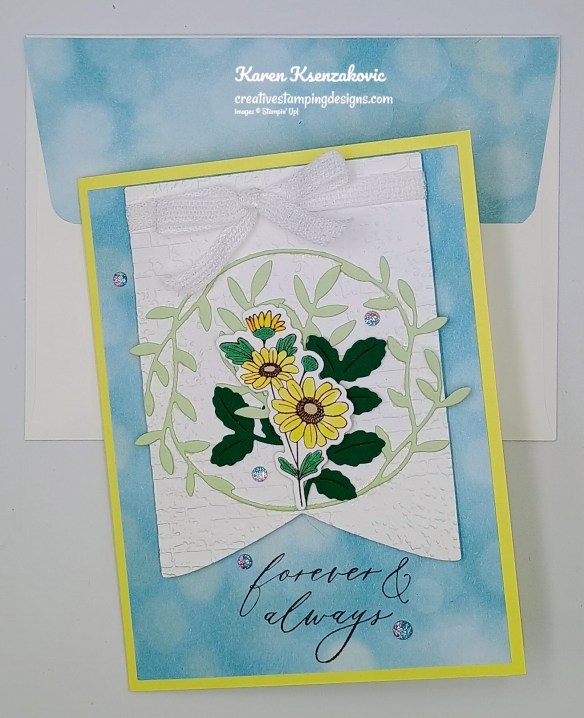
So, since we have an engagement party, my daughter asked me if I would make a card for her to give them. That’s today’s card in the theme colors of the party. If you’d like to see a quick video of how I made this card, Click Here to go to my Instagram Reels. Here is my card for today.
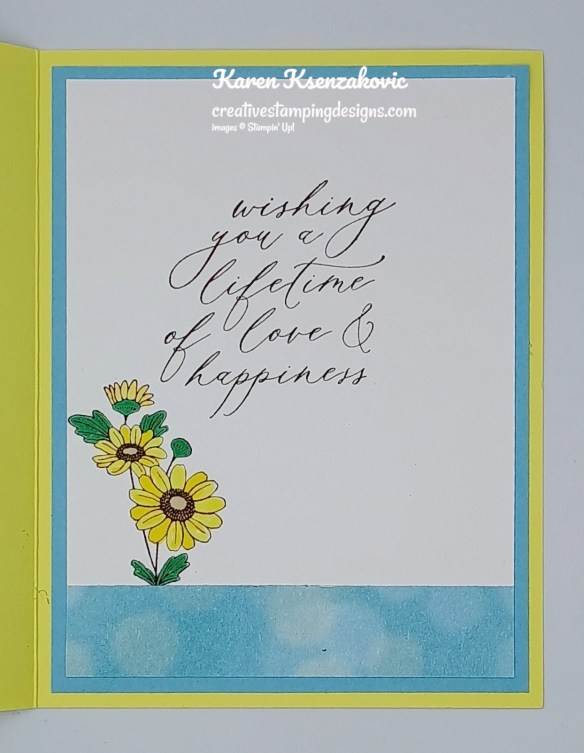
I used the Stampin’ Up! Lifetime of Love Cling Stamp Set along with the Lifetime of Love Dies, Party Banner Dies, Exposed Brick 3D Embossing Folder and Beautiful Bokeh 6 x 6 Designer Series Paper for my card today.
Adhere a panel of Beautiful Bokeh DSP to a Lemon Lolly card base. Stamp the sentiment from Lifetime of Love stamp set in Early Espresso Ink on the bottom center of the panel.
From a panel of Basic White, cut the Party Banner Die and emboss it using the Exposed Brick EF. Wrap a piece of 1/4″ White Ribbon around the top and tie a bow. Adhere the banner to the card front with Stampin’ Dimensionals. On the panel of Basic White, stamp the small flower image from Lifetime of Love stamp set in early Espresso Ink. Color the image with Crumb Cake, Daffodil Delight, Lemon Lolly and Shaded Spruce Stampin’ Blends Markers.
Using the Lifetime of Love Dies, cut the flower image, the small leaf die from a panel of Shaded Spruce and the circle leaf die and tall leaf die from a panel of Soft Sea Foam. Adhere the circle leaf die cut to the banner. Adhere the flower die cut inside the circle with Stampin’ Dimensionals. Adhere the tall leaf and small leaf die cuts under the flower with Glue Dots. Add a few Two-Tone Sparkle Gems to the card front.
Stamp the sentiment from Lifetime of Love stamp set in Early Espresso Ink on a panel of Basic White. Stamp the flower image from the Lifetime of Love stamp set towards the bottom of the panel in early Espresso Ink. Color the image with Crumb Cake, Daffodil Delight, Lemon Lolly and Shaded Spruce Stampin’ Blends Markers. Adhere a panel of Beautiful Bokeh DSP to the bottom of the panel. Adhere the Basic White panel to a Balmy Blue mat then to the inside of the Lemon Lolly card base.
Decorate a Basic White Medium Envelope to finish your card. Stamp the small flower image from the Lifetime of Love stamp set in Early Espresso Ink on the envelope front. Color the image the same as for the card. Adhere a panel of Beautiful Bokeh DSP to the envelope flap.
Thank you for stopping by my blog today. I hope you like the card and will give it a try. Happy Stamping!!
If you need any stamping supplies, I’d love to be your Demonstrator. Just click HERE to go directly to my online store or drop me an email if you have any questions.
Together Let’s Raise Some Money for the Floods in Texas from July 4th
As of last night, July 18th, we’re at $180 of the $500 to be donated. We can Do this!!!
We’ve all been watching – and crying – as we’ve watched the devastation caused by the flooding of the Guadalupe River in Texas on July 4th. It’s beyond horrible. Since there’s really nothing most of us can do that is hands-on – I try to help financially. I’m coming to you for HELP! So…I’m going to do a fundraiser that’ll start right now. I’ve selected Mercury One as the recipient of our donation.
Mercury One is a 501(c)(3) charity that was founded in 2011 by media personality, entrepreneur, and New York Times best-selling author Glenn Beck. It was created to inspire the world in the same way the United States’ space program shaped America’s national destiny by setting a goal and committing to reach it against all odds. The only limitations to achievement are those we place on ourselves, and we believe in the goodness and power of the individual to overcome any obstacle.
How can you help me help them??
Place a Stampin’ Up! Order Thru Me OR Donate Directly!
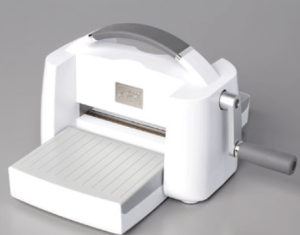
And – as an added incentive – if we hit our donation goal – $500– I’ll be giving away a new Stampin’ Cut and Emboss Machine to one winner!
I’m setting a goal of donating a total of $500 – and here’s how you can help me (and be entered to win a new Stampin’ Cut and Emboss Machine!).
1. – Shop Online:
For any orders placed through my Online Store between now and Saturday July 19,2025, I’ll be making a targeted donation of 20% of your merchandise total to Mercury One for Texas Hill County Flood Victims.
You’ll earn your Creative Stamping Designs Rewards with all order of $50 or more (before tax & shipping).
Anyone ordering $50+ (before tax & shipping) will be entered to win a new Stampin’ Cut & Emboss Machine from me to give away on July 20th.
OR…
2. – Make a Donation of $50+ directly to Mercury One at this LINK
For those in the US, send me a screenshot (to creativestampingdesigns@gmail.com) of the receipt for your donation of $50+ to Mercury One and you’ll be entered to win a new Stampin’ Cut & Emboss Machine from me to be give away on July 20th.
OR…
3. – Do Both!!
If you order $50+ through my Stampin’ Up! Online Store AND donate at least $50 directly to Mercury One, then your name will be entered TWICE to win the Stampin’ Cut & Emboss Machine!
Please note: Per Stampin’ Up! rules, I’m only allowed to ship the Stampin’ Cut & Emboss Machine to addresses in the United States or military APO addresses. Only those with US/APO shipping addresses will be eligible to win the Stampin’ Cut & Emboss Machine. Anyone outside the US is welcome to donate but will not be eligible to win the machine.
NOTE: Orders and/or Donations must be placed by midnight Eastern Time on Saturday July 19 to be entered to win the machine. One winner of the Stampin’ Cut & Emboss Machine will be randomly chosen on Sunday July 20th from all of the entries received.
Any questions, please send me an email to creativestampingdesigns@gmail.com. I appreciate your help more than I can express.
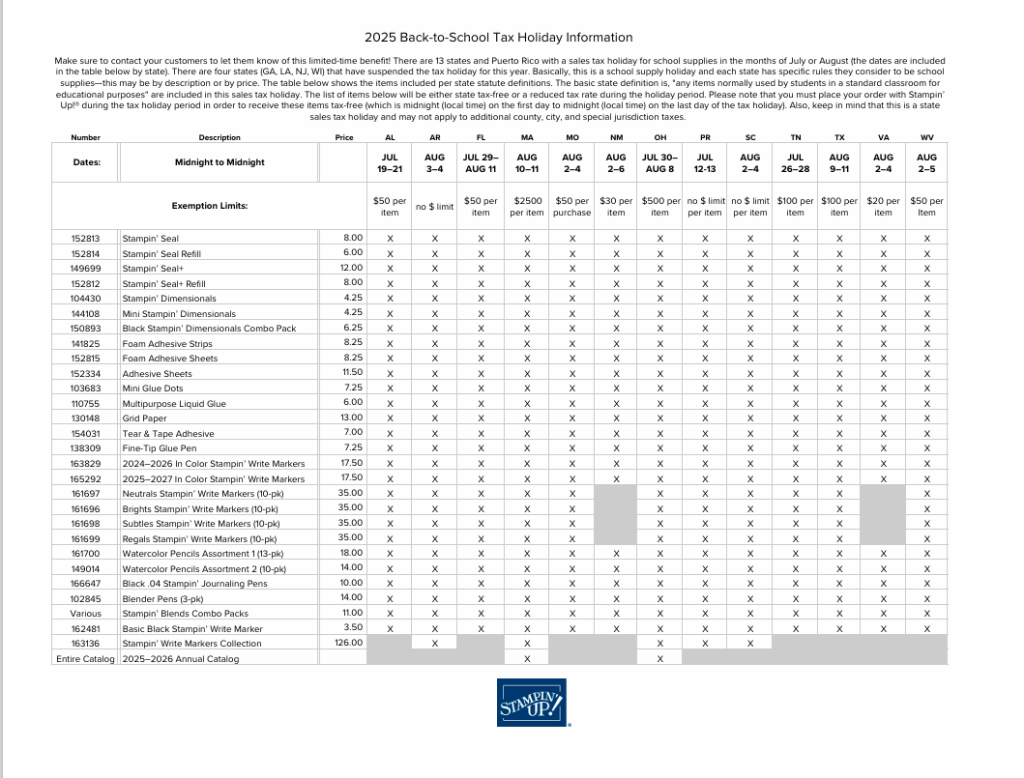
Twelve states and Puerto Rico are having Back-to-School Sales Tax Holidays this year and some Stampin’ Up! items qualify for the tax break in those states!
The states with upcoming tax holidays are: Alabama, Arkansas, Florida, Massachusetts, Missouri, New Mexico, Ohio, South Carolina, Tennessee, Texas, Virginia and West Virginia. So if you live in one of those states or Puerto Rico, take a second to download the spreadsheet below and mark your calendar!
Here is the list of states having sales tax holidays, what the dates are and what supplies will be tax free during the holiday (click on the image to download a full-size printable page):
Please note that you must place your order with Stampin’ Up! during the tax holiday period in your state in order to receive these items tax-free (which is midnight on the first day to midnight on the last day of the tax holiday). Also, keep in mind that this is a state sales tax holiday; the state statute may not apply to county, city, and special jurisdiction taxes.
For those wondering about Georgia, Illinois, Louisiana, New Jersey, and Wisconsin, those states have suspended the sales tax holiday this year.
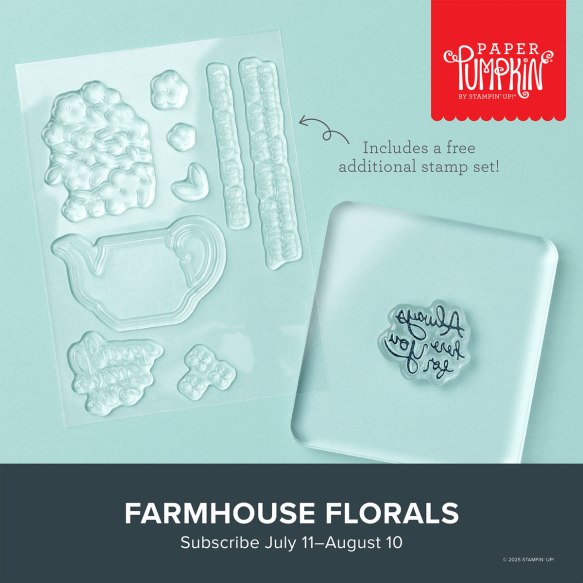
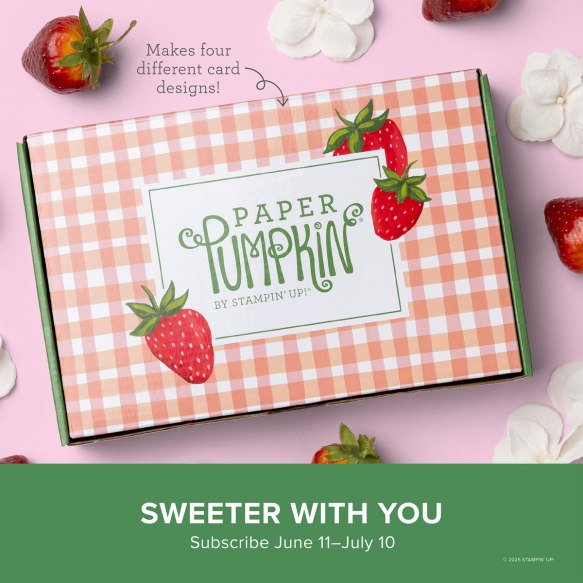
Don’t miss the coordinating Circle of Seasons Dies Add-On!
Make the most of your Paper Pumpkin kits with the Circle of Seasons Dies add-on! Quickly and cleanly cut out a strawberry with a blossom, a circle, a leaf, or an acorn to elevate your crafting projects. These additional dies are designed to work with THREE Paper Pumpkin Kits: the Sweeter with You Paper Pumpkin Kit, the Farmhouse Florals Paper Pumpkin Kit, and the Fall for Toile Paper Pumpkin Kit. Pair these dies with other Stampin’ Up! products for even more creative options! This exclusive add-on (item 167277) coordinates with the three upcoming kits! Paper Pumpkin subscribers can purchase it beginning June 11. Add-on is available only while supplies last, so it’s best to shop early!
DETAILS – 4 dies – Largest die: 2-1/2″ x 1-1/4″ (6.4 x 3.2 cm) – Use with a Stampin’ Cut & Emboss Machine (sold separately)
You must be a current Paper Pumpkin subscriber to purchase this item. To become a subscriber, visit www.stampinup.com/paperpumpkin.
Note: Supplies may be limited toward the end of the subscription period.
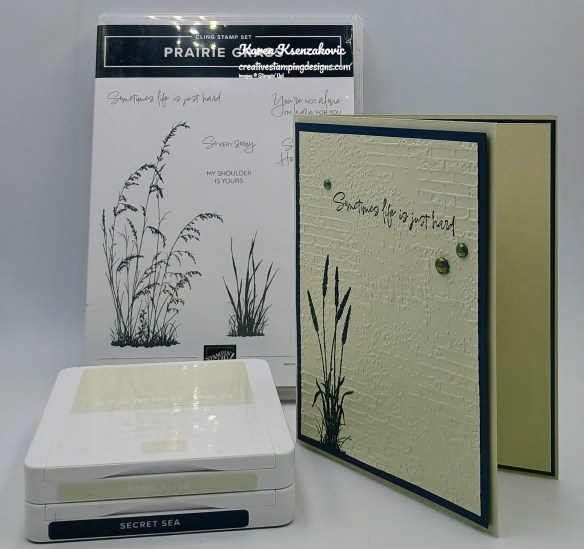
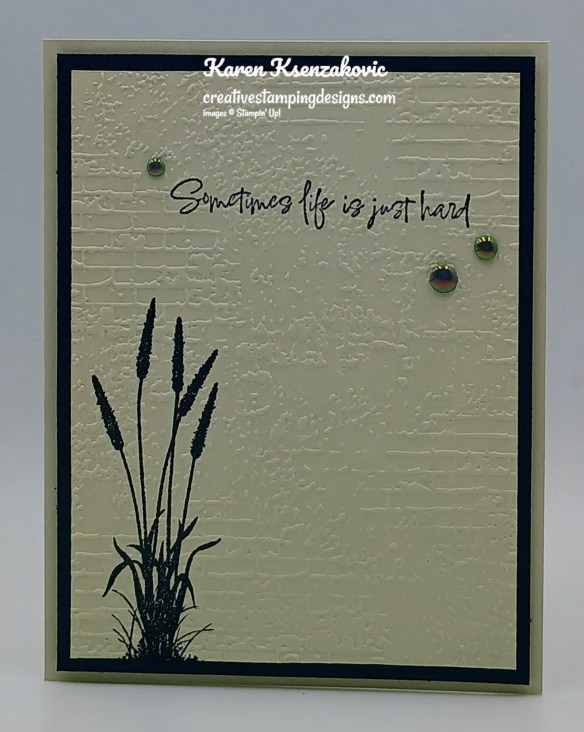
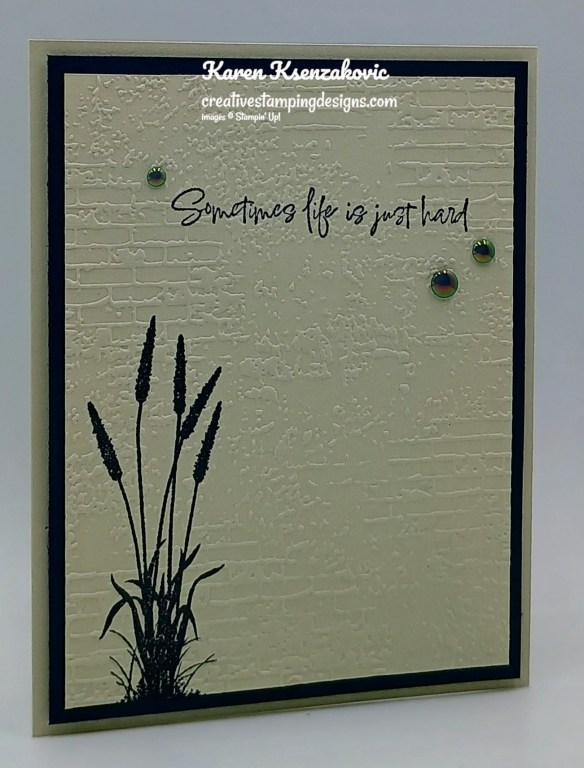
Good Tuesday morning stamping friends. I hope your week has started off well.
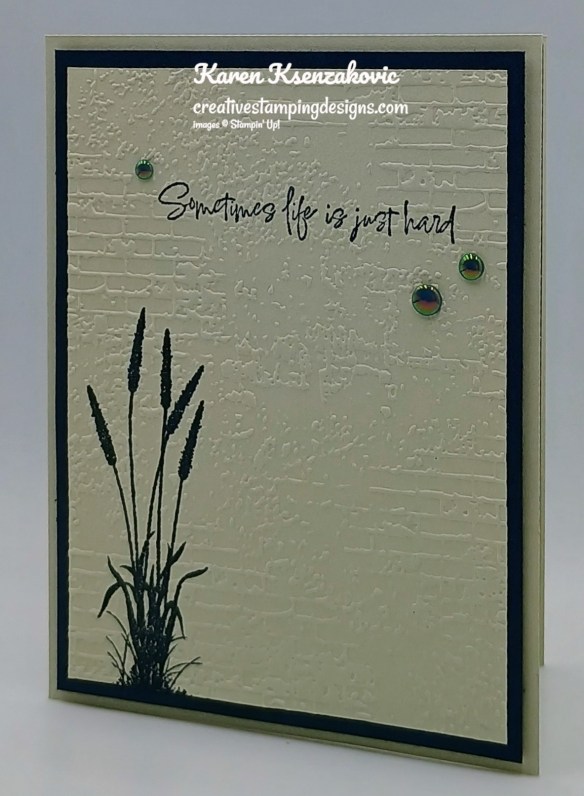
I have a sneak peek for you today of a new Online Exclusive set that will be available starting July 1st. This was one of those sets that I knew I needed as soon as I saw it. If you’d like to see a quick video of how I made this card, Click Here to go to my Instagram Reels. Here’s my card for today.
I used the new Stampin’ Up! Prairie Grass Cling Stamp Set (available July 1) along with the Exposed Brick 3D Embossing Folder for my card today.
Stamp the cattail image from the Prairie Grass stamp set in Secret Sea Ink on the bottom of a Basic Beige card front. Stamp the sentiment from Prairie Grass stamp set in Secret Sea Ink on the top of the panel.
Emboss the card front using the Exposed Brick EF. Adhere the embossed panel to a Secret Sea mat with Liquid Glue.
Adhere the layered panel to a Basic Beige card base with Stampin’ Dimensionals. Add a few 2025 – 2027 In-Color Flat Pearls to the card front.
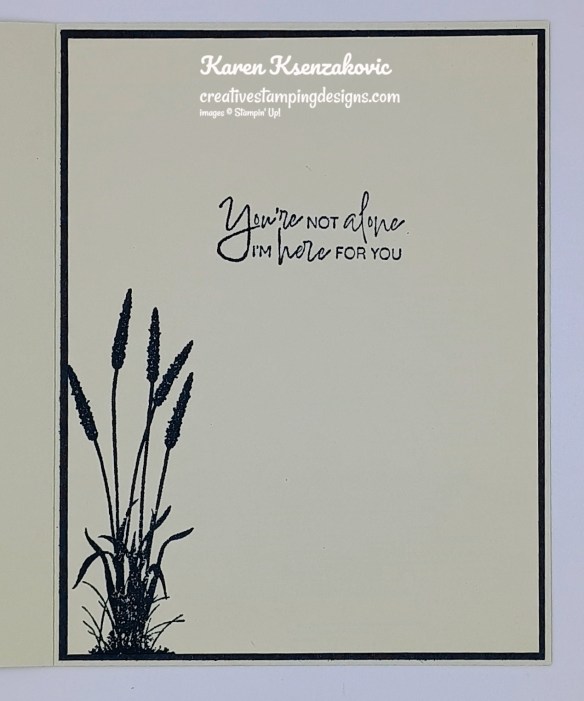
Stamp the sentiment from Prairie Grass stamp set in Secret Sea Ink on a panel of Basic Beige. Stamp the cattail image from Prairie Grass stamp set in Secret Sea Ink on the bottom of the panel. Adhere the Basic Beige panel to a Secret Sea mat then to the inside of the Basic Beige card base.
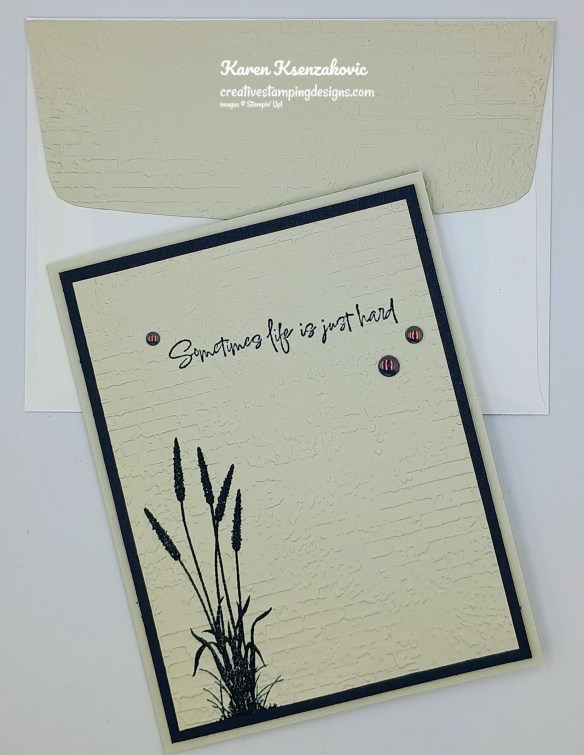
Decorate a Basic White Medium Envelope to finish the card. Stamp the cattail image from Prairie Grass stamp set in Secret Sea Ink on the envelope front. Emboss a panel of Basic Beige using the Exposed Brick EF. Adhere the embossed panel to the envelope flap.
Thank you for stopping by my blog today. I hope you like the card and will give it a try. Happy Stamping!!
If you need any stamping supplies, I’d love to be your Demonstrator. Just click HERE to go directly to my online store or drop me an email if you have any questions.
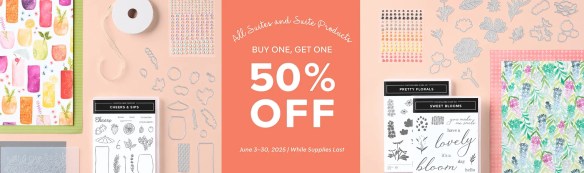
June 3-30, all available suites and suite products from the 2025–2026 Annual Catalog and Online Exclusives are buy one, get one 50% off! If you’ve had your eye on a new suite from the annual catalog or you really like the look of a stamp set from an Online Exclusives suite, you don’t have to choose—you can get both!
Here are the promotion details:
All available suites and suite products from the 2025–2026 Annual Catalog and Online Exclusives are buy one, get one 50% off.
When you shop the sale, the 50% off discount will apply to the lower-priced item (for example, if you buy a suite collection and a stamp set from a suite, the suite would be full price, and the stamp set would be 50% off).
Suite collections are available if all items are in stock; if all items are not in stock, you can still shop the available suite products.
You don’t have to buy a suite and suite products all from the same suite collection for the discount to apply. You can buy any suite products from any suite.
The discount will appear in your cart once you’ve added two items within the sale parameters to your cart.
Products are available only while supplies last.
See and shop all qualifying suites in the Online Store
The sale begins June 3, 2025 at 12:01 AM MT.
The sale ends June 30, 2025 at 11:59 PM MT.
Let me know if you have any questions. YAY for an awesome sale! Get your lists ready and get your orders placed between June 3-30!!
Craft sweet handmade cards featuring sun-kissed strawberries and breezy gingham. • Makes 8 cards: 2 each of 4 designs with 8 coordinating envelopes • Precut paper pieces and vellum accents • Hand-painted card base designs • Coordinating colors: Garden Green (Classic Stampin’ Spot), Granny Apple Green, Pool Party, Poppy Parade, Strawberry Slush, Timid Tiger
Subscribe to the June Paper Pumpkin Kit between 11 June and 10 July by clicking here!
Don’t miss the coordinating Circle of Seasons Dies Add-On!
Make the most of your Paper Pumpkin kits with the Circle of Seasons Dies add-on! Quickly and cleanly cut out a strawberry with a blossom, a circle, a leaf, or an acorn to elevate your crafting projects. These additional dies are designed to work with THREE Paper Pumpkin Kits: the Sweeter with You Paper Pumpkin Kit, the Farmhouse Florals Paper Pumpkin Kit, and the Fall for Toile Paper Pumpkin Kit. Pair these dies with other Stampin’ Up! products for even more creative options! This exclusive add-on (item 167277) coordinates with the three upcoming kits! Paper Pumpkin subscribers can purchase it beginning June 11. Add-on is available only while supplies last, so it’s best to shop early!
DETAILS – 4 dies – Largest die: 2-1/2″ x 1-1/4″ (6.4 x 3.2 cm) – Use with a Stampin’ Cut & Emboss Machine (sold separately)
You must be a current Paper Pumpkin subscriber to purchase this item. To become a subscriber, visit www.stampinup.com/paperpumpkin.
Note: Supplies may be limited toward the end of the subscription period.
Basic Beige Cardstock 5 1/2″ x 8 1/2″(card base scored & folded at 4 1/4″), 3 3/4″ x 5″(card front), 4″ x 5 1/4″(inner liner), 2 1/4″ x 6″(envelope flap)
Secret Sea Cardstock 4″ x 5 1/4″(card front mat), 4 1/8″ x 5 3/8″(inner liner mat)
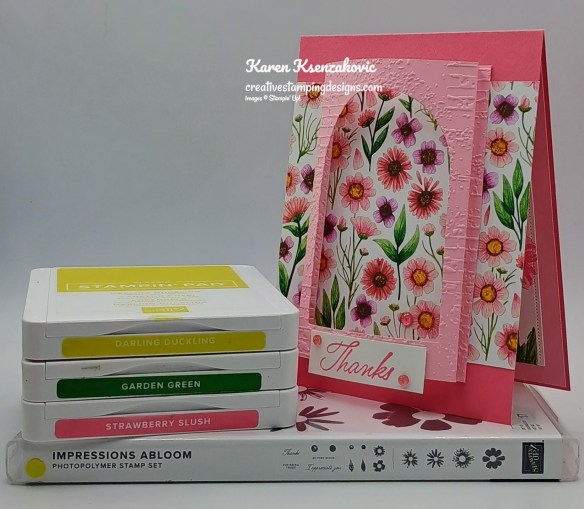
Good Monday morning stamping friends and welcome to a new week. How was your weekend. We ended up having a beautiful one here. Yesterday the humidity lifted and it turned out to be a beautiful breezy day.
Today’s card I played with some Online Exclusive products. I think this is one of my absolute favorite packs of DSP. I love all the flowers and designs in it. If you’d like to see a quick video of how I made this card, Click Here to go to my Instagram Reels. Here’s my card for today.
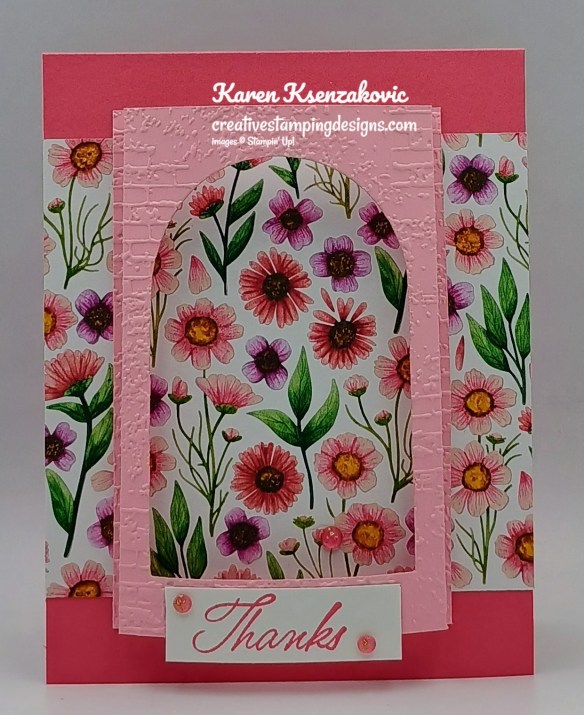
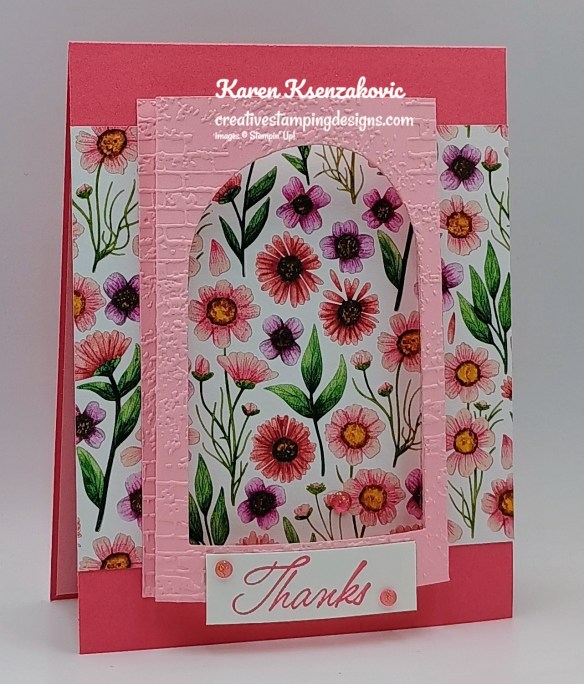
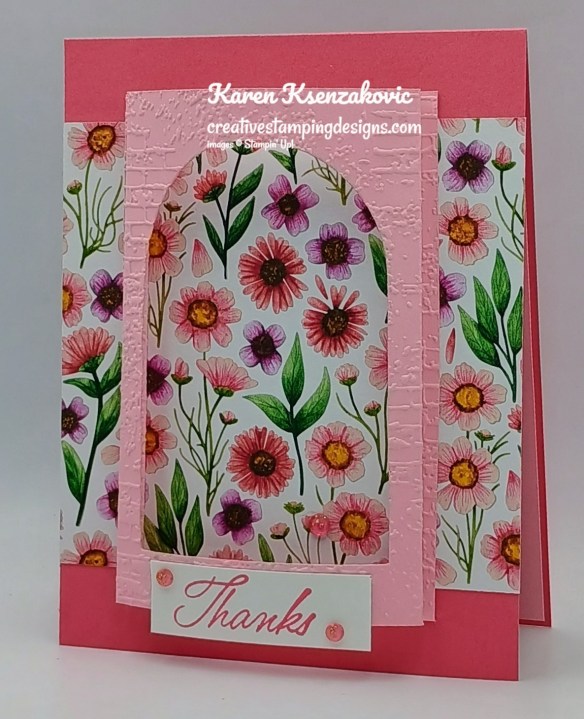
I used the Stampin’ Up! Impressions Abloom Photopolymer Stamp Set along with the Floral Impressions Designer Series Paper, Everyday Arches Dies and Exposed Brick 3D Embossing Folder for my card today.
Adhere a panel of Floral Impressions DSP to a Strawberry Slush card base with Stampin’ Seal.
Using the 6th largest Everyday Arches Dies (expected back in stock the 1st week of June), cut out the center of the Pretty in Pink panel. Score the sides of the panel at 1/4″, 1/2″, 3 3/8″ & 3 5/8″. Emboss the panel using the Exposed Brick EF. Fold the sides on the score lines and adhere it to the card front with Tear & Tape.
On a panel of Basic White, stamp the sentiment from the Impressions Abloom stamp set in Strawberry Slush Ink. Adhere the sentiment to the bottom of the arch with Liquid Glue. Add a few Strawberry Slush Gems.
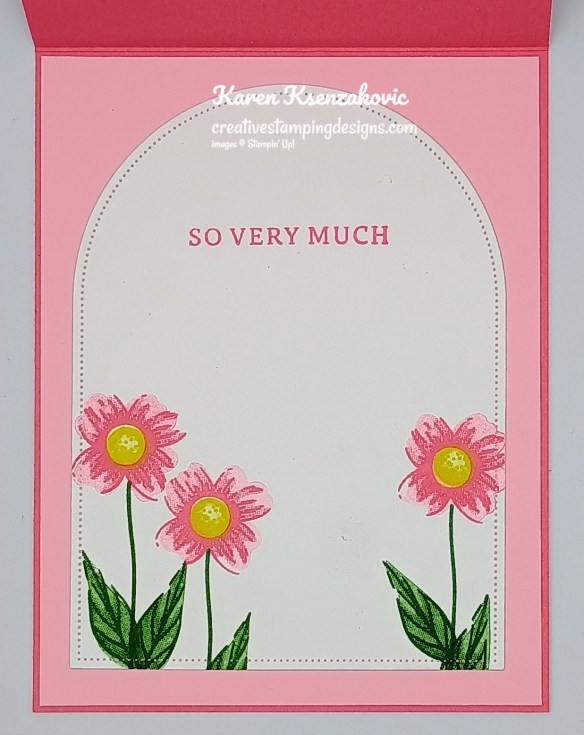
Stamp the sentiment from Impressions Abloom stamp set in Strawberry Slush Ink on a panel of Basic White. Cut the panel using the 2nd largest Everyday Arches Dies. Stamp the stem image from the Impressions Abloom stamp set in Garden Green Ink 3 times on the bottom of the panel. Stamp the detailed leaf image from Impressions Abloom stamp set on the stems. Stamp the solid leaf image in Garden Green Ink, stamping off once on scrap paper, over the detailed images. Stamp the detailed flower image from Impressions Abloom stamp set in Strawberry Slush Ink on the stems. Stamp the solid flower image in Strawberry Slush Ink, stamping off once on scrap paper, over the detailed images. Stamp the flower center image in Darling Duckling Ink. Adhere the Basic White panel to the Pretty in Pink mat then to the inside of the Strawberry Slush card base.
Decorate a Basic White Medium Envelope to finish your card. Stamp the stem and leaf images from Impressions Abloom stamp set in Garden Green Ink on the envelope front. Stamp the detailed flower image in Strawberry Slush Ink on the stem. Stamp the solid flower image from Impressions Abloom stamp set in Strawberry Slush Ink, stamping off once on scrap paper, over the detailed image. Stamp the flower center in Darling Duckling Ink. Adhere a panel of Floral Impressions DSP to the envelope flap.
Thank you for stopping by my blog today. I hope you like the card and will give it a try. Happy Stamping!!
If you need any stamping supplies, I’d love to be your Demonstrator. Just click HERE to go directly to my online store or drop me an email if you have any questions.
Stampin’ Up!’s BIGGEST Starter Kit Joining Special May 6th – 31st
May is an awesome time to join my Stampin’ Up! Team!! Have you ever thought about joining the Stampin’ Up! community? Are you into scrapbooking and have you seen all the new scrapbook products Stampin’ Up! has? Is your wish/want list pretty long and do you order often? Wouldn’t you love to get all these products at a discount? Why not consider joining the Stampin’ Up! community between May 6-31, and save a minimum of 20% off everything you buy? Are you new to stamping and don’t know where to start, but would like to join to save? Ask me for help, I’m here to help and assist you anyway that I can.
Stampin’ Up!’s BIGGEST Starter Kit Special will be available for a limited time! Between May 6–31, anyone who signs up to be a demonstrator can pack their Starter Kit with $165 USD worth of products for only $99 USD. That’s an extra $66 USD in products!
Crafting is even more fun with community, and there’s never been a better time to join then with Stampin’ Up!’s BIGGEST Starter Kit Special. Become a demonstrator and enjoy all the perks that come with that, like a 20–25% product discount, exclusive early access to new products, the chance to attend incredible training and crafting events like Stampin’ Up!’s OnStage and Creativity Now, and so much more!
If you join my team, I’m offering free classes to my team members. Tara Carpenter and I run Online Zoom classes and we decided that our direct team members will receive the classes for free. You’ll get the PDF and the link to the Online Zoom class along with the replay.
There is never an obligation to sell. You can join just to enjoy the discount for yourself along with all the other Demonstrator benefits. Once you join, you’ll get at least a 20% discount on all of your Stampin’ Up! merchandise purchases and you get to order early from the upcoming catalogs and Online Exclusives! You will also be able to attend the OnStage Events and any other events Stampin’ Up! has and you get to be a part of our awesome Stampin’ Up! team!
Unsure about this and want to talk? Contact me at creativestampingdesigns@gmail.com and we can talk. You can also find additional information Here at Join My Team. Being a part of the Stampin’ Up! Community is one of the best decisions I’ve ever made. I have made many friends along the way while doing what I love, Paper Crafting. This Joining offer is only good starting May 6 – May 31. Why not give it a try? I’d love to have you on my team.
Send your loved ones elevated cards with heartfelt sentiments! • Makes 9 cards: 3 each of 3 designs with 9 coordinating envelopes • Envelopes and card bases with decorative gold foil • Precut paper pieces and unique sentiment labels • Coordinating colors: Berry Burst, Cajun Craze, Early Espresso, Mossy Meadow, Pretty Peacock (Classic Stampin’ Spot), Timid Tiger Coordinates with the Floral Charm Suite Collection (item 166141)
Subscribe to the June Paper Pumpkin Kit between 11 May and 10 June by clicking here!
Don’t miss the coordinating Hugs Abloom Dies Add-On!
Make the most of your Paper Pumpkin kits with the Hugs Abloom Dies add-on! Quickly and cleanly cut out a flower, leaf sprig, sentiment label, or Hugs sentiment to elevate your crafting projects. These additional dies are designed to work with THREE Paper Pumpkin Kits: the Inked Occasions Paper Pumpkin Kit, the Mountain Majesties Paper Pumpkin Kit, and the Full of Charm Paper Pumpkin Kit. Pair these dies with other Stampin’ Up! products for even more creative options!
DETAILS – 4 dies – Largest die: 2-1/2″ x 1-1/4″ (6.4 x 3.2 cm) – Use with a Stampin’ Cut & Emboss Machine (sold separately)
You must be a current Paper Pumpkin subscriber to purchase this item. To become a subscriber, visit www.stampinup.com/paperpumpkin.
Note: Supplies may be limited toward the end of the subscription period.
Good Saturday morning stamping friends and welcome to the weekend. It’s supposed to be another rainy and cold one here in NJ. I hope you have some plans in the works, I’ll be working all day today.
We did some mystery stamping at our monthly meeting on Tuesday. This was a fun card to make. Jaimie sent us measurements and we all assembled our cards together live. Here’s my card for today.
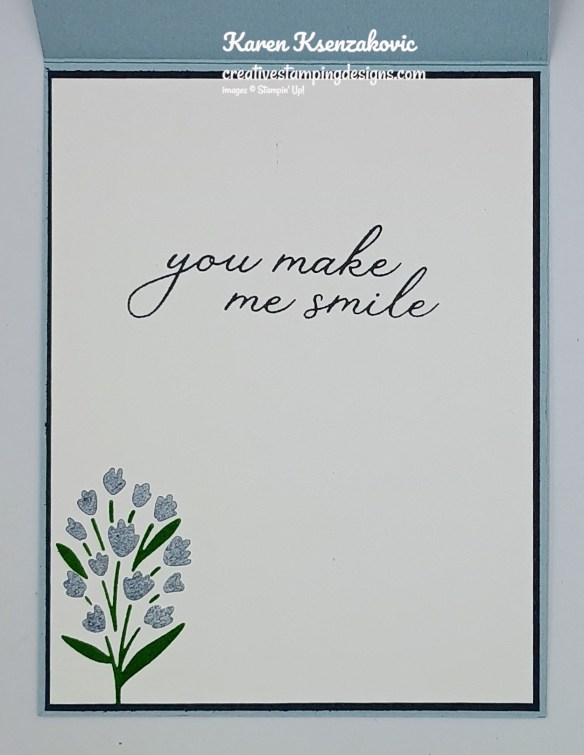
I used the new Stampin’ Up! Sweet Blooms Bundle along with the Floral in Blooms Designer Series Paper and Exposed Brick 3D Embossing Folder for my card today.
Emboss a panel of Cloud Cover using the Exposed Brick EF. Adhere the embossed panel to a Cloud Cover card base using Liquid Glue.
Emboss a small panel of Basic white using the Exposed Brick EF. Adhere the embossed panel to the top right corner of the Secret Sea mat using Liquid Glue, leaving a small mat around the top and right edge. Cut the corner of the panel of Florals in Bloom DSP off using Paper Snips of the Paper Trimmer. Adhere the panel of Florals in Bloom DSP to the Secret Sea mat using Stampin’ Seal. Wrap a piece of Strawberry Slush Twine around the corner and tie a bow. Adhere the layered panel to the Cloud Cover card base using Stampin’ Dimensionals.
Stamp the sentiment from Sweet Blooms stamp set in Secret Sea Ink on a strip of Basic White, spaced apart so you can cut them with Paper Snips. Cut the sentiment mat using the Sweet Blooms dies from a panel of Basic White. Cut the detailed sentiment using the Sweet Blooms Dies from a panel of Florals in Bloom DSP. Adhere the detailed sentiment to the mat using Liquid Glue. Adhere the die cut sentiment to the card front using Stampin’ Dimensionals. Adhere the cut sentient to the card front using Stampin’ Dimensionals. Add a few 2025-2027 In-Color Flat Pearls to the card front.
On a panel of Basic white, stamp the sentiment from the Sweet Blooms stamp set in Secret Sea Ink on a panel of Basic White. Stamp the stem image from the Sweet Blooms stamp set in Garden Green Ink on the bottom of the panel. Stamp the flower image from Sweet Blooms stamp set in Secret Sea Ink, stamping off once on scrap paper, on the stems. Adhere the Basic White panel to a Secret Sea mat then to the inside of the Cloud Cover card base.
decorate a Basic White Medium Envelope to finish the card. Stamp the stem image from the Sweet Blooms stamp set in garden Green Ink on the envelope front. Stamp the flower image from the Sweet Blooms stamp set in Secret Sky Ink, stamping off once on scrap paper, on the stem image. Adhere a panel of Florals in Bloom DSP to the envelope flap.
Thank you for stopping by my blog today. I hope you like my card, and you have this bundle and DSP on your shopping list for May 6th. Happy Stamping!!
If you need any stamping supplies, I’d love to be your Demonstrator. Just click HERE to go directly to my online store or drop me an email if you have any questions.
MY CURRENT HOST CODE IS: Q74RCCMW
Use this host code when placing an order with me. When you order $50 or greater you will receive a free gift from me! If your order is over $150, please do not use this code, but you’ll still get the free gift. The free gift is your choice of any 1 item valued up to $10.00 from the 2024 – 2025 Annual Catalog, January – April 2025 Mini Catalog or from the Online Exclusives! For any orders $50 or more I will also send you my monthly class tutorials. Click HERE or go to my Customer Rewards for more details and to see what this month’s tutorials are.
Please remember to use my current Host Code and make sure that you can see my name on the final checkout page listed as your Demonstrator when you order so that you know that you’re ordering with me, and you’ll get my rewards!
My 2025 – 2026 Annual Catalog and May Online Exclusive Designer Series Paper and Ribbon Shares are open for ordering. You can order just the DSP share, just the ribbon share or you can order both.
I’m offering a Designer Series Paper share from the 2025-2026 Annual Catalog, Two-Tone Cardstock Share along with the upcoming May Online Exclusives and I’d love to have you join!! I’m placing my share order early on May 6th and I’m going to use the expedited shipping option so I should be able to have the shares cut, bundled and back out to you during the week of May 12th. Wouldn’t you love to have all of the gorgeous new Designer Series Papers in the Stampin’ Up! 2025-2026 Annual Catalog and the upcoming May Online Exclusives? What is a Paper Share you ask? It’s a sample of each of the new Designer Series Papers from the Catalog and Online Exclusives. Shares give you a good working sample of all of the papers so that you can decide which ones to order in full packs! If you were to purchase all of the DSP in the new Catalog and Online Exclusives, it would cost you over $250.00 plus shipping and if you were to purchase all the ribbon it would cost you over $65.00.
New Designer Series Paper Share – $51.00 plus $9.00 for Priority Mail Shipping
How my shares work: I order full packs of all of the Designer Series Papers listed below, I cut them into 6″ X 6″ pieces (or 6″ X 12″ pieces for double shares) and give you one panel of each design from each pack on the list. I pack up the paper in a cellophane bag with labels listing the Name, Item # and Colors in the pack and mail it back out to you just as quickly as I can!
New Designer Series Paper Share – $51.00 plus $9.00 for Priority Mail shipping
You will receive one 6×6 sheet of each design from the following DSP packs (the number after the name indicates how many 6×6 sheets of that paper pack you will receive):
2024-2026 In Color Designer Series Paper (10)
2025-2027 In Color Designer Series Paper (10)
Brights Designer Series Paper (20)
Neutrals Designer Series Paper (20)
Regals Designer Series Paper (20)
Subtles Designer Series Paper (20)
Beautiful Gallery (12)
Boho Vibes (8)
Celebratory Sips (6)
Florals in Bloom (6)
Floral Impressions (6)
Flower Garden Foils Specialty (6)
Irresistible Designs Specialty (3)
Kintsugi Inspirations Specialty (6)
Turtle-y Cute (6)
Weekend Adventures (3)
In all, you’ll receive 162 – 6” x 6” sheets of designer or specialty paper!
Two-Tone Cardstock Share – $6 plus $9.00 Priority Mail Shipping
Have you been wanting to try the Two-Tone Cardstock but didn’t want to buy a whole pack? You can add a share of the 4 different Two-Tone Cardstock packs for an additional $6 or purchase them separately for $6 + $9 Priority Shipping
You will receive one 6×6 sheet of each color from each of the packs (the number after the name indicates how many 6×6 sheets of that paper pack you will receive):
Celebrate Together (6)
Memories in Bloom (6)
Turtle-y Cute (6)
Weekend Adventures (6)
In all, you’ll receive 24 – 6” x 6” sheets of cardstock!
If you’d like double shares of the designer paper or cardstock, I’m offering those too! I’ll cut the 12″ x 12″ sheets into 6″ × 12″ so that you’ll be able to get 3 full A2 size card fronts from each sheet and you’ll get double sheets of the 6″ x 6″ since they’re already precut.
New Ribbon Share – $20.00 plus $9.00 Priority Mail Shipping
All ribbons will come individually wrapped and labeled with the name and number of the product.
One-Fourth of a Roll of each:
Cloud Cover 3/8″ Linen Ribbon
Darling Duckling 3/8″ Linen Ribbon
Secret Sea 3/8″ Linen Ribbon
Strawberry Slush 3/8″ Linen Ribbon
Timid Tiger 3/8″ Linen Ribbon
Basic Beige 3/8″ Classic Ribbon
Shaded Spruce & Soft Sea Foam 1/2″ Ribbon
Gold Striped 3/8″ Mesh Ribbon Online Exclusive
If you’d like double shares of the Ribbon, you will be getting 1/2 of the roll or each ribbon.
Anyone is welcome to join in my shares (please note, I can only ship to addresses within the US). To make ordering the shares a little easier, I have created a form for you to submit, that way you can order any combination of shares you want. Click Here for the form. I will send out PayPal Invoices on May 4th.
Deadline to sign up for my share is Saturday May 3rd at 5:00 PM ET.
Let me know if you have any questions, I’m more than happy to help you. Thank you for joining in my Shares this year!!
Did you miss out on retired Bundles, Stamp Sets, Dies or Embossing Folders? I’ve updated my list with products from the Online Exclusives and September – December 2024 Mini Catalog along with a few others. Click Here to go to my retirement list. If you see something you would like, send me an email at creativestampingdesigns@gmail.com and I will pull the item(s) pack it up and send you a price. Feel free to contact me if you have any questions.
Don’t miss the coordinating Hugs Abloom Dies Add-On!
Make the most of your Paper Pumpkin kits with the Hugs Abloom Dies add-on! Quickly and cleanly cut out a flower, leaf sprig, sentiment label, or Hugs sentiment to elevate your crafting projects. These additional dies are designed to work with THREE Paper Pumpkin Kits: the Inked Occasions Paper Pumpkin Kit, the Mountain Majesties Paper Pumpkin Kit, and the Full of Charm Paper Pumpkin Kit. Pair these dies with other Stampin’ Up! products for even more creative options!
DETAILS – 4 dies – Largest die: 2-1/2″ x 1-1/4″ (6.4 x 3.2 cm) – Use with a Stampin’ Cut & Emboss Machine (sold separately)
You must be a current Paper Pumpkin subscriber to purchase this item. To become a subscriber, visit www.stampinup.com/paperpumpkin.
Note: Supplies may be limited toward the end of the subscription period.
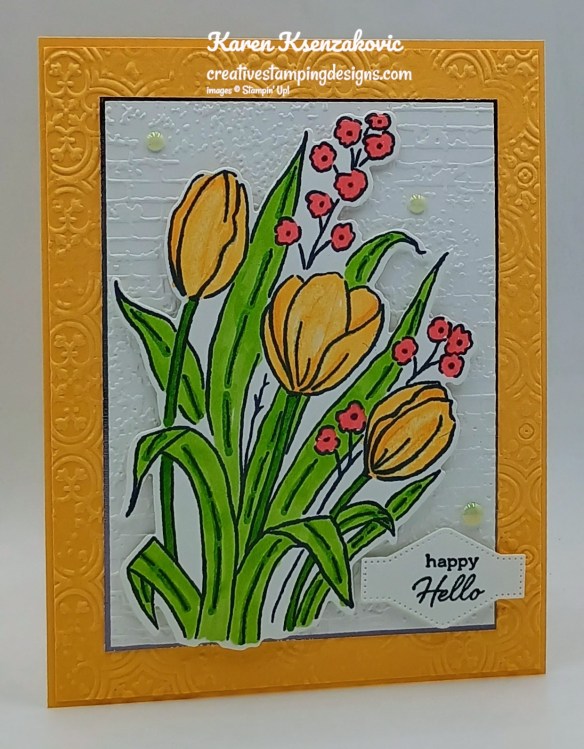
Good Tuesday morning my stamping friends welcome to Amy’s Inkin’ Krew Team Blog Hop. It’s the 2nd Tuesday of the month so that means Blog Hop Day!! If you are starting with me, be sure to hop around to see everyone’s beautiful projects. If you’ve hopped over from Ann Louise’s blog, welcome to my blog and thank you for stopping by. The theme this month is “Celebrate Spring”. We can interpret this however we want. Tulips said spring to me since they all bloom in my front yard in the spring. If you’d like to see a quick video on how I made this card, Click Here to go to my Instagram Reels. Here’s my card for today.
I used the Stampin’ Up! Online Exclusive Mixed Florals Bundle along with the Stampin’ Up! Flower Cart Photopolymer Stamp Set, Distressed Tile 3D Embossing Folder, Exposed Brick 3D Embossing Folder, Unbounded Love Dies and Textured Metallic Specialty Paper for my card today.
Emboss the 3 1/4″ X 4 1/2″ panel of Basic White using the Exposed Brick EF. Emboss the panel of Peach Pie using the Distressed Tile EF. Adhere the embossed Peach Pie panel to a Peach Pie card base using Liquid Glue. Adhere the embossed Basic White panel to the Textured Metallic mat using Liquid Glue. Adhere the layered panel to the card front using Liquid Glue.
Stamp the tulip image from the Stampin’ Up! Mixed Florals Photopolymer Stamp Set in Tuxedo Black Ink on a panel of Basic White. Color the image using Granny Apple Green, Peach Pie and Poppy Parade Stampin’ Blends Markers. Cut the image out using the Mixed Florals Dies. Adhere the floral image to the card front using Stampin’ Dimensionals.
On the panel of Basic White, stamp the sentiment from the Flower Cart stamp set in Tuxedo Black Ink. Cut the sentiment out using the Unbounded Love Dies. Adhere the sentiment to the card front using Stampin’ Dimensionals. Add a few Antique Pearls to the card front.
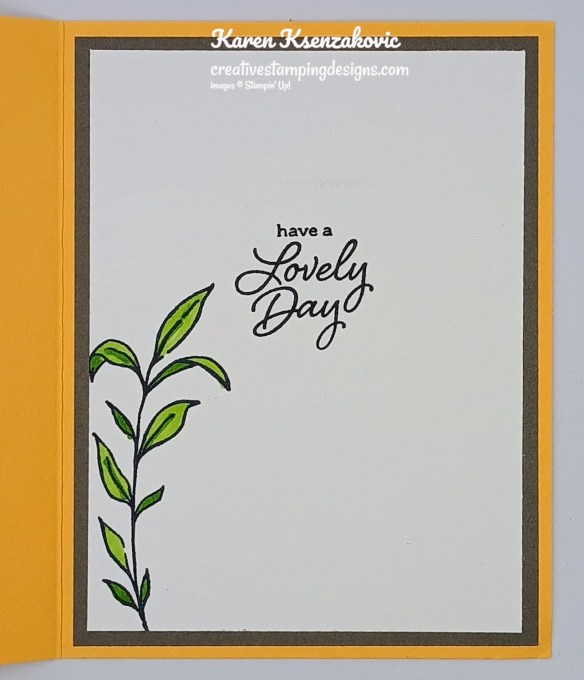
Stamp the sentiment from the Flower Cart stamp set in Tuxedo Black Ink on a panel of Basic White. Stamp the leaf image from the Mixed Florals stamp set in Tuxedo Black Ink on the bottom of the panel. Color the image using Granny Apple Green Stampin’ Blends Markers. Adhere the Basic White panel to a Pebbled Path mat then to the inside of the Peach Pie card base.
Decorate a Basic White Medium Envelope to complete the card. Stamp the leaf and small floral images from the Mixed Florals stamp set in Tuxedo Black Ink on the envelope front. Color the images using Granny Apple Green and Peach Pie Stampin’ Blends Markers. Emboss a panel of Peach Pie using the Distressed Tile EF. Adhere the panel to the envelope flap.
Thank you for stopping by my blog today. Now that you’ve seen my card, let’s get on with the hop! Click on the Next Blog button to move on to Karen’s project or click the Previous Blog button to go back to see the project that Ann Louise created. Happy Hopping.
Just in case you get lost along the way, here is a list of the team members involved in the hop today.
If you need any stamping supplies, I’d love to be your Demonstrator. Just click HERE to go directly to my online store or drop me an email if you have any questions.
MY CURRENT HOST CODE IS: RSQGVJPH
Use this host code when placing an order with me. When you order $50 or greater you will receive a free gift from me! If your order is over $150, please do not use this code, but you’ll still get the free gift. The free gift is your choice of any 1 item valued up to $10.00 from the 2024 – 2025 Annual Catalog, January – April 2025 Mini Catalog or from the Online Exclusives! For any orders $50 or more I will also send you my monthly class tutorials. Click HERE or go to my Customer Rewards for more details and to see what this month’s tutorials are.
Please remember to use my current Host Code and make sure that you can see my name on the final checkout page listed as your Demonstrator when you order so that you know that you’re ordering with me, and you’ll get my rewards!
Craft stunning cards with hand-painted, alcohol ink designs! • Makes 9 cards: 3 each of 3 designs with 9 coordinating envelopes • Textured gold foil on the card bases and sentiments • Precut paper pieces and butterfly embellishments • Coordinating colors: Berry Burst (Classic Stampin’ Spot), Flirty Flamingo, Fresh Freesia, Gorgeous Grape, Peach Pie, Pool Party
Cards come in a beautiful coordinating box!
Subscribe to the April Paper Pumpkin Kit between 11 March and 10 April by clicking here!
Don’t miss the coordinating Hugs Abloom Dies Add-On!
Make the most of your Paper Pumpkin kits with the Hugs Abloom Dies add-on! Quickly and cleanly cut out a flower, leaf sprig, sentiment label, or Hugs sentiment to elevate your crafting projects. These additional dies are designed to work with THREE Paper Pumpkin Kits: the Inked Occasions Paper Pumpkin Kit, the Mountain Majesties Paper Pumpkin Kit, and the Full of Charm Paper Pumpkin Kit. Pair these dies with other Stampin’ Up! products for even more creative options!
DETAILS – 4 dies – Largest die: 2-1/2″ x 1-1/4″ (6.4 x 3.2 cm) – Use with a Stampin’ Cut & Emboss Machine (sold separately)
You must be a current Paper Pumpkin subscriber to purchase this item. To become a subscriber, visit www.stampinup.com/paperpumpkin.
Note: Supplies may be limited toward the end of the subscription period.
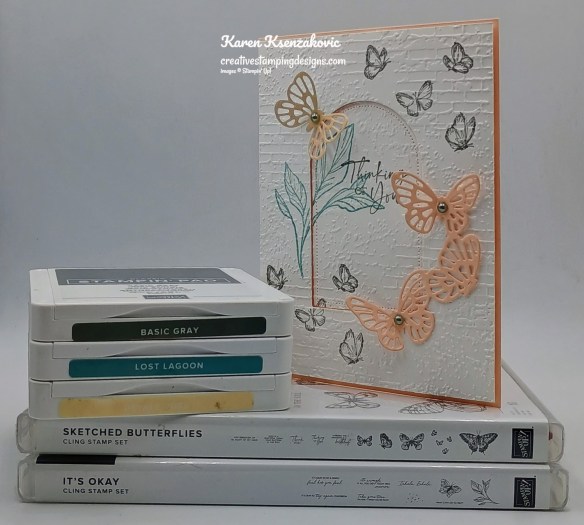
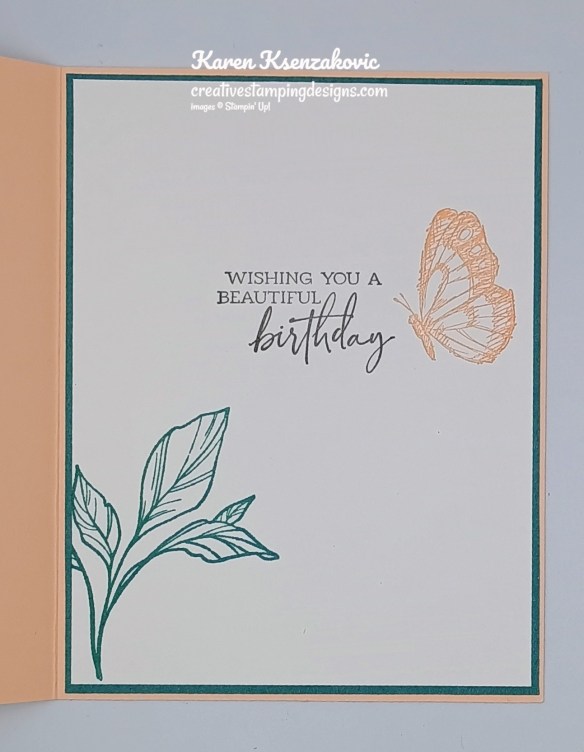
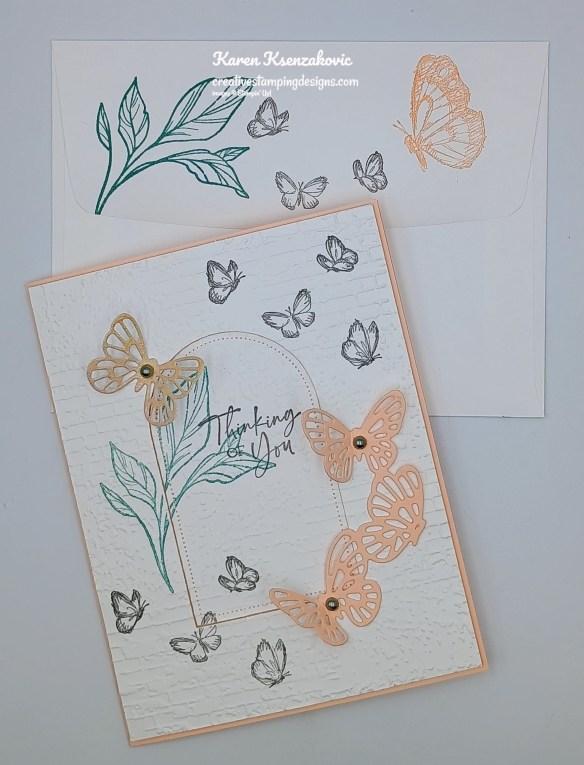
Good Thursday morning stamping friends and welcome to our Happy Inkin’ Thursday Blog Hop. If you are starting with me, thank you, I hope you will stop by everyone’s blog to see what they have created this week. If you are hopping over from Akiko’s blog, thank you for stopping by. This week we have Theme Challenge. If you’d like to see a quick video of how I made this card, Click Here to go to my Instagram Reels. Here is my card using this week’s theme.
I used the Stampin’ Up! Sketched Butterflies Bundle along with the Exposed Brick 3D Embossing Folder, Stampin’ Up! Online Exclusive It’s Okay Cling Stamp Set (available March 4th) and Everyday Arches Dies for my card today.
This is our theme for this week.
Using the 4th from the smallest Everyday Arches Dies, cut the center of the Basic White card front out. Set the cut-out piece back in the center and stamp the small cluster of butterflies from the Stampin’ Up! Sketched Butterflies Cling Stamp Set in Basic Gray Ink on the top and bottom of the panel. Stamp the leaf image from the It’s Okay stamp set in Lost Lagoon Ink, stamping off once on scrap paper, on the side of the arch. Stamp the sentiment from the Sketched Butterflies stamp set in Basic Gray on the die cut arch.
Emboss the card front, with center piece, using the Exposed Brick EF. Adhere the large card front panel to a Petal Pink card base using Stampin’ Dimensionals. Adhere the center die cut arch to the card front, fitting it inside the large card front, using Liquid Glue. Cut the small, detailed butterfly using the Sketched Butterflies Dies from a panel of Pastel Ombre Glimmer Paper. Adhere the butterfly to the top of the arch using a Glue Dot.
Cut the three detailed butterflies from a panel of Petal Pink using the Sketched Butterflies Dies. Adhere the butterflies to the card front using Glue Dots. Add a few Basic Gray Pearls to the center of the butterflies.
On a panel of Basic White, stamp the sentiment from the Sketched Butterflies stamp set in Basic Gray Ink. Stamp the leaf image from the It’s Okay stamp set in Lost Lagoon Ink on the bottom of the panel. Stamp the butterfly image from the Sketched Butterflies stamp set in Petal Pink Ink next to the sentiment. Adhere the Basic White panel to a Lost Lagoon mat then to the inside of the Petal Pink card base.
Decorate a Basic White Medium Envelope to complete the card. Stamp the leaf image from the It’s Okay stamp set in Lost Lagoon Ink on the envelope front and flap. Stamp the butterfly image from the Sketched Butterflies stamp set in Petal Pink Ink on the envelope front and flap. Stamp the cluster of butterflies from the Sketched Butterflies stamp set in Basic Gray Ink on the envelope flap.
Thank you for stopping by my blog today. Now that you’ve seen my card, let’s get on with the hop! Click the button below to hop over to see what Tara has created. Happy Hopping!!
Just in case you get lost along the way, here is a list of the team members involved in the hop today.
If you need any stamping supplies, I’d love to be your Demonstrator. Just click HERE to go directly to my online store or drop me an email if you have any questions.
MY CURRENT HOST CODE IS: ZZDPZRSF
Use this host code when placing an order with me. When you order $50 or greater you will receive a free gift from me! If your order is over $150, please do not use this code, but you’ll still get the free gift. The free gift is your choice of any 1 item valued up to $10.00 from the 2024 – 2025 Annual Catalog, January – April 2025 Mini Catalog or from the Online Exclusives! For any orders $50 or more I will also send you my monthly class tutorials. Click HERE or go to my Customer Rewards for more details and to see what this month’s tutorials are.
Please remember to use my current Host Code and make sure that you can see my name on the final checkout page listed as your Demonstrator when you order so that you know that you’re ordering with me, and you’ll get my rewards!
Ready for more? There are EVEN MORE PRODUCTS available to shop, earn, and redeem during Sale-A-Bration. We don’t want you to miss out on these great products and incredible deals, Click HERE for the Sale-A-Bration Additional Products Flyer.
Remember, you must use the item numbers in the flyer in order to redeem these products as Sale-A-Bration items. These products have different item numbers in the catalog, which won’t register as part of Sale-A-Bration.
We’ve included two kits as part of our Sale-A-Bration newly added products. Once the kits sell out, they will be discontinued. If they do not sell out during Sale-A-Bration, they may be discounted at a later date.
Note: The newly added products that are now redeemable during Sale-A-Bration are part of Stampin’ Up!’s existing product offering.
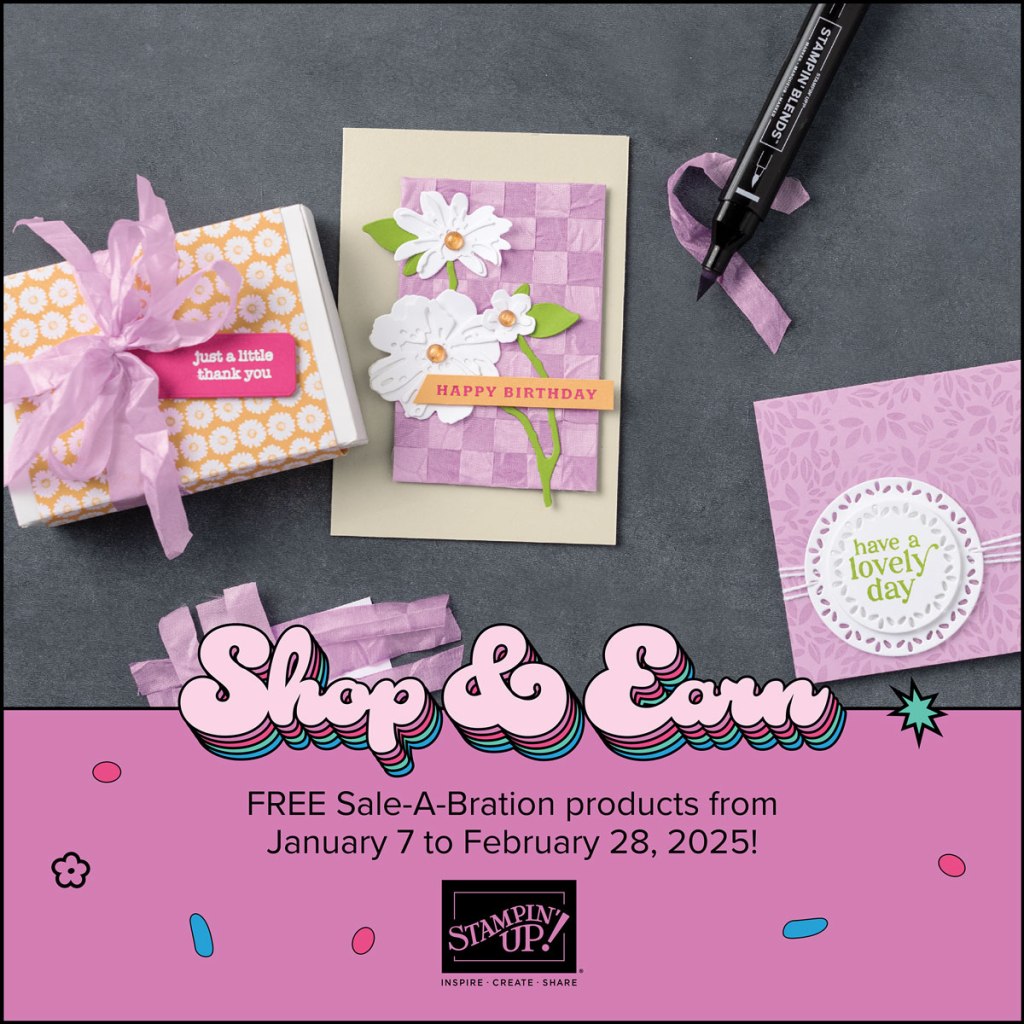
Sale-a-bration 2025 runs through Friday, February 28! There are some awesome new products that you can earn for FREE with orders of $60+ and orders of $120+ placed during Sale-a-bration as well as a great host bonus and a joining special!
SHOP
Spend $60 or more and pick from 12 new products (5 stamp sets,3 designer series paper packs, 1 embossing folder, 1 kit, 1 pack of embellishments and 1 spool of ribbon!) that are available as free items!
Spend $120 or more and pick from 2 new items (1 stamp bundle and 1 stamp set) that are available as free items!
HOST
Get an additional $30 in FREE Stampin’ Rewards with any party or individual order of $300 or greater during Sale-a-bration! You can spend your Stampin’ Rewards on any items currently available from Stampin’ Up! including (but not limited to) the host exclusive stamp sets!
JOIN
Sale-A-Bration is an excellent time you to join Stampin’ Up! In addition to the already great value of the Starter Kit, if you sign up as a Stampin’ Up! demonstrator during Sale-a-bration, you can choose from two incredible options:
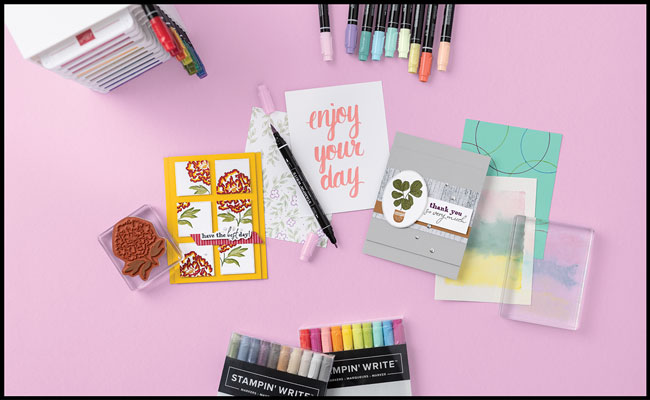
Option 1: Join Stampin’ Up! during Sale-a-bration as a new demonstrator and get $125 worth of products PLUS a choice of 2 Stampin’ Write Marker Assortments AND the Handmade Designs Cling Stamp Set, an exclusive stamp set designed to work with the markers. That’s a $216 value all for just $99!
Option 2: Join Stampin’ Up! during Sale-A-Bration and get $125 worth of product PLUS an additional $30 worth of product of your choice for just $99. That’s a $155 value!
Two joining options so you can pick the one that you like the best!!
There is never an obligation to sell. You can join just to enjoy the discount for yourself along with all the other Demonstrator benefits. Once you join, you’ll get at least a 20% discount on all of your Stampin’ Up! merchandise purchases and you get to order early from the upcoming catalogs! You will also be able to attend the OnStage Events and any other events Stampin’ Up! has and you get to be a part of our Stampin’ Up! team!
Unsure about this and want to talk? Contact me at creativestampingdesigns@gmail.com and we can talk. You can also find additional information Here at Join My Team. Being a part of the Stampin’ Up! Community is one of the best decisions I’ve ever made. I have made many friends along the way while doing what I love, Paper Crafting. This Joining offer is only good during Sale-a-bration which starts January 7 and ends on February 28. Why not give it a try? I’d love to have you on my team.
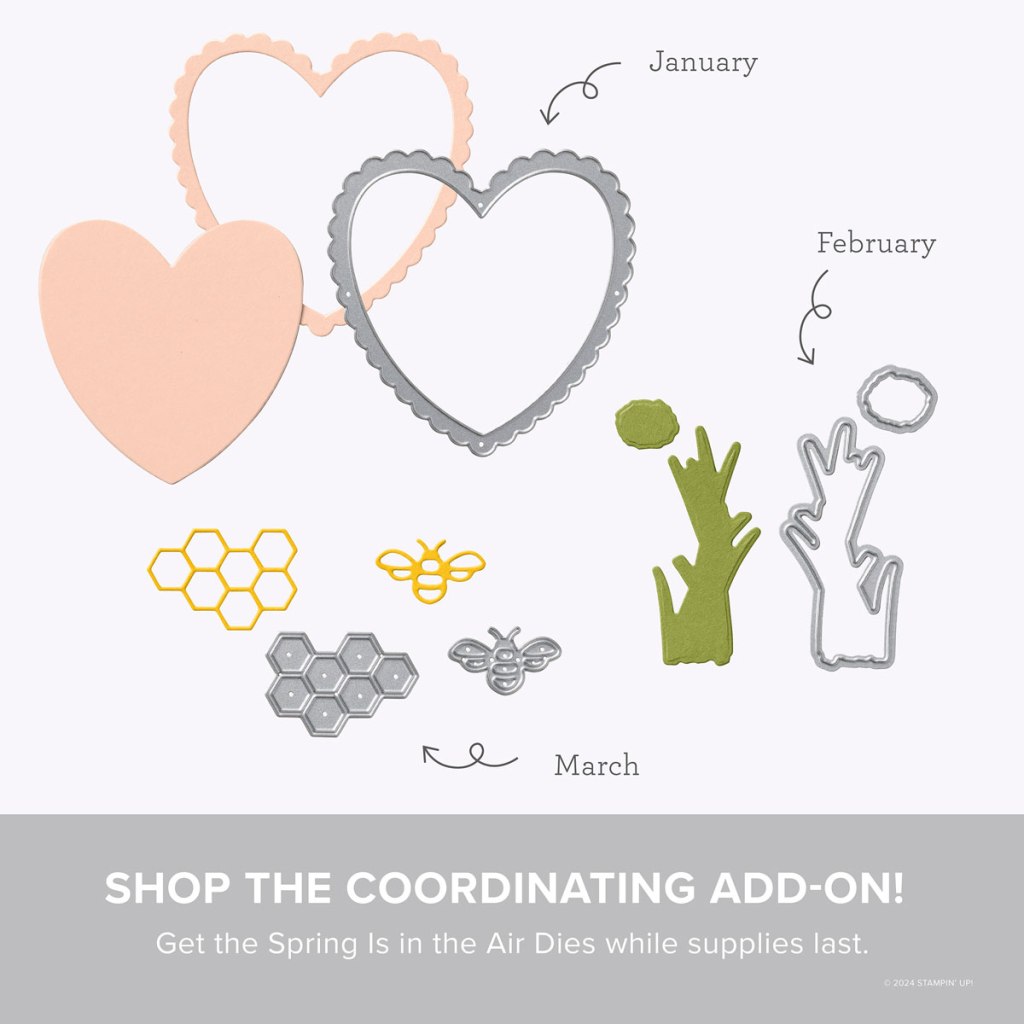
Don’t miss the coordinating Spring is in The Air Dies Add-On!
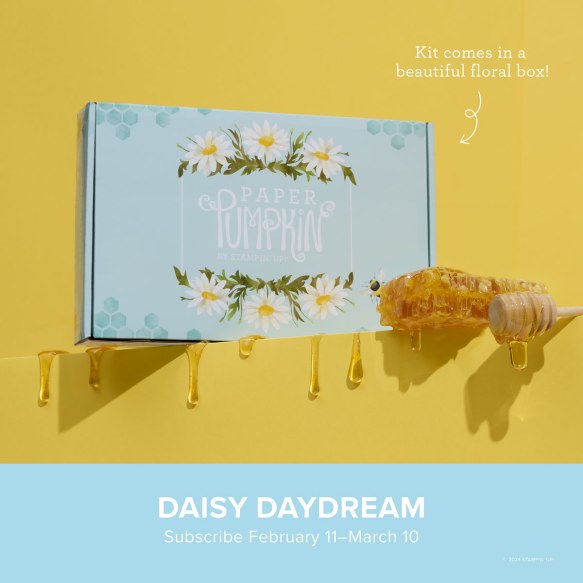
Make the most of your Paper Pumpkin kits with the Spring Is in the Air Dies add-on! Quickly and cleanly cut out a heart frame, flowering chive, honeycomb, or tiny bumblebee to elevate your crafting projects. These additional dies are designed to work with THREE Paper Pumpkin Kits: the Hearts for You Paper Pumpkin Kit, the Spring Is in the Air Paper Pumpkin Kit, and the Daisy Daydream Paper Pumpkin Kit. Pair these dies with other Stampin’ Up! products for even more creative options!
DETAILS – 5 dies – Largest die: 3″ x 3″ (7.6 x 7.6 cm) – Use with a Stampin’ Cut & Emboss Machine (sold separately)
You must be a current Paper Pumpkin subscriber to purchase this item. To become a subscriber, visit paperpumpkin.com.
#166237 $12
Note: Supplies may be limited toward the end of the subscription period.
Good Thursday morning stamping friends and welcome to our Happy Inkin’ Thursday Blog Hop. If you are starting with me, thank you, I hope you will stop by everyone’s blog to see what they have created this week. If you are hopping over from Akiko’s blog, thank you for stopping by. This week we have Color Challenge and I made another CAS card for you. If you’d like to see a quick video of how I made this card, Click Here to go to my Instagram Reels. Here is my card using this week’s colors.
I used the new Stampin’ Up! Online Exclusive Mixed Labels Bundle and Mixed Media Florals Designer Series Paper along with the Exposed Brick 3D Embossing Folder for my card today.
There are out colors for this week.
Emboss 2 panels of Boho Blue using the Exposed Brick EF. Adhere the 2 panels to a Flirty Flamingo mat using Liquid Glue.
Adhere a panel of Mixed Media Florals DSP to the Flirty Flamingo mat using Liquid Glue. Adhere the layered panel to a Boho Blue card base using Stampin’ Dimensionals.
Stamp the sentiment from the Stampin’ Up! Mixed Labels Cling Stamp Set in Boho Blue Ink on a panel of Basic White. Cut the sentiment out with the 2nd smallest Mixed Labels Dies. Cut the largest Mixed Labels Die from a panel of Poppy Parade. Adhere the sentiment to the Poppy Parade mat using Stampin’ Dimensionals. Cut a few leaves from a panel of Granny Apple Green using the Mixed Labels Dies. Adhere the leaves between the die cut sentiment using Glue Dots. Adhere the layered sentiment to the card front using Liquid Glue. Add a few Opal Rounds to the card front.
On a panel of Basic White, stamp the sentiment from the Mixed Labels stamp set in Boho Blue Ink. Stamp the flower image from the Mixed Labels stamp set in Tuxedo Black Ink on the bottom of the panel. Color the image using Flirty Flamingo and Granny Apple Green Stampin’ Blends Markers. Adhered the Basic White panel to a Flirty Flamingo mat then to the inside of the Boho Blue card base.
Complete the card by decorating a Basic White Medium Envelope. Stamp the flower image from the Mixed Labels stamp set in Tuxedo Black Ink on the envelope front. Color the images using Flirty Flamingo and Granny Apple Green Stampin’ Blends Markers. Adhere a panel of Mixed Media Florals DSP to the envelope flap.
Thank you for stopping by my blog today. Now that you’ve seen my card, let’s get on with the hop! Click the button below to hop over to see what Tara has created. Happy Hopping!!
Just in case you get lost along the way, here is a list of the team members involved in the hop today.
If you need any stamping supplies, I’d love to be your Demonstrator. Just click HERE to go directly to my online store or drop me an email if you have any questions.
MY CURRENT HOST CODE IS: YUDYEUVM
Use this host code when placing an order with me. When you order $50 or greater you will receive a free gift from me! If your order is over $150, please do not use this code, but you’ll still get the free gift. The free gift is your choice of any 1 item valued up to $10.00 from the 2024 – 2025 Annual Catalog, September – December 2024 Mini Catalog or from the Online Exclusives! For any orders $50 or more I will also send you my monthly class tutorials. Click HERE or go to my Customer Rewards for more details and to see what this month’s tutorials are.
Please remember to use my current Host Code and make sure that you can see my name on the final checkout page listed as your Demonstrator when you order so that you know that you’re ordering with me, and you’ll get my rewards!
In response to changing policies at Stampin’ Up – I’m adjusting my Ordering Gift policy as well. I’m having to get a little more tough on the adding of Host codes when you place your order thru my Online Store.
Not to worry – you’re still going to get that $10 ordering gift for orders of $50 (before shipping & tax) or greater. And the gift is still any 1 SU! product up to that $10 value.
But – if you DO NOT use the Host code for your orders of less than $150 (this is the RETAIL total before Shipping & Handling), then you’ll have two options:
You’ll need to call Stampin’ Up! (1-800-Stamp-Up) and ask them to add it for you. They’re very helpful and will get it done quickly! OR….
If your order was over the $50 threshold but under $150, then…you’ll forfeit that $10 ordering gift and rewards – this is the Bummer Option – and I REALLY don’t want to do this, SO please remember to add my Current Host Code.
Create heartfelt cards for Valentine’s Day, Galentine’s Day, and beyond! • Makes 9 cards: 3 each of 3 designs with 9 envelopes • Heart-shaped precut pieces and stickers • Twine and heart gem embellishments • Coordinating colors: Flirty Flamingo, Petal Pink, Real Red (Classic Stampin’ Spot)
Subscribe to Paper Pumpkin for a monthly, all-inclusive crafting kit that’s a fun surprise! Each kit includes a photopolymer stamp set, Classic Stampin’ Spot, and step by step instructions to complete exclusive paper craft projects, including cards, tags, and gift packaging. And don’t miss the special add-on that coordinates with the next three months!
Subscribe to the January Paper Pumpkin Kit between 11 December and 10 January by clicking here!
Don’t miss the coordinating Spring is in The Air Dies Add-On!
Make the most of your Paper Pumpkin kits with the Spring Is in the Air Dies add-on! Quickly and cleanly cut out a heart frame, flowering chive, honeycomb, or tiny bumblebee to elevate your crafting projects. These additional dies are designed to work with THREE Paper Pumpkin Kits: the Hearts for You Paper Pumpkin Kit, the Spring Is in the Air Paper Pumpkin Kit, and the Daisy Daydream Paper Pumpkin Kit. Pair these dies with other Stampin’ Up! products for even more creative options!
DETAILS – 5 dies – Largest die: 3″ x 3″ (7.6 x 7.6 cm) – Use with a Stampin’ Cut & Emboss Machine (sold separately)
You must be a current Paper Pumpkin subscriber to purchase this item. To become a subscriber, visit paperpumpkin.com.
#166237 $12
Note: Supplies may be limited toward the end of the subscription period.


![Basic White 8 1/2" X 11" Cardstock [ 166780 ]](https://assets1.tamsnetwork.com/images/EC042017NF/166780s.jpg "Basic White 8 1/2\" X 11\" Cardstock [ 166780 ]")
![Cloud Cover 8 1/2" X 11" Cardstock [ 165621 ]](https://assets1.tamsnetwork.com/images/EC042017NF/165621s.jpg "Cloud Cover 8 1/2\" X 11\" Cardstock [ 165621 ]")
![Crumb Cake 8-1/2" X 11" Cardstock [ 120953 ]](https://assets1.tamsnetwork.com/images/EC042017NF/120953s.jpg "Crumb Cake 8-1/2\" X 11\" Cardstock [ 120953 ]")
![Early Espresso 8-1/2" X 11" Cardstock [ 119686 ]](https://assets1.tamsnetwork.com/images/EC042017NF/119686s.jpg "Early Espresso 8-1/2\" X 11\" Cardstock [ 119686 ]")
![Petal Pink Classic Stampin' Pad [ 147108 ]](https://assets1.tamsnetwork.com/images/EC042017NF/147108s.jpg "Petal Pink Classic Stampin' Pad [ 147108 ]")
![Secret Sea Classic Stampin' Pad [ 165285 ]](https://assets1.tamsnetwork.com/images/EC042017NF/165285s.jpg "Secret Sea Classic Stampin' Pad [ 165285 ]")
![Cajun Craze 12" X 12" (30.5 X 30.5 Cm) Two Tone Cardstock [ 166675 ]](https://assets1.tamsnetwork.com/images/EC042017NF/166675s.jpg "Cajun Craze 12\" X 12\" (30.5 X 30.5 Cm) Two Tone Cardstock [ 166675 ]")
![Crumb Cake 12" X 12" (30.5 X 30.5 Cm) Two Tone Cardstock [ 166671 ]](https://assets1.tamsnetwork.com/images/EC042017NF/166671s.jpg "Crumb Cake 12\" X 12\" (30.5 X 30.5 Cm) Two Tone Cardstock [ 166671 ]")
![Early Espresso 12" X 12" (30.5 X 30.5 Cm) Two Tone Cardstock [ 166668 ]](https://assets1.tamsnetwork.com/images/EC042017NF/166668s.jpg "Early Espresso 12\" X 12\" (30.5 X 30.5 Cm) Two Tone Cardstock [ 166668 ]")
![Flirty Flamingo 12" X 12" (30.5 X 30.5 Cm) Two Tone Cardstock [ 166667 ]](https://assets1.tamsnetwork.com/images/EC042017NF/166667s.jpg "Flirty Flamingo 12\" X 12\" (30.5 X 30.5 Cm) Two Tone Cardstock [ 166667 ]")
![Garden Green 12" X 12" (30.5 X 30.5 Cm) Two Tone Cardstock [ 166665 ]](https://assets1.tamsnetwork.com/images/EC042017NF/166665s.jpg "Garden Green 12\" X 12\" (30.5 X 30.5 Cm) Two Tone Cardstock [ 166665 ]")
![Granny Apple Green 12" X 12" (30.5 X 30.5 Cm) Two Tone Cardstock [ 166663 ]](https://assets1.tamsnetwork.com/images/EC042017NF/166663s.jpg "Granny Apple Green 12\" X 12\" (30.5 X 30.5 Cm) Two Tone Cardstock [ 166663 ]")
![Old Olive 12" X 12" (30.5 X 30.5 Cm) Two Tone Cardstock [ 166683 ]](https://assets1.tamsnetwork.com/images/EC042017NF/166683s.jpg "Old Olive 12\" X 12\" (30.5 X 30.5 Cm) Two Tone Cardstock [ 166683 ]")
![Boho Vibes 6" X 6" (15.2 X 15.2 Cm) Designer Series Paper [ 165144 ]](https://assets1.tamsnetwork.com/images/EC042017NF/165144s.jpg "Boho Vibes 6\" X 6\" (15.2 X 15.2 Cm) Designer Series Paper [ 165144 ]")
![Exposed Brick 3 D Embossing Folder [ 161600 ]](https://assets1.tamsnetwork.com/images/EC042017NF/161600s.jpg "Exposed Brick 3 D Embossing Folder [ 161600 ]")
![Basic White Medium Envelopes [ 159236 ]](https://assets1.tamsnetwork.com/images/EC042017NF/159236s.jpg "Basic White Medium Envelopes [ 159236 ]")
![Stampin' Cut & Emboss Machine [ 149653 ]](https://assets1.tamsnetwork.com/images/EC042017NF/149653s.jpg "Stampin' Cut & Emboss Machine [ 149653 ]")
![Mini Glue Dots [ 103683 ]](https://assets1.tamsnetwork.com/images/EC042017NF/103683s.jpg "Mini Glue Dots [ 103683 ]")
![Multipurpose Liquid Glue [ 110755 ]](https://assets1.tamsnetwork.com/images/EC042017NF/110755s.jpg "Multipurpose Liquid Glue [ 110755 ]")
![Stampin' Dimensionals [ 104430 ]](https://assets1.tamsnetwork.com/images/EC042017NF/104430s.jpg "Stampin' Dimensionals [ 104430 ]")
![Stampin' Seal [ 152813 ]](https://assets1.tamsnetwork.com/images/EC042017NF/152813s.jpg "Stampin' Seal [ 152813 ]")
![Bone Folder [ 102300 ]](https://assets1.tamsnetwork.com/images/EC042017NF/102300s.jpg "Bone Folder [ 102300 ]")
![Take Your Pick [ 144107 ]](https://assets1.tamsnetwork.com/images/EC042017NF/144107s.jpg "Take Your Pick [ 144107 ]")
![Paper Trimmer [ 152392 ]](https://assets1.tamsnetwork.com/images/EC042017NF/152392s.jpg "Paper Trimmer [ 152392 ]")


![Friendly Foliage Photopolymer Stamp Set (English) [ 167021 ]](https://assets1.tamsnetwork.com/images/EC042017NF/167021s.jpg "Friendly Foliage Photopolymer Stamp Set (English) [ 167021 ]")
![Simply Beautiful Bundle (English) [ 166965 ]](https://assets1.tamsnetwork.com/images/EC042017NF/166965s.jpg "Simply Beautiful Bundle (English) [ 166965 ]")
![Simply Beautiful Photopolymer Stamp Set (English) [ 166958 ]](https://assets1.tamsnetwork.com/images/EC042017NF/166958s.jpg "Simply Beautiful Photopolymer Stamp Set (English) [ 166958 ]")
![Simply Beautiful Dies [ 166964 ]](https://assets1.tamsnetwork.com/images/EC042017NF/166964s.jpg "Simply Beautiful Dies [ 166964 ]")
![Basic White 8 1/2" X 11" Thick Cardstock [ 159229 ]](https://assets1.tamsnetwork.com/images/EC042017NF/159229s.jpg "Basic White 8 1/2\" X 11\" Thick Cardstock [ 159229 ]")
![Old Olive 8-1/2" X 11" Cardstock [ 100702 ]](https://assets1.tamsnetwork.com/images/EC042017NF/100702s.jpg "Old Olive 8-1/2\" X 11\" Cardstock [ 100702 ]")
![Lovely & Beautiful 12" X 12" (30.5 X 30.5 Cm) Specialty Designer Series Paper [ 166957 ]](https://assets1.tamsnetwork.com/images/EC042017NF/166957s.jpg "Lovely & Beautiful 12\" X 12\" (30.5 X 30.5 Cm) Specialty Designer Series Paper [ 166957 ]")
![Darling Duckling 12" X 12" (30.5 X 30.5 Cm) Two Tone Cardstock [ 166707 ]](https://assets1.tamsnetwork.com/images/EC042017NF/166707s.jpg "Darling Duckling 12\" X 12\" (30.5 X 30.5 Cm) Two Tone Cardstock [ 166707 ]")
![Fresh Freesia 12" X 12" (30.5 X 30.5 Cm) Two Tone Cardstock [ 166666 ]](https://assets1.tamsnetwork.com/images/EC042017NF/166666s.jpg "Fresh Freesia 12\" X 12\" (30.5 X 30.5 Cm) Two Tone Cardstock [ 166666 ]")
![Petal Pink 12" X 12" (30.5 X 30.5 Cm) Two Tone Cardstock [ 166689 ]](https://assets1.tamsnetwork.com/images/EC042017NF/166689s.jpg "Petal Pink 12\" X 12\" (30.5 X 30.5 Cm) Two Tone Cardstock [ 166689 ]")
![Gold Foil Sheets [ 132622 ]](https://assets1.tamsnetwork.com/images/EC042017NF/132622s.jpg "Gold Foil Sheets [ 132622 ]")
![Stylish Shapes Dies [ 159183 ]](https://assets1.tamsnetwork.com/images/EC042017NF/159183s.jpg "Stylish Shapes Dies [ 159183 ]")
![White With Gold 3/8" (1 Cm) Ribbon [ 166979 ]](https://assets1.tamsnetwork.com/images/EC042017NF/166979s.jpg "White With Gold 3/8\" (1 Cm) Ribbon [ 166979 ]")
![2024 2026 In Color™ Flat Pearls [ 165266 ]](https://assets1.tamsnetwork.com/images/EC042017NF/165266s.jpg "2024 2026 In Color™ Flat Pearls [ 165266 ]")


![Simply Said Mix & Match Photopolymer Stamp Set (English) [ 163756 ]](https://assets1.tamsnetwork.com/images/EC042017NF/163756s.jpg "Simply Said Mix & Match Photopolymer Stamp Set (English) [ 163756 ]")
![Label Me Grateful Cling Stamp Set (English) [ 166108 ]](https://assets1.tamsnetwork.com/images/EC042017NF/166108s.jpg "Label Me Grateful Cling Stamp Set (English) [ 166108 ]")
![Shaded Spruce 8-1/2" X 11" Cardstock [ 146981 ]](https://assets1.tamsnetwork.com/images/EC042017NF/146981s.jpg "Shaded Spruce 8-1/2\" X 11\" Cardstock [ 146981 ]")
![Perennial Lavender 12" X 12" (30.5 X 30.5 Cm) Designer Series Paper [ 162593 ]](https://assets1.tamsnetwork.com/images/EC042017NF/162593s.jpg "Perennial Lavender 12\" X 12\" (30.5 X 30.5 Cm) Designer Series Paper [ 162593 ]")
![Shaded Spruce Classic Stampin' Pad [ 147088 ]](https://assets1.tamsnetwork.com/images/EC042017NF/147088s.jpg "Shaded Spruce Classic Stampin' Pad [ 147088 ]")
![Tuxedo Black Memento Ink Pad [ 132708 ]](https://assets1.tamsnetwork.com/images/EC042017NF/132708s.jpg "Tuxedo Black Memento Ink Pad [ 132708 ]")
![Flirty Flamingo Stampin' Blends Combo Pack [ 154884 ]](https://assets1.tamsnetwork.com/images/EC042017NF/154884s.jpg "Flirty Flamingo Stampin' Blends Combo Pack [ 154884 ]")
![Lemon Lolly Stampin’ Blends Combo Pack [ 161673 ]](https://assets1.tamsnetwork.com/images/EC042017NF/161673s.jpg "Lemon Lolly Stampin’ Blends Combo Pack [ 161673 ]")
![Shaded Spruce Stampin' Blends Combo Pack [ 154903 ]](https://assets1.tamsnetwork.com/images/EC042017NF/154903s.jpg "Shaded Spruce Stampin' Blends Combo Pack [ 154903 ]")
![Spotlight On Nature Dies [ 163580 ]](https://assets1.tamsnetwork.com/images/EC042017NF/163580s.jpg "Spotlight On Nature Dies [ 163580 ]")
![Baker's Twine Essentials Pack [ 155475 ]](https://assets1.tamsnetwork.com/images/EC042017NF/155475s.jpg "Baker's Twine Essentials Pack [ 155475 ]")
![Strawberry Slush & Pretty In Pink Gems [ 165615 ]](https://assets1.tamsnetwork.com/images/EC042017NF/165615s.jpg "Strawberry Slush & Pretty In Pink Gems [ 165615 ]")


![Lifetime Of Love Cling Stamp Set (English) [ 162574 ]](https://assets1.tamsnetwork.com/images/EC042017NF/162574s.jpg "Lifetime Of Love Cling Stamp Set (English) [ 162574 ]")
![Balmy Blue 8-1/2" X 11" Cardstock [ 146982 ]](https://assets1.tamsnetwork.com/images/EC042017NF/146982s.jpg "Balmy Blue 8-1/2\" X 11\" Cardstock [ 146982 ]")
![Lemon Lolly 8 1/2" X 11" Cardstock [ 161720 ]](https://assets1.tamsnetwork.com/images/EC042017NF/161720s.jpg "Lemon Lolly 8 1/2\" X 11\" Cardstock [ 161720 ]")
![Soft Sea Foam 8-1/2" X 11" Cardstock [ 146988 ]](https://assets1.tamsnetwork.com/images/EC042017NF/146988s.jpg "Soft Sea Foam 8-1/2\" X 11\" Cardstock [ 146988 ]")
![Beautiful Bokeh 6" X 6" (15.2 X 15.2 Cm) Designer Series Paper [ 164607 ]](https://assets1.tamsnetwork.com/images/EC042017NF/164607s.jpg "Beautiful Bokeh 6\" X 6\" (15.2 X 15.2 Cm) Designer Series Paper [ 164607 ]")
![Early Espresso Classic Stampin' Pad [ 147114 ]](https://assets1.tamsnetwork.com/images/EC042017NF/147114s.jpg "Early Espresso Classic Stampin' Pad [ 147114 ]")
![Crumb Cake Stampin' Blends Combo Pack [ 154882 ]](https://assets1.tamsnetwork.com/images/EC042017NF/154882s.jpg "Crumb Cake Stampin' Blends Combo Pack [ 154882 ]")
![Daffodil Delight Stampin' Blends Combo Pack [ 154883 ]](https://assets1.tamsnetwork.com/images/EC042017NF/154883s.jpg "Daffodil Delight Stampin' Blends Combo Pack [ 154883 ]")
![Lifetime Of Love Dies [ 162583 ]](https://assets1.tamsnetwork.com/images/EC042017NF/162583s.jpg "Lifetime Of Love Dies [ 162583 ]")
![Party Banners Dies [ 165264 ]](https://assets1.tamsnetwork.com/images/EC042017NF/165264s.jpg "Party Banners Dies [ 165264 ]")
![White 1/4" (6.4 Mm) Ribbon [ 165562 ]](https://assets1.tamsnetwork.com/images/EC042017NF/165562s.jpg "White 1/4\" (6.4 Mm) Ribbon [ 165562 ]")
![Two Tone Sparkle Gems [ 164633 ]](https://assets1.tamsnetwork.com/images/EC042017NF/164633s.jpg "Two Tone Sparkle Gems [ 164633 ]")

![Basic Beige 8 1/2" X 11" Cardstock [ 164511 ]](https://assets1.tamsnetwork.com/images/EC042017NF/164511s.jpg "Basic Beige 8 1/2\" X 11\" Cardstock [ 164511 ]")
![Secret Sea 8 1/2" X 11" Cardstock [ 165624 ]](https://assets1.tamsnetwork.com/images/EC042017NF/165624s.jpg "Secret Sea 8 1/2\" X 11\" Cardstock [ 165624 ]")
![2025–2027 In Color™ Flat Pearls [ 165192 ]](https://assets1.tamsnetwork.com/images/EC042017NF/165192s.jpg "2025–2027 In Color™ Flat Pearls [ 165192 ]")


![Impressions Abloom Photopolymer Stamp Set (English) [ 165605 ]](https://assets1.tamsnetwork.com/images/EC042017NF/165605s.jpg "Impressions Abloom Photopolymer Stamp Set (English) [ 165605 ]")
![Pretty In Pink 8 1/2" X 11" Cardstock [ 163793 ]](https://assets1.tamsnetwork.com/images/EC042017NF/163793s.jpg "Pretty In Pink 8 1/2\" X 11\" Cardstock [ 163793 ]")
![Strawberry Slush 8 1/2" X 11" Cardstock [ 165625 ]](https://assets1.tamsnetwork.com/images/EC042017NF/165625s.jpg "Strawberry Slush 8 1/2\" X 11\" Cardstock [ 165625 ]")
![Floral Impressions 12" X 12" (30.5 X 30.5 Cm) Designer Series Paper [ 165603 ]](https://assets1.tamsnetwork.com/images/EC042017NF/165603s.jpg "Floral Impressions 12\" X 12\" (30.5 X 30.5 Cm) Designer Series Paper [ 165603 ]")
![Darling Duckling Classic Stampin' Pad [ 165277 ]](https://assets1.tamsnetwork.com/images/EC042017NF/165277s.jpg "Darling Duckling Classic Stampin' Pad [ 165277 ]")
![Garden Green Classic Stampin' Pad [ 147089 ]](https://assets1.tamsnetwork.com/images/EC042017NF/147089s.jpg "Garden Green Classic Stampin' Pad [ 147089 ]")
![Strawberry Slush Classic Stampin' Pad [ 165286 ]](https://assets1.tamsnetwork.com/images/EC042017NF/165286s.jpg "Strawberry Slush Classic Stampin' Pad [ 165286 ]")
![Everyday Arches Dies [ 164629 ]](https://assets1.tamsnetwork.com/images/EC042017NF/164629s.jpg "Everyday Arches Dies [ 164629 ]")


![Pack Your Bags Twine Three Pack [ 165582 ]](https://assets1.tamsnetwork.com/images/EC042017NF/165582s.jpg "Pack Your Bags Twine Three Pack [ 165582 ]")


")


 Specialty Paper")


")
")


 Specialty Paper")


")
")


 Designer Series Paper")


