
Good Friday morning my fellow stampers. Are you ready for the weekend? It’s here, ready or not. Is anyone making plans to do anything fun? It’s the 1st of the month, so I’ll be working and of course it’s supposed to be sunny and 82 here.
Only 5 days left and the new 2019-2020 Annual Catalog goes live, YAY! Do you all have your shopping lists ready? I was hoping to be able to hop on first thing Tuesday morning to get my order places, but I have to be at work 😦 Guess I’ll be hoping on as soon as I get home, but my list is ready to go.
LAST CHANCE PRODUCTS-DISCOUNTING SOME ITEMS!!
Stampin’ Up! just let us know that they will be discounting some of the retiring products beginning TODAY, May 30! The discount will be up to 30% on select items!
The discount pricing will go into effect at 12:00 PM (MT) on Thursday, May 30.
Click here to see the list of items that will be discounted from the 2018-19 Annual Catalog retiring list.
Click here to see the list of items that will be discounted from the 2019 Occasions Catalog retiring list. **The sale prices are listed on the second page.
The products are only available while supplies last so order soon to make sure that you get your goodies on sale!
CLICK HERE TO HEAD OVER TO MY ONLINE STORE TO
So, for today’s card I have a quick and easy knid of a fun fold for you along with a sneak peek of some new 2019-2021 In-Colors. Here’s my card.

I started by adhering a panel of the new Pretty Peacock 2019-2021 In-Colors Designer Series Paper to a Rococo Rose card base. On a panel of Whisper White cardstock I stamped the sentiment from the Stampin’ Up Enjoy Life Stamp Set in Pretty Peacock. I stamped one of the butterflies from the Enjoy Life stamp set in Rococo Rose Ink above the sentiment. I cut the sentiment out using the 2nd largest square from the Stitched Shapes Dies. I cut the matching scalloped square from the Layering Squares Dies from Rococo Rose cardstock.

I adhered the sentiment panel to the scalloped mat using Snail and then to the card front using Stampin’ Dimensionals. I added a couple of the new Rococo Rose 2019-2021 Faceted Dots to the artwork.

This is where it is kind of a fun fold. The edges of the card do not meet, and I did this on purpose. I added a strip of the Pretty Peacock 2019-2021 In-Color DSP to the inside edge of the card.

On the inside I stamped the sentiment from the Enjoy Life stamp set in Pretty Peacock Ink in the center of a Whisper White panel. I stamped one of the butterflies from the Enjoy Life stamp set in Pretty Peacock above the sentiment. I stamped the tall floral image from the Enjoy Life stamp set on the bottom of the Whisper White panel. I stamped the 2 end ones off once and the center one I stamped off twice. I stamped the small flower image and the butterflies, both from the Enjoy Life stamp set, in Rococo Rose Ink between the tall flowers and above. I adhered the Whisper White panel to the inside of the Rococo Rose card base using Multipurpose Liquid Glue.


To finish my card I decorated a Medium Whisper White Envelope. I stamped the tall flowers from the Enjoy Life stamp set in Pretty Peacock Ink on the envelope front, the same as I did for the card. I stamped the small flowers and the butterflies from the Enjoy Life stamp set in Rococo Rose Ink on the envelope front. I stamped a couple butterflies from the Enjoy Life stamp set on the envelope back in Pretty Peacock Ink. I stamped a couple of the small flowers from the Enjoy Life stamp set on the envelope back in Rococo Rose Ink. I adhered a piece of the Pretty Peacock 2019-2021 In-Color DSP to the envelope flap.
Thank you for stopping by my blog today. I hope you liked my card and will give it a try. Happy Stamping!!
If you need any stamping supplies, I’d be very happy to be your Demonstrator. Just click here to go directly to my online store or drop me an email if you have any questions.
Click here to shop the clearance rack.
MY CURRENT HOST CODE IS: 4WY7GYTC
Happy Stamping, Karen!
****************************************************************************************************
If you are interested in joining my team click here for details or email me. I’d love to have you on my team.
****************************************************************************************************
Share A Little Love – June Paper Pumpkin Kit!
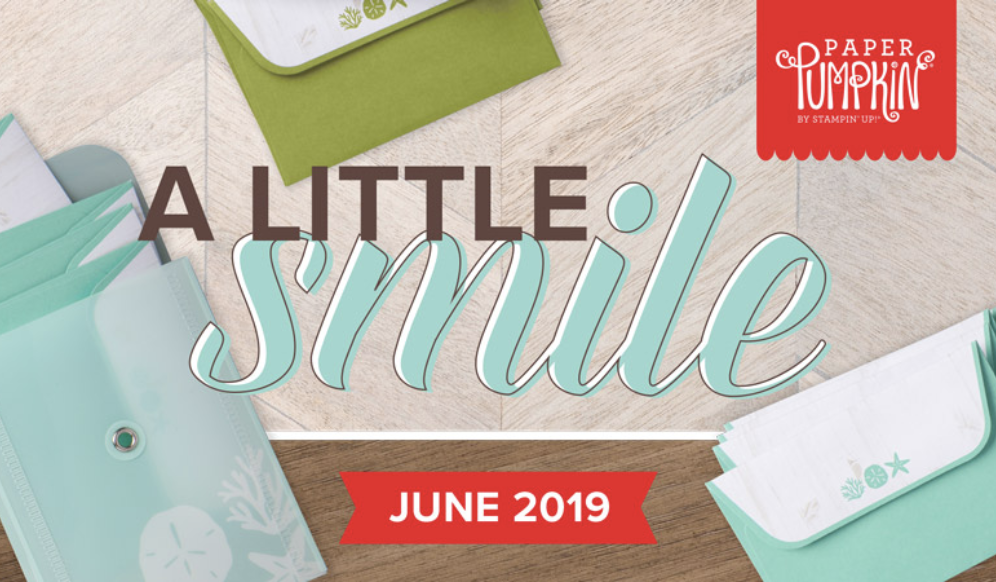
Care about someone? Why not tell them?
The Paper Pumpkin June kit makes it easy for you to scatter sunshine this summer—whenever, with whomever. Not only do we give you 16 fun-sized, beach-themed cards and envelopes, but the kit also includes an exclusive carrying case so you’ll always have your cards on hand to share wherever you go. And don’t forget the exclusive stamp set and ink spot that completes every Paper Pumpkin kit!!
More about the June Kit:
- In order to receive the June Paper Pumpkin Kit, you must have an active subscription by June 10 at 11:50 PM (MT).
- The kit creates 16 fun-sized, beach-themed cards and envelopes.
- Coordinating colors: Coastal Cabana, Crumb Cake, and Old Olive
Check out the quick video created by Stampin’ Up! with some sneak peaks of the June kit!
 If you’re interested in subscribing to Paper Pumpkin yourself, you can either sign up for a subscription where you are billed monthly for your kit or you can purchase a prepaid subscription in my online store. To see more information and to sign up for the monthly subscription, click here. To see the options for prepaid subscriptions in my online store, click here. Let me know if you have any questions.
****************************************************************************************************EVERYTHING IS ROSY PRODUCE MEDLEY – LAST DAY TO ORDER!!

WHAT IS A PRODUCT MEDLEY?
Product medleys are new to Stampin’ Up!. In addition to being filled to the brim with cute, coordinating products, we’ve designed our product medleys to provide you with endless creative possibilities.
The Everything Is Rosy Product Medley includes these exclusive products:
- Everything Is Rosy Photopolymer Stamp Set—18 stamps
- Everything Is Rosy Dies—10 dies; largest die 2-7/8″ x 1″
- 6″ x 6″ Designer Series Paper Stack—48 sheets; 8 each of 6 double-sided designs
- 6″ x 6″ rose gold foil paper—8 sheets
- Printed die cuts—2 sheets
- Rose gold die cuts—4 sheets; 2 each of 2 designs
- Rose gold adhesive backed mirror embellishments—60 embellishments; 1/4″
- Melon Mambo 1/4″ Ruched Ribbon—10 yards
- Night of Navy/Rose Gold 3/8″ Metallic –Edge Ribbon—10 yards
- Rose Gold Shimmer Paint—1/2 oz.
Sales Period: May 1–31, 2019 while supplies last!
Click the image below to head over to my online store to get yours now!

****************************************************************************************************
Card stock cuts for this project:
- Rococo Rose Cardstock 8″ X 5 1/2″ (card base scored and folded at 3 3/4″), 2 1/2″ X 2 1/2″ (scalloped artwork mat)
- Whisper White Cardstock 5 1/4″ X 3 1/2″ (inner liner), 2 1/2″ X 2 1/2″ (artwork)
- 2019-2021 In-Color Designer Series Paper 5 3/;8″ X 3 5/8″ (card front), 3/8″ X 5 3/8″ (inside edge strip)
****************************************************************************************************
Product List


 Designer Series Paper")


 Designer Series Paper")


 Reversible Ribbon")


 Designer Series Paper")


 I started with a Lemon Lime Twist card front and adhered a piece of the beautiful Sale-A-Bration Botanical Butterfly Designer Series Paper to it using Multipurpose Liquid Glue. I stamped the sentiment from the Stampin’ Up Butterfly Gala Stamp Set in Tuxedo Black Memento Ink on the bottom portion of the cardstock. I then ran it through my Big Shot using the Subtle Dynamic Textured Impressions Embossing Folder to give it a little texture.


 For this card, the measurements are a little different then my normal cards. The measurements are below. Using my Big Shot, I started by cutting out the beautiful corner floral piece from the Springtime Impressions Thinlits Dies in So Saffron cardstock. I adhered the die cut to a So Saffron card base using Multipurpose Liquid Glue.
 On a Whisper White panel, using my Stamparatus, I stamped the Thank You sentiment from the Stampin’ Up Abstract Impressions stamp set in Shaded Spruce, Melon Mambo and Mango Melody Inks. I then stamped the watermark behind each sentiment in Soft Sea Foam, Powder Pink and So Saffron Inks. I was able to get everything lined up perfectly by using the Stamparatus and hinging down to repeat each sentiment, (hope that made sense). I adhered the Whisper White panel to a Night Of Navy mat using Snail.
 I adhered a double bow using Night Of Navy Medium Bakers Twine below the sentiments. I adhered the artwork to the So Saffron card base using Stampin’ Dimensionals.
 On the inside I adhered a piece of Garden Impressions Designer Series Paper to the right side of the card base. I stamped the flowers from the Abstract Impressions stamp set in Shaded Spruce Ink, stamped off once, Soft Sea Foam Ink, Petal Pink Ink and Calypso Coral Ink along the bottom of a Whisper White panel. I stamped the sentiment from the same stamp set in Night of Navy Ink in the center. I adhered the Whisper White panel to the So Saffron card base using Multipurpose Liquid Glue.
 I adhered a panel of the Garden Impressions Designer Series Paper to the inside left of the card base using Snail.


 Designer Series Paper")


 Here is what I came up with for this Sketch and Thank you Challenge. Take a look.
 I started with a Calypso Coral card front and using my Big Shot I embossed it with the Swirls & Curls Textured Impressions Embossing Folder. I adhered the card front to a Calypso Coral card base using Multipurpose Liquid Glue.
 On a piece of Whisper White cardstock I stamped the image from the Stampin’ Up Bee Thankful stamp set in Tuxedo Black Memento Ink. I colored the image in using my Calypso Coral, Daffodil Delight and Granny Apple Green Stampin’ Blends Markers. To get the shading on the thanks, I first colored with my Light Calypso Coral Stampin’ Blends Marker. I then colored the bottom with the Dark Calypso Coral Stampin’ Blends Marker and then blended it with my Light Calypso Coral Stampin’ Blends Marker. I adhered the artwork to a Granny Apple Green mat using Snail. I adhered a piece of the Daffodil Delight 1/4″ Organdy Ribbon across the bottom of the artwork. I adhered the artwork to the card front using Stampin’ Dimensionals.
 On a scrap piece of Whisper White cardstock I stamped the so much sentiment from the Stampin’ Up A Big Thank You stamp set in Calypso Coral Ink. I cut the ends on an angle using my Paper Snips and adhered it below the artwork using Mini Stampin’ Dimensionals. I added a Granny Apple Green Glitter Enamel Dot to the small strip.


