
Good Sunday morning my stamping friends. How is everyone’s weekend going? Hope you are all making the best of it and having some fun.
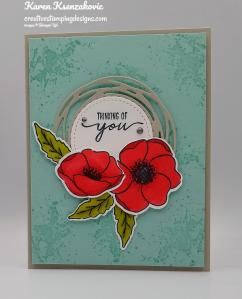
Today’s card uses some of the 2021-2023 In-Colors. I’m really loving these new colors this year. Here’s my card for today.

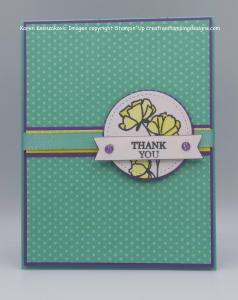
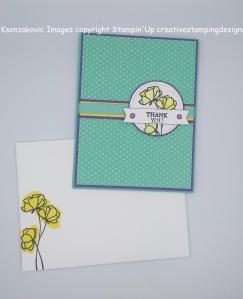
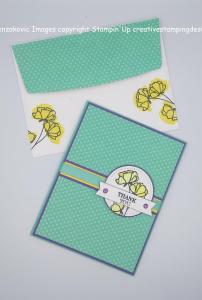
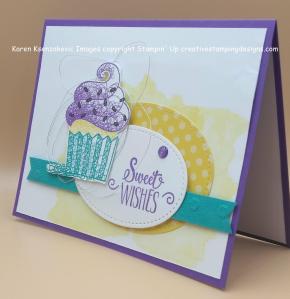
I used the Stampin’ Up! Color & Contour Bundle for my card along with the beautiful 2021-2023 In-Color Shimmer Vellum Paper.

I played along with Festive Friday Challenge #084. I have Green, Die Cuts & Flowers.

I started by stamping the outline flower image from the Stampin’ Up! Color & Contour Photopolymer Stamp Set in Tuxedo Black Ink on the panel of Basic White cardstock. I stamped the flower fill image in Fresh Freesia Ink over the outline image. I cut the flower out using the Scalloped Contours Dies. I cut the middle scallop frame from Scalloped Contours Dies from the Basic White panel. Using my Blending Brushes, I added some Soft Succulent Ink on the scalloped frame. I stamped the sentiment from the Color & Contour stamp set in Tuxedo Black Ink on the bottom of the frame. I adhered the flower to the frame using Stampin’ Dimensionals.

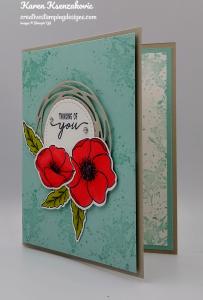
I embossed a panel of the 2021-2023 In-Color Shimmer Vellum Paper using the Pretty Flowers Embossing Folder. I adhered the Vellum panel to a Soft Succulent mat using Multipurpose Liquid Glue just behind where I was putting the frame. I adhered the matted card front to a Fresh Freesia card base using Stampin’ Seal.

I adhered a length of Soft Succulent 3/8″ Open Weave Ribbon to the card front using Glue Dots. I adhered the artwork over the ribbon using Stampin’ Dimensionals. I added a few 2021-2023 In-Color Jewels to the card front.

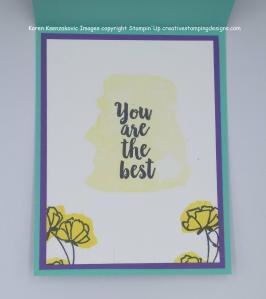
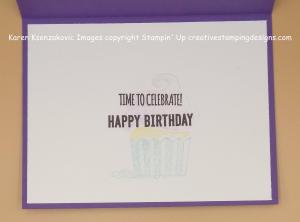
On the inside I stamped the sentiment from the Stampin’ Up! Love What You Do Photopolymer Stamp Set in Tuxedo Black Ink. I stamped the flower image from the Color & Contour stamp set in Tuxedo Black Ink to the side of the sentiment. I stamped the flower fill color in Fresh Freesia Ink over the outline image. I adhered a strip of the 2021-2023 In-Color Shimmer Vellum Paper to the bottom of the panel using Stampin’ Seal only on the sides. I adhered the Basic White panel to a Soft Succulent mat using Stampin’ Seal and then to the inside of the Fresh Freesia card base using Multipurpose Liquid Glue.

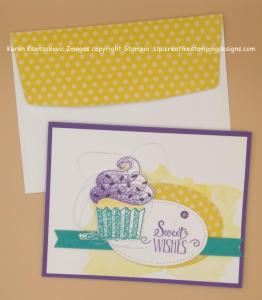
To finish my card I decorated a Basic White Medium Envelope. I stamped the outline flower image from the Color & Contour stamp set in Tuxedo Black Ink on the envelope front. I stamped the flower fill image in Fresh Freesia Ink. I adhered a panel of the 2021-2023 In-Color 6 X 6 Designer Series Paper to the envelope flap.

Thank you for stopping by my blog today. I hope you liked my card and will give it a try. Happy Stamping!!
*********************************************************************************************************
If you need any stamping supplies, I’d love to be your Demonstrator. Just click HERE to go directly to my online store or drop me an email if you have any questions.
MY CURRENT HOST CODE IS: QH7JDXHB
Use this host code when you order $50 or greater and receive a free gift from me! If your order is over $150, please do not use this code, but you’ll still get the free gift. The free gift is your choice of any 1 item valued up to $10.00 from the 2020-2021 Annual Catalog or the January-June 2021 Mini Catalog! For any orders $50 or more I will also send you my monthly class tutorials. Click HERE or go to my Customer Rewards for more details and to see what this months tutorials are.
Click HERE to shop the clearance rack.
Please remember to use my current Host Code and make sure that you can see my name on the final checkout page listed as your Demonstrator when you order so that you know that you’re ordering with me and you’ll get my rewards!
Happy Stamping, Karen!
*********************************************************************************************************
Stampin’ Up! Join + Promotion May 4-31

May is a fabulous time to join Stampin’ Up! because you’ll get even MORE FREE products in your customizable Starter Kit! From May 4–31, you will get $125 USD $155 worth of products for only $99 + free business supplies + free shipping + all the fun being a part of Stampin’ Up!!
PROMOTION DATES: 4–31 MAY 2021
- New demonstrators who purchase their Starter Kit between May 4 and May 31 will be able to redeem $155 of Starter Kit eligible products for $99.
- New demonstrators who submit their Independent Demonstrator Agreement (IDA) before May 4 or after May 31 will not be eligible for this offer.
- A new demonstrator can select any eligible Stampin’ Up! products up to the stated value.
- The Starter Kit also includes business resources like catalogs, brochures, order forms, and postcards at no additional charge.
- The Starter Kit also includes a FREE past Paper Pumpkin kit.
- The Starter Kit promotion begins May 4.
- Deadline to purchase the Starter Kit and receive the extra $30 in free products: May 31, 2021 at 11:50 PM (MT).
In addition to the amazing added value to the Starter Kit, when you join Stampin’ Up! you get to be a part of our amazing community of crafters! Plus, you get to enjoy sharing simple and fun crafting experiences with others, early access to products, and exclusive access to training events! Demonstrators also get at least a 20% discount on all of the products that they purchase and there is no requirement to sell to anyone. There is no risk and no penalty if you decide that being a Demonstrator isn’t right for you. With this great deal, there is no reason not to join in May!!
If you have any questions about joining or being a Stampin’ Up! Demonstrator, please drop me a note at creativestampingdesigns@gmail.com. If you want to read more about becoming a Demonstrator and the benefits of joining, head over to my Stampin’ Up! page HERE. I’d LOVE to have you on my team!!
*********************************************************************************************************
Expressions In Color
Subscribe May11 – June 10

Dream and discover In Color! With the Expressions In Color Paper Pumpkin Kit, you’ll be introduced to our intriguing collection of In Colors for 2021–2023—and, you’ll find a familiar shade from our 2020–2022 In Color selection. This month’s ink-credible kit contains enough elements to create nine cards—and coordinating envelopes—including ink-stained paper pieces, an exclusive stamp set, and not one, but two Classic Stampin’ Spots! And, it all comes in a cute, colorful, and collectible box.
What are In Colors, anyway? In Colors consist of a limited-edition collection of colors. We come up with a new collection every year, and we release it around the same time as the release of our annual catalog! In each In Color collection, we’ll offer ink, paper, markers, and more. The catch? They’re only available to purchase for a period of two years, so stock up on your favorite In Color supplies while you can!
With the Expressions In Color kit, you can explore and experiment with our 2020–2022 and 2021–2023 In Color collections. Make a splash with awe-inspiring, ink-stained artistry!
Details
- Kit contains enough supplies to create 9 cards—3 each of 3 designs—and coordinating envelopes. This all-inclusive kit includes printed card bases, die-cut paper pieces, embellishments, adhesive, and more!
- Card size: 4-1/4″ x 5-1/2″ (10.8 x 14 cm)
- Envelope size: 4-1/2″ x 5-3/4″ (11.4 x 14.6 cm)
- Coordinating colors: Bumblebee, Evening Evergreen, Fresh Freesia, Polished Pink
- As always, this month’s kit features an exclusive stamp set. But, this month’s kit also includes not one, but two Classic Stampin’ Spots!
- Comes in a cute, colorful, and collectible box.
- Coordinates with products from the Expressions in Ink Suite (US | CA) (item #155459).
Subscribe to the June 2021 Paper Pumpkin Kit—Expressions In Color—between 11 May and 10 June at paperpumpkin.com!
Note: Supplies may be limited toward the end of the subscription period.
*********************************************************************************************************
Stampin’ Up! Connect, Craft & Collect $25 Stampin’ Rewards Bonus May 4 – June 14!!
From May 4 – June 14, 2021, qualifying Stampin’ Up! orders and parties over $250 will receive $25 in BONUS Stampin’ Rewards! YAY for more free goodies to kick off a new catalog!!
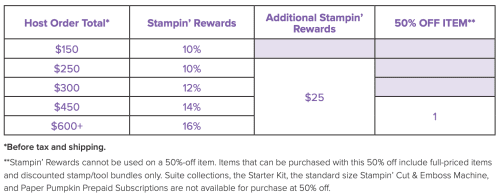
Stampin’ Rewards can be spent on any merchandise in either of the current catalogs, including the host exclusive items on pages 170-171 in the new Annual Catalog and page 88 in the January-June Mini Catalog!
PROMOTION DATES: MAY 4 – JUNE 14, 2021
- Workshop orders, customer orders, and online orders all qualify for the extra $25 in Stampin’ Rewards if they reach the $250 level.
- The order must reach the qualifying amount of $250 in merchandise prior to shipping and tax.
- The extra $25 rewards are only valid once per order no matter how high the order total.
- Starter Kit orders do not qualify for this promotion.
- Stampin’ Rewards can not be used on a 50% off item.
- Deadline to submit an order and receive the extra $25 in free Stampin’ Rewards: June 14, 2021 at 11:50 PM (MT).
If you have any questions or would like me to set up a host code for you to see if you can collect $250 in orders for yourself, please drop me a note at creativestampingdesigns@gmail.com. I’ll be happy to do that for you!
Looking For The BEST Deal???
Join during May AND then place an order of $250+!! You can “double dip” and get $30 additional free merchandise with your Starter Kit AND $25 extra in host cash to spend when you place orders of $250+ before June 14!!
If you have any questions, drop me a note at creativestampingdesigns@gmail.com.
*********************************************************************************************************
Card stock cuts for this project:
- Basic White Cardstock 4″ X 5 1/4″ (artwork), 3 3/4″ X 5″ (inner liner)
- Fresh Freesia Cardstock 4 1/4″ X 11″ (card base scored and folded at 5 1/2″)
- Soft Succulent Cardstock 2 – 4″ X 5 1/4″ (card front and inner liner mats)
- 2021-2023 In-Color Shimmer Vellum Paper 3 3/4″ X 5″ (card front), 1″ x 3 3/4″ (inner liner)
- 2021-2023 In-Color 6 X 6 Designer Series Paper 2 1/2″ X 6″ (envelope flap)
*********************************************************************************************************
Product List
")


 Designer Series Paper")


 Open Weave Ribbon")


 Designer Series Paper")


 Reversible Ribbon")


 Designer Series Paper")


