
Good Tuesday morning my fellow stampers. How are you doing today? I hope everyone’s week has started off well.
For today’s card I did some sponging and some embossing for you. I have to admit, it took me a couple do-overs before I got this card to look like I wanted and didn’t have any mess ups. Here’s my card.

My card for today played along with 3 challenges. First is As You See It challenge #202. Here are their colors.

Next I played along with Inspire.Create challenge #045 Here is their theme.

I also joined in with Seize The Birthday challenge # 167.
![]()
I started with a panel of Whisper White cardstock. Using my Stamping Sponges I first sponged the Calypso Coral Ink along the top half of the panel. I Then sponged the Daffodil Delight Ink on the bottom half of the panel.

I stamped the grass and flower image from the Stampin’ Up Enjoy Life Photopolymer Stamp Set in Tuxedo Black Memento Ink on the bottom of the sponged panel. I stamped the mountain image from the Stampin’ Up Waterfront Photopolymer Stamp Set in Smoky Slate Ink across the center of the panel. I stamped the trees from the Waterfront stamp set in Mossy Meadow Ink in front of the mountains. Lastly I stamped the bike rider from the Enjoy Life stamp set in Versamark Ink on the bottom of the panel and immediately sprinkled it with Black Stampin’ Emboss Powder and set it using my Heat Tool.

I stamped the sentiment from the Stampin’ Up Itty Bitty Birthdays Cling Stamp Set in Tuxedo Black Memento Ink on the top of the panel. I adhered the artwork to a thin Mossy Meadow mat using Snail. I then adhered it to a Mossy Meadow card base using Stampin’ Dimensionals.

On the inside I stamped the sentiment from the Enjoy Life stamp set in Mossy Meadow Ink in the center of a Whisper White panel. I stamped the mountain image from the Waterfront stamp set in Sahara Sand Ink along the bottom of the Whisper White panel. I stamped the trees from the Waterfront stamp set in Mossy Meadow Ink on the bottom in front of the mountains. I adhered the Whisper White panel to the inside of the Mossy Meadow card base using Multipurpose Liquid Glue.


To finish my card I decorated a Medium Whisper White Envelope. I stamped the bike rider image from the Enjoy Life stamp set in Tuxedo Black Memento Ink on the envelope front. I stamped the grass and tree images from the Waterfront stamp set in Mossy Meadow Ink on the envelope flap.
Thank you for stopping by my blog today. I hope you liked my card and will give it a try. Happy Stamping!!****************************************************************************************************
If you need any stamping supplies, I’d be very happy to be your Demonstrator. Just click here to go directly to my online store or drop me an email if you have any questions.
MY CURRENT HOST CODE IS: AHCJYGJN
For any orders $50 or more I will send you my monthly class tutorials. Click here or go to my Customer Rewards to see what this months tutorials are.
Click here to shop the clearance rack.
Happy Stamping, Karen!
****************************************************************************************************
If you are interested in joining my team click here for details or email me. I’d love to have you on my team.
****************************************************************************************************
Sail Into Summer – July Paper Pumpkin Kit!
This month, Paper Pumpkin is providing unprecedented catalog coordination, giving you THREE new suites that you can mix and match with July’s kit! The three suites are:
- Woven Threads Suite p. 13–14
- Garden Lane Suite p. 40–41
- Come Sail Away Suite p. 144–145
More about the July Kit:
- Makes 9 mailable cards with envelopes (3 each of 3 designs)
- Coordinating colors: Gold, Kraft, Mossy Meadow, Old Olive, Pear Pizzazz, Pretty Peacock, Sahara Sand, Seaside Spray, and Terracotta Tile
- Must have an active subscription by July 10, 2019 to receive the On My Mind kit.
- Product availability may be limited toward the end of the promotion period.

If you’re interested in subscribing to Paper Pumpkin yourself, you can either sign up for a subscription where you are billed monthly for your kit or you can purchase a prepaid subscription in my online store. To see more information and to sign up for the monthly subscription, CLICK HERE. To see the options for prepaid subscriptions in my online store, CLICK HERE.
****************************************************************************************************
Card stock cuts for this project:
- Mossy Meadow Cardstock 8 1/2″ X 5 1/2″ (card base scored and folded at 4 1/4″), 5 1/8″ X 3 7/8″ (artwork mat)
- Whisper White Cardstock 5″ X 3 3/4″ (artwork), 5 1/4″ x 4″ (inner liner)
****************************************************************************************************
Product List


 Designer Series Paper")


 I adhered the artwork to a Silver Foil Sheet using Multipurpose Liquid Glue and then to a Night of Navy card base using Stampin’ Dimensionals.


 I also joined in with a couple challenges today. 1st is the
  The next is
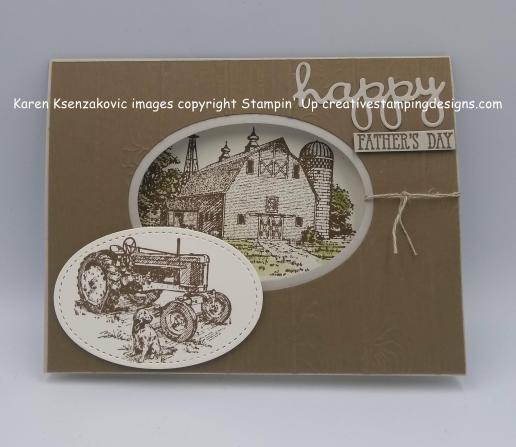
  I started by adhering a piece of Wood Textures Designer Series Paper to a panel of Pear Pizzazz cardstock using Snail. On another smaller piece of Wood Textures DSP I stamped the little boy with the ducks from the Heartland stamp set in Tuxedo Black Memento Ink on the right side. I colored the little boy in with my Pear Pizzazz Stampin’ Write Marker and my light Daffodil Delight Stampin’ Blends Marker. I then adhered the panel to the bottom of the Pear Pizzazz card front using Snail.
 I wrapped a piece of Linen Thread around the seam twice and tied a small bow. I adhered the card front to a So Saffron card base using Stampin’ Dimensionals.
 On a small piece of Whisper White cardstock I stamped the tractor with the dog from the Heartland stamp set in Tuxedo Black Memento Ink. I colored the tractor in using my Pear Pizzazz Stampin’ Write Marker and my Dark Daffodil Delight Stampn’ Blends Marker. Using my Big Shot, I cut the image out with my Square Stitched Shaped Framelits Dies and I adhered it to the card front using Stampin’ Dimensionals.
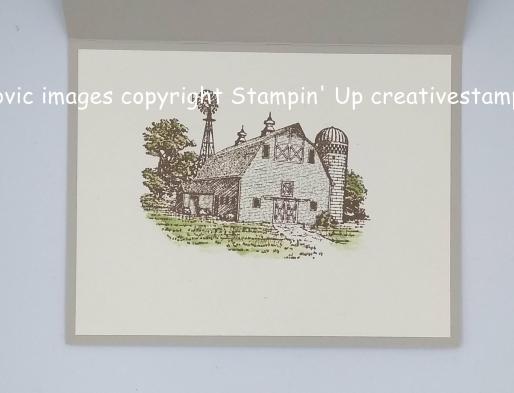
 On the inside I stamped the tractor image from the Heartland stamp set in Early Espresso Ink, stamping off twice, in the center of a Whisper White panel. I stamped the sentiment from the Stampin’ Up Part Of My Story Stamp Set in Pear Pizzazz Ink over the tractor. This stamp set is a Sale-A-Bration item free with a $50 order.


 I started with a panel of Nature’s Poem Designer Series Paper and using my Big Shot, I ran it through with the Pinewood Planks Dynamic Textured Impressions Embossing Folder. I adhered the card front to a Tranquil Tide card base using Multipurpose Liquid Glue.
 Using my Big Shot again, I cut 2 panels of the Nature’s Poem DSP out using my Rectangle Stitched Framelits Dies. I adhered each of the rectangles to a Tranquil Tide mat using Snail then I adhered them to the card front using Multipurpose Liquid Glue.
 On a small piece of Whisper White cardstock I stamped the tree trunk image from the Stampin’ Up Rooted In Nature Stamp Set in Soft Suede Ink, stamping off twice. I stamped the sentiment from the Rooted In Nature stamp set in Soft Suede Ink in the center of the trunk then I fussy cut the trunk. I adhered the trunk to the center of the card front using Stampin’ Dimensionals. I embossed and die cut a couple of the leaves from the Nature’s Roots Framelits Dies in Tranquil Tide cardstock. I adhered the triple leaf under the top of the trunk using Multipurpose Liquid Glue and I adhered the other 2 leaves on the bottom of the trunk using Stampin’ Dimensionals. I adhered a small Mint Macaron bow from the Nature’s Twine using a Glue Dot on top of the leaf stems.
 On the inside I stamped the sentiment from the Rooted In Nature stamp set in Soft Suede Ink in the center of a Whisper White panel. I stamped the leaf images from the same stamp set in Blackberry Bliss, Cajun Craze, Grapefruit Grove, Mint Macaron and Tranquil Tide Inks stamping off once or twice to get light images. I adhered the Whisper White panel to the inside of the Tranquil Tide card base using Multipurpose Liquid Glue.


 and here is ‘Just Us Girls’ Challenge
 I started with a panel of Wood Textures Designer Series Paper and adhered it to a Crumb Cake card base using Multipurpose Liquid Glue.
 On a panel of Whisper White cardstock I stamped the house image from the Stampin’ Up By The Bay Stamp Set in Tuxedo Black Memento Ink. This beautiful stamp set is a FREE item with a $50 order during Sale-A-Bration. I just love this image and would absolutely love to be in that house looking out at the bay right now. On a smaller piece of Whisper White cardstock I stamped the seagull image in Tuxedo Black Memento Ink. Using my Aqua Painter filled with Alcohol, I water colored the images in using Balmy Blue, Cajun Craze, Crumb Cake, Gray Granite, Pacific Point, Pear Pizzazz, Sahara Sand, Smoky Slate and Soft Suede Inks. To get the ink I squeezed the stamp pad before opening it so that ink goes on the inside of the lid. I used my Aqua Painter to pick up the ink to color my picture with. When I was done with each color, I wiped the lid with paper towel to make sure ALL alcohol was off the lid before closing it. You do not want to get alcohol in your ink. Once I was done watercoloring my pictures I cut them out using the Layering Oval Framelits Dies and my Big Shot. I adhered the house and bay image to the card front using Multipurpose Liquid Glue and I adhered the seagull image using Stampin’ Dimensionals.
 On a small strip of Whisper White cardstock I stamped the sentiment from the By The Bay stamp set in Soft Suede Ink. I stamped the seashell from the same stamp set to the right of the sentiment in Crumb Cake Ink. I edged the strip using my Crumb Cake Stampin’ Write Marker to give it a little dimension. I then adhered the sentiment to the card front, sliding it under the seagull image, using Multipurpose Liquid Glue. I attached a small bow made of Linen Thread to the sentiment strip using a Glue Dot.
 On the inside I stamped the house image from By The Bay stamp set in Crumb Cake Ink, stamping it off once, in the center of a Whisper White panel. I stamped the sentiment from the same stamp set in Soft Suede Ink over the house image.


