Stampin’ Up! Season of Chic Merlot Thanks

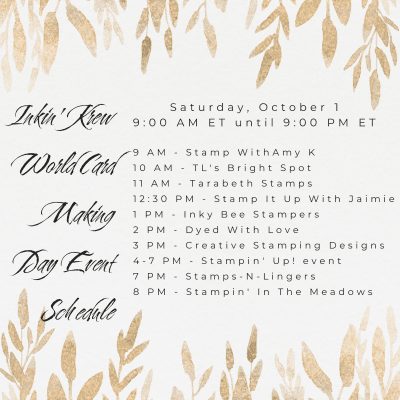
Good Tuesday morning my stamping friends. I hope you are having a great start of the week.

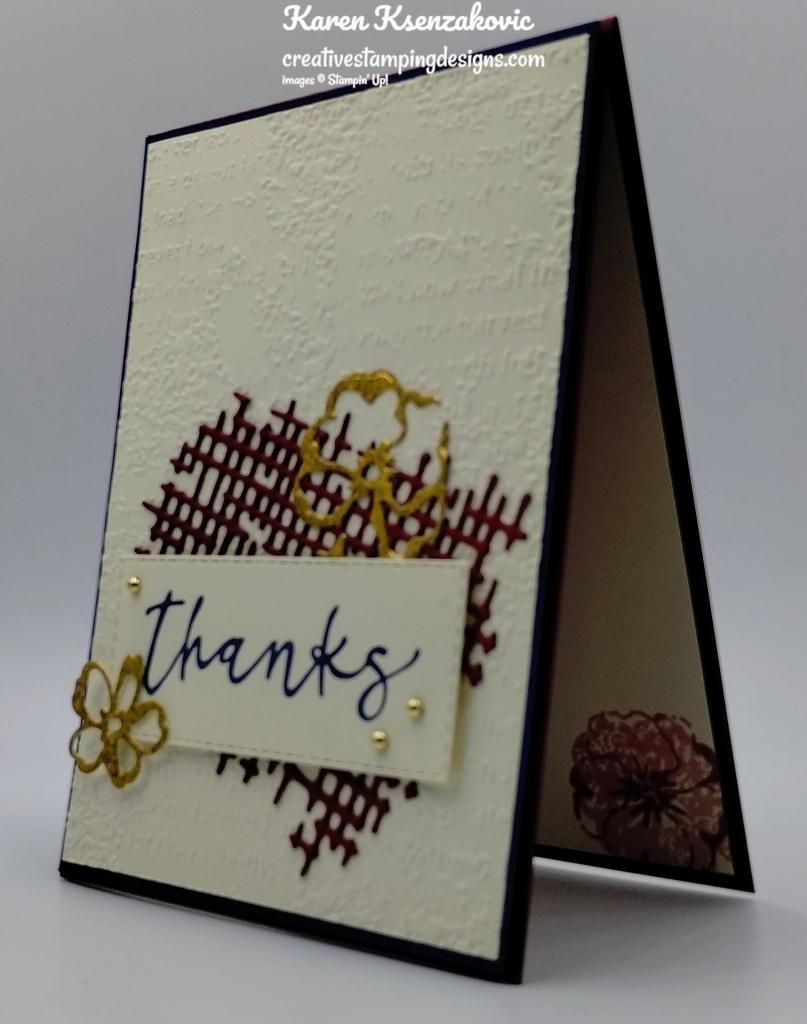
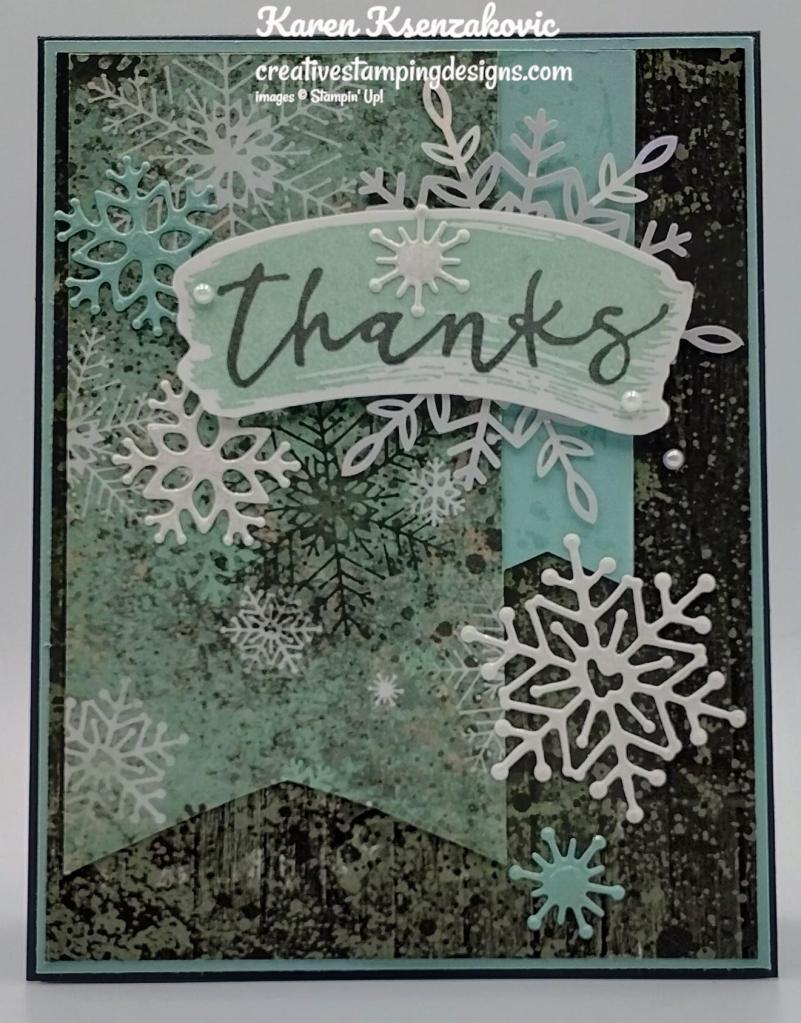
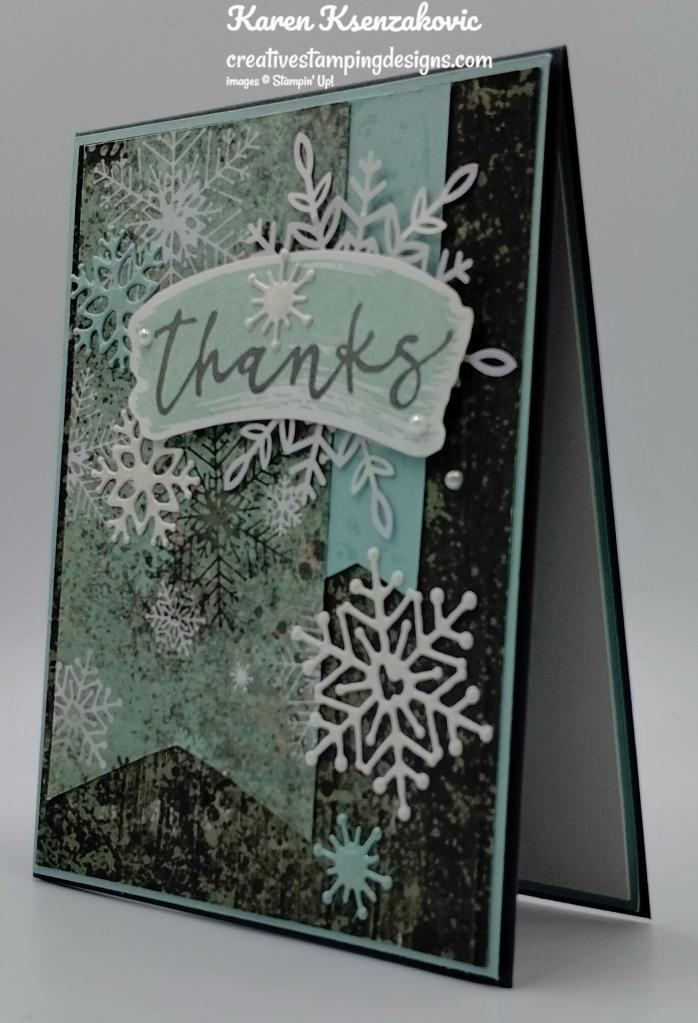
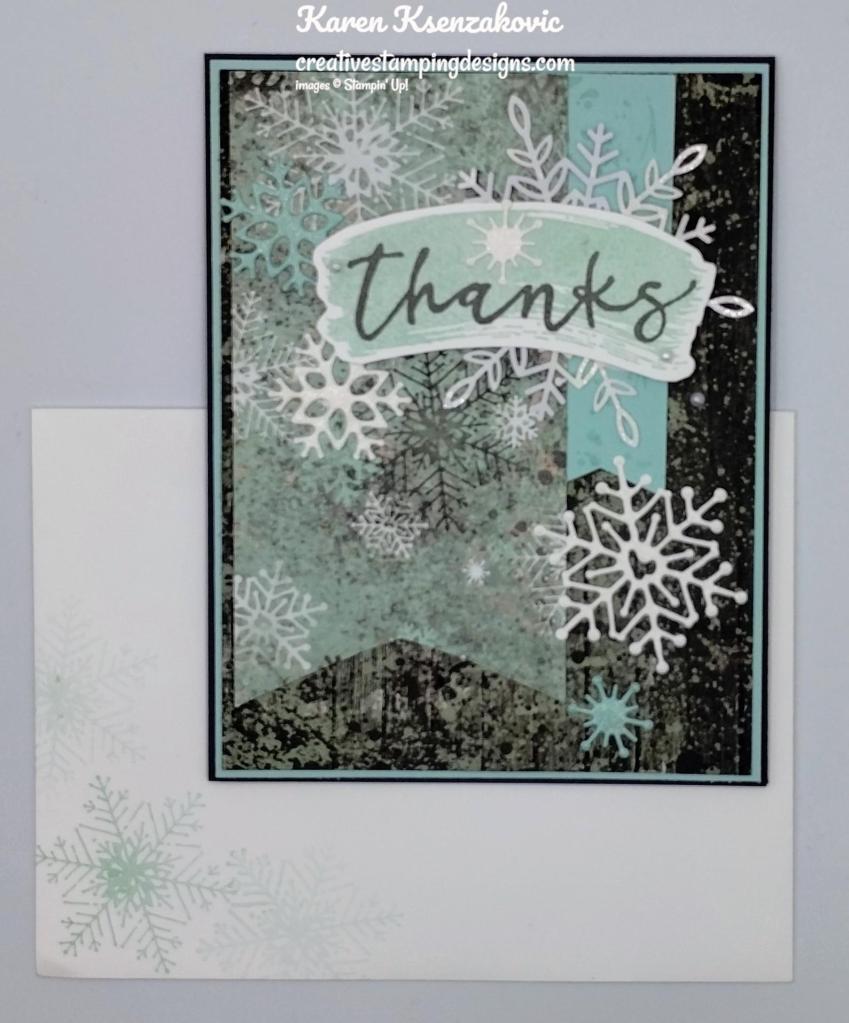
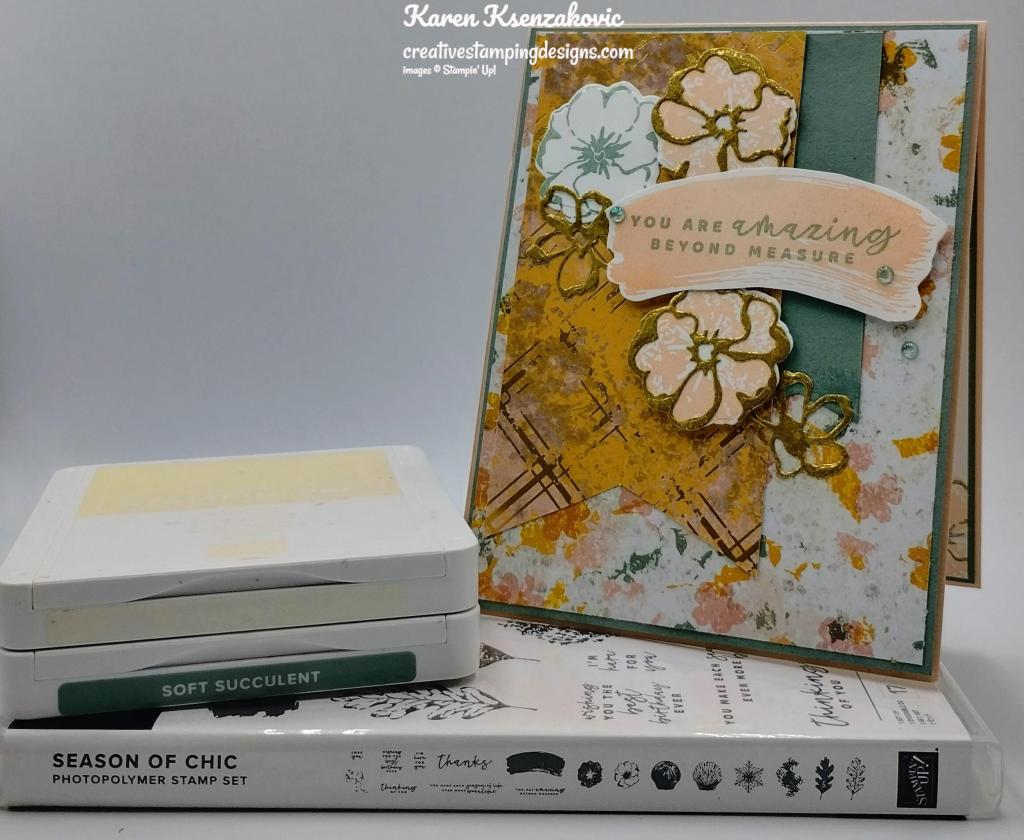
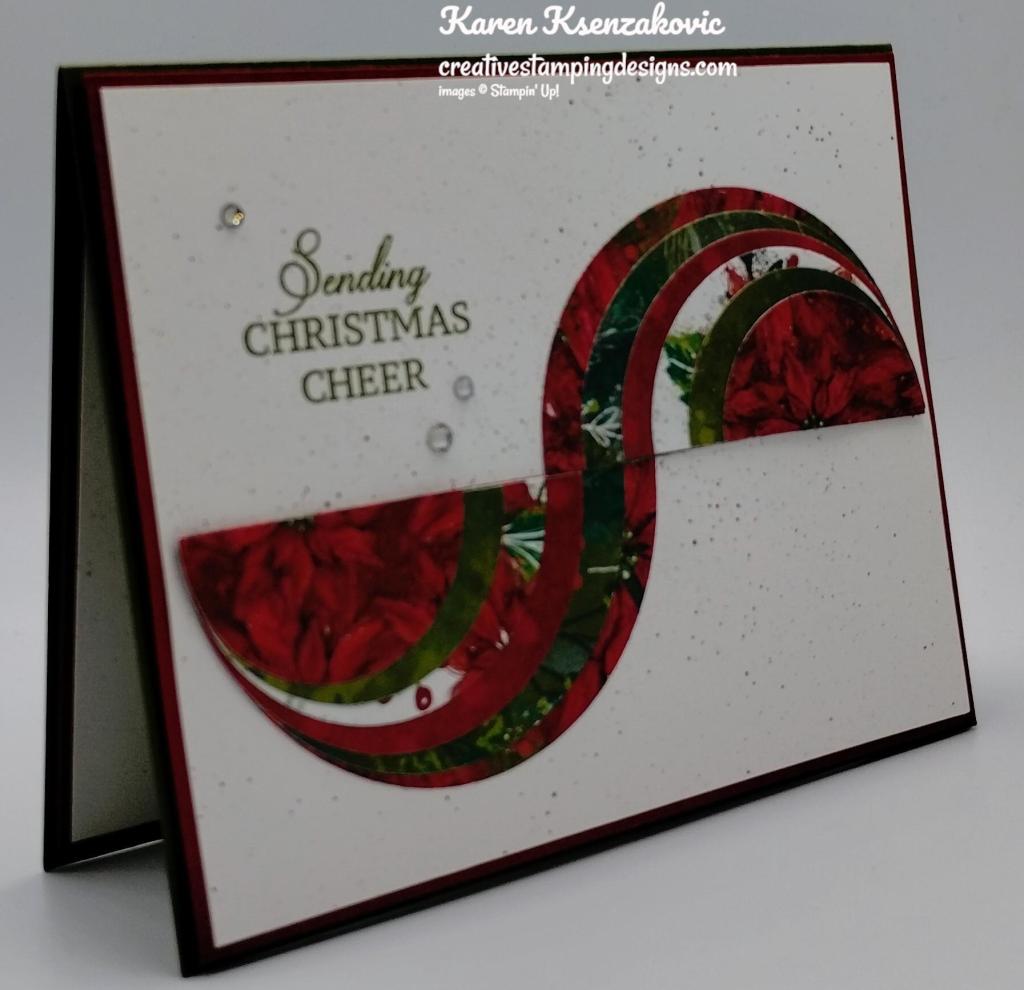
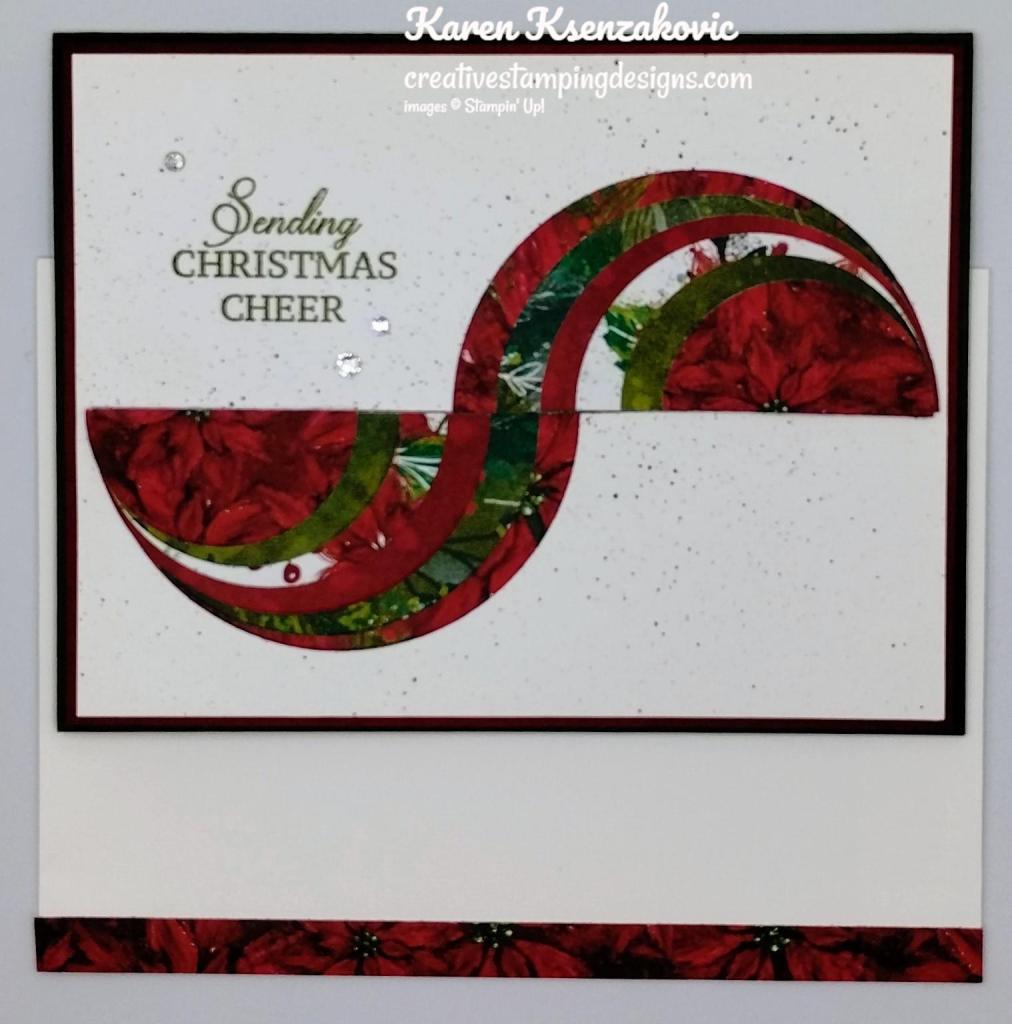
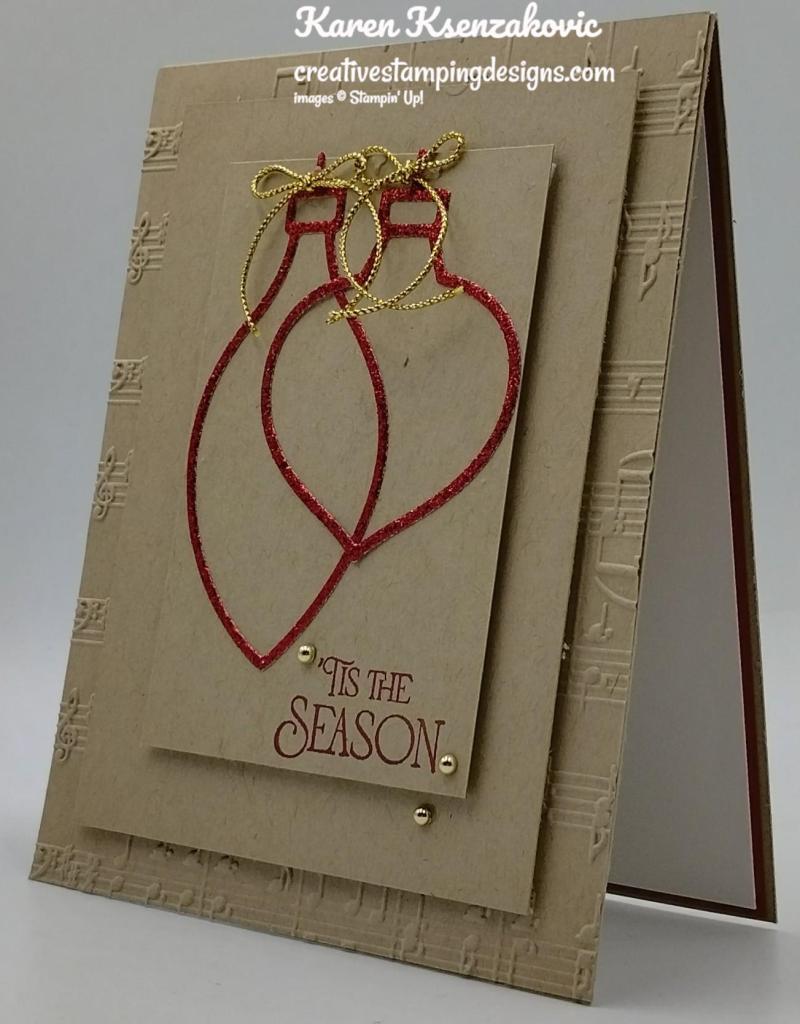
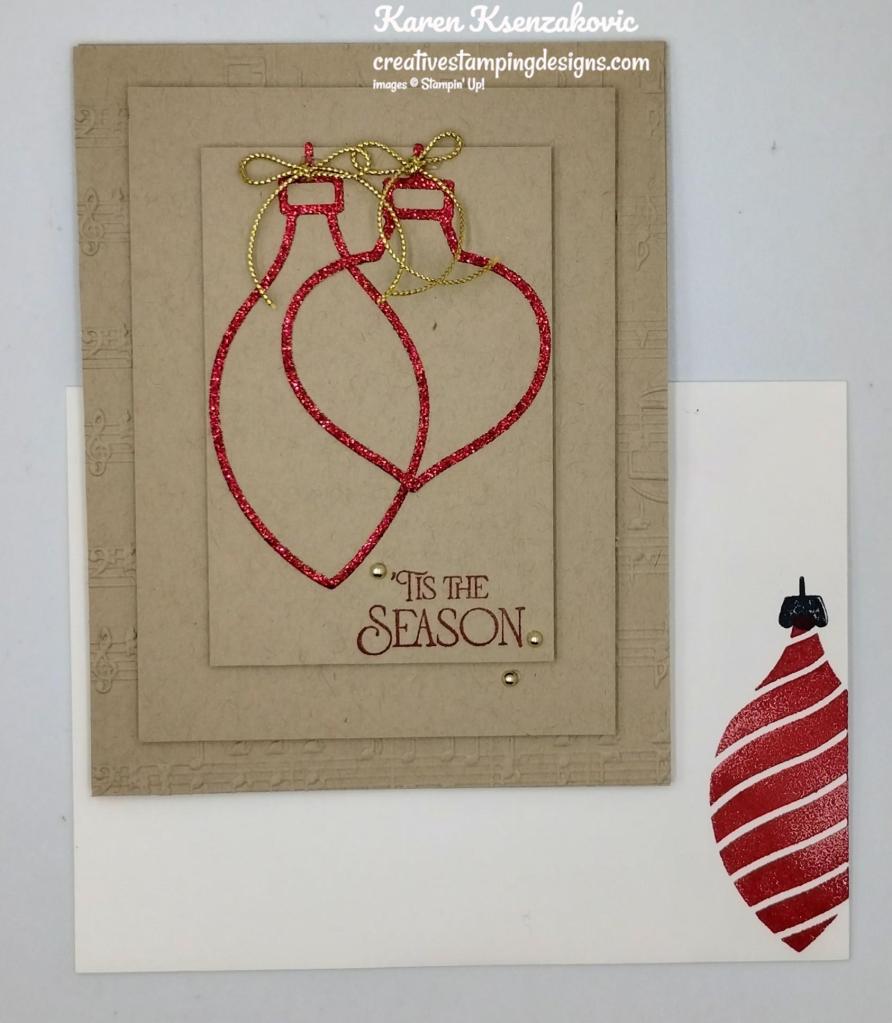
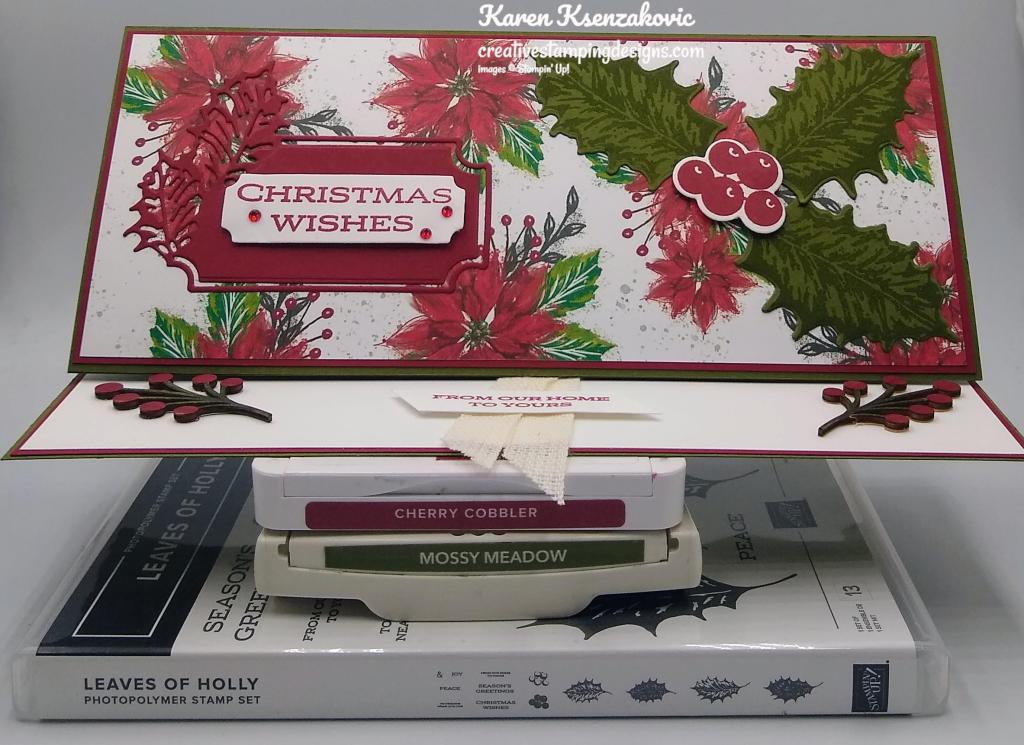
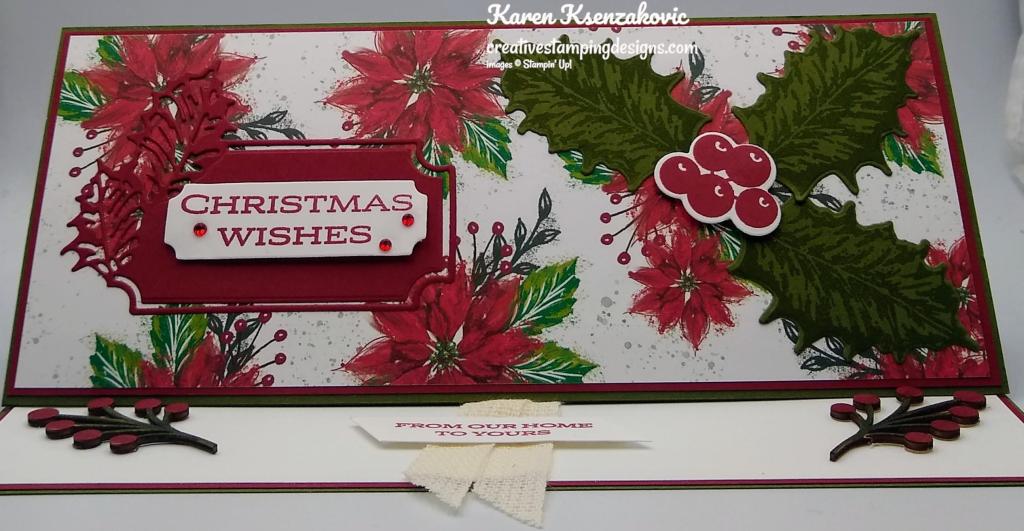
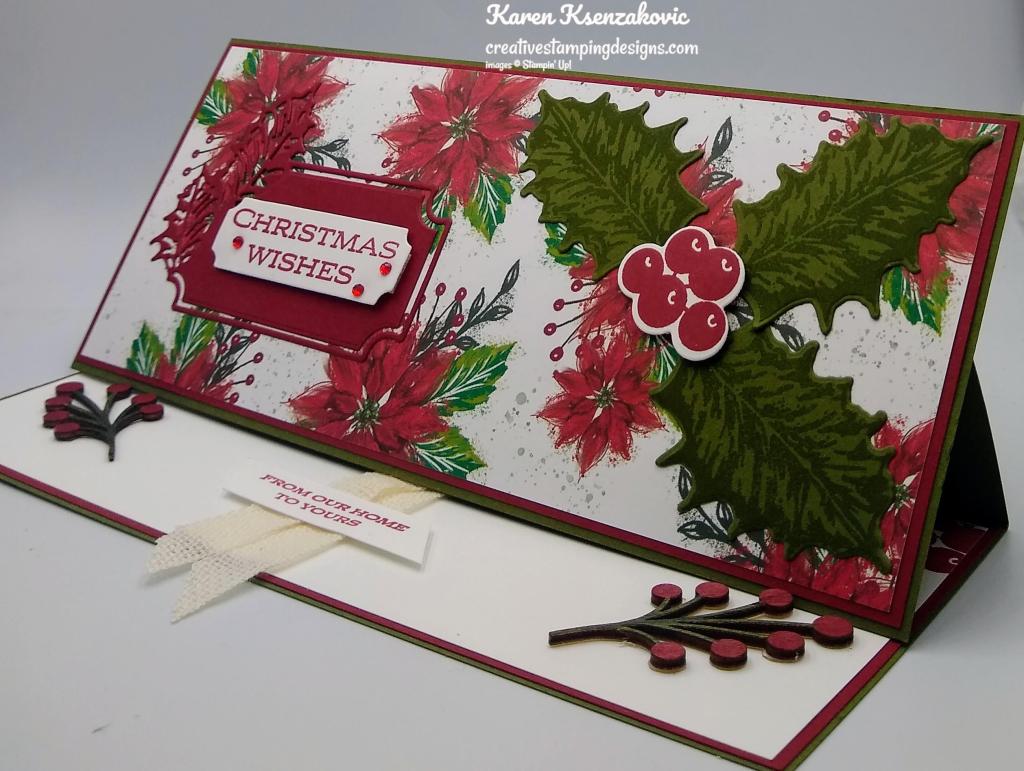
Today’s card is one that we made at our quarterly meeting on Sunday. It was designed by one of my amazing team member Tara Carpenter. Here’s my card for today.

Stampin' Up! Season of Chic Merlot Thanks 1 creativestampingdesigns.com

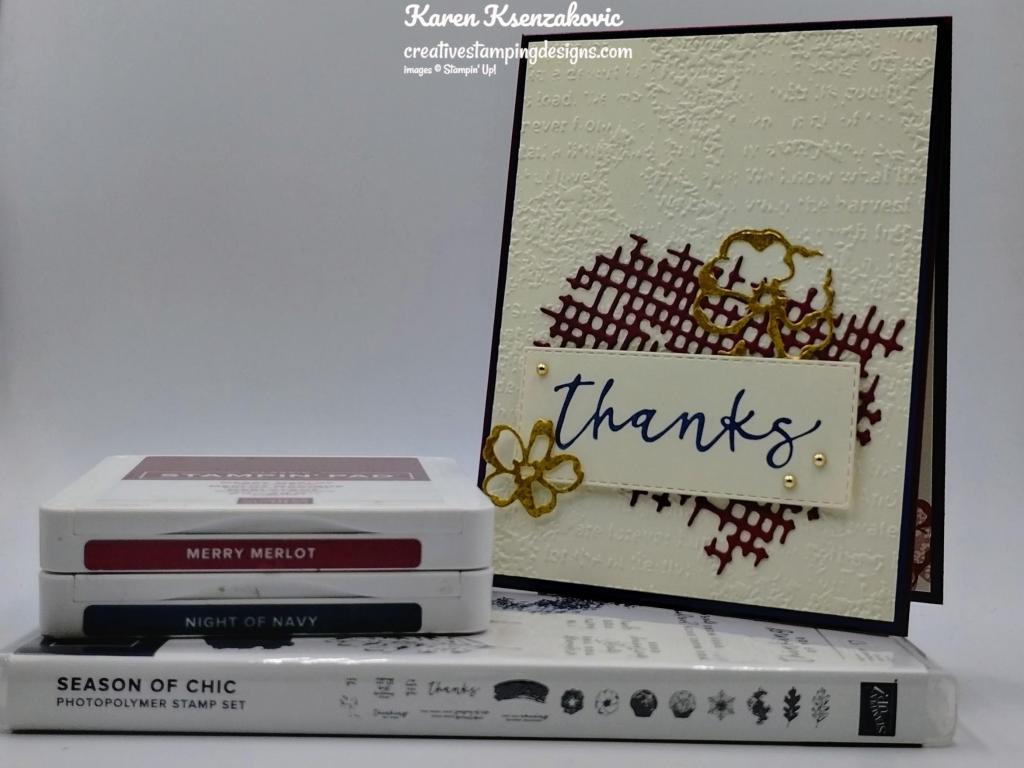
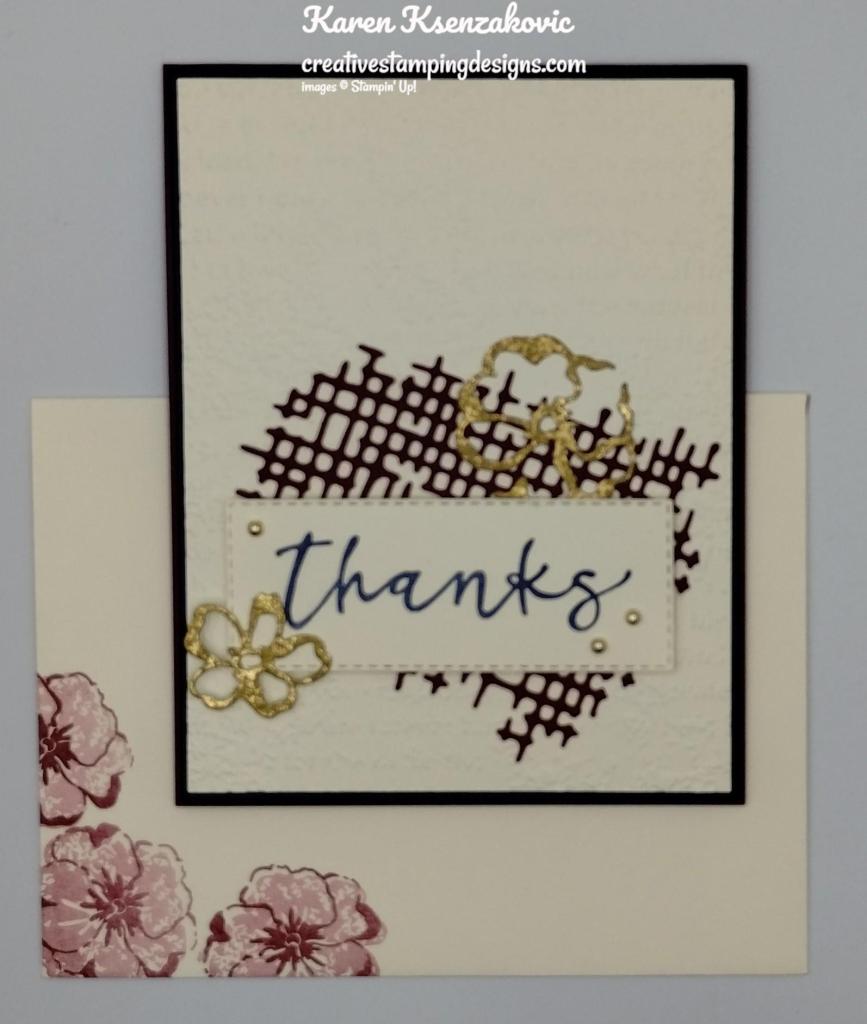
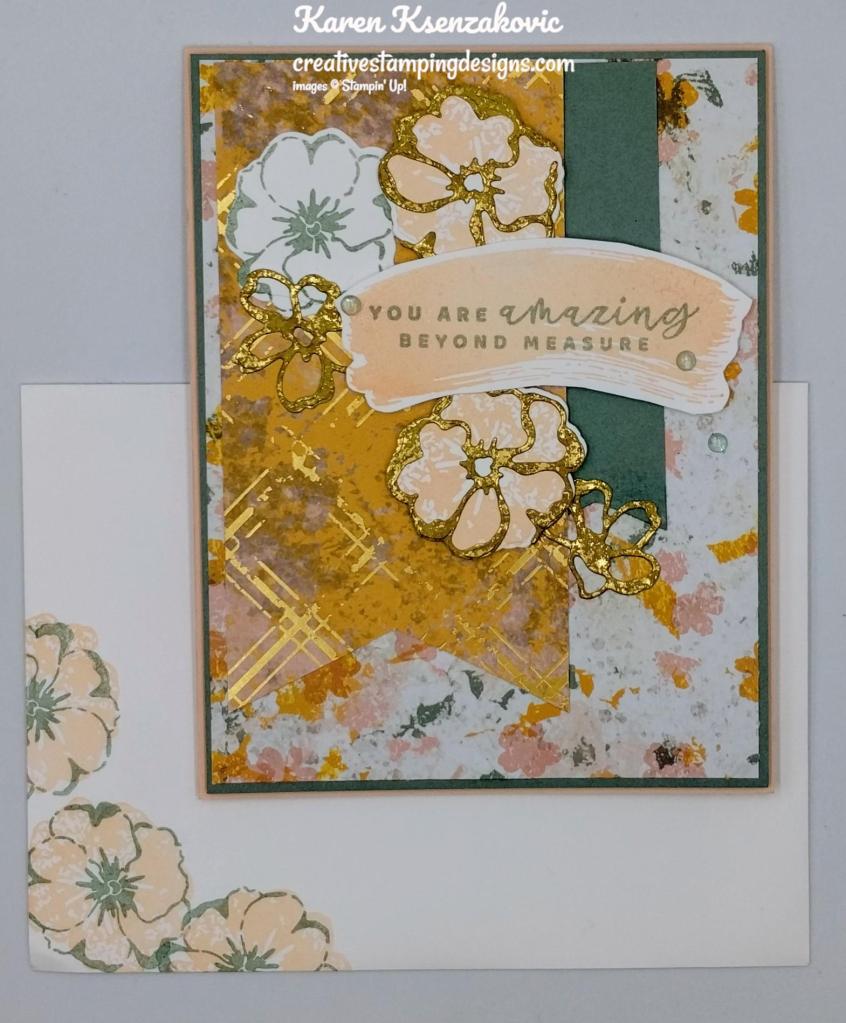
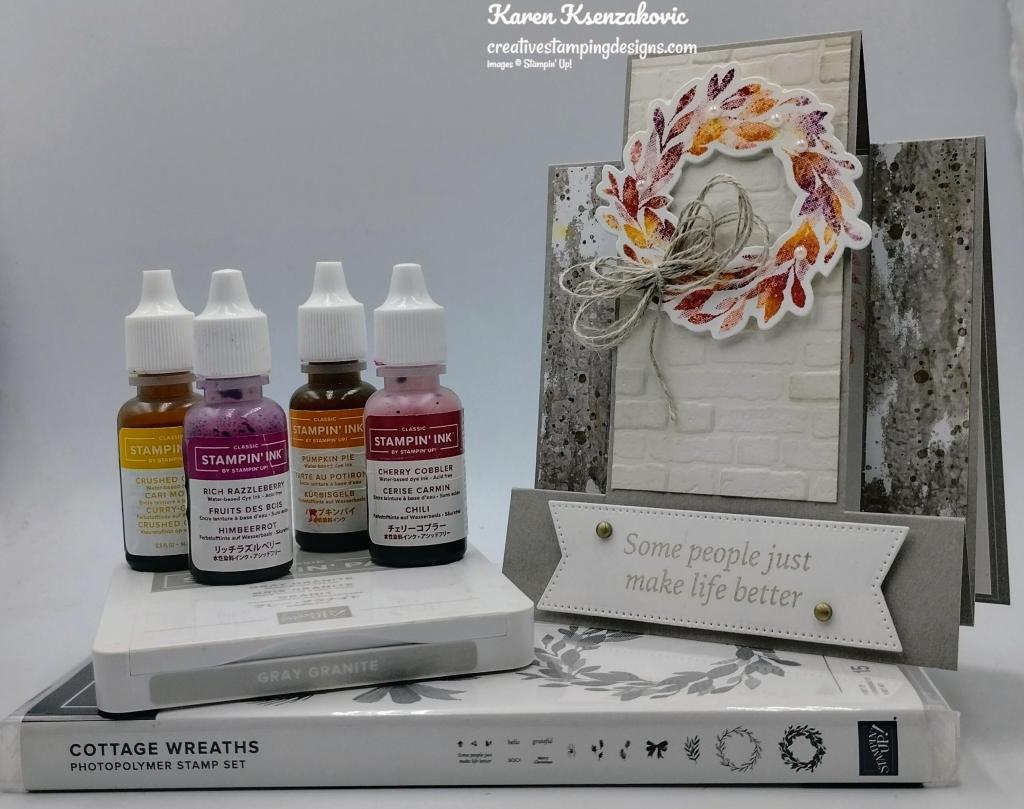
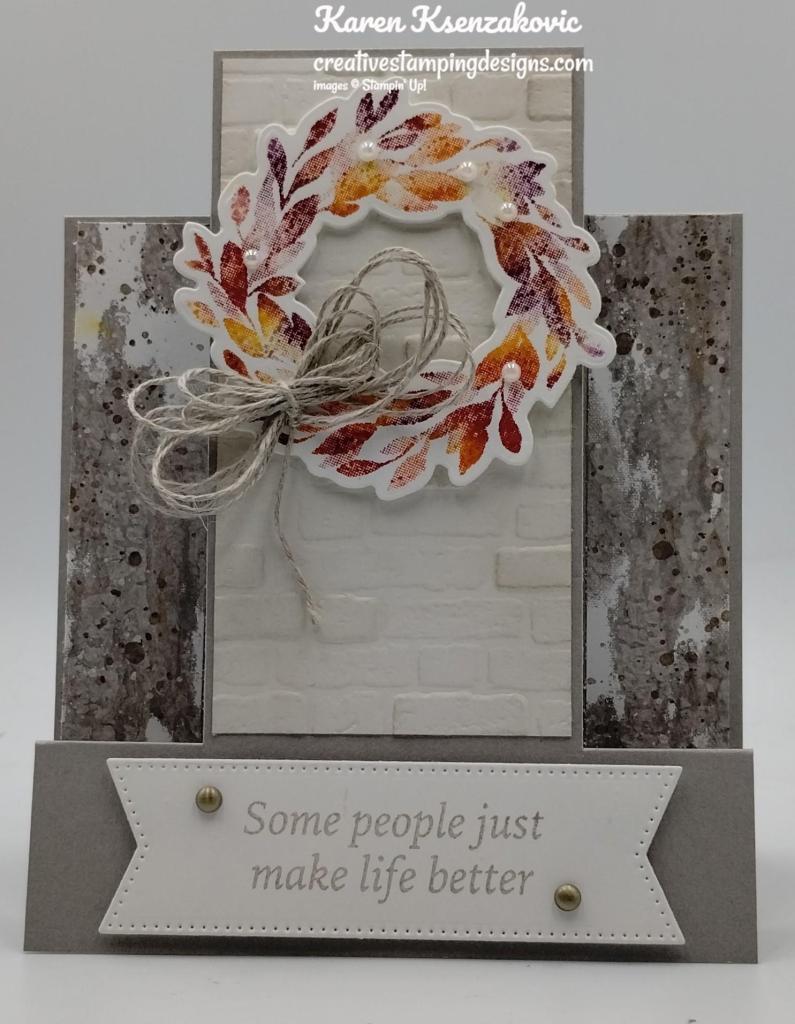
I used the Stampin’ Up! Season of Chic Bundle for my card today.

Stampin' Up! Season of Chic Merlot Thanks 2 creativestampingdesigns.com

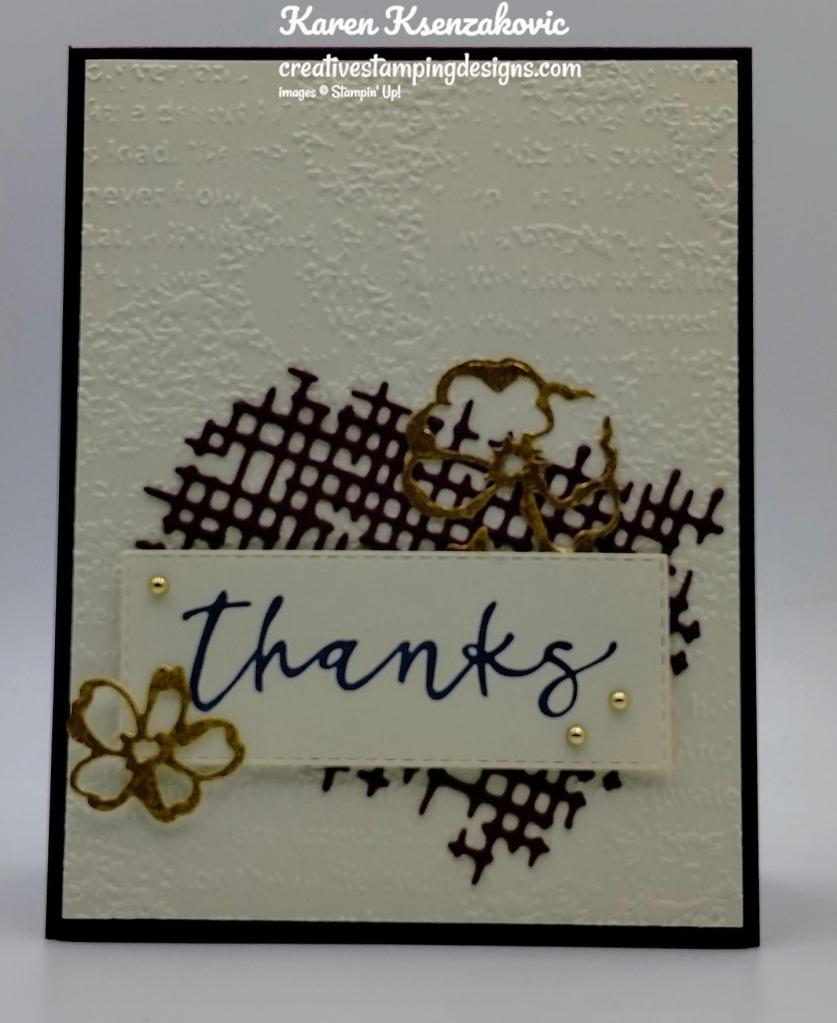
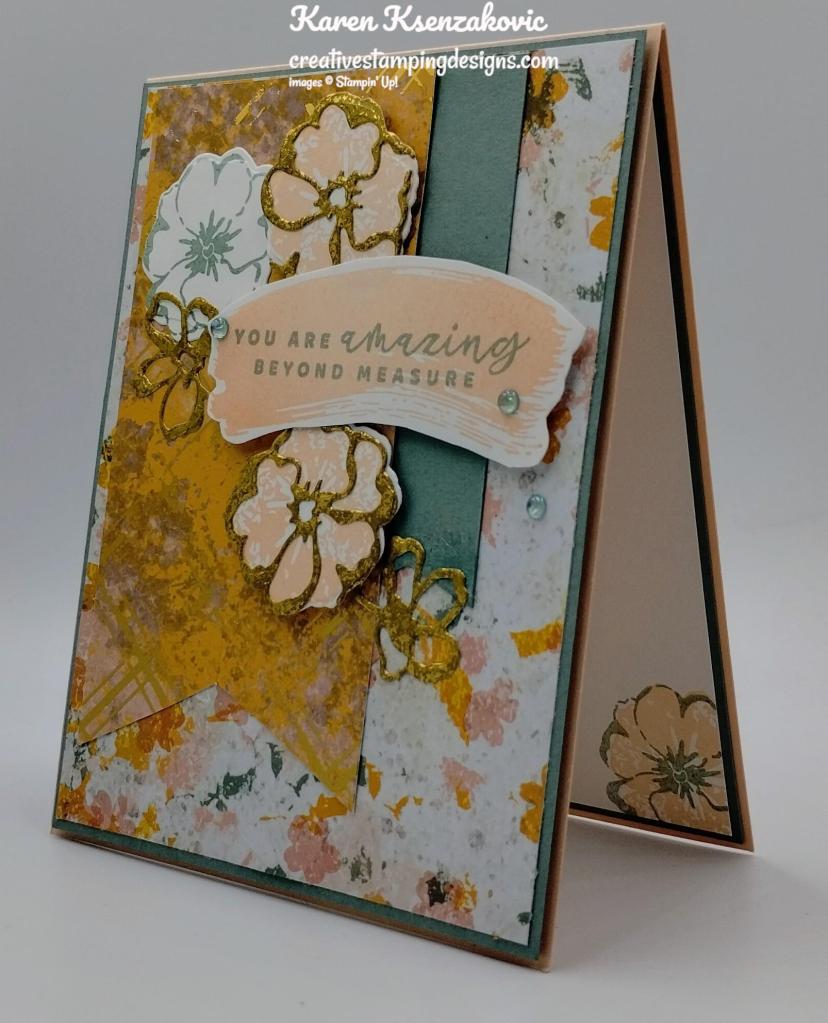
I started by embossing a Very Vanilla card front using the Timeworn Type 3D Embossing Folder. I adhered the embossed panel to a Night of Navy mat using Multipurpose Liquid Glue. I adhered the layered card front to a Merry Merlot card base using Stampin’ Dimensionals.

Stampin' Up! Season of Chic Merlot Thanks 3 creativestampingdesigns.com

From a panel of Merry Merlot cardstock, I cut the mesh die from the Chic Dies. I adhered it to the card front using small amounts of Multipurpose Liquid Glue. Using the Chic Dies, I cut 2 of the detailed flowers dies from a panel of Distressed Gold Specialty Paper.

Stampin' Up! Season of Chic Merlot Thanks 4 creativestampingdesigns.com

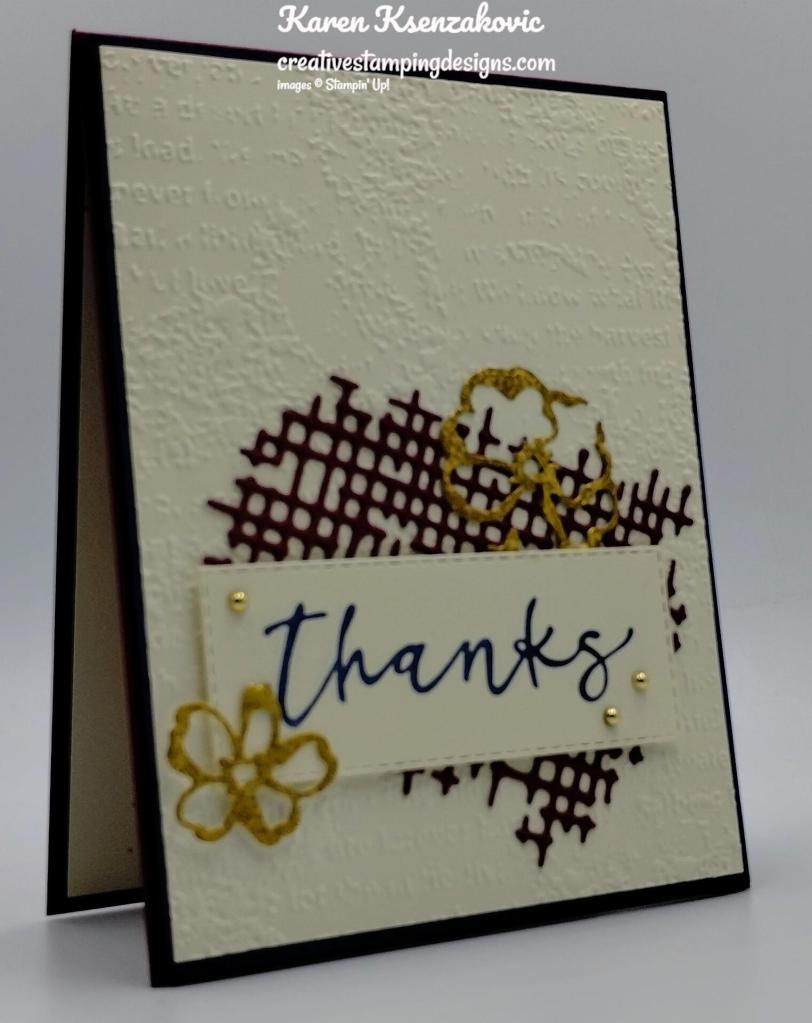
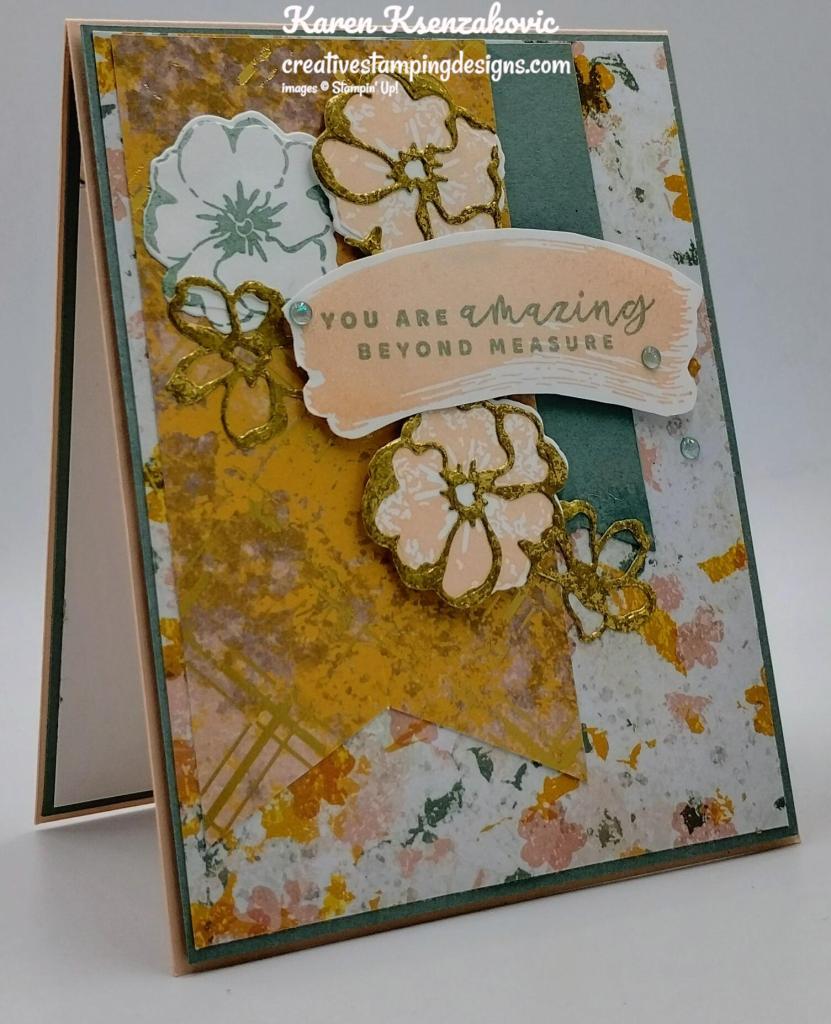
On a panel of Very Vanilla cardstock, I stamped the sentiment from the Season of Chic stamp set in Night of Navy Ink. I cut the sentiment out using the Stitched Rectangle Dies. I adhered the sentiment to the card front using Stampin’ Dimensionals. I adhered the Distressed Gold Flowers to the card front using Glue Dots. I added a few Festive Pearls to the card front.

Stampin' Up! Season of Chic Merlot Thanks 5 creativestampingdesigns.com

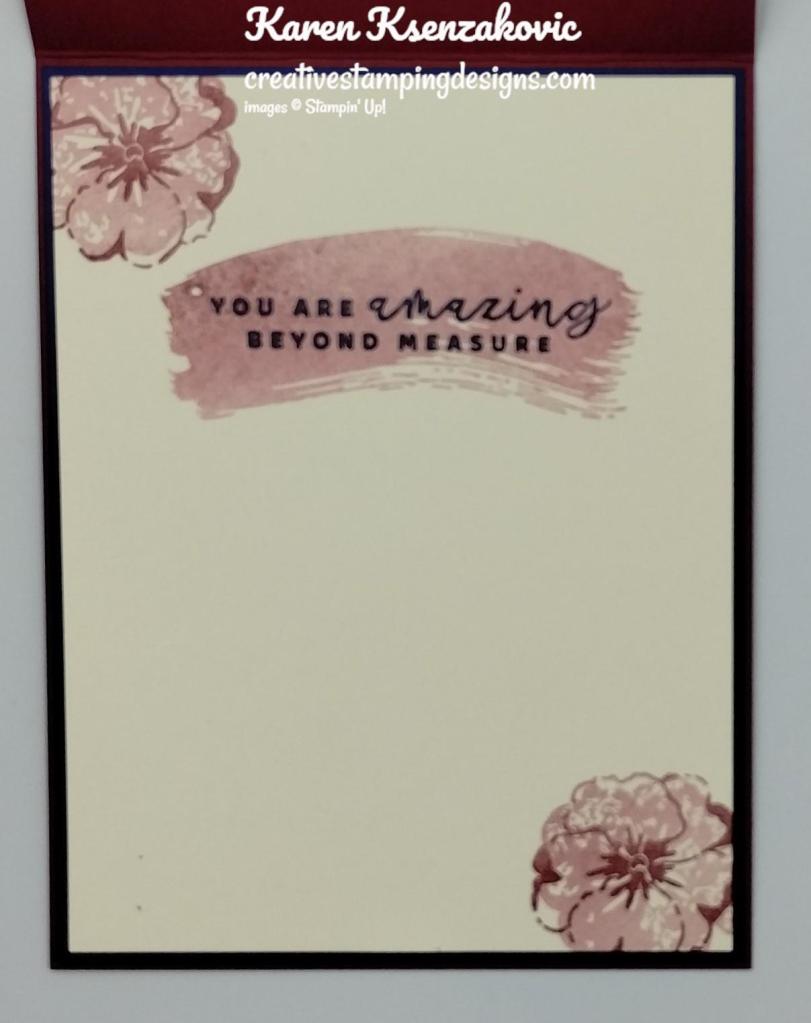
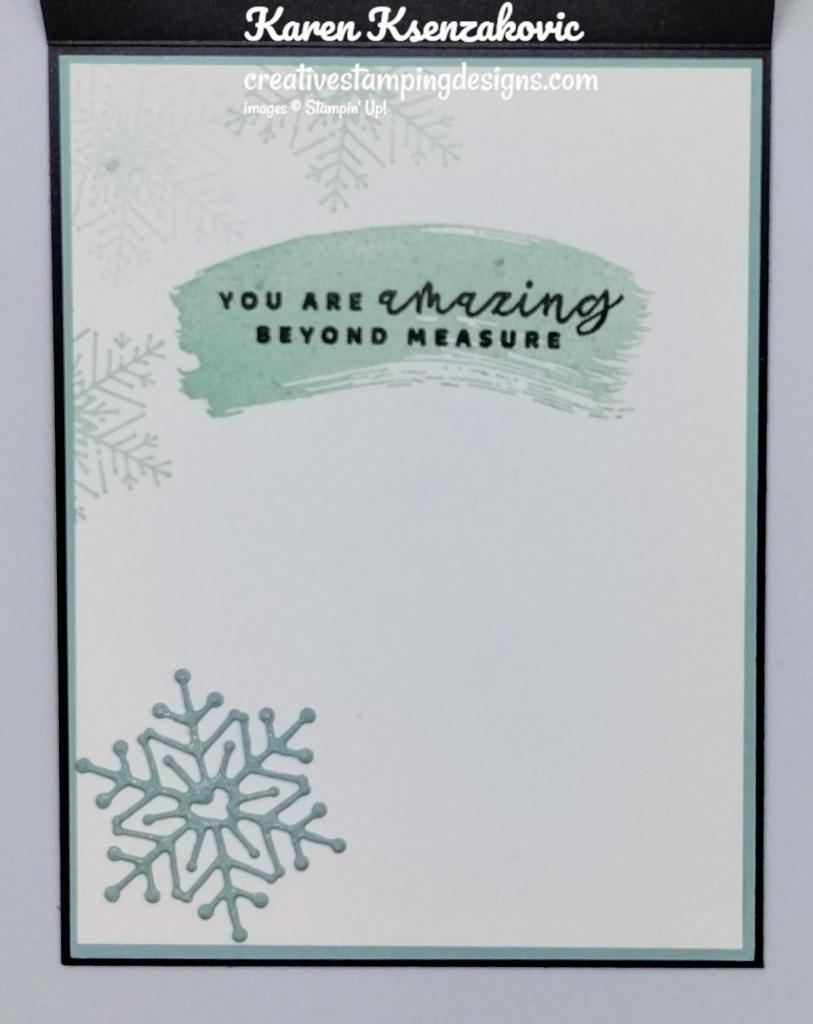
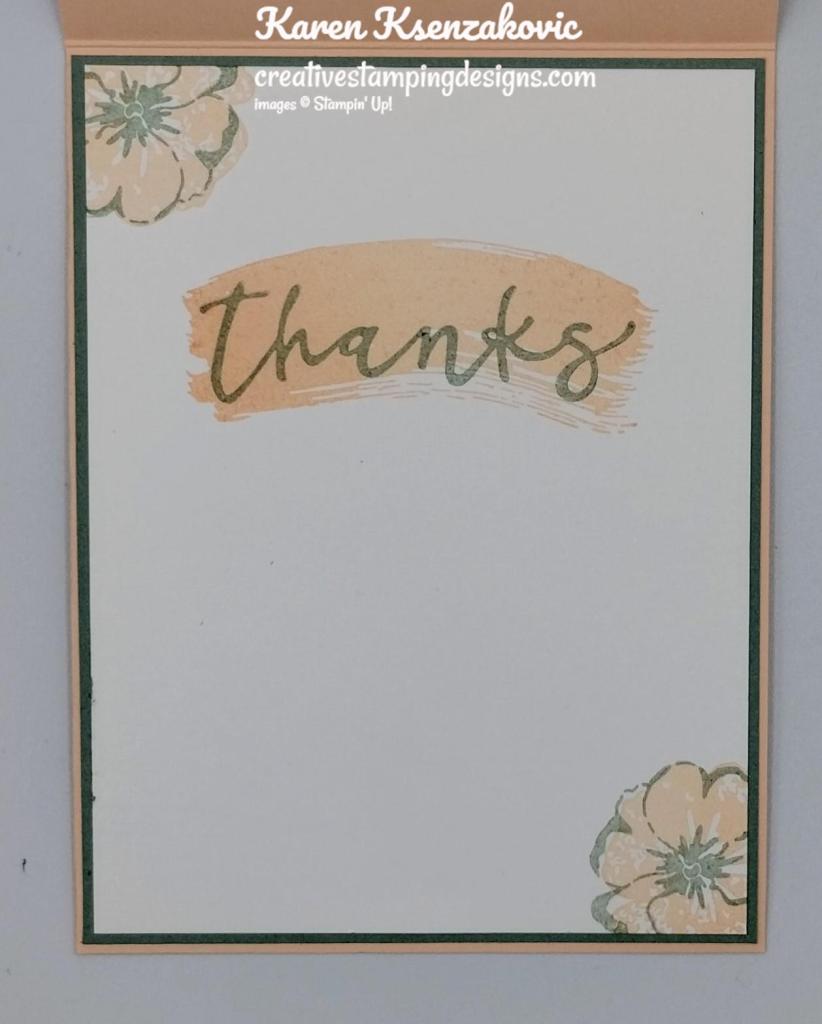
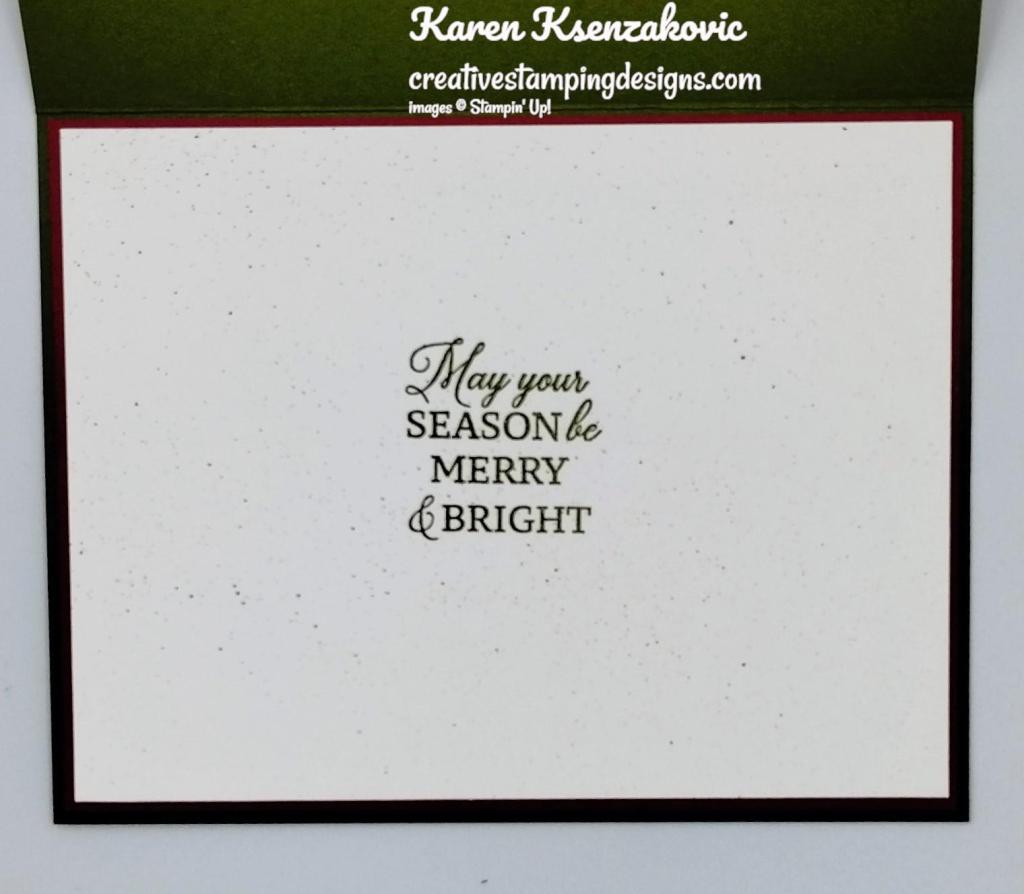
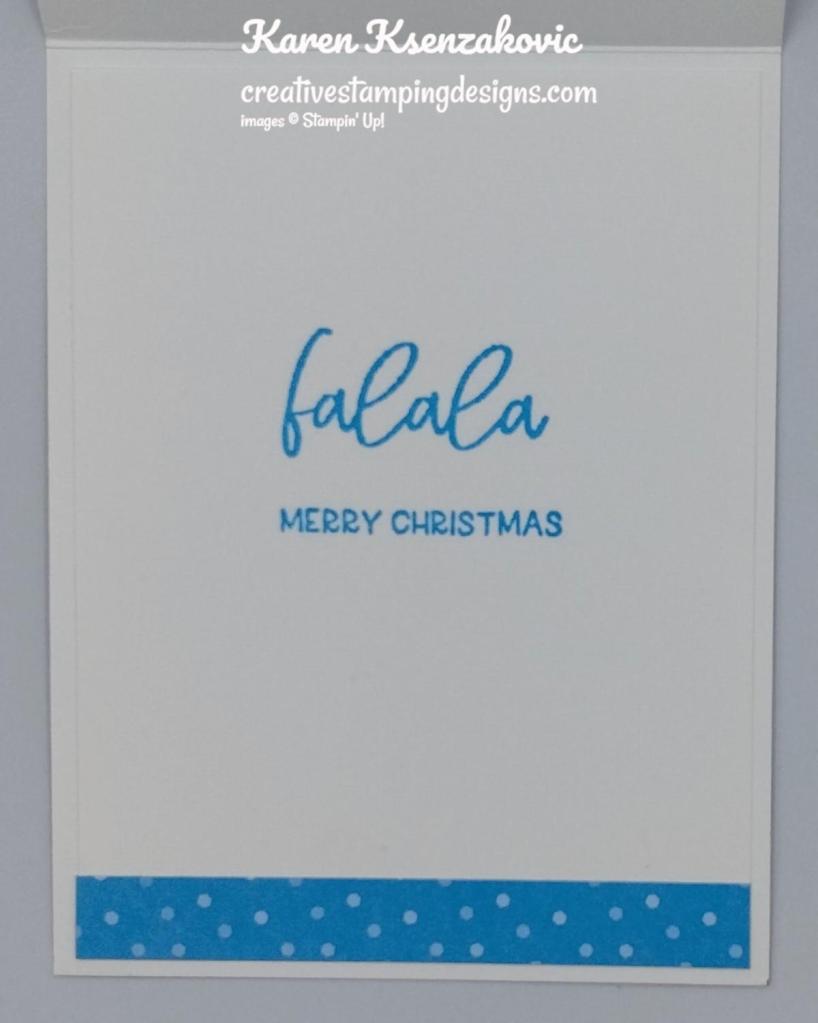
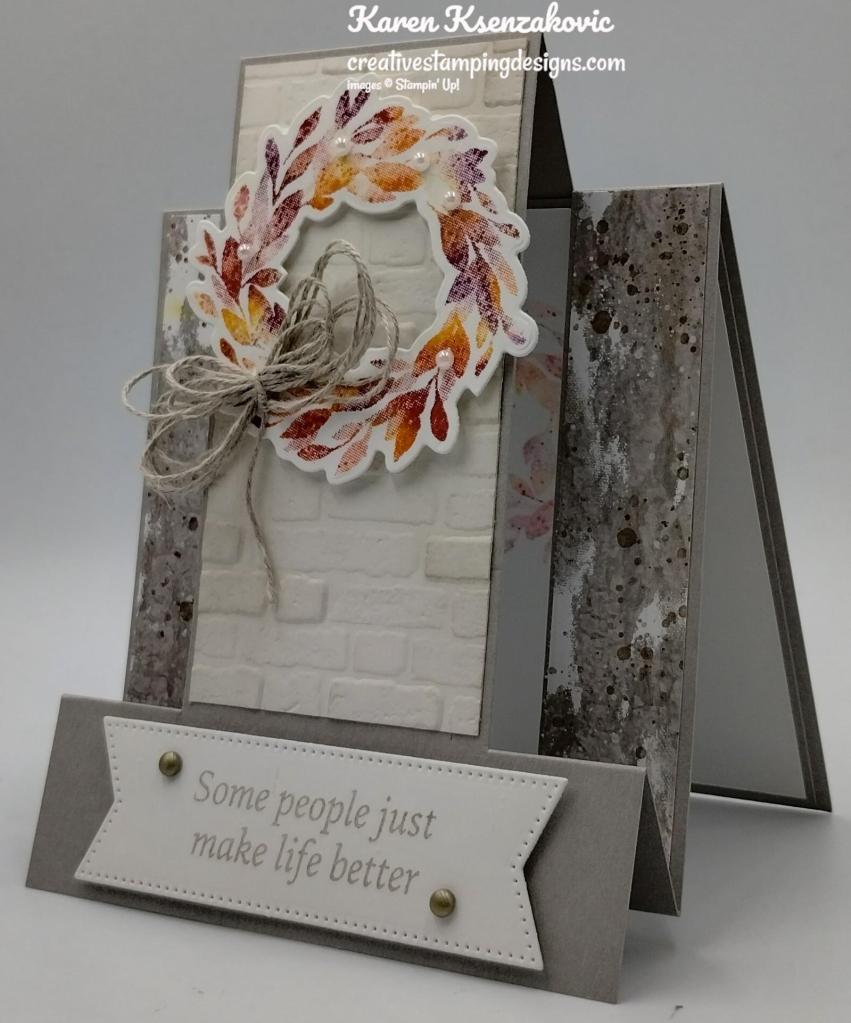
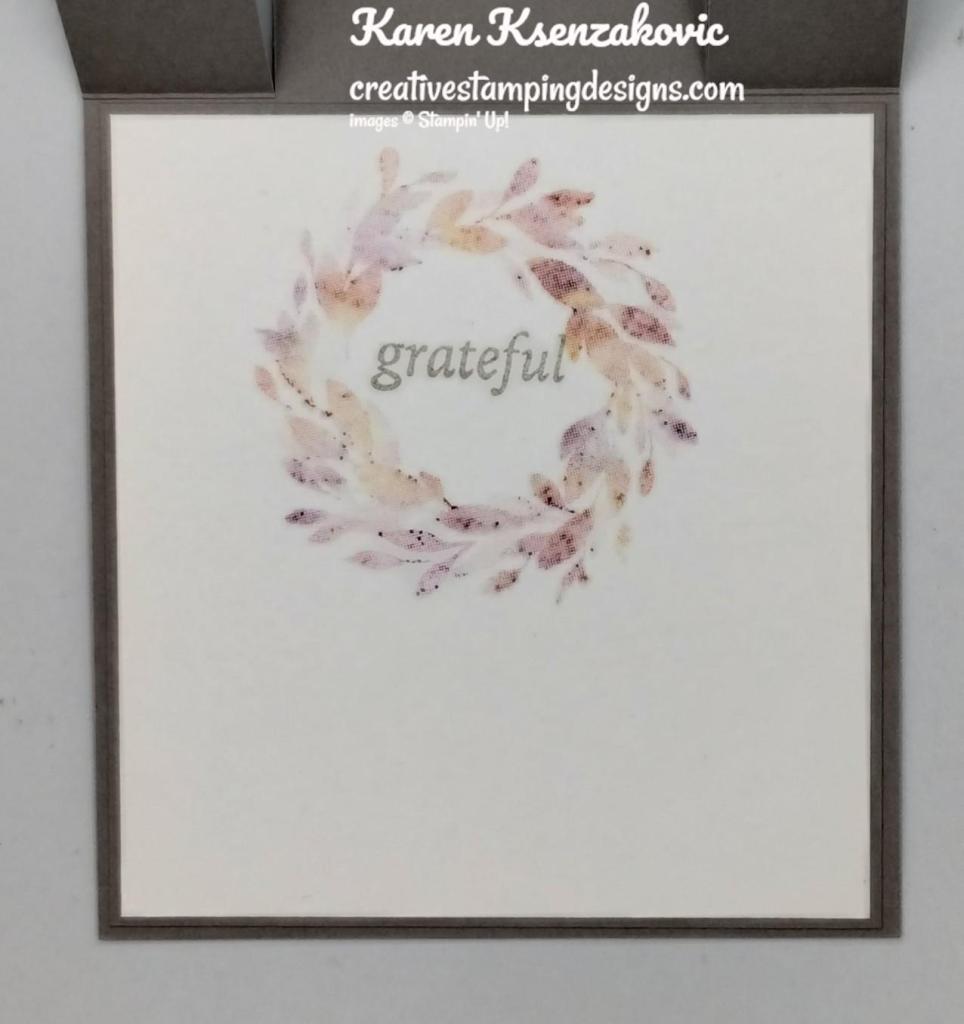
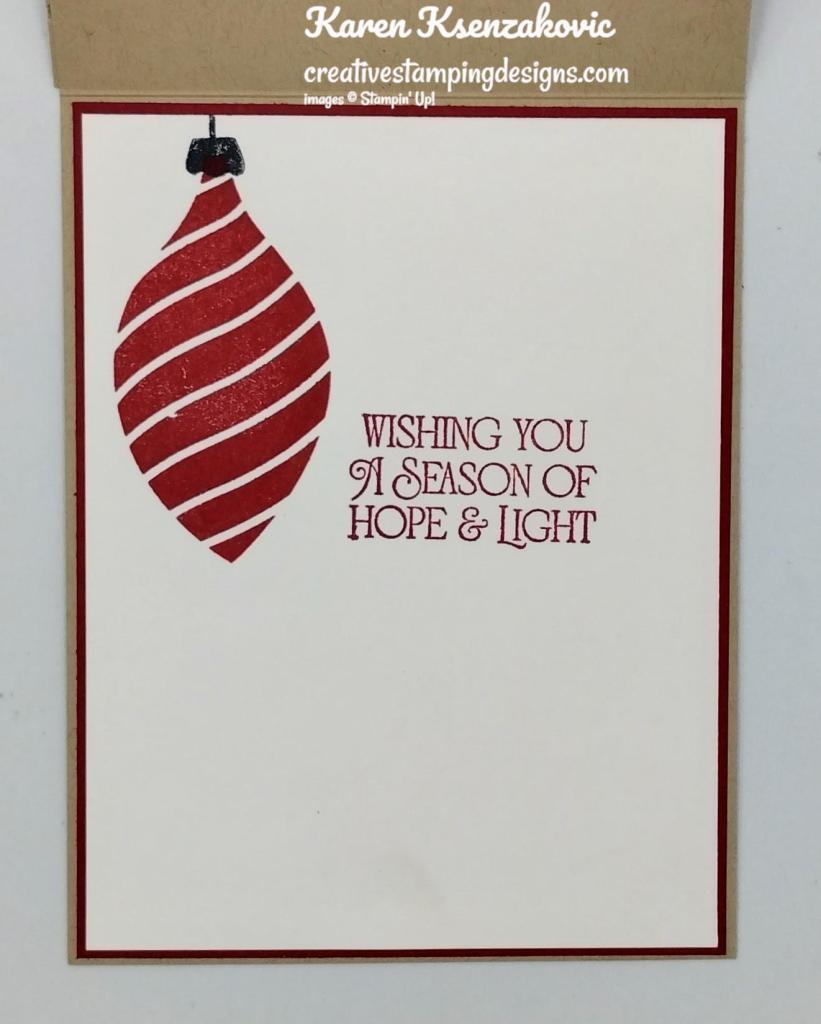
On the inside I stamped the swish image from the Season of Chic stamp set in Merry Merlot Ink, stamping off once, on a Very Vanilla panel. I stamped the sentiment from the Season of Chic stamp set in Night of Navy Ink over the swish image. I stamped the outline flower image from the Season of Chic stamp set in Merry Merlot Ink on the corners of the panel. I stamped the solid flower image in Merry Merlot Ink, stamping off once, inside the outline image. I adhered the Very Vanilla panel to a Night of Navy mat then to the inside of the Merry Merlot card base.

Stampin' Up! Season of Chic Merlot Thanks 6 creativestampingdesigns.com

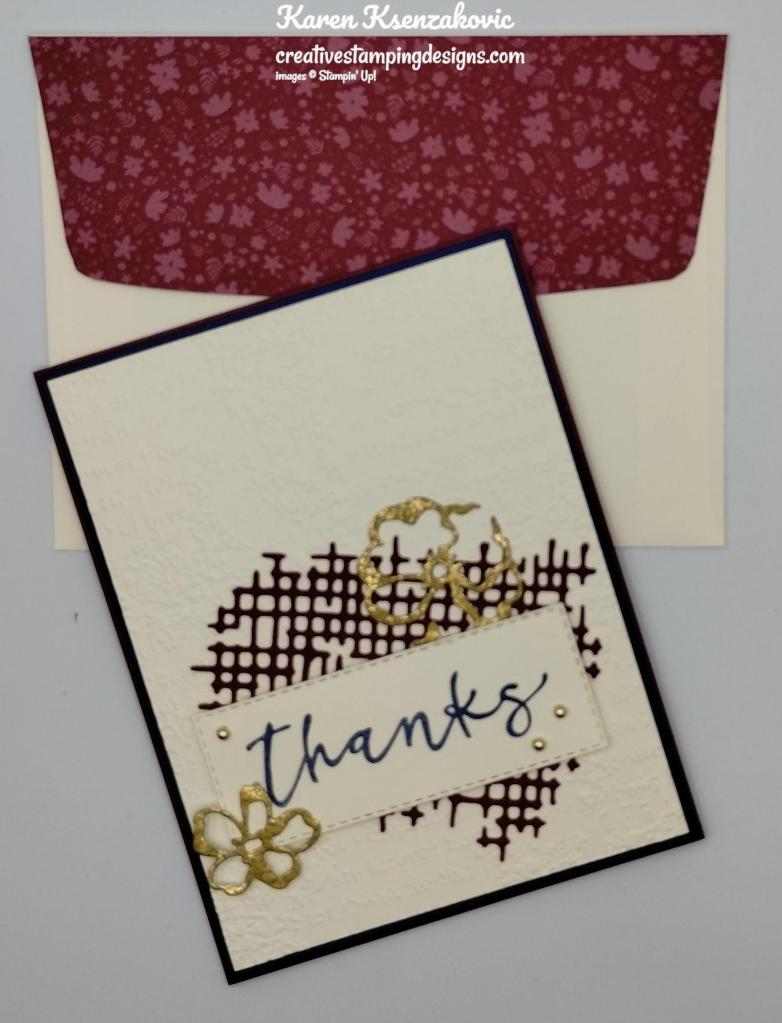
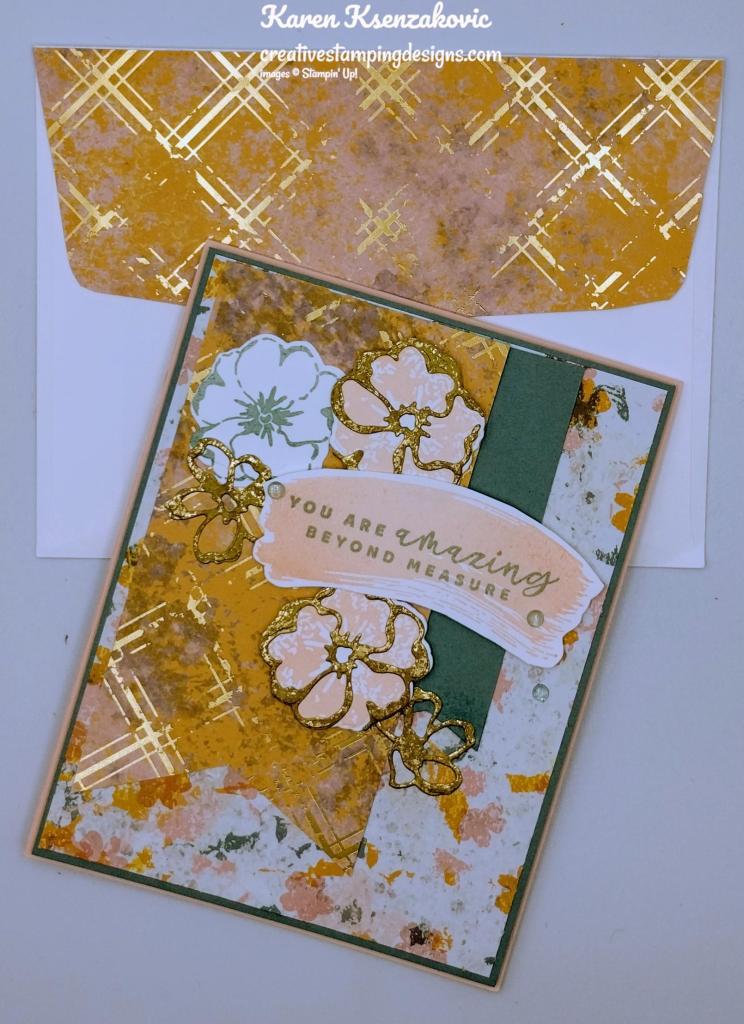
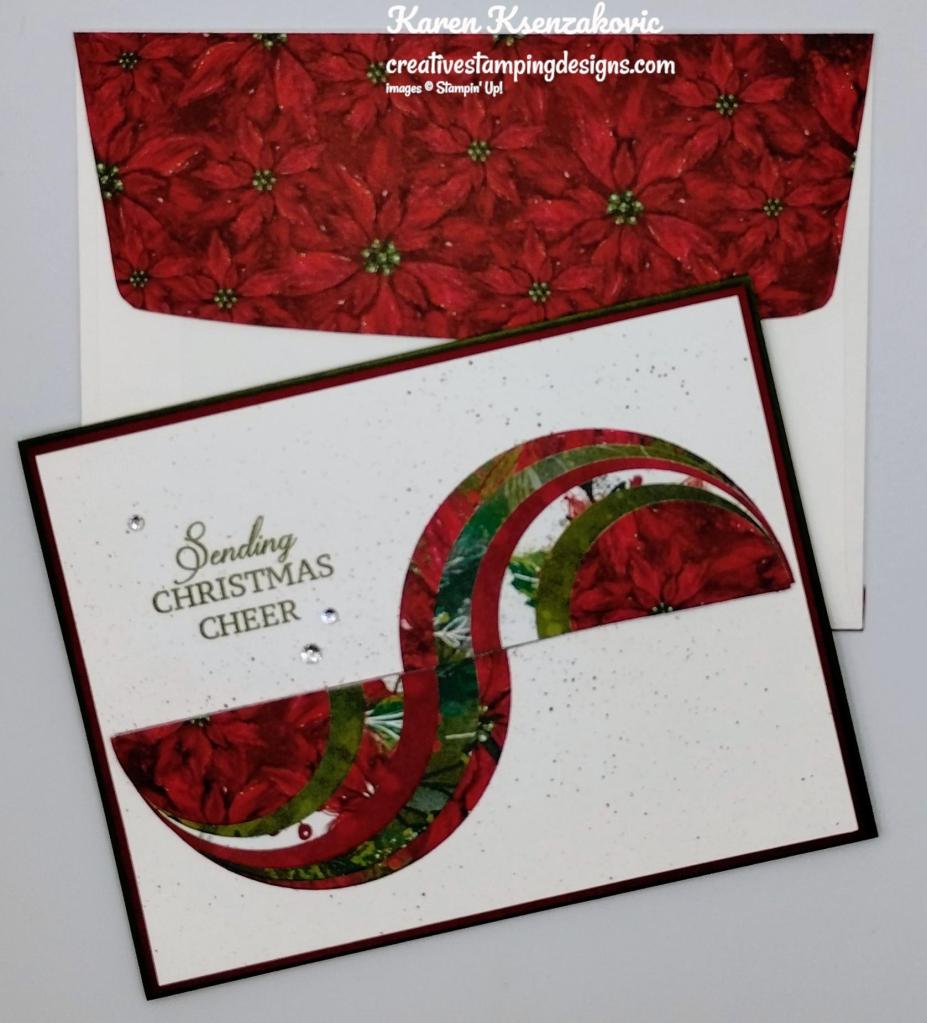
To finish my card, I decorated a Very Vanilla Medium Envelope. I stamped the outline flower image from the Season of Chic stamp set on the envelope front in Merry Merlot Ink. I stamped the solid flower image from the Season of Chic stamp set in Merry Merlot Ink, stamping off once, inside the outline image. I adhered a panel of Neutrals 6 X 6 Designer Series Paper to the envelope flap.

Stampin' Up! Season of Chic Merlot Thanks 7 creativestampingdesigns.com

Thank you for stopping by my blog today. I hope you like my card and will give it a try. Happy Stamping!!

*********************************************************************************************************

If you need any stamping supplies, I’d love to be your Demonstrator. Just click HERE to go directly to my online store or drop me an email if you have any questions. 

MY CURRENT HOST CODE IS:   7PTW7A3H

Use this host code when placing an order with me. When you order $50 or greater you will receive a free gift from me! If your order is over $150, please do not use this code, but you’ll still get the free gift. The free gift is your choice of any 1 item valued up to $10.00 from the 2022-2023 Annual Catalog or the July – December 2022 Mini Catalog!  Unfortunately packs of cardstock are no longer an option for a free gift. Shipping has become too expensive to ship and it’s costing me as much to ship as the cardstock costs. For any orders $50 or more I will also send you my monthly class tutorials.  Click HERE or go to my Customer Rewards for more details and to see what this month’s tutorials are.

Please remember to use my current Host Code and make sure that you can see my name on the final checkout page listed as your Demonstrator when you order so that you know that you’re ordering with me and you’ll get my rewards! 

Happy Stamping, Karen

*********************************************************************************************************

In response to changing policies at Stampin’ Up – I’m adjusting my Ordering Gift policy as well.  I’m having to get a little more tough on the adding of Host codes when you place your order thru my Online Store.

Not to worry – you’re still going to get that $10 ordering gift for orders of $50 (before shipping & tax) or greater.  And the gift is still any 1 SU! product up to that $10 value (cardstock packs excluded) – which includes some of our fun Host Sets!

But – if you DO NOT use the Host code for your orders of less than $150 (this is the RETAIL total before Shipping & Handling), then you’ll have two options:

  1. You’ll need to call Stampin’ Up! (1-800-Stamp-Up) and ask them to add it for you. They’re very helpful and will get it done quickly!  OR….
  2. If your order was over the $50 threshold but under $150, then…you’ll forfeit that $10 ordering gift and rewards – this is the Bummer Option – and I REALLY don’t want to do this, SO please remember to add my Current Host Code.

*********************************************************************************************************

Last Chance Products available through January 4, 2023

The July–December 2022 Mini Catalog will be retiring soon! It’s always bittersweet to see a classic Stampin’ Up! catalog take a trip to retirement. But, we’re looking forward to all the new products on their way—and we hope you are, too!

Stock up on your favorite products before they’re gone for good! Save up to 60% on essential craft supplies. What are you waiting for? Start shopping! After all, this selection of Last Chance Products is only available while supplies last. Click Here for a printable PDF of the Last Chance List. Get those shopping lists ready for December 1st to shop early

  • This Last Chance Products promotion typically includes a Retiring List (products that will no longer be available once the catalog retires) and a Carryover List (products that will still be available once the catalog retires).
  • Discounts are not always available with the Retiring List. When they are, they will vary from one market to another depending on product performance.
  • All products are available while supplies last, and there are no purchase limits.
  • Discounted items can be added to a Starter Kit and redeemed as a 50% off item or with Stampin’ Rewards.
  • Stamp Sets are not guaranteed during this promotion and are while supplies last.

SALES PERIOD

  • Starts: 1 December 2022 at 12:00 AM (MT)
  • Ends: 4 January 2023 at 11:59 PM (MT)

Clearance Rack Has Been Refreshed!!

On 1 December Stampin’ Up! will be adding new items to our clearance rack, including dies offered during the Perfect Partners Promotion! With discounts up to 60% off, you can get the die sets that coordinate with the still-available stamp sets at a great price. This is a fantastic offer. Hurry the Perfect Partners dies and Clearance Rack products (available while supplies lasts)—don’t forget the coordinating stamps.

*********************************************************************************************************

Good Thing Come In Small Packages

Subscribe November 11 – December 10

Create fun gift card holders to help you celebrate your special occasions all year long! Personalize each gift with these reversible boxes and paper bands for a unique design every time. This kit comes with enough supplies for you to make 16 different gift card holders—2 each of 8 designs. It also has an all-occasion stamp set and enough paper pieces to make your craft really pop! No matter what the occasion or who the recipient is, this is a coordinated paper craft that everyone will love and appreciate! 

Plus, this month you can take your crafting even further with a special add-on! Give a gift card and a personalized card with the Good Things Cards & Envelopes add-on. You get 16 cards (4 each of 4 designs) and 16 coordinating envelopes. Add-ons are live during the subscription period but will only be available while supplies last, so don’t wait! 

This kit includes:

  • Good Things Come in Small Packages Photopolymer Stamp Set
  • Garden Green Classic Stampin’ Spot
  • 16 gift card holders: 2 each of 8 reversible designs
  • Precut paper pieces, twine, and belly bands to customize all your crafts.
  • Enough adhesive for each project!

Finished box size: 3-5/8″ x 2-1/2″ x 1/2″ (9.2 x 6.4 x 1.3 cm)

Coordinating Stampin’ Up! colors: Balmy Blue, Basic Gray, Blushing Bride, Calypso Coral, Crushed Curry, Garden Green, Tahitian Tide

Subscribe to the November Paper Pumpkin Kit between 11 November and 10 December at paperpumpkin.com!

Note: Supplies may be limited toward the end of the subscription period.

ADD-ON

Good Things Cards & Envelopes Add-on

Add-on number: 163134

Available starting: 11 November

Price: $10.00 USD / $13.75 CAD

The add-on includes:

  • 16 cards, 4 each of 4 designs, and 16 coordinating envelopes
  • Card size: 4-1/4″ x 5-1/2″ (10.8 x 14 cm)
  • Coordinating Stampin’ Up! colors: Balmy Blue, Basic Gray, Blushing Bride, Garden Green

*********************************************************************************************************

It’s almost time for me to order the new January – April 2023 Mini Catalog and the January-February 2023 Sale-a-bration brochure. If you are a customer of mine, I will be shipping them out to you just as soon as I receive them. If you are not a customer of mine yet but would like to be, send me an email to creativestampingdesigns@gmail.com requesting a catalog along with your name and address and I will gladly get one in the mail to you.

Once again with a new catalog comes my Designer Series Paper Shares. I’ll be posting the details soon about my Paper Shares. What is a Designer Series Paper Share? It’s a sampling of all the new DSP coming in the new mini catalog. You will receive a sample of each of the new DSP’s (6 X 6 sheets). It’s a great way to sample all the paper to see if you like it and want to purchase it. I’m hoping to post something with in the week, so stay tuned.

*********************************************************************************************************

Card stock cuts for this project:

  • Merry Merlot Cardstock 4 1/4″ X 11″(card base scored & folded at 5 1/2″), 3″ X 4″(mesh die)
  • Night of Navy Cardstock 2 – 4 1/8″ X 5 3/8″ (card front & inner liner mats)
  • Very Vanilla Cardstock 2 – 4″ X 5 1/4″ (card front & inner liner), 2″ X 4″ (sentiment)
  • Distressed Gold Specialty Paper 2 1/2″ X 2″ (flowers)
  • Neutrals 6 x 6 Designer Series Paper 2 1/4″ X 6″ (envelope flap)

*********************************************************************************************************

Product List

Stampin’ Up! Season of Chic Snowflake Thanks

Good Monday morning my stamping friends. How was everyone’s weekend? Has anyone gotten decorating done? I got a little more of mine finished. I have a little more to go and I’ll be done. I can’t put all my decorations up this year because of my puppy. She’s a thief and I’m afraid she will destroy things this year. I’m hoping next Christmas she’ll be a little more mature and not steal things.

Today’s card is the same as yesterday but a little different. I demonstrated a card yesterday at our quarterly team meeting. I showed the card I posted yesterday and remade it with different DSP and snowflakes. I love how just a change of DSP and a die cut changes the whole card. Here’s my card for today.

Stampin' Up! Season of Chic Snowflake Thanks 1 creativestampingdesigns.com

I used the Stampin’ Up! Season of Chic Bundle and the Texture Chic Designer Series Paper for my card today.

Stampin' Up! Season of Chic Snowflake Thanks 2 creativestampingdesigns.com

I started by adhering a panel of Texture Chic Designer Series Paper to a Pool Party mat using Stampin’ Seal. I adhered the layered panel to a Basic Gray card front using Stampin’ Dimensionals. I cut the 2 1/2″ x 4 3/4″ panel of Texture Chic DSP into a banner using my Paper Snips. I adhered the banner to the card front using Stampin’ Seal on the left side and in the center of the banner.

Stampin' Up! Season of Chic Snowflake Thanks 3 creativestampingdesigns.com

I cut the small piece of Pool Party cardstock into a banner using the Banner Pick A Punch. I adhered the small banner to the card front, just under the large banner using Stampin’ Seal. I adhered the Wonderful Snowflake to the card front using a Glue Dot. On a panel of Basic White cardstock I stamped the swish image from the Stampin’ Up! Season of Chic Photopolymer Stamp Set in Pool Party Ink. I stamped the sentiment from the Season of Chic stamp set over the swish in Basic Gray Ink. I fussy cut the sentiment out using my Paper Snips. I adhered the sentiment to the card front over the banners using Stampin’ Dimensionals.

Stampin' Up! Season of Chic Snowflake Thanks 4 creativestampingdesigns.com

I cut the detail snowflake dies from the Chic Dies from a panel of Basic White and Pool Party cardstock. I brushed all the snowflakes using Clear Wink of Stella. I adhered the snowflakes to the card front. I added a few Iridescent Pearls to the card front.

Stampin' Up! Season of Chic Snowflake Thanks 5 creativestampingdesigns.com

On the inside I stamped the swish image from the Season of Chic stamp set in Pool Party Ink on a Basic White panel. I stamped the sentiment from the Season of Chic stamp set in Basic Gray Ink over the swish. I stamped the snowflake image from the Season of Chic stamp set in Pool Party on the top of the panel. I adhered the last snowflake to the bottom of the panel. I adhered the Basic White panel to a Pool Party mat then to the inside of the Basic Gray card base.

Stampin' Up! Season of Chic Snowflake Thanks 6 creativestampingdesigns.com

To finish my card, I decorated a Basic White Medium Envelope. I stamped the snowflake image from the Season of Chic stamp set on the envelope front in Pool Party Ink. I adhered a panel of Texture Chic DSP to the envelope flap.

Stampin' Up! Season of Chic Snowflake Thanks 7 creativestampingdesigns.com

Thank you for stopping by my blog today. I hope you like my card and will give it a try. Happy Stamping!!

*********************************************************************************************************

If you need any stamping supplies, I’d love to be your Demonstrator. Just click HERE to go directly to my online store or drop me an email if you have any questions. 

MY CURRENT HOST CODE IS:   7PTW7A3H

Use this host code when placing an order with me. When you order $50 or greater you will receive a free gift from me! If your order is over $150, please do not use this code, but you’ll still get the free gift. The free gift is your choice of any 1 item valued up to $10.00 from the 2022-2023 Annual Catalog or the July – December 2022 Mini Catalog!  Unfortunately packs of cardstock are no longer an option for a free gift. Shipping has become too expensive to ship and it’s costing me as much to ship as the cardstock costs. For any orders $50 or more I will also send you my monthly class tutorials.  Click HERE or go to my Customer Rewards for more details and to see what this month’s tutorials are.

Please remember to use my current Host Code and make sure that you can see my name on the final checkout page listed as your Demonstrator when you order so that you know that you’re ordering with me and you’ll get my rewards! 

Happy Stamping, Karen

*********************************************************************************************************

In response to changing policies at Stampin’ Up – I’m adjusting my Ordering Gift policy as well.  I’m having to get a little more tough on the adding of Host codes when you place your order thru my Online Store.

Not to worry – you’re still going to get that $10 ordering gift for orders of $50 (before shipping & tax) or greater.  And the gift is still any 1 SU! product up to that $10 value (cardstock packs excluded) – which includes some of our fun Host Sets!

But – if you DO NOT use the Host code for your orders of less than $150 (this is the RETAIL total before Shipping & Handling), then you’ll have two options:

  1. You’ll need to call Stampin’ Up! (1-800-Stamp-Up) and ask them to add it for you. They’re very helpful and will get it done quickly!  OR….
  2. If your order was over the $50 threshold but under $150, then…you’ll forfeit that $10 ordering gift and rewards – this is the Bummer Option – and I REALLY don’t want to do this, SO please remember to add my Current Host Code.

*********************************************************************************************************

Last Chance Products available through January 4, 2023

The July–December 2022 Mini Catalog will be retiring soon! It’s always bittersweet to see a classic Stampin’ Up! catalog take a trip to retirement. But, we’re looking forward to all the new products on their way—and we hope you are, too!

Stock up on your favorite products before they’re gone for good! Save up to 60% on essential craft supplies. What are you waiting for? Start shopping! After all, this selection of Last Chance Products is only available while supplies last. Click Here for a printable PDF of the Last Chance List. Get those shopping lists ready for December 1st to shop early

  • This Last Chance Products promotion typically includes a Retiring List (products that will no longer be available once the catalog retires) and a Carryover List (products that will still be available once the catalog retires).
  • Discounts are not always available with the Retiring List. When they are, they will vary from one market to another depending on product performance.
  • All products are available while supplies last, and there are no purchase limits.
  • Discounted items can be added to a Starter Kit and redeemed as a 50% off item or with Stampin’ Rewards.
  • Stamp Sets are not guaranteed during this promotion and are while supplies last.

SALES PERIOD

  • Starts: 1 December 2022 at 12:00 AM (MT)
  • Ends: 4 January 2023 at 11:59 PM (MT)

Clearance Rack Has Been Refreshed!!

On 1 December Stampin’ Up! will be adding new items to our clearance rack, including dies offered during the Perfect Partners Promotion! With discounts up to 60% off, you can get the die sets that coordinate with the still-available stamp sets at a great price. This is a fantastic offer. Hurry the Perfect Partners dies and Clearance Rack products (available while supplies lasts)—don’t forget the coordinating stamps.

*********************************************************************************************************

Good Thing Come In Small Packages

Subscribe November 11 – December 10

Create fun gift card holders to help you celebrate your special occasions all year long! Personalize each gift with these reversible boxes and paper bands for a unique design every time. This kit comes with enough supplies for you to make 16 different gift card holders—2 each of 8 designs. It also has an all-occasion stamp set and enough paper pieces to make your craft really pop! No matter what the occasion or who the recipient is, this is a coordinated paper craft that everyone will love and appreciate! 

Plus, this month you can take your crafting even further with a special add-on! Give a gift card and a personalized card with the Good Things Cards & Envelopes add-on. You get 16 cards (4 each of 4 designs) and 16 coordinating envelopes. Add-ons are live during the subscription period but will only be available while supplies last, so don’t wait! 

This kit includes:

  • Good Things Come in Small Packages Photopolymer Stamp Set
  • Garden Green Classic Stampin’ Spot
  • 16 gift card holders: 2 each of 8 reversible designs
  • Precut paper pieces, twine, and belly bands to customize all your crafts.
  • Enough adhesive for each project!

Finished box size: 3-5/8″ x 2-1/2″ x 1/2″ (9.2 x 6.4 x 1.3 cm)

Coordinating Stampin’ Up! colors: Balmy Blue, Basic Gray, Blushing Bride, Calypso Coral, Crushed Curry, Garden Green, Tahitian Tide

Subscribe to the November Paper Pumpkin Kit between 11 November and 10 December at paperpumpkin.com!

Note: Supplies may be limited toward the end of the subscription period.

ADD-ON

Good Things Cards & Envelopes Add-on

Add-on number: 163134

Available starting: 11 November

Price: $10.00 USD / $13.75 CAD

The add-on includes:

  • 16 cards, 4 each of 4 designs, and 16 coordinating envelopes
  • Card size: 4-1/4″ x 5-1/2″ (10.8 x 14 cm)
  • Coordinating Stampin’ Up! colors: Balmy Blue, Basic Gray, Blushing Bride, Garden Green

*********************************************************************************************************

It’s almost time for me to order the new January – April 2023 Mini Catalog and the January-February 2023 Sale-a-bration brochure. If you are a customer of mine, I will be shipping them out to you just as soon as I receive them. If you are not a customer of mine yet but would like to be, send me an email to creativestampingdesigns@gmail.com requesting a catalog along with your name and address and I will gladly get one in the mail to you.

Once again with a new catalog comes my Designer Series Paper Shares. I’ll be posting the details soon about my Paper Shares. What is a Designer Series Paper Share? It’s a sampling of all the new DSP coming in the new mini catalog. You will receive a sample of each of the new DSP’s (6 X 6 sheets). It’s a great way to sample all the paper to see if you like it and want to purchase it. I’m hoping to post something with in the week, so stay tuned.

*********************************************************************************************************

Card stock cuts for this project:

  • Basic White Cardstock 2″ X 4″ (sentiment), 2″ X 3″ (snowflakes), 4″ x 5 1/4″ (inner liner)
  • Basic Gray Cardstock 4 1/4″ X 11″ (card base scored & folded at 5 1/2″)
  • Pool Party Cardstock 2 – 4 1/8″ x 5 3/8″ (card front & inner liner mats), 1″ X 3 1/2″ (small banner), 2″ X 3″ (snowflakes)
  • Texture Chic Specialty Designer Series Paper 4″ x 5 1/4″ (card front), 2 1/2″ x 4 3/4″ (banner), 2 1/4″ x 6″ (envelope flap)

*********************************************************************************************************

Product List

Stampin’ Up! Season of Chic Thanks

Good Sunday morning my stamping friends. How is everyone’s weekend going? Yesterday was a long rainy day at work and of course just when we were finally able to leave the sky opened up. Today I have my in person quarterly meeting which I’m excited about.

My card today is the card I designed for our quarterly meeting to demo and hopefully others will be stamping along. The design of today’s card is what we will be making, but I’ll be using different DSP. I’ll show the actual card tomorrow and you will be able to see by just changing the DSP it changes the whole card. Here’s my card for today.

Stampin' Up! Season of Chic Thanks 1 creativestampingdesigns.com

I used the Stampin’ Up! Texture Chic Suite from page 98 of the 2022-2023 Annual Catalog for my card today.

Stampin' Up! Season of Chic Thanks 2 creativestampingdesigns.com

I started by adhering a panel of Texture Chic Designer Series Paper to a Soft Succulent mat using Stampin’ Seal. I adhered the layered panel to a Petal Pink card front using Stampin’ Dimensionals. I cut the 2 1/2″ x 4 3/4″ panel of Texture Chic DSP into a banner using my Paper Snips. I adhered the banner to the card front using Stampin’ Seal on the left side and in the center of the banner.

Stampin' Up! Season of Chic Thanks 3 creativestampingdesigns.com

I cut the small piece of Soft Succulent cardstock into a banner using the Banner Pick A Punch. I adhered the small banner to the card front, just under the large banner using Stampin’ Seal. On a panel of Basic White cardstock I stamped the swish image from the Stampin’ Up! Season of Chic Photopolymer Stamp Set in Petal Pink Ink. I stamped the sentiment from the Season of Chic stamp set over the swish in Soft Succulent Ink. I fussy cut the sentiment out using my Paper Snips. I adhered the sentiment to the card front over the banners using Stampin’ Dimensionals.

Stampin' Up! Season of Chic Thanks 4 creativestampingdesigns.com

On a panel of Basic White cardstock I stamped the solid flower image from the Season of Chic stamp set in Petal Pink Ink 2 times. I stamped the outline flower image from the Season of Chic stamp set in Soft Succulent Ink. I cut the flowers out using the Chic Dies. I cut the outline flower die from the Chic Dies from a panel of Distressed Gold Paper. I adhered the 2 larger outline gold flowers to the solid Petal Pink flowers. I adhered the layered flowers to the card front using Stampin’ Dimensionals. I adhered the stamped outline flower and the gold outline flowers to the card front using Multipurpose Liquid Glue. I added a few 2021 – 2023 In-color Opal Rounds to the card front.

Stampin' Up! Season of Chic Thanks 5 creativestampingdesigns.com

On the inside I stamped the swish image from the Season of Chic stamp set in Petal Pink Ink on a Basic White panel. I stamped the sentiment from the Season of Chic stamp set in Soft Succulent Ink over the swish. I stamped the solid flower image from the Season of Chic stamp set in Petal Pink on the corners of the panel. I stamped the flower outline image in Soft Succulent Ink over the solid image. I adhered the Basic White panel to a Soft Succulent mat then to the inside of the Petal Pink card base.

Stampin' Up! Season of Chic Thanks 6 creativestampingdesigns.com

To finish my card, I decorated a Basic White Medium Envelope. I stamped the flower and flower outline images from the Season of Chic stamp set on the envelope front in Petal Pink and Soft Succulent. I adhered a panel of Texture Chic DSP to the envelope flap.

Stampin' Up! Season of Chic Thanks 7 creativestampingdesigns.com

Thank you for stopping by my blog today. I hope you like my card and will give it a try. Happy Stamping!!

*********************************************************************************************************

If you need any stamping supplies, I’d love to be your Demonstrator. Just click HERE to go directly to my online store or drop me an email if you have any questions. 

MY CURRENT HOST CODE IS:   7PTW7A3H

Use this host code when placing an order with me. When you order $50 or greater you will receive a free gift from me! If your order is over $150, please do not use this code, but you’ll still get the free gift. The free gift is your choice of any 1 item valued up to $10.00 from the 2022-2023 Annual Catalog or the July – December 2022 Mini Catalog!  Unfortunately packs of cardstock are no longer an option for a free gift. Shipping has become too expensive to ship and it’s costing me as much to ship as the cardstock costs. For any orders $50 or more I will also send you my monthly class tutorials.  Click HERE or go to my Customer Rewards for more details and to see what this month’s tutorials are.

Please remember to use my current Host Code and make sure that you can see my name on the final checkout page listed as your Demonstrator when you order so that you know that you’re ordering with me and you’ll get my rewards! 

Happy Stamping, Karen

*********************************************************************************************************

In response to changing policies at Stampin’ Up – I’m adjusting my Ordering Gift policy as well.  I’m having to get a little more tough on the adding of Host codes when you place your order thru my Online Store.

Not to worry – you’re still going to get that $10 ordering gift for orders of $50 (before shipping & tax) or greater.  And the gift is still any 1 SU! product up to that $10 value (cardstock packs excluded) – which includes some of our fun Host Sets!

But – if you DO NOT use the Host code for your orders of less than $150 (this is the RETAIL total before Shipping & Handling), then you’ll have two options:

  1. You’ll need to call Stampin’ Up! (1-800-Stamp-Up) and ask them to add it for you. They’re very helpful and will get it done quickly!  OR….
  2. If your order was over the $50 threshold but under $150, then…you’ll forfeit that $10 ordering gift and rewards – this is the Bummer Option – and I REALLY don’t want to do this, SO please remember to add my Current Host Code.

*********************************************************************************************************

Last Chance Products available through January 4, 2023

The July–December 2022 Mini Catalog will be retiring soon! It’s always bittersweet to see a classic Stampin’ Up! catalog take a trip to retirement. But, we’re looking forward to all the new products on their way—and we hope you are, too!

Stock up on your favorite products before they’re gone for good! Save up to 60% on essential craft supplies. What are you waiting for? Start shopping! After all, this selection of Last Chance Products is only available while supplies last. Click Here for a printable PDF of the Last Chance List. Get those shopping lists ready for December 1st to shop early

  • This Last Chance Products promotion typically includes a Retiring List (products that will no longer be available once the catalog retires) and a Carryover List (products that will still be available once the catalog retires).
  • Discounts are not always available with the Retiring List. When they are, they will vary from one market to another depending on product performance.
  • All products are available while supplies last, and there are no purchase limits.
  • Discounted items can be added to a Starter Kit and redeemed as a 50% off item or with Stampin’ Rewards.
  • Stamp Sets are not guaranteed during this promotion and are while supplies last.

SALES PERIOD

  • Starts: 1 December 2022 at 12:00 AM (MT)
  • Ends: 4 January 2023 at 11:59 PM (MT)

Clearance Rack Has Been Refreshed!!

On 1 December Stampin’ Up! will be adding new items to our clearance rack, including dies offered during the Perfect Partners Promotion! With discounts up to 60% off, you can get the die sets that coordinate with the still-available stamp sets at a great price. This is a fantastic offer. Hurry the Perfect Partners dies and Clearance Rack products (available while supplies lasts)—don’t forget the coordinating stamps.

*********************************************************************************************************

Good Thing Come In Small Packages

Subscribe November 11 – December 10

Create fun gift card holders to help you celebrate your special occasions all year long! Personalize each gift with these reversible boxes and paper bands for a unique design every time. This kit comes with enough supplies for you to make 16 different gift card holders—2 each of 8 designs. It also has an all-occasion stamp set and enough paper pieces to make your craft really pop! No matter what the occasion or who the recipient is, this is a coordinated paper craft that everyone will love and appreciate! 

Plus, this month you can take your crafting even further with a special add-on! Give a gift card and a personalized card with the Good Things Cards & Envelopes add-on. You get 16 cards (4 each of 4 designs) and 16 coordinating envelopes. Add-ons are live during the subscription period but will only be available while supplies last, so don’t wait! 

This kit includes:

  • Good Things Come in Small Packages Photopolymer Stamp Set
  • Garden Green Classic Stampin’ Spot
  • 16 gift card holders: 2 each of 8 reversible designs
  • Precut paper pieces, twine, and belly bands to customize all your crafts.
  • Enough adhesive for each project!

Finished box size: 3-5/8″ x 2-1/2″ x 1/2″ (9.2 x 6.4 x 1.3 cm)

Coordinating Stampin’ Up! colors: Balmy Blue, Basic Gray, Blushing Bride, Calypso Coral, Crushed Curry, Garden Green, Tahitian Tide

Subscribe to the November Paper Pumpkin Kit between 11 November and 10 December at paperpumpkin.com!

Note: Supplies may be limited toward the end of the subscription period.

ADD-ON

Good Things Cards & Envelopes Add-on

Add-on number: 163134

Available starting: 11 November

Price: $10.00 USD / $13.75 CAD

The add-on includes:

  • 16 cards, 4 each of 4 designs, and 16 coordinating envelopes
  • Card size: 4-1/4″ x 5-1/2″ (10.8 x 14 cm)
  • Coordinating Stampin’ Up! colors: Balmy Blue, Basic Gray, Blushing Bride, Garden Green

*********************************************************************************************************

It’s almost time for me to order the new January – April 2023 Mini Catalog and the January-February 2023 Sale-a-bration brochure. If you are a customer of mine, I will be shipping them out to you just as soon as I receive them. If you are not a customer of mine yet but would like to be, send me an email to creativestampingdesigns@gmail.com requesting a catalog along with your name and address and I will gladly get one in the mail to you.

Once again with a new catalog comes my Designer Series Paper Shares. I’ll be posting the details soon about my Paper Shares. What is a Designer Series Paper Share? It’s a sampling of all the new DSP coming in the new mini catalog. You will receive a sample of each of the new DSP’s (6 X 6 sheets). It’s a great way to sample all the paper to see if you like it and want to purchase it. I’m hoping to post something with in the week, so stay tuned.

*********************************************************************************************************

Card stock cuts for this project:

Card stock cuts for this project:

  • Basic White Cardstock 2″ X 4″ (sentiment), 3″ X 4″ (flowers), 4″ x 5 1/4″ (inner liner)
  • Petal Pink Cardstock 4 1/4″ X 11″ (card base scored & folded at 5 1/2″)
  • Soft Succulent Cardstock 2 – 4 1/8″ x 5 3/8″ (card front & inner liner mats), 1″ X 3 1/2″ (small banner)
  • Texture Chic Specialty Designer Series Paper 4″ x 5 1/4″ (card front), 2 1/2″ x 4 3/4″ (banner), 2 1/4″ x 6″ (envelope flap)
  • Distressed Gold Paper 3″ X 3 1/2″ (flower outlines)

*********************************************************************************************************

Product List

Stampin’ Up! Trimming The Tree Swirl Card

Good Saturday morning my stamping friends and welcome to the weekend. I hope you have some fun plans in store. I’ll be working all day both days this weekend.

Today’s card is one that we made at our Stamp Camp Card Class this past week. I usually have my classes the 1st Tuesday of the month, but with being sick I had to postpone it. I’ve been wanting to make one of these cards and I thought this was the perfect opportunity to share with the ladies. Here’s my card for today.

Stampin' Up! Trimming The Tree Swirl 1 creativestampingdesigns.com

I used the Stampin’ Up! Trimming The Tree Photopolymer Stamp Set along with the Boughs of Holly Designer Series Paper for my card today.

Stampin' Up! Trimming The Tree Swirl 2 creativestampingdesigns.com

I started by using my Cherry Cobbler Stampin’ Write Marker and I flicked ink all over the Basic White card front panel to give it a very light and subtle background. I adhered the card front to a Cherry Cobbler mat using Stampin’ Seal.

Stampin' Up! Trimming The Tree Swirl 3 creativestampingdesigns.com

I cut 6 different size circles using my Layering Circles Dies from 6 different patterns of Boughs of Holly DSP. I cut all the circles in half using my Paper Trimmer. I layered the circles from largest to smallest adhering them together using Multipurpose Liquid Glue. I adhered the layered circles to the card front using Multipurpose Liquid Glue lining up the 3 ends together.

Stampin' Up! Trimming The Tree Swirl 4 creativestampingdesigns.com

I stamped the sentiment from the Trimming The Tree stamp set in Mossy Meadow Ink on the card front. I adhered the layered card front to the Mossy Meadow card base using Stampin’ Dimensionals. I added a few Rhinestone Basic Jewels to the card front.

Stampin' Up! Trimming The Tree Swirl 5 creativestampingdesigns.com

On the inside, I stamped the sentiment from the Trimming The Tree stamp set in Mossy Meadow Ink on a panel of Basic White cardstock. Using my Cherry Cobbler Stampin’ Write Marker, I flicked color all over the panel. I adhered the Basic White panel to a Cherry Cobbler mat then to the inside of the Mossy Meadow card base.

Stampin' Up! Trimming The Tree Swirl 6 creativestampingdesigns.com

To finish my card, I decorated a Basic White Medium Envelope. I adhered a thin strip of Boughs of Holly DSP to the envelope front and a panel to the envelope flap.

Stampin' Up! Trimming The Tree Swirl 7 creativestampingdesigns.com

Thank you for stopping by my blog today. I hope you like my card and will give it a try. Happy Stamping!!

*********************************************************************************************************

If you need any stamping supplies, I’d love to be your Demonstrator. Just click HERE to go directly to my online store or drop me an email if you have any questions. 

MY CURRENT HOST CODE IS:   7UP2RPAX

Use this host code when placing an order with me. When you order $50 or greater you will receive a free gift from me! If your order is over $150, please do not use this code, but you’ll still get the free gift. The free gift is your choice of any 1 item valued up to $10.00 from the 2022-2023 Annual Catalog or the July – December 2022 Mini Catalog!   For any orders $50 or more I will also send you my monthly class tutorials.  Click HERE or go to my Customer Rewards for more details and to see what this month’s tutorials are.

Please remember to use my current Host Code and make sure that you can see my name on the final checkout page listed as your Demonstrator when you order so that you know that you’re ordering with me and you’ll get my rewards! 

Happy Stamping, Karen

*********************************************************************************************************

DOUBLE CREATIVE STAMPING DESIGNS REWARDS ENDS TODAY!!!

It’s my birthday week so I decided to give my customers a gift. Any orders over $50 starting today, Tuesday November 15th – Saturday November 19th, I’m going to give you Double Creatives Stamping Designs Rewards. If you place and order of $50 you’ll receive 2 rewards, $100 you’ll receive 4 rewards, $150 you’ll receive 6 rewards etc. I love giving gifts so this is my little gift to you. Don’t forget for any orders under $150 you MUST use my Current Host Code 7UP2RPAX in order to get double rewards and 1 free gift from me valued up to $10.

*********************************************************************************************************

In response to changing policies at Stampin’ Up – I’m adjusting my Ordering Gift policy as well.  I’m having to get a little more tough on the adding of Host codes when you place your order thru my Online Store.

Not to worry – you’re still going to get that $10 ordering gift for orders of $50 (before shipping & tax) or greater.  And the gift is still any 1 SU! product up to that $10 value – which includes some of our fun Host Sets!

But – if you DO NOT use the Host code for your orders of less than $150 (this is the RETAIL total before Shipping & Handling), then you’ll have two options:

  1. You’ll need to call Stampin’ Up! (1-800-Stamp-Up) and ask them to add it for you. They’re very helpful and will get it done quickly!  OR….
  2. If your order was over the $50 threshold but under $150, then…you’ll forfeit that $10 ordering gift and rewards – this is the Bummer Option – and I REALLY don’t want to do this, SO please remember to add my Current Host Code.

*********************************************************************************************************

Good Thing Come In Small Packages

Subscribe November 11 – December 10

Create fun gift card holders to help you celebrate your special occasions all year long! Personalize each gift with these reversible boxes and paper bands for a unique design every time. This kit comes with enough supplies for you to make 16 different gift card holders—2 each of 8 designs. It also has an all-occasion stamp set and enough paper pieces to make your craft really pop! No matter what the occasion or who the recipient is, this is a coordinated paper craft that everyone will love and appreciate! 

Plus, this month you can take your crafting even further with a special add-on! Give a gift card and a personalized card with the Good Things Cards & Envelopes add-on. You get 16 cards (4 each of 4 designs) and 16 coordinating envelopes. Add-ons are live during the subscription period but will only be available while supplies last, so don’t wait! 

This kit includes:

  • Good Things Come in Small Packages Photopolymer Stamp Set
  • Garden Green Classic Stampin’ Spot
  • 16 gift card holders: 2 each of 8 reversible designs
  • Precut paper pieces, twine, and belly bands to customize all your crafts.
  • Enough adhesive for each project!

Finished box size: 3-5/8″ x 2-1/2″ x 1/2″ (9.2 x 6.4 x 1.3 cm)

Coordinating Stampin’ Up! colors: Balmy Blue, Basic Gray, Blushing Bride, Calypso Coral, Crushed Curry, Garden Green, Tahitian Tide

Subscribe to the November Paper Pumpkin Kit between 11 November and 10 December at paperpumpkin.com!

Note: Supplies may be limited toward the end of the subscription period.

ADD-ON

Good Things Cards & Envelopes Add-on

Add-on number: 163134

Available starting: 11 November

Price: $10.00 USD / $13.75 CAD

The add-on includes:

  • 16 cards, 4 each of 4 designs, and 16 coordinating envelopes
  • Card size: 4-1/4″ x 5-1/2″ (10.8 x 14 cm)
  • Coordinating Stampin’ Up! colors: Balmy Blue, Basic Gray, Blushing Bride, Garden Green

*********************************************************************************************************

Card stock cuts for this project:

  • Basic White Cardstock 2 – 4″ X 5 1/4″ (card front & inner liner)
  • Cherry Cobbler Cardstock 2 – 4 1/8″ X 5 3/8″ (card front & inner liner mats)
  • Mossy Meadow Cardstock 8 1/2″ X 5 1/2″ (card base scored & folded at 4 1/4″)
  • Boughs of Holly Designer Series Paper Different Patterns for all the different size circles, 1/4″ X 6″ & 2 1/4″ x 6″ (envelope)

*********************************************************************************************************

Product List

Stampin’ Up! Framed & Festive CAS

Good Saturday morning my stamping friends and welcome to the weekend. I made it to Jacksonville yesterday. We had a wonderful dinner meeting up with all my team members. This morning I’m off to OnStage. By the time you read this I’ll be heading over to OnStage to check in and start the event. I can’t wait to see the new catalog.

Today I have the quickest and easiest card I think I’ve ever made. Here’s my card for today.

Stampin' Up! Framed & festive CAS 1 creativestampingdesigns.com

I used the Stampin’ Up! Framed & Festive Cling Stamp Set and the Whimsical Woodland 3D Embossing Folder for my card today.

Stampin' Up! Framed & festive CAS 2 creativestampingdesigns.com

I started by embossing a Basic White card front using the Whimsical Woodland 3D Embossing Folder. I adhered the embossed panel to a Basic White Thick card front using Multipurpose Liquid Glue.

Stampin' Up! Framed & festive CAS 3 creativestampingdesigns.com

On a panel of Basic White cardstock, I stamped the sentiment from the Framed & Festive stamp set in Tahitian Tide Ink. I cut the sentiment out using the Deckled Rectangle Dies.

Stampin' Up! Framed & festive CAS 4 creativestampingdesigns.com

I adhered a piece of the Balmy Blue 5/8″ Double Stitched Ribbon to the card front using Stampin’ Seal. I adhered the sentiment over the ribbon using Stampin’ Dimensionals. I added a few Fine Sparkle Adhesive Backed Gems to the card front.

Stampin' Up! Framed & festive CAS 5 creativestampingdesigns.com

On the inside, I stamped the sentiments from the Framed & Festive stamp set in Tahitian Tide Ink on a panel of Basic White cardstock. I adhered a strip of the 2022-2024 6 X 6 Designer Series Paper to the bottom of the panel. I adhered the Basic White panel to the inside of the Basic White Thick card base.

Stampin' Up! Framed & festive CAS 6 creativestampingdesigns.com

To finish my card, I decorated a Basic White Medium Envelope. I adhered a strip of the 2022-2024 In-Color DSP to the envelope front and a panel to the envelope flap.

Stampin' Up! Framed & festive CAS 7 creativestampingdesigns.com

Thank you for stopping by my blog today. I hope you like my CAS card and will give it a try. Happy Stamping!!

*********************************************************************************************************

If you need any stamping supplies, I’d love to be your Demonstrator. Just click HERE to go directly to my online store or drop me an email if you have any questions. 

MY CURRENT HOST CODE IS:   7UP2RPAX

Use this host code when placing an order with me. When you order $50 or greater you will receive a free gift from me! If your order is over $150, please do not use this code, but you’ll still get the free gift. The free gift is your choice of any 1 item valued up to $10.00 from the 2022-2023 Annual Catalog or the July – December 2022 Mini Catalog!   For any orders $50 or more I will also send you my monthly class tutorials.  Click HERE or go to my Customer Rewards for more details and to see what this month’s tutorials are.

Please remember to use my current Host Code and make sure that you can see my name on the final checkout page listed as your Demonstrator when you order so that you know that you’re ordering with me and you’ll get my rewards! 

Happy Stamping, Karen

*********************************************************************************************************

Starting Tuesday November 15th – Friday November 18th!

Stampin Up! has just announced a Seasonal Sale going on next week.

Create more by spending less during the Seasonal Sale! Between 15 and 18 November 2022, select products from the 2022–2023 Annual Catalog will be on sale with the following discounts:

  • 10% off all punches
  • 15% of all stamps (Host stamp sets are not included in this sale)
  • 20% off all dies
  • 20% off all embossing folders
  • 20% off all non-specialty Designer Series Paper

With the season of giving upon us, this is a great opportunity to buy gifts for your fellow crafting enthusiasts, or to stock up on supplies for all your upcoming handmade projects. Remember, this sale is for four days only! Don’t miss out!

You won’t want to miss our fabulous Seasonal Sale. So, get a head start on your festive gift giving and get those shopping lists ready! Click Here for a printable PDF.

*********************************************************************************************************

FITTING FLORETS COLLECTION Now Available

Add just the right touch of elegance to any occasion, including Christmas and seasonal celebrations, with the sweet Fitting Florets Collection. From color schemes to sentiments and embellishments to dies, these unique products blend together so that your cards and crafts fit whatever occasion you might need. Send birthday wishes, express your gratitude, or spread Christmas cheer—with so many options to mix and match you’ll be set no matter the celebration all year!

Starting 1 November 2022, you can order items from the Fitting Florets Collection. All items in the collection can be ordered separately. Click HERE or on the photo for a printable PDF flyer.

The following exclusive products are only available while supplies last:

  • Framed & Festive Cling Stamp Set (item 160888)
  • Fitting Florets Designer Series Paper (item 161814)
  • Gold Adhesive-Backed Swirls (item 161822)

The following will be available for purchase in the Mini Catalog starting January 2023:

  • Framed Florets Bundle (item 162407)
  • Framed Florets Photopolymer Stamp Set (item 161815)
  • Framed Florets Dies (item 160623)

*********************************************************************************************************

Good Thing Come In Small Packages

Subscribe November 11 – December 10

Create fun gift card holders to help you celebrate your special occasions all year long! Personalize each gift with these reversible boxes and paper bands for a unique design every time. This kit comes with enough supplies for you to make 16 different gift card holders—2 each of 8 designs. It also has an all-occasion stamp set and enough paper pieces to make your craft really pop! No matter what the occasion or who the recipient is, this is a coordinated paper craft that everyone will love and appreciate! 

Plus, this month you can take your crafting even further with a special add-on! Give a gift card and a personalized card with the Good Things Cards & Envelopes add-on. You get 16 cards (4 each of 4 designs) and 16 coordinating envelopes. Add-ons are live during the subscription period but will only be available while supplies last, so don’t wait! 

This kit includes:

  • Good Things Come in Small Packages Photopolymer Stamp Set
  • Garden Green Classic Stampin’ Spot
  • 16 gift card holders: 2 each of 8 reversible designs
  • Precut paper pieces, twine, and belly bands to customize all your crafts.
  • Enough adhesive for each project!

Finished box size: 3-5/8″ x 2-1/2″ x 1/2″ (9.2 x 6.4 x 1.3 cm)

Coordinating Stampin’ Up! colors: Balmy Blue, Basic Gray, Blushing Bride, Calypso Coral, Crushed Curry, Garden Green, Tahitian Tide

Subscribe to the November Paper Pumpkin Kit between 11 November and 10 December at paperpumpkin.com!

Note: Supplies may be limited toward the end of the subscription period.

ADD-ON

Good Things Cards & Envelopes Add-on

Add-on number: 163134

Available starting: 11 November

Price: $10.00 USD / $13.75 CAD

The add-on includes:

  • 16 cards, 4 each of 4 designs, and 16 coordinating envelopes
  • Card size: 4-1/4″ x 5-1/2″ (10.8 x 14 cm)
  • Coordinating Stampin’ Up! colors: Balmy Blue, Basic Gray, Blushing Bride, Garden Green

*********************************************************************************************************

Card stock cuts for this project:

  • Basic White Cardstock 4 1/8″ x 5 3/8″ (card front), 3 1/2″ X 2 1/4″ (sentiment), 4″ x 5 1/4″ (inner liner)
  • Basic White Thick Cardstock 4 1/4″ X 11″ (card base scored & folded at 5 1/2″)
  • 2022-2024 In-Color 6 X 6 Designer Series Paper 1/2″ X 4″ (inner liner), 1/2″ X 6″ & 2 1/4″ X 6″ (envelope)

*********************************************************************************************************

Product List

Stampin’ Up Cottage Wreaths Fun Fold Video Tutorial

Good Sunday morning my stamping friends. I hope you are all having a wonderful weekend. I hope you were able to catch all or some of our Facebook Live videos yesterday. I was able to catch all of them and I thought they were great. A lot of great ideas. If you joined our World Card Making Day Facebook page, the videos will be up until Facebook decides that we can’t keep them, so you can go back and watch them over and over. If you haven’t joined yet, you can still join. We are going to allow people in for a few more days.

Today’s card is the one I made on the Facebook Live yesterday. If you caught me live or watched the replay, thank you. If you want to watch and stamp along, the measurements are listed below. Here’s my card for today.

I used the Stampin’ Up! Cottage Wreath Bundle and the Boughs of Holly Designer Series Paper for my card today.

Here is the template as promised for cutting the card base.

I started by cutting and folding the card base as in the image above. I embossed a panel of Basic White cardstock using the Brick and Mortar 3D Embossing Folder. Using my Blending Brush, I added some Gray Granite Ink lightly to the embossed panel. I adhered the embossed panel to the card base using Multipurpose Liquid Glue. I adhered 2 panels of Boughs of Holly DSP to either side of the card front using Multipurpose Liquid Glue.

On a panel of Basic White cardstock, I stamped the sentiment from the Stampin’ Up! Cottage Wreaths Photopolymer Stamp Set in Gray Granite Ink. I cut the sentiment out using the Stylish Shapes Dies. I adhered the sentiment to the bottom portion of the card base using Stampin’ Dimensionals.

For the wreath I used the Baby Wipe Technique. I folded a baby wipe in quarters. Using my Cherry Cobbler, Crushed Curry, Pumpkin Pie and Rich Razzleberry Ink Refills, I added drops of ink on the baby wipe. I inked up the wreath image from the Cottage Wreaths stamp set from the baby wipe and stamped a Basic White panel. I cut the wreath out using the Country Wreaths Dies. I adhered the wreath to the card front using Stampin’ Dimensionals. I tied a multi loop bow using Linen Thread and added it to the wreath using a Glue Dot. I added some of the Iridescent Pearl Basic Jewels to the wreath. I added a couple Brushed Metallic Adhesive-Backed Dots to the sentiment.

On the inside I stamped the wreath image from the Cottage Wreath stamp set on a Basic White panel, using the ink from the baby wipe, stamping it off once on scrap paper. I stamped the sentiment from the Cottage Wreaths stamp set in Gray Granite Ink inside the wreath. I adhered the Basic White panel to a Gray Granite mat then to the inside of the Gray Granite card base.

To complete my card, I decorated a Basic White Medium Envelope. I stamped the wreath image from the Cottage Wreaths stamp set on the bottom of the envelope front. I stamped the sentiment from the Cottage Wreaths stamps et in Gray Granite Ink inside the wreath. I adhered a panel of Boughs of Holly DSP to the envelope flap.

Thank you for stopping by my blog today. I hope you liked my card and will give it a try. I hope you will CASE this card and please feel free to post it in the comments of my Facebook page under my post. I’d love to see your take on the card. The list of measurements are below if you’d like to stamp along while watching the video. You can watch my video on my Facebook page Here.

You can also view the video on my YouTube channel Here. If you watch this on my YouTube channel, please remember to subscribe so that you will get notified when a new video goes live. I’m hoping to start doing YouTube lives soon, thanks to all that have subscribed. Happy Stamping!!

*********************************************************************************************************

If you need any stamping supplies, I’d love to be your Demonstrator. Just click HERE to go directly to my online store or drop me an email if you have any questions. 

MY CURRENT HOST CODE IS:   76V6XDMX

Use this host code when placing an order with me. When you order $50 or greater you will receive a free gift from me! If your order is over $150, please do not use this code, but you’ll still get the free gift. The free gift is your choice of any 1 item valued up to $10.00 from the 2022-2023 Annual Catalog or the July – December 2022 Mini Catalog!   For any orders $50 or more I will also send you my monthly class tutorials.  Click HERE or go to my Customer Rewards for more details and to see what this month’s tutorials are.

Please remember to use my current Host Code and make sure that you can see my name on the final checkout page listed as your Demonstrator when you order so that you know that you’re ordering with me and you’ll get my rewards! 

Happy Stamping, Karen

*********************************************************************************************************

Free Shipping from Stampin’ Up! for 24hours October 4, 2022

Time for you to stock up and save on your favorite Stampin’ Up! products! What’s the big occasion? On 4 October 2022 only, we are offering FREE shipping on orders subtotaling $75 USD or more. This incredible deal lasts for 24 hours only, so get those shopping lists ready today!

ORDERING INFORMATION:

  • Free shipping applies after the qualifying amount has been met.
  • The minimum qualifying amount to receive free shipping is $75 or more (before tax).
  • Free shipping only applies during the 24-hour period the promotion is live; this means that the order must be opened and closed on October 4, 2022.
  • With the exception of month-to-month Paper Pumpkin subscriptions, all Stampin’ Up! products qualify for the promotion.
    • Month-to-month Paper Pumpkin subscriptions are NOT eligible for free shipping. Subscriptions billed and shipped this month will be charged for the normal amount.
  • Prepaid Paper Pumpkin subscriptions are eligible for FREE shipping under the same rules as all other Stampin’ Up! items during the promotion.
  • The free shipping promotion does not cover the additional cost for expedited shipping.

This promotion is available for one day only!  The free shipping promotion begins at 12:00 a.m. (MT) and ends at 11:59 p.m (MT) on Tuesday, October 4, 2022!

Let me know if you have any questions.

Double Creative Stamping Designs Rewards

To sweeten the offer, I’m offering Double Creative Stamping Designs Rewards for one day only during the Stampin’ Up! Free Shipping promotion. Any orders placed during the 24hr period of $75 (before tax) on October 4th, will receive Double Creative Stamping Designs Rewards from me along with your 1 free gift valued up to $10.

My Creative Stamping Designs Rewards starts at 12:00am MT and ends at 11:59pm MT on Tuesday, October 4, 2022

*********************************************************************************************************

Starter Kit + Promotion From Stampin’ Up! October 4-31!!

October is a fabulous time to join Stampin’ Up!  You will get even MORE FREE products in your customizable Starter Kit!  Between October 4-31, when you join, you will get $155 worth of products in your Starter Kit for only $99!!  Plus you’ll get free shipping and all the fun being a part of Stampin’ Up! and our Inkin’ Krew Team!

STARTER KIT+ PROMOTION DATES:  OCTOBER 4-31, 2022

  • When you purchase your Starter Kit, you will be able to redeem $155 of Starter Kit eligible products for just $99!!
  • You can select any eligible Stampin’ Up! products up to the stated value of $155.
  • Your Starter Kit also includes business resources like catalogs, brochures, order forms, and postcards.
  • The Starter Kit also includes a FREE past Paper Pumpkin kit!
  • In addition to the amazing added value to your Starter Kit, when you join Stampin’ Up! you get to be a part of our amazing community of crafters. Plus, you get to enjoy sharing simple and fun crafting experiences with others, early access to products, and exclusive access to training events!!
  • There is no requirement to hold events, share online or sell in any way to others.  You can join and simply get the awesome Starter Kit+ deal and then get a minimum of a 20% discount on anything that you purchase as a Demonstrator!
  • New demonstrators who submit their Independent Demonstrator Agreement (IDA) before October 4 or after October 31 will not be eligible for this offer.
  • Starter Kit + Promotion begins : October 4, 2022
  • Starter Kit + Promotion ends: October 31, 2022 @ 11:50pm MT

You can check out more information about joining our team Here and more details about the benefits of being a Demonstrator and find the link to join Here.

I’d be happy to help you and talk to you about joining. Contact me at creativestampingdesigns@gmail.com and we can connect. This is such a great deal you won’t want to pass it up.

*********************************************************************************************************

Ho Ho Ho

Subscribe September 11 – October 10

‘Tis the season to make your own Christmas cards with the Ho Ho Ho Paper Pumpkin Kit! This kit contains whimsical designs of Santa and his reindeer in a classic Christmas color palette which is sure to match various styles of holiday décor and look great on mantles everywhere. 
Each kit contains enough supplies to create 9 festive cards—3 each of 3 designs—and 9 coordinating envelopes. These cards are sure to bring the warm holiday spirit. 
And word from the North Pole is that this kit coordinates with next month’s Paper Pumpkin tag kit and the special add-on product! With so much coordination between products, you’ll have a breeze at creating a cohesive look for all your holiday gifting needs. Make this season the most wonderful time of the year for your loved ones—and for yourself!

This kit includes:

  • Ho Ho Ho Photopolymer Stamp Set
  • Early Espresso Classic Stampin’ Spot
  • Printed card bases
  • Printed envelopes
  • Printed die cuts
  • Die-cut labels
  • Iridescent foil die-cut snowflakes
  • Vellum
  • Vanilla expoy dots
  • Adhesive dots
  • Mini Dimensionals

Card size: 4-1/4″ x 5-1/2″ (10.8 x 14 cm) 

Coordinating Stampin’ Up! colors: Bermuda Bay, Cherry Cobbler, Crumb Cake, Early Espresso, Shaded Spruce, Sweet Sorbet, Very Vanilla

Subscribe to the October Paper Pumpkin Kit between 11 September and 10 October at paperpumpkin.com!

Note: Supplies may be limited toward the end of the subscription period.

*********************************************************************************************************

Card stock cuts for this project:

  • Basic White Cardstock 2 1/8″ X 4 1/8″ (card front panel), 1 1/4″ X 4″ (sentiment), 3″ X 3″ (wreath), 4″ X 4 1/4″ (inner liner)
  • Gray Granite Cardstock 4 1/4″ X 11″ (card base scored & folded as in diagram above), 4 1/8″ X 4 3/8″ (inner liner mat)
  • Boughs of Holly Designer Series Paper 2 – 7/8″ x 4 1/8″ (card front panels), 2 1/4″ X 6″ (envelope flap)

*********************************************************************************************************

Product List

Stampin’ Up! Spruced Up CAS Christmas Card

Good Saturday morning my stamping friends, welcome to the weekend. Happy October and Happy World Card Making Day!! By the time you get this post I’ll have been at work for over an hour. I’m going in super early so I can get my bills done and get home to watch all my team members live videos and make some cards. I’ll be going live at 3pm today right before the break for the Stampin’ Up! Event. I hope you have all registered. You have a couple hours left to get yourself registered. I hope you have also joined our team Facebook page. The link is below if you haven’t joined yet.

Today I have a really quick Christmas card for you. This is another one that you can make a lot of really fast. Here’s my card for today.

Stampin' Up! Spruced Up CAS 1 creativestampingdesigns.com

I used the Stampin’ Up! Spruced Up Bundle along with the Stampin’ Up! Brightest Glow Cling Stamp Set for my card today.

Stampin' Up! Spruced Up CAS 2 creativestampingdesigns.com

I started by embossing a panel of Crumb Cake cardstock using the Merry Melody 3D Embossing Folder. I adhered the embossed panel to a Crumb Cake card base using Multipurpose Liquid Glue. I adhered an adhesive sheet to the back of a panel of Real Red Glimmer Paper from the Real Red & White 6 X 6 Glimmer Paper. I cut the 2 ornaments out using the Spruced Up Outlines Dies.

Stampin' Up! Spruced Up CAS 3 creativestampingdesigns.com

On a small panel of Crumb Cake cardstock I stamped the sentiment from the Brightest Glow stamp set in Cherry Cobbler Ink. I adhered the 2 ornaments to the panel. I adhered the artwork panel to a Crumb Cake mat using Stampin’ Dimensionals.

Stampin' Up! Spruced Up CAS 4 creativestampingdesigns.com

I adhered the layered panel to the card base using Stampin’ Dimensionals. I tied 2 small bows using the Gold Simply Elegant Trim. I adhered the bows to the top of the ornaments using Glue Dots. I added a few Festive Pearls to the card front.

Stampin' Up! Spruced Up CAS 5 creativestampingdesigns.com

On the inside I stamped the sentiment from the Brightest Glow stamp set in Cherry Cobbler Ink on a Basic White panel. I stamped the striped ornament from the Spruced Up stamp set in Cherry Cobbler Ink next to the sentiment. I stamped the ornament hanger in Tuxedo Black Ink on top of the ornament. I adhered the Basic White panel to a Cherry Cobbler mat then to the inside of the Crumb Cake card base.

Stampin' Up! Spruced Up CAS 6 creativestampingdesigns.com

To finish my card, I decorated a Basic White Medium Envelope. I stamped the striped ornament from the Spruced Up stamp set in Cherry Cobbler Ink on the envelope front and flap. I stamped the ornament holder in Tuxedo Black Ink on top of the ornament.

Stampin' Up! Spruced Up CAS 7 creativestampingdesigns.com

Thank you for stopping by my blog today. I hope you like my card and will give it a try. Happy Stamping!!

*********************************************************************************************************

If you need any stamping supplies, I’d love to be your Demonstrator. Just click HERE to go directly to my online store or drop me an email if you have any questions. 

MY CURRENT HOST CODE IS:   76V6XDMX

Use this host code when placing an order with me. When you order $50 or greater you will receive a free gift from me! If your order is over $150, please do not use this code, but you’ll still get the free gift. The free gift is your choice of any 1 item valued up to $10.00 from the 2022-2023 Annual Catalog or the July – December 2022 Mini Catalog!   For any orders $50 or more I will also send you my monthly class tutorials.  Click HERE or go to my Customer Rewards for more details and to see what this month’s tutorials are.

Please remember to use my current Host Code and make sure that you can see my name on the final checkout page listed as your Demonstrator when you order so that you know that you’re ordering with me and you’ll get my rewards! 

Happy Stamping, Karen

*********************************************************************************************************

World Card Making Day Events

Inkin’ Krew Event Page Open

Come Join Us!!!

Our team is hosting an event this Saturday, October 1 for World Card Making Day!  Stampin’ Up! is also hosting a 3 hours card making event on Saturday afternoon!  Come join us for both events and make some cards to celebrate the day!

INKIN’ KREW WORLD CARD MAKING DAY EVENT

9 AM ET UNTIL 9 PM ET, SATURDAY, OCTOBER 1!

We’re doing it again!!  Our team will be hosting a fun all-day event on Saturday, October 1 for World Card Making Day!  Our event will feature card making presentations live on the event Facebook page as well as some fun giveaways!

Hop over to our event page now and request to join so that you don’t miss out on any of the fun!  You can find the page right here:

https://www.facebook.com/groups/inkinkrewworldcardmakingday2022

Stampin’ Up! is also hosting an event online (see the details below) and we’re scheduling our event so that it runs before and after the Stampin’ Up! event!  Most of us will be using one of the three bundles from the Stampin’ Up! event for our projects so you will come away from the day with tons of ideas for those three bundles!

If you’re interested, here is our schedule of live card making presentations:

All are welcome to join us!  No registration required for our group, just request to join the Facebook page Here.

STAMPIN’ UP! WORLD CARD MAKING DAY EVENT

2 PM MT UNTIL 5 PM MT (4 PM ET UNTIL 7 PM ET), SATURDAY, OCTOBER 1!

FREE VIRTUAL, CRAFT-ALONG EVENT WITH STAMPIN’ UP!

Stampin’ Up! is also hosting a free, virtual card making event on October 1!  In just under three hours, Stampin’ Up will make three unique cards and will share the instructions with you.  Everyone is invited and welcome, and registration is not required.  Mark your calendars now!

STAMPIN’ UP! WORLD CARD MAKING DAY CRAFTING EVENT DETAILS

Who: Anyone!
When: October 1 from 2:00–5:00 p.m. (MT)
Where: Online
Price of Event: Free
Registration Dates*: August 11 – October 1 (Registration is not required)

*You can still participate in the event without registering. Registration is encouraged because it’s the best way to stay up to date regarding event details.

Click here to register.

To make the most of this experience, you can order the Cottage Rose Bundle from the 2022–2023 Annual Catalog, the Cottage Wreaths Bundle from the July–December 2022 Mini Catalog, or the Warm Welcome Bundle which you can get early from the January–June 2023 Mini Catalog!!  The bundles aren’t required to attend the event, but if you’d like to make the projects presented, you’ll want to get the bundles!

If you haven’t seen the Warm Welcome bundle yet, here it is!

When you order any bundle, you’ll get a FREE gift of Iridescent Pearl Basic Jewels! (Note that even if you order all three bundles, you’ll only receive one Iridescent Pearls gift.) 

Check out the Product Flyer with all the bundles’ ordering information. You can still attend this event without ordering the bundles, but it will be a lot more fun to craft together if you have one or more bundles! Order early to get your products in time for our World Card Making Day Creative Event.

Click Here to go to my Online Store to order any of these awesome bundles.

*********************************************************************************************************

Starter Kit + Promotion From Stampin’ Up! October 4-31!!

October is a fabulous time to join Stampin’ Up!  You will get even MORE FREE products in your customizable Starter Kit!  Between October 4-31, when you join, you will get $155 worth of products in your Starter Kit for only $99!!  Plus you’ll get free shipping and all the fun being a part of Stampin’ Up! and our Inkin’ Krew Team!

STARTER KIT+ PROMOTION DATES:  OCTOBER 4-31, 2022

  • When you purchase your Starter Kit, you will be able to redeem $155 of Starter Kit eligible products for just $99!!
  • You can select any eligible Stampin’ Up! products up to the stated value of $155.
  • Your Starter Kit also includes business resources like catalogs, brochures, order forms, and postcards.
  • The Starter Kit also includes a FREE past Paper Pumpkin kit!
  • In addition to the amazing added value to your Starter Kit, when you join Stampin’ Up! you get to be a part of our amazing community of crafters. Plus, you get to enjoy sharing simple and fun crafting experiences with others, early access to products, and exclusive access to training events!!
  • There is no requirement to hold events, share online or sell in any way to others.  You can join and simply get the awesome Starter Kit+ deal and then get a minimum of a 20% discount on anything that you purchase as a Demonstrator!
  • New demonstrators who submit their Independent Demonstrator Agreement (IDA) before October 4 or after October 31 will not be eligible for this offer.
  • Starter Kit + Promotion begins : October 4, 2022
  • Starter Kit + Promotion ends: October 31, 2022 @ 11:50pm MT

You can check out more information about joining our team Here and more details about the benefits of being a Demonstrator and find the link to join Here.

I’d be happy to help you and talk to you about joining. Contact me at creativestampingdesigns@gmail.com and we can connect. This is such a great deal you won’t want to pass it up.

*********************************************************************************************************

Ho Ho Ho

Subscribe September 11 – October 10

‘Tis the season to make your own Christmas cards with the Ho Ho Ho Paper Pumpkin Kit! This kit contains whimsical designs of Santa and his reindeer in a classic Christmas color palette which is sure to match various styles of holiday décor and look great on mantles everywhere. 
Each kit contains enough supplies to create 9 festive cards—3 each of 3 designs—and 9 coordinating envelopes. These cards are sure to bring the warm holiday spirit. 
And word from the North Pole is that this kit coordinates with next month’s Paper Pumpkin tag kit and the special add-on product! With so much coordination between products, you’ll have a breeze at creating a cohesive look for all your holiday gifting needs. Make this season the most wonderful time of the year for your loved ones—and for yourself!

This kit includes:

  • Ho Ho Ho Photopolymer Stamp Set
  • Early Espresso Classic Stampin’ Spot
  • Printed card bases
  • Printed envelopes
  • Printed die cuts
  • Die-cut labels
  • Iridescent foil die-cut snowflakes
  • Vellum
  • Vanilla expoy dots
  • Adhesive dots
  • Mini Dimensionals

Card size: 4-1/4″ x 5-1/2″ (10.8 x 14 cm) 

Coordinating Stampin’ Up! colors: Bermuda Bay, Cherry Cobbler, Crumb Cake, Early Espresso, Shaded Spruce, Sweet Sorbet, Very Vanilla

Subscribe to the October Paper Pumpkin Kit between 11 September and 10 October at paperpumpkin.com!

Note: Supplies may be limited toward the end of the subscription period.

*********************************************************************************************************

Card stock cuts for this project:

  • Basic White Cardstock 4″ X 5 1/4″ (inner liner)
  • Cherry Cobbler Cardstock 4 1/8″ X 5 3/8″ (inner liner mat)
  • Crumb Cake Cardstock 4 1/4″ X 11″ (card base scored & folded at 5 1/2″), 4 1/4″ X 5 1/2″ (card front), 3 /2″ X 4 3/4″ (artwork mat), 2 1/2″ X 3 3/4″ (artwork panel)

*********************************************************************************************************

Product List

Stampin’ Up! Leaves of Holly Slimline

Good Tuesday morning my stamping friends. I hope your week has started well. I’ve got a busy one ahead of me. Today is my only day off and I’ll be working the next 6 days straight. Maybe I’ll be surprised, and they won’t schedule me for Sunday.

Today’s card is another one that we made at our quarterly team meeting a couple weeks ago. This one was designed by another one of our team members Darryl Robbins. Here’s my card for today.

Stampin' Up! Leaves of Holly Slimline 1 creativestampingdesigns.com

I used the Stampin’ Up! Leaves of Holly Bundle along with the Boughs of Holly Designer Series Paper for my card today. This was the first time I’ve made a Slimline card and I think it came out pretty good since I didn’t know what I was doing.

Stampin' Up! Leaves of Holly Slimline 2 creativestampingdesigns.com

I started by adhering a panel of Boughs of Holly DSP to a Cherry Cobbler mat. I adhered the layered panel to the panel of Mossy Meadow cardstock using Multipurpose Liquid Glue. I adhered the layered panels to the 1 7/8″ section of the Mossy Meadow card base using Multipurpose Liquid Glue.

Stampin' Up! Leaves of Holly Slimline 3 creativestampingdesigns.com

Using the Holly Berry Dies, I cut the holly frame die from a panel of Cherry Cobbler cardstock. I stamped the sentiment from the Stampin’ Up! Leaves of Holly Photopolymer Stamp Set in Cherry Cobbler Ink on a panel of Basic White cardstock. I cut the sentiment out using the Holly Berry Dies. I adhered the holly frame to the card front using Multipurpose Liquid Glue. I adhered the sentiment inside the frame using Stampin’ Dimensionals.

Stampin' Up! Leaves of Holly Slimline 4 creativestampingdesigns.com

On the panel of Mossy Meadow cardstock, I stamped the smaller holly leaf image from the Leaves of Holly stamp set in Mossy Meadow Ink. I cut the leaves out using the Holly Berry Dies. On the panel of Basic White cardstock, I stamped the berry image from the Leaves of Holly stamp set in Cherry Cobbler Ink and cut them out with the Holly Berry Dies. I adhered the leaves to the card front using Multipurpose Liquid Glue. I adhered the berries over the leaves using Stampin’ Dimensionals. I added a few Red Rhinestone Basic Jewels to the card front.

Stampin' Up! Leaves of Holly Slimline 5 creativestampingdesigns.com

For the inside. I stamped the holly leaf images from the Leaves of Holly stamp set in Mossy Meadow Ink on the top of a Basic White panel. I stamped the berry image by the holly leaves in Cherry Cobbler Ink. I adhered the Basic White panel to a Cherry Cobbler mat and then to the inside of the Mossy Meadow card base. I stamped the sentiment from the Leaves of Holly stamp set in Cherry Cobbler Ink on a panel of Basic White cardstock. I cut the 2 ends on an angle using my Paper Snips. I adhered a piece of the Natural 1/2″ Woven Ribbon on the bottom of the panel using Stampin’ Seal. I adhered the sentiment over the ribbon using Stampin’ Dimensionals. I colored 2 of the Textural Elements using the Cherry Cobbler and Mossy Meadow Stampin’ Blends Markers. I adhered the Textural Elements on either side of the panel where I wanted the easel to stand using Glue Dots on the berry parts.

Stampin' Up! Leaves of Holly Slimline 6 creativestampingdesigns.com

To finish my card, I decorated a Slimline Envelope. I stamped the holly leaf images from the Leaves of Holly stamp set in Mossy Meadow Ink and the berry image in Cherry Cobbler Ink on the envelope front.

Thank you for stopping by my blog today. I hope you liked the slimline card and will try it. Happy Stamping!!

*********************************************************************************************************

If you need any stamping supplies, I’d love to be your Demonstrator. Just click HERE to go directly to my online store or drop me an email if you have any questions. 

MY CURRENT HOST CODE IS:   CD74ZSKH

Use this host code when placing an order with me. When you order $50 or greater you will receive a free gift from me! If your order is over $150, please do not use this code, but you’ll still get the free gift. The free gift is your choice of any 1 item valued up to $10.00 from the 2022-2023 Annual Catalog or the July – December 2022 Mini Catalog!   For any orders $50 or more I will also send you my monthly class tutorials.  Click HERE or go to my Customer Rewards for more details and to see what this month’s tutorials are.

Please remember to use my current Host Code and make sure that you can see my name on the final checkout page listed as your Demonstrator when you order so that you know that you’re ordering with me and you’ll get my rewards! 

Happy Stamping, Karen

*********************************************************************************************************

September 1 – September 30!!!

Every week in the month of September Stampin’ Up! will be offering a selection of discounted products. Discounts and product selection will vary from week to week.

Head over to my Online Store Here to see the Weekly Deals for this week.

  • New products added each week on 1, 8, 15, and 22 September.
  • Week 1: Sept 1−7, Week 2: Sept 8−14, Week 3: Sept 15−21, Week 4: Sept 22−28
  • Promotion ends 28 September.
  • Product options and discounts vary based on inventory availability.
  • All order types qualify for this promotion
  • Discounted items can be added to a Starter Kit.
  • Get the most up-to-date product information on the online store beginning 1 September.

*********************************************************************************************************

Available Now!!

Some things are great on their own but become epic when they are paired with something else: cereal and milk, toast and butter, Fred Astaire and Ginger Rogers. We may be biased, but our favorite combo is our stamp sets and dies—and that’s what the Perfect Partners promotion is all about! 

We created six new dies that coordinate with stamp sets in the 2022–2023 Annual Catalog and the July–December 2022 Mini Catalog. These coordinating dies will only be available during this promotion and will not be offered in any catalog.  

These stamp sets and dies are available separately or as a bundle. By buying the bundle, you and your customers will save 10% off the retail price. 

Put these wonderful stamp sets and dies together for more papercrafting fun!

*********************************************************************************************************

Ho Ho Ho

Subscribe September 11 – October 10

‘Tis the season to make your own Christmas cards with the Ho Ho Ho Paper Pumpkin Kit! This kit contains whimsical designs of Santa and his reindeer in a classic Christmas color palette which is sure to match various styles of holiday décor and look great on mantles everywhere. 
Each kit contains enough supplies to create 9 festive cards—3 each of 3 designs—and 9 coordinating envelopes. These cards are sure to bring the warm holiday spirit. 
And word from the North Pole is that this kit coordinates with next month’s Paper Pumpkin tag kit and the special add-on product! With so much coordination between products, you’ll have a breeze at creating a cohesive look for all your holiday gifting needs. Make this season the most wonderful time of the year for your loved ones—and for yourself!

This kit includes:

  • Ho Ho Ho Photopolymer Stamp Set
  • Early Espresso Classic Stampin’ Spot
  • Printed card bases
  • Printed envelopes
  • Printed die cuts
  • Die-cut labels
  • Iridescent foil die-cut snowflakes
  • Vellum
  • Vanilla expoy dots
  • Adhesive dots
  • Mini Dimensionals

Card size: 4-1/4″ x 5-1/2″ (10.8 x 14 cm) 

Coordinating Stampin’ Up! colors: Bermuda Bay, Cherry Cobbler, Crumb Cake, Early Espresso, Shaded Spruce, Sweet Sorbet, Very Vanilla

Subscribe to the October Paper Pumpkin Kit between 11 September and 10 October at paperpumpkin.com!

Note: Supplies may be limited toward the end of the subscription period.

*********************************************************************************************************

Card stock cuts for this project:

  • Basic White Cardstock 3″ X 4″ (sentiment & berries), 3 1/2″ X 8 1/2″ (inner liner), 1/2″ X 2″ (inside sentiment)
  • Cherry Cobbler Cardstock 2 – 3 5/8″ X 8 3/8″ (card front & inner liner mats), 3″ X 4″ (die cut panel)
  • Mossy Meadow Cardstock 7 1/2″ X 8 3/4″(card bae scored & folded at 1 7/8″ & 3 3/4″), 3 3/4″ X 8 3/4″ (easel panel), 4″ X 5 1/4″ (holly leaves)
  • Boughs of Holly Designer Series Paper 3 1/2″ X 8 1/2″ (card front)

*********************************************************************************************************

Product List

Stampin’ Up! Apple Harvest Friendship

Good Saturday morning my stamping friends, welcome to the weekend. I hope you have something fun planned. I’ll be working all day today.

This past Tuesday was our team meeting. After we finish with the business part of the meeting, we do some mystery stamping. Our upline Jaimie gives us measurements of cardstock and DSP and lets us know what other products we may need. The rest is up to us. She talks up through what to do and at the end our cards are all similar, but also very different. Here’s what I came up with.

Stampin' Up! Apple Harvest Friendship 1 creativestanpingdesigns.com

I used the Stampin’ Up! Apple Harvest Bundle along with the Gingham Cottage Designer Series Paper for my card today. This bundle is only available until September 30, 2022. The stamp set is in the July-December 2022 Mini Catalog.

Stampin' Up! Apple Harvest Friendship 2 creativestanpingdesigns.com

I started by making a small mark about 1 3/4″ up from the bottom left front of a So Saffron card base. I cut from that mark to the bottom right corner using my Paper Trimmer.

Stampin' Up! Apple Harvest Friendship 3 creativestanpingdesigns.com

On a panel of Basic White cardstock, I stamped the apple image from the Stampin’ Up! Apple Harvest Cling Stamp Set in Tuxedo Black Ink. I colored the image using my Flirty Flamingo, Granny Apple Green, Poppy Parade, Soft Suede and So Saffron Stampin’ Blends Markers. I cut the image out using my Apple Blossoms Dies. I cut a panel of Granny Apple Green cardstock using the Stylish Shapes Dies. I embossed the die cut panel using the Stitched Greenery Die.

Stampin' Up! Apple Harvest Friendship 4 creativestanpingdesigns.com

I adhered the die cut apple image to the Granny Apple Green panel using Stampin’ Dimensionals. I tied a small bow with Linen Thread and adhered it to the apple stem using a Glue Dot. I adhered the layered panel to the card front using Stampin’ Dimensionals. I stamped the sentiment from the Apple Harvest stamp set in Tuxedo Black Ink on the Basic White panel. I cut the sentiment out using the Harvest Dies. I adhered the sentiment to the card base along the bottom angled edge using Stampin’ Dimensionals. I colored a few of the Pearl Basic Jewels using my Dark Granny Apple Green Stampin’ Blends Marker. I adhered the pearls to the card front.

Stampin' Up! Apple Harvest Friendship 5 creativestanpingdesigns.com

On the inside I stamped the sentiment from the Apple Harvest stamp set in Tuxedo Black Ink on a Basic White panel. I adhered the Basic White panel to a Granny Apple Green mat then to the inside top of the So Saffron card base. I adhered a panel of Gingham Cottage DSP to the inside bottom of the So Saffron card base.

Stampin' Up! Apple Harvest Friendship 6 creativestanpingdesigns.com

To finish my card, I decorated a Basic White Medium Envelope. I stamped the apple image from the Apple Harvest stamp set on the envelope front and colored it the same as I did for the card. I adhered a panel of the Gingham Cottage DSP to the envelope flap.

Stampin' Up! Apple Harvest Friendship 7 creativestanpingdesigns.com

Thank you for stopping by my blog today. I hope you like my card and will give it a try. Happy Stamping!!

*********************************************************************************************************

If you need any stamping supplies, I’d love to be your Demonstrator. Just click HERE to go directly to my online store or drop me an email if you have any questions. 

MY CURRENT HOST CODE IS:   CD74ZSKH

Use this host code when placing an order with me. When you order $50 or greater you will receive a free gift from me! If your order is over $150, please do not use this code, but you’ll still get the free gift. The free gift is your choice of any 1 item valued up to $10.00 from the 2022-2023 Annual Catalog or the July – December 2022 Mini Catalog!   For any orders $50 or more I will also send you my monthly class tutorials.  Click HERE or go to my Customer Rewards for more details and to see what this month’s tutorials are.

Please remember to use my current Host Code and make sure that you can see my name on the final checkout page listed as your Demonstrator when you order so that you know that you’re ordering with me and you’ll get my rewards! 

Happy Stamping, Karen

*********************************************************************************************************

September 1 – September 30!!!

Every week in the month of September Stampin’ Up! will be offering a selection of discounted products. Discounts and product selection will vary from week to week.

Head over to my Online Store Here to see the Weekly Deals for this week.

  • New products added each week on 1, 8, 15, and 22 September.
  • Week 1: Sept 1−7, Week 2: Sept 8−14, Week 3: Sept 15−21, Week 4: Sept 22−28
  • Promotion ends 28 September.
  • Product options and discounts vary based on inventory availability.
  • All order types qualify for this promotion
  • Discounted items can be added to a Starter Kit.
  • Get the most up-to-date product information on the online store beginning 1 September.

*********************************************************************************************************

Available Now!!

Some things are great on their own but become epic when they are paired with something else: cereal and milk, toast and butter, Fred Astaire and Ginger Rogers. We may be biased, but our favorite combo is our stamp sets and dies—and that’s what the Perfect Partners promotion is all about! 

We created six new dies that coordinate with stamp sets in the 2022–2023 Annual Catalog and the July–December 2022 Mini Catalog. These coordinating dies will only be available during this promotion and will not be offered in any catalog.  

These stamp sets and dies are available separately or as a bundle. By buying the bundle, you and your customers will save 10% off the retail price. 

Put these wonderful stamp sets and dies together for more papercrafting fun!

*********************************************************************************************************

Ho Ho Ho

Subscribe September 11 – October 10

‘Tis the season to make your own Christmas cards with the Ho Ho Ho Paper Pumpkin Kit! This kit contains whimsical designs of Santa and his reindeer in a classic Christmas color palette which is sure to match various styles of holiday décor and look great on mantles everywhere. 
Each kit contains enough supplies to create 9 festive cards—3 each of 3 designs—and 9 coordinating envelopes. These cards are sure to bring the warm holiday spirit. 
And word from the North Pole is that this kit coordinates with next month’s Paper Pumpkin tag kit and the special add-on product! With so much coordination between products, you’ll have a breeze at creating a cohesive look for all your holiday gifting needs. Make this season the most wonderful time of the year for your loved ones—and for yourself!

This kit includes:

  • Ho Ho Ho Photopolymer Stamp Set
  • Early Espresso Classic Stampin’ Spot
  • Printed card bases
  • Printed envelopes
  • Printed die cuts
  • Die-cut labels
  • Iridescent foil die-cut snowflakes
  • Vellum
  • Vanilla expoy dots
  • Adhesive dots
  • Mini Dimensionals

Card size: 4-1/4″ x 5-1/2″ (10.8 x 14 cm) 

Coordinating Stampin’ Up! colors: Bermuda Bay, Cherry Cobbler, Crumb Cake, Early Espresso, Shaded Spruce, Sweet Sorbet, Very Vanilla

Subscribe to the October Paper Pumpkin Kit between 11 September and 10 October at paperpumpkin.com!

Note: Supplies may be limited toward the end of the subscription period.

*********************************************************************************************************

Card stock cuts for this project:

  • Basic White Cardstock 4″ X 5 1/4″ (artwork & sentiment), 3 1/4″ X 4″ (inner liner)
  • Granny Apple Green Cardstock 3 1/4″ X 3 1/4″ (artwork mat), 3 3/8″ X 4 1/8″ (inner liner mat)
  • So Saffron Cardstock 4 1/4″ X 11″ (scored & folded at 5 1/2″)
  • Gingham Cottage Cardstock 2″ X 4 1/4″ (inner panel) 2 1/4″ X 6″ (envelope flap)

*********************************************************************************************************

Product List

Stampin’ Up! Leaves of Holly Z-Fold

Good Wednesday morning my stamping friends. How is everyone’s week going? We’re already halfway through and on our way to the weekend.

Today’s card is another one that we made at our in-person quarterly meeting this past Sunday. This one was designed by Carol Buckalew who is from Delaware. Here’s my card for today.

Stampin' Up! Leaves of Holly Z-Fold 1 creativestampingdesigns.com

I used the Stampin’ Up! Leaves of Holly Bundle along with the Boughs of Holly Designer Series Paper for my card today.

Stampin' Up! Leaves of Holly Z-Fold 2 creativestampingdesigns.com

I started by adhering 2 panels of Boughs of Holly DSP to the first 2 sections of the Cherry Cobbler card base.

Stampin' Up! Leaves of Holly Z-Fold 3 creativestampingdesigns.com

Using the Holly Berry Dies I cut 2 solid leaves and 2 detailed leave from panels of Brushed Metallic Paper. I cut the solid berries from a panel of Poppy Parade and the detailed berries from a panel of Cherry Cobbler cardstock. I cut the pine boughs from panels of Basic White and Soft Succulent cardstock. I adhered a panel of Boughs of Holly DSP to an Evening Evergreen mat. I adhered a piece of Gold 3/8″ Shimmer Ribbon to the layered panel using Stampin’ Seal.

Stampin' Up! Leaves of Holly Z-Fold 4 creativestampingdesigns.com

I adhered the detailed holly leaves to the solid holly leaves using tiny amounts of Multipurpose Liquid Glue. I adhered the detailed berries to the solid berries using Multipurpose Liquid Glue. I adhered the Holly leaves to the panel over the ribbon using Stampin’ Dimensionals. I adhered the berries to the bottom of the leaves using Glue Dots. I snuck the pine boughs under the holly leaves adhering them using Multipurpose Liquid Glue. I stamped the sentiment from the Leaves of Holly stamp set in Cherry Cobbler Ink on a panel of Basic White cardstock. I cut the sentiment using the Holly Berry Dies. I adhered the sentiment using Stampin’ Dimensionals. I added a few Festive Pearls to the panel. I adhered the collage panel to the card base using Stampin’ Dimensionals only on the left half.

Stampin' Up! Leaves of Holly Z-Fold 5 creativestampingdesigns.com

On the inside, I stamped the sentiments from the Leaves of Holly stamp set in Cherry Cobbler Ink on a panel of Basic White cardstock. I adhered a panel of Boughs of Holly DSP to the Basic White panel. I adhered the layered panel to the inside of the Cherry Cobbler card base.

Stampin' Up! Leaves of Holly Z-Fold 6 creativestampingdesigns.com

To finish my card, I decorated a Basic White Medium Envelope. I adhered a strip of the Boughs of Holly DSP to the envelope front and a panel to the envelope flap.

Stampin' Up! Leaves of Holly Z-Fold 7 creativestampingdesigns.com

Thank you for stopping by my blog today. I hope you liked my card and will give it a try. Happy Stamping!!

*********************************************************************************************************

If you need any stamping supplies, I’d love to be your Demonstrator. Just click HERE to go directly to my online store or drop me an email if you have any questions. 

MY CURRENT HOST CODE IS:   CD74ZSKH

Use this host code when placing an order with me. When you order $50 or greater you will receive a free gift from me! If your order is over $150, please do not use this code, but you’ll still get the free gift. The free gift is your choice of any 1 item valued up to $10.00 from the 2021-2022 Annual Catalog or the January – June 2022 Mini Catalog!   For any orders $50 or more I will also send you my monthly class tutorials.  Click HERE or go to my Customer Rewards for more details and to see what this month’s tutorials are.

Please remember to use my current Host Code and make sure that you can see my name on the final checkout page listed as your Demonstrator when you order so that you know that you’re ordering with me and you’ll get my rewards! 

Happy Stamping, Karen

*********************************************************************************************************

September 1 – September 30!!!

Every week in the month of September Stampin’ Up! will be offering a selection of discounted products. Discounts and product selection will vary from week to week.

Head over to my Online Store Here to see the Weekly Deals for this week.

  • New products added each week on 1, 8, 15, and 22 September.
  • Week 1: Sept 1−7, Week 2: Sept 8−14, Week 3: Sept 15−21, Week 4: Sept 22−28
  • Promotion ends 28 September.
  • Product options and discounts vary based on inventory availability.
  • All order types qualify for this promotion
  • Discounted items can be added to a Starter Kit.
  • Get the most up-to-date product information on the online store beginning 1 September.

*********************************************************************************************************

Available Now!!

Some things are great on their own but become epic when they are paired with something else: cereal and milk, toast and butter, Fred Astaire and Ginger Rogers. We may be biased, but our favorite combo is our stamp sets and dies—and that’s what the Perfect Partners promotion is all about! 

We created six new dies that coordinate with stamp sets in the 2022–2023 Annual Catalog and the July–December 2022 Mini Catalog. These coordinating dies will only be available during this promotion and will not be offered in any catalog.  

These stamp sets and dies are available separately or as a bundle. By buying the bundle, you and your customers will save 10% off the retail price. 

Put these wonderful stamp sets and dies together for more papercrafting fun!

*********************************************************************************************************

Ho Ho Ho

Subscribe September 11 – October 10

‘Tis the season to make your own Christmas cards with the Ho Ho Ho Paper Pumpkin Kit! This kit contains whimsical designs of Santa and his reindeer in a classic Christmas color palette which is sure to match various styles of holiday décor and look great on mantles everywhere. 
Each kit contains enough supplies to create 9 festive cards—3 each of 3 designs—and 9 coordinating envelopes. These cards are sure to bring the warm holiday spirit. 
And word from the North Pole is that this kit coordinates with next month’s Paper Pumpkin tag kit and the special add-on product! With so much coordination between products, you’ll have a breeze at creating a cohesive look for all your holiday gifting needs. Make this season the most wonderful time of the year for your loved ones—and for yourself!

This kit includes:

  • Ho Ho Ho Photopolymer Stamp Set
  • Early Espresso Classic Stampin’ Spot
  • Printed card bases
  • Printed envelopes
  • Printed die cuts
  • Die-cut labels
  • Iridescent foil die-cut snowflakes
  • Vellum
  • Vanilla expoy dots
  • Adhesive dots
  • Mini Dimensionals

Card size: 4-1/4″ x 5-1/2″ (10.8 x 14 cm) 

Coordinating Stampin’ Up! colors: Bermuda Bay, Cherry Cobbler, Crumb Cake, Early Espresso, Shaded Spruce, Sweet Sorbet, Very Vanilla

Subscribe to the October Paper Pumpkin Kit between 11 September and 10 October at paperpumpkin.com!

Note: Supplies may be limited toward the end of the subscription period.

*********************************************************************************************************

Card stock cuts for this project:

  • Basic White Cardstock 2″ X 4″ (pine boughs), 4 1/8″ X 5 3/8″ (inner liner)
  • Cherry Cobbler Cardstock 8 1/2″ X 5 1/2″ (card base scored & folded at 2 1/8″ & 4 1/4″), 2″ X 2″ (detailed berries)
  • Evening Evergreen Cardstock 2 3/4″ X 2 3/4″ (artwork mat)
  • Poppy Parade Cardstock 2″ X 2″ (berries)
  • Soft Succulent Cardstock 2″ X 2″ (pine boughs)
  • Boughs of Holly Designer Series Paper 3 – 2″ X 5 3/8″ (card front and inner liner panels), 2 1/2″ X 2 1/2″ (artwork panel), 1/2″ X 6″ & 2 1/4″ X 6′ (envelope)
  • Brushed Metallic Paper 2 – 4″ X 4″ (holly leaves)

*********************************************************************************************************

Product List