Stampin’ Up! Prized Peony Sympathy CAS

Good Saturday morning my fellow stampers. Hope everyone’s weekend is starting out well.

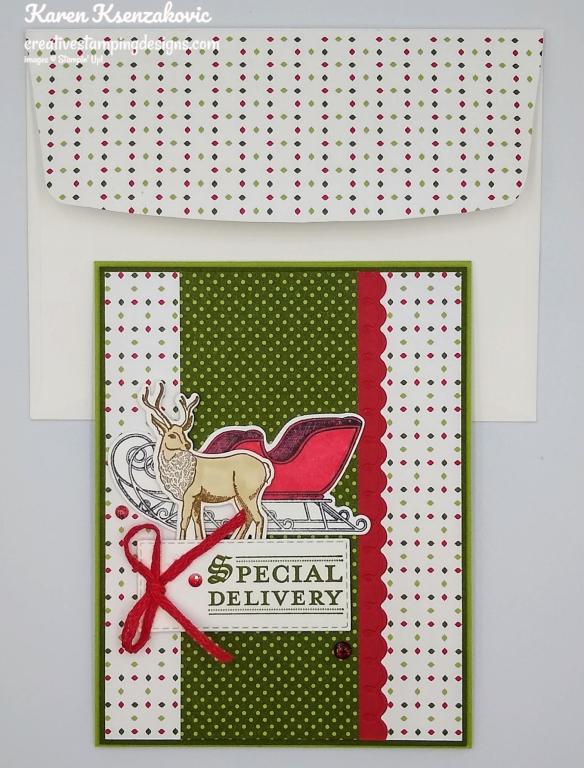
I have a clean and simple card for you today using the Stampin’ Up! Prized Peony Bundle. I thought after yesterday’s very involved card I’d do something simple. Here’s my card for today.

My colors are from the Color Throwdown Challenge #626.

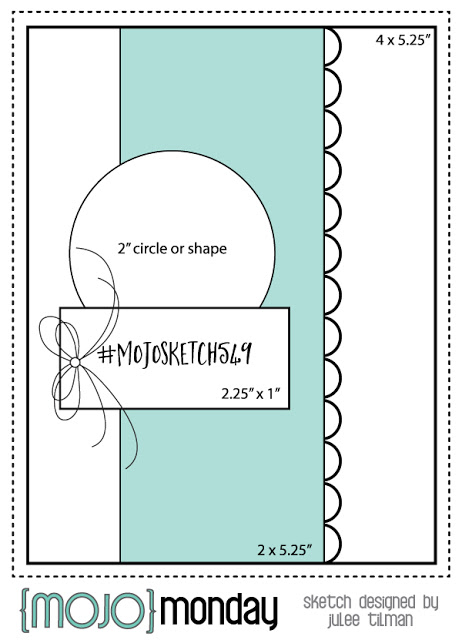
My design is from Freshly Made Sketches #469.

I started by stamping the sentiment from the Stampin’ Up! Itty Bitty Greetings Cling Stamp Set in Tuxedo Black Ink on the bottom of a Very Vanilla panel. I embossed the panel using the Dainty Diamonds 3D Embossing Folder.

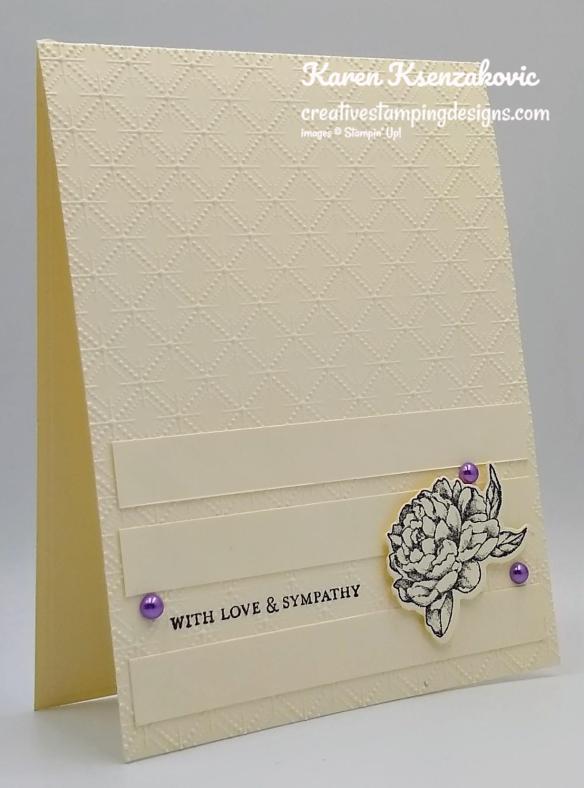
I adhered 2 strips of Very Vanilla cardstock on the card front using Multipurpose Liquid Glue. I adhered the card front to a Thick Very Vanilla card base using Multipurpose Liquid Glue.

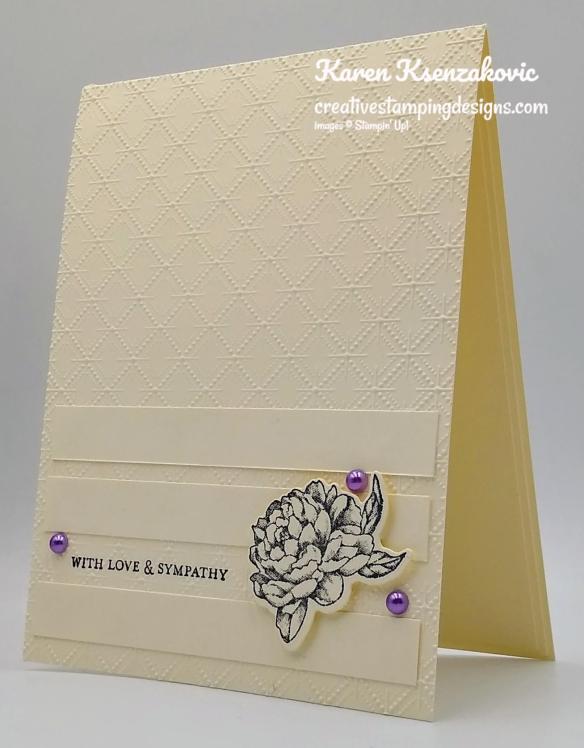
On a small panel of Very Vanilla cardstock I stamped the smallest flower from the Stampin’ Up! Prized Peony Cling Stamp Set in Tuxedo Black Ink. I cut the image using the Peony Dies and adhered it to the card front using Stampin’ Dimensionals. I added a few Gorgeous Grape Pastel Pearls to the card front.

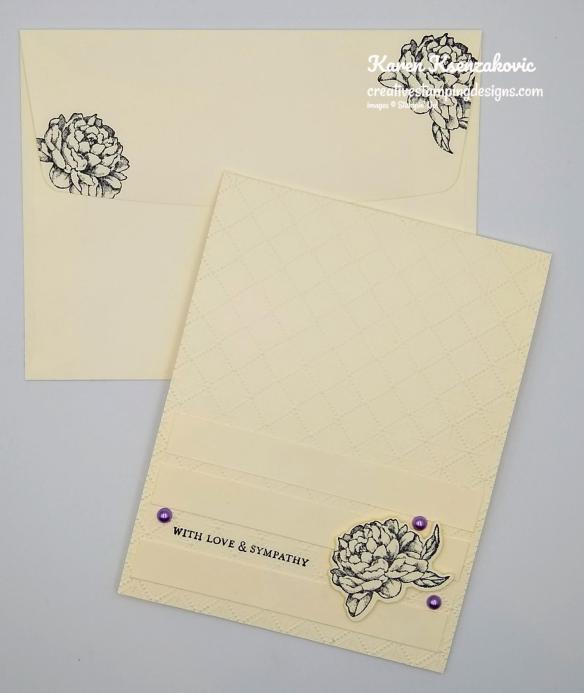
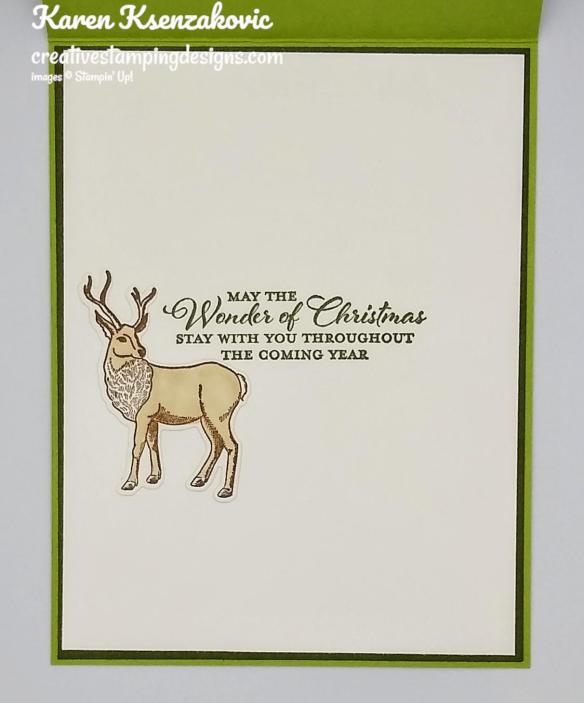
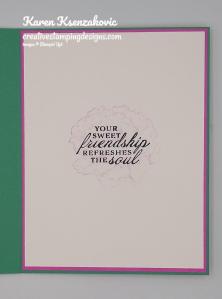
On the inside I stamped the sentiment from the Prized Peony stamp set in the center of a Very Vanilla panel using Tuxedo Black Ink. I stamped the small flower from the Prized Peony stamp set over the sentiment, stamping off 3 times, in Tuxedo Black Ink. I adhered the Very Vanilla panel to a Very Vanilla mat using Stampin’ Seal and then to the inside of the Thick Very Vanilla card base using Stampin’ Seal.

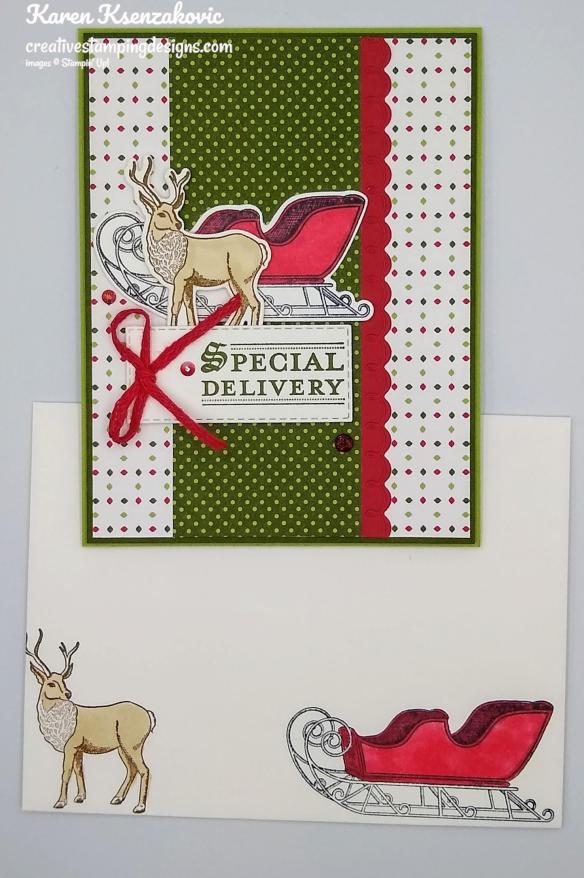
To finish my card I decorated a Very Vanilla Medium Envelope. I stamped the small flower from the Prized Peony stamp set in Tuxedo Black Ink on the bottom of the envelope front and the envelope flap.

Thank you for stopping by my blog today. I hope you liked my card and will give it a try. Happy Stamping!!

*********************************************************************************************************

If you need any stamping supplies, I’d love to be your Demonstrator. Just click HERE to go directly to my online store or drop me an email if you have any questions. 

MY CURRENT HOST CODE IS: C4XDWQT6

Use this host code when you order $50 or greater and receive a free gift from me! If your order is over $150, please do not use this code, but you’ll still get the free gift. The free gift is your choice of any 1 item valued up to $10.00 from the 2020-2021 Annual Catalog or the January-June 2021 Mini Catalog!   For any orders $50 or more I will also send you my monthly class tutorials.  Click HERE or go to my Customer Rewards for more details and to see what this months tutorials are.

 Click HERE to shop the clearance rack.

Please remember to use my current Host Code and make sure that you can see my name on the final checkout page listed as your Demonstrator when you order so that you know that you’re ordering with me and you’ll get my rewards! 

Happy Stamping, Karen!

*********************************************************************************************************

Bouquet of Hope

Subscribe January 11 – February 10

What is Paper Pumpkin? Paper Pumpkin is our monthly One-Stop Box™ that offers a unique variety of paper projects for subscribers of any skill level to enjoy! These thoughtfully-themed and all-inclusive craft kits encourage you to explore your creativity, try new techniques, and discover your potential in papercrafting.

Paper Pumpkin introduces you to an impressive collection of Stampin’ Up! products, from our one-of-a-kind ink pads to our eye-catching embellishments. Plus, the carefully-chosen components of each Paper Pumpkin kit highlight the unbeatable versatility and coordination our products provide! This easy and exciting way to stock up on supplies—and create small-batch projects for occasions of any kind—inspires you to continue crafting. With Paper Pumpkin, it’s simple: share what you love, and help others enjoy creativity!

The Bouquet of Hope Paper Pumpkin Kit provides enough supplies to create nine cards and coordinating envelopes. This soft, sympathetic kit includes patterned card bases, die-cut floral elements, ribbon, embellishments, and more!

The kit’s exclusive Bouquet of Hope Stamp Set features supportive sentiments centered around comfort, care, hope, and love. Such a versatile stamp set can be used throughout the year! Sadly, there is heartache in the world all around us. We all know someone who could use a heartfelt, handmade card that gives sympathy and strength during a difficult time. This kit’s cards are a must to have on-hand!

ABOUT THE FEBRUARY KIT

Details

  • Kit contains enough supplies to create 9 cards—3 each of 3 designs—and coordinating envelopes. Kit includes card bases, decorative die-cut pieces, embellishments, and more.
  • Card size: 4-1/4″ x 5-1/2″ (10.8 x 14 cm)
  • Envelope size: 4-1/2″ x 5-3/4″ (11.4 x 14.6 cm)
  • Coordinating colors: Basic Black, Bumblebee, Just Jade, Merry Merlot, Mossy Meadow, Rococo Rose
  • Coordinates with the Flower & Field Designer Series Paper, an exclusive Sale-A-Bration item.

Subscribe to the February 2021 Paper Pumpkin Kit between 11 January and 10 February at paperpumpkin.com!

Note: Supplies may be limited toward the end of the subscription period.

COORDINATING PRODUCT

155223 | Flower & Field Designer Series Paper

  • Earn this pack of paper for FREE with a purchase of $50 USD or more during Stampin’ Up!’s Sale-A-Bration promotion! 

*********************************************************************************************************

Card stock cuts for this project:

  • Very Vanilla Cardstock 4 1/4″ X 5 1/2″ (card front), 3 – 1/2″ X 4″ (card front strips), 2″ X 2″ (flower), 4 1/8″ X 5 3/8″ (inner liner mat), 4″ X 5 1/4″ (inner liner)
  • Thick Very Vanilla Cardstock 4 1/4″ X 11″ (card base scored and folded at 5 1/2″)

*********************************************************************************************************

Product List

Stampin’ Up! Wishes and Wonder for Amy’s Inkin’ Krew Blog Hop

Good Tuesday morning my fellow stampers. Welcome to Amy’s Inkin’ Krew Team Blog Hop. It’s the 2nd Tuesday of the month so that means Blog Hop Day!! If you are starting with me, be sure to hop around to see everyone’s beautiful projects. If you’ve hopped over from Tara Carpenter’s blog, welcome to my blog and thank you for stopping by. The theme this month is “Christmas or Happy Holidays”.  We can interpret this however we want.  Here’s my card.

I used the Stampin’ Up! Wonder & Wishes Bundle for my card today. My design is from Mojo Monday Sketch #549. Here is their sketch.

I started by adhering a Heartwarming Hugs Designer Series Paper card front to a Mossy Meadow mat using Stampin’ Seal I cut a strip of Real Red cardstock using the scalloped edge die from the Peony Dies and adhered it to another panel of Heartwarming Hugs DSP using Stampin’ Seal. I adhered the panel to the card front using Multipurpose Liquid Glue.

On a panel of Whisper White cardstock I stamped the sleigh image from the Stampin’ Up! Wishes & Wonder Cling Stamp Set in Tuxedo Black Memento Ink. I stamped the deer image from the Wishes & Wonder stamp set in Soft Suede Ink on the same panel. I colored the sleigh in using my Real Red Stampin’ Blends Markers and the deer in using my Crumb Cake Stampin’ Blends Markers. I cut the images out using my North Pole Wonder Dies. I stamped the sentiment from the Wishes & Wonder stamp set in Mossy Meadow Ink on the Whisper White panel and cut it out using my Stitched Rectangle Dies, keeping the sentiment to the right.

I adhered the sleigh to the card front using Glue Dots. I adhered the deer in front of the sleigh using Stampin’ Dimensionals. I adhered the sentiment below the images using Stampin’ Dimensionals. I added a few Real Red Wonderful Gems to the card front. I tied a small bow using the Real Red 3/16″ Braided Linen Trim and adhered it to the sentiment using a Glue Dot. I adhered the card front to a Pear Pizzazz card base using Stampin’ Dimensionals.

On the inside I stamped the sentiment from the Wishes & Wonder stamp set in Mossy Meadow Ink in the center of a Whisper White panel. I had stamped, colored and cut out a 2nd deer from the Wishes & Wonder stamp set, so I adhered it next to the sentiment using Multipurpose Liquid Glue. I adhered the Whisper White panel to a Mossy Meadow mat using Stampin’ Seal and then to the inside of the Pear Pizzazz card base using Multipurpose Liquid Glue.

To complete my card I decorated a Medium Whisper White Envelope. I stamped the sleigh image from the Wishes & Wonder stamp set in Tuxedo Black Memento Ink on the envelope front and colored it in using my Real Red Stampin’ Blends Markers. I stamped the deer image from the Wishes & Wonder stamp set in Soft Suede Ink and colored it in using my Crumb Cake Stampin’ Blends Markers. I adhered a panel of Heartwarming Hugs DSP to the envelope flap.

Thank you for visiting by my blog today. I hope you liked my card and will give it a try. Now that you’ve seen my card, be sure to hop around to see everyone’s beautiful projects. Hit Previous to hop back to Tara Carpenter’s blog or hit Next to head over to Mary Deatherage’s blog. You can also click on each of the names and hop around that way. Happy Hopping!!

  1. Jaimie Babarczy:
  2. Karen Finkle:
  3. Tara Carpenter:
  4. Karen Ksenzakovic: You Are Here
  5. Mary Deatherage:
  6. Sue Prather:
  7. Krista Yagci:
  8. Terry Lynn Bright:
  9. Akiko Sudano:
  10. Donna Leonard:
  11. Lisa Jurich:
  12. Amy Koenders:

*********************************************************************************************************

If you need any stamping supplies, I’d love to be your Demonstrator. Just click HERE to go directly to my online store or drop me an email if you have any questions. 

MY CURRENT HOST CODE IS: 9XYYG2ZU

Use this host code when you order $50 or greater and receive a free gift from me! If your order is over $150, please do not use this code, but you’ll still get the free gift. The free gift is your choice of any 1 item valued up to $10.00 in the 2020-2021 Annual Catalog!   For any orders $50 or more I will also send you my monthly class tutorials.  Click HERE or go to my Customer Rewards for more details and to see what this months tutorials are.

 Click HERE to shop the clearance rack.

Please remember to use my current Host Code and make sure that you can see my name on the final checkout page listed as your Demonstrator when you order so that you know that you’re ordering with me and you’ll get my rewards! 

Happy Stamping, Karen!

*********************************************************************************************************

Jolly Gingerbread

LAST DAY TO SUBSCRIBE

Subscribe October 11 – November 10

Paper Pumpkin is our monthly subscription service that offers unique papercrafting projects for crafters of any skill level! In these all-inclusive kits, subscribers receive pre-cut paper pieces, embellishments, ink, and an exclusive stamp set designed to encourage them to explore their creativity. As their subscription continues, subscribers will have a collection of cards—and other creations—for a variety of occasions, in addition to a stockpile of supplies!


So, what’s in store for this month’s Paper Pumpkin kit? November’s cute, gingerbread-themed kit contains enough supplies to create one-of-a-kind Christmas crafts! Whether it’s a gift card carrier, traditional card, or tasty-looking tag, this sweet and seasonal kit is the key to heartfelt holiday gifting. With curly cutouts, sugary stickers, and delicious die-cut designs in a special-edition box, a jolly holiday will be on its way with this kit!

Details About The November Kit:

  • Kit contains enough supplies to create 15 gift card carriers and coordinating envelopes.
  • Kit contents can also be used to design traditional holiday cards, gift tags, and other paper projects.
  • Contents arrive in a collectible, special-edition box!
  • Project size: 2-1/4″ x 4″
  • Envelope size: 2-3/4″ x 4-3/8″
  • Coordinating colors: Cinnamon Cider, Daffodil Delight, Calypso Coral, Mint Macaron, Shaded Spruce, Blushing Bride, and Whisper White

Subscribe to the November 2020 Paper Pumpkin Kit from 11 October to 10 November at paperpumpkin.com!

Note: Supplies may be limited toward the end of the subscription period.

*********************************************************************************************************

Card stock cuts for this project:

  • Mossy Meadow Cardstock 2 – 4 1/8″ X 5 3/8″ (card front and inner liner mats)
  • Pear Pizzazz Cardstock 4 1/4″ X 11″ (card base scored and folded at 5 1/2″)
  • Real Red Cardstock 1″ X 5 1/4″ (scalloped edge)
  • Whisper White Cardstock 3 1/2″ X 3 1/2″ (artwork), 4″ X 5 1/4″ (inner liner)
  • Heartwarming Hugs Designer Series Paper 4″ X 5 1/4′ (card front), 2″ X 5 1/4″ (card front panel), 2 1/4″ X 6″ 9piece for envelope flap)

*********************************************************************************************************

Product List

Stampin’ Up! Blue Peony for Fun Fold Friday

Good Friday morning my stamping friends and welcome to my Fun Fold Friday.  How was everyone’s week?  Is anyone doing anything fun this weekend?  Normally this is the weekend that we have our quarterly in person team meeting, but under the circumstances we will not be able to meet in person.  Hopefully we will for our next quarterly meeting.  Instead, we will be meeting up together virtually.  It should still be fun.  This was also the weekend I was finally going to be off from work.  Notice I said ‘was’.   Yup, my boss asked me to come in both days to relieve my cashiers so they could take a lunch break, so I’ll be working both days for a couple hours.

So for today’s card I have a super simple fun fold.  I finally got brave and tried making the layered peony.  It’s much easier that it appears when you first look at all the dies. Here’s my card for today.

My design is from Global Design Project Challenge #244.  Their theme is CASE = Copy And Selectively Edit.

I also played along with Watercooler Wednesday Challenge #275.  Here is their theme.

I started by cutting 1 1/2″ off the right side of the card front base.  I adhered a panel of In Good Taste Designer Series Paper to a Balmy Blue mat using Stampin’ Seal and then to the front of the card base using Multipurpose Liquid Glue.

Using my Peony Dies for all the following, I cut all the layers of the peony out of a panel of Seaside Spray cardstock.  Using my Sponge Dauber I sponged all the edges of the pieces using Misty Moonlight Ink.  I embossed the pieces using my Subtle 3D Embossing Folder then using my Bone Folder I curled the edges of all the pieces.  I layered the pieces one inside the other and adhered them together using Glue Dots.  I cut the center of the peony from a scrap of So Saffron cardstock and brushed some Clear Wink of Stella over it.  I adhered it to the center of the flower using Multipurpose Liquid Glue.   I cut 3 large leaves from a panel of Just Jade cardstock and 3 leaf edges from a panel of Shaded Spruce cardstock.  I embossed the leaves using my Subtle 3D Embossing Folder.  I adhered the Shaded Spruce leaf pieces to the full leaves using Multipurpose Liquid Glue and adhered them to the back of the peony using Glue Dots.

I added some of the Misty Moonlight/Silver Bakers Twine, from the Flowers For Every Season Ribbon Combo Pack, to the card front.  I adhered the peony over the twine using Stampin’ Dimensionals.  On a strip of Whisper White cardstock I stamped the sentiment from the Stampin’ Up! Special Someone Photopolymer Stamp Set in Misty Moonlight Ink.  I made it into a banner and adhered it to the peony using Glue Dots.  I added a few of the clear Elegant Faceted Gems to the card front.

On the inside I stamped the sentiment from the Special Someone stamp set in Misty Moonlight Ink in the center of the Whisper White panel.  I stamped the medium peony from the Stampin’ Up! Prized Peony Cling Stamp Set on the bottom of the panel in Misty Moonlight Ink and colored it in using my Seaside Spray and So Saffron Stampin’ Blends Markers.  I adhered the Whisper White panel to the left side of a Seaside Spray mat using Stampin’ Seal.  I adhered a small panel of the Forever Greenery Designer Series Paper to the right side of the Seaside Spray mat using Stampin’ Seal.  I then adhered it to the inside of the Misty Moonlight card base using Multipurpose Liquid Glue.

To finish my card I decorated a Medium Whisper White Envelope.  I stamped the medium peony from the Prized Peony stamp set in Misty Moonlight Ink on the envelope front and colored it in using my Seaside Spray and So Saffron Stampin’ Blends Markers.  I adhered a panel of the In Good Taste DSP to the envelope flap.

Thank you for stopping by my blog today.  I hope you liked my card and will give it a try. Happy Stamping!!

****************************************************************************************************

If you need any stamping supplies, I’d love to be your Demonstrator. Just click HERE to go directly to my online store or drop me an email if you have any questions. 

MY CURRENT HOST CODE IS: RBBKEF3W

Use this host code when you order $50 or greater and receive a free gift from me! If your order is over $150, please do not use this code, but you’ll still get the free gift. The free gift is your choice of any item valued up to $10.00 in either the 2019-2020 Annual Catalog or the 2020 January-June Mini Catalog!   For any orders $50 or more I will also send you my monthly class tutorials.  Click HERE or go to my Customer Rewards for more details and to see what this months tutorials are.

 Click HERE to shop the clearance rack.

Happy Stamping, Karen!

****************************************************************************************************

SUMMER NIGHTS BY PAPER PUMPKIN

SUBSCRIBE JUNE 11 – JULY 10

Celebrate the magic of summer nights with the Summer Nights Paper Pumpkin Kit! In this exclusive fun-filled kit, you’ll unbox enough supplies to create nine postcard-style cards, coordinating envelopes, and die-cut tealight bags. What’s even more spectacular about July’s kit is the add-on you can purchase along with it! The Summer Nights Add-On includes 24 card bases and envelopes in coordinating Summer Nights designs. This add-on is perfect for helping you expand the Summer Nights creative experience beyond the Paper Pumpkin kit. Between the add-on and the leftover supplies from your Summer Nights kit, you will be crafting a summer night worth celebrating all month long!

Don’t miss out on the fireworks, fireflies, and fun! You can subscribe to the Summer Nights Paper Pumpkin Kit between June 11 and July10, and order the Summer Nights Add-On starting 1 July; while supplies last.

Kit contains enough supplies to create nine postcards and coordinating envelopes, as well as nine die-cut tealight bags.

  • Card size: 4” x 5-1/4” (10.2 x 13.3 cm)
  • Envelope size: 4-1/2” x 5-3/4” (11.4 x 14.6 cm)

Coordinating Colors: Blackberry Bliss, Calypso Coral, Costal Cabana, Night of Navy

The Paper Pumpkin kit does not require the add-on to create completed projects.

Summer Nights Add-On

Contains 24 preprinted card bases and coordinating envelopes.

  • Card size: 4-1/4″ x 5-1/2″ (10.8 x 14 cm)
  • Envelope size: 4-1/2″ x 5-3/4″ (11.4 x 14.6 cm)

The Summer Nights Add-On is not required to complete the Paper Pumpkin kit projects.

The Summer Nights Add-On is $10.00 USD/$13.00 CAD and is only available to Paper Pumpkin subscribers. The add-on is available while supplies last, beginning July 1st!

Note: During demonstrator product testing, we learned that the Summer Nights Add-On could make at least 20 additional cards when combined with the leftover pieces from the Summer Nights kit.

Subscribe to the July 2020 Paper Pumpkin Kit from June 11 to July 10 at paperpumpkin.com!

Note: Supplies may be limited toward the end of the subscription period.

****************************************************************************************************

Double Sand Dollar Rewards are only around for 3 more days

I’m celebrating the start of the new 2020-2021 Annual Catalog by offering DOUBLE SAND DOLLAR REWARDS for any orders placed June 3rd – June 15th.  You will get double Sand Dollar Rewards for every order of $50 or more (before tax and shipping).  This means for a $50 order you will get you 2 Sand Dollard, $100 order will get you 4 Sand Dollard, etc.   Remember, you MUST use my Host Code, RBBKEF3W, to receive the Sand Dollar Rewards and your order must be $50 or more.  Click Here for details about my Sand Dollar Rewards.

***************************************************************************************************

STAMPIN’ UP! PICK A FREE BUNDLE STARTER KIT PROMOTION

Wow!!!  Stampin’ Up! is offering an AWESOME promotion if you join during the month of June!!  You get to pick a FREE bundle of your choice with your Starter Kit Purchase!!

Here are the details:

  • Joining promotion dates:  June 3–30, 2020
  • New demonstrators who submit their Independent Demonstrator Agreement (IDA) before June 3 or after June 30 will not be eligible for this promotion.
  • When you purchase your Starter Kit for $99, you get to select $125 worth of products of your choice for your Starter Kit PLUS you get to select ONE stamp and punch bundle (p. 168–169) or ONE stamp and die bundle (p. 173-179) from the new 2020–2021 Annual Catalog—in addition to your regular Starter Kit for FREE.  And your Starter Kit always ships for free…double bonus!!

Once you join, you’ll get at least a 20% discount on all products that you purchase plus you get to preorder from the upcoming catalogs a month before they go live for customer ordering!!  There is no requirement to sell and there is no commitment beyond your Starter Kit purchase.  Why not give it a try?  🙂

You can see more details about joining and about our team here on my blog here.  You can also see more information about the benefits of becoming a Stampin’ Up! Demonstrator here.

That is such a great deal!!  If you’ve been considering joining, June will be a great time to jump in!  Drop me an email at creativestampingdesigns@gmail.com

****************************************************************************************************

STAMPIN’ UP! ANNUAL KICK OFF CELEBRATION

EXTRA HOST REWARDS FOR YOU!!

The brand new 2020–2021 Stampin’ Up! Annual Catalog is going live on June 3 2020, and Stampin’ Up! is having a celebration!

Anyone who places an order of $250+ or holds a party with $250+ in sales during the month of June will receive $25 in extra Stampin’ Rewards!!  So that means that you’ll earn $50 in Stampin’ Rewards with any order or party of $250+ that is submitted between June 3 and June 30! Yay!!!!

Here are the details:

  • Customer, workshop and online order types all qualify for this promotion.
  • Starter Kit orders do not qualify for this promotion.  But you CAN use your host cash toward the purchase of your Starter Kit, ask me for details!
  • Paper Pumpkin prepaid subscriptions count toward a qualifying purchase. Month-to-month subscriptions do not qualify for this promotion.
  • The qualifying amount must be reached with merchandise prior to shipping and tax.
  • The $25 additional Stampin’ Rewards for this promotion will only be awarded once per order/party.
  • Order Deadline:  June 30, 2020; 11:50 PM (MT)

Drop me a note if you’d like to set up a catalog party!  I can set up a host code for you and you can have your stamping friends place orders with your host code.  If your party reaches $250 in sales, you’ll get that extra $25 in host cash when we close out your party!   If you’re interested, ask me for details!

Let me know if you have any questions.  Have fun making your shopping list!

****************************************************************************************************

Card stock cuts for this project:

  • Just Jade Cardstock 4 3/4″ X 1 1/2″ (leaves)
  • Misty Moonlight Cardstock 8 1/2″ X 5 1/2″ (card base scored and folded at 4 1/4″)
  • Seaside Spray Cardstock 2 5/8″ X 5 3/8″ (card front mat), 8 1/2″ x 3″ (peony pieces), 4 1/8″ x 5 3/8″ (inner liner mat)
  • Shaded Spruce Cardstock 3″ X 1 1/2″ (leaf edges)
  • So Saffron Cardstock scrap for flower center
  • Whisper White Cardstock 2 1/2″ X 5 1/4″ (Inner liner), 1/2″ X 3″ (sentiment)
  • Forever Greenery Designer Series Paper 1 3/16″ X 5 1/4″ (inner liner strip)
  • In Good Taste Designer Series Paper 2 1/3″ X 5 1/4″ (card front), 2 1/4″ X 6″ (piece for envelope flap)

****************************************************************************************************

Product List

Stampin’ Up! Peony Garden

Good Sunday morning my fellow stampers.  How is everyone doing today?  Did anyone do anything fun yesterday?  Does anyone have plans for today?  I’m going into work just to relieve my cashiers so they can take a lunch break.  I’m hoping to only be there for an hour or 2 at the most.

When I buy my stamp sets and accessories, I rarely by a whole suite.  There is always something that I’m sure I won’t use.  That’s NOT the case with the new 2020-2021 Annual Catalog.  I’ve bought quite a few of the Suites this time around.  This catalog is just so awesome.  For today’s card I’ve used a little of everything from the Peony Garden Suite.  My card was inspired by my neighbors flowers.  When I walk out my side door he has these beautiful flowers.  I just figured out what they were.  Here’s what I walk out to everyday (he doesn’t live this close, I zoomed in).

Here is my card inspired by these flowers.

I started by cutting the sides of a Just Jade card front using the Peony Dies.  There is a border die in the set that is absolutely gorgeous.  I then embossed a smaller panel of Just Jade cardstock using the Dainty Diamonds 3D Embossing Folder.  I adhered the embossed panel to the card front using Multipurpose Liquid Glue.

I stamped the sentiment from the Stampin’ Up! Timeless Tulips Photopolymer Stamp Set in Tuxedo Black Memento Ink on a panel of Peony Garden Designer Series Paper and adhered it to a Magenta Madness mat using Stampin’ Seal.  I adhered a Square Vellum Doilie to the embossed panel using a couple tiny drops of Multipurpose Liquid Glue on the top of the vellum.  I adhered the matted DSP on top of the doilie using Multipurpose Liquid Glue.

On a panel of Whisper White cardstock I stamped the large peony image from the Stampin’ Up! Prized Peony Cling Stamp Set in Tuxedo Black Memento Ink.  I colored the image in using my Just Jade and Magenta Madness Stampin’ Blends Markers and  cut the image out using my Peony Dies.  I adhered a piece of the Gray Granite 1/4″ Shimmer Ribbon to the card front DSP using Glue Dots.  I adhered the cut peony image to the card front using Stampin’ Dimensionals.  I adhered the card front to a Just Jade card base using Stampin’ Dimensionals and added a few Elegant Faceted Gems.

On the inside I stamped the sentiment from the Prized Peony stamp set in Tuxedo Black Memento Ink in the center of a Whisper White panel.  I stamped the medium peony image from the Prized Peony stamp set in Magenta Madness Ink, stamping off twice, over the sentiment.  I adhered the Whisper White panel to a Magenta Madness mat using Stampin’ Seal and then to the inside of the Just Jade card base using Multipurpose Liquid Glue.
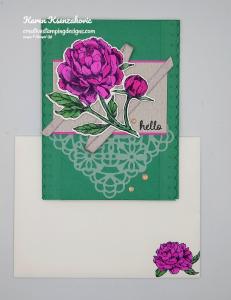
To finish my card I decorated a Medium Whisper White Envelope.  I stamped the small peony image from the Prized Peony stamp set in Tuxedo Black Memento Ink on the envelope front.  I colored the image in using my Just Jade and Magenta Madness Stampin’ Blends Markers.  I adhered a panel of the Peony Garden DSP to the envelope flap.

Thank you for stopping by my blog today.  I hope you liked my card and will give it a try. Happy Stamping!!

****************************************************************************************************

If you need any stamping supplies, I’d love to be your Demonstrator. Just click HERE to go directly to my online store or drop me an email if you have any questions. 

MY CURRENT HOST CODE IS: RBBKEF3W

Use this host code when you order $50 or greater and receive a free gift from me! If your order is over $150, please do not use this code, but you’ll still get the free gift. The free gift is your choice of any item valued up to $10.00 in either the 2019-2020 Annual Catalog or the 2020 January-June Mini Catalog!   For any orders $50 or more I will also send you my monthly class tutorials.  Click HERE or go to my Customer Rewards for more details and to see what this months tutorials are.

 Click HERE to shop the clearance rack.

Happy Stamping, Karen!

****************************************************************************************************


****************************************************************************************************

STAMPIN’ UP! PICK A FREE BUNDLE STARTER KIT PROMOTION

Wow!!!  Stampin’ Up! is offering an AWESOME promotion if you join during the month of June!!  You get to pick a FREE bundle of your choice with your Starter Kit Purchase!!

Here are the details:

  • Joining promotion dates:  June 3–30, 2020
  • New demonstrators who submit their Independent Demonstrator Agreement (IDA) before June 3 or after June 30 will not be eligible for this promotion.
  • When you purchase your Starter Kit for $99, you get to select $125 worth of products of your choice for your Starter Kit PLUS you get to select ONE stamp and punch bundle (p. 168–169) or ONE stamp and die bundle (p. 173-179) from the new 2020–2021 Annual Catalog—in addition to your regular Starter Kit for FREE.  And your Starter Kit always ships for free…double bonus!!

Once you join, you’ll get at least a 20% discount on all products that you purchase plus you get to preorder from the upcoming catalogs a month before they go live for customer ordering!!  There is no requirement to sell and there is no commitment beyond your Starter Kit purchase.  Why not give it a try?  🙂

You can see more details about joining and about our team here on my blog here.  You can also see more information about the benefits of becoming a Stampin’ Up! Demonstrator here.

That is such a great deal!!  If you’ve been considering joining, June will be a great time to jump in!  Drop me an email at creativestampingdesigns@gmail.com

****************************************************************************************************

STAMPIN’ UP! ANNUAL KICK OFF CELEBRATION

EXTRA HOST REWARDS FOR YOU!!

The brand new 2020–2021 Stampin’ Up! Annual Catalog is going live on June 3 2020, and Stampin’ Up! is having a celebration!

Anyone who places an order of $250+ or holds a party with $250+ in sales during the month of June will receive $25 in extra Stampin’ Rewards!!  So that means that you’ll earn $50 in Stampin’ Rewards with any order or party of $250+ that is submitted between June 3 and June 30! Yay!!!!

Here are the details:

  • Customer, workshop and online order types all qualify for this promotion.
  • Starter Kit orders do not qualify for this promotion.  But you CAN use your host cash toward the purchase of your Starter Kit, ask me for details!
  • Paper Pumpkin prepaid subscriptions count toward a qualifying purchase. Month-to-month subscriptions do not qualify for this promotion.
  • The qualifying amount must be reached with merchandise prior to shipping and tax.
  • The $25 additional Stampin’ Rewards for this promotion will only be awarded once per order/party.
  • Order Deadline:  June 30, 2020; 11:50 PM (MT)

Drop me a note if you’d like to set up a catalog party!  I can set up a host code for you and you can have your stamping friends place orders with your host code.  If your party reaches $250 in sales, you’ll get that extra $25 in host cash when we close out your party!   If you’re interested, ask me for details!

Let me know if you have any questions.  Have fun making your shopping list!

****************************************************************************************************

JUNE 2020 PAPER PUMPKIN BOX OF SUNSHINE

Subscribe May 11 – June 10

This exclusive Sara-inspired Paper Pumpkin kit is here to help you #sharesunshine. It includes supplies for eight handmade cards and is specially designed to help you create a box full of cheer. Once you’ve made all the cards, use any leftover pieces to decorate the box. Fill it with yellow goodies, add the included adhesive label, address it to someone special, and brighten their life with a little sunshine!

It’s a one-of-a-kind kit, inspired by Sara and her #sharesunshine passion.  It provides a unique crafting experience with the added Box of Sunshine element.

  • Kit contains supplies for 8 cards and envelopes (2 cards of 4 designs)
    • Card size: 4-1/4″ x 5-1/2″ (10.8 x 14 cm)
    • Envelope size: 4-1/2″ x 5-3/4″ (11.4 x 14.6 cm)

Coordinating Colors: Basic Black, Bumblebee, Crushed Curry, Poppy Parade, Shaded Spruce, White, and Gold

This kit includes extra pieces and stickers (including a sticker label) to help you create cards AND a Box of Sunshine filled with treats and goodies to send to a friend. (Treats not included.)

  • Subscribe for the June kit from 11 May–10 June at paperpumpkin.com.
  • Supplies may be limited toward the end of each subscription period.

****************************************************************************************************

Card stock cuts for this project:

  • Just Jade Cardstock 8 1/2″ X 5 1/2″ (card base scored and folded at 4 1/4″), 4 1/4″ X 5 1/2″ (card front), 3″ X 5 1/2″ (embossed card front panel)
  • Magenta Madness Cardstock 2 1/4″ X 3 1/2″ (card front dsp mat), 4 1/8″ X 5 3/8″ (inner liner mat)
  • Whisper White Cardstock 3 1/2″ X 4″ (artwork), 4″ X 5 1/4″ (inner liner)
  • Peony Garden Designer Series Paper 2 1/8″ X 3 1/2″ (card front panel), 2 1/4″ X 6″ (piece for envelope flap)

****************************************************************************************************

Product List