Stampin’ Up! Cottage Wreaths Hello

Good Saturday morning my stamping friends and welcome to the weekend. I hope you are all planning something fun. We’re actually getting autumn weather here. I’ve started to see the leaves turning which I wasn’t sure if it was going to happen since summer didn’t want to leave us and it was so dry. I’ll be at work all day today, but have tomorrow off, YAY!!!

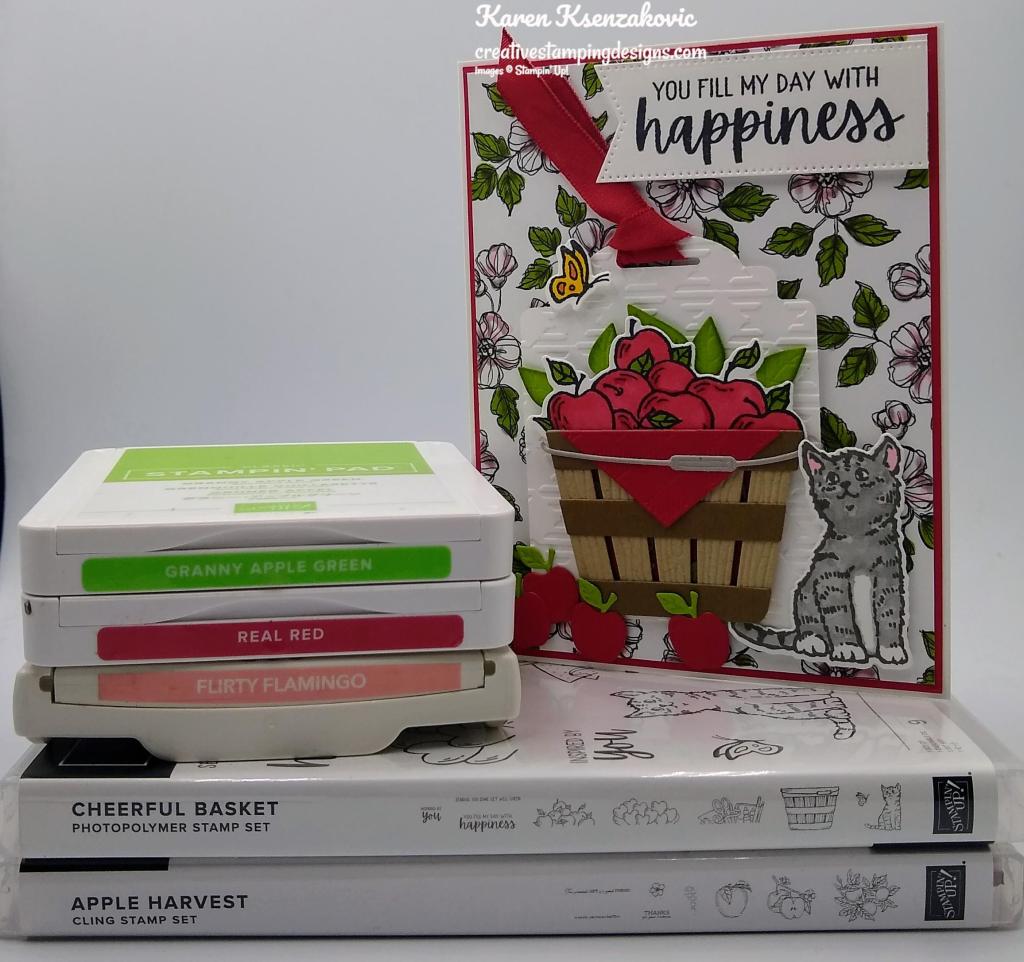
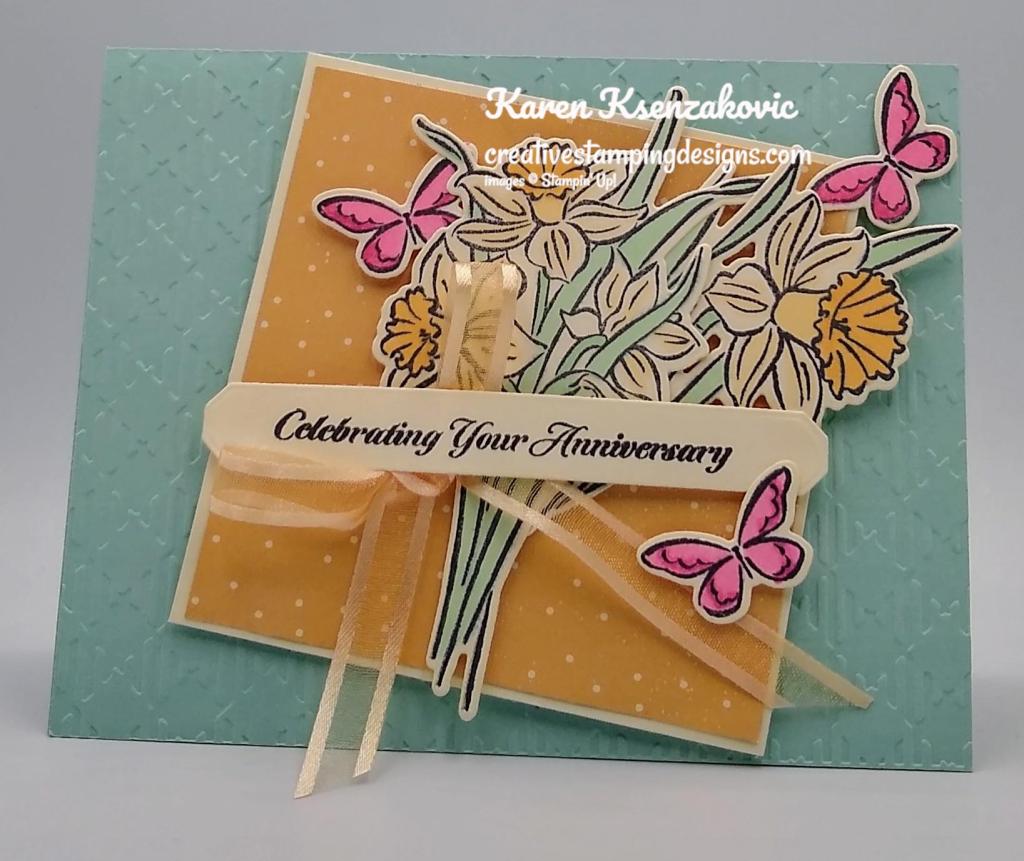
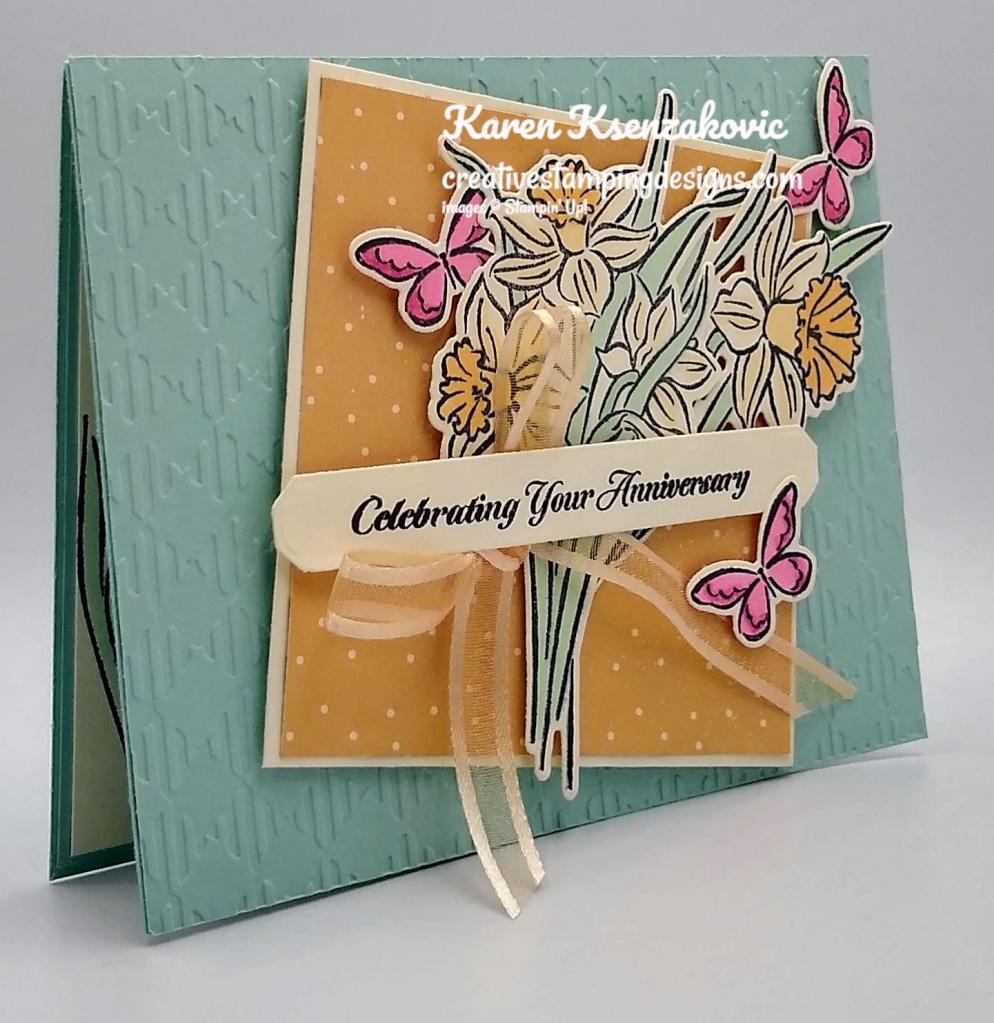
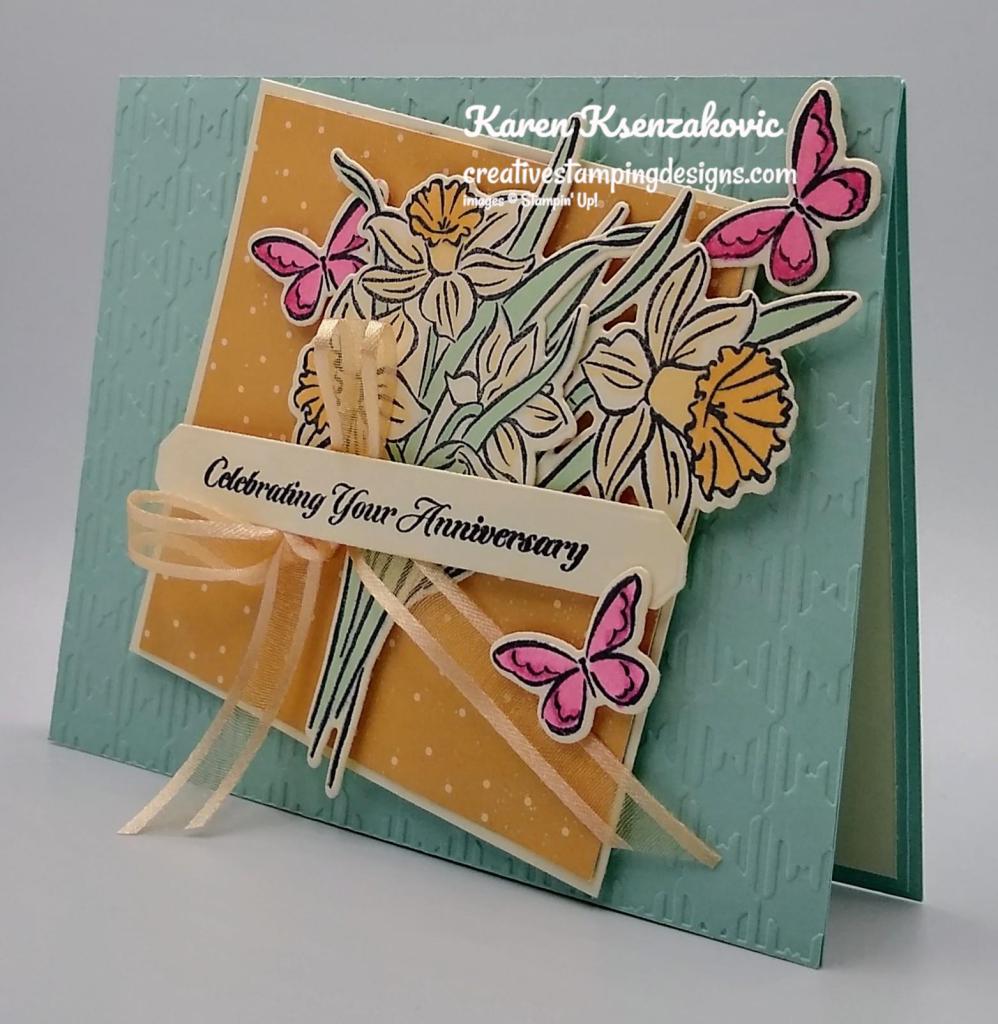
Today’s card is one that I on World Card Making Day last Saturday. This is one of the designs from Stampin’ Up!’s event and I added my own little twist. Here’s my card for today.

Stampin' Up! Cottage Wreaths Hello 1 creativestampingdesigns.com

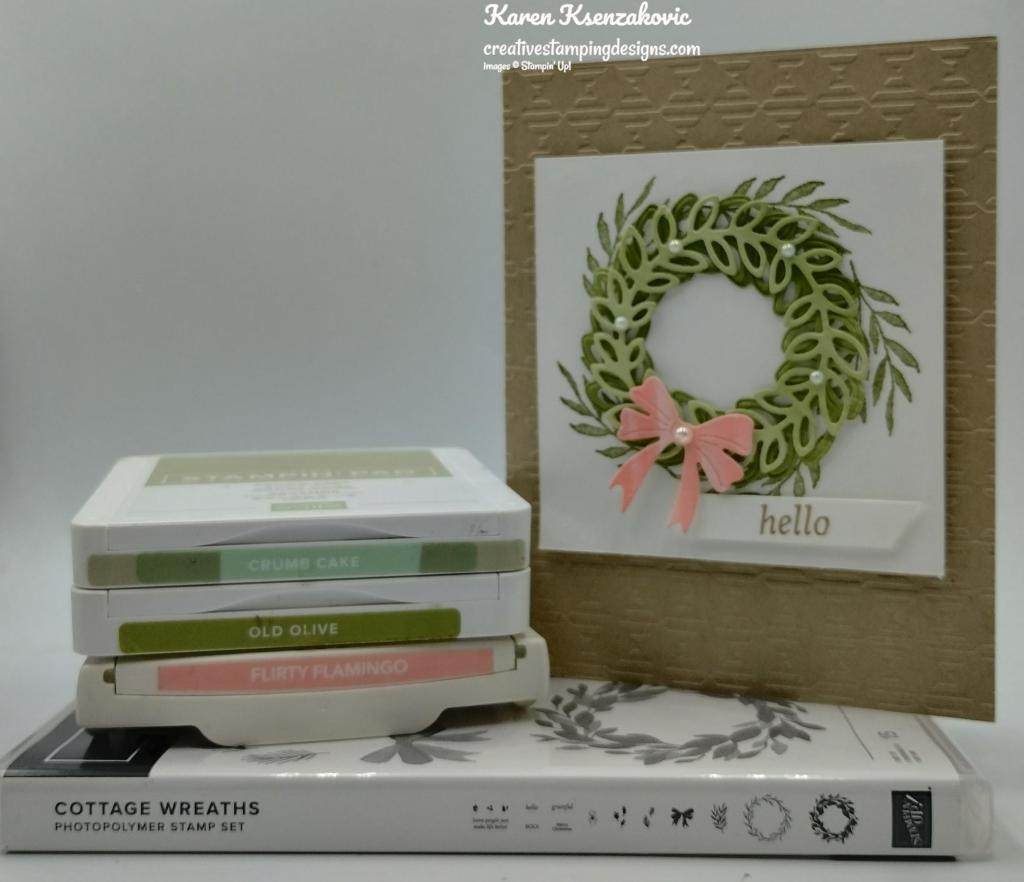
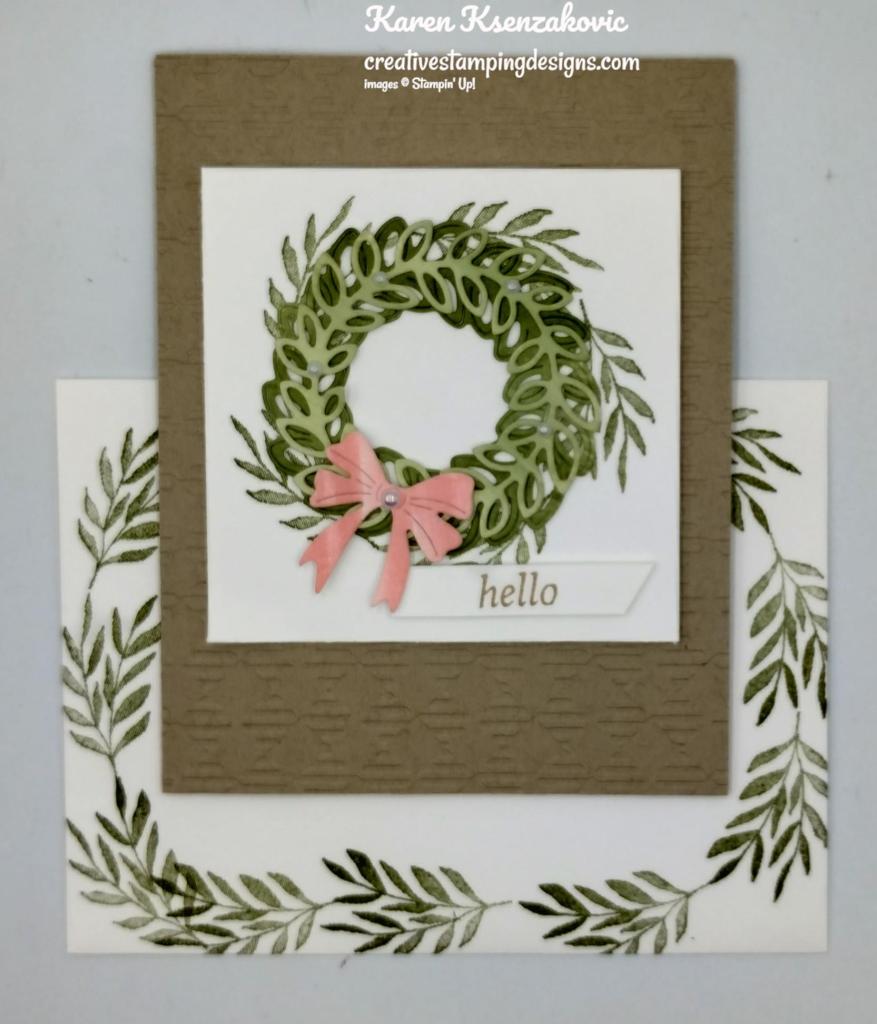
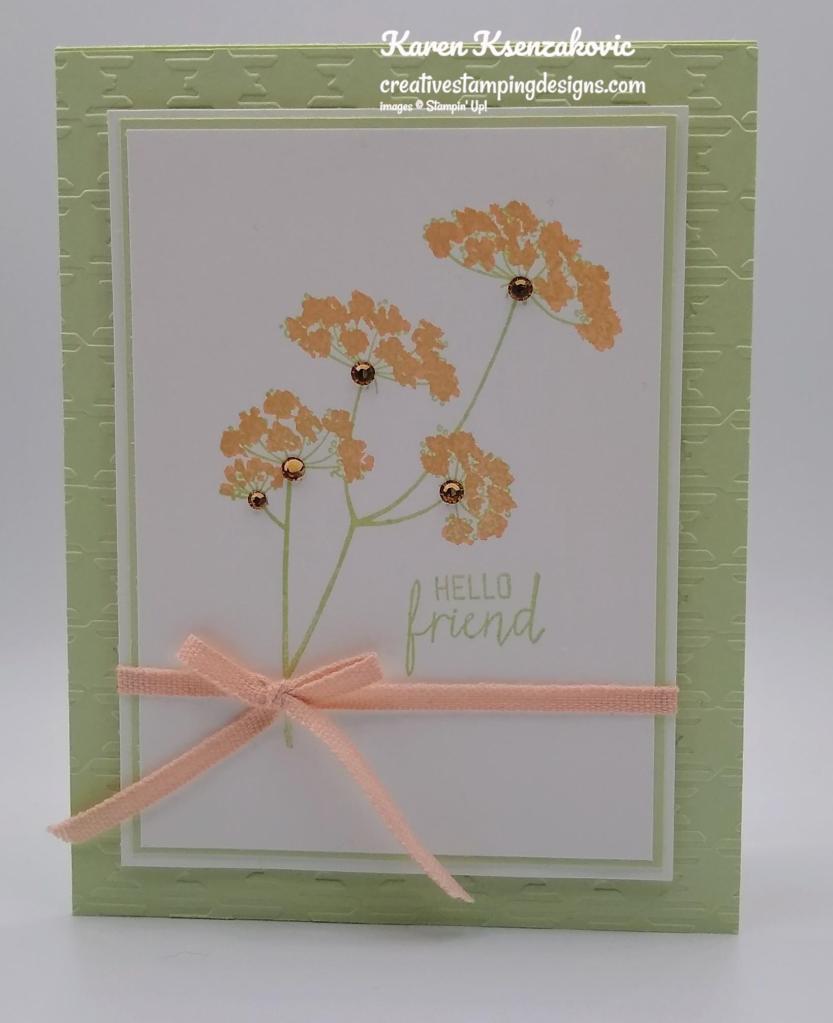
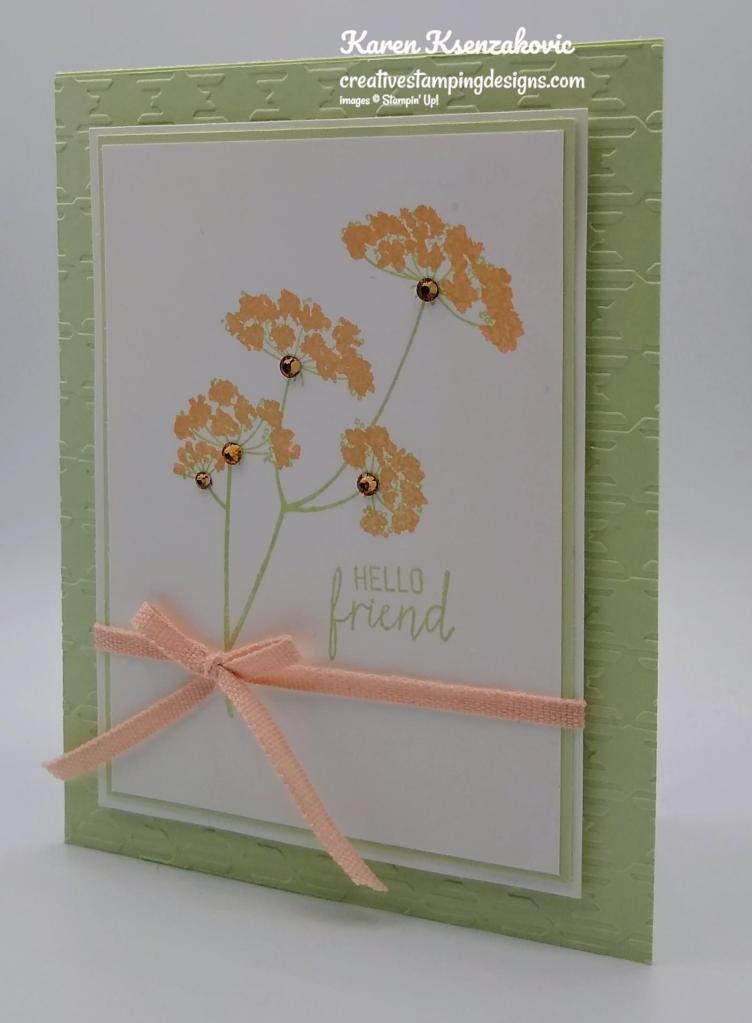
I used the Stampin’ Up! Cottage Wreaths Bundle for my card today.

Stampin' Up! Cottage Wreaths Hello 2 creativestampingdesigns.com

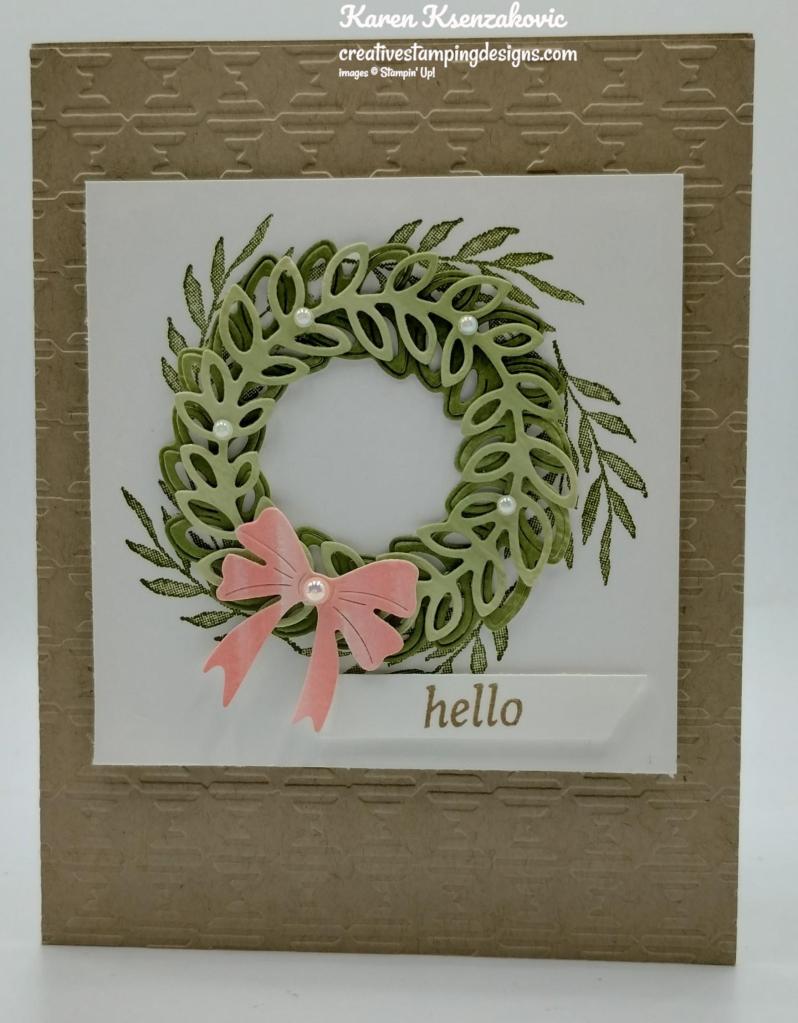
I started by using my Water Painters and added Old Olive Ink to the 2 panels of Shimmer White cardstock. Using my Water Painter again, I added Flirty Flamingo Ink to the smaller panel of Shimmer White. I set them aside to dry. On the panel of Basic White cardstock I stamped the leaf image from the Stampin’ Up! Cottage Wreaths Photopolymer Stamp Set 5 times in a circle in Old Olive Ink.

Stampin' Up! Cottage Wreaths Hello 3 creativestampingdesigns.com

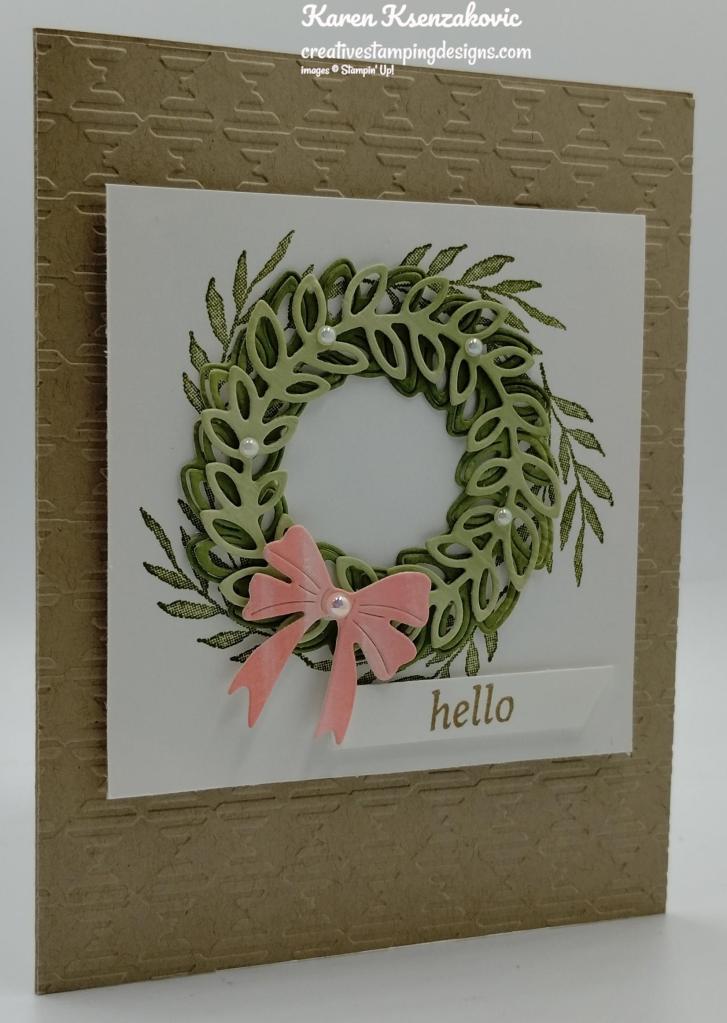
I embossed a panel of Crumb Cake cardstock using the Gingham Embossing Folder. I adhered it to the Crumb Cake card base using Multipurpose Liquid Glue. I adhered the stamped Basic White panel to the card bae using Stampin’ Dimensionals.

Stampin' Up! Cottage Wreaths Hello 4 creativestampingdesigns.com

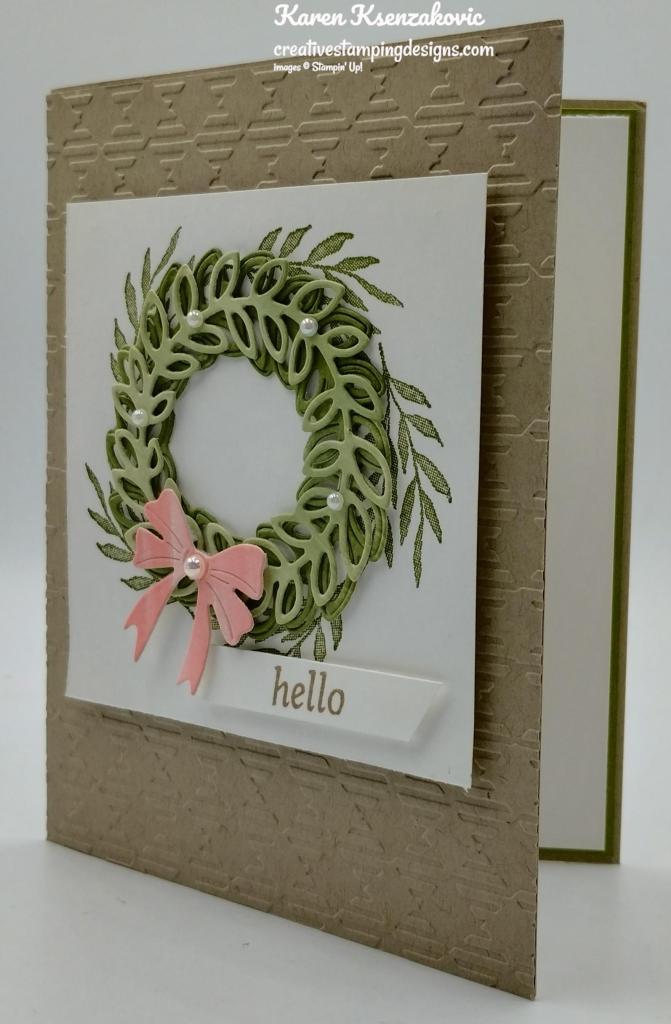
Using the Country Wreaths Dies, I cut the 2 detailed wreaths from the panels of Shimmer White paper. I cut the detailed bow from the small panel of Shimmer White paper. I adhered the detailed wreaths together using Glue Dots. I adhered the layered wreaths to the stamped Basic White panel using Glue Dots. I adhered the bow using a Stampin’ Dimensional. I stamped the sentiment from the Cottage Wreaths stamp set on a strip of Basic White cardstock in Crumb Cake Ink. I cut the end on an angle using my Paper Snips and adhered it to the card front using Stampin’ Dimensionals. I added a few Iridescent Pearls Basic Jewels to the wreath and bow.

Stampin' Up! Cottage Wreaths Hello 5 creativestampingdesigns.com

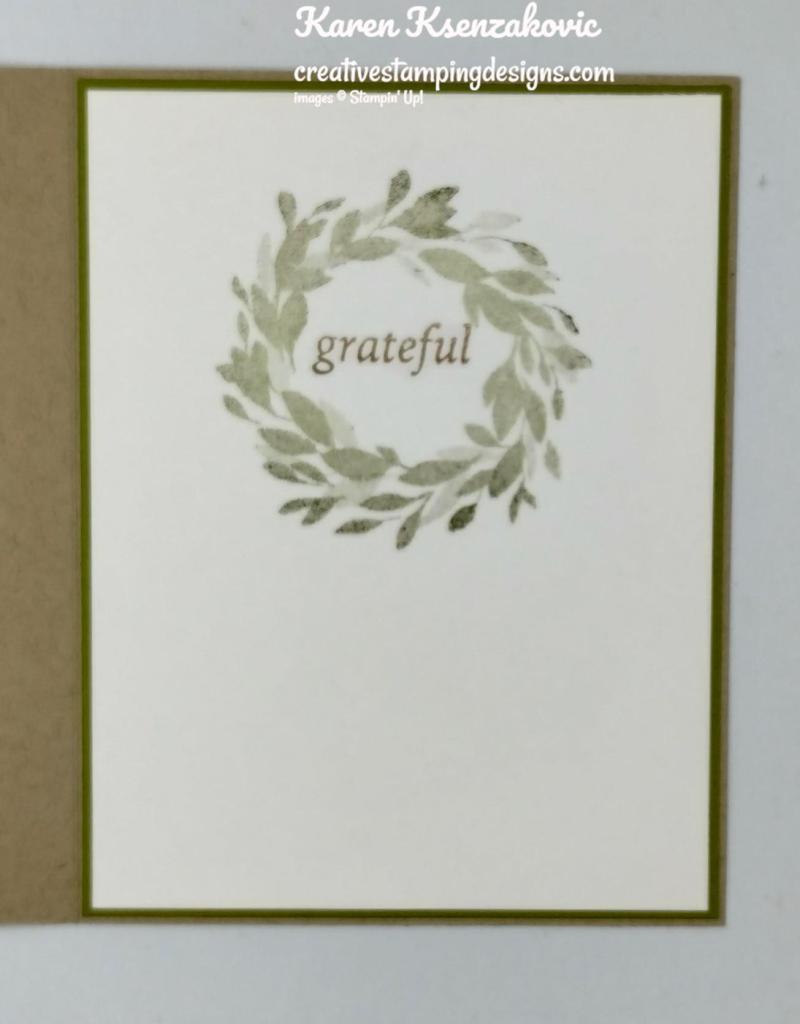
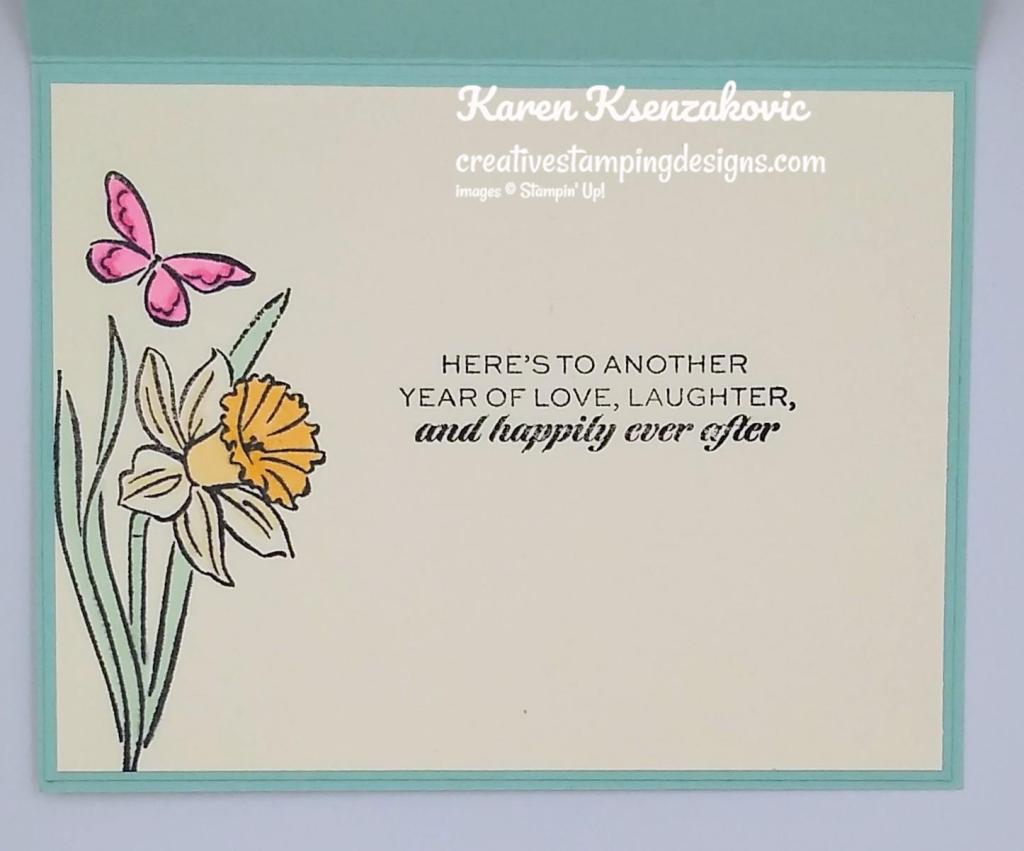
On the inside, I stamped the wreath image from the Cottage Wreaths stamp set in Old Olive Ink on a panel of Basic White cardstock, stamping off once on scrap paper. I stamped the sentiment from the Cottage Wreaths stamp set in Crumb Cake Ink in the center of the wreath. I adhered the Basic White panel to an Old Olive mat then to the inside of the Crumb Cake card base.

Stampin' Up! Cottage Wreaths Hello 6 creativestampingdesigns.com

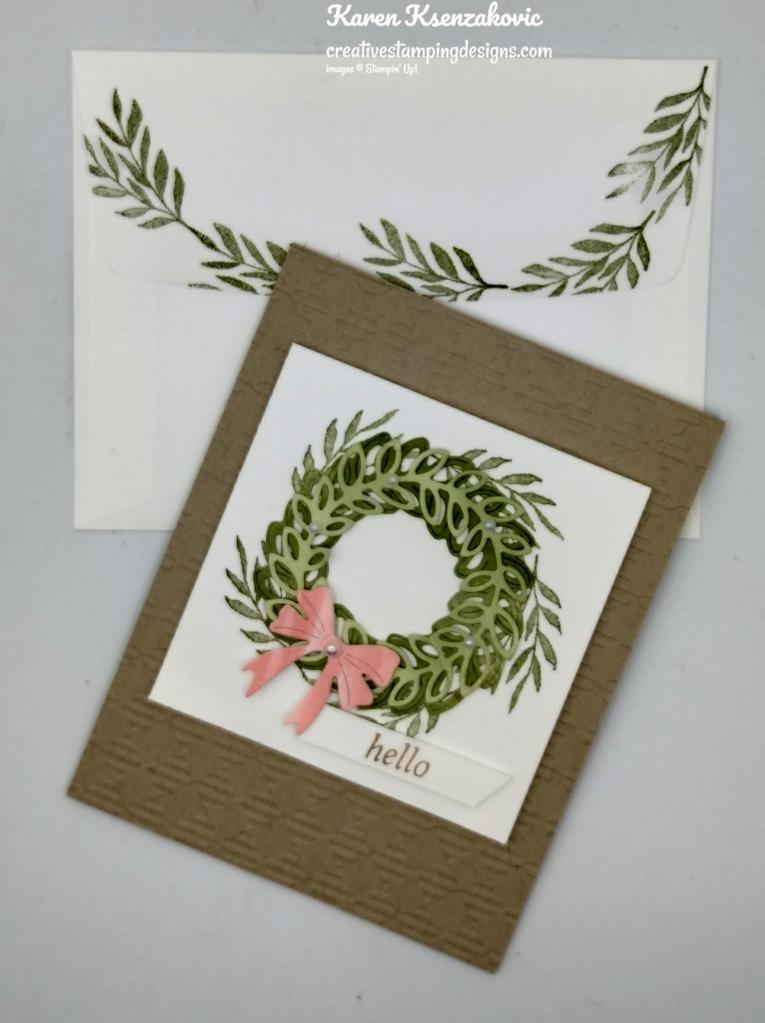
To finish my card, I decorated a Basic White Medium Envelope. I stamped the leaf image from the Cottage Wreaths stamp set in Old Olive Ink around the envelope front and flap.

Stampin' Up! Cottage Wreaths Hello 7 creativestampingdesigns.com

Thank you for stopping by my blog today. I hope you like the card and will give it a try. Happy Stamping!!

*********************************************************************************************************

If you need any stamping supplies, I’d love to be your Demonstrator. Just click HERE to go directly to my online store or drop me an email if you have any questions. 

MY CURRENT HOST CODE IS:   76V6XDMX

Use this host code when placing an order with me. When you order $50 or greater you will receive a free gift from me! If your order is over $150, please do not use this code, but you’ll still get the free gift. The free gift is your choice of any 1 item valued up to $10.00 from the 2022-2023 Annual Catalog or the July – December 2022 Mini Catalog!   For any orders $50 or more I will also send you my monthly class tutorials.  Click HERE or go to my Customer Rewards for more details and to see what this month’s tutorials are.

Please remember to use my current Host Code and make sure that you can see my name on the final checkout page listed as your Demonstrator when you order so that you know that you’re ordering with me and you’ll get my rewards! 

Happy Stamping, Karen

*********************************************************************************************************

Starter Kit + Promotion From Stampin’ Up! October 4-31!!

October is a fabulous time to join Stampin’ Up!  You will get even MORE FREE products in your customizable Starter Kit!  Between October 4-31, when you join, you will get $155 worth of products in your Starter Kit for only $99!!  Plus you’ll get free shipping and all the fun being a part of Stampin’ Up! and our Inkin’ Krew Team!

STARTER KIT+ PROMOTION DATES:  OCTOBER 4-31, 2022

  • When you purchase your Starter Kit, you will be able to redeem $155 of Starter Kit eligible products for just $99!!
  • You can select any eligible Stampin’ Up! products up to the stated value of $155.
  • Your Starter Kit also includes business resources like catalogs, brochures, order forms, and postcards.
  • The Starter Kit also includes a FREE past Paper Pumpkin kit!
  • In addition to the amazing added value to your Starter Kit, when you join Stampin’ Up! you get to be a part of our amazing community of crafters. Plus, you get to enjoy sharing simple and fun crafting experiences with others, early access to products, and exclusive access to training events!!
  • There is no requirement to hold events, share online or sell in any way to others.  You can join and simply get the awesome Starter Kit+ deal and then get a minimum of a 20% discount on anything that you purchase as a Demonstrator!
  • New demonstrators who submit their Independent Demonstrator Agreement (IDA) before October 4 or after October 31 will not be eligible for this offer.
  • Starter Kit + Promotion begins : October 4, 2022
  • Starter Kit + Promotion ends: October 31, 2022 @ 11:50pm MT

You can check out more information about joining our team Here and more details about the benefits of being a Demonstrator and find the link to join Here.

I’d be happy to help you and talk to you about joining. Contact me at creativestampingdesigns@gmail.com and we can connect. This is such a great deal you won’t want to pass it up.

*********************************************************************************************************

BIRTHDAY CARD ORGANIZER KIT NOW AVAILABLE

Get ready for the latest addition to the Kits Collection by Stampin’ Up! The Birthday Card Organizer Kit has everything you need to plan ahead and never forget another birthday again! 
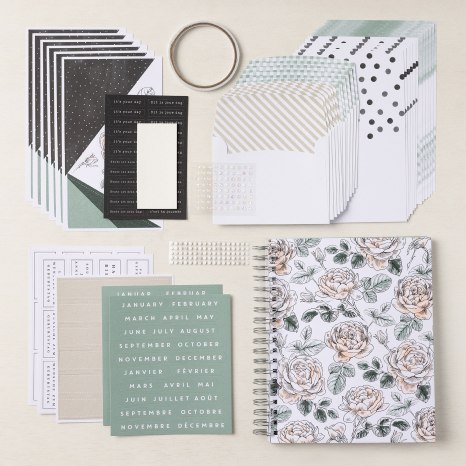
#161056 / $25 USD 

  • Kit includes one 8″ x 10″ (20.3 x 25.4 cm) monthly planner with space to record birthdays each month as well as a pocket sleeve to hold birthday cards.
  • Includes 12 full-size birthday cards, 6 of 2 designs, and 12 coordinating envelopes.
  • Includes Glue Dots, Stampin’ Dimensionals, Adhesive-Backed Embellishments, and Tear & Tape Adhesive
  • Includes die-cut florals and pieces ready for you to use­—no prep work required!
  • Includes sticker sentiments and die-cut labels in Dutch, English, French, and German
  • Coordinating colors: Basic Black, Evening Evergreen, Petal Pink, Sahara Sand, and Soft Succulent
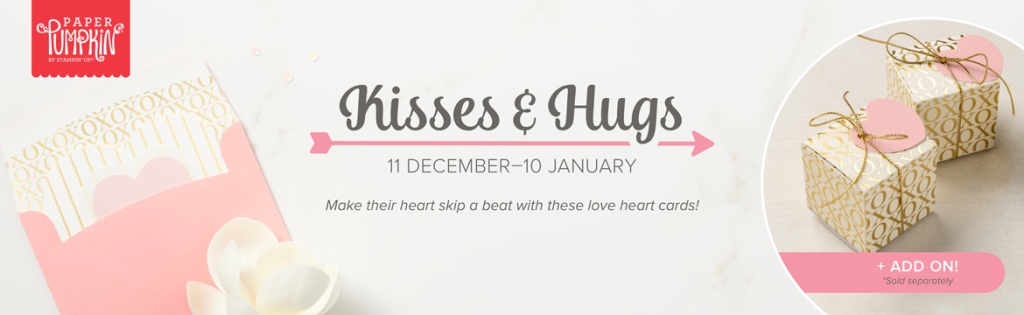
*********************************************************************************************************

Ho Ho Ho

Subscribe September 11 – October 10

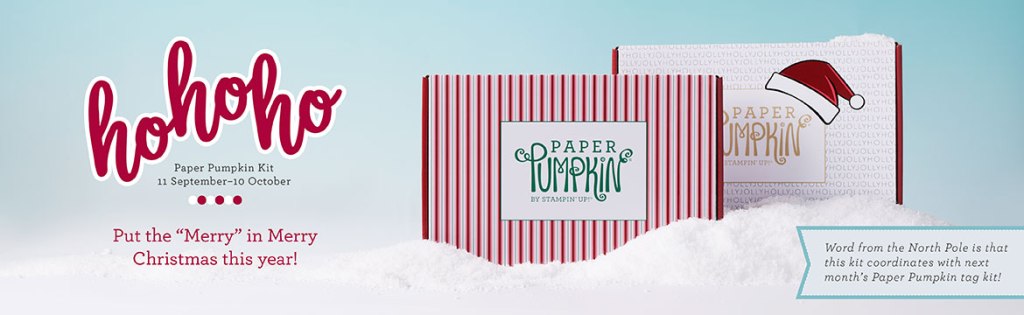
‘Tis the season to make your own Christmas cards with the Ho Ho Ho Paper Pumpkin Kit! This kit contains whimsical designs of Santa and his reindeer in a classic Christmas color palette which is sure to match various styles of holiday décor and look great on mantles everywhere. 
Each kit contains enough supplies to create 9 festive cards—3 each of 3 designs—and 9 coordinating envelopes. These cards are sure to bring the warm holiday spirit. 
And word from the North Pole is that this kit coordinates with next month’s Paper Pumpkin tag kit and the special add-on product! With so much coordination between products, you’ll have a breeze at creating a cohesive look for all your holiday gifting needs. Make this season the most wonderful time of the year for your loved ones—and for yourself!

This kit includes:

  • Ho Ho Ho Photopolymer Stamp Set
  • Early Espresso Classic Stampin’ Spot
  • Printed card bases
  • Printed envelopes
  • Printed die cuts
  • Die-cut labels
  • Iridescent foil die-cut snowflakes
  • Vellum
  • Vanilla expoy dots
  • Adhesive dots
  • Mini Dimensionals

Card size: 4-1/4″ x 5-1/2″ (10.8 x 14 cm) 

Coordinating Stampin’ Up! colors: Bermuda Bay, Cherry Cobbler, Crumb Cake, Early Espresso, Shaded Spruce, Sweet Sorbet, Very Vanilla

Subscribe to the October Paper Pumpkin Kit between 11 September and 10 October at paperpumpkin.com!

Note: Supplies may be limited toward the end of the subscription period.

*********************************************************************************************************

Card stock cuts for this project:

  • Basic White Cardstock 3 1/2″ X 3 1/2″ (card front panel), 3/8″ X 1 1/2″ (sentiment), 4″ X 5 1/4″ (inner liner)
  • Crumb Cake Cardstock 8 1/2″ X 5 1/2″ (card base scored & folded at 4 1/4″), 4 1/4″ X 5 1/2″ (card front panel)
  • Old Olive Cardstock 4 1/8″ X 5 3/8″(inner liner mat)
  • Shimmer White Cardstock 2 – 3″ X 3″ (wreaths), 2″ X 2″ (bow)

*********************************************************************************************************

Product List

Stampin’ Up! Cheerful Basket Thank You with Video Tutorial

Good Friday morning my stamping friends welcome to my Fun Fold Friday. How was everyone’s week? I had a bit of an exciting week starting off Monday. You’ll see below. Has anyone made any plans for the weekend yet? I’ll be working all day tomorrow and Sunday again.

So, before I get started with my card, last week I missed my live because we went to meet a puppy. It’s been a really sad house here since my Jasmine puppy passed. Unfortunately, the puppy was listed as a female lab/border collie mix and that was wrong. I was going to just wait until spring and this little cutie came to me. Meet Coraline. She’s a 10-week-old mix breed. I just ordered a DNA kit to find out what she is. She was listed as a lab/border collie mix, I think there might be more. I’ll let you know once I find out. She is such a good girl already. I’ve got her house broken, sleeping through the night and walking on a leash. She knows the sit command and touch already. She knows where my card making table is and runs ahead of me down the stairs to curl up while I make my cards.

Today’s card I made on my Facebook Live video on Wednesday. If you were able to join me or watched the replay, thank you. If you’d like to watch my video and stamp along, the measurements are below along with the links to my Facebook page and my YouTube channel. Here is my card for today.

Stampin' Up! Cheerful Basket Fun Fold 1 creativestampingdesigns.com

I used the Stampin’ Up! Cheerful Basket Bundle along with the Stampin’ Up! Apple Harvest Cling Stamp Set and the Perfectly Penciled Designer Series Paper for my card today.

Stampin' Up! Cheerful Basket Fun Fold 2 creativestampingdesigns.com

I started by coloring a panel of Perfectly Penciled DSP using my Flirty Flamingo and Granny Apple Green Stampin’ Blends Markers. I adhered the panel to a Real Red mat and then to a Basic White Thick card base. On a panel of Basic White cardstock I stamped the sentiment, the apple, the cat and the butterfly images from the Stampin’ Up! Cheerful Basket Photopolymer Stamp Set in Tuxedo Black Ink. I colored the images in using my Daffodil Delight, Flirty Flamingo, Granny Apple Green, Real Red and Smoky Slate Stampin’ Blends Markers. I cut all the images out using my Full Basket Dies.

Stampin' Up! Cheerful Basket Fun Fold 3 creativestampingdesigns.com

I cut the largest tag die from the Designer Tags Dies from a panel of Basic White cardstock. I cut one end of the tag off using my Paper Snips and embossed the tag using the Gingham Embossing Folder. Using my Full Basket Dies, I cut the detailed basket from a panel of Crumb Cake cardstock, the basket bands from Soft Suede cardstock, the leaves from Granny Apple Green Cardstock, the handle from Smoky Slate cardstock and the solid basket, napkin and apples from Real Red cardstock. I adhered the solid red basket behind the detailed basket using Stampin’ Dimensionals and trimmed the excess using my Paper Snips. I adhered the colored apples to the basket using Multipurpose Liquid Glue to the back of the basket. I adhered the basket to the embossed tag. I threaded a piece of Real Red ribbon from the Real Red & Garden Green 3/8″ Ribbon Combo Pack through the tag and tied it off. I adhered the tag to the card front using Stampin’ Dimensionals.

Stampin' Up! Cheerful Basket Fun Fold 4 creativestampingdesigns.com

I adhered the cat next to the basket using Stampin’ Dimensionals. I adhered the butterfly to the top of the tag and the extra apples to the bottom of the card front. I cut the sentiment using my Stylish Shapes Dies and adhered it to the top of the card front using Stampin’ Dimensionals.

Stampin' Up! Cheerful Basket Fun Fold 5 creativestampingdesigns.com

This next part is much easier to understand if you watch the video or my Instagram Reel. On the I folded the 5 1/8″ x 5 1/4″ panel of Real Red cardstock on the 1″ & 2″ score lines. I folded the 5 3/8″ X 5 1/4″ panel of Real Red cardstock on the 3 1/8″ score line. I adhered the 1″fold to the back of the 3 1/8″ fold using Multipurpose Liquid Glue. I adhered the folded panel to the inside of the Basic White Thick card base using Multipurpose Liquid Glue.

Stampin' Up! Cheerful Basket Fun Fold 6 creativestampingdesigns.com

I adhered a colored panel of Perfectly Penciled DSP to the right inside of the card base. On a 2 3/8″ x 5 1/8″ panel of Basic White cardstock, I stamped the small apple branch from the Apple Harvest stamp set in Tuxedo Black Ink. I colored the image using my Granny Apple Green, Real Red and Soft Suede Stampin’ Blends Markers. I adhered the panel to the center of the inner liner. On a panel of Basic White cardstock, I stamped the large apple branch image from the Apple Harvest stamp set in Tuxedo Black Ink. I colored the image using my Flirty Flamingo, Granny Apple Green, Real Red and Soft Suede Stampin’ Blends Markers. I fussy cut the image using my Paper Snips (the dies for this stamp set will be available Sept 1st). I adhered the cut image to the center panel so that it would overhang. On the 3″ X 5 1/8″ panel of Basic White cardstock, I stamped the sentiment and the small flower image from the Apple Harvest stamp set in Tuxedo Black Ink. I colored the flower using my Flirty Flamingo Stampin’ Blends Markers. I adhered the panel to the left side of the inner liner.

Stampin' Up! Cheerful Basket Fun Fold 7 creativestampingdesigns.com

To finish my card, I decorated a Basic White Medium Envelope. I stamped the apple image from the Cheerful Basket stamp set in Tuxedo Black Ink on the envelope front. I colored the image using my Granny Apple Green and Real Red Stampin’ Blends Markers. I adhered a colored panel of Perfectly Penciled DSP to the envelope flap.

Stampin' Up! Cheerful Basket Fun Fold 8 creativestampingdesigns.com

Thank you for stopping by my blog today. I hope you liked my card and will give it a try. I hope you will CASE this card and please feel free to post it in the comments of my Facebook page under my post. I’d love to see your take on the card. The list of measurements are below if you’d like to stamp along while watching the video. You can watch my video on my Facebook page Here.

You can also view the video on my YouTube channel Here. If you watch this on my YouTube channel, please remember to subscribe so that you will get notified when a new video goes live.  Happy Stamping!!

*********************************************************************************************************

If you need any stamping supplies, I’d love to be your Demonstrator. Just click HERE to go directly to my online store or drop me an email if you have any questions. 

MY CURRENT HOST CODE IS:   QY4S2TZX

Use this host code when placing an order with me. When you order $50 or greater you will receive a free gift from me! If your order is over $150, please do not use this code, but you’ll still get the free gift. The free gift is your choice of any 1 item valued up to $10.00 from the 2021-2022 Annual Catalog or the January – June 2022 Mini Catalog!   For any orders $50 or more I will also send you my monthly class tutorials.  Click HERE or go to my Customer Rewards for more details and to see what this month’s tutorials are.

Please remember to use my current Host Code and make sure that you can see my name on the final checkout page listed as your Demonstrator when you order so that you know that you’re ordering with me and you’ll get my rewards! 

Happy Stamping, Karen

*********************************************************************************************************

Coming Soon!!! Starting September 1, 2022

Some things are great on their own but become epic when they are paired with something else: cereal and milk, toast and butter, Fred Astaire and Ginger Rogers. We may be biased, but our favorite combo is our stamp sets and dies—and that’s what the Perfect Partners promotion is all about! 

We created six new dies that coordinate with stamp sets in the 2022–2023 Annual Catalog and the July–December 2022 Mini Catalog. These coordinating dies will only be available during this promotion and will not be offered in any catalog.  

These stamp sets and dies are available separately or as a bundle. By buying the bundle, you and your customers will save 10% off the retail price. 

Put these wonderful stamp sets and dies together for more papercrafting fun!

Interested in Being Able to Order Them Now? Join My Team!!

Being a demonstrator, you are able to order products ahead of customers. You get to attend the Stampin’ Up! events and be a part of an awesome team and community. There is no obligation to sell or blog, you can join as a Hobby Demonstrator just to enjoy the discount. For just $99 you get to pick $125 in product of your choice. Stampin’ Up! includes a past Paper Pumpkin Kit along with some business items in case you want to make it a business. This all ships for FREE. After that all your future orders you get to enjoy a 20% discount. Ask me how!!

If you join during Sale-a-bration you will receive this awesome Making Plans Collection absolutely free. It includes a July 2022-December 2023 Making Plans Planner including an 8″ X 9 1/2″ Faux Leather Carrying Case, 5 1/2″ X 8 1/2″ Planer Pages, Monthly Divider Pages and Sticker Sheets. It also includes 3 – Creative Journals that are 5 3/4″ X 8″ and a Making Plans Photopolymer Stamp Set. Contact me for more information at creativestampingdesigns@gmail.com. I’d love to have you on my team. You can join as a hobby demonstrator just to enjoy the discount for yourself. No obligations to sell, hold classes or have a blog.

*********************************************************************************************************

New Sale-a-bration Items Added

Stampin’ Up! has added some additional items that you can earn for FREE with orders beginning at $50 during Sale-a-bration!  You can see the new items Here. There are some really great new items to pick from!  You’ll see them added to the list of options that you can pick for free with orders of $50+ as you go through the checkout process.  Let me know if you have any questions.  Happy Shopping!

*********************************************************************************************************

The Back To School Sales Tax Holiday is going on until August. For those of you living in Alabama, Arkansas, Florida, Illinois, Massachusetts, Mississippi, Missouri, New Jersey, New Mexico, Ohio, Puerto Rico, South Carolina, Tennessee, Texas, Virginia and West Virginia…you’ve got sales tax holidays coming up!! Be sure to check the list.

The good news is that some items in the Stampin’ Up! Catalogs qualify for the sales tax holidays!  The list of sales tax holidays by state and items in that state that qualify Here on a printable PDF. Check it out to see when your state has the Sales Tax Holiday.

*********************************************************************************************************

Spooky Treats

Subscribe August 11 – September 10

Get your Halloween crafting on with the Spooky Treats Paper Pumpkin Kit. This month’s kit includes everything you need to make 18 absolutely adorable (and just the right amount of spooky) treat boxes—that’s 6 each of 3 unique designs! No need to let the season creep up on you; subscribe and order your kit today.


Plus, we’re putting the TREAT in trick-or-treat with a special GIVEAWAY on social media starting 5 September at 9:00am (MT)! Simply follow @PaperPumpkin on Instagram or the Paper Pumpkin page on Facebook, like either post, and mention three friends in the comments for your chance to win one of two personalized JBL speakers. You’ll have to be quick because the giveaway closes 8 September at 4:00pm (MT). Don’t miss out on this fang-tastic opportunity!

This kit includes:

  • This month’s kit contains enough elements to create 18 treat boxes—6 each of 3 designs. This all-inclusive kit includes printed box bases and tops, die-cut paper pieces, adhesives, and more!
  • The Spooky Treats Paper Pumpkin Kit includes an Orchid Oasis Classic Stampin’ Spot!
  • This kit’s stamp set puts the TREAT in trick-or-treat with fun, Halloween-themed sentiments and designs. Embrace the spooky season with ghost, bat, spider, and star images.
  • This kit also includes a special peek-through box top on one of the box designs.

Finished box size: 2-1/2″ x 3″ x 1″ (6.4 x 7.6 x 2.5 cm)

Coordinating Stampin’ Up! colors: Basic Black, Gray Granite, Orchid Oasis, Fresh Freesia, Crushed Curry, Pumpkin Pie

Subscribe to the August Paper Pumpkin Kit between 11 August and 10 September at paperpumpkin.com!

Note: Supplies may be limited toward the end of the subscription period.

*********************************************************************************************************

Card stock cuts for this project:

  • Basic White Cardstock 3″ X 5 1/8″ & 2 3/8″ x 5 1/8″ (inner liners), 8 1/2″ x 5 1/2″ (tag, sentiment & artwork)
  • Basic White Thick Cardstock 8 1/2″ X 5 1/2″ (card base scored & folded at 4 1/4″)
  • Crumb Cake Cardstock 2″ X 2 1/2″ (detailed basket)
  • Granny Apple Green Cardstock 3 1/2″ x 2″ (leaves)
  • Real Red Cardstock 4 1/8″ X 5 3/8″ (card front mat), 4 1/4″ X 1″ (apples), 2 3/4″ x 2 1/4″ (solid basket), 5 1/8″ x 5 1/4″ (inner liner scored & folded at 1″ & 2″), 5 3/8″ x 5 1/4″ (inner liner scored & folded at 3 1/8″)
  • Soft Suede Cardstock 2 1/2″ X 1 1/2″ (basket bands)
  • Smoky Slate Cardstock 1/2″ x 2 1/2″ (handle)
  • Perfectly Penciled Designer Series Paper 4″ X 5 1/4″ (card front), 3″ X 5 1/8″ (inner liner), 2 1/4″ X 6″ (envelope flap)

*********************************************************************************************************

Product List

Paper Snips

[103579]
$11.00

Stamparatus

[146276]
$49.00

Stampin’ Up! Special Moments CAS

Good Wednesday morning my stamping friends. We’re halfway through the week and on the downhill to the weekend and the end of the month.

I have a CAS card for you today using Sale-a-bration items. Here’s my card for today.

I used the Stampin’ Up! Special Moments Photopolymer Stamp Set along with the Daffodil Afternoon Designer Series Paper for my card today. Both these items are Sale-a-bration items and can be earned free with a qualifying order.

My design is from The Paper Players Sketch Challenge #575.

I started by embossing a panel of Pear Pizzazz cardstock using the Gingham Embossing Folder. I adhered a panel of the Daffodil Afternoon DSP to the embossed panel using Multipurpose Liquid Glue.

I wrapped a piece of the Blushing Bride 3/8″ Frayed Grosgrain Ribbon around the layered panel and tied a bow. I adhered the card front to a Pear Pizzazz card base using Stampin’ Dimensionals.

On a small panel of Basic White cardstock I stamped the sentiment from the Special Moments stamp set in Pear Pizzazz Ink. I cut the sentiment out using my Ornate Frames Dies and adhered it to the card front using Stampin’ Dimensionals. I added a Brushed Brass Butterfly to the sentiment.

On the inside I stamped the sentiment from the Special Moments stamp set in Pear Pizzazz Ink on a Basic Whtie panel. I adhered a strip of the Daffodil Afternoon DSP to the bottom of the panel. I adhered the Basic White panel to a Pear Pizzazz mat and then to the inside of the Pear Pizzazz card base.

To finish my card, I decorated a Basic Whtie Medium Envelope. I adhered a strip of the Daffodil Afternoon DSP on the envelope front and a panel on the envelope flap.

Thank you for stopping by my blog today. I hope you liked my card and will give it a try. Happy Stamping!!

*********************************************************************************************************

Join me today at 4:00pm on my Facebook Live.

I’m planning to go live on my Facebook page with a project today at 4pm ET.  Please join me if you can, to see what card I will be making today.

*********************************************************************************************************

If you need any stamping supplies, I’d love to be your Demonstrator. Just click HERE to go directly to my online store or drop me an email if you have any questions. 

MY CURRENT HOST CODE IS:   6P9HT6GS

Use this host code when placing an order with me. When you order $50 or greater you will receive a free gift from me! If your order is over $150, please do not use this code, but you’ll still get the free gift. The free gift is your choice of any 1 item valued up to $10.00 from the 2020-2021 Annual Catalog or the July-December 2021 Mini Catalog!   For any orders $50 or more I will also send you my monthly class tutorials.  Click HERE or go to my Customer Rewards for more details and to see what this months tutorials are.

Please remember to use my current Host Code and make sure that you can see my name on the final checkout page listed as your Demonstrator when you order so that you know that you’re ordering with me and you’ll get my rewards! 

Happy Stamping, Karen

*********************************************************************************************************

Looking for some past stamp sets or bundles. Check out my Retired List of items. Click Here to go to my Retirement Sale List page.

*********************************************************************************************************

Join The Stampin’ Up! Community During Sale-a-bration and get 2 FREE Stamp Sets

Now through February 28 you can get 2 FREE STAMP SETS when you join Stampin’ Up! For just $99 you get to choose $125 of product of your choice from any of the current catalogs and you can also choose any 2 Stamp Sets of your choice (cannot be host or Sale-a-bration sets) absolutely FREE!!! You can end up with $175 in product for just $99. There is no obligation to sell, you can join as a Hobby Demonstrator. Interested??? Ask me how. I’d love to have you on my team, drop me a note at creativestampingdesigns@gmail.com I’d be more than happy to talk to you about it.

Here is what $172.00 worth of product looks like and you can get it for just $99 and it ships for FREE. Stampin’ Up! also throws in a past Paper Pumpkin kit, catalogs and other material. We have an awesome team and I’d love to have you join us. Contact me and we can talk.

*********************************************************************************************************

Sale-a-bration January 4 – February 28!!!

Sale-a-bration is going on right now. Click Here for a PDF version of the Sale-a-bration brochure. This is my most favorite time of Stampin’ Up! because you get to earn FREE products. There are 7 wonderful stamp sets and 4 gorgeous packs of Designer Series Paper. You can earn all of these FREE with qualifying orders. Who doesn’t like FREE??????

When you are placing your order, don’t forget to use my Current Host Code 6P9HT6GS for all orders under $150.

*********************************************************************************************************

Host A Party During Sale-a-bration

If you host a party during Sale-a-bration, both you and your guests can earn FREE Sal-a-bration products! Plus, place any party or personal order of $300 or more and receive the exclusive Stampin’ Up! Calming Camellia Stamp Set for FREE! Interested? I can set up a Host Code for you and your friends/family to order with. Drop me a line at creativestampingdesigns@gmail.com. I’d be happy to talk to you about it.

*********************************************************************************************************

Safari Celebration

Subscribe January 11 – February 10

Did you see that? It’s a mischievous monkey swinging from tree to tree! What about that elephant marching through the mud? Can you catch an antelope galloping in the grass? Grab your binoculars, buckle up, and hop into our off-road truck—there’s so much to see on this safari!

Answer the call of the wild—and your creativity—with the Safari Celebration Paper Pumpkin Kit. This playful, party-themed kit includes all the goodies and gear you need to create nine cards and coordinating envelopes in safari-inspired shapes and patterns you’ll go wild for! Make every occasion a celebration with this month’s amusing animals, beautiful botanicals, and celebratory sentiments.

Don’t monkey around and miss this amazing adventure! Unleash your creativity with February’s wildly fun kit. To explore what’s inside, keep reading!

Details:

  • This month’s kit contains enough elements to create 9 cards—3 each of 3 designs—and 9 coordinating envelopes. This all-inclusive kit includes printed card bases, die-cut paper pieces, embellishments, adhesive, and more!
  • The Safari Celebration Paper Pumpkin Kit includes a Rich Razzleberry Classic Stampin’ Spot!
  • This kit’s stamp set is an uplifting one! Make every occasion a celebration with sentiments that say “yay!”, “fantastic!”, and other fun phrases.
  • Explore each of our current In Color collections with this colorful kit! Discover designs and paper pieces in Bumblebee (a 2020–2022 In Color), Fresh Freesia (a 2021–2023 In Color), and Soft Succulent (a 2021–2023 In Color).
  • Card size: 4-1/4″ x 5-1/2″ (10.8 x 14 cm)
  • Envelope size: 4-1/2″ x 5-3/4″ (11.4 x 14.6 cm)
  • Coordinating colors: Bumblebee, Fresh Freesia, Pear Pizzazz, Rich Razzleberry, Soft Succulent, Soft Suede

Subscribe to the February 2022 Paper Pumpkin Kit between 11 January and 10 February at paperpumpkin.com!

Note: Supplies may be limited toward the end of the subscription period.

*********************************************************************************************************

Card stock cuts for this project:

  • Basic White Cardstock 1 3/4″ X 1 1/4″ (sentiment), 4″ X 5 1/4″ (inner liner)
  • Pear Pizzazz Cardstock 8 1/2″ X 5 1/2″ (card base scored & folded at 4 1/4″), 2 – 4 1/8″ x 5 3/8″ (card front & inner liner mat)
  • Daffodil Afternoon Designer Series Paper 3 1/4″ X 4 1/8″ (card front), 1″ X 4″ (inner liner), 1/2″ X 6″ & 2 1/4″ X 6″ (envelope)

*********************************************************************************************************

Product List

Stampin’ Up! Daffodil Daydream Anniversary

Good Saturday morning my stamping friends and welcome to the weekend. Can you believe it’s the middle of the month already? January usually drags for me, but it seems to be flying by. Does anyone have plans? Other than working my only plan is to try to stay warm, it’s supposed to be a cold one here.

Today’s card we made at our team lounge this past Tuesday. My upline Jaimie has a small meeting and then we do some mystery stamping. I really do enjoy it, even if she makes me go out of my comfort zone. Here’s my card for today.

I used the Stampin’ Up! Daffodil Daydream Bundle along with the Daffodil Afternoon Designer Series Paper for my card today.

My colors are from Global Design Project Color Challenge #325.

I started by embossing a Pool Party card front using the Gingham Embossing Folder and adhered it to a Pool Party card base using Multipurpose Liquid Glue.

On a panel of Very Vanilla cardstock I stamped the butterfly and 2 daffodil images from the Stampin’ Up! Daffodil Daydream Cling Stamp Set in Tuxedo Black Ink. I cut the images out using my Daffodil Dies. I colored the images using my Pale Papaya, Polished Pink and Pool Party Stampin’ Blends Markers. I adhered a panel of the Daffodil Afternoon DSP to a Very Vanilla mat and then to the card front on an angle using Stampin’ Dimensionals. I adhered the daffodil and butterfly images to the layered panel using Stampin’ Dimensionals.

I tied a bow with my Pale Papaya 3/8″ Open Weave Ribbon and adhered it next to the daffodils using a Glue Dot. I stamped the sentiment from the Stampin’ Up! Love & Happiness Cling Stamp Set in Tuxedo Black Ink and cut it out using my Harvest Dies. I adhered the sentiment over the ribbon and daffodils using Stampin’ Dimensionals.

On the inside I stamped the sentiment from the Love & Happiness stamp set in Tuxedo Black Ink on a Very Vanilla panel. I stamped the butterfly and smaller daffodil images from the Daffodil Daydream stamp set in Tuxedo Black Ink on the side of the panel. I colored the images in using my Pale Papaya, Polished Pink and Pool Party Stampin’ Blends Markers. I adhered the Very Vanilla panel to a Pool Party mat and then to the inside of the Pool Party card base.

To finish my card, I decorated a Very Vanilla Medium Envelope. I stamped the single daffodil image from the Daffodil Daydream stamp set in Tuxedo Black Ink on the envelope front and colored it using my Pale Papaya and Pool Party Stampin’ Blends Markers. I adhered a panel of the Daffodil Afternoon DSP to the envelope flap.

Thank you for stopping by my blog today. I hope you liked my card and will give it a try. Happy Stamping!!

*********************************************************************************************************

If you need any stamping supplies, I’d love to be your Demonstrator. Just click HERE to go directly to my online store or drop me an email if you have any questions. 

MY CURRENT HOST CODE IS:   6P9HT6GS

Use this host code when placing an order with me. When you order $50 or greater you will receive a free gift from me! If your order is over $150, please do not use this code, but you’ll still get the free gift. The free gift is your choice of any 1 item valued up to $10.00 from the 2020-2021 Annual Catalog or the July-December 2021 Mini Catalog!   For any orders $50 or more I will also send you my monthly class tutorials.  Click HERE or go to my Customer Rewards for more details and to see what this months tutorials are.

Please remember to use my current Host Code and make sure that you can see my name on the final checkout page listed as your Demonstrator when you order so that you know that you’re ordering with me and you’ll get my rewards! 

Happy Stamping, Karen!

*********************************************************************************************************

Safari Celebration

Subscribe January 11 – February 10

Did you see that? It’s a mischievous monkey swinging from tree to tree! What about that elephant marching through the mud? Can you catch an antelope galloping in the grass? Grab your binoculars, buckle up, and hop into our off-road truck—there’s so much to see on this safari!

Answer the call of the wild—and your creativity—with the Safari Celebration Paper Pumpkin Kit. This playful, party-themed kit includes all the goodies and gear you need to create nine cards and coordinating envelopes in safari-inspired shapes and patterns you’ll go wild for! Make every occasion a celebration with this month’s amusing animals, beautiful botanicals, and celebratory sentiments.

Don’t monkey around and miss this amazing adventure! Unleash your creativity with February’s wildly fun kit. To explore what’s inside, keep reading!

Details:

  • This month’s kit contains enough elements to create 9 cards—3 each of 3 designs—and 9 coordinating envelopes. This all-inclusive kit includes printed card bases, die-cut paper pieces, embellishments, adhesive, and more!
  • The Safari Celebration Paper Pumpkin Kit includes a Rich Razzleberry Classic Stampin’ Spot!
  • This kit’s stamp set is an uplifting one! Make every occasion a celebration with sentiments that say “yay!”, “fantastic!”, and other fun phrases.
  • Explore each of our current In Color collections with this colorful kit! Discover designs and paper pieces in Bumblebee (a 2020–2022 In Color), Fresh Freesia (a 2021–2023 In Color), and Soft Succulent (a 2021–2023 In Color).
  • Card size: 4-1/4″ x 5-1/2″ (10.8 x 14 cm)
  • Envelope size: 4-1/2″ x 5-3/4″ (11.4 x 14.6 cm)
  • Coordinating colors: Bumblebee, Fresh Freesia, Pear Pizzazz, Rich Razzleberry, Soft Succulent, Soft Suede

Subscribe to the February 2022 Paper Pumpkin Kit between 11 January and 10 February at paperpumpkin.com!

Note: Supplies may be limited toward the end of the subscription period.

*********************************************************************************************************

Sale-a-bration January 4 – February 28!!!

Sale-a-bration is going on right now. Click Here for a PDF version of the Sale-a-bration brochure. This is my most favorite time of Stampin’ Up! because you get to earn FREE products. There are 7 wonderful stamp sets and 4 gorgeous packs of Designer Series Paper. You can earn all of these FREE with qualifying orders. Who doesn’t like FREE??????

When you are placing your order, don’t forget to use my Current Host Code 6P9HT6GS for all orders under $150.

*********************************************************************************************************

Host A Party During Sale-a-bration

If you host a party during Sale-a-bration, both you and your guests can earn FREE Sal-a-bration products! Plus, place any party or personal order of $300 or more and receive the exclusive Stampin’ Up! Calming Camellia Stamp Set for FREE! Interested? I can set up a Host Code for you and your friends/family to order with. Drop me a line at creativestampingdesigns@gmail.com. I’d be happy to talk to you about it.

*********************************************************************************************************

Join The Stampin’ Up! Community During Sale-a-bration and get 2 FREE Stamp Sets

Starting January 4 through February 28 you can get 2 FREE STAMP SETS when you join Stampin’ Up! For just $99 you get to choose $125 of product of your choice from any of the current catalogs and you can also choose any 2 Stamp Sets of your choice (cannot be host or Sale-a-bration sets) absolutely FREE!!! You can end up with $175 in product for just $99. There is no obligation to sell, you can join as a Hobby Demonstrator. Interested??? Ask me how. I’d love to have you on my team, drop me a note at creativestampingdesigns@gmail.com I’d be more than happy to talk to you about it.

*********************************************************************************************************

Card stock cuts for this project:

  • Pool Party Cardstock 8 1/2″ x 5 1/2″ (card base scored & folded at 4 1/4″), 4 1/4″ X 5 1/2″ (card front), 4 1/8″ x 5 3/8″ (inner liner mat)
  • Very Vanilla Cardstock 3 5/8″ x 3 5/8″ (dsp mat), 5 1/2″ X 4″ (artwork), 4″ X 5 1/4″ (inner liner)
  • Daffodil Afternoon Designer Series Paper 3 1/2″ X 3 1/2″ (card front panel), 2 1/4″ X 6″ (envelope flap)

*********************************************************************************************************

Product List

Stampin’ Up! Queen Anne’s Lace Thank You

Good Sunday morning my stamping friends. How is everyone doing today? Hope you are enjoying your long weekend. For me, it’s the beginning of the month which means I have to go into work to do the bills. Not sure if I’m going to have to work at the register in between or not. We’re having a bit of a Covid outbreak in the store this past week, so I’ve been scrambling to get all the time filled in so that we have all the cashiers we need.

Today I have a mix of old and new for my card. I used a set from the 2021-2022 Annual Catalog and an Embossing Folder from the January-June 2022 Mini Catalog. Here’s my card for today.

I used the gorgeous Stampin’ Up! Queen Anne’s Lace Photopolymer Stamp Set along with the new Gingham Embossing Folder (available January 4, 2022), for my card today.

I started by stamping the stem image from the Queen Anne’s Lace stamp set in Soft Sea Foam Ink on a Basic White card front. I stamped the floral image from the Queen Anne’s Lace stamp set in Petal Pink Ink on the stem. I stamped the sentiment from the Queen Anne’s Lace stamp set in Soft Sea Foam Ink next to the floral image.

I adhered the card front to a Soft Sea Foam mat and then to a Basic White mat. I wrapped a piece of the new Petal Pink 1/8″ Cotton Ribbon from the Cotton Ribbon Combo Pack (available January 4, 2022) and tied a bow.

I embossed a panel of Soft Sea Foam cardstock using the new Gingham Embossing Folder and adhered it to a Soft Sea Foam card base using Multipurpose Liquid Glue. I adhered the layered panel to the card front using Stampin’ Dimensionals. I added a few Champagne Rhinestones Basic Jewels to the artwork.

On the inside I stamped the sentiment from the Queen Anne’s Lace stamp set in Soft Sea Foam Ink on a Basic Whtie panel. I stamped the floral image from the Queen Anne’s Lace stamp set on the side of the panel the same as I did for the card front. I adhered the Basic White panel to a Soft Sea Foam mat and then to the inside of the Soft Sea Foam card base.

To finish my card, I decorated a Basic White Medium Envelope. I stamped the floral image from the Queen Anne’s Lace stamp set on the envelope front the same as I did for the card. I embossed a panel of Soft Sea Foam cardstock using the Gingham Embossing Folder and adhered it to the envelope flap.

Thank you for stopping by my blog today. I hope you liked my card and will give it a try. Happy Stamping!!

*********************************************************************************************************

If you need any stamping supplies, I’d love to be your Demonstrator. Just click HERE to go directly to my online store or drop me an email if you have any questions. 

MY CURRENT HOST CODE IS:   6P9HT6GS

Use this host code when placing an order with me. When you order $50 or greater you will receive a free gift from me! If your order is over $150, please do not use this code, but you’ll still get the free gift. The free gift is your choice of any 1 item valued up to $10.00 from the 2020-2021 Annual Catalog or the July-December 2021 Mini Catalog!   For any orders $50 or more I will also send you my monthly class tutorials.  Click HERE or go to my Customer Rewards for more details and to see what this months tutorials are.

Please remember to use my current Host Code and make sure that you can see my name on the final checkout page listed as your Demonstrator when you order so that you know that you’re ordering with me and you’ll get my rewards! 

Happy Stamping, Karen!

*********************************************************************************************************

Stampin’ Up! has updated the Clearance Rack with a few new goodies!  Head over there quick to get your hands on some great deals.  But hurry!!  Clearance Rack deals are only while supplies last!

CLICK HERE to head over to my online store to shop those great deals now!!  Have fun shopping!

*********************************************************************************************************

The July–December 2021 Mini Catalog will be retiring soon! t’s always bittersweet to see a classic Stampin’ Up! catalog take a trip to retirement. But, we’re looking forward to all the new products on their way—and we hope you are, too!  Beginning December 1, Stock up on your favorite products before they’re gone for good! Save up to 50% on essential craft supplies. The selection of Last Chance Products is only available while supplies last.

Click Here to open the full retiring list from the July-December 2021 Mini Catalog (includes the sale prices that start on December 1)

Click Here to see the full carryover list (items that will continue to be available and items that will be available again in the July-December 2022 Mini Catalog)

Last Chance Sale Details:

  • See the full Retiring List (products that will no longer be available once the catalog retires) with the sale prices Here. The sale prices start on December 1!
  • See the Carryover List (products that will still be available once the catalog retires) Here.
  • All retiring products are available while supplies last, and there are no purchase limits.
  • Discounted items can be added to a Starter Kit and redeemed as a 50% off item or with Stampin’ Rewards.
  • Last Chance Sales Period:  Starts December 1, 2021 at 12:01 AM MT and ends January 3, 2022 at 11:50 PM MT

Let me know if you have any questions and don’t forget to pick up any of those items on the retiring list that you’re wanting soon so that you don’t miss out!

*********************************************************************************************************

Kisses & Hugs

Subscribe December 11 – January 10

We all know that roses are red and violets are blue—it’s time that love-themed cards got an upgrade! The Kisses & Hugs Paper Pumpkin Kit will help you express that forever kind of love with heart-shaped cards that would make Cupid jealous. 

The Kisses & Hugs kit is not bound to just Valentine’s Day, it works for all love occasions year-round like anniversaries, weddings, birthdays, or those “just because” days. Check out the teaser video below to get a taste of what’s included.

Details:

  • Kit contains enough supplies to create 10 cards—5 each of 2 designs—and 10 coordinating envelopes
  • Kit features an exclusive Two-Step photopolymer stamp set
  • Kit includes a Gray Granite Classic Stampin’ Spot
  • Card size: 4-1/2″ x 4-1/4″ (11.4 x 10.8 cm) heart-shaped cards; folded
  • Coordinating colors: Blushing Bride, Flirty Flamingo, Gray Granite, Very Vanilla

ADD-ON

Name: Kisses & Hugs Mini Treat Boxes 

Item number: 160147 | $10.00 USD | $13.75 CAD

Details:

  • Contains 20 mini treat boxes and 20 heart tags
  • Gold cord: 10-1/2″ yards (9.6 m)
  • Finished size: 1-3/4″ x 1-3/4″ x 1-3/4″ (4.4 x 4.4 x 4.4 cm)
  • Printed with gold foil

These coordinated treat boxes are not included in this month’s kit and are only available for purchase separately as an add-on online starting 25 January. You must be a Paper Pumpkin subscriber to purchase and they are only available while supplies last.

Subscribe to the January 2022 Paper Pumpkin Kit between 11 December and 10 January at paperpumpkin.com!

Note: Supplies may be limited toward the end of the subscription period

*********************************************************************************************************

Card stock cuts for this project:

  • Basic White Cardstock 4 1/2″ X 3 1/4″ (card front), 4 3/4″ X 3 1/2″ (card front mat), 4″ X 5 1/4″ (inner liner)
  • Soft Sea Foam Cardstock 8 1/2″ X 5 1/2″ (card base scored & folded at 4 1/4″), 4 5/8″ X 3 3/8″ (artwork mat), 4 1/4″ X 5 1/2″ (card front panel), 4 1/8″ X 5 3/8″ (inner liner mat), 2 1/2″ x 6″ (envelope flap)

*********************************************************************************************************

Product List