Stampin’ Up! Dragonfly Garden Wishes

Good Monday morning my stamping friends. How was everyone’s weekend? I hope you had enjoyable one and were able to find some time for yourself.

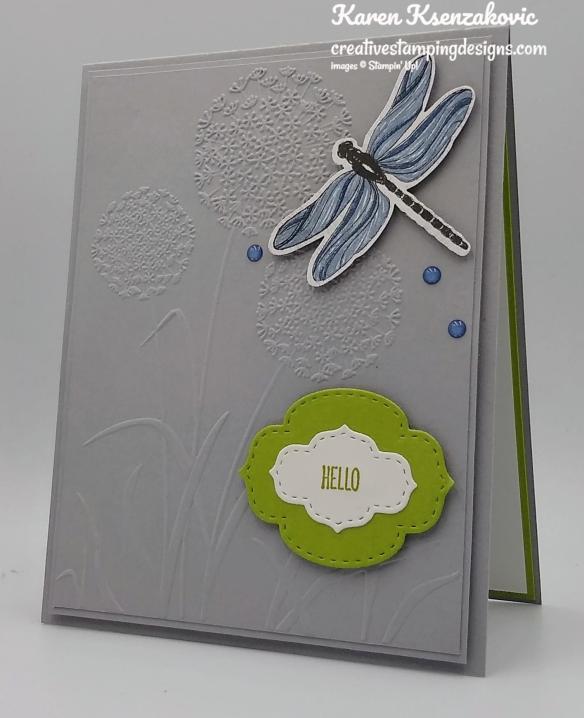
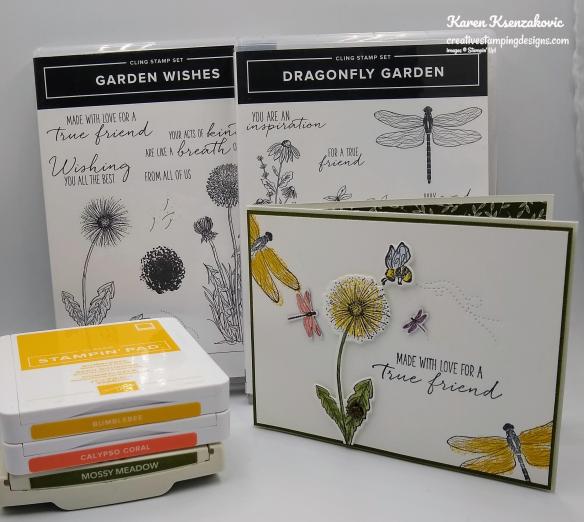
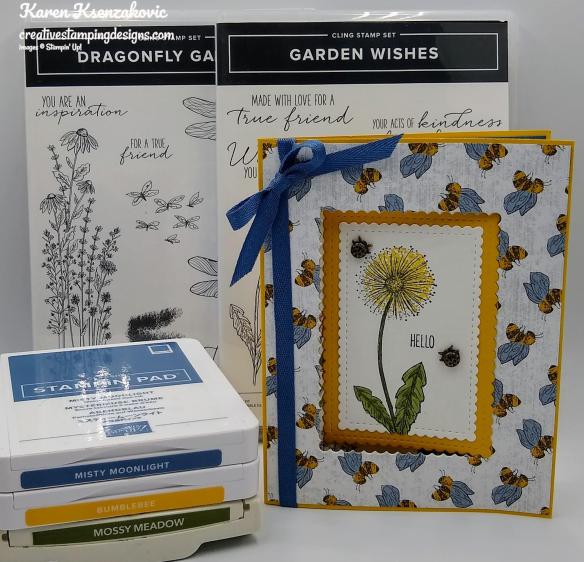
Today’s card is one that we’re making at my card class tonight. This is the 1st class in over a year that I’m having. I’m really hoping this will be the 1st of many monthly classes again. I used the Stampin’ Up! Dragonfly Garden Cling Stamp Set and the Stampin’ Up! Garden Wishes Cling Stamp Set for my card. My card is similar to one a did a while back, one of the ladies coming asked about making it. Here’s my card for today.

My colors are from CAS Colours & Sketches Challenge #414.

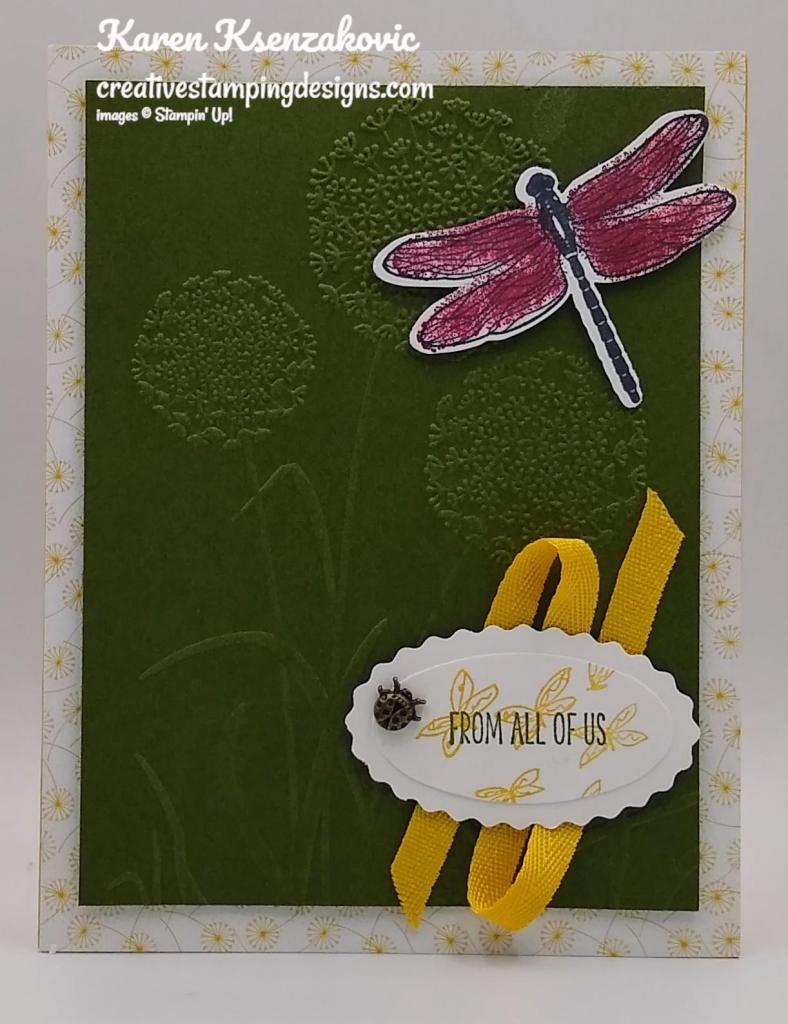
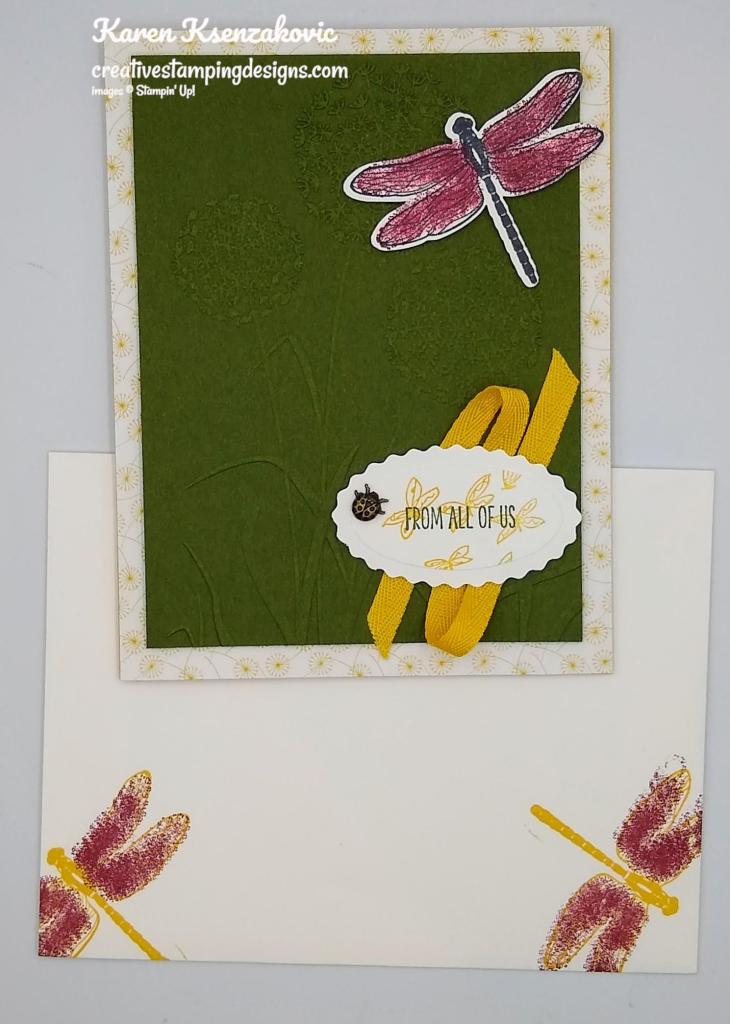
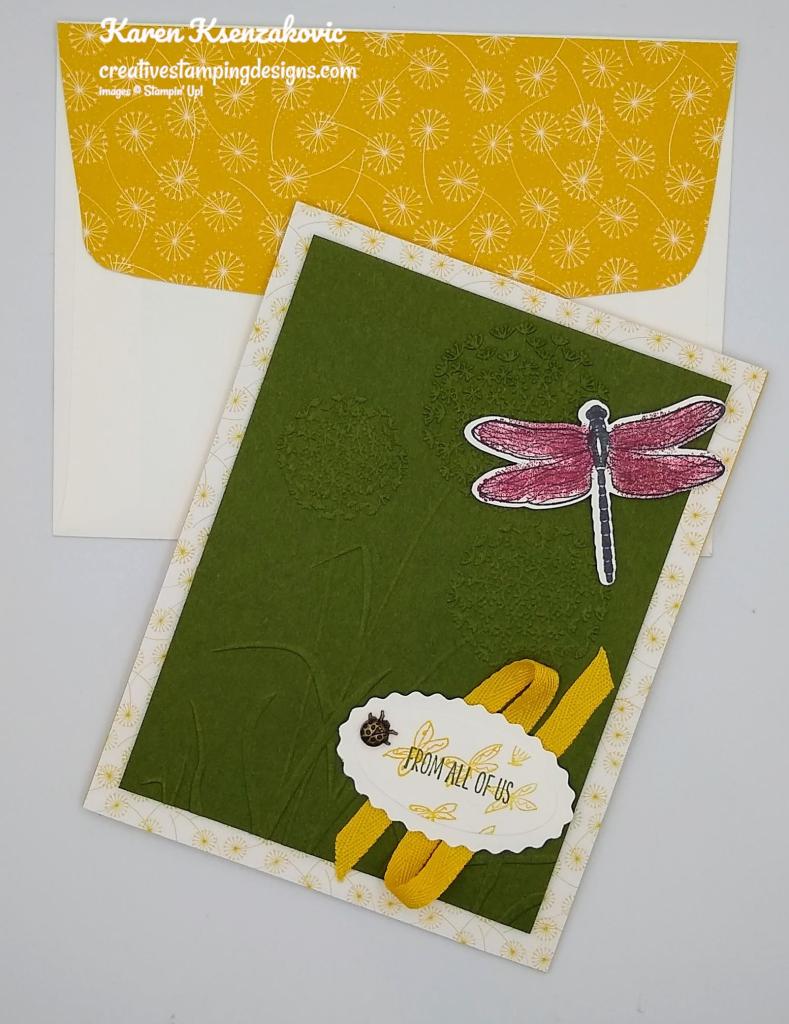
I started by adhering a Dandy Garden Designer Series Paper card front to a Bumblebee card base using Stampin’ Seal.

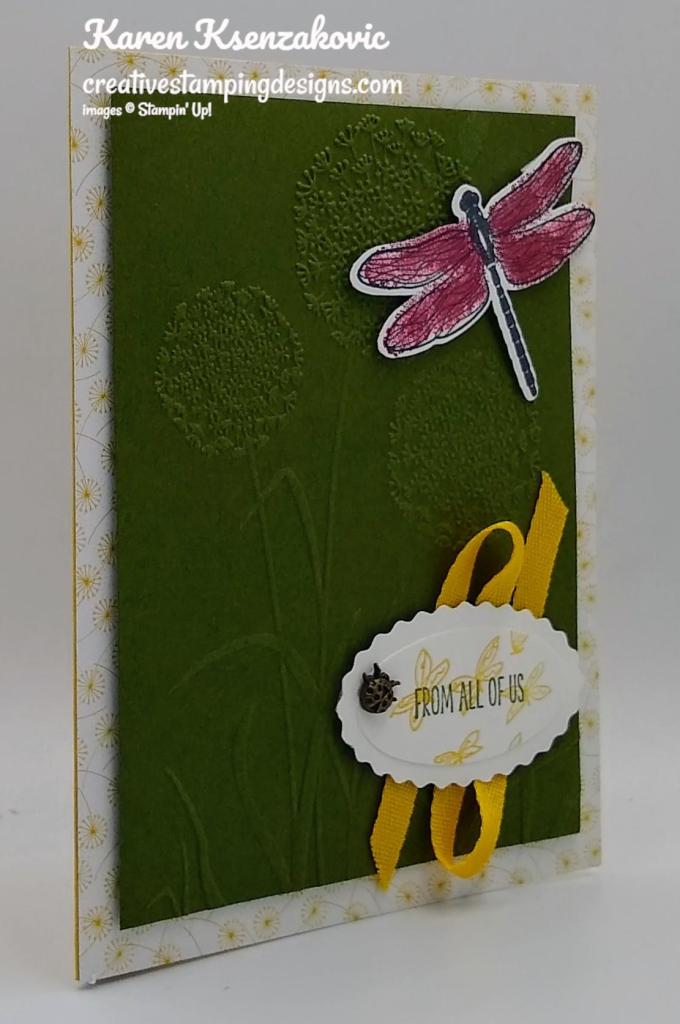
I embossed a panel of Mossy Meadow cardstock using the Dandelion 3D Embossing Folder and adhered it to the card front using Stampin’ Dimensionals.

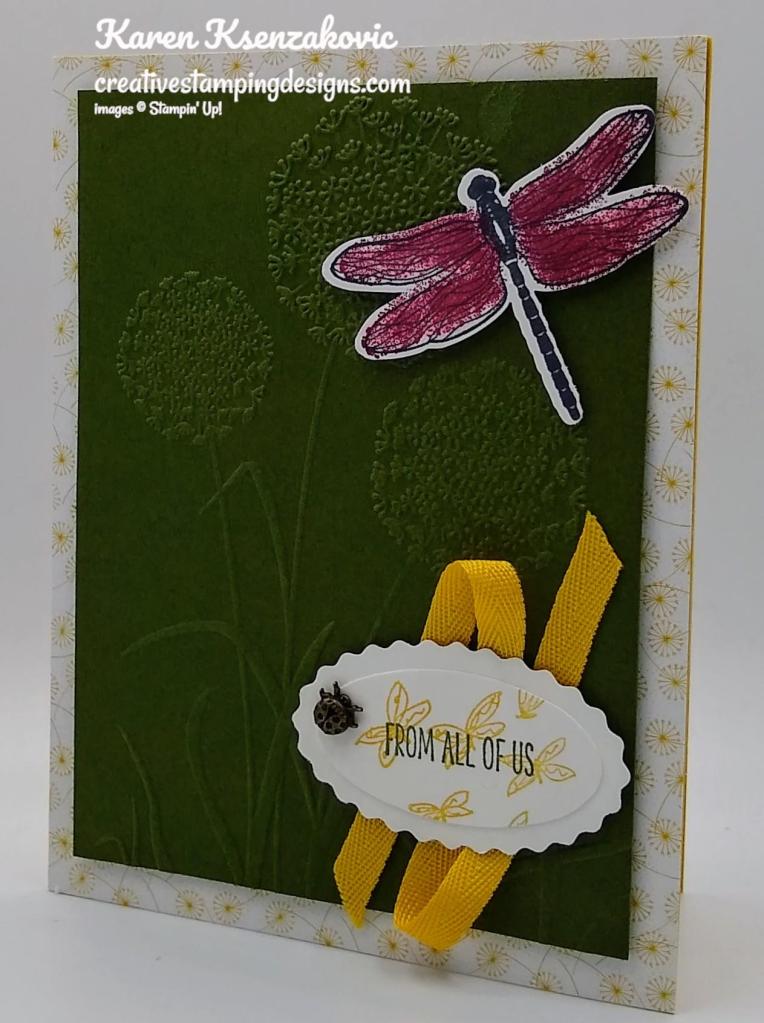
On a panel of Basic White cardstock I stamped the dragonfly image from the Dragonfly Garden stamp set in Tuxedo Black Ink. I stamped the wing fill image in Merry Merlot Ink and I punched the dragonfly out using the Dragonflies Punch. I stamped the sentiment from the Garden Wishes stamp set in Mossy Meadow Ink on the same panel of Basic White cardstock. I stamped the small dragonfly image from the Dragonfly Garden stamp set in Bumblebee Ink over the sentiment and punched it out using the Double Oval Punch. I punched the scalloped oval from the panel of Basic White cardstock using the Double Oval Punch. I adhered the sentiment oval to the scalloped oval using Stampin’ Seal. I adhered a length of 1/4″ Bumblebee Ribbon to the card front adhering it with a small amount of Stampin’ Seal in a ‘Z’ form and adhered the sentiment over the top using Stampin’ Dimensionals. I added a Ladybug Trinket to the sentiment using a Glue Dot. I brushed the wings of the dragonfly with some Clear Wink of Stella and adhered it to the card front using Stampin’ Dimensionals.

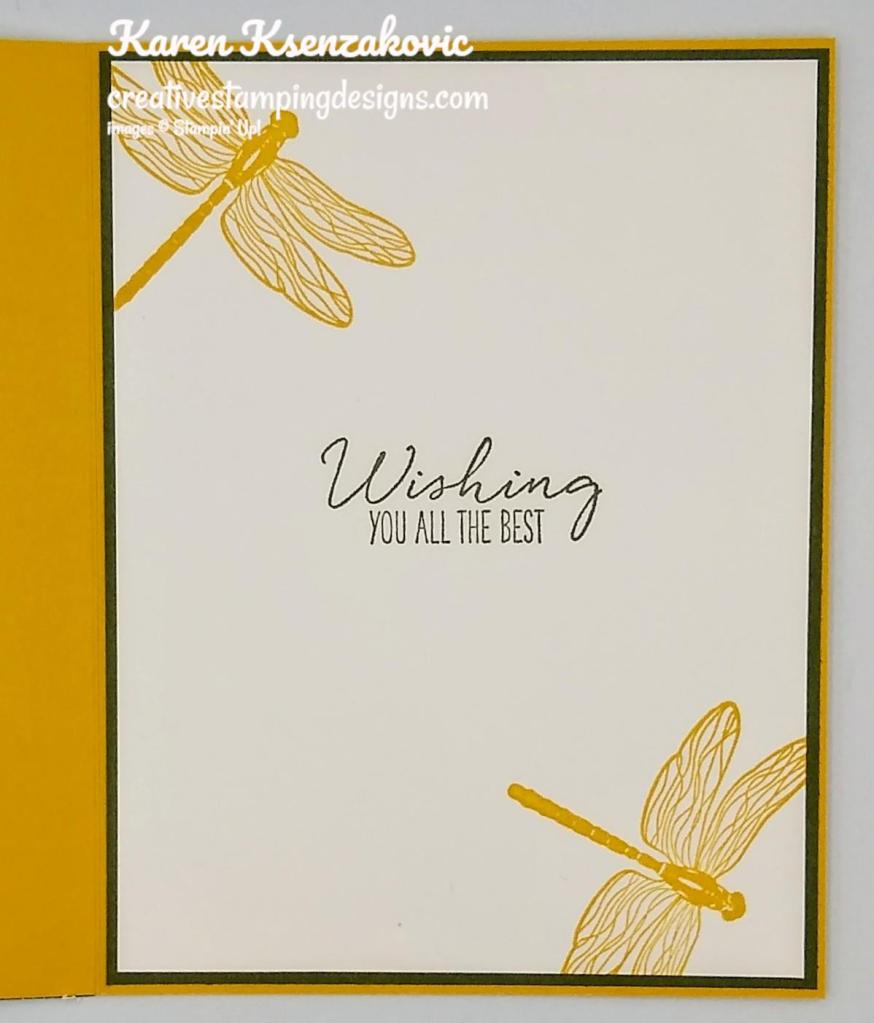
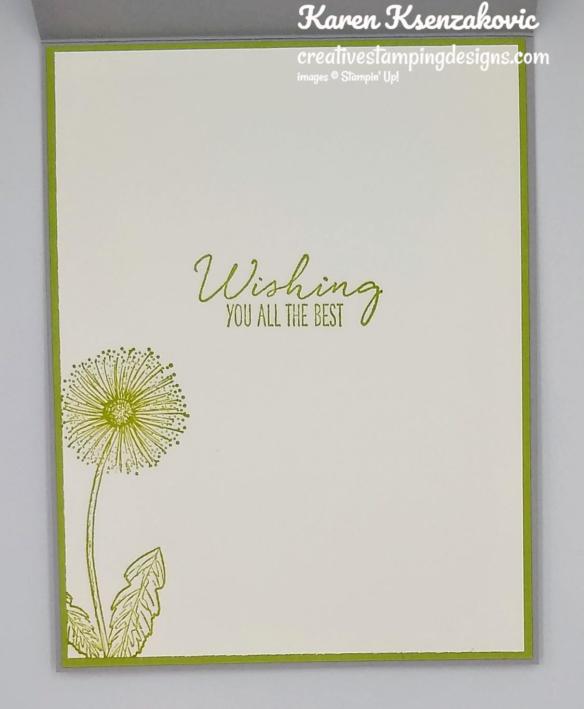
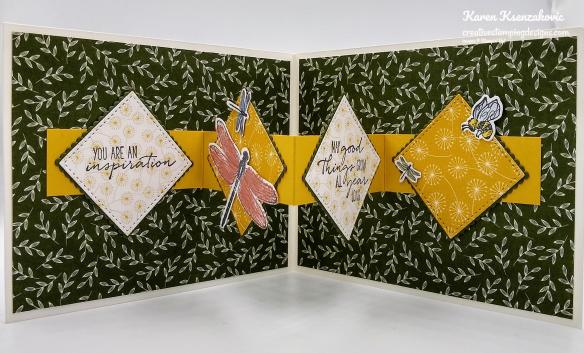
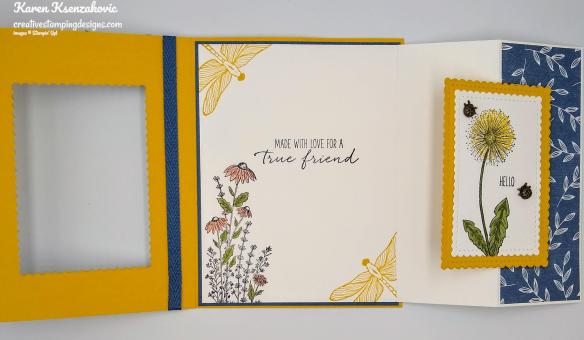
On the inside I stamped the sentiment from the Garden Wishes stamp set in the center of a Basic White panel using Mossy Meadow Ink. I stamped the dragonfly image from the Dragonfly Garden stamp set in Bumblebee Ink on the top and bottom corners of the panel. I adhered the Basic White panel to a Mossy Meadow mat using Stampin’ Seal and then to the inside of the Bumblebee card base using Multipurpose Liquid Glue.

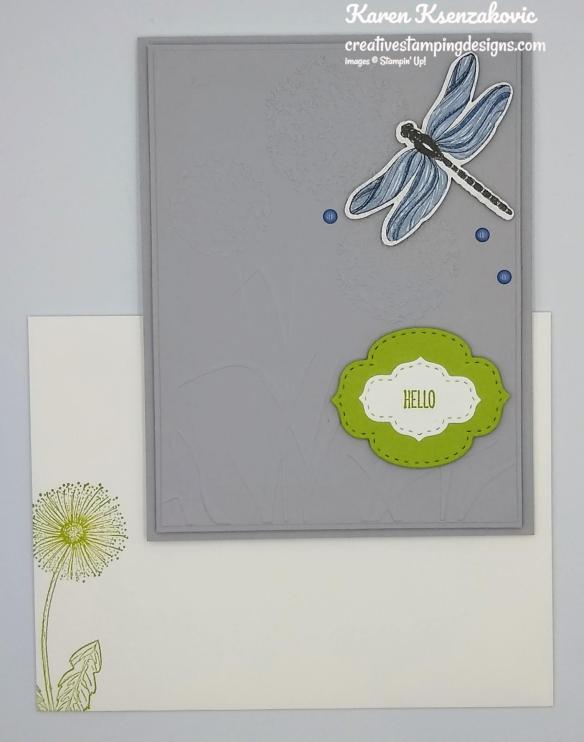
To finish my card I decorated a Basic White Medium Envelope. I stamped the dragonfly from the Dragonfly Garden stamp set on the envelope front and adhered a panel of the Dandy Garden DSP to the envelope flap.

Thank you for stopping by my blog today. I hope you liked my card and will give it a try. Happy Stamping!!

*********************************************************************************************************

If you need any stamping supplies, I’d love to be your Demonstrator. Just click HERE to go directly to my online store or drop me an email if you have any questions. 

MY CURRENT HOST CODE IS: 9R4BQD64

Use this host code when you order $50 or greater and receive a free gift from me! If your order is over $150, please do not use this code, but you’ll still get the free gift. The free gift is your choice of any 1 item valued up to $10.00 from the 2020-2021 Annual Catalog or the January-June 2021 Mini Catalog!   For any orders $50 or more I will also send you my monthly class tutorials.  Click HERE or go to my Customer Rewards for more details and to see what this months tutorials are.

 Click HERE to shop the clearance rack.

Please remember to use my current Host Code and make sure that you can see my name on the final checkout page listed as your Demonstrator when you order so that you know that you’re ordering with me and you’ll get my rewards! 

Happy Stamping, Karen!

*********************************************************************************************************

IT’S THE LAST-CHANCE PRODUCTS SALE

If you love great deals, Stampin’ Up!’s Last-Chance Products Sale is the perfect time to shop. You’ll get deep discounts on your favorite products from the 2020–2021 Annual Catalog—and as an extra bonus—you’ll get a peek at the list of items carrying over to the other catalogs. Many items will sell out fast, so don’t delay—shop early for the best selection!

Sales Period: March 24, 1:00 PM (MT) – May 3, 2021, 11:59 PM (MT)

  • Only select items in the 2020–2021 Annual Catalog will be discounted.
  • Sale applies to all order types except host items (see Last-Chance Products List for items on sale).
  • No minimum purchase is required.
  • Retiring items are available while supplies last.
  • Items and discounts may vary by market (depending on inventory levels).
  • Exclusions apply: Carryover items and some retiring items will not be discounted.
  • Ordering Deadline for retiring products:  May 3, 2021 at 11:59 PM (MT)

Here are the official retiring lists from Stampin’ Up!.

Head over to my online store to pick up those retiring items now!  They’re only available while supplies last from now through May 3!

*********************************************************************************************************

Batter Up!

Subscribe April 11 – May 10

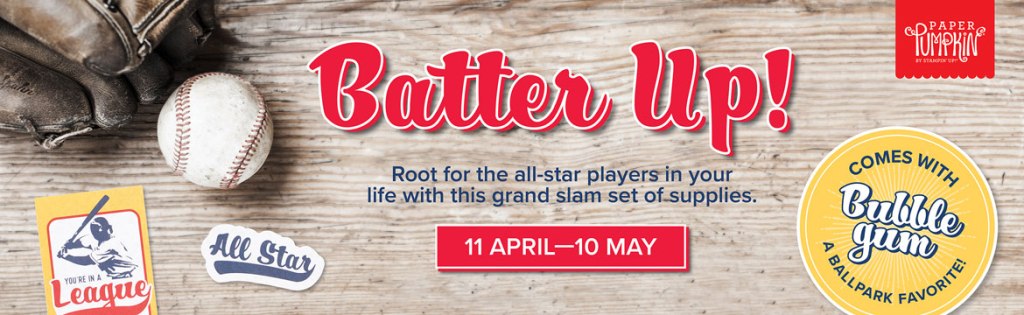
Whether you’re crafting for a father, grandfather, nephew, or brother, we’ve got all your bases covered with the Batter Up! Paper Pumpkin Kit! This month’s kit is the perfect pick for making masculine masterpieces.

Then again, we know that grass-stained pants and sliding into home aren’t just for the boys—this month’s kit is a triple threat! Designed with men, sport-lovin’ ladies, and baseball fanatics in mind, anyone would bounce from their spot in the bleachers if they received a classic card from the Batter Up! kit. After all, this month’s kit was made for celebrating the all-stars, MVPs, and the greats—no matter what team they play on!

Step up to the plate, take a swing, and knock it out of the park! With the Batter Up! Paper Pumpkin Kit, it’s your turn to go to bat for all the people who’ve gone to bat for you. This month’s timeless kit with a “throwback” theme contains enough grand slam supplies to create nine cards—and coordinating envelopes—featuring classic colors, pinwheel and pinstripe patterns, and vintage-washed paper pieces. There’s no “batter” way to root, root, root for your home team and honor the all-stars in your life!

A beloved baseball-themed kit would be incomplete without the sport’s signature, sticky snack—the official bubble gum of the MLB! A favorite in the field, the Batter Up! Paper Pumpkin Kit contains a couple sticks of the chewy staple; chew while you craft, slide a piece into a card, or save it for later.

Send a seventh-inning stretch in a classic card with all-star stripes, a nostalgic nod, and a stamp set fit for an MVP! But, before you give it all you’ve got, give this month’s promotional video a watch. See what the Batter Up! kit is all about! Play ball!

Details

  • Kit contains enough supplies to create 9 cards—3 each of 3 designs—and coordinating envelopes. The all-inclusive kit includes printed card bases, die-cut paper pieces, embellishments, adhesive, and more!
    • Card size: 4-1/4″ x 5-1/2″ (10.8 x 14 cm)
    • Envelope size: 4-1/2″ x 5-3/4″ (11.4 x 14.6 cm)
  • Coordinating colors: Basic White, Bumblebee, Night of Navy, Pacific Point, Real Red, Smoky Slate, Soft Suede
  • Comes with the official bubble gum of the MLB—a ballpark favorite! Chew while you craft, slide a piece into a card, or save it for later.

Subscribe to the May 2021 Paper Pumpkin Kit between 11 April and 10 May at paperpumpkin.com!

Note: Supplies may be limited toward the end of the subscription period.

*********************************************************************************************************

Card stock cuts for this project:

  • Basic White Cardstock 2″ X 5 1/2″ (dragonfly & sentiment), 4″ X 5 1/4″ (inner liner)
  • Bumblebee Cardstock 8 1/2″ X 5 1/2″ (card base scored and folded at 4 1/4″)
  • Mossy Meadow Cardstock 3 3/4″ X 5″ (card front), 4 1/8″ X 5 3/8″ (inner liner mat)
  • Dandy Garden Designer Series Paper 4 1/4″ X 5 1/2″ (card front), 2 1/2″ X 6″ (envelope)

*********************************************************************************************************

Product List

Stampin’ Up! Garden Wishes Hello CAS

Good Monday morning my stamping friends. How was everyone’s weekend? Saturday was an absolutely gorgeous spring day here. Sunday, well, lets just say it was a good day to stay in. Unfortunately I had to go out to work, it was just a very rainy gloomy day.

I have another quick and easy card for you today using the sentiments from the Stampin’ Up! Garden Wishes Cling Stamp Set. The main part of my card uses the Dandelion 3D Embossing Folder. Here’s my card for today.

My colors are from Fab Friday Challenge #210.

I started by embossing a Smoky Slate card front using the Dandelion 3D Embossing Folder. I adhered the embossed panel to a Smoky Slate mat using Multipurpose Liquid Glue and then to a Smoky Slate card base using Stampin’ Dimensionals.

I stamped the sentiment from the Garden Wishes stamp set in Pear Pizzazz Ink on a panel of Basic White cardstock in Pear Pizzazz Ink. I cut the sentiment out using the Stitched So Sweetly Dies. I cut a mat from a panel of Pear Pizzazz cardstock using the larger die from the Stitched So Sweetly Dies. I adhered the sentiment to the mat using Multipurpose Liquid Glue. I adhered the layered panel to the card front using Stampin’ Dimensionals. I punched one of the dragonflies out of a panel of the Dandy Garden Designer Series Paper using my Dragonflies Punch and adhered it to the card front using Stampin’ Dimensionals.

I added a few 2020-2022 In-Color Enamel Dots to the card front.

On the inside I stamped the sentiment from the Garden Wishes stamp set in Pear Pizzazz Ink in the center of a Basic White panel. I stamped the dandelion image from the Garden Wishes stamp set in Pear Pizzazz Ink on the bottom of the panel. I adhered the Basic White panel to a Pear Pizzazz mat using Stampin’ Seal and then to the inside of the Smoky Slate card base using Multipurpose Liquid Glue.

To finish my card I decorated a Basic White Medium Envelope. I stamped the dandelion image from the Garden Wishes stamp set in Pear Pizzazz Ink on the envelope front. I adhered a panel of the Subtle 6 X 6 Designer Series Paper to the envelope flap.

Thank you for stopping by my blog today. I hope you liked my card and will give it a try. Happy Stamping!!

*********************************************************************************************************

If you need any stamping supplies, I’d love to be your Demonstrator. Just click HERE to go directly to my online store or drop me an email if you have any questions. 

MY CURRENT HOST CODE IS: 2QRN664Q

Use this host code when you order $50 or greater and receive a free gift from me! If your order is over $150, please do not use this code, but you’ll still get the free gift. The free gift is your choice of any 1 item valued up to $10.00 from the 2020-2021 Annual Catalog or the January-June 2021 Mini Catalog!   For any orders $50 or more I will also send you my monthly class tutorials.  Click HERE or go to my Customer Rewards for more details and to see what this months tutorials are.

 Click HERE to shop the clearance rack.

Please remember to use my current Host Code and make sure that you can see my name on the final checkout page listed as your Demonstrator when you order so that you know that you’re ordering with me and you’ll get my rewards! 

Happy Stamping, Karen!

*********************************************************************************************************

IT’S THE LAST-CHANCE PRODUCTS SALE

If you love great deals, Stampin’ Up!’s Last-Chance Products Sale is the perfect time to shop. You’ll get deep discounts on your favorite products from the 2020–2021 Annual Catalog—and as an extra bonus—you’ll get a peek at the list of items carrying over to the other catalogs. Many items will sell out fast, so don’t delay—shop early for the best selection!

Sales Period: March 24, 1:00 PM (MT) – May 3, 2021, 11:59 PM (MT)

  • Only select items in the 2020–2021 Annual Catalog will be discounted.
  • Sale applies to all order types except host items (see Last-Chance Products List for items on sale).
  • No minimum purchase is required.
  • Retiring items are available while supplies last.
  • Items and discounts may vary by market (depending on inventory levels).
  • Exclusions apply: Carryover items and some retiring items will not be discounted.
  • Ordering Deadline for retiring products:  May 3, 2021 at 11:59 PM (MT)

Here are the official retiring lists from Stampin’ Up!.

Head over to my online store to pick up those retiring items now!  They’re only available while supplies last from now through May 3!

*********************************************************************************************************

So Cool

Subscribe March 11 – April 10

  • The So Cool Paper Pumpkin Kit is a little taste of summer fun, with enough supplies to make 12 colorful, shaped cards with coordinating envelopes. Six card bases are popsicle shaped, the other six are semicircles: three watermelons and three rainbows. All of the cards are splashed with cheerful, vivid watercolor images. The kit also includes two full-size, matching sticker sheets, die-cut accents, fun embellishments, and more.
  • This kit was designed with kids in mind, as a way to spark their creative imagination and introduce them to papercrafting.
  • The So Cool Kit makes a great gift! It’s an even better way to enjoy some quality time with those special little ones in life.
  • Even though the So Cool Kit was designed with kids in mind, these fun-shaped cards, featuring vivid watercolors, are versatile enough to gift to kids of all ages—the young in years and the young at heart. They’re a great way to send some “sunshine in a card!” Who wouldn’t love that?
  • The kit’s exclusive So Cool Stamp Set is versatile, offering sentiments that can be used for multiple occasions such as birthdays, congrats, cheer, and more! It’s a great addition to any crafter’s collection.

Details

  • Kit includes enough supplies to make 12 fresh, fun-shaped cards—6 popsicles and 6 blank semicircles to color—and coordinating envelopes. Kit includes card bases, 2 full sticker sheets, decorative die-cut pieces, embellishments, and more.
  • Envelope size: 4-1/2″ x 5-3/4″ (11.4 x 14.6 cm)
  • Coordinating colors: Blackberry Bliss, Bermuda Bay, Bumblebee, Cinnamon Cider, Old Olive, Terracotta Tile
  • Coordinates with the Ice Cream Corner Suite from our January–June 2021 Mini Catalog.

Subscribe to the April Paper Pumpkin Kit between 11 March and 10 April at paperpumpkin.com!

Note: Supplies may be limited toward the end of the subscription period.

THERE’S MORE TO LOVE IN THE COORDINATING ICE CREAM CORNER SUITE!

154567

154567
ICE CREAM CORNER DESIGNER SERIES PAPER

Keep the creative fun going by pairing the So Cool Kit with the Ice Cream Corner Designer Series Paper (154567) featured in our 2021 January–June Mini Catalog. It’s a great way to use the kit’s stamps, ink, stickers, and more to further indulge your craving for summer fun. Plus, the paper is part of the matching Ice Cream Corner Suite, so there’s virtually no end to the possibilities!

Coordinating colors: Bermuda Bay, Blackberry Bliss, Cinnamon Cider, Old Olive, Petal Pink, Pool Party, Purple Posy, So Saffron, Soft Sea Foam, Terracotta Tile

Click this link to view the suite and start shopping.

*********************************************************************************************************

Card stock cuts for this project:

  • Basic White Cardstock 1 1/4″ X 1 1/2″ (sentiment), 4′ X 5 1/4″ (inner liner)
  • Pear Pizzazz Cardstock 2 1/4′ x 1 3/4″ (sentiment mat), 4 1/8″ X 5 3/8″ (inner liner mat)
  • Smoky Slate Cardstock 4 1/4″ x 11″ (card base scored and folded at 5 1/2″)
  • Dandy Garden Designer Series Paper (dragonfly)
  • Neutrals 6 X 6 Designer Series Paper 2 1/2″ X 6″ (envelope flap)

*********************************************************************************************************

Product List

Stampin’ Up! Dragonfly Garden Hello for The Happy Inkin’ Thursday Blog Hop

Good Thursday morning my stamping friends and welcome to our Happy Inkin’ Thursday Blog Hop. I hope everyone is doing well today. If you are hopping over from Akiko, thank you for stopping by my blog. This week we have a Color Challenge. Be sure to take a moment to hop around to see everyone’s beautiful projects. I used the new Stampin’ Up! Dragonfly Garden Cling Stamp and the Stampin’ Up! Garden Wishes Bundle along with the Dandy Garden 6 x 6 Designer Series Paper. Here’s my card using this weeks colors.

I played along with the Paper Players Theme Challenge #531 this week.

Here are the colors we had for our challenge this week.

I started by adhering a Dandy Garden DSP card front to a Mossy Meadow card base using Multipurpose Liquid Glue. I adhered another panel of Dandy Garden DSP down the center of the card front using Stampin’ Seal. I adhered a panel of Dandy Garden DSP to a Mossy Meadow mat using Stampin’ Seal and adhered it to the card front using Stampin’ Dimensionals.

I stamped the wildflower image from the Dragonfly Garden stamp set in Tuxedo Black Ink on a panel of Basic White cardstock. I colored the flowers and leaves in using my Blackberry Bliss and Mossy Meadow Stampin’ Blends Markers. I colored the flower centers in using my Bumblebee Stampin’ Write Marker. I stamped the sentiment from the Stampin’ Up! Garden Wishes Cling Stamp Set in Tuxedo Black Ink on the panel. I cut the panel using my Stitched Rectangle Dies and embossed it using my Subtle 3D Embossing Folder. I adhered the artwork to a Mossy Meadow mat using Multipurpose Liquid Glue and adhered it to the card front using Stampin’ Seal.

I cut a couple of the bees from a panel of the Dandy Garden DSP using my Dandy Wishes Dies and adhered them to the artwork using Stampin’ Dimensionals. I tied a double bow using the Misty Moonlight/Silver Bakers Twine from the Flowers For Every Season Ribbon Combo Pack and adhered it to the bottom of the artwork using a Glue Dot. I added a Ladybug Trinket by the sentiment using a Glue Dot.

On the inside I stamped the sentiment from the Garden Wishes stamp set in Tuxedo Black Ink in the center of a Basic White panel. I stamped the wildflower image from the Dragonfly Garden stamp set in Tuxedo Black Ink on the bottom of the panel and colored the flowers and leaves in using my Blackberry Bliss and Mossy Meadow Stampin’ Blends Markers. I adhered another bee that I had cut from the Dandy Garden DSP using Multipurpose Liquid Glue. I adhered the Basic White panel to a Mossy Meadow mat using Stampin’ Seal and then to the inside of the Mossy Meadow card base using Multipurpose Liquid Glue.

To complete my card I decorated a Basic White Medium Envelope. I stamped the wildflower image from the Dragonfly Garden stamp set on the envelope front and colored it in the same as I did for the card. I adhered a panel of the Dandy Garden DSP to the envelope flap.

Thank you for visiting my blog today. I hope you liked my card and will give it a try. Now that you’ve seen my card, take a minute to hop through all our projects today. If you click on the Next Blog button, you’ll go to Amy’s page. Or you can just click on the names below to go directly to all their blogs! Happy Hopping!!

Amy Koenders:

Mary Deatherage:

Kristi Gray:

Jaimie Babarczy:

Sue Prather:

Karen Finkle:

Akiko Sudano:

Karen Ksenzakovic: You Are Here

*********************************************************************************************************

If you need any stamping supplies, I’d love to be your Demonstrator. Just click HERE to go directly to my online store or drop me an email if you have any questions. 

MY CURRENT HOST CODE IS: 2QRN664Q

Use this host code when you order $50 or greater and receive a free gift from me! If your order is over $150, please do not use this code, but you’ll still get the free gift. The free gift is your choice of any 1 item valued up to $10.00 from the 2020-2021 Annual Catalog or the January-June 2021 Mini Catalog!   For any orders $50 or more I will also send you my monthly class tutorials.  Click HERE or go to my Customer Rewards for more details and to see what this months tutorials are.

 Click HERE to shop the clearance rack.

Please remember to use my current Host Code and make sure that you can see my name on the final checkout page listed as your Demonstrator when you order so that you know that you’re ordering with me and you’ll get my rewards! 

Happy Stamping, Karen!

*********************************************************************************************************

So Cool

Subscribe March 11 – April 10

  • The So Cool Paper Pumpkin Kit is a little taste of summer fun, with enough supplies to make 12 colorful, shaped cards with coordinating envelopes. Six card bases are popsicle shaped, the other six are semicircles: three watermelons and three rainbows. All of the cards are splashed with cheerful, vivid watercolor images. The kit also includes two full-size, matching sticker sheets, die-cut accents, fun embellishments, and more.
  • This kit was designed with kids in mind, as a way to spark their creative imagination and introduce them to papercrafting.
  • The So Cool Kit makes a great gift! It’s an even better way to enjoy some quality time with those special little ones in life.
  • Even though the So Cool Kit was designed with kids in mind, these fun-shaped cards, featuring vivid watercolors, are versatile enough to gift to kids of all ages—the young in years and the young at heart. They’re a great way to send some “sunshine in a card!” Who wouldn’t love that?
  • The kit’s exclusive So Cool Stamp Set is versatile, offering sentiments that can be used for multiple occasions such as birthdays, congrats, cheer, and more! It’s a great addition to any crafter’s collection.

Details

  • Kit includes enough supplies to make 12 fresh, fun-shaped cards—6 popsicles and 6 blank semicircles to color—and coordinating envelopes. Kit includes card bases, 2 full sticker sheets, decorative die-cut pieces, embellishments, and more.
  • Envelope size: 4-1/2″ x 5-3/4″ (11.4 x 14.6 cm)
  • Coordinating colors: Blackberry Bliss, Bermuda Bay, Bumblebee, Cinnamon Cider, Old Olive, Terracotta Tile
  • Coordinates with the Ice Cream Corner Suite from our January–June 2021 Mini Catalog.

Subscribe to the April Paper Pumpkin Kit between 11 March and 10 April at paperpumpkin.com!

Note: Supplies may be limited toward the end of the subscription period.

THERE’S MORE TO LOVE IN THE COORDINATING ICE CREAM CORNER SUITE!

154567

154567
ICE CREAM CORNER DESIGNER SERIES PAPER

Keep the creative fun going by pairing the So Cool Kit with the Ice Cream Corner Designer Series Paper (154567) featured in our 2021 January–June Mini Catalog. It’s a great way to use the kit’s stamps, ink, stickers, and more to further indulge your craving for summer fun. Plus, the paper is part of the matching Ice Cream Corner Suite, so there’s virtually no end to the possibilities!

Coordinating colors: Bermuda Bay, Blackberry Bliss, Cinnamon Cider, Old Olive, Petal Pink, Pool Party, Purple Posy, So Saffron, Soft Sea Foam, Terracotta Tile

Click this link to view the suite and start shopping.

*********************************************************************************************************

Available Now!!!

Bring in the beauty of nature with the artistic designs of the Butterfly Brilliance Bundle and coordinating designer series paper, along with textured specialty paper that will put a pop of brilliance on every project. The Butterfly Brilliance Collection will be available March2 — May 3, 2021.

*********************************************************************************************************

The 2019-2021 In-Colors will be retiring soon. See the complete list of items in my online store Here.

*********************************************************************************************************

Card stock cuts for this project:

  • Basic White Cardstock 4 1/4″ x 3″ (artwork), 4″ X 5 1/4″ (inner liner)
  • Mossy Meadow Cardstock 4 1/4″ X 11″ (card base scored and folded at 5 1/2″), 4 1/8″ x 2 3/4″ (artwork mat), 3 5/8″ X 3 1/2″ (dsp mat), 4 1/8″ x 5 3/8″ (inner liner mat)
  • Dandy Garden Designer Series Paper 4″ x 5 1/4″ (card front), 2″ x 5 1/4″ (card front panel), 3 1/2″ x 3 3/8″ (card front panel), 2 1/2″ X 6″ (envelope flap)

*********************************************************************************************************

Product List

Stampin’ Up! Dragonfly Garden Wishes for Fun Fold Friday

Good Friday morning my stamping friends and welcome to my Fun Fold Friday. How was everyone’s week? Is anyone doing anything for the weekend? I thought I was working all weekend, but to my surprise I’m only working on Sunday.

Today’s card I made on my Facebook Live video on Wednesday. If you were able to join me or watched the replay, thank you very much. If you’d like to watch my video and stamp along, the measurements are below along with the links to my Facebook page and my YouTube channel. Here’s my card that I made.

I used the Stampin’ Up! Dragonfly Garden Bundle and the Stampin’ Up! Garden Wishes Bundle for my card along with the Dandy Garden 6 X 6 Designer Series Paper.

For the card front I started by stamping the dragonfly image from the Stampin’ Up! Dragonfly Garden Cling Stamp Set on 2 of the corners of a Basic White panel in Tuxedo Black Ink. I stamped the inside of the wings in Bumblebee Ink. I stamped the sentiment from the Stampin’ Up! Garden Wishes Cling Stamp Set in Tuxedo Black Ink a little off centered.

On a small panel of Basic White cardstock I stamped the dandelion image from the Garden Wishes stamp set in Tuxedo Black Ink. I also stamped 2 of the bee images from the Garden Wishes stamp set in Tuxedo Black Ink. I colored the bee in using my Mango Melody and Seaside Spray Stampin’ Blends Markers. I stamped the dandelion center in Bumblebee Ink, stamping off once and colored the leaves in using my Mossy Meadow Stampin’ Blends Markers. I cut the images out using the Dandy Wishes Dies. I fussy cut some of the tiny dragonflies from a panel of Dandy Garden DSP using my Paper Snips.

I adhered the cut out dandelion and bee images to the card front using Stampin’ Dimensionals. I adhered a couple of the cut out dragonflies to the card front using Glue Dots. I adhered the card front to a Mossy Meadow mat using Stampin’ Seal and then to the Thick Basic White card base using Stampin’ Dimensionals. I added a Ladybug Trinket to the leaf of the dandelion using a Glue Dot.

On the inside I adhered 2 panels of the Dandy Garden DSP to both sides of the inside card base using Multipurpose Liquid Glue. I cut 4 stitched squares out of 2 different panels of Dandy Garden DSP using the Stitched Shapes Dies. I cut 4 scalloped squares out of a panel of Mossy Meadow card stock using the Layering Squares Dies. I adhered 2 of the stitched squares to 2 of the Mossy Meadow scalloped squares using Stampin’ Seal. On the 2 lighter stitched DSP squares I stamped the sentiments from the Dragonfly Garden stamp set in Tuxedo Black Ink. I adhered the stamped DSP stitched squares to the other 2 Mossy Meadow scalloped squares using Stampin’ Seal.

I adhered a 1″ scored strip of Bumblebee cardstock to the center of the inside card base using Tear & Tape. I adhered the squares to the Bumblebee strip using Stampin’ Seal. I stamped the dragonfly image from the Dragonfly Garden on a small panel of Basic White cardstock in Tuxedo Black Ink. I stamped the wings in Calypso Coral Ink and cut the dragonfly out using the Dragonfly Punch. I adhered the dragonfly to the darker DSP square using Glue Dots. I adhered the cut out bee to the top of the last square using a Glue Dot. I added a couple more of the tiny fussy cut dragonflies to the darker squares using Glue Dots.

To finish my card I decorated a Basic White Medium Envelope. I stamped the dandelion from the Garden Wishes stamp set and the dragonfly from the Dragonfly Garden stamp set in Tuxedo Black Ink on the envelope front. I stamped the dragonfly wings in Bumblebee Ink and the center of the dandelion in Bumblebee Ink, stamped off once. I colored the leaves of the dandelion in using my Mossy Meadow Stampin’ Blends Markers. I adhered a panel of the Dandy Garden DSP to the envelope flap.

Thank you for stopping by my blog today. I hope you liked my card and will give it a try. The list of measurements are below if you’d like to stamp along while watching the video. You can watch my video on my Facebook page Here.

You can also view the video on my YouTube channel Here. Happy Stamping!!

*********************************************************************************************************

If you need any stamping supplies, I’d love to be your Demonstrator. Just click HERE to go directly to my online store or drop me an email if you have any questions. 

MY CURRENT HOST CODE IS: C4XDWQT6

Use this host code when you order $50 or greater and receive a free gift from me! If your order is over $150, please do not use this code, but you’ll still get the free gift. The free gift is your choice of any 1 item valued up to $10.00 from the 2020-2021 Annual Catalog or the January-June 2021 Mini Catalog!   For any orders $50 or more I will also send you my monthly class tutorials.  Click HERE or go to my Customer Rewards for more details and to see what this months tutorials are.

 Click HERE to shop the clearance rack.

Please remember to use my current Host Code and make sure that you can see my name on the final checkout page listed as your Demonstrator when you order so that you know that you’re ordering with me and you’ll get my rewards! 

Happy Stamping, Karen!

*********************************************************************************************************

Sending Hearts

Subscribe December 11-January 10 

Love is in the air! Send a little love to someone special with the Sending Hearts Paper Pumpkin Kit. From heaps of heart-shaped elements to paper pieces in red and pink, this month’s kit has everything you need to create eight adorable cards—with coordinating envelopes—for Valentine’s Day, anniversaries, and every celebration of love in between!

With the add-on to January’s sweet and sentimental kit, there’s even more love to share! The add-on—called Little Love Boxes—includes 20 tiny, printed boxes and 24 die-cut, heart-shelled snails and sentiment labels. When combined with the remaining components from the Sending Hearts kit, you can create treat packaging, additional cards, and so much more!

ABOUT THE JANUARY KIT

Details

  • Kit contains enough supplies to create eight cards—four each of two designs—and coordinating envelopes.
  • Card size: 4-1/4″ x 5-1/2″ (10.8 x 14 cm)
  • Envelope size: 4-1/2″ x 5-3/4″ (11.4 x 14.6 cm)
  • Coordinating colors: Basic Black, gold, Petal Pink, Poppy Parade, Smoky Slate, white

ABOUT THE ADD-ON

Name Little Love Boxes

Details

  • Add-on contains 20 printed mini boxes and 24 die-cut decorative pieces and sentiment labels.
  • Item number: 156842
  • Price: $8 USD/$11 CAD 
  • Available 1 January, while supplies last!

Subscribe to the January 2021 Paper Pumpkin Kit between 11 December and 10 January at paperpumpkin.com!

ADD-ON ORDERING INFORMATION

Purchase the Little Love Boxes add-on to the Sending Hearts Paper Pumpkin Kit on stampinup.com, or by placing an order through my online store. The add-on will be available starting 1 January, while supplies last. You must be a Paper Pumpkin subscriber to order the add-on.

  • Little Love Boxes (156842)
  • $8 USD | $11 CAD

Note: Add-on is not included in January’s Paper Pumpkin subscription. It must be purchased through a separate order. 

Note: Supplies may be limited toward the end of the subscription period.

*********************************************************************************************************

Card stock cuts for this project:

  • Bumblebee Cardstock 1″ X 11″ (center strip scored at 2 3/4″, 5 1/2′ & 8 1/4″)
  • Mossy Meadow Cardstock 4 1/8″ x 5 3/8″ (card front mat), 4″ X 4″ (scalloped squares)
  • Basic White Cardstock 4″ X 5 1/4″ (card front), 3″ x 4 1/2″ (dandelion and bees), 2″ X 3″ (dragonfly)
  • Thick Basic White Cardstock 4 1/4″ X 11″ (card base scored and folded at 5 1/2″)
  • Dandy Garden 6 X 6 Designer Series Paper 2-2″ X 4″ (2 different designs for inside panels), 2 – 4″ X 5 1/4″ (inner liner panels), 2 1/2″ X 6″ (piece for envelope flap)

*********************************************************************************************************

Product List

Dragonflies Punch


Dandy Wishes Dies


Ladybug Trinkets


Layering Squares Dies


Stitched Shapes Dies


Mini Glue Dots


$5.25


Multipurpose Liquid Glue


Stampin' Dimensionals


Stampin' Seal


$8.00


Bone Folder


$7.00


Paper Trimmer


$25.00


Clear Block Bundle


Stamparatus


$49.00

Stampin’ Up! Garden Wishes Sneak Peek for my Fun Fold Friday

Good Friday morning my stamping friends and welcome to my Fun Fold Friday. How was everyone’s week? I hope you all had a productive one. Does anyone have plans for the weekend? I’ll be working all day tomorrow. It’s been a rainy few days here but of course it’s suppose to be sunny tomorrow.

Today’s card I made on my Facebook Live video on Wednesday. If you were able to join me or watched the replay, thank you very much. If you’d like to watch my video and stamp along, the measurements are below along with the links to my Facebook page and my YouTube channel. You won’t be able to make the exact card unless you were able to purchase these set already. Both stamp sets and the DSP will be available in the January-June 2021 Mini Catalog. Here’s the card that I made.

I used the new Stampin’ Up! Garden Wishes Cling Stamp Set and the Stampin’ Up! Dragonfly Garden Cling Stamp Set to make my card today.

I started by lightly adhering a panel of the Dandy Garden 6 X 6 Designer Series Paper to a Bumblebee card base using a tiny amount of Stampin’ Seal just on 2 of the corners to hold it in place. I cut the center out using the 2nd largest die from the Stitched So Sweetly Dies. I set the pieces to the side and adhered the Dandy Garden DSP to the card base using Multipurpose Liquid Glue.

I tied a piece of the Misty Moonlight 2020-2022 In-Color 1/4″ Ribbon around the card front and tied a bow. I added a Glue Dot under the bow to hold it in place.

On a panel of Whisper White cardstock I stamped the dandelion image from the Garden Wishes stamp set in Tuxedo Black Memento Ink. I stamped the flower center image from the Garden Wishes stamp set in Bumblebee Ink, stamping off once, in the center of the dandelion. I colored the stem and leave in using my Mossy Meadow Stampin’ Blends Markers. I cut the image out using the 3rd largest die from the Stitched So Sweetly Dies. I adhered the artwork to the Bumblebee mat (which I cut out from the card base earlier), using Stampin’ Seal.

I adhered a panel of Dandy Garden DSP to the inner card base using Multipurpose Liquid Glue then adhered the matted artwork to it using Stampin’ Dimensionals. I added a couple of the Ladybug Trinkets to the artwork using Glue Dots.

On the inside Z-Fold card I stamped the wild flower image from the Dragonfly Garden stamp set in Tuxedo Black Memento Ink on the bottom of the panel. I stamped the sentiment from the Garden Wishes stamp set in the center of the Whisper White panel I stamped the dragonfly image from the Dragonfly Garden stamp set in Bumblebee Ink on the top and bottom corners of the panel, masking it with a Post-It note so that I didn’t get ink on the side panel. I colored the flowers in using my Calypso Coral and Mossy Meadow Stampin’ Blends Markers. I adhered the inner card base to a Misty Moonlight mat using Stampin’ Seal and then to the inside of the Bumblebee card base using Multipurpose Liquid Glue.

To finish my card I decorated a Medium Whisper White Envelope. I stamped the dandelion image from the Garden Wishes stamp set in Tuxedo Black Memento Ink on the envelope front. I stamped the flower center image from the Garden Wishes stamp set in bumblebee Ink, stamping off once, in the center of the dandelion. I colored the leaves and stem in using my Mossy Meadow Stampin’ Blends Markers. I stamped the dragonfly image from the Dragonfly Garden stamp set in Bumblebee Ink on the envelope front. I adhered a panel of the Dandy Garden DSP to the envelope flap.

Thank you for stopping by my blog today. I hope you liked my card and will give it a try. The list of measurements are below if you’d like to stamp along while watching the video. The stamp sets and DSP for my project today will be available in the January-June 2021 Mini Catalog on January 5, 2021. If you are one of my customers and have placed an order this past year, I will be sending you a catalog as soon as they are available. If you need a catalog and would like me to be your demonstrator, please drop me a line and I will be more that happy to get one out to you as soon as I can. You can watch my video on my Facebook page Here.

You can also view the video on my YouTube channel Here. Happy Stamping!!

*********************************************************************************************************

If you need any stamping supplies, I’d love to be your Demonstrator. Just click HERE to go directly to my online store or drop me an email if you have any questions. 

MY CURRENT HOST CODE IS: 9XYYG2ZU

Use this host code when you order $50 or greater and receive a free gift from me! If your order is over $150, please do not use this code, but you’ll still get the free gift. The free gift is your choice of any 1 item valued up to $10.00 in the 2020-2021 Annual Catalog!   For any orders $50 or more I will also send you my monthly class tutorials.  Click HERE or go to my Customer Rewards for more details and to see what this months tutorials are.

 Click HERE to shop the clearance rack.

Please remember to use my current Host Code and make sure that you can see my name on the final checkout page listed as your Demonstrator when you order so that you know that you’re ordering with me and you’ll get my rewards! 

Happy Stamping, Karen!

*********************************************************************************************************

Beary Comforting

Subscribe November 11-December 10

If you haven’t heard already, Paper Pumpkin is our monthly One-Stop Box™ that offers a wide variety of unique papercrafting projects for subscribers of any skill level! These themed, all-inclusive craft kits encourage customers to explore their creativity, try new techniques, and discover their potential in papercrafting.

December’s cute and cuddly Paper Pumpkin kit—called “Beary Comforting”—is designed to uplift your loved ones as this beary tough year finally comes to a close. After a year like 2020, we all could use a big bear hug! With the help of this bear-themed kit, you can create 12 unbearably cute cards featuring warm and fuzzy friends, sweet stamps, and meaningful messages. Near or far, send your friends and family the extra comfort, love, and encouragement they need with this month’s Paper Pumpkin kit!

ABOUT THE DECEMBER KIT

Details

  • Kit contains enough supplies to create 12 cards and coordinating envelopes.
  • Card size: 4-1/4″ x 5-1/2″ (10.8 x 14 cm)
  • Envelope size: 4-1/2″ x 5-3/4″ (11.4 x 14.6 cm)
  • Coordinating colors: Basic Gray, Calypso Coral, Cinnamon Cider, Daffodil Delight, Rich Razzleberry, Soft Sea Foam, Whisper White

SUBSCRIPTION INFORMATION

Subscribe to the December 2020 Paper Pumpkin Kit between 11 November and 10 December at paperpumpkin.com!

Note: Supplies may be limited toward the end of the subscription period.

*********************************************************************************************************

FREE Bonus Quite Curvy and Curvy Christmas Project Tutorials With Videos When You Purchase The Bundle From Me!!

A group of us worked together to create five awesome tutorials using the Stampin’ Up! Curvy Celebrations special release products with video tutorials!  You can get this set of exclusive tutorials when you purchase either the Quite Curvy Variety Bundle (item 158396) or the Quite Curvy Bundle (item 156228) from me between now and January 4!

If your order is $50 or greater and includes either of these bundles, you will get this set of tutorials in addition to the monthly online class tutorials AND your $10 thank you gift!  And you’ll also earn my Creative Stamping Designs Reward Points!

*********************************************************************************************************

Card stock cuts for this project:

  • Bumblebee Cardstock 8 1/2″ X 5 1/2″ (card base scored and folded at 4 1/4″)
  • Misty Moonlight Cardstock (inner card base mat)
  • Whisper White Cardstock 8″ X 5 1/4″ (inner card base scored and folded at 2″ & 4″), 2 1/2″ x 3 1/2″ (artwork)
  • Dandy Garden 6 X 6 Designer Series Paper 4 1/8″ X 5 3/8″ (card front), 1 7/8″ x 5 1/8″ (inner card base panel), 2 1/4″ X 6″ (piece for envelope flap)

*********************************************************************************************************

Product List