
Good Friday morning my stamping friends and welcome to my Fun Fold Friday. How was everyone’s week? Is anyone doing anything for the weekend? I thought I was working all weekend, but to my surprise I’m only working on Sunday.
Today’s card I made on my Facebook Live video on Wednesday. If you were able to join me or watched the replay, thank you very much. If you’d like to watch my video and stamp along, the measurements are below along with the links to my Facebook page and my YouTube channel. Here’s my card that I made.
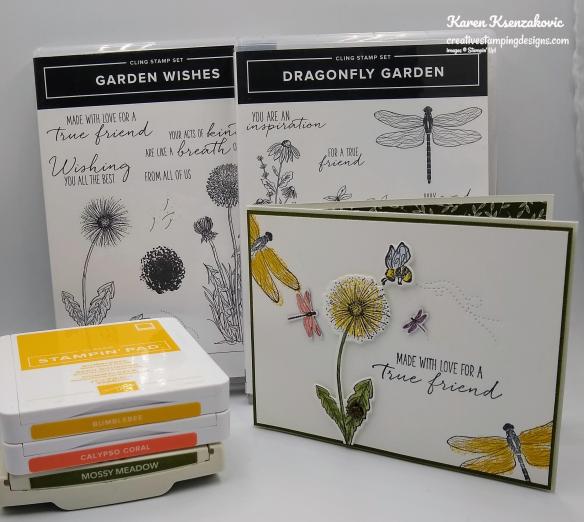
I used the Stampin’ Up! Dragonfly Garden Bundle and the Stampin’ Up! Garden Wishes Bundle for my card along with the Dandy Garden 6 X 6 Designer Series Paper.

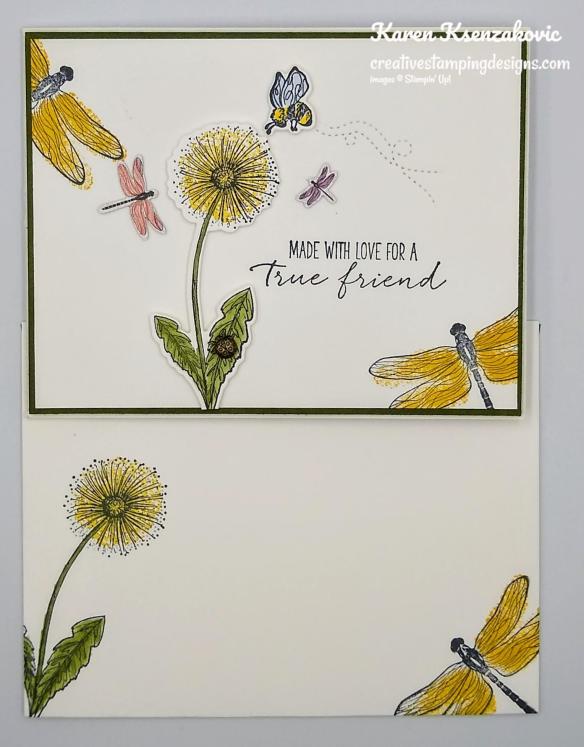
For the card front I started by stamping the dragonfly image from the Stampin’ Up! Dragonfly Garden Cling Stamp Set on 2 of the corners of a Basic White panel in Tuxedo Black Ink. I stamped the inside of the wings in Bumblebee Ink. I stamped the sentiment from the Stampin’ Up! Garden Wishes Cling Stamp Set in Tuxedo Black Ink a little off centered.

On a small panel of Basic White cardstock I stamped the dandelion image from the Garden Wishes stamp set in Tuxedo Black Ink. I also stamped 2 of the bee images from the Garden Wishes stamp set in Tuxedo Black Ink. I colored the bee in using my Mango Melody and Seaside Spray Stampin’ Blends Markers. I stamped the dandelion center in Bumblebee Ink, stamping off once and colored the leaves in using my Mossy Meadow Stampin’ Blends Markers. I cut the images out using the Dandy Wishes Dies. I fussy cut some of the tiny dragonflies from a panel of Dandy Garden DSP using my Paper Snips.

I adhered the cut out dandelion and bee images to the card front using Stampin’ Dimensionals. I adhered a couple of the cut out dragonflies to the card front using Glue Dots. I adhered the card front to a Mossy Meadow mat using Stampin’ Seal and then to the Thick Basic White card base using Stampin’ Dimensionals. I added a Ladybug Trinket to the leaf of the dandelion using a Glue Dot.
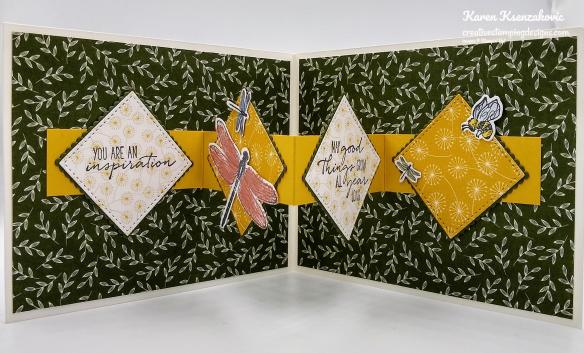
On the inside I adhered 2 panels of the Dandy Garden DSP to both sides of the inside card base using Multipurpose Liquid Glue. I cut 4 stitched squares out of 2 different panels of Dandy Garden DSP using the Stitched Shapes Dies. I cut 4 scalloped squares out of a panel of Mossy Meadow card stock using the Layering Squares Dies. I adhered 2 of the stitched squares to 2 of the Mossy Meadow scalloped squares using Stampin’ Seal. On the 2 lighter stitched DSP squares I stamped the sentiments from the Dragonfly Garden stamp set in Tuxedo Black Ink. I adhered the stamped DSP stitched squares to the other 2 Mossy Meadow scalloped squares using Stampin’ Seal.
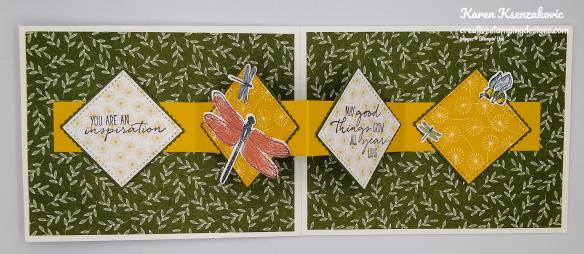
I adhered a 1″ scored strip of Bumblebee cardstock to the center of the inside card base using Tear & Tape. I adhered the squares to the Bumblebee strip using Stampin’ Seal. I stamped the dragonfly image from the Dragonfly Garden on a small panel of Basic White cardstock in Tuxedo Black Ink. I stamped the wings in Calypso Coral Ink and cut the dragonfly out using the Dragonfly Punch. I adhered the dragonfly to the darker DSP square using Glue Dots. I adhered the cut out bee to the top of the last square using a Glue Dot. I added a couple more of the tiny fussy cut dragonflies to the darker squares using Glue Dots.
To finish my card I decorated a Basic White Medium Envelope. I stamped the dandelion from the Garden Wishes stamp set and the dragonfly from the Dragonfly Garden stamp set in Tuxedo Black Ink on the envelope front. I stamped the dragonfly wings in Bumblebee Ink and the center of the dandelion in Bumblebee Ink, stamped off once. I colored the leaves of the dandelion in using my Mossy Meadow Stampin’ Blends Markers. I adhered a panel of the Dandy Garden DSP to the envelope flap.

Thank you for stopping by my blog today. I hope you liked my card and will give it a try. The list of measurements are below if you’d like to stamp along while watching the video. You can watch my video on my Facebook page Here.
You can also view the video on my YouTube channel Here. Happy Stamping!!
*********************************************************************************************************
If you need any stamping supplies, I’d love to be your Demonstrator. Just click HERE to go directly to my online store or drop me an email if you have any questions.
MY CURRENT HOST CODE IS: C4XDWQT6
Use this host code when you order $50 or greater and receive a free gift from me! If your order is over $150, please do not use this code, but you’ll still get the free gift. The free gift is your choice of any 1 item valued up to $10.00 from the 2020-2021 Annual Catalog or the January-June 2021 Mini Catalog! For any orders $50 or more I will also send you my monthly class tutorials. Click HERE or go to my Customer Rewards for more details and to see what this months tutorials are.
Click HERE to shop the clearance rack.
Please remember to use my current Host Code and make sure that you can see my name on the final checkout page listed as your Demonstrator when you order so that you know that you’re ordering with me and you’ll get my rewards!
Happy Stamping, Karen!
*********************************************************************************************************
Sending Hearts
Subscribe December 11-January 10

Love is in the air! Send a little love to someone special with the Sending Hearts Paper Pumpkin Kit. From heaps of heart-shaped elements to paper pieces in red and pink, this month’s kit has everything you need to create eight adorable cards—with coordinating envelopes—for Valentine’s Day, anniversaries, and every celebration of love in between!
With the add-on to January’s sweet and sentimental kit, there’s even more love to share! The add-on—called Little Love Boxes—includes 20 tiny, printed boxes and 24 die-cut, heart-shelled snails and sentiment labels. When combined with the remaining components from the Sending Hearts kit, you can create treat packaging, additional cards, and so much more!
ABOUT THE JANUARY KIT
Details
- Kit contains enough supplies to create eight cards—four each of two designs—and coordinating envelopes.
- Card size: 4-1/4″ x 5-1/2″ (10.8 x 14 cm)
- Envelope size: 4-1/2″ x 5-3/4″ (11.4 x 14.6 cm)
- Coordinating colors: Basic Black, gold, Petal Pink, Poppy Parade, Smoky Slate, white
ABOUT THE ADD-ON
Name Little Love Boxes
Details
- Add-on contains 20 printed mini boxes and 24 die-cut decorative pieces and sentiment labels.
- Item number: 156842
- Price: $8 USD/$11 CAD
- Available 1 January, while supplies last!
Subscribe to the January 2021 Paper Pumpkin Kit between 11 December and 10 January at paperpumpkin.com!
ADD-ON ORDERING INFORMATION
Purchase the Little Love Boxes add-on to the Sending Hearts Paper Pumpkin Kit on stampinup.com, or by placing an order through my online store. The add-on will be available starting 1 January, while supplies last. You must be a Paper Pumpkin subscriber to order the add-on.
- Little Love Boxes (156842)
- $8 USD | $11 CAD
Note: Add-on is not included in January’s Paper Pumpkin subscription. It must be purchased through a separate order.
Note: Supplies may be limited toward the end of the subscription period.
*********************************************************************************************************
Card stock cuts for this project:
- Bumblebee Cardstock 1″ X 11″ (center strip scored at 2 3/4″, 5 1/2′ & 8 1/4″)
- Mossy Meadow Cardstock 4 1/8″ x 5 3/8″ (card front mat), 4″ X 4″ (scalloped squares)
- Basic White Cardstock 4″ X 5 1/4″ (card front), 3″ x 4 1/2″ (dandelion and bees), 2″ X 3″ (dragonfly)
- Thick Basic White Cardstock 4 1/4″ X 11″ (card base scored and folded at 5 1/2″)
- Dandy Garden 6 X 6 Designer Series Paper 2-2″ X 4″ (2 different designs for inside panels), 2 – 4″ X 5 1/4″ (inner liner panels), 2 1/2″ X 6″ (piece for envelope flap)
*********************************************************************************************************
Product List
")


")


 Designer Series Paper")


So Pretty!! Love this!😊
LikeLiked by 1 person
Thank you Akiko 🙂
LikeLiked by 1 person
So pretty Karen! Love the fun fold design, perfect colors and designer papers! 🙂
LikeLiked by 1 person
Thank you Amy 🙂
LikeLike
I had to rewatch the beginning of the video because I came in late. I was quite curious about the “stitched” movement behind the bee. I haven’t even opened these dies yet so now I won’t have to wonder what it’s for! TFS.
LikeLike
I tried it on a scrap of paper first Karen, since I had no idea what it was either.
LikeLike
What are the measurements for Dragonfly Garden Fun Fold, please? Great card. Loved it!
LikeLiked by 1 person
Thank you Doris 🙂 Measurements are just above, where you left this comment on my blog. Thanks for checking it out
LikeLike