
Good Friday morning stamping friends and welcome to my Fun Fold Friday. How was everyone’s week? I hope you are ready for the weekend. I’ll be working tomorrow and we’re expecting it to be busy. We’re having our annual bucket sale. Customers come in and purchase a 5gal bucket for $5 where all the money goes to the Children’s Miracle Network. They walk around and do their shopping, filling the bucket with what they want/need. When they come up to check out, they get 20% off just about everything in the bucket. There are always some exclusions. It’s usually a very busy day which will make the day go super-fast..
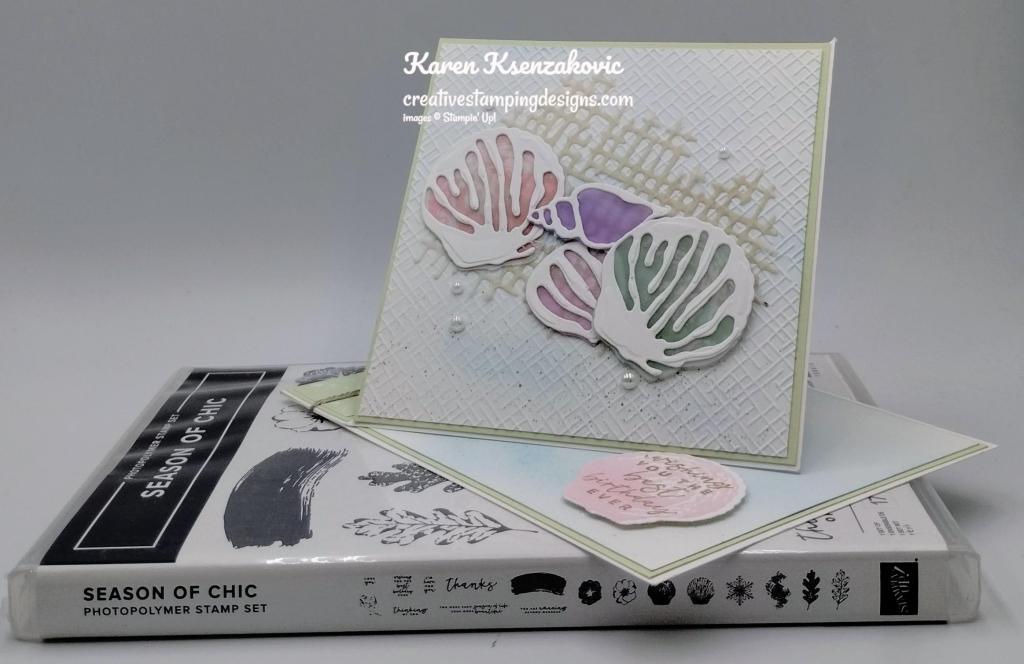
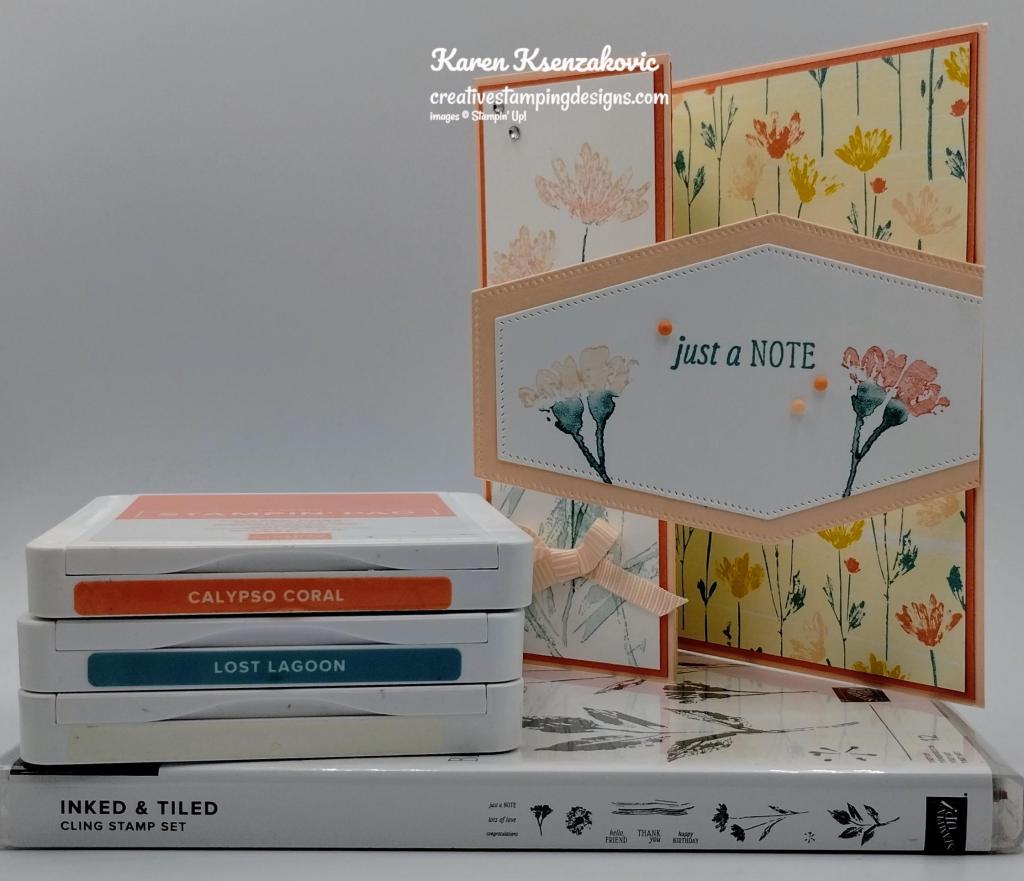
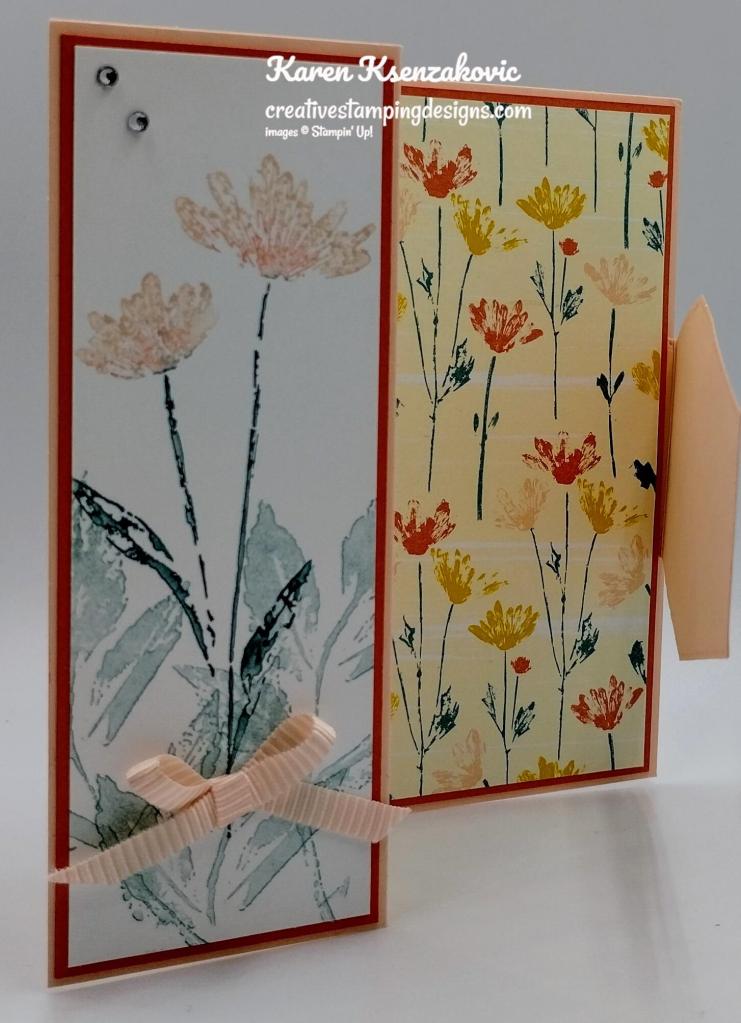
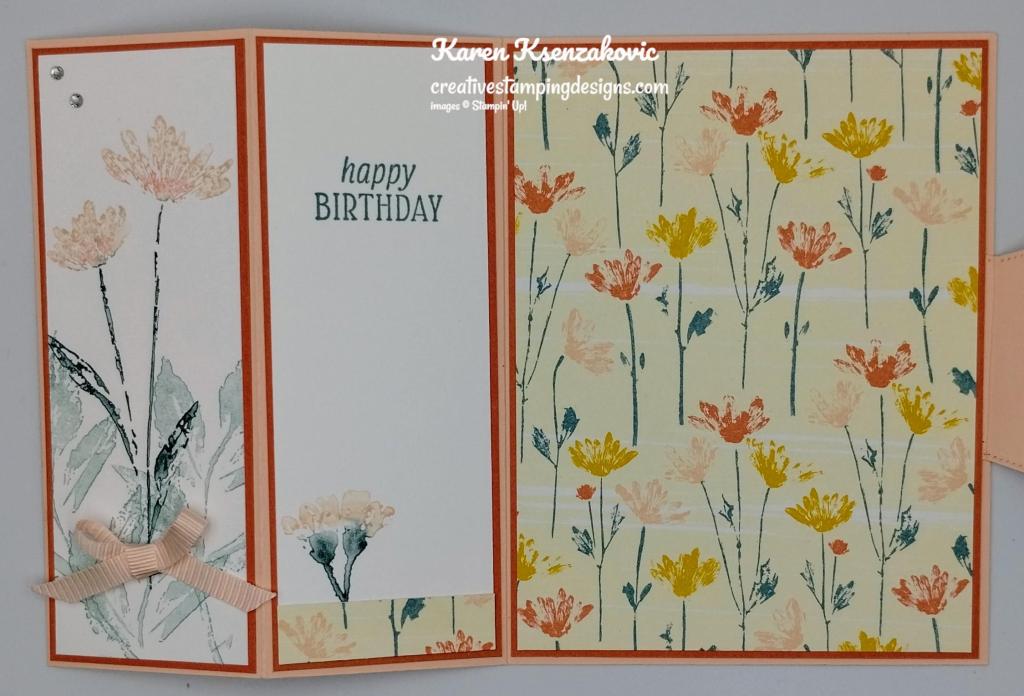
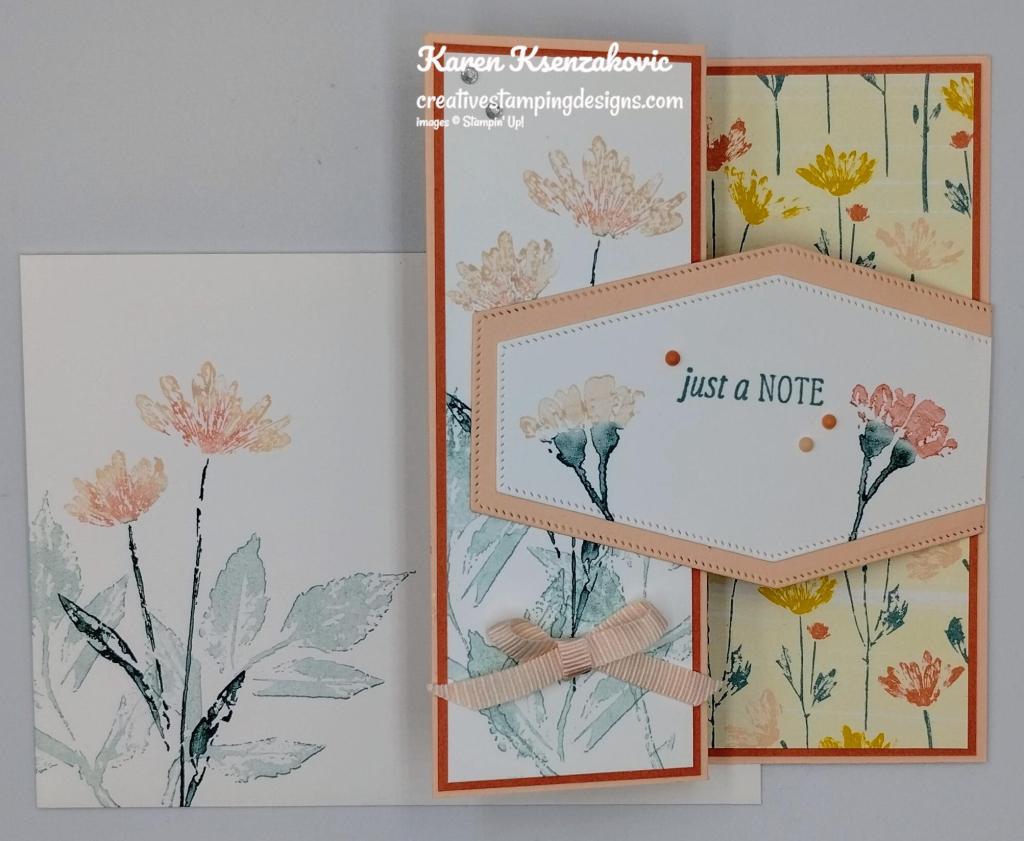
Today’s card I made on YouTube Live on Wednesday. If you were able to join me or watched the replay, thank you. If you’d like to watch my video and stamp along, the measurements are below along with the link to my YouTube channel. Here is my card for today.
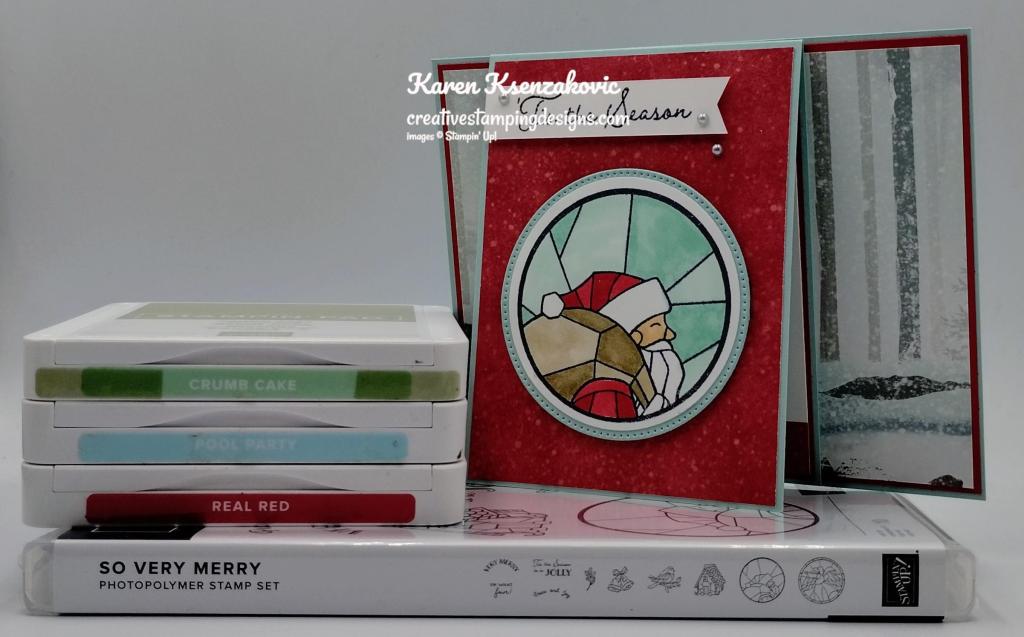
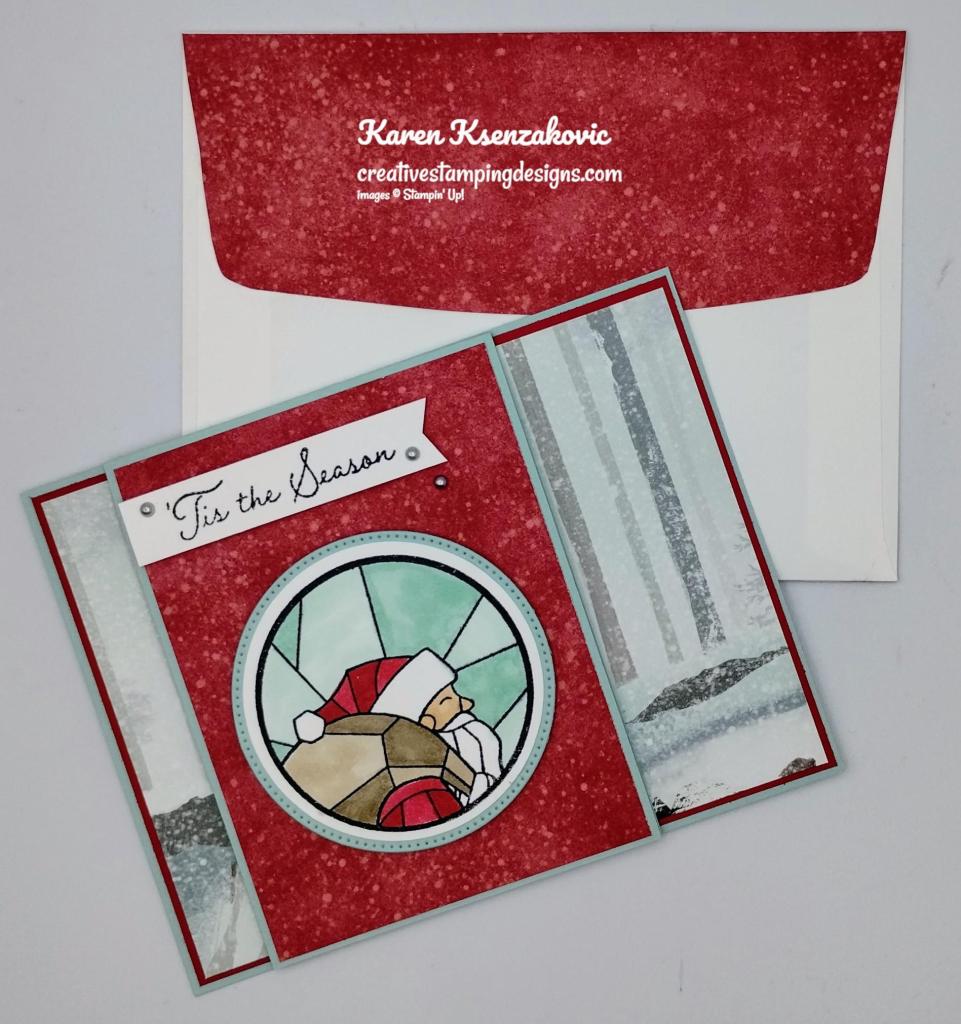
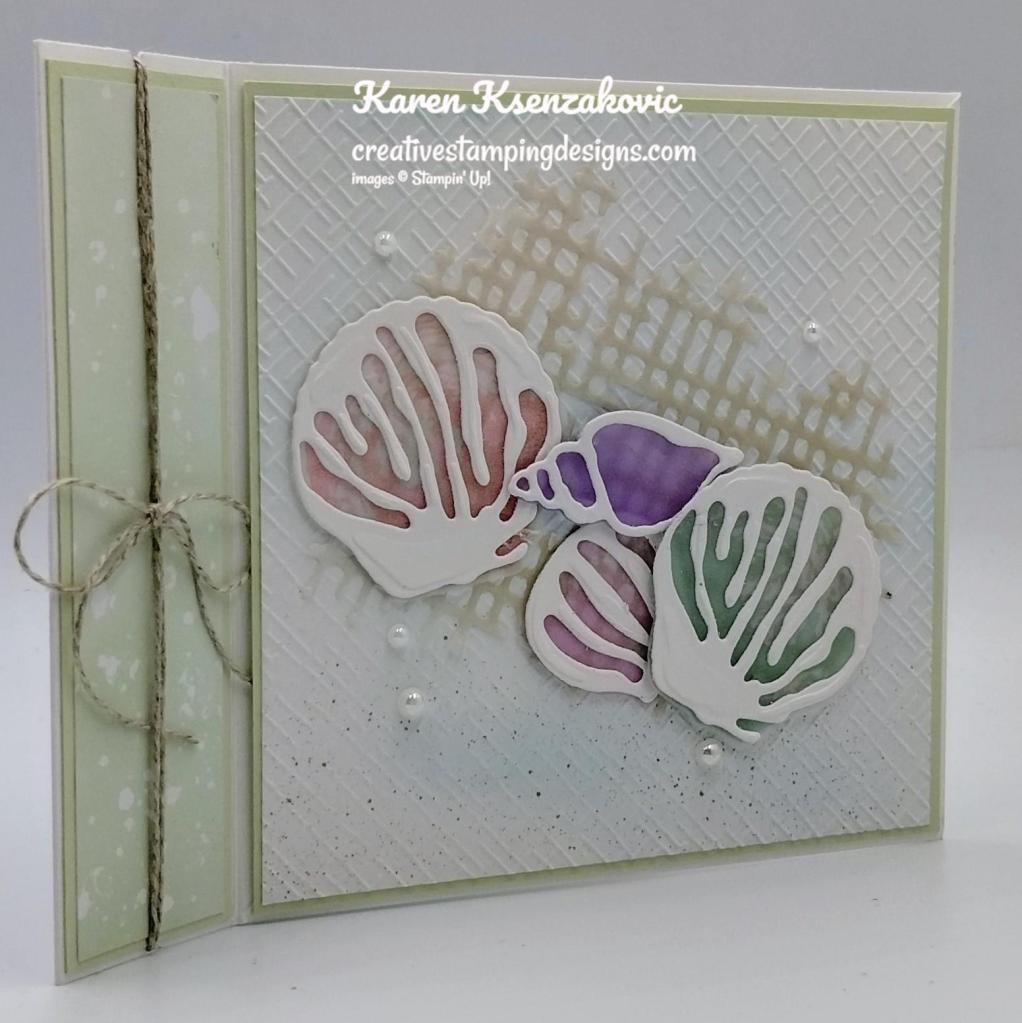
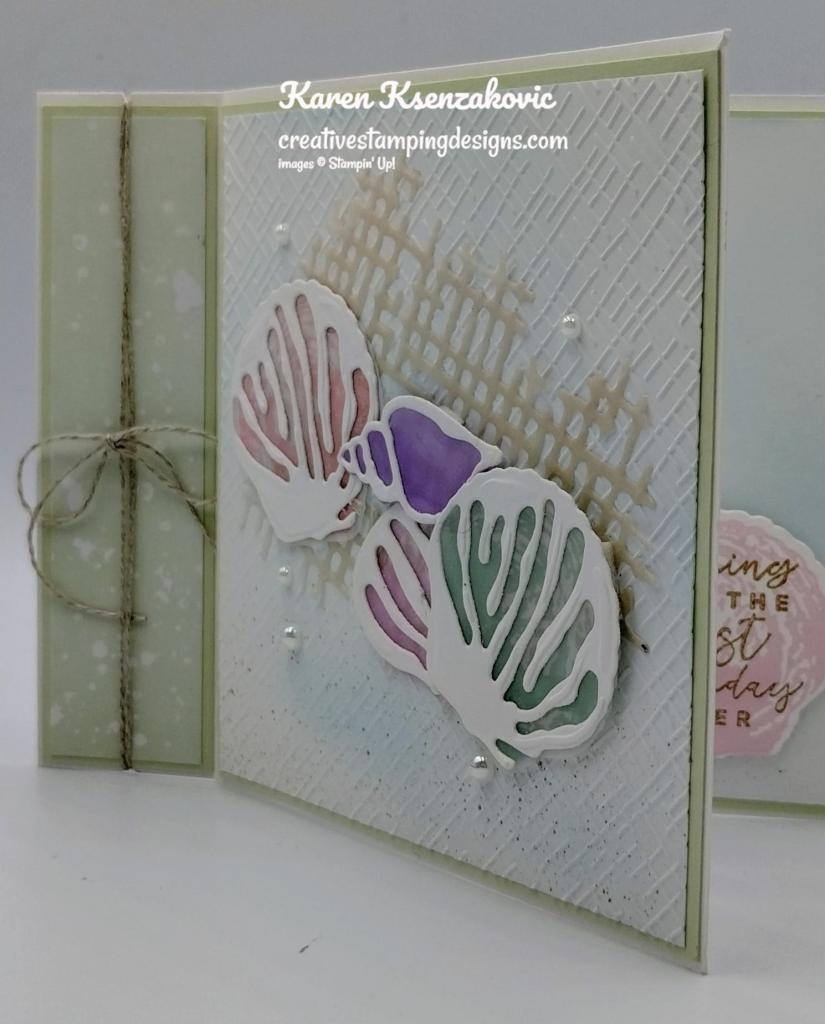
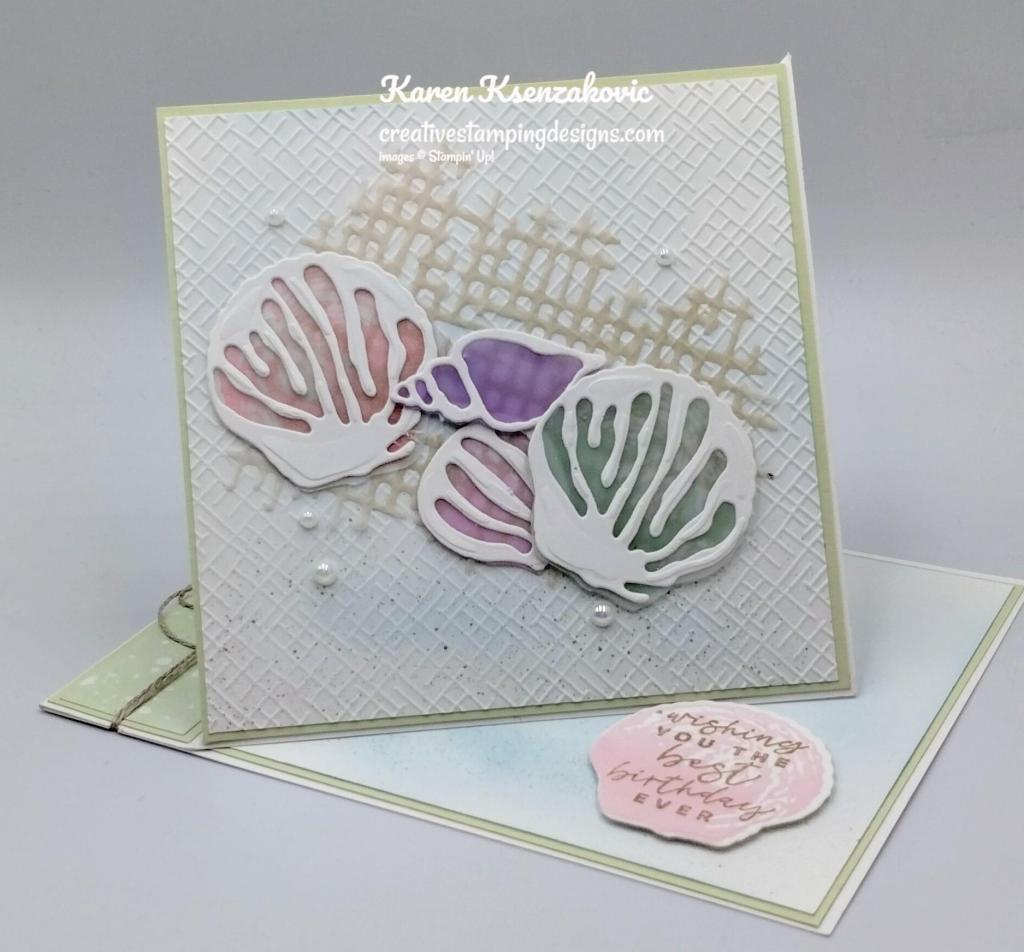
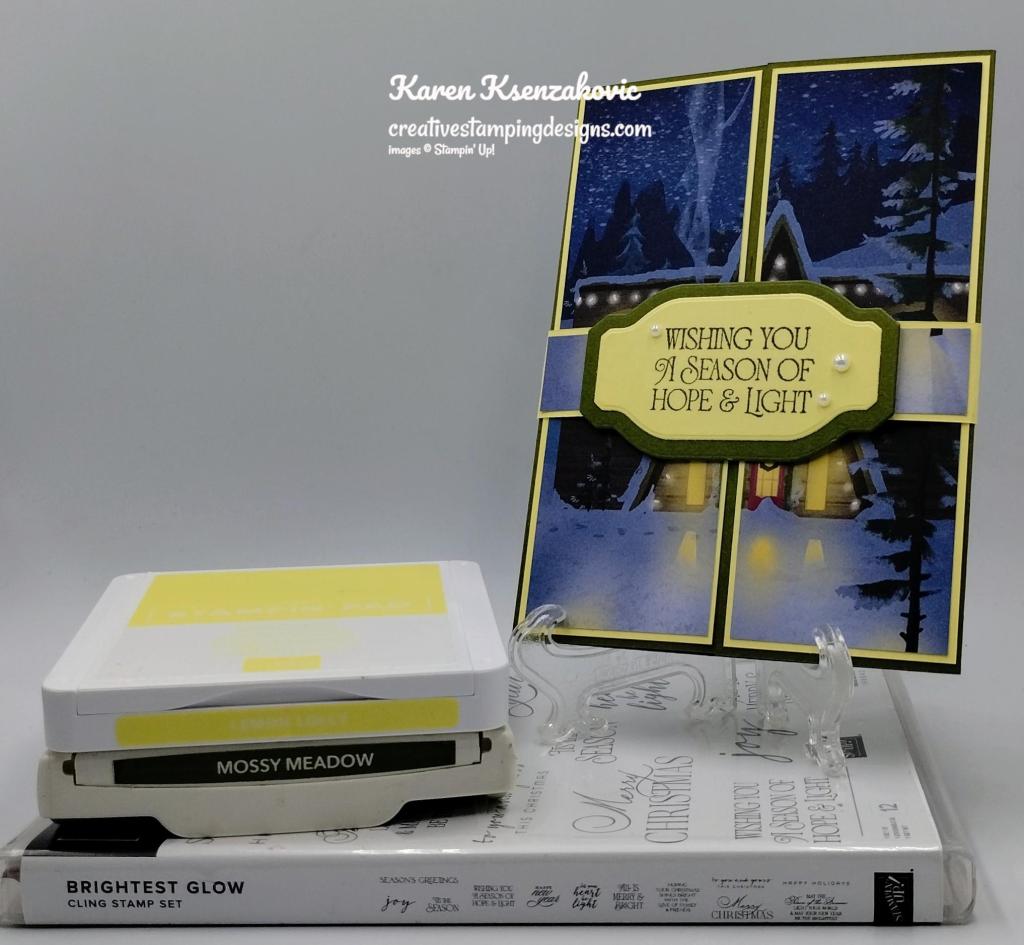
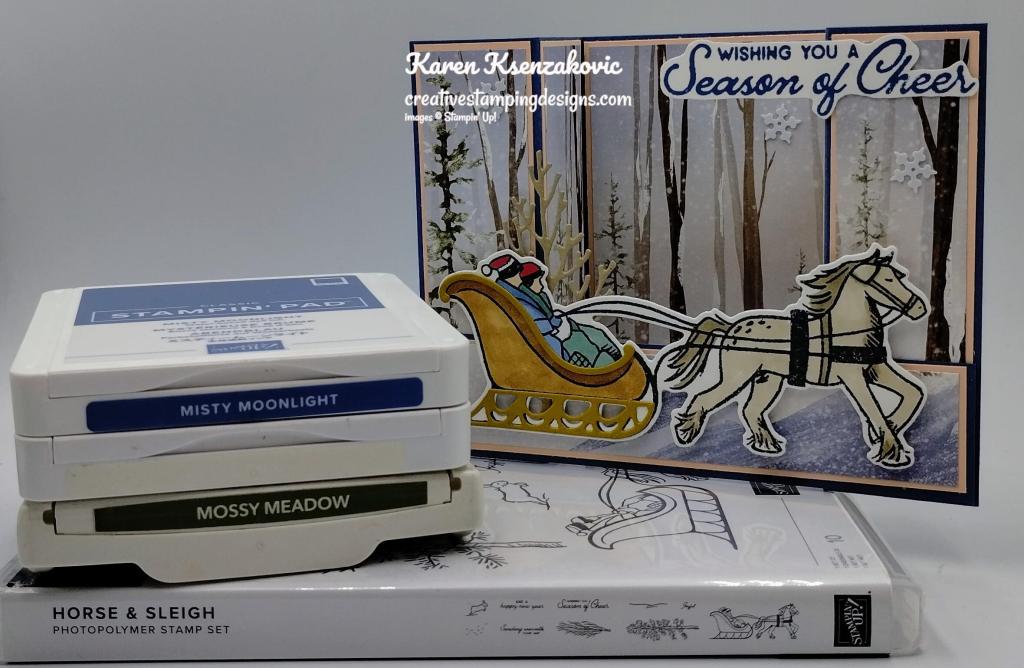
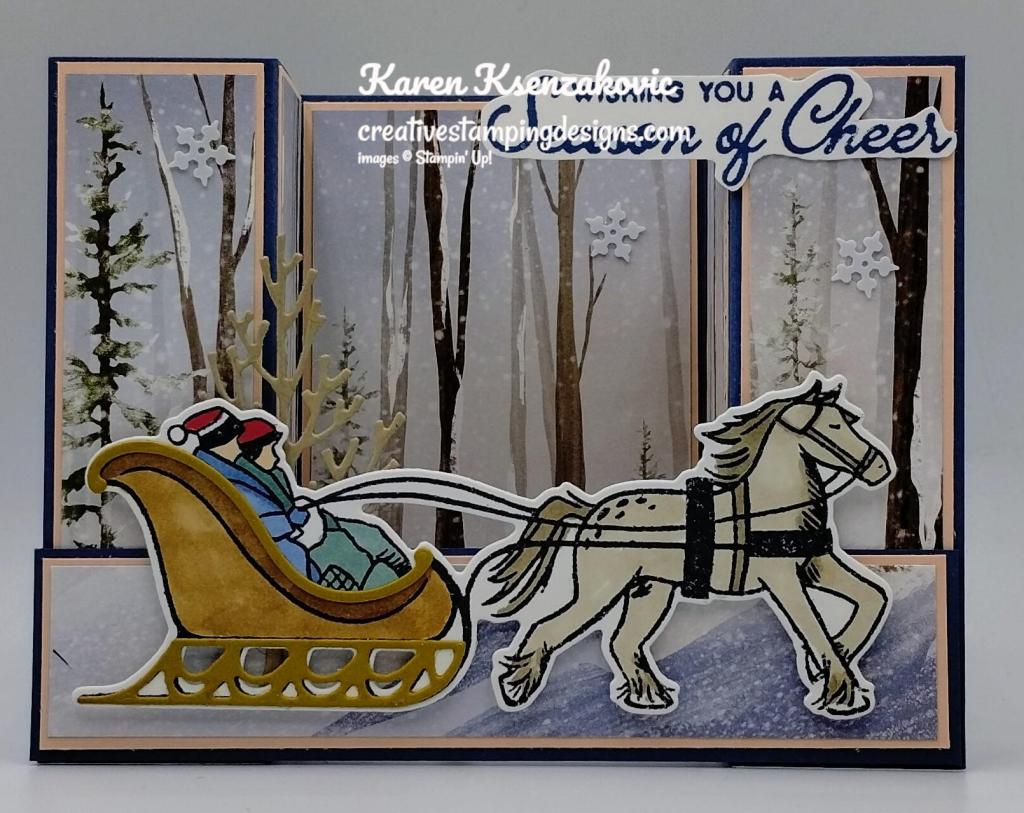
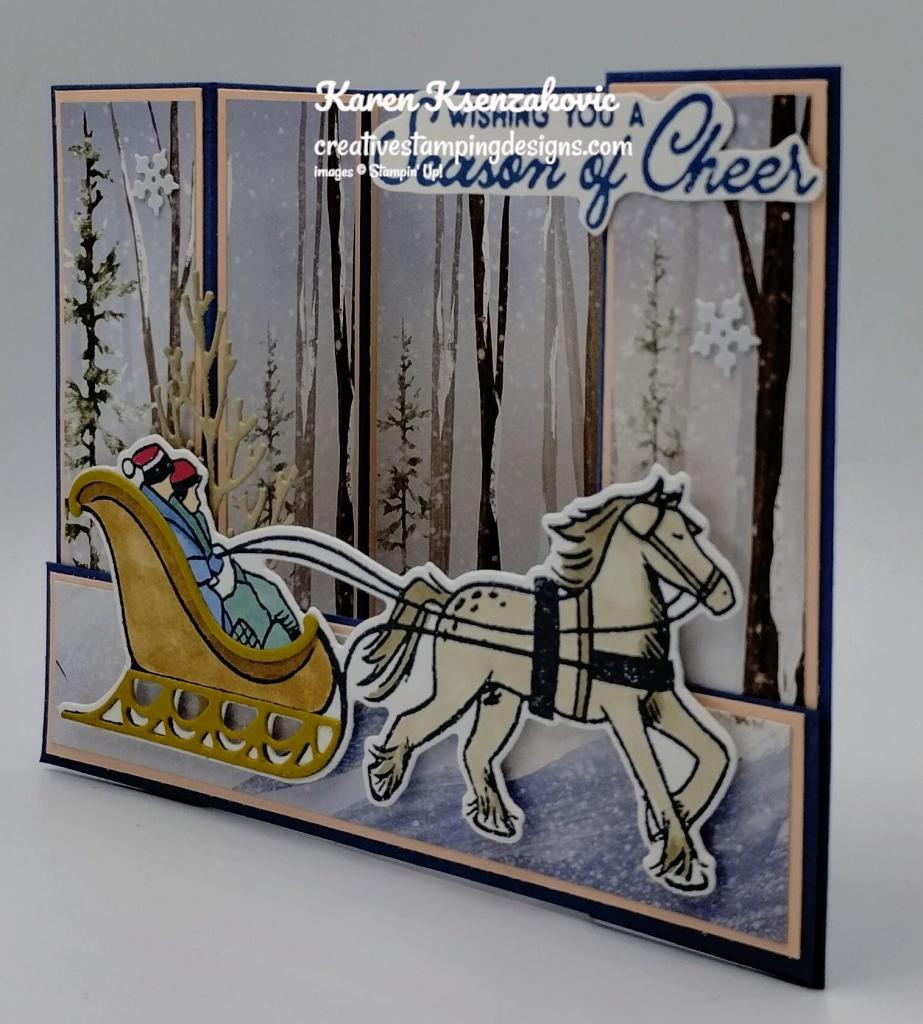
I used the Stampin’ Up! Do Very Merry Photopolymer Stamp Set along with the One Horse Open Sleigh 6 X 6 Designer Series Paper, Stylish Shapes Dies, 2 3/8″ Circle Punch and Banner Pick A Punch for my card today.
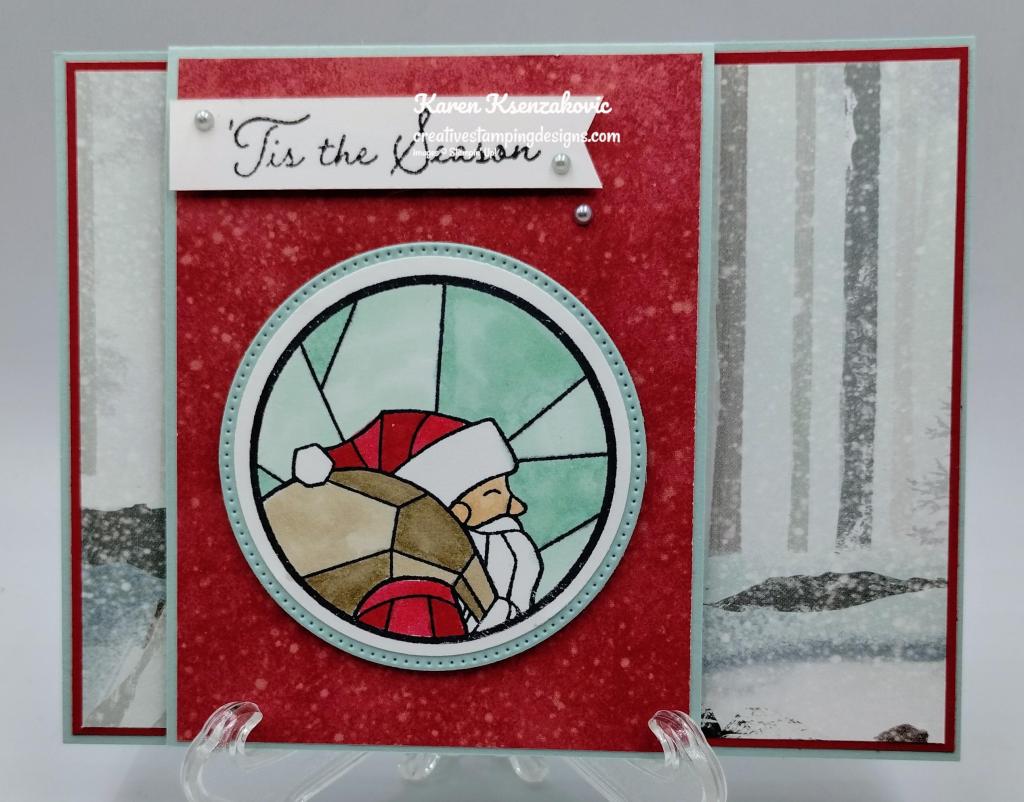
I started by adhering a panel of One-Horse Open Sleigh DSP to a Real Red mat using Multipurpose Liquid Glue. I adhered the layered panel to a Pool Party card bae using Multipurpose Liquid Glue. I folded the small card base in half and adhered it to the large card base using Multipurpose Liquid Glue. I adhered a panel of One-Horse Open Sleigh DSP to the small card front using Multipurpose Liquid Glue.

On a panel of Basic White, I stamped the Santa-stained glass image from the So Very Merry stamp set in Tuxedo Black Ink. I colored the image using Crumb Cake, Ivory, Pool Party and Real Red Stampin’ Blends Markers. I cut the image out using the 2 38″ Circle Punch. From a panel of Pool Party cardstock, I cut the 2nd largest circle from the Stylish Shapes Dies. I adhered the Santa image using Multipurpose Liquid Glue. I adhered the layered artwork to the small card front using Stampin’ Dimensionals.
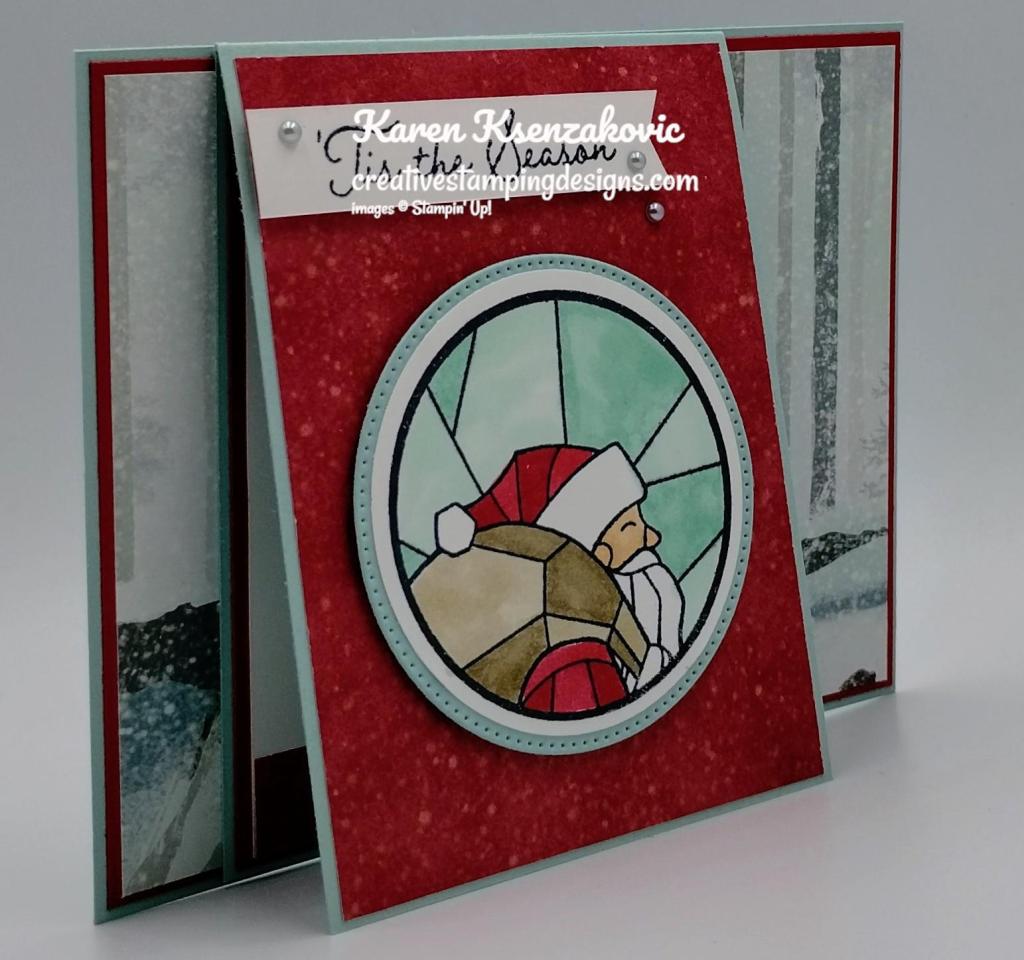
On a strip of Basic White, I stamped the top part of the sentiment from So Very Merry stamp set in Tuxedo Black Ink. I used a piece of Post-It Note Tape to block off the bottom portion of the sentiment. I used the Banner Pick A Punch to cut the one end of the sentiment. I adhered the sentiment to the card front using Stampin’ Dimensionals. I added a few Festive Pearls to the card front.
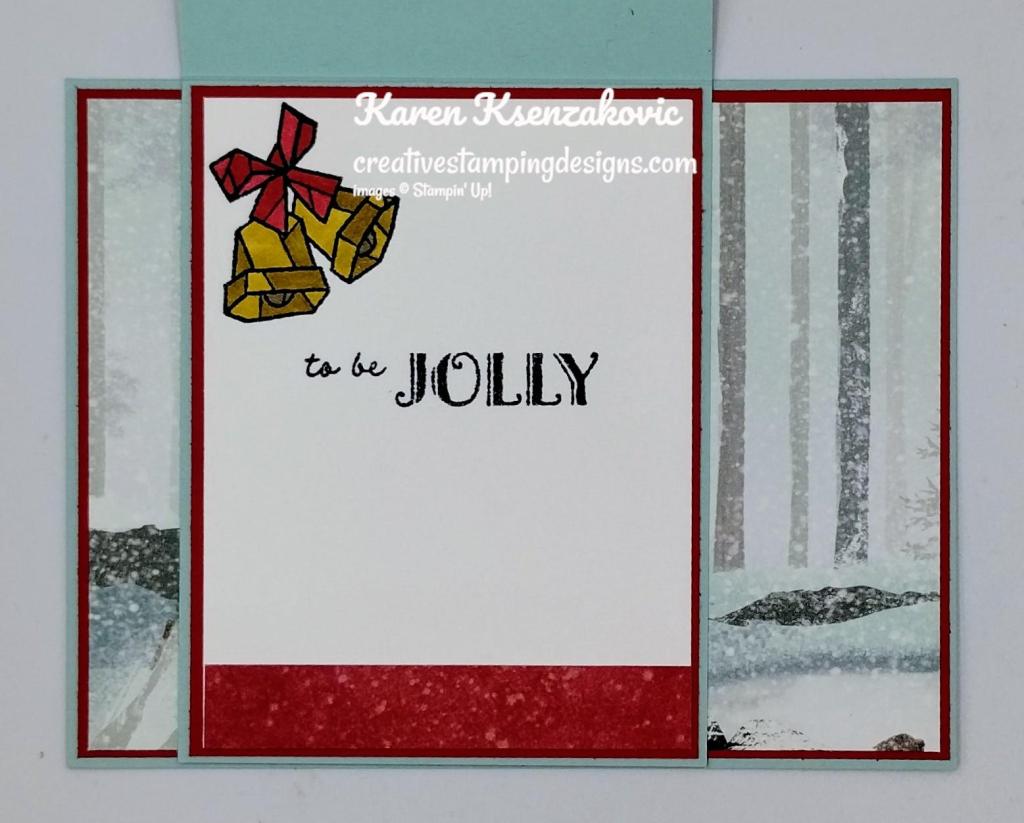
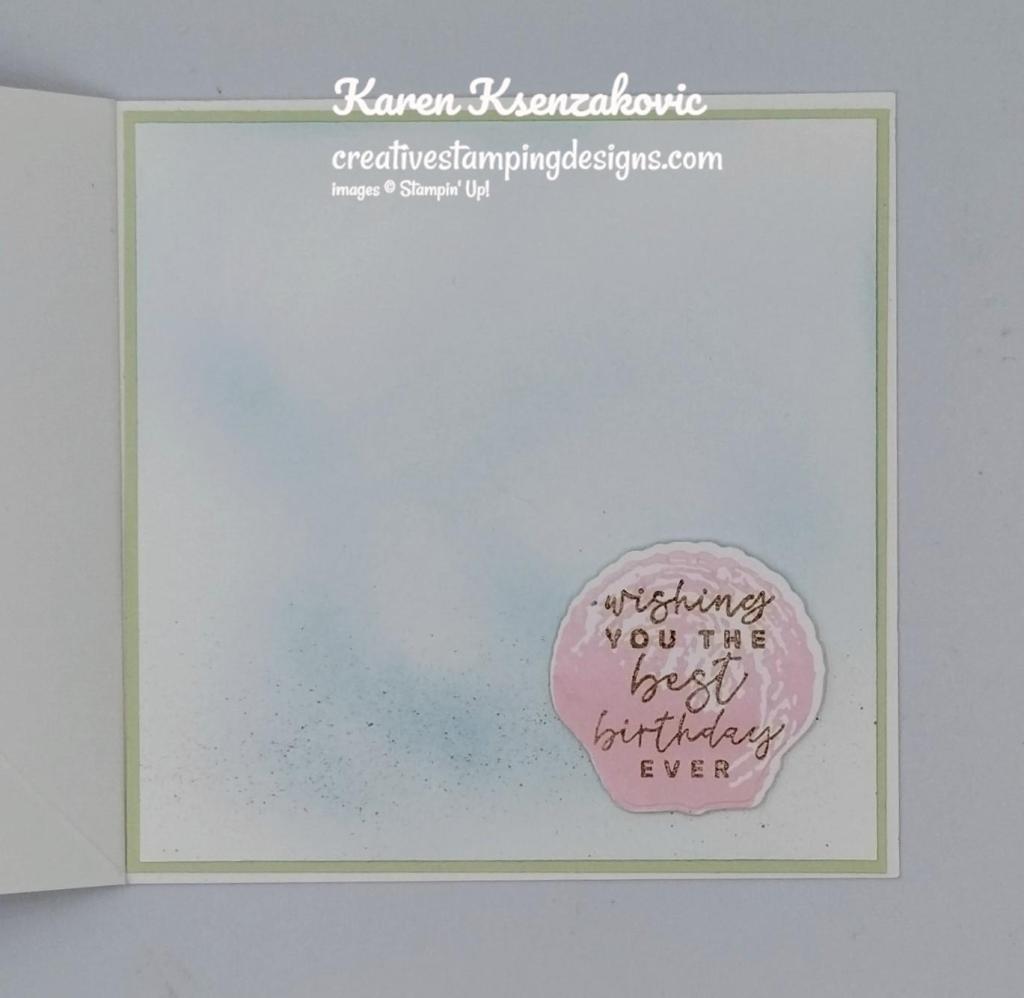
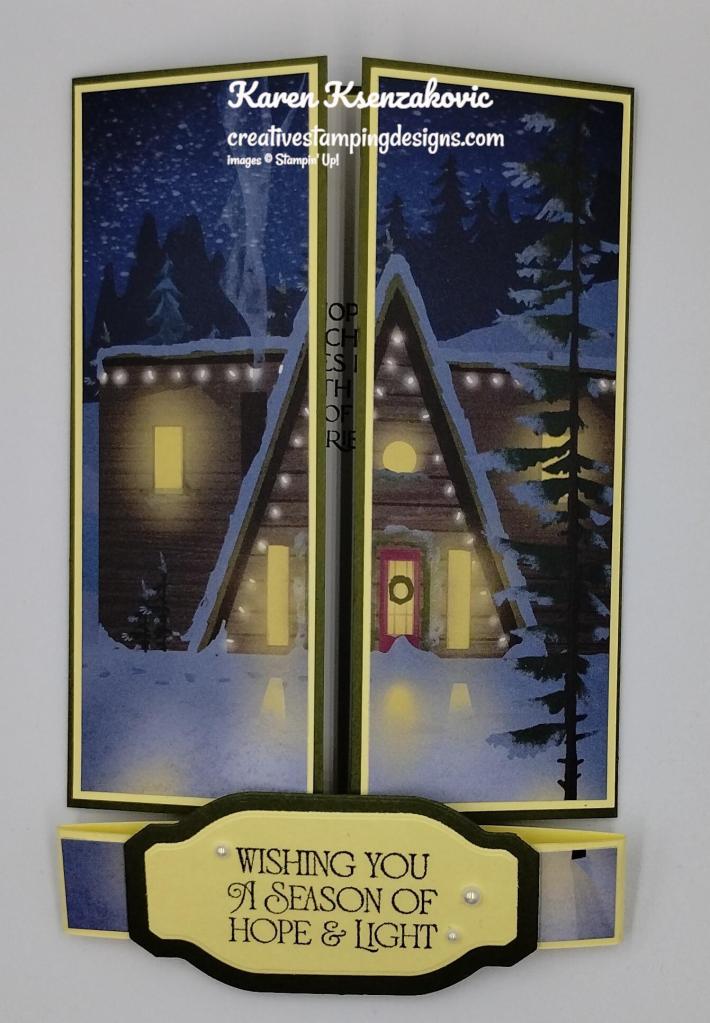
On the inside, I stamped the bottom portion of the sentiment from So Very Merry stamp set in Tuxedo Black Ink. To get just the bottom, I used the Post-It-Note Tape to block off the top when inking the stamp. I stamped the stained-glass bells image from the So Very Merry stamp set on the top of the panel in Tuxedo Black Ink. I colored the image using Real Red and Wild Wheat Stampin’ Blends Markers. I adherd a strip of One-Horse Open Sleigh DSP to the bottom of the panel. I adhered the Basic White panel to a Real Red mat and then to the inside of the Pool party card base.

To finish my card, I decorated a Basic White Medium Envelope. I stamped the stained-glass bells image from the So Very Merry stamp ser in Tuxedo Black Ink on the top of the envelope front. I colored the image using Real Red and Wild Wheat Stampin’ blends Markers. I adhered a strip of One-Horse Open Sleigh DSP to the bottom of the envelope front and a panel to the envelope flap.
Thank you for stopping by my blog today. I hope you liked my card and will give it a try. I hope you will CASE this card and please feel free to post it in the comments of my Facebook page under my post. I’d love to see your take on the card. The list of measurements are below if you’d like to stamp along while watching the video. You can watch my video on my YouTube Channel Here.
If you watch this on my YouTube channel, please remember to subscribe so that you will get notified when a new video goes live. Thank you to those that have subscribed already. Happy Stamping!!
Thank you for stopping by my blog today. I hope you like the card and will give it a try. Happy Stamping!!
*********************************************************************************************************
If you need any stamping supplies, I’d love to be your Demonstrator. Just click HERE to go directly to my online store or drop me an email if you have any questions.
MY CURRENT HOST CODE IS: 4G2N3MDT
Use this host code when placing an order with me. When you order $50 or greater you will receive a free gift from me! If your order is over $150, please do not use this code, but you’ll still get the free gift. The free gift is your choice of any 1 item valued up to $10.00 from the 2023-2024 Annual Catalog! Unfortunately, packs of cardstock are no longer an option for a free gift. Shipping has become too expensive to ship and it’s costing me as much to ship as the cardstock costs. For any orders $50 or more I will also send you my monthly class tutorials. Click HERE or go to my Customer Rewards for more details and to see what this month’s tutorials are.
Please remember to use my current Host Code and make sure that you can see my name on the final checkout page listed as your Demonstrator when you order so that you know that you’re ordering with me, and you’ll get my rewards!
Happy Stamping, Karen
*********************************************************************************************************
In response to changing policies at Stampin’ Up – I’m adjusting my Ordering Gift policy as well. I’m having to get a little more tough on the adding of Host codes when you place your order thru my Online Store.
Not to worry – you’re still going to get that $10 ordering gift for orders of $50 (before shipping & tax) or greater. And the gift is still any 1 SU! product up to that $10 value – which includes some of our fun Host Sets!
But – if you DO NOT use the Host code for your orders of less than $150 (this is the RETAIL total before Shipping & Handling), then you’ll have two options:
- You’ll need to call Stampin’ Up! (1-800-Stamp-Up) and ask them to add it for you. They’re very helpful and will get it done quickly! OR….
- If your order was over the $50 threshold but under $150, then…you’ll forfeit that $10 ordering gift and rewards – this is the Bummer Option – and I REALLY don’t want to do this, SO please remember to add my Current Host Code.
*********************************************************************************************************

You can start redeeming your Bonus Days Coupons today, August 1 – August 31st. Redeem 1 coupon code or all your codes on an order.
Ordering Deadlines
Redemption Period: August1– August 31, 2023 at 11:59 p.m. (MT)
- There is no limit to the number of coupon codes participants can redeem on an order during the redemption period. If using multiple codes, they must be separated by a space.
- Coupons may be redeemed one time only.
- Coupon codes may be redeemed for any product (excluding Starter Kits, demonstrator supply items, and Paper Pumpkin month-to-month subscriptions).
- New prepaid Paper Pumpkin codes may be discounted using Bonus Days coupon codes.
*********************************************************************************************************
Festive Tags Kit Now Available
’Tis the season to start your holiday crafting! It’s so simple with this all-inclusive kit. Adhere the die cuts and embellishments, then tie the tag to a gift with a twine bow. You’ll have handmade tags in minutes!
The Festive Tags Kit includes:
- Predesigned projects
- Step-by-step instructions
- Precut pieces (No prep work! Get right to crafting)
- Makes 15 tags: 3 each of 5 designs
- Size range: 1-1/2″ x 2″–2-1/2″ x 3″
- Enough adhesive to complete projects
- Die cut stickers and accents
- Peel-and-stick gold dots
- Baker’s twine
- A 9-7/8″ x 6-1/2″ x 2-3/4″ printed designer box for storage or crafting on the go
- Product colors: Basic Black, Flirty Flamingo, Garden Green, Lost Lagoon, Pool Party, Real Red
- Item number: 162485
- Kit Price:
$13.00$11.70 (on sale!!)
Check out everything comes in the kit!


*********************************************************************************************************
Kits Collection Up To 30% Off Starting Tuesday Today August 1 – 31
If you are new to stamping and don’t know where to start or if you are even going to like it, the Kits Collections is a perfect place to start. These all-inclusive kits are the perfect solution to get your feet wet. What better time to try it than when they are on sale. Click Here to head over to the Kits Collection in the online store to see all of the kits that are available now! And get your orders placed early in August, the Kits Collection kits are available while supplies last!
You can save up to 30% on amazing kits from the Kits Collection by Stampin’ Up! This is a limited time offer you won’t want to miss.
Kits Collection Sale Details:
- Sales Period: August 1-31
- Ordering Deadline: August 31, 2023 at 11:59 p.m. (MT)
- The sale only applies to the Kits Collection by Stampin’ Up! (it does not include Paper Pumpkin kits).
- There is no limit to how many kits may be purchased.
- The kits will be up to 30% off, sale prices will be reflected in the online store.
- No discount code necessary—the discount will be applied automatically.
Head over to my online store during August and pick up some of those awesome kits at a great deal!
*********************************************************************************************************
Sales Tax Holiday Going On!!!

Thirteen states are having Back-to-School Sales Tax Holidays this year and some Stampin’ Up! items qualify for the tax break in those states!
The states with upcoming tax holidays are: Alabama, Arkansas, Florida, Massachusetts, Mississippi, Missouri, New Jersey, New Mexico, Ohio, South Carolina, Tennessee, Texas, and West Virginia. So, if you live in one of those states, take a second to download the spreadsheet Click Here and mark your calendar! Florida is still going on now. Missouri, New Mexico, Ohio, South Carolina and West Virginia start today, Friday August 4th. Arkansas starts on Saturday August 5th.
Please note that you must place your order with Stampin’ Up! during the tax holiday period in your state in order to receive these items tax-free (which is midnight on the first day to midnight on the last day of the tax holiday). Also, keep in mind that this is a state sales tax holiday; the state statute may not apply to county, city, and special jurisdiction taxes.
For those wondering about Georgia, Louisiana, Virginia, and Wisconsin, those states have suspended the sales tax holiday again this year.
*********************************************************************************************************
September-December 2023 Mini Catalog Paper Shares Ordering Is Open
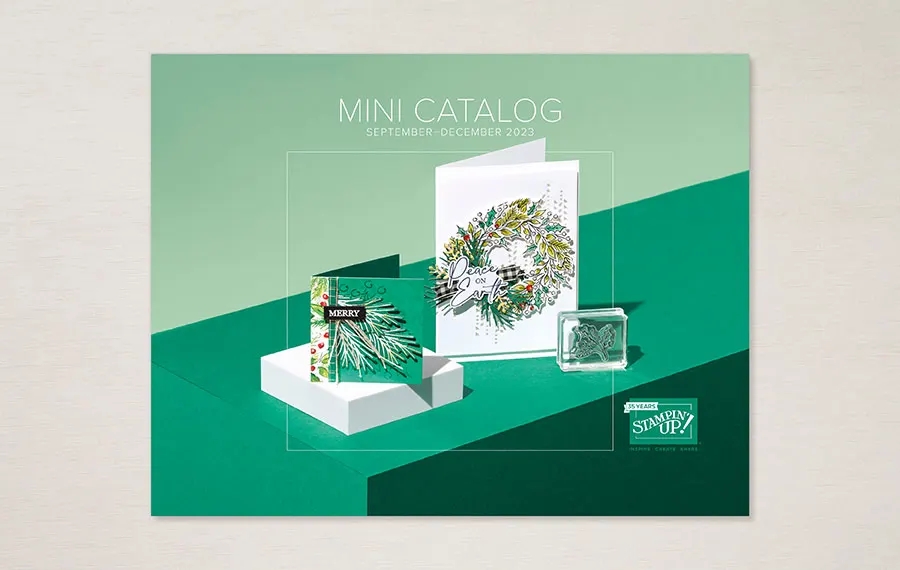
Do you want all of the gorgeous new designer papers in the Stampin’ Up! September-December 2023 Mini Catalog but can’t afford everything? I’m doing a Designer Series Paper Share! What is a Paper Share you ask? It’s a sample of each of the new Designer Series Papers from the Stampin’ Up! September-December 2023 Minil Catalog. If you were to purchase all of the DSP in the new Annual Catalog, it would cost you over $170.00 plus shipping.
New Designer Series Paper Share – $30.00 plus $8.50 for Priority Mail Shipping
I’m offering a Designer Series Paper share from the Stampin’ Up! September-December 2023 Mini Catalog and I’d love to have you join!! I’m placing my share order early on September 6th and I’m going to use the expedited shipping option so I should be able to have the shares cut, bundled and back out to you during the week of September 11th.
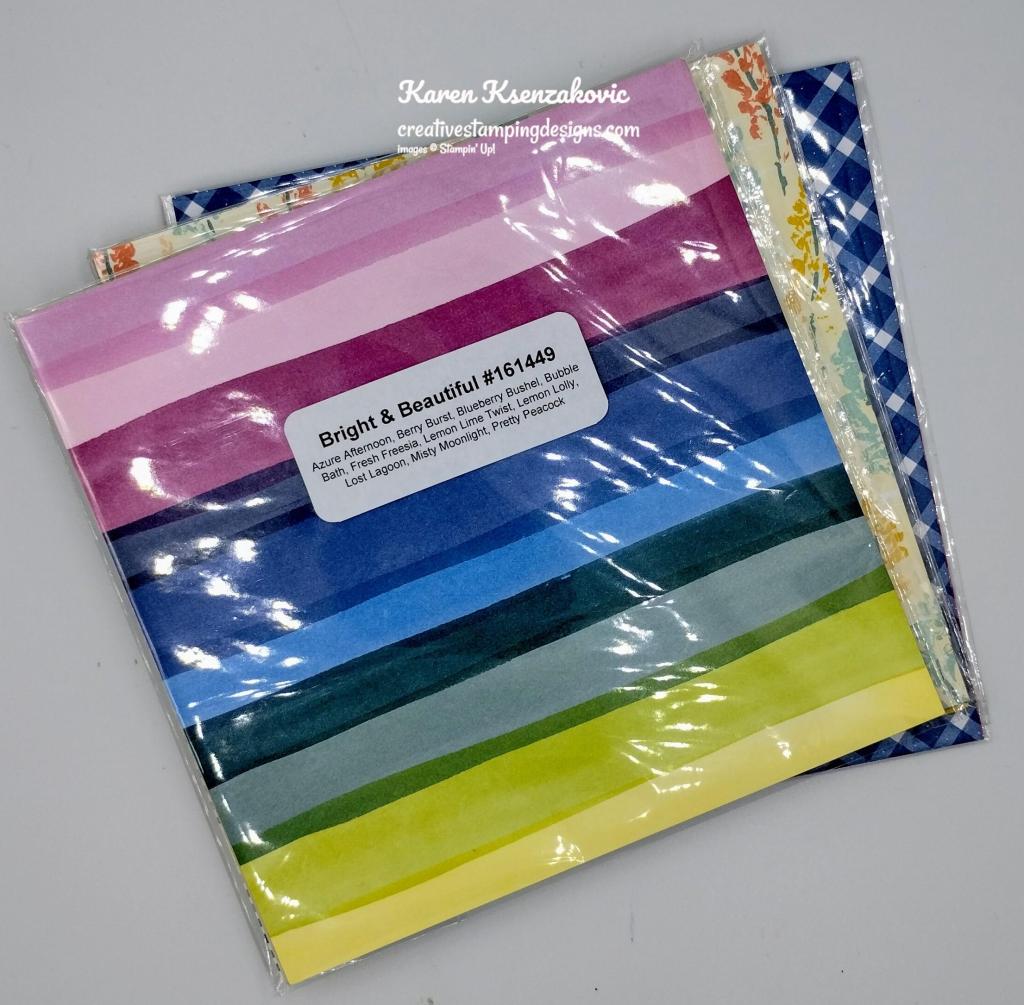
How my shares work: I order full packs of all of the Designer Series Papers listed below, I cut them into 6″ x 6″ pieces (or 6″ x 12″ pieces for double shares) and give you one panel of each design from each pack on the list. I pack up the paper in a cellophane bag with labels listing the Name, Item # and Colors in the pack and mail it back out to you just as quickly as I can! Shares give you a good working sample of all of the papers so that you can decide which ones to order in full packs!
Here are the Designer Series Paper Shares that I am offering from the new Mini Catalog!
New Designer Series Paper Share – $30.00 plus $8.50 for Priority Mail shipping
You will receive one 6×6 sheet of each design from the following DSP packs (the number after the name indicates how many 6×6 sheets of that paper pack you will receive):
- A Walk In The Forest – 6
- All About Autumn 6″ X 6″ – 12
- Beary Christmas – 6
- Melon Mambo & Granny Apple Green Foil Sheets – 2
- Garden Walk 6″ X 6″ – 8
- Glow-In-The Dark 6″ X 6″ Specialty Paper – 1
- Joy Of Christmas – 6
- Joyful Specialty Paper – 4
- Merry Bold & Bright – 6
- O Holy Night – 6
- Oxidized Copper Specialty Paper – 2
- Shining Brightly Specialty Paper – 6
- Snowflake Magic Specialty Paper – 3
- Them Bones – 6
- Winter Meadow – 6
In all, you’ll receive 80 – 6” x 6” sheets of designer or specialty paper!
Double DSP Share – $60 + $8.50 Shipping by Priority Mail – if you’d like double shares of the designer paper, I’m offering those too! I’ll cut the 12″ x 12″ designer paper sheets into 6″ × 12″ so that you’ll be able to get 3 full A2 size card fronts from each sheet and you’ll get double sheets of the 6″ x 6″ since they’re already precut.
Anyone is welcome to join in my share (please note, I can only ship to addresses within the US). If you’d like to join, email the following information to creativestampingdesigns@gmail.com
- Your first and last name
- The email address that is connected to your PayPal account. I only accept PayPal for payment. ***You do not need to have a PayPal account to pay the invoice, you can choose to pay by credit card without having a PayPal account.
Deadline to sign up for my share is Monday, September 4th at 5:00 PM ET.
Let me know if you have any questions. Thanks!
*********************************************************************************************************
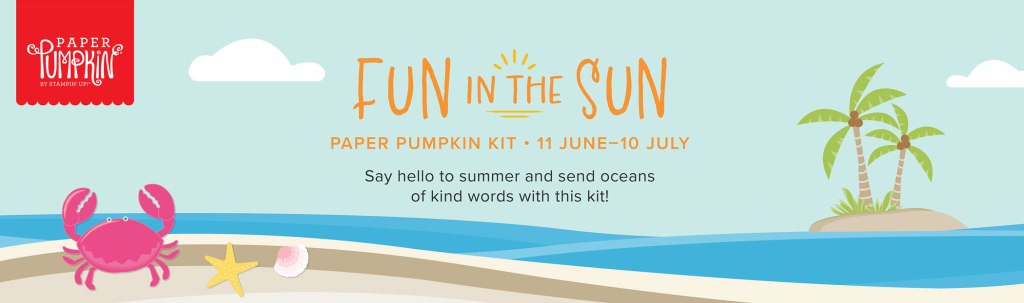
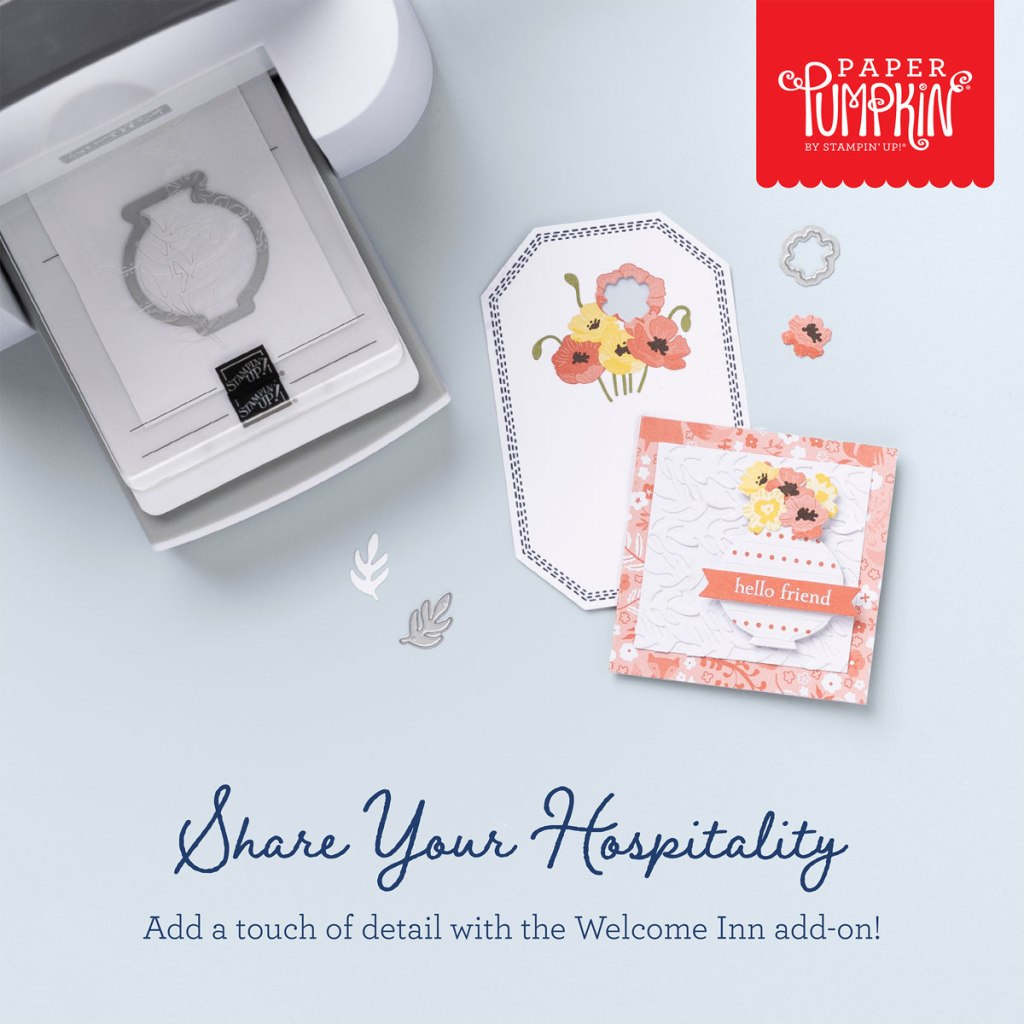
Meaningful Flowers
Subscribe Julu 11 – August 10
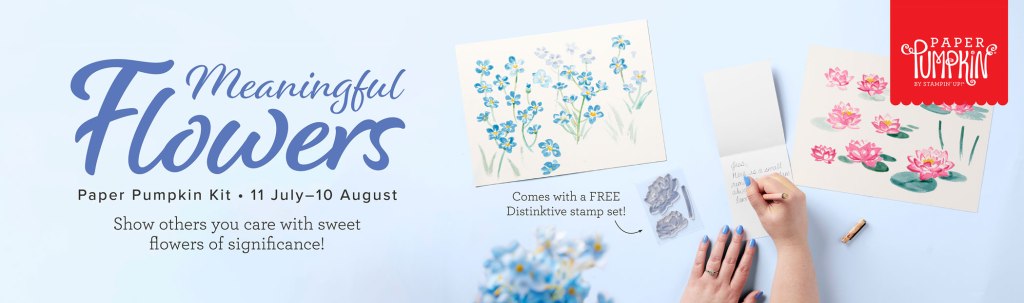
Discover messages of friendship and loyalty in the flowers from the August Paper Pumpkin Kit! This kit includes 8 cards, 4 each of 2 designs, and 8 coordinating envelopes. The kit is special because of the way it uses the meaning of flowers. On each card, you’ll find a small inscription of what the flowers represent. As you craft with the included vellum and watercolor paper pieces, you’ll know you’re sending a message of encouragement and loyalty to your recipients. The Meaningful Flowers Paper Pumpkin Kit is full of florals that are meant to spread hope, encouragement, and remind you of your favorite memories. The kit focuses specifically on forget-me-nots and lotuses. Their meaning is enscripted on the back of each card. Subscribe by 10 August to send beautiful paper crafts with thoughtful messages to those you love.
And don’t wait, because anyone who subscribes to this month’s kit will get a FREE stamp set! This Distinktive stamp set is perfect for a variety of occasions!
This kit includes:
- 8 cards; 4 each of 2 designs
- 8 coordinating envelopes
- 1 photopolymer stamp set
- 1 Pretty Peacock Ink Spot
- Linen thread
- Vellum and precut paper pieces
- FREE Distinktive stamp set
- Adhesives
- Final card size: 4-1/4″ x 5-1/2″ (10.8 x 14 cm)
Coordinating Stampin’ Up! colors: Bubble Bath, Crushed Curry, Garden Green, Melon Mambo, Misty Moonlight, Orchid Oasis, Pretty Peacock, Tahitian Tide
Subscribe to the August Paper Pumpkin Kit between 11 July and 10 August by clicking here!
Note: Supplies may be limited toward the end of the subscription period.
*********************************************************************************************************
Card stock cuts for this project:
- Basic White Cardstock 3″ X 3″ (artwork), 1/2″ X 2 3/4″ (sentiment), 3″ X 4″ (inner liner)
- Pool Party Cardstock 4 1/4″ X 5 1/2″ (card base), 3 1/4″ X 8 1/2″ (small card base scored & folded at 4 1/4″), 3″ X 3″ (artwork mat)
- Real Red Cardstock 4 1/8″ X 5 3/8″ (large card front mat), 3 1/8″ X 4 1/8″ (inner liner mat)
- One Horse Open Sleigh 6 X 6 Designer Series Paper 4″ X 5 1/4″ (large card front), 3 1/8″ X 4 1/8″ (small card front), 1/2″ X 3″ (inner liner), 2 1/4″ X 6″ (envelope flap)
*********************************************************************************************************
Product List
")


 Designer Series Paper")


 Circle Punch")


")


 Designer Series Paper")


")


")


 Specialty Paper")


")


")
")


 Designer Series Paper")
 Specialty Designer Series Paper")


 Sheer Ribbon Combo Pack")


")
")


 Designer Series Paper")


")

 Designer Series Paper")


")


