Good Sunday morning stamping friends and welcome to Daylight Savings Time, my favorite time of the year. What kind of plans do you have for today? I’ll be heading to Amy’s this afternoon for our quarterly team meeting and stamping with friends.
I played with another new bundle that just became available with the March Online Exclusives. Here’s my card for today
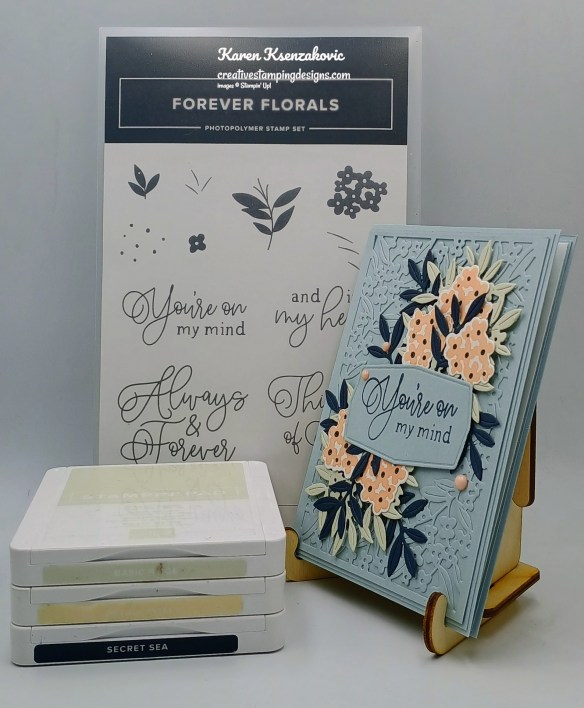
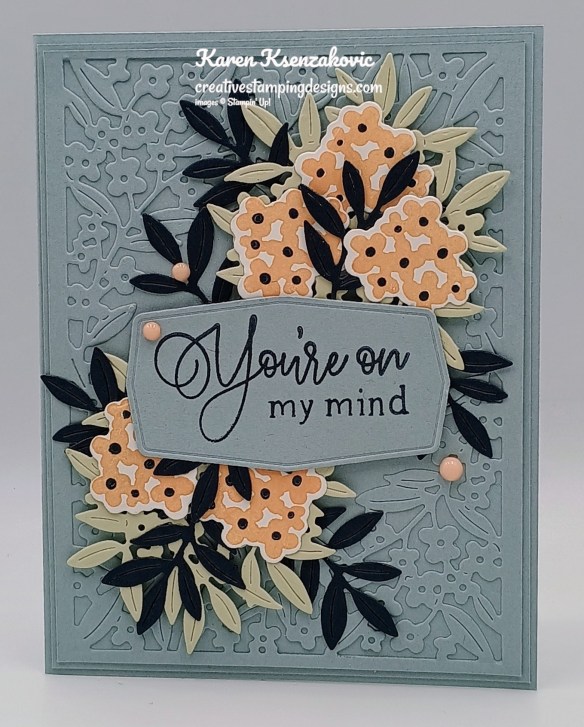
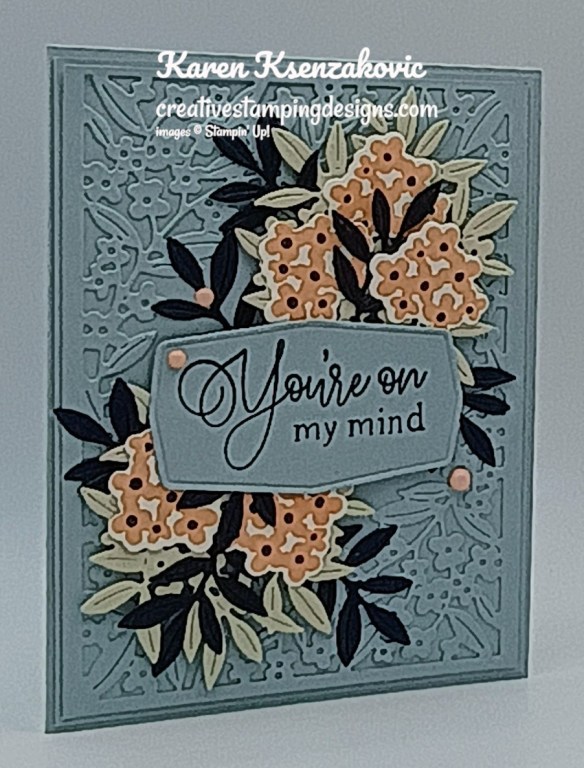
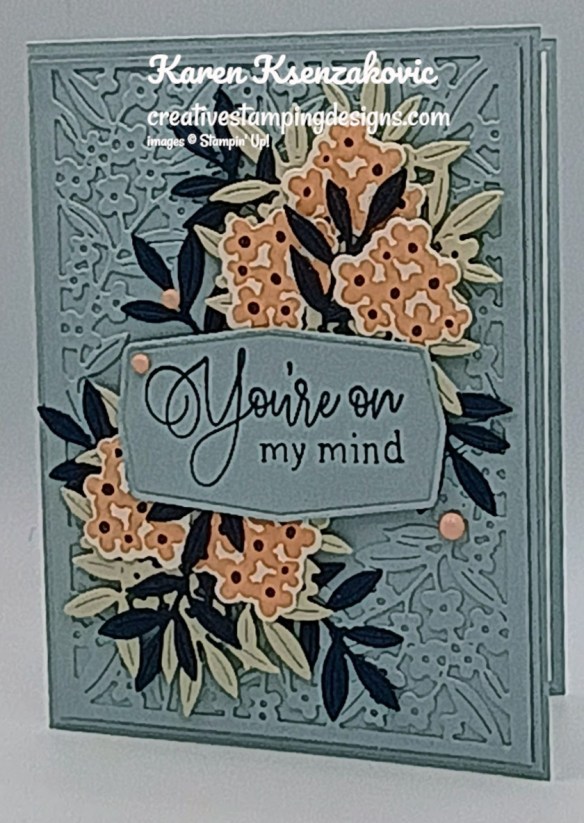
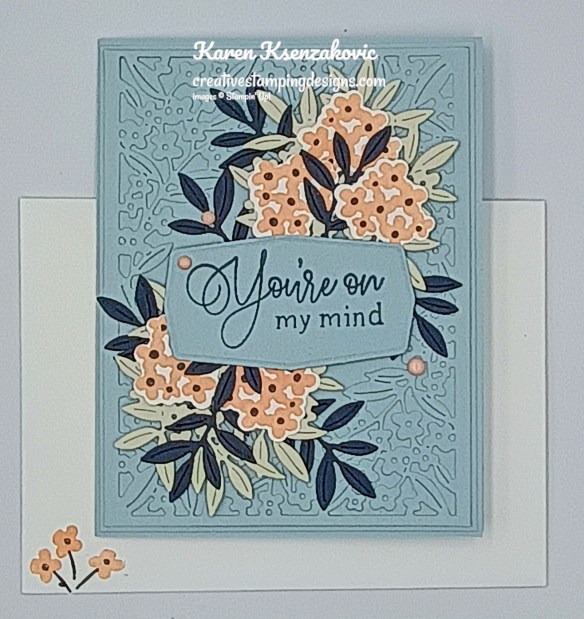
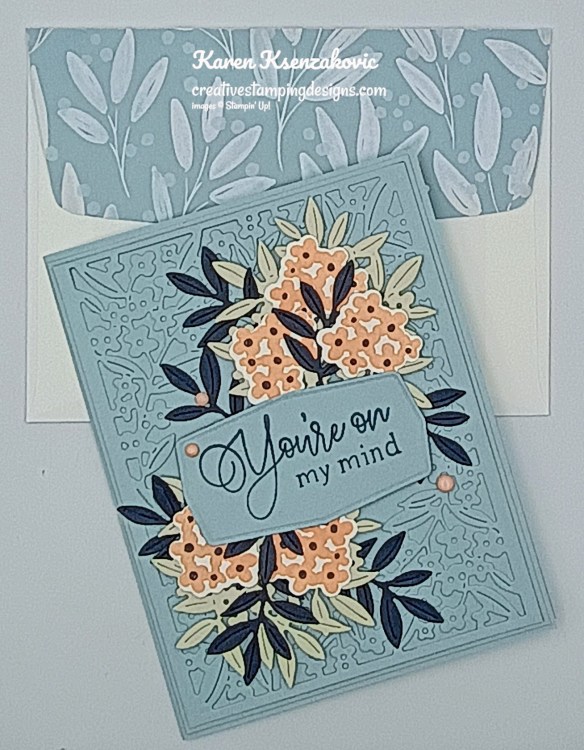
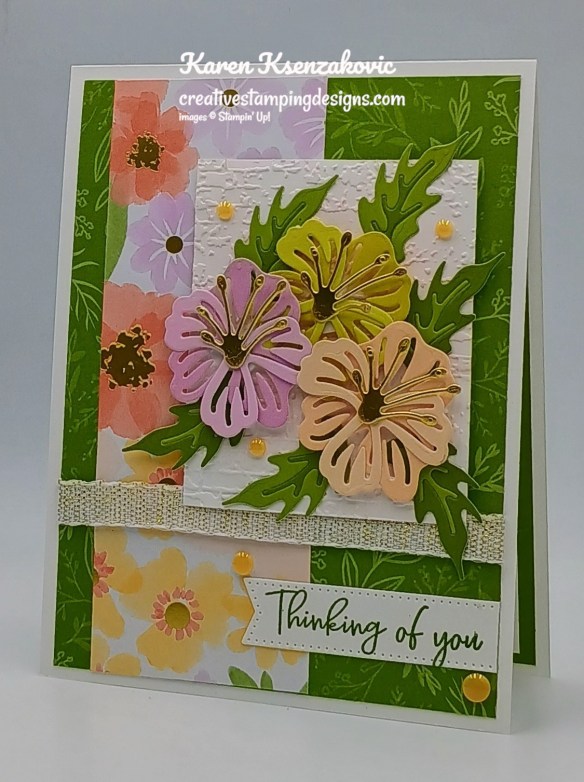
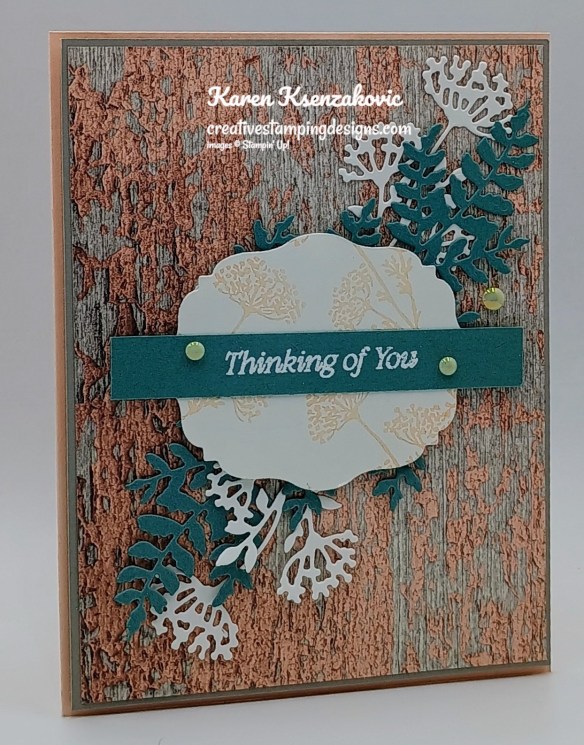
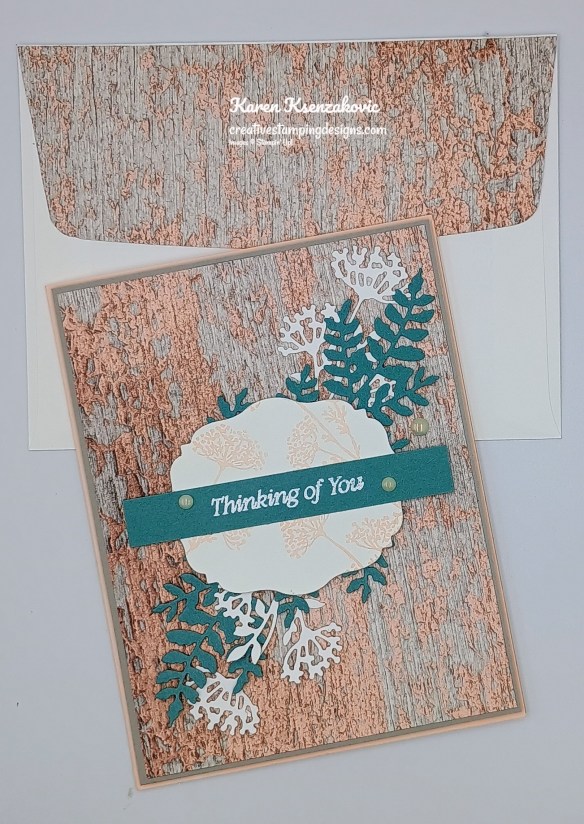
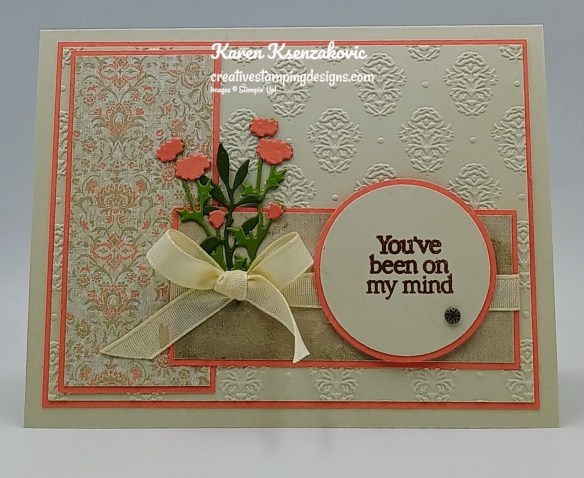
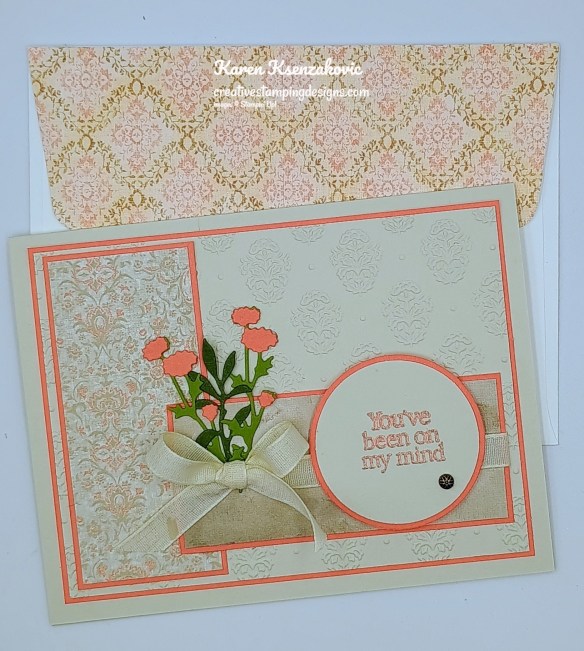
I used the Stampin’ Up! Forever Florals Bundle for my card today.
Cut a Cloud Cover card front using the largest Forever Florals Dies. Adhere the die cut panel to a Cloud Cover mat then to the front of the Cloud Cover card base.
Die cut 2 of the large leaf/flower die using the Forever Florals Dies from a panel of Basic Beige. Cut the small leaf die using the Forever Florals Dies from a panel of Secret Sea. On a panel of Basic White, stamp the cluster of flower image from the Forever Florals stamp set in Petal Pink Ink 5 times. Stamp the flower center image from the Forever Florals stamp set in Secret Sea Ink over the flower image. Cut the flower out using the Forever Florals Dies. Arrange and adhere the flowers and leaves to the card front.
On a panel of Cloud Cover, stamp the sentiment from the Forever Florals stamp set in Secret Sea Ink. Cut the sentiment out using the Forever Florals Dies. Adhere the sentiment to the card front with Stampin’ Dimensionals. Add a few Muted Palette Dots to the card front.
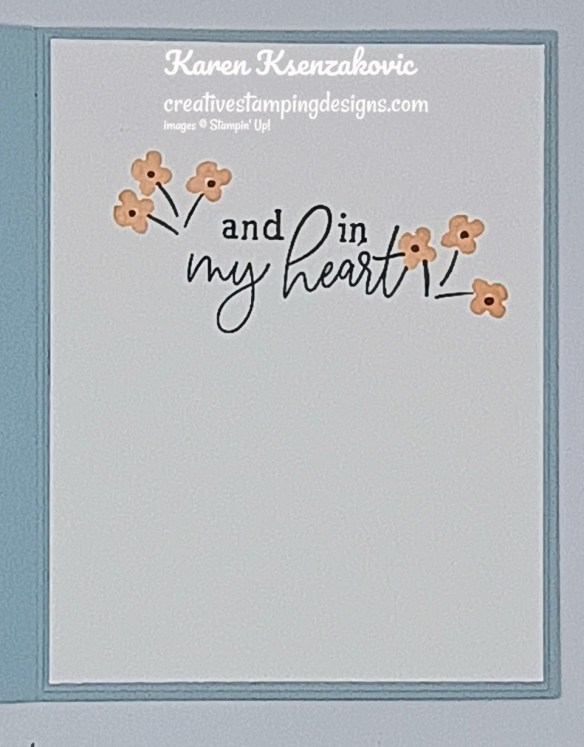
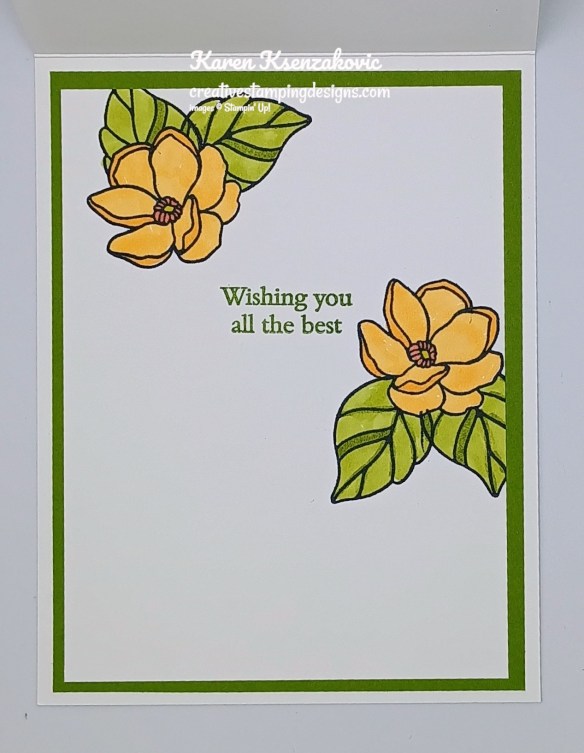
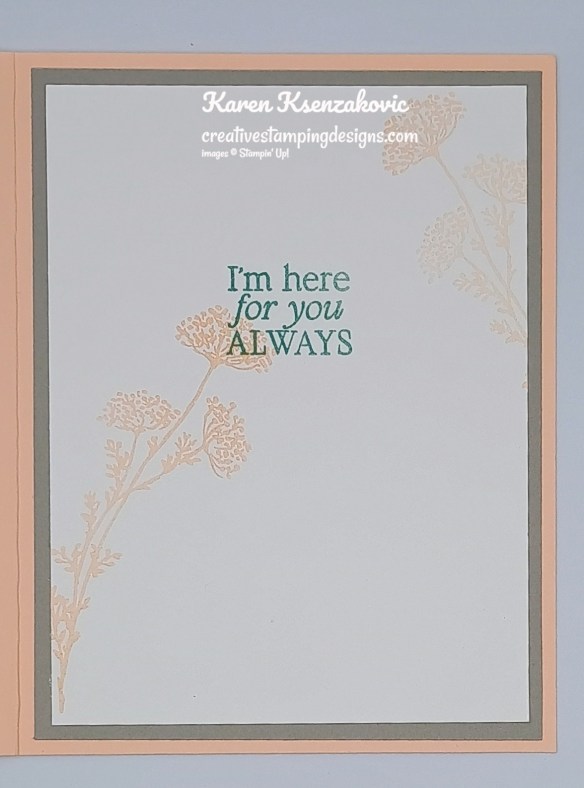
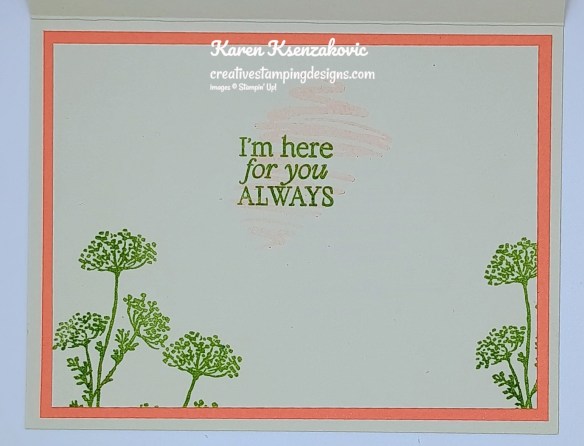
Stamp the sentiment from Forever Florals stamp set in Secret Sea Ink on a panel of Basic White. Stamp the small stem image from Forever Florals stamp set in Secret Sea Ink next to the sentiments. Stamp the single flower image from Forever Florals stamp set in Petal Pink Ink. Adhere the Basic White panel to a Cloud Cover mat then to the inside of the Cloud Cover card base.
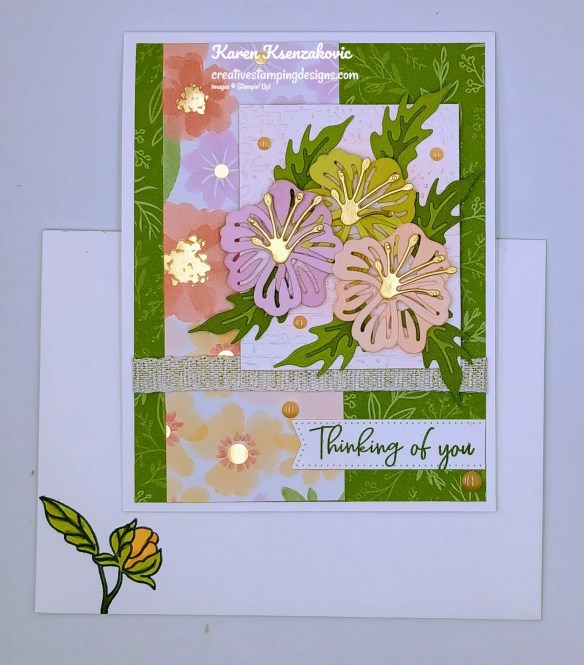
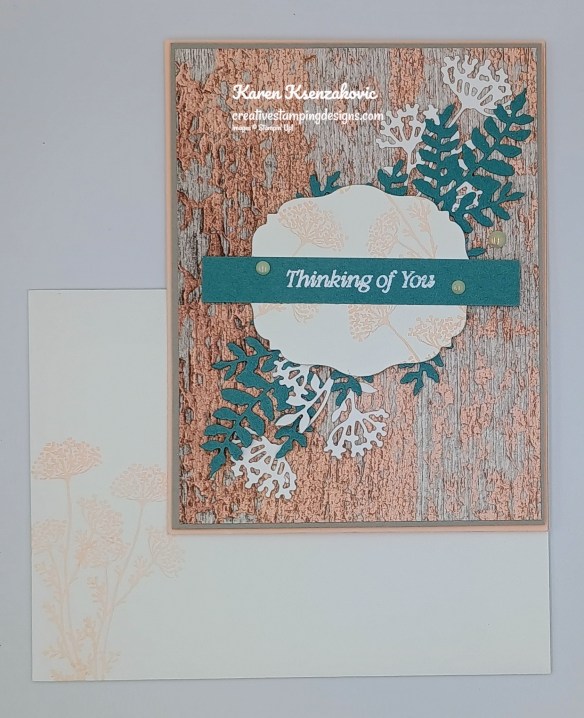
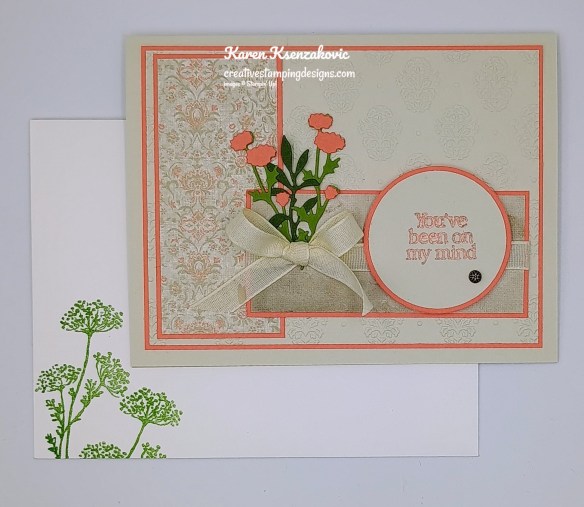
Decorate a Basic White Medium Envelope to finish your card. Stamp the small stem image from the Forever Florals stamp set in Secret Sea Ink on the envelope front. Stamp the single flower image from Forever Florals stamp set on the stems in Petal Pink Ink and the flower centers in Secret Sea. Adhere a panel of 2025-2027 In-Color DSP to the envelope flap.
Thank you for stopping by my blog today. I hope you like the card and will give it a try. Happy Stamping!!
If you need any stamping supplies, I’d love to be your Demonstrator. Just click HERE to go directly to my online store or drop me an email if you have any questions.
The new March Online Exclusives are now available to order. I’m offering Double Creative Stamping Designs Rewards. THAT’S 2X THE REWARDS FOR YOU FROM ME!!! March 3 – Monday March 9 for all orders over $50 (before tax & shipping)!! How does this work? For a $50 you’ll earn 2 rewards, $100 you’ll earn 4 rewards, $150 you’ll earn 6 rewards, etc. Head over to my Online Store and get those orders in early and earn those Double Rewards!!
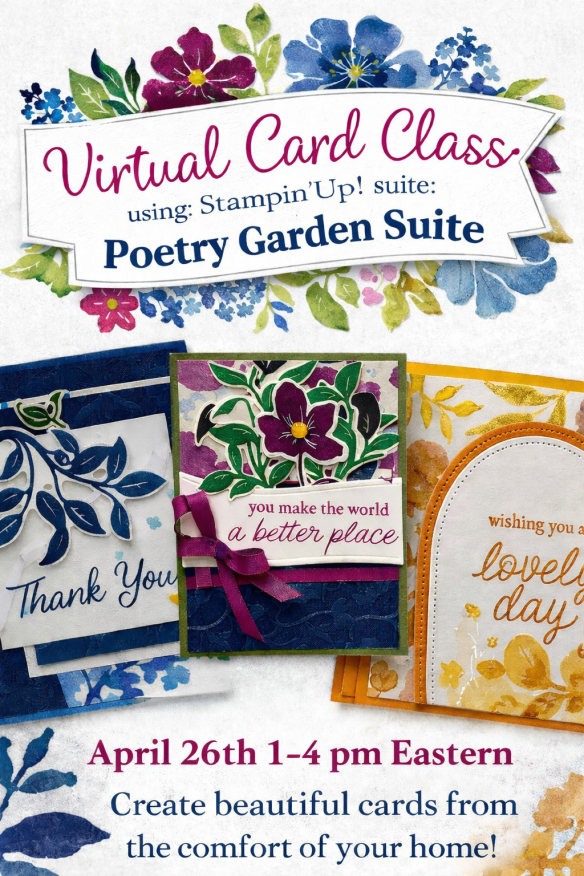
Tara Carpenter and I are teaming up to offer a fun online class using Stampin’ Up! March Online Exclusive Poetry Garden Suite. We will be creating 6 different cards during the class including 2 Fun Fold Cards. Sign Up now by Clicking Here to reserve your spot.
Zoom class with complete instructions to complete each card
PDF with detailed directions
During sign up you will have the option to add additional items to your order that you can take advantage of at no additional shipping cost. These items are optional, however if you want to recreate the cards you will need them. If you’ve attended a previous class, you were given a discount code, there is a spot to put that code on the form and the discount only applies to the products that you check off that you wish to purchase, not the class. Since the Bundles are already discounted, the discount does not apply to them either.
The class will be held Sunday April 26th from 1 to 4 pm Eastern Time via Zoom. This allows anyone in the United States to participate live! Can’t join us live… no worries, we will record the session so it can be replayed at any time.
I will email written directions that will include directions, cardstock cuts as well as photos to help you create each card.
The bundles are not included in the price of the class. You can purchase the bundle through me at an additional 10% discount of the Online Exclusive price (see below).
Class Cost $40 + $10 (Shipping)
Additional purchased items will be included in the above shipping price. I will invoice you through PayPal and invoices must be paid by April 5th to insure I can get the products delivered, packaged up and out to you with enough time.
Deadline: Sunday April 5th
Click Here to register for the class now!! Let me know if you have any questions.
I’ve updated my Retired List. I’ve added a LOT more items that have been retired by Stampin’ Up! at a discounted price. Check out my list, there might be something that you missed out on and really wanted. You can find it by Clicking Here.
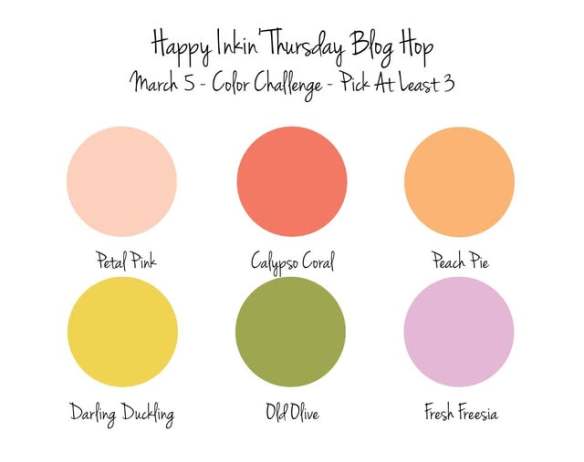
Good Thursday morning stamping friends welcome to our Happy Inkin’ Thursday Blog Hop. If you are starting with me, thank you, I hope you will stop by everyone’s blog to see the awesome projects they have created this week. If you are hopping over from Mary’s blog, thank you for stopping by. This week we have a Color Challenge to work with. If you’d like to see a quick video on how I made this card, Click Here to go to my Instagram Reels. Here is my card using this week’s colors.
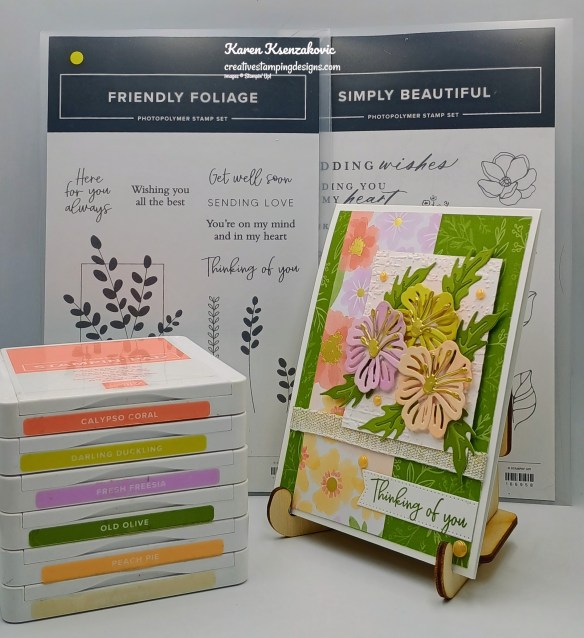
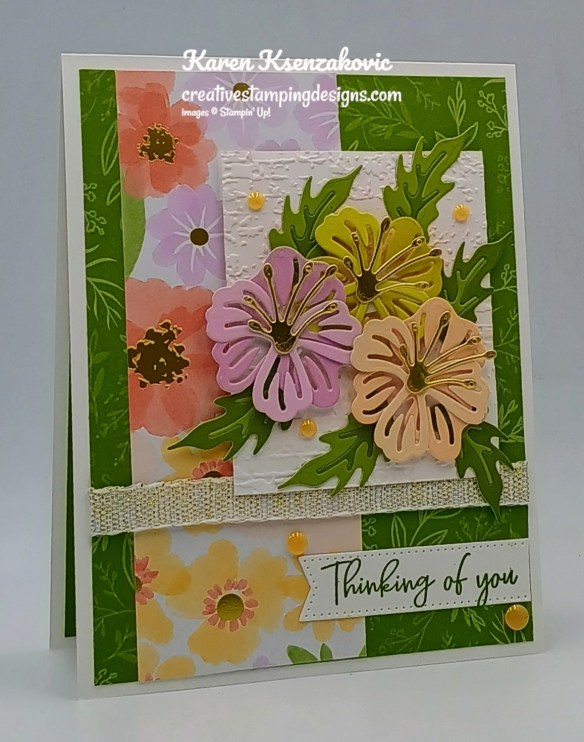
I used the Stampin’ Up! Friendly Foliage Stamp Set along with the Lovely & Beautiful Specialty Designer Series Paper, Exposed Brick 3D Embossing Folder, Stylish Shapes Dies and Stampin’ Up! Simply Beautiful Bundle for my card today.
There are out colors for this week
Adhere a panel of Lovely & Beautiful DSP to another panel of Lovely & Beautiful DSP. Wrap a piece of Gold White 3/8″ Ribbon around the layered panel and adhere it on the back. Adhere the layered panel to a Basic White thick card base.
Emboss a panel of Basic Whtie using the Exposed Brick EF. Using the Simply Beautiful Dies, cut the leaves from a panel of Two-Tone Old Olive cardstock, the flowers from panels of Two-Tone Darling Duckling, Two-Tone Fresh Freesia and Two-Tone Petal Pink cardstocks, and the flower centers from Gold Foil paper. Adhere the flower and leaf pieces together.
Adhere the flowers to the embossed panel with Stampin’ Dimensionals. Adhere the leaves under the flowers. Adhere the artwork panel to the card front with Stampin’ Dimensionals. Stamp the sentiment from Friendly Foliage stamp set in Old Olive Ink on a panel of Basic White. Cut the sentiment out using the Stylish Shapes Dies. Adhere the sentiment to the card front. Add a few 2024-2026 In-Color Flat Pearls to the card front.
Stamp the sentiment from the Friendly Foliage stamp set in Old Olive Ink on a panel of Basic White. Stamp the small flower and leaf images from the Simply Beautiful stamp set in Tuxedo Black Ink next to the sentiment. Color the images with Old Olive and Peach Pie Stampin’ Blends Markers. Adhere the Basic Whtie panel to an Old Olive mat then to the inside of the Basic Whtie Thick card base.
To complete your card, decorate a Basic White Medium Envelope. Stamp the small flower image from the Simply Beautiful stamp set in Tuxedo Black Ink on the envelope front. Color the image using Old Olive and Peach Pie Stampin’ Blends Markers. Adhere a panel of Lovely & Beautiful DSP to the envelope flap.
Thank you for stopping by my blog today. Now that you’ve seen my card, let’s get on with the hop! Click the next button below to hop over to see what Tara has created. Happy Hopping
Just in case you get lost along the way, here is a list of the team members involved in the hop today.
If you need any stamping supplies, I’d love to be your Demonstrator. Just click HERE to go directly to my online store or drop me an email if you have any questions.
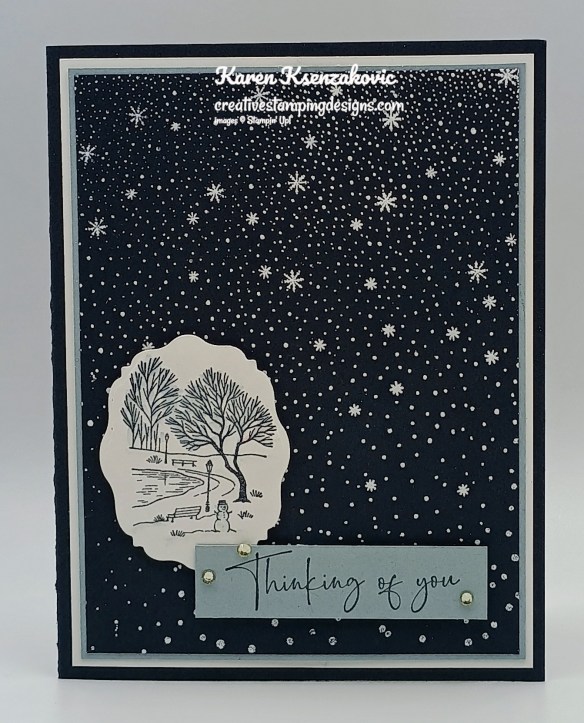
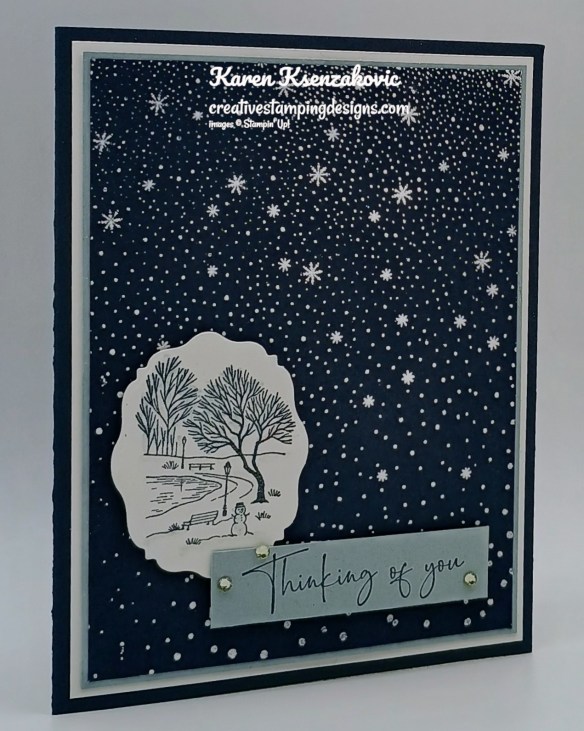
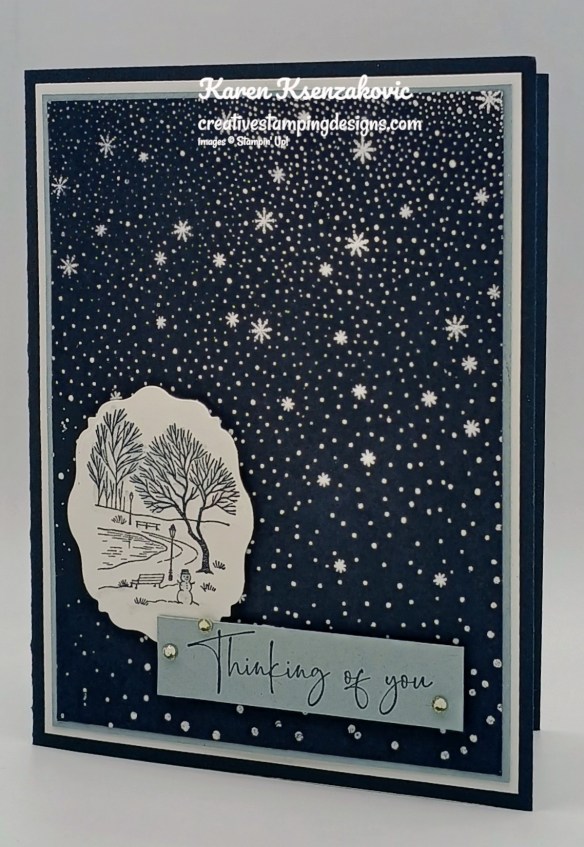
Good Freezing Sunday morning stamping friends. I hope you are having a great weekend. This has been by far the coldest winter in NJ I remember. The temps are supposed to be warming up to the 30’s this week last I saw. It was 1-degree this morning when I looked with a negative real feel with the winds.
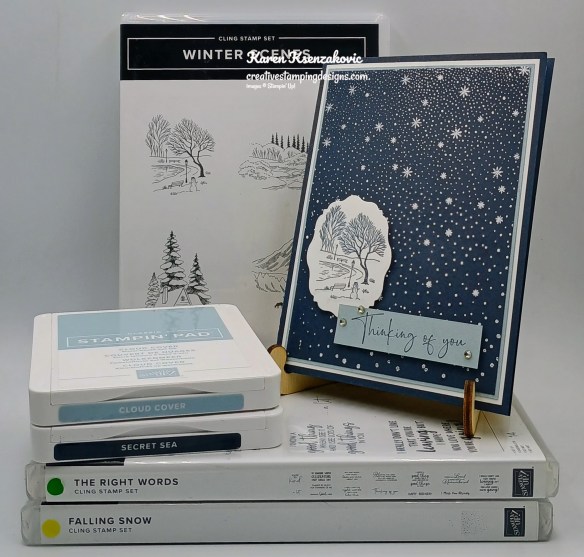
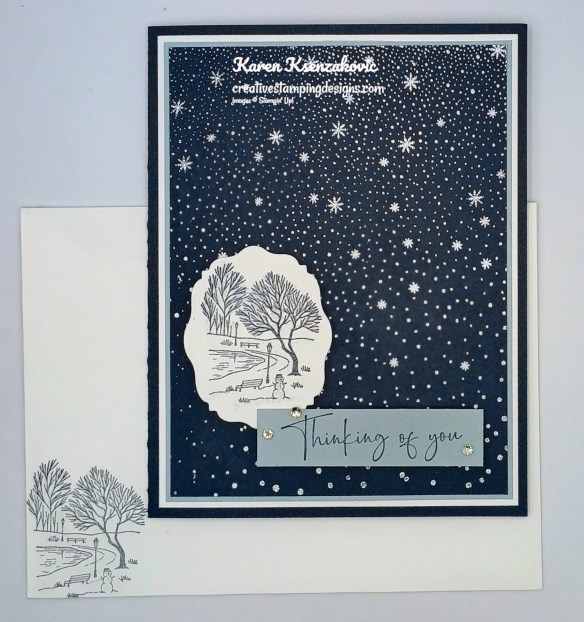
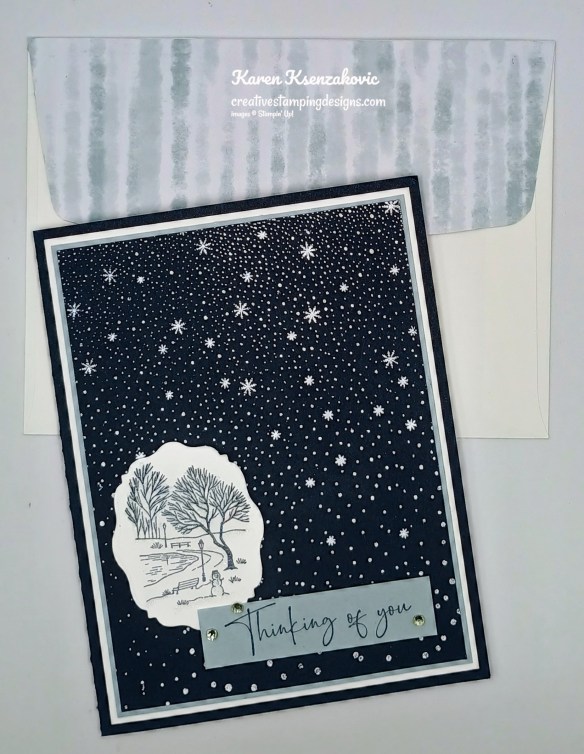
My card today features my 2 favorite 2025-2027 In-Colors, Cloud Cover and Secret Sea, along with my favorite, lots of layers. I love this color combination and hope that one day they make these 2 colors permanent. What are your favorite In-Colors? Here’s my card for today.
I used the Stampin’ Up! Winter Scenes Stamp Set along with the Stampin’ Up! the Right Words Stamp Set and Stampin’ Up! Falling Snow Stamp Set for my card today.
Stamp the snow image from the Falling Snow stamp set on a panel of Secret Sea in Versamark Ink. Sprinkle the image with White Embossing Powder and set it using the Heat Tool. Adhere the embossed panel to a Cloud Cover mat and a Basic White mat. Adhere the layered panel to a Secret Sea card base.
Stamp the park image from the Winter Scenes stamp set in Secret Sea Ink on a panel of Basic White. Cut the image out using the Beautifully Celebrated Dies. Using the Clear Wink of Stella Brush, go over the trees, snowman and snow on the ground. Adhere the die cut image to the card front with Stampin’ Dimensionals.
On a panel of Cloud Cover, stamp the sentiment from The Right Words stamp set in Secret Sea Ink.. Adhere the sentiment to the card front with Stampin’ Diimensionals. Add a few Rhinestone Basic Jewels to the card front.
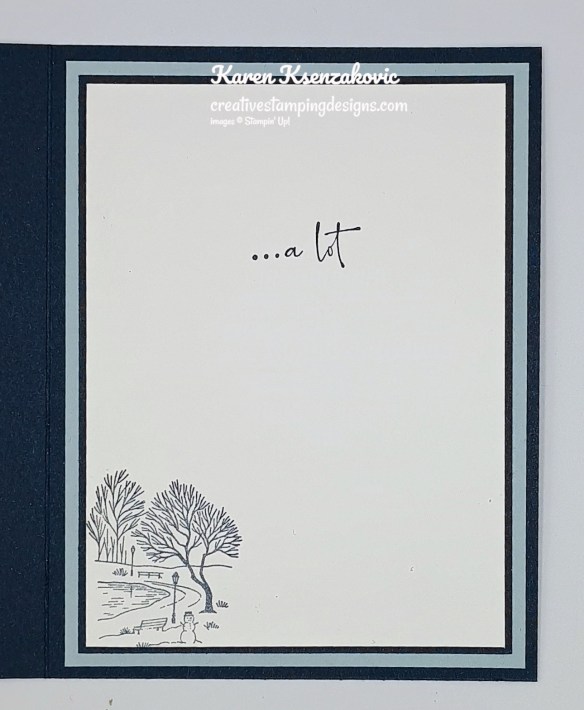
Stamp the sentiment from The Right Words stamp set in Secret Sea Ink on a panel of Basic White. Stamp the park scene from the Winter Scenes stamp set in Secret Sea Ink on the bottom of the panel. Adhere the Basic White panel to Secret Sea and Cloud Cover mats then to the inside of the Secret Sea card base
Decorate a Basic White Medium Envelope to finish your card. Stamp the park image from the Winter Scenes stamp set in Secret Sea Ink on the envelope front. Adhere a panel of 2025-2027 In-Color 6 x 6 Designer Series Paper to the envelope flap.
Thank you for stopping by my blog today. I hope you like the card and will give it a try. Happy Stamping!!
If you need any stamping supplies, I’d love to be your Demonstrator. Just click HERE to go directly to my online store or drop me an email if you have any questions.
I’m offering a little ordering special for Valentine’s Day again this year! I call it my “Stuck on You Valentine” ordering special! For all orders of $50 or greater (before shipping and taxes and after coupons) placed through me between now and Saturday, February 14, you’ll get your choice of a free adhesive!
This can be anything that Stampin’ Up! sells that could be used as an adhesive! And for the adhesives that are $5 or under, two packs will equal one choice (see the items with the (2) on the list below) so if you select those, you’ll get double!!
Here is a list of the adhesives that you can pick from:
Adhesive Sheets – 152334
Multipurpose Liquid Glue – 110755
Mini Glue Dots – 103683
Tear & Tape Adhesive – 154031
Stampin’ Seal – 152813
Stampin’ Seal Refill – 152814
Stampin’ Seal + – 149699
Stampin’ Seal + Refill – 152812
Fine-Tip Glue Pen – 138309
Silicone Craft Sheet (even though it’s not an adhesive…it is an awesome tool for adhesives!) – 127853
Foam Adhesive Strips – 141825
Stampin’ Dimensionals (2) – 104430
Mini Stampin’ Dimensionals (2) – 144108
Black Stampin’ Dimensionals Combo Pack – 150893
Foam Adhesive Sheets – 152815
I’ll be placing the order for the adhesives on February 16th, so please be sure to send your selections right away when you order…otherwise I’ll pick one for you and send it out with your thank you gift!
*With Stampin’ Up!’s backorder policy where numbers are turned off for ordering if they go on backorder, if the adhesive that you pick is turned off for ordering when I place the order on the 16th, I’ll order Stampin’ Dimensionals for you instead.
Visit my Online Store Here and start shopping now!!
February’s Free Online Fun Fold Class Registration Open
It’s time to cash in those Bonus Coupons (starting February 3), so Tara Carpenter and I are offering a Free Online Zoom Class for February. We will be creating 6 different Fun Fold cards; we’re hoping to show you how easy some fun folds can be. This class will be FREE with a $50 purchase from my Online Store. We will not be sharing the products we are using since the cards we make live will most likely be using new products that will be available in March (a week after the class).
The class requirements:
Visit my Online Store and place a $50 or more order before tax and shipping and after coupon codes.
Once you have made the purchase, fill out the Google Form HERE and submit.
What you will receive:
Zoom class with complete step by step instructions to complete each card as we go.
PDF with detailed directions and photos
A Link to the recorded class after we are done so you can watch it again and make more cards.
A week before the class I will send you the complete PDF of the cards so you can cut all your cardstock gather your supplies, so you are ready to go. We will NOT be cutting cardstock or doing any die cutting live since all the cards will be different. Everyone’s cards will be unique since you will pick which color cardstock and ink you want to use along with the Designer Series Paper, Ribbon & Embellishments for each card.
The class will be held on Sunday February 22nd from 1pm – 4pm Eastern Time via Zoom. This will allow everyone all over the United States to participate live!
I will email you the Zoom link to the class a day before the event.
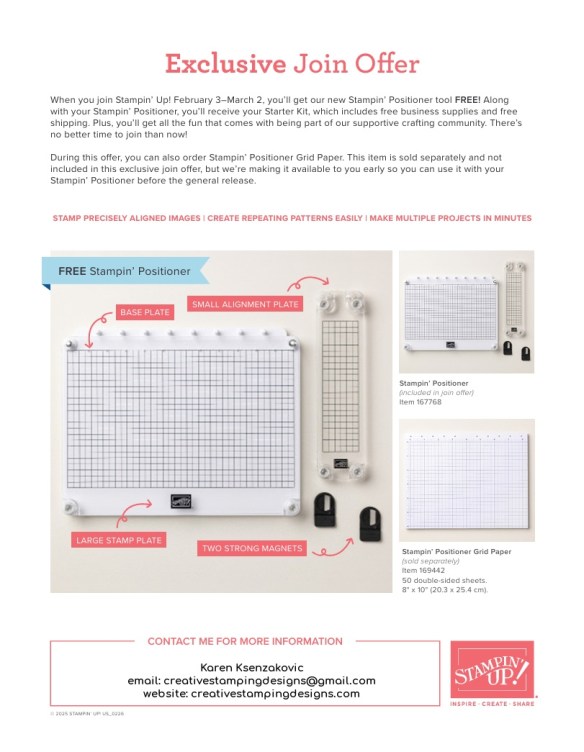
February 3 – March 2 – Stampin’ Up! Joining Special – Free Positioning Tool
Stampin’ Up! announced an amazing new tool that will be available for FREE with the purchase of a Starter Kit between February 3-March 2!! Anyone that purchases the Starter Kit during the promotion will get the awesome new Stampin’ Positioner with their Starter Kit absolutely FREE!!
Here are the Starter Kit promotion details:
Promotion Period:February 3–March 2
New team members who purchase their Starter Kit February 3–March 2 will also receive our new Stampin’ Positioner*.
New demonstrators who submit their Independent Demonstrator Agreement (IDA) before February 3 or after March 2 will not be eligible for this offer.
Joining deadline: March 2, 2026, at 11:59 p.m. (MT)
*What’s the Stampin’ Positioner?
It’s Stampin’ Up!’s new stamping alignment tool that makes stamping easier and more accurate. It allows you to stamp precisely aligned images, create repeating patterns and Two-Step Stampin’ images easily, and make multiple projects in minutes.
Stampin’ Positioner Grid Paper will also be available for to order but it is not included as part of this exclusive join offer.
A few other things to know:
The Stampin’ Positioner WILL be available for purchase by everyone at a later date. We have not been given any details on when that will be.
The Stampin’ Positioner is available for a limited time for current Demonstrators to purchase.
You can read more details about the joining offer on this PDF (click the image to open a full-size printable PDF):
We’d love to have you join our team!! Once you join, you get at least a 20% discount on all of your Stampin’ Up! purchases and you get to preorder from the upcoming catalogs and promotions!! You can attend the Stampin’ Up! events too. There’s never an obligation to sell, you can join to enjoy the discount for yourself. Contact me if you have any questions and we can talk. I’d love to have you on my team. I’d be more than happy to answer any of your questions, contact me at creativestampingdesigns@gmail.com
You can read a bit more information about the benefits of being a Demonstrator and a part of our team here. When you’re ready to join, you can get started here. Let me know if you have any questions.
There is no limit to the number of coupon codes you can redeem on an order during the redemption period. If you’re redeeming multiple codes, you must put a space between each code.
You may only redeem coupon codes one time. You cannot redeem them after February 28.
You can redeem Bonus Days coupon codes for month-to-month Paper Pumpkin subscriptions and new prepaid subscriptions.
Some restrictions apply. Coupons can’t be redeemed towards Starter Kits and you cannot use them on exchanges.
Redemption period ends: February 28, 2026, at 11:59 p.m. (MT)
Add color and whimsy to your paper crafting with the Painted Illusions 12″ x 12″ (30.5 x 30.5 cm) Designer Series Paper! This craft paper features soft watercolor gradients in pink, green, blue, teal, and yellow, with white patterns that flow over the background. Layer with other Stampin’ Up! products in coordinating colors to create your own harmonious card making and scrapbooking designs. The Painted Illusions 12″ x 12″ (30.5 x 30.5 cm) Designer Series Paper is the exclusive Product of the Month for February 2026! Only available until stocks run out—don’t wait to get yours!
DETAILS – February 2026 Product of the Month – 12 sheets: 3 each of 4 double-sided designs – 12″ x 12″ (30.5 x 30.5 cm) – Acid and lignin free (this product is photo-safe) – Colors: Darling Duckling, Flirty Flamingo, Granny Apple Green, Lost Lagoon, Misty Moonlight, Petal Pink, Pretty Peacock
DESIGNER SERIES PAPER – Can be used for card making, scrapbooking, and other paper crafts! – Features exclusive designs by in-house Stampin’ Up! artists. – Complements other Stampin’ Up! products and colors.
PRODUCT OF THE MONTH – Is a new exclusive product released each month! – Can be unlocked for just $5 with orders over $75 (after discounts and rewards). – Is only available while supplies last—they can sell out quickly! – Is limited to one per customer (including language versions).
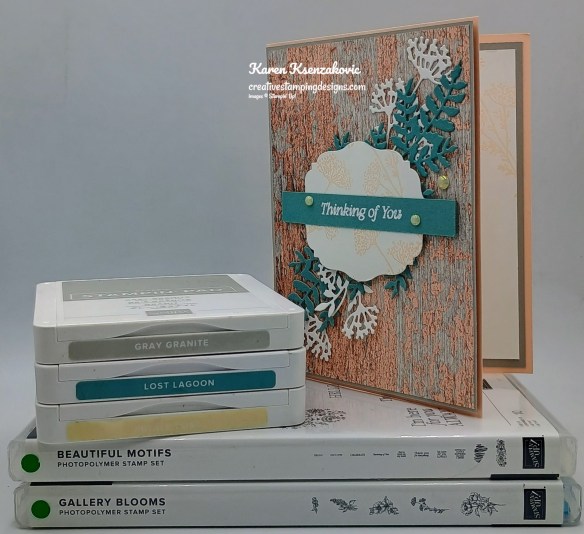
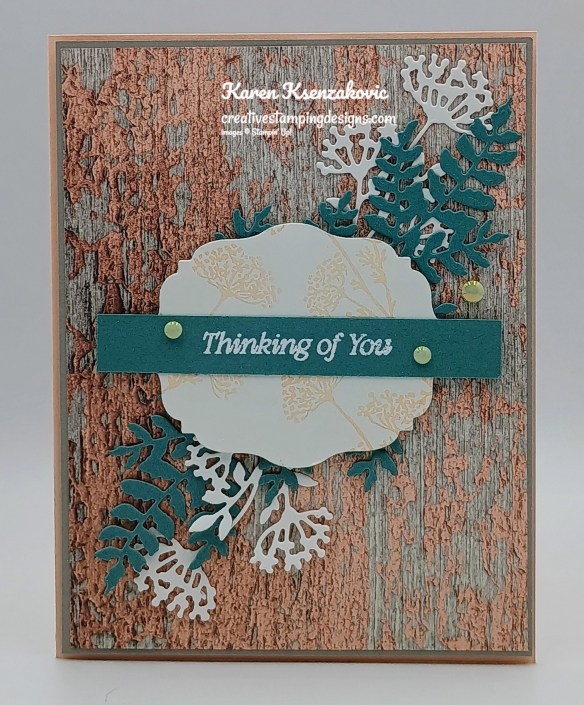
Good Thursday morning stamping friends welcome to our Happy Inkin’ Thursday Blog Hop. If you are starting with me, thank you, I hope you will stop by everyone’s blog to see what they have created this week. If you are hopping over from Mary’s blog, thank you for stopping by. This week we have Sketch Challenge. If you’d like to see a quick video on how I made this card, Click Here to go to my Instagram Reels. Here is my card using this week’s sketch.
I used the Stampin’ Up! Beautiful Motifs bundle along with the Country Woods Designer Series Paper, Beautifully Celebrated Dies and Stampin’ Up! Gallery Blooms Stamp Set for my card today.
This is our sketch for this week.
Adhere a panel of Country Woods DSP to a Gray Granite mat. Adhere the layered panel to a Petal Pink card base with Stampin’ Dimensionals.
Using the Beautiful Motifs Dies, cut 2 of the leafy dies from a panel of Lost Lagoon and 2 of the floral dies from a panel of Basic White. Adhere 1 of each of the die cut pieces together with a Glue Dot. Adhere the layered die cuts to the card front opposite each other on an angle and overlapping in the center. Cut off stems where they are overlapping with snips.
Cut a panel of Basic White using the Beautifully Celebrated Dies. Stamp the floral image from the Gallery Blooms stamp set in Petal Pink Ink on the die cut panel multiple times. On a panel of Lost Lagoon, stamp the sentiment from the Beautiful Motifs stamp set in Versamark Ink. Sprinkle the sentiment with White Embossing Powder and set it using the Heat Tool. Adhere the sentiment to the center of the stamped die cut panel. Adhere the layered sentiment to the card front with Stampin’ Dimensionals. Add a few Antique Pearls to the card front.
Stamp the sentiment from Beautiful Motifs stamp set in Lost Lagoon Ink on a panel of Basic White. Stamp the floral image from Gallery Blooms stamp set on the panel in Petal Pink Ink. Adhere the Basic White panel to a Gray Granite mat then to the inside of the Petal Pink card base.
Decorate a Basic White Medium Envelope to complete your card. Stamp the floral image from the Gallery Blooms stamp set in Petal Pink Ink on the envelope front 2 times. Adhere a panel of Country Woods DSP to the envelope flap.
Thank you for stopping by my blog today. Now that you’ve seen my card, let’s get on with the hop! Click the next button below to hop over to see what Tara has created. Happy Hopping
Just in case you get lost along the way, here is a list of the team members involved in the hop today.
If you need any stamping supplies, I’d love to be your Demonstrator. Just click HERE to go directly to my online store or drop me an email if you have any questions.
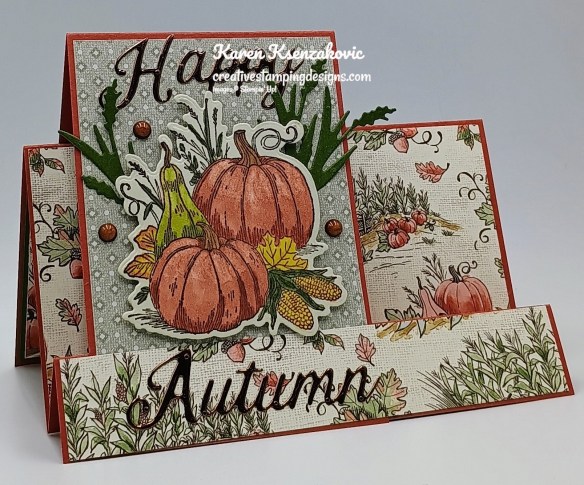
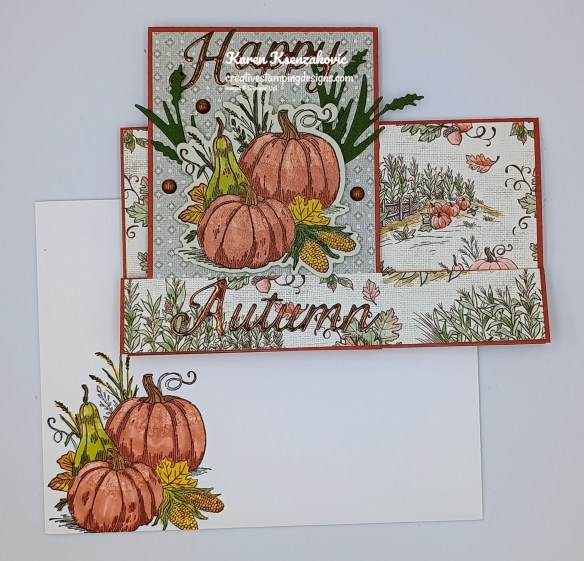
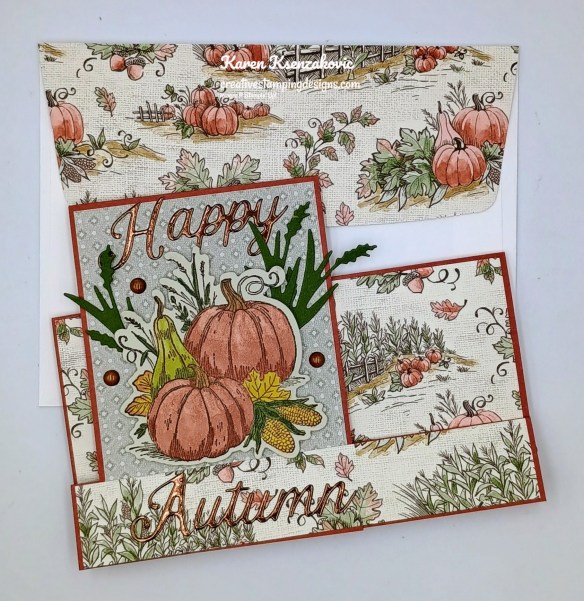
Good Saturday morning stamping friends and welcome to the weekend. I hope you are starting to make some plans for the weekend. The last 2 days were the most perfect summer days you could want. Low 80’s with very low humidity and a beautiful breeze. It was just gorgeous out. I made sure to take advantage and go for multiple walks. Temperatures are going up again starting today.
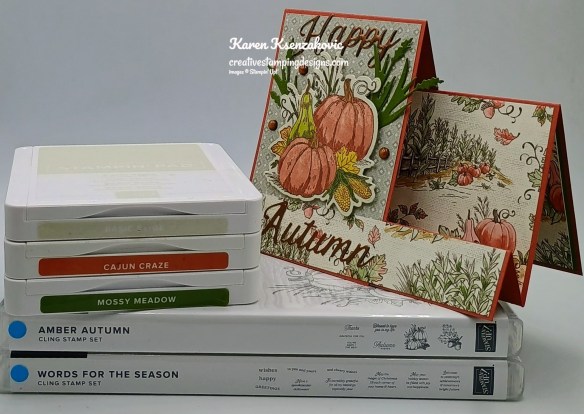
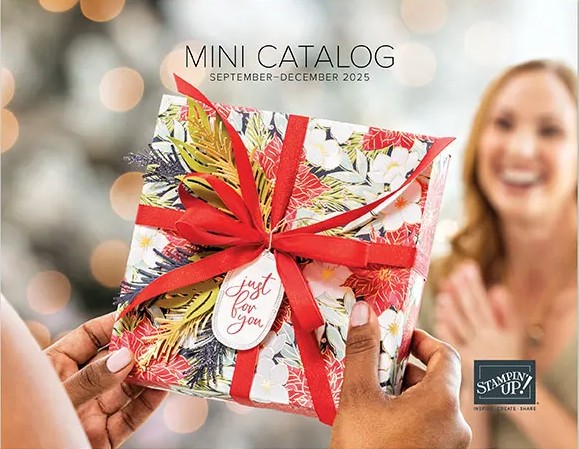
I played with some new products coming in the September – December 2025 Mini Catalog. This autumn bundle is just gorgeous, and it was a MUST HAVE for me from the first time I saw it. You’ll be able to purchase it starting September 3rd, unless you want to get your hands on it early and join the Stampin’ Up! community. If that’s the case, contact me and we can talk about signing you up. You can add the new products coming in September to your starter kit so that you won’t have to wait. If you’d like to see a quick video of how I made this card, Click Here to go to my Instagram Reels. Here’s my card for today.
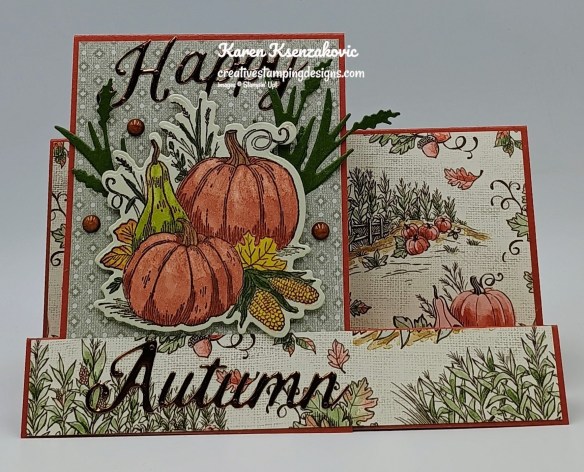
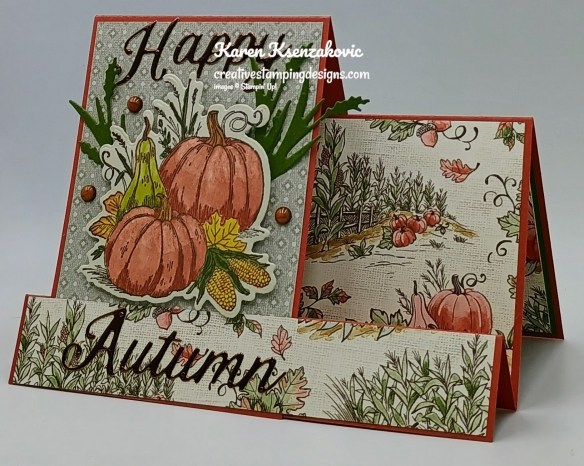
I used the Stampin’ Up! Amber Autumn Bundle along with the Stampin’ Up! Words For the Season Bundle, Autumn Toile Designer Series Paper and the Earthen Toned Metallic Specialty Paper for my card today.
Adhere the 2 7/8″ x 5 3/8″ panel of Autumn Toile DSP to the Cajun Craze card base. Adhere the 3″ x 6″ step to the card base. Adhere the bottom front first, then adhere the folded edge to the back of the card base. Adhere a panel of Autumn Toile DSP to the small card front. Adhere the 7/8″ x 5 3/8″ strip of Autumn Toile DSP to the bottom front of the card base.
On a panel of Basic Beige, stamp the pumpkin image from the Stampin’ Up! Amber Autumn Cling Stamp Set in Early Espresso Ink. Color the image using Cajun Craze, Darling Duckling, Lemon Lolly, Mossy Meadow, Old Olive and Pecan Pie Stampin’ Blends Markers. Using the Amber Autumn Dies, cut the pumpkin image out along with the sprigs from a panel of Mossy Meadow. Cut the sentiment using the Words for the Season Dies, from a panel of Earthen Toned Metallic Paper.
Adhere the pumpkin image to the small card front with Stampin’ Dimensionals. Adhere the sprigs behind the pumpkin with Glue Dots. Adhere the die cut sentiment to the small card front. Add a few Streaked Dots to the card front.
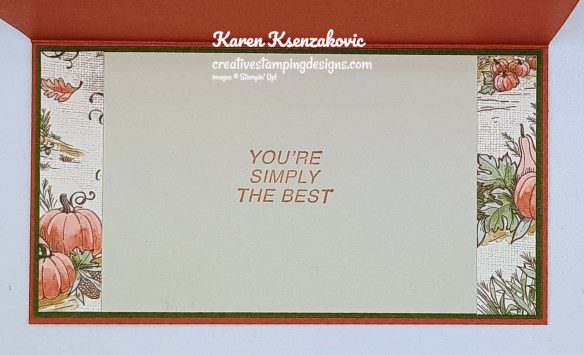
On a panel of Basic Beige, stamp the sentiment from Amber Autumn stamp set in Cajun Craze Ink. Adhere 2 panels of Autumn Toile DSP to either side of the panel. Adhere the Basic Beige panel to a Mossy Meadow mat then to the inside of the Cajun Craze card base.
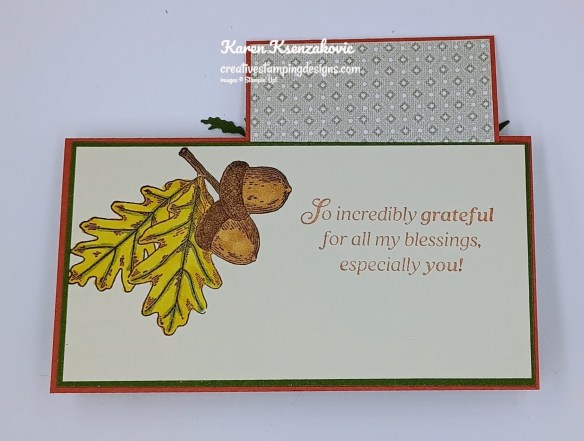
On a panel of Basic Beige, stamp the sentiment from the Words For The Season stamp set in Cajun Craze Ink. Stamp the leaf/acorn image from the Amber Autumn stamp set in Early Espresso Ink on the side of the panel. Color the image with Darling Duckling, Old Olive and Pecan Pie Stampin’ Blends Markers. Adhere the Basic Beige panel to a Mossy Meadow mat then to the back of the Cajun Craze card base.
Finish the card by decorating a Basic White Medium Envelope. Stamp the pumpkin image from the Amber Autumn stamp set in Early Espresso Ink on the envelope front. color the image with Cajun Craze, Darling Duckling, Lemon Lolly, Mossy Meadow, Old Olive and Pecan Pie Stampin’ Blends Markers. Adhere a panel of Autumn Toile DSP to the envelope flap.
Thank you for stopping by my blog today. I hope you like the card and will give it a try. Happy Stamping!!
If you need any stamping supplies, I’d love to be your Demonstrator. Just click HERE to go directly to my online store or drop me an email if you have any questions.
My September – December 2025 Mini Catalog and September Online Exclusive Designer Series Paper, Ribbon and Embellishment Shares are open for ordering. You can order just the DSP share, just the Two-Tone cardstock share, just the Ribbon share or just the Embellishment share, or you can it all!!
I’m offering a Designer Series PaperShare, Two-Tone Cardstock Share, Ribbon Share & Embellishment Share from the September-December 2025 Mini Catalog, along with the upcoming September Online Exclusives and I’d love to have you join!! I’m placing my share order early on September 3rd and I’m going to use the expedited shipping option so I should be able to have the shares cut, bundled and back out to you during the week of September 8th. Wouldn’t you love to have all of the gorgeous new Designer Series Papers in the Stampin’ Up! September – December 2025 Mini Catalog and the upcoming September Online Exclusives? What is a Paper Share you ask? It’s a sample of each of the new Designer Series Papers from the Catalog and Online Exclusives. Shares give you a good working sample of all of the papers so that you can decide which ones to order in full packs! If you were to purchase all of the DSP in the new Catalog and Online Exclusives, it would cost you over $165.00 plus shipping and if you were to purchase all the ribbon it would cost you over $75.00.
New Designer Series Paper Share – $21.00 plus $9.00 for Priority Mail Shipping
How my shares work: I order full packs of all of the Designer Series Papers listed below, I cut them into 6″ X 6″ pieces (or 6″ X 12″ pieces for double shares) and give you one panel of each design from each pack on the list. I pack up the paper in a cellophane bag with labels listing the Name, Item # and Colors in the pack and mail it back out to you just as quickly as I can!
New Designer Series Paper Share – $21.00 plus $9.00 for Priority Mail shipping
You will receive one 6×6 sheet of each design from the following DSP packs (the number after the name indicates how many 6×6 sheets of that paper pack you will receive):
All Season Velvet (3)
Autumn Toil (4)
Christmas Tags & More (8)
Earthen Toned Metallic (1)
Elegant Pine Snowflakes (6)
Gathering Together (6)
Lights of Aurora (6)
Modern Christmas (6)
North Pole Delivery (5)
Peaceful Garden (6)
Peaceful Garden Glimmer (3)
Traditions of Christmas (6)
Silent Snowflake (1)
In all, you’ll receive 61 – 6” x 6” sheets of designer or specialty paper!
Double Designer Series Paper Share – $42.00 Plus $9.00 Priority Mail Shipping
As a gift from me for ordering a Double Share of Designer Series Paper, I will include a Greetings For You Mix & Match Ephemera Pack. This gift is only for ordering a Double DSP Share.
Two-Tone Cardstock Share
Have you been wanting to try the Two-Tone Cardstock but didn’t want to buy a whole pack? You can add a share of the 4 different Two-Tone Cardstock packs for an additional $6 or purchase them separately for $6 + $9 Priority Shipping
You will receive one 6×6 sheet of each color from each of the packs (the number after the name indicates how many 6×6 sheets of that paper pack you will receive):
Keeping Traditions (6)
Peaceful Days (6)
Lovely Florals (6)
Sweet Halloween (6)
In all, you’ll receive 24 – 6” x 6” sheets of cardstock!
If you’d like double shares of the designer paper or cardstock, I’m offering those too! I’ll cut the 12″ x 12″ sheets into 6″ × 12″ so that you’ll be able to get 3 full A2 size card fronts from each sheet and you’ll get double sheets of the 6″ x 6″ since they’re already precut.
Ribbon Share – $20.00 plus $9.00 Priority Mail Shipping
All ribbons will come individually wrapped and labeled with the name and number of the product.
One-Fourth of a Roll of each:
Balmy Blue 1/2″ Sheer Ribbon
Black & White & Gold Baker’s Twine
Early Espresso & Old Olive Linen Thread
Irregular Weave 3/8″ Trim
Misty Moonlight & Silver Edged 1/2″ Ribbon
Real Red 1/2″ Shiny Ribbon
Shaded Spruce 7/8″ Ribbon
White 3/8″ Fluffy Trim
Double Ribbon Share – $40.00 Plus $9.00 Priority Mail Shipping and you will be getting 1/2 of the roll or each ribbon.
Embellishment Share – $16.00 plus $9.00 Priority Mail Shipping
I’m also offering an Embellishment Share. I will divide the embellishments up and package them in a cello bag with the name and number for easy ordering, just like I do with the paper and ribbon.
You will receive (approximate # listed:
Cajun Craze & Gold Dots (30)
Dear Dots (40)
Delightful Decorative Dots (36)
Faceted Snowflakes (42)
Frosted Iridescent Dots (40)
Hues of Blue Flowers (32)
Large Gold Hoops (2)
Streaked Dots (32)
Traditional Sparkling Sequins (48)
Double Share of the Embellishments – $32.00 plus $9.00 Priority Mail Shipping
Anyone is welcome to join in my shares (please note, I can only ship to addresses within the US). To make ordering the shares a little easier, I have created a form for you to submit, that way you can order any combination of shares you want. Click Here for the form. I will send out PayPal Invoices by September 1st.
Deadline to sign up for my share is Sunday August 31st at 5:00 PM ET.
Let me know if you have any questions, I’m more than happy to help you. Thank you for joining in my Shares!!
LAST DAY FOR DOUBLE CREATIVE STAMPING DESIGNS REWARDS
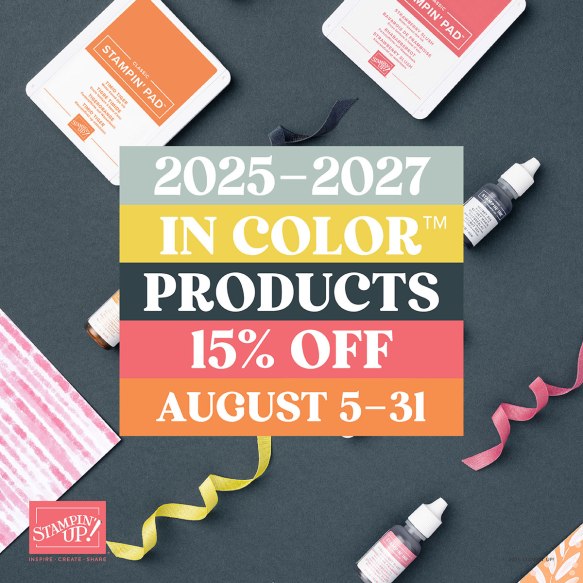
To get everything started, I’m offering Double Creative Stamping Designs Rewards starting today, Tuesday August 5th, through Saturday August 9th for orders of $50 + before tax and shipping. How does this work? For a $50 you’ll earn 2 rewards, $100 you’ll earn 4 rewards, $150 you’ll earn 6 rewards, etc. Head over to my Online Store and get those orders in early for all those beautiful In-Color products.
Starting August 5, select products that feature the new 2025–2027 In Colors™ are 15% off! This is a great opportunity to purchase new In Color products at a discount, so grab products you love—like ink, two-tone cardstock, and Designer Series Paper—and get everything you need to create projects that showcase Stampin’ Up!’s amazing color coordination!
Promotion Details:
Sales Period: August 5–31
Ordering Deadline: August 31, 2025, at 11:59 p.m. (MT)
Sale includes select inks, cardstock, Designer Series Paper, embellishments, and other products that include these new In Colors. Only products featured on the 2025–2027 In Colors page are included in this promotion.
Products are available only while supplies last.
You can find the 2025-2027 In Color sale items that will be on sale beginning August 5 right here! Get your list ready and shop early for the best selection!
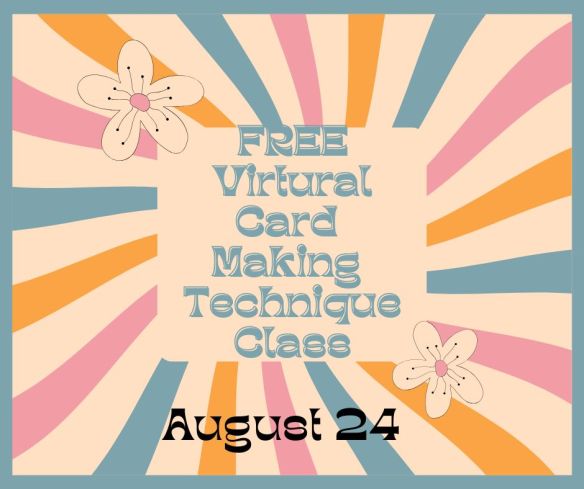
Registration Open for our August Online Technique Class
Tara Carpenter, Nicole Bloxom and I are teaming up to offer a fun Technique Online Zoom Class. We will be creating 6 different cards using 6 different techniques. This class is free with a $50 purchase from my Online Store. We will supply a list of supplies we are going to be using in the next couple days. We decided to open registration early so you can take advantage of the Free Shipping and my Double Rewards and also earn a free class.
The class requirements and What You Will Receive:
Visit my Online Store and place a $50 or more order before tax and shipping.
Zoom class with complete step by step instructions to complete each card as we go.
PDF with detailed directions and photos
A Link to the recorded class after we are done so you can watch it again and make more cards.
Here is a list of just some of the items that Tara, Nicole and I will be using.
Charming Day Bundle
Elements of Text stamp set
Artistic Leaves Stamp Set
Two-Tone Cardstock
Fluid 100 Watercolor Paper
Iridescent Treat Bags
Stampin’ Spritzer
Wow Basics Embossing Powder
Heat Tool
Floral Charm DSP
Adhesive Sheets
Stylish Shapes Dies
A week before the class I will send you the complete PDF of the cards so you can cut all your cardstock and gather your supplies, so you are ready to go. We will NOT be cutting cardstock live. Everyone’s cards will be unique since you will pick which color cardstock and ink you want to use for each card.
The class will be held on Sunday August 24th from 1pm – 5pm Eastern Time via Zoom. This will allow everyone all over the United States to participate live!
I will email you the Zoom link to the class a few days before the event.
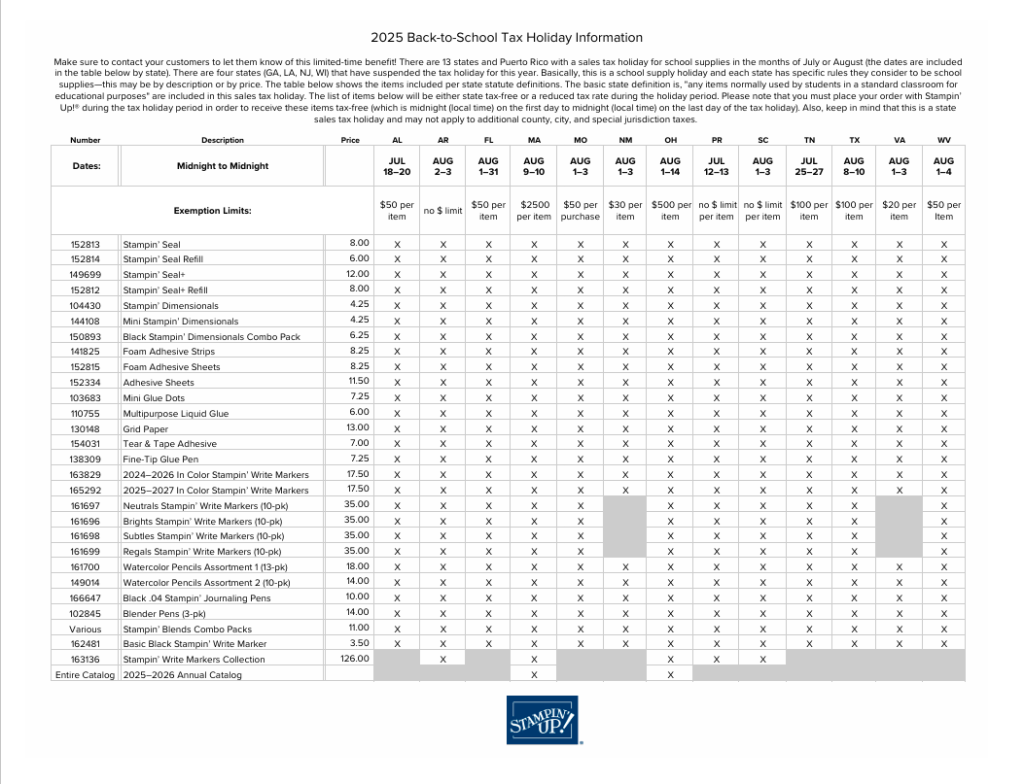
Twelve states and Puerto Rico are having Back-to-School Sales Tax Holidays this year and some Stampin’ Up! items qualify for the tax break in those states!
The states with upcoming tax holidays are: Alabama, Arkansas, Florida, Massachusetts, Missouri, New Mexico, Ohio, South Carolina, Tennessee, Texas, Virginia and West Virginia. So if you live in one of those states or Puerto Rico, take a second to download the spreadsheet below and mark your calendar!
Here is the list of states having sales tax holidays, what the dates are and what supplies will be tax free during the holiday (click on the image to download a full-size printable page):
Please note that you must place your order with Stampin’ Up! during the tax holiday period in your state in order to receive these items tax-free (which is midnight on the first day to midnight on the last day of the tax holiday). Also, keep in mind that this is a state sales tax holiday; the state statute may not apply to county, city, and special jurisdiction taxes.
For those wondering about Georgia, Illinois, Louisiana, New Jersey, and Wisconsin, those states have suspended the sales tax holiday this year.
Basic Beige Cardstock (2) – 2 3/4″ x 5 1/4″(inner liner & back panel), 3″ x 3″(artwork)
Cajun Craze Cardstock 5 1/2″ x 8″ (card base scored & folded at 3″, 6″ & 7″), 3″ x 6″ (step panel scored at 4 1/4″)
Mossy Meadow Cardstock (2) – 2 7/8″ x 5 3/8″(inner liner and back panel mats)
Autumn Toile Designer Series Paper 2 7/8″ x 5 3/8″(cad front panel), 7/8″ x 5 3/8″(lower card front panel), 2 7/8″ x 3 1/2″(step card front panel), (2) – 5/8″ x 2 3/4″(inner liner panels), 2 1/4″ x 6″(envelope flap)
Earthen Toned Metallic Specialty Paper 1″ x 5″(die cut sentiment)
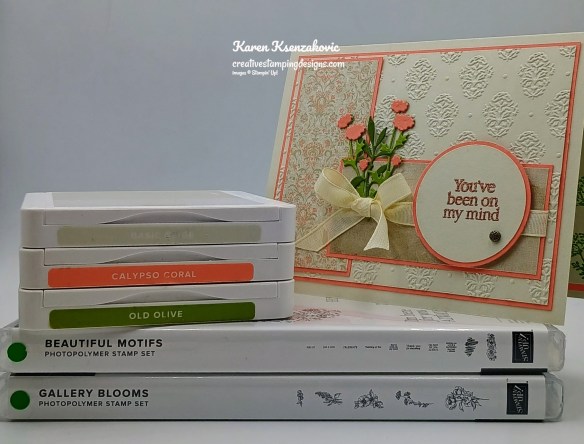
Good Thursday morning stamping friends and welcome to our Happy Inkin’ Thursday Blog Hop. If you are starting with me, thank you. I hope you will stop by everyone’s blog to see what they have created this week. If you are hopping over from Mary’s blog, thank you for stopping by. This week we have Theme Challenge. If you’d like to see a quick video of how I made this card, Click Here to go to my Instagram Reels. Here is my card using this week’s theme.
I used the Stampin’ Up! Beautiful Motifs Bundle along with the Damasks Designs 3D Embossing Folder, Beautiful Gallery 6 x 6 Designer Series Paper and Stampin’ Up! Gallery Blooms Photopolymer Stamp Set for my card today.
This is our theme this week. I did Dry and Heat Embossing on my card.
Emboss a panel of Basic Beige with the Damasks Designs EF. Adhere the embossed panel to a Calypso Coral mat. Adhere the layered panel to a Basic Beige card base.
Adhere a panel of Beautiful Gallery DSP to a Calypso Coral mat. Adhere the layered panel to the embossed card front, vertically. Adhere another panel of Beautiful Gallery DSP to a Calypso Coral mat. Wrap a piece of 3/8″ Basic Beige Classic Ribbon around the layered panel and tie a bow. Adhere the layered panel to the card front, horizontally overlapping the vertical panel.
Using the Beautiful Motifs Dies, cut 2 flowers from a panel of Old Olive, 2 flowers from a panel of Calypso Coral and the leaf die from a panel of Mossy Meadow. Cut the Calypso Coral flowers off the stems and adhere them to the Old Olive stems over the flowers. Create a small bouquet and adhere it just under the bow. On a panel of Basic Beige, stamp the sentiment from the Stampin’ Up! Beautiful Motifs Photopolymer Stamp set in Versamarik Ink. Sprinkle the sentiment with Copper Embossing Powder and set it with the Heat Tool. Cut the sentiment out using the 1 3/4″ Circle Punch. Cut a panel of Calypso Coral using the 1 7/8″ Circle Punch. Adhere the sentiment to the Calypso Coral mat then adhere it to the card front, over the ribbon with Stampin’ Dimensionals. Add a Pressed Flowers Motifs to the sentiment.
Stamp the sentiment from Beautiful Motifs stamp set in Old Olive Ink on a panel of Basic Beige. Stamp the swish image from the Beautiful Motifs stamp set in Calypso Coral Ink, stamping off 2 times on scrap paper, over the sentiment. Stamp the floral image from the Gallery Blooms stamp set in Old Olive Ink on the bottom of the panel. Adhere the Basic Beige panel to a Calypso Coral mat then to the inside of the Basic Beige card base.
Complete the card by decorating a Basic White Medium Envelope. Stamp the floral image from the Gallery Blooms stamp set in Old Olive Ink on the envelope front. Adhere a panel of Beautiful Gallery DSP to the envelope flap.
Thank you for stopping by my blog today. Now that you’ve seen my card, let’s get on with the hop! Click the button below to hop over to see what Tara has created. Happy Hopping!!
Just in case you get lost along the way, here is a list of the team members involved in the hop today.
If you need any stamping supplies, I’d love to be your Demonstrator. Just click HERE to go directly to my online store or drop me an email if you have any questions.
Starting August 5, select products that feature the new 2025–2027 In Colors™ are 15% off! This is a great opportunity to purchase new In Color products at a discount, so grab products you love—like ink, two-tone cardstock, and Designer Series Paper—and get everything you need to create projects that showcase Stampin’ Up!’s amazing color coordination!
Promotion Details:
Sales Period: August 5–31
Ordering Deadline: August 31, 2025, at 11:59 p.m. (MT)
Sale includes select inks, cardstock, Designer Series Paper, embellishments, and other products that include these new In Colors. Only products featured on the 2025–2027 In Colors page are included in this promotion.
Products are available only while supplies last.
You can find the 2025-2027 In Color sale items that will be on sale beginning August 5 right here! Get your list ready and shop early for the best selection!
Basic Beige Cardstock 5 1/2″ x 8 1/2″(card base scored & folded at 4 1/4″), (2) 3 3/4″ x 5″(card front & inner liner), 2″ x 2″(sentiment)
Calypso Coral Cardstock 3 7/8″ x 5 1/8″(card front mat), (2) 1 5/8″ x 3 5/8″(card front panel mats), 2″ x 2″(sentiment mat), 4″ x 5 1/4″(inner liner mat), 1″ x 4″(die cuts)
Mossy Meadow Cardstock 1″ x 1 1/2″(die cut)
Old Olive Cardstock 1″ x 4″(die cuts)
Beautiful Gallery 6 x 6 Designer Series Paper – (2) 1 1/2″ x 3 1/2″ (card front panels), 2 1/4″ x 6″(envelope flap)
Good Saturday morning stamping friends and welcome to the weekend. I hope you have some fun plans in the works. It’s supposed to rain here today, at least that’s the last I heard. I’ll be at work all day, so we’ll see what the day brings.
For today’s card I played with the same 2 sets I played with last week. When I won this set at OnStage, I wasn’t sure if I would even use it. Once I paired it up with the sentiment set, ideas were coming to me. If you’d like to see a quick video of how I made this card, Click Here to go to my Instagram Reels. Here’s my card for today.
I used the Stampin’ Up! Online Exclusive Blooming Phrases Photopolymer Stamp Set along with the Stampin’ Up! Along These Lines Photopolymer Stamp Set,Nested Essentials Dies and On The Go Designer Series Paper for my card today.
Adhere a panel of On The Go DSP to a Basic Black mat with Stampin’ Seal. Wrap a piece of Black Baker’s Twine around the layered panel and tie a bow. Adhere the layered panel to a Strawberry Slush card base with Stampin’ Dimensionals.
Cut a panel of Basic White with the largest Nested Essentials Die. Stamp the sentiment from Blooming Phrases stamp set in Tuxedo Black Ink center left of the panel. Stamp the dog image from Along These Lines stamp set in Tuxedo Black Ink next to the sentiment connecting the lines.
Outline the dog image using Crumb Cake Stampin’ Blends Marker. Adhere the die cut panel to the card front with Stampin’ Dimensionals. Add a Strawberry Slush Gem to the image.
Stamp the sentiment from Blooming Phrases stamp set in Tuxedo Black Ink on a panel of Basic White. Stamp the heart image from Along These Lines stamp set in Tuxedo Black Ink, connecting the lines, next to the sentiment. Color the heart with Strawberry Slush Stampin’ Blends Markers. Adhere the Basic White panel to a Basic Black mat then to the inside of the Strawberry Slush card base.
Decorate a Basic White Medium Envelope to complete your card. Stamp the dog and heart images from Along These Lines stamp set in Tuxedo Black Ink on the envelope front, being sure to connect the lines. Color the images with Crumb Cake and Strawberry Slush Stampin’ Blends Markers. Adhere a panel of On The Go DSP to the envelope flap.
Thank you for stopping by my blog today. I hope you like the card and will give it a try. Happy Stamping!!
If you need any stamping supplies, I’d love to be your Demonstrator. Just click HERE to go directly to my online store or drop me an email if you have any questions.
The Buy 1 Get 1 50% off Sale is going on, YAY!!! To kick this sale off, I’m offering a little bonus. With this awesome Suite Sale from Stampin’ Up!, I thought that I’d give you a little bonus to help you with coloring all of those pretty stamped images! I’m offering a FREE pack of Stampin’ Blends Combo Pack Markers of your choice starting June 3rd – Tuesday June 10th for any order of $50 or more before tax, shipping and after Stampin’ Rewards. If you use your Stampin’ Up! Rewards and it falls below $50; it will not qualify for a pack of blends or my rewards. You will also still earn your Creative Stamping Designs Rewards from me for your order of $50 or more. Once you have placed your order, I will send you an email asking which combo pack you would like. You must send me your selection by June 11th or I will pick a color pack for you. I’ll be placing my order for the blends on June 11th.
June 3-30, all available suites and suite products from the 2025–2026 Annual Catalog and Online Exclusives are buy one, get one 50% off! If you’ve had your eye on a new suite from the annual catalog or you really like the look of a stamp set from an Online Exclusives suite, you don’t have to choose—you can get both!
Here are the promotion details:
All available suites and suite products from the 2025–2026 Annual Catalog and Online Exclusives are buy one, get one 50% off.
When you shop the sale, the 50% off discount will apply to the lower-priced item (for example, if you buy a suite collection and a stamp set from a suite, the suite would be full price, and the stamp set would be 50% off).
Suite collections are available if all items are in stock; if all items are not in stock, you can still shop the available suite products.
You don’t have to buy a suite and suite products all from the same suite collection for the discount to apply. You can buy any suite products from any suite.
The discount will appear in your cart once you’ve added two items within the sale parameters to your cart.
Products are available only while supplies last.
See and shop all qualifying suites in the Online Store
The sale begins June 3, 2025 at 12:01 AM MT.
The sale ends June 30, 2025 at 11:59 PM MT.
Let me know if you have any questions. YAY for an awesome sale! Get your lists ready and get your orders placed between June 3-30!!
Karen & Tara’s Cheers & Sips Online Zoom Class Registration Open
Tara Carpenter and I are teaming up to offer a fun online class using Stampin’ Up! Online Exclusive Cheers & Sips Bundle. We will be creating 6 different cards during the class including 2 fun folds.
The class fee includes:
Stampin’ Up! Holographic Resin Dots (full pack)
Stampin’ Up! Gold Striped Mesh Ribbon (full pack)
Pre-cut card kits to complete each card
Zoom class with complete instructions to complete each card
PDF with detailed directions
During sign up you will have the option to add additional items to your order that you can take advantage of at no additional shipping cost. These items are optional, however if you want to recreate the cards you will need them.
The class will be held Sunday June 29th from 1 to 5 pm Eastern Time via Zoom. This allows anyone in the United States to participate live! Can’t join us live… no worries, we will record the session so it can be replayed at any time.
We will email written directions that will include directions, cardstock cuts as well as photos to help you create each card.
We are not including the bundle in the price of the class. You can purchase the bundle through me at an additional 10% discount of the Online Exclusive price (see below).
Class Cost $35 + $9 (Priority Shipping)
Additional purchased items will be included in the above shipping price. We will invoice you through PayPal by June 15tth to insure we can get the products delivered, packaged up and out to you with enough time.
Deadline: Saturday June 14th (this is so we have time to order all the bundles, embellishments and DSP being used)
Click Here to register for the class now!! Let me know if you have any questions.
Stampin’ Up! has added a bunch of items to the Last Chance Products list! Be sure to scroll through all of the pages so that you don’t miss anything. There are newly added items sprinkled throughout the list.
You can find the Last Chance Products list Here in the online store.
Don’t forget that Last Chance Products are only available while supplies last, so order early for the best selection!
Send your loved ones elevated cards with heartfelt sentiments! • Makes 9 cards: 3 each of 3 designs with 9 coordinating envelopes • Envelopes and card bases with decorative gold foil • Precut paper pieces and unique sentiment labels • Coordinating colors: Berry Burst, Cajun Craze, Early Espresso, Mossy Meadow, Pretty Peacock (Classic Stampin’ Spot), Timid Tiger Coordinates with the Floral Charm Suite Collection (item 166141)
Subscribe to the June Paper Pumpkin Kit between 11 May and 10 June by clicking here!
Don’t miss the coordinating Hugs Abloom Dies Add-On!
Make the most of your Paper Pumpkin kits with the Hugs Abloom Dies add-on! Quickly and cleanly cut out a flower, leaf sprig, sentiment label, or Hugs sentiment to elevate your crafting projects. These additional dies are designed to work with THREE Paper Pumpkin Kits: the Inked Occasions Paper Pumpkin Kit, the Mountain Majesties Paper Pumpkin Kit, and the Full of Charm Paper Pumpkin Kit. Pair these dies with other Stampin’ Up! products for even more creative options!
DETAILS – 4 dies – Largest die: 2-1/2″ x 1-1/4″ (6.4 x 3.2 cm) – Use with a Stampin’ Cut & Emboss Machine (sold separately)
You must be a current Paper Pumpkin subscriber to purchase this item. To become a subscriber, visit www.stampinup.com/paperpumpkin.
Note: Supplies may be limited toward the end of the subscription period.
Good Thursday morning stamping friends and welcome to our Happy Inkin’ Thursday Blog Hop. If you are starting with me, thank you. I hope you will stop by everyone’s blog to see what they have created this week. If you are hopping over from Mary’s blog, thank you for stopping by. This week we have Sketch Challenge. If you’d like to see a quick video of how I made this card, Click Here to go to my Instagram Reels. Here is my card using this week’s sketch.
I used the Stampin’ Up! with You in Mind Photopolymer Stamp Set along with the Stampin’ Up! Textured Notes Bundle and Turtle-y Cute Designer Series Paper for my card today.
This is our sketch for this week.
Adhere a panel of Turtle-y Cute DSP to a Shaded Spruce card base with Liquid Glue.
Using the Textured Notes Dies, cut a panel of Shaded Spruce and Soft Sea Foam with the 2nd largest die. Adhere the Shaded Spruce die cut frame to the card front, on an angle with Stampin’ Seal. Stamp the sentient from With You in Mind stamp set in Shaded Spruce Ink on the Soft Sea Foam die cut frame. Stamp the small leaf image from the Stampin’ Up! Textured Notes Cling Stamp Set on the bottom of the frame in Soft Sea Foam Ink. Adhere the soft Sea Foam panel to the card front, straight with Stampin’ Dimensionals.
Tie a bow with the Shaded Spruce & Soft Sea Foam 1/2″ Bordered Ribbon and adhere it to the bottom of the stamped leaf image with a Glue Dot. Add a few Shades of Green Hexagons to the card front.
Stamp the sentiment from Textured Notes stamp set in Shaded Spruce Ink on a panel of Basic White. Stamp the small leaf image from Textured Notes stamp set in Shaded Spruce and Soft Sea Foam Inks on the bottom of the panel. Adhere the Basic White panel to a Soft Sea Foam mat then to the inside of the Shaded Spruce card base.
Decorate a Basic White Medium Envelope to complete your card. Stamp the small leaf image from Textured Notes stamp set in Shaded Spruce and Soft Sea Foam Inks on the bottom of the envelope front. Adhere a panel of Turtle-y Cute DSP to the envelope flap.
Thank you for stopping by my blog today. Now that you’ve seen my card, let’s get on with the hop! Click the button below to hop over to see what Tara has created. Happy Hoping!
Just in case you get lost along the way, here is a list of the team members involved in the hop today.
If you need any stamping supplies, I’d love to be your Demonstrator. Just click HERE to go directly to my online store or drop me an email if you have any questions.
Send your loved ones elevated cards with heartfelt sentiments! • Makes 9 cards: 3 each of 3 designs with 9 coordinating envelopes • Envelopes and card bases with decorative gold foil • Precut paper pieces and unique sentiment labels • Coordinating colors: Berry Burst, Cajun Craze, Early Espresso, Mossy Meadow, Pretty Peacock (Classic Stampin’ Spot), Timid Tiger Coordinates with the Floral Charm Suite Collection (item 166141)
Subscribe to the June Paper Pumpkin Kit between 11 May and 10 June by clicking here!
Don’t miss the coordinating Hugs Abloom Dies Add-On!
Make the most of your Paper Pumpkin kits with the Hugs Abloom Dies add-on! Quickly and cleanly cut out a flower, leaf sprig, sentiment label, or Hugs sentiment to elevate your crafting projects. These additional dies are designed to work with THREE Paper Pumpkin Kits: the Inked Occasions Paper Pumpkin Kit, the Mountain Majesties Paper Pumpkin Kit, and the Full of Charm Paper Pumpkin Kit. Pair these dies with other Stampin’ Up! products for even more creative options!
DETAILS – 4 dies – Largest die: 2-1/2″ x 1-1/4″ (6.4 x 3.2 cm) – Use with a Stampin’ Cut & Emboss Machine (sold separately)
You must be a current Paper Pumpkin subscriber to purchase this item. To become a subscriber, visit www.stampinup.com/paperpumpkin.
Note: Supplies may be limited toward the end of the subscription period.
Good Wednesday morning stamping friends. We’re halfway through the week already. My days are all mixed up because of having Monday off. I had to work yesterday, which I normally have Tuesday’s off, so in my mind today was Tuesday. Does anyone else get your days mixed up when you have off a day you normally work?
I have a super quick card for you today letting the DSP do all the work for me. Here’s my card for today.
I used the Stampin’ Up! Beautiful Motifs Bundle along with the gorgeous Beautiful Gallery 6 x 6 Designer Series Paper and Textured Notes Dies for my card today.
Using the 3rd largest Textured Notes Dies, cut the center of a panel of Beautiful Gallery DSP. Adhere the outside portion of the DSP to a Pecan Pie card base with Liquid Glue.
Adhere the die cut panel to a Pecan Pie mat with Stampin’ Seal. Adhere the layered panel to the card front with Stampin’ Dimensionals.
Cut the flower die cut using the Beautiful Motifs Dies from a panel of Basic Beige. Adhere the die cut flower to the card front with Liquid Glue. Stamp the sentiment from the Stampin’ Up! beautiful Motifs Photopolymer Stamp Set in Pecan Pie Ink on a panel of Basic Beige. Adhere the sentiment to the card front with Stampin’ Seal. Add a Pressed Flower Motifs to the sentiment.
On a panel of Basic Beige, stamp the sentiment from Beautiful Motifs stamp set in Pecan Pie Ink. Stamp the swish image from the Beautiful Motifs stamp set in Basic Beige Ink, stamping off once on scrap paper, over the sentiment. Adhere a strip of Beautiful Gallery DSP to the side of the panel. Adhere the Basic Beige panel to a Pecan Pie mat then to the onside of the Pecan Pie card base.
Decorate a Basic White Medium Envelope to finish your card. Adhere a strip of Beautiful Gallery DSP to the envelope front and a panel to the envelope flap.
Thank you for stopping by my blog today. I hope you like the card and will give it a try. Happy Stamping!!
If you need any stamping supplies, I’d love to be your Demonstrator. Just click HERE to go directly to my online store or drop me an email if you have any questions.
Final Week for Stampin’ Up!’s BIGGEST Starter Kit Joining Special –Ends May 31st
May is an awesome time to join my Stampin’ Up! Team!! Have you ever thought about joining the Stampin’ Up! community? Are you into scrapbooking and have you seen all the new scrapbook products Stampin’ Up! has? Is your wish/want list pretty long and do you order often? Wouldn’t you love to get all these products at a discount? Why not consider joining the Stampin’ Up! community between May 6-31, and save a minimum of 20% off everything you buy? Are you new to stamping and don’t know where to start, but would like to join to save? Ask me for help, I’m here to help and assist you anyway that I can.
Stampin’ Up!’s BIGGEST Starter Kit Special will be available for a limited time! Between May 6–31, anyone who signs up to be a demonstrator can pack their Starter Kit with $165 USD worth of products for only $99 USD. That’s an extra $66 USD in products!
Crafting is even more fun with community, and there’s never been a better time to join then with Stampin’ Up!’s BIGGEST Starter Kit Special. Become a demonstrator and enjoy all the perks that come with that, like a 20–25% product discount, exclusive early access to new products, the chance to attend incredible training and crafting events like Stampin’ Up!’s OnStage and Creativity Now, and so much more!
If you join my team, I’m offering free classes to my team members. Tara Carpenter and I run Online Zoom classes and we decided that our direct team members will receive the classes for free. You’ll get the PDF and the link to the Online Zoom class along with the replay.
There is never an obligation to sell. You can join just to enjoy the discount for yourself along with all the other Demonstrator benefits. Once you join, you’ll get at least a 20% discount on all of your Stampin’ Up! merchandise purchases and you get to order early from the upcoming catalogs and Online Exclusives! You will also be able to attend the OnStage Events and any other events Stampin’ Up! has and you get to be a part of our awesome Stampin’ Up! team!
Unsure about this and want to talk? Contact me at creativestampingdesigns@gmail.com and we can talk. You can also find additional information Here at Join My Team. Being a part of the Stampin’ Up! Community is one of the best decisions I’ve ever made. I have made many friends along the way while doing what I love, Paper Crafting. This Joining offer is only good starting May 6 – May 31. Why not give it a try? I’d love to have you on my team.
Karen & Tara’s Cheers & Sips Online Zoom Class Registration Open
Tara Carpenter and I are teaming up to offer a fun online class using Stampin’ Up! Online Exclusive Cheers & Sips Bundle. We will be creating 6 different cards during the class including 2 fun folds.
The class fee includes:
Stampin’ Up! Holographic Resin Dots (full pack)
Stampin’ Up! Gold Striped Mesh Ribbon (full pack)
Pre-cut card kits to complete each card
Zoom class with complete instructions to complete each card
PDF with detailed directions
During sign up you will have the option to add additional items to your order that you can take advantage of at no additional shipping cost. These items are optional, however if you want to recreate the cards you will need them.
The class will be held Sunday June 29th from 1 to 5 pm Eastern Time via Zoom. This allows anyone in the United States to participate live! Can’t join us live… no worries, we will record the session so it can be replayed at any time.
We will email written directions that will include directions, cardstock cuts as well as photos to help you create each card.
We are not including the bundle in the price of the class. You can purchase the bundle through me at an additional 10% discount of the Online Exclusive price (see below).
Class Cost $35 + $9 (Priority Shipping)
Additional purchased items will be included in the above shipping price. We will invoice you through PayPal by June 15tth to insure we can get the products delivered, packaged up and out to you with enough time.
Deadline: Saturday June 14th (this is so we have time to order all the bundles, embellishments and DSP being used)
Click Here to register for the class now!! Let me know if you have any questions.
June 3-30, all available suites and suite products from the 2025–2026 Annual Catalog and Online Exclusives are buy one, get one 50% off! If you’ve had your eye on a new suite from the annual catalog or you really like the look of a stamp set from an Online Exclusives suite, you don’t have to choose—you can get both!
Here are the promotion details:
All available suites and suite products from the 2025–2026 Annual Catalog and Online Exclusives are buy one, get one 50% off.
When you shop the sale, the 50% off discount will apply to the lower-priced item (for example, if you buy a suite collection and a stamp set from a suite, the suite would be full price, and the stamp set would be 50% off).
Suite collections are available if all items are in stock; if all items are not in stock, you can still shop the available suite products.
You don’t have to buy a suite and suite products all from the same suite collection for the discount to apply. You can buy any suite products from any suite.
The discount will appear in your cart once you’ve added two items within the sale parameters to your cart.
Products are available only while supplies last.
See and shop all qualifying suites in the Online Store
The sale begins June 3, 2025 at 12:01 AM MT.
The sale ends June 30, 2025 at 11:59 PM MT.
Let me know if you have any questions. YAY for an awesome sale! Get your lists ready and get your orders placed between June 3-30!!
Send your loved ones elevated cards with heartfelt sentiments! • Makes 9 cards: 3 each of 3 designs with 9 coordinating envelopes • Envelopes and card bases with decorative gold foil • Precut paper pieces and unique sentiment labels • Coordinating colors: Berry Burst, Cajun Craze, Early Espresso, Mossy Meadow, Pretty Peacock (Classic Stampin’ Spot), Timid Tiger Coordinates with the Floral Charm Suite Collection (item 166141)
Subscribe to the June Paper Pumpkin Kit between 11 May and 10 June by clicking here!
Don’t miss the coordinating Hugs Abloom Dies Add-On!
Make the most of your Paper Pumpkin kits with the Hugs Abloom Dies add-on! Quickly and cleanly cut out a flower, leaf sprig, sentiment label, or Hugs sentiment to elevate your crafting projects. These additional dies are designed to work with THREE Paper Pumpkin Kits: the Inked Occasions Paper Pumpkin Kit, the Mountain Majesties Paper Pumpkin Kit, and the Full of Charm Paper Pumpkin Kit. Pair these dies with other Stampin’ Up! products for even more creative options!
DETAILS – 4 dies – Largest die: 2-1/2″ x 1-1/4″ (6.4 x 3.2 cm) – Use with a Stampin’ Cut & Emboss Machine (sold separately)
You must be a current Paper Pumpkin subscriber to purchase this item. To become a subscriber, visit www.stampinup.com/paperpumpkin.
Note: Supplies may be limited toward the end of the subscription period.
Good Wednesday morning stamping friends. We’re halfway through the week and on our way to a long holiday weekend. It’s going to be rainy and cold here for the next couple of days.
I have a quick card for you today. If you’d like to see a quick video of how I made this card, Click Here to go to my Instagram Reels. Here’s my card for today.
I used the Stampin’ Up! Gallery Blooms Photopolymer Stamp Set along with the Stampin’ Up! Beautiful Motifs Photopolymer Stamp Set and Perennial Postage Dies for my card today.
Emboss a panel of Secret Sea using the Damask Designs EF. Adhere the embossed panel to the front of the Secret Sea card base with Liquid Glue.
On a panel of Secret Sea, stamp the flower image from the Gallery Blooms stamp set in Versamark Ink. Sprinkle the image with White Embossing Powder. Stamp the sentiment from Beautiful Motifs stamp set in Versamark Ink next to the flower image. Sprinkle the sentiment with White Embossing Powder. Set the image and sentiment with the Heat Tool. Cut the image out using the 2nd largest Perennial Postage Die. Adhere the die cut panel to a Cherry Cobbler mat with Stampin’ Seal.
Adhere the layered panel to the card front with Stampin’ Dimensionals. Color a piece of Basic Beige 3/8″ Classic Ribbon using the Cherry Cobbler Stampin’ Blends Marker. tie a small bow with the colored ribbon and adhere it to the stem of the flower with a Glue Dot. Add a Pressed Flower Motifs to the card front.
Stamp the sentiment from Beautiful Motifs stamp set in Secret Sea Ink on a panel of Basic White. Stamp the swish image from Beautiful Motifs stamp set in Cherry Cobbler Ink, stamping off 2 times on scrap paper, over the sentiment. Cut the panel using the largest Perennial Postage Dies. Adhere the Basic White panel to a Cherry Cobbler mat then to the inside of the Secret Sea card base.
Decorate a Basic White Medium Envelope for finish your card. Stamp the flower image from Gallery Blooms stamp set in Secret Sea Ink on the envelope front. Emboss a panel of Secret Sea using the Damask Designs EF. Adhere the embossed panel to the envelope flap.
Thank you for stopping by my blog today. I hope you like the card and will give it a try. Happy Stamping!!
If you need any stamping supplies, I’d love to be your Demonstrator. Just click HERE to go directly to my online store or drop me an email if you have any questions.
Stampin’ Up!’s BIGGEST Starter Kit Joining Special May 6th – 31st
May is an awesome time to join my Stampin’ Up! Team!! Have you ever thought about joining the Stampin’ Up! community? Are you into scrapbooking and have you seen all the new scrapbook products Stampin’ Up! has? Is your wish/want list pretty long and do you order often? Wouldn’t you love to get all these products at a discount? Why not consider joining the Stampin’ Up! community between May 6-31, and save a minimum of 20% off everything you buy? Are you new to stamping and don’t know where to start, but would like to join to save? Ask me for help, I’m here to help and assist you anyway that I can.
Stampin’ Up!’s BIGGEST Starter Kit Special will be available for a limited time! Between May 6–31, anyone who signs up to be a demonstrator can pack their Starter Kit with $165 USD worth of products for only $99 USD. That’s an extra $66 USD in products!
Crafting is even more fun with community, and there’s never been a better time to join then with Stampin’ Up!’s BIGGEST Starter Kit Special. Become a demonstrator and enjoy all the perks that come with that, like a 20–25% product discount, exclusive early access to new products, the chance to attend incredible training and crafting events like Stampin’ Up!’s OnStage and Creativity Now, and so much more!
If you join my team, I’m offering free classes to my team members. Tara Carpenter and I run Online Zoom classes and we decided that our direct team members will receive the classes for free. You’ll get the PDF and the link to the Online Zoom class along with the replay.
There is never an obligation to sell. You can join just to enjoy the discount for yourself along with all the other Demonstrator benefits. Once you join, you’ll get at least a 20% discount on all of your Stampin’ Up! merchandise purchases and you get to order early from the upcoming catalogs and Online Exclusives! You will also be able to attend the OnStage Events and any other events Stampin’ Up! has and you get to be a part of our awesome Stampin’ Up! team!
Unsure about this and want to talk? Contact me at creativestampingdesigns@gmail.com and we can talk. You can also find additional information Here at Join My Team. Being a part of the Stampin’ Up! Community is one of the best decisions I’ve ever made. I have made many friends along the way while doing what I love, Paper Crafting. This Joining offer is only good starting May 6 – May 31. Why not give it a try? I’d love to have you on my team.
Send your loved ones elevated cards with heartfelt sentiments! • Makes 9 cards: 3 each of 3 designs with 9 coordinating envelopes • Envelopes and card bases with decorative gold foil • Precut paper pieces and unique sentiment labels • Coordinating colors: Berry Burst, Cajun Craze, Early Espresso, Mossy Meadow, Pretty Peacock (Classic Stampin’ Spot), Timid Tiger Coordinates with the Floral Charm Suite Collection (item 166141)
Subscribe to the June Paper Pumpkin Kit between 11 May and 10 June by clicking here!
Don’t miss the coordinating Hugs Abloom Dies Add-On!
Make the most of your Paper Pumpkin kits with the Hugs Abloom Dies add-on! Quickly and cleanly cut out a flower, leaf sprig, sentiment label, or Hugs sentiment to elevate your crafting projects. These additional dies are designed to work with THREE Paper Pumpkin Kits: the Inked Occasions Paper Pumpkin Kit, the Mountain Majesties Paper Pumpkin Kit, and the Full of Charm Paper Pumpkin Kit. Pair these dies with other Stampin’ Up! products for even more creative options!
DETAILS – 4 dies – Largest die: 2-1/2″ x 1-1/4″ (6.4 x 3.2 cm) – Use with a Stampin’ Cut & Emboss Machine (sold separately)
You must be a current Paper Pumpkin subscriber to purchase this item. To become a subscriber, visit www.stampinup.com/paperpumpkin.
Note: Supplies may be limited toward the end of the subscription period.


![Basic Beige 8 1/2" X 11" Cardstock [ 164511 ]](https://assets1.tamsnetwork.com/images/EC042017NF/164511s.jpg "Basic Beige 8 1/2\" X 11\" Cardstock [ 164511 ]")
![Basic White 8 1/2" X 11" Cardstock [ 166780 ]](https://assets1.tamsnetwork.com/images/EC042017NF/166780s.jpg "Basic White 8 1/2\" X 11\" Cardstock [ 166780 ]")
![Cloud Cover 8 1/2" X 11" Cardstock [ 165621 ]](https://assets1.tamsnetwork.com/images/EC042017NF/165621s.jpg "Cloud Cover 8 1/2\" X 11\" Cardstock [ 165621 ]")
![Secret Sea 8 1/2" X 11" Cardstock [ 165624 ]](https://assets1.tamsnetwork.com/images/EC042017NF/165624s.jpg "Secret Sea 8 1/2\" X 11\" Cardstock [ 165624 ]")
![2025–2027 In Color™ 6" X 6" (15.2 X 15.2 Cm) Designer Series Paper [ 165300 ]](https://assets1.tamsnetwork.com/images/EC042017NF/165300s.jpg "2025–2027 In Color™ 6\" X 6\" (15.2 X 15.2 Cm) Designer Series Paper [ 165300 ]")
![Petal Pink Classic Stampin' Pad [ 147108 ]](https://assets1.tamsnetwork.com/images/EC042017NF/147108s.jpg "Petal Pink Classic Stampin' Pad [ 147108 ]")
![Secret Sea Classic Stampin' Pad [ 165285 ]](https://assets1.tamsnetwork.com/images/EC042017NF/165285s.jpg "Secret Sea Classic Stampin' Pad [ 165285 ]")
![Muted Palette Dots [ 165155 ]](https://assets1.tamsnetwork.com/images/EC042017NF/165155s.jpg "Muted Palette Dots [ 165155 ]")
![Basic White Medium Envelopes [ 159236 ]](https://assets1.tamsnetwork.com/images/EC042017NF/159236s.jpg "Basic White Medium Envelopes [ 159236 ]")
![Stampin' Cut & Emboss Machine [ 149653 ]](https://assets1.tamsnetwork.com/images/EC042017NF/149653s.jpg "Stampin' Cut & Emboss Machine [ 149653 ]")
![Mini Glue Dots [ 103683 ]](https://assets1.tamsnetwork.com/images/EC042017NF/103683s.jpg "Mini Glue Dots [ 103683 ]")
![Multipurpose Liquid Glue [ 110755 ]](https://assets1.tamsnetwork.com/images/EC042017NF/110755s.jpg "Multipurpose Liquid Glue [ 110755 ]")
![Stampin' Dimensionals [ 104430 ]](https://assets1.tamsnetwork.com/images/EC042017NF/104430s.jpg "Stampin' Dimensionals [ 104430 ]")
![Stampin' Seal [ 152813 ]](https://assets1.tamsnetwork.com/images/EC042017NF/152813s.jpg "Stampin' Seal [ 152813 ]")
![Bone Folder [ 102300 ]](https://assets1.tamsnetwork.com/images/EC042017NF/102300s.jpg "Bone Folder [ 102300 ]")
![Take Your Pick [ 144107 ]](https://assets1.tamsnetwork.com/images/EC042017NF/144107s.jpg "Take Your Pick [ 144107 ]")
![Paper Trimmer [ 152392 ]](https://assets1.tamsnetwork.com/images/EC042017NF/152392s.jpg "Paper Trimmer [ 152392 ]")


![Friendly Foliage Photopolymer Stamp Set (English) [ 167021 ]](https://assets1.tamsnetwork.com/images/EC042017NF/167021s.jpg "Friendly Foliage Photopolymer Stamp Set (English) [ 167021 ]")
![Simply Beautiful Bundle (English) [ 166965 ]](https://assets1.tamsnetwork.com/images/EC042017NF/166965s.jpg "Simply Beautiful Bundle (English) [ 166965 ]")
![Simply Beautiful Photopolymer Stamp Set (English) [ 166958 ]](https://assets1.tamsnetwork.com/images/EC042017NF/166958s.jpg "Simply Beautiful Photopolymer Stamp Set (English) [ 166958 ]")
![Simply Beautiful Dies [ 166964 ]](https://assets1.tamsnetwork.com/images/EC042017NF/166964s.jpg "Simply Beautiful Dies [ 166964 ]")
![Basic White 8 1/2" X 11" Thick Cardstock [ 159229 ]](https://assets1.tamsnetwork.com/images/EC042017NF/159229s.jpg "Basic White 8 1/2\" X 11\" Thick Cardstock [ 159229 ]")
![Old Olive 8-1/2" X 11" Cardstock [ 100702 ]](https://assets1.tamsnetwork.com/images/EC042017NF/100702s.jpg "Old Olive 8-1/2\" X 11\" Cardstock [ 100702 ]")
![Lovely & Beautiful 12" X 12" (30.5 X 30.5 Cm) Specialty Designer Series Paper [ 166957 ]](https://assets1.tamsnetwork.com/images/EC042017NF/166957s.jpg "Lovely & Beautiful 12\" X 12\" (30.5 X 30.5 Cm) Specialty Designer Series Paper [ 166957 ]")
![Darling Duckling 12" X 12" (30.5 X 30.5 Cm) Two Tone Cardstock [ 166707 ]](https://assets1.tamsnetwork.com/images/EC042017NF/166707s.jpg "Darling Duckling 12\" X 12\" (30.5 X 30.5 Cm) Two Tone Cardstock [ 166707 ]")
![Fresh Freesia 12" X 12" (30.5 X 30.5 Cm) Two Tone Cardstock [ 166666 ]](https://assets1.tamsnetwork.com/images/EC042017NF/166666s.jpg "Fresh Freesia 12\" X 12\" (30.5 X 30.5 Cm) Two Tone Cardstock [ 166666 ]")
![Old Olive 12" X 12" (30.5 X 30.5 Cm) Two Tone Cardstock [ 166683 ]](https://assets1.tamsnetwork.com/images/EC042017NF/166683s.jpg "Old Olive 12\" X 12\" (30.5 X 30.5 Cm) Two Tone Cardstock [ 166683 ]")
![Petal Pink 12" X 12" (30.5 X 30.5 Cm) Two Tone Cardstock [ 166689 ]](https://assets1.tamsnetwork.com/images/EC042017NF/166689s.jpg "Petal Pink 12\" X 12\" (30.5 X 30.5 Cm) Two Tone Cardstock [ 166689 ]")
![Gold Foil Sheets [ 132622 ]](https://assets1.tamsnetwork.com/images/EC042017NF/132622s.jpg "Gold Foil Sheets [ 132622 ]")
![Exposed Brick 3 D Embossing Folder [ 161600 ]](https://assets1.tamsnetwork.com/images/EC042017NF/161600s.jpg "Exposed Brick 3 D Embossing Folder [ 161600 ]")
![Stylish Shapes Dies [ 159183 ]](https://assets1.tamsnetwork.com/images/EC042017NF/159183s.jpg "Stylish Shapes Dies [ 159183 ]")
![White With Gold 3/8" (1 Cm) Ribbon [ 166979 ]](https://assets1.tamsnetwork.com/images/EC042017NF/166979s.jpg "White With Gold 3/8\" (1 Cm) Ribbon [ 166979 ]")
![2024 2026 In Color™ Flat Pearls [ 165266 ]](https://assets1.tamsnetwork.com/images/EC042017NF/165266s.jpg "2024 2026 In Color™ Flat Pearls [ 165266 ]")


![Winter Scenes Cling Stamp Set (English) [ 166088 ]](https://assets1.tamsnetwork.com/images/EC042017NF/166088s.jpg "Winter Scenes Cling Stamp Set (English) [ 166088 ]")
![Falling Snow Cling Stamp Set [ 164312 ]](https://assets1.tamsnetwork.com/images/EC042017NF/164312s.jpg "Falling Snow Cling Stamp Set [ 164312 ]")
![The Right Words Cling Stamp Set (English) [ 165316 ]](https://assets1.tamsnetwork.com/images/EC042017NF/165316s.jpg "The Right Words Cling Stamp Set (English) [ 165316 ]")
![Versamark Pad [ 102283 ]](https://assets1.tamsnetwork.com/images/EC042017NF/102283s.jpg "Versamark Pad [ 102283 ]")
![Basics Wow! Embossing Powder [ 165679 ]](https://assets1.tamsnetwork.com/images/EC042017NF/165679s.jpg "Basics Wow! Embossing Powder [ 165679 ]")
![Heat Tool (Us And Canada) [ 129053 ]](https://assets1.tamsnetwork.com/images/EC042017NF/129053s.jpg "Heat Tool (Us And Canada) [ 129053 ]")
![Clear Wink Of Stella Glitter Brush [ 141897 ]](https://assets1.tamsnetwork.com/images/EC042017NF/141897s.jpg "Clear Wink Of Stella Glitter Brush [ 141897 ]")
![Beautifully Celebrated Dies [ 166974 ]](https://assets1.tamsnetwork.com/images/EC042017NF/166974s.jpg "Beautifully Celebrated Dies [ 166974 ]")
![Rhinestone Basic Jewels [ 144220 ]](https://assets1.tamsnetwork.com/images/EC042017NF/144220s.jpg "Rhinestone Basic Jewels [ 144220 ]")

![Tear & Tape Adhesive [ 154031 ]](https://assets1.tamsnetwork.com/images/EC042017NF/154031s.jpg "Tear & Tape Adhesive [ 154031 ]")

![Beautiful Motifs Bundle (English) [ 165206 ]](https://assets1.tamsnetwork.com/images/EC042017NF/165206s.jpg "Beautiful Motifs Bundle (English) [ 165206 ]")
![Beautiful Motifs Photopolymer Stamp Set (English) [ 165198 ]](https://assets1.tamsnetwork.com/images/EC042017NF/165198s.jpg "Beautiful Motifs Photopolymer Stamp Set (English) [ 165198 ]")
![Beautiful Motifs Dies [ 165205 ]](https://assets1.tamsnetwork.com/images/EC042017NF/165205s.jpg "Beautiful Motifs Dies [ 165205 ]")
![Gallery Blooms Photopolymer Stamp Set [ 165211 ]](https://assets1.tamsnetwork.com/images/EC042017NF/165211s.jpg "Gallery Blooms Photopolymer Stamp Set [ 165211 ]")
![Gray Granite 8-1/2" X 11" Cardstock [ 146983 ]](https://assets1.tamsnetwork.com/images/EC042017NF/146983s.jpg "Gray Granite 8-1/2\" X 11\" Cardstock [ 146983 ]")
![Lost Lagoon 8-1/2" X 11" Cardstock [ 133679 ]](https://assets1.tamsnetwork.com/images/EC042017NF/133679s.jpg "Lost Lagoon 8-1/2\" X 11\" Cardstock [ 133679 ]")
![Petal Pink 8-1/2" X 11" Cardstock [ 146985 ]](https://assets1.tamsnetwork.com/images/EC042017NF/146985s.jpg "Petal Pink 8-1/2\" X 11\" Cardstock [ 146985 ]")
![Country Woods 12" X 12" (30.5 X 30.5 Cm) Designer Series Paper [ 163393 ]](https://assets1.tamsnetwork.com/images/EC042017NF/163393s.jpg "Country Woods 12\" X 12\" (30.5 X 30.5 Cm) Designer Series Paper [ 163393 ]")
![Lost Lagoon Classic Stampin' Pad [ 161678 ]](https://assets1.tamsnetwork.com/images/EC042017NF/161678s.jpg "Lost Lagoon Classic Stampin' Pad [ 161678 ]")
![Antique Pearls [ 164679 ]](https://assets1.tamsnetwork.com/images/EC042017NF/164679s.jpg "Antique Pearls [ 164679 ]")


![Cajun Craze 8-1/2" X 11" Cardstock [ 119684 ]](https://assets1.tamsnetwork.com/images/EC042017NF/119684s.jpg "Cajun Craze 8-1/2\" X 11\" Cardstock [ 119684 ]")
![Mossy Meadow 8-1/2" X 11" Cardstock [ 133676 ]](https://assets1.tamsnetwork.com/images/EC042017NF/133676s.jpg "Mossy Meadow 8-1/2\" X 11\" Cardstock [ 133676 ]")
![Cajun Craze Classic Stampin' Pad [ 147085 ]](https://assets1.tamsnetwork.com/images/EC042017NF/147085s.jpg "Cajun Craze Classic Stampin' Pad [ 147085 ]")
![Early Espresso Classic Stampin' Pad [ 147114 ]](https://assets1.tamsnetwork.com/images/EC042017NF/147114s.jpg "Early Espresso Classic Stampin' Pad [ 147114 ]")
![Cajun Craze Stampin' Blends Combo Pack [ 154879 ]](https://assets1.tamsnetwork.com/images/EC042017NF/154879s.jpg "Cajun Craze Stampin' Blends Combo Pack [ 154879 ]")
![Darling Duckling Stampin’ Blends Combo Pack [ 165288 ]](https://assets1.tamsnetwork.com/images/EC042017NF/165288s.jpg "Darling Duckling Stampin’ Blends Combo Pack [ 165288 ]")
![Lemon Lolly Stampin’ Blends Combo Pack [ 161673 ]](https://assets1.tamsnetwork.com/images/EC042017NF/161673s.jpg "Lemon Lolly Stampin’ Blends Combo Pack [ 161673 ]")
![Mossy Meadow Stampin' Blends Combo Pack [ 154890 ]](https://assets1.tamsnetwork.com/images/EC042017NF/154890s.jpg "Mossy Meadow Stampin' Blends Combo Pack [ 154890 ]")
![Old Olive Stampin' Blends Combo Pack [ 154892 ]](https://assets1.tamsnetwork.com/images/EC042017NF/154892s.jpg "Old Olive Stampin' Blends Combo Pack [ 154892 ]")


![Calypso Coral 8-1/2" X 11" Cardstock [ 122925 ]](https://assets1.tamsnetwork.com/images/EC042017NF/122925s.jpg "Calypso Coral 8-1/2\" X 11\" Cardstock [ 122925 ]")
![Beautiful Gallery 6" X 6" (15.2 X 15.2 Cm) Designer Series Paper [ 165196 ]](https://assets1.tamsnetwork.com/images/EC042017NF/165196s.jpg "Beautiful Gallery 6\" X 6\" (15.2 X 15.2 Cm) Designer Series Paper [ 165196 ]")
![Calypso Coral Classic Stampin' Pad [ 147101 ]](https://assets1.tamsnetwork.com/images/EC042017NF/147101s.jpg "Calypso Coral Classic Stampin' Pad [ 147101 ]")
![Old Olive Classic Stampin' Pad [ 147090 ]](https://assets1.tamsnetwork.com/images/EC042017NF/147090s.jpg "Old Olive Classic Stampin' Pad [ 147090 ]")
![Metallics Wow! Embossing Powder [ 165678 ]](https://assets1.tamsnetwork.com/images/EC042017NF/165678s.jpg "Metallics Wow! Embossing Powder [ 165678 ]")
![1-3/4" (4.4 Cm) Circle Punch [ 119850 ]](https://assets1.tamsnetwork.com/images/EC042017NF/119850s.jpg "1-3/4\" (4.4 Cm) Circle Punch [ 119850 ]")
![1 7/8" (4.8 Cm) Circle Punch [ 165259 ]](https://assets1.tamsnetwork.com/images/EC042017NF/165259s.jpg "1 7/8\" (4.8 Cm) Circle Punch [ 165259 ]")
![Damask Designs Embossing Folder [ 165214 ]](https://assets1.tamsnetwork.com/images/EC042017NF/165214s.jpg "Damask Designs Embossing Folder [ 165214 ]")
![Basic Beige 3/8" (1 Cm) Classic Ribbon [ 165216 ]](https://assets1.tamsnetwork.com/images/EC042017NF/165216s.jpg "Basic Beige 3/8\" (1 Cm) Classic Ribbon [ 165216 ]")
![Pressed Flower Motifs [ 165215 ]](https://assets1.tamsnetwork.com/images/EC042017NF/165215s.jpg "Pressed Flower Motifs [ 165215 ]")

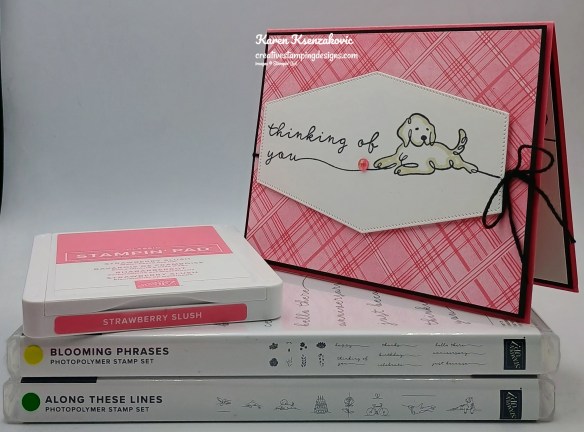


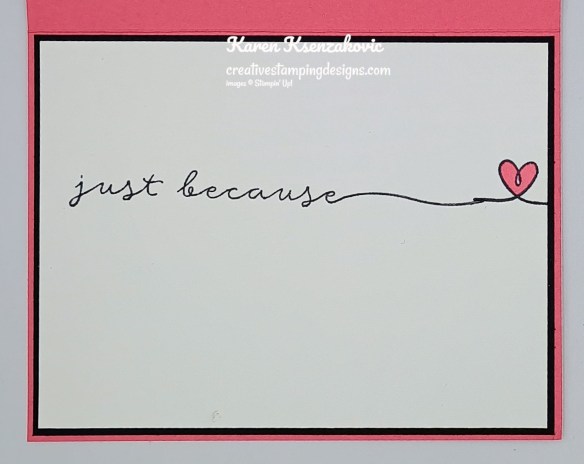
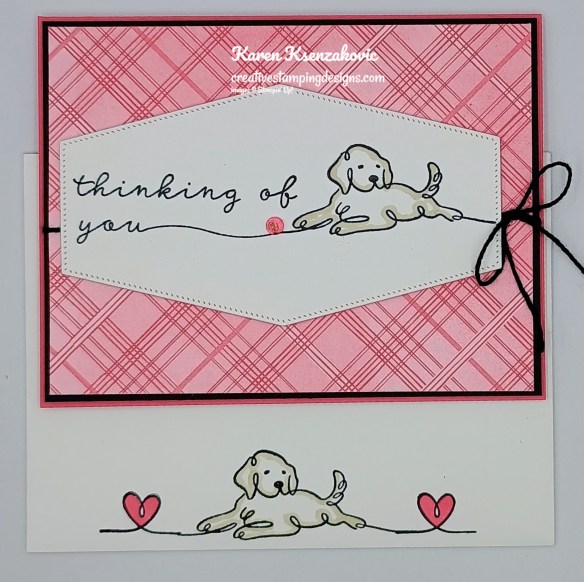
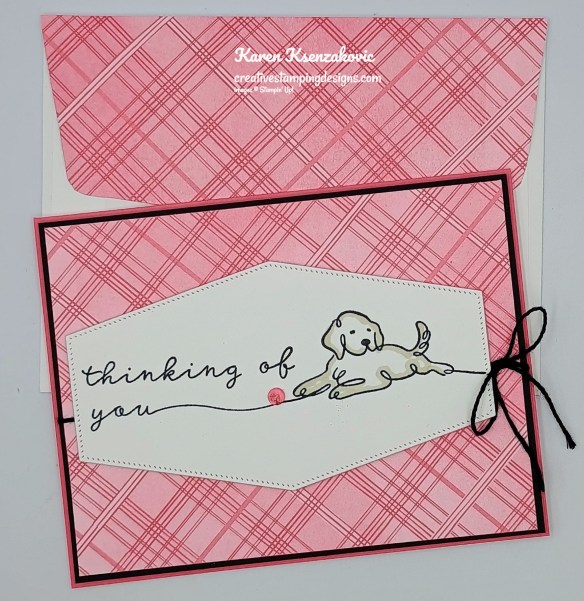
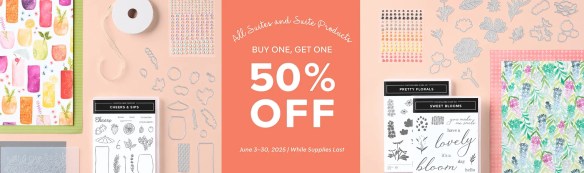


![Blooming Phrases Photopolymer Stamp Set (English) [ 165523 ]](https://assets1.tamsnetwork.com/images/EC042017NF/165523s.jpg "Blooming Phrases Photopolymer Stamp Set (English) [ 165523 ]")
![Along These Lines Photopolymer Stamp Set [ 165352 ]](https://assets1.tamsnetwork.com/images/EC042017NF/165352s.jpg "Along These Lines Photopolymer Stamp Set [ 165352 ]")
![Basic Black 8-1/2" X 11" Cardstock [ 121045 ]](https://assets1.tamsnetwork.com/images/EC042017NF/121045s.jpg "Basic Black 8-1/2\" X 11\" Cardstock [ 121045 ]")
![Strawberry Slush 8 1/2" X 11" Cardstock [ 165625 ]](https://assets1.tamsnetwork.com/images/EC042017NF/165625s.jpg "Strawberry Slush 8 1/2\" X 11\" Cardstock [ 165625 ]")
![On The Go 12" X 12" (30.5 X 30.5 Cm) Designer Series Paper [ 165566 ]](https://assets1.tamsnetwork.com/images/EC042017NF/165566s.jpg "On The Go 12\" X 12\" (30.5 X 30.5 Cm) Designer Series Paper [ 165566 ]")
![Tuxedo Black Memento Ink Pad [ 132708 ]](https://assets1.tamsnetwork.com/images/EC042017NF/132708s.jpg "Tuxedo Black Memento Ink Pad [ 132708 ]")
![Crumb Cake Stampin' Blends Combo Pack [ 154882 ]](https://assets1.tamsnetwork.com/images/EC042017NF/154882s.jpg "Crumb Cake Stampin' Blends Combo Pack [ 154882 ]")
![Strawberry Slush Stampin’ Blends Combo Pack [ 165290 ]](https://assets1.tamsnetwork.com/images/EC042017NF/165290s.jpg "Strawberry Slush Stampin’ Blends Combo Pack [ 165290 ]")
![Nested Essentials Dies [ 161597 ]](https://assets1.tamsnetwork.com/images/EC042017NF/161597s.jpg "Nested Essentials Dies [ 161597 ]")
![Baker's Twine Essentials Pack [ 155475 ]](https://assets1.tamsnetwork.com/images/EC042017NF/155475s.jpg "Baker's Twine Essentials Pack [ 155475 ]")
![Strawberry Slush & Pretty In Pink Gems [ 165615 ]](https://assets1.tamsnetwork.com/images/EC042017NF/165615s.jpg "Strawberry Slush & Pretty In Pink Gems [ 165615 ]")


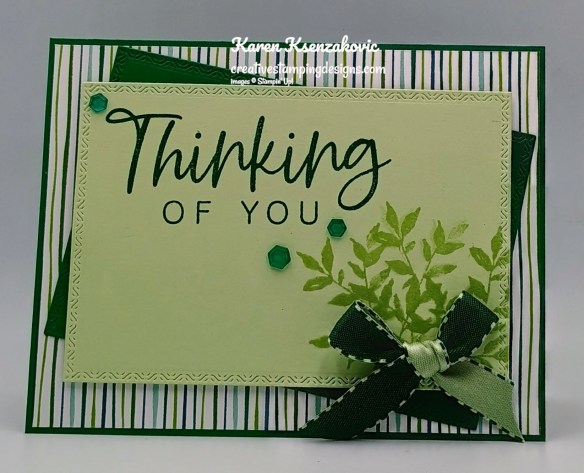


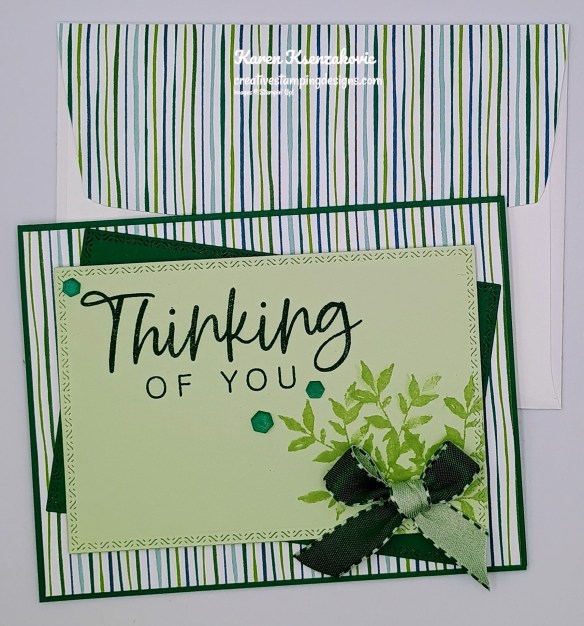
![With You In Mind Photopolymer Stamp Set (English) [ 164747 ]](https://assets1.tamsnetwork.com/images/EC042017NF/164747s.jpg "With You In Mind Photopolymer Stamp Set (English) [ 164747 ]")
![Textured Notes Bundle (English) [ 165556 ]](https://assets1.tamsnetwork.com/images/EC042017NF/165556s.jpg "Textured Notes Bundle (English) [ 165556 ]")
![Textured Notes Cling Stamp Set (English) [ 165548 ]](https://assets1.tamsnetwork.com/images/EC042017NF/165548s.jpg "Textured Notes Cling Stamp Set (English) [ 165548 ]")
![Textured Notes Dies [ 165555 ]](https://assets1.tamsnetwork.com/images/EC042017NF/165555s.jpg "Textured Notes Dies [ 165555 ]")
![Shaded Spruce 8-1/2" X 11" Cardstock [ 146981 ]](https://assets1.tamsnetwork.com/images/EC042017NF/146981s.jpg "Shaded Spruce 8-1/2\" X 11\" Cardstock [ 146981 ]")
![Soft Sea Foam 8-1/2" X 11" Cardstock [ 146988 ]](https://assets1.tamsnetwork.com/images/EC042017NF/146988s.jpg "Soft Sea Foam 8-1/2\" X 11\" Cardstock [ 146988 ]")
![Turtle Y Cute 12" X 12" (30.5 X 30.5 Cm) Designer Series Paper [ 165221 ]](https://assets1.tamsnetwork.com/images/EC042017NF/165221s.jpg "Turtle Y Cute 12\" X 12\" (30.5 X 30.5 Cm) Designer Series Paper [ 165221 ]")
![Shaded Spruce Classic Stampin' Pad [ 147088 ]](https://assets1.tamsnetwork.com/images/EC042017NF/147088s.jpg "Shaded Spruce Classic Stampin' Pad [ 147088 ]")
![Soft Sea Foam Classic Stampin' Pad [ 147102 ]](https://assets1.tamsnetwork.com/images/EC042017NF/147102s.jpg "Soft Sea Foam Classic Stampin' Pad [ 147102 ]")
![Shades Of Green Hexagons [ 165233 ]](https://assets1.tamsnetwork.com/images/EC042017NF/165233s.jpg "Shades Of Green Hexagons [ 165233 ]")
![Shaded Spruce & Soft Sea Foam 1/2" (1.3 Cm) Ribbon [ 165234 ]](https://assets1.tamsnetwork.com/images/EC042017NF/165234s.jpg "Shaded Spruce & Soft Sea Foam 1/2\" (1.3 Cm) Ribbon [ 165234 ]")


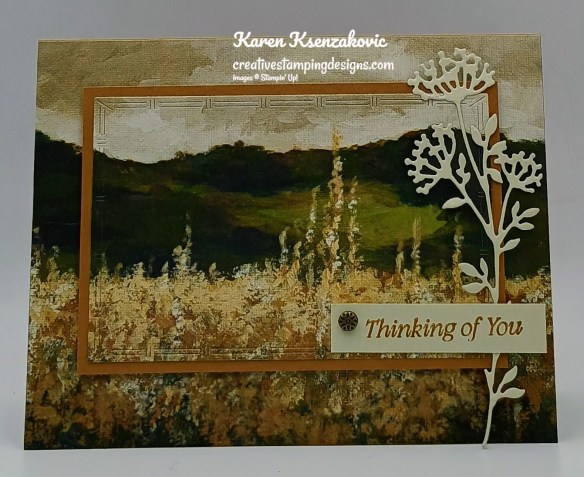


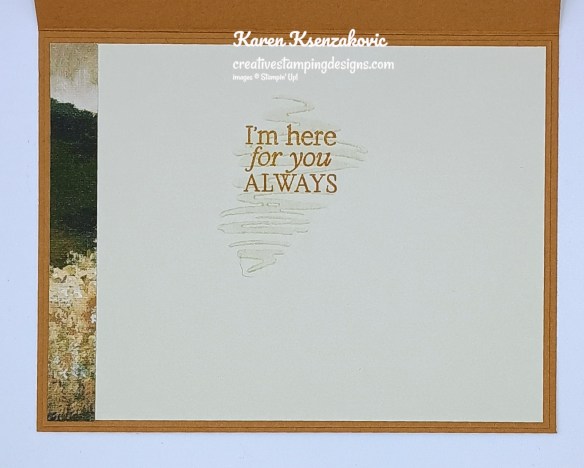
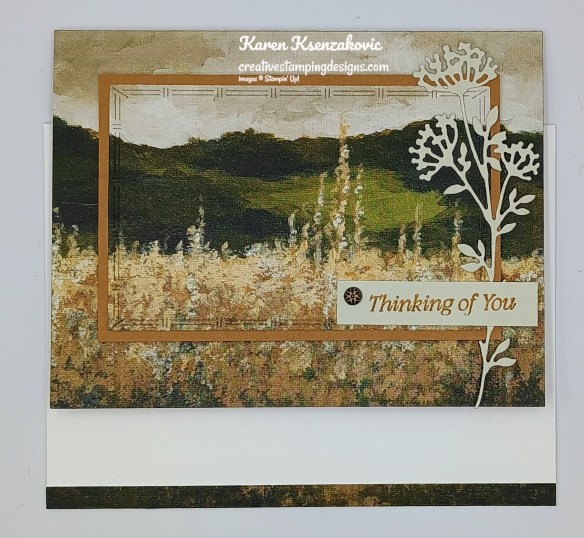

![Pecan Pie 8 1/2" X 11" Cardstock [ 161717 ]](https://assets1.tamsnetwork.com/images/EC042017NF/161717s.jpg "Pecan Pie 8 1/2\" X 11\" Cardstock [ 161717 ]")
![Basic Beige Classic Stampin Pad [ 163806 ]](https://assets1.tamsnetwork.com/images/EC042017NF/163806s.jpg "Basic Beige Classic Stampin Pad [ 163806 ]")
![Pecan Pie Classic Stampin' Pad [ 161665 ]](https://assets1.tamsnetwork.com/images/EC042017NF/161665s.jpg "Pecan Pie Classic Stampin' Pad [ 161665 ]")


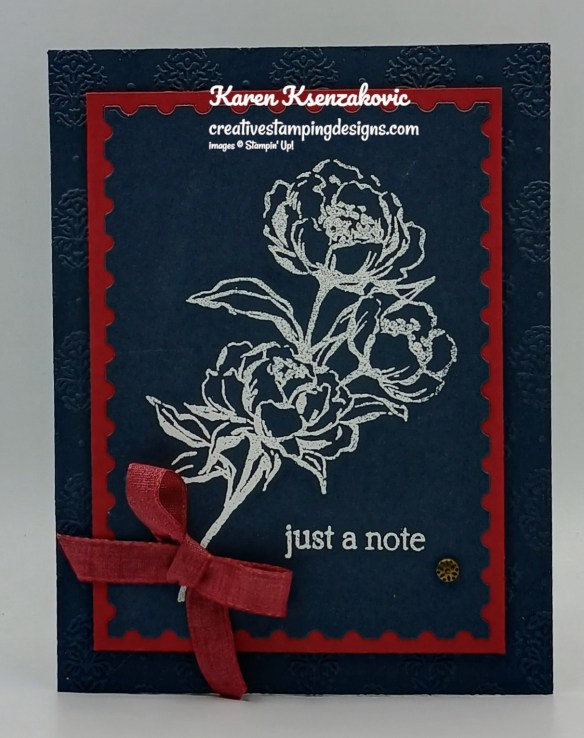
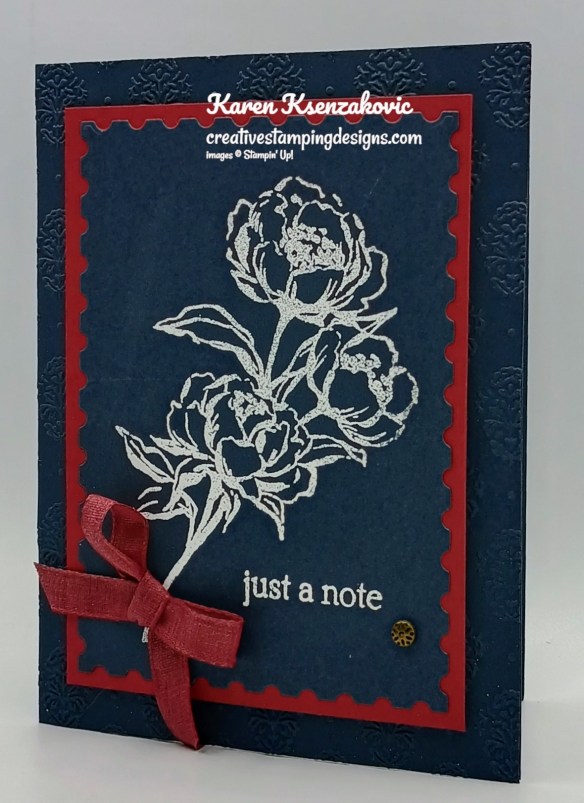
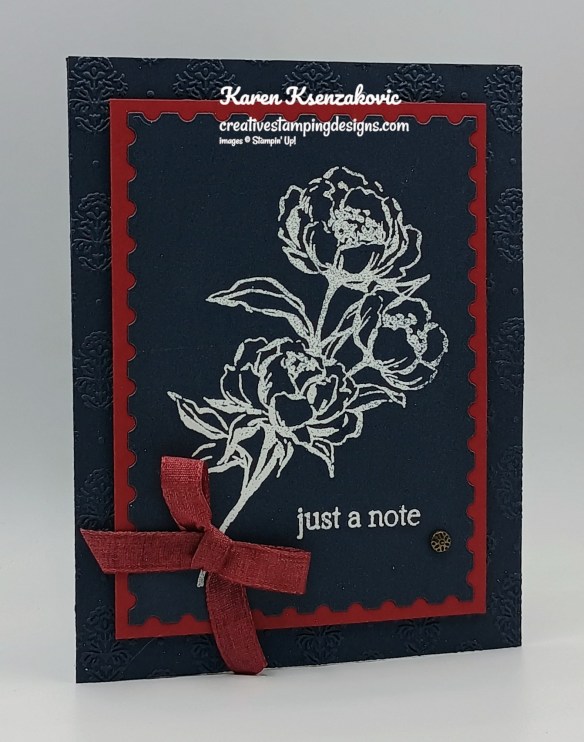


![Cherry Cobbler 8-1/2" X 11" Cardstock [ 119685 ]](https://assets1.tamsnetwork.com/images/EC042017NF/119685s.jpg "Cherry Cobbler 8-1/2\" X 11\" Cardstock [ 119685 ]")
![Cherry Cobbler Classic Stampin' Pad [ 147083 ]](https://assets1.tamsnetwork.com/images/EC042017NF/147083s.jpg "Cherry Cobbler Classic Stampin' Pad [ 147083 ]")
![Cherry Cobbler Stampin' Blends Combo Pack [ 154880 ]](https://assets1.tamsnetwork.com/images/EC042017NF/154880s.jpg "Cherry Cobbler Stampin' Blends Combo Pack [ 154880 ]")
![Perennial Postage Dies [ 162607 ]](https://assets1.tamsnetwork.com/images/EC042017NF/162607s.jpg "Perennial Postage Dies [ 162607 ]")

