Stampin’ Up So Hoppy Together Sneak Peak for Global Designs and Sunday Stamps

Good Wednesday morning my fellow stampers.  I have a sneak peak for you today from the upcoming Sale-A-Bration catalog.

My card today is for 2 challenges.  It’s for Global Designs Project # 169 and for Sunday Stamps Getting Sketchy # 194.  Be sure to stop by Global Designs and Sunday Stamps to see all the amazing projects made and to play along.

Global Designs Project #169 has a color challenge.

Sunday Stamps has a Sketch challenge.

Here is what I came up with for the 2 challenges.  Take a look.

I started with a piece of Brights 6 X 6 Designer Series Paper in Poppy  Parade and adhered it to a Pool Party mat using Snail.  I adhered it to a Poppy Parade card front using Multipurpose Liquid Glue.  On a small piece of Whisper White cardstock using Tuxedo Black Memento Ink,  I stamped the frog from the up coming So Hoppy Together stamp set that will be available FREE as a Sale-A-Bration item from January 3, 2019 – March 31, 2019.  You will be able to get this stamp set free with a $50 purchase.  I colored the frog in using Granny Apple Green Stampin’ Blends Markers.

I cut the frog image out using my Big Shot and one of the circles from the Stitched Shaped Framelits Dies.  I cut the scalloped circle out in Pool Party cardstock using the Layering Circles Framelits Dies.  I adhered the artwork to the scalloped circle mat using Snail and adhered it to the card front using Stampin’ Dimensionals.

I stamped the dragonfly from the So Hoppy Together stamp set in Tuxedo Black Memento Ink above the frog image.  On a strip of Whisper White cardstock I stamped the sentiment from the same stamp set in Tuxedo Black Memento Ink and made a banner.  I adhered the banner below the frog using Snail and added a Granny Apple Green Glitter Enamel Dot.  I adhered the card front to a Pool Party card base using Multipurpose Liquid Glue.

On the inside on a Whisper White panel I stamped the sentiment from Colorful Seasons stamp set in Tuxedo Black Memento Ink.  I stamped the frog and the bees from the So Hoppy Together stamp set on the bottom of the panel.  I adhered the Whisper White panel to the Pool Party card base using Multipurpose Liquid Glue.

To finish my card I decorated a Medium Whisper White Envelope.  I stamped the frog and dragonfly image from So Hoppy Together stamp set in Tuxedo Black Memento Ink on the bottom front of the envelope.  I colored the frog in using Granny Apple Green Stampin’ Blends Markers.  I colored the dragonfly in with Pool Party and Poppy Parade Stampin’ Blends Markers.  I adhered a piece of Brights 6 X 6 DSP to the envelope flap.

Thank you for stopping by my blog today.  I hope you liked my card.  Starting January 3, 2019 you will be able to earn this stamp set with Sale-A-Bration along with a lot of other great items.  Happy Stamping.

****************************************************************************************************

If you need any stamping supplies, I’d be very happy to be your Demonstrator.  Just click here to go directly to my online store or drop me an email if you have any questions.

MY CURRENT HOST CODE IS: MBWFWZCA

Happy Stamping, Karen!

****************************************************************************************************

I’m starting an online Host Club for January, February and March.  I’m doing it during Sale-A-Bration.  Everyone loves to get free items, why not be the host for a month and get extra free items.  Are you interested in building your Stampin’ Up supplies a little at a time and want to be able to receive host benefits?  An Online Host Club might be the perfect solution for you!  With the new Occasions and Sale-A-Bration Catalogs starting on January 3, this is a great time to join!

You sign up for a 3 month term and commit to:

  • A $50.00 minimum order each month (which will get you a free Sale-A-Bration item)
  • Place your order by the 20th of each month
  • Using the Host code for each month provided to you in an email sent out at the beginning of each month

Once 3 members have joined a random draw will determine your host month and you are guaranteed:

  • a $150.00 Workshop order during your host month
  • $15.00 minimum of Host Dollars to spend on the exclusive Host Stamp Sets, or any other current Stampin’ Up! product during your host month
  • At the end of the 3 months you will get a gift from me.

If you are interested in joining, please contact me ASAP.  This is a great way to earn some free products and build your Stampin’ Up supplies.

****************************************************************************************************

Card stock cuts for this project:

  • Pool Party Cardstock 8 1/2″ X 5 1/2″ (card base scored and folded at 4 1/4″),        2 1/8″ X 5″ (designer series paper mat)
  • Poppy Parade Cardstock 4 1/8″ X 5 3/8″ (card front), 3″ X 3″ (artwork mat)
  • Whisper White Cardstock 4″ X 5 1/4″ (inner liner), 3″ X 3″ (artwork)
  • Brights 6 X 6 Designer Series Paper 2″ X 4 7/8″

****************************************************************************************************

Product List

Stampin’ Up Birthday Statements Sneak Peak

Good Friday morning my stamping friends.  Have you made any fun plans for the weekend.  I’m still baking and will be through the weekend.

Before I get to my card I’m starting an online Host Club for January, February and March.  I’m doing it during Sale-A-Bration.  Everyone loves to get free items, why not be the host for a month and get extra free items.  Are you interested in building your Stampin’ Up supplies a little at a time and want to be able to receive host benefits?  An Online Host Club might be the perfect solution for you!  With the new Occasions and Sale-A-Bration Catalogs starting on January 3, this is a great time to join!

You sign up for a 3 month term and commit to:

  • A $50.00 minimum order each month (which will get you a free Sale-A-Bration item)
  • Place your order by the 20th of each month
  • Using the Host code for each month provided to you in an email sent out at the beginning of each month

Once 3 members have joined a random draw will determine your host month and you are guaranteed:

  • a $150.00 Workshop order during your host month
  • $15.00 minimum of Host Dollars to spend on the exclusive Host Stamp Sets, or any other current Stampin’ Up! product during your host month
  • At the end of the 3 months you will get a gift from me.

If you are interested in joining, please contact me ASAP.  This is a great way to earn some free products and build your Stampin’ Up supplies.

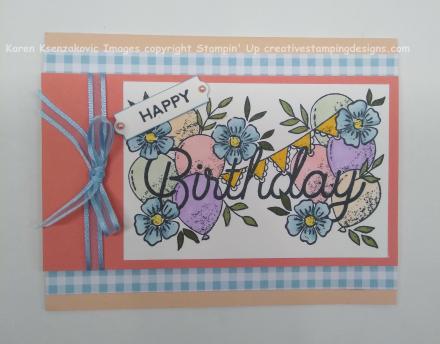
Now for my card today I used the Stampin’ Up Birthday Statements stamp set along with a few other items that will be available January 3, 2019.  Take a look.

I started with a panel of Whisper White cardstock and stamped the Birthday Statements in Tuxedo Black Memento Ink.  I colored it in using my Balmy Blue (available January 3, 2019), Flirty Flamingo, Highland Heather, Mango Melody, Mossy Meadow (available January 3, 2019), Petal Pink and Soft Sea Foam Stampin’ Blends Markers.  I adhered the artwork to a Flirty Flamingo mat using Snail.

On a scrap piece of Whisper White cardstock I stamped Happy from the Birthday Statements stamp set in Tuxedo Black Memento Ink and using my Big Shot I cut it out with one of the Bunch Of Banners Framelits.  I adhered it to the artwork using Stampin’ Dimensionals.  I added a couple Share What You Love Artisan Pearls to the banner.  I wrapped a piece of 1/4″ Balmy Blue Organdy Ribbon, (available FREE with a $50 order during Sale-A-Bration), around the Flirty Flamingo and tied a bow.

I adhered a piece of Balmy Blue Gingham Gala 6X6 Designer Series Paper (available January 3, 2019), to a Petal Pink card base using Multipurpose Liquid Glue.  I adhered the card front using Stampin’ Dimensionals.

On the inside Whisper White panel I stamped the sentiment from the Stampin’ Up Colorful Seasons stamp set in Balmy Blue Ink. I adhered the Whisper White panel to a Balmy Blue mat using Snail then adhered it to the Petal Pink card base using Multipurpose Liquid Glue.

To finish my card I decorated a Medium Whisper White Envelope by adhering pieces of the Gingham Gala 6 X 6 DSP to the envelope front and flap.

Thank you for stopping by my blog today.  I hope you liked my card.  Most of the items used today will be available January 3, 2019.  They are either in the new Occasions Catalog or the Sale-A-Bration Catalog.

****************************************************************************************************

If you need any stamping supplies, I’d be very happy to be your Demonstrator.  Just click here to go directly to my online store or drop me an email if you have any questions.

MY CURRENT HOST CODE IS: MBWFWZCA

Happy Stamping, Karen!

****************************************************************************************************

Card stock cuts for this project:

  • Balmy Blue Cardstock 5 3/8″ X 4 1/8″ (inner liner mat)
  • Flirty Flamingo Cardstock 3″ X 5 1/2″ (artwork mat)
  • Petal Pink Cardstock 8 1/2″ X 5 1/2″ (card base scored and folded at 4 1/4″)
  • Whisper White Cardstock 2 3/4″ X 4 1/8″ (artwork), 4″ X 5 1/4″ (inner liner)
  • Gingham Gala Designer Series Paper 3 3/4″ X 5 1/2″

****************************************************************************************************

Product List

Stampin’ Up Amazing Life Sneak Peak

Good Wednesday morning everyone.  Hope your having a wonderful week so far.

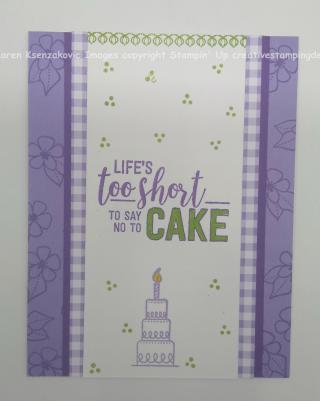
I’ve got another sneak peak for you from the upcoming 2019 Occasions Catalog.  I used the Stampin’ Up Amazing Life stamp set and the  new Gingham Gala 6X6 Designer Series Paper which will be available January 3, 2019.  Take a look.

I started with a Whisper White panel and stamped the cake from Amazing Life stamp set in Highland Heather Ink on the bottom.  I stamped the sentiment from the same set in Gorgeous Grape Ink in the center of the panel.  I colored the word cake in using my Granny Apple Green Stampin’ Write Marker and I colored the candle flame in using my Pineapple Punch Stampin’ Write Marker.  I then stamped the border and dots from the same stamp set in Granny Apple Green Ink on the Whisper White panel.

I adhered the Whisper White panel to a piece of Highland Heather Gingham Gala 6X6 Designer Series Paper using Snail.  This new paper is so pretty.  There is large Gingham on one side and small Gingham on the other in 5 different colors.  This was a must have when I saw it.

I adhered the artwork to a Gorgeous Grape mat using Snail and then adhered it to a Highland Heather card base, using Multipurpose Liquid Glue, which I had stamped with the flower image from the Amazing Life stamp set in Highland Heather Ink.

On the inside I stamped the cake image from Amazing Life stamp set in Highland Heather Ink, stamping off once, in the center of a Whisper White Panel.  I stamped the Happy Birthday in Gorgeous Grape Ink over the middle of the cake.  I stamped one of the scrolls from the same stamp set in Granny Apple Green toward the top of the panel.  I adhered the Whisper White panel to the Highland Heather card base using Multipurpose Liquid Glue.

To finish my card I decorated a Medium Whisper White Envelope.  I stamped the cake image from the Amazing Life stamp set in Highland Heather Ink on the bottom left front of the envelope.  I adhered a piece of Gingham Gala 6X6 DSP to the envelope flap.

Thank you for stopping by my blog today.  I hope you liked my card. This is just one of the wonderful new sets that will be available January 3, 2019.

****************************************************************************************************

If you need any stamping supplies, I’d be very happy to be your Demonstrator.  Just click here to go directly to my online store or drop me an email if you have any questions.

MY CURRENT HOST CODE IS: MBWFWZCA

Happy Stamping, Karen!

****************************************************************************************************

Card stock cuts for this project:

  • Gorgeous Grape Cardstock 3 1/4″ X 5 1/2″ (artwork mat)
  • Highland Heather Cardstock 4 1/4″ X 11″ (card base scored and folded at 5 1/2″)
  • Whisper White Cardstock 2 1/2″ X 5 1/2″(artwork), 5 1/4″ X 4″(inner liner)
  • Gingham Gala 6X6 Designer Series Paper 3 1/4″ X 5 1/2″ (artwork mat)

****************************************************************************************************

Product List

Stampin’ Up Beauty Abounds Sneak Peak

Good Tuesday morning everyone.  Hope your week is starting off great.

I’ve got a sneak peak for you today from the up coming 2019 Occasions Catalog.  I’ve used the Stampin’ Up Beauty Abound Bundle for my card. Take a look.

I started with a Granny Apple Green card front and ran it through my Big Shot using the Layering Leaves Dynamic Textured Impressions Embossing Folder.  Again using my Big Shot, I cut the Butterflies from the upcoming Butterfly Beauty Thinlits Dies, available January 3, 2019, from Basic Black cardstock.  I adhered the butterflies to the embossed panel using Stampin’ Dimensionals.

On a small piece of Whisper White cardstock I stamped the Hello from the Beauty Abounds stamp set in Highland Heather Ink.  I bannered the sentiment and adhered it to the right side of the butterflies using Stampin’ Dimensionals.

I adhered the card front to a Basic Black mat using Multipurpose Liquid Glue.  I then adhered it to a Highland Heather card base using Multipurpose Liquid Glue.  I added some Rhinestone Basic Jewels to the butterfly.

On the inside I stamped the splatter image from the Beauty Abounds stamp set multiple times in the center of a Whisper White panel in Highland Heather Ink, stamping off once each time.  I then stamped the sentiment from the same stamp set in Granny Apple Green Ink over the splatter image.  I adhered the Whisper White panel to a Basic Black mat using Snail.  I adhered it to the Highland Heather card base using Multipurpose Liquid Glue.

To finish my card I decorated a Medium Whisper White Envelope.  I stamped the flower image from the Beauty Abounds stamp set in Granny Apple Green Ink on the front left of the envelope.  I stamped the butterfly image from the same set in Highland Heather Ink by the flowers and on the back envelope flap.

Thank you for stopping by my blog today.  I hope you liked the sneak peak.  This bundle will be available January 3, 2019.  Purchasing this bundle will also allow you to pick a free product from the Sale-A-Bration catalog which starts on January 3, 2019 and runs until March 31, 2019.  Who doesn’t like free products???  I’ll be posting more sneak peaks of the products coming in the new Occasions Catalog in the next few weeks.  Happy Stamping!

****************************************************************************************************

If you need any stamping supplies, I’d be very happy to be your Demonstrator.  Just click here to go directly to my online store or drop me an email if you have any questions.

MY CURRENT HOST CODE IS: MBWFWZCA

Happy Stamping, Karen!

****************************************************************************************************

Card stock cuts for this project:

  • Basic Black Cardstock 5 5/16″ X 4 1/16″ (card front mat), 5 1/4″ X 4″ (inner liner mat)
  • Granny Apple Green Cardstock 5 1/4″ X 4″ (card front)
  • Highland Heather Cardstock 5 1/2″ X 8 1/2″ (card base scored and folded at 4 1/4″)
  • Whisper White Cardstock 5″ X 3 3/4″ (inner liner), 1/2″ X 1 3/4″ (sentiment banner)

****************************************************************************************************

Product List

Stampin’ Up Humming Along Sneak Peek for Fab Friday Challenge

Good Tuesday morning everyone.  Hope you’ve had a good start to the week.  Hopefully you have a short work week ahead.

For today’s card I played along with the Fab Friday 150 Challenge.  Be sure to stop by the Fab Friday blog to see all the projects made.  They have a color challenge this time.  Here’s the colors I got to work with.

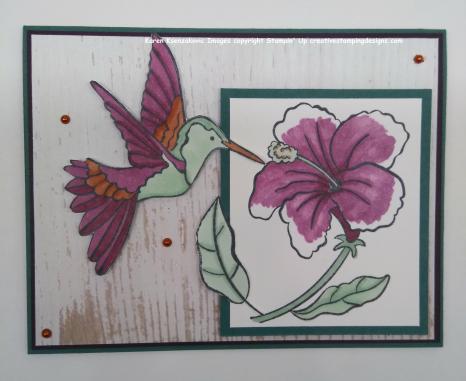
I’ve got another sneak peek for you for this color challenge.  I used the Stampin’ Up Humming Along stamp set that will be available on January 3, 2019.  Take a look.

I started by adhering a piece of Wood Textured Designer Series Paper to a Blackberry Bliss mat using Snail.  I then adhered it to a Tranquil Tide card base using Multipurpose Liquid Glue.

On a small piece of Whisper White cardstock I stamped the Hibiscus image from the Humming Along stamp set, available January 3, 2019, in Tuxedo Black Memento Ink.  I colored it in using my Blackberry Bliss and Mint Macaron Stampin’ Blends Markers.  I stamped the leaf from the set on a scrap piece of Whisper White cardstock in Tuxedo Black Memento Ink and colored it in using my Mint Macaron Stampin’ Blends Markers. I then fussy cut the leaf using my Paper Snips and adhered it to the artwork using a Glue Dot.  I adhered the artwork to a Tranquil Tide mat using Snail then I adhered it to the card front using Stampin’ Dimensionals.

On another piece of Whisper White cardstock I stamped the Humming Bird in Tuxedo Black Memento Ink and colored it in using my Blackberry Bliss,Cajun Craze and Mint Macaron Stampin’ Blends Markers.  I fussy cut it using my Paper Snips and adhered it to the card front using Stampin’ Dimensionals.  I colored a few Pearl Basic Jewels with my Dark Cajun Craze Stampin’ Blends Marker and adhered them to the card front.

On the inside on a Whisper White panel I stamped the Hibiscus from the Humming Along stamp set in Mint Macaron Ink stamping off twice in the center.  I stamped the sentiment from the same set over the flower in Tuxedo Black Memento Ink.  I adhered the Whisper White panel to a Blackberry Bliss mat using Snail then adhered it to the Tranquil Tide card base using Multipurpose Liquid Glue.

To finish my card I decorated a Medium Whisper White Envelope.  I stamped the Hibiscus and Humming Bird on the front of the envelope.  I adhered a piece of Wood Textures DSP to the envelope flap.

Thank you for stopping by my blog today.  I hope you liked the sneak peek from the Humming Along stamp set.  These images are perfect to color with the Stampin’ Blends Markers.  Happy Stamping!

****************************************************************************************************

If you need any stamping supplies, I’d be very happy to be your Demonstrator.  Just click here to go directly to my online store or drop me an email if you have any questions.

MY CURRENT HOST CODE IS: YTMBUVZE

Happy Stamping, Karen!

****************************************************************************************************

Card stock cuts for this project:

  • Blackberry Bliss Cardstock 4 1/8″ X 5 3/8″ (card front mat), 4″ X 5 1/4″ (inner liner mat)
  • Tranquil Tide Cardstock 8 1/2″ X 5 1/2″ (card base scored and folded at 4 1/4″),   2 3/4″ X 3 1/4″ (artwork mat)
  • Whisper White Cardstock 2 1/2″ X 3″ (artwork), 5″ X 3 3/4″ (inner liner)
  • Wood Textures Designer Series Paper 4″ X 5 1/4″ (card front)

****************************************************************************************************

Product List

Stampin’ Up Beauty Abounds Sneak Peek for Freshly Made Sketches and Hand Stamped Sentiments Challenges

Good Monday morning everyone.  Hope you all had a wonderful weekend and are ready to start a short work week.  If you were able to stop by my booth at the Holiday Craft Show, thank you very much I really appreciate it.  I can’t believe that Thanksgiving is just 3 days away.  I’ve got a lot of baking and cooking to get done before Thursday.  How about you?

For today’s card I played along with 2 different challenges.  The first one is Freshly Made Sketches #363.  Be sure to stop by the Freshly Made Sketches blog to see all the amazing projects made.  Here is their sketch challenge.

The other challenge I played along with is Hand Stamped Sentiments #302.  Be sure to stop by Hand Stamped Sentiments blog to see all the beautiful projects made.  Here is their color challenge.

Here is what I came up with for the 2 challenges.  I’m giving you a sneak peek of a new Stampin’ Up stamp set called Beauty Abounds that will be available January 3, 2019.  Take a look.

I started with a Thick Very Vanilla card front and stamped it with the Hardwood stamp in Crushed Curry Ink.  I adhered a strip of Merry Merlot on the right side then ran it through my Big Shot using the Pinewood Planks Dynamic Textured Impressions Embossing Folder.

I adhered the stamped panel to a Thick Very Vanilla card base using Multipurpose Liquid Glue.

On a small panel of Very Vanilla cardstock I stamped the image from the Stampin’ Up Beauty Abounds stamp set, available January 3, 2019, in Tuxedo Black Memento Ink.  I stamped the sentiment on the side in Merry Merlot Ink.  I colored the image in using my Pumpkin Pie Stampin’ Blends Markers.  I adhered the artwork to a Pumpkin Pie mat using Snail then adhered it to the card front using Stampin’ Dimensionals.  I stamped the butterfly from the stamp set in Tuxedo Black Memento Ink on a scrap piece of Crushed Curry cardstock and fussy cut it using my Paper Snips.  I adhered it to the artwork using a Glue Dot.  I added 3 Clear Rhinestone Basic Jewels to the card front.

On the inside, on a Very Vanilla panel, I stamped the Bokeh dots from the Beauty Abounds stamp set in Pumpkin Pie Ink.  I stamped the sentiment from the same stamp set in Tuxedo Black Memento Ink over the Bokeh dots.  I adhered the panel to a Merry Merlot mat using Snail then adhered it to the Thick Very Vanilla card base using Multipurpose Liquid Glue.

To finish my card I decorated a Medium Very Vanilla Envelope.  I stamped the Bokeh Dots in Pumpkin Pie Ink on the bottom front of the envelope and the envelope flap.  I stamped the image from the Beauty Abounds stamp set in Tuxedo Black Memento Ink on the bottom left of the envelope.

Thank you for stopping by my blog today.  I hope you liked the sneak peek of what’s coming in January.  I’ll have more sneak peaks in the next couple weeks.  Happy Stamping!

****************************************************************************************************

If you need any stamping supplies, I’d be very happy to be your Demonstrator.  Just click here to go directly to my online store or drop me an email if you have any questions.

MY CURRENT HOST CODE IS: YTMBUVZE

Happy Stamping, Karen!

****************************************************************************************************

Card stock cuts for this project:

  • Thick Very Vanilla Cardstock 4 1/4″ X 11″ (card base scored and folded at 5 1/2″), 4″ X 5 1/4″ (card front)
  • Very Vanilla Cardstock 1 1/2″ X 4 1/4″ (artwork), 5 1/5″ X 4″ (inner liner)
  • Merry Merlot Cardstock 3/4″ X 5 1/5″ (strip on card front), 5 3/8″ X 4 1/8″ (inner liner mat)
  • Pumpkin Pie Cardstock 1 3/4″ X 4 1/2″ (artwork mat)

****************************************************************************************************

Product List