
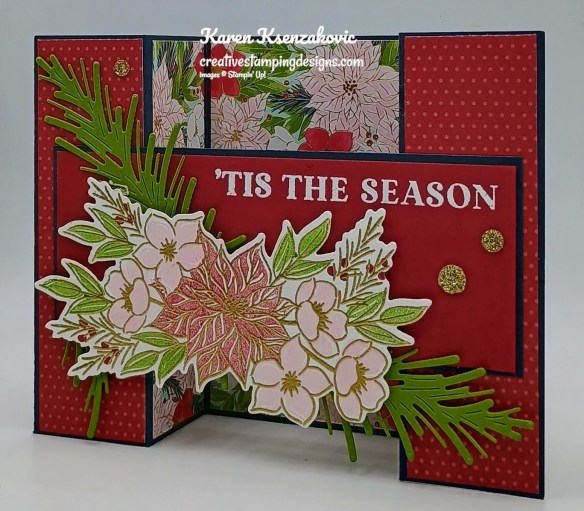
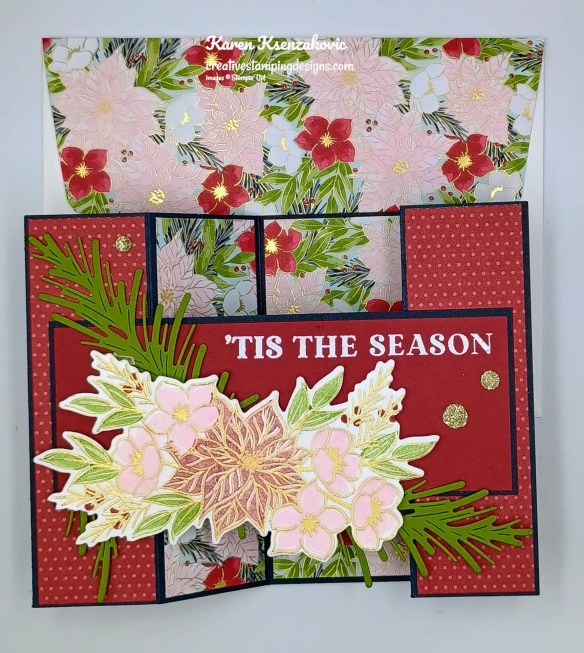
Good Friday morning stamping friends and welcome to my Fun Fold Friday. Happy Halloween!!! I hope you all had a wonderful week and are looking forward to the weekend. It’s the end of the month so most of you know where I’ll be and it’s not in my card studio.
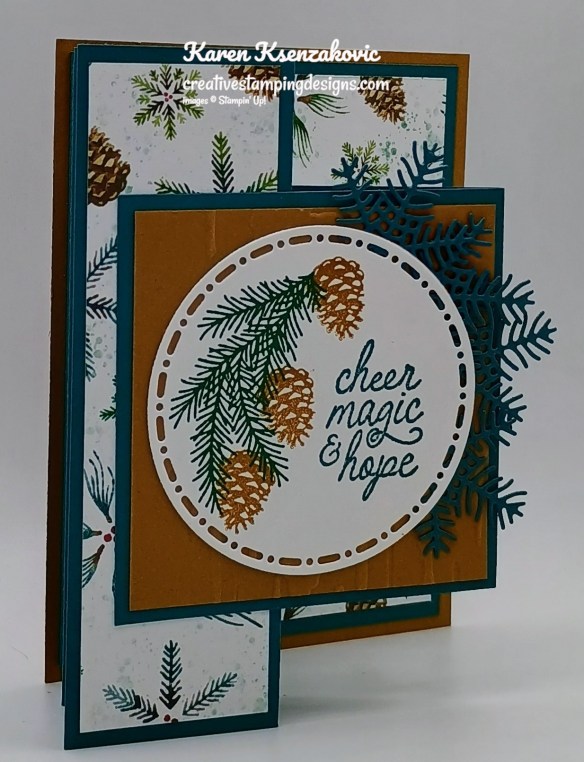
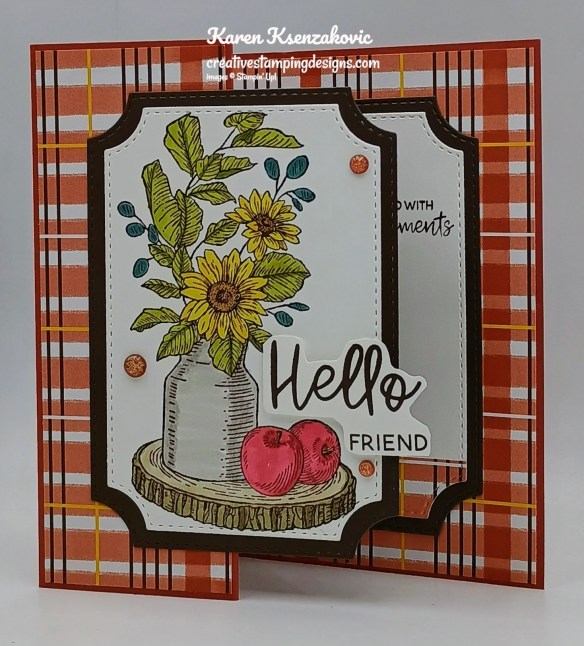
Today’s card it the one I made live yesterday on my YouTube channel. If you were able to hop on to watch, thank you!! If you weren’t and would like to watch my video you can see it Here. The measurements are below so that you can watch and stamp along with me. Here’s my card for today.
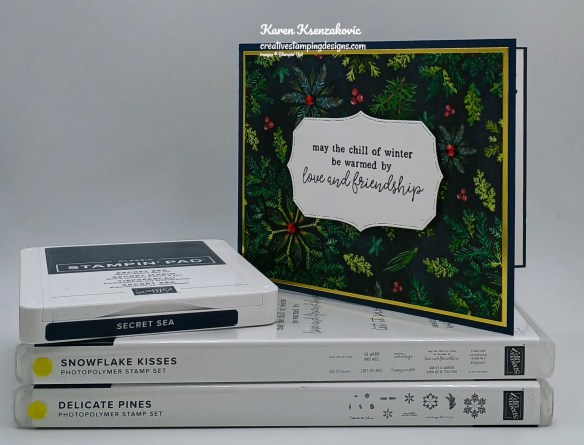
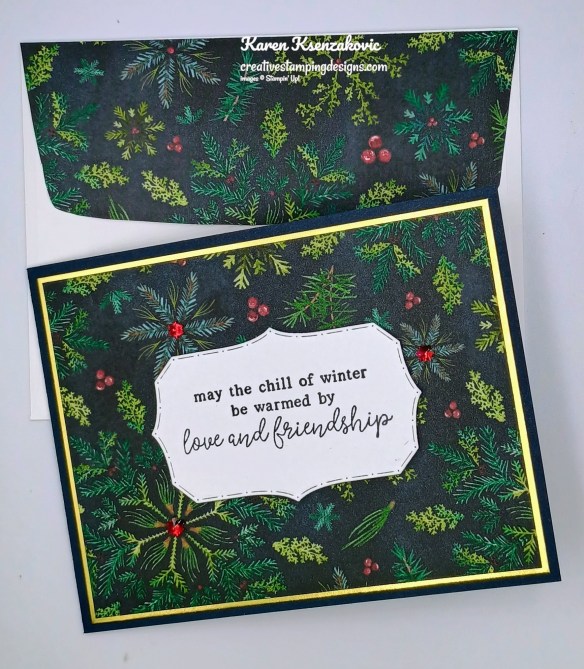
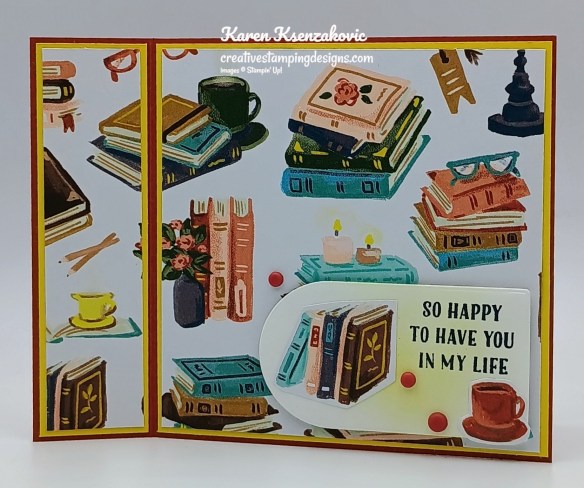
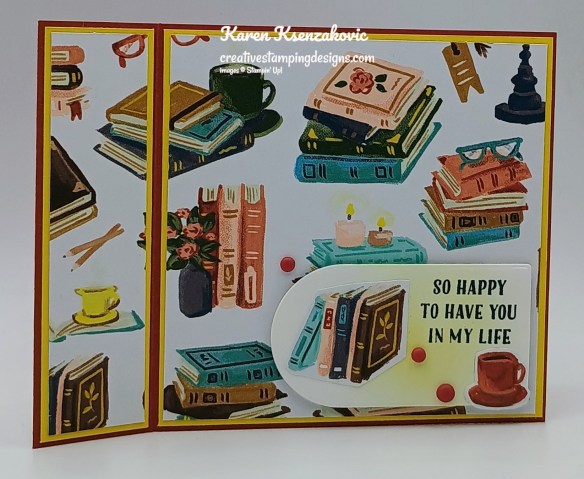
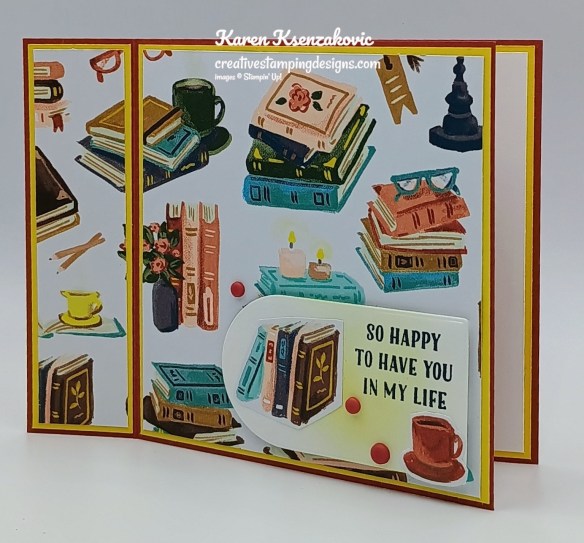
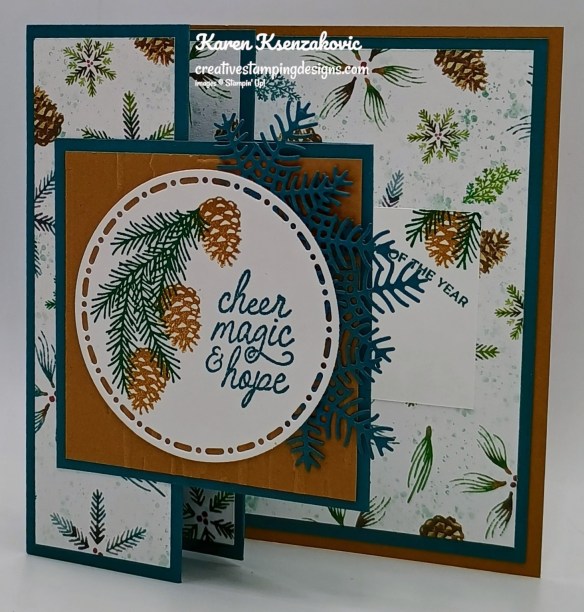
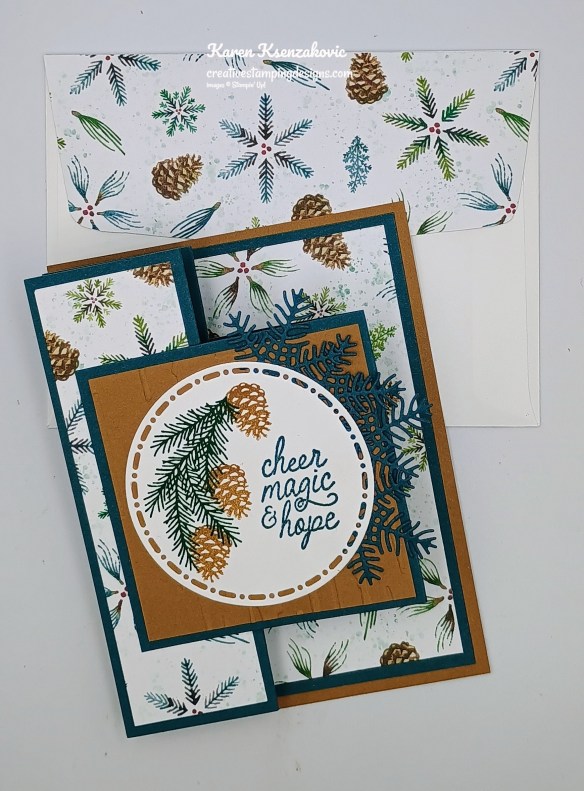
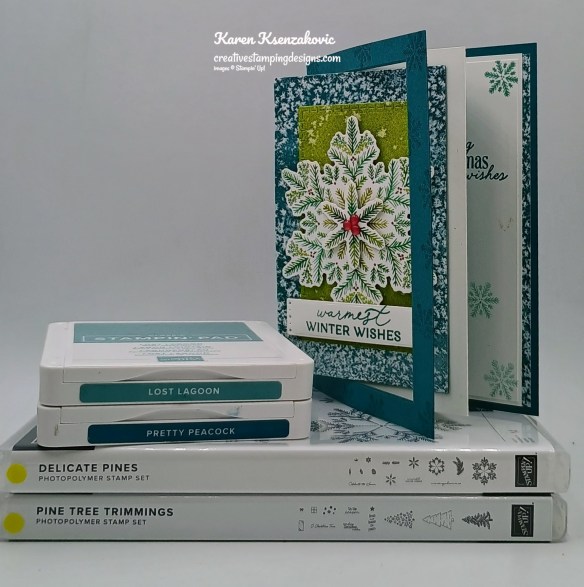
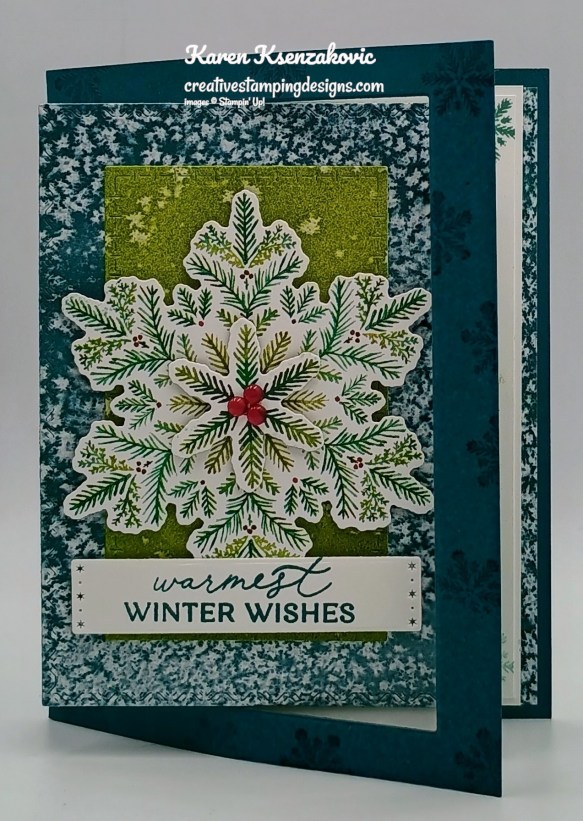
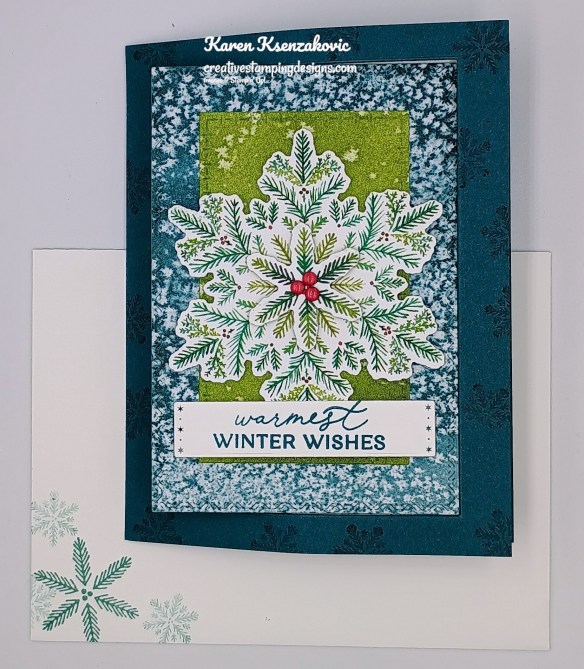
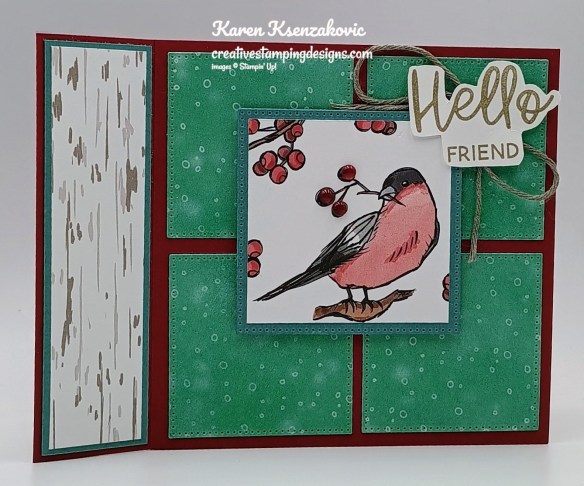
I used the Stampin’ Up! Snowflake Kisses Bundle along with the Elegant Pine Snowflakes Designer Series Paper, Traditional Labels Dies, Stampin’ Up! Delicate Pines Photopolymer Stamp Set, Gold Foil Sheets and Vellum Specialty Paper (available Nov 4th) for my card today.
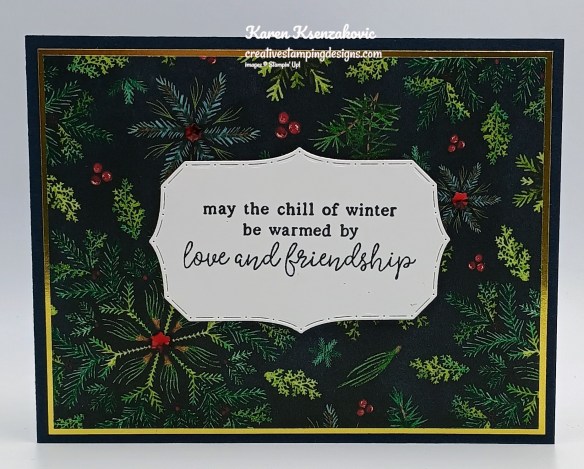
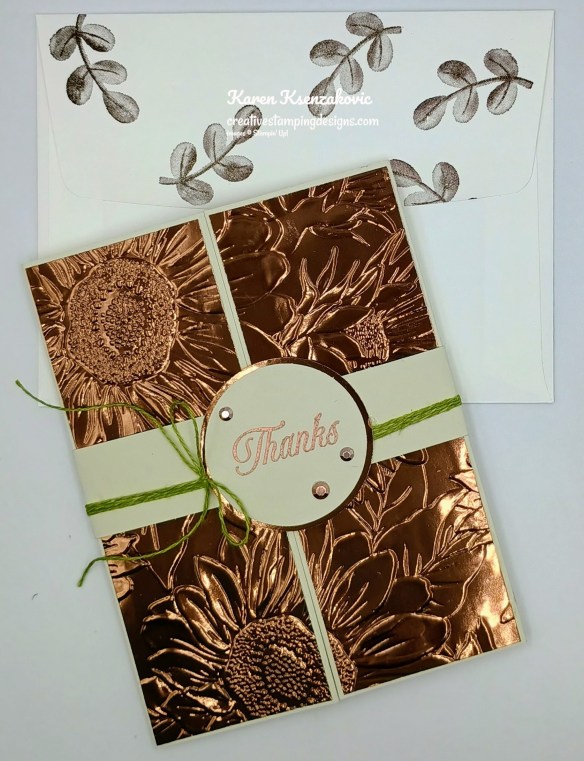
Adhere the panel of Elegant Pine Snowflakes DSP to the Gold Foil Mat. Adhere the layered panel to the front of the Secret Sea card base.
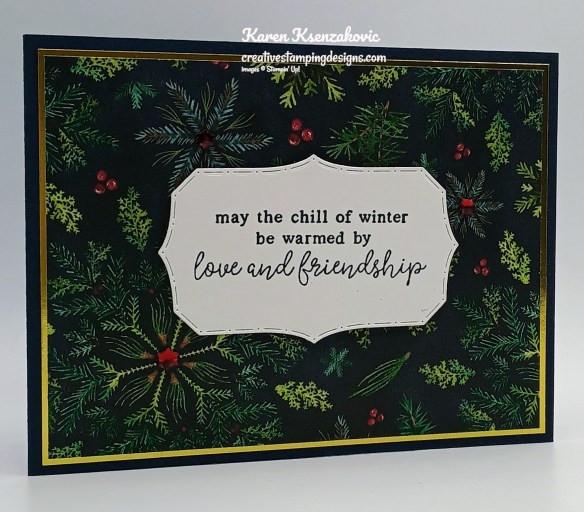
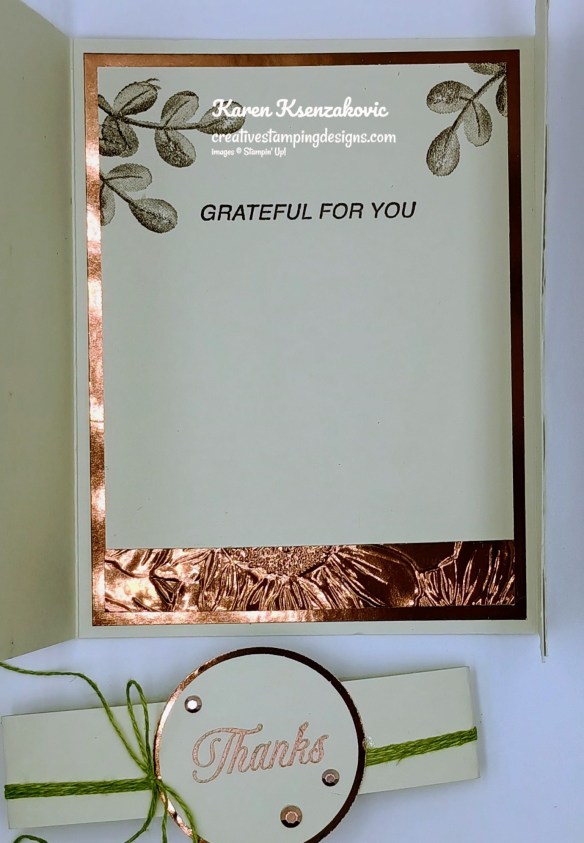
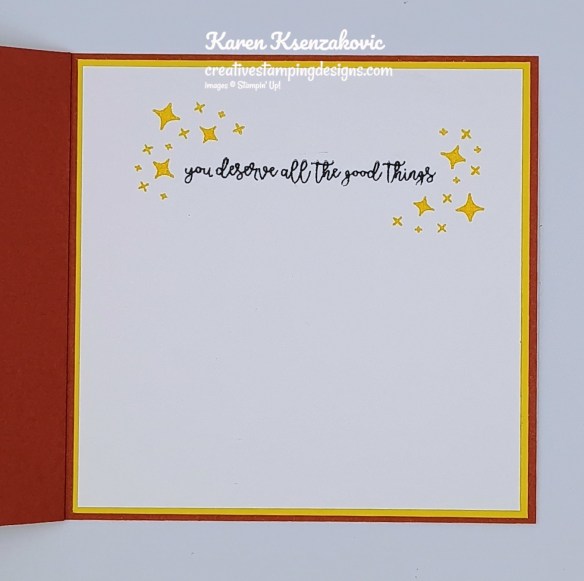
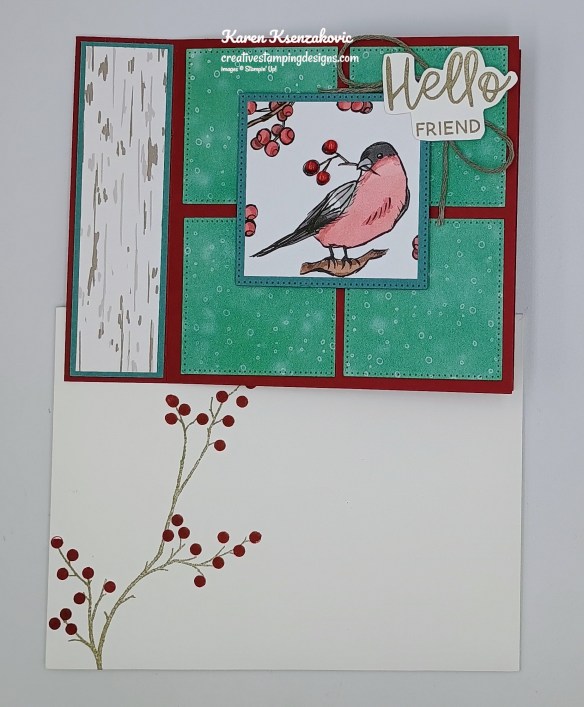
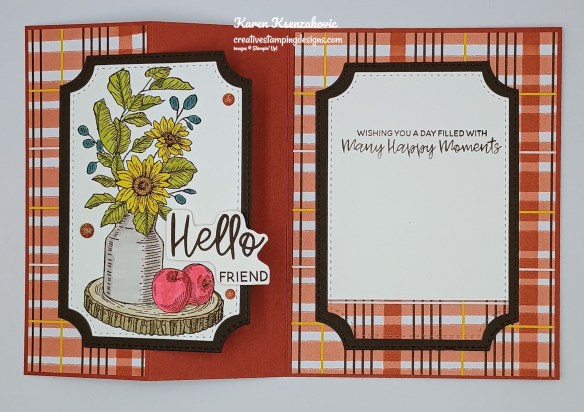
Stamp the sentiment from the Stampin’ Up! Snowflake Kisses Photopolymer Stamp Set in Secret Sea Ink on the panel of Basic White. Cut the sentiment out using the Traditional Labels Dies. Adhere the sentiment to the card front using Stampin’ Dimensionals. Add a few Faceted Snowflakes to the card front.

Score the smaller panel of Secret Sea as listed below. Using the Snowflake Kisses Dies, cut snowflakes out on either side of the center score line (but not over the top of it).
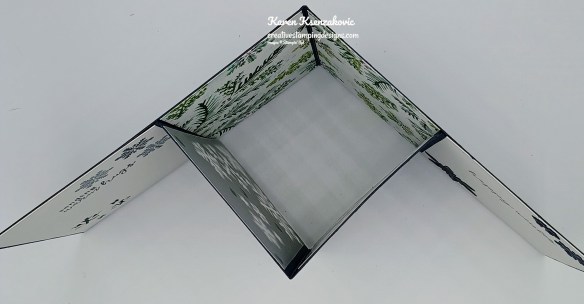
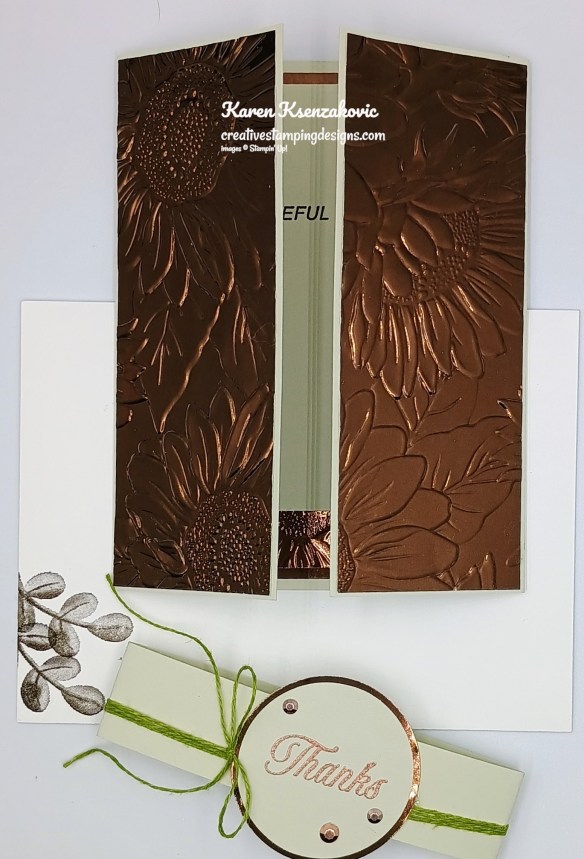
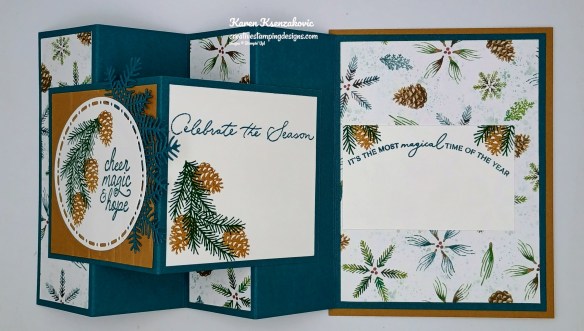
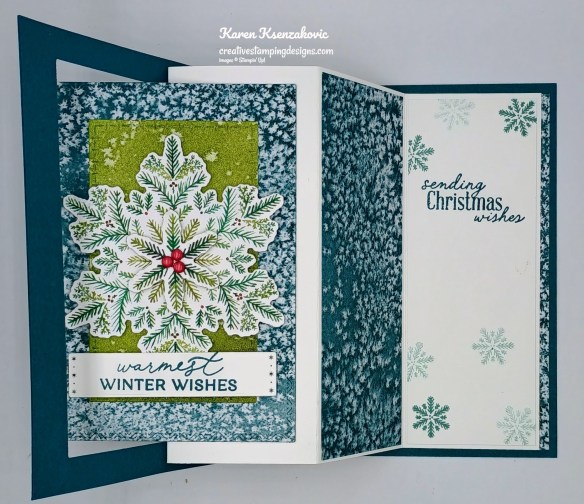
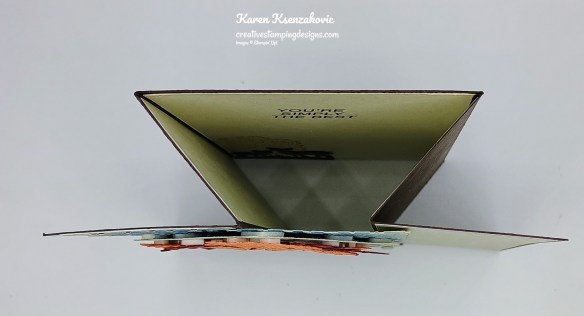
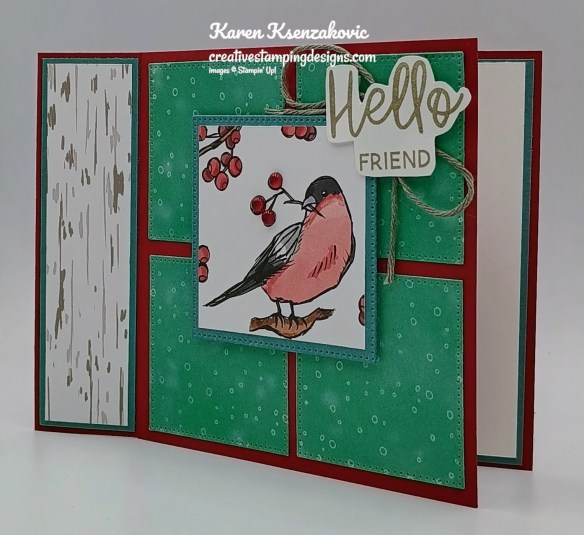
Adhere the 2 smaller panels of the Elegant Pine Snowflakes DSP to the inside center of the Secret Sea card base. Add Tear & Tape to the 1/2″ sides of the die cut panel. Adhere the 2 Vellum panels to the back of the die cut panel. Fold the die cut panel in half with the tear & tape folded out and place it 1/4″ from the outside edge of the Secret Sea card base. Remove the strip of the Tear & Tape and fold the card base over the die cut panel. Flip the card base over and do the same to the other side.
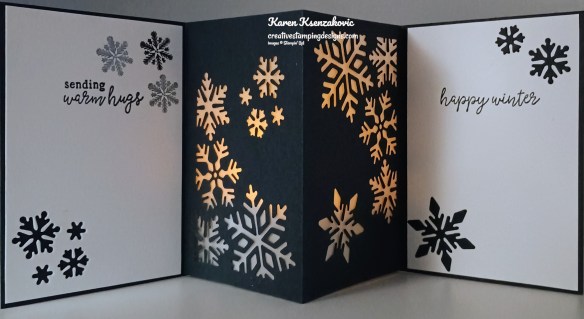
Stamp the sentiments from the Snowflake Kisses stamp set in Secret Sea Ink on the 2 panels on Basic White. Stamp the small snowflake image from the Delicate Pines stamp set on the panel in Secret Sea Ink, stamping off once on scrap paper. Die cut one of the panels in the corner using the smallest collage of snowflakes dies from the Snowflake Kisses Dies. On the other panel, add the small snowflakes that were cut from the center panel to the corners. Adhere the Basic White panels to the inside of the Secret Sea card base on either side of the mechanism. A tealight will fit inside to make the snowflakes glow.

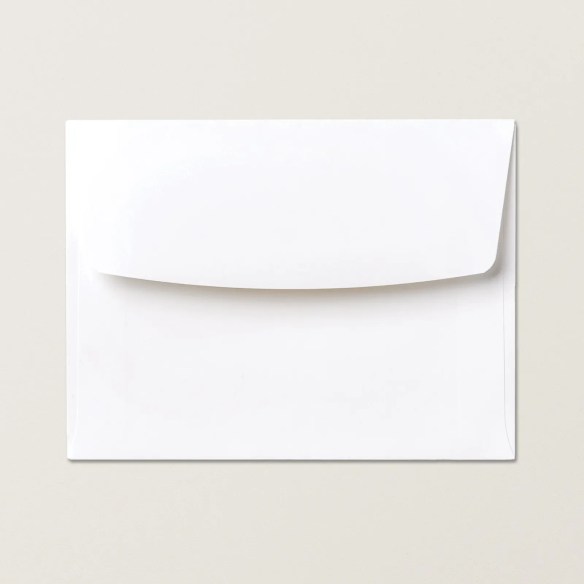
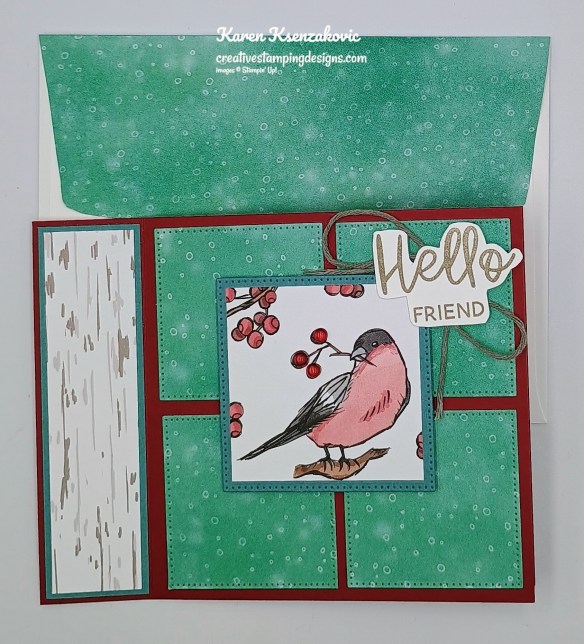
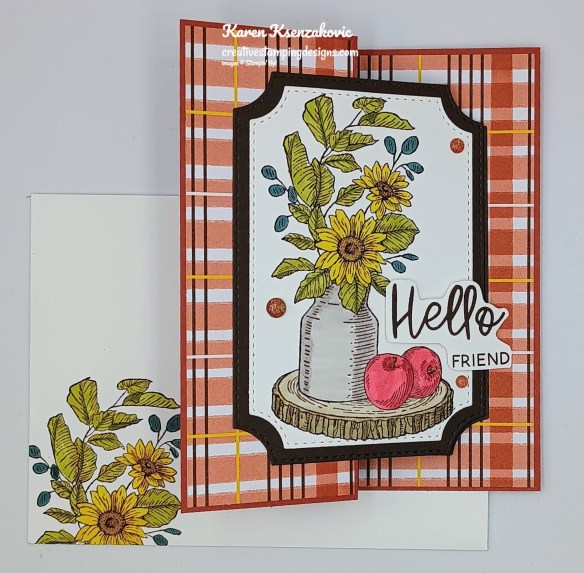
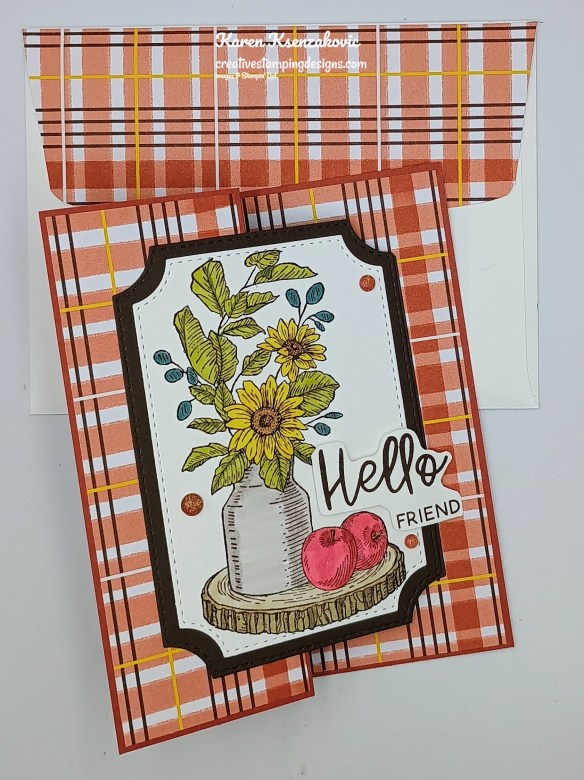
Decorate a Basic White Medium Envelope to finish your card. Stamp the snowflake images from the Delicate Pines stamp set in Secret Sea Ink, full strength and stamped off once on scrap paper. Adhere a panel of Elegant Pine Snowflakes to the envelope flap.
Thank you for stopping by my blog today. I hope you liked my card and will give it a try. I hope you will CASE this card and please feel free to post it in the comments of my Facebook page under my post. I’d love to see your take it. You can watch my video on my YouTube Channel HERE.
If you watch this on my YouTube channel, please remember to subscribe so that you will get notified when a new video goes live. Thank you to those that have subscribed already. Happy Stamping!!
*********************************************************************************************************
If you need any stamping supplies, I’d love to be your Demonstrator. Just click HERE to go directly to my online store or drop me an email if you have any questions.
*********************************************************************************************************
Come Join My Team
LAST DAY for Stampin’ Up! BEST JOINING SPECIAL EVER – October 1 – 31
Why not give this a try, you have nothing to lose. Order your Starter kit today and in a couple weeks you can preorder the new January-April 2026 Mini Catalog products, YAY!! Contact me today at creativestampingdesigns@gmail.com and we can talk about signing you up. As an extra bonus for joining my team, you get to attend ALL my Monthly Online Classes FREE. That’s just a little perk and Thank You for joining with me

From October 1 to 31, anyone who purchases the Starter Kit can choose between two amazing offers. In addition to FREE shipping, FREE business supplies, and a FREE Paper Pumpkin kit, you can either get $125 worth of products for just $35, an amazing first time ever offer, OR $189 worth of products for just $99!


Here are the details:
- Promotion dates: October 1-31
- New team members who purchase their starter kit from October 1 to 31 will be able to choose between these two offers:
- $125 worth of products for just $35
- $189 worth of products for just $99
- New demonstrators who submit their Independent Demonstrator Agreement (IDA) before October 1 or after October 31 will not be eligible for these offers.
- Deadline to join: October 31, 2025, at 11:59 p.m. (MT)
As an added bonus, the Demonstrator preorder has begun for the November Online Exclusives and those items can be added to your Starter Kit or purchased with the Demonstrator discount once you join!
Click Here to get started!!
********************************************************************************************************
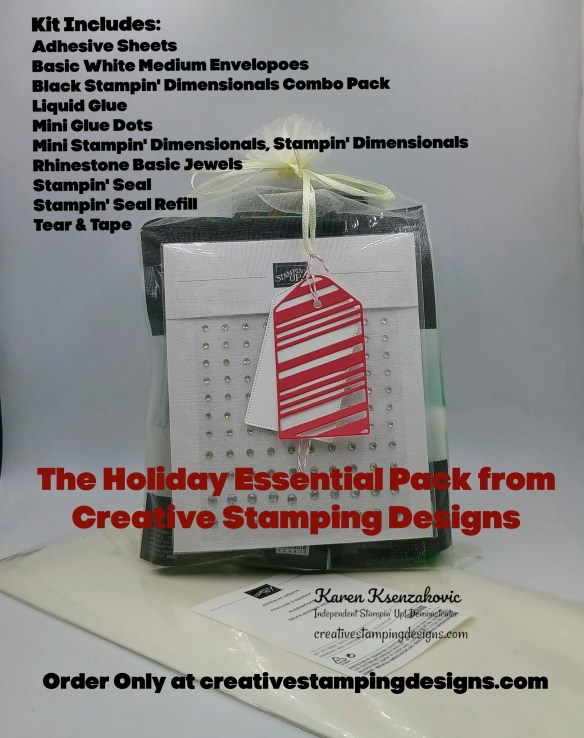
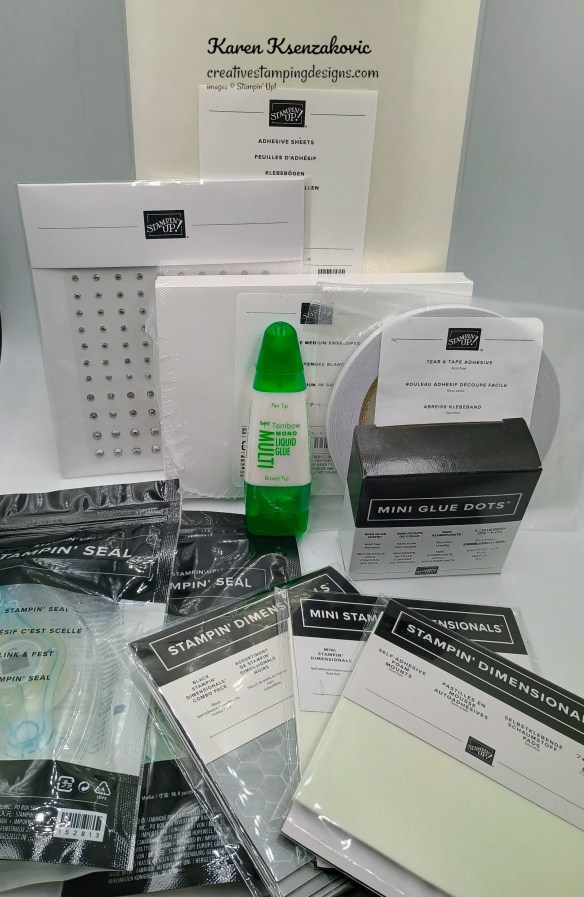
Last Day to order My Holiday Essential Pack
My Holiday Essential Pack is back for ordering October 11 – 31. Everyone seemed to love this essential pack when I offered it in August so I thought I’d offer it again since Holiday card making is approaching fast.
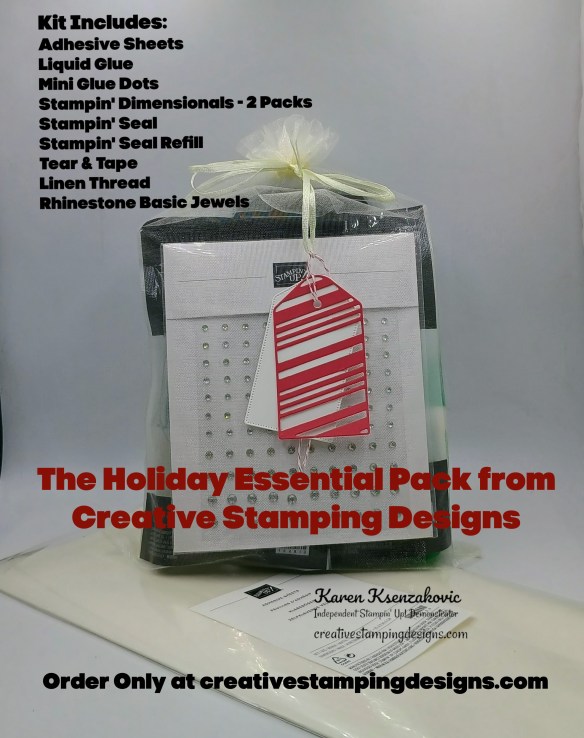
I’m offering a Holiday Essential Pack to get those holiday cards made. Let’s get a head on making those Holiday cards this year. Get all your adhesives ordered now so you don’t run out while you’re in the middle of making those Holiday cards.
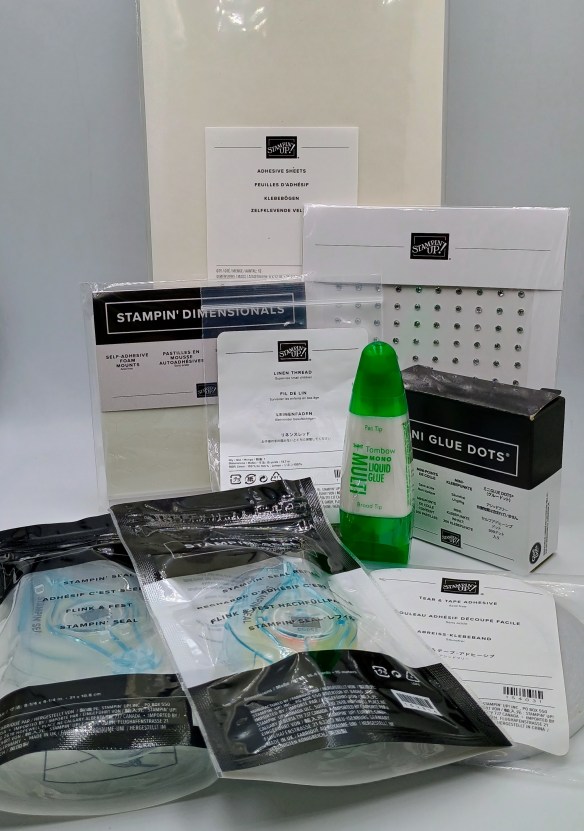
Each Kit will Include Full Packs of:
- Adhesive Sheets
- Liquid Glue
- Mini Glue Dots
- Stampin’ Dimensionals – 2 Packs
- Stampin’ Seal
- Stampin’ Seal Refill
- Tear & Tape Adhesive
- Linen Thread
- Rhinestone Basic Jewels
If you were to order all this separately it would cost $65.25 + shipping. I’m offering it for $56.00 plus $9.00 for Priority Mail Shipping. All orders must be submitted by October 31st. I’ll be placing 2 separate orders, once on October 22 for the first group and a 2nd order on November 1st. Once everything arrives, I’ll package it up in a cut little bag and ship it out to you.
As an EXTRA BONUS I’ll also throw in a pack of Basic White Medium Envelopes
Click Here to place your order for the Essential Pack Today!! Deadline to order is Friday October 31st
********************************************************************************************************
Card stock cuts for this project:
- Basic White Cardstock 2 1/2″ x 4″(sentiment), (2) – 2 7/8″ x 4 1/8″(inner liners)
- Secret Sea Cardstock 4 1/4″ x 11″(card base scored & folded at 5 1/2″), 6 1/2″ x 4 3/16″(Inner mechanism scored & folded at 1/2″, 3 1/4″ & 6″)
- Elegant Pine Snowflakes Designer Series Paper – 3 7/8″ x 5 1/8″(card front), (2) – 2 3/8″ x 4 1/8″(inner panels), 2 1/4″ x 6″(envelope flap)
- Gold Foil Sheet 4″ x 5 1/4″(card front mat)
- Vellum Paper – (2) – 2 1/2″ x 4 1/8″ (mechanism panels)
*********************************************************************************************************
Product List
![Snowflake Kisses Bundle (English) [ 166023 ]](https://assets1.tamsnetwork.com/images/EC042017NF/166023s.jpg "Snowflake Kisses Bundle (English) [ 166023 ]")
![Snowflake Kisses Photopolymer Stamp Set (English) [ 166018 ]](https://assets1.tamsnetwork.com/images/EC042017NF/166018s.jpg "Snowflake Kisses Photopolymer Stamp Set (English) [ 166018 ]")
![Snowflake Kisses Dies [ 166022 ]](https://assets1.tamsnetwork.com/images/EC042017NF/166022s.jpg "Snowflake Kisses Dies [ 166022 ]")
![Delicate Pines Photopolymer Stamp Set (English) [ 166067 ]](https://assets1.tamsnetwork.com/images/EC042017NF/166067s.jpg "Delicate Pines Photopolymer Stamp Set (English) [ 166067 ]")
![Basic White 8 1/2" X 11" Cardstock [ 166780 ]](https://assets1.tamsnetwork.com/images/EC042017NF/166780s.jpg "Basic White 8 1/2\" X 11\" Cardstock [ 166780 ]")
![Secret Sea 8 1/2" X 11" Cardstock [ 165624 ]](https://assets1.tamsnetwork.com/images/EC042017NF/165624s.jpg "Secret Sea 8 1/2\" X 11\" Cardstock [ 165624 ]")
![Elegant Pine Snowflakes 12" X 12" (30.5 X 30.5 Cm) Designer Series Paper [ 166066 ]](https://assets1.tamsnetwork.com/images/EC042017NF/166066s.jpg "Elegant Pine Snowflakes 12\" X 12\" (30.5 X 30.5 Cm) Designer Series Paper [ 166066 ]")
![Gold Foil Sheets [ 132622 ]](https://assets1.tamsnetwork.com/images/EC042017NF/132622s.jpg "Gold Foil Sheets [ 132622 ]")
![Secret Sea Classic Stampin' Pad [ 165285 ]](https://assets1.tamsnetwork.com/images/EC042017NF/165285s.jpg "Secret Sea Classic Stampin' Pad [ 165285 ]")
![Traditional Labels Dies [ 165864 ]](https://assets1.tamsnetwork.com/images/EC042017NF/165864s.jpg "Traditional Labels Dies [ 165864 ]")
![Faceted Snowflakes [ 166077 ]](https://assets1.tamsnetwork.com/images/EC042017NF/166077s.jpg "Faceted Snowflakes [ 166077 ]")
![Basic White Medium Envelopes [ 159236 ]](https://assets1.tamsnetwork.com/images/EC042017NF/159236s.jpg "Basic White Medium Envelopes [ 159236 ]")

![Adhesive Sheets [ 152334 ]](https://assets1.tamsnetwork.com/images/EC042017NF/152334s.jpg "Adhesive Sheets [ 152334 ]")


![Take Your Pick [ 144107 ]](https://assets1.tamsnetwork.com/images/EC042017NF/144107s.jpg "Take Your Pick [ 144107 ]")


![Amber Autumn Cling Stamp Set (English) [ 165883 ]](https://assets1.tamsnetwork.com/images/EC042017NF/165883s.jpg "Amber Autumn Cling Stamp Set (English) [ 165883 ]")
![Gathering Moments Cling Stamp Set (English) [ 165970 ]](https://assets1.tamsnetwork.com/images/EC042017NF/165970s.jpg "Gathering Moments Cling Stamp Set (English) [ 165970 ]")
![Basic Beige 8 1/2" X 11" Cardstock [ 164511 ]](https://assets1.tamsnetwork.com/images/EC042017NF/164511s.jpg "Basic Beige 8 1/2\" X 11\" Cardstock [ 164511 ]")
![Earthen Toned Metallic 12" X 12" (30.5 X 30.5 Cm) Specialty Paper [ 165901 ]](https://assets1.tamsnetwork.com/images/EC042017NF/165901s.jpg "Earthen Toned Metallic 12\" X 12\" (30.5 X 30.5 Cm) Specialty Paper [ 165901 ]")
![Early Espresso Classic Stampin' Pad [ 147114 ]](https://assets1.tamsnetwork.com/images/EC042017NF/147114s.jpg "Early Espresso Classic Stampin' Pad [ 147114 ]")
![Versamark Pad [ 102283 ]](https://assets1.tamsnetwork.com/images/EC042017NF/102283s.jpg "Versamark Pad [ 102283 ]")
![Metallics Wow! Embossing Powder [ 165678 ]](https://assets1.tamsnetwork.com/images/EC042017NF/165678s.jpg "Metallics Wow! Embossing Powder [ 165678 ]")
![Heat Tool (Us And Canada) [ 129053 ]](https://assets1.tamsnetwork.com/images/EC042017NF/129053s.jpg "Heat Tool (Us And Canada) [ 129053 ]")
![Sunflower 3 D Embossing Folder [ 166145 ]](https://assets1.tamsnetwork.com/images/EC042017NF/166145s.jpg "Sunflower 3 D Embossing Folder [ 166145 ]")
![1-3/4" (4.4 Cm) Circle Punch [ 119850 ]](https://assets1.tamsnetwork.com/images/EC042017NF/119850s.jpg "1-3/4\" (4.4 Cm) Circle Punch [ 119850 ]")
![1 7/8" (4.8 Cm) Circle Punch [ 165259 ]](https://assets1.tamsnetwork.com/images/EC042017NF/165259s.jpg "1 7/8\" (4.8 Cm) Circle Punch [ 165259 ]")
![Adhesive Backed Metallic Gems [ 163780 ]](https://assets1.tamsnetwork.com/images/EC042017NF/163780s.jpg "Adhesive Backed Metallic Gems [ 163780 ]")
![Early Espresso & Old Olive Linen Thread Pack [ 165986 ]](https://assets1.tamsnetwork.com/images/EC042017NF/165986s.jpg "Early Espresso & Old Olive Linen Thread Pack [ 165986 ]")


![Cajun Craze 8-1/2" X 11" Cardstock [ 119684 ]](https://assets1.tamsnetwork.com/images/EC042017NF/119684s.jpg "Cajun Craze 8-1/2\" X 11\" Cardstock [ 119684 ]")
![Daffodil Delight 8-1/2" X 11" Cardstock [ 119683 ]](https://assets1.tamsnetwork.com/images/EC042017NF/119683s.jpg "Daffodil Delight 8-1/2\" X 11\" Cardstock [ 119683 ]")
![Daffodil Delight Classic Stampin' Pad [ 147094 ]](https://assets1.tamsnetwork.com/images/EC042017NF/147094s.jpg "Daffodil Delight Classic Stampin' Pad [ 147094 ]")
![Small Blending Brushes [ 160518 ]](https://assets1.tamsnetwork.com/images/EC042017NF/160518s.jpg "Small Blending Brushes [ 160518 ]")

![Coneflower Celebrations Photopolymer Stamp Set (English) [ 165247 ]](https://assets1.tamsnetwork.com/images/EC042017NF/165247s.jpg "Coneflower Celebrations Photopolymer Stamp Set (English) [ 165247 ]")
![Pretty Peacock 8-1/2" X 11" Cardstock [ 150880 ]](https://assets1.tamsnetwork.com/images/EC042017NF/150880s.jpg "Pretty Peacock 8-1/2\" X 11\" Cardstock [ 150880 ]")
![Florals In Bloom 12" X 12" (30.5 X 30.5 Cm) Designer Series Paper [ 165175 ]](https://assets1.tamsnetwork.com/images/EC042017NF/165175s.jpg "Florals In Bloom 12\" X 12\" (30.5 X 30.5 Cm) Designer Series Paper [ 165175 ]")
![Tuxedo Black Memento Ink Pad [ 132708 ]](https://assets1.tamsnetwork.com/images/EC042017NF/132708s.jpg "Tuxedo Black Memento Ink Pad [ 132708 ]")
![Darling Duckling Stampin’ Blends Combo Pack [ 165288 ]](https://assets1.tamsnetwork.com/images/EC042017NF/165288s.jpg "Darling Duckling Stampin’ Blends Combo Pack [ 165288 ]")
![Pecan Pie Stampin’ Blends Combo Pack [ 161674 ]](https://assets1.tamsnetwork.com/images/EC042017NF/161674s.jpg "Pecan Pie Stampin’ Blends Combo Pack [ 161674 ]")
![Timid Tiger Stampin’ Blends Combo Pack [ 165291 ]](https://assets1.tamsnetwork.com/images/EC042017NF/165291s.jpg "Timid Tiger Stampin’ Blends Combo Pack [ 165291 ]")
![Holographic Resin Dots [ 165598 ]](https://assets1.tamsnetwork.com/images/EC042017NF/165598s.jpg "Holographic Resin Dots [ 165598 ]")


![Delicate Pines Bundle (English) [ 166074 ]](https://assets1.tamsnetwork.com/images/EC042017NF/166074s.jpg "Delicate Pines Bundle (English) [ 166074 ]")
![Delicate Pines Dies [ 166073 ]](https://assets1.tamsnetwork.com/images/EC042017NF/166073s.jpg "Delicate Pines Dies [ 166073 ]")
![Magic & Hope Cling Stamp Set (English) [ 165950 ]](https://assets1.tamsnetwork.com/images/EC042017NF/165950s.jpg "Magic & Hope Cling Stamp Set (English) [ 165950 ]")
![Pecan Pie 8 1/2" X 11" Cardstock [ 161717 ]](https://assets1.tamsnetwork.com/images/EC042017NF/161717s.jpg "Pecan Pie 8 1/2\" X 11\" Cardstock [ 161717 ]")
![Pecan Pie Classic Stampin' Pad [ 161665 ]](https://assets1.tamsnetwork.com/images/EC042017NF/161665s.jpg "Pecan Pie Classic Stampin' Pad [ 161665 ]")
![Pretty Peacock Classic Stampin’ Pad [ 150083 ]](https://assets1.tamsnetwork.com/images/EC042017NF/150083s.jpg "Pretty Peacock Classic Stampin’ Pad [ 150083 ]")
![Shaded Spruce Classic Stampin' Pad [ 147088 ]](https://assets1.tamsnetwork.com/images/EC042017NF/147088s.jpg "Shaded Spruce Classic Stampin' Pad [ 147088 ]")
![Birch Wood 3 D Embossing Folder [ 164069 ]](https://assets1.tamsnetwork.com/images/EC042017NF/164069s.jpg "Birch Wood 3 D Embossing Folder [ 164069 ]")
![Spotlight On Nature Dies [ 163580 ]](https://assets1.tamsnetwork.com/images/EC042017NF/163580s.jpg "Spotlight On Nature Dies [ 163580 ]")


![Pine Tree Trimmings Photopolymer Stamp Set (English) [ 166040 ]](https://assets1.tamsnetwork.com/images/EC042017NF/166040s.jpg "Pine Tree Trimmings Photopolymer Stamp Set (English) [ 166040 ]")
![Lost Lagoon Classic Stampin' Pad [ 161678 ]](https://assets1.tamsnetwork.com/images/EC042017NF/161678s.jpg "Lost Lagoon Classic Stampin' Pad [ 161678 ]")
![Textured Notes Dies [ 165555 ]](https://assets1.tamsnetwork.com/images/EC042017NF/165555s.jpg "Textured Notes Dies [ 165555 ]")
![Cherry Cobbler & Pearl Adhesive Backed Berries [ 164119 ]](https://assets1.tamsnetwork.com/images/EC042017NF/164119s.jpg "Cherry Cobbler & Pearl Adhesive Backed Berries [ 164119 ]")


![Christmas Greenery Bundle [ 165873 ]](https://assets1.tamsnetwork.com/images/EC042017NF/165873s.jpg "Christmas Greenery Bundle [ 165873 ]")
![Christmas Greenery Photopolymer Stamp Set [ 165870 ]](https://assets1.tamsnetwork.com/images/EC042017NF/165870s.jpg "Christmas Greenery Photopolymer Stamp Set [ 165870 ]")
![Christmas Greenery Dies [ 165872 ]](https://assets1.tamsnetwork.com/images/EC042017NF/165872s.jpg "Christmas Greenery Dies [ 165872 ]")
![Traditional Labels Photopolymer Stamp Set (English) [ 165854 ]](https://assets1.tamsnetwork.com/images/EC042017NF/165854s.jpg "Traditional Labels Photopolymer Stamp Set (English) [ 165854 ]")
![Cherry Cobbler 8-1/2" X 11" Cardstock [ 119685 ]](https://assets1.tamsnetwork.com/images/EC042017NF/119685s.jpg "Cherry Cobbler 8-1/2\" X 11\" Cardstock [ 119685 ]")
![Old Olive 8-1/2" X 11" Cardstock [ 100702 ]](https://assets1.tamsnetwork.com/images/EC042017NF/100702s.jpg "Old Olive 8-1/2\" X 11\" Cardstock [ 100702 ]")
![Traditions Of Christmas 12" X 12" (30.5 X 30.5 Cm) Specialty Designer Series Paper [ 165853 ]](https://assets1.tamsnetwork.com/images/EC042017NF/165853s.jpg "Traditions Of Christmas 12\" X 12\" (30.5 X 30.5 Cm) Specialty Designer Series Paper [ 165853 ]")
![Bubble Bath Classic Stampin' Pad [ 161664 ]](https://assets1.tamsnetwork.com/images/EC042017NF/161664s.jpg "Bubble Bath Classic Stampin' Pad [ 161664 ]")
![Cherry Cobbler Classic Stampin' Pad [ 147083 ]](https://assets1.tamsnetwork.com/images/EC042017NF/147083s.jpg "Cherry Cobbler Classic Stampin' Pad [ 147083 ]")
![Old Olive Classic Stampin' Pad [ 147090 ]](https://assets1.tamsnetwork.com/images/EC042017NF/147090s.jpg "Old Olive Classic Stampin' Pad [ 147090 ]")
![Basics Wow! Embossing Powder [ 165679 ]](https://assets1.tamsnetwork.com/images/EC042017NF/165679s.jpg "Basics Wow! Embossing Powder [ 165679 ]")
![Traditional Sparkling Sequins [ 165875 ]](https://assets1.tamsnetwork.com/images/EC042017NF/165875s.jpg "Traditional Sparkling Sequins [ 165875 ]")


![Early Espresso 8-1/2" X 11" Cardstock [ 119686 ]](https://assets1.tamsnetwork.com/images/EC042017NF/119686s.jpg "Early Espresso 8-1/2\" X 11\" Cardstock [ 119686 ]")
![Timid Tiger 8 1/2" X 11" Cardstock [ 165626 ]](https://assets1.tamsnetwork.com/images/EC042017NF/165626s.jpg "Timid Tiger 8 1/2\" X 11\" Cardstock [ 165626 ]")
![Misty Moonlight Classic Stampin' Pad [ 153118 ]](https://assets1.tamsnetwork.com/images/EC042017NF/153118s.jpg "Misty Moonlight Classic Stampin' Pad [ 153118 ]")
![Blending Brushes [ 153611 ]](https://assets1.tamsnetwork.com/images/EC042017NF/153611s.jpg "Blending Brushes [ 153611 ]")
![Neutral Matte Dots [ 165561 ]](https://assets1.tamsnetwork.com/images/EC042017NF/165561s.jpg "Neutral Matte Dots [ 165561 ]")


![Lost Lagoon 8-1/2" X 11" Cardstock [ 133679 ]](https://assets1.tamsnetwork.com/images/EC042017NF/133679s.jpg "Lost Lagoon 8-1/2\" X 11\" Cardstock [ 133679 ]")
![Nests Of Winter 12" X 12" (30.5 X 30.5 Cm) Designer Series Paper [ 164183 ]](https://assets1.tamsnetwork.com/images/EC042017NF/164183s.jpg "Nests Of Winter 12\" X 12\" (30.5 X 30.5 Cm) Designer Series Paper [ 164183 ]")
![Gray Granite Classic Stampin' Pad [ 147118 ]](https://assets1.tamsnetwork.com/images/EC042017NF/147118s.jpg "Gray Granite Classic Stampin' Pad [ 147118 ]")
![Baker's Twine Essentials Pack [ 155475 ]](https://assets1.tamsnetwork.com/images/EC042017NF/155475s.jpg "Baker's Twine Essentials Pack [ 155475 ]")

![Rustic Centerpiece Cling Stamp Set [ 166186 ]](https://assets1.tamsnetwork.com/images/EC042017NF/166186s.jpg "Rustic Centerpiece Cling Stamp Set [ 166186 ]")
![Crumb Cake Stampin' Blends Combo Pack [ 154882 ]](https://assets1.tamsnetwork.com/images/EC042017NF/154882s.jpg "Crumb Cake Stampin' Blends Combo Pack [ 154882 ]")
![Gray Granite Stampin' Blends Combo Pack [ 154886 ]](https://assets1.tamsnetwork.com/images/EC042017NF/154886s.jpg "Gray Granite Stampin' Blends Combo Pack [ 154886 ]")
![Old Olive Stampin' Blends Combo Pack [ 154892 ]](https://assets1.tamsnetwork.com/images/EC042017NF/154892s.jpg "Old Olive Stampin' Blends Combo Pack [ 154892 ]")
![Pretty Peacock Stampin’ Blends Combo Pack [ 161676 ]](https://assets1.tamsnetwork.com/images/EC042017NF/161676s.jpg "Pretty Peacock Stampin’ Blends Combo Pack [ 161676 ]")
![Real Red Stampin' Blends Combo Pack [ 154899 ]](https://assets1.tamsnetwork.com/images/EC042017NF/154899s.jpg "Real Red Stampin' Blends Combo Pack [ 154899 ]")

