Stampin’ Up Lovely Lattice

Good Tuesday morning my fellow stampers.  How has your week started off?

For today’s card I used 4 Sale-A-Bration items that will only be around for less than a week now.  Here’s my card.

I was able to join in with a few challenges with my card today.  First is Just Add Ink Colour Challenge #449.  Here are their beautiful vibrant colors

Next we have Stampin’ Up Only Coloring Challenge # 219

Next I played along with TGIF Product Spotlight Challenge #204

I started with a panel of Whisper White cardstock and stamped the large image from the Stampin’ Up Lovely Lattice Stamp Set (FREE Sale-A-Bration item) in Tuxedo Black Memento Ink in the center.  I colored the image in using my Bermuda Bay and Lovely Lipstick Stampin’ Blends Markers.

I adhered the artwork with Multipurpose Liquid Glue to a Gorgeous Grape card front, which I had run through my Big Shot using the Country Floral Dynamic Textured Impressions Embossing Folder (FREE Sale-A-Bration item). I adhered the card front to a Bermuda Bay card base using Multipurpose Liquid Glue.

I made a bow using the Pearlized Thread from the Share What You Love Embellishment Kit (FREE Sale-A-Bration Item). I adhered it to the artwork using a Glue Dot.  I added a Silver Adhesive Backed Rose from the same embellishment kit.

On the inside I stamped the smaller flower from the Lovely Lattice stamp set in Tuxedo Black Memento Ink in the 2 corners of a Whisper White panel and colored them in with my Bermuda Bay and Lovely Lipstick Stampin’ Blends Markers.  I stamped the sentiment from the Stampin’ Up Part Of My Story Stamp Set (FREE Sale-A-Bration item) in Bermuda Bay Ink on a scrap piece of Whisper White cardstock.  I cut the sentiment out using my Big Shot and the Layering Ovals Framelits Dies.  Using the Story Label Punch I punched out a label in Lovely Lipstick cardstock.  I adhered the oval to the center of the label using Snail and then to the Whisper White panel using Multipurpose Liquid Glue.  I adhered the Whisper White panel to a Gorgeous Grape mat using Snail and then to the inside of the Bermuda Bay card base using Multipurpose Liquid Glue.

To finish my card I decorated a Medium Whisper White Envelope.  I stamped part of the large floral image from the Lovely Lattice stamp set on the envelope front and the envelope flap in Tuxedo Black Memento Ink.  I colored them in the same as I did for the card front.

Thank you for stopping by my blog today.  I hope you liked my card and will give it a try. I was able to use 4 of the Sale-A-Bration items for this card.  The Lovely Lattice stamp set (1st release), Country Floral Dynamic Textured Impressions Embossing Folder (2nd release), Part Of My Story stamp set (1st release) and the Share What You Love Embellishment Kit (3rd release).  You only have 6 days left to get your free items. Happy Stamping!!

****************************************************************************************************

If you need any stamping supplies, I’d be very happy to be your Demonstrator.  Just click here to go directly to my online store or drop me an email if you have any questions.

MY CURRENT HOST CODE IS: EDKNVWRP

Happy Stamping, Karen!

****************************************************************************************************

SALE-A-BRATION COORDINATION ITEMS. THIS IS THE LAST WEEK THEY ARE AVAILABLE.  THEY WILL BE GONE SUNDAY

LIMITED-TIME PRODUCTS THAT COORDINATE PERFECTLY WITH SELECT SALE-A-BRATION PRODUCTS.  VISIT MY ONLINE STORE HERE FOR MORE DETAILS.

****************************************************************************************************

Third release of SALE-A-BRATION  items available.  Click HERE to see items.

Delightfully Detailed Laser-Cut Specialty Paper, Mini Pizza Boxes, Pearlized Doilies, Petal Promenade Designer Series Paper, Rich Razzleberry 1/4″ (6.4 Mm) Velvet Ribbon, Scattered Sequins Dynamic Textured Impressions Embossing & Share What You Love Embellishment Kit.

****************************************************************************************************

Here at Paper Pumpkin, we love providing easy, fast, and fun creative experiences for our subscribers. We do this in a cost-saving and time-efficient way: by delivering a cute package filled with fun paper-crafting goodies . . . right to your door.
In addition to providing everything you need to make a pre-designed, all-inclusive project, we also have another goal in mind: to help you unlock and explore your creativity by introducing you to exciting and innovative products from Stampin’ Up!
In April’s Paper Pumpkin kit, we’re pleased to announce that we’ll be treating you to something extra-special: Stampin’ Up!’s brand new Distinktive® stamp images.

About Distinktive Stamps
Distinktive stamps give you photo-realistic images with just one stamp. They have a special texture that gives added depth and dimension in a single step.
These stamps are available only from Stampin’ Up! and are made using a patent-pending process.
Distinktive stamps are available in red rubber and photopolymer; Paper Pumpkin’s April kit includes photopolymer stamps.
Shop Distinktive stamps in the online store by searching “Distinktive,” or look for the Distinktive icon in Stampin’ Up! catalogs.

Click HERE to go to my store to subscribe to April’s Paper Pumpkin before April 10th.

****************************************************************************************************

April I will be starting my Online Host Club and I have a couple of spots open.  If you have a long wish list and you want to purchase Stampin’ Up supplies a little at a time, this might just be the perfect solution for you.  For more information click HERE.  If you are interested in joining in, please email me at creativestampingdesigns@gmail.com.

****************************************************************************************************

Card stock cuts for this project:

  • Bermuda Bay Cardstock 4 1/4″ X 11″ (card base scored and folded at 5 1/2″)
  • Gorgeous Grape Cardstock 2 – 4″ X 5 1/4″ (card front and inner liner mat)
  • Lovely Lipstick Cardstock scrap for label
  • Whisper White Cardstock 3 3/4″ X 3 1/4″ (artwork), 3 3/4″ X 5″ (inner liner)

****************************************************************************************************

Product List

Stampin’ Up Meant To Be

Good Wednesday morning my fellow stampers.  Happy 1st Day Of Spring!!!

There are less than 2 weeks left for Sale-A-Bration, yikes!  If there are still items you wanted to get, don’t wait.  Things are selling out.  They’ve added a 3rd release, you can see it below.

For today’s card I have a real quick and easy card for you.  Take a look.

I started by cutting the rectangles.  I used the 3 middle Rectangle Stitched Framelits Dies along with my Big Shot and cut the largest in Lovely Lipstick cardstock, the middle one in Flirty Flamingo cardstock and the smallest one in All My Love Designer Series Paper.  Once I cut them out I layered them inside one another.

As you can see, this is a very flat card since they are inside and not layered on top of one another.  I adhered the rectangles to a Whisper White card front using Multipurpose Liquid Glue.  I just love how the stitching looks on all the rectangles.

On a scrap piece of Whisper White cardstock I stamped the sentiment from the Stampin’ Up Meant To Be Stamp Set in Versamark Ink and immediately sprinkled it with my Lovely Lipstick Embossing Powder.  I heat set it using my Heat Tool then cut the circle out using my Big Shot and the Stitched Shapes Framelits Dies.  I also cut a scalloped circle from the Layering Circles Framelits Dies and adhered the stitched circle to it using Snail.  I adhered the circle to the card front using Stampin’ Dimensionals and adhered a small Flirty Flamingo bow made from the All My Love Ribbon Combo Pack.  I adhered the card front to a Thick Whisper White card base.

On the inside I stamped the single flower from Stampin’ Up Forever Lovely Stamp Set in Flirty Flamingo Ink.  I stamped the sentiment from the same stamp set in Lovely Lipstick Ink in the center.  I adhered the Whisper White panel to the inside of the Thick Whisper White card base using Multipurpose Liquid Glue.

To finish my card I decorated a Medium Whisper White Envelope.  I stamped the flower from the Forever Lovely stamp set on the envelope front.  I adhered a piece of All My Love DSP to the envelope flap.

Thank you for stopping by my blog today.  I hope you liked my quick and easy card and will give it a try.  Happy Stamping!!

****************************************************************************************************

If you need any stamping supplies, I’d be very happy to be your Demonstrator.  Just click here to go directly to my online store or drop me an email if you have any questions.

MY CURRENT HOST CODE IS: EDKNVWRP

Happy Stamping, Karen!

****************************************************************************************************

SALE-A-BRATION COORDINATION ITEMS ARE AVAILABLE NOW THROUGH MARCH 31, 2019 OR WHILE SUPPLIES LAST.

LIMITED-TIME PRODUCTS THAT COORDINATE PERFECTLY WITH SELECT SALE-A-BRATION PRODUCTS.  VISIT MY ONLINE STORE HERE FOR MORE DETAILS.

****************************************************************************************************

Third release of SALE-A-BRATION  items available.  Click HERE to see items.

Delightfully Detailed Laser-Cut Specialty Paper, Mini Pizza Boxes, Pearlized Doilies, Petal Promenade Designer Series Paper, Rich Razzleberry 1/4″ (6.4 Mm) Velvet Ribbon, Scattered Sequins Dynamic Textured Impressions Embossing & Share What You Love Embellishment Kit.

****************************************************************************************************

Here at Paper Pumpkin, we love providing easy, fast, and fun creative experiences for our subscribers. We do this in a cost-saving and time-efficient way: by delivering a cute package filled with fun papercrafting goodies . . . right to your door.
In addition to providing everything you need to make a pre-designed, all-inclusive project, we also have another goal in mind: to help you unlock and explore your creativity by introducing you to exciting and innovative products from Stampin’ Up!
In April’s Paper Pumpkin kit, we’re pleased to announce that we’ll be treating you to something extra-special: Stampin’ Up!’s brand new Distinktive® stamp images.

About Distinktive Stamps
Distinktive stamps give you photo-realistic images with just one stamp. They have a special texture that gives added depth and dimension in a single step.
These stamps are available only from Stampin’ Up! and are made using a patent-pending process.
Distinktive stamps are available in red rubber and photopolymer; Paper Pumpkin’s April kit includes photopolymer stamps.
Shop Distinktive stamps in the online store by searching “Distinktive,” or look for the Distinktive icon in Stampin’ Up! catalogs.

Click HERE to go to my store to subscribe to April’s Paper Pumpkin before April 10th.

****************************************************************************************************

April I will be starting my Online Host Club and I have a couple of spots open.  If you have a long wish list and you want to purchase Stampin’ Up supplies a little at a time, this might just be the perfect solution for you.  For more information click HERE.  If you are interested in joining in, please email me at creativestampingdesigns@gmail.com.

****************************************************************************************************

Card stock cuts for this project:

  • Flirty Flamingo Cardstock 4 1/2″ X 3″ (middle stitched rectangle)
  • Lovely Lipstick Cardstock 4 1/2″ X 3″ (largest stitched rectangle)
  • Whisper White Cardstock 2 – 4″ X 5 1/4″ (card front and inner liner)
  • Thick Whisper White Cardstock 8 1/2″ X 5 1/2″(card base scored and folded at     4 1/4″)
  • All My Love Designer Series Paper 4 1/2″ X 3″(smallest stitched rectangle), piece for envelope flap

****************************************************************************************************

Product List

Stampin’ Up Flowering Desert for SUO Challenge

Good Wednesday morning my fellow stampers.  How is your week going?  We’re half way through already.  Did you have a chance to hop around our Blog Hop yesterday?  If not, try to take the time to go back and see all the beautiful projects.

For today’s card I used the Stampin’ Up Flowering Desert Stamp Set.  I’ve done the Masking and Sponging Techniques on it.  I love doing both techniques.  Here’s my card.

My card was able to join in with the Stampin’ Up Only Challenge color challenge #218.  Be sure to stop by to play along and see what everyone else has made.  Here is their challenge. We are doing a fun spring color palette challenge of Granny Apple Green, Lovely Lipstick, and Pool Party, with a bonus color of Mango Melody. All neutrals are allowed.

I started with a panel of Whisper White cardstock and stamped the cactus from the Flowering Desert stamp set in Granny Apple Green Ink in the center.  I covered the image with a mask I had made from a Post-It note and fussy cut.

I stamped the mountain image from the Stampin’ Up Waterfront Stamp Set behind the cactus in Basic Gray Ink.  I then began my sponging.  I started with the bottom and sponged Crumb Cake Ink using my Stamping Sponges, up to the mountains.  I stamped the sand image from the Waterfront stamp set in Crumb Cake Ink over the sponged area.

I next sponged Pool Party Ink above the mountains followed by Mango Melody Ink, Lovely Lipstick Ink and along the top I added some Smoky Slate Ink.  As I sponged up I blended the colors together.  I stamped the flowers on the cactus in Lovely Lipstick Ink and the aloe plants in the sand in Granny Apple Green Ink.  Using my Big Shot,  I cut the artwork out using the 2nd largest Rectangle Stitched Framelits Dies.  I cut a Pool Party frame out using the largest and 2nd largest Rectangle Stitched Framelits Dies.  I adhered the artwork and frame to a Mango Melody card base using Stampin’ Dimensionals.  On a small strip of Pool Party cardstock, I stamped the sentiment from the Flowering Desert stamp set in Versamark Ink.  I immediately sprinkled it with my Lovely Lipstick Stampin’ Emboss Powder and heat set it with my Heat Tool.  I made it into a banner and adhered it to the card front using Stampin’ Dimensionals.

On the inside on a Whisper White panel I stamped the cactus from the Flowering Desert stamp set in the center using Granny Apple Green Ink stamping off twice.  I stamped the flowers from the same stamp set in Lovely Lipstick Ink stamping off 3 times and the aloe plants in Granny Apple Green Ink some stamping off once and some full strength ink.  I stamped the sentiment from the same stamp set in Lovely Lipstick Ink over the cactus.  I adhered the Whisper White panel to a Lovely Lipstick mat using Snail and then to the inside of the Mango Melody card base using Multipurpose Liquid Glue.

To finish my card I decorated a Medium Whisper White Envelope.  I stamped the front and back of the envelope with the images from the Flowering Desert stamp set.

Thank you for stopping by my blog today.  I hope you liked my card and will give these techniques a try.  Happy Stamping!!

****************************************************************************************************

If you need any stamping supplies, I’d be very happy to be your Demonstrator.  Just click here to go directly to my online store or drop me an email if you have any questions.

MY CURRENT HOST CODE IS: EDKNVWRP

Happy Stamping, Karen!

****************************************************************************************************

SALE-A-BRATION COORDINATION ITEMS ARE AVAILABLE NOW THROUGH MARCH 31, 2019 OR WHILE SUPPLIES LAST.

LIMITED-TIME PRODUCTS THAT COORDINATE PERFECTLY WITH SELECT SALE-A-BRATION PRODUCTS.  VISIT MY ONLINE STORE HERE FOR MORE DETAILS.

****************************************************************************************************

Third release of SALE-A-BRATION  items available.  Click HERE to see items.

Delightfully Detailed Laser-Cut Specialty Paper, Mini Pizza Boxes, Pearlized Doilies, Petal Promenade Designer Series Paper, Rich Razzleberry 1/4″ (6.4 Mm) Velvet Ribbon, Scattered Sequins Dynamic Textured Impressions Embossing & Share What You Love Embellishment Kit.

****************************************************************************************************

April I will be starting my Online Host Club and I have a couple of spots open.  If you have a long wish list and you want to purchase Stampin’ Up supplies a little at a time, this might just be the perfect solution for you.  For more information click HERE.  If you are interested in joining in, please email me at creativestampingdesigns@gmail.com.

****************************************************************************************************

Card stock cuts for this project:

  • Lovely Lipstick Cardstock 4″ X 5 1/4″ (inner liner mat)
  • Mango Melody Cardstock 8 1/2″ X 5 1/2″ (card base scored and folded at 4 1/4″)
  • Pool Party Cardstock 4 1/4″ X 5 1/2″ (card front frame), 5/16″ X 3 1/4″ (banner)
  • Whisper White Cardstock 4″ X 5 1/4″ (artwork), 3 3/4″ X 5″ (inner liner)

****************************************************************************************************

Product List

Stampin’ Up Painted Seasons for Amy’s Inkin’ Krew Blog Hop

Good Tuesday morning my fellow stampers and welcome to our monthly Amy’s Inkin’ Krew Blog Hop. The 2nd Tuesday of every month this amazing group of ladies put together a blog hop and you are guaranteed to see some gorgeous projects.  This month our theme is ‘CELEBRATE SPRING’.  We can interpret this any way we would like to.  If you are starting with me, be sure to hop around to see everyone’s projects.  If you’ve hopped over from Amy Koenders, welcome to my blog and thank you for stopping by.  I’ve used the FREE with Sale-A-Bration , Painted Seasons Bundle and the Four Seasons Famelits Dies for my card today.  Here is my card for today.

I love doing Fancy Fold cards, it’s one of my favorites.  Whenever I see a different fold, I keep practicing until I get it right.  I just love the challenge of different folds.  My card has a lot of pieces to it.  All the measurements are listed below.  I started with a Pool Party panel and scored it at 5 1/4″.  Putting the short side on the edge of my Stampin’ Trimmer, I lined up the long edge at the 1″ mark.  I cut from 3″ to 7 1/2″.  I then put the long edge with the 3″ side on the edge of my Stampin’ Trimmer and the 5 1/4″ score mark to the right and scored at the 3″ mark.  Keeping the cardstock the same, I scored the 1″ piece at 7 1/2″.  I hope this makes sense to you.

Here is what it will look like once you fold on the score lines.

I adhered my Wood Textures Designer Series Paper on Petal Pink mats using Snail. I adhered my Painted Seasons Designer Series Paper on the smaller Petal Pink mats using Snail.  I adhered all the matted pieces to the scored Pool Party panel where they all fit using Multipurpose Liquid Glue.  I adhered the Pool Party card front to a Petal Pink card base using Multipurpose Liquid Glue.  Using my Big Shot I cut the word ‘friend’ out from the Well Written Framelit Dies in the Wood Textures DSP.  It did not photograph well, but it show up much better in person.  I adhered it to the bottom front section using Multipurpose Liquid Glue.

On a panel of Whisper White cardstock, using my Stamparatus,  I stamped the succulent flower image from the Stampin’ Up Painted Seasons Stamp Set (FREE Sale-A-Bration item) 3 times.  I stamped 2 in Pool Party Ink and 1 in Petal Pink Ink. On the Petal Pink flower I used my Sponge Dauber and lightly went around the edges with Pool Party Ink and then stamped over the 1st image.  I did the same with the Pool Party flowers except I used Petal Pink Ink.  I stamped the leaf image from the same stamp set in Lemon Lime Twist Ink 3 times.  Using my Big Shot, I cut all the images out with my Four Seasons Framelits Dies (available for a limited time during the month of March).  I adhered 2 of the flowers and the 3 leaf images to the front section of the card using Stampin’ Dimensionals and Glue Dots.  I adhered the 3rd flower to the back section of the card front using Stampin’ Dimensionals.  I wrapped a piece of Silver and Petal Pink Bakers Twine around the front section of the card front and tied a bow.  I added some Clear Rhinestone Basic Jewels to the card front.

On the inside I stamped the succulent flower from the Painted Seasons stamp set in Petal Pink Ink on a small panel of Whisper White cardstock stamping it off once.  I stamped the sentiment from the Stampin’ Up Well Said Stamp Set in Early Espresso Ink over the flower.  I adhered the Whisper White panel to the inside of the card using Multipurpose Liquid Glue.

To finish my card I decorated a Medium Whisper White Envelope.  I stamped the succulent flower from the Painted Seasons stamp set on the front of the envelope once in Petal Pink Ink and twice in Pool Party Ink.  I adhered a piece of Painted Seasons DSP to the envelope flap.

Thank you for stopping by my blog today, I hope you liked my card today.

Now be sure to hit Previous to hop back to Amy Koenders blog or hit Next to head over to Connie Troyer blog. You can also click on each of the names and hop around that way. Happy Hopping!!

  1. Karen Ksenzakovic – You Are Here
  2. Connie Troyer
  3. Jaimie Babarczy
  4. Sue Prather
  5. Julie Johnston
  6. Mary Deatherage
  7. Karen Finkle
  8. Shirley Gentry
  9. Amy Koenders
****************************************************************************************************

If you need any stamping supplies, I’d be very happy to be your Demonstrator.  Just click here to go directly to my online store or drop me an email if you have any questions.

MY CURRENT HOST CODE IS: EDKNVWRP

Happy Stamping, Karen!

****************************************************************************************************

SALE-A-BRATION COORDINATION ITEMS ARE AVAILABLE NOW THROUGH MARCH 31, 2019 OR WHILE SUPPLIES LAST.

LIMITED-TIME PRODUCTS THAT COORDINATE PERFECTLY WITH SELECT SALE-A-BRATION PRODUCTS.  VISIT MY ONLINE STORE HERE FOR MORE DETAILS.

****************************************************************************************************

Third release of SALE-A-BRATION  items available.  Click HERE to see items.

Delightfully Detailed Laser-Cut Specialty Paper, Mini Pizza Boxes, Pearlized Doilies, Petal Promenade Designer Series Paper, Rich Razzleberry 1/4″ (6.4 Mm) Velvet Ribbon, Scattered Sequins Dynamic Textured Impressions Embossing & Share What You Love Embellishment Kit.

****************************************************************************************************

April I will be starting my Online Host Club and I have a couple of spots open.  If you have a long wish list and you want to purchase Stampin’ Up supplies a little at a time, this might just be the perfect solution for you.  For more information click HERE.  If you are interested in joining in, please email me at creativestampingdesigns@gmail.com.

****************************************************************************************************

Card stock cuts for this project:

  • Petal Pink Cardstock 4 1/4″ X 5 1/2″ (card base), 2 7/8″ X 2 7/8″, 2 7/8″ X 2 1/8″,  2 /7/8″ X 4 3/8″, 7/8″ X 5 1/8″, 2 – 7/8″ X 2 1/8″ (mats for designer series paper)
  • Pool Party 4″ X 9 3/4″ (card scored at 5 1/4″, other scores and cuts above)
  • Painted Seasons Designer Series Paper 3/4″ X 5″, 2 – 3/4″ X 2″
  • Wood Textures Designer Series Paper 2 3/4″ X 2 3/4″, 2 3/4″ X 2″, 2 3/4″ X 4 1/4, scrap for ‘friend’ die cut
  • Whisper White Cardstock 2″ X 2 1/2″ (inner liner), scraps for flowers and leaves

****************************************************************************************************

Product List

Stampin’ Up Painted Seasons for Just Us Girls and TGIF

Good Tuesday morning my fellow stampers.  Hope your week has started out well.

For today’s card I used the Stampin’ Up Painted Seasons Stamp Set again.  I’m loving this set.  You can get this set as a bundle with Designer Series Paper FREE with a $100.00 order.  I absolutely love the images in this set.  My card today is very similar to yesterday’s card in style, measurements are a little different and of course different colors.  Take a look.

I joined in with the ‘Just Us Girls’ color challenge # 475.  Be sure to stop by to see what everyone has made and to play along.  Here is their colors.

I also joined in with the TGIF Sale-A-Bration Inspiration challenge #199. Be sure to stop by to see what everyone has made for their challenge too and to play along.  Here is their challenge.

I started with a panel of Whisper White cardstock and stamped the succulent flower image from the Painted Seasons stamp set in Blushing Bride Ink randomly around the paper.  I stamped the star clusters from the same stamp set in Cherry Cobbler Ink around filling in empty spaces.  I adhered the artwork panel to a Blushing Bride mat using Snail.  I adhered the matted artwork to a Thick Whisper White card base using Multipurpose Liquid Glue.

I stamped the sentiment from the Stampin’ Up By The Bay Stamp Set, FREE Sale-A-Bration item with a $50.00 order, in Cherry Cobbler Ink on the bottom right of the card front.  I added 3 Rhinestone Basic Jewels that I had colored in with my Dark Cherry Cobbler Stampin’ Blend Marker, to the top corner of the card front.

On the inside I stamped the succulent flower image from the Painted Seasons stamp set in Blushing Bride Ink on the two corners of a Whisper White panel.  I stamped the star clusters from the same stamp set in Cherry Cobbler Ink by the flowers.  I stamped the sentiment from the By The Bay stamp set in Cherry Cobbler Ink in the center of the panel.  I adhered the Whisper White panel to the inside of the Thick Whisper White card base using Multipurpose Liquid Glue.

To finish my card I decorated a Medium Whisper White Envelope.  I stamped the succulent flower image from the Painted Seasons stamp set on the envelope front and the envelope flap in Blushing Bride Ink.  I stamped the star cluster in Cherry Cobbler Ink by the flowers.

Thank you for stopping by my blog today.  I hope you liked my card and will give it a try.  Yesterday and today’s card were the same layout, but using different colors, different measurements and the different flower making the cards look a little different.  Happy Stamping.

****************************************************************************************************

If you need any stamping supplies, I’d be very happy to be your Demonstrator.  Just click here to go directly to my online store or drop me an email if you have any questions.

MY CURRENT HOST CODE IS: EHUYUM4S 

Happy Stamping, Karen!

****************************************************************************************************

Paper Pumpkin is turning six and we want to celebrate with you! After all, we could not have shared all these years of creativity if it weren’t for our subscribers.
To celebrate this fun occasion and to thank everyone who supports Paper Pumpkin month after month, we’re offering a specially-designed March kit and a FREE STAMP SET. Oh, yes. You read that right. In March, you will receive TWO stamp sets with your Paper Pumpkin kit.

There has never been a better time to give Paper Pumpkin a try. And because it’s our sixth birthday celebration, we’ll be pulling out all the stops. You’ll get an adorable kit, a special box, and most importantly, you’ll get TWO stamp sets instead of one.
$20 for a Paper Pumpkin kit is always a steal, but in March the deal is even better! There has never been a better time for you to join Paper Pumpkin.

Because it’s our birthday, we decided to create a kit that is perfect for making birthday cards!
The March kit features eight full-sized, mailable cards
Coordinating colors are Basic Black, Bermuda Bay, Daffodil Delight, Flirty Flamingo, and Poppy Parade
This kit has an element that is sure to “pop”!
The FREE stamp set is even bigger and better than your typical Paper Pumpkin stamp set and can be used on a variety of crafting projects.

A subscriber must have an active subscription by March 10, 2019 in order to receive the March kit.
The FREE stamp set coordinates with the March kit but it is not needed to complete the projects.
Supplies may be limited toward the end of the subscription period, so DON’T WAIT.

Click HERE to go to my store and subscribe.

****************************************************************************************************

Card stock cuts for this project:

  • Blushing Bride Cardstock 2 1/2″ X 5 1/2″ (artwork mat)
  • Whisper White Cardstock 2 1/4″ X 5 1/2″ (artwork), 4″ X 5 1/4″ (inner liner)
  • Thick Whisper White Cardstock 8 1/2″ X 5 1/2″ (card base scored and folded at 4 1/4″)

****************************************************************************************************

Product List

Stampin’ Up Painted Seasons for Color Throwdown

Good Monday morning my fellow stampers.  How was your weekend?  For those of you that have today off for Presidents Day, I hope you’re enjoying your long weekend.  It was actually a beautiful weekend here, the weather was beautiful for this time of year.  Now the snow and ice start again.

For today’s card I used one of the new beautiful Sale-A-Bration stamp sets that’s available as a bundle with Designer Series Paper FREE with a $100.00 order.  It’s the Stampin’ Up Painted Seasons Stamp Set.  I did not use the DSP for my card today that comes with the bundle, but I will soon.  Take a look.

I joined in with the Color Throwdown challenge #530.  Be sure to stop by to see what everyone has made and to play along.  Here is their challenge.

I started with a Smoky Slate card front and ran it through my Big Shot using the Subtle Dynamic Textured Impressions Embossing Folder.

On a strip of Whisper White cardstock I stamped the flower image from the Painted Seasons stamp set in Melon Mambo Ink randomly around.  I then stamped the small star cluster image from the same stamp set in Tuxedo Black Memento Ink around to fill in empty spaces.  I adhered the artwork to a Melon Mambo mat using Snail.  I then adhered the matted artwork to the card front using Multipurpose Liquid Glue and adhered the card front to a Smoky Slate card base using Multipurpose Liquid Glue.

Using the soon to be available from the Sale-A-Bration Coordination collection, Story Label Punch (available March 1st), I punched a label out in Melon Mambo cardstock.  I stamped the sentiment from the Stampin’ Up Part Of My Story Stamp Set (Free Sale-A-Bration item) in Versamark Ink on a strip of Whisper White cardstock.  I sprinkled it immediately with my Black Stampin’ Emboss Powder and heat set it with my Heat Tool.  I adhered the sentiment to the label and trimmed the ends to the label.  I added a Heart Epoxy Droplet, which I colored with my Dark Lovely Lipstick Stampin’ Blend Marker (that was the closest to Melon Mambo I could get).  I adhered the label to the right of my artwork with Stampin’ Dimensionals.

On the inside I stamped the flower from the Painted Seasons stamp set in Melon Mambo Ink on the two corners of a panel of Whisper White cardstock.  I added a couple of the star clusters from the same stamp set in Tuxedo Black Memento Ink by the flowers.  I stamped the sentiment from the Stampin’ Up Itty Bitty Birthdays Stamp Set in Tuxedo Black Memento Ink in the center of the panel.  I adhered the Whisper White panel to a Melon Mambo mat using Snail and adhered it to the inside of the Smoky Slate card base using Multipurpose Liquid Glue.

To finish my card I decorated a Medium Whisper White Envelope.  I stamped the flower from the Painted Seasons stamp set on the front of the envelope and the envelope flap in Melon Mambo Ink and the star cluster in Tuxedo Black Memento Ink.

Thank you for stopping by my blog today. I hope you liked my card and will give it a try. Happy Stamping!

****************************************************************************************************

If you need any stamping supplies, I’d be very happy to be your Demonstrator.  Just click here to go directly to my online store or drop me an email if you have any questions.

MY CURRENT HOST CODE IS: EHUYUM4S 

Happy Stamping, Karen!

****************************************************************************************************

Paper Pumpkin is turning six and we want to celebrate with you! After all, we could not have shared all these years of creativity if it weren’t for our subscribers.
To celebrate this fun occasion and to thank everyone who supports Paper Pumpkin month after month, we’re offering a specially-designed March kit and a FREE STAMP SET. Oh, yes. You read that right. In March, you will receive TWO stamp sets with your Paper Pumpkin kit.

There has never been a better time to give Paper Pumpkin a try. And because it’s our sixth birthday celebration, we’ll be pulling out all the stops. You’ll get an adorable kit, a special box, and most importantly, you’ll get TWO stamp sets instead of one.
$20 for a Paper Pumpkin kit is always a steal, but in March the deal is even better! There has never been a better time for you to join Paper Pumpkin.

Because it’s our birthday, we decided to create a kit that is perfect for making birthday cards!
The March kit features eight full-sized, mailable cards
Coordinating colors are Basic Black, Bermuda Bay, Daffodil Delight, Flirty Flamingo, and Poppy Parade
This kit has an element that is sure to “pop”!
The FREE stamp set is even bigger and better than your typical Paper Pumpkin stamp set and can be used on a variety of crafting projects.

A subscriber must have an active subscription by March 10, 2019 in order to receive the March kit.
The FREE stamp set coordinates with the March kit but it is not needed to complete the projects.
Supplies may be limited toward the end of the subscription period, so DON’T WAIT.

Click HERE to go to my store and subscribe.

****************************************************************************************************

Card stock cuts for this project:

  • Melon Mambo Cardstock 2 1/4″ X 5 1/2″ (artwork mat), 4″ X 5 1/4″ (inner liner mat)
  • Smoky Slate Cardstock 8 1/2″ X 5 1/2″ (card base scored and folded at 4 1/4″),    4 1/8″ X 5 3/8″ (card front)
  • Whisper White Cardstock 2″ X 5 1/2″ (artwork), 3 3/4″ X 5″ (inner liner)

****************************************************************************************************

Product List

Stampin’ Up Meant To Be Forever Lovely

Good Tuesday morning my fellow stampers.  How has your week started?  Is everyone warming up a little from that freezing weather we were having?

For today’s card I used the beautiful Stampin’ Up Forever Lovely and Meant To Be Stamp Sets for a clean and simple card. Take a look.

I joined in with Global Design Projects 175 Theme Challenge too.  Be sure to check out all the beautiful projects that were made and play along too.  Here is their challenge.

I am really loving my Stamparatus.  I used it for this card and envelope and was able to line everything up perfectly.  I started with a Whisper White card front and stamped the floral image from Forever Lovely stamp set.  I first stamped the leaf image in Soft Sea Foam Ink.  I then stamped the floral image, lining it up using my Stamparatus, in Petal Pink Ink.
I wrapped a piece of the gorgeous new Petal Pink/Whisper White Variegated Ribbon around the card front and tied a bow.  This ribbon is so wonderful to work with and makes bows so easy.  I added a Glue Dot under the bow to hold it in place.  I added a few clear Rhinestone Basic Jewels to the card front by the flowers.
I stamped the sentiment from the Meant To Be stamp set in Petal Pink on a small piece of Whisper White cardstock and punched it out with the Pretty Label Punch.  I adhered it to the card front using Stampin’ Dimensionals.  I adhered the card front to a Whisper White card base using Stampin’ Dimensionals.
It is extremely hard to see, but I stamped the leaves and floral design, from the Forever Lovely stamp set, the same way I did on the card front, stamping off once, on the inside Whisper White panel.  I stamped the sentiment from the Forever Lovely stamp set in Petal Pink Ink over the floral image.  I adhered the Whisper White panel to the inside of the Whisper White card base using Snail.

To finish my card I decorated a Medium Whisper White Envelope.  I stamped the leaves and floral image from the Forever Lovely stamp set on the envelope front and the envelope flap the same way that I did for the card front.

Thank you for stopping by my blog today.   I hope you liked my card and will give it a try. Happy Stamping!

****************************************************************************************************

If you need any stamping supplies, I’d be very happy to be your Demonstrator.  Just click here to go directly to my online store or drop me an email if you have any questions.

MY CURRENT HOST CODE IS: EHUYUM4S 

Happy Stamping, Karen!

****************************************************************************************************

Card stock cuts for this project:

  • Whisper White Cardstock 8 1/2″ X 5 1/2″ (card base scored and folded at 4 1/4″), 4 1/8″ X 5 3/8″ (card front), 4″ X 5 1/4″ (inner liner)

****************************************************************************************************

Product List

Stampin’ Up Colorful Seasons Quick and Easy Card

Good Friday morning my stamping friends.  How was your week?  Are you ready for the weekend?  Have you made some fun plans?

For today’s card I joined in with 2 challenges.   The first one is What Will You Stamp Challenge #203.  This was a new one for me.  They give you a stamp set and you come up with something.  Be sure to stop by to see what everyone has made at What Will You Stamp and to play along.  Here is their challenge.

The other challenge I joined in with is Colour and Sketches #305.  Stop by to see what everyone has made at Colour and Sketches and to play along with them .. Here is their sketch.

I’ve made a very clean and simple card today for the 2 challenges.  I don’t usually do simple, but every once in a while I like to add one in.  Take a look.
I started by cutting 2 mats in Balmy Blue cardstock.  On the larger mat I adhered a piece of Subtles 6 X 6 Designer Series Paper in Balmy Blue using Snail.  I adhered the matted DSP to a Night of Navy card base using Multipurpose Liquid Glue.

On a panel of Whisper White cardstock I stamped the sentiment from the Stampin’ Up Colorful Seasons stamp set in Balmy Blue Ink.  I adhered the stamped panel to the smaller Balmy Blue mat using Snail.  I then adhered it to the Night of Navy card base,  using Stampin’ Dimensionals, over lapping the matted DSP panel.

I cut one of the snowflakes from the Seasonal Layers Thinlits Dies using my Big Shot out of a piece of Sparkle Glimmer Paper.  I adhered the snowflake to the over lapped matted panels using Stampin’ Dimensionals and Multipurpose Liquid Glue.

On the inside I stamped the larger snowflake from the Colorful Seasons stamp set in Balmy Blue Ink, stamping off once, across a Whisper White panel.  I stamped the sentiment from the same stamp set in Night of Navy Ink over the snowflakes.  I adhered the Whisper White panel to the inside of the Night of Navy card base using Multipurpose Liquid Glue.

To finish my card I decorated a Medium Whisper White Envelope.  I stamped the smaller snowflake from the Colorful Seasons stamp set across the bottom front of the envelope.  I adhered a piece of the Subtles 6 X 6 DSP to the envelope flap.

Thank you for stopping by my blog today.  I hope you liked my quick and easy card and will give it a try.  Happy Stamping.

****************************************************************************************************

If you need any stamping supplies, I’d be very happy to be your Demonstrator.  Just click here to go directly to my online store or drop me an email if you have any questions.

MY CURRENT HOST CODE IS: Q2B3H6HZ 

Happy Stamping, Karen!

****************************************************************************************************

Card stock cuts for this project:

  • Balmy Blue Cardstock 3″ X 3″ (dsp mat), 2 5/8″ X 2 5/8″ (sentiment mat)
  • Night of Navy Cardstock 8 1/2″ X 5 1/2″ (card base scored and folded at 4 1/4″)
  • Sparkle Glimmer Paper (scrap for snowflake)
  • Whisper White Cardstock 4″ X 5 1/4″ (inner liner)
  • Subtles 6 X 6 Designer Series Paper 2 7/8″ X 2 7/8″ (card front artwork)

****************************************************************************************************

Product List

Stampin’ Up Accented Blooms for CAS(E) This Sketch and Global Designs

Good Wednesday morning my fellow stampers.  Hope you are all having a great week.

For today’s card I played along with 2 challenges.  The first one is CAS(E) This Sketch  #305.  Be sure to stop by CAS(E) This Sketch to see what everyone has made and to play along.  Here is their sketch

The next one I played along with is Global Design Project Color Challenge #173.  Be sure to stop by Global Design Project to see all the beautiful projects and to play along. Here are their colors.

Here is what I came up with for the 2 challenges  Take a look

I started with a Petal Pink card front and using my Big Shot I embossed it with my Tufted Dynamic Textured Impressions Embossing Folder.  I then cut out the largest flourish from the Flourish Thinlits Dies in Soft Sea Foam cardstock 2 times.  I adhered the one flourish on top of the second to make it a little thicker.  I sponged the die cut with my Soft Sea Foam Ink then adhered it to the card front using Multipurpose Liquid Glue.  I added some Wink Of Stella to the flowers on the die cut.

On a small strip of Whisper White cardstock I stamped the sentiment from the Stampin’ Up Accented Blooms stamp set in So Saffron Ink.  I cut the strip into a banner using my Triple Banner Punch and sponged the edges with the So Saffron Ink.  I adhered the banner to the card front using Stampin’ Dimensionals.

I added a few So Saffron Share What You Love Artisan Pearls to the card front and the banner.  I adhered the card front to a Petal Pink card base using Multipurpose Liquid Glue.

On the inside I stamped the sentiment from the Stampin’ Up Love What You Do stamp set in Soft Sea Foam Ink in the center of a Whisper White panel.  I stamped the bottom with one of the floral images from the same stamp set in Soft Sea Foam Ink and colored the little flowers in using my Petal Pink Stampin’ Write Marker.  I adhered the Whisper White panel to the Petal Pink card base using Multipurpose Liquid Glue.

I finished my card off by decorating a Medium Whisper White Envelope.  I stamped one of the floral images from the Love What You Do stamp set in Soft Sea Foam Ink on the envelope front and flap.  I colored the flowers in using my Petal Pink Stampin’ Write Marker.

Thank you for stopping by my blog today.  I hope you liked my card and will give it a try. Happy Stamping.

****************************************************************************************************

If you need any stamping supplies, I’d be very happy to be your Demonstrator.  Just click here to go directly to my online store or drop me an email if you have any questions.

MY CURRENT HOST CODE IS: Q2B3H6HZ 

Happy Stamping, Karen!

****************************************************************************************************

Card stock cuts for this project:

  • Petal Pink Cardstock 4 1/4″ X 11″ (card base scored and folded at 5 1/2″),           4″ X 5 1/4″ (card front)
  • Soft Sea Foam Cardstock (piece for flourish)
  • Whisper White Cardstock 4″ X 5 1/4″ (inner liner), 7/8″ X 4″ (banner)

****************************************************************************************************

Product List

Stampin’ Up Seasoned With Kindness for CAS(E) This Sketch #303 and Fab Friday # 154

Good Wednesday morning my fellow stampers.  How is your week going?

For today’s card I used a Host Exclusive Stamp Set called Seasoned With Kindness.  I played along with 2 different challenges today.  Fab Friday color challenge # 154 and CAS(E) This Sketch challenge #303.  Please be sure to stop by the Fab Friday blog to see all the beautiful projects made and to play along.  Also, be sure to stop by the CAS(E) This Sketch challenge to see what everyone has made and to play along with them too.

Here is the Fab Friday Color Challenge # 154.  I have to admit, this was a real challenge for me.  These colors were a little difficult for me.

Here is the CAS(E) This Sketch Challenge # 303.

Here is what I came up with for the 2 challenges.  Take a look.

I started with a Highland Heather card front and adhered a panel of Tranquil Textures Designer Series Paper to it using Snail.  I adhered the card front to a Tranquil Tide card base using Multipurpose Liquid Glue.

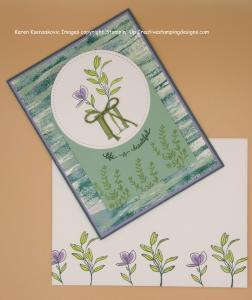
On a piece of Whisper White cardstock I stamped 2 of the plant images from the Stampin’ Up Seasoned With Kindness Host Exclusive stamp set.  I first stamped the outlines in Tranquil Tide Ink.  I then stamped the inside of the leaves in Lemon Lime Twist Ink and the inside of the flower in Highland Heather Ink.  I stamped the inside of the flower-pot in Pear Pizzazz Ink.  I did all the stamping using my Stamparatus.  It made lining everything up very easy. Using my Big Shot I cut the artwork out using the circle from the Stitched Shapes Framelits Dies.

I adhered the circle to a small piece of Mint Macaron cardstock using Snail.  I stamped the sentiment from the Stampin’ Up Easter Beauty stamp set in Tranquil Tide Ink around the bottom of the circle.  I stamped another plant image from the Seasoned With Kindness stamp set in Pear Pizzazz Ink along the bottom of the Mint Macaron panel.  I adhered the artwork to the card front using Stampin’ Dimensionals.  I then took a piece of Whisper White Bakers Twine and colored it using my Pear Pizzazz Ink.  I tied a small bow and attached it to the flower pot using a Glue Dot.

On the inside I stamped the plant images from the Seasoned With Kindness stamp set along the bottom of a Whisper White panel the same way I stamped them on the card front.  I stamped the sentiment from the same stamp set in Tranquil Tide Ink in the center of the panel and adhered it to a Highland Heather mat using Snail.  I then adhered it to the Tranquil Tide card base using Multipurpose Liquid Glue.

To finish my card I decorated a Medium Whisper White Envelope.  I stamped the plant images from the Seasoned With Kindness stamp set on the bottom front of the envelope.  I adhered a piece of Tranquil Textures DSP to the envelope flap.

Thank you for stopping by my blog today.  I hope you liked my card and will give it a try.  To get this host exclusive stamp set you either must have a qualifying party  to earn this set or if you purchase $150 in product you can earn it.  Happy stamping!

****************************************************************************************************

If you need any stamping supplies, I’d be very happy to be your Demonstrator.  Just click here to go directly to my online store or drop me an email if you have any questions.

MY CURRENT HOST CODE IS: Q2B3H6HZ 

Happy Stamping, Karen!

****************************************************************************************************

Paper Pumpkin and Animal Expedition Go Wild for Valentine’s Day

January’s Paper Pumpkin Kit is a Valentine Kit called Be Mine. It combines everything you love about Paper Pumpkin-style treat packaging with adorable critter coordination in the popular Animal Expedition Kit!

About the Kit

January’s Paper Pumpkin kit is a Valentine kit coordinates with the Animal Expedition Suite. Here are a few more details:

  • Makes 24 adorable Valentine’s treat packages
  • Coordinating colors: Crumb Cake, Flirty Flamingo, Lemon Lime Twist, Melon Mambo, Petal Pink, and Pool Party

Subscribers must have an active subscription by January 10, 2019 to receive the Be Mine, Valentine kit.

Supplies are limited, so don’t wait—subscribe today!

In the event of supplies running out, Stampin’ Up! will end the subscription period early and stop taking new subscribers for January.

If you’re interested in subscribing to Paper Pumpkin yourself, you can either sign up for a subscription where you are billed monthly for your kit or you can purchase a prepaid subscription in my online store.  Just click here to go directly to my online store.  To see more information and sign up for the monthly subscription click here.

****************************************************************************************************

Card stock cuts for this project:

  • Highland Heather Cardstock 2 – 4 1/8″ X 5 3/8″ (card front and inner liner mats)
  • Mint Macaron Cardstock 3 1/4″ X 3″ (card front panel)
  • Tranquil Tide Cardstock 4 1/4″ X 11″ (card base scored and folded at 5 1/2″)
  • Whisper White Cardstock 4″ X 5 1/4″ (inner liner), 3 1/2″ X 3 1/2″ (artwork)
  • Tranquil Textures Designer Series Paper 4″ X 5 1/4″ (card front), piece for envelope flap

****************************************************************************************************

Product List