
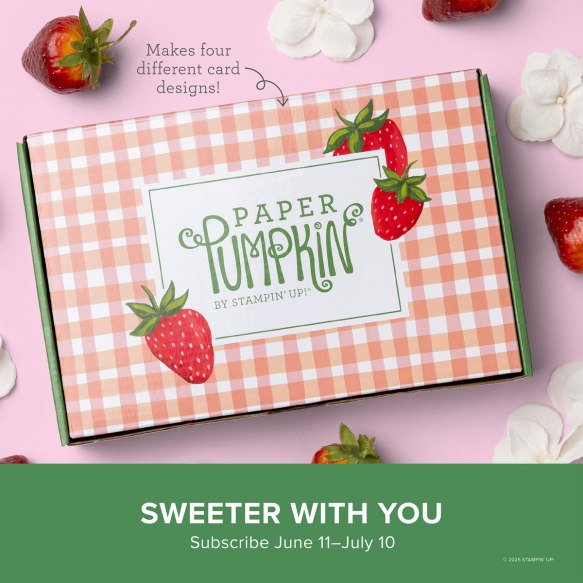
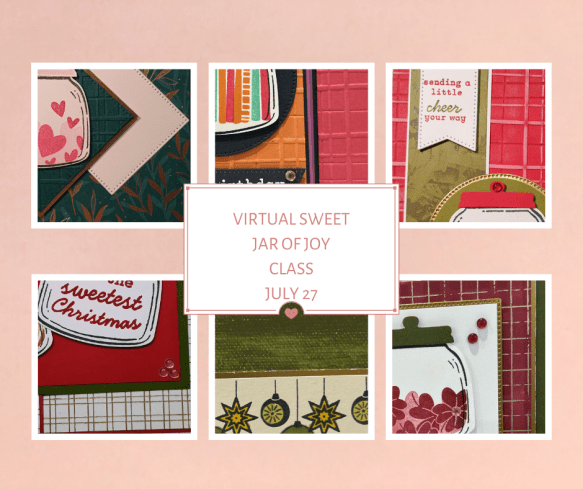
Good Saturday morning stamping friends, welcome to the weekend. What kind of plans do you have for the weekend? I’ll be working all day today and tomorrow Tara and I will be holding our Sweet Jar of Joy Online Zoom class. We’re super excited about this class and can’t wait to make the cards with everyone who signed up.
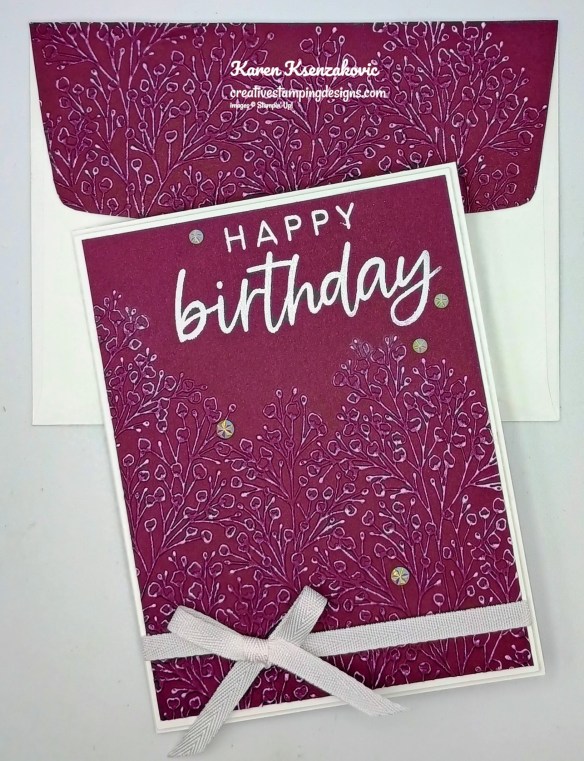
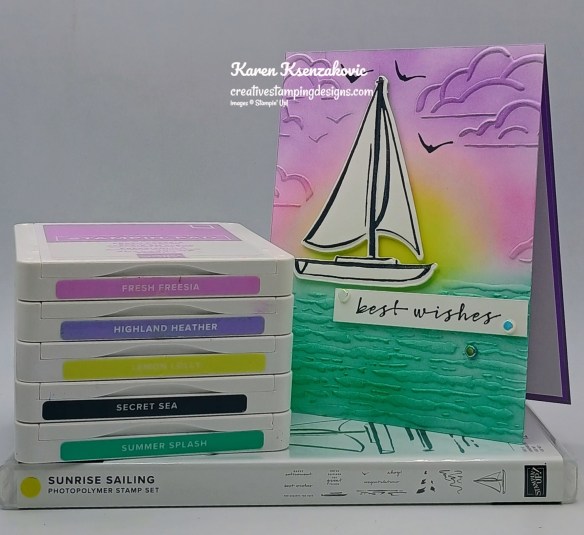
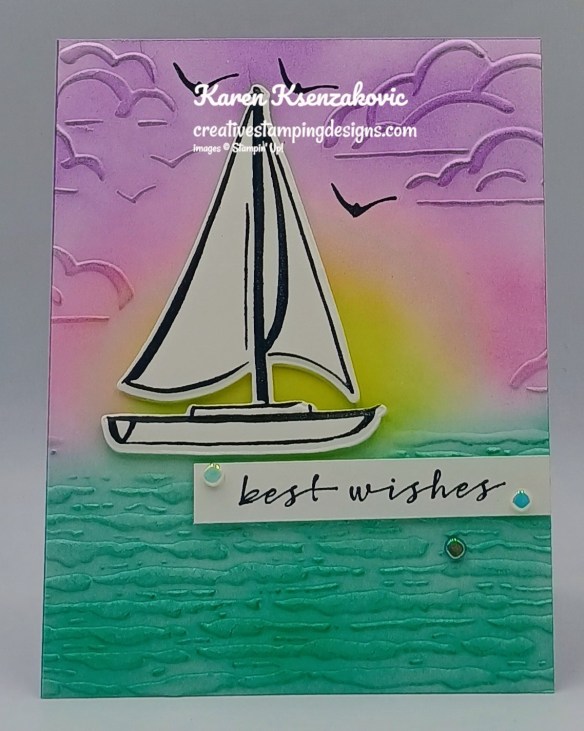
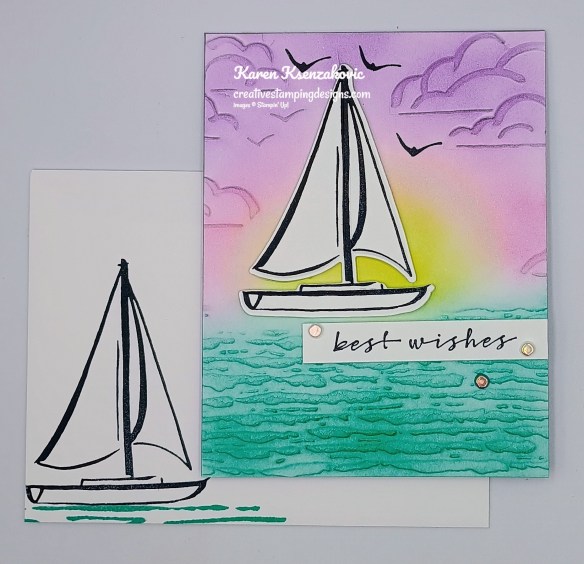
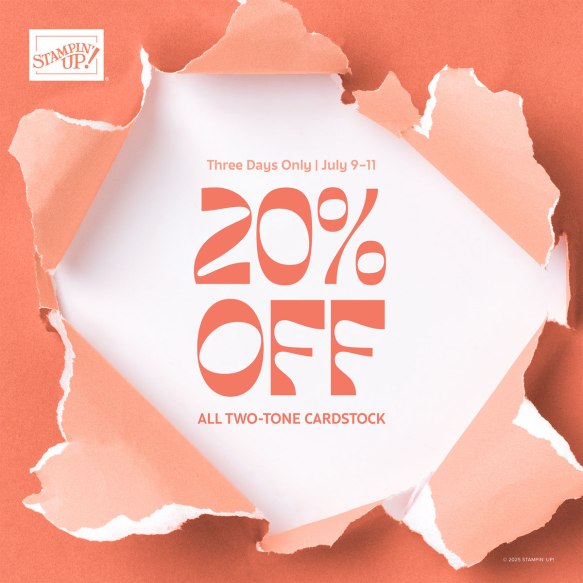
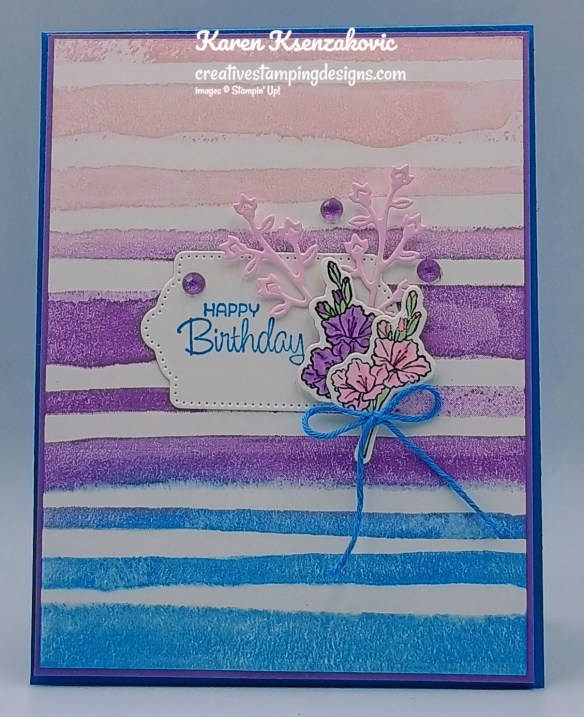
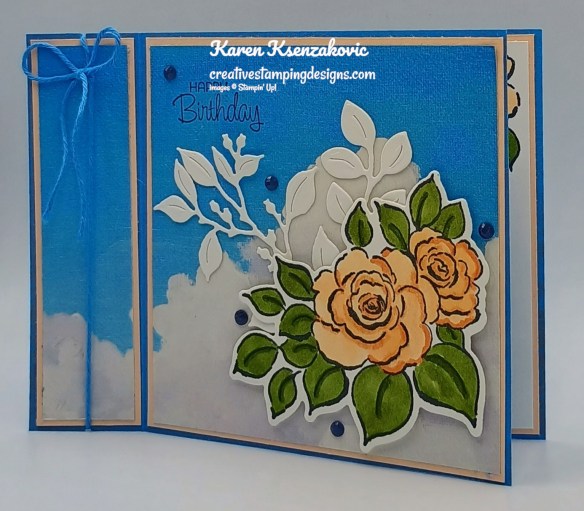
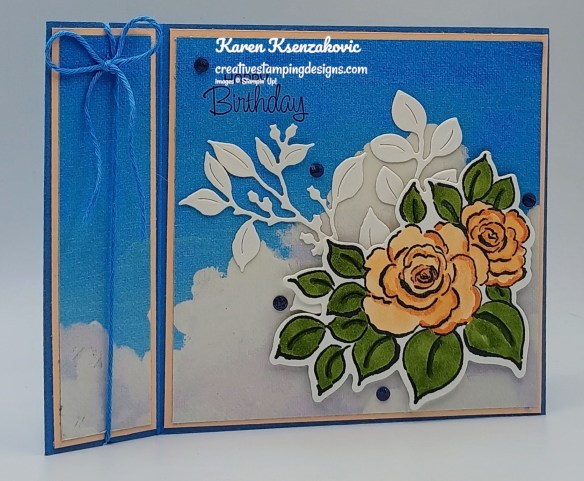
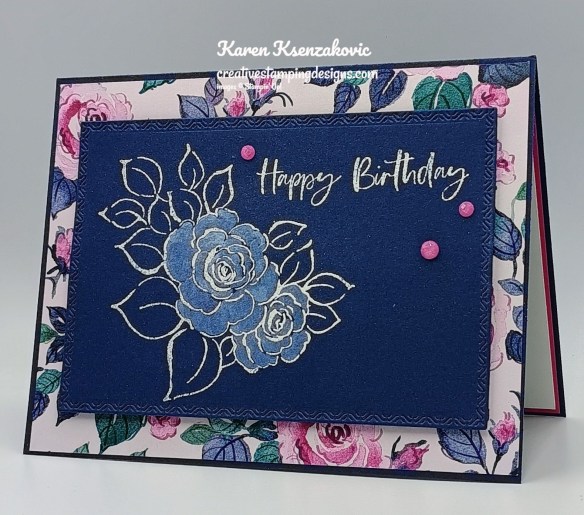
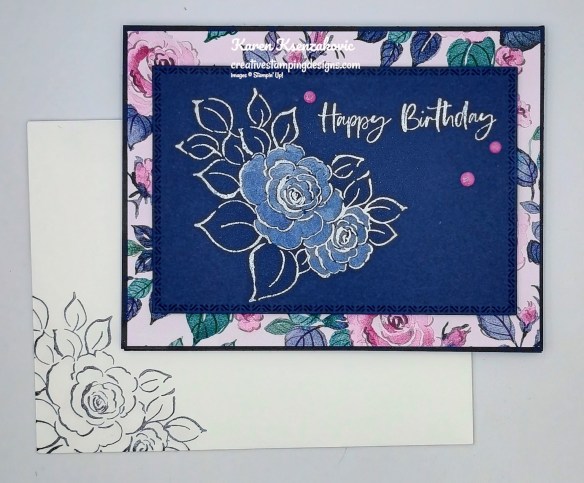
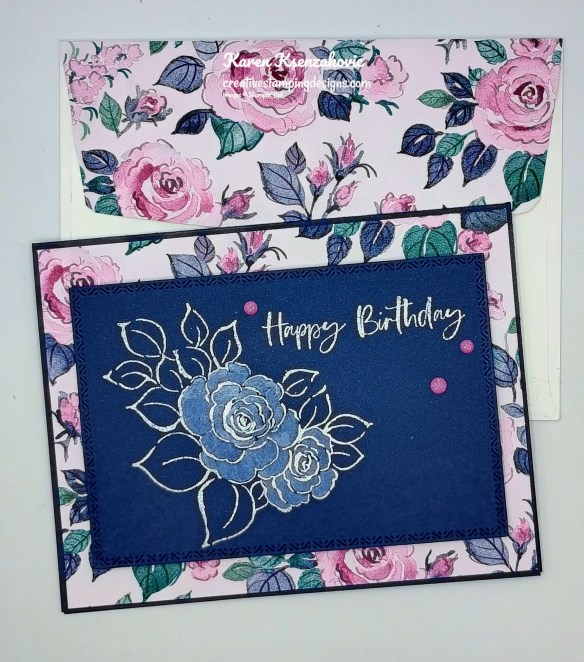
I played with some Two-Tone cardstock for today’s card. If you’d like to see a quick video of how I made this card, Click Here to go to my Instagram Reels. Here’s my card for today.

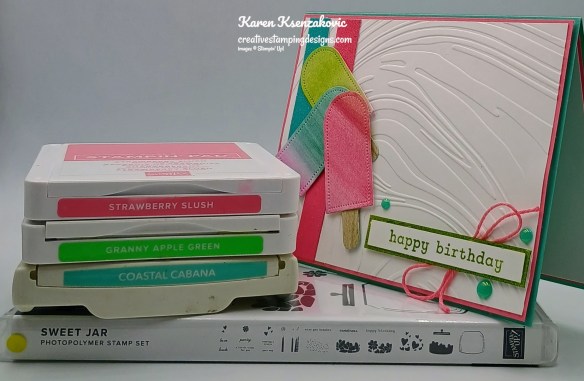
I used the Stampin’ Up! With You IN Mind Photopolymer Stamp Set along with the Stampin’ Up! Paper Tags Cling Stamp Set, Pressed Flowers Embossing Folder and Blackberry Bliss Two-Tone Cardstock for my card today.

Emboss a panel of Blackberry Bliss Tow-Tone cardstock using the Pressed Flowers EF. Stamp the sentiment from With You in Mind stamp set in Versamark Ink on the top of the panel. Sprinkle the sentiment with White Embossing Powder and set it with the Heat Tool.

With a very fine piece of sandpaper or a craft sanding block, lightly go over the embossed portion of the card front to bring out the core white. Adhere the embossed panel to a Basic White mat.

Wrap a piece of White 1/4″ Starter Ribbon around the layered panel and tie a bow. Adhere the layered panel to a Basic White Thick card base with Stampin’ Dimensionals. Add a few Iridescent Faceted Gems to the card front.

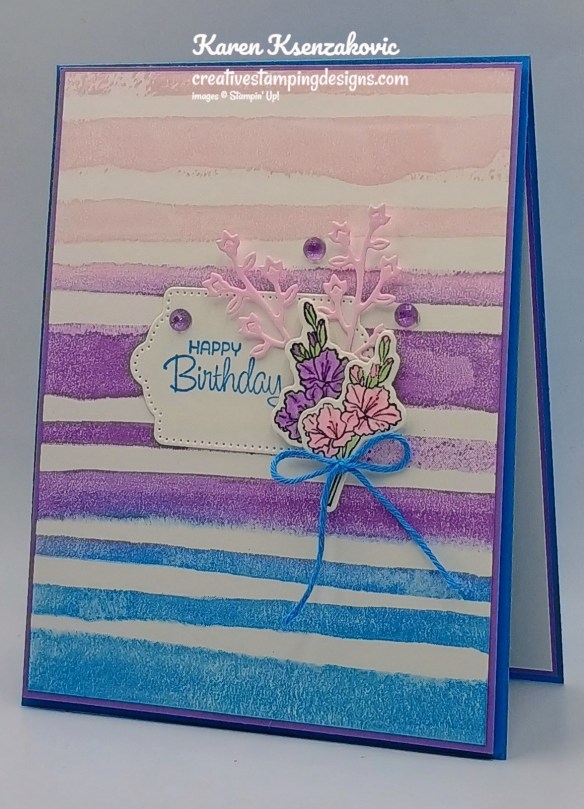
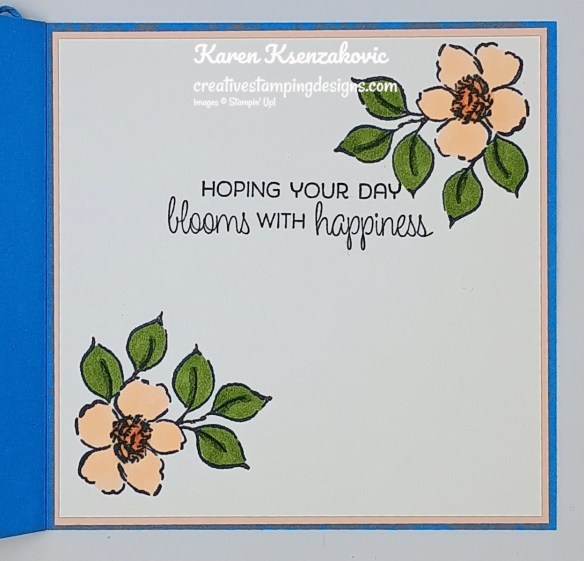
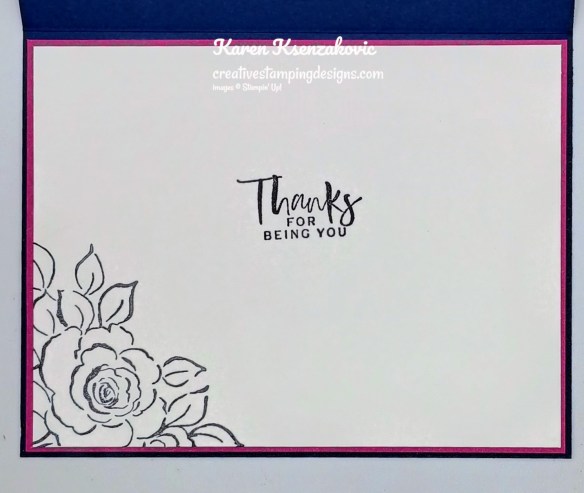
Stamp the sentiment from the Paper Tags stamp set in Blackberry Bliss Ink on a panel of Basic White. Adhere the panel of Blackberry Bliss Two-Tone Cardstock to the bottom of the panel. Adhere the Basic White panel to a Blackberry Bliss mat then to the inside of the Basic White Thick card base.
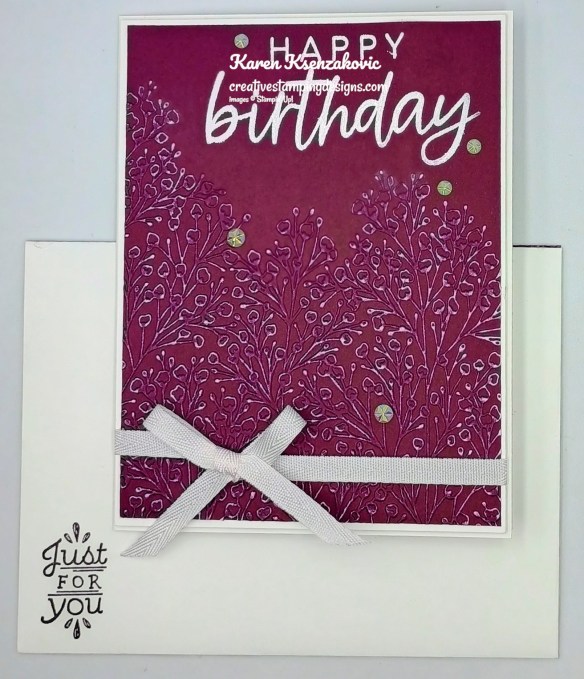
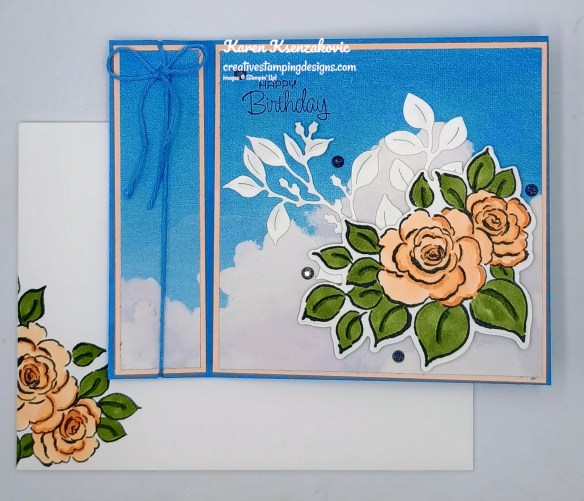
Finish your card by decorating a Basic White Medium Envelope. Stamp the sentiment from Paper Tags stamp set in Blackberry Bliss Ink on the envelope front. Emboss a panel of the Blackberry Bliss Tow-Tone cardstock using the Pressed Flowers EF. Use the sanding block to lighten the image and adhere it to the envelope flap.
Thank you for stopping by my blog today. I hope you like the card and will give it a try. Happy Stamping!!
*********************************************************************************************************
If you need any stamping supplies, I’d love to be your Demonstrator. Just click HERE to go directly to my online store or drop me an email if you have any questions.
*********************************************************************************************************
Registration Open for our August Online Technique Class
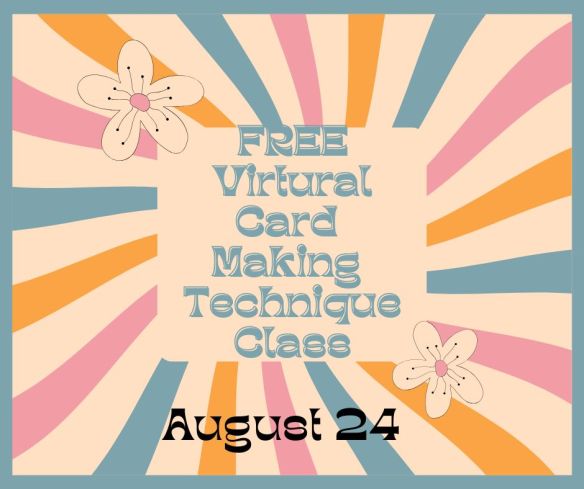
Tara Carpenter, Nicole Bloxom and I are teaming up to offer a fun Technique Online Zoom Class. We will be creating 6 different cards using 6 different techniques. This class is free with a $50 purchase from my Online Store. We will supply a list of supplies we are going to be using in the next couple days. We decided to open registration early so you can take advantage of the Free Shipping and my Double Rewards and also earn a free class.
The class requirements and What You Will Receive:
- Visit my Online Store and place a $50 or more order before tax and shipping.
- Once you have made the purchase, fill out this form and submit Click Here for Google Form
- Zoom class with complete step by step instructions to complete each card as we go.
- PDF with detailed directions and photos
- A Link to the recorded class after we are done so you can watch it again and make more cards.
A week before the class I will send you the complete PDF of the cards so you can cut all your cardstock and gather your supplies, so you are ready to go. We will NOT be cutting cardstock live. Everyone’s cards will be unique since you will pick which color cardstock and ink you want to use for each card.
The class will be held on Sunday August 24th from 1pm – 5pm Eastern Time via Zoom. This will allow everyone all over the United States to participate live!
I will email you the Zoom link to the class a few days before the event.
Deadline to sign up is Sunday August 17th at 5pm ET
*********************************************************************************************************
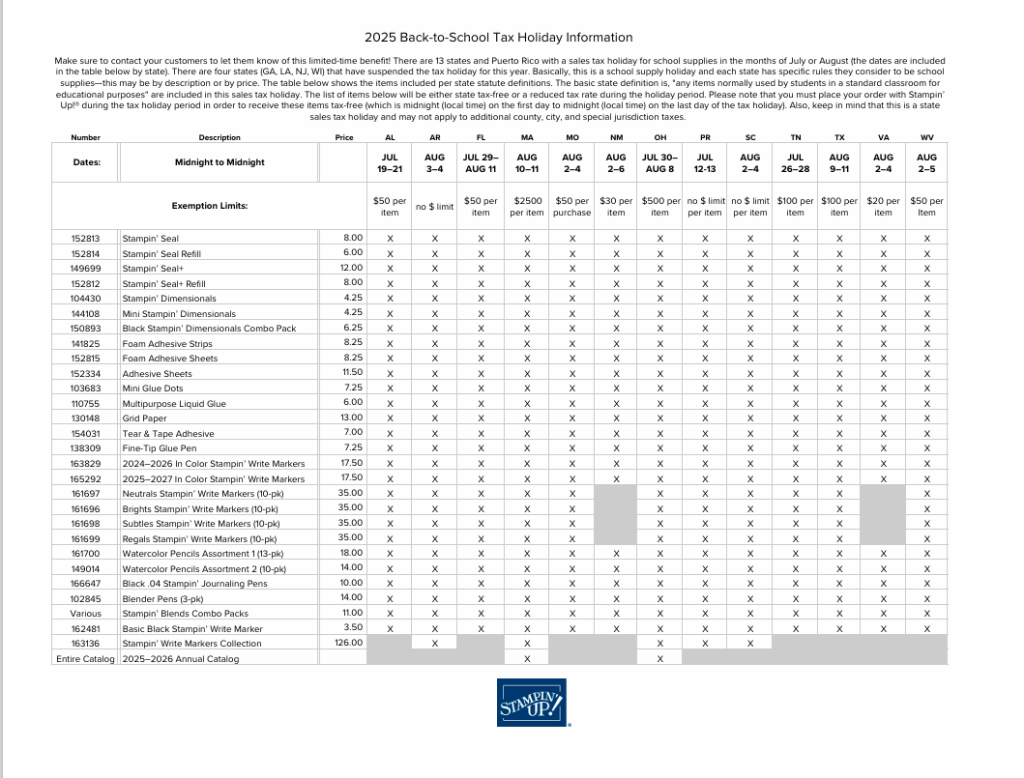
Sales Tax Holiday

Twelve states and Puerto Rico are having Back-to-School Sales Tax Holidays this year and some Stampin’ Up! items qualify for the tax break in those states!
The states with upcoming tax holidays are: Alabama, Arkansas, Florida, Massachusetts, Missouri, New Mexico, Ohio, South Carolina, Tennessee, Texas, Virginia and West Virginia. So if you live in one of those states or Puerto Rico, take a second to download the spreadsheet below and mark your calendar!
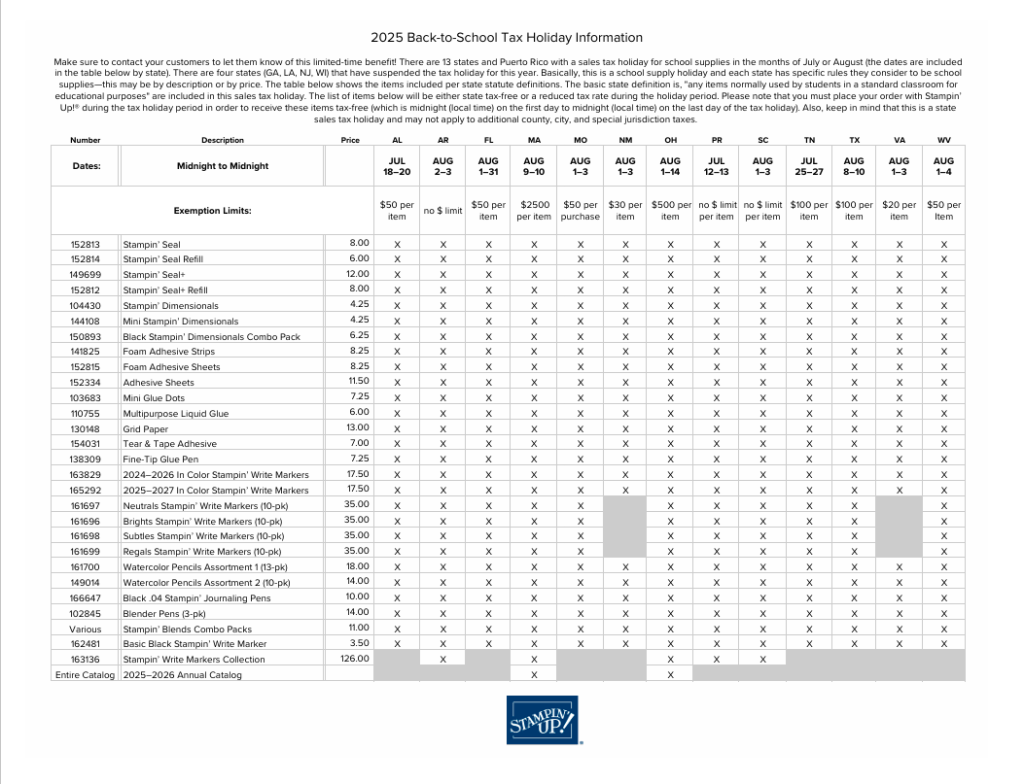
Please note that you must place your order with Stampin’ Up! during the tax holiday period in your state in order to receive these items tax-free (which is midnight on the first day to midnight on the last day of the tax holiday). Also, keep in mind that this is a state sales tax holiday; the state statute may not apply to county, city, and special jurisdiction taxes.
For those wondering about Georgia, Illinois, Louisiana, New Jersey, and Wisconsin, those states have suspended the sales tax holiday this year.
*********************************************************************************************************
Card stock cuts for this project:
- Basic White Cardstock 4 1/8″ x 5 3/8″(card front mat), 4″ x 5 1/4″(inner liner)
- Basic White Thick Cardstock 5 1/2″ x 8 1/2″(card base scored & folded at 4 1/4″)
- Blackberry Bliss Cardstock 4 1/8″ x 5 3/8″(inner liner mat)
- Blackberry Bliss Two-Tone Cardstock 4″ x 5 1/4″(card front), 3/4″ x 4″(inner liner), 2 1/4′ x 6″(envelope flap)
*********************************************************************************************************
Product List
![With You In Mind Photopolymer Stamp Set (English) [ 164747 ]](https://assets1.tamsnetwork.com/images/EC042017NF/164747s.jpg "With You In Mind Photopolymer Stamp Set (English) [ 164747 ]")
![Paper Tags Cling Stamp Set (English) [ 165454 ]](https://assets1.tamsnetwork.com/images/EC042017NF/165454s.jpg "Paper Tags Cling Stamp Set (English) [ 165454 ]")
![Basic White 8 1/2" X 11" Cardstock [ 166780 ]](https://assets1.tamsnetwork.com/images/EC042017NF/166780s.jpg "Basic White 8 1/2\" X 11\" Cardstock [ 166780 ]")
![Basic White 8 1/2" X 11" Thick Cardstock [ 159229 ]](https://assets1.tamsnetwork.com/images/EC042017NF/159229s.jpg "Basic White 8 1/2\" X 11\" Thick Cardstock [ 159229 ]")
![Blackberry Bliss 8-1/2" X 11" Cardstock [ 133675 ]](https://assets1.tamsnetwork.com/images/EC042017NF/133675s.jpg "Blackberry Bliss 8-1/2\" X 11\" Cardstock [ 133675 ]")
![Blackberry Bliss 12" X 12" (30.5 X 30.5 Cm) Two Tone Cardstock [ 166678 ]](https://assets1.tamsnetwork.com/images/EC042017NF/166678s.jpg "Blackberry Bliss 12\" X 12\" (30.5 X 30.5 Cm) Two Tone Cardstock [ 166678 ]")
![Blackberry Bliss Classic Stampin' Pad [ 147092 ]](https://assets1.tamsnetwork.com/images/EC042017NF/147092s.jpg "Blackberry Bliss Classic Stampin' Pad [ 147092 ]")
![Versamark Pad [ 102283 ]](https://assets1.tamsnetwork.com/images/EC042017NF/102283s.jpg "Versamark Pad [ 102283 ]")
![Basics Wow! Embossing Powder [ 165679 ]](https://assets1.tamsnetwork.com/images/EC042017NF/165679s.jpg "Basics Wow! Embossing Powder [ 165679 ]")
![Heat Tool (Us And Canada) [ 129053 ]](https://assets1.tamsnetwork.com/images/EC042017NF/129053s.jpg "Heat Tool (Us And Canada) [ 129053 ]")
![Pressed Flowers Embossing Folder [ 165614 ]](https://assets1.tamsnetwork.com/images/EC042017NF/165614s.jpg "Pressed Flowers Embossing Folder [ 165614 ]")
![Misty Moonlight & White 1/4" (6.4 Mm) Starter Ribbon Pack [ 165276 ]](https://assets1.tamsnetwork.com/images/EC042017NF/165276s.jpg "Misty Moonlight & White 1/4\" (6.4 Mm) Starter Ribbon Pack [ 165276 ]")
![Iridescent Faceted Gems [ 163368 ]](https://assets1.tamsnetwork.com/images/EC042017NF/163368s.jpg "Iridescent Faceted Gems [ 163368 ]")
![Basic White Medium Envelopes [ 159236 ]](https://assets1.tamsnetwork.com/images/EC042017NF/159236s.jpg "Basic White Medium Envelopes [ 159236 ]")


![Take Your Pick [ 144107 ]](https://assets1.tamsnetwork.com/images/EC042017NF/144107s.jpg "Take Your Pick [ 144107 ]")


![Sunrise Sailing Bundle (English) [ 165497 ]](https://assets1.tamsnetwork.com/images/EC042017NF/165497s.jpg "Sunrise Sailing Bundle (English) [ 165497 ]")
![Sunrise Sailing Photopolymer Stamp Set (English) [ 165491 ]](https://assets1.tamsnetwork.com/images/EC042017NF/165491s.jpg "Sunrise Sailing Photopolymer Stamp Set (English) [ 165491 ]")
![Sunrise Sailing Hybrid Embossing Folder [ 165496 ]](https://assets1.tamsnetwork.com/images/EC042017NF/165496s.jpg "Sunrise Sailing Hybrid Embossing Folder [ 165496 ]")
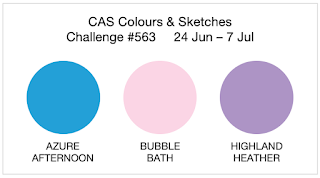
![Highland Heather 8-1/2" X 11" Cardstock [ 146986 ]](https://assets1.tamsnetwork.com/images/EC042017NF/146986s.jpg "Highland Heather 8-1/2\" X 11\" Cardstock [ 146986 ]")
![Fresh Freesia Classic Stampin' Pad [ 155611 ]](https://assets1.tamsnetwork.com/images/EC042017NF/155611s.jpg "Fresh Freesia Classic Stampin' Pad [ 155611 ]")
![Lemon Lolly Classic Stampin' Pad [ 161666 ]](https://assets1.tamsnetwork.com/images/EC042017NF/161666s.jpg "Lemon Lolly Classic Stampin' Pad [ 161666 ]")
![Highland Heather Classic Stampin' Pad [ 147103 ]](https://assets1.tamsnetwork.com/images/EC042017NF/147103s.jpg "Highland Heather Classic Stampin' Pad [ 147103 ]")
![Secret Sea Classic Stampin' Pad [ 165285 ]](https://assets1.tamsnetwork.com/images/EC042017NF/165285s.jpg "Secret Sea Classic Stampin' Pad [ 165285 ]")
![Summer Splash Classic Stampin Pad [ 163809 ]](https://assets1.tamsnetwork.com/images/EC042017NF/163809s.jpg "Summer Splash Classic Stampin Pad [ 163809 ]")
![Riverside Irregular Pearls [ 164937 ]](https://assets1.tamsnetwork.com/images/EC042017NF/164937s.jpg "Riverside Irregular Pearls [ 164937 ]")
![Small Blending Brushes [ 160518 ]](https://assets1.tamsnetwork.com/images/EC042017NF/160518s.jpg "Small Blending Brushes [ 160518 ]")


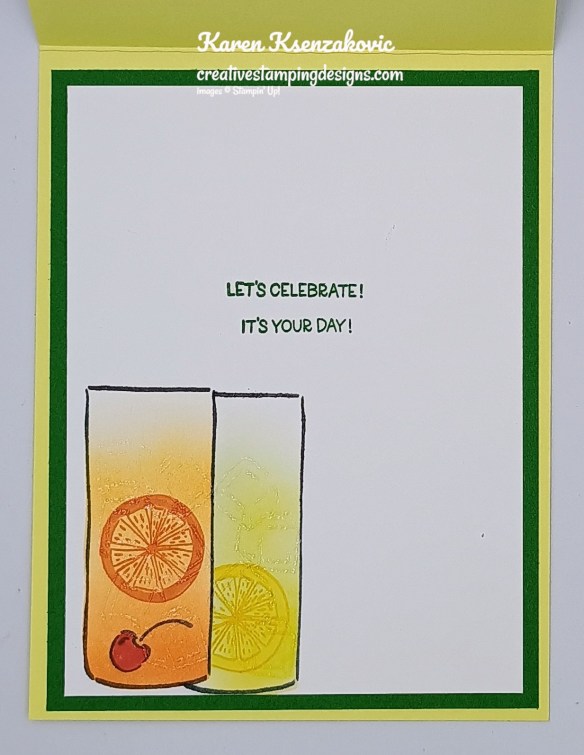
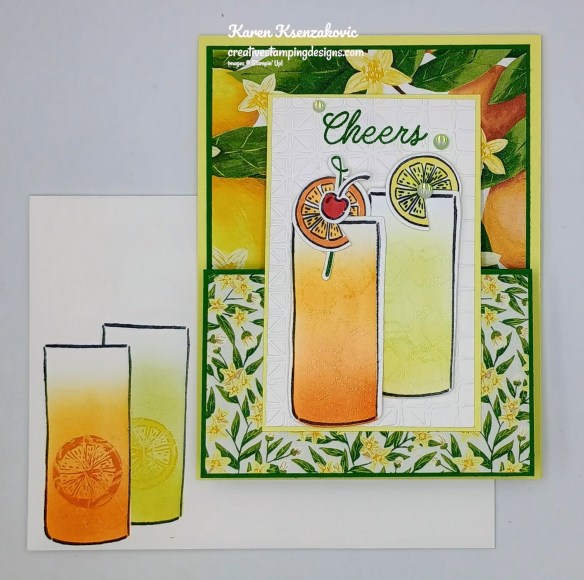


![Cheers & Sips Bundle (English) [ 165594 ]](https://assets1.tamsnetwork.com/images/EC042017NF/165594s.jpg "Cheers & Sips Bundle (English) [ 165594 ]")
![Cheers & Sips Photopolymer Stamp Set (English) [ 165588 ]](https://assets1.tamsnetwork.com/images/EC042017NF/165588s.jpg "Cheers & Sips Photopolymer Stamp Set (English) [ 165588 ]")
![Cheers & Sips Dies [ 165593 ]](https://assets1.tamsnetwork.com/images/EC042017NF/165593s.jpg "Cheers & Sips Dies [ 165593 ]")
![Garden Green 8-1/2" X 11" Cardstock [ 102584 ]](https://assets1.tamsnetwork.com/images/EC042017NF/102584s.jpg "Garden Green 8-1/2\" X 11\" Cardstock [ 102584 ]")
![Lemon Lolly 8 1/2" X 11" Cardstock [ 161720 ]](https://assets1.tamsnetwork.com/images/EC042017NF/161720s.jpg "Lemon Lolly 8 1/2\" X 11\" Cardstock [ 161720 ]")
![Mediterranean Blooms 12" X 12" (30.5 X 30.5 Cm) Designer Series Paper [ 163284 ]](https://assets1.tamsnetwork.com/images/EC042017NF/163284s.jpg "Mediterranean Blooms 12\" X 12\" (30.5 X 30.5 Cm) Designer Series Paper [ 163284 ]")
![Garden Green Classic Stampin' Pad [ 147089 ]](https://assets1.tamsnetwork.com/images/EC042017NF/147089s.jpg "Garden Green Classic Stampin' Pad [ 147089 ]")
![Pumpkin Pie Classic Stampin' Pad [ 147086 ]](https://assets1.tamsnetwork.com/images/EC042017NF/147086s.jpg "Pumpkin Pie Classic Stampin' Pad [ 147086 ]")
![Peach Pie Classic Stampin Pad [ 163810 ]](https://assets1.tamsnetwork.com/images/EC042017NF/163810s.jpg "Peach Pie Classic Stampin Pad [ 163810 ]")
![Blending Brushes [ 153611 ]](https://assets1.tamsnetwork.com/images/EC042017NF/153611s.jpg "Blending Brushes [ 153611 ]")
![Tuxedo Black Memento Ink Pad [ 132708 ]](https://assets1.tamsnetwork.com/images/EC042017NF/132708s.jpg "Tuxedo Black Memento Ink Pad [ 132708 ]")
![Daffodil Delight Stampin' Blends Combo Pack [ 154883 ]](https://assets1.tamsnetwork.com/images/EC042017NF/154883s.jpg "Daffodil Delight Stampin' Blends Combo Pack [ 154883 ]")
![Lemon Lolly Stampin’ Blends Combo Pack [ 161673 ]](https://assets1.tamsnetwork.com/images/EC042017NF/161673s.jpg "Lemon Lolly Stampin’ Blends Combo Pack [ 161673 ]")
![Peach Pie Stampin’ Blends Combo Pack [ 163827 ]](https://assets1.tamsnetwork.com/images/EC042017NF/163827s.jpg "Peach Pie Stampin’ Blends Combo Pack [ 163827 ]")
![Poppy Parade Stampin' Blends Combo Pack [ 154958 ]](https://assets1.tamsnetwork.com/images/EC042017NF/154958s.jpg "Poppy Parade Stampin' Blends Combo Pack [ 154958 ]")
![Pumpkin Pie Stampin' Blends Combo Pack [ 154897 ]](https://assets1.tamsnetwork.com/images/EC042017NF/154897s.jpg "Pumpkin Pie Stampin' Blends Combo Pack [ 154897 ]")
![Glass & Gardens Embossing Folders [ 165597 ]](https://assets1.tamsnetwork.com/images/EC042017NF/165597s.jpg "Glass & Gardens Embossing Folders [ 165597 ]")
![Holographic Resin Dots [ 165598 ]](https://assets1.tamsnetwork.com/images/EC042017NF/165598s.jpg "Holographic Resin Dots [ 165598 ]")


![Sweet Jar Photopolymer Stamp Set (English) [ 165501 ]](https://assets1.tamsnetwork.com/images/EC042017NF/165501s.jpg "Sweet Jar Photopolymer Stamp Set (English) [ 165501 ]")
![Coastal Cabana 8-1/2" X 11" Cardstock [ 131297 ]](https://assets1.tamsnetwork.com/images/EC042017NF/131297s.jpg "Coastal Cabana 8-1/2\" X 11\" Cardstock [ 131297 ]")
![Strawberry Slush 8 1/2" X 11" Cardstock [ 165625 ]](https://assets1.tamsnetwork.com/images/EC042017NF/165625s.jpg "Strawberry Slush 8 1/2\" X 11\" Cardstock [ 165625 ]")
![Country Woods 12" X 12" (30.5 X 30.5 Cm) Designer Series Paper [ 163393 ]](https://assets1.tamsnetwork.com/images/EC042017NF/163393s.jpg "Country Woods 12\" X 12\" (30.5 X 30.5 Cm) Designer Series Paper [ 163393 ]")
![Full Of Life 6" X 6" (15.2 X 15.2 Cm) Designer Series Paper [ 163357 ]](https://assets1.tamsnetwork.com/images/EC042017NF/163357s.jpg "Full Of Life 6\" X 6\" (15.2 X 15.2 Cm) Designer Series Paper [ 163357 ]")
![Pastel Ombre Glimmer 12" X 12" (30.5 X 30.5 Cm) Specialty Paper [ 164851 ]](https://assets1.tamsnetwork.com/images/EC042017NF/164851s.jpg "Pastel Ombre Glimmer 12\" X 12\" (30.5 X 30.5 Cm) Specialty Paper [ 164851 ]")
![Coastal Cabana Classic Stampin' Pad [ 147097 ]](https://assets1.tamsnetwork.com/images/EC042017NF/147097s.jpg "Coastal Cabana Classic Stampin' Pad [ 147097 ]")
![Granny Apple Green Stampin' Pad [ 147095 ]](https://assets1.tamsnetwork.com/images/EC042017NF/147095s.jpg "Granny Apple Green Stampin' Pad [ 147095 ]")
![Strawberry Slush Classic Stampin' Pad [ 165286 ]](https://assets1.tamsnetwork.com/images/EC042017NF/165286s.jpg "Strawberry Slush Classic Stampin' Pad [ 165286 ]")
![So Swirly Embossing Folder [ 163791 ]](https://assets1.tamsnetwork.com/images/EC042017NF/163791s.jpg "So Swirly Embossing Folder [ 163791 ]")
![Everyday Arches Dies [ 164629 ]](https://assets1.tamsnetwork.com/images/EC042017NF/164629s.jpg "Everyday Arches Dies [ 164629 ]")
![More Messages Die [ 165472 ]](https://assets1.tamsnetwork.com/images/EC042017NF/165472s.jpg "More Messages Die [ 165472 ]")
![2024 2026 In Color™ Flat Pearls [ 165266 ]](https://assets1.tamsnetwork.com/images/EC042017NF/165266s.jpg "2024 2026 In Color™ Flat Pearls [ 165266 ]")
![Pack Your Bags Twine Three Pack [ 165582 ]](https://assets1.tamsnetwork.com/images/EC042017NF/165582s.jpg "Pack Your Bags Twine Three Pack [ 165582 ]")


![Year Of Flowers Bundle (English) [ 165375 ]](https://assets1.tamsnetwork.com/images/EC042017NF/165375s.jpg "Year Of Flowers Bundle (English) [ 165375 ]")
![Year Of Flowers Cling Stamp Set (English) [ 165367 ]](https://assets1.tamsnetwork.com/images/EC042017NF/165367s.jpg "Year Of Flowers Cling Stamp Set (English) [ 165367 ]")
![Year Of Flowers Dies [ 165374 ]](https://assets1.tamsnetwork.com/images/EC042017NF/165374s.jpg "Year Of Flowers Dies [ 165374 ]")
![Painted Stripes Cling Stamp Set [ 165437 ]](https://assets1.tamsnetwork.com/images/EC042017NF/165437s.jpg "Painted Stripes Cling Stamp Set [ 165437 ]")
![Azure Afternoon 8 1/2" X 11" Cardstock [ 161719 ]](https://assets1.tamsnetwork.com/images/EC042017NF/161719s.jpg "Azure Afternoon 8 1/2\" X 11\" Cardstock [ 161719 ]")
![Bubble Bath 8 1/2" X 11" Cardstock [ 161718 ]](https://assets1.tamsnetwork.com/images/EC042017NF/161718s.jpg "Bubble Bath 8 1/2\" X 11\" Cardstock [ 161718 ]")
![Azure Afternoon Classic Stampin' Pad [ 161663 ]](https://assets1.tamsnetwork.com/images/EC042017NF/161663s.jpg "Azure Afternoon Classic Stampin' Pad [ 161663 ]")
![Bubble Bath Classic Stampin' Pad [ 161664 ]](https://assets1.tamsnetwork.com/images/EC042017NF/161664s.jpg "Bubble Bath Classic Stampin' Pad [ 161664 ]")
![Bubble Bath Stampin’ Blends Combo Pack [ 161675 ]](https://assets1.tamsnetwork.com/images/EC042017NF/161675s.jpg "Bubble Bath Stampin’ Blends Combo Pack [ 161675 ]")
![Highland Heather Stampin' Blends Combo Pack [ 154887 ]](https://assets1.tamsnetwork.com/images/EC042017NF/154887s.jpg "Highland Heather Stampin' Blends Combo Pack [ 154887 ]")
![Soft Sea Foam Stampin' Blends Combo Pack [ 154902 ]](https://assets1.tamsnetwork.com/images/EC042017NF/154902s.jpg "Soft Sea Foam Stampin' Blends Combo Pack [ 154902 ]")
![Purple Fine Shimmer Gems [ 162611 ]](https://assets1.tamsnetwork.com/images/EC042017NF/162611s.jpg "Purple Fine Shimmer Gems [ 162611 ]")


![Petal Pink 8-1/2" X 11" Cardstock [ 146985 ]](https://assets1.tamsnetwork.com/images/EC042017NF/146985s.jpg "Petal Pink 8-1/2\" X 11\" Cardstock [ 146985 ]")
![Everyday Skies 6" X 6" (15.2 X 15.2 Cm) Designer Series Paper [ 164622 ]](https://assets1.tamsnetwork.com/images/EC042017NF/164622s.jpg "Everyday Skies 6\" X 6\" (15.2 X 15.2 Cm) Designer Series Paper [ 164622 ]")
![Night Of Navy Classic Stampin' Pad [ 147110 ]](https://assets1.tamsnetwork.com/images/EC042017NF/147110s.jpg "Night Of Navy Classic Stampin' Pad [ 147110 ]")
![Mossy Meadow Stampin' Blends Combo Pack [ 154890 ]](https://assets1.tamsnetwork.com/images/EC042017NF/154890s.jpg "Mossy Meadow Stampin' Blends Combo Pack [ 154890 ]")
![Petal Pink Stampin' Blends Combo Pack [ 154893 ]](https://assets1.tamsnetwork.com/images/EC042017NF/154893s.jpg "Petal Pink Stampin' Blends Combo Pack [ 154893 ]")
![Timid Tiger Stampin’ Blends Combo Pack [ 165291 ]](https://assets1.tamsnetwork.com/images/EC042017NF/165291s.jpg "Timid Tiger Stampin’ Blends Combo Pack [ 165291 ]")


![Coneflower Celebration Bundle (English) [ 165251 ]](https://assets1.tamsnetwork.com/images/EC042017NF/165251s.jpg "Coneflower Celebration Bundle (English) [ 165251 ]")
![Coneflower Celebrations Photopolymer Stamp Set (English) [ 165247 ]](https://assets1.tamsnetwork.com/images/EC042017NF/165247s.jpg "Coneflower Celebrations Photopolymer Stamp Set (English) [ 165247 ]")
![Coneflower Celebrations Dies [ 165250 ]](https://assets1.tamsnetwork.com/images/EC042017NF/165250s.jpg "Coneflower Celebrations Dies [ 165250 ]")
![Lost Lagoon 8-1/2" X 11" Cardstock [ 133679 ]](https://assets1.tamsnetwork.com/images/EC042017NF/133679s.jpg "Lost Lagoon 8-1/2\" X 11\" Cardstock [ 133679 ]")
![Timid Tiger 8 1/2" X 11" Cardstock [ 165626 ]](https://assets1.tamsnetwork.com/images/EC042017NF/165626s.jpg "Timid Tiger 8 1/2\" X 11\" Cardstock [ 165626 ]")
![Bronze & Ivory Stampin' Blends Combo Pack [ 154922 ]](https://assets1.tamsnetwork.com/images/EC042017NF/154922s.jpg "Bronze & Ivory Stampin' Blends Combo Pack [ 154922 ]")
![Darling Duckling Stampin’ Blends Combo Pack [ 165288 ]](https://assets1.tamsnetwork.com/images/EC042017NF/165288s.jpg "Darling Duckling Stampin’ Blends Combo Pack [ 165288 ]")
![Old Olive Stampin' Blends Combo Pack [ 154892 ]](https://assets1.tamsnetwork.com/images/EC042017NF/154892s.jpg "Old Olive Stampin' Blends Combo Pack [ 154892 ]")
![Mini Corrugated 3 D Embossing Folder [ 165559 ]](https://assets1.tamsnetwork.com/images/EC042017NF/165559s.jpg "Mini Corrugated 3 D Embossing Folder [ 165559 ]")


![Berry Burst 8-1/2" X 11" Cardstock [ 144243 ]](https://assets1.tamsnetwork.com/images/EC042017NF/144243s.jpg "Berry Burst 8-1/2\" X 11\" Cardstock [ 144243 ]")
![Night Of Navy 8-1/2" X 11" Cardstock [ 100867 ]](https://assets1.tamsnetwork.com/images/EC042017NF/100867s.jpg "Night Of Navy 8-1/2\" X 11\" Cardstock [ 100867 ]")
![Uninked Stampin’ Craft Pad & Whisper White Refill [ 147277 ]](https://assets1.tamsnetwork.com/images/EC042017NF/147277s.jpg "Uninked Stampin’ Craft Pad & Whisper White Refill [ 147277 ]")
![Blender Pens [ 102845 ]](https://assets1.tamsnetwork.com/images/EC042017NF/102845s.jpg "Blender Pens [ 102845 ]")
![Textured Notes Dies [ 165555 ]](https://assets1.tamsnetwork.com/images/EC042017NF/165555s.jpg "Textured Notes Dies [ 165555 ]")


![Pecan Pie 8 1/2" X 11" Cardstock [ 161717 ]](https://assets1.tamsnetwork.com/images/EC042017NF/161717s.jpg "Pecan Pie 8 1/2\" X 11\" Cardstock [ 161717 ]")
![Pretty In Pink 8 1/2" X 11" Cardstock [ 163793 ]](https://assets1.tamsnetwork.com/images/EC042017NF/163793s.jpg "Pretty In Pink 8 1/2\" X 11\" Cardstock [ 163793 ]")
![Azure Afternoon Stampin’ Blends Combo Pack [ 161672 ]](https://assets1.tamsnetwork.com/images/EC042017NF/161672s.jpg "Azure Afternoon Stampin’ Blends Combo Pack [ 161672 ]")
![Granny Apple Green Stampin' Blends Combo Pack [ 154885 ]](https://assets1.tamsnetwork.com/images/EC042017NF/154885s.jpg "Granny Apple Green Stampin' Blends Combo Pack [ 154885 ]")
![Pecan Pie Stampin’ Blends Combo Pack [ 161674 ]](https://assets1.tamsnetwork.com/images/EC042017NF/161674s.jpg "Pecan Pie Stampin’ Blends Combo Pack [ 161674 ]")
![Pretty In Pink Stampin’ Blends Combo Pack [ 163824 ]](https://assets1.tamsnetwork.com/images/EC042017NF/163824s.jpg "Pretty In Pink Stampin’ Blends Combo Pack [ 163824 ]")
![Strawberry Slush & Pretty In Pink Gems [ 165615 ]](https://assets1.tamsnetwork.com/images/EC042017NF/165615s.jpg "Strawberry Slush & Pretty In Pink Gems [ 165615 ]")

