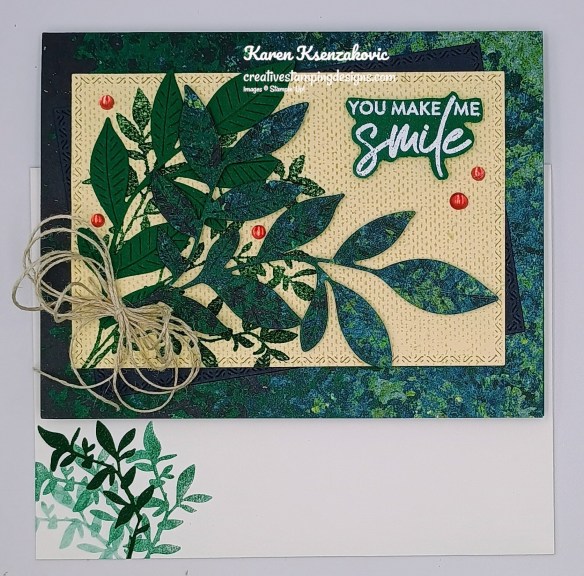
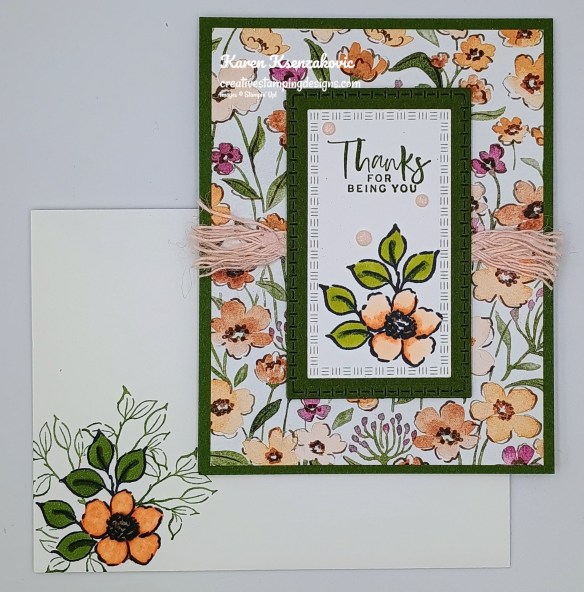
Good Thursday morning stamping friends and welcome to our Happy Inkin’ Thursday Blog Hop. If you are starting with me, thank you, I hope you will stop by everyone’s blog to see what they have created this week. If you are hopping over from Mary’s blog, thank you for stopping by. This week we have Sketch Challenge. If you’d like to see a quick video on how I made this card, Click Here to go to my Instagram Reels. Here is my card using this week’s sketch.
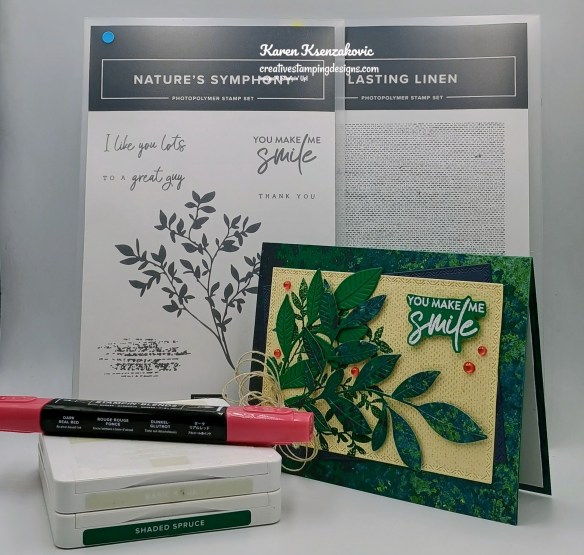
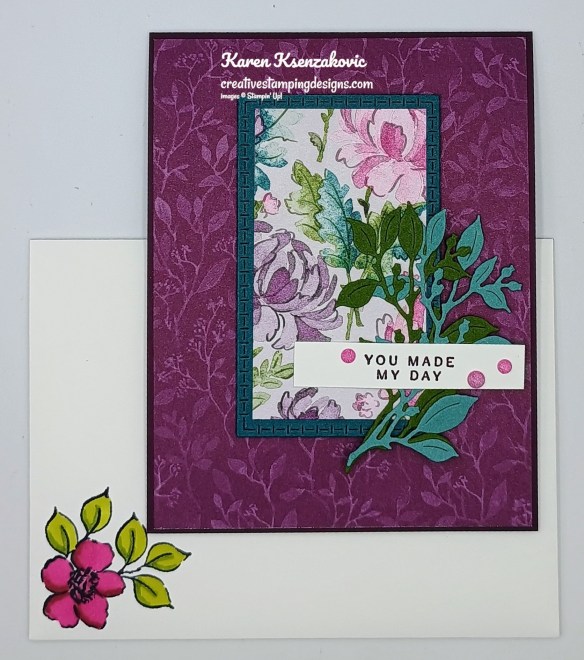
I used the Stampin’ Up! Nature’s Symphony Bundle along with the Stampin’ Up! Lasting Linen Stamp Set, Natures Walk Designer Series Paper, Natural Hues Textured Specialty Paper (all available January 6) and the Textured Notes Dies for my card today.
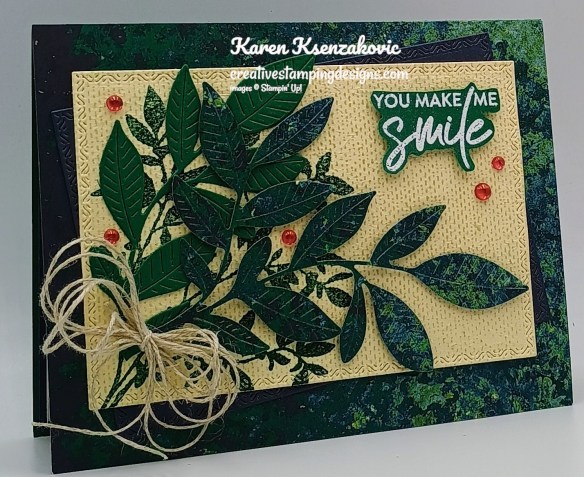
Using the Nature’s Symphony Dies cut the large leaf die from the center of the panel of Natures Walk DSP and the Shaded Spruce panel. Adhere the panel of Natures Walk DSP to the front of the Shaded Spruce card base. Stamp the panel of Natural Hues Textured paper with the Lasting Linen stamp set in Basic Beige Ink. Cut the panels of Secret Sea and stamped Natural Hues Textured paper using the Textured Notes Dies.
Adhere the die cut panel of Secret Sea to the card front on an angle. Stamp the large leaf image from the Nature’s Symphony stamp set in Shaded Spruce Ink on the stamped panel of Natural Hues Textured paper. Adhere the stamped panel to the card front. Snip the large Shaded Spruce die cut leaf to make 2. Adhere the die cut DSP leaf to the card front with Stampin’ Dimensionals. Adhere the Shaded Spruce leaf under the DSP leaf. Tie a multi loop bow with the Linen Thread and adhere it to the stems of the leaves.
On a panel of Shaded Spruce stamp the sentiment from Nature’s Symphony stamp set in Versamark Ink. Sprinkle the sentiment with White Embossing Powder and set it with the Heat Tool. Fussy cut the sentiment with snips. Adhere the sentiment to the card front with Stampin’ Dimensionals. Color a few of the Holographic Resin Dots using the Real Red Stampin’ Blends Marker and adhere them to the card front.
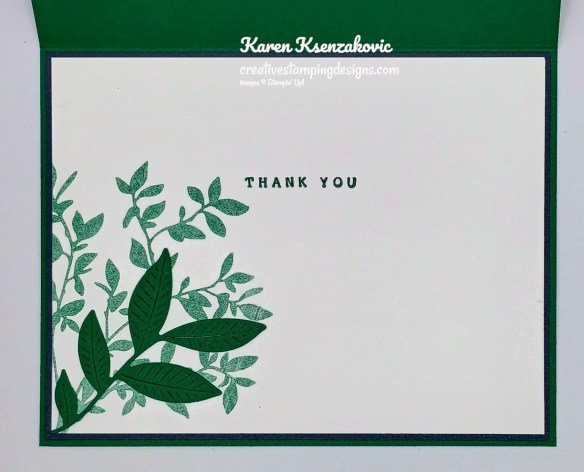
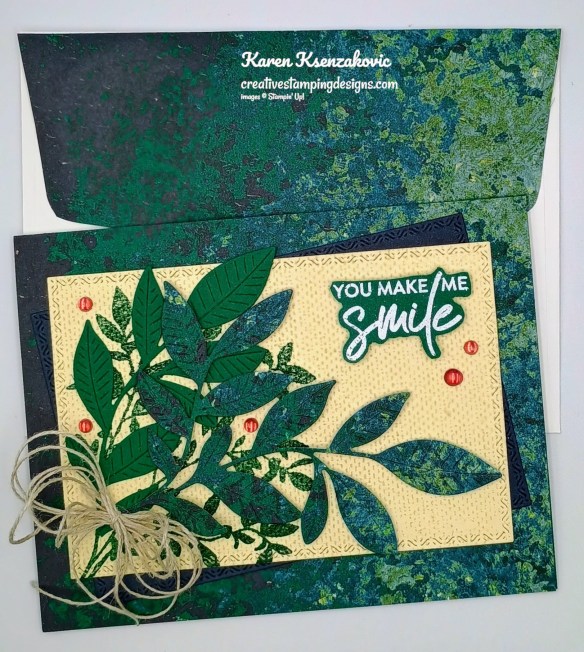
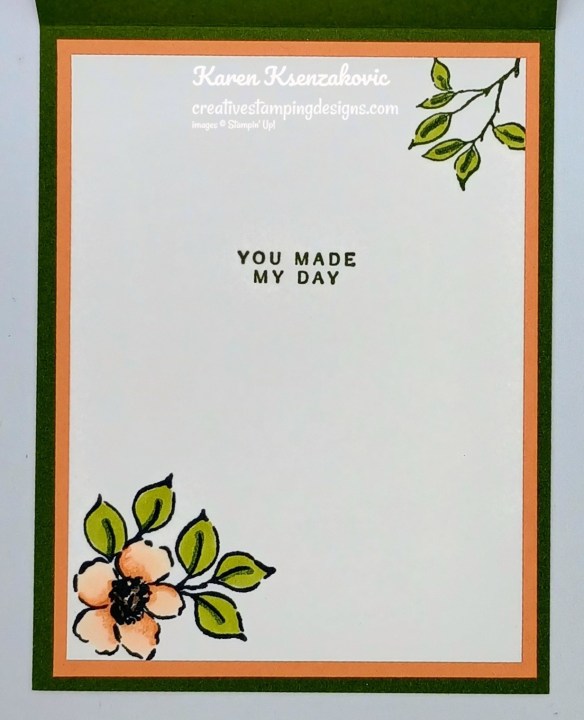
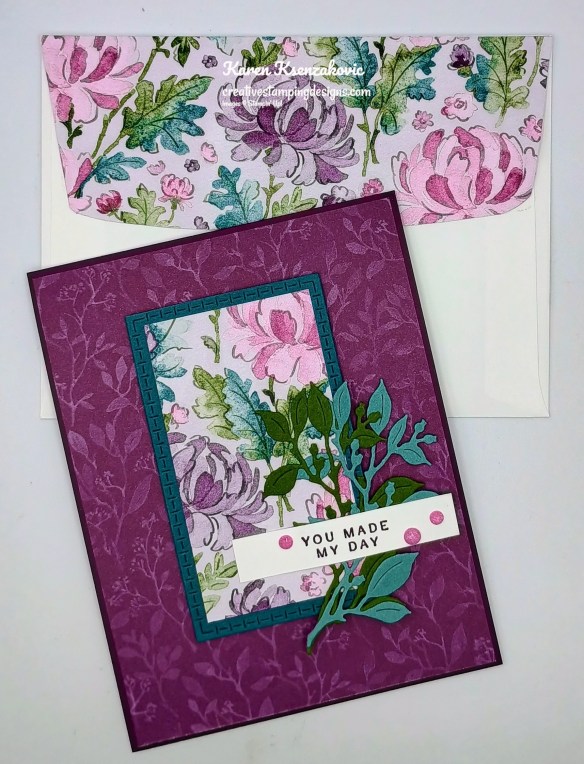
On a panel of Basic White, stamp the sentiment from the Nature’s Symphony stamp set in Shaded Spruce Ink. Stamp the larger leaf image from the Nature’s Symphony stamp set in Shaded Spruce Ink, stamping off once on scrap paper, on the bottom of the panel. Adhere the die cut leaf that you sniped off the larger die cut piece to the bottom of the panel. Adhere the Basic White panel to a Secret Sea mat then to the inside of the Shaded Spruce card base.
Decorate a Basic White Medium Envelope to complete your card. Stamp the small leafy image from the Nature’s Symphony stamp set in shaded Spruce Ink on the envelope front. Adhere a panel of Natures Walk DSP to the envelope flap.
Thank you for stopping by my blog today. Now that you’ve seen my card, let’s get on with the hop! Click the next button below to hop over to see what Tara has created. Happy Hopping!!
Just in case you get lost along the way, here is a list of the team members involved in the hop today.
If you need any stamping supplies, I’d love to be your Demonstrator. Just click HERE to go directly to my online store or drop me an email if you have any questions.
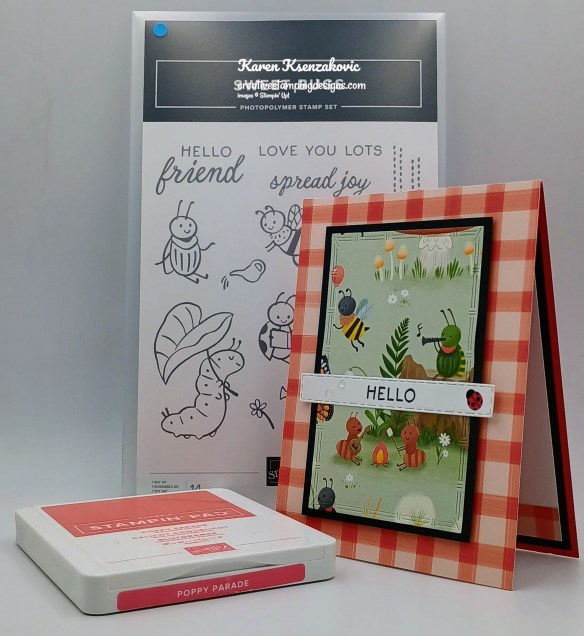
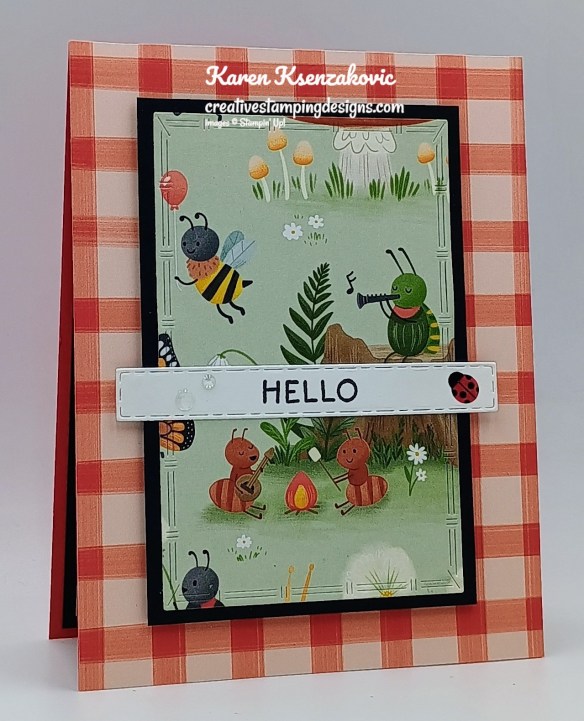
Good Thursday morning stamping friends and welcome to our Happy Inkin’ Thursday Blog Hop. If you are starting with me, thank you, I hope you will stop by everyone’s blog to see what they have created this week. If you are hopping over from Mary’s blog, thank you for stopping by. This week we have Sketch Challenge. If you’d like to see a quick video on how I made this card, Click Here to go to my Instagram Reels. Here is my card using this week’s sketch.
I used the new Stampin’ Up! Sweet Bungs Stamp Set and Cute As A Bug Designer Series Paper (both will be available Jan 6) along with the Textured Notes Dies for my card today.
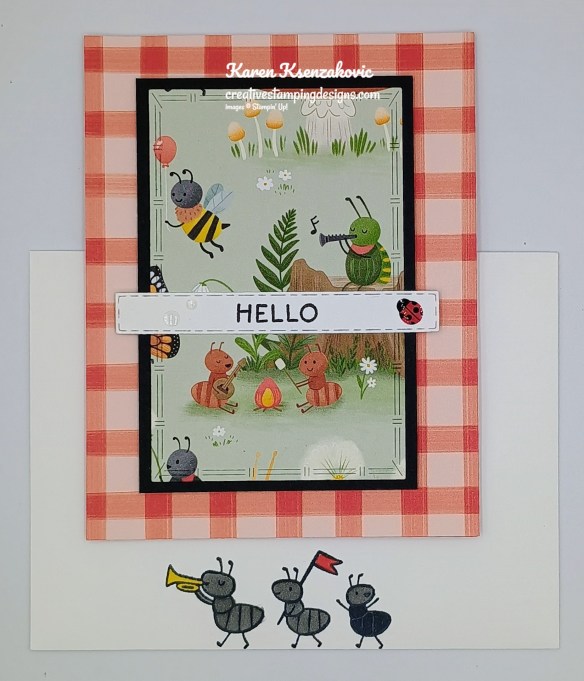
This is our sketch for this week.
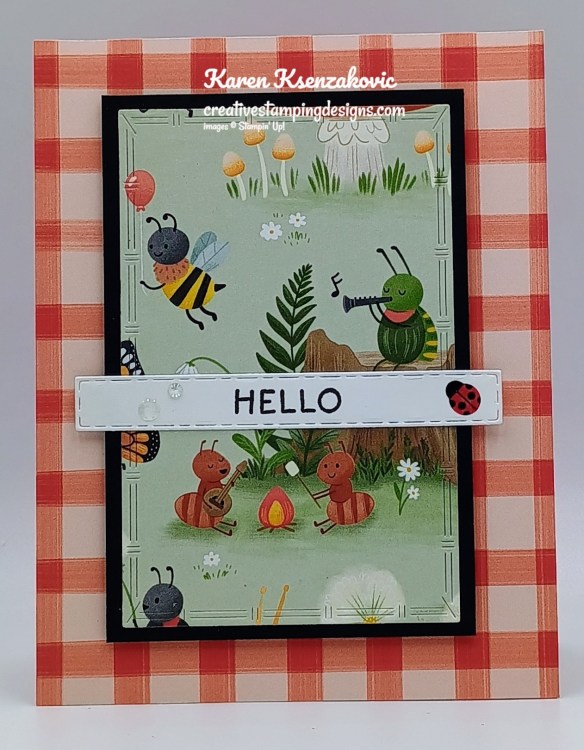
Adhere a panel of Cute As A Bug DSP to a Poppy Parade card base. Cut another panel of the Cute As A Bug DSP using the Textured Notes Dies.
Adhere the die cut panel of Cute As A Bug DSP to a Basic Black mat. Adhere the layered panel to the card front with Stampin’ Dimensionals.
On a panel of Basic White, stamp the sentiment from the Sweet Bugs stamp set in Tuxedo Black Ink. Cut the sentiment out using the Textured Notes Dies. Adhere the sentiment to the card front. Add a few Ladybug Garden Epoxy Shapes to the card front.
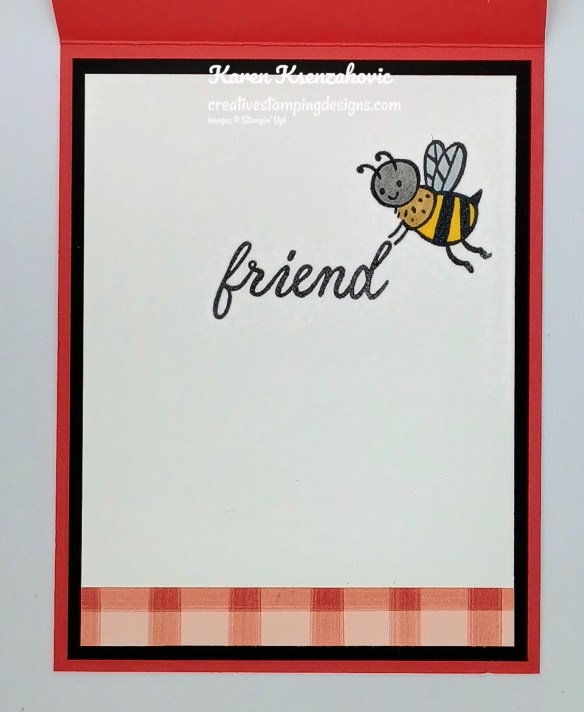
Stamp the sentiment from Sweet Bugs stamp set in Tuxedo Black Ink on a panel of Basic White. Stamp the bee image from the Sweet Bugs stamp set in Tuxedo Black Ink next to the sentiment. Color the image with Cloud Cover, Daffodil Delight, Pecan Pie and Smoky Slate Stampin’ Blends Markers. Adhere a panel of Cute As A Bug DSP to the bottom of the panel. Adhere the Basic White panel to a Basic Black mat then to the inside of the Poppy Parade card base.
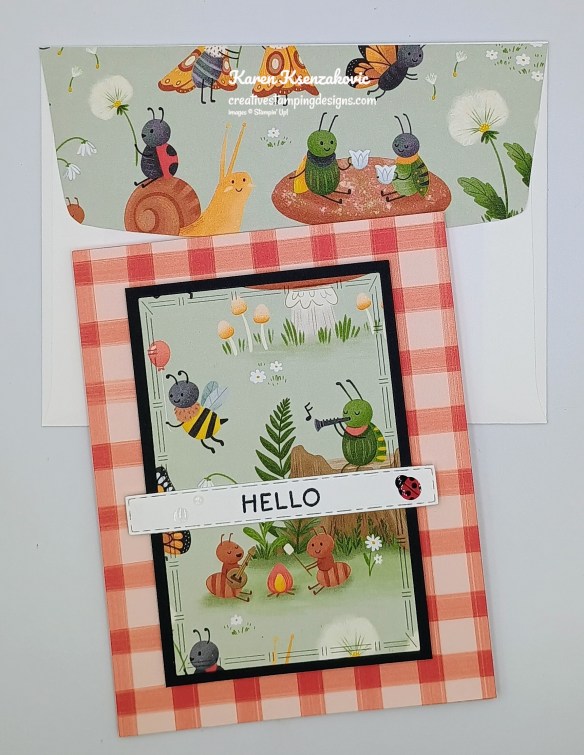
Decorate a Basic White Medium Envelope to complete the card. Stamp the ant image from the Sweet Bugs stamp set in Tuxedo Black Ink on the envelope front. Color the image using Darling Duckling, Poppy Parade and Smoky Slate Stampin’ Blends Markers. Adhere a panel of Cute As A Bug DSP to the envelope flap.
Thank you for stopping by my blog today. Now that you’ve seen my card, let’s get on with the hop! Click the button below to hop over to see what Tara has created. Happy Hopping!!
Just in case you get lost along the way, here is a list of the team members involved in the hop today.
If you need any stamping supplies, I’d love to be your Demonstrator. Just click HERE to go directly to my online store or drop me an email if you have any questions.
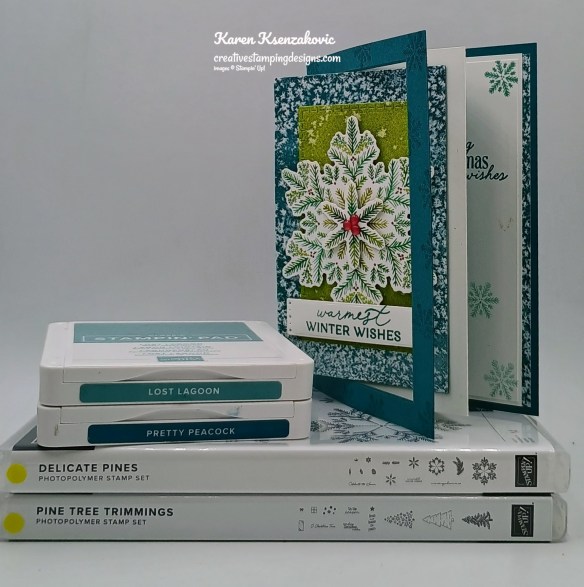
Good Friday morning stamping friends and welcome to my fun fold Friday. I hope you all had a great week and are looking forward to the weekend ahead.
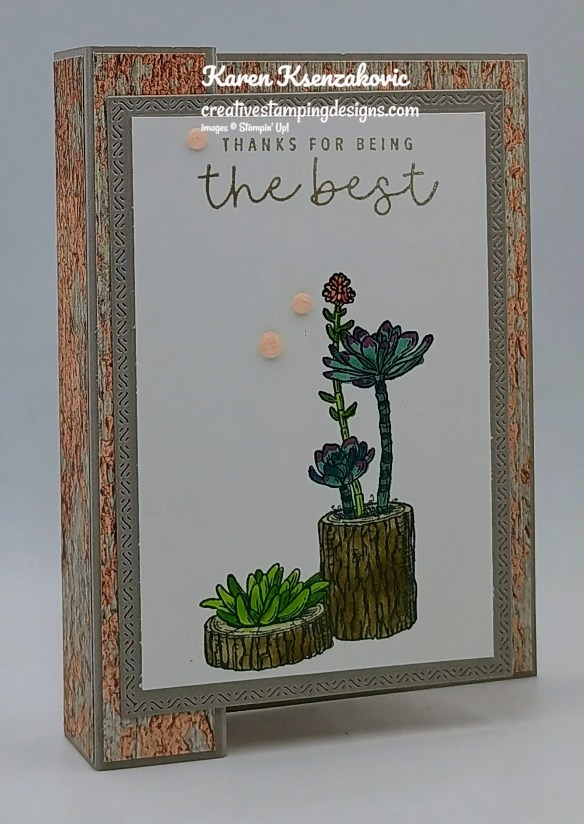
Today’s card is one that we made at our quarterly in person team meeting on Sunday. This beauty was designed by one of my team members Terry Lynn Bright. Here’s my card for today.
I used the Stampin’ Up! Delicate Pines Bundle along with the Elegant Pines Designer Series Paper, Textured Notes Dies and Stampin’ Up! Pine Tree Trimmings Photopolymer Stamp Set for my card today.
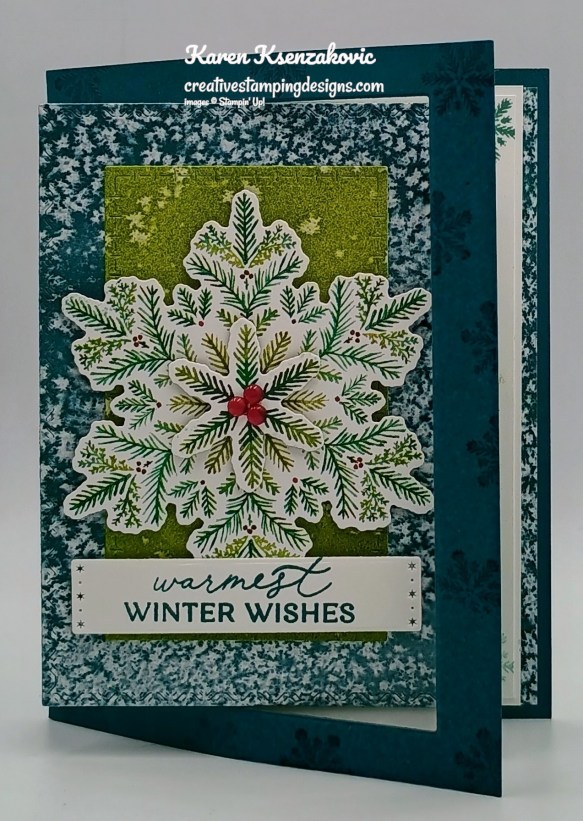
Randomly stamp the small snowflake image from the Stampin’ Up! Delicate Pines Photopolymer Stamp Set in Pretty Peacock Ink around the edges of the panel of Pretty Peacock. Adhere panel of Pretty Peacock to card front of the Pretty Peacock card base w/ adhesive on outer edges only. Die cut using Textured Notes Dies in center of card front, remove both panels. Die cut a panel of Elegant Pines DSP using the same Textured Notes Dies. Adhere the die cut DSP to one of the die cut panels of Pretty Peacock with Stampin’ Seal.
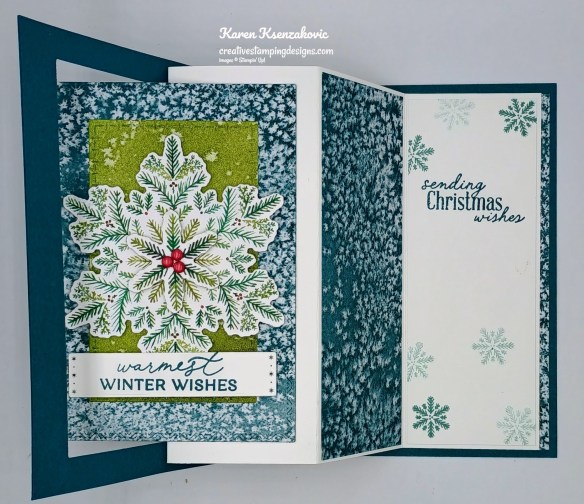
Fold the Basic White panel that has been scored. Fold in mountain, mountain, valley folds. Adhere the panel of Elegant Pines DSP to the back of the inside of the Pretty Peacock card base. Adhere the Basic white panel first to the inside front of the Pretty Peacock card base being sure to put a small amount of adhesive just along the outside edges of the first folded section. Adhere the back section of the Basic White panel to the back inside of the card base, opening the card base and laying the panel flat.
Close the card base and adhere the layered DSP panel to the 2nd section of the Basic White panel, being sure to only add adhesive to only the back left of the layered panel. Center this panel inside the front of the card base. Using a smaller Textured Notes Dies, cut a panel of Elegant Pines DSP. Adhere the die cut panel to the center of the card front with Stampin’ Seal.
Using the Delicate Pines Dies, cut a large and medium snowflake from a panel of Elegant Pines DSP. Adhere the snowflakes together with a Stampin’ Dimensional. Adhere the layered snowflake to the center of the card front, making sure the snowflake is not in the way of opening the card. Stamp the sentiment from the Delicate Pines stamp set in Pretty Peacock Ink on a panel of Basic White. Cut the sentiment out using the Snowflake Kisses Dies. Adhere the sentiment to the card front with Stampin’ Dimensionals. Add a Cherry Cobbler & Pearl Adhesive-Backed Berries to the center of the snowflake.
Adhere the panel of Elegant Pines DSP to the 3rd panel of the Basic White panel on the inside of the card base. On a panel of Basic White, stamp the sentiment from the Pine Tree Trimmings stamp set in Pretty Peacock Ink. Stamp the small snowflake image from the Delicate Pines stamp set in Lost Lagoon Ink on the Basic White panel. Adhere the Basic White panel to the 4th section of the Basic White panel on the inside of the card base.
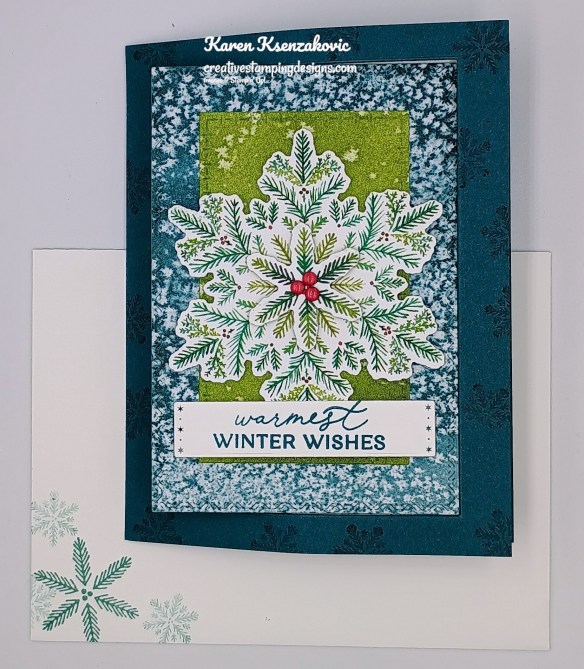
Decorate a Basic White Medium Envelope to finish the card. Stamp the medium & small snowflakes from the Delicate Pines stamp set on the envelope front in Pretty Peacock and Lost Lagoon Inks. Adhere a panel of Elegant Pines DSP to the envelope flap.
Thank you for stopping by my blog today. I hope you like the card and will give it a try. Happy Stamping!!
If you need any stamping supplies, I’d love to be your Demonstrator. Just click HERE to go directly to my online store or drop me an email if you have any questions.
Basic White Cardstock 5 1/4″ x 8″(mechanism scored & folded at 2″, 4″ & 6″), 1 7/8″ x 5 1/8″(inner liner), 1″ x 3 1/3″ (sentiment)
Pretty Peacock Cardstock 5 1/2″ x 8 1/2″(card base scored & folded at 4 1/4″, 4 1/4″ x 5 1/2″(card front panel)
Elegant Pines Designer Series Paper 3 1/2″ x 5″(interlocking panel), 4″ x 5 1/4″(back panel), 1 7/8″ x 5 1/8″(inside panel), 2 1/2″ x 4″(card front panel), 2 1/4″ x 6″(envelope flap)
God Monday morning stamping friends and welcome to a new week. I hope you a had a great weekend!! We all went to the baseball game Saturday night, it’s always so much fun getting together outside of work with all my fellow employees. It was the Yankees minor league game, the Patriots, which they are located about 10 minutes from my home. They won the game and it was ended by a great firework display.
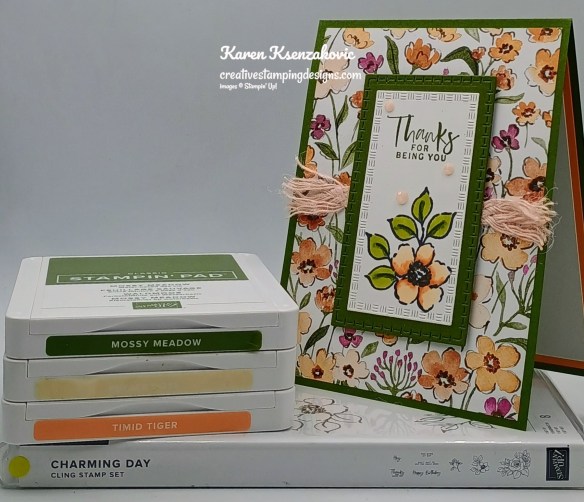
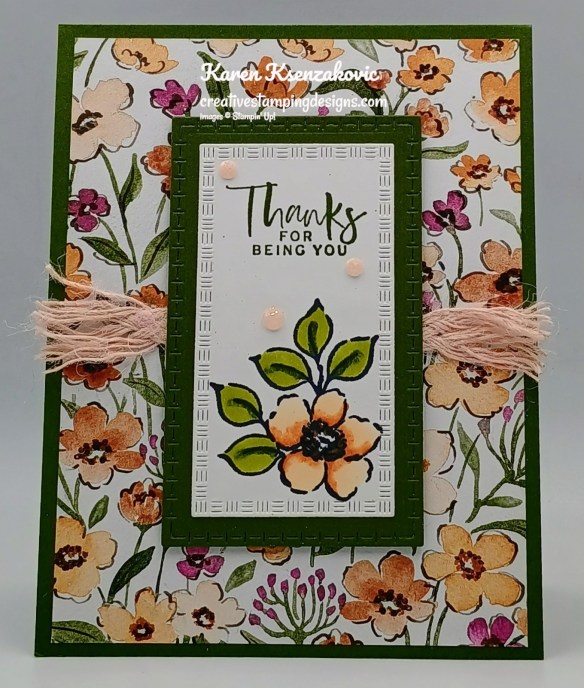
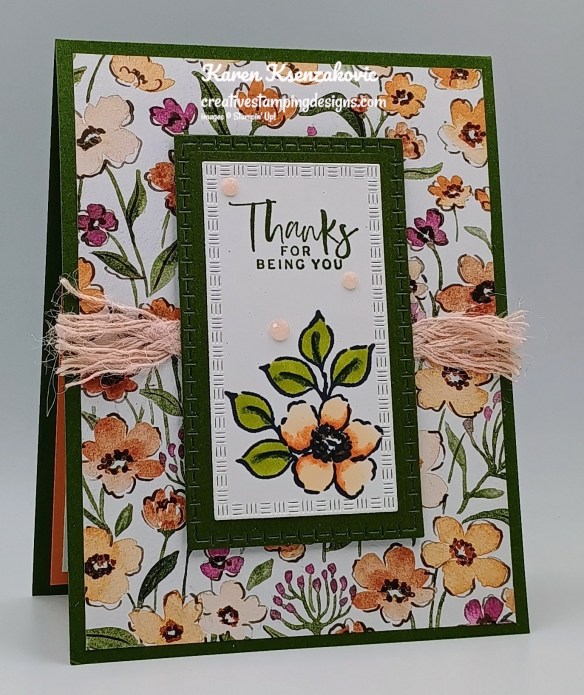
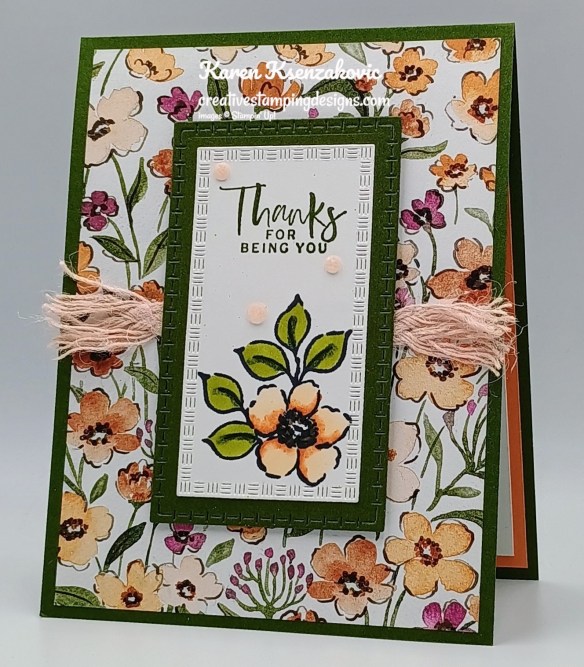
I have a quick card for you today playing with some Online Exclusives again. Hopefully next week I’ll be sharing some sneak peeks from the new September-December 2025 Mini Catalog and September Online Exclusives. If you’d like to see a quick video of how I made this card, Click Here to go to my Instagram Reels. Here’s my card for today.
I used the Stampin’ Up! Charming Day Cling Stamp Set along with the Floral Charm Designer Series Paper and Textured Notes Dies for my card today.
Adhere a panel of Floral Charm DSP to a Mossy Meadow card base. Adhere a piece of Petal Pink 5/16″ Braided Trim to the card front with Stampin’ Seal. Fray the ends of the ribbon using the Take Your Pick Tool.
Using the 4th & 5th largest Textured Notes Dies cut panels of Mossy Meadow and Basic White. Stamp the sentiment from Charming Day stamp set on the top of the Basic White frame in Mossy Meadow Ink. Stamp the small flower image from the Charming Day stamp set in Tuxedo Black Ink on the bottom of the panel. Color the image using Mossy Meadow, Old Olive, Petal Pink and Timid Tiger Stampin’ Blends Markers.
Adhere the Basic White frame to the Mossy Meadow frame with Stampin’ Seal. Adhere the layered frame to the card front over the ribbon with Stampin’ Dimensionals. Add a few Charming Shimmer Faceted Dots to the card front.
Stamp the sentiment from Charming Day stamp set in Mossy Meadow Ink on a panel of Basic White. Stamp the leaf and flower images from the Charming Day stamp set in Tuxedo Black Ink in the corners of the panel. Color the images with Mossy Meadow, Old Olive, Petal Pink and Timid Tiger Stampin’ Blends Markers. Adhere the Basic White panel to a Timid Tiger mat then to the inside of the Mossy Meadow card base.
Finish the card by decorating a Basic White Medium Envelope. Stamp the small floral image from the Charming Day stamp set in Tuxedo Black Ink on the envelope front. Color the image using Mossy Meadow, Old Olive and Timid Tiger Stampin Blends Markers. Adhere a panel of Floral Charm DSP to the envelope flap.
Thank you for stopping by my blog today. I hope you like the card and will give it a try. Happy Stamping!!
If you need any stamping supplies, I’d love to be your Demonstrator. Just click HERE to go directly to my online store or drop me an email if you have any questions.
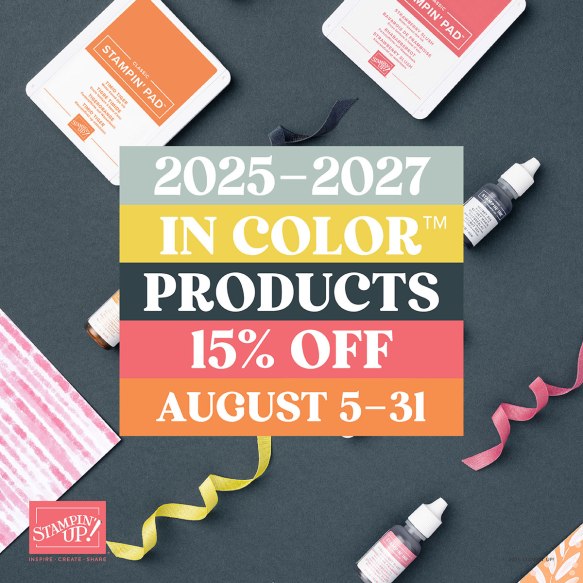
2025-2027 In-Color Products Sale starting Tomorrow, August 5
Starting August 5, select products that feature the new 2025–2027 In Colors™ are 15% off! This is a great opportunity to purchase new In Color products at a discount, so grab products you love—like ink, two-tone cardstock, and Designer Series Paper—and get everything you need to create projects that showcase Stampin’ Up!’s amazing color coordination!
Promotion Details:
Sales Period: August 5–31
Ordering Deadline: August 31, 2025, at 11:59 p.m. (MT)
Sale includes select inks, cardstock, Designer Series Paper, embellishments, and other products that include these new In Colors. Only products featured on the 2025–2027 In Colors page are included in this promotion.
Products are available only while supplies last.
You can find the 2025-2027 In Color sale items that will be on sale beginning August 5 right here! Get your list ready and shop early for the best selection!
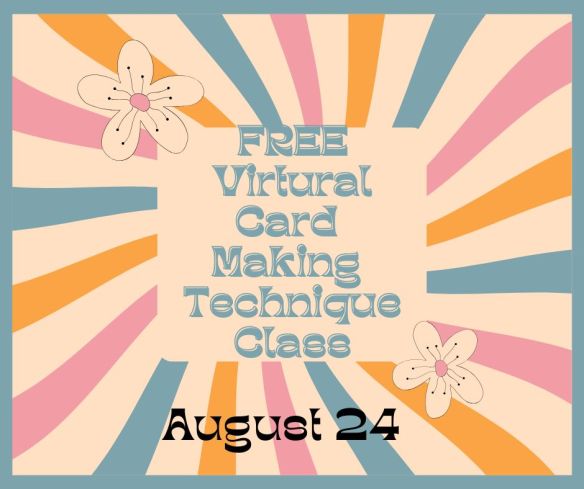
Registration Open for our August Online Technique Class
Tara Carpenter, Nicole Bloxom and I are teaming up to offer a fun Technique Online Zoom Class. We will be creating 6 different cards using 6 different techniques. This class is free with a $50 purchase from my Online Store. We will supply a list of supplies we are going to be using in the next couple days. We decided to open registration early so you can take advantage of the Free Shipping and my Double Rewards and also earn a free class.
The class requirements and What You Will Receive:
Visit my Online Store and place a $50 or more order before tax and shipping.
Zoom class with complete step by step instructions to complete each card as we go.
PDF with detailed directions and photos
A Link to the recorded class after we are done so you can watch it again and make more cards.
Here is a list of just some of the items that Tara, Nicole and I will be using.
Charming Day Bundle
Elements of Text stamp set
Artistic Leaves Stamp Set
Two-Tone Cardstock
Fluid 100 Watercolor Paper
Iridescent Treat Bags
Stampin’ Spritzer
Wow Basics Embossing Powder
Heat Tool
Floral Charm DSP
Adhesive Sheets
Stylish Shapes Dies
A week before the class I will send you the complete PDF of the cards so you can cut all your cardstock and gather your supplies, so you are ready to go. We will NOT be cutting cardstock live. Everyone’s cards will be unique since you will pick which color cardstock and ink you want to use for each card.
The class will be held on Sunday August 24th from 1pm – 5pm Eastern Time via Zoom. This will allow everyone all over the United States to participate live!
I will email you the Zoom link to the class a few days before the event.
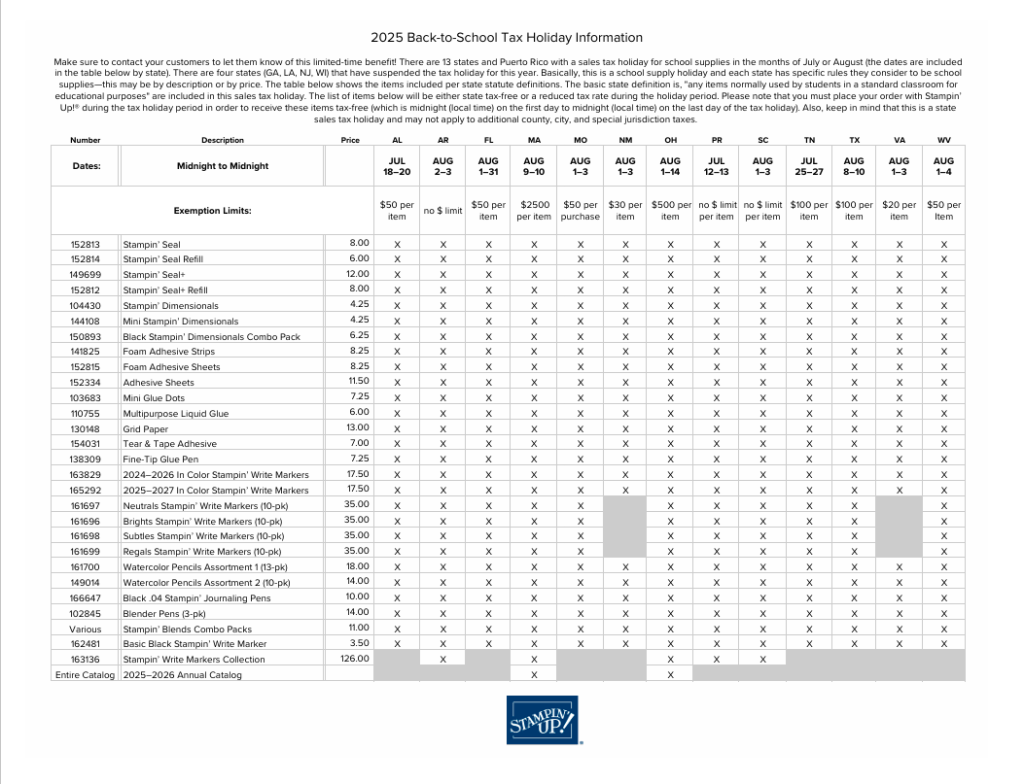
Twelve states and Puerto Rico are having Back-to-School Sales Tax Holidays this year and some Stampin’ Up! items qualify for the tax break in those states!
The states with upcoming tax holidays are: Alabama, Arkansas, Florida, Massachusetts, Missouri, New Mexico, Ohio, South Carolina, Tennessee, Texas, Virginia and West Virginia. So if you live in one of those states or Puerto Rico, take a second to download the spreadsheet below and mark your calendar!
Please note that you must place your order with Stampin’ Up! during the tax holiday period in your state in order to receive these items tax-free (which is midnight on the first day to midnight on the last day of the tax holiday). Also, keep in mind that this is a state sales tax holiday; the state statute may not apply to county, city, and special jurisdiction taxes.
For those wondering about Georgia, Illinois, Louisiana, New Jersey, and Wisconsin, those states have suspended the sales tax holiday this year.
Good Friday morning stamping friends and welcome to my Fun Fold Friday!! Are you getting ready for the weekend? I was finally able to get outside and do some weeding and dead heading to my flowers yesterday. I spent about 5 hours outside and only made a small dent. I decided it was time to call it quits when it was 85 with a real feel of 100, and it was going up to over 90. This morning I’m heading out really early again to do the same in my backyard gardens. It’s supposed to be in the upper 90’s today. Hopefully I won’t be out there as long.
I played with some Online Exclusives for today’s card. If you’d like to see a quick video of how I made this card, Click Here to go to my Instagram Reels. Here’s my card for today.
I used the Stampin’ Up! Rustic Centerpiece Cling Stamp Set along with the Stampin’ Up! Pattern of Friendship Photopolymer Stamp Set, Country Woods Designer Series Paper and Textured Notes Dies for my card today.
I got this template from Mary Deatherage which made assembling the card super easy.
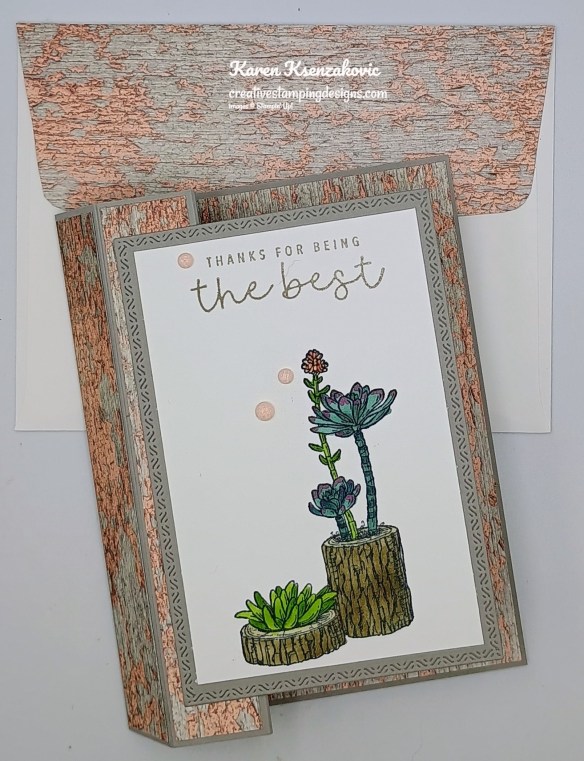
Score and fold the Gray Granite card base at 1″, 2″, 3″ & 4″. Add the 3 panels of Country Woods DSP to the center 3 sections. Add Tear & Tape on the 1st scored section (see the image above). Adhere the panel of Country Woods DSP to the larger section of the card base. Adhere the first section to the back panel making a cube.
Stamp the succulent image from the Rustic Centerpiece stamp set in tuxedo Black Ink towards the bottom of the Basic White panel. Color the image with Blackberry Bliss, Calypso Coral, Crumb Cake, Granny Apple Green, Lost Lagoon, Petal Pink and Pretty Peacock Stampin’ Blends Markers. Stamp the sentiment from Pattern of Friendship stamp set in Gray Granite Ink on the top of the panel.
Using the 2nd largest Textured Notes Dies, cut a panel of Gray Granite. Adhere the artwork to the center of the die cut panel. Adhere the layered panel to the tower section of the card base using adhesive only on a small section on the back left of the panel. Add a few Charming Shimmer Faceted Dots to the card front.
Stamp the sentiment from the Pattern of Friendship stamp set in Gray Granite Ink on a panel of Basic White. Adhere a panel of Country Woods DSP to the bottom of the panel. Adhere the Basic White panel to a Petal Pink mat then to the back of the card base.
Finish your card by decorating a Basic White Medium Envelope. Stamp the succulent image from the Rustic Centerpiece stamp set in Tuxedo Black Ink on the envelope front. Color the image with Blackberry Bliss, Calypso Coral, Crumb Cake, Granny Apple Green, Lost Lagoon, Petal Pink and Pretty Peacock Stampin’ Blends Markers. Adhere a panel of Country Woods DSP to the envelope flap.
Thank you for stopping by my blog today. I hope you like the card and will give it a try. Happy Stamping!!
If you need any stamping supplies, I’d love to be your Demonstrator. Just click HERE to go directly to my online store or drop me an email if you have any questions.
LAST DAY for Free Shipping and Creative Stamping Designs Double Rewards
All order types qualify for this promotion.
Free shipping is for three days only. Orders must be closed July 25.
Free shipping automatically applies to your cart after the qualifying amount has been met, which is $75 USD (before tax).
Coupon codes and Stampin’ Rewards will lower your order’s retail amount. Orders must meet the qualifying amount to be eligible for free shipping.
The additional cost for expedited shipping is not covered by this promotion.
Prepaid 3-, 6-, and 12-month Paper Pumpkin subscriptions and month-to-month subscriptions do not qualify for free shipping. Refills, past kits and add-ons do qualify toward free shipping, but you must be a subscriber to purchase. Subscriptions billed and shipped this month will be charged for the normal amount ($27.00 USD shipping included) + tax.
To sweeten the deal a little better, I’m going to be giving you Double Creative Stamping Designs Rewards for those 3 Days Only. How does this work? For a $50 you’ll earn 2 rewards, $100 you’ll earn 4 rewards, $150 you’ll earn 6 rewards, etc. Head over to my Online Store and get those orders in early. When you are shopping, don’t forget to check out the new Online Exclusive products available in the Online Store. My Double Rewards will end on Friday July 25th when the Free Shipping ends.
Get those orders ready and head over to my Online Store first thing Wednesday morning and place those orders early.
Registration Open for our August Online Technique Class
Tara Carpenter, Nicole Bloxom and I are teaming up to offer a fun Technique Online Zoom Class. We will be creating 6 different cards using 6 different techniques. This class is free with a $50 purchase from my Online Store. We will supply a list of supplies we are going to be using in the next couple days. We decided to open registration early so you can take advantage of the Free Shipping and my Double Rewards and also earn a free class.
The class requirements and What You Will Receive:
Visit my Online Store and place a $50 or more order before tax and shipping.
Zoom class with complete step by step instructions to complete each card as we go.
PDF with detailed directions and photos
A Link to the recorded class after we are done so you can watch it again and make more cards.
A week before the class I will send you the complete PDF of the cards so you can cut all your cardstock and gather your supplies, so you are ready to go. We will NOT be cutting cardstock live. Everyone’s cards will be unique since you will pick which color cardstock and ink you want to use for each card.
The class will be held on Sunday August 24th from 1pm – 5pm Eastern Time via Zoom. This will allow everyone all over the United States to participate live!
I will email you the Zoom link to the class a few days before the event.
Twelve states and Puerto Rico are having Back-to-School Sales Tax Holidays this year and some Stampin’ Up! items qualify for the tax break in those states!
The states with upcoming tax holidays are: Alabama, Arkansas, Florida, Massachusetts, Missouri, New Mexico, Ohio, South Carolina, Tennessee, Texas, Virginia and West Virginia. So if you live in one of those states or Puerto Rico, take a second to download the spreadsheet below and mark your calendar!
Please note that you must place your order with Stampin’ Up! during the tax holiday period in your state in order to receive these items tax-free (which is midnight on the first day to midnight on the last day of the tax holiday). Also, keep in mind that this is a state sales tax holiday; the state statute may not apply to county, city, and special jurisdiction taxes.
For those wondering about Georgia, Illinois, Louisiana, New Jersey, and Wisconsin, those states have suspended the sales tax holiday this year.
Basic White Cardstock 2 7/8″ x 4 3/8″(artwork), 4″ x 5 1/4″(back panel)
Gray Granite Cardstock 5 1/2″ x 8 1/4″(card base scored & folded at 1″, 2″, 3″ & 4″), 3 1/2″ x 5″(artwork mat)
Petal Pink Cardstock 4 1/8″ x 5 3/8″(back panel mat)
Country Woods Designer Series Paper (3) – 7/8″ x 5 3/8″ (tower panels), 4 1/8″ x 5 2/8″ (card base panel), 3/4″ x 4″(back panel), 2 1/4″ x 6″(envelope flap)
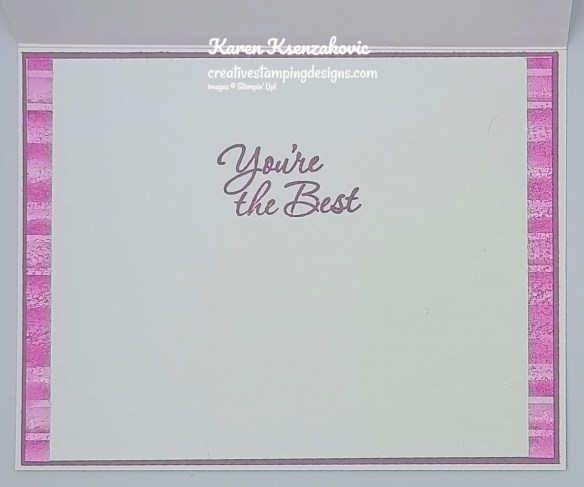
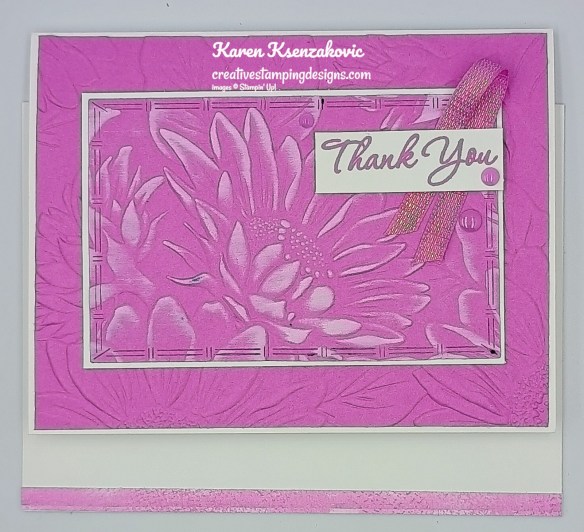
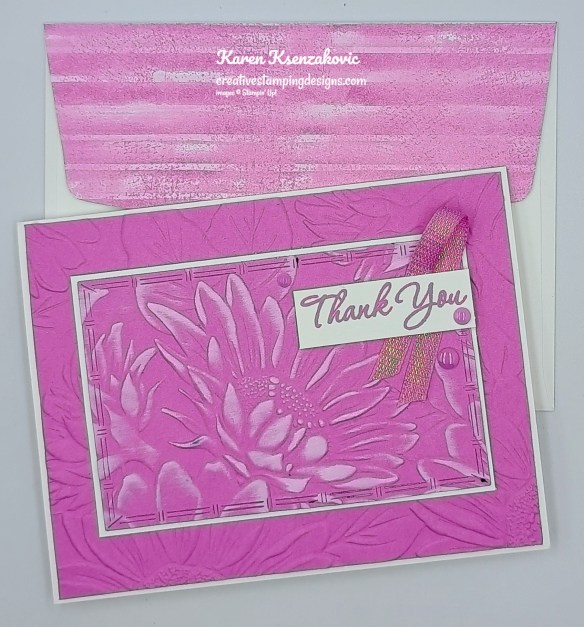
Good Wednesday morning stamping friends. How is your week going? I hope you are having a good one so far and it’s not too hot where you are. It’s been very steamy here in NJ with what feels like 1000% humidity.
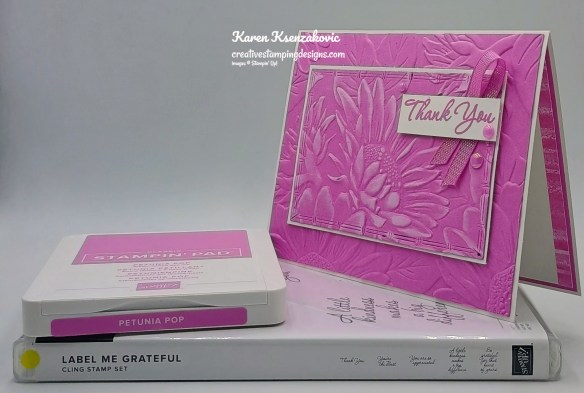
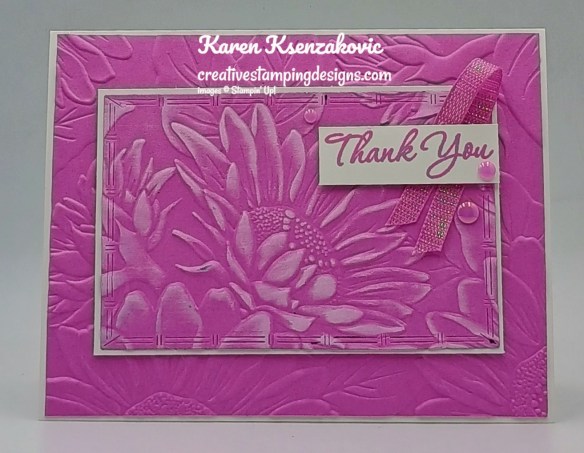
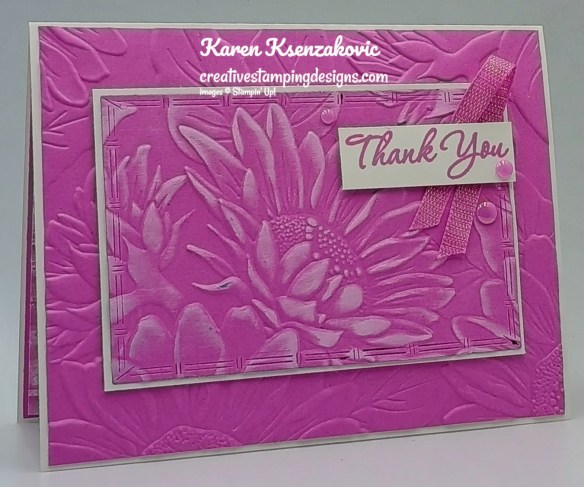
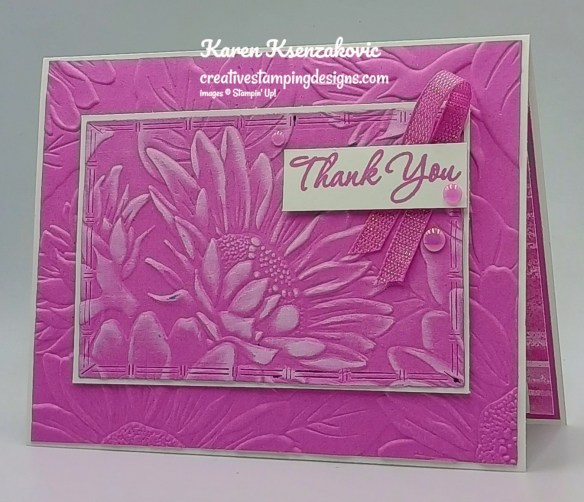
I played with my favorite embossing folder for a supper quick and easy card today. I really like when either an embossing folder or DSP does most of the work for you with a card. Here’s my card for today.
I used the Stampin’ Up! Label Me Grateful Cling Stamp Set along with the Textured Notes Dies and Sunflower 3D Embossing Folder for my card today.
Cut the center out of a panel of Petunia Pop with the 3rd largest Textured Notes Dies. Put the panel back together and emboss the panel with the Sunflower EF.
Adhere the outside frame of the embossed panel to a Thick Basic White card base with Liquid Glue. For the center panel, swipe the White Craft Ink across the panel highlighting the raised image. Adhere the inked panel to a Basic White mat with Liquid Glue. Adhere the layered panel to the center of the card front with Stampin’ Dimensionals.
Stamp the sentiment from Label Me Grateful stamp set in Petunia Pop Ink on a panel of Basic White. Adhere a piece of Petunia Pop 1/4″ Iridescent Ribbon to the card front with Stampin’ Seal. Adhere the sentiment over the ribbon with Stampin’ Dimensionals. Add a few 2024-2026 In-Color Flat Pearls to the card front.
Stamp the sentiment from Label Me Grateful stamp set in Petunia Pop Ink on a panel of Basic White. Adhere 2 strips of Unbounded Beauty Designer Series Paper to the sides of the panel. Adhere the Basic White panel to a Petunia Pop mat then to the inside of the Basic White Thick Card base.
Decorate a Basic White Medium Envelope to finish your card. Adhere a strip of Unbounded Beauty DSP to the envelope front and a panel to the envelope flap.
Thank you for stopping by my blog today. I hope you like the card and will give it a try. Happy Stamping!!
If you need any stamping supplies, I’d love to be your Demonstrator. Just click HERE to go directly to my online store or drop me an email if you have any questions.
20% off All Two-Tone Cardstock Sale Starts Today!!!
This three-day sale is the perfect opportunity to stock up on every color of two-tone cardstock. Whether you’re making cards or a scrapbook spread, two-tone cardstock is a must-have crafting staple. Each piece of cardstock has a smooth texture for stamping and a white core that works great for techniques like tearing, sanding, crumpling, embossing, etc. Some colors may sell out faster than others, so don’t wait to start shopping when this sale starts on July 9! Hurry over to my Online Store on the 9th and SAVE 20% on that paper.
Sales Period:July 9–11
Single-pack and multipack two-tone cardstock is 20% off.
Some colors might sell out sooner than others.
Available while supplies last.
See and shop all two-tone cardstock in the online store.
7 years ago, I decided to join the Stampin’ Up! community because I loved the products so much and wanted to enjoy the discount for myself. I then decided to try making it a business for myself and that’s when I started meeting all my awesome team members and YOU my amazing customers. I’m celebrating 7 years with Stampin’ Up! by offering you Double Creative Stamping Designs Rewards. THAT’S 2X THE REWARDS FOR YOU FROM ME for being such loyal customers and supporting my small business!!! For all orders over $50 (before tax & shipping) I’m giving you Double Rewards through Wednesday July 9th!! How does this work? For a $50 you’ll earn 2 rewards, $100 you’ll earn 4 rewards, $150 you’ll earn 6 rewards, etc. Head over to my Online Store and get those orders in early and earn those Double Rewards!!
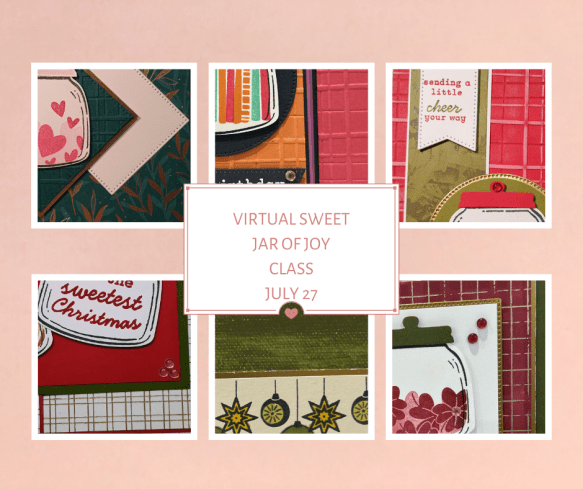
Tara Carpenter and I are teaming up to offer a fun online class using Stampin’ Up! Sweet Jar Bundle and the new Stampin’ Up! Jar of Joy set. We will be creating 6 different cards during the class including 2 fun folds. 3 of the cards will be Christmas Cards and 3 will be Birthday Cards. Sign Up now by Clicking Here to reserve your spot.
Zoom class with complete instructions to complete each card
PDF with detailed directions
During sign up you will have the option to add additional items to your order that you can take advantage of at no additional shipping cost. These items are optional, however if you want to recreate the cards you will need them.
The class will be held Sunday July 27th from 1 to 5 pm Eastern Time via Zoom. This allows anyone in the United States to participate live! Can’t join us live… no worries, we will record the session so it can be replayed at any time.
We will email written directions that will include directions, cardstock cuts as well as photos to help you create each card.
We are not including the bundle or stamp set in the price of the class. You can purchase the bundle through me at an additional 10% discount of the Online Exclusive price (see below).
Class Cost $35 + $9 (Priority Shipping)
Additional purchased items will be included in the above shipping price. I will invoice you through PayPal by July 13th to insure we can get the products delivered, packaged up and out to you with enough time.
Deadline: Saturday July 12th (this is so we have time to order all the products being used)
Click Here to register for the class now!! Let me know if you have any questions.
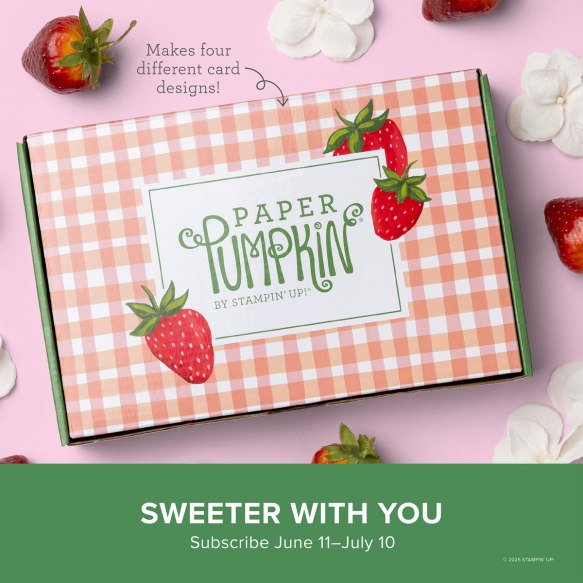
Craft sweet handmade cards featuring sun-kissed strawberries and breezy gingham. • Makes 8 cards: 2 each of 4 designs with 8 coordinating envelopes • Precut paper pieces and vellum accents • Hand-painted card base designs • Coordinating colors: Garden Green (Classic Stampin’ Spot), Granny Apple Green, Pool Party, Poppy Parade, Strawberry Slush, Timid Tiger
Subscribe to the June Paper Pumpkin Kit between 11 June and 10 July by clicking here!
Don’t miss the coordinating Circle of Seasons Dies Add-On!
Make the most of your Paper Pumpkin kits with the Circle of Seasons Dies add-on! Quickly and cleanly cut out a strawberry with a blossom, a circle, a leaf, or an acorn to elevate your crafting projects. These additional dies are designed to work with THREE Paper Pumpkin Kits: the Sweeter with You Paper Pumpkin Kit, the Farmhouse Florals Paper Pumpkin Kit, and the Fall for Toile Paper Pumpkin Kit. Pair these dies with other Stampin’ Up! products for even more creative options! This exclusive add-on (item 167277) coordinates with the three upcoming kits! Paper Pumpkin subscribers can purchase it beginning June 11. Add-on is available only while supplies last, so it’s best to shop early!
DETAILS – 4 dies – Largest die: 2-1/2″ x 1-1/4″ (6.4 x 3.2 cm) – Use with a Stampin’ Cut & Emboss Machine (sold separately)
You must be a current Paper Pumpkin subscriber to purchase this item. To become a subscriber, visit www.stampinup.com/paperpumpkin.
Note: Supplies may be limited toward the end of the subscription period.
Good Saturday morning stamping friends and welcome to the weekend. Does anyone have plans? I’m not working today, which is very unusual for me. I switched my days around since I have a demonstrator event this afternoon. I’m attending the Creativity Now event from Stampin’ Up! virtually. This is a demo only event that we have once a year. I got to preorder a suite that will be available in the September-December Mini Catalog, and we’ll be creating card with it.
I have a quick card for you today playing with the stamp set coming on July 1st with the new Online Exclusives. Here’s my card for today.
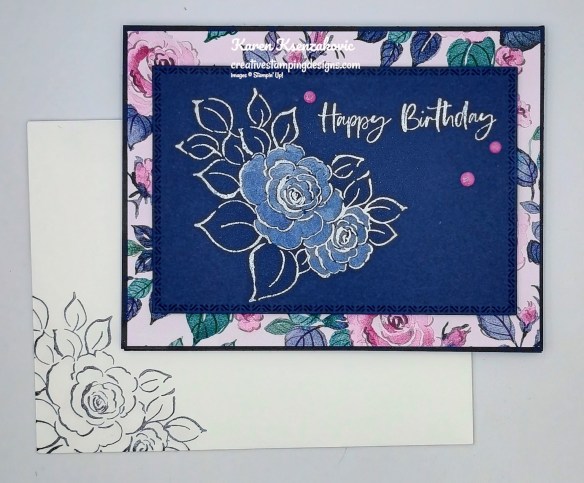
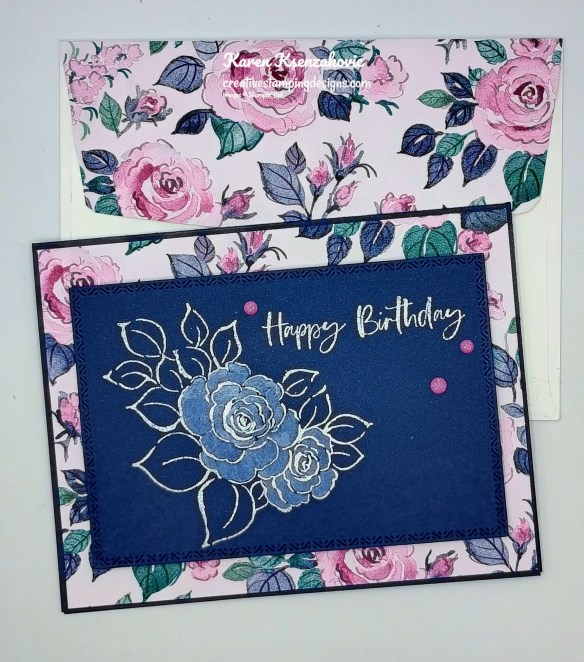
I used the Stampin’ Up! Charming Day Cling Stamp Set along with the Floral Charm Designer Series Paper and Textured Notes Dies for my card today.
Adhere a panel of Floral Charm DSP to a Night of Navy card base with Stampin’ Seal.
Stamp the large flower image from the Charming Day stamp set in Versamark Ink on a panel of Night of Navy. Sprinkle the image with White Embossing Powder and set it with the Heat Tool. Cut the image out using the 2nd largest Textured Notes Dies. Using a Blender Pen, add Craft White Ink to the flower.
Stamp the sentiment from Charming Day stamp set in Versamark Ink on the top of the panel. Sprinkle the sentiment with White Embossing Powder and set it with the Heat Tool. Adhere the Night of Navy panel to the card front with Stampin’ Dimensionals. Add a few Charming Shimmer Faceted Dots to the card front.
Stamp the sentiment from Charming Day stamp set in Night of Navy Ink on a panel of Basic White. Stamp the flower image from Charming Day stamp set in Night of Navy Ink, stamping off once on scrap paper, on the bottom of the panel. Adhere the Basic White panel to a Berry Burst mat then to the inside of the Night of Navy card base.
Decorate a Basic White Medium Envelope to finish your card. Stamp the flower image from the Charming Day stamp set in Night of Navy Ink, stamping off once on scrap paper, on the envelope front. Adhere a panel of Floral Charm DSP to the envelope flap.
Thank you for stopping by my blog today. I hope you like the card and will give it a try. Happy Stamping!!
If you need any stamping supplies, I’d love to be your Demonstrator. Just click HERE to go directly to my online store or drop me an email if you have any questions.
June 3-30, all available suites and suite products from the 2025–2026 Annual Catalog and Online Exclusives are buy one, get one 50% off! If you’ve had your eye on a new suite from the annual catalog or you really like the look of a stamp set from an Online Exclusives suite, you don’t have to choose—you can get both!
Here are the promotion details:
All available suites and suite products from the 2025–2026 Annual Catalog and Online Exclusives are buy one, get one 50% off.
When you shop the sale, the 50% off discount will apply to the lower-priced item (for example, if you buy a suite collection and a stamp set from a suite, the suite would be full price, and the stamp set would be 50% off).
Suite collections are available if all items are in stock; if all items are not in stock, you can still shop the available suite products.
You don’t have to buy a suite and suite products all from the same suite collection for the discount to apply. You can buy any suite products from any suite.
The discount will appear in your cart once you’ve added two items within the sale parameters to your cart.
Products are available only while supplies last.
See and shop all qualifying suites in the Online Store
The sale begins June 3, 2025 at 12:01 AM MT.
The sale ends June 30, 2025 at 11:59 PM MT.
Let me know if you have any questions. YAY for an awesome sale! Get your lists ready and get your orders placed between June 3-30!!
Craft sweet handmade cards featuring sun-kissed strawberries and breezy gingham. • Makes 8 cards: 2 each of 4 designs with 8 coordinating envelopes • Precut paper pieces and vellum accents • Hand-painted card base designs • Coordinating colors: Garden Green (Classic Stampin’ Spot), Granny Apple Green, Pool Party, Poppy Parade, Strawberry Slush, Timid Tiger
Subscribe to the June Paper Pumpkin Kit between 11 June and 10 July by clicking here!
Don’t miss the coordinating Circle of Seasons Dies Add-On!
Make the most of your Paper Pumpkin kits with the Circle of Seasons Dies add-on! Quickly and cleanly cut out a strawberry with a blossom, a circle, a leaf, or an acorn to elevate your crafting projects. These additional dies are designed to work with THREE Paper Pumpkin Kits: the Sweeter with You Paper Pumpkin Kit, the Farmhouse Florals Paper Pumpkin Kit, and the Fall for Toile Paper Pumpkin Kit. Pair these dies with other Stampin’ Up! products for even more creative options! This exclusive add-on (item 167277) coordinates with the three upcoming kits! Paper Pumpkin subscribers can purchase it beginning June 11. Add-on is available only while supplies last, so it’s best to shop early!
DETAILS – 4 dies – Largest die: 2-1/2″ x 1-1/4″ (6.4 x 3.2 cm) – Use with a Stampin’ Cut & Emboss Machine (sold separately)
You must be a current Paper Pumpkin subscriber to purchase this item. To become a subscriber, visit www.stampinup.com/paperpumpkin.
Note: Supplies may be limited toward the end of the subscription period.
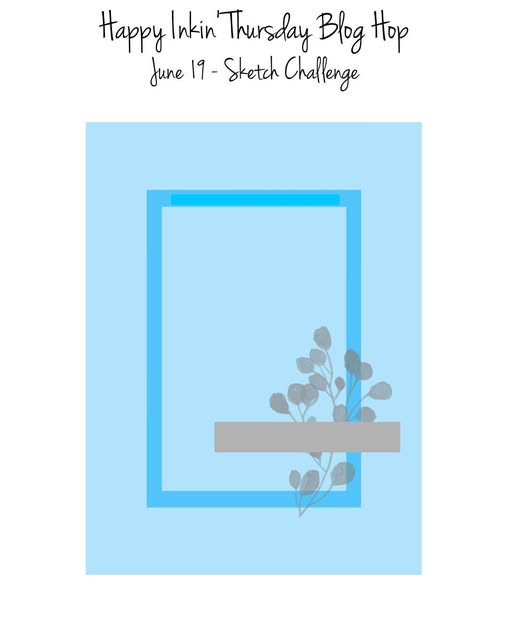
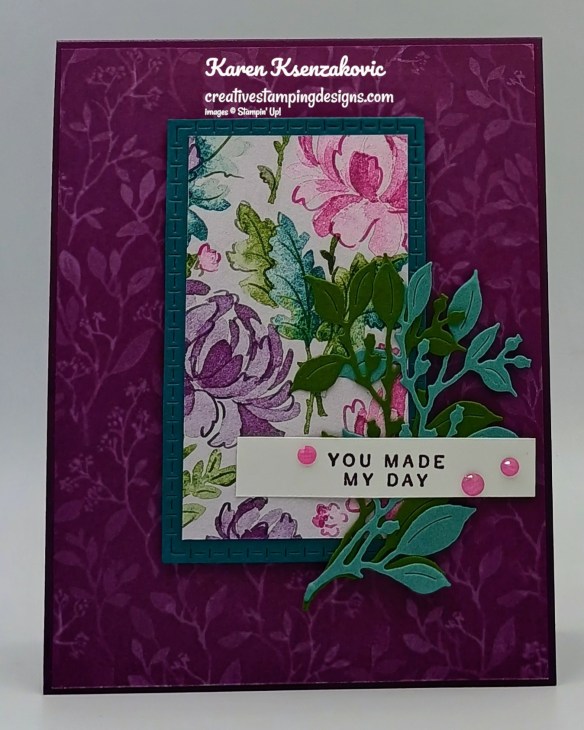
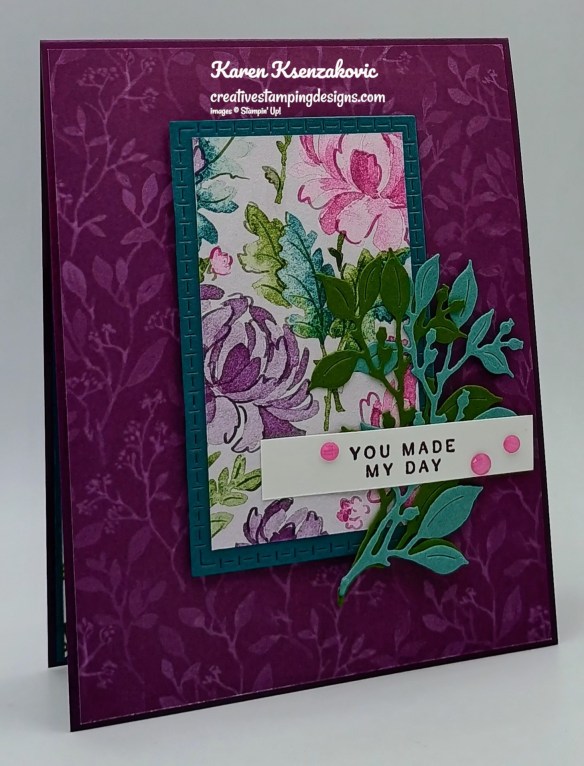
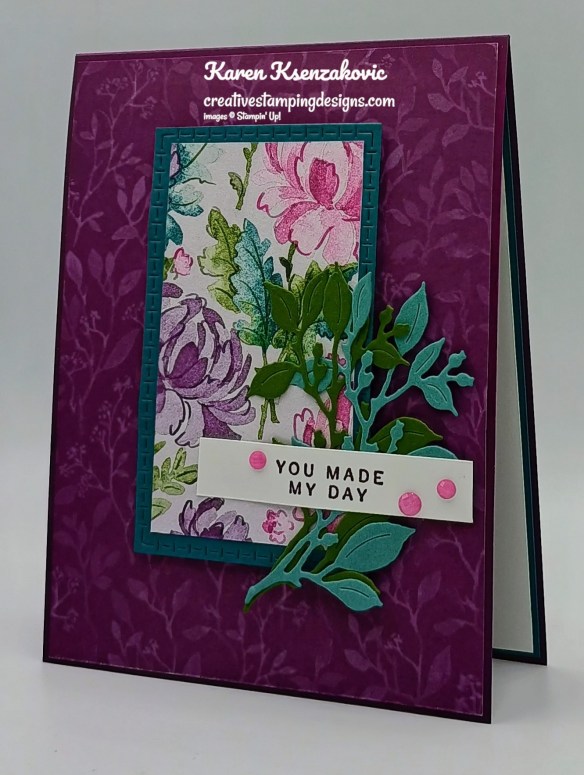
Good Thursday morning stamping friends Happy Juneteenth!! It also happens to be my son’s 30th birthday, I’m not sure where the time went that he could be 30 already. Welcome to our Happy Inkin’ Thursday Blog Hop. If you are starting with me, thank you. I hope you will stop by everyone’s blog to see what they have created this week. If you are hopping over from Mary’s blog, thank you for stopping by. This week we have Sketch Challenge. If you’d like to see a quick video of how I made this card, Click Here to go to my Instagram Reels. Here is my card using this week’s sketch.
I used the Stampin’ Up! Charming Day Bundle along with the Floral Charm Designer Series Paper (both available July 1st) and Textured Notes Dies for my card today.
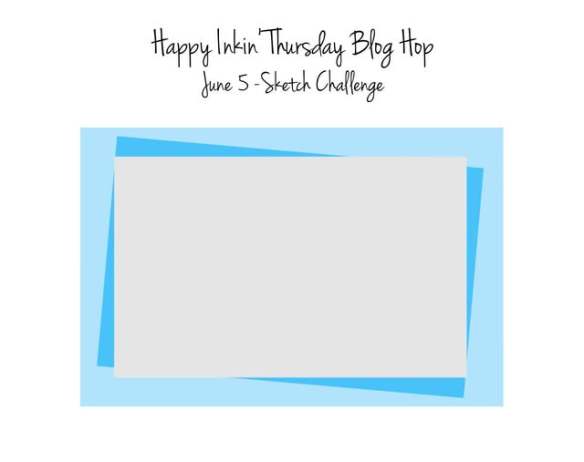
This is our sketch for this week.
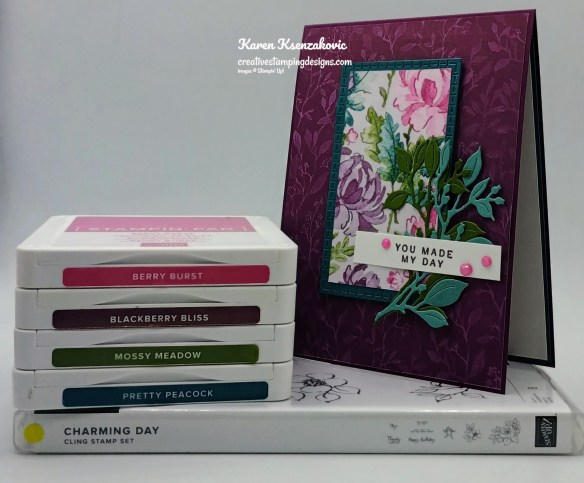
Adhere a panel of Floral Charm DSP to a Blackberry Bliss card base with Stampin’ Seal.
Cut a panel of Pretty Peacock using the Textured Notes Dies. Adhere a panel of Floral Charm DSP to the center of the die cut frame.2
Using the larger leaf die from the Charming Day Dies, cut 1 from a panel of Lost Lagoon and 1 from a panel of Mossy Meadow. Adhere the die cuts to the card front with Glue Dots. Stamp the sentiment from Charming Day stamp set in Blackberry Bliss Ink on a panel of Basic White. Adhere the sentiment to the card front, over the die cuts, with Stampin’ Seal and a Stampin’ Dimensional. Add a few Charming Shimmer Faceted Gems to the card front.
On a panel of Basic White, stamp the sentiment from Charming Day stamp set in Blackberry Bliss Ink. stamp the small flower image from Charming Day stamp set in Tuxedo Black Ink on the top corner. Stamp the leaf image from Charming Day stamp set in Mossy Meadow Ink on the bottom corner. Color the images using Berry Burst, Blackberry Bliss, Old Olive and Mossy Meadow Stampin’ Blends Markers. Adhere the Basic White panel to a Pretty Peacock mat then to the inside of the Blackberry Bliss card base.
Decorate a Basic White Medium Envelope to complete your card. Stamp the small flower image from the Charming Day stamp set in Tuxedo Black Ink on the envelope front. Color the image with Berry Burst, Blackberry Bliss, Old Olive and Mossy Meadow Stampin’ Blends Markers. Adhere a panel of Floral Charm DSP to the envelope flap.
Thank you for stopping by my blog today. Now that you’ve seen my card, let’s get on with the hop! Click the button below to hop over to see what Tara has created. Happy Hoping!!
Just in case you get lost along the way, here is a list of the team members involved in the hop today.
If you need any stamping supplies, I’d love to be your Demonstrator. Just click HERE to go directly to my online store or drop me an email if you have any questions.
Craft sweet handmade cards featuring sun-kissed strawberries and breezy gingham. • Makes 8 cards: 2 each of 4 designs with 8 coordinating envelopes • Precut paper pieces and vellum accents • Hand-painted card base designs • Coordinating colors: Garden Green (Classic Stampin’ Spot), Granny Apple Green, Pool Party, Poppy Parade, Strawberry Slush, Timid Tiger
Subscribe to the June Paper Pumpkin Kit between 11 June and 10 July by clicking here!
Don’t miss the coordinating Circle of Seasons Dies Add-On!
Make the most of your Paper Pumpkin kits with the Circle of Seasons Dies add-on! Quickly and cleanly cut out a strawberry with a blossom, a circle, a leaf, or an acorn to elevate your crafting projects. These additional dies are designed to work with THREE Paper Pumpkin Kits: the Sweeter with You Paper Pumpkin Kit, the Farmhouse Florals Paper Pumpkin Kit, and the Fall for Toile Paper Pumpkin Kit. Pair these dies with other Stampin’ Up! products for even more creative options! This exclusive add-on (item 167277) coordinates with the three upcoming kits! Paper Pumpkin subscribers can purchase it beginning June 11. Add-on is available only while supplies last, so it’s best to shop early!
DETAILS – 4 dies – Largest die: 2-1/2″ x 1-1/4″ (6.4 x 3.2 cm) – Use with a Stampin’ Cut & Emboss Machine (sold separately)
You must be a current Paper Pumpkin subscriber to purchase this item. To become a subscriber, visit www.stampinup.com/paperpumpkin.
Note: Supplies may be limited toward the end of the subscription period.
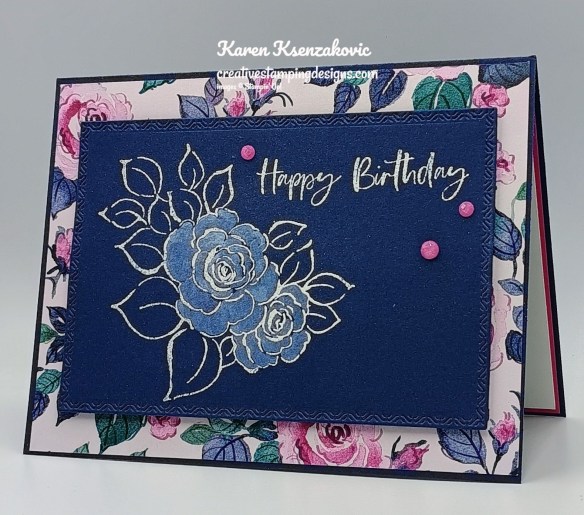
Good Monday morning stamping friends and welcome to a new week. How was your weekend? Yesterday was our quarterly team meeting where we did some stamping together. The presenters did an amazing job making the cards and demoing how to make them.
My card for today is one that Judi Hartbarger designed and demonstrated for us. Judi is from Tennessee and has become a good friend of mine. After she was done creating this beautiful card with us, she showed us another one she made with different DSP. Here’s my card for today.
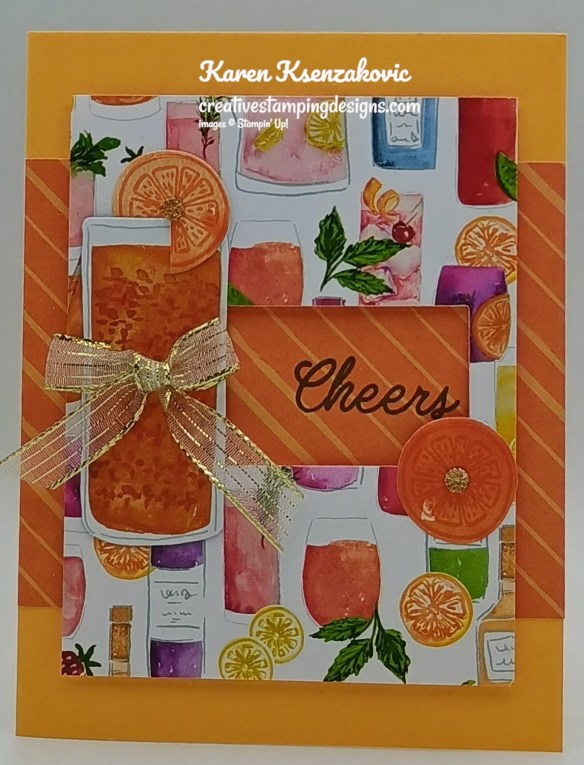
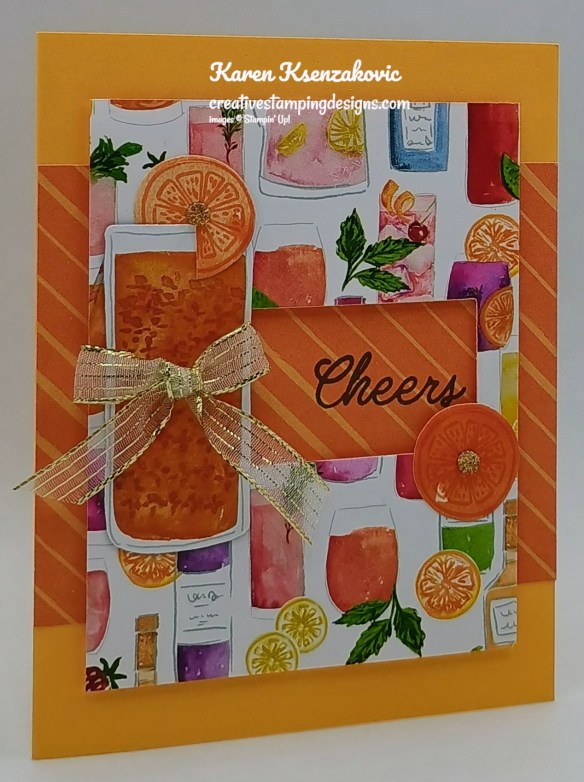
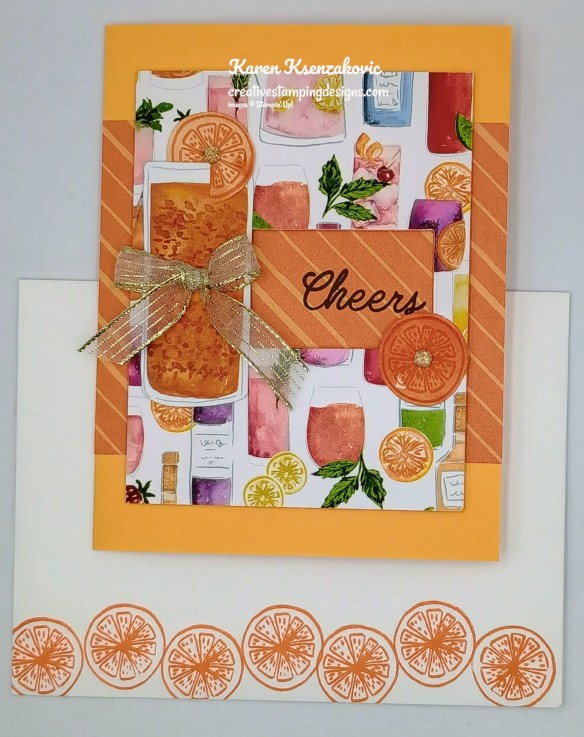
I used the Stampin’ Up! Online Exclusive Cheers & Sips Bundle along with the Celebratory Sips Designer Series Paper and Textured Notes Dies for my card today.
Adhere a panel of Celebratory Sips DSP to a Peach Pie card base with Stampin’ Seal. On the other panel of Celebratory Sips DSP adhere the panel of Basic White to the back for support. Using the 2nd smallest Textured Notes Die, cut the center out of the DSP.
Set the die cut panel over the card front panel and stamp the sentiment from the Stampin’ Up! Cheers & Sips Photopolymer Stamp Set in Tuxedo Black Ink on the panel. Adhere the die cut panel to the card front with Stampin’ Dimensionals.
From the panel of Celebratory Sips DSP that has the glasses, cut one of the orange drink glasses using the Cheers & Sips Dies. On the Watercolor block panel of Celebratory Sips DSP, stamp the citrus image from the Cheers & Sips stamp set in Timid Tiger 2 times. Cut the citrus image out using the Cheers & Sips Dies. Snip one of the orange slices with Paper Snips and adhere it to the top of the drink glass with a Glue Dot. Adhere the glass to the card front with Glue Dots and Stampin’ Dimensionals. Adhere the other orange slice by the sentiment. Tie a small bow with the Gold Striped 3/8″ Mesh Ribbon and adhere it to the drink glass with a Glue Dot. Add a couple Drusy Adhesive Backed Embellishments to the card front.
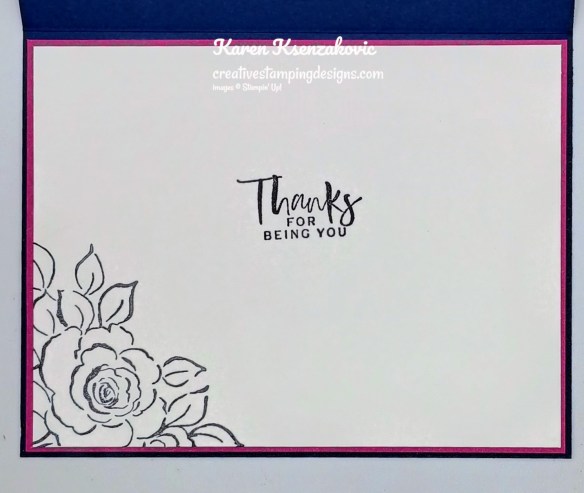
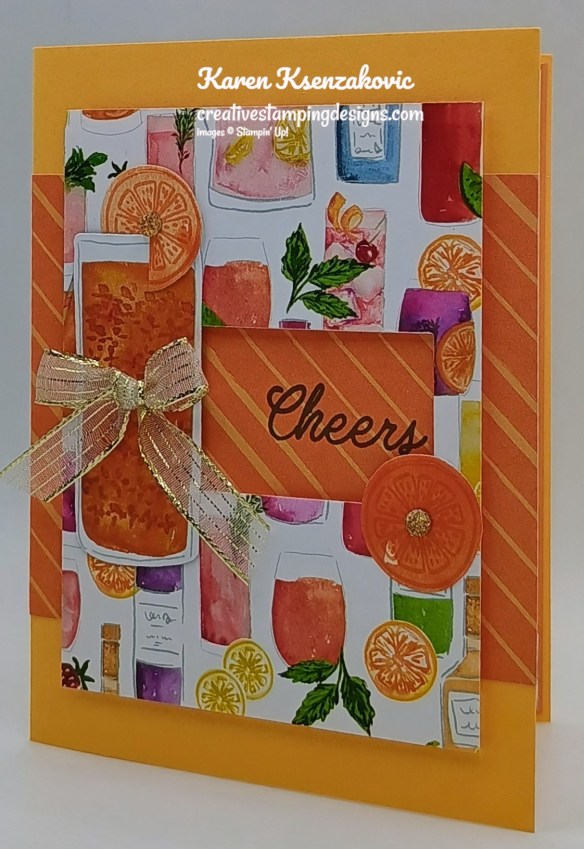
Stamp the sentiments from the Cheers & Sips stamp set on a Basic White panel in Tuxedo Black Ink. Towards the bottom of the panel, stamp the citrus slice image from the Cheers & Sips stamp set in Timid Tiger Ink. Adhere the panels of Celebratory Sips DSP to the bottom of the panel. Adhere the Basic White panel to a Timid Tiger mat then to the inside of the Peach Pie card base.
Decorate a Basic White Medium Envelope to finish your card. Stamp the citrus slice image from the Cheers & Sips stamp set in Timid Tiger Ink across the bottom front of the envelope. Adhere a panel of Celebratory Sips DSP to the envelope flap.
Thank you for stopping by my blog today. I hope you like the card and will give it a try. Happy Stamping!!
If you need any stamping supplies, I’d love to be your Demonstrator. Just click HERE to go directly to my online store or drop me an email if you have any questions.
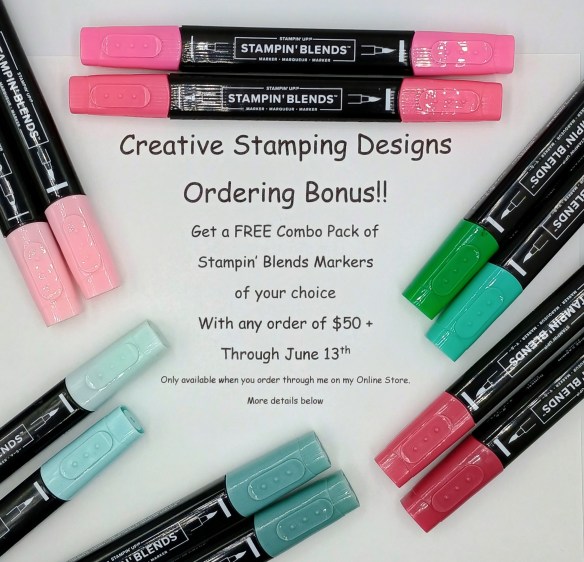
Since you are loving this ordering special so much, I thought I would extend it through Friday June 13th.
To kick this amazing Suite Sale off, I’m offering a little bonus to help you with coloring all those pretty stamped images. With any order of 50+ (before tax & shipping and after Stampin’ Rewards) placed through my Online Store between June 3 – Friday June 13th, you’ll get your choice of a FREECombo Pack of Stampin’ Blends Markers. Once you have placed your order, I will send you an email asking which color combo pack you would like. You must send me your selection by June 14th or I will pick a color pack for you. I’ll be placing my order for the blends on June 14th.
All Suite & Bundle Sale June 3rd – 30th
June 3-30, all available suites and suite products from the 2025–2026 Annual Catalog and Online Exclusives are buy one, get one 50% off! If you’ve had your eye on a new suite from the annual catalog or you really like the look of a stamp set from an Online Exclusives suite, you don’t have to choose—you can get both!
Here are the promotion details:
All available suites and suite products from the 2025–2026 Annual Catalog and Online Exclusives are buy one, get one 50% off.
When you shop the sale, the 50% off discount will apply to the lower-priced item (for example, if you buy a suite collection and a stamp set from a suite, the suite would be full price, and the stamp set would be 50% off).
Suite collections are available if all items are in stock; if all items are not in stock, you can still shop the available suite products.
You don’t have to buy a suite and suite products all from the same suite collection for the discount to apply. You can buy any suite products from any suite.
The discount will appear in your cart once you’ve added two items within the sale parameters to your cart.
Products are available only while supplies last.
See and shop all qualifying suites in the Online Store
The sale begins June 3, 2025 at 12:01 AM MT.
The sale ends June 30, 2025 at 11:59 PM MT.
Let me know if you have any questions. YAY for an awesome sale! Get your lists ready and get your orders placed between June 3-30!!
Karen & Tara’s Cheers & Sips Online Zoom Class Registration Open
Tara Carpenter and I are teaming up to offer a fun online class using Stampin’ Up! Online Exclusive Cheers & Sips Bundle. We will be creating 6 different cards during the class including 2 fun folds.
The class fee includes:
Stampin’ Up! Holographic Resin Dots (full pack)
Stampin’ Up! Gold Striped Mesh Ribbon (full pack)
Pre-cut card kits to complete each card
Zoom class with complete instructions to complete each card
PDF with detailed directions
During sign up you will have the option to add additional items to your order that you can take advantage of at no additional shipping cost. These items are optional, however if you want to recreate the cards you will need them.
The class will be held Sunday June 29th from 1 to 5 pm Eastern Time via Zoom. This allows anyone in the United States to participate live! Can’t join us live… no worries, we will record the session so it can be replayed at any time.
We will email written directions that will include directions, cardstock cuts as well as photos to help you create each card.
We are not including the bundle in the price of the class. You can purchase the bundle through me at an additional 10% discount of the Online Exclusive price (see below).
Class Cost $35 + $9 (Priority Shipping)
Additional purchased items will be included in the above shipping price. We will invoice you through PayPal by June 15tth to insure we can get the products delivered, packaged up and out to you with enough time.
Deadline: Saturday June 14th (this is so we have time to order all the bundles, embellishments and DSP being used)
Click Here to register for the class now!! Let me know if you have any questions.
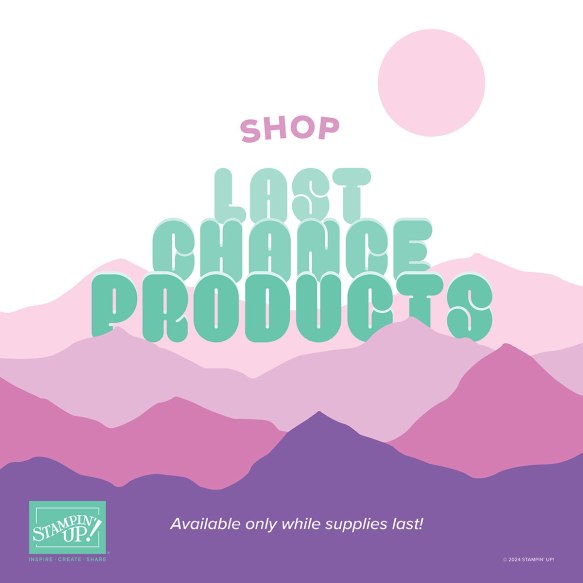
Stampin’ Up! has added a bunch of items to the Last Chance Products list! Be sure to scroll through all of the pages so that you don’t miss anything. There are newly added items sprinkled throughout the list.
You can find the Last Chance Products list Here in the online store.
Don’t forget that Last Chance Products are only available while supplies last, so order early for the best selection!
Send your loved ones elevated cards with heartfelt sentiments! • Makes 9 cards: 3 each of 3 designs with 9 coordinating envelopes • Envelopes and card bases with decorative gold foil • Precut paper pieces and unique sentiment labels • Coordinating colors: Berry Burst, Cajun Craze, Early Espresso, Mossy Meadow, Pretty Peacock (Classic Stampin’ Spot), Timid Tiger Coordinates with the Floral Charm Suite Collection (item 166141)
Subscribe to the June Paper Pumpkin Kit between 11 May and 10 June by clicking here!
Don’t miss the coordinating Hugs Abloom Dies Add-On!
Make the most of your Paper Pumpkin kits with the Hugs Abloom Dies add-on! Quickly and cleanly cut out a flower, leaf sprig, sentiment label, or Hugs sentiment to elevate your crafting projects. These additional dies are designed to work with THREE Paper Pumpkin Kits: the Inked Occasions Paper Pumpkin Kit, the Mountain Majesties Paper Pumpkin Kit, and the Full of Charm Paper Pumpkin Kit. Pair these dies with other Stampin’ Up! products for even more creative options!
DETAILS – 4 dies – Largest die: 2-1/2″ x 1-1/4″ (6.4 x 3.2 cm) – Use with a Stampin’ Cut & Emboss Machine (sold separately)
You must be a current Paper Pumpkin subscriber to purchase this item. To become a subscriber, visit www.stampinup.com/paperpumpkin.
Note: Supplies may be limited toward the end of the subscription period.
Basic White Cardstock 4″ x 5 1/4″(inner liner), 3 1/2″ x 4 1/2″(backing panel for DSP)
Peach Pie Cardstock 5 1/2″ x 8 1/2″(card base scored & folded at 4 1/4″)
Timid Tiger Cardstock 4 1/8″ x 5 3/8″(inner liner mat)
Celebratory Sips Designer Series Paper 3 1/2″ x 4 1/4″(card front panel), 3 1/2″ x 4 1/2″(die cut card front panel), 2 – 1/2″ x 4″ (inner liner), 2 1/4″ x 6″(envelope flap)
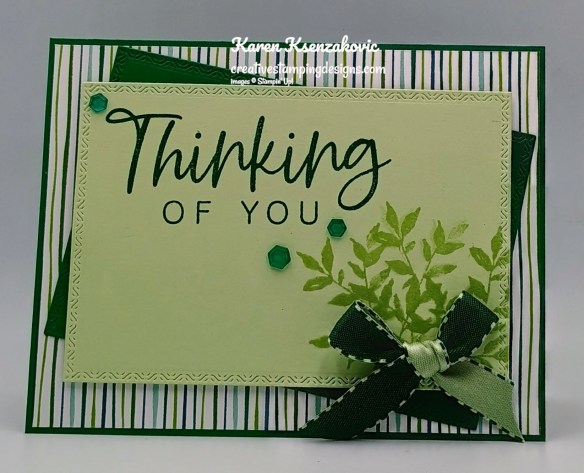
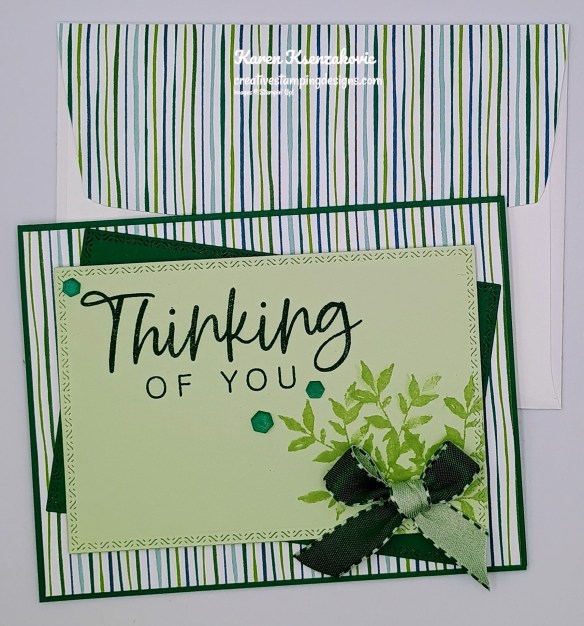
Good Thursday morning stamping friends and welcome to our Happy Inkin’ Thursday Blog Hop. If you are starting with me, thank you. I hope you will stop by everyone’s blog to see what they have created this week. If you are hopping over from Mary’s blog, thank you for stopping by. This week we have Sketch Challenge. If you’d like to see a quick video of how I made this card, Click Here to go to my Instagram Reels. Here is my card using this week’s sketch.
I used the Stampin’ Up! with You in Mind Photopolymer Stamp Set along with the Stampin’ Up! Textured Notes Bundle and Turtle-y Cute Designer Series Paper for my card today.
This is our sketch for this week.
Adhere a panel of Turtle-y Cute DSP to a Shaded Spruce card base with Liquid Glue.
Using the Textured Notes Dies, cut a panel of Shaded Spruce and Soft Sea Foam with the 2nd largest die. Adhere the Shaded Spruce die cut frame to the card front, on an angle with Stampin’ Seal. Stamp the sentient from With You in Mind stamp set in Shaded Spruce Ink on the Soft Sea Foam die cut frame. Stamp the small leaf image from the Stampin’ Up! Textured Notes Cling Stamp Set on the bottom of the frame in Soft Sea Foam Ink. Adhere the soft Sea Foam panel to the card front, straight with Stampin’ Dimensionals.
Tie a bow with the Shaded Spruce & Soft Sea Foam 1/2″ Bordered Ribbon and adhere it to the bottom of the stamped leaf image with a Glue Dot. Add a few Shades of Green Hexagons to the card front.
Stamp the sentiment from Textured Notes stamp set in Shaded Spruce Ink on a panel of Basic White. Stamp the small leaf image from Textured Notes stamp set in Shaded Spruce and Soft Sea Foam Inks on the bottom of the panel. Adhere the Basic White panel to a Soft Sea Foam mat then to the inside of the Shaded Spruce card base.
Decorate a Basic White Medium Envelope to complete your card. Stamp the small leaf image from Textured Notes stamp set in Shaded Spruce and Soft Sea Foam Inks on the bottom of the envelope front. Adhere a panel of Turtle-y Cute DSP to the envelope flap.
Thank you for stopping by my blog today. Now that you’ve seen my card, let’s get on with the hop! Click the button below to hop over to see what Tara has created. Happy Hoping!
Just in case you get lost along the way, here is a list of the team members involved in the hop today.
If you need any stamping supplies, I’d love to be your Demonstrator. Just click HERE to go directly to my online store or drop me an email if you have any questions.
Send your loved ones elevated cards with heartfelt sentiments! • Makes 9 cards: 3 each of 3 designs with 9 coordinating envelopes • Envelopes and card bases with decorative gold foil • Precut paper pieces and unique sentiment labels • Coordinating colors: Berry Burst, Cajun Craze, Early Espresso, Mossy Meadow, Pretty Peacock (Classic Stampin’ Spot), Timid Tiger Coordinates with the Floral Charm Suite Collection (item 166141)
Subscribe to the June Paper Pumpkin Kit between 11 May and 10 June by clicking here!
Don’t miss the coordinating Hugs Abloom Dies Add-On!
Make the most of your Paper Pumpkin kits with the Hugs Abloom Dies add-on! Quickly and cleanly cut out a flower, leaf sprig, sentiment label, or Hugs sentiment to elevate your crafting projects. These additional dies are designed to work with THREE Paper Pumpkin Kits: the Inked Occasions Paper Pumpkin Kit, the Mountain Majesties Paper Pumpkin Kit, and the Full of Charm Paper Pumpkin Kit. Pair these dies with other Stampin’ Up! products for even more creative options!
DETAILS – 4 dies – Largest die: 2-1/2″ x 1-1/4″ (6.4 x 3.2 cm) – Use with a Stampin’ Cut & Emboss Machine (sold separately)
You must be a current Paper Pumpkin subscriber to purchase this item. To become a subscriber, visit www.stampinup.com/paperpumpkin.
Note: Supplies may be limited toward the end of the subscription period.


![Basic White 8 1/2" X 11" Cardstock [ 166780 ]](https://assets1.tamsnetwork.com/images/EC042017NF/166780s.jpg "Basic White 8 1/2\" X 11\" Cardstock [ 166780 ]")
![Secret Sea 8 1/2" X 11" Cardstock [ 165624 ]](https://assets1.tamsnetwork.com/images/EC042017NF/165624s.jpg "Secret Sea 8 1/2\" X 11\" Cardstock [ 165624 ]")
![Shaded Spruce 8-1/2" X 11" Cardstock [ 146981 ]](https://assets1.tamsnetwork.com/images/EC042017NF/146981s.jpg "Shaded Spruce 8-1/2\" X 11\" Cardstock [ 146981 ]")
![Basic Beige Classic Stampin Pad [ 163806 ]](https://assets1.tamsnetwork.com/images/EC042017NF/163806s.jpg "Basic Beige Classic Stampin Pad [ 163806 ]")
![Shaded Spruce Classic Stampin' Pad [ 147088 ]](https://assets1.tamsnetwork.com/images/EC042017NF/147088s.jpg "Shaded Spruce Classic Stampin' Pad [ 147088 ]")
![Versamark Pad [ 102283 ]](https://assets1.tamsnetwork.com/images/EC042017NF/102283s.jpg "Versamark Pad [ 102283 ]")
![Basics Wow! Embossing Powder [ 165679 ]](https://assets1.tamsnetwork.com/images/EC042017NF/165679s.jpg "Basics Wow! Embossing Powder [ 165679 ]")
![Heat Tool (Us And Canada) [ 129053 ]](https://assets1.tamsnetwork.com/images/EC042017NF/129053s.jpg "Heat Tool (Us And Canada) [ 129053 ]")
![Real Red Stampin' Blends Combo Pack [ 154899 ]](https://assets1.tamsnetwork.com/images/EC042017NF/154899s.jpg "Real Red Stampin' Blends Combo Pack [ 154899 ]")
![Holographic Resin Dots [ 165598 ]](https://assets1.tamsnetwork.com/images/EC042017NF/165598s.jpg "Holographic Resin Dots [ 165598 ]")
![Linen Thread [ 104199 ]](https://assets1.tamsnetwork.com/images/EC042017NF/104199s.jpg "Linen Thread [ 104199 ]")
![Basic White Medium Envelopes [ 159236 ]](https://assets1.tamsnetwork.com/images/EC042017NF/159236s.jpg "Basic White Medium Envelopes [ 159236 ]")

![Adhesive Sheets [ 152334 ]](https://assets1.tamsnetwork.com/images/EC042017NF/152334s.jpg "Adhesive Sheets [ 152334 ]")


![Take Your Pick [ 144107 ]](https://assets1.tamsnetwork.com/images/EC042017NF/144107s.jpg "Take Your Pick [ 144107 ]")


![Basic Black 8-1/2" X 11" Cardstock [ 121045 ]](https://assets1.tamsnetwork.com/images/EC042017NF/121045s.jpg "Basic Black 8-1/2\" X 11\" Cardstock [ 121045 ]")
![Poppy Parade 8-1/2" X 11" Cardstock [ 119793 ]](https://assets1.tamsnetwork.com/images/EC042017NF/119793s.jpg "Poppy Parade 8-1/2\" X 11\" Cardstock [ 119793 ]")
![Tuxedo Black Memento Ink Pad [ 132708 ]](https://assets1.tamsnetwork.com/images/EC042017NF/132708s.jpg "Tuxedo Black Memento Ink Pad [ 132708 ]")
![Cloud Cover Stampin’ Blends Combo Pack [ 165287 ]](https://assets1.tamsnetwork.com/images/EC042017NF/165287s.jpg "Cloud Cover Stampin’ Blends Combo Pack [ 165287 ]")
![Daffodil Delight Stampin' Blends Combo Pack [ 154883 ]](https://assets1.tamsnetwork.com/images/EC042017NF/154883s.jpg "Daffodil Delight Stampin' Blends Combo Pack [ 154883 ]")
![Darling Duckling Stampin’ Blends Combo Pack [ 165288 ]](https://assets1.tamsnetwork.com/images/EC042017NF/165288s.jpg "Darling Duckling Stampin’ Blends Combo Pack [ 165288 ]")
![Pecan Pie Stampin’ Blends Combo Pack [ 161674 ]](https://assets1.tamsnetwork.com/images/EC042017NF/161674s.jpg "Pecan Pie Stampin’ Blends Combo Pack [ 161674 ]")
![Poppy Parade Stampin' Blends Combo Pack [ 154958 ]](https://assets1.tamsnetwork.com/images/EC042017NF/154958s.jpg "Poppy Parade Stampin' Blends Combo Pack [ 154958 ]")
![Smoky Slate Stampin' Blends Combo Pack [ 154904 ]](https://assets1.tamsnetwork.com/images/EC042017NF/154904s.jpg "Smoky Slate Stampin' Blends Combo Pack [ 154904 ]")


![Delicate Pines Bundle (English) [ 166074 ]](https://assets1.tamsnetwork.com/images/EC042017NF/166074s.jpg "Delicate Pines Bundle (English) [ 166074 ]")
![Delicate Pines Photopolymer Stamp Set (English) [ 166067 ]](https://assets1.tamsnetwork.com/images/EC042017NF/166067s.jpg "Delicate Pines Photopolymer Stamp Set (English) [ 166067 ]")
![Delicate Pines Dies [ 166073 ]](https://assets1.tamsnetwork.com/images/EC042017NF/166073s.jpg "Delicate Pines Dies [ 166073 ]")
![Pine Tree Trimmings Photopolymer Stamp Set (English) [ 166040 ]](https://assets1.tamsnetwork.com/images/EC042017NF/166040s.jpg "Pine Tree Trimmings Photopolymer Stamp Set (English) [ 166040 ]")
![Pretty Peacock 8-1/2" X 11" Cardstock [ 150880 ]](https://assets1.tamsnetwork.com/images/EC042017NF/150880s.jpg "Pretty Peacock 8-1/2\" X 11\" Cardstock [ 150880 ]")
![Elegant Pine Snowflakes 12" X 12" (30.5 X 30.5 Cm) Designer Series Paper [ 166066 ]](https://assets1.tamsnetwork.com/images/EC042017NF/166066s.jpg "Elegant Pine Snowflakes 12\" X 12\" (30.5 X 30.5 Cm) Designer Series Paper [ 166066 ]")
![Lost Lagoon Classic Stampin' Pad [ 161678 ]](https://assets1.tamsnetwork.com/images/EC042017NF/161678s.jpg "Lost Lagoon Classic Stampin' Pad [ 161678 ]")
![Pretty Peacock Classic Stampin’ Pad [ 150083 ]](https://assets1.tamsnetwork.com/images/EC042017NF/150083s.jpg "Pretty Peacock Classic Stampin’ Pad [ 150083 ]")
![Snowflake Kisses Dies [ 166022 ]](https://assets1.tamsnetwork.com/images/EC042017NF/166022s.jpg "Snowflake Kisses Dies [ 166022 ]")
![Textured Notes Dies [ 165555 ]](https://assets1.tamsnetwork.com/images/EC042017NF/165555s.jpg "Textured Notes Dies [ 165555 ]")
![Cherry Cobbler & Pearl Adhesive Backed Berries [ 164119 ]](https://assets1.tamsnetwork.com/images/EC042017NF/164119s.jpg "Cherry Cobbler & Pearl Adhesive Backed Berries [ 164119 ]")


![Charming Day Cling Stamp Set (English) [ 166126 ]](https://assets1.tamsnetwork.com/images/EC042017NF/166126s.jpg "Charming Day Cling Stamp Set (English) [ 166126 ]")
![Mossy Meadow 8-1/2" X 11" Cardstock [ 133676 ]](https://assets1.tamsnetwork.com/images/EC042017NF/133676s.jpg "Mossy Meadow 8-1/2\" X 11\" Cardstock [ 133676 ]")
![Timid Tiger 8 1/2" X 11" Cardstock [ 165626 ]](https://assets1.tamsnetwork.com/images/EC042017NF/165626s.jpg "Timid Tiger 8 1/2\" X 11\" Cardstock [ 165626 ]")
![Floral Charm 12" X 12" (30.5 X 30.5 Cm) Designer Series Paper [ 166125 ]](https://assets1.tamsnetwork.com/images/EC042017NF/166125s.jpg "Floral Charm 12\" X 12\" (30.5 X 30.5 Cm) Designer Series Paper [ 166125 ]")
![Mossy Meadow Classic Stampin' Pad [ 147111 ]](https://assets1.tamsnetwork.com/images/EC042017NF/147111s.jpg "Mossy Meadow Classic Stampin' Pad [ 147111 ]")
![Mossy Meadow Stampin' Blends Combo Pack [ 154890 ]](https://assets1.tamsnetwork.com/images/EC042017NF/154890s.jpg "Mossy Meadow Stampin' Blends Combo Pack [ 154890 ]")
![Old Olive Stampin' Blends Combo Pack [ 154892 ]](https://assets1.tamsnetwork.com/images/EC042017NF/154892s.jpg "Old Olive Stampin' Blends Combo Pack [ 154892 ]")
![Petal Pink Stampin' Blends Combo Pack [ 154893 ]](https://assets1.tamsnetwork.com/images/EC042017NF/154893s.jpg "Petal Pink Stampin' Blends Combo Pack [ 154893 ]")
![Timid Tiger Stampin’ Blends Combo Pack [ 165291 ]](https://assets1.tamsnetwork.com/images/EC042017NF/165291s.jpg "Timid Tiger Stampin’ Blends Combo Pack [ 165291 ]")
![Stampin’ Blends Deep Combo Pack [ 158152 ]](https://assets1.tamsnetwork.com/images/EC042017NF/158152s.jpg "Stampin’ Blends Deep Combo Pack [ 158152 ]")
![Petal Pink 5/16" (8 Mm) Braided Trim [ 166140 ]](https://assets1.tamsnetwork.com/images/EC042017NF/166140s.jpg "Petal Pink 5/16\" (8 Mm) Braided Trim [ 166140 ]")
![Charming Shimmer Faceted Dots [ 166139 ]](https://assets1.tamsnetwork.com/images/EC042017NF/166139s.jpg "Charming Shimmer Faceted Dots [ 166139 ]")


![Rustic Centerpiece Cling Stamp Set [ 166186 ]](https://assets1.tamsnetwork.com/images/EC042017NF/166186s.jpg "Rustic Centerpiece Cling Stamp Set [ 166186 ]")
![Pattern Of Friendship Photopolymer Stamp Set (English) [ 165383 ]](https://assets1.tamsnetwork.com/images/EC042017NF/165383s.jpg "Pattern Of Friendship Photopolymer Stamp Set (English) [ 165383 ]")
![Gray Granite 8-1/2" X 11" Cardstock [ 146983 ]](https://assets1.tamsnetwork.com/images/EC042017NF/146983s.jpg "Gray Granite 8-1/2\" X 11\" Cardstock [ 146983 ]")
![Petal Pink 8-1/2" X 11" Cardstock [ 146985 ]](https://assets1.tamsnetwork.com/images/EC042017NF/146985s.jpg "Petal Pink 8-1/2\" X 11\" Cardstock [ 146985 ]")
![Country Woods 12" X 12" (30.5 X 30.5 Cm) Designer Series Paper [ 163393 ]](https://assets1.tamsnetwork.com/images/EC042017NF/163393s.jpg "Country Woods 12\" X 12\" (30.5 X 30.5 Cm) Designer Series Paper [ 163393 ]")
![Gray Granite Classic Stampin' Pad [ 147118 ]](https://assets1.tamsnetwork.com/images/EC042017NF/147118s.jpg "Gray Granite Classic Stampin' Pad [ 147118 ]")
![Blackberry Bliss Stampin' Blends Combo Pack [ 154877 ]](https://assets1.tamsnetwork.com/images/EC042017NF/154877s.jpg "Blackberry Bliss Stampin' Blends Combo Pack [ 154877 ]")
![Calypso Coral Stampin' Blends Combo Pack [ 154881 ]](https://assets1.tamsnetwork.com/images/EC042017NF/154881s.jpg "Calypso Coral Stampin' Blends Combo Pack [ 154881 ]")
![Crumb Cake Stampin' Blends Combo Pack [ 154882 ]](https://assets1.tamsnetwork.com/images/EC042017NF/154882s.jpg "Crumb Cake Stampin' Blends Combo Pack [ 154882 ]")
![Granny Apple Green Stampin' Blends Combo Pack [ 154885 ]](https://assets1.tamsnetwork.com/images/EC042017NF/154885s.jpg "Granny Apple Green Stampin' Blends Combo Pack [ 154885 ]")
![Lost Lagoon Stampin’ Blends Combo Pack [ 161680 ]](https://assets1.tamsnetwork.com/images/EC042017NF/161680s.jpg "Lost Lagoon Stampin’ Blends Combo Pack [ 161680 ]")
![Pretty Peacock Stampin’ Blends Combo Pack [ 161676 ]](https://assets1.tamsnetwork.com/images/EC042017NF/161676s.jpg "Pretty Peacock Stampin’ Blends Combo Pack [ 161676 ]")
![Small Blending Brushes [ 160518 ]](https://assets1.tamsnetwork.com/images/EC042017NF/160518s.jpg "Small Blending Brushes [ 160518 ]")


![Label Me Grateful Cling Stamp Set (English) [ 166108 ]](https://assets1.tamsnetwork.com/images/EC042017NF/166108s.jpg "Label Me Grateful Cling Stamp Set (English) [ 166108 ]")
![Basic White 8 1/2" X 11" Thick Cardstock [ 159229 ]](https://assets1.tamsnetwork.com/images/EC042017NF/159229s.jpg "Basic White 8 1/2\" X 11\" Thick Cardstock [ 159229 ]")
![Petunia Pop 8 1/2" X 11" Cardstock [ 163801 ]](https://assets1.tamsnetwork.com/images/EC042017NF/163801s.jpg "Petunia Pop 8 1/2\" X 11\" Cardstock [ 163801 ]")
![Unbounded Beauty 12" X 12" (30.5 X 30.5 Cm) Designer Series Paper [ 163372 ]](https://assets1.tamsnetwork.com/images/EC042017NF/163372s.jpg "Unbounded Beauty 12\" X 12\" (30.5 X 30.5 Cm) Designer Series Paper [ 163372 ]")
![Petunia Pop Classic Stampin Pad [ 163811 ]](https://assets1.tamsnetwork.com/images/EC042017NF/163811s.jpg "Petunia Pop Classic Stampin Pad [ 163811 ]")
![Uninked Stampin’ Craft Pad & Whisper White Refill [ 147277 ]](https://assets1.tamsnetwork.com/images/EC042017NF/147277s.jpg "Uninked Stampin’ Craft Pad & Whisper White Refill [ 147277 ]")
![Sunflower 3 D Embossing Folder [ 166145 ]](https://assets1.tamsnetwork.com/images/EC042017NF/166145s.jpg "Sunflower 3 D Embossing Folder [ 166145 ]")
![Petunia Pop 1/4" (6.4 Mm) Iridescent Ribbon [ 166203 ]](https://assets1.tamsnetwork.com/images/EC042017NF/166203s.jpg "Petunia Pop 1/4\" (6.4 Mm) Iridescent Ribbon [ 166203 ]")
![2024 2026 In Color™ Flat Pearls [ 165266 ]](https://assets1.tamsnetwork.com/images/EC042017NF/165266s.jpg "2024 2026 In Color™ Flat Pearls [ 165266 ]")


![Berry Burst 8-1/2" X 11" Cardstock [ 144243 ]](https://assets1.tamsnetwork.com/images/EC042017NF/144243s.jpg "Berry Burst 8-1/2\" X 11\" Cardstock [ 144243 ]")
![Night Of Navy 8-1/2" X 11" Cardstock [ 100867 ]](https://assets1.tamsnetwork.com/images/EC042017NF/100867s.jpg "Night Of Navy 8-1/2\" X 11\" Cardstock [ 100867 ]")
![Night Of Navy Classic Stampin' Pad [ 147110 ]](https://assets1.tamsnetwork.com/images/EC042017NF/147110s.jpg "Night Of Navy Classic Stampin' Pad [ 147110 ]")
![Blender Pens [ 102845 ]](https://assets1.tamsnetwork.com/images/EC042017NF/102845s.jpg "Blender Pens [ 102845 ]")


![Blackberry Bliss 8-1/2" X 11" Cardstock [ 133675 ]](https://assets1.tamsnetwork.com/images/EC042017NF/133675s.jpg "Blackberry Bliss 8-1/2\" X 11\" Cardstock [ 133675 ]")
![Lost Lagoon 8-1/2" X 11" Cardstock [ 133679 ]](https://assets1.tamsnetwork.com/images/EC042017NF/133679s.jpg "Lost Lagoon 8-1/2\" X 11\" Cardstock [ 133679 ]")
![Blackberry Bliss Classic Stampin' Pad [ 147092 ]](https://assets1.tamsnetwork.com/images/EC042017NF/147092s.jpg "Blackberry Bliss Classic Stampin' Pad [ 147092 ]")
![Berry Burst Stampin’ Blends Combo Pack [ 161681 ]](https://assets1.tamsnetwork.com/images/EC042017NF/161681s.jpg "Berry Burst Stampin’ Blends Combo Pack [ 161681 ]")


![Cheers & Sips Bundle (English) [ 165594 ]](https://assets1.tamsnetwork.com/images/EC042017NF/165594s.jpg "Cheers & Sips Bundle (English) [ 165594 ]")
![Cheers & Sips Photopolymer Stamp Set (English) [ 165588 ]](https://assets1.tamsnetwork.com/images/EC042017NF/165588s.jpg "Cheers & Sips Photopolymer Stamp Set (English) [ 165588 ]")
![Cheers & Sips Dies [ 165593 ]](https://assets1.tamsnetwork.com/images/EC042017NF/165593s.jpg "Cheers & Sips Dies [ 165593 ]")
![Peach Pie 8 1/2" X 11" Cardstock [ 163799 ]](https://assets1.tamsnetwork.com/images/EC042017NF/163799s.jpg "Peach Pie 8 1/2\" X 11\" Cardstock [ 163799 ]")
![Celebratory Sips 12" X 12" (30.5 X 30.5 Cm) Designer Series Paper [ 165586 ]](https://assets1.tamsnetwork.com/images/EC042017NF/165586s.jpg "Celebratory Sips 12\" X 12\" (30.5 X 30.5 Cm) Designer Series Paper [ 165586 ]")
![Timid Tiger Classic Stampin' Pad [ 165278 ]](https://assets1.tamsnetwork.com/images/EC042017NF/165278s.jpg "Timid Tiger Classic Stampin' Pad [ 165278 ]")
![Gold Striped 3/8" (1 Cm) Mesh Ribbon [ 165599 ]](https://assets1.tamsnetwork.com/images/EC042017NF/165599s.jpg "Gold Striped 3/8\" (1 Cm) Mesh Ribbon [ 165599 ]")
![Drusy Adhesive Backed Embellishments [ 164223 ]](https://assets1.tamsnetwork.com/images/EC042017NF/164223s.jpg "Drusy Adhesive Backed Embellishments [ 164223 ]")


![With You In Mind Photopolymer Stamp Set (English) [ 164747 ]](https://assets1.tamsnetwork.com/images/EC042017NF/164747s.jpg "With You In Mind Photopolymer Stamp Set (English) [ 164747 ]")
![Textured Notes Bundle (English) [ 165556 ]](https://assets1.tamsnetwork.com/images/EC042017NF/165556s.jpg "Textured Notes Bundle (English) [ 165556 ]")
![Textured Notes Cling Stamp Set (English) [ 165548 ]](https://assets1.tamsnetwork.com/images/EC042017NF/165548s.jpg "Textured Notes Cling Stamp Set (English) [ 165548 ]")
![Soft Sea Foam 8-1/2" X 11" Cardstock [ 146988 ]](https://assets1.tamsnetwork.com/images/EC042017NF/146988s.jpg "Soft Sea Foam 8-1/2\" X 11\" Cardstock [ 146988 ]")
![Turtle Y Cute 12" X 12" (30.5 X 30.5 Cm) Designer Series Paper [ 165221 ]](https://assets1.tamsnetwork.com/images/EC042017NF/165221s.jpg "Turtle Y Cute 12\" X 12\" (30.5 X 30.5 Cm) Designer Series Paper [ 165221 ]")
![Soft Sea Foam Classic Stampin' Pad [ 147102 ]](https://assets1.tamsnetwork.com/images/EC042017NF/147102s.jpg "Soft Sea Foam Classic Stampin' Pad [ 147102 ]")
![Shades Of Green Hexagons [ 165233 ]](https://assets1.tamsnetwork.com/images/EC042017NF/165233s.jpg "Shades Of Green Hexagons [ 165233 ]")
![Shaded Spruce & Soft Sea Foam 1/2" (1.3 Cm) Ribbon [ 165234 ]](https://assets1.tamsnetwork.com/images/EC042017NF/165234s.jpg "Shaded Spruce & Soft Sea Foam 1/2\" (1.3 Cm) Ribbon [ 165234 ]")

