
Good Wednesday morning my stamping friends. How is everyone doing today? We’re halfway through the week and on our way to the weekend already. It’s bee COLD here in NJ. Last night we were at -2, that’s about 78 degrees too cold for me. Last I heard we’re expecting a foot of snow this weekend. My husband is never going to finish shoveling at this rate.
Today’s card is for the inspiration challenge from The Card Concepts. The inspiration photo #223b is Cozy New Year. They’ve added a 2nd inspiration photo for this month, so don’t forget to head over and join in. If you’d like to see a quick video of how I made this card, Click Here to go to my Instagram Reels. Here’s my card for today.
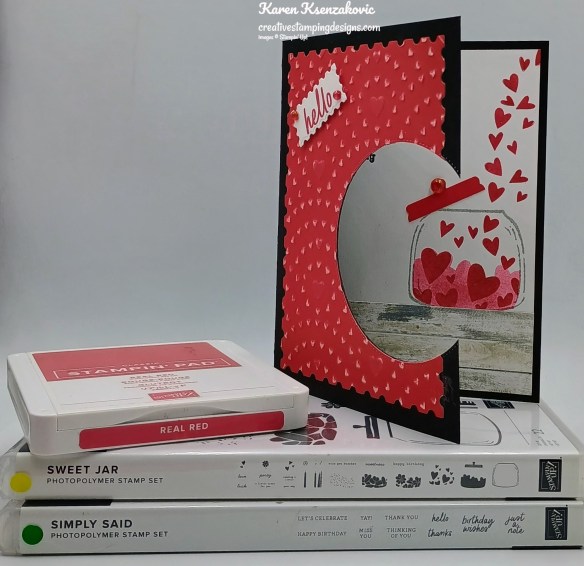
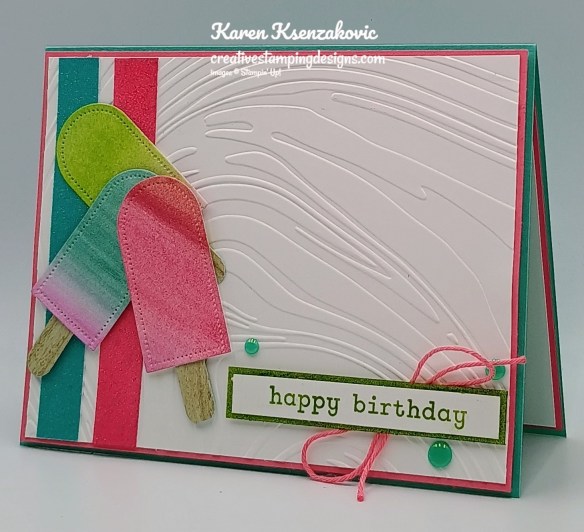
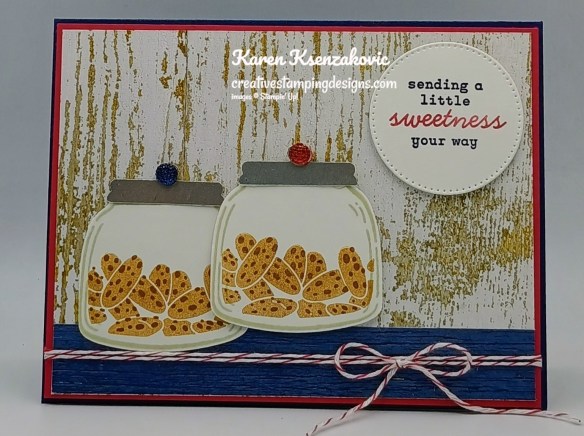
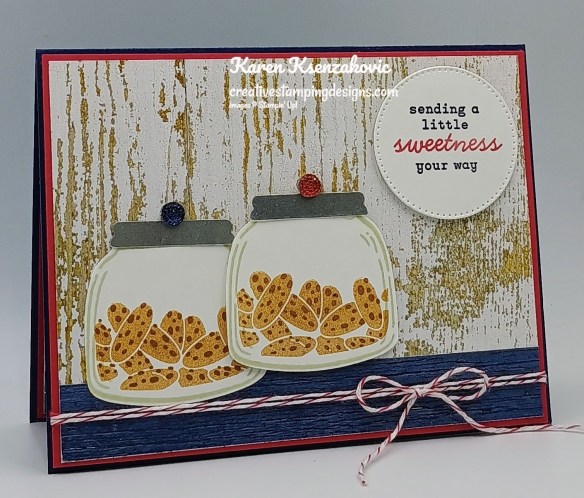
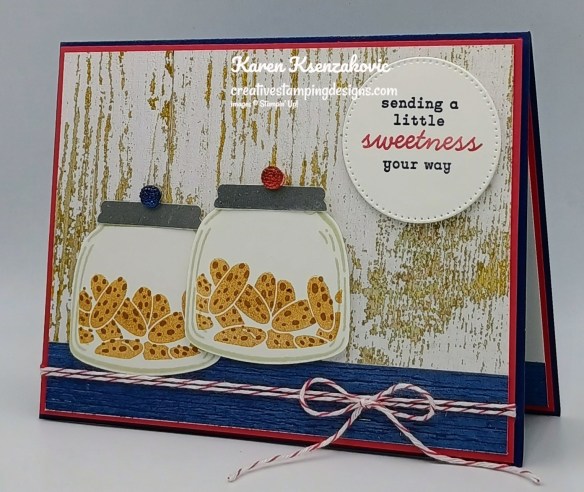
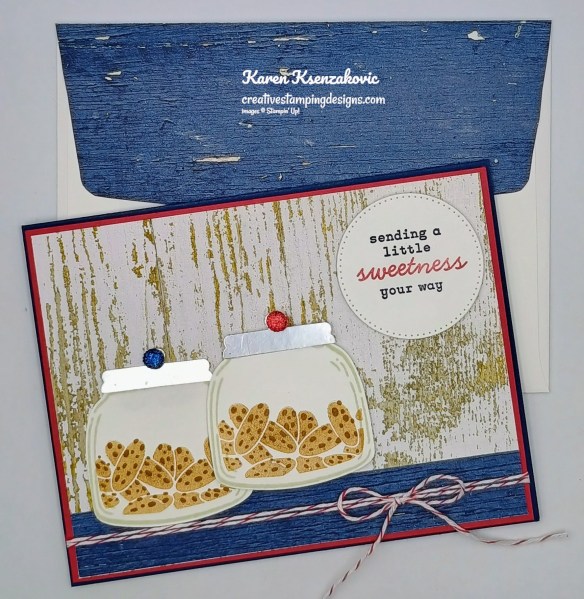
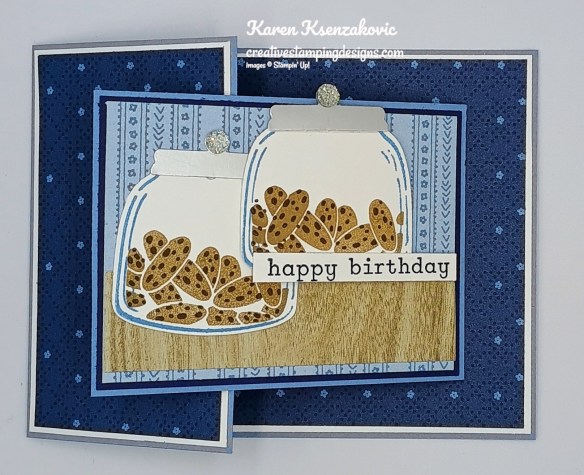
I used the Stampin’ Up! Sweet Jar Bundle along with the Stampin’ Up! Simply Said Stamp Set, Perennial Postage Dies, Stylish Shapes Dies and Hearts of Love Embossing Folder for my card today. I was inspired by all the hearts and colors for my Clean & Layered card.
I hope you will take a moment to visit The Card Concepts and join us for our challenge 223b. How are you inspired by the photos?
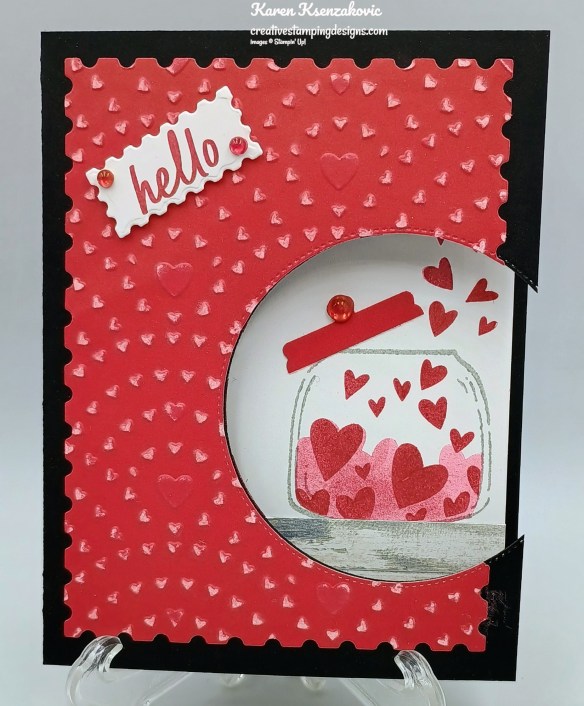
Cut a panel of Real Red Two-Tone cardstock using the largest Perennial Postage Die.
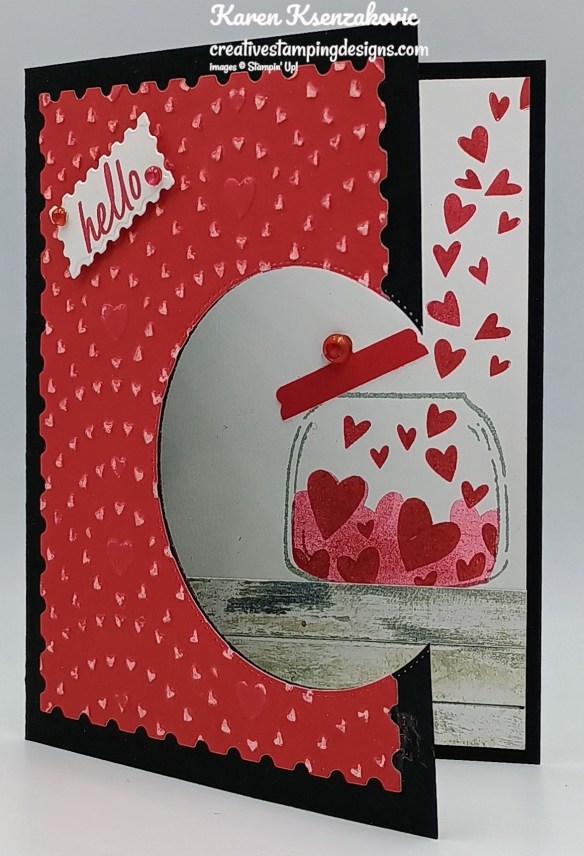
Using the largest circle from the Stylish Shapes Dies, cut the panel of Real Red Two-Tone cardstock and the Basic Black card base. Emboss the Real Red panel using the Hearts of Love EF. Use a sanding block over the Two-Tone cardstock to highlight the hearts. Adhere the embossed panel to the card front, lining up the die cut areas.
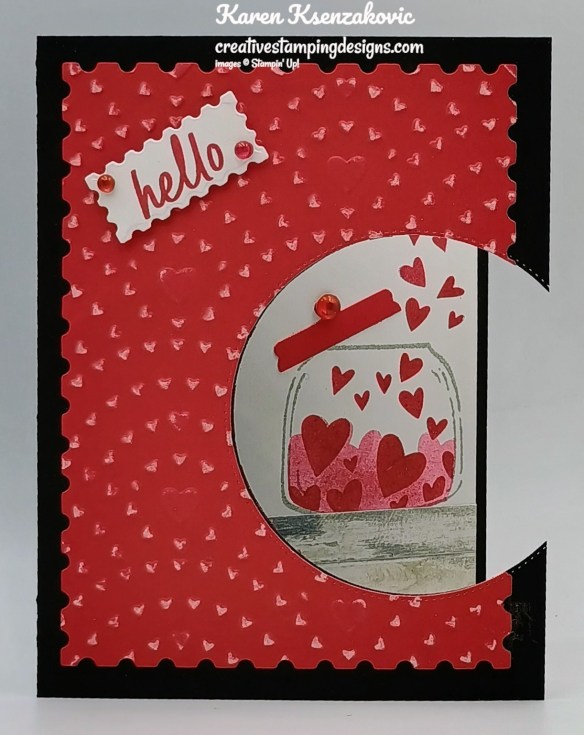
On a panel of Basic White, stamp the sentiment from Simply Said stamp set in Real Red Ink. Cut the sentiment out using the smallest Perennial Postage Die. Adhere the sentiment to the card front with Stampin’ Dimensionals. Add a couple Holographic Resin Dots, colored with the Real Red Stampin’ Blend Marker, to the sentiment.

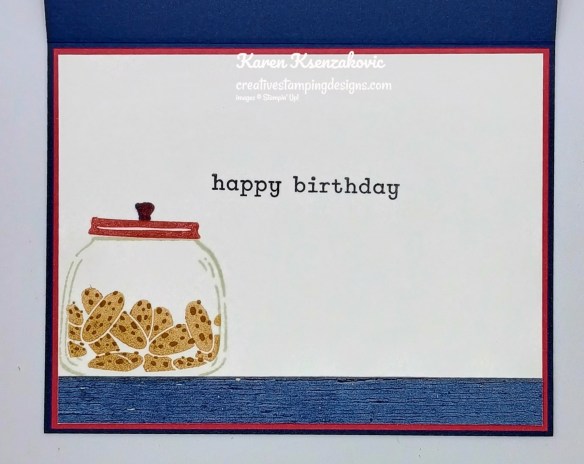
Stamp the jar image from the Sweet Jar stamp set in Smoky Slate Ink on a Basic White panel making sure it will show through the opening on the card front. Stamp the detailed heart image from the Sweet Jar stamp set in Real Red Ink inside the jar. Stamp the solid heart image from the Sweet Jar stamp set in Real Red Ink, stamping off 2 times on scrap paper, over the detailed image. Stamp the small heart images from the Sweet Jar stamp set above the jar. Stamp the sentiments from the Sweet Jar stamp set in Tuxedo Black and Real Red Inks. Using the Sweet Jar Builder Punch, punch the lid out of the scrap of Real Red Two-Tone cardstock and adhere it to the jar. Add a Holographic Resin Dot that was colored with Real Red Stampin’ Blend Marker, to the lid knob.
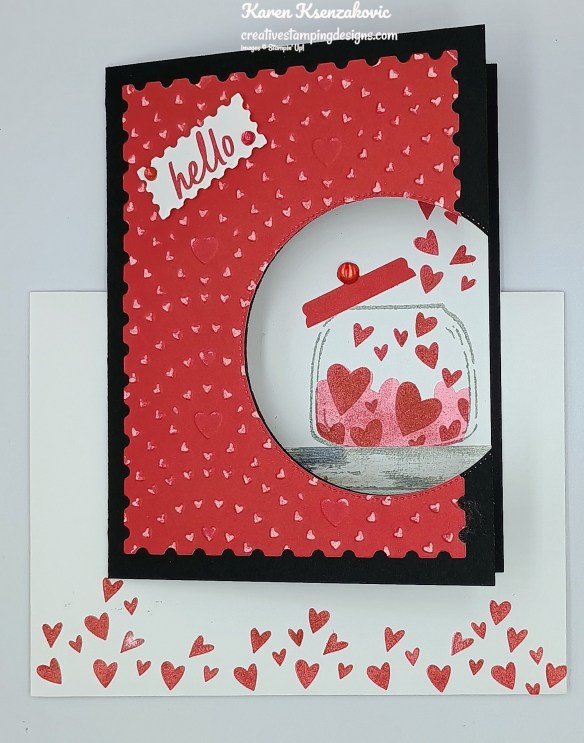
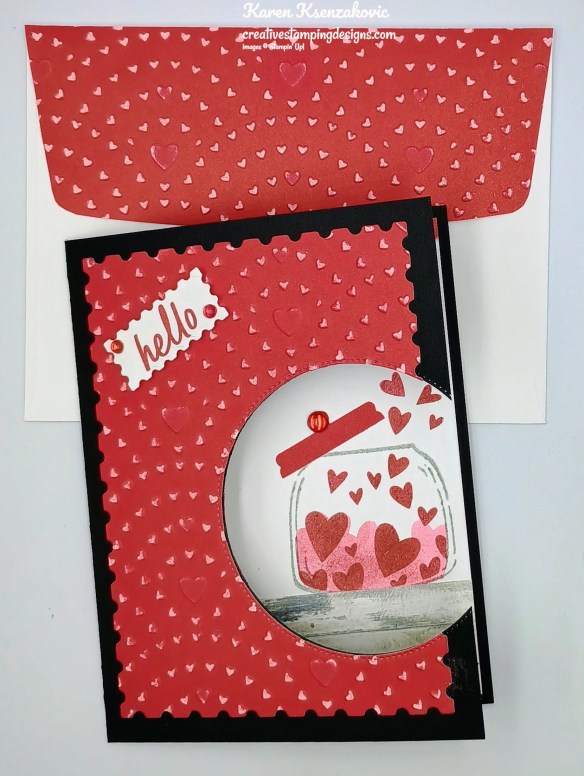
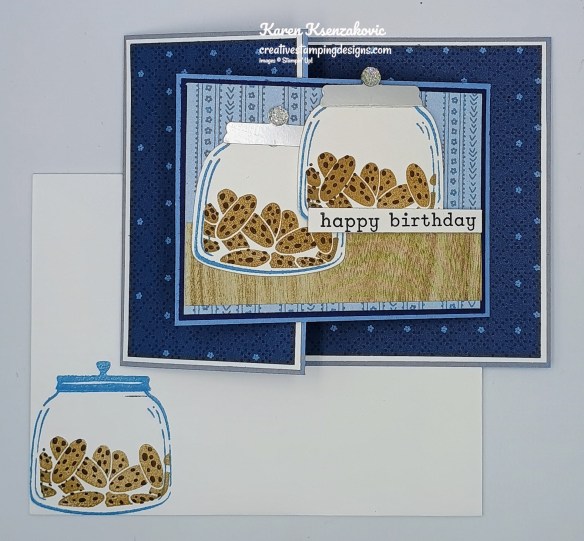
Decorate a Basic White Medium Envelope to complete the card. Stamp the small heart images from the Sweet Jar stamp set in Real Red Ink across the bottom of the envelope front. emboss a panel of Real Red Two-Tone cardstock using the Hearts of Love EF. Use a sanding block on the embossed panel and adhere it to the envelope flap.
Thank you for stopping by my blog today. I hope you like the card and will give it a try. Happy Stamping!!
*********************************************************************************************************
If you need any stamping supplies, I’d love to be your Demonstrator. Just click HERE to go directly to my online store or drop me an email if you have any questions.
*********************************************************************************************************
Bonus Days Going On!!!

It’s almost time for BONUS DAYS! Because do you know what’s a great deal? Getting rewarded for all the crafting supplies you’re already going to buy! When you shop between January 6 and February 2 and spend $50 USD, you will earn a $5 USD coupon! Make sure you save all your coupons because you can redeem them (and we mean ALL of them) between February 3 and 28. And don’t forget—each purchase earns you Stampin’ Rewards, so that’s even more bang for your buck! There’s no limit to how many coupons you can earn!
Details:
- Earn a $5 USD coupon for every $50 USD spent (before shipping and tax).
- All coupon codes will be emailed right after a qualifying purchase has been made. You must have a customer account with a valid email address to earn coupons when you shop.
- If you earn multiple codes from a single order, you will receive one email with multiple codes. If you earn multiple codes from multiple orders, you will receive separate emails for each code earned.
- All order types qualify for this promotion.
- Orders started before the promotion begins will not count toward earning coupon codes. You must add items to your cart and complete your purchase during the earning period.
- There is no limit to the number of coupon codes participants can earn per order or throughout the duration of the earning period.
*********************************************************************************************************
New Stampin’ Up! Product of The Month
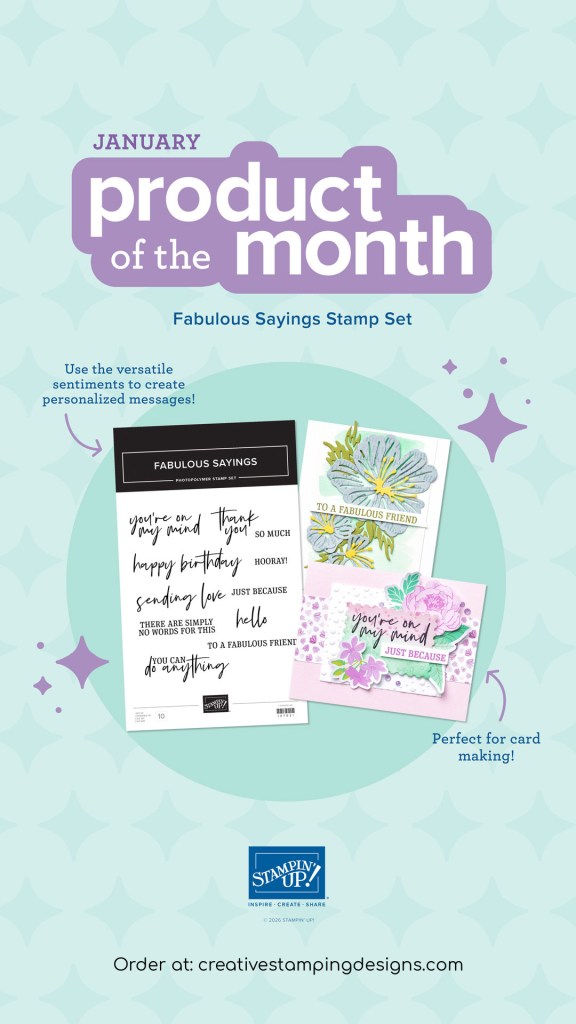
Send thoughtful messages with style using the Fabulous Sayings Stamp Set! This versatile stamp set features all-occasion sentiment stamps for birthdays, thank-you notes, love, friendship, and support cards. The mix of a handwritten script with a classic serif font pair beautifully with a wide range of card making and paper crafting styles. The Fabulous Sayings Stamp Set is the exclusive Product of the Month for January 2026! Only available until stocks run out—don’t wait to get yours! This is a Two-Step Stampin’ set; it allows you to layer two or more images to create one final image with extra texture and dimension in the colors you want.
DETAILS
– January 2026 Product of the Month
– 11 photopolymer stamps
– Suggested clear blocks (sold separately): c, h
– Two-Step
PRODUCT OF THE MONTH
– Is a new exclusive product released each month!
– Can be unlocked for just $5 with orders over $75 (after discounts and rewards).
– Is only available while supplies last—they can sell out quickly!
– Is limited to one per customer (including language versions).
*********************************************************************************************************
Card stock cuts for this project:
- Basic Black Cardstock 5 1/2″ x 8 1/2″ (card base scored & folded at 4 1/4″)
- Basic White Cardstock 1 1/4″ x 3″ (sentiment), 4″ x 5 1/4″ (inner liner)
- Real Red Two-Tone Cardstock 4″ x 5 1/4″(card front), 2 1/4″ x 6″(envelope flap)
- Country Woods Designer Series Paper 1 1/4″ x 4″(inner liner)
*********************************************************************************************************
Product List
![Sweet Jar Bundle (English) [ 165507 ]](https://assets1.tamsnetwork.com/images/EC042017NF/165507s.jpg "Sweet Jar Bundle (English) [ 165507 ]")
![Sweet Jar Photopolymer Stamp Set (English) [ 165501 ]](https://assets1.tamsnetwork.com/images/EC042017NF/165501s.jpg "Sweet Jar Photopolymer Stamp Set (English) [ 165501 ]")
![Sweet Jar Builder Punch [ 165506 ]](https://assets1.tamsnetwork.com/images/EC042017NF/165506s.jpg "Sweet Jar Builder Punch [ 165506 ]")
![Simply Said Mix & Match Photopolymer Stamp Set (English) [ 163756 ]](https://assets1.tamsnetwork.com/images/EC042017NF/163756s.jpg "Simply Said Mix & Match Photopolymer Stamp Set (English) [ 163756 ]")
![Basic Black 8-1/2" X 11" Cardstock [ 121045 ]](https://assets1.tamsnetwork.com/images/EC042017NF/121045s.jpg "Basic Black 8-1/2\" X 11\" Cardstock [ 121045 ]")
![Basic White 8 1/2" X 11" Cardstock [ 166780 ]](https://assets1.tamsnetwork.com/images/EC042017NF/166780s.jpg "Basic White 8 1/2\" X 11\" Cardstock [ 166780 ]")
![Real Red 12" X 12" (30.5 X 30.5 Cm) Two Tone Cardstock [ 166696 ]](https://assets1.tamsnetwork.com/images/EC042017NF/166696s.jpg "Real Red 12\" X 12\" (30.5 X 30.5 Cm) Two Tone Cardstock [ 166696 ]")
![Real Red Classic Stampin' Pad [ 147084 ]](https://assets1.tamsnetwork.com/images/EC042017NF/147084s.jpg "Real Red Classic Stampin' Pad [ 147084 ]")
![Smoky Slate Classic Stampin' Pad [ 147113 ]](https://assets1.tamsnetwork.com/images/EC042017NF/147113s.jpg "Smoky Slate Classic Stampin' Pad [ 147113 ]")
![Tuxedo Black Memento Ink Pad [ 132708 ]](https://assets1.tamsnetwork.com/images/EC042017NF/132708s.jpg "Tuxedo Black Memento Ink Pad [ 132708 ]")
![Hearts Of Love 3 D Embossing Folder [ 167071 ]](https://assets1.tamsnetwork.com/images/EC042017NF/167071s.jpg "Hearts Of Love 3 D Embossing Folder [ 167071 ]")
![Perennial Postage Dies [ 162607 ]](https://assets1.tamsnetwork.com/images/EC042017NF/162607s.jpg "Perennial Postage Dies [ 162607 ]")
![Stylish Shapes Dies [ 159183 ]](https://assets1.tamsnetwork.com/images/EC042017NF/159183s.jpg "Stylish Shapes Dies [ 159183 ]")
![Holographic Resin Dots [ 165598 ]](https://assets1.tamsnetwork.com/images/EC042017NF/165598s.jpg "Holographic Resin Dots [ 165598 ]")
![Basic White Medium Envelopes [ 159236 ]](https://assets1.tamsnetwork.com/images/EC042017NF/159236s.jpg "Basic White Medium Envelopes [ 159236 ]")


![Tear & Tape Adhesive [ 154031 ]](https://assets1.tamsnetwork.com/images/EC042017NF/154031s.jpg "Tear & Tape Adhesive [ 154031 ]")

![Take Your Pick [ 144107 ]](https://assets1.tamsnetwork.com/images/EC042017NF/144107s.jpg "Take Your Pick [ 144107 ]")


![Coastal Cabana 8-1/2" X 11" Cardstock [ 131297 ]](https://assets1.tamsnetwork.com/images/EC042017NF/131297s.jpg "Coastal Cabana 8-1/2\" X 11\" Cardstock [ 131297 ]")
![Strawberry Slush 8 1/2" X 11" Cardstock [ 165625 ]](https://assets1.tamsnetwork.com/images/EC042017NF/165625s.jpg "Strawberry Slush 8 1/2\" X 11\" Cardstock [ 165625 ]")
![Country Woods 12" X 12" (30.5 X 30.5 Cm) Designer Series Paper [ 163393 ]](https://assets1.tamsnetwork.com/images/EC042017NF/163393s.jpg "Country Woods 12\" X 12\" (30.5 X 30.5 Cm) Designer Series Paper [ 163393 ]")
![Full Of Life 6" X 6" (15.2 X 15.2 Cm) Designer Series Paper [ 163357 ]](https://assets1.tamsnetwork.com/images/EC042017NF/163357s.jpg "Full Of Life 6\" X 6\" (15.2 X 15.2 Cm) Designer Series Paper [ 163357 ]")
![Pastel Ombre Glimmer 12" X 12" (30.5 X 30.5 Cm) Specialty Paper [ 164851 ]](https://assets1.tamsnetwork.com/images/EC042017NF/164851s.jpg "Pastel Ombre Glimmer 12\" X 12\" (30.5 X 30.5 Cm) Specialty Paper [ 164851 ]")
![Coastal Cabana Classic Stampin' Pad [ 147097 ]](https://assets1.tamsnetwork.com/images/EC042017NF/147097s.jpg "Coastal Cabana Classic Stampin' Pad [ 147097 ]")
![Granny Apple Green Stampin' Pad [ 147095 ]](https://assets1.tamsnetwork.com/images/EC042017NF/147095s.jpg "Granny Apple Green Stampin' Pad [ 147095 ]")
![Strawberry Slush Classic Stampin' Pad [ 165286 ]](https://assets1.tamsnetwork.com/images/EC042017NF/165286s.jpg "Strawberry Slush Classic Stampin' Pad [ 165286 ]")
![Blending Brushes [ 153611 ]](https://assets1.tamsnetwork.com/images/EC042017NF/153611s.jpg "Blending Brushes [ 153611 ]")
![So Swirly Embossing Folder [ 163791 ]](https://assets1.tamsnetwork.com/images/EC042017NF/163791s.jpg "So Swirly Embossing Folder [ 163791 ]")
![Everyday Arches Dies [ 164629 ]](https://assets1.tamsnetwork.com/images/EC042017NF/164629s.jpg "Everyday Arches Dies [ 164629 ]")
![More Messages Die [ 165472 ]](https://assets1.tamsnetwork.com/images/EC042017NF/165472s.jpg "More Messages Die [ 165472 ]")
![2024 2026 In Color™ Flat Pearls [ 165266 ]](https://assets1.tamsnetwork.com/images/EC042017NF/165266s.jpg "2024 2026 In Color™ Flat Pearls [ 165266 ]")
![Pack Your Bags Twine Three Pack [ 165582 ]](https://assets1.tamsnetwork.com/images/EC042017NF/165582s.jpg "Pack Your Bags Twine Three Pack [ 165582 ]")


![Night Of Navy 8-1/2" X 11" Cardstock [ 100867 ]](https://assets1.tamsnetwork.com/images/EC042017NF/100867s.jpg "Night Of Navy 8-1/2\" X 11\" Cardstock [ 100867 ]")
![Real Red 8-1/2" X 11" Cardstock [ 102482 ]](https://assets1.tamsnetwork.com/images/EC042017NF/102482s.jpg "Real Red 8-1/2\" X 11\" Cardstock [ 102482 ]")
![Silver Foil 12" X 12" (30.5 X 30.5 Cm) Specialty Pack [ 163096 ]](https://assets1.tamsnetwork.com/images/EC042017NF/163096s.jpg "Silver Foil 12\" X 12\" (30.5 X 30.5 Cm) Specialty Pack [ 163096 ]")
![Basic Beige Classic Stampin Pad [ 163806 ]](https://assets1.tamsnetwork.com/images/EC042017NF/163806s.jpg "Basic Beige Classic Stampin Pad [ 163806 ]")
![Night Of Navy Classic Stampin' Pad [ 147110 ]](https://assets1.tamsnetwork.com/images/EC042017NF/147110s.jpg "Night Of Navy Classic Stampin' Pad [ 147110 ]")
![Pecan Pie Classic Stampin' Pad [ 161665 ]](https://assets1.tamsnetwork.com/images/EC042017NF/161665s.jpg "Pecan Pie Classic Stampin' Pad [ 161665 ]")
![Night Of Navy Stampin' Blends Combo Pack [ 154891 ]](https://assets1.tamsnetwork.com/images/EC042017NF/154891s.jpg "Night Of Navy Stampin' Blends Combo Pack [ 154891 ]")
![Real Red Stampin' Blends Combo Pack [ 154899 ]d](https://assets1.tamsnetwork.com/images/EC042017NF/154899s.jpg "Real Red Stampin' Blends Combo Pack [ 154899 ]d")
![Real Red & White Baker's Twine [ 164051 ]](https://assets1.tamsnetwork.com/images/EC042017NF/164051s.jpg "Real Red & White Baker's Twine [ 164051 ]")
![Faceted Gems Trio Pack [ 162148 ]](https://assets1.tamsnetwork.com/images/EC042017NF/162148s.jpg "Faceted Gems Trio Pack [ 162148 ]")


 Designer Series Paper")
 Foil Sheets")


