
Good Friday morning stamping friends, welcome to my fun fold Friday. I hope you all had a great week and are looking forward to the weekend.
Today’s card is one that I did on my YouTube Live yesterday. If you were able to join me, thank you for hopping on. If you’d like to watch the replay and stamp along, the measurements are on the bottom of this post along with the link to my video. Here’s my card for today.
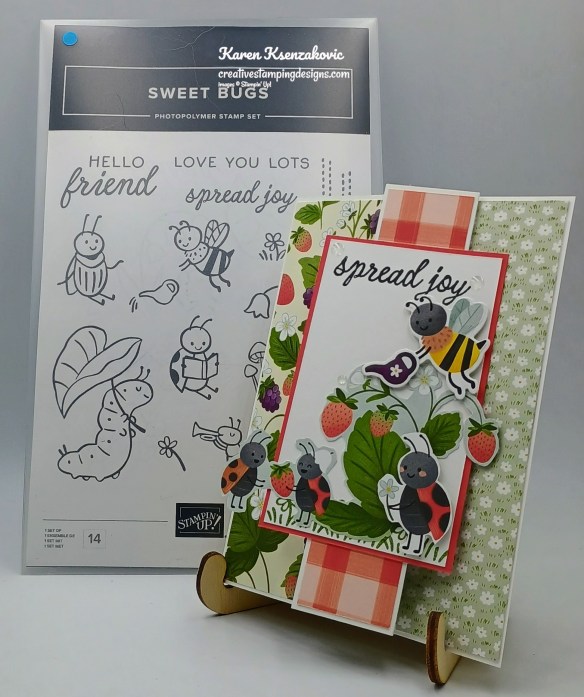
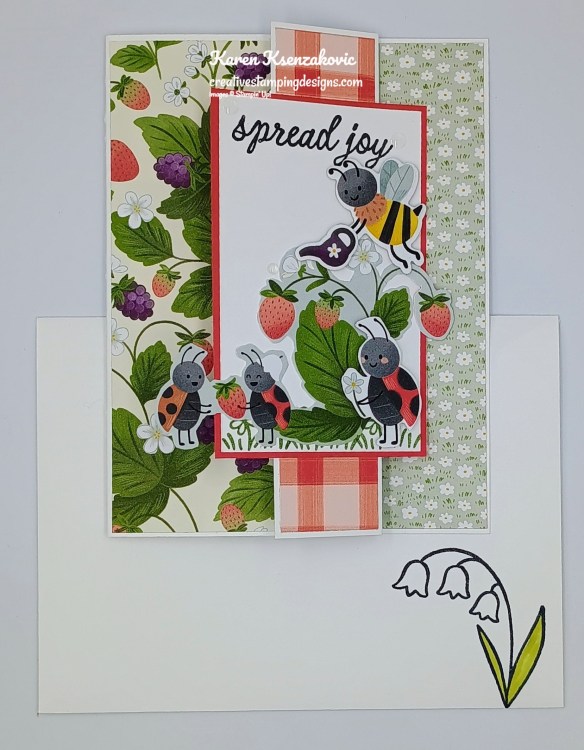
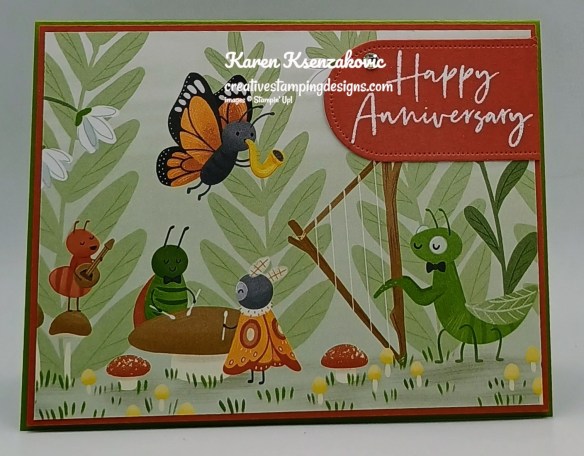
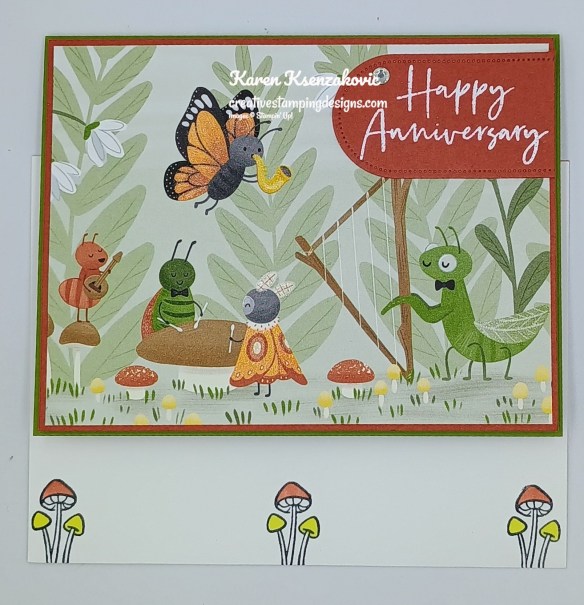
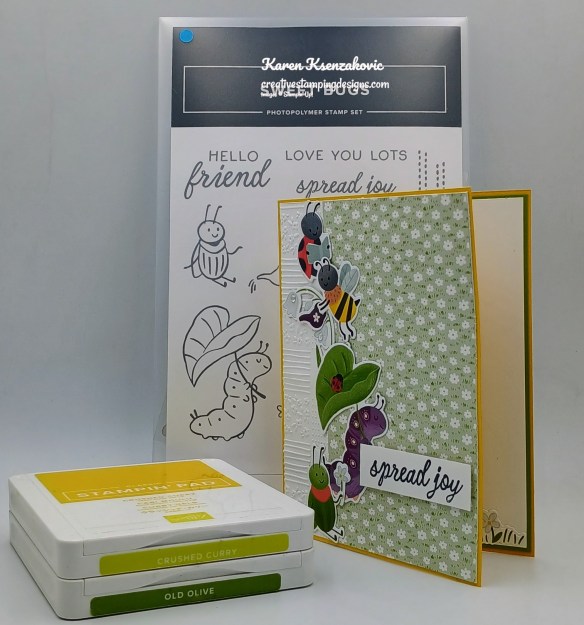
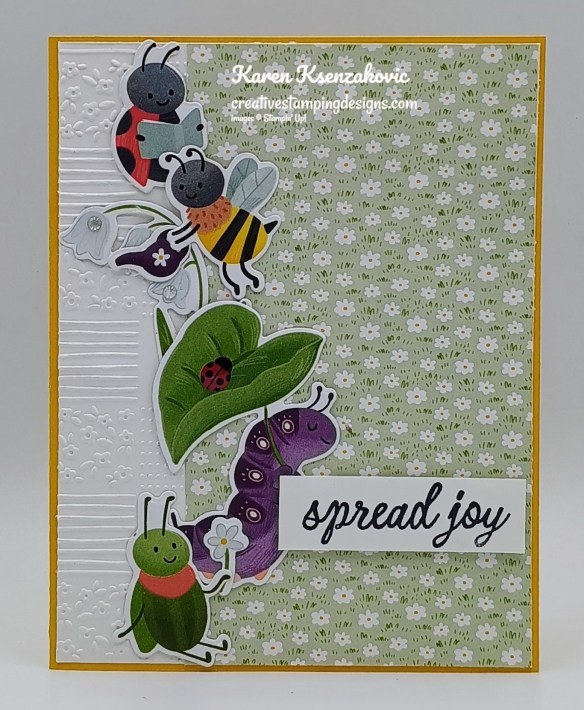
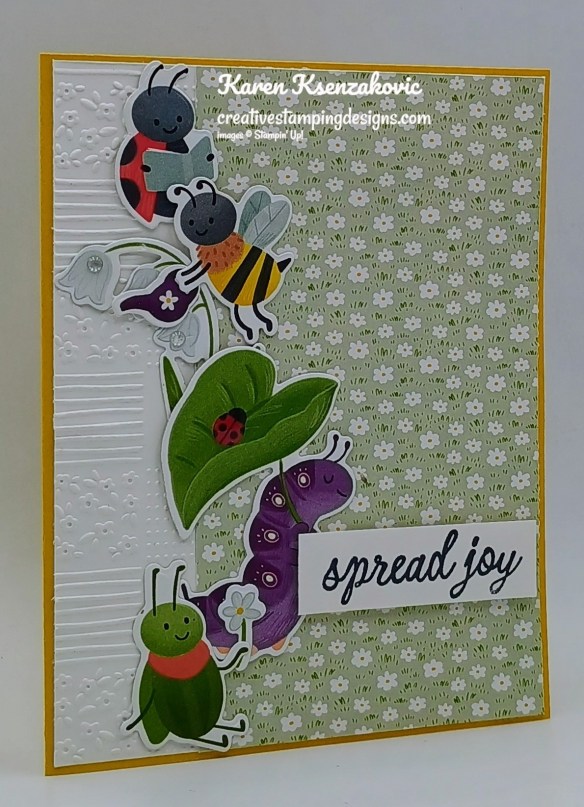
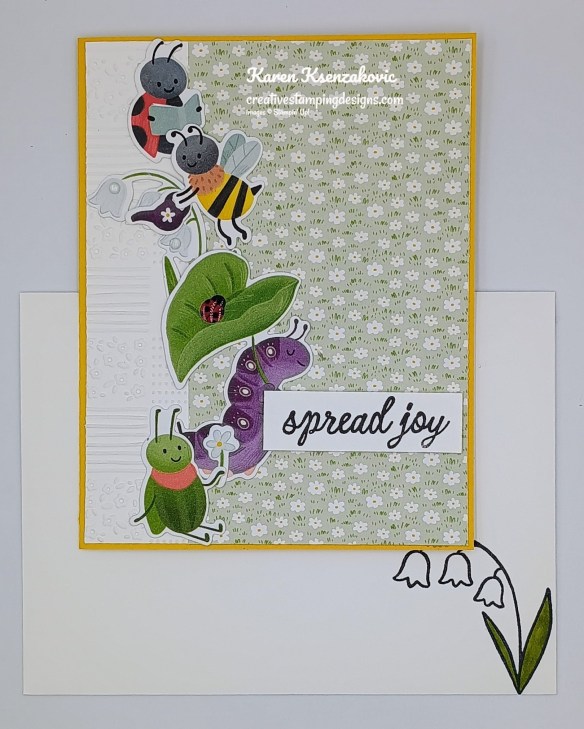
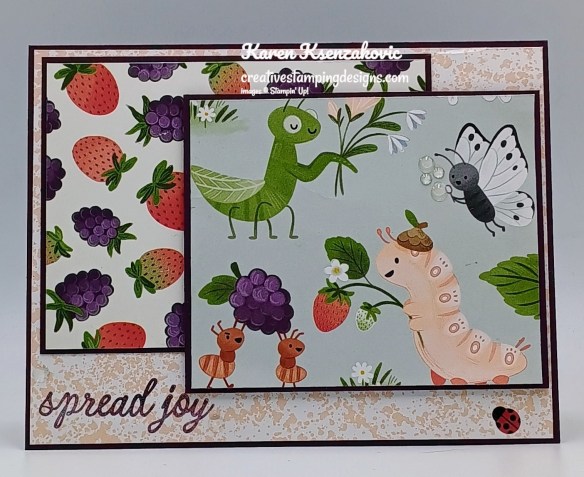
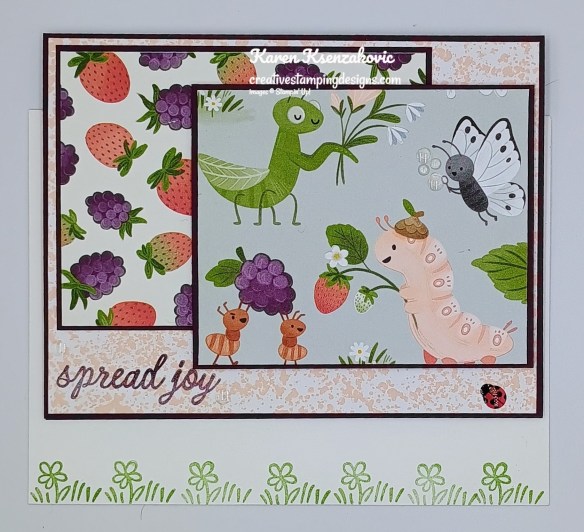
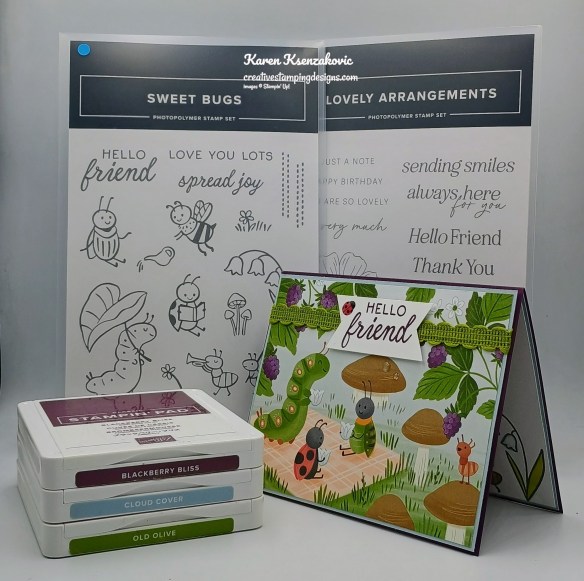
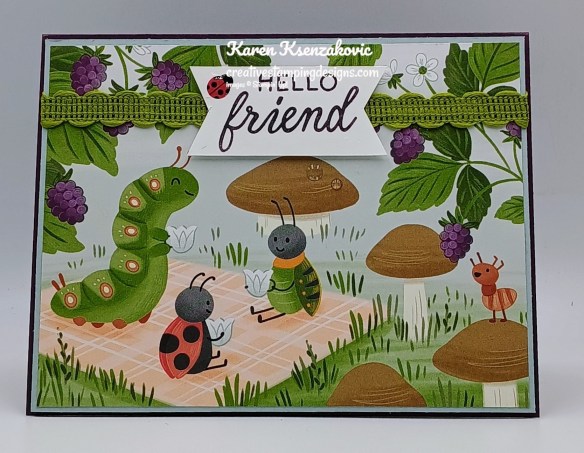
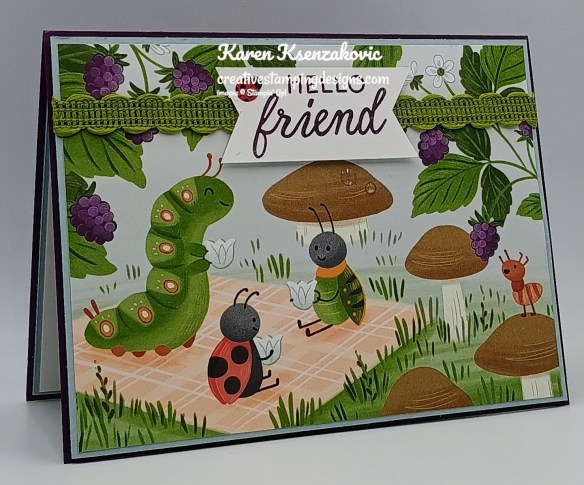
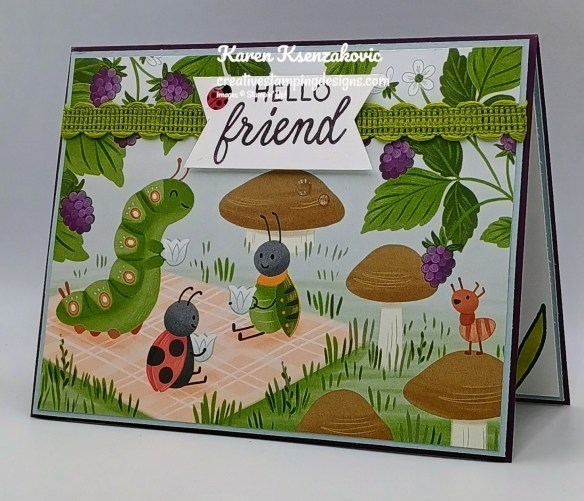
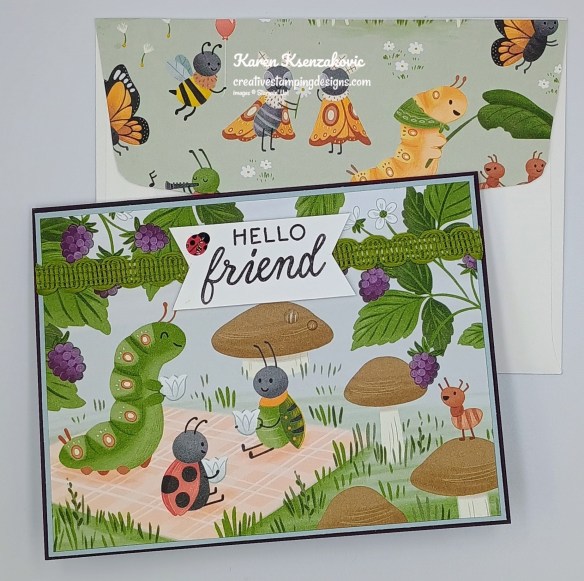
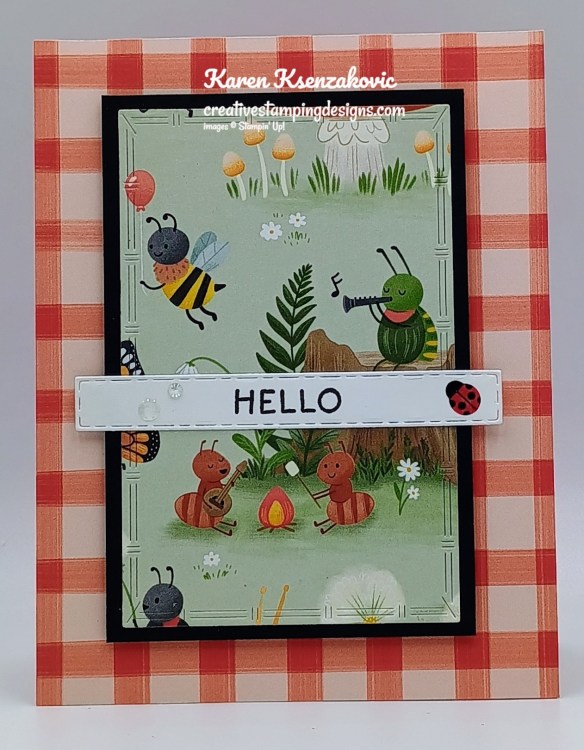
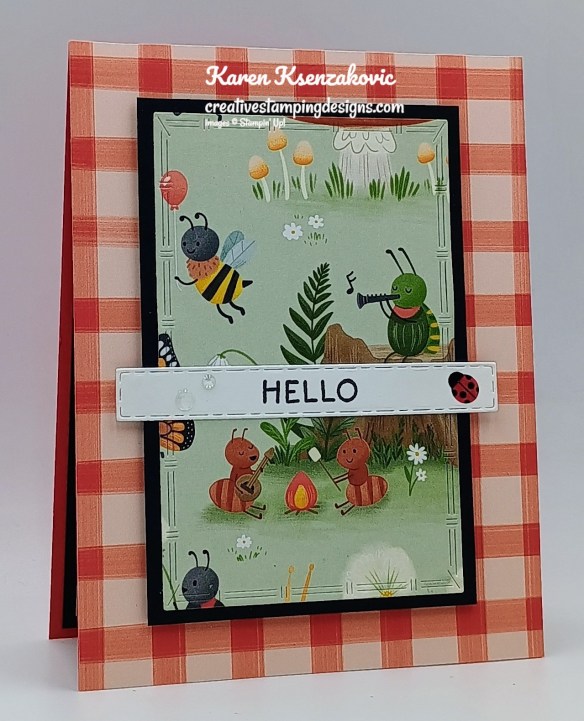
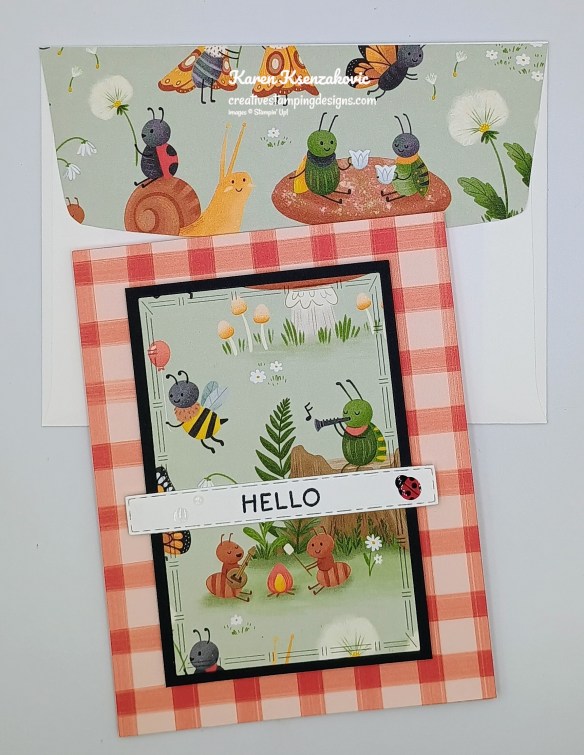
I used the Stampin’ Up! Sweet Bugs Bundle along with the Cute as a Bug Designer Series Paper for my card today.
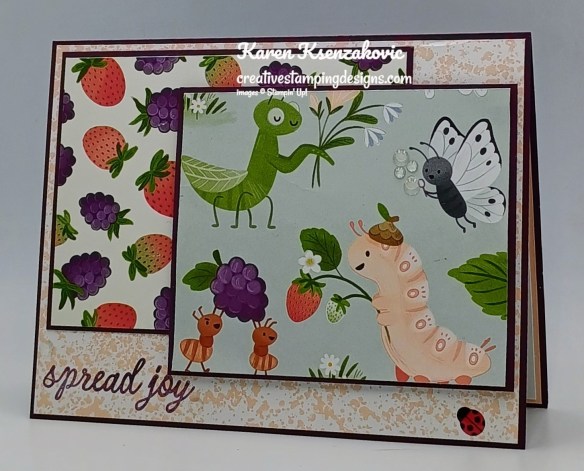
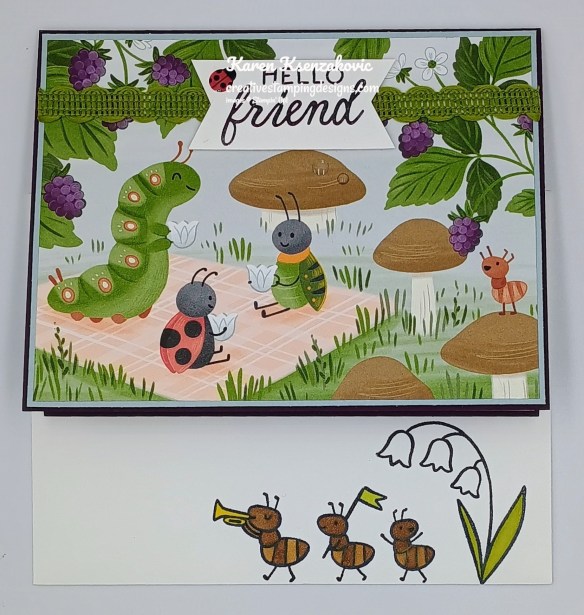
Adhere a panel of Cute as a Bug DSP to the front of the Basic White Thick card base. Adhere a narrow panel of Cute as a Bug DSP to the 1 1/4″ flap that folds over the card front.
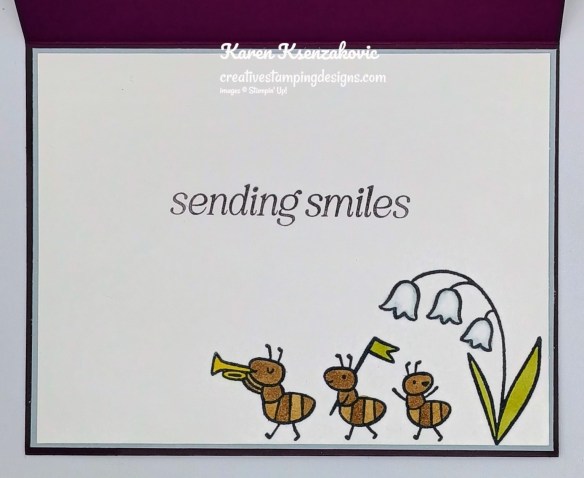
Stamp the grass/flower image from the Sweet Bugs stamp set in Old Olive Ink along the bottom of a Basic White panel. Stamp the sentiment from the Sweet Bugs stamp set in Tuxedo Black Ink on the top of the panel. Adhere the pieces of DSP that you fussy cut from the Cute as a Bug DSP to the bottom of the panel. Adhere the artwork panel to a Poppy Parade mat. Adhere the layered panel to the card front flap.
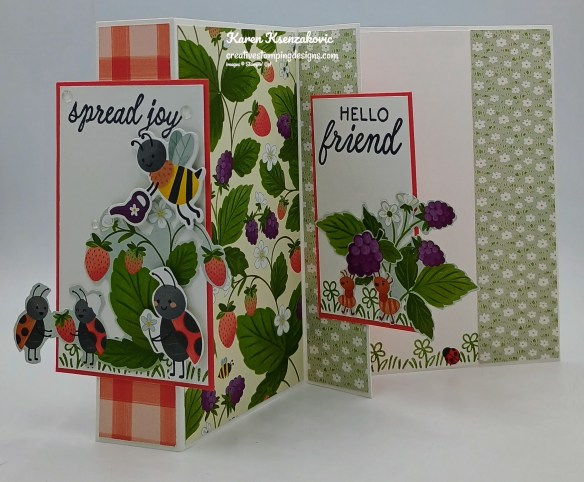
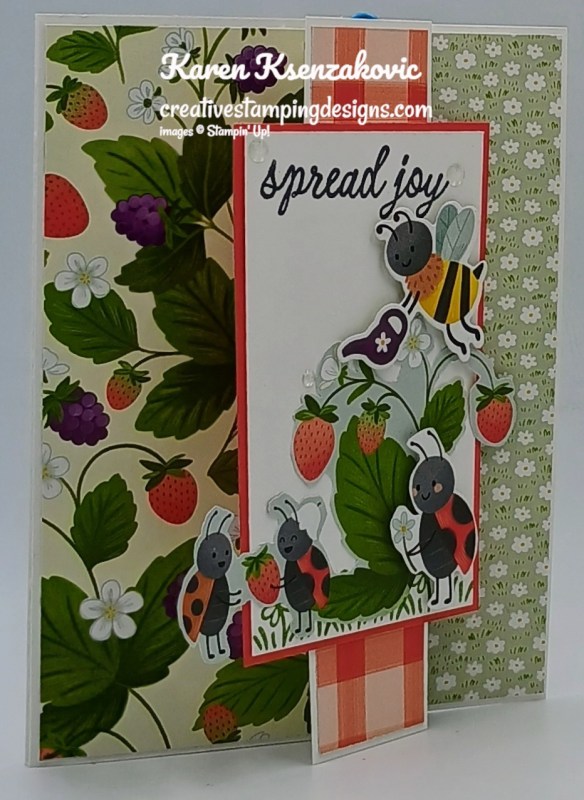
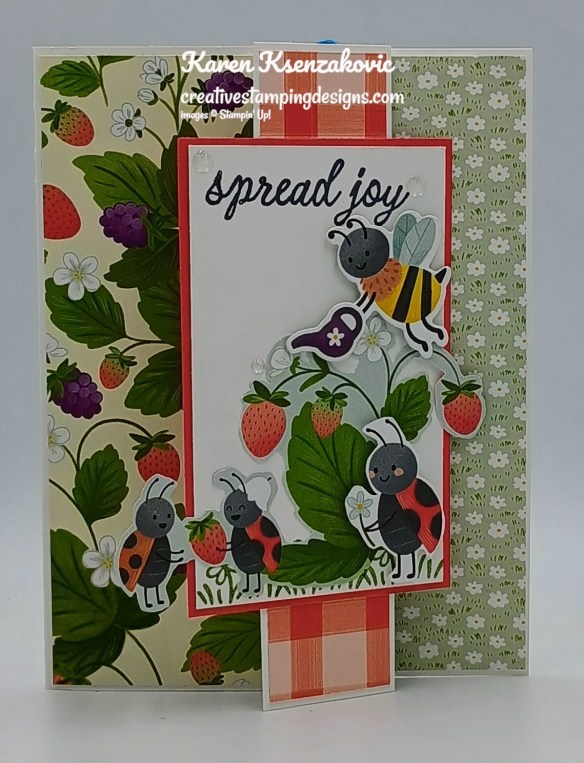
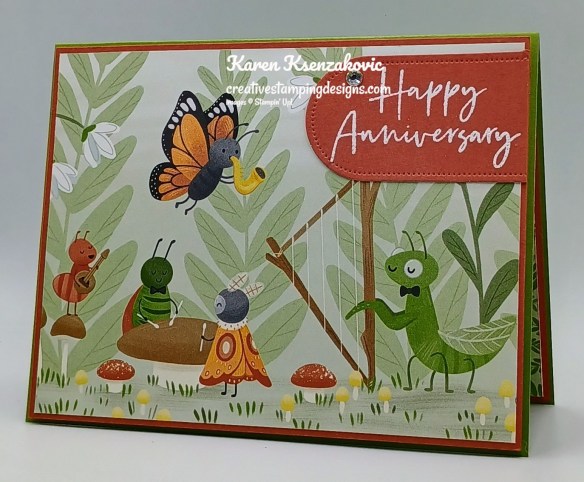
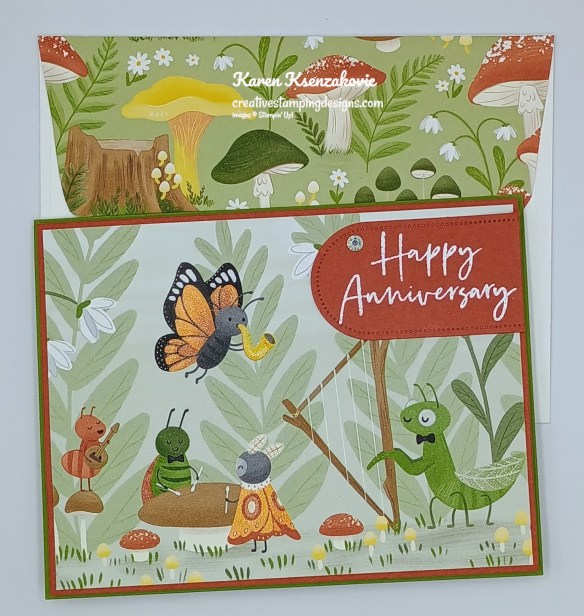
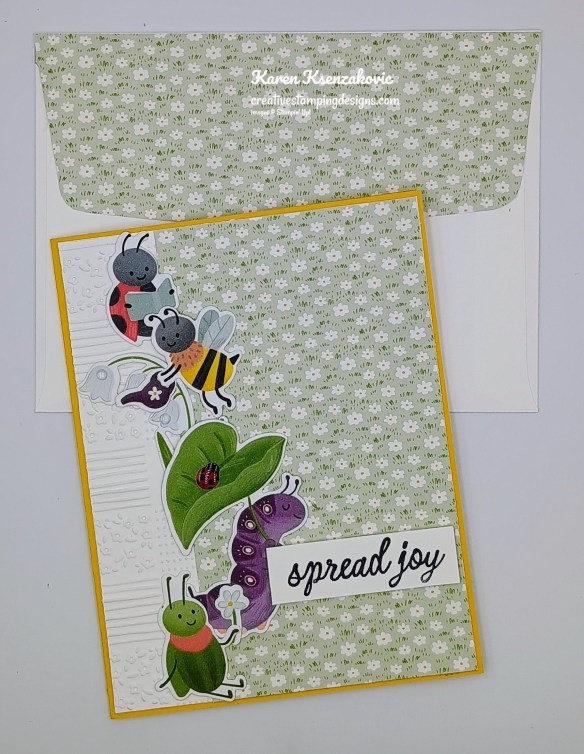
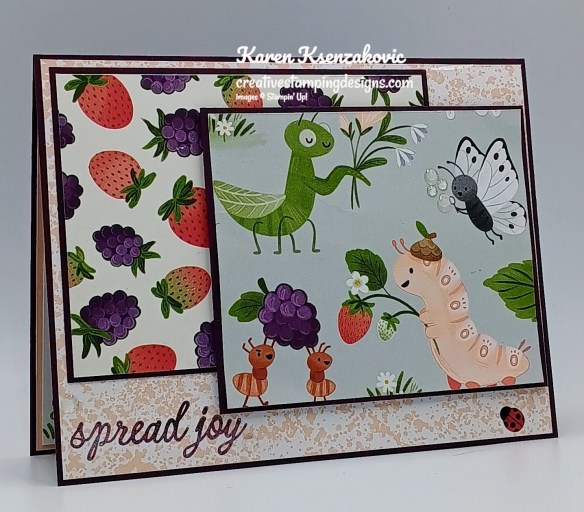
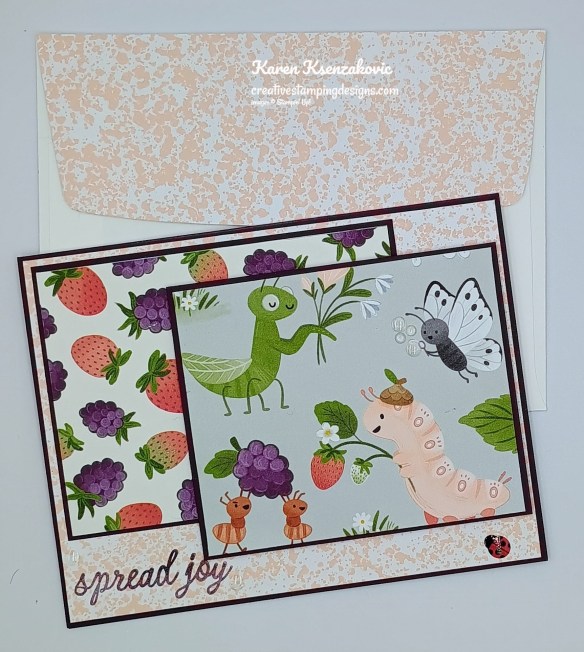
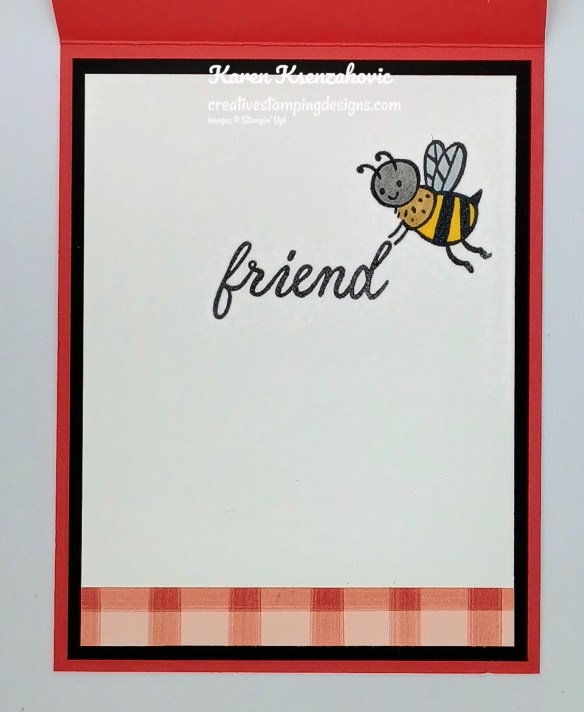
Adhere another panel of Cute as a Bug DSP to the inside front of the card base. Adhere a narrow panel of the Cute as a Bug DSP to the inside mechanism. On a panel of Basic White, stamp the sentiment from the Sweet Bugs stamp set in Tuxedo Black Ink on the top of the panel. Stamp the grass/flower image from Sweet Bugs stamp set in Old Olive Ink along the bottom of the panel. Adhere the fussy cut pieces from the Cute as a Bug DSP to the bottom of the panel. Adhere the Basic White panel to a Poppy Parade mat. Adhere the layered panel to the front of the pop-up mechanism
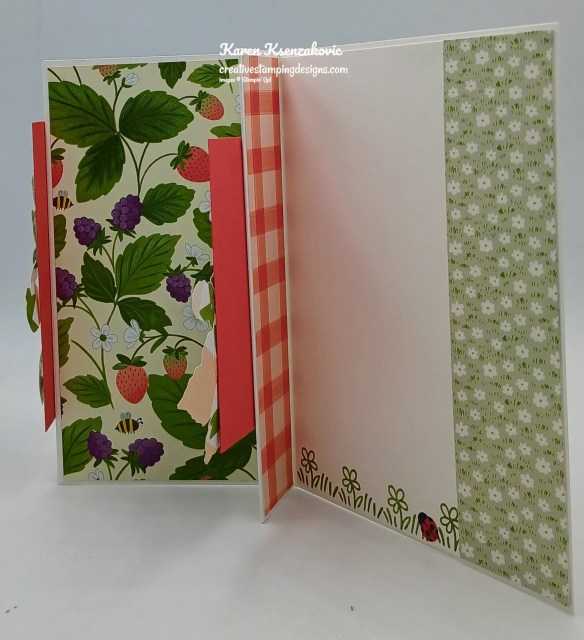
Adhere a narrow panel of Cute as a Bug DSP to the backside of the mechanism.

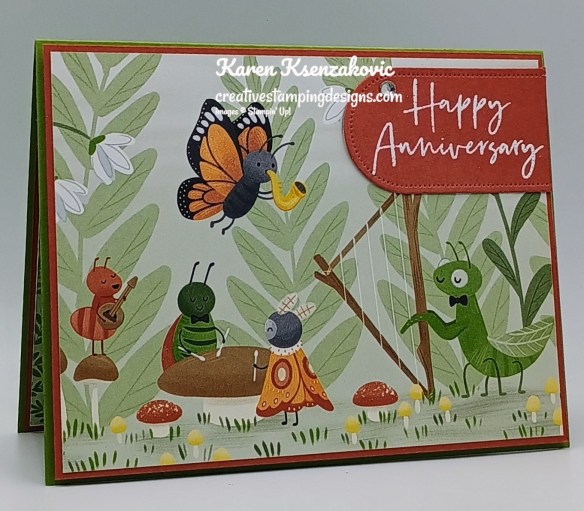
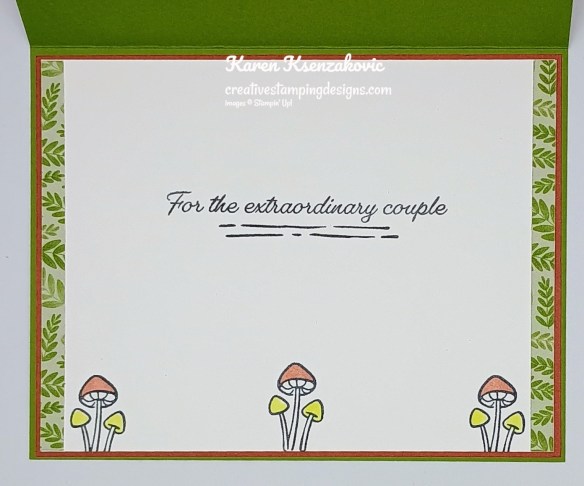
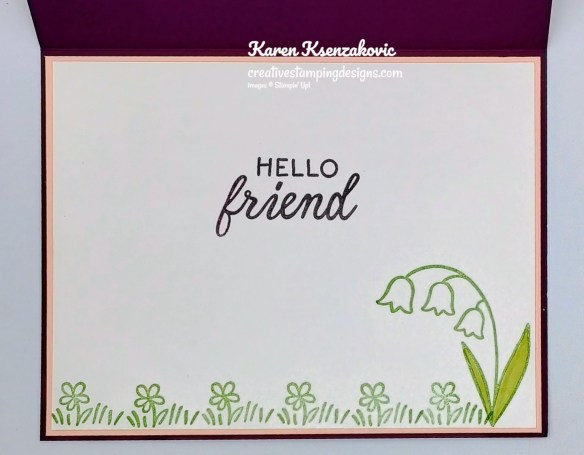
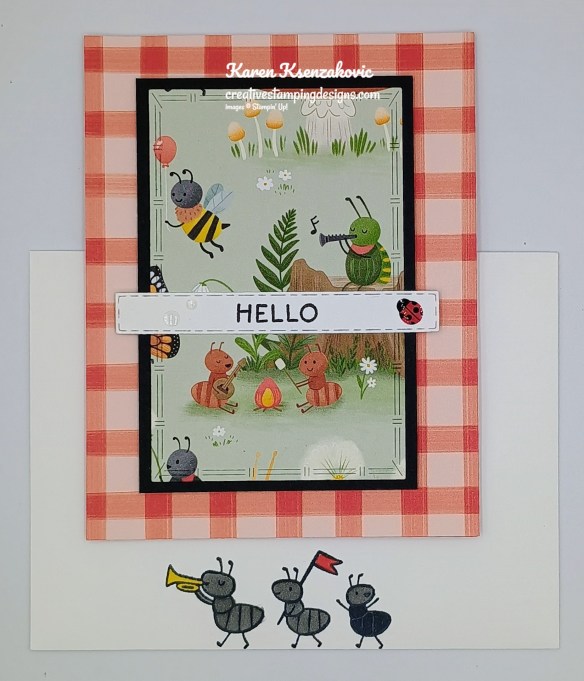
Stamp the grass/flower image from the Sweet Bugs stamp set in Old Olive Ink across the bottom of a Basic Whtie panel. Adhere a panel of Cute as a Bug DSP to the right side of the panel. Adhere the Basic Whtie panel to the inside of the Basic White Thick card base. Add a Ladybug Garden Epoxy Shapes in the grass.
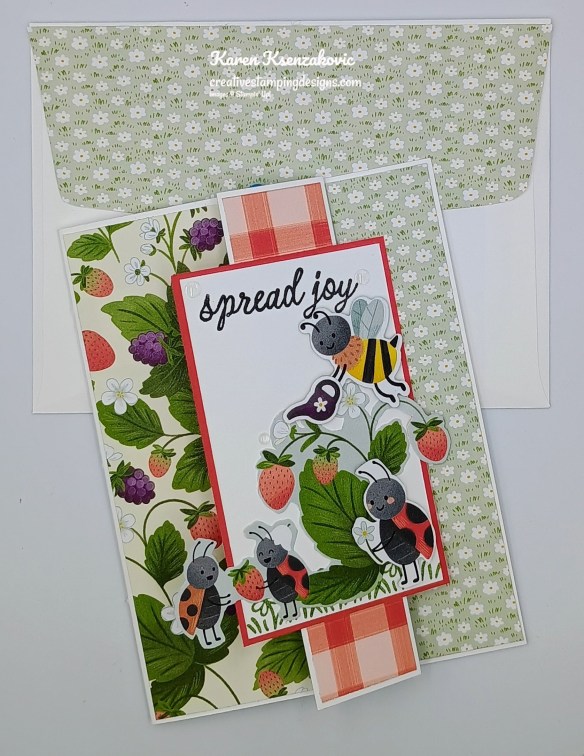
Decorate a Basic White Medium Envelope to finish your card. Stamp the flower image from the Sweet Bugs stamp set in Tuxedo Black Ink on the envelope front. Adhere a panel to Cute as a Bug DSP to the envelope flap.
Thank you for stopping by my blog today. I hope you liked my card and will give it a try. I hope you will CASE this card and please feel free to post it in the comments of my Facebook page under my post. I’d love to see your take it. You can watch my video on my YouTube Channel Here.
If you watch this on my YouTube channel, please remember to subscribe so that you will get notified when a new video goes live. Thank you to those that have subscribed already. Happy Stamping!!
*********************************************************************************************************
If you need any stamping supplies, I’d love to be your Demonstrator. Just click HERE to go directly to my online store or drop me an email if you have any questions.
*********************************************************************************************************
New Stampin’ Up! Product of The Month
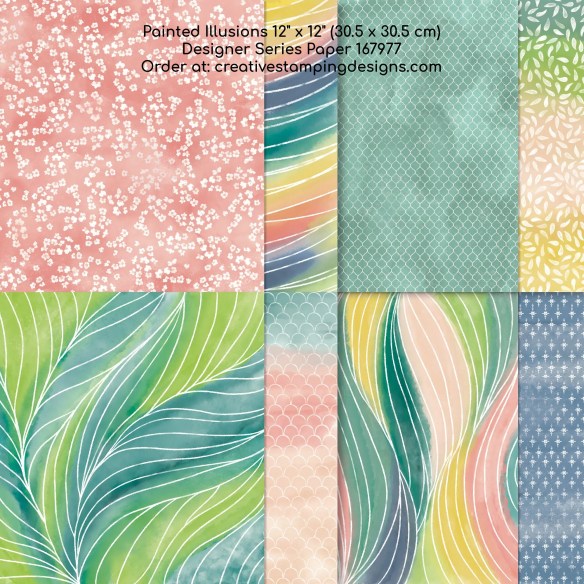
Since you’ll be placing that $75 order to get Free Shipping, why not add a pack of the Painted Illusions DSP Product of the Month?

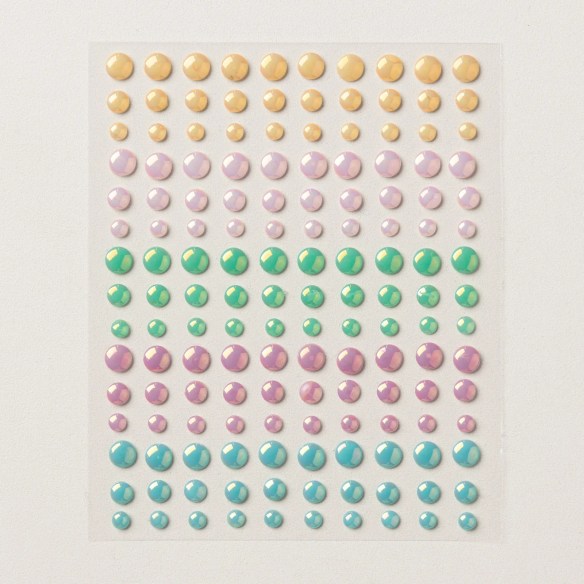
Add color and whimsy to your paper crafting with the Painted Illusions 12″ x 12″ (30.5 x 30.5 cm) Designer Series Paper! This craft paper features soft watercolor gradients in pink, green, blue, teal, and yellow, with white patterns that flow over the background. Layer with other Stampin’ Up! products in coordinating colors to create your own harmonious card making and scrapbooking designs. The Painted Illusions 12″ x 12″ (30.5 x 30.5 cm) Designer Series Paper is the exclusive Product of the Month for February 2026! Only available until stocks run out—don’t wait to get yours!
DETAILS
– February 2026 Product of the Month
– 12 sheets: 3 each of 4 double-sided designs
– 12″ x 12″ (30.5 x 30.5 cm)
– Acid and lignin free (this product is photo-safe)
– Colors: Darling Duckling, Flirty Flamingo, Granny Apple Green, Lost Lagoon, Misty Moonlight, Petal Pink, Pretty Peacock
DESIGNER SERIES PAPER
– Can be used for card making, scrapbooking, and other paper crafts!
– Features exclusive designs by in-house Stampin’ Up! artists.
– Complements other Stampin’ Up! products and colors.
PRODUCT OF THE MONTH
– Is a new exclusive product released each month!
– Can be unlocked for just $5 with orders over $75 (after discounts and rewards).
– Is only available while supplies last—they can sell out quickly!
– Is limited to one per customer (including language versions).
Stampin’ Up! also gave us an early look at the March Product of the Month!
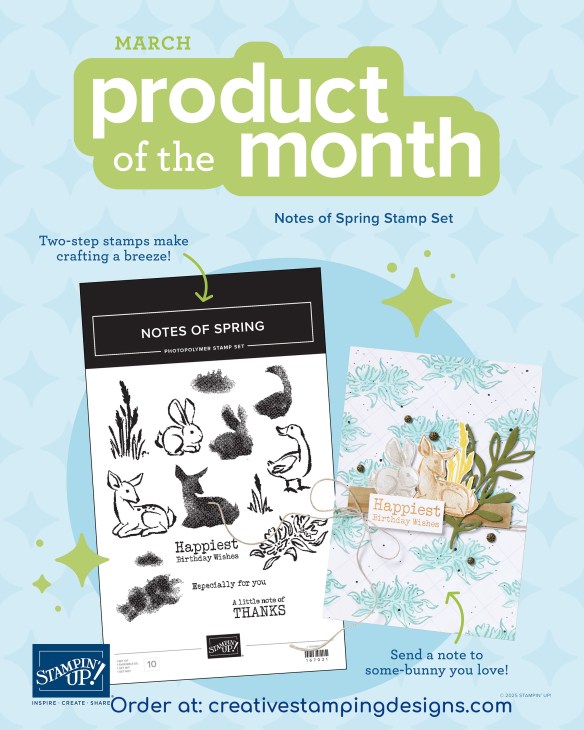
Create an adorable card with this stamp set and send it to some-bunny you love! Or use it to craft a scrapbook spread of a moment you hold deer. Whatever you choose to create this stamp set with woodland friends and useful sentiments is sure to add some springtime joy! Notes of Spring Stamp Set available beginning March 3!
*********************************************************************************************************
Reminder!!! 2024 – 2026 In-Colors Soon to Retire
Do you LOVE the 2024-2026 In-Colors. This is a perfect time to stock up on the Ink Pads, DSP, Cardstock, Blends and Embellishments especially with Free Shipping Wednesday-Friday. Next month I will get to see the new catalog with the 2026-2028 In-Colors, which means that the 2024-2026 In-Colors will be retiring. Don’t wait until they go out of stock, stock up now so you don’t miss out.

Head over to my Online Store and Stock Up on all your favorite colors HERE!!
*********************************************************************************************************
Final 2 days to Redeem Those Bonus Days Coupons – Ends February 28

- Redemption Period: February 3–28, 2026
- There is no limit to the number of coupon codes you can redeem on an order during the redemption period. If you’re redeeming multiple codes, you must put a space between each code.
- You may only redeem coupon codes one time. You cannot redeem them after February 28.
- You can redeem Bonus Days coupon codes for month-to-month Paper Pumpkin subscriptions and new prepaid subscriptions.
- Some restrictions apply. Coupons can’t be redeemed towards Starter Kits and you cannot use them on exchanges.
- Redemption period ends: February 28, 2026, at 11:59 p.m. (MT)
*********************************************************************************************************
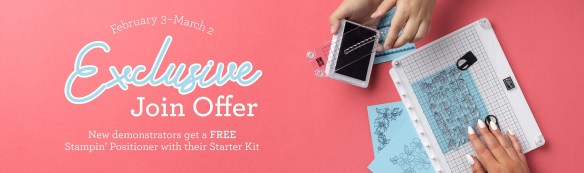
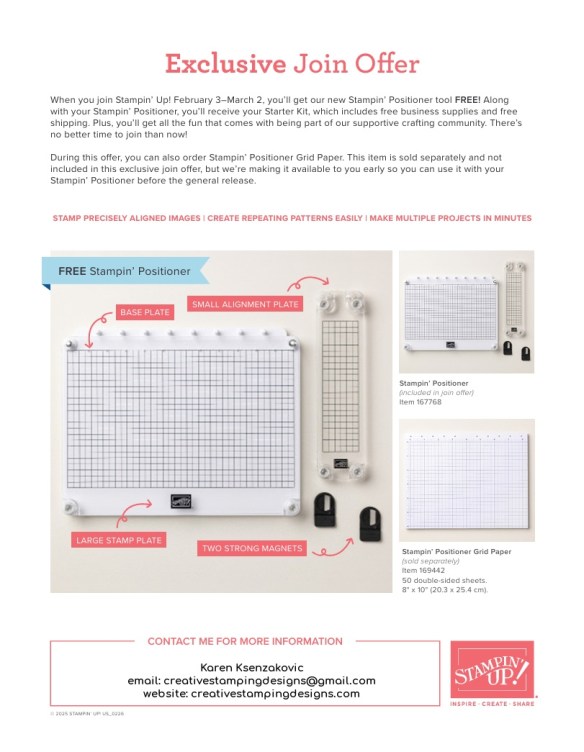
Final Days for Stampin’ Up! Joining Special – Free Positioning Tool Ends March 2
Stampin’ Up! has an amazing new tool that will be available for FREE with the purchase of a Starter Kit between February 3-March 2!! Anyone that purchases the Starter Kit during the promotion will get the awesome new Stampin’ Positioner with their Starter Kit absolutely FREE!! As a bonus for joining my team, you get to attend all my monthly Online Classes absolutely FREE. Contact me today and we can talk about getting you signed up.
Here are the Starter Kit promotion details:
- Promotion Period: February 3–March 2
- New team members who purchase their Starter Kit February 3–March 2 will also receive our new Stampin’ Positioner*.
- New demonstrators who submit their Independent Demonstrator Agreement (IDA) before February 3 or after March 2 will not be eligible for this offer.
- Joining deadline: March 2, 2026, at 11:59 p.m. (MT)
*What’s the Stampin’ Positioner?
It’s Stampin’ Up!’s new stamping alignment tool that makes stamping easier and more accurate. It allows you to stamp precisely aligned images, create repeating patterns and Two-Step Stampin’ images easily, and make multiple projects in minutes.
Stampin’ Positioner Grid Paper will also be available for to order but it is not included as part of this exclusive join offer.
A few other things to know:
- The Stampin’ Positioner WILL be available for purchase by everyone at a later date. We have not been given any details on when that will be.
- The Stampin’ Positioner is available for a limited time for current Demonstrators to purchase.
You can read more details about the joining offer on this PDF (click the image to open a full-size printable PDF):
We’d love to have you join our team!! Once you join, you get at least a 20% discount on all of your Stampin’ Up! purchases and you get to preorder from the upcoming catalogs and promotions!! You can attend the Stampin’ Up! events too. There’s never an obligation to sell, you can join to enjoy the discount for yourself. Contact me if you have any questions and we can talk. I’d love to have you on my team. I’d be more than happy to answer any of your questions, contact me at creativestampingdesigns@gmail.com
You can read a bit more information about the benefits of being a Demonstrator and a part of our team here. When you’re ready to join, you can get started here. Let me know if you have any questions.
*********************************************************************************************************
Card stock cuts for this project:
- Basic White Cardstock 2 1/4″ x 3 3/4″(card front panel), 1 3/4″ x 3 1/4″ (pop out panel), 4 1/8″ x 5 3/8″(inner linr)
- Basic White thick Cardstock 5 1/2″ x 11″(card base scored & folded at 1 1 /4″, 4 1/4″, 5 1/2″ &6 3/4″)
- Poppy Parade Cardstock 2 3/8″ x 3 7/8″ (card front pane mat), 1 7/8″ x 3 3/8″(pop out panel mat)
- Cute as a bug Designer Series Paper (3) – 1 1/8″ x 5 3/8″ panels, (2) – 2 7/8″ x 5 3/8″ panels, 1 3/8″ x 5 3/8″ (inner liner panel), 2 1/4″ x 6″(envelope flap)
*********************************************************************************************************
Product List
![Sweet Bugs Bundle (English) [ 167002 ]](https://assets1.tamsnetwork.com/images/EC042017NF/167002s.jpg "Sweet Bugs Bundle (English) [ 167002 ]")
![Sweet Bugs Photopolymer Stamp Set (English) [ 166995 ]](https://assets1.tamsnetwork.com/images/EC042017NF/166995s.jpg "Sweet Bugs Photopolymer Stamp Set (English) [ 166995 ]")
![Sweet Bugs Dies [ 167001 ]](https://assets1.tamsnetwork.com/images/EC042017NF/167001s.jpg "Sweet Bugs Dies [ 167001 ]")
![Basic White 8 1/2" X 11" Cardstock [ 166780 ]](https://assets1.tamsnetwork.com/images/EC042017NF/166780s.jpg "Basic White 8 1/2\" X 11\" Cardstock [ 166780 ]")
![Basic White 8 1/2" X 11" Thick Cardstock [ 159229 ]](https://assets1.tamsnetwork.com/images/EC042017NF/159229s.jpg "Basic White 8 1/2\" X 11\" Thick Cardstock [ 159229 ]")
![Poppy Parade 8-1/2" X 11" Cardstock [ 119793 ]](https://assets1.tamsnetwork.com/images/EC042017NF/119793s.jpg "Poppy Parade 8-1/2\" X 11\" Cardstock [ 119793 ]")
![Cute As A Bug 12" X 12" (30.5 X 30.5 Cm) Designer Series Paper [ 166994 ]](https://assets1.tamsnetwork.com/images/EC042017NF/166994s.jpg "Cute As A Bug 12\" X 12\" (30.5 X 30.5 Cm) Designer Series Paper [ 166994 ]")
![Old Olive Classic Stampin' Pad [ 147090 ]](https://assets1.tamsnetwork.com/images/EC042017NF/147090s.jpg "Old Olive Classic Stampin' Pad [ 147090 ]")
![Tuxedo Black Memento Ink Pad [ 132708 ]](https://assets1.tamsnetwork.com/images/EC042017NF/132708s.jpg "Tuxedo Black Memento Ink Pad [ 132708 ]")
![Ladybug Garden Epoxy Shapes [ 167005 ]](https://assets1.tamsnetwork.com/images/EC042017NF/167005s.jpg "Ladybug Garden Epoxy Shapes [ 167005 ]")
![Basic White Medium Envelopes [ 159236 ]](https://assets1.tamsnetwork.com/images/EC042017NF/159236s.jpg "Basic White Medium Envelopes [ 159236 ]")
![Stampin' Cut & Emboss Machine [ 149653 ]](https://assets1.tamsnetwork.com/images/EC042017NF/149653s.jpg "Stampin' Cut & Emboss Machine [ 149653 ]")
![Mini Glue Dots [ 103683 ]](https://assets1.tamsnetwork.com/images/EC042017NF/103683s.jpg "Mini Glue Dots [ 103683 ]")
![Multipurpose Liquid Glue [ 110755 ]](https://assets1.tamsnetwork.com/images/EC042017NF/110755s.jpg "Multipurpose Liquid Glue [ 110755 ]")
![Stampin' Dimensionals [ 104430 ]](https://assets1.tamsnetwork.com/images/EC042017NF/104430s.jpg "Stampin' Dimensionals [ 104430 ]")
![Stampin' Seal [ 152813 ]](https://assets1.tamsnetwork.com/images/EC042017NF/152813s.jpg "Stampin' Seal [ 152813 ]")
![Bone Folder [ 102300 ]](https://assets1.tamsnetwork.com/images/EC042017NF/102300s.jpg "Bone Folder [ 102300 ]")
![Take Your Pick [ 144107 ]](https://assets1.tamsnetwork.com/images/EC042017NF/144107s.jpg "Take Your Pick [ 144107 ]")
![Paper Trimmer [ 152392 ]](https://assets1.tamsnetwork.com/images/EC042017NF/152392s.jpg "Paper Trimmer [ 152392 ]")

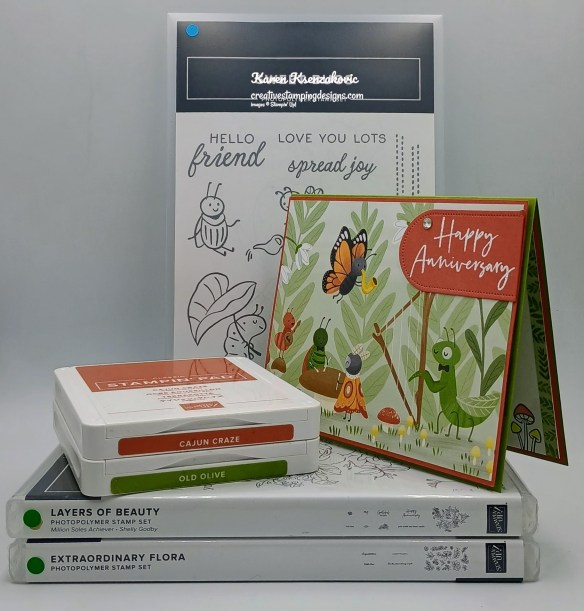

![Layers Of Beauty Photopolymer Stamp Set (English) [ 163514 ]](https://assets1.tamsnetwork.com/images/EC042017NF/163514s.jpg "Layers Of Beauty Photopolymer Stamp Set (English) [ 163514 ]")
![Extraordinary Flora Photopolymer Stamp Set (English) [ 165243 ]](https://assets1.tamsnetwork.com/images/EC042017NF/165243s.jpg "Extraordinary Flora Photopolymer Stamp Set (English) [ 165243 ]")
![Cajun Craze 8-1/2" X 11" Cardstock [ 119684 ]](https://assets1.tamsnetwork.com/images/EC042017NF/119684s.jpg "Cajun Craze 8-1/2\" X 11\" Cardstock [ 119684 ]")
![Old Olive 8-1/2" X 11" Cardstock [ 100702 ]](https://assets1.tamsnetwork.com/images/EC042017NF/100702s.jpg "Old Olive 8-1/2\" X 11\" Cardstock [ 100702 ]")
![Cajun Craze Stampin' Blends Combo Pack [ 154879 ]](https://assets1.tamsnetwork.com/images/EC042017NF/154879s.jpg "Cajun Craze Stampin' Blends Combo Pack [ 154879 ]")
![Lemon Lolly Stampin’ Blends Combo Pack [ 161673 ]](https://assets1.tamsnetwork.com/images/EC042017NF/161673s.jpg "Lemon Lolly Stampin’ Blends Combo Pack [ 161673 ]")
![Versamark Pad [ 102283 ]](https://assets1.tamsnetwork.com/images/EC042017NF/102283s.jpg "Versamark Pad [ 102283 ]")
![Clear Wink Of Stella Glitter Brush [ 141897 ]](https://assets1.tamsnetwork.com/images/EC042017NF/141897s.jpg "Clear Wink Of Stella Glitter Brush [ 141897 ]")
![Everyday Arches Dies [ 164629 ]](https://assets1.tamsnetwork.com/images/EC042017NF/164629s.jpg "Everyday Arches Dies [ 164629 ]")
![Rhinestone Basic Jewels [ 144220 ]](https://assets1.tamsnetwork.com/images/EC042017NF/144220s.jpg "Rhinestone Basic Jewels [ 144220 ]")
![Basics Wow! Embossing Powder [ 165679 ]](https://assets1.tamsnetwork.com/images/EC042017NF/165679s.jpg "Basics Wow! Embossing Powder [ 165679 ]")
![Heat Tool (Us And Canada) [ 129053 ]](https://assets1.tamsnetwork.com/images/EC042017NF/129053s.jpg "Heat Tool (Us And Canada) [ 129053 ]")

![Tear & Tape Adhesive [ 154031 ]](https://assets1.tamsnetwork.com/images/EC042017NF/154031s.jpg "Tear & Tape Adhesive [ 154031 ]")


![Crushed Curry 8-1/2" X 11" Cardstock [ 131199 ]](https://assets1.tamsnetwork.com/images/EC042017NF/131199s.jpg "Crushed Curry 8-1/2\" X 11\" Cardstock [ 131199 ]")


![Blackberry Bliss 8-1/2" X 11" Cardstock [ 133675 ]](https://assets1.tamsnetwork.com/images/EC042017NF/133675s.jpg "Blackberry Bliss 8-1/2\" X 11\" Cardstock [ 133675 ]")
![Petal Pink 8-1/2" X 11" Cardstock [ 146985 ]](https://assets1.tamsnetwork.com/images/EC042017NF/146985s.jpg "Petal Pink 8-1/2\" X 11\" Cardstock [ 146985 ]")
![Blackberry Bliss Classic Stampin' Pad [ 147092 ]](https://assets1.tamsnetwork.com/images/EC042017NF/147092s.jpg "Blackberry Bliss Classic Stampin' Pad [ 147092 ]")
![Old Olive Stampin' Blends Combo Pack [ 154892 ]](https://assets1.tamsnetwork.com/images/EC042017NF/154892s.jpg "Old Olive Stampin' Blends Combo Pack [ 154892 ]")
![Adhesive Sheets [ 152334 ]](https://assets1.tamsnetwork.com/images/EC042017NF/152334s.jpg "Adhesive Sheets [ 152334 ]")


![Cloud Cover 8 1/2" X 11" Cardstock [ 165621 ]](https://assets1.tamsnetwork.com/images/EC042017NF/165621s.jpg "Cloud Cover 8 1/2\" X 11\" Cardstock [ 165621 ]")
![Cloud Cover Stampin’ Blends Combo Pack [ 165287 ]](https://assets1.tamsnetwork.com/images/EC042017NF/165287s.jpg "Cloud Cover Stampin’ Blends Combo Pack [ 165287 ]")
![Darling Duckling Stampin’ Blends Combo Pack [ 165288 ]](https://assets1.tamsnetwork.com/images/EC042017NF/165288s.jpg "Darling Duckling Stampin’ Blends Combo Pack [ 165288 ]")
![Pecan Pie Stampin’ Blends Combo Pack [ 161674 ]](https://assets1.tamsnetwork.com/images/EC042017NF/161674s.jpg "Pecan Pie Stampin’ Blends Combo Pack [ 161674 ]")


![Basic Black 8-1/2" X 11" Cardstock [ 121045 ]](https://assets1.tamsnetwork.com/images/EC042017NF/121045s.jpg "Basic Black 8-1/2\" X 11\" Cardstock [ 121045 ]")
![Daffodil Delight Stampin' Blends Combo Pack [ 154883 ]](https://assets1.tamsnetwork.com/images/EC042017NF/154883s.jpg "Daffodil Delight Stampin' Blends Combo Pack [ 154883 ]")
![Poppy Parade Stampin' Blends Combo Pack [ 154958 ]](https://assets1.tamsnetwork.com/images/EC042017NF/154958s.jpg "Poppy Parade Stampin' Blends Combo Pack [ 154958 ]")
![Smoky Slate Stampin' Blends Combo Pack [ 154904 ]](https://assets1.tamsnetwork.com/images/EC042017NF/154904s.jpg "Smoky Slate Stampin' Blends Combo Pack [ 154904 ]")

