Stampin’ Up Country Home Thanksgiving Card

Good Tuesday morning everyone.  Hope your week has started off well.  For my card today I used the Country Home Photopolymer stamp set and Buffalo Check stamp set.  I’m not much of a ‘country’ type person, but I’m really loving these sets.  Once again I’ve used my Stampin’ Blends Markers.  I just love coloring with them.  I normally can’t color to save my life, but with these markers it seems really easy.  Take a look.  I’ve gone with some non traditional fall colors.

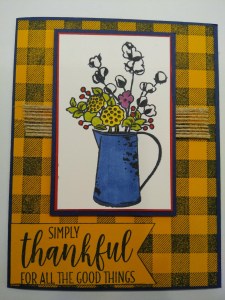
I started with a piece of Mango Melody cardstock and stamped it with the Buffalo Check stamp in Night of Navy Ink.  I adhered it to a Night of Navy card base using Multipurpose Liquid Glue.

On a piece of Whisper White cardstock I stamped the Pitcher image from the Country Home Photopolymer stamp set in Tuxedo Black Momento Ink. I colored it in using my Night of Navy Stampin’ Blends Markers.  Above the pitcher I stamped one of the floral images from the Country Home stamp set. I colored this in using my Blackberry Bliss, Mango Melody, Old Olive and Poppy Parade Stampin’ Blends Markers.  I used some Clear Wink of Stella on the white flowers to make them shimmer a little.  I adhered the artwork panel first to a mat of Poppy Parade, using Snail, then to a mat of Night of Navy, using Snail again.  I attached a small piece of  5/8″ Burlap Ribbon to the card front using Snail and adhered the matted artwork using Stampin’ Dimensionals.

On a small piece of Mango Melody cardstock I stamped the sentiment from the Country Home stamp set in Night of Navy Ink and made a banner. I edged it with my Night of Navy Stampin’ Write Marker and adhered it to the left side of the card front using Snail.

On the inside I stamped the floral image on the bottom of Whisper White cardstock in Night of Navy Ink stamping off twice.  I then stamped another one of the sentiments in Night of Navy Ink in the center.  I adhered it to a Mango Melody Mat using Snail and adhered it to the card base using Multipurpose Liquid Glue.

To finish my card off I decorated a Medium Whisper White Envelope by stamping the floral image in Night of Navy Ink, stamping off once, on the front of the envelope.  On the envelope flap I stamped the Buffalo Check image in Night of Navy Ink.  Thank you for checking out my blog and I hope you will stop back again soon.  Give this card a try, it was a pretty easy one.  Happy Stamping!

****************************************************************************************************

If you need any stamping supplies, I’d be very happy to be your Demonstrator.  Just click here to go directly to my online store or drop me an email if you have any questions.  Happy Stamping, Karen!

****************************************************************************************************

Card stock cuts for this project:

  • Mango Melody Cardstock 4 1/8″ X 5 3/8″ (card front), 4″ X 5 1/4″ (inside mat)
  • Night of Navy Cardstock 8 1/2″ X 5 1/2″ (card base scored and folded at 4 1/4″),   2 1/2″ X 3 1/2″ (artwork mat)
  • Poppy Parade Cardstock 2 5/16″ X 3 9/16″ (artwork mat)
  • Whisper White Cardstock 2 1/4″ X 3 1/2″ (artwork), 3 3/4″ X 5″ (inner liner)

****************************************************************************************************

Product List

Stampin’ Up Animal Outing Birthday Card for Fab Friday

Good Monday morning everyone and Happy Fall.  Hope you all had a great weekend.  Today’s card uses a really cute bundle called Animal Outing.  I just love all the animals in it.  The best part is the Thinlit Dies that you can get to go with the stamp set so you don’t have to fussy cut.  I played along with the Fab Friday challenge. Here are the colors for Fab Friday 146.  Stop by the challenge blog to see the beautiful projects everyone has made and play along too.

Here is what I came up with for this sweet color combination.

I started with a piece of Balmy Blue cardstock and ran it through my Big Shot using the Layered Leaves Dynamic Textured Impressions Embossing Folder.

On the right side I adhered a piece of Gorgeous Grape cardstock using Multipurpose Liquid Glue.  I then took a piece of Highland Heather cardstock and ran it through my Big Shot 3 times using the Giraffe Cutout Thinlit Die.  I adhered the Highland Heather piece with Multipurpose Liquid Glue on top of the Gorgeous Grape.  I stamped the sentiment from the Animal Outing stamp set in Tranquil Tide Ink on a piece of Vellum paper and cut it out using the 3rd smallest Layering Ovals Framelits.  Using Glue Dots, I attached it to the center of the giraffe cut out.  I added a couple branches that were cut out in Tranquil Tide cardstock from the Animal Friends Thinlits Dies to the top and bottom of the oval.  I tied a piece of Whisper White 5/8″ Polka Dot Tulle Ribbon around the card front and tied a knot.

I stamped the Giraffe image from the Animal Outing stamp set in Smoky Slate Ink on a piece of Powder Pink cardstock.  Then using the Giraffe Die from the Animal Friends Thinlits Dies, I cut it out using my Big Shot.  I went over the spots on the giraffe with my Powder Pink Stampin’ Write Marker to make them a little darker pink.  I stamped the Branch with Frog image in Tranquil Tide Ink on a piece of Whisper White cardstock.  I colored the branch in with my Crumb Cake Stampin’ Write Marker and the frog and leaves in with my Granny Apple Green Stampin’ Write Marker.  I cut the circle out using the 2nd largest circle from the Stitched Shaped Framelits.  I cut the 3rd largest Scalloped Circle from the Layering Circle Framelits Dies and adhered the Whisper White circle to it using Multipurpose Liquid Glue. I attached the Giraffe and some more of the branches cut from Tranquil Tide cardstock with Multipurpose Liquid Glue to the Whisper White circle.  I attached the circle to the card front with Stampin’ Dimensionals.  I adhered the card front to a Powder Pink card base using Multipurpose Liquid Glue.

On the inside I stamped the Giraffe image using Smoky Slate Ink and Branch with Frog image using Tranquil Tide Ink.  I colored the giraffe in with my Powder Pink Stampin’ Write Marker.  I colored the branch with my Crumb Cake Stampin’ Write Marker and the frog and leaves in with my Granny Apple Green Stampin’ Write Marker.  I used the sentiment from the Pretty Kitty stamp set and stamped it in Gorgeous Grape Ink.  I adhered the liner to a Highland Heather cardstock mat using Snail then adhered it to the card base using Multipurpose Liquid Glue.

To finish my card off, I decorated a Medium Whisper White Envelope by stamping the giraffe and branch image on the front and colored them in the same as I did on the card.

Thank you for stopping by my blog.  Hope you will give this card a try.  Happy Stamping.

****************************************************************************************************

If you need any stamping supplies, I’d be very happy to be your Demonstrator.  Just click here to go directly to my online store or drop me an email if you have any questions.  Happy Stamping, Karen!

****************************************************************************************************

Card stock cuts for this project:

  • Balmy Blue Cardstock 4 1/8″ X 5 3/8″ (card front)
  • Gorgeous Grape Cardstock 2 5/16″ X 4 1/8″ (side strip under cut out)
  • Highland Heather Cardstock 2 5/16″ X 4 1/8″ (side strip with giraffe cutout), 4 1/8″ X 5 3/8″ (inside mat)
  • Powder Pink Cardstock 8 1/2″ X 5 1/2″ (card base scored and folded at 4 1/4″), scrap piece for the giraffe
  • Tranquil Tide Cardstock 3″ X 3″ (scallop circle), scraps for the branches
  • Whisper White Cardstock 4″ X 5 1/4″ (inner liner), 3″ X 3″ (artwork circle)

****************************************************************************************************

Product List

Big Shot

$110.00

Stampin’ Up Colorful Seasons

Good Friday morning everyone.  Hope you’ve had a successful week and have some fun plans for the weekend.  Sunday Autumn officially starts.  It’s always such a beautiful time of the year with all the leaves changing colors.

For today’s card I used the Colorful Seasons Photopolymer Stamp Set.  This set is so versatile.  It’s got images for Winter, Spring, Summer and Fall.  It also has a Seasonal Layers Thinlits set that can be used with it.  I chose not to use them with todays card, take a look.

I started with a panel of Whisper White cardstock.  I placed my Oval Stitched Framelit Die where I thought I’d want my sentiment.  I then stamped the sentiment from the Colorful Seasons stamp set in Mossy Meadow Ink.  I moved the framelit out-of-the-way and stamped the detailed Leaves from the set in Mossy Meadow Ink around the sentiment.  I colored the leaves in with my Cajun Craze, Cherry Cobbler, Daffodil Delight, Mango Melody, Pumpkin Pie and Real Red Stampin’ Blends Markers. Once everything was colored in I cut out the oval using the largest Oval from the Stitched Shapes Framelits.

I adhered a strip from the Wood Textures Designer Series Paper, with Snail, along the left edge of the card front.  Using Multipurpose Liquid Glue, I adhered the card front to a Thick Whisper White card base.

I then put some Stampin’ Dimensionals on the back of the oval.  I cut a long enough piece of Rose Metallic Thread  and placed it how I thought it would look nice, peeking out the sides of the oval.  It’s very hard to see in the photo since the thread is so fine.  Believe me, it’s there and just gives it a little sparkle. I adhered the oval back  to where I cut it out of the card front.  I added 4 Rhinestone Basic Jewels to 4 of the leaves to give it a little bling.

On the inside panel I stamped the leaves in the 4 corners with Mossy Meadow Ink and colored them in with Cherry Cobbler, Mango Melody, Pumpkin Pie and Real Red Stampin’ Blends Markers.  I stamped the sentiment from Country Home Photopolymer stamp set in Mossy Meadow Ink.  I adhered the panel to the card base using Snail.

To finish off my card, I adhered a thin strip from the Wood Textures DSP to the bottom front of a Medium Whisper White Envelope using Snail.  I then stamped the leaves again on the front and back flap of the envelope in Mossy Meadow Ink and colored them in the same as on the card front.  So that the markers didn’t bleed through the envelope, I inserted a piece of scrap paper until I was done coloring.  Hope you’ll try this card, the coloring was a lot of fun.  Thanks for checking out my blog and hope you will stop back again.

****************************************************************************************************

If you need any stamping supplies, I’d be very happy to be your Demonstrator.  Just click here to go directly to my online store or drop me an email if you have any questions.  Happy Stamping, Karen!

****************************************************************************************************

Card stock cuts for this project:

  • Thick Whisper White Cardstock 5 1/2″ X 8 1/2″ (card base)
  • Whisper White Cardstock 4 1/8″ X 5 3/8″ (card front), 3 3/4″ X 5″ (inside liner)
  • Wood Textures Designer Series Paper 1/2″ X 5 3/8″ (card front side strip),        1/2″ X 5 3/4″ (envelope strip)

****************************************************************************************************

Product List

Stampin’ Up Postcard Pals

Good Thursday morning all. We are around the bend to the close of the week.  Hope you’ve had a great week so far and are making some fun plans for the weekend.

For today’s card I used the adorable Postcard Pals stamp set.  I think these animal images are just the sweetest.  I used the Platypus image for my card today.  I also played along with the Hand Stamped Sentiments challenge. Take a look.

I started by stamping the Platypus image from the Postcard Pals stamp set in Early Espresso Ink on a small piece of Whisper White cardstock.  I colored it in using my Bronze, Crumb Cake, Ivory, Mint Macaron, Night of Navy and Soft Suede Stampin’ Blends Markers.  Then using the largest circle from the Stitched Shaped Framelits, I cut the image out with my Big Shot.

Using Multipurpose Liquid Glue I adhered it to a panel of Mint Macaron cardstock which I ran through my Big Shot with the Seaside Textured Impressions Embossing Folder.  Using Snail I adhered a piece of the beautiful Tranquil Textures Designer Series Paper to a Blackberry Bliss card base.  In the center of the card I attached a strip of Night of Navy cardstock using Multipurpose Liquid Glue.

I adhered the Mint Macaron panel to the center of the card using Stampin’ Dimensionals.  I cut out 3 circles from another design of the Tranquil Textures DSP, one using the smallest circle from the Layering Circles Framelits, one with my 1″ Circle Punch and one with my 3/4″ Circle Punch. I arranged them on the left side of the artwork, the bottom 2 were adhered with Multipurpose Liquid Glue and the small top one was attached with a Stampin’ Dimensional.

On the inside liner I stamped the Platypus using Early Espresso Ink, in the center of the Whisper White panel, stamping off 4 times to get a very light image.  I then stamped the sentiment from the Postcard Pals stamp set in Night of Navy Ink on top of the Platypus.  I adhered the Whisper White liner to a Mint Macaron cardstock mat using Snail.  I then adhered this to the inside of the card base using Multipurpose Liquid Glue.

To finish off my card I decorated a Medium Whisper White Envelope.  I stamped the Platypus in Early Espresso Ink, stamping off twice, to the front of the envelope.  I then added a piece of Tranquil Textures DSP to the envelope flap.  This card was really a lot of fun making.  I hope you will consider giving it a try.  Thanks for checking out my blog today, hope you will stop back again soon.

****************************************************************************************************

If you need any stamping supplies, I’d be very happy to be your Demonstrator.  Just click here to go directly to my online store or drop me an email if you have any questions.  Happy Stamping, Karen!

****************************************************************************************************

Card stock cuts for this project:

  • Blackberry Bliss Cardstock 5 1/2″ X 8 1/2″ (scored and folded at 4 1/4″)
  • Mint Macaron Cardstock 4 1/2″ X 3 1/4″ (front panel), 4″ X 5 1/4″ (inner liner mat)
  • Night of Navy Cardstock 1 7/8″ X 5 1/4″ (front strip)
  • Whisper White Cardstock 3 1/2″ X 3 1/2″ (artwork), 3 3/4″ X 5″ (inner liner)
  • Tranquil Textures Designer Series Paper 5 3/8″ X 4 1/8″ (card front), scrap for circles

****************************************************************************************************

Product List

Stampin’ Up Beautiful You

Good Wednesday morning everyone.  Hope you are all having a wonderful week.  Since it is still Summer for a couple more days, I decided to do a bit of a summery card for todays blog.

For today’s card I used the Beautiful You stamp set, which I absolutely love.  I love stamps with a sketched look.

I started with a piece of So Saffron cardstock, stamped the sentiment from the Beautiful You stamp set on the bottom right side in Pacific Point Ink. I then ran it through my Big Shot using the Subtle Dynamic Textured Impressions Embossing Folder.  With the Dynamic Textured Impressions Folders you only need to use one cutting pad.  I spritzed the paper gently on the back (so that my ink wouldn’t run), with water using my Stampin’ Spritzer to break up the paper fibers a little so that the paper wouldn’t crack when running it through the Big Shot.

Using Multipurpose Liquid Glue I added a strip of Garden Impression Designer Series Paper to the left side.  I stamped the image of the woman in Early Espresso Ink on a small piece of Whisper White cardstock.  I colored her dress and hat using my Soft Sea Foam Stampin’ Blends Markers and her arms and legs with the Ivory Stampin’ Blends Marker.  I then sponged the edge of the artwork with Pacific Point Ink using a Sponge Dauber.  I also sponged the edge of the Pacific Point cardstock square behind the artwork using Pacific Point Ink.

I adhered the artwork to the Pacific Point square using Multipurpose Liquid Glue then attached it to the card front using Stampin’ Dimensionals. I adhered the card front to a Pacific Point card base using Multipurpose Liquid Glue.  I added 3 of the Rhinestone Basic Jewels to finish off the front of my card.

On the inside I stamped the woman again, stamping off 5 times to get a very light image.  I stamped another sentiment from the Beautiful You set in Pacific Point Ink over the image of the woman.  Using Snail I adhered the inner liner to a So Saffron mat and then to the card base using Multipurpose Liquid Glue.

To finish off my card, I stamped the image of the woman, stamping off twice, on the front and added a piece of Garden Impression DSP with Multipurpose Liquid Glue to the flap of a Medium Whisper White Envelope.  Hope you’ll consider trying this card for yourself.

****************************************************************************************************

If you need any stamping supplies, I’d be very happy to be your Demonstrator.  Just click here to go directly to my online store or drop me an email if you have any questions.  Happy Stamping, Karen!

****************************************************************************************************

Card stock cuts for this project:

  • Pacific Point Cardstock 4 1/4″ X 11″ (scored and folded at 5 1/2″), 2 3/4″ X 2 3/4″  (square behind artwork)
  • So Saffron Cardstock 2 pieces 4″ X 5 1/4″ (card front and mat for inner liner)
  • Whisper White Cardstock 3 3/4″ X 5″ (inner liner), 2 1/2″ X 2 1/2″  (for artwork)
  • Garden Impressions Designer Series Paper 1 1/2″ X 5 1/4″ (side strip)

****************************************************************************************************

Product List

Stampin’ Up Hand Delivered

Good morning everyone and Happy Tuesday.  Hope everyone is having an awesome week so far.

For my card today I used a Host set called Hand Delivered.  It’s a Photopolymer Two-Step stamp set.  When I first got the new annual catalog that was one of the 1st host sets I wanted.  You can not buy a host set you have to earn them with Stampin’ Rewards.  You can either host a party or if you have a qualifying order of $150 or more you earn Stampin’ Rewards that you can use towards host sets. Take a look.

I started with a piece of Whisper White cardstock and stamped the Two-Step Hand Delivered Photopolymer stamp in Tuxedo Black Momento Ink.  I colored the balloons in Call Me Clover, Lovely Lipstick and Pineapple Punch Stampin’ Blends markers, using both the light and dark of each color.  I colored the woman’s skirt in Highland Heather Stampin’ Blends markers, her legs and arms in Ivory Stampin’ Blends marker and her shoes in Light Basic Black Stampin’ Blends marker.

I adhered the Whisper White panel to a mat of Basic Black cardstock using Snail.  I adhered a strip of Designer Series Paper from the 2018-2020 In-Color 6 X 6 stack using Snail to a Thick Whisper White card base.

Using Stampin’ Dimensionals I attached the card front to the card base.  I added a few of the Clear Rhinestone Basic Jewels to the card front.  On a small piece of Whisper White cardstock, using Versa Mark Ink, I stamped the sentiment from the Hand Delivered set.  I sprinkled it with Call Me Clover Emboss Powder and heated it using my Heat Tool.  I made a banner out of the strip using my Paper Snips.  To make it pop a little, I edged the banner using my Lovely Lipstick Stampin Write Marker and attached it to the card front, on an angle, using Mini Stampin’ Dimensionals.

On the inside I stamped another sentiment from the Hand Delivered set in Call Me Clover Ink on a panel of Whisper White cardstock.  I stamped some of the flower images from the set in Tuxedo Black Momento Ink and colored them in with my Call Me Clover, Lovely Lipstick and Pineapple Punch Stampin’ Blends Markers. I adhered a small strip of the DSP to the bottom of the panel using Snail.  I then adhered the panel to a mat of Basic Black cardstock using Snail and adhered it to the card base using Multipurpose Liquid Glue.

To finish my card off I decorated a Medium Whisper White Envelope flap with a piece of the 2018-2020 In-Color 6 X 6 DSP.  Thanks for stopping by and I hope you will give this card a try.

****************************************************************************************************

If you need any stamping supplies, I’d be very happy to be your Demonstrator.  Just click here to go directly to my online store or drop me an email if you have any questions.  Happy Stamping, Karen!

****************************************************************************************************

Card stock cuts for this project:

  • Thick Whisper White Cardstock 4 1/4″ X 11″ (card base scored & folded at 5 1/2″)
  • Whisper White Cardstock 2 – 3 3/4″ X 5″ (card front and inner liner), 1/2″ X 2 1/4″ (sentiment banner)
  • Basic Black Cardstock 2 – 3 7/8″ X 5 1/8″ (mats for card front and inner liner)
  • 2018-2020 In-Color 6 X 6 Designer Series Paper 2″ X 5 1/2″ (strip on card front), 1/2″ X 3 3/4″ (strip on inner liner)

****************************************************************************************************

Product List

Stampin’ Up Rooted In Nature

Good Monday morning everyone.  Hope your week is starting off good so far.

For today’s card I used the Rooted In Nature Bundle again.  This is such a great set, I’m really loving it.  The Nature’s Poem Designer Paper is just beautiful too.

I started with a piece of Cajun Craze cardstock for the card base.  I stamped the small leaf image from Rooted in Nature in Cajun Craze Ink on the card front.  I then adhered a piece of Nature’s Poem Designer Series Paper to the right side of the card front using Snail.

On a piece of Whisper White cardstock I stamped the image of one of the trees.  To get the 2 colors I colored the stamp using my Soft Suede and Mint Macaron Stampin’ Write Markers. I then sponged a little Mint Macaron on the bottom of the white paper to make it look like grass.  Using Snail I adhered it to a Grapefruit Grove mat.  I attached it to the center of the card front using Stampin’ Dimensionals.

On a scrap of Whisper White cardstock I stamped the smaller leaf image 3 times, once each in Cajun Craze, Grapefruit Grove and Mint Macaron Inks.  I then cut the leaf images out using the Nature’s Roots Framelit Dies with my Big Shot.  I attached them to the top left of my center piece using Stampin’ Dimensionals.  I adhered a bow made from Linen Thread to the bottom of my 3 leaves using a Glue Dot.

On the inside Whisper White panel, I stamped the small leaf image multiple times using Cajun Craze, Grapefruit Grove and Mint Macaron Inks.  Some of the images are full strength and some are stamped off.  No sentiment was added so that the card could be used for any occasion.  I adhered the panel using Snail to a Grapefruit Grove mat.  Using Liquid Glue I adhered it to the card base.

To complete my card I decorated a Medium Whisper White Envelope by stamping the small leaf image in Cajun Craze, Grapefruit Grove and Mint Macaron Inks, stamping off once, around the edges of the envelope.

****************************************************************************************************

If you need any stamping supplies, I’d be very happy to be your Demonstrator.  Just click here to go directly to my online store or drop me an email if you have any questions.  Happy Stamping, Karen!

****************************************************************************************************

Card stock cuts for this project:

  • Cajun Craze Cardstock 5 1/2″ X 8 1/2″ (card base scored and folded at 4 1/4″)
  • Grapefruit Grove Cardstock 3 1/2″ X 2 1/2″ (artwork mat), 4″ X 5 1/4″ (inside liner mat)
  • Whisper White Cardstock 3 1/4″ X 2 1/4″ (artwork), 3 3/4″ X 5″ (inner liner)
  • Nature’s Poem Designer Series Paper 1 3/4″ X 5 1/2″ (strip on card front)

****************************************************************************************************

Product List

Stampin’ Up Love What You Do

Good Friday morning everyone.  Hope your week went well and you have some fun plans for the weekend.

For today’s card I used the Love What You Do Photopolymer Stamp Set and the absolutely gorgeous Share What You Love Designer Series Paper.  It’s a very clean and simple card.  If you haven’t been able to tell from previous posts, I love my layers.

I started with a Grapefruit Grove card base.  I adhered a piece of Share What You Love Designer Paper to the front using Snail.

On a panel of Whisper White cardstock I stamped the flower image from the Love What You Do Photopolymer Stamp Set in Old Olive Ink on the right side.  I colored the flower in using my Grapefruit Grove Stampin’ Write Marker.  I then stamped the sentiment in Old Olive Ink on the bottom left of the panel.  Using Snail I adhered the artwork panel to a Grapefruit Grove mat.  I added 3 Grapefruit Grove pearls from the Share What You Love Artisan Pearl pack.  I attached it to the card front using Stampin’ Dimensionals.

I decorated a Medium Whisper White Envelope to complete my card.  I stamped the flower image on the front of the envelope in Old Olive Ink.  I then stamped the ink spot on each flower using Grapefruit Grove Ink, stamping off once.

****************************************************************************************************

If you need any stamping supplies, I’d be very happy to be your Demonstrator.  Just click here to go directly to my online store or drop me an email if you have any questions.  Happy Stamping, Karen!

****************************************************************************************************

Card stock cuts for this project:

  • Grapefruit Grove Cardstock 5 1/2″ X 8 1/2″(card base scored and folded at 4 1/2″), 3 3/4″ X 5″ (artwork mat)
  • Whisper White Cardstock 3 1/2″ X 4 3/4″ (artwork), 4″ X 5 1/4″ (inner liner)
  • Share What You Love Designer Paper 4 1/8″ X 5 3/8″ (card front layer)

****************************************************************************************************

Product List

Stampin’ Up Rooted in Nature

Good Wednesday morning everyone.  Hope your week is going well.  Thanks for checking out my blog!  I’ve got a very Clean and Simple card for you today.

For today’s card I used the Rooted in Nature Bundle

I started with a piece of Crumb Cake cardstock for the card base and adhered a piece of Very Vanilla Cardstock using Liquid Glue.

 I attached a strip of Natures Poem Designer Series Paper on the left side of the Very Vanilla using Snail.  I added 3 Grapefruit Grove Pearls from the Share What you Love Artisan Pearl Pack to the top of the Designer Paper.

I stamped the Sentiment from  Rooted in Nature in Tranquil Tide Ink on the Very Vanilla.  On a scrap of Very Vanilla cardstock I stamped the leaf from the Rooted in Nature in Grape Grove Ink and cut it out using the Nature’s Roots Framelit Dies with my Big Shot. I attached a bow made from Linen Thread on the stem of the leaf using a Glue Dot and adhered it above the sentiment with Stampin’ Dimensionals.

On the inside I stamped the leaf again in Grapefruit Grove Ink, stamping off once in the center of the Very Vanilla cardstock.  I adhered another strip from the Natures Poem Designer Paper on the left side using Snail.  Again using Snail, I attached the Very Vanilla panel to a Tranquil Tide mat and adhered it to the card base using Liquid Glue.  I don’t always stamp a sentiment on the inside until I’m ready to use my cards.  I like to leave them blank so that I could use it for any occasion needed.


To finish off my card I made a matching envelope.  I stamped the leaf image to the front of a Medium Very Vanilla Envelope in Grapefruit Grove Ink.  I then added a piece of Natures Poem Designer Paper to the envelope flap.

****************************************************************************************************

If you need any stamping supplies, I’d be very happy to be your Demonstrator.  Just click here to go directly to my online store or drop me an email if you have any questions.  Happy Stamping, Karen!

****************************************************************************************************

Card stock cuts for this project:

  • Crumb Cake Cardstock 4 1/4″ X 11″ (card base scored and folded at 5 1/2″)
  • Very Vanilla Cardstock 3 1/4″ X 5 1/2″ (front panel), 4″ X 5 1/4″ (inner liner)
  • Tranquil Tide Cardstock 4 1/8″ X 5 3/8″ (inner liner mat)
  • Natures Poem DSP 3/4″ X 5 1/2″ (strip on front panel), 1/2″ X 5 1/2″ (strip on inner liner)

****************************************************************************************************

Product List

Stampin’ Up Buffalo Check and Country Home Thanksgiving

Good Monday morning all. Hope your week has started off good.

For today’s card I used the Buffalo Check Stamp and Country Home stamp set.

I started by stamping the Buffalo Check stamp in Tuxedo Black Momento Ink on Cherry Cobbler cardstock.

I added a piece of Basic Gray cardstock on the side and wrapped it with a piece of Cherry Cobbler cotton twine from the Festive Farmhouse Cotton Twine pack.  So that the twine doesn’t move, using the 1/2″ circle punch, I punched off just enough of the circle to make an indent.  Using Multipurpose Liquid Glue I adhered it to the Cherry Cobbler cardbase.

On a piece of Whisper White I stamped the milk can and one of the sets of flowers from the Country Home stamp set in Tuxedo Black Ink.  I then colored it with Cajun Craze, Cherry Cobbler, Ivory, Old Olive, Pumpkin Pie and Smoky Slate Stampin’ Blends. I adhered it to a Basic Gray mat using Snail. I attached the artwork to the card front using Stampin Dimensionals.  I stamped the sentiment from the Country Home set in Tuxedo Black Ink on the small piece of Whisper White and adhered it to the small mat of Basic Gray.  I colored one of the small pearls from the Basic Pearl Jewels pack with my Dark Cherry Cobbler Stampin’ Blends. Once it dried, I attached it in the left corner of the sentiment. I then attached the sentiment below the artwork with Stampin’ Dimensionals.

On the inside Whisper White panel I stamped the milk can and flowers in Smoky Slate stamping off twice.  I then stamped the sentiment in Tuxedo Black over the stamped image and adhered it with Snail.

To complete my card I stamped the Buffalo Check on my Whisper White Medium Envelope flap.

****************************************************************************************************

If you need any stamping supplies, I’d be very happy to be your Demonstrator.  Just click here to go directly to my online store or drop me an email if you have any questions.  Happy Stamping, Karen!

****************************************************************************************************

Card stock cuts for this project:

  • Cherry Cobbler Cardstock 4 1/4″ X 11″ (card base scored and folded at 5 1/2″),    4 1/4″ X 5 1/2″ (card front)
  • Basic Gray Cardstock 2 3/8″ X 4″ (artwork mat), 1/2″ X 5 1/2″ (side strip),              3 1/16″ X 5/8″ (sentiment mat)
  • Whisper White Cardstock 2 1/4″ X 3 7/8″ (artwork), 3″ X 9/16″ (sentiment),           4″ X 5 1/4″ (inner liner)

****************************************************************************************************

Product List