Stampin’ Up! Stars At Night for Fun Fold Friday

Good Friday morning stamping friends and welcome to my Fun Fold Friday. How was everyone’s week? Are you ready for the weekend? I hope you are starting to make some plans. I’ll be at work all day tomorrow. Don’t forget I still have my Double Creative Stamping Designs Rewards going on for my birthday week until Monday November 20th.

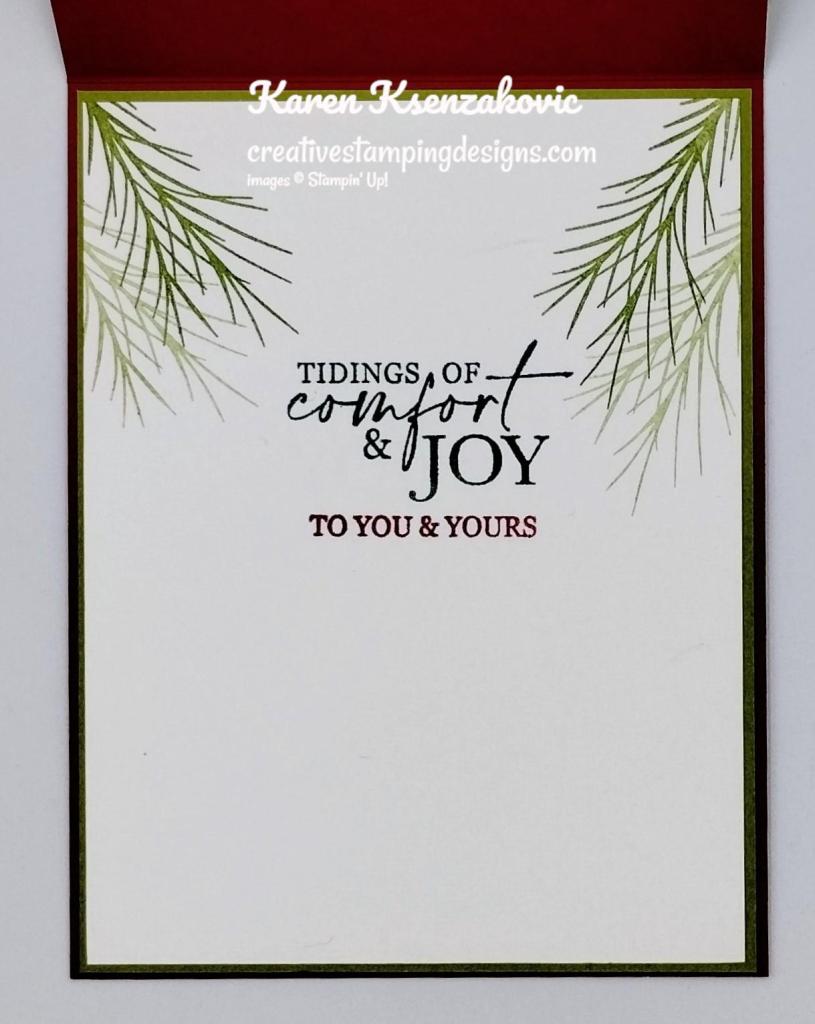
Today’s card I made on YouTube Live on Wednesday. If you were able to join me or watched the replay, thank you. If you’d like to watch my video and stamp along, the measurements are below, just above the supply list, along with the link to my YouTube channel. Here is my card for today.

Stampin' Up1 Stars At Night Fun Fold 1 creativestampingdesigns.com

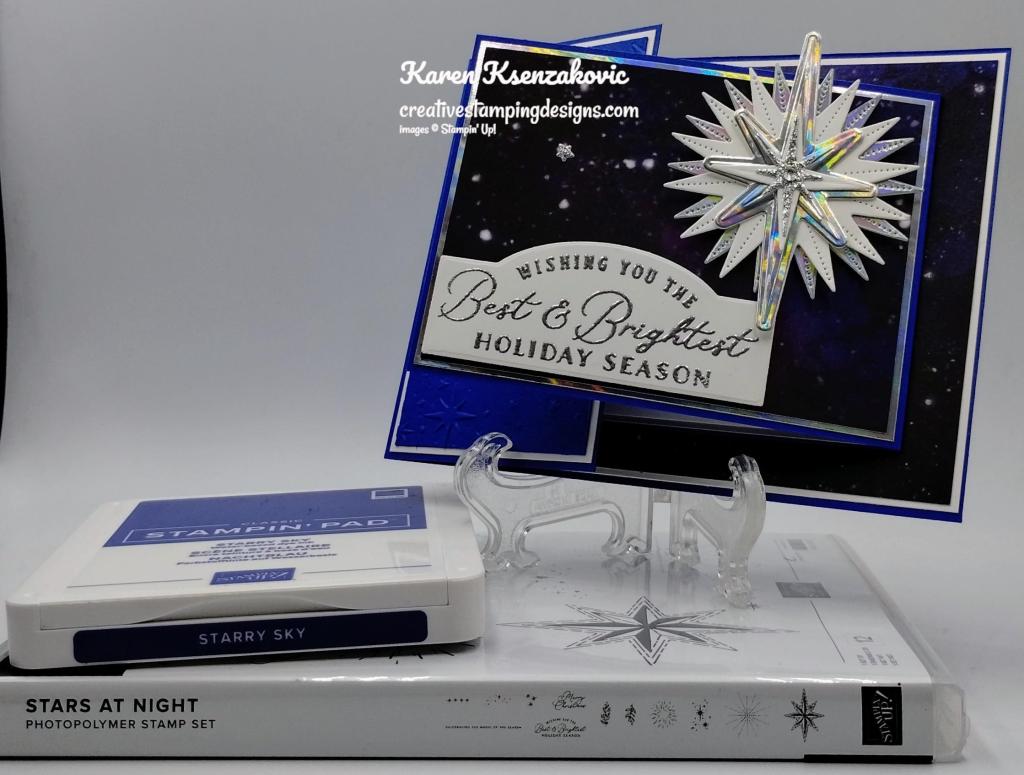
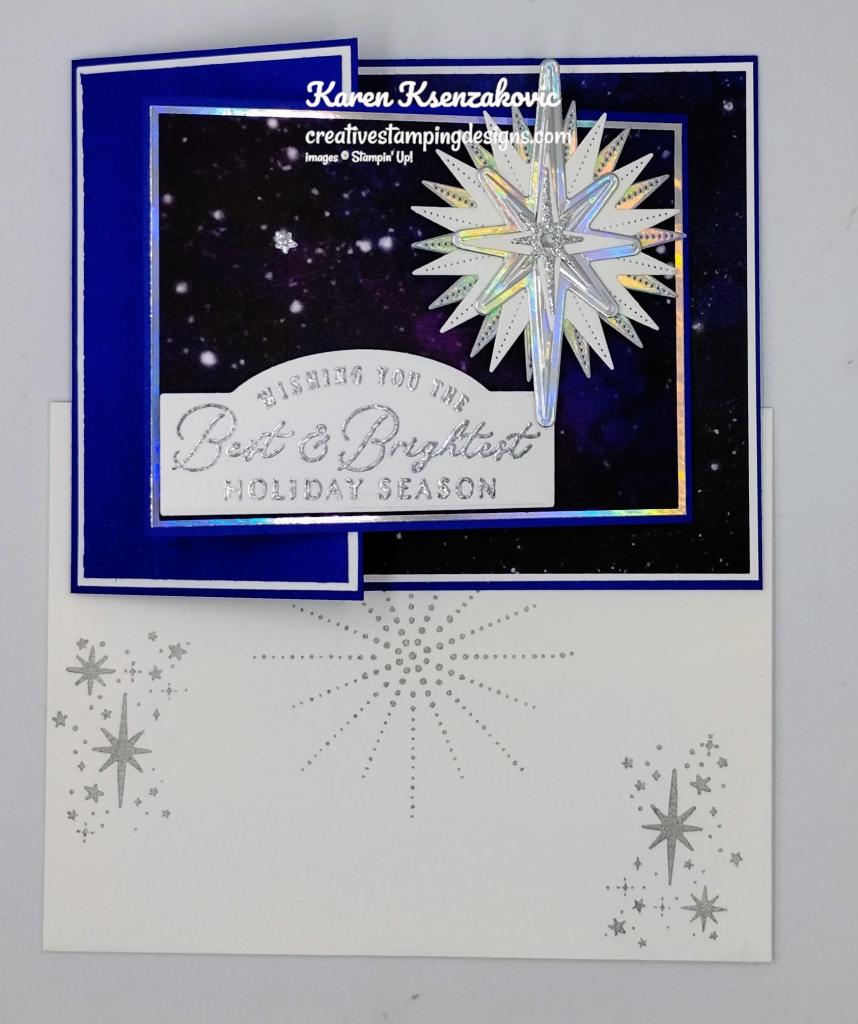
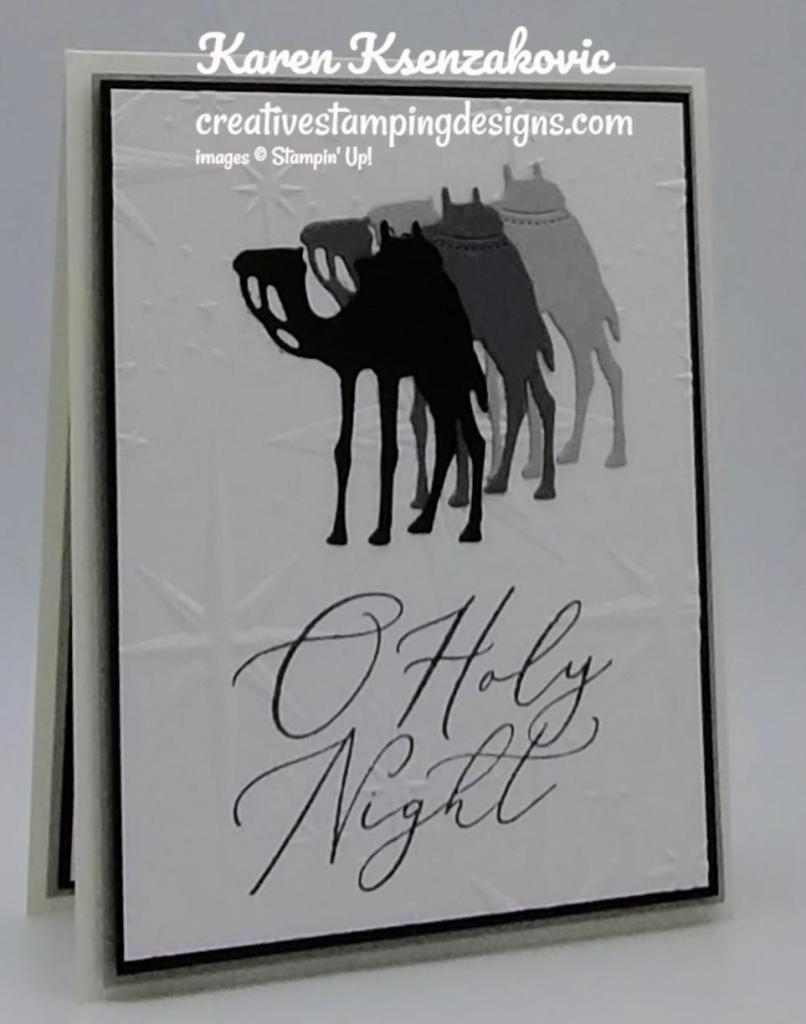
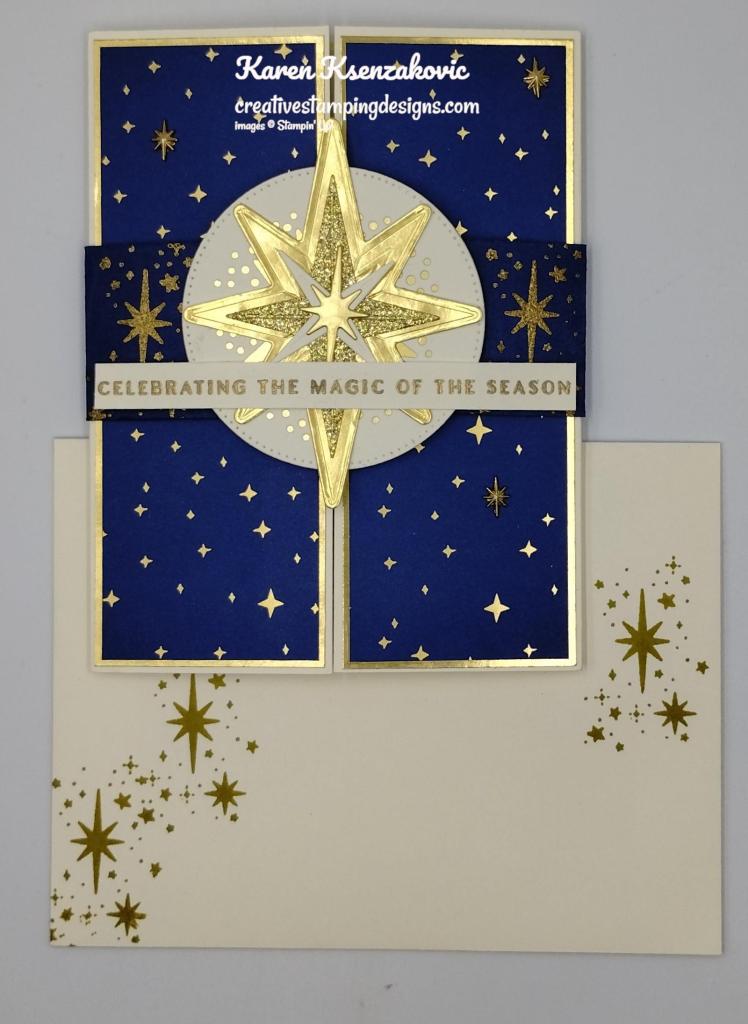
I used the Stampin’ Up! Stars At Night Bundle along with the Stargazing Designer Series Paper, Holographic Specialty Paper and Online Exclusive Silver & Gold Adhesive-Backed Glimmer Paper for my card today.

Stampin' Up1 Stars At Night Fun Fold 2 creativestampingdesigns.com

I adhered a panel of Stargazing DSP to a Basic White mat using Stampin’ Seal. I adhered the layered panel to the back inside of the large card base using Liquid Glue. From panels of Holographic paper, Silver Glimmer paper and Basic White, I cut multiple stars, large and small using the Stars At Night Hybrid Embossing Folder and Dies.

Stampin' Up1 Stars At Night Fun Fold 3 creativestampingdesigns.com

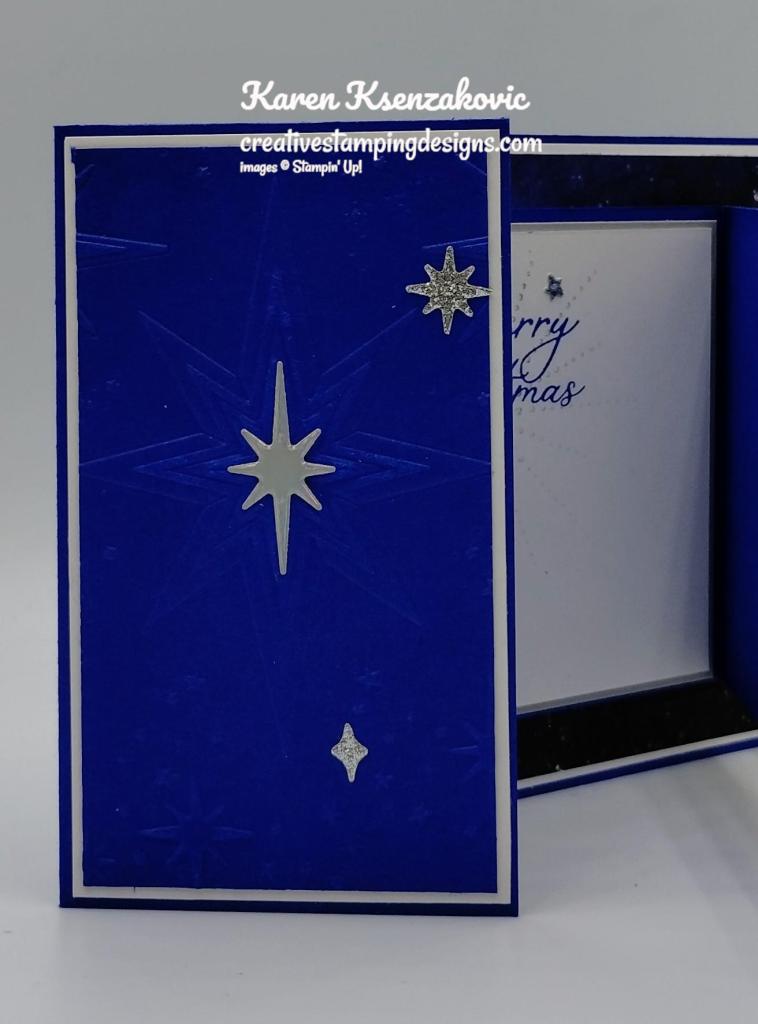
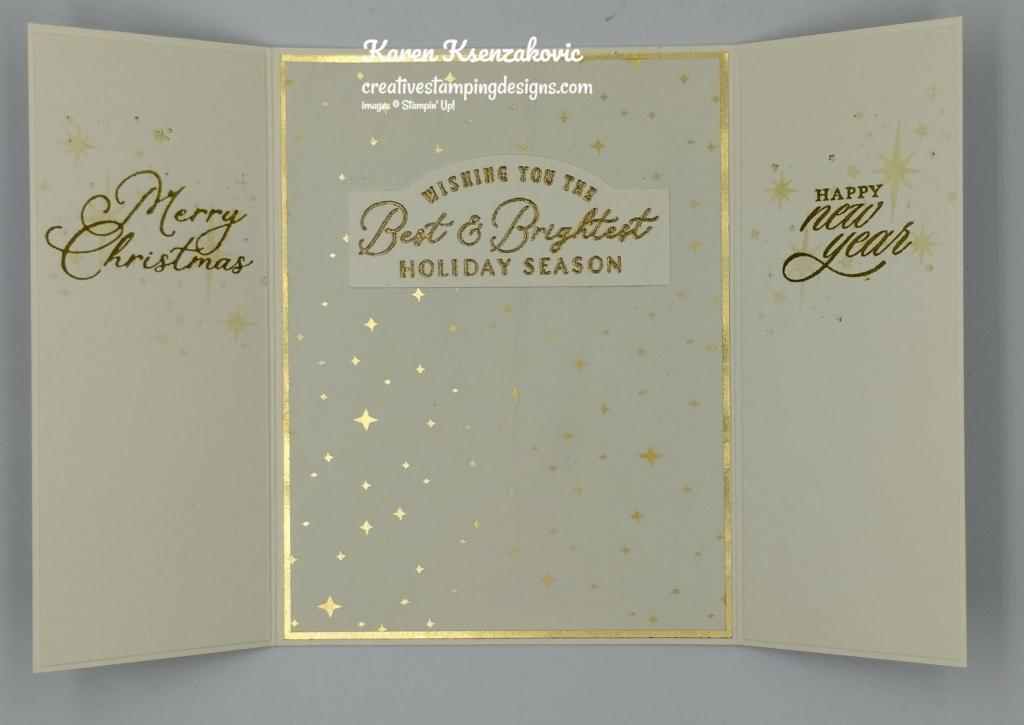
I embossed a small panel of Starry Sky using the Stars At Night Hybrid Embossing Folder. I adhered the embossed panel to a Basic White mat using Liquid Glue. I adhered the layered panel to the large card base using Liquid Glue. I added a Holographic star to the center of the large, embossed star using Liquid Glue. I added a few of the Silver Glimmer stars to the panel. On the video I had added a larger star, but it was too large, so I switched it out.

Stampin' Up1 Stars At Night Fun Fold 4 creativestampingdesigns.com

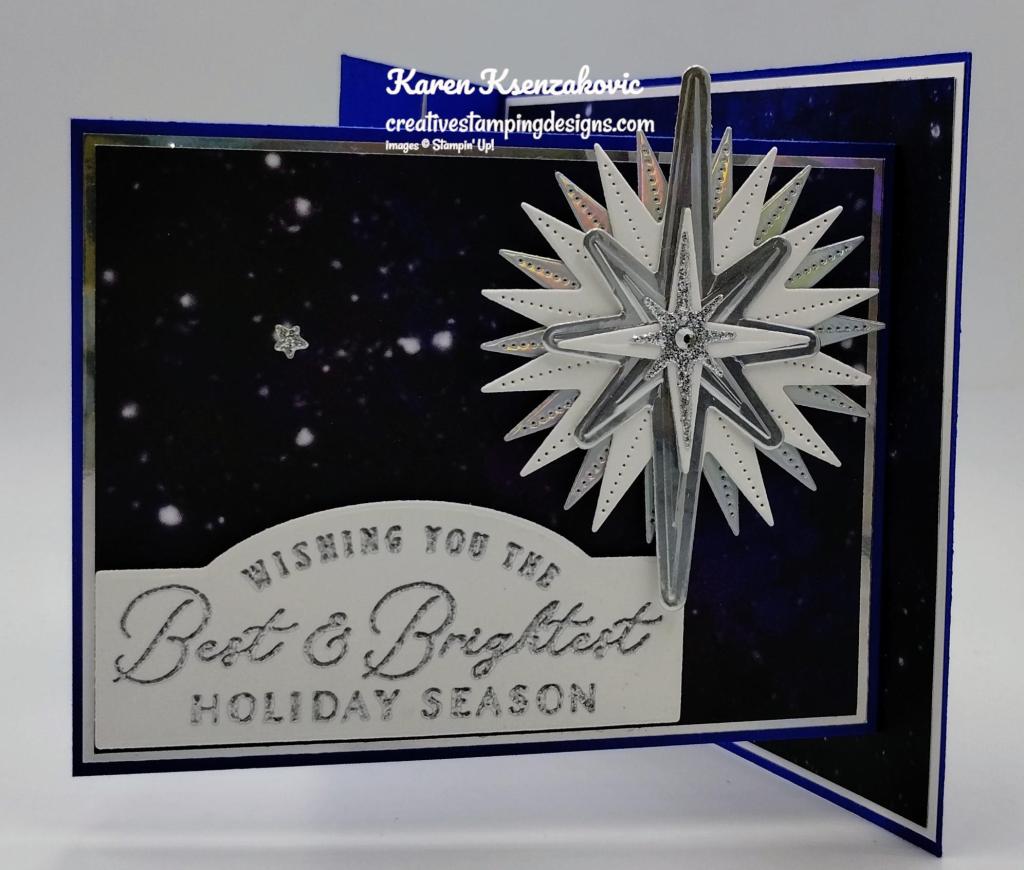
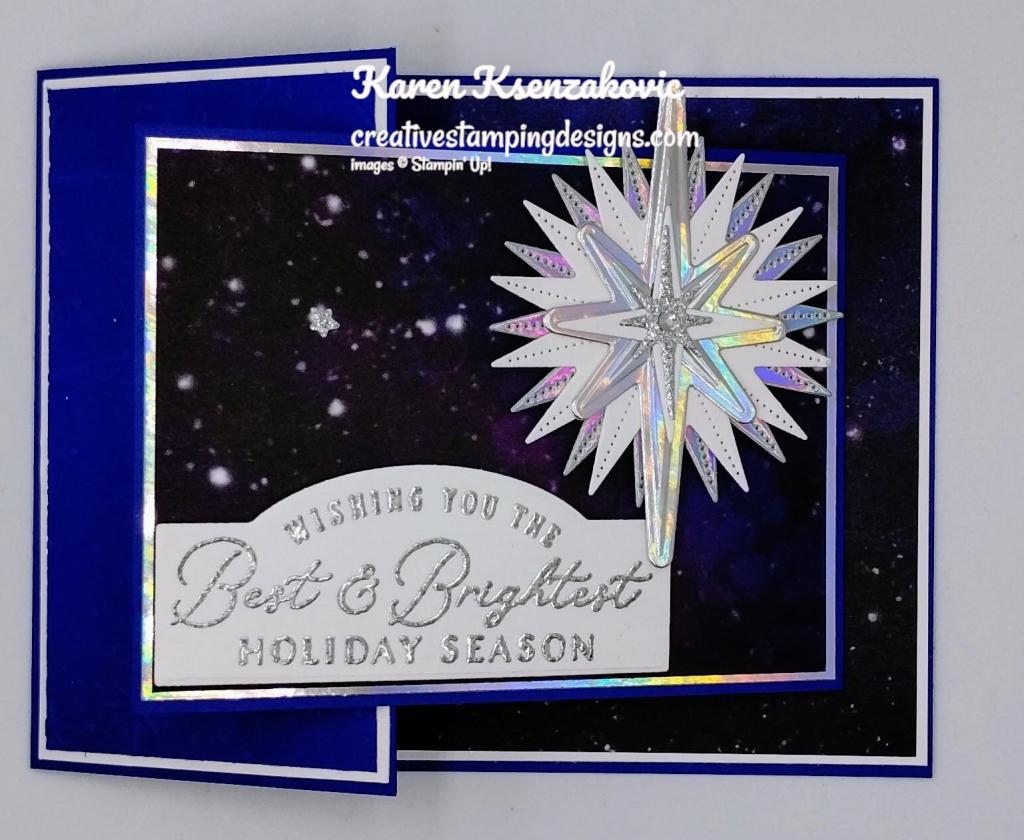
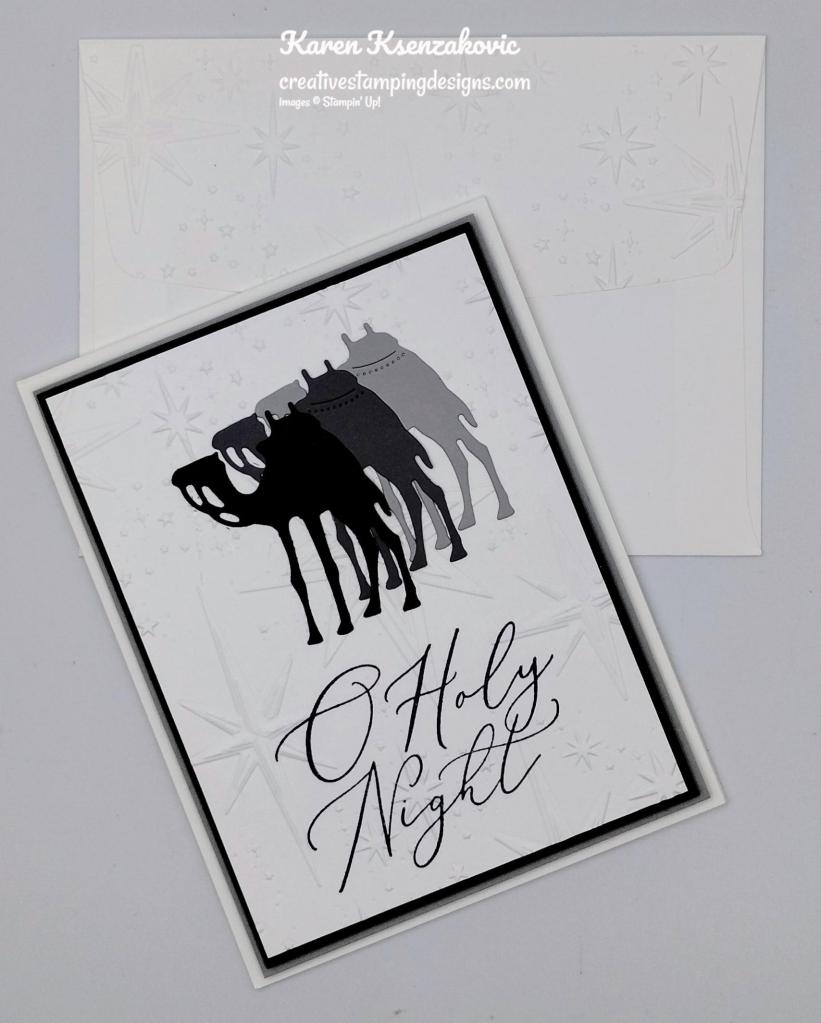
I adhered a panel of Stargazing DSP to a Holographic mat using Stampin’ Seal. I adhered the layered panel to the front of the small Starry Sky card base using Liquid Glue. I layered the stars the way I wanted them using Glue Dots. I adhered the layered stars to the small card front using Stampin’ Dimensionals. On a panel of Basic White, I stamped the sentiment from the Stampin’ Up! Stars At Night Photopolymer Stamp Set in Versamark Ink. I sprinkled it with Silver Embossing Powder and set it using the Heat Tool. I cut the sentiment out using the Stars At Night Dies. I adhered the sentiment to the small card front using Stampin’ Dimensionals.

Stampin' Up1 Stars At Night Fun Fold 5 creativestampingdesigns.com

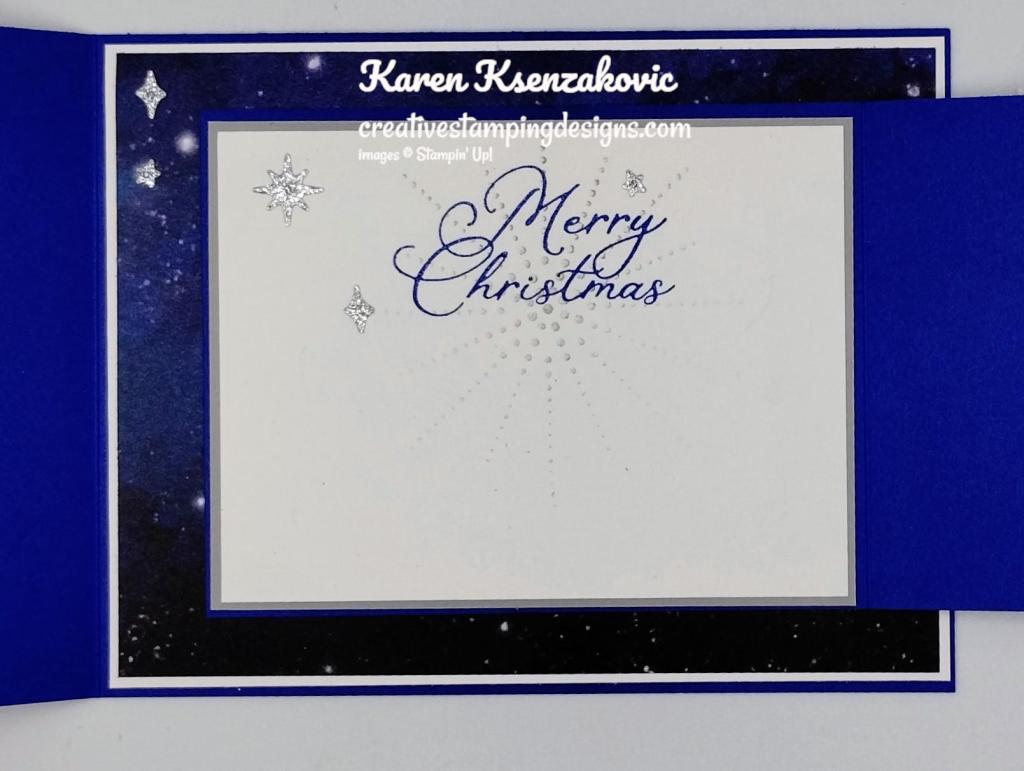
On the inside of the small card base, I stamped the sentiment from the Stars At Night stamp set in Starry Sky Ink on a panel of Basic White. I stamped the large, dotted star image from the Stars At Night stamp set in Smoky Slate Ink, stamping off once on scrap paper, over the sentiment. I adhered the Basic Whtie panel to a Smoky Slate mat then to the inside of the small Starry Sky card base. I added a few of the tiny Silver Glimmer stars around the sentiment.

Stampin' Up1 Stars At Night Fun Fold 6 creativestampingdesigns.com

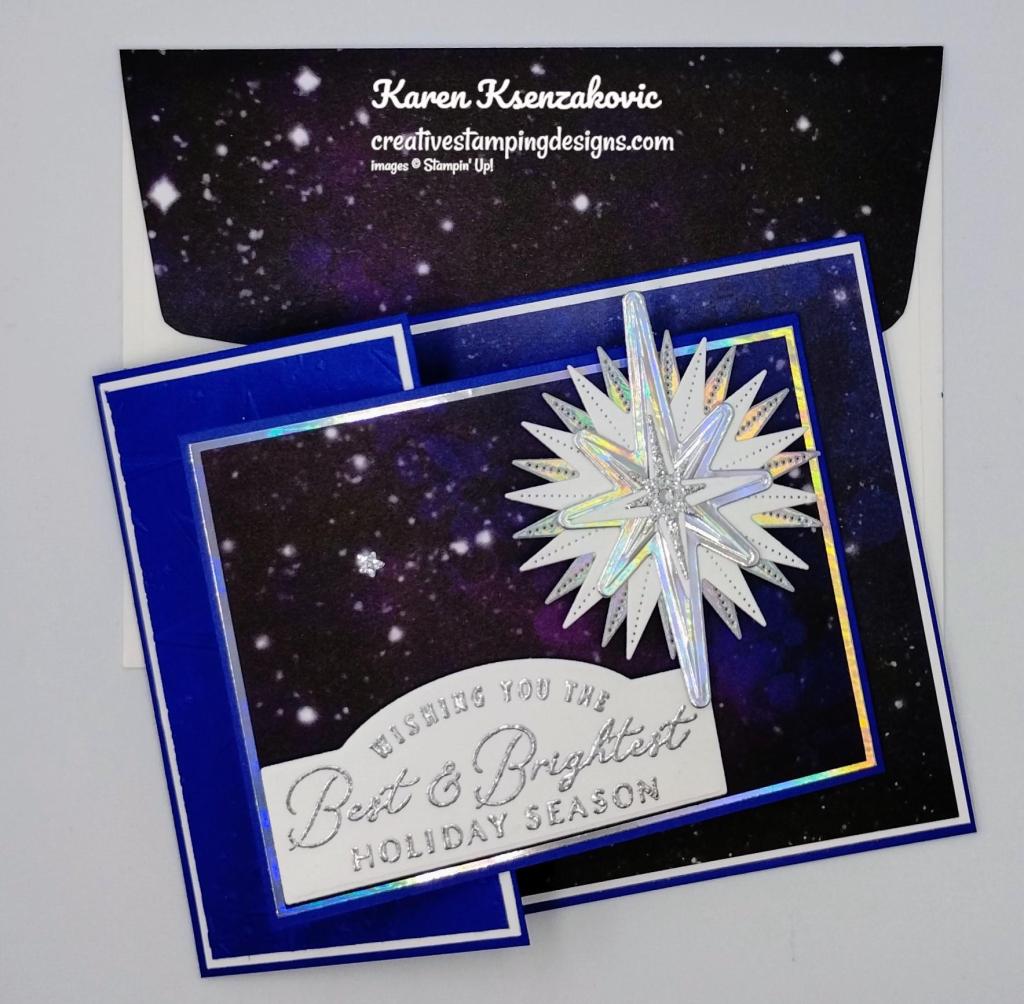
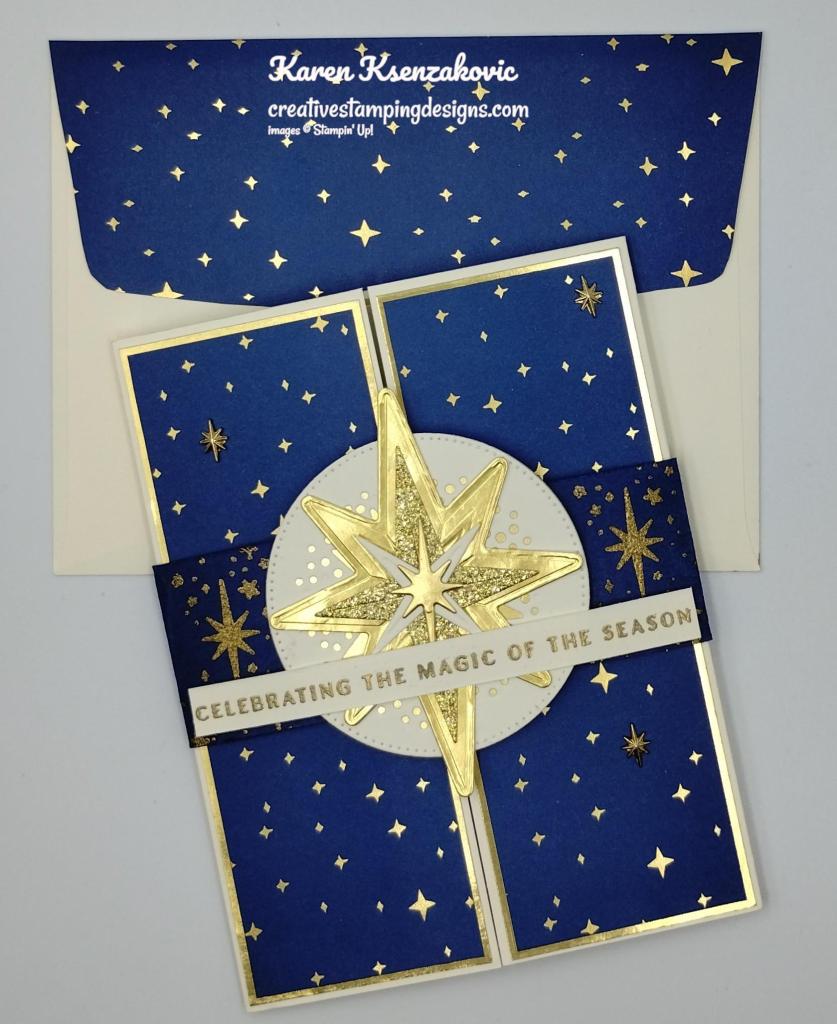
To finish my card, I decorated a Basic White Medium Envelope. I stamped the star images from the Stars At Night stamp set in Smoky Slate Ink on the envelope front. I adhered a panel of Stargazing DSP to the envelope flap.

Stampin' Up1 Stars At Night Fun Fold 7 creativestampingdesigns.com

Thank you for stopping by my blog today. I hope you liked my card and will give it a try. I hope you will CASE this card and please feel free to post it in the comments of my Facebook page under my post. I’d love to see your take on the card. The list of measurements are below if you’d like to stamp along while watching the video. You can watch my video on my YouTube Channel Here.

If you watch this on my YouTube channel, please remember to subscribe so that you will get notified when a new video goes live. Thank you to those that have subscribed already. Happy Stamping!!

*********************************************************************************************************

If you need any stamping supplies, I’d love to be your Demonstrator. Just click HERE to go directly to my online store or drop me an email if you have any questions. 

MY CURRENT HOST CODE IS:   BX4UV6HE

Use this host code when placing an order with me. When you order $50 or greater you will receive a free gift from me! If your order is over $150, please do not use this code, but you’ll still get the free gift. The free gift is your choice of any 1 item valued up to $10.00 from the 2023-2024 Annual Catalog!  Unfortunately, packs of cardstock are no longer an option for a free gift. Shipping has become too expensive to ship and it’s costing me as much to ship as the cardstock costs. For any orders $50 or more I will also send you my monthly class tutorials.  Click HERE or go to my Customer Rewards for more details and to see what this month’s tutorials are.

Please remember to use my current Host Code and make sure that you can see my name on the final checkout page listed as your Demonstrator when you order so that you know that you’re ordering with me, and you’ll get my rewards! 

Happy Stamping, Karen

*********************************************************************************************************

In response to changing policies at Stampin’ Up – I’m adjusting my Ordering Gift policy as well.  I’m having to get a little more tough on the adding of Host codes when you place your order thru my Online Store.

Not to worry – you’re still going to get that $10 ordering gift for orders of $50 (before shipping & tax) or greater.  And the gift is still any 1 SU! product up to that $10 value – which includes some of our fun Host Sets!

But – if you DO NOT use the Host code for your orders of less than $150 (this is the RETAIL total before Shipping & Handling), then you’ll have two options:

  1. You’ll need to call Stampin’ Up! (1-800-Stamp-Up) and ask them to add it for you. They’re very helpful and will get it done quickly!  OR….
  2. If your order was over the $50 threshold but under $150, then…you’ll forfeit that $10 ordering gift and rewards – this is the Bummer Option – and I REALLY don’t want to do this, SO please remember to add my Current Host Code.

*********************************************************************************************************

New Online Exclusives Now Available

Go check out my Online Store for the NEW Online Exclusive products available. Get those orders placed early so you don’t miss out on the pretty new suite and new bundles.

*********************************************************************************************************

The Best Destination Kit Now Available

Plan a crafting getaway today with the all-inclusive The Best Destination Kit! This kit lets you make nine tri-fold cards with a colorful, nostalgic, travel vibe. Resort-hopping was never so easy!

This month’s kit includes:

  • Enough supplies to create 9 cards—3 each of 3 designs
  • 9 coordinating envelopes
  • Best Destination Photopolymer Stamp Set
  • One Gorgeous Grape Ink Spot
  • Printed card bases, printed die cuts, adhesive, embellishments, and a clear block
  • Finished card size: 5-1/2″ x 4-1/4″ (14 x 10.8 cm)
  • Coordinating colors: Balmy Blue, Boho Blue, Cajun Craze, Calypso Coral, Coastal Cabana, Crushed Curry, Daffodil Delight, Early Espresso, Flirty Flamingo, Fresh Freesia, Gorgeous Grape, Granny Apple Green, Misty Moonlight, Pecan Pie, Petal Pink, Pretty Peacock, and Shaded Spruce

163186 $20.00 USD

*********************************************************************************************************

All The Best

Subscribe November 11 – December 10

Send a wish to all your loved ones with the December Paper Pumpkin Kit! It comes with nine card fronts, three each of three designs, and nine coordinating envelopes. It has paper pieces detailed with gold foil, embellishments, an all-occasion stamp set, and an acetate box where you can store your finished cards! You can gift the kit itself or the finished product in the acetate box; either way, it’s the perfect last-minute gift for any occasion. 

The paper pieces in the December Paper Pumpkin kit have gold foil detailing. Whether it’s an elegant boarder, or woven into the floral artwork, it’s a detail that will surely catch your recipient’s eye! It’s the perfect way to take any paper craft to the next level. 

The beauty of the December Paper Pumpkin Kit lies in the hand drawn artwork. The bright blue skies and elegant yellow flowers compliment the different design elements perfectly. It’s a simple yet sophisticated design that will catch any recipient’s eye! 

This kit includes:

  • 9 cards; 3 each of 3 designs.
  • 9 coordinating envelopes.
  • 1 Acetate box to fit cards and envelopes from the kit.
  • 1 Pebbled Path Stampin’ Spot.
  • 1 photopolymer stamp set.
  • Embellishments.
  • Specialty gold foil die cuts.
  • Enough adhesive to finish the project.
  • Finished card size: 4-1/4″ x 5-1/2″ (10.8 x 14 cm)
  • Coordinating Stampin’ Up! colors: Balmy Blue, Crushed Curry, gold foil, Old Olive, Pebbled Path

Subscribe to the November Paper Pumpkin Kit between 11 November and 10 December by clicking here!

Note: Supplies may be limited toward the end of the subscription period.

*********************************************************************************************************

Card stock cuts for this project:

  • Basic White Cardstock 1 3/4″ x 3 1/2″ (sentiment), 2 1/2″ X 3 1/2″ (stars), 2 3/8″ X 4 1/8″ (embossed panel mat), 4 1/8″ X 5 3/8″ (back panel mat)
  • Smoky Slate Cardstock 3 1/8″ X 4 1/8″ (inner liner mat)
  • Starry Sky Cardstock 4 1/4″ X 8″ (large card base scored & folded at 2 1/2″), 3 1/4″ X 8 1/2″ (small card base scored & folded at 4 1/4″), 2 1/4″ X 4″ (embossed panel)
  • Stargazing Designer Series Paper 3″ X 4″ (small card front), 4″ X 5 1/4″ (back panel), 2 1/4″ X 6″ (envelope flap)
  • Holographic Specialty Paper 3 1/8″ X 4 1/8″ (small card front mat), 1 3/4″ X 3 1/4″ (embossed star), 3″ X 3″ (stars)
  • Silver & Gold Adhesive-Backed Glimmer Paper 2″ X 2″ (stars)

*********************************************************************************************************

Product List

Stars At Night Bundle (English)

$56.50

Stars At Night Photopolymer Stamp Set (English)

$24.00

Stars At Night Hybrid Embossing Folder

$39.00

Basic White 8 1/2" X 11" Cardstock

$10.50

Smoky Slate 8-1/2" X 11" Cardstock

$10.00

Starry Sky 8 1/2" X 11" Cardstock

$10.00

Stargazing 12" X 12" (30.5 X 30.5 Cm) Designer Series Paper

$12.50

 Holographic Trio 12" X 12" (30.5 X 30.5 Cm) Specialty Paper

$10.00

Silver & Gold 12" X 12" (30.5 X 30.5 Cm) Adhesive Backed Glimmer Paper

$7.00

Smoky Slate Classic Stampin' Pad

$9.00

Starry Sky Classic Stampin' Pad

$9.00

Versamark Pad

$9.50

Metallics Embossing Powders

$18.00

Heat Tool (Us And Canada)

$31.00

Basic White Medium Envelopes

$8.50

Stampin' Cut & Emboss Machine

$128.00

Mini Glue Dots

$5.75

Multipurpose Liquid Glue

$5.50

Mini Stampin' Dimensionals

$4.25

Stampin' Dimensionals

$4.25

Stampin' Seal

$8.00

Bone Folder

$7.00

Paper Snips

$11.00

Paper Trimmer

$26.00

Clear Block Bundle

$80.75

Stampin’ Up! Christmas Classics for The Happy Inkin’ Thursday Blog Hop

Good Thursday morning my stamping friends welcome to our Happy Inkin’ Thursday Blog Hop. If you are starting with me, thank you, I hope you will stop by everyone’s blog to see what they have created this week. If you are hopping over from Akiko’s blog, thank you for stopping by. This week we have Color Challenge. We have a new member with us, Help me welcome Nel Thames to our group. If you’d like to see a quick video on how I made this card, Click Here for my Instagram Reels. Here is my card using this week’s colors.

Stampin' Up! Christmas Classics CAS1 creativestampimngdesigns.com

I used the Stampin’ Up! Christmas Classics Bundle along with the Joy of Christmas Designer Series Paper for my card today.

These are our colors for this week.

My design is from Sunday Stamps Challenge #322.

Stampin' Up! Christmas Classics CAS2 creativestampimngdesigns.com

I started by adhering a panel of Joy of Christmas DSP to a Cherry Cobbler card base using Liquid Glue. I adhered a smaller panel of Joy of Christmas DSP to an Old Olive mat using Stampin’ Seal. I adhered the layered panel to the card front using Stampin’ Dimensionals.

Stampin' Up! Christmas Classics CAS3 creativestampimngdesigns.com

Using the Christmas Classics Dies, I cut a panel of Joy of Christmas DSP. I cut the panel on the opposite side of the DSP so that the holly and berries were hanging down on the bottom right. I trimmed the holy and berries off the top using Paper Snips. I used my Bone Folder to smooth the die cut piece.

Stampin' Up! Christmas Classics CAS4 creativestampimngdesigns.com

On a panel of Basic White, I stamped the sentiments from the Stampin’ Up! Christmas Classics Photopolymer Stamp Set in Cherry Cobbler and Shaded Spruce Inks. I cut the sentiment out using the Christmas Classics Dies. I adhered the sentiment to the inside of the die cut panel using Stampin’ Seal. I adhered the layered sentiment panel to the card front using Stampin’ Dimensionals. I added a few 2023-2025 In-Color Dots to the card front.

Stampin' Up! Christmas Classics CAS5 creativestampimngdesigns.com

On the inside, I stamped the sentiments from the Christmas Classics stamp set in Cherry Cobbler and Shaded Spruce Inks on a panel of Basic White. I stamped the pine bough image from the Christmas Classics stamp set in Old Olive Ink on the side of the panel. Some are stamped full strength, and some are stamped off once on scrap paper. I adhered the Basic Whtie panel to an Old Olive mat then to the inside of the Cherry Cobbler card base.

Stampin' Up! Christmas Classics CAS6 creativestampimngdesigns.com

To complete my card, I decorated a Basic Whtie Medium Envelope. I stamped the pine bough image from the Christmas Classics stamp set in Old Olive Ink on the envelope front. I adhered a panel of Joy of Christmas DSP to the envelope flap.

Stampin' Up! Christmas Classics CAS7 creativestampimngdesigns.com

Thank you for stopping by my blog today. I hope you liked my card and will give it a try. Now that you’ve seen my card, take a minute to hop through and see everyone’s projects today. If you click on the Next Blog button, you’ll go to Tara’s page. Or you can just click on the names below to go directly to all their blogs! Happy Hopping!

Amy Koenders

Mary Deatherage

Jaimie Babarczy

Karen Finkle

Akiko Sudano

Karen Ksenzakovic You Are Here

Tara Carpenter

Terry Lynn Bright

Carol Buckalew

Nel Thames

*********************************************************************************************************

If you need any stamping supplies, I’d love to be your Demonstrator. Just click HERE to go directly to my online store or drop me an email if you have any questions. 

MY CURRENT HOST CODE IS:   BX4UV6HE

Use this host code when placing an order with me. When you order $50 or greater you will receive a free gift from me! If your order is over $150, please do not use this code, but you’ll still get the free gift. The free gift is your choice of any 1 item valued up to $10.00 from the 2023-2024 Annual Catalog!  Unfortunately, packs of cardstock are no longer an option for a free gift. Shipping has become too expensive to ship and it’s costing me as much to ship as the cardstock costs. For any orders $50 or more I will also send you my monthly class tutorials.  Click HERE or go to my Customer Rewards for more details and to see what this month’s tutorials are.

Please remember to use my current Host Code and make sure that you can see my name on the final checkout page listed as your Demonstrator when you order so that you know that you’re ordering with me, and you’ll get my rewards! 

Happy Stamping, Karen

*********************************************************************************************************

In response to changing policies at Stampin’ Up – I’m adjusting my Ordering Gift policy as well.  I’m having to get a little more tough on the adding of Host codes when you place your order thru my Online Store.

Not to worry – you’re still going to get that $10 ordering gift for orders of $50 (before shipping & tax) or greater.  And the gift is still any 1 SU! product up to that $10 value – which includes some of our fun Host Sets!

But – if you DO NOT use the Host code for your orders of less than $150 (this is the RETAIL total before Shipping & Handling), then you’ll have two options:

  1. You’ll need to call Stampin’ Up! (1-800-Stamp-Up) and ask them to add it for you. They’re very helpful and will get it done quickly!  OR….
  2. If your order was over the $50 threshold but under $150, then…you’ll forfeit that $10 ordering gift and rewards – this is the Bummer Option – and I REALLY don’t want to do this, SO please remember to add my Current Host Code.

*********************************************************************************************************

LAST DAY for the Stampin’ Up! Seasonal Sale

Stampin’ Up! let us know about the upcoming sale starting Tuesday November 14th through Thursday November 16th. Take advantage of this sale by stocking up on items that you use for every handmade craft!

Create more by spending less during the Seasonal Sale! Between 14–16 November, you can get select products from the 2023–2024 Annual Catalog up to 20% off. Have your eye on something from our new color collection? Don’t miss your opportunity to shop the colors you’ve been craving during this phenomenal sale! 

You can stock up on supplies for all your upcoming handmade projects or embrace the season of giving and buy something for your fellow crafting enthusiasts. Make sure to act quickly on this limited time only deal!

Sales Period: November 14 – 16 2023

  • 10% off ribbons and trims.
  • 15% off inks, including pads, refills, markers, and Blends. Bundles are not included.
  • 20% off papers, including cardstock, specialty paper, and Designer Series Paper.
  • Shop online to see the full selection of discounted products available. This is a limited time offer.
  • Discounts are automatically applied when sale items are added to any order, including Starter Kits.
  • Please keep in mind that due to the high volume of orders, the distribution center may fall behind our typical shipping timeframes. We will do everything we can to return to our regular service levels as quickly as possible.
  • Please note: Some items may sell out due to high demand. The discount will automatically be applied to qualifying items that are in stock. Per our updated policy, backorders are not available. 

*********************************************************************************************************

New Online Exclusives Now Available

Go check out my Online Store for the NEW Online Exclusive products available. Get those orders placed early so you don’t miss out on the pretty new suite and new bundles.

*********************************************************************************************************

The Best Destination Kit Now Available

Plan a crafting getaway today with the all-inclusive The Best Destination Kit! This kit lets you make nine tri-fold cards with a colorful, nostalgic, travel vibe. Resort-hopping was never so easy!

This month’s kit includes:

  • Enough supplies to create 9 cards—3 each of 3 designs
  • 9 coordinating envelopes
  • Best Destination Photopolymer Stamp Set
  • One Gorgeous Grape Ink Spot
  • Printed card bases, printed die cuts, adhesive, embellishments, and a clear block
  • Finished card size: 5-1/2″ x 4-1/4″ (14 x 10.8 cm)
  • Coordinating colors: Balmy Blue, Boho Blue, Cajun Craze, Calypso Coral, Coastal Cabana, Crushed Curry, Daffodil Delight, Early Espresso, Flirty Flamingo, Fresh Freesia, Gorgeous Grape, Granny Apple Green, Misty Moonlight, Pecan Pie, Petal Pink, Pretty Peacock, and Shaded Spruce

163186 $20.00 USD

*********************************************************************************************************

All The Best

Subscribe November 11 – December 10

Send a wish to all your loved ones with the December Paper Pumpkin Kit! It comes with nine card fronts, three each of three designs, and nine coordinating envelopes. It has paper pieces detailed with gold foil, embellishments, an all-occasion stamp set, and an acetate box where you can store your finished cards! You can gift the kit itself or the finished product in the acetate box; either way, it’s the perfect last-minute gift for any occasion. 

The paper pieces in the December Paper Pumpkin kit have gold foil detailing. Whether it’s an elegant boarder, or woven into the floral artwork, it’s a detail that will surely catch your recipient’s eye! It’s the perfect way to take any paper craft to the next level. 

The beauty of the December Paper Pumpkin Kit lies in the hand drawn artwork. The bright blue skies and elegant yellow flowers compliment the different design elements perfectly. It’s a simple yet sophisticated design that will catch any recipient’s eye! 

This kit includes:

  • 9 cards; 3 each of 3 designs.
  • 9 coordinating envelopes.
  • 1 Acetate box to fit cards and envelopes from the kit.
  • 1 Pebbled Path Stampin’ Spot.
  • 1 photopolymer stamp set.
  • Embellishments.
  • Specialty gold foil die cuts.
  • Enough adhesive to finish the project.
  • Finished card size: 4-1/4″ x 5-1/2″ (10.8 x 14 cm)
  • Coordinating Stampin’ Up! colors: Balmy Blue, Crushed Curry, gold foil, Old Olive, Pebbled Path

Subscribe to the December Paper Pumpkin Kit between 11 November and 10 December by clicking here!

Note: Supplies may be limited toward the end of the subscription period.

*********************************************************************************************************

Card stock cuts for this project:

  • Basic White Cardstock 1 1/2″ X 4 1/4″ (sentiment), 4″ X 5 1/4″ (inner liner)
  • Cherry Cobbler Cardstock 4 1/4″ X 11″ (card base scored & folded at 5 1/2″)
  • Old Olive Cardstock 3 1/4″ X 4 1/2″ (card front panel mat), 4 1/8″ X 5 3/8″ (inner liner mat)
  • Joy Of Christmas Designer Series Paper 4 1/8″ X 5 3/8″ (card front), 3 1/8″ X 4 3/8″ (card front panel), 2 1/4″ X 4 1/4″ (die cut panel), 2 1/4″ X 6″ (envelope flap)

*********************************************************************************************************

Product List
Christmas Classics Bundle (English)
$52.00
Christmas Classics Photopolymer Stamp Set (English)
$21.00
Christmas Classics Dies
$37.00
Basic White 8 1/2" X 11" Cardstock
$10.50
Cherry Cobbler 8-1/2" X 11" Cardstock
$10.00
Old Olive 8-1/2" X 11" Cardstock
$10.00
Joy Of Christmas 12" X 12" (30.5 X 30.5 Cm) Designer Series Paper
$12.50
Cherry Cobbler Classic Stampin' Pad
$9.00
Old Olive Classic Stampin' Pad
$9.00
Shaded Spruce Classic Stampin' Pad
$9.00
2023–2025 In Color™ Dots
$8.00
Basic White Medium Envelopes
$8.50
Stampin' Cut & Emboss Machine
$128.00
Mini Glue Dots
$5.75
Multipurpose Liquid Glue
$5.50
Mini Stampin' Dimensionals
$4.25
Stampin' Dimensionals
$4.25
Stampin' Seal
$8.00
Bone Folder
$7.00
Paper Snips
$11.00
Paper Trimmer
$26.00
Clear Block Bundle
$80.75

Stampin’ Up! Very Best Occasions for Amy’s Inkin’ Krew Team Blog Hop

Good Tuesday morning my stamping friends welcome to Amy’s Inkin’ Krew Team Blog Hop. It’s the 2nd Tuesday of the month so that means Blog Hop Day!! If you are starting with me, be sure to hop around to see everyone’s beautiful projects. If you’ve hopped over from Shirley’s blog, welcome to my blog and thank you for stopping by. The theme this month is “Merry Christmas/Happy Holiday”. We can interpret this however we want. If you’d like to see a quick video of how I made this card, Click Here to go to my Instagram Reels. Here’s my card for today.

Stampin' Up! Very Best Occasions Christmas 1 creativestampingdesigns.com

I used the Stampin’ Up! Very Best Occasions Cling Stamp Set along with the Stampin’ Up! Christmas Classics Photopolymer Stamp Set, Joy Of Christmas Designer Series Paper, Labels Aglow Dies and Magical Meadow Dies for my card today.

Stampin' Up! Very Best Occasions Christmas 2 creativestampingdesigns.com

I started by adhering 3 strips of Joy of Christmas DSP to a Joy of Christmas DSP card front using Liquid Glue. I adhered the panel to a Shaded Spruce mat using Stampin’ Seal. I adhered the layered panel to a Real Red card base using Stampin’ Dimensionals.

Stampin' Up! Very Best Occasions Christmas 3 creativestampingdesigns.com

Using the Magical Meadow Dies, I cut 2 of the sprigs from a panel of Shaded Spruce, 1 from a panel of Old Olive and the berries from a panel of Real Red. I adhered the berries to the Old Olive Sprig.

Stampin' Up! Very Best Occasions Christmas 4 creativestampingdesigns.com

On a panel of Basic White, I stamped the sentiment from the Very Best Occasions stamp set in Shaded Spruce Ink. I cut the sentiment out using the Labels Aglow Dies. I adhered the sentiment to the bottom of the card front using Stampin’ Dimensionals. I adhered the sprigs behind the sentiment. I added a few Festive Pearls to the card front.

Stampin' Up! Very Best Occasions Christmas 5 creativestampingdesigns.com

On the inside, I stamped the sentiment from Very Best Occasions stamp set in Shaded Spruce Ink on a panel of Basic White. I stamped the holly leaf image from Christmas Classics stamp set on the top of the panel in shaded Spruce Ink. I stamped the pine boughs image from Christmas Classics stamp set in Old Olive Ink around the holly. I colored the holly leaves in using Shaded Spruce Stampin’ Blends Markers. I colored the berries on the sentiment using Real Red Stampin’ Blends Markers. I adhered a strip of Joy of Christmas DSP to the bottom of the panel. I adhered the Basic White panel to a Shaded Spruce mat then to the inside of the Real Red card base.

Stampin' Up! Very Best Occasions Christmas 6 creativestampingdesigns.com

To complete my card, I decorated a Basic White Medium Envelope. I stamped the holly leaf image from the Christmas Classics stamp set in Shaded Spruce Ink on the envelope front. I stamped the pine bough image from the Christmas Classics stamp set in Old Olive Ink around the holly. I colored the holly using Shaded Spruce Stampin’ Blends Markers. I adhered a panel of Joy Of Christmas DSP to the envelope flap.

Stampin' Up! Very Best Occasions Christmas 7 creativestampingdesigns.com

Thank you for visiting by my blog today, I hope you liked my card and will give it a try. Now that you’ve seen my card, be sure to hop around to see everyone’s beautiful projects. Hit Previous to hop back to Shirley’s blog or hit Next to head over to Akiko’s blog. You can also click on each of the names and hop around that way. I hope you enjoy seeing everyone’s projects. Happy Hopping!!

  1. Ann Louise Fodgaard
  2. Mary Deatherage
  3. Tara Carpenter
  4. Carol Buckalew
  5. Nel Thames
  6. Shirley Gentry
  7. Karen Ksenzakovic You Are Here
  8. Akiko Sudano
  9. Karen Finkle
  10. Amy Koenders

*********************************************************************************************************

If you need any stamping supplies, I’d love to be your Demonstrator. Just click HERE to go directly to my online store or drop me an email if you have any questions. 

MY CURRENT HOST CODE IS:   BX4UV6HE

Use this host code when placing an order with me. When you order $50 or greater you will receive a free gift from me! If your order is over $150, please do not use this code, but you’ll still get the free gift. The free gift is your choice of any 1 item valued up to $10.00 from the 2023-2024 Annual Catalog!  Unfortunately, packs of cardstock are no longer an option for a free gift. Shipping has become too expensive to ship and it’s costing me as much to ship as the cardstock costs. For any orders $50 or more I will also send you my monthly class tutorials.  Click HERE or go to my Customer Rewards for more details and to see what this month’s tutorials are.

Please remember to use my current Host Code and make sure that you can see my name on the final checkout page listed as your Demonstrator when you order so that you know that you’re ordering with me, and you’ll get my rewards! 

Happy Stamping, Karen

*********************************************************************************************************

In response to changing policies at Stampin’ Up – I’m adjusting my Ordering Gift policy as well.  I’m having to get a little more tough on the adding of Host codes when you place your order thru my Online Store.

Not to worry – you’re still going to get that $10 ordering gift for orders of $50 (before shipping & tax) or greater.  And the gift is still any 1 SU! product up to that $10 value – which includes some of our fun Host Sets!

But – if you DO NOT use the Host code for your orders of less than $150 (this is the RETAIL total before Shipping & Handling), then you’ll have two options:

  1. You’ll need to call Stampin’ Up! (1-800-Stamp-Up) and ask them to add it for you. They’re very helpful and will get it done quickly!  OR….
  2. If your order was over the $50 threshold but under $150, then…you’ll forfeit that $10 ordering gift and rewards – this is the Bummer Option – and I REALLY don’t want to do this, SO please remember to add my Current Host Code.

*********************************************************************************************************

Stampin’ Up! Seasonal Sale November 14th – 16th

Stampin’ Up! let us know about the upcoming sale starting Tuesday November 14th through Thursday November 16th. Take advantage of this sale by stocking up on items that you use for every handmade craft!

Create more by spending less during the Seasonal Sale! Between 14–16 November, you can get select products from the 2023–2024 Annual Catalog up to 20% off. Have your eye on something from our new color collection? Don’t miss your opportunity to shop the colors you’ve been craving during this phenomenal sale! 

You can stock up on supplies for all your upcoming handmade projects or embrace the season of giving and buy something for your fellow crafting enthusiasts. Make sure to act quickly on this limited time only deal!

Sales Period: November 14 – 16 2023

  • 10% off ribbons and trims.
  • 15% off inks, including pads, refills, markers, and Blends. Bundles are not included.
  • 20% off papers, including cardstock, specialty paper, and Designer Series Paper.
  • Shop online to see the full selection of discounted products available. This is a limited time offer.
  • Discounts are automatically applied when sale items are added to any order, including Starter Kits.
  • Please keep in mind that due to the high volume of orders, the distribution center may fall behind our typical shipping timeframes. We will do everything we can to return to our regular service levels as quickly as possible.
  • Please note: Some items may sell out due to high demand. The discount will automatically be applied to qualifying items that are in stock. Per our updated policy, backorders are not available. 

*********************************************************************************************************

New Online Exclusives Now Available

Go check out my Online Store for the NEW Online Exclusive products available. Get those orders placed early so you don’t miss out on the pretty new suite and new bundles.

*********************************************************************************************************

The Best Destination Kit Now Available

Plan a crafting getaway today with the all-inclusive The Best Destination Kit! This kit lets you make nine tri-fold cards with a colorful, nostalgic, travel vibe. Resort-hopping was never so easy!

This month’s kit includes:

  • Enough supplies to create 9 cards—3 each of 3 designs
  • 9 coordinating envelopes
  • Best Destination Photopolymer Stamp Set
  • One Gorgeous Grape Ink Spot
  • Printed card bases, printed die cuts, adhesive, embellishments, and a clear block
  • Finished card size: 5-1/2″ x 4-1/4″ (14 x 10.8 cm)
  • Coordinating colors: Balmy Blue, Boho Blue, Cajun Craze, Calypso Coral, Coastal Cabana, Crushed Curry, Daffodil Delight, Early Espresso, Flirty Flamingo, Fresh Freesia, Gorgeous Grape, Granny Apple Green, Misty Moonlight, Pecan Pie, Petal Pink, Pretty Peacock, and Shaded Spruce

163186 $20.00 USD

*********************************************************************************************************

All The Best

Subscribe November 11 – December 10

Send a wish to all your loved ones with the December Paper Pumpkin Kit! It comes with nine card fronts, three each of three designs, and nine coordinating envelopes. It has paper pieces detailed with gold foil, embellishments, an all-occasion stamp set, and an acetate box where you can store your finished cards! You can gift the kit itself or the finished product in the acetate box; either way, it’s the perfect last-minute gift for any occasion. 

The paper pieces in the December Paper Pumpkin kit have gold foil detailing. Whether it’s an elegant boarder, or woven into the floral artwork, it’s a detail that will surely catch your recipient’s eye! It’s the perfect way to take any paper craft to the next level. 

The beauty of the December Paper Pumpkin Kit lies in the hand drawn artwork. The bright blue skies and elegant yellow flowers compliment the different design elements perfectly. It’s a simple yet sophisticated design that will catch any recipient’s eye! 

This kit includes:

  • 9 cards; 3 each of 3 designs.
  • 9 coordinating envelopes.
  • 1 Acetate box to fit cards and envelopes from the kit.
  • 1 Pebbled Path Stampin’ Spot.
  • 1 photopolymer stamp set.
  • Embellishments.
  • Specialty gold foil die cuts.
  • Enough adhesive to finish the project.
  • Finished card size: 4-1/4″ x 5-1/2″ (10.8 x 14 cm)
  • Coordinating Stampin’ Up! colors: Balmy Blue, Crushed Curry, gold foil, Old Olive, Pebbled Path

Subscribe to the December Paper Pumpkin Kit between 11 November and 10 December by clicking here!

Note: Supplies may be limited toward the end of the subscription period.

*********************************************************************************************************

Card stock cuts for this project:

  • Basic White Cardstock 2 1/2″ X 4″ (sentiment), 4″ x 5 1/4″(inner liner)
  • Old Olive Cardstock 2 3/4″ X 3 1/4″ (sprig)
  • Real Red Cardstock 4 1/4″ X 11″ (card base scored & folded at 5 1/2″), 1/2″ X 1 1/4″(berries)
  • Shaded Spruce Cardstock 2 – 4 1/8″ X 5 3/8″ (card front & inner liner mats), 2″ X 4 1/2″ (sprigs)
  • Joy Of Christmas Designer Series Paper 4″ X 5 1/4″ (card front), 3 – 1/2″ X 6″ (card front strips), 3/4″ X 4″ (inner liner), 2 1/4″ X 6″ (envelope flap)

*********************************************************************************************************

Product List

Very Best Occasions Cling Stamp Set (English)

$25.00

Christmas Classics Photopolymer Stamp Set (English)

$21.00

Basic White 8 1/2" X 11" Cardstock

$10.50

Old Olive 8-1/2" X 11" Cardstock

$10.00

Real Red 8-1/2" X 11" Cardstock

$10.00

Shaded Spruce 8-1/2" X 11" Cardstock

$10.00

Joy Of Christmas 12" X 12" (30.5 X 30.5 Cm) Designer Series Paper

$12.50

Old Olive Classic Stampin' Pad

$9.00

Shaded Spruce Classic Stampin' Pad

$9.00

Real Red Stampin' Blends Combo Pack

$10.00

Shaded Spruce Stampin' Blends Combo Pack

$10.00

Labels Aglow Dies

$33.00

Magical Meadow Dies

$37.00

Festive Pearls

$7.00

Basic White Medium Envelopes

$8.50

Stampin' Cut & Emboss Machine

$128.00

Mini Glue Dots

$5.75

Multipurpose Liquid Glue

$5.50

Mini Stampin' Dimensionals

$4.25

Stampin' Dimensionals

$4.25

Stampin' Seal

$8.00

Bone Folder

$7.00

Paper Snips

$11.00

Paper Trimmer

$26.00

Clear Block Bundle

$80.75

Stampin’ Up! Above It All Fun Fold

Today’s card was one we made at the retreat and was designed by Joan Siler. One good thing about making some of the cards we made, if they are stamp sets you don’t have this is a great way to try them out. I didn’t think I was going to like the set she used, but I was wrong. It’s so much fun to play with, guess another one going on my list.

Stampin' Up! Above It All Fun Fold 1 creativestampingdesigns.com

I used the Stampin’ Up! Above It All Bundle along with the Stampin’ Up! Fragrant Forest Cling Stamp Set, Joy Of Christmas Designer Series Paper and the Snowflake Sky 3d Embossing Folder for my card today. I started by scoring a panel of Joy of Christmas DSP at 2″ & 4″ on each side. I measured up 2 3/4″ from the bottom of each side and made a little pencil mark. I cut from the pencil mark to the 4″ score line on an angle on each side using my Paper Trimmer.

Stampin' Up! Above It All Fun Fold 2 creativestampingdesigns.com

I embossed 2 panels of Basic White using the Snowflake Sky EF. I cut 1 panel 2 3/4″ up from the bottom left to the top right corner and the other 2 3/4″ up from the bottom right up to the top left corner using the Paper Trimmer. I adhered the panels to the front folded panels using Liquid Glue. I cut multiple of the snow die from the Above It All Dies from a panel of Basic White. I adhered them to the front panel and trimmed them using Paper Snips.

Stampin' Up! Above It All Fun Fold 3 creativestampingdesigns.com

On a panel of Basic White, I stamped the larger and smaller trees from the Stampin’ Up! Above It All Photopolymer Stamp Set in Shaded Spruce Ink. I cut the trees out using the Above It All Dies. I cut the medium tree from the Above It All Dies from a panel of Shaded Spruce. I adhered the trees using Stampin’ dimensionals.

Stampin' Up! Above It All Fun Fold 4 creativestampingdesigns.com

On the inside, I stamped a panel of Basic White using the Fragrant Forest stamp set in Shaded Spruce Ink. I adhered the panel to the inside of the Joy of Christmas card base. I embossed 2 more panels of Basic White using the Snowflake Sky EF. I cut the panels using the Paper Trimmer 1 panel 4″ up from the bottom left to the top right corner and the other 4″ up from the bottom right to the top left corner. I adhered the panels to the inside of the card base. I adhered the die cut pieces of snow to the bottom of the panels. I stamped the sentiments from the Above It All stamp set in Shaded Spruce Ink and fussy cut them using Paper Snips. Joan had all the pieces of the gondola and track cut out for us. We just had to assemble it and adhere it to the inside of the card base.

Stampin' Up! Above It All Fun Fold 5 creativestampingdesigns.com

To finish my card, I decorated a Basic Whtie Medium Envelope. I stamped the tree image from Above It All stamp set in Shaded Spruce Ink on the envelope front. I adhered a panel of Joy of Christmas DSP to the envelope flap.

Stampin' Up! Above It All Fun Fold 6 creativestampingdesigns.com

Thank you for stopping by my blog today. I hope you like the card and will give it a try. Happy Stamping!!

*********************************************************************************************************

If you need any stamping supplies, I’d love to be your Demonstrator. Just click HERE to go directly to my online store or drop me an email if you have any questions. 

MY CURRENT HOST CODE IS:   BX4UV6HE

Use this host code when placing an order with me. When you order $50 or greater you will receive a free gift from me! If your order is over $150, please do not use this code, but you’ll still get the free gift. The free gift is your choice of any 1 item valued up to $10.00 from the 2023-2024 Annual Catalog!  Unfortunately, packs of cardstock are no longer an option for a free gift. Shipping has become too expensive to ship and it’s costing me as much to ship as the cardstock costs. For any orders $50 or more I will also send you my monthly class tutorials.  Click HERE or go to my Customer Rewards for more details and to see what this month’s tutorials are.

Please remember to use my current Host Code and make sure that you can see my name on the final checkout page listed as your Demonstrator when you order so that you know that you’re ordering with me, and you’ll get my rewards! 

Happy Stamping, Karen

*********************************************************************************************************

In response to changing policies at Stampin’ Up – I’m adjusting my Ordering Gift policy as well.  I’m having to get a little more tough on the adding of Host codes when you place your order thru my Online Store.

Not to worry – you’re still going to get that $10 ordering gift for orders of $50 (before shipping & tax) or greater.  And the gift is still any 1 SU! product up to that $10 value – which includes some of our fun Host Sets!

But – if you DO NOT use the Host code for your orders of less than $150 (this is the RETAIL total before Shipping & Handling), then you’ll have two options:

  1. You’ll need to call Stampin’ Up! (1-800-Stamp-Up) and ask them to add it for you. They’re very helpful and will get it done quickly!  OR….
  2. If your order was over the $50 threshold but under $150, then…you’ll forfeit that $10 ordering gift and rewards – this is the Bummer Option – and I REALLY don’t want to do this, SO please remember to add my Current Host Code.

*********************************************************************************************************

Stampin’ Up! Seasonal Sale November 14th – 16th

Stampin’ Up! let us know about the upcoming sale starting tomorrow Tuesday November 14th through Thursday November 16th. Take advantage of this sale by stocking up on items that you use for every handmade craft!

Create more by spending less during the Seasonal Sale! Between 14–16 November, you can get select products from the 2023–2024 Annual Catalog up to 20% off. Have your eye on something from our new color collection? Don’t miss your opportunity to shop the colors you’ve been craving during this phenomenal sale! 

You can stock up on supplies for all your upcoming handmade projects or embrace the season of giving and buy something for your fellow crafting enthusiasts. Make sure to act quickly on this limited time only deal!

Sales Period: November 14 – 16 2023

  • 10% off ribbons and trims.
  • 15% off inks, including pads, refills, markers, and Blends. Bundles are not included.
  • 20% off papers, including cardstock, specialty paper, and Designer Series Paper.
  • Shop online to see the full selection of discounted products available. This is a limited time offer.
  • Discounts are automatically applied when sale items are added to any order, including Starter Kits.
  • Please keep in mind that due to the high volume of orders, the distribution center may fall behind our typical shipping timeframes. We will do everything we can to return to our regular service levels as quickly as possible.
  • Please note: Some items may sell out due to high demand. The discount will automatically be applied to qualifying items that are in stock. Per our updated policy, backorders are not available. 

*********************************************************************************************************

New Online Exclusives Now Available

Go check out my Online Store for the NEW Online Exclusive products available. Get those orders placed early so you don’t miss out on the pretty new suite and new bundles.

*********************************************************************************************************

The Best Destination Kit Now Available

Plan a crafting getaway today with the all-inclusive The Best Destination Kit! This kit lets you make nine tri-fold cards with a colorful, nostalgic, travel vibe. Resort-hopping was never so easy!

This month’s kit includes:

  • Enough supplies to create 9 cards—3 each of 3 designs
  • 9 coordinating envelopes
  • Best Destination Photopolymer Stamp Set
  • One Gorgeous Grape Ink Spot
  • Printed card bases, printed die cuts, adhesive, embellishments, and a clear block
  • Finished card size: 5-1/2″ x 4-1/4″ (14 x 10.8 cm)
  • Coordinating colors: Balmy Blue, Boho Blue, Cajun Craze, Calypso Coral, Coastal Cabana, Crushed Curry, Daffodil Delight, Early Espresso, Flirty Flamingo, Fresh Freesia, Gorgeous Grape, Granny Apple Green, Misty Moonlight, Pecan Pie, Petal Pink, Pretty Peacock, and Shaded Spruce

163186 $20.00 USD

*********************************************************************************************************

All The Best

Subscribe November 11 – December 10

Send a wish to all your loved ones with the December Paper Pumpkin Kit! It comes with nine card fronts, three each of three designs, and nine coordinating envelopes. It has paper pieces detailed with gold foil, embellishments, an all-occasion stamp set, and an acetate box where you can store your finished cards! You can gift the kit itself or the finished product in the acetate box; either way, it’s the perfect last-minute gift for any occasion. 

The paper pieces in the December Paper Pumpkin kit have gold foil detailing. Whether it’s an elegant boarder, or woven into the floral artwork, it’s a detail that will surely catch your recipient’s eye! It’s the perfect way to take any paper craft to the next level. 

The beauty of the December Paper Pumpkin Kit lies in the hand drawn artwork. The bright blue skies and elegant yellow flowers compliment the different design elements perfectly. It’s a simple yet sophisticated design that will catch any recipient’s eye! 

This kit includes:

  • 9 cards; 3 each of 3 designs.
  • 9 coordinating envelopes.
  • 1 Acetate box to fit cards and envelopes from the kit.
  • 1 Pebbled Path Stampin’ Spot.
  • 1 photopolymer stamp set.
  • Embellishments.
  • Specialty gold foil die cuts.
  • Enough adhesive to finish the project.
  • Finished card size: 4-1/4″ x 5-1/2″ (10.8 x 14 cm)
  • Coordinating Stampin’ Up! colors: Balmy Blue, Crushed Curry, gold foil, Old Olive, Pebbled Path

Subscribe to the November Paper Pumpkin Kit between 11 November and 10 December by clicking here!

Note: Supplies may be limited toward the end of the subscription period.

*********************************************************************************************************

Card stock cuts for this project:

  • Basic White Cardstock 2 – 1 3/4″ X 4″ & 2 – 1 3/4″ X 5 1/4″ (angled panels), 3 7/8″ X 5 1/4″ (inner liner), 4″ X 5 1/4″ (snow, trees & sentiments)
  • Shaded Spruce CArdstock scrap for tree
  • Joy of Christmas Designer Series Paper 5 1/2″ X 12″ (scored, cut and folded as above), 2 1/4″ x 6″ (envelope flap)

*********************************************************************************************************

Product List
Above It All Bundle (English)
$46.75
Above It All Photopolymer Stamp Set (English)
$20.00
Above It All Dies
$32.00
Fragrant Forest Cling Stamp Set (English)
$20.00
Basic White 8 1/2" X 11" Cardstock
$10.50
Shaded Spruce 8-1/2" X 11" Cardstock
$10.00
Joy Of Christmas 12" X 12" (30.5 X 30.5 Cm) Designer Series Paper
$12.50
Silver & Gold 12" X 12" (30.5 X 30.5 Cm) Adhesive Backed Glimmer Paper
$7.00
Shaded Spruce Classic Stampin' Pad
$9.00
Snowflake Sky 3 D Embossing Folder
$11.00
Basic White Medium Envelopes
$8.50
Stampin' Cut & Emboss Machine
$128.00
Mini Glue Dots
$5.75
Multipurpose Liquid Glue
$5.50
Mini Stampin' Dimensionals
$4.25
Stampin' Dimensionals
$4.25
Stampin' Seal
$8.00
Bone Folder
$7.00
Paper Snips
$11.00
Paper Trimmer
$26.00
Clear Block Bundle
$80.75

Stampin’ Up! Winter Owl

Good Sunday morning stamping friends. I hope your weekend is going well. I’ll be at work all day today. I do have a team meeting via zoom today that I am planning on hoping onto while I’m at work. Hopefully it won’t be too busy so I can.

I have another card that we made at the retreat last weekend. Today’s card was designed by our team leader Amy Koenders. Here’s my card for today.

Stampin' Up! Winter Owl 1 creativestampingdesigns.com

The sentiments used for today’s card are from the Stampin’ Up! Winter Owl Cling Stamp Set. This is another set that I haven’t purchased yet but I may be seeing it in the very near future. I also used the Stampin’ Up! Magical Meadow Bundle along with the Winter Magic Designer Series Paper and Snowflake Sky 3D Embossing Folder.

Stampin' Up! Winter Owl 2 creativestampingdesigns.com

I started by embossing a Smoky Slate card front using the Snowflake Sky EF. I adhered the embossed panel to a Smoky Slate card base using Liquid Glue. I cut a panel of Winter Meadow DSP using the 2nd largest square from the Stylish Shapes Dies. I adhered the die cut panel to a Basic Gray mat using Stampin’ Seal. I adhered the layered panel to the card front using Stampin’ Dimensionals.

Stampin' Up! Winter Owl 3 creativestampingdesigns.com

I stamped the sentiment from the Winter Owl stamp set in Versamark Ink on a panel of Basic White. I sprinkled it with Silver Embossing Powder and set it using the Heat Tool. I cut the sentiment out using the longer narrow Stylish Shapes Dies. I cut the sprig from a panel of Silver Foil using the Magical Meadow Dies. I adhered the sprig using a Glue Dot to the card front. I adhered the sentiment over the artwork and sprig using Stampin’ Dimensionals. I added a Faceted Gem Trio Pack to the card front and Rhinestone Basic Jewels to the sentiment.

Stampin' Up! Winter Owl 4 creativestampingdesigns.com

On the inside I stamped the sentiment from the Winter Owl stamp set in Smoky Slate Ink on a panel of Basic White. I embossed the bottom of the panel using the Snowflake Sky EF. I adhered the Basic white panel to a Baic Gray mat then to the inside of the Smoky Slate card base.

Stampin' Up! Winter Owl 5 creativestampingdesigns.com

To finish my card, I decorated a Basic White Medium Envelope. I stamped the images from the Stampin’ Up! Magical Meadow Cling Stamp Set in Smoky Slate Ink on the envelope front. I adhered a panel of Winter Meadow DSP to the envelope flap.

Stampin' Up! Winter Owl 6 creativestampingdesigns.com

Thank you for stopping by my blog today. I hope you like the card and will give it a try. Happy Stamping!!

*********************************************************************************************************

If you need any stamping supplies, I’d love to be your Demonstrator. Just click HERE to go directly to my online store or drop me an email if you have any questions. 

MY CURRENT HOST CODE IS:   BX4UV6HE

Use this host code when placing an order with me. When you order $50 or greater you will receive a free gift from me! If your order is over $150, please do not use this code, but you’ll still get the free gift. The free gift is your choice of any 1 item valued up to $10.00 from the 2023-2024 Annual Catalog!  Unfortunately, packs of cardstock are no longer an option for a free gift. Shipping has become too expensive to ship and it’s costing me as much to ship as the cardstock costs. For any orders $50 or more I will also send you my monthly class tutorials.  Click HERE or go to my Customer Rewards for more details and to see what this month’s tutorials are.

Please remember to use my current Host Code and make sure that you can see my name on the final checkout page listed as your Demonstrator when you order so that you know that you’re ordering with me, and you’ll get my rewards! 

Happy Stamping, Karen

*********************************************************************************************************

In response to changing policies at Stampin’ Up – I’m adjusting my Ordering Gift policy as well.  I’m having to get a little more tough on the adding of Host codes when you place your order thru my Online Store.

Not to worry – you’re still going to get that $10 ordering gift for orders of $50 (before shipping & tax) or greater.  And the gift is still any 1 SU! product up to that $10 value – which includes some of our fun Host Sets!

But – if you DO NOT use the Host code for your orders of less than $150 (this is the RETAIL total before Shipping & Handling), then you’ll have two options:

  1. You’ll need to call Stampin’ Up! (1-800-Stamp-Up) and ask them to add it for you. They’re very helpful and will get it done quickly!  OR….
  2. If your order was over the $50 threshold but under $150, then…you’ll forfeit that $10 ordering gift and rewards – this is the Bummer Option – and I REALLY don’t want to do this, SO please remember to add my Current Host Code.

*********************************************************************************************************

Stampin’ Up! Seasonal Sale November 14th – 16th

Stampin’ Up! let us know about the upcoming sale starting Tuesday November 14th through Thursday November 16th. Take advantage of this sale by stocking up on items that you use for every handmade craft!

Create more by spending less during the Seasonal Sale! Between 14–16 November, you can get select products from the 2023–2024 Annual Catalog up to 20% off. Have your eye on something from our new color collection? Don’t miss your opportunity to shop the colors you’ve been craving during this phenomenal sale! 

You can stock up on supplies for all your upcoming handmade projects or embrace the season of giving and buy something for your fellow crafting enthusiasts. Make sure to act quickly on this limited time only deal!

Sales Period: November 14 – 16 2023

  • 10% off ribbons and trims.
  • 15% off inks, including pads, refills, markers, and Blends. Bundles are not included.
  • 20% off papers, including cardstock, specialty paper, and Designer Series Paper.
  • Shop online to see the full selection of discounted products available. This is a limited time offer.
  • Discounts are automatically applied when sale items are added to any order, including Starter Kits.
  • Please keep in mind that due to the high volume of orders, the distribution center may fall behind our typical shipping timeframes. We will do everything we can to return to our regular service levels as quickly as possible.
  • Please note: Some items may sell out due to high demand. The discount will automatically be applied to qualifying items that are in stock. Per our updated policy, backorders are not available. 

*********************************************************************************************************

New Online Exclusives NOW Available

Go check out my Online Store for the NEW Online Exclusive products available. Get those orders placed early so you don’t miss out on the pretty new suite and new bundles.

*********************************************************************************************************

The Best Destination Kit Now Available

Plan a crafting getaway today with the all-inclusive The Best Destination Kit! This kit lets you make nine tri-fold cards with a colorful, nostalgic, travel vibe. Resort-hopping was never so easy!

This month’s kit includes:

  • Enough supplies to create 9 cards—3 each of 3 designs
  • 9 coordinating envelopes
  • Best Destination Photopolymer Stamp Set
  • One Gorgeous Grape Ink Spot
  • Printed card bases, printed die cuts, adhesive, embellishments, and a clear block
  • Finished card size: 5-1/2″ x 4-1/4″ (14 x 10.8 cm)
  • Coordinating colors: Balmy Blue, Boho Blue, Cajun Craze, Calypso Coral, Coastal Cabana, Crushed Curry, Daffodil Delight, Early Espresso, Flirty Flamingo, Fresh Freesia, Gorgeous Grape, Granny Apple Green, Misty Moonlight, Pecan Pie, Petal Pink, Pretty Peacock, and Shaded Spruce

163186 $20.00 USD

*********************************************************************************************************

All The Best

Subscribe November 11 – December 10

Send a wish to all your loved ones with the December Paper Pumpkin Kit! It comes with nine card fronts, three each of three designs, and nine coordinating envelopes. It has paper pieces detailed with gold foil, embellishments, an all-occasion stamp set, and an acetate box where you can store your finished cards! You can gift the kit itself or the finished product in the acetate box; either way, it’s the perfect last-minute gift for any occasion. 

The paper pieces in the December Paper Pumpkin kit have gold foil detailing. Whether it’s an elegant boarder, or woven into the floral artwork, it’s a detail that will surely catch your recipient’s eye! It’s the perfect way to take any paper craft to the next level. 

The beauty of the December Paper Pumpkin Kit lies in the hand drawn artwork. The bright blue skies and elegant yellow flowers compliment the different design elements perfectly. It’s a simple yet sophisticated design that will catch any recipient’s eye! 

This kit includes:

  • 9 cards; 3 each of 3 designs.
  • 9 coordinating envelopes.
  • 1 Acetate box to fit cards and envelopes from the kit.
  • 1 Pebbled Path Stampin’ Spot.
  • 1 photopolymer stamp set.
  • Embellishments.
  • Specialty gold foil die cuts.
  • Enough adhesive to finish the project.
  • Finished card size: 4-1/4″ x 5-1/2″ (10.8 x 14 cm)
  • Coordinating Stampin’ Up! colors: Balmy Blue, Crushed Curry, gold foil, Old Olive, Pebbled Path

Subscribe to the November Paper Pumpkin Kit between 11 October and 10 November by clicking here!

Note: Supplies may be limited toward the end of the subscription period.

*********************************************************************************************************

Card stock cuts for this project:

  • Basic White Cardstock 4″ X 5 1/4″ (inner liner), 1″ X 3″ (sentiment)
  • Basic Gray Cardstock2 1/2″ X 2 1/2″ (artwork mat), 4 1/8″ x 5 3/8″ (inner liner mat)
  • Smoky Slate Cardstock 5 1/2″ X 8 1/2″ (card base scored & folded at 4 1/4″), 4 X 5 1/4″ (card front)
  • Winter Meadow Designer Series Paper 2 1/2″ X 2 1/2″ (artwork), 2 1/4″ X 6″ (envelope flap)
  • Silver Foil Specialty Paper 2″ X 4″ (sprig)

*********************************************************************************************************

Product List

Winter Owls Cling Stamp Set (English)

$24.00

Magical Meadow Bundle (English)

$57.50

Magical Meadow Cling Stamp Set (English)

$27.00

Magical Meadow Dies

$37.00

Basic White 8 1/2" X 11" Cardstock

$10.50

Basic Gray 8-1/2" X 11" Cardstock

$10.00

Smoky Slate 8-1/2" X 11" Cardstock

$10.00

Winter Meadow 12" X 12" (30.5 X 30.5 Cm) Designer Series Paper

$12.50

Smoky Slate Classic Stampin' Pad

$9.00

Versamark Pad

$9.50

Metallics Embossing Powders

$18.00

Heat Tool (Us And Canada)

$31.00

Snowflake Sky 3 D Embossing Folder

$11.00

Stylish Shapes Dies

$30.00

Faceted Gems Trio Pack

$7.50

Rhinestone Basic Jewels

$6.00

Basic White Medium Envelopes

$8.50

Stampin' Cut & Emboss Machine

$128.00

Mini Glue Dots

$5.75

Multipurpose Liquid Glue

$5.50

Mini Stampin' Dimensionals

$4.25

Stampin' Dimensionals

$4.25

Stampin' Seal

$8.00

Bone Folder

$7.00

Paper Snips

$11.00

Paper Trimmer

$26.00

Clear Block Bundle

$80.75

Stampin’ Up! Stars At Night Divine

Good Saturday morning stamping friends and welcome to the weekend. Happy Veterans Day to all those that served for us, present and past. My dad was a veteran of the US Army during WWII. I have his medals here with me and I was looking at them yesterday. I keep a flag outside flying for him in one of my gardens. He told me many stories of being on the front lines during the war.

I hope you have some fun plans in the works. I’ll be at my OnStage @ Home event most of the day. I’ll get a peek at the January-April 2024 Mini Catalog and get to see what I can preorder. These are just a couple of the best perks of being a demonstrator. We like to get together afterwards to talk about the new catalog and upcoming products. I’m looking forward to a fun day.

Today’s card is one that we made at the retreat last weekend. This card was designed by one of my team members Mary Deatherage. Here’s my card for today.

Stampin' Up! Night Devine 1 creativestampingdesigns.com

For this card we used the Stampin’ Up! Night Devine Bundle which I do not have. After making this card, it is now on my list to purchase with my next order. We also used the Stampin’ Up! Stars At Night Photopolymer Stamp Set along with the Stars At Night Hybrid Embossing Folder.

Stampin' Up! Night Devine 2 creativestampingdesigns.com

I started by stamping the sentiment from the Stampin’ Up! Night Divine Cling Stamp Set in Tuxedo Black Ink on the bottom of the Basic White panel. I embossed the panel using the Stars At Night Hybrid Embossing Folder. I adhered the embossed panel to a Basic Black mat using Liquid Glue.

Stampin' Up! Night Devine 3 creativestampingdesigns.com

From the panels of Basic Black, Basic Gray and Smoky Slate I cut camels using the Night Divine Dies. I adhered the Smoky Slate camel first using Liquid Glue. I adhered the Basic Gray and then the Basic Black camels using Liquid Glue. I adhered the layered panel to a Smoky Slate mat using Stampin’ Dimensionals. I adhered the layered panel to the Basic White Thick card base using Stampin’ Dimensionals.

Stampin' Up! Night Devine 4 creativestampingdesigns.com

On the inside, I stamped the sentiment from the Night Divine stamp set in Smoky Slate Ink on a panel of Basic White. I stamped the star image from the Stars At Night stamp set in Smoky Slate Ink on the panel. I adhered the Basic White panel to a Basic Black mat then to the Smoky Slate mat. I adhered the layered panel to the inside of the Basic White Thick card base.

Stampin' Up! Night Devine 5 creativestampingdesigns.com

To finish my card, I decorated a Basic White Medium Envelope. I stamped the star image from the Stars At Night stamp set in Smoky Slate Ink on the envelope front. I embossed the envelope flap using the Stars At Night Hybrid Embossing Folder.

Stampin' Up! Night Devine 6 creativestampingdesigns.com

Thank you for stopping by my blog today. I hope you like the card and will give it a try. Happy Stamping!!

*********************************************************************************************************

If you need any stamping supplies, I’d love to be your Demonstrator. Just click HERE to go directly to my online store or drop me an email if you have any questions. 

MY CURRENT HOST CODE IS:   BX4UV6HE

Use this host code when placing an order with me. When you order $50 or greater you will receive a free gift from me! If your order is over $150, please do not use this code, but you’ll still get the free gift. The free gift is your choice of any 1 item valued up to $10.00 from the 2023-2024 Annual Catalog!  Unfortunately, packs of cardstock are no longer an option for a free gift. Shipping has become too expensive to ship and it’s costing me as much to ship as the cardstock costs. For any orders $50 or more I will also send you my monthly class tutorials.  Click HERE or go to my Customer Rewards for more details and to see what this month’s tutorials are.

Please remember to use my current Host Code and make sure that you can see my name on the final checkout page listed as your Demonstrator when you order so that you know that you’re ordering with me, and you’ll get my rewards! 

Happy Stamping, Karen

*********************************************************************************************************

In response to changing policies at Stampin’ Up – I’m adjusting my Ordering Gift policy as well.  I’m having to get a little more tough on the adding of Host codes when you place your order thru my Online Store.

Not to worry – you’re still going to get that $10 ordering gift for orders of $50 (before shipping & tax) or greater.  And the gift is still any 1 SU! product up to that $10 value – which includes some of our fun Host Sets!

But – if you DO NOT use the Host code for your orders of less than $150 (this is the RETAIL total before Shipping & Handling), then you’ll have two options:

  1. You’ll need to call Stampin’ Up! (1-800-Stamp-Up) and ask them to add it for you. They’re very helpful and will get it done quickly!  OR….
  2. If your order was over the $50 threshold but under $150, then…you’ll forfeit that $10 ordering gift and rewards – this is the Bummer Option – and I REALLY don’t want to do this, SO please remember to add my Current Host Code.

*********************************************************************************************************

Stampin’ Up! Seasonal Sale November 14th – 16th

Stampin’ Up! let us know about the upcoming sale starting Tuesday November 14th through Thursday November 16th. Take advantage of this sale by stocking up on items that you use for every handmade craft!

Create more by spending less during the Seasonal Sale! Between 14–16 November, you can get select products from the 2023–2024 Annual Catalog up to 20% off. Have your eye on something from our new color collection? Don’t miss your opportunity to shop the colors you’ve been craving during this phenomenal sale! 

You can stock up on supplies for all your upcoming handmade projects or embrace the season of giving and buy something for your fellow crafting enthusiasts. Make sure to act quickly on this limited time only deal!

Sales Period: November 14 – 16 2023

  • 10% off ribbons and trims.
  • 15% off inks, including pads, refills, markers, and Blends. Bundles are not included.
  • 20% off papers, including cardstock, specialty paper, and Designer Series Paper.
  • Shop online to see the full selection of discounted products available. This is a limited time offer.
  • Discounts are automatically applied when sale items are added to any order, including Starter Kits.
  • Please keep in mind that due to the high volume of orders, the distribution center may fall behind our typical shipping timeframes. We will do everything we can to return to our regular service levels as quickly as possible.
  • Please note: Some items may sell out due to high demand. The discount will automatically be applied to qualifying items that are in stock. Per our updated policy, backorders are not available. 

*********************************************************************************************************

New Online Exclusives Now Available

Go check out my Online Store for the NEW Online Exclusive products available. Get those orders placed early so you don’t miss out on the pretty new suite and new bundles.

*********************************************************************************************************

The Best Destination Kit Now Available

Plan a crafting getaway today with the all-inclusive The Best Destination Kit! This kit lets you make nine tri-fold cards with a colorful, nostalgic, travel vibe. Resort-hopping was never so easy!

This month’s kit includes:

  • Enough supplies to create 9 cards—3 each of 3 designs
  • 9 coordinating envelopes
  • Best Destination Photopolymer Stamp Set
  • One Gorgeous Grape Ink Spot
  • Printed card bases, printed die cuts, adhesive, embellishments, and a clear block
  • Finished card size: 5-1/2″ x 4-1/4″ (14 x 10.8 cm)
  • Coordinating colors: Balmy Blue, Boho Blue, Cajun Craze, Calypso Coral, Coastal Cabana, Crushed Curry, Daffodil Delight, Early Espresso, Flirty Flamingo, Fresh Freesia, Gorgeous Grape, Granny Apple Green, Misty Moonlight, Pecan Pie, Petal Pink, Pretty Peacock, and Shaded Spruce

163186 $20.00 USD

*********************************************************************************************************

All The Best

Subscribe November 11 – December 10

Send a wish to all your loved ones with the December Paper Pumpkin Kit! It comes with nine card fronts, three each of three designs, and nine coordinating envelopes. It has paper pieces detailed with gold foil, embellishments, an all-occasion stamp set, and an acetate box where you can store your finished cards! You can gift the kit itself or the finished product in the acetate box; either way, it’s the perfect last-minute gift for any occasion. 

The paper pieces in the December Paper Pumpkin kit have gold foil detailing. Whether it’s an elegant boarder, or woven into the floral artwork, it’s a detail that will surely catch your recipient’s eye! It’s the perfect way to take any paper craft to the next level. 

The beauty of the December Paper Pumpkin Kit lies in the hand drawn artwork. The bright blue skies and elegant yellow flowers compliment the different design elements perfectly. It’s a simple yet sophisticated design that will catch any recipient’s eye! 

This kit includes:

  • 9 cards; 3 each of 3 designs.
  • 9 coordinating envelopes.
  • 1 Acetate box to fit cards and envelopes from the kit.
  • 1 Pebbled Path Stampin’ Spot.
  • 1 photopolymer stamp set.
  • Embellishments.
  • Specialty gold foil die cuts.
  • Enough adhesive to finish the project.
  • Finished card size: 4-1/4″ x 5-1/2″ (10.8 x 14 cm)
  • Coordinating Stampin’ Up! colors: Balmy Blue, Crushed Curry, gold foil, Old Olive, Pebbled Path

Subscribe to the December Paper Pumpkin Kit between 11 November and 10 December by clicking here!

Note: Supplies may be limited toward the end of the subscription period.

*********************************************************************************************************

Card stock cuts for this project:

  • Basic White Cardstock 2 – 3 3/4″ X 5″ (card front & inner liner)
  • Basic White Thick Cardstock 4 1/4″ X 11″ (card base scored & folded at 5 1/2″)
  • Basic Black Cardstock 2 – 3 7/8″ X 5 1/8 (card front & inner liner middle mat), 2 1/2″ X 2 1/2″ (camel)
  • Basic Gray Cardstock 2 1/2″ X 2 1/2″ (camel)
  • Smoky Slate Cardstock 2 – 4″ X 5 1/4″ (card front & inner liner mats), 2 1/2″ X 2 1/2″ (camel)

*********************************************************************************************************

Product List

Night Divine Bundle (English)

$48.50

Night Divine Cling Stamp Set (English)

$27.00

Night Divine Dies

$27.00

Stars At Night Bundle (English)

$56.50

Stars At Night Photopolymer Stamp Set (English)

$24.00

Stars At Night Hybrid Embossing Folder

$39.00

Basic White 8 1/2" X 11" Cardstock

$10.50

Basic White 8 1/2" X 11" Thick Cardstock

$9.00

Basic Black 8-1/2" X 11" Cardstock

$10.00

Basic Gray 8-1/2" X 11" Cardstock

$10.00

Smoky Slate 8-1/2" X 11" Cardstock

$10.00

Smoky Slate Classic Stampin' Pad

$9.00

Tuxedo Black Memento Ink Pad

$6.50

Basic White Medium Envelopes

$8.50

Stampin' Cut & Emboss Machine

$128.00

Mini Glue Dots

$5.75

Multipurpose Liquid Glue

$5.50

Mini Stampin' Dimensionals

$4.25

Stampin' Dimensionals

$4.25

Stampin' Seal

$8.00

Bone Folder

$7.00

Paper Snips

$11.00

Paper Trimmer

$26.00

Clear Block Bundle

$80.75

Stampin’ Up! Stars At Night for Fun Fold Friday

Good Friday morning stamping friends and welcome to my Fun Fold Friday. We arrived safely yesterday, and our first day was wonderful. It’s a little chilly here in GA, but it’s supposed to get a little warmer each day. We all got set up and started passing out our little gifts and starting on our card swaps. Dinner last night was nothing short of amazing. James really knows how to cook up the best meals. After dinner we all just sat around the table for a few hours talking, laughing, more talking and much, much more laughing. This is such an awesome group of ladies I’m with. I’ll be sharing pictures when I can throughout the weekend.

I have a gate fold fun fold card for you today using a gorgeous bundle that I absolutely love. If you’d like to see a quick video of how I made my card, Click Here to go to my Instagram Reels. Here’s my card for today.

Stampin' Up! Stars At Night Fun Fold 1 creativestampingdesigns.com

I used the Stampin’ Up! Stars At Night Bundle along with the Shining Brightly Specialty Designer Series Paper, Stampin’ Up! Brightest Glow Cling Stamp Set, Gold Foil Paper and Online Exclusive Silver & Gold Adhesive Backed Glimmer Paper for my card today.

Stampin' Up! Stars At Night Fun Fold 2 creativestampingdesigns.com

I started by cutting and prepping all the components before actually putting the card together. Using the Stars At Night Hybrid Embossing Folder and Stars At Nigh Dies, I cut the largest and smallest stars from a panel of Gold Foil. I cut the 2nd largest star from a panel of Gold Adhesive Back Glimmer Paper and the 2nd smallest star from a panel of Very Vanilla. Using the Stylish Shapes Dies, I cut the 2nd largest circle from a panel of Very Vanilla and Gold Foil paper. I cut the center of the Very Vanilla circle using the Stars At Night Dies. I adhered the Very Vanilla circle to the Gold Foil circle using Multipurpose Liquid Glue. On a strip of Very Vanilla I stamped the sentiment from the Stampin’ Up! Stars At Night Photopolymer Stamp Set in Versamark Ink. I sprinkled it with Gold Embossing Powder and set it using the Heat Tool.

Stampin' Up! Stars At Night Fun Fold 3 creativestampingdesigns.com

I adhered 2 panels of Shining Brightly DSP to Gold Foil mats using Stampin’ Seal. I adhered the 2 layered panels to each side of the Very Vanilla Thick card base using Multipurpose Liquid Glue.

Stampin' Up! Stars At Night Fun Fold 4 creativestampingdesigns.com

I adhered the Gold Glimmer star to the large Gold Foil star. I adhered the Very Vanilla star to the Gold Glimmer star using a Glue Dot. I adhered the small Gold Foil star to the Very Vanilla star using a Glue Dot. I adhered the layered star to the layered circle die cut using Multipurpose Liquid Glue. I wrapped a Night of Navy belly band around the card and adhered it together using Tear & Tape. I removed the belly band and stamped the multi star image from the Stars At Night stamp set in Versamark Ink on both sides of the belly band. I sprinkled the images with Gold Embossing Powder and set it with the Heat Tool. I put the belly band back on the card and adhered the layered star in the center using Stampin’ Dimensionals. I adhered the sentiment across the star on the belly band using Stampin’ Dimensionals.

Stampin' Up! Stars At Night Fun Fold 5 creativestampingdesigns.com

For the inside, I adhered a panel of Shining Brightly DSP to a Gold Foil mat using Stampin’ Seal. I adhered the layered panel to the center of the inside card base using Multipurpose Liquid Glue. On a panel of Very Vanilla, I stamped the sentiment from the Stars At Night stamp set in Versamark Ink. I sprinkled it with Gold Embossing Powder and set it using the Heat Tool. I adhered the sentiment to the center of the DSP using Multipurpose Liquid Glue. On a panel of Very Vanilla, I stamped the sentiment from Stars At Night stamp set in Wild Wheat Ink. On the other panel of Very Vanilla, I stamped the sentiment from the Brightest Glow stamp set in Wild Wheat Ink. I stamped the multi star image from the Stars At Night stamp set in Wild Wheat Ink, stamping off once on scrap paper, on both panels. I adhered the panels to the inside of the card base.

Stampin' Up! Stars At Night Fun Fold 6 creativestampingdesigns.com

To finish my card, I decorated a Very Vanilla Medium Envelope. I stamped the star image from the Stars At Night stamp set in Wild Wheat Ink on the envelope front. I adhered a panel of Shining Brightly DSP to the envelpe flap.

Stampin' Up! Stars At Night Fun Fold 7 creativestampingdesigns.com

Thank you for stopping by my blog today. I hope you like the card and will give it a try. Happy Stamping!!

*********************************************************************************************************

If you need any stamping supplies, I’d love to be your Demonstrator. Just click HERE to go directly to my online store or drop me an email if you have any questions. 

MY CURRENT HOST CODE IS:   BX4UV6HE

Use this host code when placing an order with me. When you order $50 or greater you will receive a free gift from me! If your order is over $150, please do not use this code, but you’ll still get the free gift. The free gift is your choice of any 1 item valued up to $10.00 from the 2023-2024 Annual Catalog!  Unfortunately, packs of cardstock are no longer an option for a free gift. Shipping has become too expensive to ship and it’s costing me as much to ship as the cardstock costs. For any orders $50 or more I will also send you my monthly class tutorials.  Click HERE or go to my Customer Rewards for more details and to see what this month’s tutorials are.

Please remember to use my current Host Code and make sure that you can see my name on the final checkout page listed as your Demonstrator when you order so that you know that you’re ordering with me, and you’ll get my rewards! 

Happy Stamping, Karen

*********************************************************************************************************

In response to changing policies at Stampin’ Up – I’m adjusting my Ordering Gift policy as well.  I’m having to get a little more tough on the adding of Host codes when you place your order thru my Online Store.

Not to worry – you’re still going to get that $10 ordering gift for orders of $50 (before shipping & tax) or greater.  And the gift is still any 1 SU! product up to that $10 value – which includes some of our fun Host Sets!

But – if you DO NOT use the Host code for your orders of less than $150 (this is the RETAIL total before Shipping & Handling), then you’ll have two options:

  1. You’ll need to call Stampin’ Up! (1-800-Stamp-Up) and ask them to add it for you. They’re very helpful and will get it done quickly!  OR….
  2. If your order was over the $50 threshold but under $150, then…you’ll forfeit that $10 ordering gift and rewards – this is the Bummer Option – and I REALLY don’t want to do this, SO please remember to add my Current Host Code.

*********************************************************************************************************

The Best Destination Kit Now Available

Plan a crafting getaway today with the all-inclusive The Best Destination Kit! This kit lets you make nine tri-fold cards with a colorful, nostalgic, travel vibe. Resort-hopping was never so easy!

This month’s kit includes:

  • Enough supplies to create 9 cards—3 each of 3 designs
  • 9 coordinating envelopes
  • Best Destination Photopolymer Stamp Set
  • One Gorgeous Grape Ink Spot
  • Printed card bases, printed die cuts, adhesive, embellishments, and a clear block
  • Finished card size: 5-1/2″ x 4-1/4″ (14 x 10.8 cm)
  • Coordinating colors: Balmy Blue, Boho Blue, Cajun Craze, Calypso Coral, Coastal Cabana, Crushed Curry, Daffodil Delight, Early Espresso, Flirty Flamingo, Fresh Freesia, Gorgeous Grape, Granny Apple Green, Misty Moonlight, Pecan Pie, Petal Pink, Pretty Peacock, and Shaded Spruce

163186 $20.00 USD

*********************************************************************************************************

Warm Wishes

Subscribe October 11 – November 10

Light up the Christmas season with this month’s Paper Pumpkin kit! With traditional Christmas home designs and warm Christmas wishes, spread the light of Christmas with a gift box. Plus, you can get the Warm Wishes Cards & Envelopes Add-On to take your Christmas crafting even further (available while supplies last). This month’s kit coordinates with the October Home for the Holidays Paper Pumpkin Kit! If you can’t get enough of this traditional Christmas scene and need more cozy crafts, then make sure to check the October Refill’s availability and spend more time crafting this holiday season!

This month’s kit comes with everything you need to make traditional Christmas treat packaging boxes that you can fill up with all sorts of small goodies, treats, gifts, and more. Subscribe today so you can take part in spreading the light of Christmas around you!

This kit includes:

  • 8 boxes; 4 each of 2 designs
  • 1 Mossy Meadow Stampin’ Spot
  • Iridescent glitter accents on paper
  • Precut paper pieces
  • Linen thread
  • Treat bags
  • Warm Wishes photopolymer stamp set
  • Completed box size: 4-1/4″ x 4-1/2″ x 1-1/2″ (10.8 x 11.4 x 3.8 cm) and 4/1/4″ x 3-3/4″ x 1-1/2″ (10.8 x 9.5 x 3.8 cm)
  • Coordinating Stampin’ Up! colors: Balmy Blue, Blueberry Bushel, Cherry Cobbler, Crushed Curry, Daffodil Delight, Lemon Lolly, Mossy Meadow, Night of Navy, Old Olive, Pecan Pie, Real Red

ADD-ON DETAILS

Warm Wishes Cards & Envelopes
Available for purchase starting 11 October; only while supplies last.
Item number: 163985
$14.00 USD

This add-on includes:
• 20 Cards & Envelopes 
• Iridescent glitter accents on paper
• Folded card size: 5″ x 7″ (12.7 x 17.8 cm)

Subscribe to the November Paper Pumpkin Kit between 11 October and 10 November by clicking here!

Note: Supplies may be limited toward the end of the subscription period.

*********************************************************************************************************

Card stock cuts for this project:

  • Night Of Navy Cardstock 1 1/2″ X 9″ (belly band)
  • Very Vanilla Cardstock 1 1/4″ X 1 1/4″(star), 2 3/4″ X 2 3/4″ (circle), 3/8″ x 4 1/8″ (sentiment), 1 3/4″ X 3″ (inside sentiment), 2 – 2″ X 5 3/8″ (inside panels)
  • Very Vanilla Thick Cardstock 8 1/2″ X 5 1/2″ (card base scored & folded @ 2 1/8″ & 6 3/8″)
  • Shining Brightly specialty Designer Series Paper 2 – 1 7/8″ x 5 1/4″(card front panels), 4″ X 5 1/4″ (inside panel), 2 1/4″ X 6″ (envelope flap)
  • Gold Foil Paper 2 – 2″ X 5 3/8″ (card front mats), 2 3/4″ X 2 3/4″ (circle), 3″ X 4″(larger star), 1 3/4″ X 1 1/4″ (small star), 4 1/8″ X 5 3/8″ (inner liner mat)
  • Silver & Gold Shimmer Paper 2″ X 2″ (star)

*********************************************************************************************************

Product List

Stampin’ Up! Magical Meadow Collage for The Happy Inkin’ Thursday Blog Hop

Good Thursday morning my stamping friends welcome to our Happy Inkin’ Thursday Blog Hop. By the time you read this I will either be in the air flying to Georgia for our retreat or I will have landed. I’m so looking forward to being away for a few days with my stamping friends and team members. If you are starting with me, thank you, I hope you will stop by everyone’s blog to see what they have created this week. If you are hopping over from Akiko’s blog, thank you for stopping by. This week we have Theme Challenge. Here is my card using this week’s theme.

Stampin' Up! Magical Meadow Collage 1 creativestampingdesigns.com

I used the Stampin’ Up! Magical Meadow Bundle along with the Winter Meadow Designer Series Paper and Snowflake Sky 3D Embossing Folder for my card today.

This is our theme for this week.

Stampin' Up! Magical Meadow Collage 2 creativestampingdesigns.com

I started by embossing a Winter Meadow DSP card front using the Snowflake Sky EF. I adhered the embossed panel to a Moody Mauve mat using Multipurpose Liquid Glue. I adhered the layered panel to a Basic White Thick card base using Stampin’ Dimensionals.

Stampin' Up! Magical Meadow Collage 3 creativestampingdesigns.com

From panels of Blueberry Bushel, Lost Lagon, Misty Moonlight, Moody Mauve and Pretty Peacock I cut the above # of dies from the Magical Meadow Dies. I adhered the berries to the Lost Lagoon and Pretty Peacock die cuts using Multipurpose Liquid Glue. I added Clear Wink of Stella to the tops of the 2 Blueberry Bushel die cuts.

Stampin' Up! Magical Meadow Collage 4 creativestampingdesigns.com

I arranged the die cuts the way I wanted them on the Winter Meadow DSP card front and adhered them using Multipurpose Liquid Glue. I trimmed any stems that met in the center and needed to be trimmed using Paper Snips.

Stampin' Up! Magical Meadow Collage 5 creativestampingdesigns.com

On a panel of Basic White, I stamped the sentiment from the Stampin’ Up! Magical Meadow Cling Stamp Set in Moody Mauve Ink. I cut the sentiment out using the smallest rectangle from the Nested Essentials Dies. I embossed the sentiment using the Snowflake Sky EF. I adhered the sentiment to the center of the card front over the stems using Stampin’ Dimensioanls.

Stampin' Up! Magical Meadow Collage 6 creativestampingdesigns.com

On the inside, I stamped the sentiment from the Magical Meadow stamp set in Moody Mauve Ink on a panel of Basic White. I stamped the images from the Magical Meadow stamp set in Lost Lagoon, Moody Mauve and Pretty Peacock Inks on the bottom of the panel. I adhered the Basic White panel to a Moody Mauve mat then to the inside of the Basic White Thick card base.

Stampin' Up! Magical Meadow Collage 7 creativestampingdesigns.com

To complete my card, I decorated a Basic White Medium Envelope. I stamped the images from the Magical Meadow stamp set in Lost Lagoon, Moody Mauve and Pretty Peacock Inks on the envelope front and flap.

Stampin' Up! Magical Meadow Collage 8 creativestampingdesigns.com

Thank you for stopping by my blog today. I hope you liked my card and will give it a try. Now that you’ve seen my card, take a minute to hop through and see everyone’s projects today. If you click on the Next Blog button, you’ll go to Tara’s page. Or you can just click on the names below to go directly to all their blogs! Happy Hopping!

Amy Koenders

Mary Deatherage

Jaimie Babarczy

Karen Finkle

Akiko Sudano

Karen Ksenzakovic You Are Here

Tara Carpenter

Terry Lynn Bright

Carol Buckalew

*********************************************************************************************************

If you need any stamping supplies, I’d love to be your Demonstrator. Just click HERE to go directly to my online store or drop me an email if you have any questions. 

MY CURRENT HOST CODE IS:   BX4UV6HE

Use this host code when placing an order with me. When you order $50 or greater you will receive a free gift from me! If your order is over $150, please do not use this code, but you’ll still get the free gift. The free gift is your choice of any 1 item valued up to $10.00 from the 2023-2024 Annual Catalog!  Unfortunately, packs of cardstock are no longer an option for a free gift. Shipping has become too expensive to ship and it’s costing me as much to ship as the cardstock costs. For any orders $50 or more I will also send you my monthly class tutorials.  Click HERE or go to my Customer Rewards for more details and to see what this month’s tutorials are.

Please remember to use my current Host Code and make sure that you can see my name on the final checkout page listed as your Demonstrator when you order so that you know that you’re ordering with me, and you’ll get my rewards! 

Happy Stamping, Karen

*********************************************************************************************************

In response to changing policies at Stampin’ Up – I’m adjusting my Ordering Gift policy as well.  I’m having to get a little more tough on the adding of Host codes when you place your order thru my Online Store.

Not to worry – you’re still going to get that $10 ordering gift for orders of $50 (before shipping & tax) or greater.  And the gift is still any 1 SU! product up to that $10 value – which includes some of our fun Host Sets!

But – if you DO NOT use the Host code for your orders of less than $150 (this is the RETAIL total before Shipping & Handling), then you’ll have two options:

  1. You’ll need to call Stampin’ Up! (1-800-Stamp-Up) and ask them to add it for you. They’re very helpful and will get it done quickly!  OR….
  2. If your order was over the $50 threshold but under $150, then…you’ll forfeit that $10 ordering gift and rewards – this is the Bummer Option – and I REALLY don’t want to do this, SO please remember to add my Current Host Code.

*********************************************************************************************************

The Best Destination Kit Now Available

Plan a crafting getaway today with the all-inclusive The Best Destination Kit! This kit lets you make nine tri-fold cards with a colorful, nostalgic, travel vibe. Resort-hopping was never so easy!

This month’s kit includes:

  • Enough supplies to create 9 cards—3 each of 3 designs
  • 9 coordinating envelopes
  • Best Destination Photopolymer Stamp Set
  • One Gorgeous Grape Ink Spot
  • Printed card bases, printed die cuts, adhesive, embellishments, and a clear block
  • Finished card size: 5-1/2″ x 4-1/4″ (14 x 10.8 cm)
  • Coordinating colors: Balmy Blue, Boho Blue, Cajun Craze, Calypso Coral, Coastal Cabana, Crushed Curry, Daffodil Delight, Early Espresso, Flirty Flamingo, Fresh Freesia, Gorgeous Grape, Granny Apple Green, Misty Moonlight, Pecan Pie, Petal Pink, Pretty Peacock, and Shaded Spruce

163186 $20.00 USD

*********************************************************************************************************

Warm Wishes

Subscribe October 11 – November 10

Light up the Christmas season with this month’s Paper Pumpkin kit! With traditional Christmas home designs and warm Christmas wishes, spread the light of Christmas with a gift box. Plus, you can get the Warm Wishes Cards & Envelopes Add-On to take your Christmas crafting even further (available while supplies last). This month’s kit coordinates with the October Home for the Holidays Paper Pumpkin Kit! If you can’t get enough of this traditional Christmas scene and need more cozy crafts, then make sure to check the October Refill’s availability and spend more time crafting this holiday season!

This month’s kit comes with everything you need to make traditional Christmas treat packaging boxes that you can fill up with all sorts of small goodies, treats, gifts, and more. Subscribe today so you can take part in spreading the light of Christmas around you!

This kit includes:

  • 8 boxes; 4 each of 2 designs
  • 1 Mossy Meadow Stampin’ Spot
  • Iridescent glitter accents on paper
  • Precut paper pieces
  • Linen thread
  • Treat bags
  • Warm Wishes photopolymer stamp set
  • Completed box size: 4-1/4″ x 4-1/2″ x 1-1/2″ (10.8 x 11.4 x 3.8 cm) and 4/1/4″ x 3-3/4″ x 1-1/2″ (10.8 x 9.5 x 3.8 cm)
  • Coordinating Stampin’ Up! colors: Balmy Blue, Blueberry Bushel, Cherry Cobbler, Crushed Curry, Daffodil Delight, Lemon Lolly, Mossy Meadow, Night of Navy, Old Olive, Pecan Pie, Real Red

ADD-ON DETAILS

Warm Wishes Cards & Envelopes
Available for purchase starting 11 October; only while supplies last.
Item number: 163985
$14.00 USD

This add-on includes:
• 20 Cards & Envelopes 
• Iridescent glitter accents on paper
• Folded card size: 5″ x 7″ (12.7 x 17.8 cm)

Subscribe to the November Paper Pumpkin Kit between 11 October and 10 November by clicking here!

Note: Supplies may be limited toward the end of the subscription period.

*********************************************************************************************************

Card stock cuts for this project:

  • Basic White Cardstock 1 3/4″ X 2 1/2″ (sentiment), 4″ X 5 1/4″ (inner liner)
  • Basic White Thick Cardstock 4 1/4″ X 11″ (card base scored & folded at 5 1/2″)
  • Blueberry Bushel Cardstock 2 1/2″ X 3 1/2″ (sprigs)
  • Lost Lagoon Cardstock 2 1/4″ X 4 1/4″ (sprigs)
  • Misty Moonlight Cardstock 2″ X 4 1/4″ (sprigs)
  • Moody Mauve Cardstock 1″ X 4″ (berries)_, 2 – 4 1/8″ X 5 3/8″(card front & inner liner mats)
  • Pretty Peacock Cardstock 4 1/4″ X 5 1/2″ (sprigs)
  • Winter Meadow Designer Series Paper 4″ X 5 1/4″ (card front)

*********************************************************************************************************

Product List

Stampin’ Up! Sending Cheer

Good Monday morning stamping friends and Happy Halloween Eve. How many of you remember going out on mischief night and draping toilet paper on neighbors’ trees and putting soap on car windows? I know I’m dating myself here. That was always good clean fun that we had when we were kids, but it’s a thing of the past anymore.

I have another Christmas card for you today. I think Imay be at the end of having to make Holiday cards. If you’d like to see a quick video on how I made my card, Click Here to go to my Instagram Reels. Here’s my card for today.

Stampin' Up! Sending Cheery Gingerbread 1 creativestampingdesigns.com

I used the Stampin’ Up! Sending Cheer Bundle along with the Stampin’ Up! Beary Cute Photopolymer Stamp Set, Joy of Christmas Designer Series Paper, Stripes & Splatters 3D Embossing Folder and Online Exclusive Traditions of St. Nick Designer Series Paper for my card today.

My design is from Freshly Made Sketches #609.

Stampin' Up! Sending Cheery Gingerbread 2 creativestampingdesigns.com

I started by adhering a panel of Joy of Christmas DSP to a Basic White mat using Stampin’ Seal. I adhered a panel of Traditions of St. Nick DSP to the matted panel using Multipurpose Liquid Glue. I wrapped a piece of Real Red & Gold 3/8″ Dotted Ribbon around the layered panel and adhered it on the back using Stampin’ Seal. I adhered the layered panel to a Real Red card base using Stampin’ Dimensionals.

Stampin' Up! Sending Cheery Gingerbread 3 creativestampingdesigns.com

I stamped the gingerbread man image from the Stampin’ Up! Sending Cheer Photopolymer Stamp Set in Pecan Pie Ink 2 times on a panel of Basic White. I stamped the face image from the Sending Cheer stamp set in Versamark Ink on the image. I sprinkled it with White Embossing Powder and set it using the Heat Tool. I cut the images out using the Sending Cheer Dies. Using the Sending Cheer Dies I cut out 2 sets of the tiny hearts from a panel of Real Red. I embossed a panel of Vellum paper using the Stripes & Splatters EF. I adhered the hearts to the gingerbread men using Multipurpose Liquid Glue. I adhered the gingerbread men to the embossed vellum paper using Stampin’ Dimensionals. I adhered the vellum to the card front.

Stampin' Up! Sending Cheery Gingerbread 4 creativestampingdesigns.com

On a strip of Basic White, I stamped the sentiment from the Sending Cheer stamp set in Real Red Ink. I cut the end of the sentiment and the end of a strip of Real Red using the Banner Pick A Punch. I adhered the banners to the card front using Stampin’ Dimensionals. I added a few Neutrals Adhesive-Backed Sequins to the card front.

Stampin' Up! Sending Cheery Gingerbread 5 creativestampingdesigns.com

On the inside, I stamped the sentiment from the Beary Cute stamp set in Real Red Ink. I adhered a strip of Traditions of St. Nick DSP to the bottom of the panel. I adhered the Basic White panel to a Pecan Pie mat then to the inside of the Real Red card base.

Stampin' Up! Sending Cheery Gingerbread 6 creativestampingdesigns.com

To finish my card, I decorated a Basic White Medium Envelope. I stamped the gingerbread man image from the Sending Cheer stamp set in Pecan Pie Ink on the envelope front. I adhered a panel of Joy of Christmas DSP to the envelope flap.

Stampin' Up! Sending Cheery Gingerbread 7 creativestampingdesigns.com

Thank you for stopping by my blog today. I hope you like the card and will give it a try. Happy Stamping!!

*********************************************************************************************************

If you need any stamping supplies, I’d love to be your Demonstrator. Just click HERE to go directly to my online store or drop me an email if you have any questions. 

MY CURRENT HOST CODE IS:   BX4UV6HE

Use this host code when placing an order with me. When you order $50 or greater you will receive a free gift from me! If your order is over $150, please do not use this code, but you’ll still get the free gift. The free gift is your choice of any 1 item valued up to $10.00 from the 2023-2024 Annual Catalog!  Unfortunately, packs of cardstock are no longer an option for a free gift. Shipping has become too expensive to ship and it’s costing me as much to ship as the cardstock costs. For any orders $50 or more I will also send you my monthly class tutorials.  Click HERE or go to my Customer Rewards for more details and to see what this month’s tutorials are.

Please remember to use my current Host Code and make sure that you can see my name on the final checkout page listed as your Demonstrator when you order so that you know that you’re ordering with me, and you’ll get my rewards! 

Happy Stamping, Karen

*********************************************************************************************************

In response to changing policies at Stampin’ Up – I’m adjusting my Ordering Gift policy as well.  I’m having to get a little more tough on the adding of Host codes when you place your order thru my Online Store.

Not to worry – you’re still going to get that $10 ordering gift for orders of $50 (before shipping & tax) or greater.  And the gift is still any 1 SU! product up to that $10 value – which includes some of our fun Host Sets!

But – if you DO NOT use the Host code for your orders of less than $150 (this is the RETAIL total before Shipping & Handling), then you’ll have two options:

  1. You’ll need to call Stampin’ Up! (1-800-Stamp-Up) and ask them to add it for you. They’re very helpful and will get it done quickly!  OR….
  2. If your order was over the $50 threshold but under $150, then…you’ll forfeit that $10 ordering gift and rewards – this is the Bummer Option – and I REALLY don’t want to do this, SO please remember to add my Current Host Code.

*********************************************************************************************************

TOMORROW is the last day for Joining Special October 3 – October 31

If you’ve been thinking about joining the Stampin’ Up! community October is the perfect time. You can add new Online Exclusive products to your Starter Kit, and still have more money to spend. This is really an awesome deal and I’d love to have you on my team. The added free registration to OnStage is a great bonus and then you can order the Bee Mine Suite collection for your 1st order.

We want to celebrate our 35th anniversary in style! From October 3 – October 31, anyone who joins our fun crafting community as a new demonstrator can choose either 35% OFF the cost of their Starter Kit or get 35% MORE product with their Starter Kit! What a deal!

Promotion Period: 3–31 October

New demonstrators can choose one of the following options for your Starter Kit:

Option 1: Get 35% OFF the normal cost of a Stampin’ Up! Starter Kit. Those who select this option will receive $125 USD worth of product for only $64.35 USD!

Option 2: Get 35% MORE product with their Starter Kit. Those who select this option will receive $168.75 USD worth of product by spending $99 USD!

No matter which option you choose for your Starter Kit, both provide free business supplies and free shipping on your Starter Kit—not to mention all the fun that comes with being part of Stampin’ Up!

FREE OnStage @Home Registration

It gets better! Those who sign up for a Starter Kit during this offer will also be automatically registered for FREE* to our virtual OnStage event on 11 Novembera $77 USD value!

  • Those who sign up for this offer have the opportunity to watch the event independently, gathered together with other demonstrators, or with their Team Leader.
  • Demonstrators who join during this promotion will be automatically added to the OnStage attendees; they do not need to register separately.
  • Demonstrators who join during this promotion will also receive an email with all the information about this event.

*Please note that free registration will not include the gift box.

Stampin’ Up! events are always SO much fun!!  Bonus that you can join and attend your first even for free!!

Come join my team.

We welcome all types of Demonstrators from those only purchasing to get the discount for themselves to those who want to run a business and anywhere in between!  There’s never any pressure to sell! We’re a group that loves to stamp and share what you create. Demonstrators get lots of perks including at least a 20% discount on all orders that you place as a Demonstrator, invitations to Stampin’ Up! Demonstrator events and preordering from upcoming catalogs and promotions (like the new Online Exclusives coming in November!!)!  The new Online Exclusive items ARE available to pick as part of your Starter Kit (or you can order them later and get your 20% discount!). 

*********************************************************************************************************

Warm Wishes

Subscribe October 11 – November 10

Light up the Christmas season with this month’s Paper Pumpkin kit! With traditional Christmas home designs and warm Christmas wishes, spread the light of Christmas with a gift box. Plus, you can get the Warm Wishes Cards & Envelopes Add-On to take your Christmas crafting even further (available while supplies last). This month’s kit coordinates with the October Home for the Holidays Paper Pumpkin Kit! If you can’t get enough of this traditional Christmas scene and need more cozy crafts, then make sure to check the October Refill’s availability and spend more time crafting this holiday season!

This month’s kit comes with everything you need to make traditional Christmas treat packaging boxes that you can fill up with all sorts of small goodies, treats, gifts, and more. Subscribe today so you can take part in spreading the light of Christmas around you!

This kit includes:

  • 8 boxes; 4 each of 2 designs
  • 1 Mossy Meadow Stampin’ Spot
  • Iridescent glitter accents on paper
  • Precut paper pieces
  • Linen thread
  • Treat bags
  • Warm Wishes photopolymer stamp set
  • Completed box size: 4-1/4″ x 4-1/2″ x 1-1/2″ (10.8 x 11.4 x 3.8 cm) and 4/1/4″ x 3-3/4″ x 1-1/2″ (10.8 x 9.5 x 3.8 cm)
  • Coordinating Stampin’ Up! colors: Balmy Blue, Blueberry Bushel, Cherry Cobbler, Crushed Curry, Daffodil Delight, Lemon Lolly, Mossy Meadow, Night of Navy, Old Olive, Pecan Pie, Real Red

ADD-ON DETAILS

Warm Wishes Cards & Envelopes
Available for purchase starting 11 October; only while supplies last.
Item number: 163985
$14.00 USD

This add-on includes:
• 20 Cards & Envelopes 
• Iridescent glitter accents on paper
• Folded card size: 5″ x 7″ (12.7 x 17.8 cm)

Subscribe to the November Paper Pumpkin Kit between 11 October and 10 November by clicking here!

Note: Supplies may be limited toward the end of the subscription period.

*********************************************************************************************************

Card stock cuts for this project:

  • Basic White Cardstock 5/8″ X 2″(sentiment), 4 1/8″ X 5 3/8″ (card front mat), 4″ X 5 1/4″ (inner liner)
  • Pecan Pie Cardstock 4 1/8″ X 5 3/8″ (inner liner mat)
  • Real Red Cardstock 8 1/2″ X 5 1/2″ (card base scored & folded at 4 1/4″), 5/8″ X 2 3/8″ (banner), 3/8″ x 2″ (hearts)
  • Joy of Christmas Designer Series Paper 4″ X 5 1/4″ (card front), 2 1/4″ X 6″ (envelope flap)
  • Traditions of St. Nick Designer Series Paper 2 3/4″ X 5 1/4″ (card front panel), 1/2″ X 4″ (inner liner)
  • Vellum Paper 2 3/4″ x 4″ (card front panel)

*********************************************************************************************************

Product List

Stampin’ Up! Christmas Classics for The Happy Inkin’ Thursday Blog Hop

Good Thursday morning my stamping friends welcome to our Happy Inkin’ Thursday Blog Hop. If you are starting with me, thank you, I hope you will stop by everyone’s blog to see what they have created this week. If you are hopping over from Karen’s blog, thank you for stopping by. This week we have Sketch Challenge and I decided to make a traditional color Christmas card. If you’d like to see a quick video on how I made this card, Click Here to go to my Instagram Reels. Here is my card using this week’s sketch.

Stampin' Up! Christmas Classics Holly 1 creativestampingdesigns.com

I used the Stampin’ Up! Christmas Classics Bundle along with the Joyful Specialty Designer Series Paper and Stylish Shapes Dies for my card today.

This is our sketch for this week.

Stampin' Up! Christmas Classics Holly 2 creativestampingdesigns.com

I started by adhering a panel of Joyful DSP to a Shaded Spruce mat using Stampin’ Seal. I adhered the layered panel to a Cherry Cobbler card base using Multipurpose Liquid Glue.

Stampin' Up! Christmas Classics Holly 3 creativestampingdesigns.com

On a panel of Basic White, I stamped the sentiment from the Stampin’ Up! Christmas Classics Photopolymer Stamp Set in Versamark Ink. I immediately sprinkled it with Gold Embossing Powder and set it using the Heat Tool. I cut the sentiment out using the Stylish Shapes Dies. I adhered the sentiment to a Shaded Spruce mat using Stampin’ Seal. I adhered the layered sentiment to the card front using Stampin’ Dimensionals.

Stampin' Up! Christmas Classics Holly 4 creativestampingdesigns.com

Using the Christmas Classics Dies, I cut 4 of the holly leaf dies from a panel of Shaded Spruce, 2 or the sprigs from a panel of Gold Foil Sheet, 2 sets of berries from a panel of Cherry Cobbler and 4 sets of the veins of the holly leaves from a panel of Old Olive. I adhered the Old Olive holy veins to the holly leaves securing it on the back with Tear N’ Tape. I adhered 2 of the holly leaves using Glue Dots and the other 2 with Stampin’ Dimensionals. I adhered the Gold Foil sprigs between the holly leaves using Multipurpose Liquid Glue. I adhered the berries to the center of the holly leaves using Multipurpose Liquid Glue. I added a few Festive Pearls to the sentiment .

Stampin' Up! Christmas Classics Holly 5 creativestampingdesigns.com

On the inside, I stamped the sentiments from the Christmas Classics stamp set in Cherry Cobbler Ink on a panel of Basic White. I adhered 2 strips of the Joyful DSP to the sides of the panel. I stamped the holly image from the Christmas Classics stamp set in Tuxedo Black Ink on the top of the panel. I colored the image using Shaded Spruce Stampin’ Blends Markers. I adhered the other set of berries to the holy using Multipurpose Liquid Glue. I adhered the Basic White panel to a Shaded Spruce mat then to the inside of the Cherry Cobbler card base.

Stampin' Up! Christmas Classics Holly 6 creativestampingdesigns.com

To complete my card, I decorated a Basic Whtie Medium Envelope. I stamped the holly leaf image from the Christmas Classics stamp set in Tuxedo Black Ink on the envelope front. I colored the images using Shaded Spruce Stampin’ Blends Markers. I adhered a panel of Joyful DSP to the envelope flap.

Stampin' Up! Christmas Classics Holly 7 creativestampingdesigns.com

Thank you for stopping by my blog today. I hope you liked my card and will give it a try. Now that you’ve seen my card, take a minute to hop through and see everyone’s projects today. If you click on the Next Blog button, you’ll go to Tara’s page. Or you can just click on the names below to go directly to all their blogs! Happy Hopping!

Amy Koenders

Mary Deatherage

Jaimie Babarczy

Karen Finkle

Karen Ksenzakovic You Are Here

Tara Carpenter

Terry Lynn Bright

Carol Buckalew

*********************************************************************************************************

If you need any stamping supplies, I’d love to be your Demonstrator. Just click HERE to go directly to my online store or drop me an email if you have any questions. 

MY CURRENT HOST CODE IS:   WRAGYZRS

Use this host code when placing an order with me. When you order $50 or greater you will receive a free gift from me! If your order is over $150, please do not use this code, but you’ll still get the free gift. The free gift is your choice of any 1 item valued up to $10.00 from the 2023-2024 Annual Catalog!  Unfortunately, packs of cardstock are no longer an option for a free gift. Shipping has become too expensive to ship and it’s costing me as much to ship as the cardstock costs. For any orders $50 or more I will also send you my monthly class tutorials.  Click HERE or go to my Customer Rewards for more details and to see what this month’s tutorials are.

Please remember to use my current Host Code and make sure that you can see my name on the final checkout page listed as your Demonstrator when you order so that you know that you’re ordering with me, and you’ll get my rewards! 

Happy Stamping, Karen

*********************************************************************************************************

In response to changing policies at Stampin’ Up – I’m adjusting my Ordering Gift policy as well.  I’m having to get a little more tough on the adding of Host codes when you place your order thru my Online Store.

Not to worry – you’re still going to get that $10 ordering gift for orders of $50 (before shipping & tax) or greater.  And the gift is still any 1 SU! product up to that $10 value – which includes some of our fun Host Sets!

But – if you DO NOT use the Host code for your orders of less than $150 (this is the RETAIL total before Shipping & Handling), then you’ll have two options:

  1. You’ll need to call Stampin’ Up! (1-800-Stamp-Up) and ask them to add it for you. They’re very helpful and will get it done quickly!  OR….
  2. If your order was over the $50 threshold but under $150, then…you’ll forfeit that $10 ordering gift and rewards – this is the Bummer Option – and I REALLY don’t want to do this, SO please remember to add my Current Host Code.

*********************************************************************************************************

New Joining Special October 3 – October 31

If you’ve been thinking about joining the Stampin’ Up! community October is the perfect time.

We want to celebrate our 35th anniversary in style! From October 3 – October 31, anyone who joins our fun crafting community as a new demonstrator can choose either 35% OFF the cost of their Starter Kit or get 35% MORE product with their Starter Kit! What a deal!

Promotion Period: 3–31 October

New demonstrators can choose one of the following options for your Starter Kit:

Option 1: Get 35% OFF the normal cost of a Stampin’ Up! Starter Kit. Those who select this option will receive $125 USD worth of product for only $64.35 USD!

Option 2: Get 35% MORE product with their Starter Kit. Those who select this option will receive $168.75 USD worth of product by spending $99 USD!

No matter which option you choose for your Starter Kit, both provide free business supplies and free shipping on your Starter Kit—not to mention all the fun that comes with being part of Stampin’ Up!

FREE OnStage@Home Registration

It gets better! Those who sign up for a Starter Kit during this offer will also be automatically registered for FREE* to our virtual OnStage event on 11 November—a $77 USD value!

  • Those who sign up for this offer have the opportunity to watch the event independently, gathered together with other demonstrators, or with their Team Leader.
  • Demonstrators who join during this promotion will be automatically added to the OnStage attendees; they do not need to register separately.
  • Demonstrators who join during this promotion will also receive an email with all the information about this event.

*Please note that free registration will not include the gift box.

Stampin’ Up! events are always SO much fun!!  Bonus that you can join and attend your first even for free!!

I’d Love to have you on my team

If you’d like to join my team, I’d love to have you!  Once you join, you’ll get at least a 20% discount on all of your Stampin’ Up! purchases and you can preorder from the upcoming catalogs!

We welcome all types of Demonstrators from those only purchasing to get the discount for themselves to those who want to run a business and anywhere in between!  There’s never any pressure to sell! We’re a group that loves to stamp and share what you create.

If you have been back and forth about joining, drop me a note at creativestampingdesigns@gmail.com and we can talk about you joining.

*********************************************************************************************************

Warm Wishes

Subscribe October 11 – November 10

Light up the Christmas season with this month’s Paper Pumpkin kit! With traditional Christmas home designs and warm Christmas wishes, spread the light of Christmas with a gift box. Plus, you can get the Warm Wishes Cards & Envelopes Add-On to take your Christmas crafting even further (available while supplies last). This month’s kit coordinates with the October Home for the Holidays Paper Pumpkin Kit! If you can’t get enough of this traditional Christmas scene and need more cozy crafts, then make sure to check the October Refill’s availability and spend more time crafting this holiday season!

This month’s kit comes with everything you need to make traditional Christmas treat packaging boxes that you can fill up with all sorts of small goodies, treats, gifts, and more. Subscribe today so you can take part in spreading the light of Christmas around you!

This kit includes:

  • 8 boxes; 4 each of 2 designs
  • 1 Mossy Meadow Stampin’ Spot
  • Iridescent glitter accents on paper
  • Precut paper pieces
  • Linen thread
  • Treat bags
  • Warm Wishes photopolymer stamp set
  • Completed box size: 4-1/4″ x 4-1/2″ x 1-1/2″ (10.8 x 11.4 x 3.8 cm) and 4/1/4″ x 3-3/4″ x 1-1/2″ (10.8 x 9.5 x 3.8 cm)
  • Coordinating Stampin’ Up! colors: Balmy Blue, Blueberry Bushel, Cherry Cobbler, Crushed Curry, Daffodil Delight, Lemon Lolly, Mossy Meadow, Night of Navy, Old Olive, Pecan Pie, Real Red

ADD-ON DETAILS

Warm Wishes Cards & Envelopes
Available for purchase starting 11 October; only while supplies last.
Item number: 163985
$14.00 USD

This add-on includes:
• 20 Cards & Envelopes 
• Iridescent glitter accents on paper
• Folded card size: 5″ x 7″ (12.7 x 17.8 cm)

Subscribe to the November Paper Pumpkin Kit between 11 October and 10 November by clicking here!

Note: Supplies may be limited toward the end of the subscription period.

*********************************************************************************************************

Card stock cuts for this project:

  • Basic White Cardstock 2 1/4″ X 2 1/4″ (sentiment), 4″ X 5 1/4″ (inner liner)
  • Cherry Cobbler Cardstock 8 1/2″ X 5 1/2″(card base scored & folded at 4 1/4″), 1 1/4″ X 1 1/4″ (berries)
  • Old Olive Cardstock 1 1/2″ X 3 3/4″ (holly veins)
  • Shaded Spruce Cardstock 2 – 4 1/8″ X 5 3/8″ (card front & inner liner mats), 2 1/2″ X 5 1/2″ (holly leaves), 2 1 16″ X 2 1/16″ (sentiment mat)
  • Joyful Specialty Designer Series Paper 4″ X 5 1/4″ (card front), 2 – 3/8″ X 4″ (inner liner), 2 1/4″ X 6″ (envelope flap)
  • Gold Foil Paper 2″ X 2 1/2″ (sprigs)

*********************************************************************************************************

Product List