
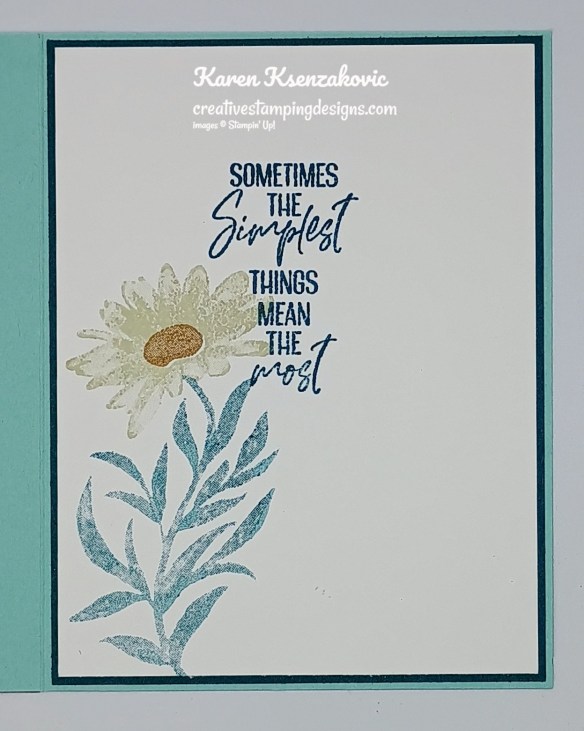
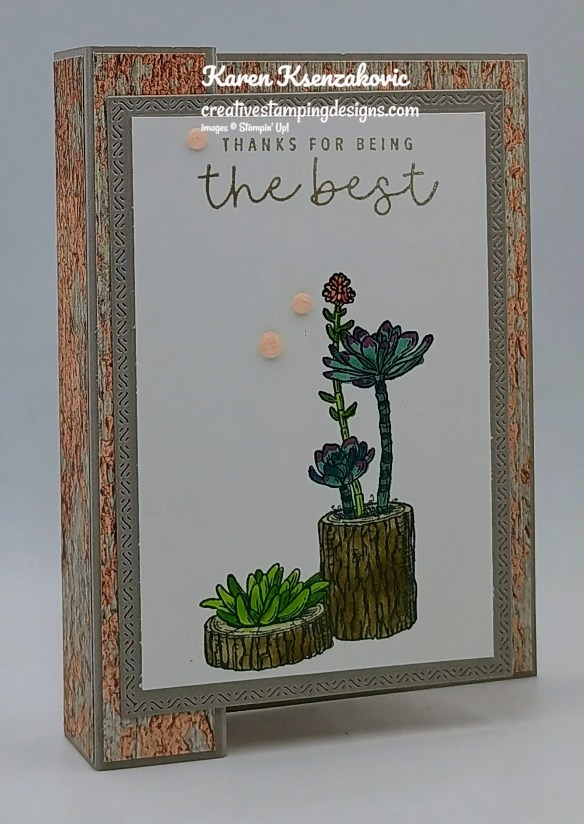
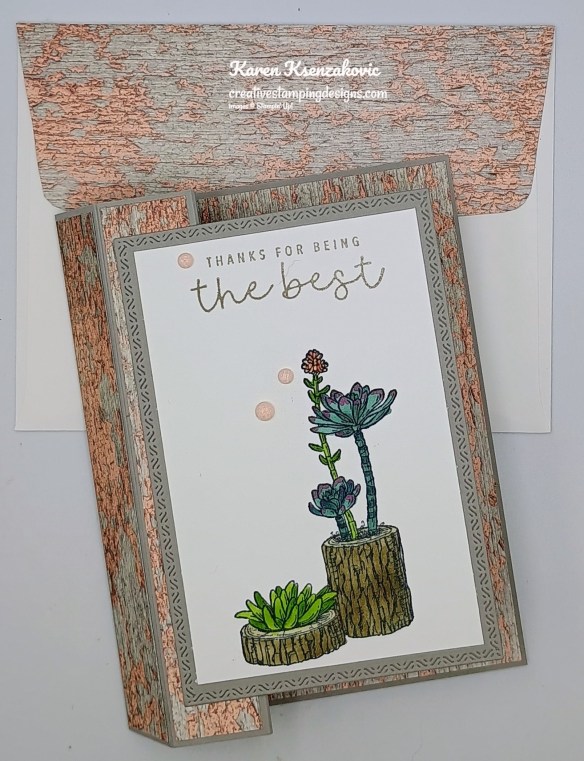
Good Friday morning stamping friends and welcome to my fun fold Friday!! Happy August!! I’m not sure where July went, but it’s gone already. I got to see the new September – December 2025 Mini Catalog and September Online Exclusives on Wednesday. I cannot wait to share them with you. I hope you love everything as much as I do. I’m going to start getting my Designer Series Paper, Ribbon and Embellishment Shares together and I will be opening them up soon to order. I will also be able to order the catalogs next week. If you have placed an order with me and are a customer of mine, they will be in the mail just as soon as I receive them. If you’d like to receive a catalog from me all you need to do is place an order in my Online Store and you’ll be on the mailing list to receive one.
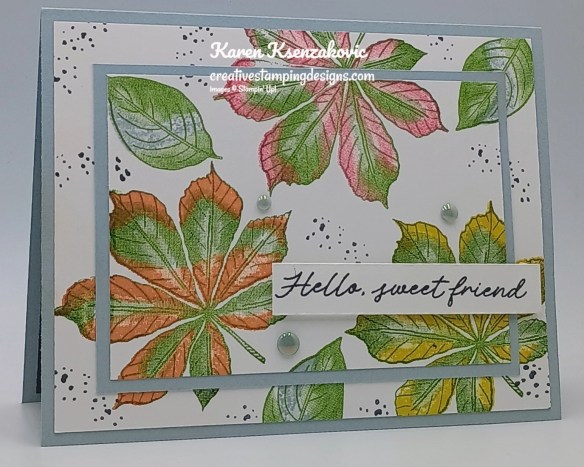
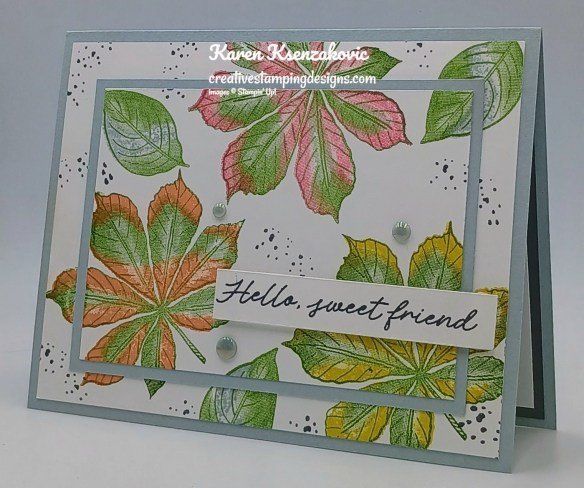
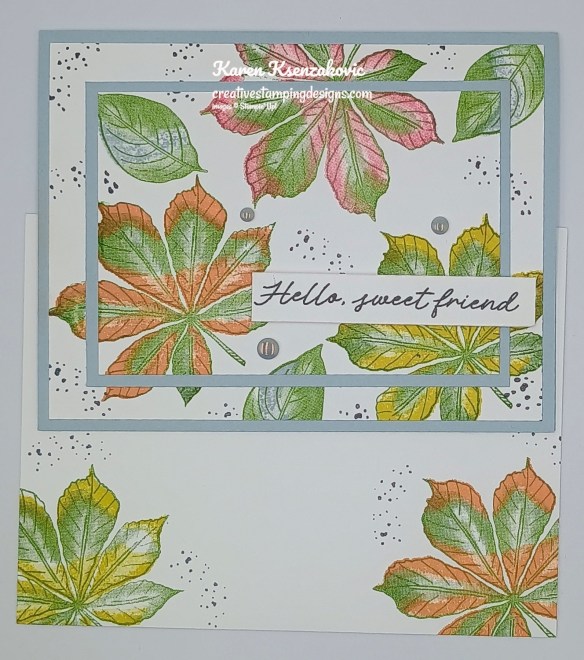
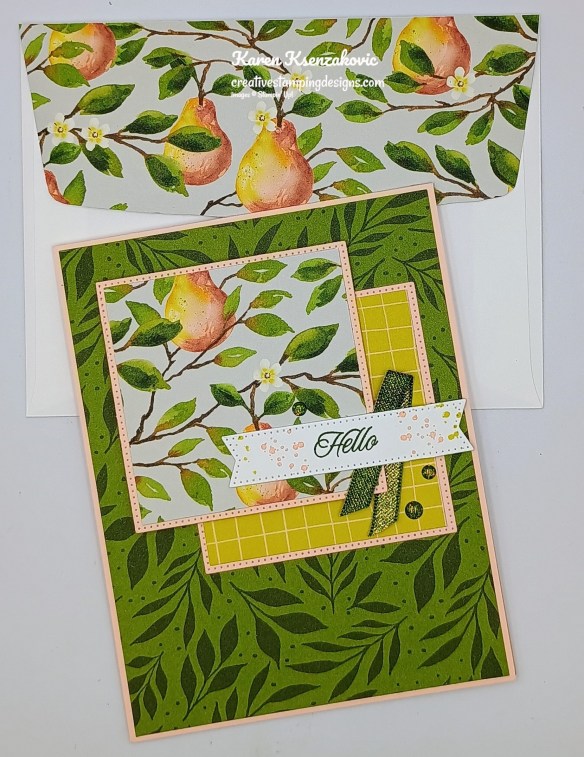
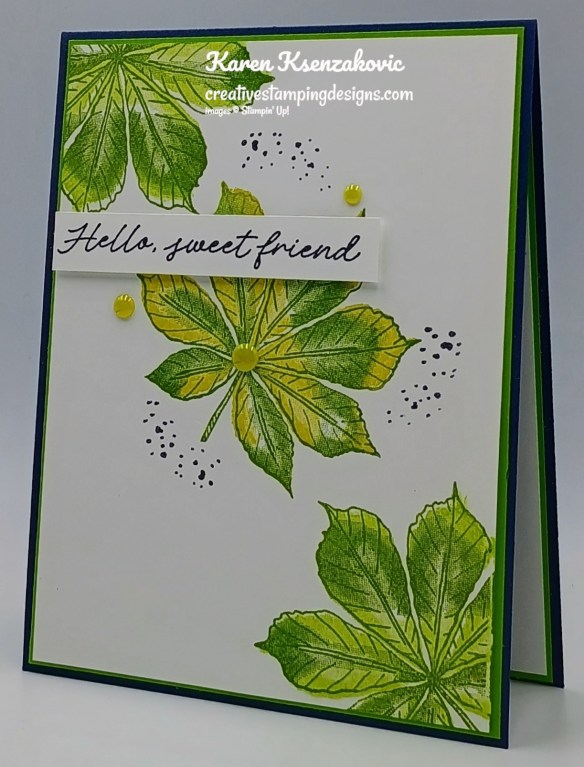
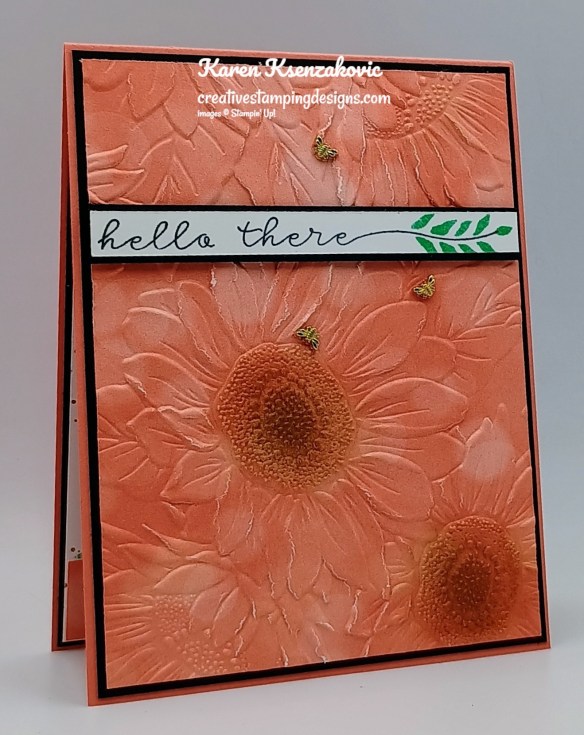
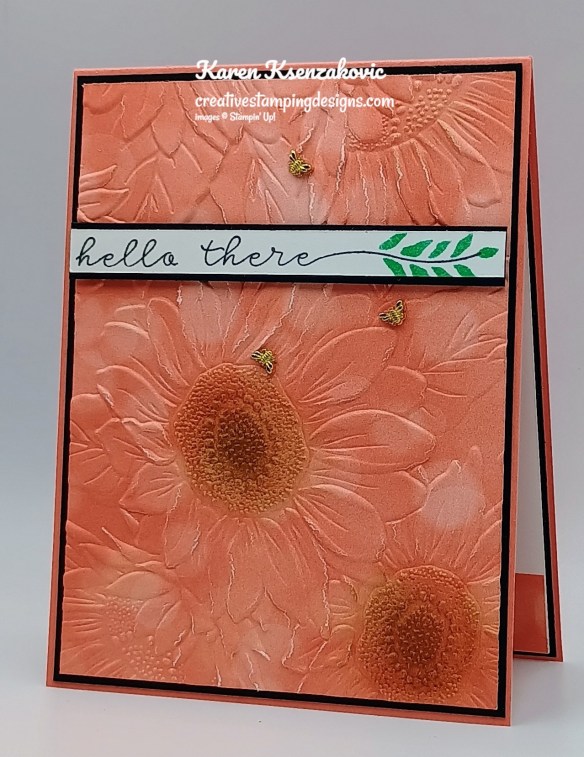
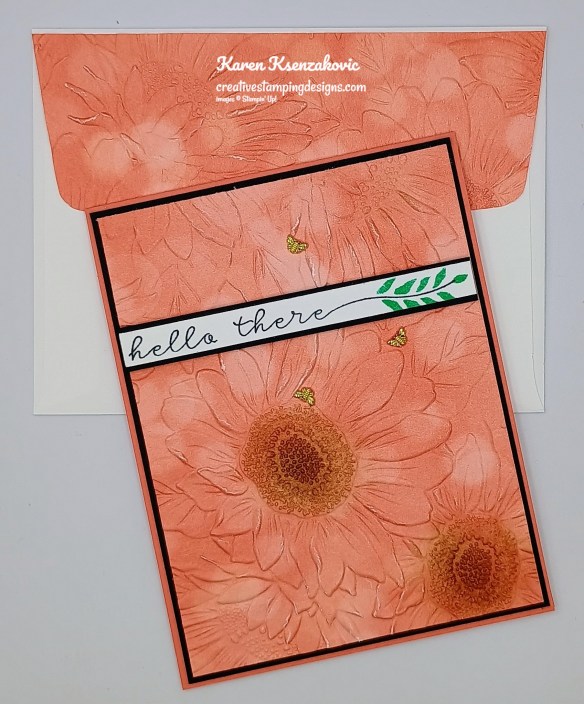
I played with some Online Exclusives for today’s card. I just love creating with this suite, the DSP is beautiful and makes beautiful cards all on its own. Here’s my card for today.

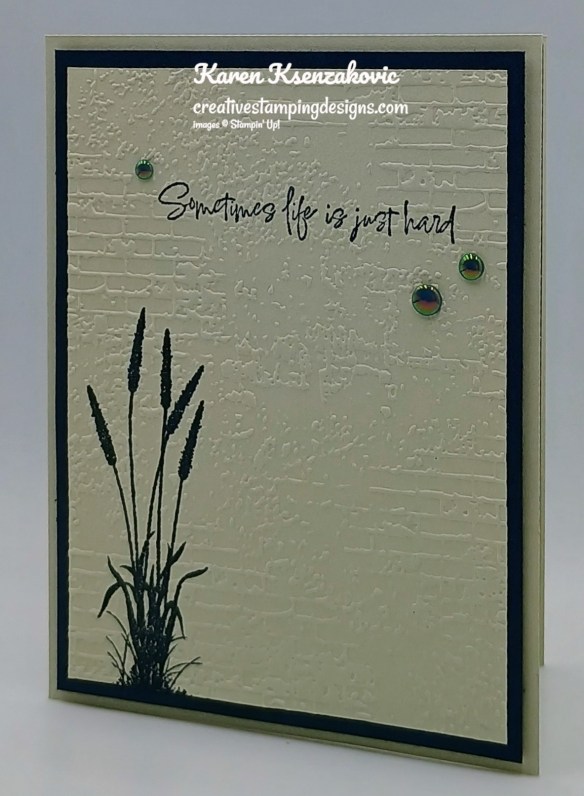
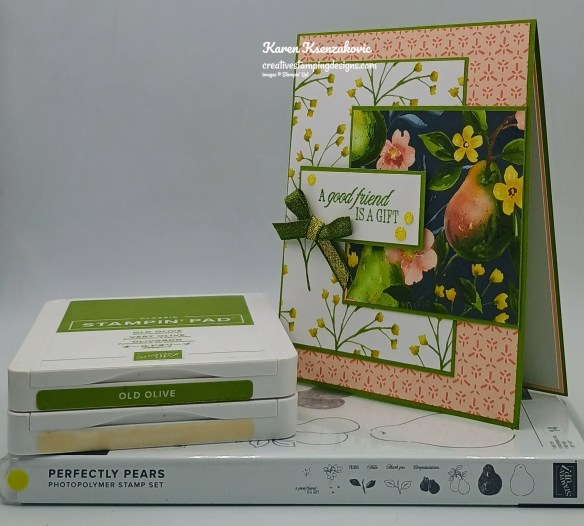
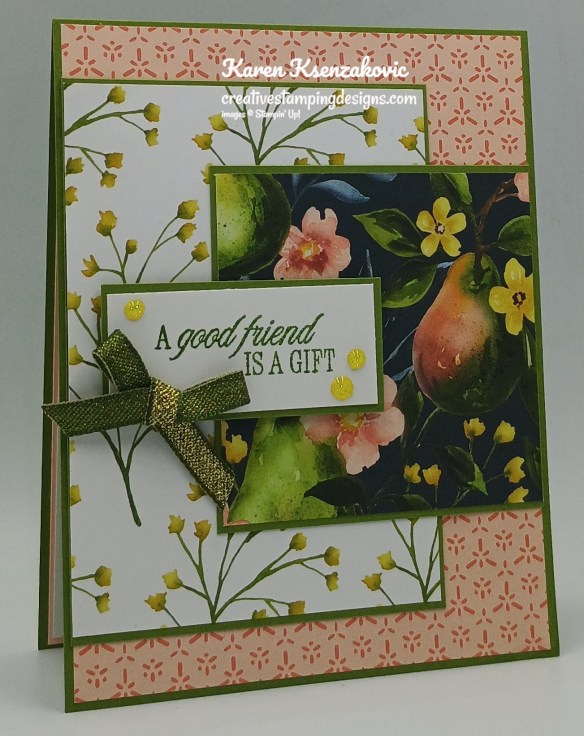
I used the Stampin’ Up! Perfectly Pears Bundle along with the Painterly Pears Designer Series Paper for my card today.
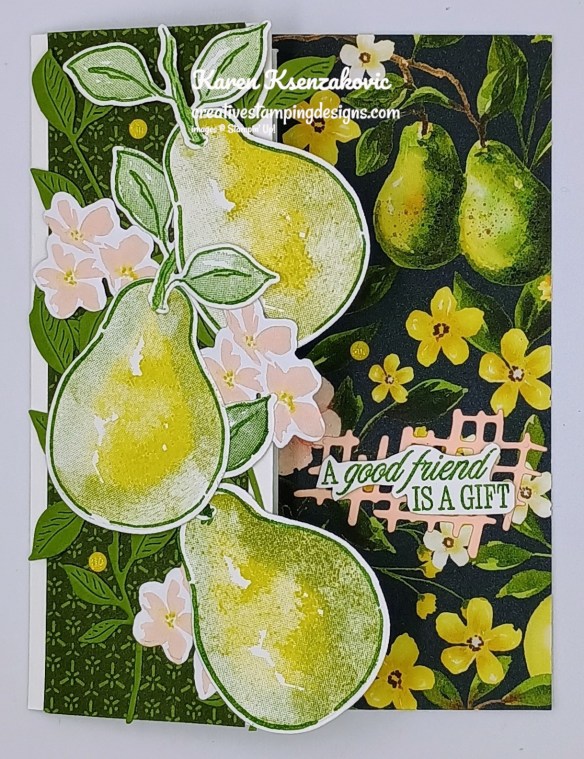
On a panel of Basic White, stamp the large outline pear and stem/leaf image from the Stampin’ Up! Perfectly Pears Photopolymer Stamp Set in Old Olive Ink 3 times each. Ink up the large solid pear image from the Perfectly Pears stamp set with Darling Duckling Ink. Using the Sponge Dauber, add Old Olive Ink around the edges of the image, stamp the solid pear over the outline pear image. Stamp the solid leaf image from the Perfectly Pears stamp set in Old Olive Ink, stamping off once on scrap paper, over the outlined leaf images. Cut the pears and stem/leaf images out using the Perfectly Pears Dies.

Using the Perfectly Pears Dies, cut 4 of the long leaf dies from a panel of Old Olive, and the flower images from a panel of Painterly Pears DSP. Adhere a panel of Painterly Pears DSP to the front of the card base. Adhere the long leaf die cuts to the front panel with Glue Dots. Adhere the die cut pears over the leaves with Glue Dots and Stampin’ Dimensionals. Adhere the flowers under the pears with Glue Dots. Add a few Low-Profile Sparkle Dots to the card front.
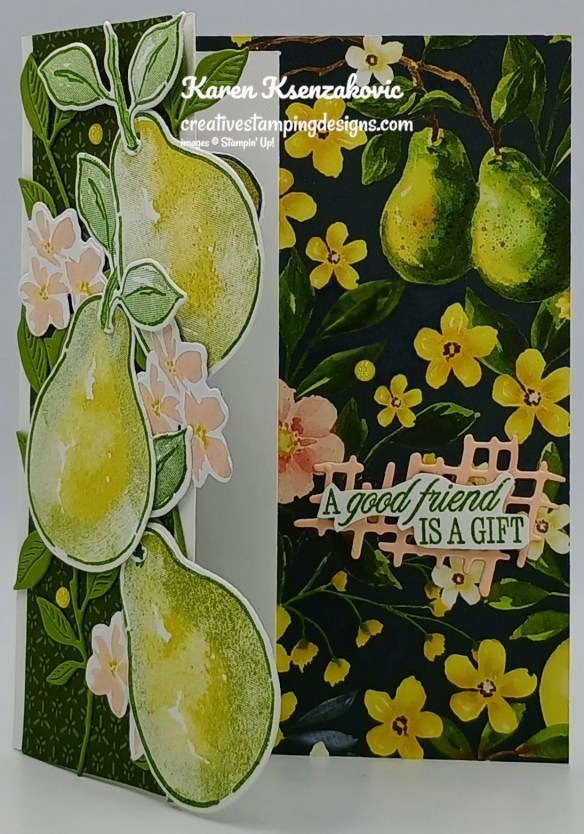
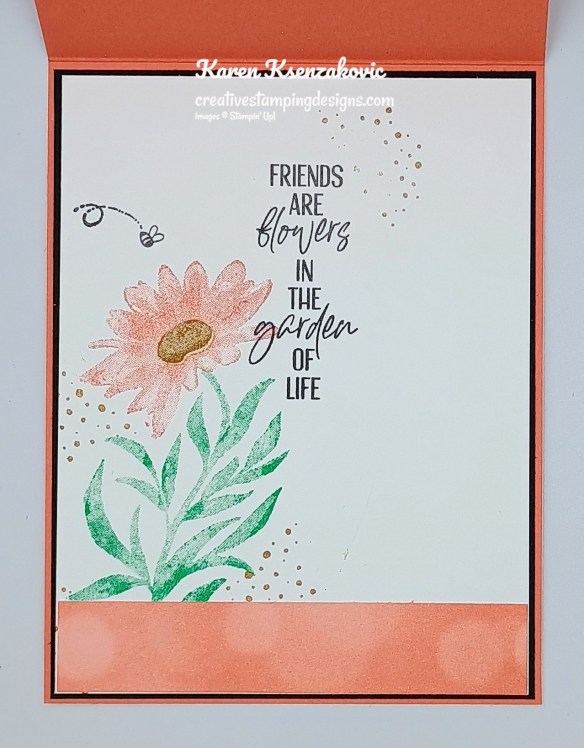
Stamp the sentiment from the Perfectly Pears stamp set in Old Olive Ink on the panel of Basic White. Fussy cut the sentiment with Paper Snips. Using the Perfectly Pears Dies cut a panel of Petal Pink using the lattice die.

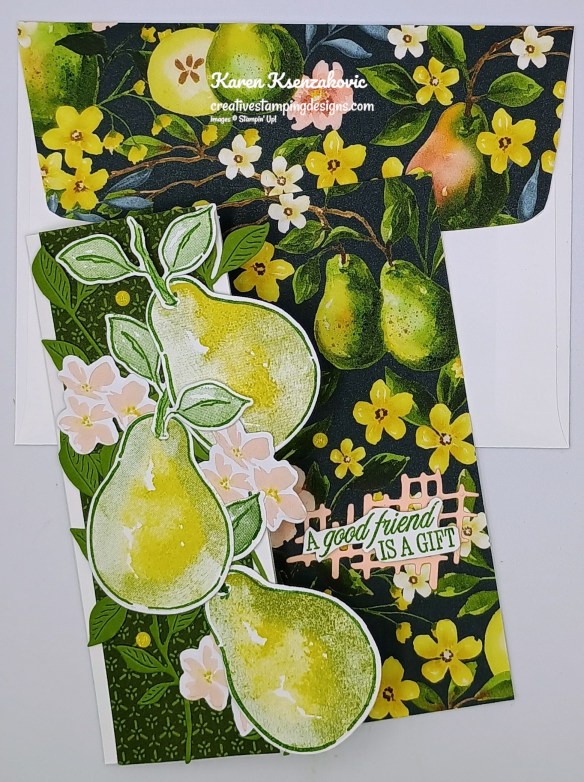
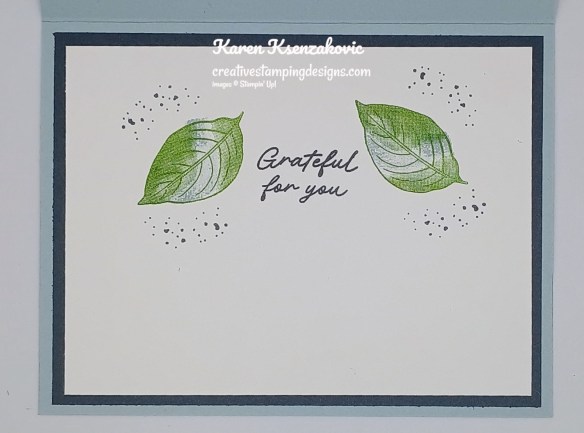
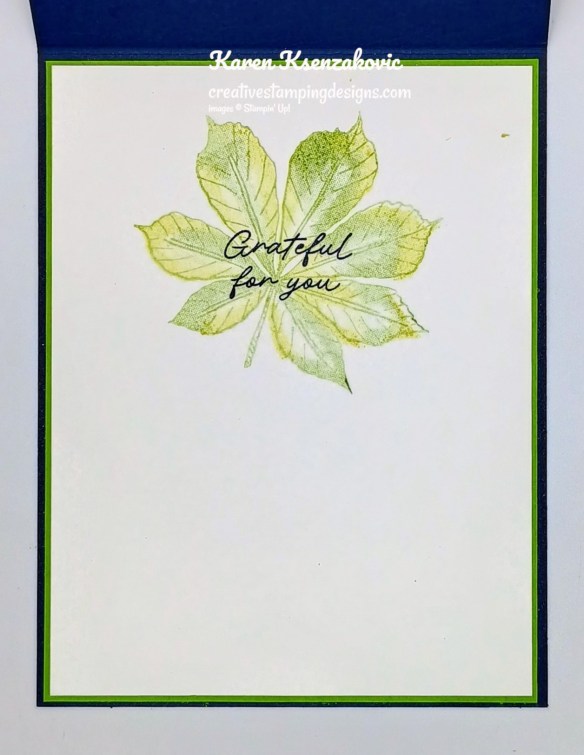
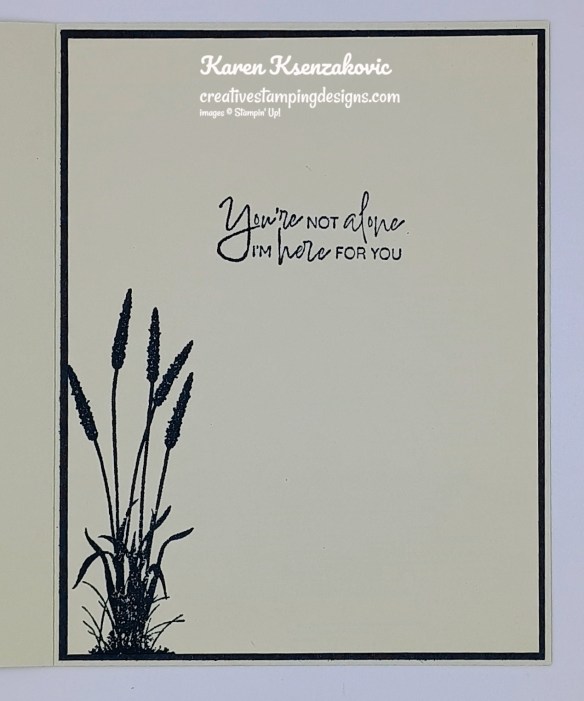
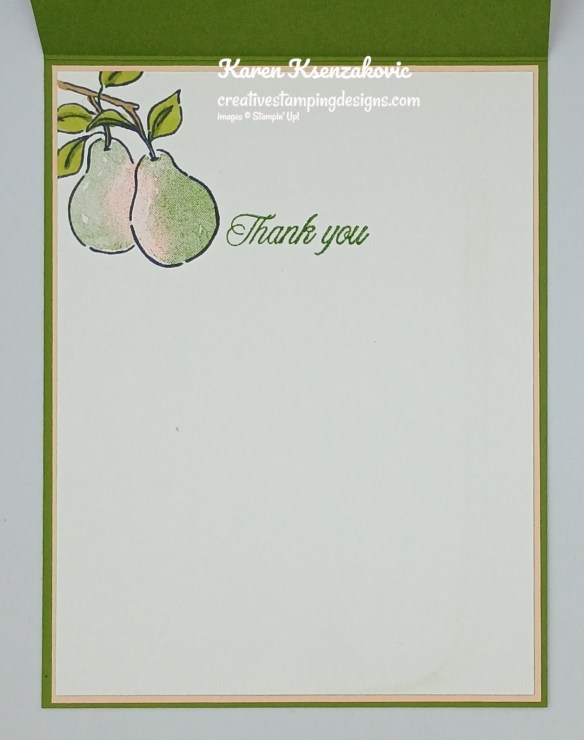
Adhere a small panel of Painterly Pears DSP to the left side of the inside card base. Adhere a panel of Painterly Pears DSP to the back inside of the card base. Adhere the lattice die cut and the sentiment on top of it with Stampin’ Dimensionals. Stamp the small, outlined pear image from the Perfectly Pears stamp set in Old Olive Ink. Ink the small, solid pear image from the Perfectly Pears stamp set in Darling Duckling Ink and using the Sponge Dauber add Old Olive Ink around the edges. Stamp the image over the outlined pear image. Color the leaves using Old Olive Stampin’ Blends Markers. Adhere the Basic White panel to the inside of the card base, behind the front panel.

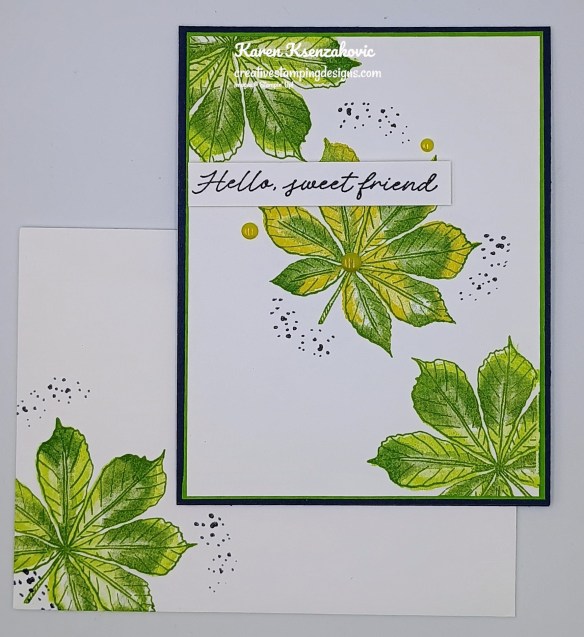
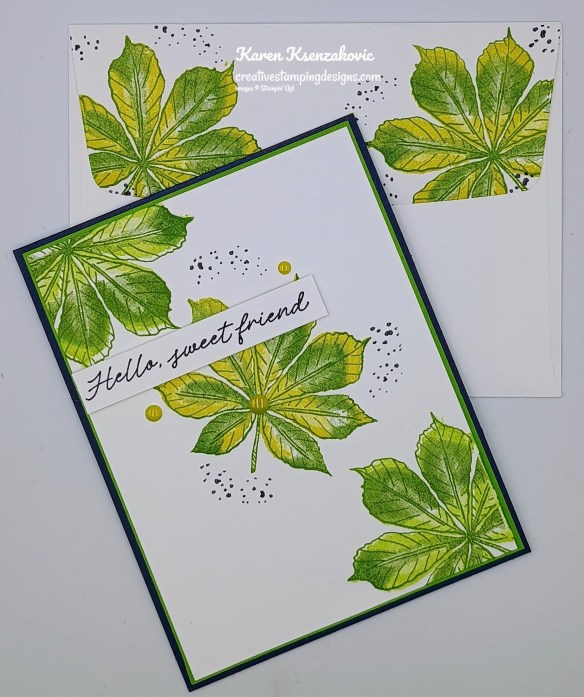
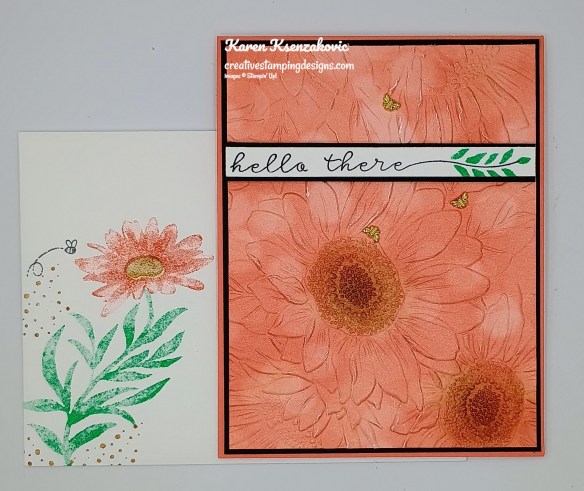
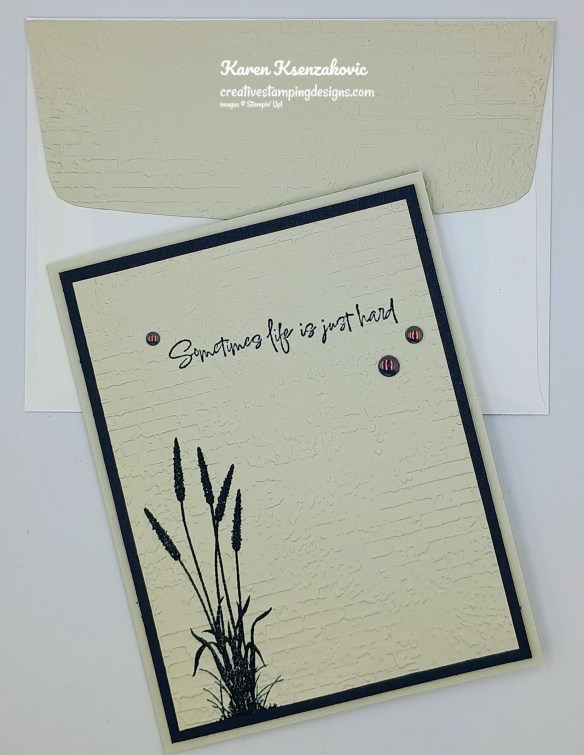
Finish the card by decorating a Basic White Medium Envelope. Stamp the small pear image from the Perfectly Pears stamp set on the envelope front the same as for the card. Adhere a panel of Painterly Pears DSP to the envelope flap.
Thank you for stopping by my blog today. I hope you like the card and will give it a try. Happy Stamping!!
*********************************************************************************************************
If you need any stamping supplies, I’d love to be your Demonstrator. Just click HERE to go directly to my online store or drop me an email if you have any questions.
*********************************************************************************************************
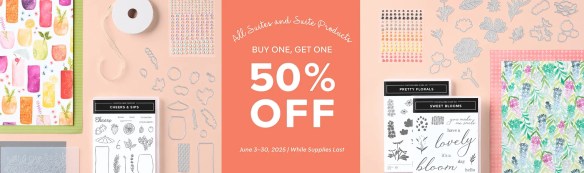
2025-2027 In-Color Products Sale starting August 5

Starting August 5, select products that feature the new 2025–2027 In Colors™ are 15% off! This is a great opportunity to purchase new In Color products at a discount, so grab products you love—like ink, two-tone cardstock, and Designer Series Paper—and get everything you need to create projects that showcase Stampin’ Up!’s amazing color coordination!
Promotion Details:
- Sales Period: August 5–31
- Ordering Deadline: August 31, 2025, at 11:59 p.m. (MT)
- Sale includes select inks, cardstock, Designer Series Paper, embellishments, and other products that include these new In Colors. Only products featured on the 2025–2027 In Colors page are included in this promotion.
- Products are available only while supplies last.
You can find the 2025-2027 In Color sale items that will be on sale beginning August 5 right here! Get your list ready and shop early for the best selection!
*********************************************************************************************************
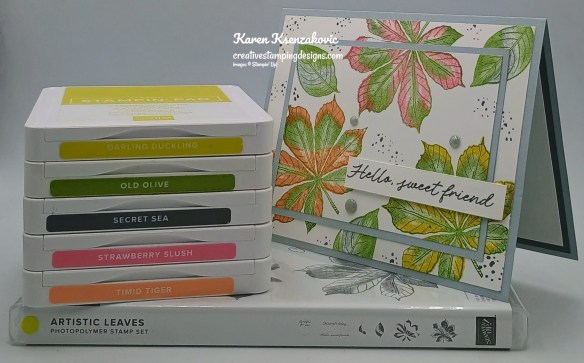
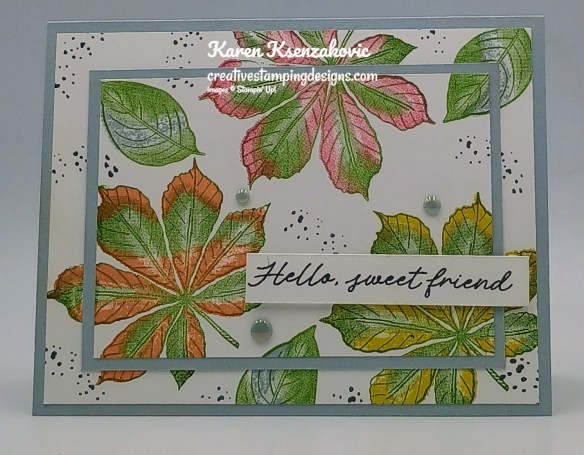
Registration Open for our August Online Technique Class
Tara Carpenter, Nicole Bloxom and I are teaming up to offer a fun Technique Online Zoom Class. We will be creating 6 different cards using 6 different techniques. This class is free with a $50 purchase from my Online Store. We will supply a list of supplies we are going to be using in the next couple days. We decided to open registration early so you can take advantage of the Free Shipping and my Double Rewards and also earn a free class.
The class requirements and What You Will Receive:
- Visit my Online Store and place a $50 or more order before tax and shipping.
- Once you have made the purchase, fill out this form and submit Click Here for Google Form
- Zoom class with complete step by step instructions to complete each card as we go.
- PDF with detailed directions and photos
- A Link to the recorded class after we are done so you can watch it again and make more cards.
Here is a list of just some of the items that Tara, Nicole and I will be using.
- Charming Day Bundle
- Elements of Text stamp set
- Artistic Leaves Stamp Set
- Two-Tone Cardstock
- Fluid 100 Watercolor Paper
- Iridescent Treat Bags
- Stampin’ Spritzer
- Wow Basics Embossing Powder
- Heat Tool
- Floral Charm DSP
- Adhesive Sheets
- Stylish Shapes Dies
A week before the class I will send you the complete PDF of the cards so you can cut all your cardstock and gather your supplies, so you are ready to go. We will NOT be cutting cardstock live. Everyone’s cards will be unique since you will pick which color cardstock and ink you want to use for each card.
The class will be held on Sunday August 24th from 1pm – 5pm Eastern Time via Zoom. This will allow everyone all over the United States to participate live!
I will email you the Zoom link to the class a few days before the event.
Deadline to sign up is Sunday August 17th at 5pm ET
*********************************************************************************************************
Sales Tax Holiday

Twelve states and Puerto Rico are having Back-to-School Sales Tax Holidays this year and some Stampin’ Up! items qualify for the tax break in those states!
The states with upcoming tax holidays are: Alabama, Arkansas, Florida, Massachusetts, Missouri, New Mexico, Ohio, South Carolina, Tennessee, Texas, Virginia and West Virginia. So if you live in one of those states or Puerto Rico, take a second to download the spreadsheet below and mark your calendar!
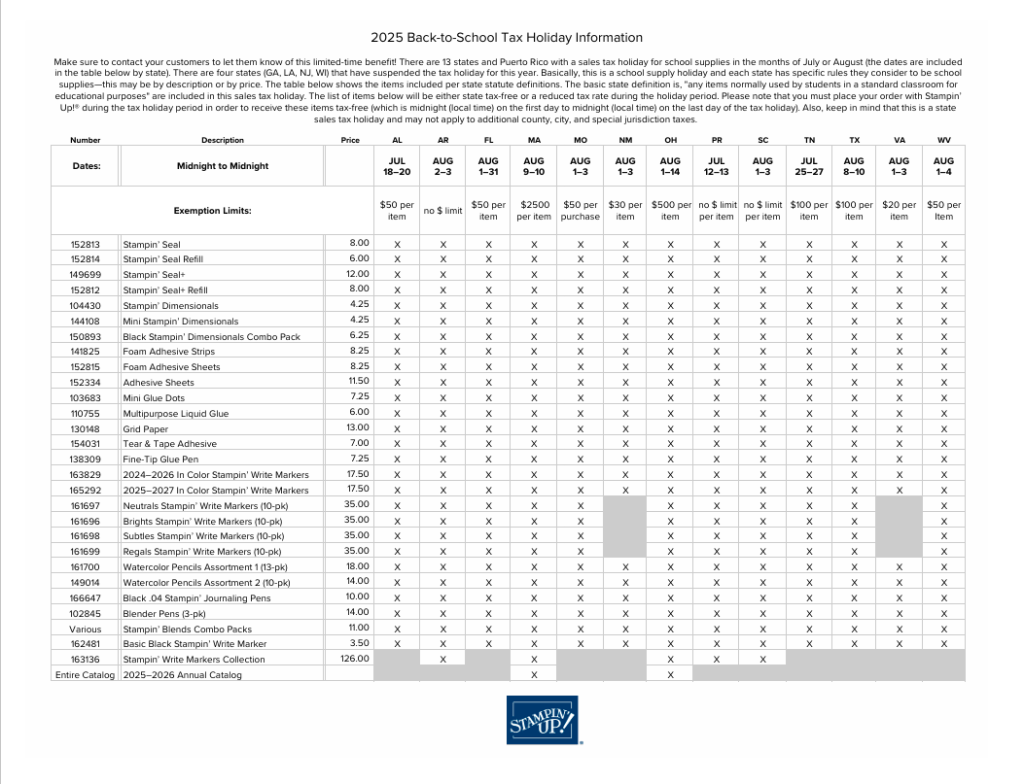
Please note that you must place your order with Stampin’ Up! during the tax holiday period in your state in order to receive these items tax-free (which is midnight on the first day to midnight on the last day of the tax holiday). Also, keep in mind that this is a state sales tax holiday; the state statute may not apply to county, city, and special jurisdiction taxes.
For those wondering about Georgia, Illinois, Louisiana, New Jersey, and Wisconsin, those states have suspended the sales tax holiday this year.
*********************************************************************************************************
Card stock cuts for this project:
- Basic White Cardstock 4 1/4″ x 5 1/2″(artwork & sentiment), 1 7/8″ x 5 1/4″(inner liner)
- Basic White Thick Cardstock 5 1/2″ x 8 1/2″(card base scored & folded at 2 1/8″ & 4 1/4″)
- Old Olive Cardstock 4 1/2″ x 5″(die cuts)
- Petal Pink Cardstock 1 1/2″ x 2 1/2″(die cut)
- Painterly Pears Designer Series Paper (2) – 1 3/4″ x 5 1/2″(card base panels), 4 1/4″ x 5 1/2″(inner panel), 2 1/4″ x 6″(envelope)
*********************************************************************************************************
Product List
![Perfectly Pears Bundle (English) [ 166154 ]](https://assets1.tamsnetwork.com/images/EC042017NF/166154s.jpg "Perfectly Pears Bundle (English) [ 166154 ]")
![Perfectly Pears Photopolymer Stamp Set (English) [ 166147 ]](https://assets1.tamsnetwork.com/images/EC042017NF/166147s.jpg "Perfectly Pears Photopolymer Stamp Set (English) [ 166147 ]")
![Perfectly Pears Dies [ 166153 ]](https://assets1.tamsnetwork.com/images/EC042017NF/166153s.jpg "Perfectly Pears Dies [ 166153 ]")
![Basic White 8 1/2" X 11" Cardstock [ 166780 ]](https://assets1.tamsnetwork.com/images/EC042017NF/166780s.jpg "Basic White 8 1/2\" X 11\" Cardstock [ 166780 ]")
![Basic White 8 1/2" X 11" Thick Cardstock [ 159229 ]](https://assets1.tamsnetwork.com/images/EC042017NF/159229s.jpg "Basic White 8 1/2\" X 11\" Thick Cardstock [ 159229 ]")
![Old Olive 8-1/2" X 11" Cardstock [ 100702 ]](https://assets1.tamsnetwork.com/images/EC042017NF/100702s.jpg "Old Olive 8-1/2\" X 11\" Cardstock [ 100702 ]")
![Petal Pink 8-1/2" X 11" Cardstock [ 146985 ]](https://assets1.tamsnetwork.com/images/EC042017NF/146985s.jpg "Petal Pink 8-1/2\" X 11\" Cardstock [ 146985 ]")
![Painterly Pears 12" X 12" (30.5 X 30.5 Cm) Designer Series Paper [ 166146 ]](https://assets1.tamsnetwork.com/images/EC042017NF/166146s.jpg "Painterly Pears 12\" X 12\" (30.5 X 30.5 Cm) Designer Series Paper [ 166146 ]")
![Darling Duckling Classic Stampin' Pad [ 165277 ]](https://assets1.tamsnetwork.com/images/EC042017NF/165277s.jpg "Darling Duckling Classic Stampin' Pad [ 165277 ]")
![Old Olive Classic Stampin' Pad [ 147090 ]](https://assets1.tamsnetwork.com/images/EC042017NF/147090s.jpg "Old Olive Classic Stampin' Pad [ 147090 ]")
![Sponge Daubers [ 133773 ]](https://assets1.tamsnetwork.com/images/EC042017NF/133773s.jpg "Sponge Daubers [ 133773 ]")
![Old Olive Stampin' Blends Combo Pack [ 154892 ]](https://assets1.tamsnetwork.com/images/EC042017NF/154892s.jpg "Old Olive Stampin' Blends Combo Pack [ 154892 ]")
![Low Profile Sparkle Dots [ 166157 ]](https://assets1.tamsnetwork.com/images/EC042017NF/166157s.jpg "Low Profile Sparkle Dots [ 166157 ]")
![Basic White Medium Envelopes [ 159236 ]](https://assets1.tamsnetwork.com/images/EC042017NF/159236s.jpg "Basic White Medium Envelopes [ 159236 ]")


![Take Your Pick [ 144107 ]](https://assets1.tamsnetwork.com/images/EC042017NF/144107s.jpg "Take Your Pick [ 144107 ]")


![Artistic Leaves Photopolymer Stamp Set (English) [ 166162 ]](https://assets1.tamsnetwork.com/images/EC042017NF/166162s.jpg "Artistic Leaves Photopolymer Stamp Set (English) [ 166162 ]")
![Cloud Cover 8 1/2" X 11" Cardstock [ 165621 ]](https://assets1.tamsnetwork.com/images/EC042017NF/165621s.jpg "Cloud Cover 8 1/2\" X 11\" Cardstock [ 165621 ]")
![Secret Sea 8 1/2" X 11" Cardstock [ 165624 ]](https://assets1.tamsnetwork.com/images/EC042017NF/165624s.jpg "Secret Sea 8 1/2\" X 11\" Cardstock [ 165624 ]")
![Cloud Cover Classic Stampin' Ink Refill [ 165279 ]](https://assets1.tamsnetwork.com/images/EC042017NF/165279s.jpg "Cloud Cover Classic Stampin' Ink Refill [ 165279 ]")
![Secret Sea Classic Stampin' Pad [ 165285 ]](https://assets1.tamsnetwork.com/images/EC042017NF/165285s.jpg "Secret Sea Classic Stampin' Pad [ 165285 ]")
![Strawberry Slush Classic Stampin' Pad [ 165286 ]](https://assets1.tamsnetwork.com/images/EC042017NF/165286s.jpg "Strawberry Slush Classic Stampin' Pad [ 165286 ]")
![Timid Tiger Classic Stampin' Pad [ 165278 ]](https://assets1.tamsnetwork.com/images/EC042017NF/165278s.jpg "Timid Tiger Classic Stampin' Pad [ 165278 ]")
![2025–2027 In Color™ Flat Pearls [ 165192 ]](https://assets1.tamsnetwork.com/images/EC042017NF/165192s.jpg "2025–2027 In Color™ Flat Pearls [ 165192 ]")


![You Are Remarkable Photopolymer Stamp Set (English) [ 165445 ]](https://assets1.tamsnetwork.com/images/EC042017NF/165445s.jpg "You Are Remarkable Photopolymer Stamp Set (English) [ 165445 ]")
![Blooming Phrases Photopolymer Stamp Set (English) [ 165523 ]](https://assets1.tamsnetwork.com/images/EC042017NF/165523s.jpg "Blooming Phrases Photopolymer Stamp Set (English) [ 165523 ]")
![Crumb Cake 8-1/2" X 11" Cardstock [ 120953 ]](https://assets1.tamsnetwork.com/images/EC042017NF/120953s.jpg "Crumb Cake 8-1/2\" X 11\" Cardstock [ 120953 ]")
![Pool Party 8-1/2" X 11" Cardstock [ 122924 ]](https://assets1.tamsnetwork.com/images/EC042017NF/122924s.jpg "Pool Party 8-1/2\" X 11\" Cardstock [ 122924 ]")
![Pretty Peacock 8-1/2" X 11" Cardstock [ 150880 ]](https://assets1.tamsnetwork.com/images/EC042017NF/150880s.jpg "Pretty Peacock 8-1/2\" X 11\" Cardstock [ 150880 ]")
![Country Woods 12" X 12" (30.5 X 30.5 Cm) Designer Series Paper [ 163393 ]](https://assets1.tamsnetwork.com/images/EC042017NF/163393s.jpg "Country Woods 12\" X 12\" (30.5 X 30.5 Cm) Designer Series Paper [ 163393 ]")
![Basic Beige Classic Stampin Pad [ 163806 ]](https://assets1.tamsnetwork.com/images/EC042017NF/163806s.jpg "Basic Beige Classic Stampin Pad [ 163806 ]")
![Crumb Cake Classic Stampin' Pad [ 147116 ]](https://assets1.tamsnetwork.com/images/EC042017NF/147116s.jpg "Crumb Cake Classic Stampin' Pad [ 147116 ]")
![Pretty Peacock Classic Stampin’ Pad [ 150083 ]](https://assets1.tamsnetwork.com/images/EC042017NF/150083s.jpg "Pretty Peacock Classic Stampin’ Pad [ 150083 ]")
![Versamark Pad [ 102283 ]](https://assets1.tamsnetwork.com/images/EC042017NF/102283s.jpg "Versamark Pad [ 102283 ]")
![Basics Wow! Embossing Powder [ 165679 ]](https://assets1.tamsnetwork.com/images/EC042017NF/165679s.jpg "Basics Wow! Embossing Powder [ 165679 ]")
![Heat Tool (Us And Canada) [ 129053 ]](https://assets1.tamsnetwork.com/images/EC042017NF/129053s.jpg "Heat Tool (Us And Canada) [ 129053 ]")
![Stylish Shapes Dies [ 159183 ]](https://assets1.tamsnetwork.com/images/EC042017NF/159183s.jpg "Stylish Shapes Dies [ 159183 ]")
![Rhinestone Basic Jewels [ 144220 ]](https://assets1.tamsnetwork.com/images/EC042017NF/144220s.jpg "Rhinestone Basic Jewels [ 144220 ]")


![Rustic Centerpiece Cling Stamp Set [ 166186 ]](https://assets1.tamsnetwork.com/images/EC042017NF/166186s.jpg "Rustic Centerpiece Cling Stamp Set [ 166186 ]")
![Pattern Of Friendship Photopolymer Stamp Set (English) [ 165383 ]](https://assets1.tamsnetwork.com/images/EC042017NF/165383s.jpg "Pattern Of Friendship Photopolymer Stamp Set (English) [ 165383 ]")
![Gray Granite 8-1/2" X 11" Cardstock [ 146983 ]](https://assets1.tamsnetwork.com/images/EC042017NF/146983s.jpg "Gray Granite 8-1/2\" X 11\" Cardstock [ 146983 ]")
![Gray Granite Classic Stampin' Pad [ 147118 ]](https://assets1.tamsnetwork.com/images/EC042017NF/147118s.jpg "Gray Granite Classic Stampin' Pad [ 147118 ]")
![Tuxedo Black Memento Ink Pad [ 132708 ]](https://assets1.tamsnetwork.com/images/EC042017NF/132708s.jpg "Tuxedo Black Memento Ink Pad [ 132708 ]")
![Blackberry Bliss Stampin' Blends Combo Pack [ 154877 ]](https://assets1.tamsnetwork.com/images/EC042017NF/154877s.jpg "Blackberry Bliss Stampin' Blends Combo Pack [ 154877 ]")
![Calypso Coral Stampin' Blends Combo Pack [ 154881 ]](https://assets1.tamsnetwork.com/images/EC042017NF/154881s.jpg "Calypso Coral Stampin' Blends Combo Pack [ 154881 ]")
![Crumb Cake Stampin' Blends Combo Pack [ 154882 ]](https://assets1.tamsnetwork.com/images/EC042017NF/154882s.jpg "Crumb Cake Stampin' Blends Combo Pack [ 154882 ]")
![Granny Apple Green Stampin' Blends Combo Pack [ 154885 ]](https://assets1.tamsnetwork.com/images/EC042017NF/154885s.jpg "Granny Apple Green Stampin' Blends Combo Pack [ 154885 ]")
![Lost Lagoon Stampin’ Blends Combo Pack [ 161680 ]](https://assets1.tamsnetwork.com/images/EC042017NF/161680s.jpg "Lost Lagoon Stampin’ Blends Combo Pack [ 161680 ]")
![Petal Pink Stampin' Blends Combo Pack [ 154893 ]](https://assets1.tamsnetwork.com/images/EC042017NF/154893s.jpg "Petal Pink Stampin' Blends Combo Pack [ 154893 ]")
![Pretty Peacock Stampin’ Blends Combo Pack [ 161676 ]](https://assets1.tamsnetwork.com/images/EC042017NF/161676s.jpg "Pretty Peacock Stampin’ Blends Combo Pack [ 161676 ]")
![Textured Notes Dies [ 165555 ]](https://assets1.tamsnetwork.com/images/EC042017NF/165555s.jpg "Textured Notes Dies [ 165555 ]")
![Charming Shimmer Faceted Dots [ 166139 ]](https://assets1.tamsnetwork.com/images/EC042017NF/166139s.jpg "Charming Shimmer Faceted Dots [ 166139 ]")
![Small Blending Brushes [ 160518 ]](https://assets1.tamsnetwork.com/images/EC042017NF/160518s.jpg "Small Blending Brushes [ 160518 ]")


![Mossy Meadow Classic Stampin' Pad [ 147111 ]](https://assets1.tamsnetwork.com/images/EC042017NF/147111s.jpg "Mossy Meadow Classic Stampin' Pad [ 147111 ]")
![Petal Pink Classic Stampin' Pad [ 147108 ]](https://assets1.tamsnetwork.com/images/EC042017NF/147108s.jpg "Petal Pink Classic Stampin' Pad [ 147108 ]")
![Mossy Meadow & Gold 1/4" (6.4 Mm) [ 166158 ]](https://assets1.tamsnetwork.com/images/EC042017NF/166158s.jpg "Mossy Meadow & Gold 1/4\" (6.4 Mm) [ 166158 ]")


![Granny Apple Green 8-1/2" X 11" Cardstock [ 146990 ]](https://assets1.tamsnetwork.com/images/EC042017NF/146990s.jpg "Granny Apple Green 8-1/2\" X 11\" Cardstock [ 146990 ]")
![Night Of Navy 8-1/2" X 11" Cardstock [ 100867 ]](https://assets1.tamsnetwork.com/images/EC042017NF/100867s.jpg "Night Of Navy 8-1/2\" X 11\" Cardstock [ 100867 ]")
![Granny Apple Green Stampin' Pad [ 147095 ]](https://assets1.tamsnetwork.com/images/EC042017NF/147095s.jpg "Granny Apple Green Stampin' Pad [ 147095 ]")
![Lemon Lime Twist Classic Stampin' Pad [ 147145 ]](https://assets1.tamsnetwork.com/images/EC042017NF/147145s.jpg "Lemon Lime Twist Classic Stampin' Pad [ 147145 ]")
![Night Of Navy Classic Stampin' Pad [ 147110 ]](https://assets1.tamsnetwork.com/images/EC042017NF/147110s.jpg "Night Of Navy Classic Stampin' Pad [ 147110 ]")


![Blackberry Bliss 8-1/2" X 11" Cardstock [ 133675 ]](https://assets1.tamsnetwork.com/images/EC042017NF/133675s.jpg "Blackberry Bliss 8-1/2\" X 11\" Cardstock [ 133675 ]")
![Bubble Bath 8 1/2" X 11" Cardstock [ 161718 ]](https://assets1.tamsnetwork.com/images/EC042017NF/161718s.jpg "Bubble Bath 8 1/2\" X 11\" Cardstock [ 161718 ]")
![Mossy Meadow 8-1/2" X 11" Cardstock [ 133676 ]](https://assets1.tamsnetwork.com/images/EC042017NF/133676s.jpg "Mossy Meadow 8-1/2\" X 11\" Cardstock [ 133676 ]")
![Celebratory Sips 12" X 12" (30.5 X 30.5 Cm) Designer Series Paper [ 165586 ]](https://assets1.tamsnetwork.com/images/EC042017NF/165586s.jpg "Celebratory Sips 12\" X 12\" (30.5 X 30.5 Cm) Designer Series Paper [ 165586 ]")
![Blackberry Bliss Classic Stampin' Pad [ 147092 ]](https://assets1.tamsnetwork.com/images/EC042017NF/147092s.jpg "Blackberry Bliss Classic Stampin' Pad [ 147092 ]")
![Modern Oval Punch [ 162234 ]](https://assets1.tamsnetwork.com/images/EC042017NF/162234s.jpg "Modern Oval Punch [ 162234 ]")
![Beautiful Motifs Dies [ 165205 ]](https://assets1.tamsnetwork.com/images/EC042017NF/165205s.jpg "Beautiful Motifs Dies [ 165205 ]")
![Rainbow Adhesive Backed Dots [ 162758 ]](https://assets1.tamsnetwork.com/images/EC042017NF/162758s.jpg "Rainbow Adhesive Backed Dots [ 162758 ]")


![Basic Black 8-1/2" X 11" Cardstock [ 121045 ]](https://assets1.tamsnetwork.com/images/EC042017NF/121045s.jpg "Basic Black 8-1/2\" X 11\" Cardstock [ 121045 ]")
![Calypso Coral 8-1/2" X 11" Cardstock [ 122925 ]](https://assets1.tamsnetwork.com/images/EC042017NF/122925s.jpg "Calypso Coral 8-1/2\" X 11\" Cardstock [ 122925 ]")
![Beautiful Bokeh 6" X 6" (15.2 X 15.2 Cm) Designer Series Paper [ 164607 ]](https://assets1.tamsnetwork.com/images/EC042017NF/164607s.jpg "Beautiful Bokeh 6\" X 6\" (15.2 X 15.2 Cm) Designer Series Paper [ 164607 ]")
![Calypso Coral Classic Stampin' Pad [ 147101 ]](https://assets1.tamsnetwork.com/images/EC042017NF/147101s.jpg "Calypso Coral Classic Stampin' Pad [ 147101 ]")
![Pecan Pie Classic Stampin' Pad [ 161665 ]](https://assets1.tamsnetwork.com/images/EC042017NF/161665s.jpg "Pecan Pie Classic Stampin' Pad [ 161665 ]")
![Shy Shamrock Classic Stampin Pad [ 163808 ]](https://assets1.tamsnetwork.com/images/EC042017NF/163808s.jpg "Shy Shamrock Classic Stampin Pad [ 163808 ]")
![Tiny Bee Trinkets [ 164714 ]](https://assets1.tamsnetwork.com/images/EC042017NF/164714s.jpg "Tiny Bee Trinkets [ 164714 ]")

![Basic Beige 8 1/2" X 11" Cardstock [ 164511 ]](https://assets1.tamsnetwork.com/images/EC042017NF/164511s.jpg "Basic Beige 8 1/2\" X 11\" Cardstock [ 164511 ]")
![Exposed Brick 3 D Embossing Folder [ 161600 ]](https://assets1.tamsnetwork.com/images/EC042017NF/161600s.jpg "Exposed Brick 3 D Embossing Folder [ 161600 ]")


![Pecan Pie Stampin’ Blends Combo Pack [ 161674 ]](https://assets1.tamsnetwork.com/images/EC042017NF/161674s.jpg "Pecan Pie Stampin’ Blends Combo Pack [ 161674 ]")

