
Good Tuesday morning my stamping friends. How has everyone’s week started off? We woke up to a blanket of snow this morning. Sadly, it will be gone by this afternoon. As much as I love a good snowstorm that I am stuck in the house and all I can do is craft, my 2nd favorite kind of snow is what we woke up to. It snowed on the grass and trees, but not the sidewalk or street, so no shoveling. Tonight, is my monthly Stamp Camp Card Class, so I’ll be prepping this morning and getting everything ready for the ladies.
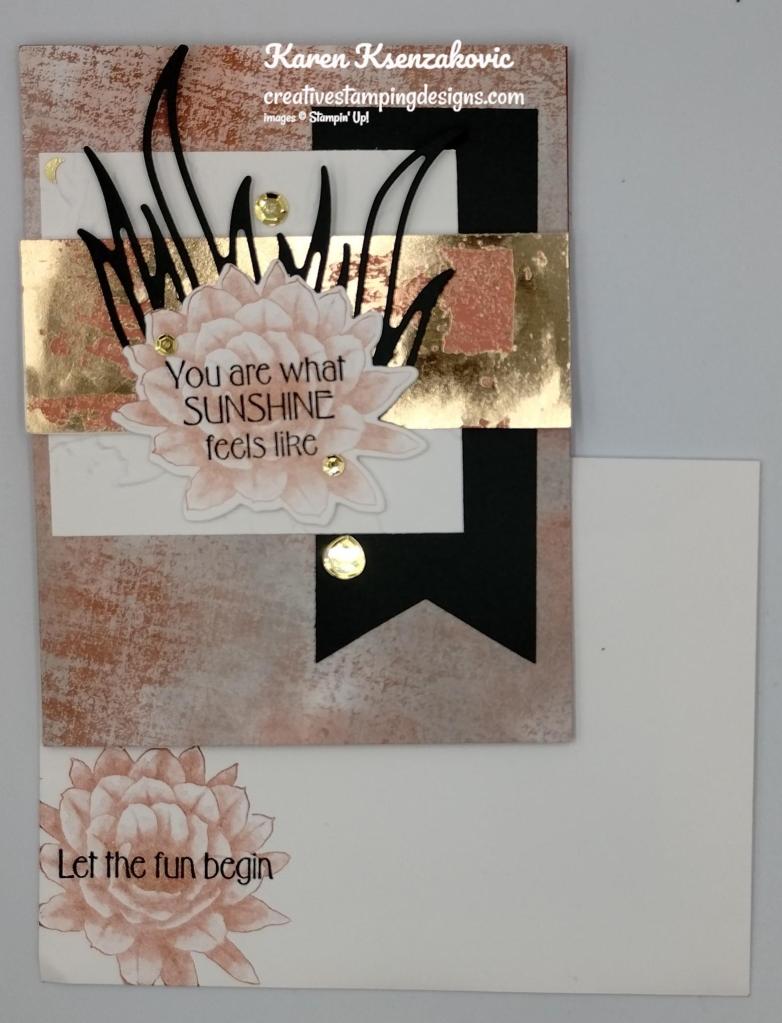
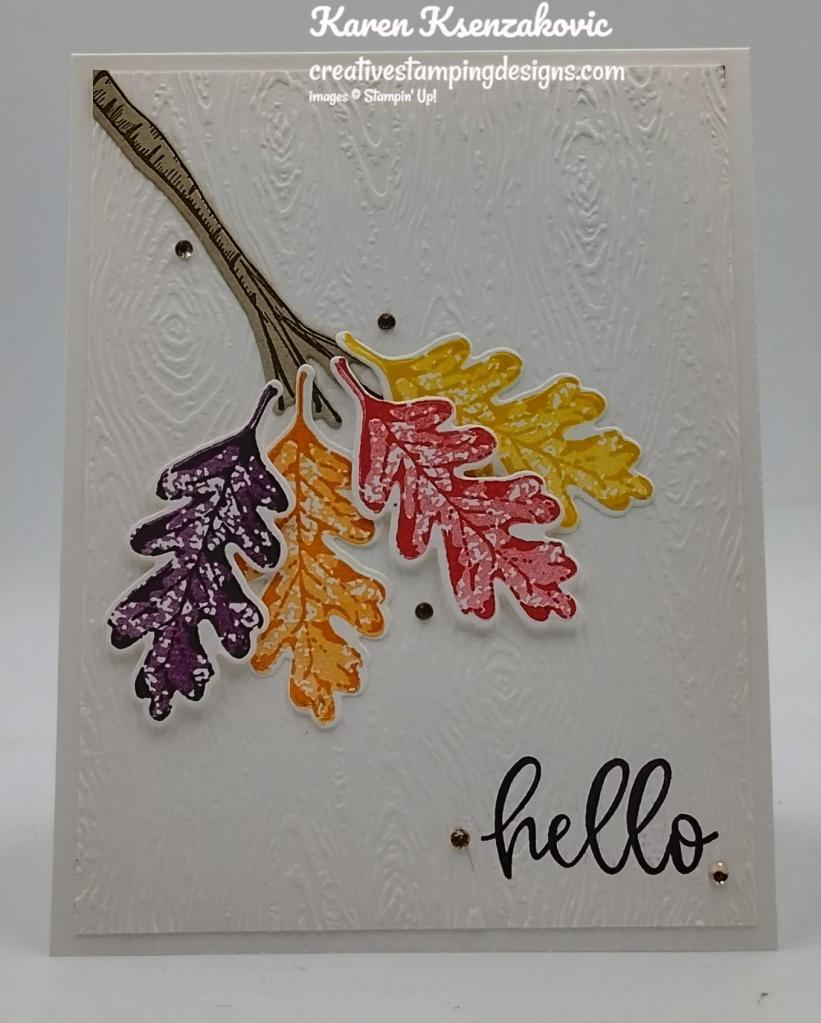
Today’s card is one that could be used for anything. I made it with nothing specific in mind, which I love having on hand so I can add my own note inside. Here’s my card for today.
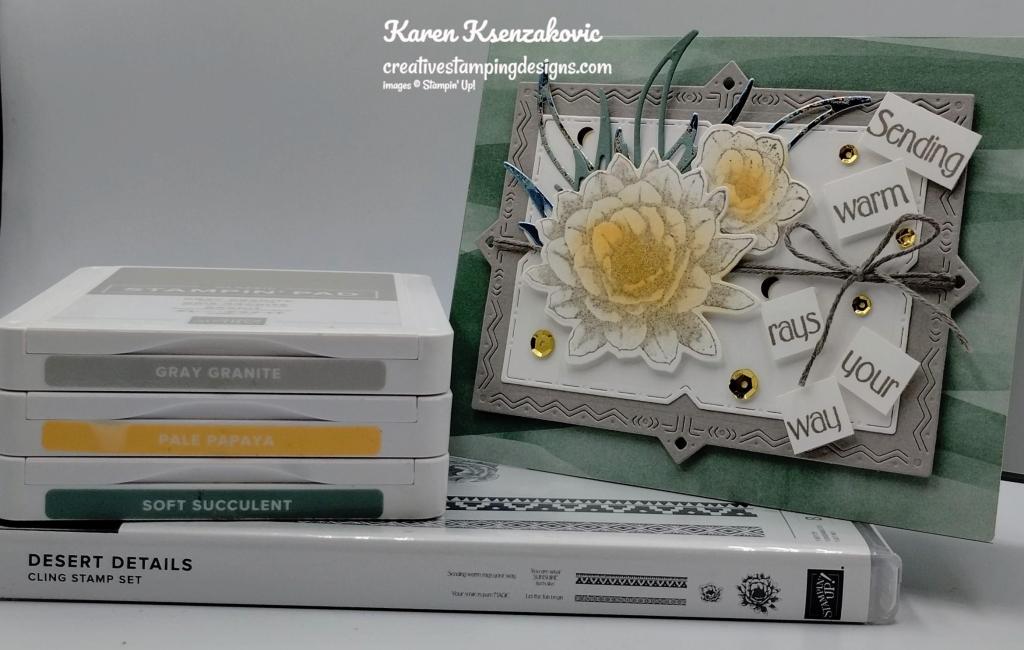
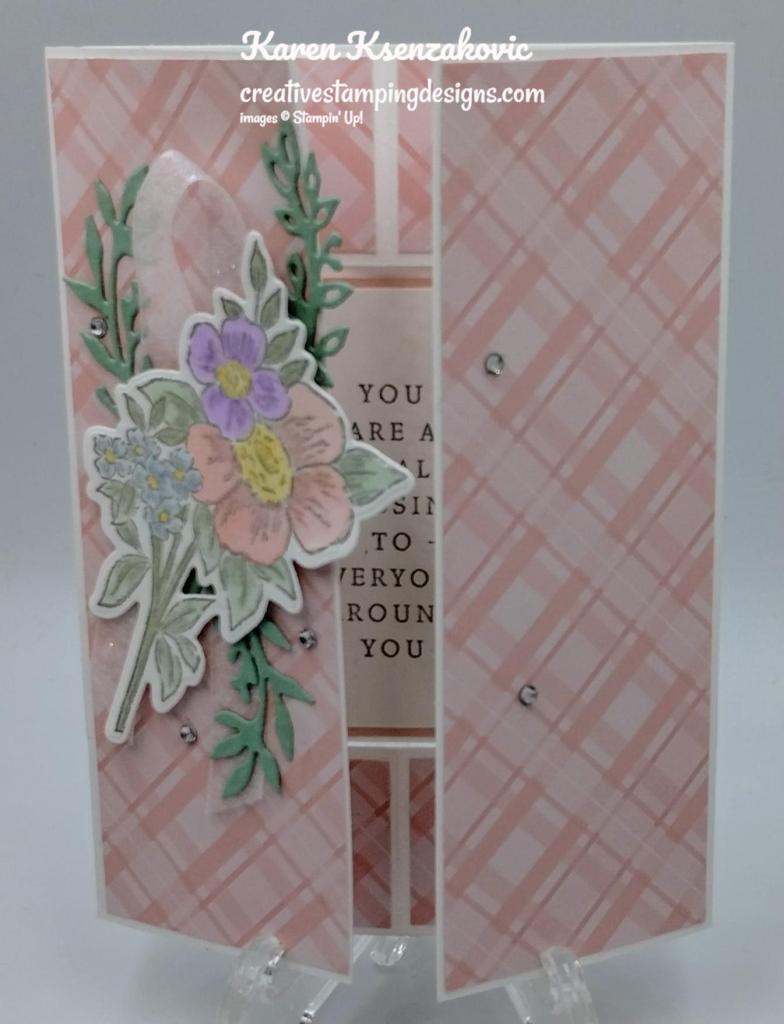
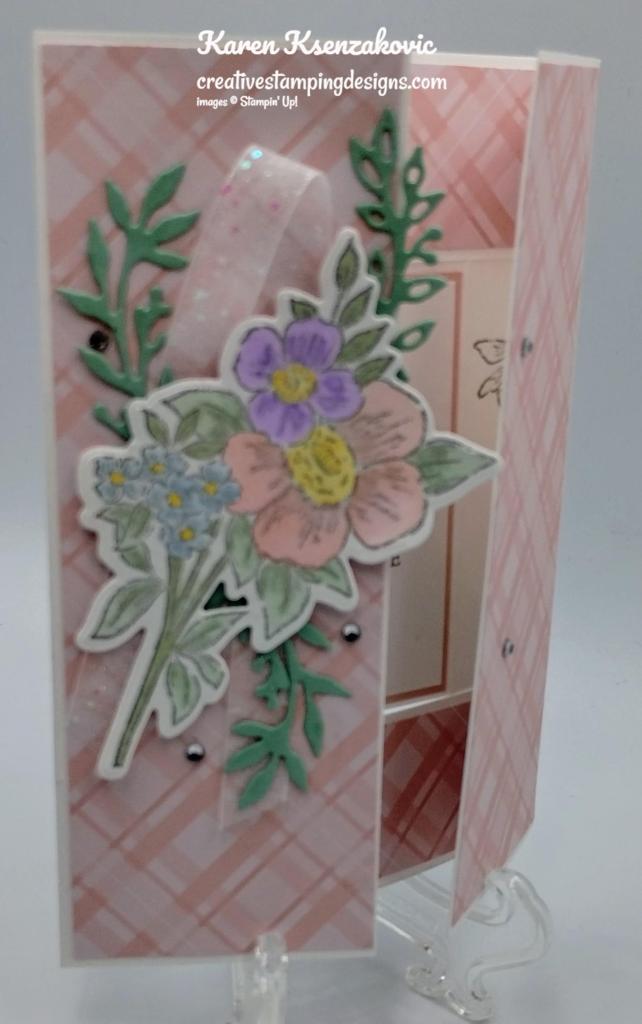
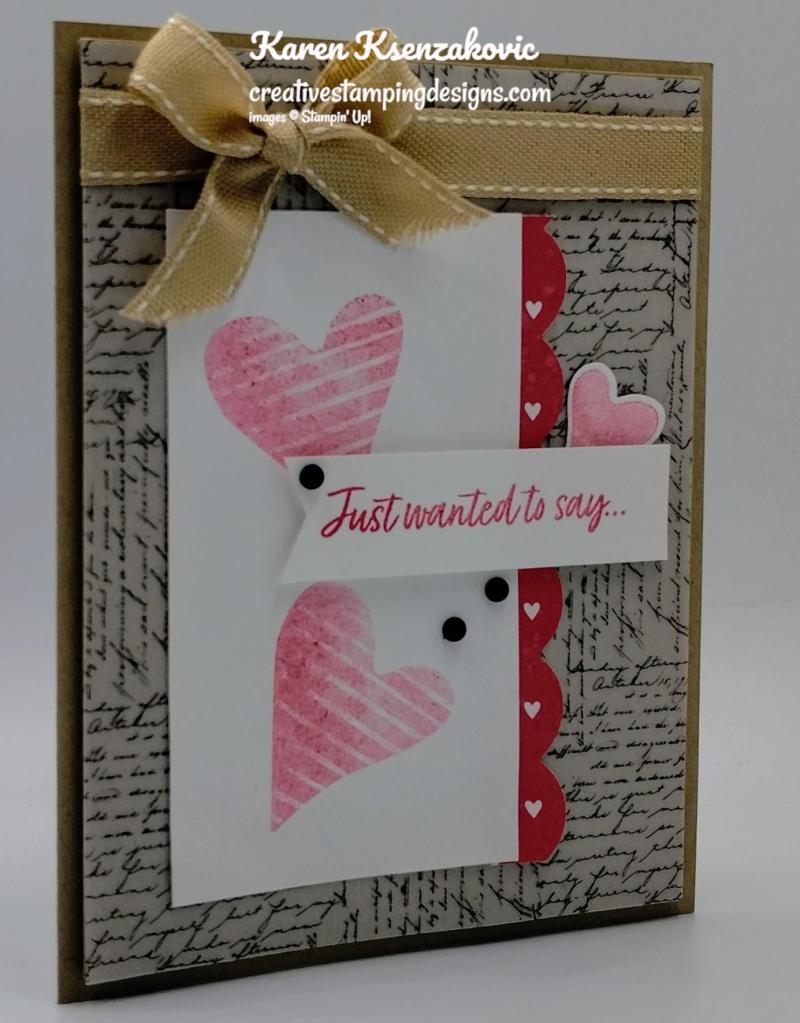
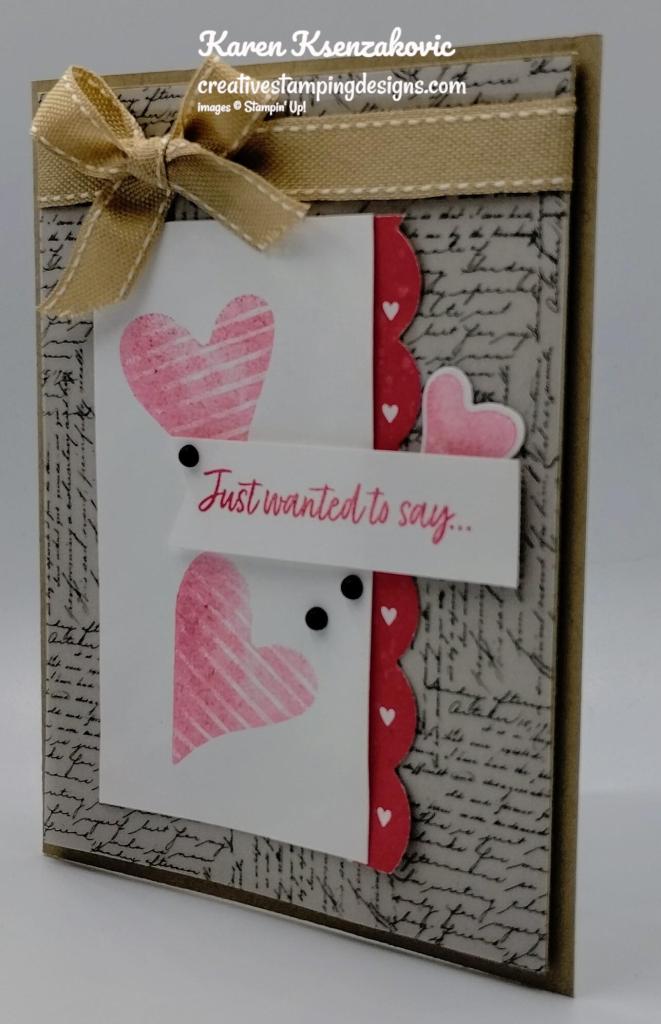
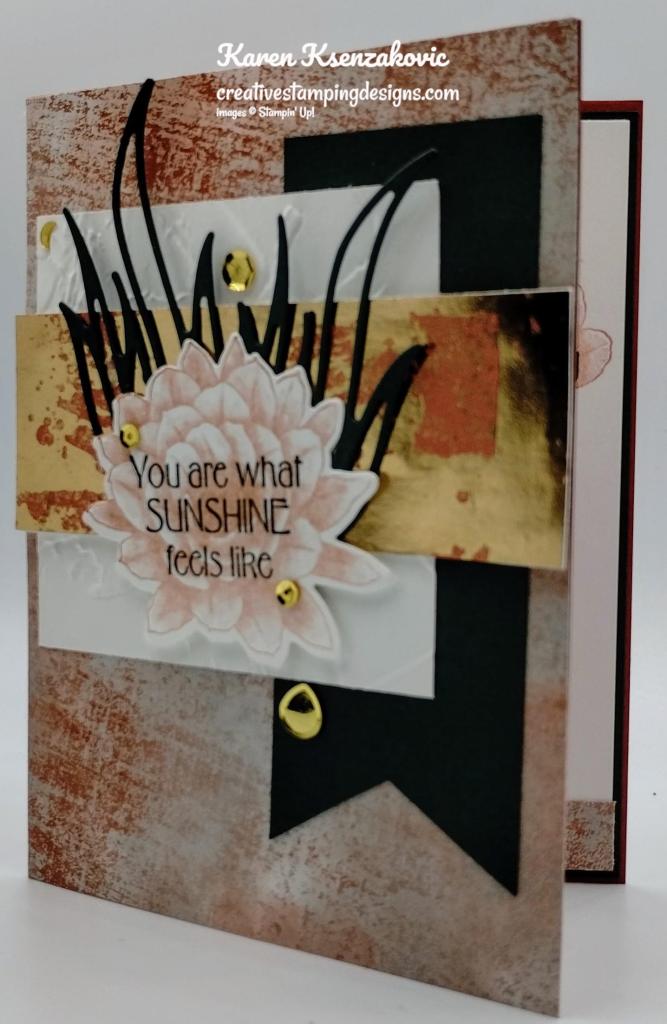
I used the Stampin’ Up! Desert Details Bundle along with the Delicate Desert Designer Series Paper and the Dry Brushed Metallic Specialty Paper for my card today.

I started by adhering a panel of Delicate Desert DSP to a Soft Succulent card base using Multipurpose Liquid Glue. Ustin the Desert Details Dies, I cut a panel of Gray Granite cardstock with the larger frame die and a panel of Basic White cardstock with the smaller frame die. I adhered the Basic Whtie to the Gray Granite using Stampin’ Seal. I threaded a piece of Gray Granite Bakers Twine from the Bakers Twine Essential Pack through the frame twice and tied a bow.

On a panel of Basic White cardstock, I stamped the 2 flower images from the Stampin’ Up! Desert Details Cling Stamp Set in Gray Granite Ink. I cut the images out with the Desert Details Dies. I brushed the inside of the flowers using the Small Blending Brush and Pale Papaya Ink. Using the aloe leaf die from the Desert Details Dies, I cut 1 from a panel of Soft Succulent cardstock and 2 from a panel of Dry Brushed Metallic Paper. I adhered the flowers to the layered panel using Stampin’ Dimensionals. I adhered the aloe die cut pieces under the flowers using Multipurpose Liquid Glue.

On a strip of Basic White cardstock, I stamped the sentiment from the Desert Details stamp set in Gray Granite Ink. I cut the words apart using my Paper Snips. I adhered the sentiment to the card front using Stampin’ Dimensionals. I adhered the layered panel to the card front using Stampin’ Dimensionals. I added Gold Faceted Adhesive-Backed Sequins to the card front.

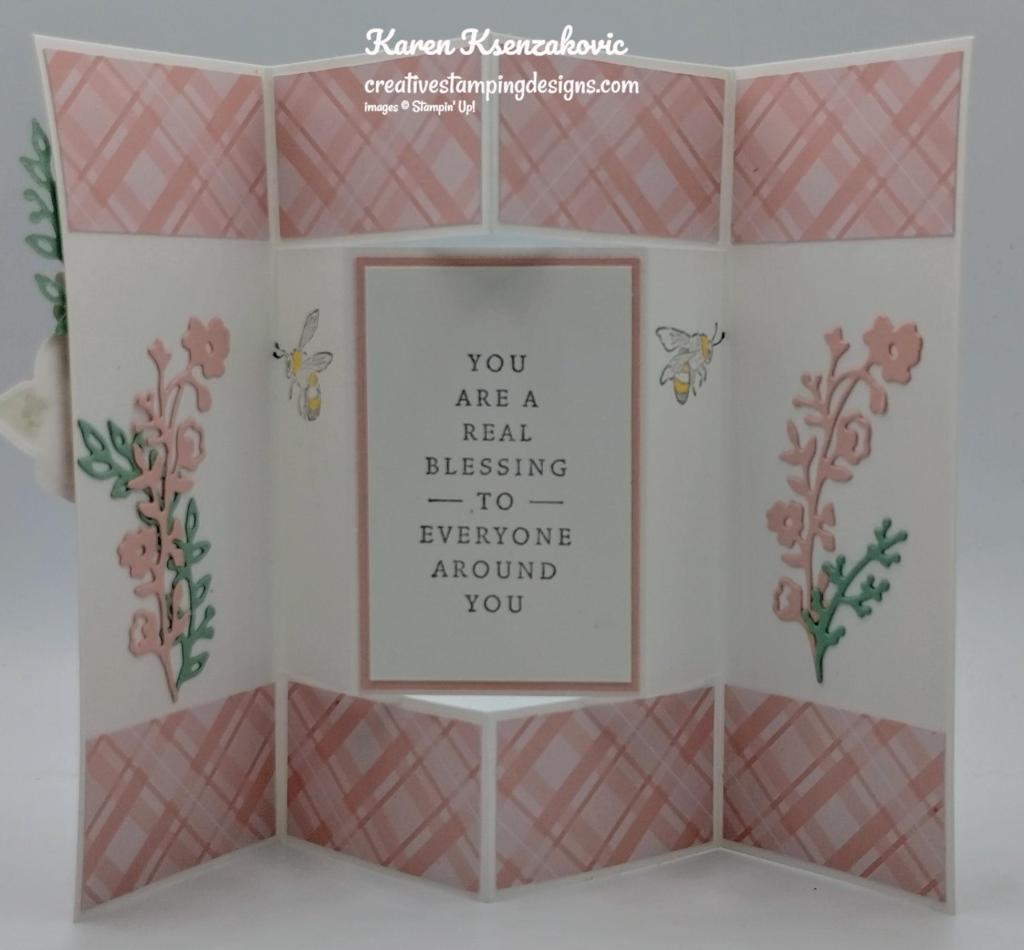
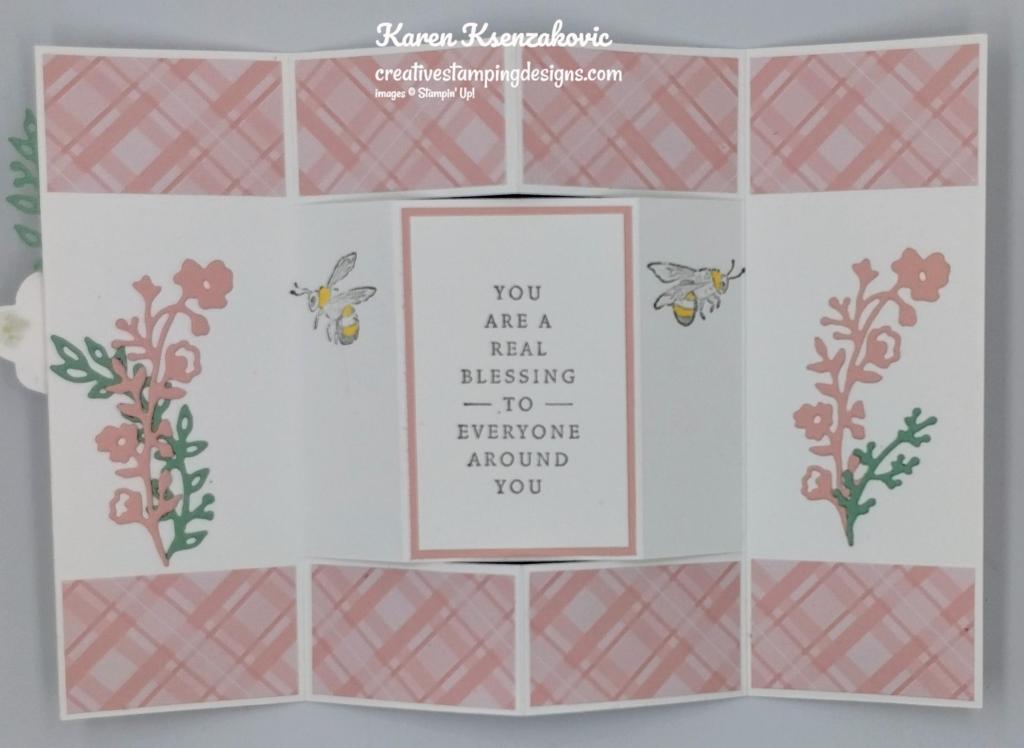
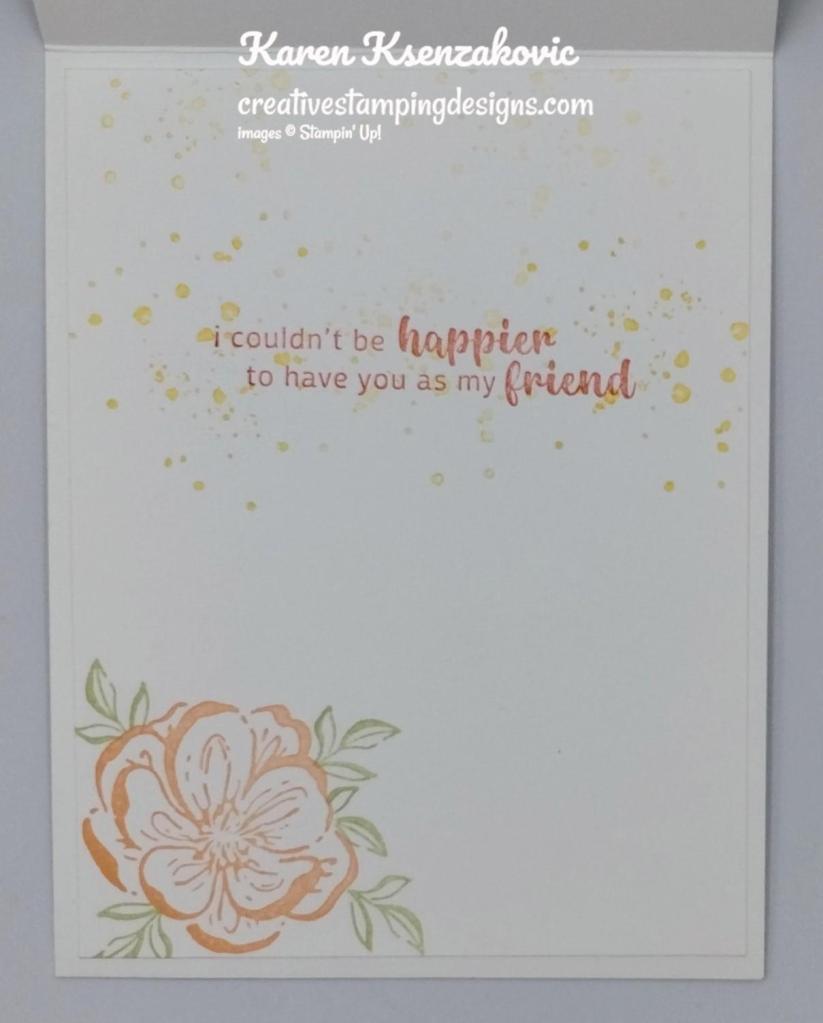
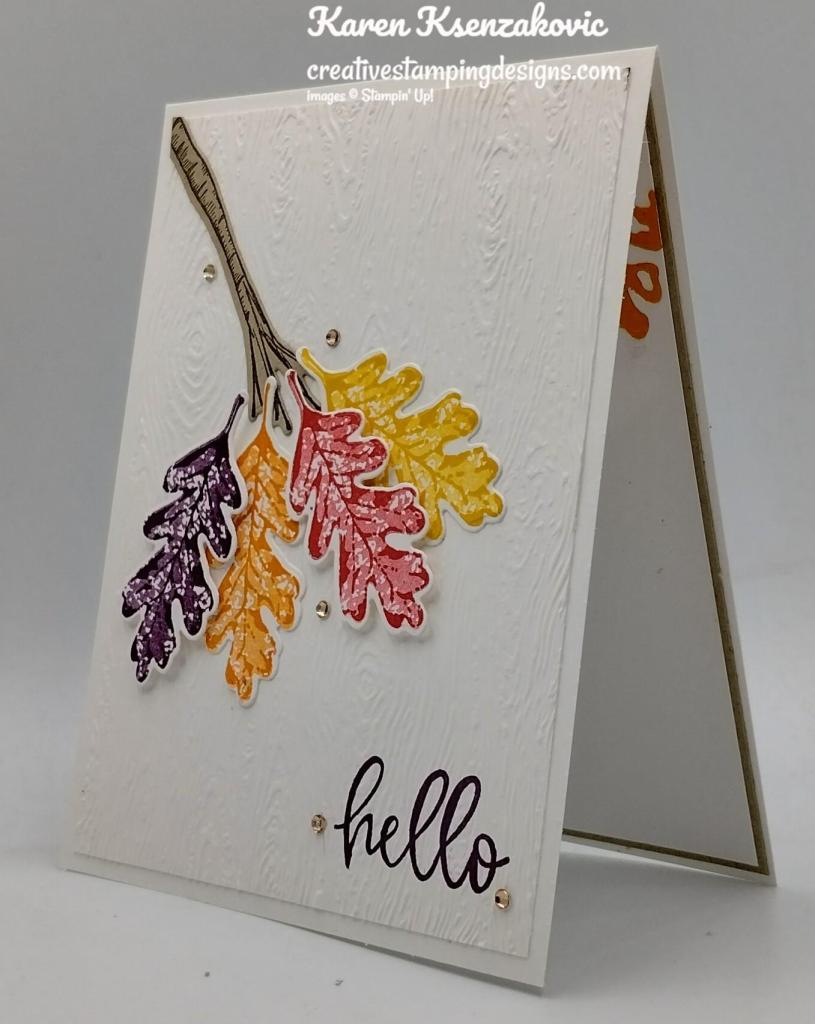
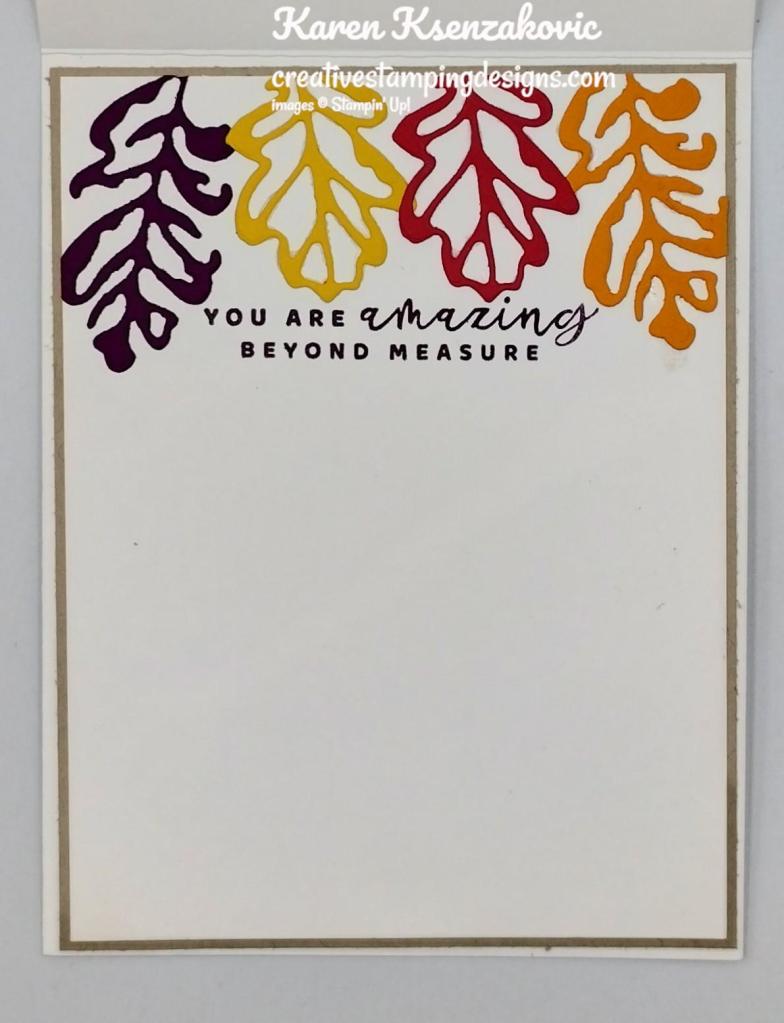
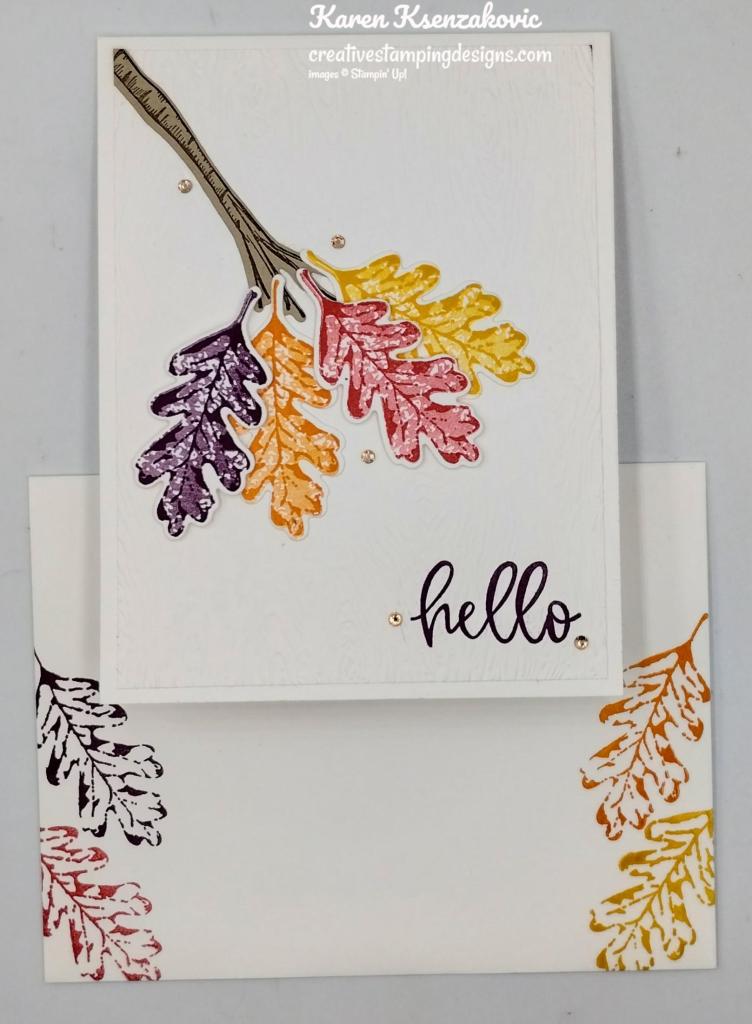
On the inside I stamped the sentiment from the Desert Details stamp set in Gray Granite Ink on a panel of Basic White cardstock. I stamped the large flower image from the Desert Details stamp set in Gray Granite Ink on the bottom of the panel. I brushed Pale Papaya Ink in the center using the Small Blending Brush. I adhered the Basic White panel to a Gray Granite mat then to the inside of the Soft Succulent card base.

To finish my card, I decorated a Basic White Medium Envelope. I stamped the large flower image from the Desert Details stamp set on the envelope front in Gray Granite Ink. I brushed color on the inside using my Small Blending Brush with Pale Papaya Ink. I adhered a panel of Delicate Desert DSP to the envelope flap.

Thank you for stopping by my blog today. I hope you like the card and will give it a try. Happy Stamping!!
*********************************************************************************************************
If you need any stamping supplies, I’d love to be your Demonstrator. Just click HERE to go directly to my online store or drop me an email if you have any questions.
MY CURRENT HOST CODE IS: 7KF3QB4G
Use this host code when placing an order with me. When you order $50 or greater you will receive a free gift from me! If your order is over $150, please do not use this code, but you’ll still get the free gift. The free gift is your choice of any 1 item valued up to $10.00 from the 2022-2023 Annual Catalog or the January-April 2023 Mini Catalog! Unfortunately, packs of cardstock are no longer an option for a free gift. Shipping has become too expensive to ship and it’s costing me as much to ship as the cardstock costs. For any orders $50 or more I will also send you my monthly class tutorials. Click HERE or go to my Customer Rewards for more details and to see what this month’s tutorials are.
Please remember to use my current Host Code and make sure that you can see my name on the final checkout page listed as your Demonstrator when you order so that you know that you’re ordering with me, and you’ll get my rewards!
Happy Stamping, Karen
*********************************************************************************************************
In response to changing policies at Stampin’ Up – I’m adjusting my Ordering Gift policy as well. I’m having to get a little more tough on the adding of Host codes when you place your order thru my Online Store.
Not to worry – you’re still going to get that $10 ordering gift for orders of $50 (before shipping & tax) or greater. And the gift is still any 1 SU! product up to that $10 value – which includes some of our fun Host Sets!
But – if you DO NOT use the Host code for your orders of less than $150 (this is the RETAIL total before Shipping & Handling), then you’ll have two options:
- You’ll need to call Stampin’ Up! (1-800-Stamp-Up) and ask them to add it for you. They’re very helpful and will get it done quickly! OR….
- If your order was over the $50 threshold but under $150, then…you’ll forfeit that $10 ordering gift and rewards – this is the Bummer Option – and I REALLY don’t want to do this, SO please remember to add my Current Host Code.
*********************************************************************************************************
Retirement List Updated

I’ve updated my retirement list. Did you miss out on a Sale-a-bration item that you really wanted. Visit my Retirement Sale List Here.
*********************************************************************************************************
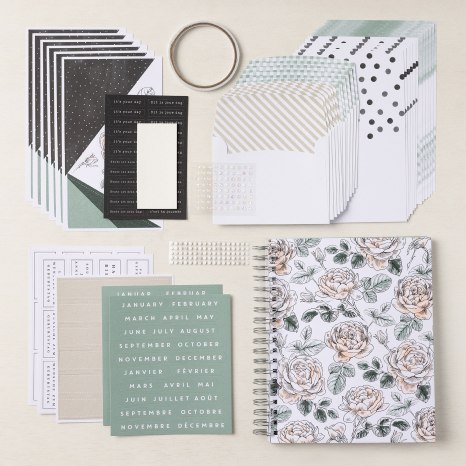
The Colorful Kaleidoscope Kit
Get ready for the latest addition to the Kits Collection by Stampin’ Up! The Colorful Kaleidoscope Kit is filled with geometric shapes and unique kaleidoscopic patterns. It’s time to give a card that no one will forget!
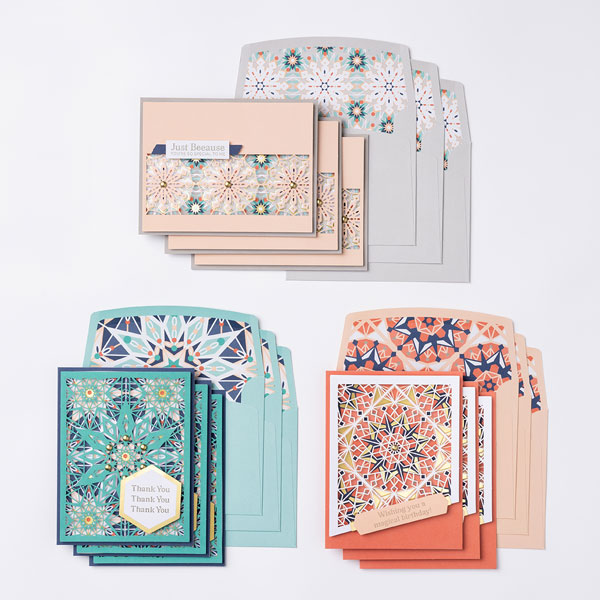
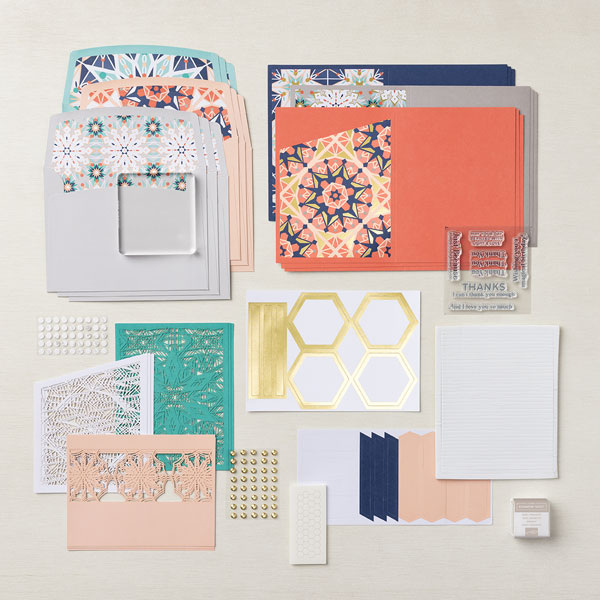
This kit includes:
- 9 full-size cards, 3 each of 3 designs, measuring 4-1/4″ x 5-1/2″ (10.8 x 14 cm) and 9 coordinating envelopes.
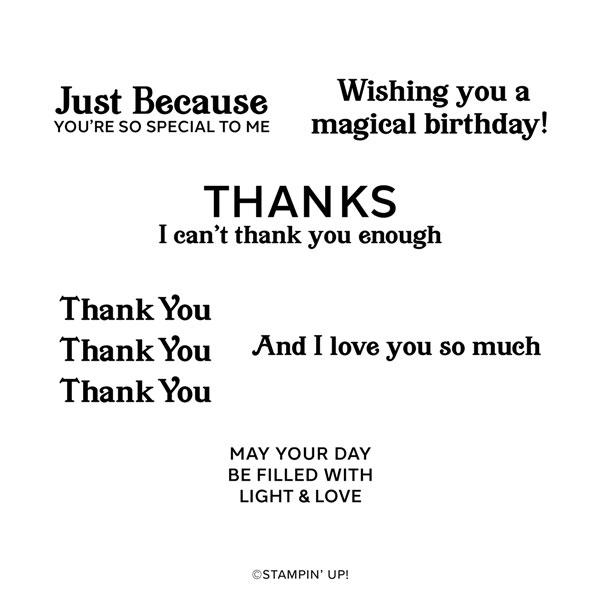
- One photopolymer stamp set with all-occasion sentiments that go beyond the basics.
- One Gray Granite Stampin’ Spot.
- 9 peek-through laser cuts that can easily be layered to create a kaleidoscopic effect.
- Precut die cuts that are lined with gold foil, perfect for all your stamped sentiments.
- Mini Stampin’ Dimensionals, Tear & Tape Adhesive, and Foam Adhesive Strips.
- Gold, pearlized embellishments.
- The coordinating colors are Bermuda Bay, Calypso Coral, Gray Granite, Night of Navy, and Petal Pink.
- Each project takes less than 60 minutes to complete.
Item #161804 $23.00 USD
*********************************************************************************************************
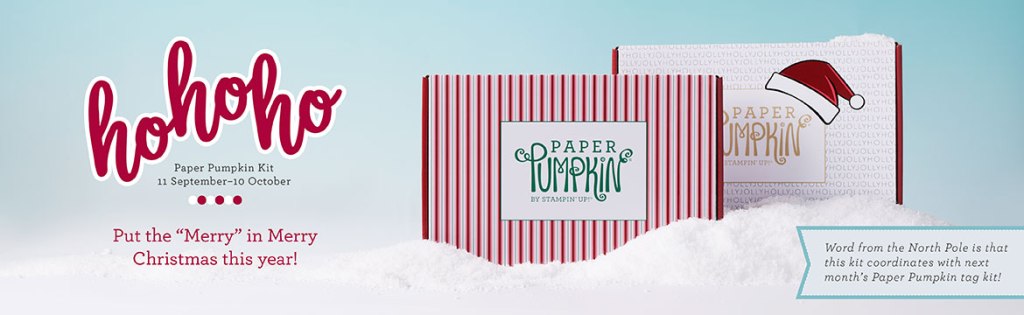
Ten Years Of Growth
Subscribe February 11 – March 10

It’s Paper Pumpkin’s 10-year anniversary and we want to celebrate how much we’ve grown! This month’s kit is all about happy greetings, organic and botanical designs digitally painted by our in-house artists, along with all-occasion sentiments to celebrate the happy moments in life and recognize the people around you who help you grow!
And as part of our anniversary celebration, the March Paper Pumpkin Kit includes a FREE GIFT featuring a plant and pot builder to make all your projects plant-astic!
This kit includes:
- All the supplies you need to create 9 cards: 3 each of 3 designs; and coordinating envelopes.
- An all-occasion stamp set to recognize the people in your life who help you grow with greetings and beautiful botanical images.
- 1 Polished Pink Classic Stampin’ Spot
- Paper pieces and embellishments with digitally-painted designs and images.
- Mini Stampin’ Dimensionals.
- 1 FREE additional stamp set, which includes a plant and pot builder to make plant-astic projects!
Completed card size: 5-1/2″ x 4-1/4″ (14 x 10.8 cm)
Coordinating Stampin’ Up! colors: Shaded Spruce, Garden Green, Coastal Cabana, Orchid Oasis, Fresh Freesia, Polished Pink, Crumb Cake
Subscribe to the March Paper Pumpkin Kit between 11 February 2023 and 10 March 2023 by clicking here!
Note: Supplies may be limited toward the end of the subscription period.
*********************************************************************************************************
Card stock cuts for this project:
- Basic White Cardstock 2 – 4″ X 3″ (card front panel & flowers), 4″ X 5 1/4″ (inner liner), 58″ X 3 1/2″ (sentiment)
- Gray Granite Cardstock 4″ X 5″ (card front panel), 4 1/8″ X 5 3/8″ (inner liner mat)
- Soft Succulent Cardstock 8 1/2″ X 5 1/2″ (card base scored & folded at 4 1/4″), 1 3/4″ X 2 3/4″ (die cut aloe)
- Delicate Desert Designer Series Paper 4 1/4″ X 5 1/2″ (card front), 2 1/4″x 6″ (envelope flap)
- Dry Brushed Metallic Specialty Paper 1 1/2″ X 6″ (die cut aloe)
*********************************************************************************************************
Product List
")
")


 Designer Series Paper")
 Specialty Designer Series Paper")


")
")

")


 Designer Series Paper")


 Glittered Organdy Ribbon")


")


")
")


 Designer Series Paper")
 Layering Designs")


")


 Designer Series Paper")
 Specialty Pack")


 Paper Pack")


")
")


")
 Designer Series Paper")


")
")

")
")

")


