Stampin’ Up Animal Expeditions Birthday

Good Friday morning my fellow stampers.  Well, we’re up to another weekend already and for some of you it’s another 4 day weekend.  I just love these short weeks.  Is anyone making some fun plans for the weekend or New Year’s yet?  2019 is just 4 days away and that means that in just 6 days the 2019 Occasions Catalog and Sale-A-Bration Catalog start.  I’m making up my wish list and I hope you are too.

For today’s card I pulled out some of the Animal Expeditions Designer Series Paper and let that do all the work for me.  I have a nephew’s birthday coming up and he loves alligators.  I don’t know about you, but I always have trouble with masculine cards and boys cards.  I’m always afraid I’m going to make them too girly looking.  Here’s what I came up with for an 8 year old boy. Take a look.
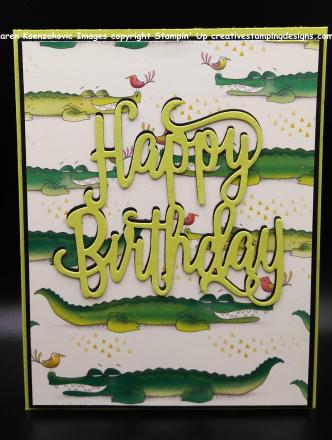
I started with a Basic Black card front and adhered a piece of the Animal Expeditions Designer Series Paper using Snail.  I then adhered it to a Lemon Lime Twist card base using Stampin’ Dimensionals.

Using my Big Shot and my Happy Birthday Thinlits Dies, I cut it out twice.  Once in Lemon Lime Twist cardstock and once in Basic Black cardstock.  I adhered the Lemon Lime Twist Happy Birthday to the Basic Black Happy Birthday using Multipurpose Liquid Glue.

I then adhered the Happy Birthday dies to the card front using Glue Dots.

On the inside Whisper White panel I stamped the sentiment from Postcard Pals stamp set in Shaded Spruce Ink in the center.  I adhered the Whisper White panel to a Shaded Spruce mat using Snail.  I then fussy cut some of the alligators from the Animal Expeditions DSP and adhered them to the Whisper White panel using Snail.  I adhered the matted panel to the Lemon Lime Twist card base using Multipurpose Liquid Glue.

To finish up my card I adhered a piece of the Animal Expeditions DSP to a Medium Whisper White Envelope.  There you go a super simple little boy’s birthday card and not too girly looking.

Thank you for stopping by my blog today.  I hope you liked my card and will give it a try. Happy Stamping!!

****************************************************************************************************

If you need any stamping supplies, I’d be very happy to be your Demonstrator.  Just click here to go directly to my online store or drop me an email if you have any questions.

MY CURRENT HOST CODE IS: MBWFWZCA

Happy Stamping, Karen!

****************************************************************************************************

Paper Pumpkin and Animal Expedition Go Wild for Valentine’s Day
January’s Paper Pumpkin Kit is a Valentine Kit called Be Mine. It combines everything you love about Paper Pumpkin-style treat packaging with adorable critter coordination in the popular Animal Expedition Kit!

About the Kit

January’s Paper Pumpkin kit is a Valentine kit coordinates with the Animal Expedition Suite. Here are a few more details:

  • Makes 24 adorable Valentine’s treat packages
  • Coordinating colors: Crumb Cake, Flirty Flamingo, Lemon Lime Twist, Melon Mambo, Petal Pink, and Pool Party

Subscribers must have an active subscription by January 10, 2019 to receive the Be Mine, Valentine kit.

Supplies are limited, so don’t wait—subscribe today!

In the event of supplies running out, Stampin’ Up! will end the subscription period early and stop taking new subscribers for January.

If you’re interested in subscribing to Paper Pumpkin yourself, you can either sign up for a subscription where you are billed monthly for your kit or you can purchase a prepaid subscription in my online store.  Just click here to go directly to my online store.  To see more information and sign up for the monthly subscription click here.

****************************************************************************************************

Card stock cuts for this project:

  • Basic Black Cardstock 4 1/8″ X 5 3/8″ (card front mat), Piece for Happy Birthday
  • Lemon Lime Twist Cardstock 8 1/2″ X 5 1/2″ (card base scored and folded at 4 1/4″), Piece for Happy Birthday
  • Shaded Spruce Cardstock 4 1/8″ X 5 3/8″ (inner liner mat)
  • Whisper White Cardstock 4″ X 5 1/4″ (inner liner)
  • Animal Expeditions Designer Series Paper 4″ X 5 1/4″ (card front)

****************************************************************************************************

Product List

Stampin’ Up Time For Tea for Fab Friday #153

Good Wednesday morning my fellow stampers.  Did you all have a nice Christmas?  Was Santa good to you?  Did anyone get some fun new stamping products?  Hope you all had an enjoyable day with your loved ones.

For today’s card I have a little sneak peek for you.  I played along with the Fab Friday sketch challenge #153.  Please be sure to stop by Fab Friday to play along and see what everyone has made.  Here is their sketch.

Here is what I came up with for the sketch.  Take a look.

I started with a Crumb Cake card base and using Snail I adhered a panel of the beautiful All My Love Designer Series Paper, which will be available January 3, 2019.  I adhered a smaller strip of the same DSP about 2/3 of the way down the card front.

On a small piece of Whisper White cardstock, I stamped the teacup image from the Stampin’ Up Time For Tea Photopolymer Stamp Set in Lovely Lipstick Ink.  Using my Lovely Lipstick Stampin’ Write Marker I colored part of the sentiment in and stamped it above and below the teacup.  I colored the teacup in using my Flirty Flamingo Stampin’ Blends Markers.  Using my Big Shot and my Stitched Shaped Framelits Dies, I cut out the teacup with my second largest stitched circle.  I adhered the artwork to a Pearlized Doilie using Multipurpose Liquid Glue.

Using my Big Shot, I cut a circle out from Balmy Blue cardstock using my Layering Circles Framelits Dies.  I adhered the Balmy Blue circle just under the Doilie.  I adhered the layered artwork to the card front using Stampin’ Dimensionals.

On the inside on a Whisper White panel I stamped the bottom section of the sentiment from the Time For Tea stamp set in Lovely Lipstick Ink.  I stamped the teacup in Flirty Flamingo Ink, stamping off twice, on top of the sentiment.  I adhered the Whisper White panel to a Balmy Blue mat using Snail then adhered it to the Crumb Cake card base using Multipurpose Liquid Glue.

To finish my card, I decorated a Medium Whisper White Envelope.  I stamped the teacup from the Time For Tea stamp set in Flirty Flamingo Ink on the front of the envelope.  I adhered a piece of the All My Love DSP on the envelope flap.

Thank you for stopping by my blog today.  I hope you liked my card and will give it a try.  Only 8 days till you can order from the new 2019 Occasions Catalog and earn FREE products from the Sale-A-Bration catalog.  Happy Stamping.

****************************************************************************************************

If you need any stamping supplies, I’d be very happy to be your Demonstrator.  Just click here to go directly to my online store or drop me an email if you have any questions.

MY CURRENT HOST CODE IS: MBWFWZCA

Happy Stamping, Karen!

****************************************************************************************************

Paper Pumpkin and Animal Expedition Go Wild for Valentine’s Day

January’s Paper Pumpkin Kit is a Valentine Kit called Be Mine. It combines everything you love about Paper Pumpkin-style treat packaging with adorable critter coordination in the popular Animal Expedition Kit!

About the Kit

January’s Paper Pumpkin kit is a Valentine kit coordinates with the Animal Expedition Suite. Here are a few more details:

  • Makes 24 adorable Valentine’s treat packages
  • Coordinating colors: Crumb Cake, Flirty Flamingo, Lemon Lime Twist, Melon Mambo, Petal Pink, and Pool Party

Subscribers must have an active subscription by January 10, 2019 to receive the Be Mine, Valentine kit.

Supplies are limited, so don’t wait—subscribe today!

In the event of supplies running out, Stampin’ Up! will end the subscription period early and stop taking new subscribers for January.

If you’re interested in subscribing to Paper Pumpkin yourself, you can either sign up for a subscription where you are billed monthly for your kit or you can purchase a prepaid subscription in my online store.  Just click here to go directly to my online store.  To see more information and sign up for the monthly subscription click here.

****************************************************************************************************

Card stock cuts for this project:

  • Crumb Cake Cardstock 4 1/4″ X 11″ (card base scored and folded at 5 1/2″)
  • Balmy Blue Cardstock 4 1/8″ X 5 3/8″ (inner liner mat), 3″ X 3″ (circle under doilie)
  • Whisper White Cardstock 4″ X 5 1/4″ (inner liner), 3″ X 3″ (artwork)
  • All My Love Designer Series Paper 4 1/8″ X 5 3/8″ (card front), 1′ X 3 1/2″ (strip on front)

****************************************************************************************************

Product List

Stampin’ Up Around The Corner Birthday Wishes For You

Good Thursday morning my fellow stampers. Well the week is just about over and only 5 days till Christmas.  I guess I should go get my shopping done and my Christmas cards in the mail.  Have you finished your shopping, baking and card making?

I’ve got a quick and easy, clean and simple card for you today.  I used the Around The Corner stamp set.  Take a look.

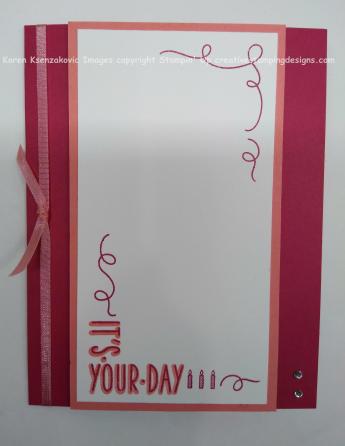
I started with a piece of Whisper White card stock and stamped the bottom corner with the It’s Your Day image from the Around The Corner stamp set in Lovely Lipstick Ink.  I stamped the shadow image in Flirty Flamingo Ink over the outlined image. I then stamped the ribbon image on the top right of the Whisper White cardstock in Lovely Lipstick Ink.  I adhered the Whisper White cardstock to a Flirty Flamingo mat using Snail.

I adhered the matted artwork to a Lovely Lipstick card base using Stampin’ Dimentionals.  I tied a piece of 1/8″ Flirty Flaming ribbon from the All My Love Ribbon Combo Pack available January 3, 2019, around the side and tied a knot.

I added a couple of the Clear Rhinestone Basic Jewels to the bottom right side.

On the inside on a Whisper White panel I stamped the Happy Birthday from the Birthday Wishes For You stamp set in Lovely Lipstick.  I then colored it in using my Flirty Flamingo Stampin’ Blends Markers.  I stamped the other image from the same stamp set in Lovely Lipstick Ink below the Happy Birthday.  I adhered the Whisper White panel to the Lovely Lipstick card base using Multipurpose Liquid Glue.

To finish my card I decorated a Medium Whisper White Envelope with the ribbon image from Around The Corner stamp set in Lovely Lipstick Ink.

Thank you for stopping by my blog today.  I hope you liked this super quick and easy card and will give it a try.  Sometimes you just need a very simple card.  Happy Stamping.

****************************************************************************************************

If you need any stamping supplies, I’d be very happy to be your Demonstrator.  Just click here to go directly to my online store or drop me an email if you have any questions.

MY CURRENT HOST CODE IS: MBWFWZCA

Happy Stamping, Karen!

****************************************************************************************************

Card stock cuts for this project:

  • Flirty Flamingo Cardstock 3″ X 5 1/2″ (artwork mat)
  • Lovely Lipstick Cardstock 5 1/2″ X 8 1/2″ (card base scored and folded at 4 1/4″)
  • Whisper White Cardstock 2 3/4″ X 5 1/4″ (artwork), 5 1/4″ X 4″ (inner liner)

****************************************************************************************************

Product List

Stampin’ Up Beautiful You for TGIF Challenge

Good Thursday morning my fellow stampers.  We’re almost done with another week and less than 2 weeks till Christmas.  Have you gotten your shopping done yet?  When you read this I will probably be in my kitchen starting my major baking weekend.  I spend 4 days baking all kinds of goodies.

For today’s card I used one of my favorite stamp sets from the Annual catalog, Beautiful You.  I played along with the TGIF Color Combo Challenge #189.  Please be sure to stop by TGIF to see all the beautiful projects and to play along.  Here is their challenge.  I really love these colors.

Here is what I came up with for this challenge.  Take a look.

I started with a Whisper White card front.  Using my Stamparatus, I stamped the dancing woman from Beautiful You stamp set toward the center bottom in Tuxedo Black Memento Ink.  I masked the image and again using my Stamparatus I stamped the Marbled background stamp in Soft Sea Foam Ink on the Whisper White panel.  I colored the woman in using my Balmy Blue (available January 3, 2019), Ivory and Mint Macaron Stampin’ Blends Markers.

On an angle on the top left I stamped Celebrate in Tuxedo Black Memento Ink.  I adhered the card front to a Mint Macaron mat using Snail.

I colored 3 of the Clear Rhinestone Basic Jewels in with my Dark Balmy Blue Stampin’ Blends Marker and adhered them to the card front.  I adhered the matted card front to a Balmy Blue card base using Multipurpose Liquid Glue.

On the inside I stamped the dancing woman from the Beautiful You stamp set in Soft Sea Foam Ink in the center on a Whisper White panel stamping off once.  I then stamped the sentiments from the same stamp set in Balmy Blue Ink over the image.  I adhered the Whisper White panel to a Mint Macaron mat using Snail then adhered it to the Balmy Blue card base using Multipurpose Liquid Glue.

To finish my card I decorated a Medium Whisper White Envelope.  I stamped the dancing woman from the Beautiful You stamp set in Soft Sea Foam Ink on the front left side of the envelope.  I stamped the envelope flap with the Marbled background stamp in Soft Sea Foam Ink.

Thank you so much for stopping by my blog today.  I hope you liked my card and will give it a try.  Happy Stamping.

****************************************************************************************************

If you need any stamping supplies, I’d be very happy to be your Demonstrator.  Just click here to go directly to my online store or drop me an email if you have any questions.

MY CURRENT HOST CODE IS: MBWFWZCA

Happy Stamping, Karen!

****************************************************************************************************

Card stock cuts for this project:

  • Balmy Blue Cardstock 4 1/4″ X 11″ (card base scored and folded at 5 1/2″)
  • Mint Macaron Cardstock 4″ X 5 1/4″ (card front mat)
  • Soft Sea Foam Cardstock 4″ X 5 1/4″ (inner liner mat)
  • Whisper White Cardstock 2 – 3 3/4″ X 5″ (artwork and inner liner)

****************************************************************************************************
Product List

Stampin’ Up Cable Knit Spirited Snowmen

Good Monday morning my Stamping Friends.  Hope you all had a wonderful weekend.  These weekends seem to go by way too fast and the week days seem to linger on, don’t you think?

For today’s card I used the Stampin’ Up Spirited Snowmen stamp set that will soon be retiring.  I absolutely love all the images in this set.  If this is a set you’ve been wanting, I’d grab it while you can.

I started with a Very Vanilla card front and ran it through my Big Shot using the Cable Knit Dynamic Textured Impressions Embossing Folder.  On a smaller piece of Very Vanilla cardstock I stamped the Snowmen image from the Spirited Snowmen stamp set (soon to be retired), in Early Espresso Ink.  I stamped the Snowflakes from the same stamp set in Versamark Ink all around the snowmen and sprinkled them with Clear Stampin’ Emboss Powder.  I heat set it using my Heat Tool.  I colored the snowmen in using my Cherry Cobbler, Crumb Cake, Night of Navy, Pumpkin Pie, Shaded Spruce and Smoky Slate Stampin’ Blends Markers.

I adhered some Copper Metallic Thread to the back of the artwork then adhered the artwork panel to the card front using Stampin’ Dimensionals.

I adhered the card front to a Thick Very Vanilla card base using Multipurpose Liquid Glue.

On the inside Very Vanilla panel I stamped the snowmen from Spirited Snowmen stamp set in Early Espresso Ink, stamping off 3 times, in the center of the panel.  I stamped the sentiment from Timeless Tidings stamp set in Early Espresso Ink over the snowmen image.  I adhered the Very Vanilla panel to the Thick Very Vanilla card base using Multipurpose Liquid Glue.

To finish my card I decorated a Medium Very Vanilla Envelope.  I stamped the Snowmen from Spirited Snowmen stamp set on the bottom front of the envelope.  I stamped the Holly & Berry from the same stamp set on the envelope flap and colored them in using my Cherry Cobbler and Shaded Spruce Stampin’ Blends Markers.

Thank you for stopping by my blog today.  I hope you liked my card and will give it a try.  Happy Stamping.

****************************************************************************************************

If you need any stamping supplies, I’d be very happy to be your Demonstrator.  Just click here to go directly to my online store or drop me an email if you have any questions.

MY CURRENT HOST CODE IS: MBWFWZCA

Happy Stamping, Karen!

****************************************************************************************************

Card stock cuts for this project:

  • Very Vanilla Cardstock 5 1/4″ X 4″ (card front), 2 1/2″ X 4″ (artwork), 5 1/4″ X 4″ (inner liner)
  • Thick Very Vanilla Cardstock 4 1/4″ X 11″ (card base scored and folded at 5 1/2″)

****************************************************************************************************

Product List

Stampin’ Up Pacific Point Snow Is Glistening Christmas Card

Good Friday morning everyone.  Hope you have had a productive week and are  making some fun plans for the weekend.  Maybe going to cut down your Christmas tree, or decorating or shopping.  What ever you do, make the best of it and have fun.

Today is the last day to order any of the Snowflake Showcase products, so today will also be my last card featuring the Stampin’ Up Snow Is Glistening stamp set and Snowfall Thinlits Dies.  If you wanted to get them today’s the day.  Feel free to head over to my online store and see all the products here.  Here’s my card for today. Take a look.

I started with a Shimmery White card front and ran it through my Big Shot using the Swirls & Curls Textured Impressions Embossing Folder.  The pictures do not show how beautiful the Shimmer White cardstock looks.

I cut out the largest snowflake from the Snowfall Thinlits Dies out of a Champagne Foil Sheet and the next size snowflake out of Shimmery White cardstock using my Big Shot.  I adhered the Shimmery White snowflake to the center of the Champagne Foil snowflake using Multipurpose Liquid Glue.  I adhered the snowflakes to the card front using Multipurpose Liquid Glue.

On a small strip of Shimmery White cardstock I stamped the sentiment from the Snow Is Glistening stamp set in Pacific Point Ink.  I made a banner from the strip and adhered it to the right side of card front using Multipurpose Liquid Glue.  I then added Clear Rhinestone Basic Jewels to the card front.  I adhered the card front to a Pacific Point card base using Multipurpose Liquid Glue.

On the inside Whisper White panel I stamped one of the snowflakes from the Snow Is Glistening stamp set in Pacific Point Ink stamping off once in both corners.  I stamped the sentiment in the center of the panel.  I adhered the Whisper White panel to the Pacific Point card base using Multipurpose Liquid Glue.

To finish my card I stamped the snowflake from the Snow Is Glistening stamp set  on the front and back flap of a Medium Whisper White Envelope in Pacific Point Ink.

Thank you for stopping by my blog today.  I hope you liked my card and will give it a try.  If there is any specific set you would like me to feature a card with, please feel free to leave a comment and I will see what I can do.  Happy Stamping!

****************************************************************************************************

If you need any stamping supplies, I’d be very happy to be your Demonstrator.  Just click here to go directly to my online store or drop me an email if you have any questions.

MY CURRENT HOST CODE IS: MBWFWZCA

Happy Stamping, Karen!

****************************************************************************************************

Card stock cuts for this project:

  • Pacific Point Cardstock 8 1/2″ X 5 1/2″ (card base scored and folded at 4 1/4″)
  • Shimmery White Cardstock 4 1/2″ X 5 3/8″ (card front), 3/4″ X 3″ (sentiment strip)piece for snowflake
  • Whisper White Cardstock 4″ X 5 1/2″ (inner liner)
  • Champagne Foil Sheet 4″ X 4″ (snowflake)

****************************************************************************************************

Product List