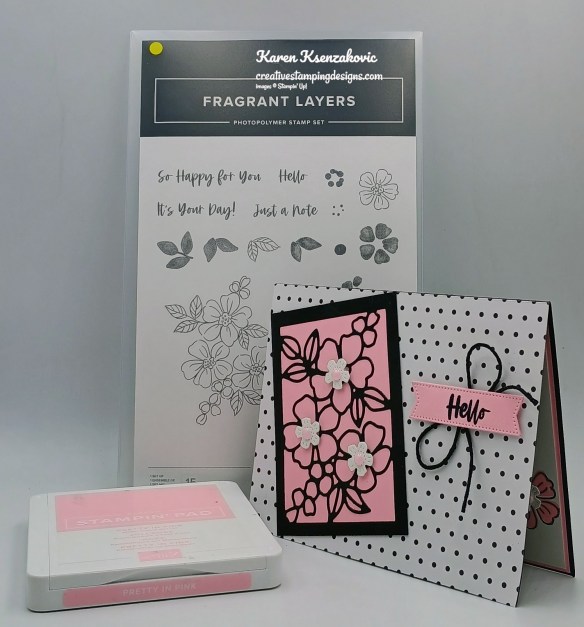
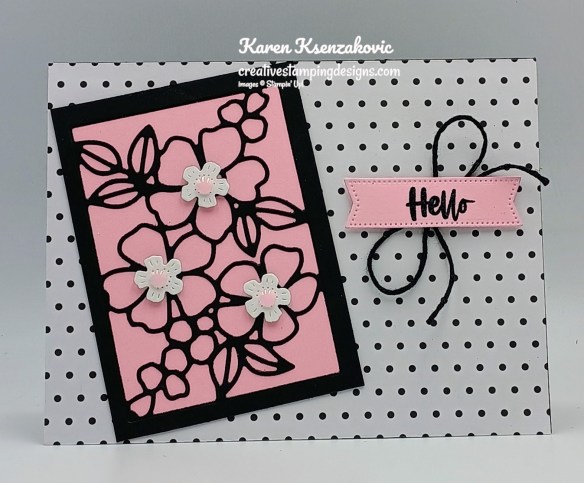
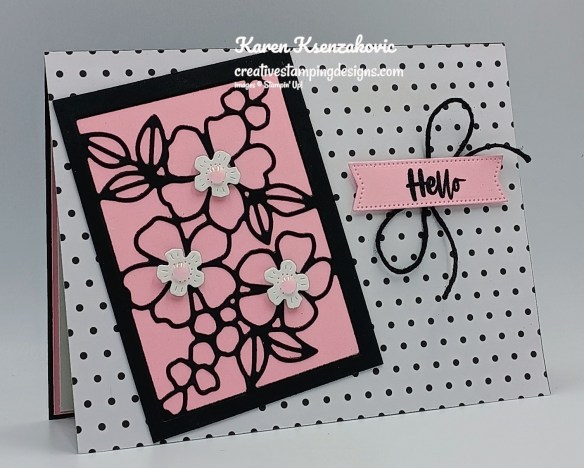
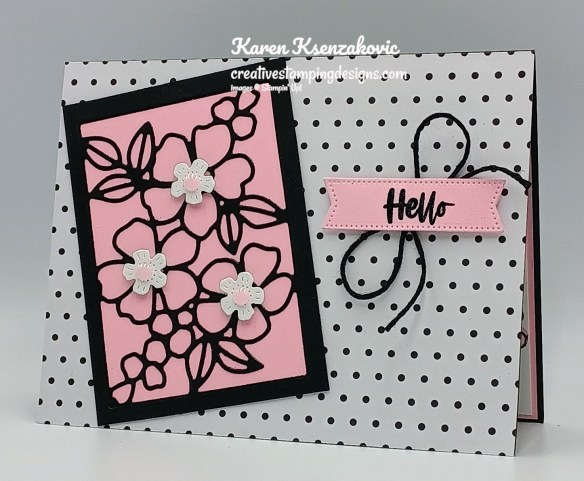
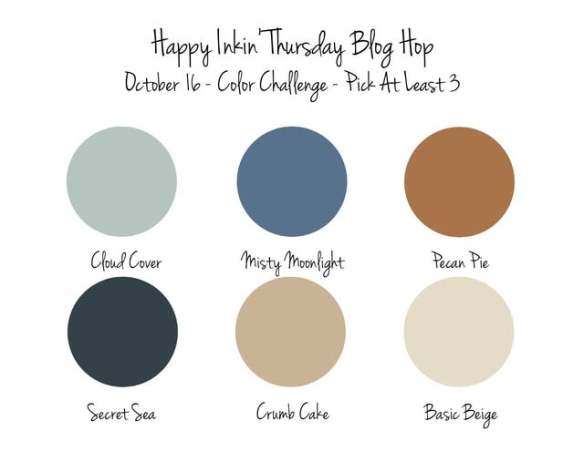
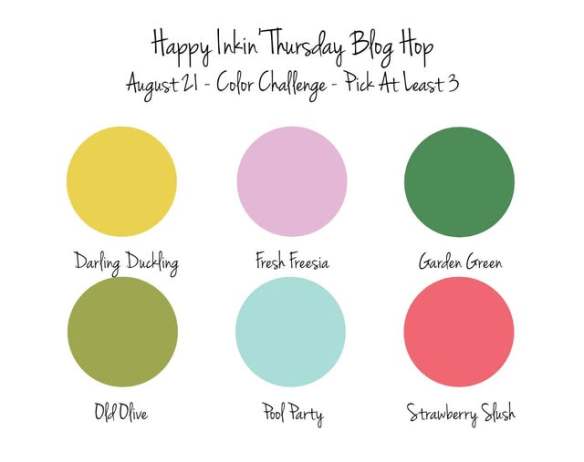
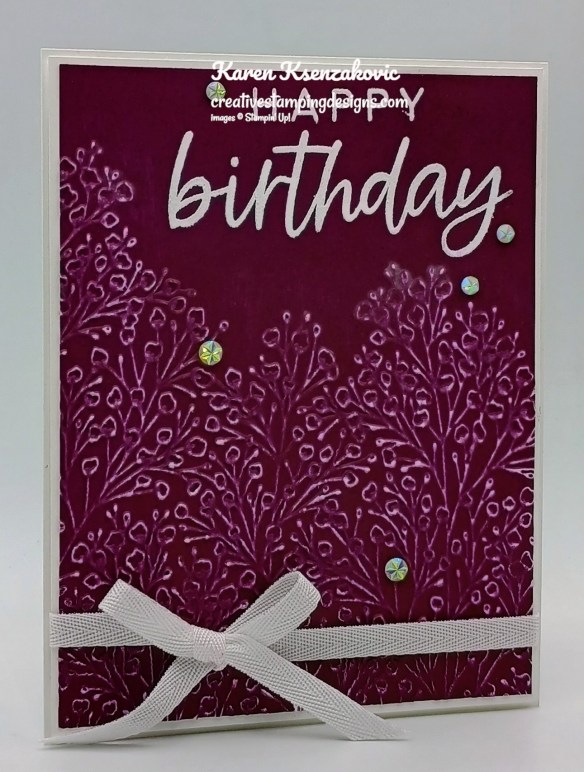
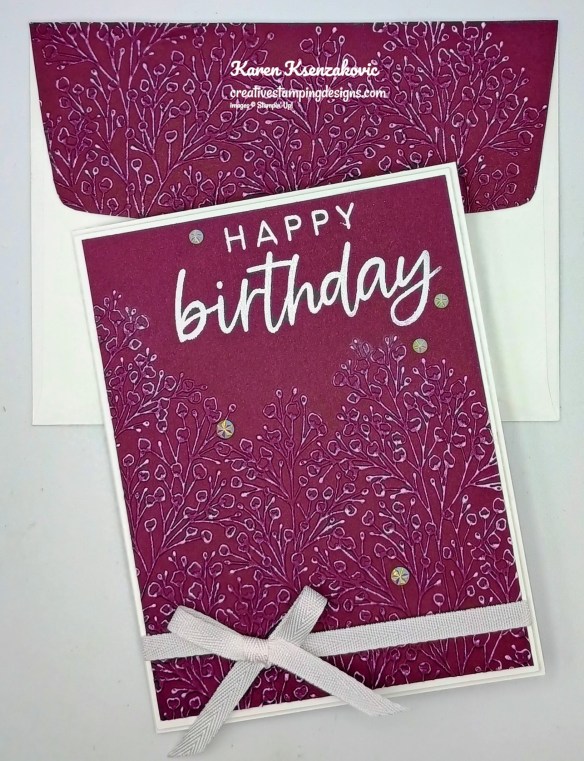
Good Thursday morning stamping friends and welcome to our Happy Inkin’ Thursday Blog Hop. If you are starting with me, thank you, I hope you will stop by everyone’s blog to see what they have created this week. If you are hopping over from Mary’s blog, thank you for stopping by. This week we have Color Challenge. If you’d like to see a quick video on how I made this card, Click Here to go to my Instagram Reels. Here is my card using this week’s colors.
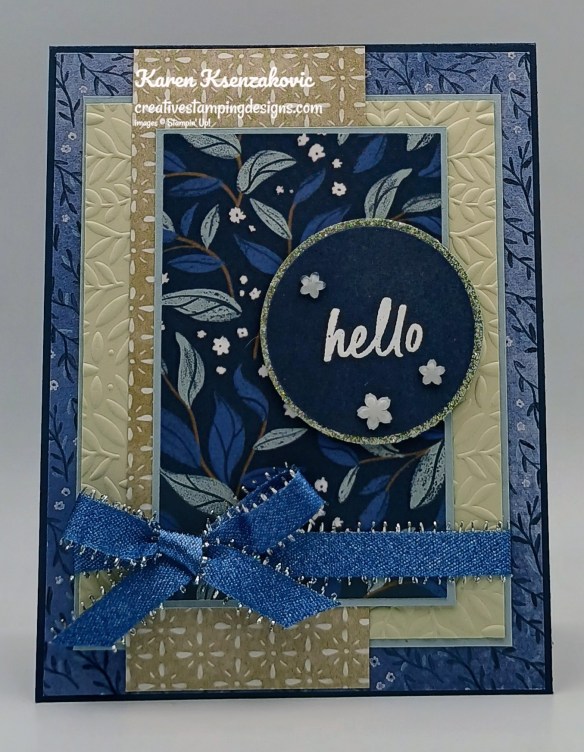
I used the new Stampin’ Up! Online Exclusive Fragrant Layers Bundle along with the Modern Christmas Specialty Designer Series Paper for my card today.
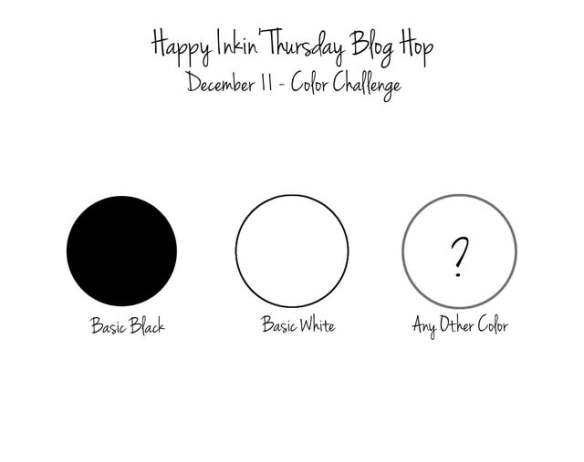
These are our colors for today. I chose to use Pretty in Pink for my other color.
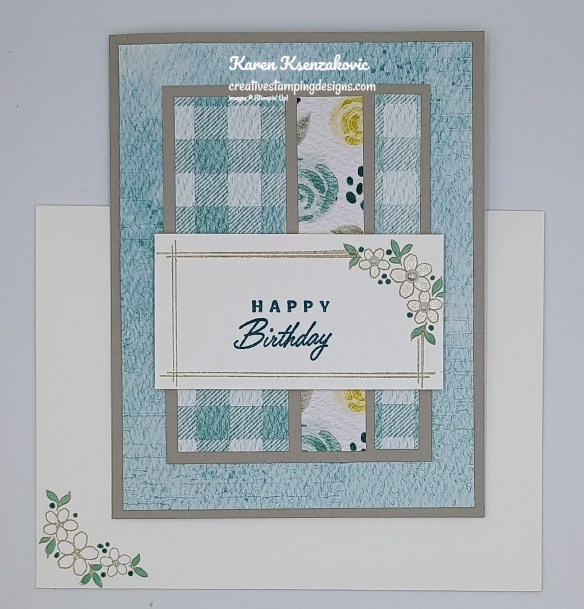
Adhere a panel of Modern Christmas DSP to a Basic Black card base.
Cut a panel of Basic Black using the Fragrant Layers Dies. Adhere the die cut panel to a Pretty in Pink panel. Adhere the layered panel to the card front. Cut the small flower die cut using the Fragrant Layers Dies from a panel of Basic White. Adhere the flowers to the die cut panel with Stampin’ Dimensionals.
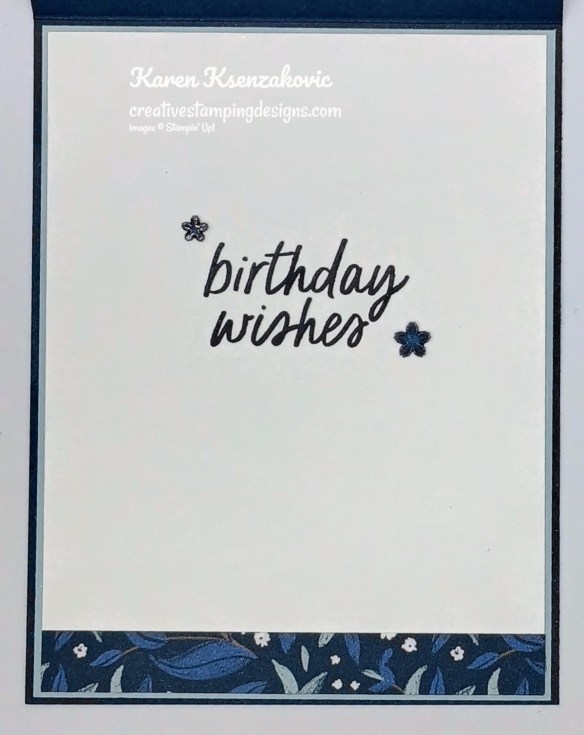
On a panel of Pretty in Pink, stamp the sentiment from Fragrant Layers stamp set in Versamark Ink. Sprinkle the sentiment with Black Embossing Powder and set it using the Heat Tool. Cut the sentiment out using the Fragrant Layers Dies. Tie a bow with Black Baker’s Twine and adhere it to the card front. Adhere the sentiment over the bow with Stampin’ Dimensionals. Add a few 2024-2026 In-Color Flat Pearls to the card front.
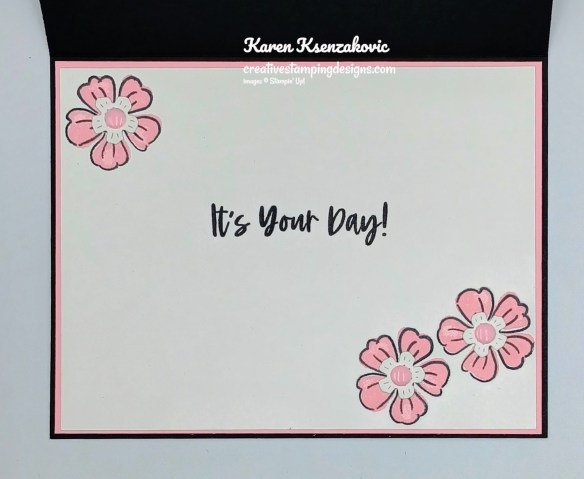
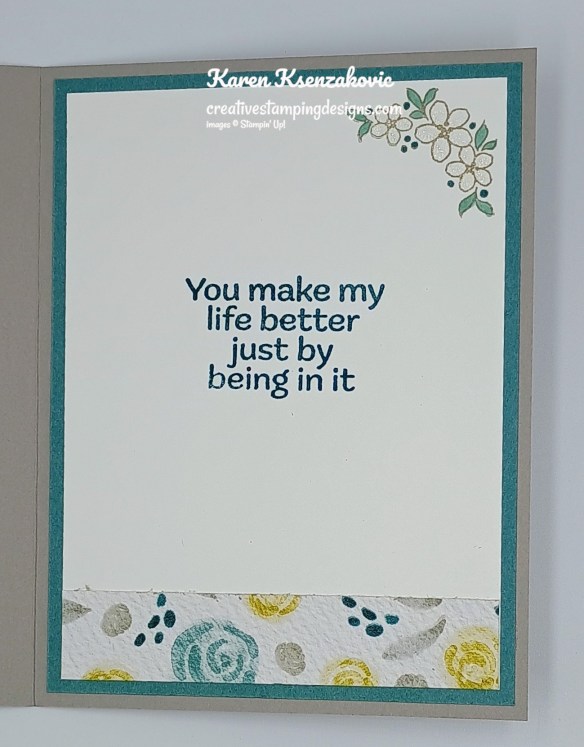
Stamp the sentiment from Fragrant Layers stamp set in tuxedo Black Ink on a panel of Basic White. Stamp the single outlined flower image from the Fragrant Layers stamp set in Tuxedo Black Ink on the Basic White panel. Stamp the solid single flower image from the Fragrant Layers stamp set in Pretty in Pink Ink over the outlined images. Adhere the die cut flowers to the flower centers. Add a few 2024-2026 In-Color Flat Pearls to the flowers. Adhere the Basic White panel to a Pretty in Pink mat then to the inside of the Basic Black card base.
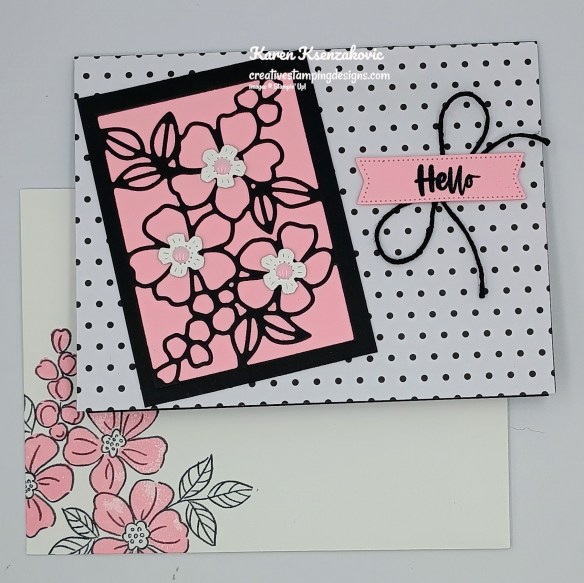
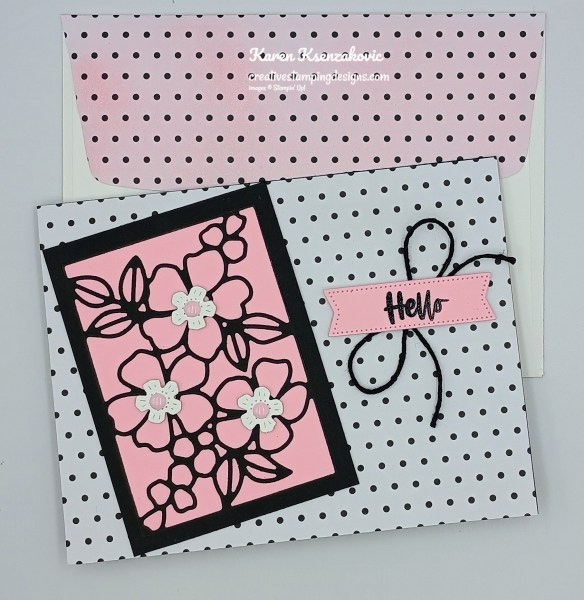
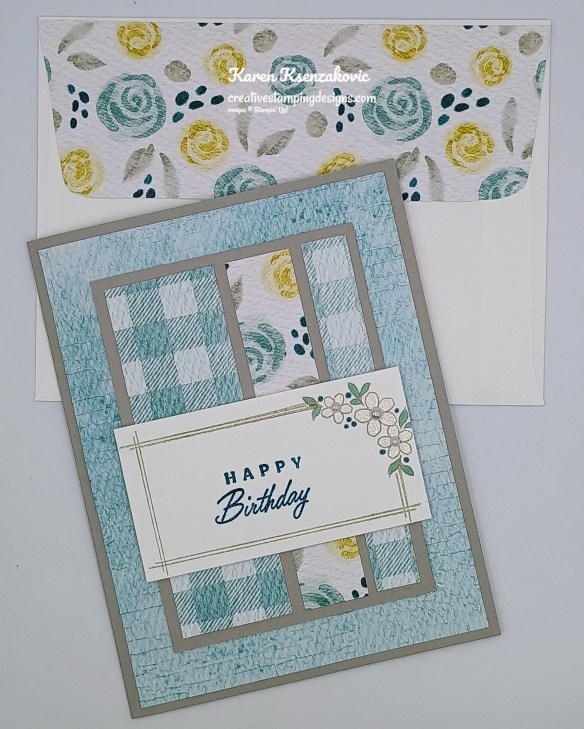
Decorate a Basic White Medium Envelope to complete the card. Stamp the large, outlined flower image from the Fragrant Layers stamp set in Tuxedo Black Ink on the envelope front. Stamp the large solid flower image from the Fragrant Layers stamp set in Pretty in Pink Ink over the outlined image. Add Pretty in Pink Ink using the Blending Brush to a panel of Modern Christmas DSP and adhere it to the envelope flap.
Thank you for stopping by my blog today. Now that you’ve seen my card, let’s get on with the hop! Click the next button below to hop over to see what Tara has created. Happy Hopping!!
Just in case you get lost along the way, here is a list of the team members involved in the hop today.
If you need any stamping supplies, I’d love to be your Demonstrator. Just click HERE to go directly to my online store or drop me an email if you have any questions.
Good Wednesday morning stamping friends. I’ve been MIA for a bit with cards; I’ve been trying to get my house completely decorated and juggling a car situation here. We’ve got 3 people sharing 1 car going in 3 different directions. Fingers crossed that we could get this all worked out sooner than later. In the meantime, with 3 of us sharing the car, it needs to go in for servicing and new tires. Why do things always happen around the holidays? I’m starting to realize that I need to get shopping done and get my cookie list together, so I know what ingredients I need. I need more than 4 weeks between Thanksgiving and Christmas, or I need to start getting lists together in October, so it doesn’t sneak up so quickly. Is anyone else feeling that way?
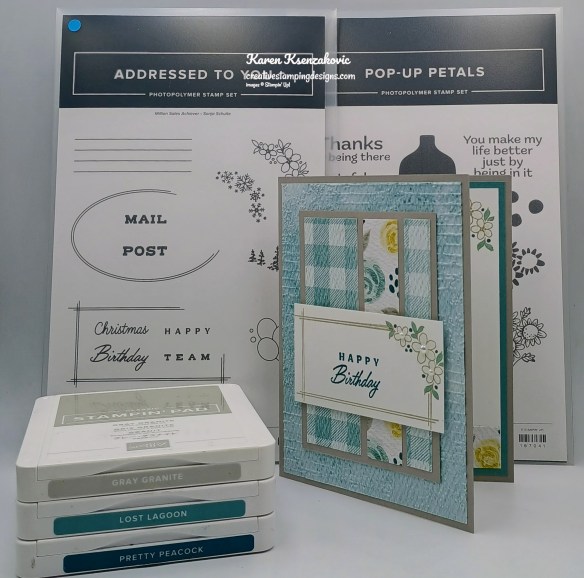
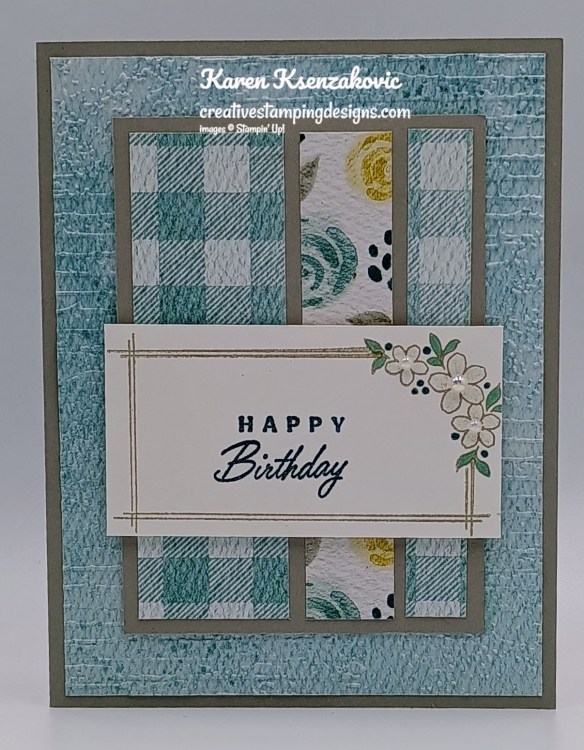
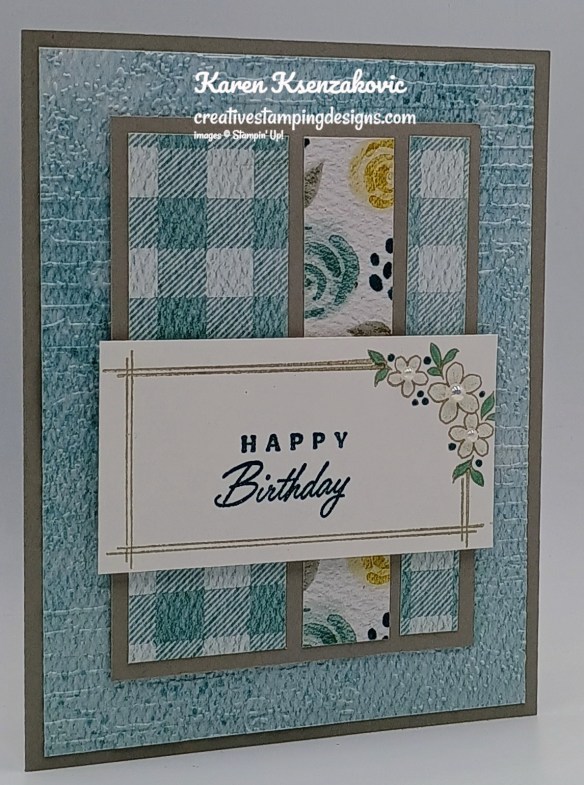
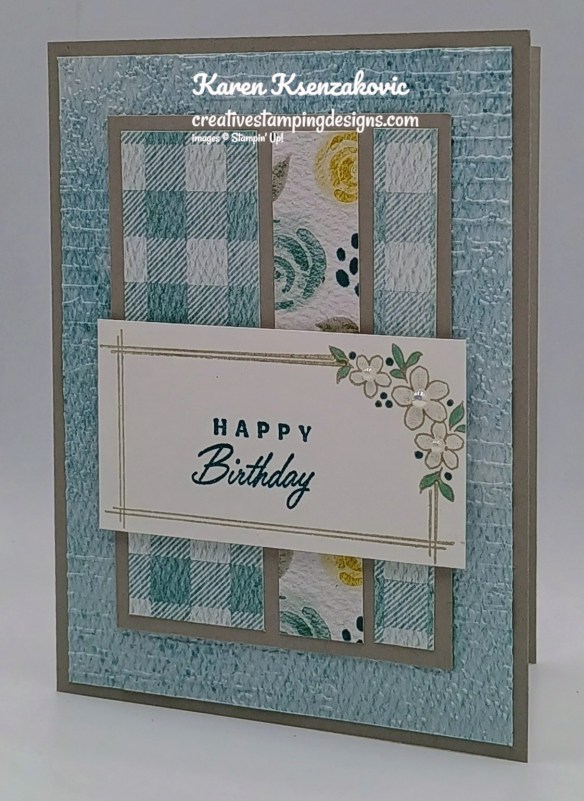
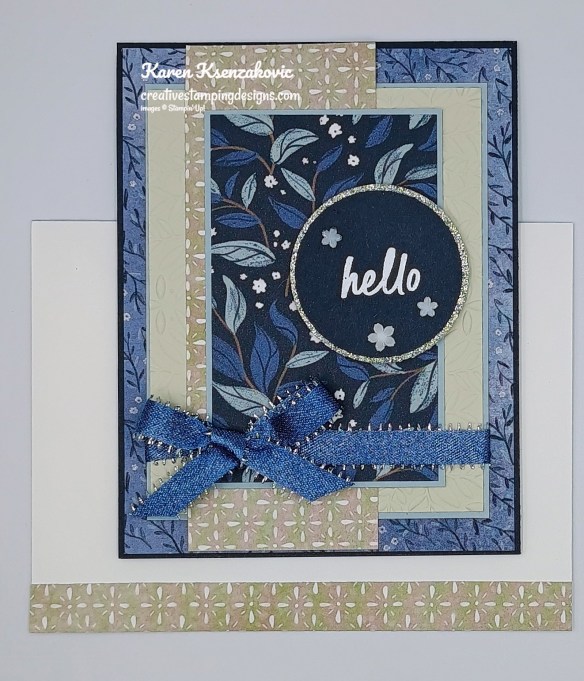
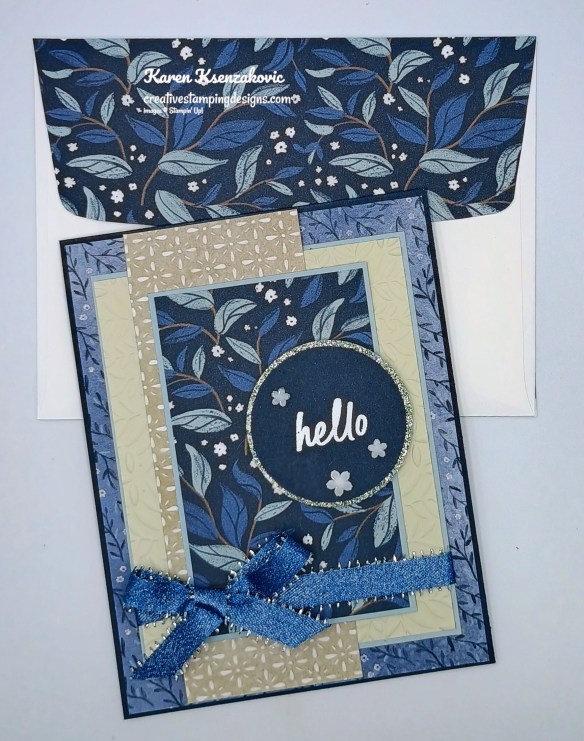
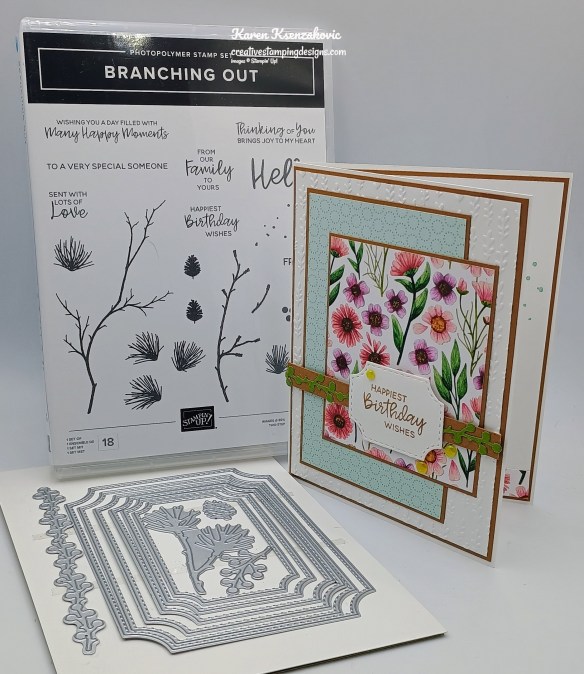
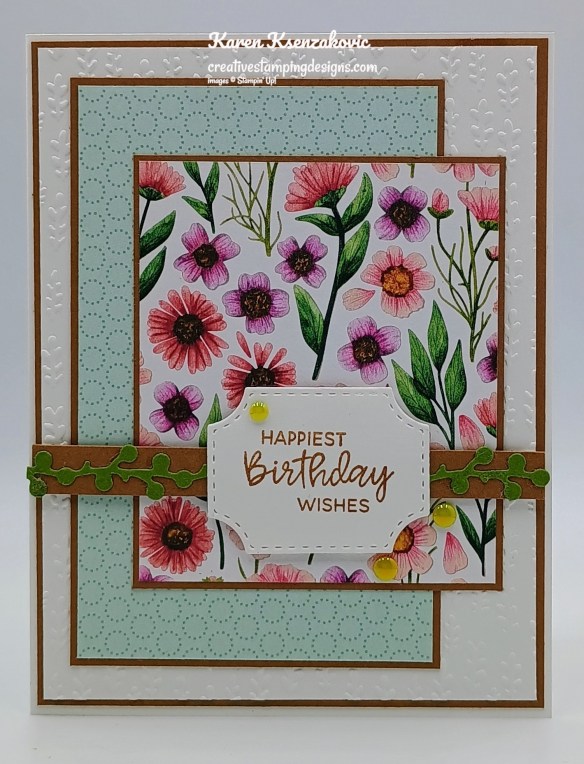
Today’s card uses new and older Online Exclusives along with a new set coming in the January-April 2026 Mini Catalog. Here’s my card for today.
I used the new Stampin’ Up! Addressed To You Stamp Set (available January 6), along with the Exposed Brick 3D Embossing Folder, Online Exclusives Everyday Happiness Designer Series Paper and Stampin’ Up! Pop-Up Petals Stamp Set for my card today.
Emboss a panel of Everyday Happiness DSP using the Exposed Brick EF. Adhere the embossed pane to a Gray Granite card base.
Adhere 3 panels of Everyday Happiness DSP to a Gray Granite mat. Adhere the layered panel to the card front
On a panel of Basic White, stamp the outline and flower images from the Addressed To You stamp set in Gray Granite Ink. Stamp the sentiments from the Addressed To You stamp set in Pretty Peacock Ink inside the outlined image. Color the leaves and dots using Lost Lagoon and Pretty Peacock Stampin’ Blends Markers. Use the Clear Wink of Stella to fill in the flowers. Adhere the sentiment to the card front with Stampin’ Dimensionals. Add a few Iridescent Pearls Basic Jewels to the flowers.
On a panel of Basic White, stamp the sentiment from the Pop-Up Petals stamp set in Pretty Peacock Ink. Stamp the small flower image from the Addressed To You stamp set in Gray Granite Ink on the top of the panel. Color the image with Lost Lagoon and Pretty Peacock Stampin’ Blends Markers. Adhere a panel of Everyday Happiness DSP to the bottom of the panel. Adhere the Basic White panel to a Lost Lagoon mat then to the inside of the Gray Granite card base.
Decorate a Basic White Medium Envelope to finish your card. Stamp the small flower image from the Addressed To You stamp set in Gray Granite Ink on the envelope front. Color the image with Lost Lagoon and Pretty Peacock Stampin’ Blends Markers. Adhere a panel of Everyday Happiness DSP to the envelope flap.
Thank you for stopping by my blog today. I hope you like the card and maybe you’ll have this set on your wish list for January. Happy Stamping!!
If you need any stamping supplies, I’d love to be your Demonstrator. Just click HERE to go directly to my online store or drop me an email if you have any questions.
New Product Of The Month from Stampin’ Up! Available
The December Product of the Month is available and it’s beautiful. The True Blue Florals 12 x 12 Designer Series Paper is available for $5 with a qualifying order of $75 + before shipping & tax, but only while supplies last.
If you love exclusive products, you’re going to love Product of the Month, a promotion centered around a special product release every month! The Product of the Month items are specially designed to be some of the best items Stampin’ Up! has to offer that aren’t available in any of our catalogs or our Online Exclusives.
The first Product of the Month is now available to order and it will be available while supplies last!!
Every month Stampin’ Up! will release a new item that is only available for purchase once per account. These items will be limited quantity and are likely to sell out quickly once they’re sold out, they’re gone for good!
Here are the details:
Qualifying Amounts.
You can purchase the Product of the Month item for only $5 when you spend $75 or more in a single order. Your cart total MUST be $75 or more at checkout to qualify. You cannot add the Product of the Month to your cart until you’ve reached the qualifying amount. If you use Stampin’ Rewards, coupons, or discount codes on your order and your cart amount falls below $75, you’ll need to add items in your cart to get the total at or above the qualifying amount again. If you reach the qualifying amount, add the Product of the Month to your cart, and the Product of the Month sells out before you’re able to check out, you won’t be able to complete your checkout until you remove the product from your cart.
Product of the Month Price. Currently the Product of the Month is only $5.
Stampin’ Up! Account. To participate in Product of the Month, you MUST have a Stampin’ Up! account.
A New Product Every Month. Stampin’ Up! will release a new Product of the Month item every month. The Product of the Month items will be available at midnight sometime near the beginning of every month. Keep an eye out for the Product Of The Month to be announced and when the new Product of the Month item will be available. You will be able to view the newly released products on the Product of the Month page in the Online Store.
Product of the Month Purchasing Limit. The Product of the Month is limited to one month’s product per Stampin’ Up! account. Additionally, the Product of the Month items are only available while supplies last, so once they’re all sold out, they’re gone for good.
Order Restrictions. All types of orders (as long as the person ordering has a Stampin’ Up! account), and phone orders all apply toward the qualifying amount for a single order. Starter Kit orders and gift orders do NOT apply toward the qualifying amount. You cannot qualify for the Product of the Month by making separate purchases that eventually amounts to $75 or more. The only way you can qualify for Product of the Month is with a single order that reaches the qualifying amount.
Canceled Orders. If you have an order with a Product of the Month included in it, and you decide to cancel the order, you WILL be able to re-qualify and re-purchase the Product of the Month as long as it’s still available.
Starter Kits. When someone orders a Starter Kit, the price of the kit will NOT count toward the qualifying amount to earn the Product of the Month. After purchasing a Starter Kit, your next order will begin to qualify for the Product of the Month.
Available Until Sold Out. Product of the Month products will be available until they’re sold out. Once they’re sold out, they won’t be available for purchase again. If you didn’t qualify to purchase the Product of the Month during the month it was first offered and it’s still available in the following months, you can purchase that product once you reach the qualifying amount. So, if you didn’t qualify in January but you qualify in February, you can choose to buy the January Product of the Month, provided it’s still available for purchase and you meet the qualifying amount. If you buy the January Product of the Month but still want the February Product of the Month, you’ll need to qualify again.
Here is a short video from Stampin’ Up! with a few of the details:
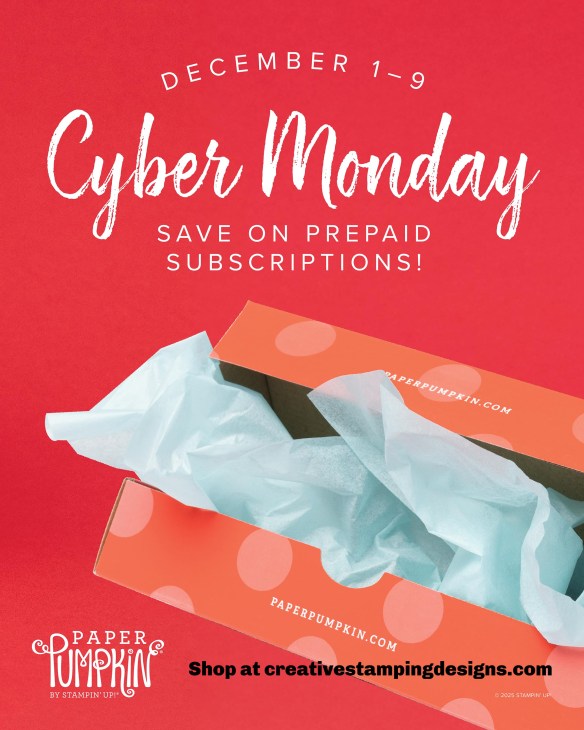
Cyber Monday – Paper Pumpkin Sale – December 1 – 9
This is such an awesome deal!! Whether you are new to Paper Pumpkin or you already have a subscription, you can take advantage of the awesome offer. You can save $80 on a 1-year subscription. If you are already subscribed, you’ll want to suspend your current subscription, so you don’t get duplicate kits (unless you want to get 2 of each).
Starting December 1 at 8 a.m. (MT), Stampin’ Up! is offering big savings on prepaid Paper Pumpkin subscriptions! There’s never been a better time to subscribe to get a new all-inclusive crafting kit delivered to your door each month. Take advantage of this Cyber Monday offer for fantastic deals on 3-, 6-, and 12-month prepaid subscriptions.
Whether you’re looking for a last-minute Christmas present that sparks creativity or resolving to make time to craft in the new year, a Paper Pumpkin subscription is the gift that keeps on giving!
From December 1–9, prepaid Paper Pumpkin subscriptions will be discounted as follows:
3-month prepaid: $61.00 (regular price $81.00)
6-month prepaid: $122.00 (regular price $162.00)
12-month prepaid: $244.00 (regular price $324.00)
Here are the details:
Subscriptions purchased during this promotion start immediately with the December Watercolor in Bloom Kit. This kit cannot be skipped.
Do not purchase multiple subscriptions for the same recipient. The subscriptions will all start with the Watercolor in Bloom Kit, so the recipient will end up receiving duplicates of the same kit each month.
Subscriptions purchased during the promotion will earn reduced rewards compared to full-priced subscriptions due to the discounted price, but they will still qualify for rewards once the threshold is met.
Don’t miss your chance to enjoy months of exciting kits at an incredible value! Stop by the Paper Pumpkin page here for more details about how Paper Pumpkin works and get ready to order your prepaid subscriptions on December 1!
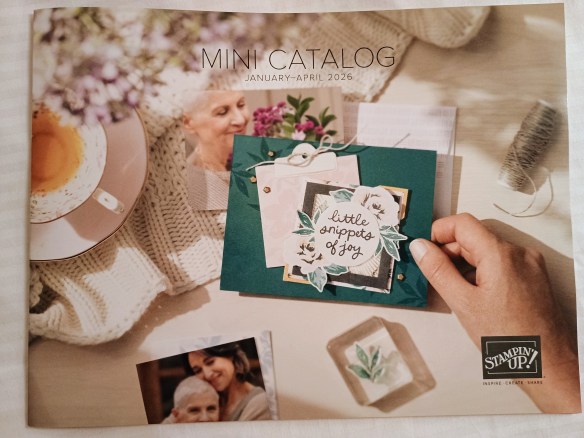
My January – April 2026 Mini Catalog and January Online Exclusive Designer Series Paper, Ribbon and Embellishment Shares are open for ordering. You can order just the DSP share, just the Two-Tone cardstock share, just the Ribbon share or just the Embellishment share, or you can it all!! For all the information, Click Here.
Anyone is welcome to join in my shares (please note, I can only ship to addresses within the US). To make ordering the shares a little easier, I have created a form for you to submit, that way you can order any combination of shares you want. Click Here for the form. I will send out PayPal Invoices by January 2nd.
Deadline to sign up for my share is Saturday January 3rd at 5:00 PM ET.
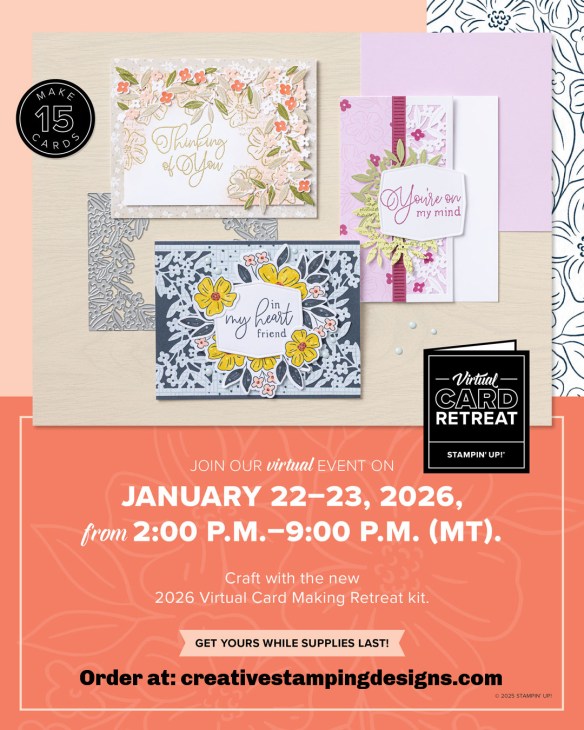
Introducing the Virtual Card Retreat, a crafting extravaganza for people who love card making and community! During this two-day virtual event, you’ll craft along with Stampin’ Up! staff as they go through the step-by-step process of creating 15 beautiful cards using the 2026 Virtual Card Making Retreat kit. There will even have some fun giveaways! Mark your calendars now and join us in January for this event!
Here are the details:
When: January 22–23, 2026, from 2:00 p.m.–9:00 p.m. (MT)
Where: Private Facebook Group
Registration: There is no registration for this event! By purchasing the 2026 Virtual Card Making Retreat kit, you’ll get access to the exclusive Facebook group where the live event will stream.
Price of 2026 Virtual Card Making Retreat kit: $165
2026 Virtual Card Making Retreat kit available for purchase: December 10, 2025
Language of Event: This event will be presented in English only.
After the Event: You can access the recorded event videos on the exclusive Facebook group. Videos with English, French, German, and Dutch captioning will be available through the Facebook group within two weeks after the live stream.
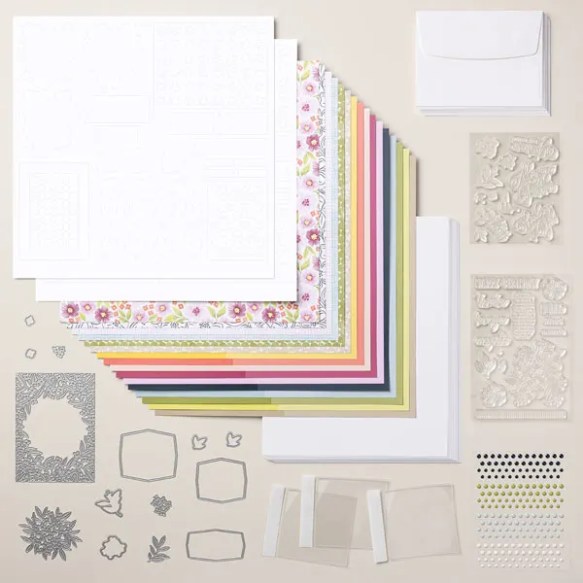
To craft along with the presenters and make 15 beautiful, all-occasion cards, you’ll need to purchase the 2026 Virtual Card Making Retreat kit. Everyone who purchases a kit will receive a link to the exclusive Facebook group where the live event will stream. There are only a limited number of kits, so make sure to order yours ASAP starting on December 10!
Here are the details for the Virtual Card Making Retreat Kit:
Item: 2026 Virtual Card Making Retreat kit (170023)
Includes: Exclusive stamp sets, a set of dies, Designer Series Paper, cardstock, envelopes, embellishments, and more
Price: $165
Ordering Begins: December 10, 2025 (Kits are only available while supplies last, so be sure to order ASAP! And you’ll want to order early to make sure you get your products in time for the event!)
Language: The kit is available in English, French, and German.
Be sure to pick up the kit beginning December 10 in my online store!
Last Chance List Updated with Sept-Dec 2025 Mini Catalog & July Online Exclusives
Stampin’ Up! has added a bunch of items from the retiring September-December 2025 Mini Catalog and July Online Exclusives to the Last Chance Products list! Be sure to scroll through all of the pages so that you don’t miss anything. There are newly added items sprinkled throughout the list.
You can find the Last Chance Products list right here in the online store.
Don’t forget that Last Chance Products are only available while supplies last, so order early for the best selection!
Basic White Cardstock 1 3/4″ x 3 1/4″(sentiment), 3 3/4″ x 5″(inner liner)
Gray Granite Cardstock 5 1/2″ x 8 1/2″(card base scored & folded at 4 1/4″), 3″ x 4 1/4″(mat for panels)
Lost Lagoon Cardstock 4″ x 5 1/4″(inner liner mat)
Everyday Happiness Designer Series Paper 4″ x 5 1/4″(card front), 1/2″ x 4″, 3/4″ x 4″ & 1 1/4″ x 4″(card front panels), 3/4″ x 3 3/4″(inner liner), 2 1/4″ x 6″(envelope)
Good Friday morning stamping friends and welcome to my Fun Fold Friday. Happy Black Friday!!!! Who all heads out to go shopping today? Today’s my day to decorate my house for Christmas. I’m hoping to get most of it done today, but if I don’t, I have off tomorrow so I can finish up then. It all starts with me going up into the attic and passing the hundred boxes down and telling them which room to put them all in. I then work on 1 room at a time unpacking and putting everything up.
I did a video on my YouTube channel for today’s card. If you’d like to stamp along while you watch the video, the list of measurements are below. Here’s my card for today.
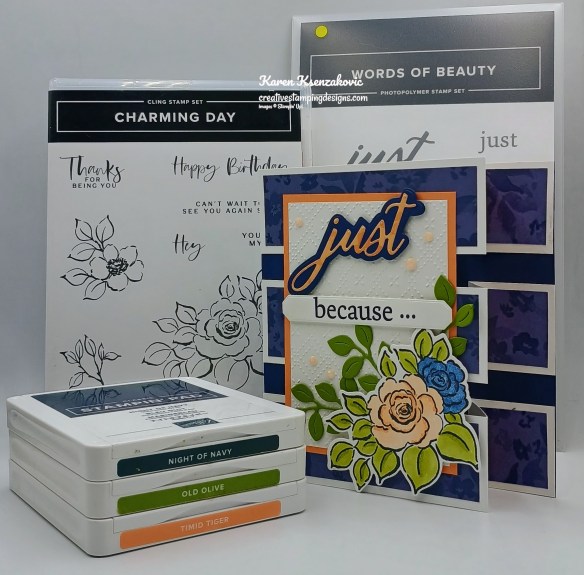
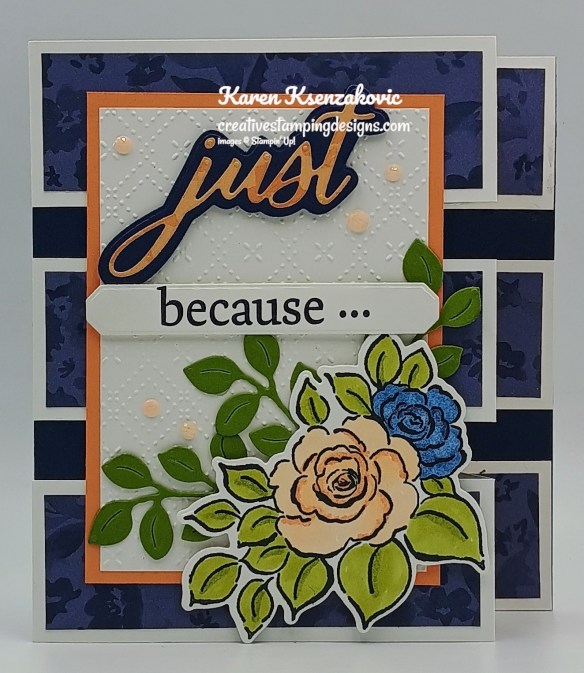
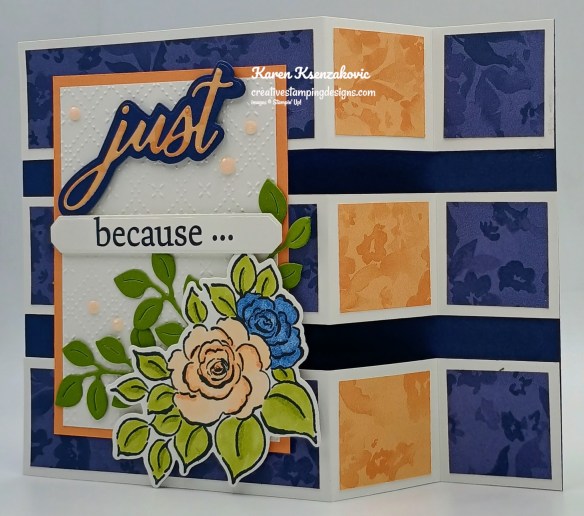
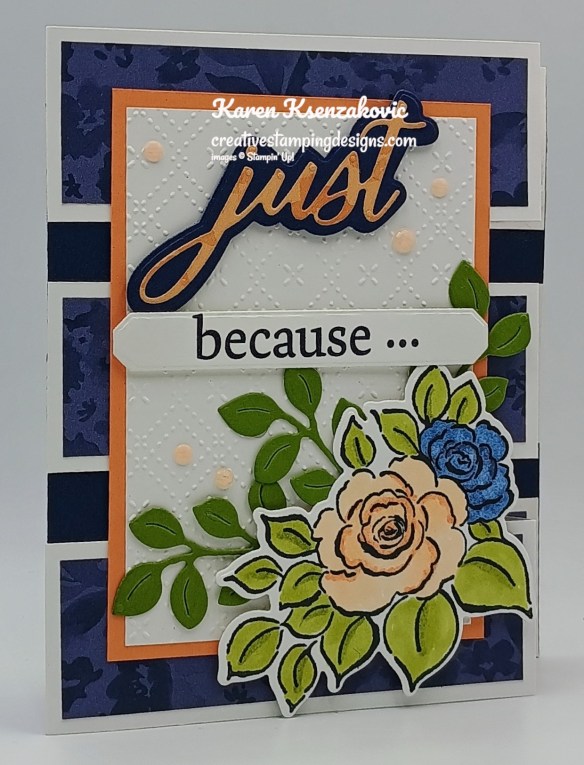
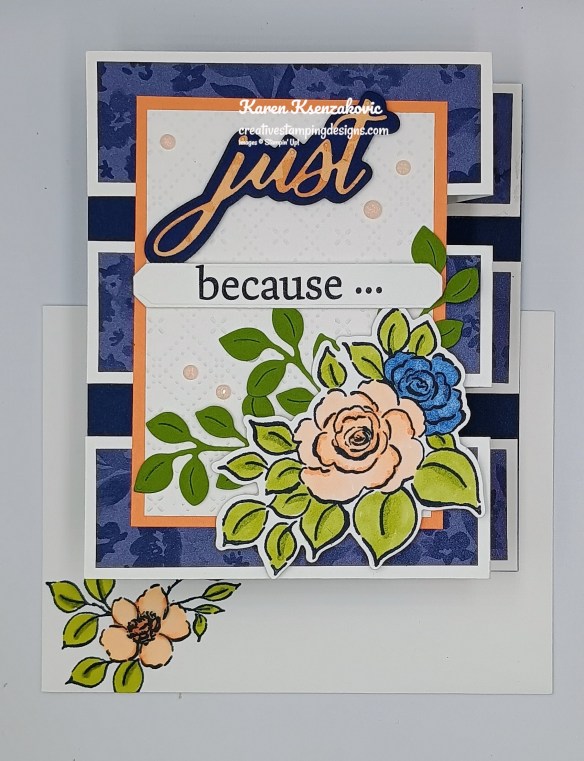
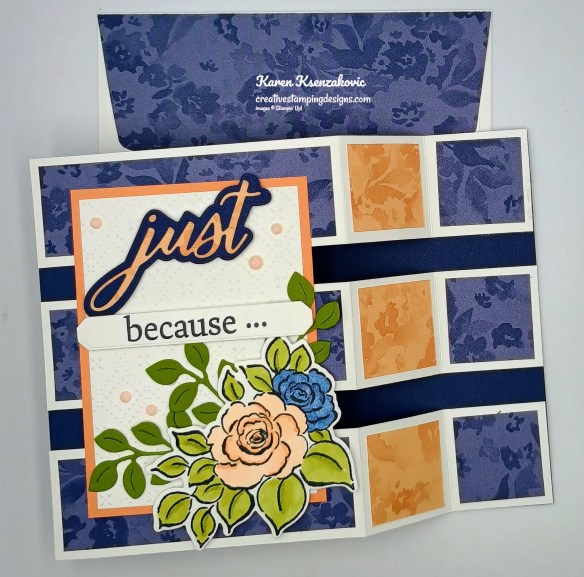
I used the Stampin’ Up! Charming Day Bundle along with the Beautiful Pattern 3D Embossing Folder, Floral Charm Designer Series Paper, and Stampin’ Up! Words of Beauty Bundle for my card today.
Adhere 3 panels of Floral Charm DSP to the front of the Basic White panels. Adhere 6 small Floral Charm DSP square panels to the folded sections of the Basic White panels. Using the Words of Beauty Dies, cut the detailed sentiment from a panel of Floral Charm DSP and the mat from a panel of Night of Navy. Adhere the detailed sentiment to the Night of Navy mat. On a panel of Basic White, stamp the sentiment from Words of Beauty stamp set in Night of Navy Ink. Cut the sentiment out using the Words of Beauty Dies.
Adhere the Basic White strips to the card base with the longer side on the front and the shorter side on the right side of the card base.
Emboss a panel of Basic White using the Beautiful Pattern EF. Adhere the embossed panel to a Timid Tiger mat. Adhere the layered panel to the front of the card base. On a panel of Basic White, stamp the large flower image from the Charming Day stamp set in Tuxedo Black Ink. Color the image using Night of Navy, Old Olive, Petal Pink and Timid Tiger Stampin’ Blends Markers. Using the Charming Day Dies, cut the image and 3 of the leaf dies from a panel of Old Olive. Adhere the floral image to the card front with Stampin’ Dimensionals. Adhere the leaf dies under the flower image. Adhere the sentiments using Stampin’ Dimensionals. Add a few Charming Shimmer Faceted Dots to the card front.
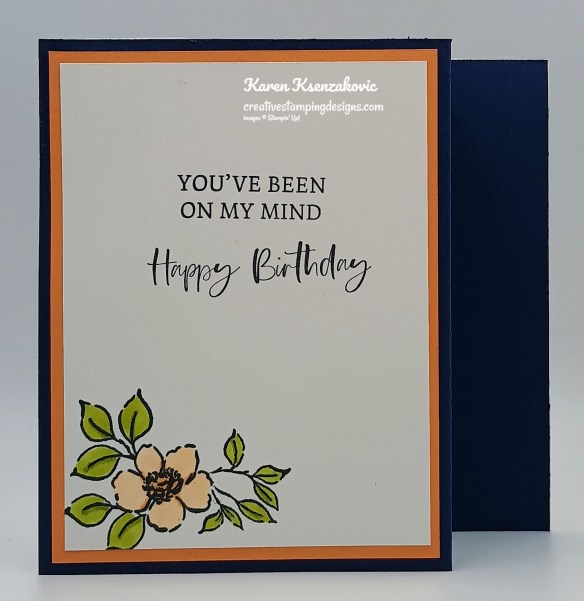
Stamp the sentiments from the Words of Beauty and Charming Day stamp sets on a panel of Basic White in Night of Navy Ink. Stamp the floral image from Charming Day stamp set in Tuxedo Black Ink in the bottom of the panel. Color the image using Old Olive, Petal Pink and Timid Tiger Stampin’ Blends Markers. Adhere the Basic White panel to a Timid Tiger mat then to the back of the Night of Navy card base.
Decorate a Basic White Medium Envelope to finish your card. Stamp the smaller flower image from the Charming Day stamp set in Tuxedo Black Ink on the envelope front. Color the image using the Night Old Olive, Petal Pink and Timid Tiger Stampin’ Blends Markers. Adhere a panel of Floral Charm DSP to the envelope flap.
Thank you for stopping by my blog today. I hope you liked my card and will give it a try. I hope you will CASE this card and please feel free to post it in the comments of my Facebook page under my post. I’d love to see your take it. You can watch my video on my YouTube Channel Here
If you watch this on my YouTube channel, please remember to subscribe so that you will get notified when a new video goes live. Thank you to those that have subscribed already. Happy Stamping!!
If you need any stamping supplies, I’d love to be your Demonstrator. Just click HERE to go directly to my online store or drop me an email if you have any questions.
Get ready for Stampin’ Up!’s Black Friday sale with up to 40% off Stampin’ Up! products! Shop this limited-time-only sale between November 25 to December 1!
Here is what will be on sale:
40% off – Stampin’ Blends – Paper Trimmer and Blades – Ink Bundles
25% off – Select adhesive
15% off – Select cardstock
Here are the details:
Shop the full selection of discounted products online.
Products are available while supplies last.
Orders will likely arrive in time for the holidays.
Ordering deadline: December 1, 2025, at 11:59 p.m. (MT)
Get your lists ready and head to the online store beginning November 25 to get those deals!!
Double Creative Stamping Designs Rewards During the Black Friday Sale
I’m offering my Double Creative Stamping Designs Rewards during the Black Friday Sale, starting today through December 1. I’m offering DOUBLE REWARDS for all orders over $50 (before tax & shipping)!! How does this work? For a $50 you’ll earn 2 rewards, $100 you’ll earn 4 rewards, $150 you’ll earn 6 rewards, etc. Head over to my Online Store and get those orders in early and earn those Double Rewards!!
My January – April 2026 Mini Catalog and January Online Exclusive Designer Series Paper, Ribbon and Embellishment Shares are open for ordering. You can order just the DSP share, just the Two-Tone cardstock share, just the Ribbon share or just the Embellishment share, or you can it all!! Click Here to order.
For all the information about what’s included Click Here.
New Product Of The Month from Stampin’ Up! Coming In December!
If you love exclusive products, you’re going to love Product of the Month, a promotion centered around a special product release every month! The Product of the Month items are specially designed to be some of the best items Stampin’ Up! has to offer that aren’t available in any of our catalogs or our Online Exclusives.
The first Product of the Month will be available to order beginning on December 2 and it will be available while supplies last!!
Every month Stampin’ Up! will release a new item that is only available for purchase once per account. These items will be limited quantity and are likely to sell out quickly once they’re sold out, they’re gone for good!
The January – April 2026 Mini Catalog is coming soon. I’ve ordered the new mini catalog and shipped them out to my customers. To be a customer of mine, you need to have placed an order with me within the last year, and you will automatically receive the catalog. If you would like a copy of the catalog from me, just go to my Online Store and place an order and you will be on my list to receive the new catalog.
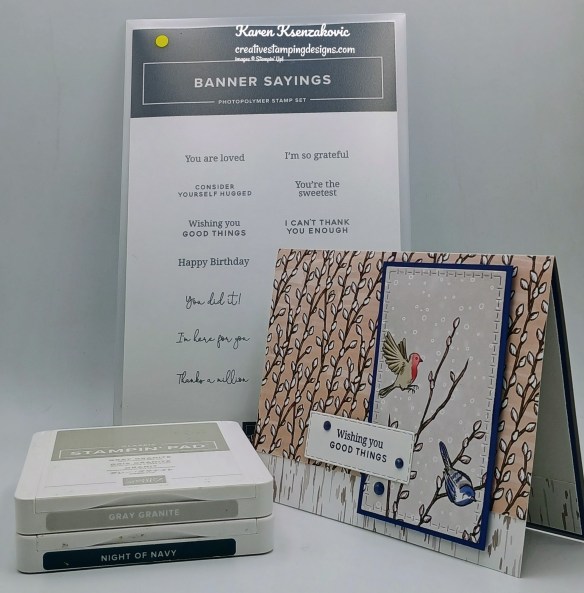
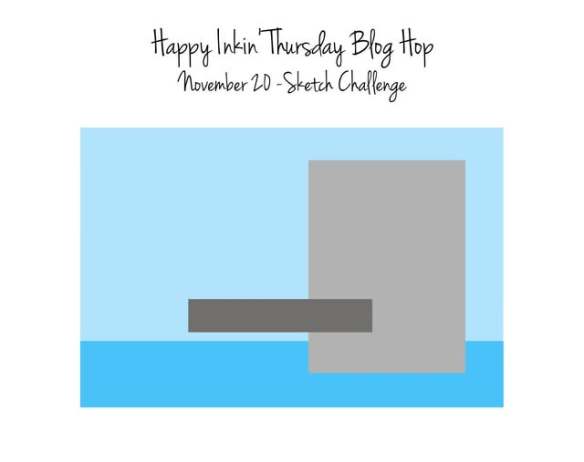
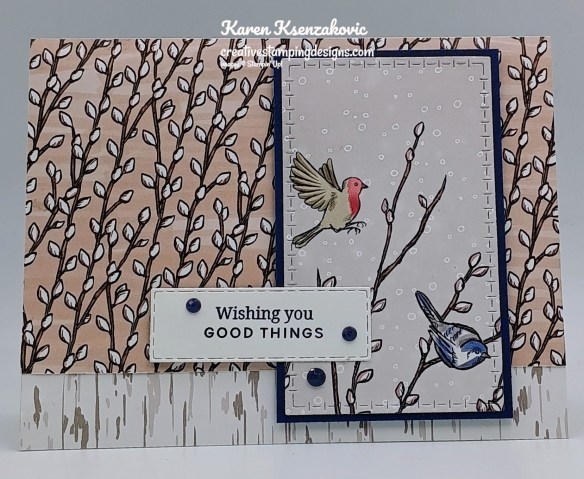
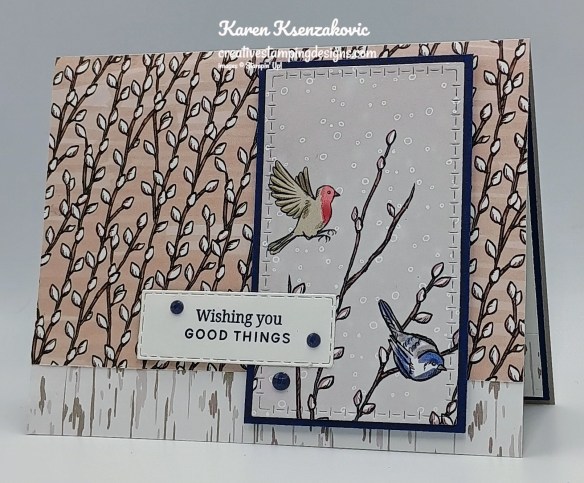
Good Thursday morning stamping friends and welcome to our Happy Inkin’ Thursday Blog Hop. If you are starting with me, thank you. I hope you will stop by everyone’s blog to see what they have created this week. If you are hopping over from Mary’s blog, thank you for stopping by. This week we have Sketch Challenge. If you’d like to see a quick video on how I made this card, Click Here to go to my Instagram Reels. Here is my card using this week’s sketch.
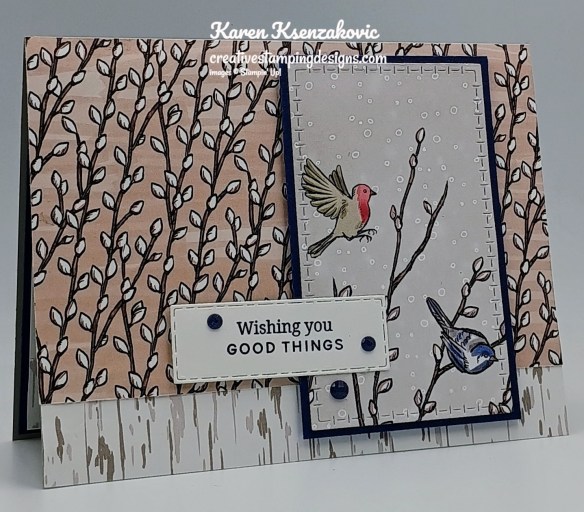
I used the Stampin’ Up! Online Exclusive Banner Sayings Photopolymer Stamp Set along with the Nests of Winter Designer Series Paper and Textured Notes Dies for my card today.
This is our sketch for this week.
Adhere 2 different panels of Nests of Winter DSP to the front of the Gray Granite card base.
Cut a panel of the Nests of Winter DSP using the Textured Notes Dies. Adhere the die cut panel to a Night of Navy mat. Adhere the layered panel to the card front with Stampin’ Dimensionals.
Stamp the sentiment from the Banner Sayings stamp set in Night of Navy Ink on a panel of Basic White. Cut the sentiment out using the Textured Notes Dies. Adhere the sentiment to the card front. Add a few Charming Shimmer Faceted Dots to the card front.
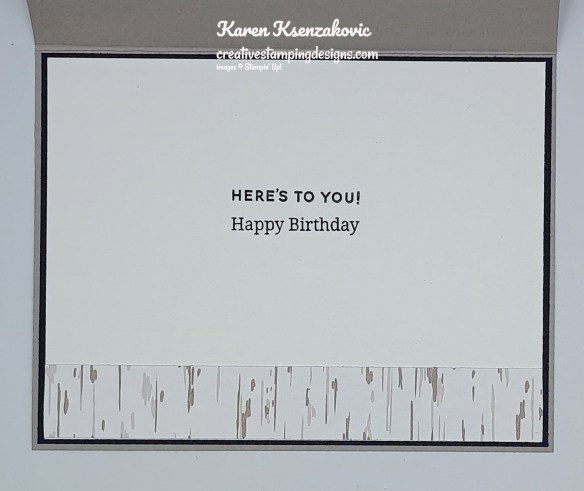
Stamp the sentiments from the Banner Sayings stamp set in Night of Navy Ink on a panel of Basic White. Adhere a panel of Nests of Winter DSP to the bottom of the panel. Adhere the Basic White panel to a Night of Navy mat then to the inside of the Gray Granite card base.
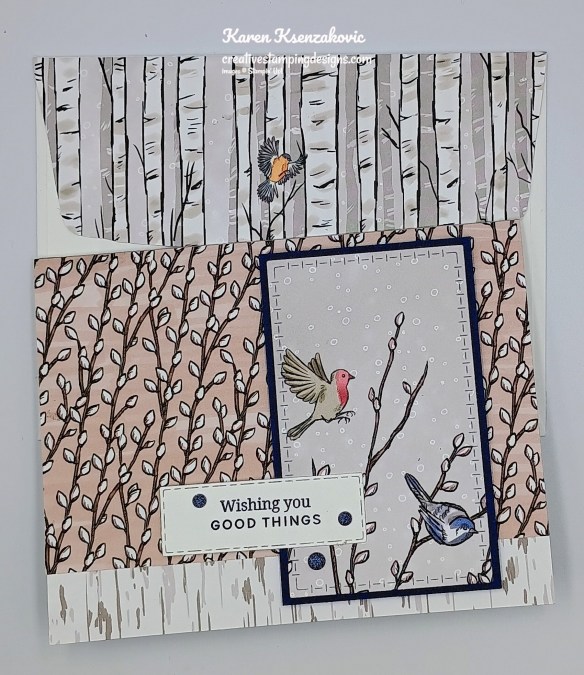
Decorate a Basic White Medium Envelope to complete your card. Adhere a strip of Nests of Winter DSP to the envelope front. Adhere a panel of Nests of Winter DSP to the envelope flap.
Thank you for stopping by my blog today. Now that you’ve seen my card, let’s get on with the hop! Click the button below to hop over to see what Akiko created. Happy Hopping!!
Just in case you get lost along the way, here is a list of the team members involved in the hop today.
If you need any stamping supplies, I’d love to be your Demonstrator. Just click HERE to go directly to my online store or drop me an email if you have any questions.
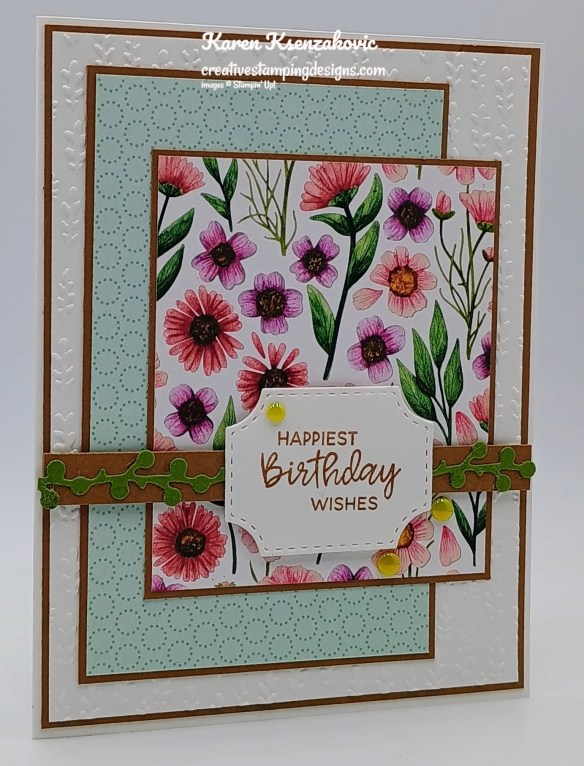
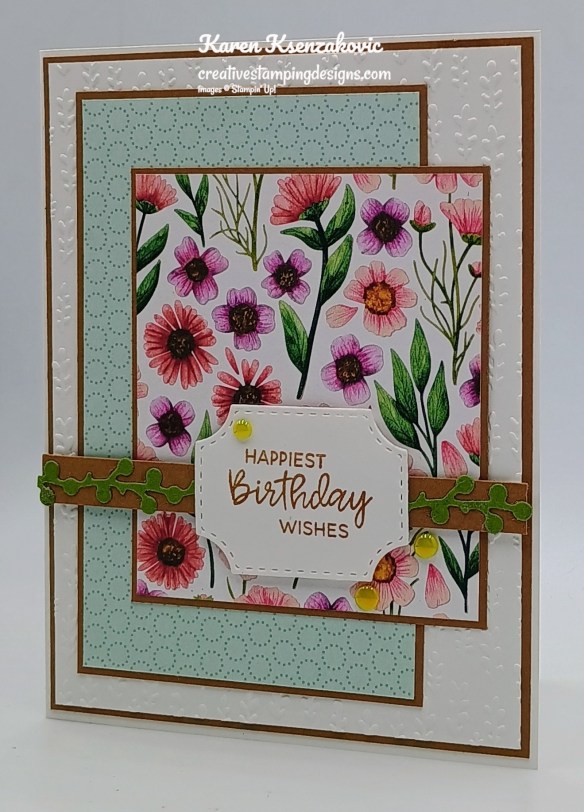
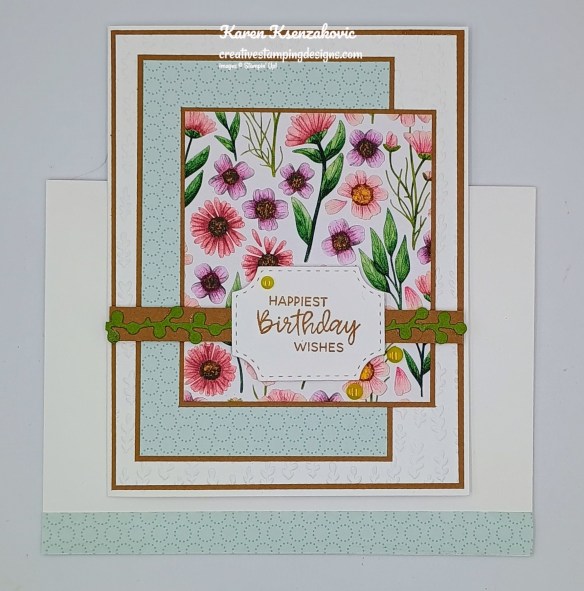
Good Thursday morning stamping friends and welcome to our Happy Inkin’ Thursday Blog Hop. If you are starting with me, thank you. I hope you will stop by everyone’s blog to see what they have created this week. If you are hopping over from Mary’s blog, thank you for stopping by. This week we have Color Challenge. If you’d like to see a quick video on how I made this card, Click Here to go to my Instagram Reels. Here is my card using this week’s colors
I used the Stampin’ Up! simply Said Photopolymer Stamp Set along with the Peaceful Garden Designer Series Paper, Peaceful Garden Glimmer Paper, Peaceful Greenery 3D Embossing Folder, 1 3/4″ & 1 7/8″ Circle Punches for my card today.
These are out colors for this week
Adhere a panel of Peaceful Garden DSP to a Secret Sea card base. Emboss a panel of Basic Beige using the Peaceful Greenery EF. Adhere the embossed panel to a Cloud Cover mat.
Adhere a panel of Peaceful Garden DSP to the left side of the embossed panel. Adhere a panel of Peaceful Garden DSP to a Cloud Cover mat. Adhere the layered panel to the right of the embossed panel. Wrap a piece of Misty Moonlight Silver Edged 1/2″ Ribbon around the layered panel and tie a bow. Adhere the layered panel to the card front with Stampin’ Dimensionals.
Stamp the sentiment from Simply Said stamp set in Versamark Ink to a panel of Secret Sea. Sprinkle the sentiment with White Embossing Powder and set it with the Heat Tool. Cut the sentiment out with the 1 3/4″ Circle Punch. Cut a panel of Peaceful Garden Glimmer Paper using the 1 7/8″ Circle Punch. Adhere the sentiment to the Glimmer mat. Adhere the layered sentiment to the card front with Stampin’ Dimensionals. Add a few Hues of Blue Flowers to the car front.
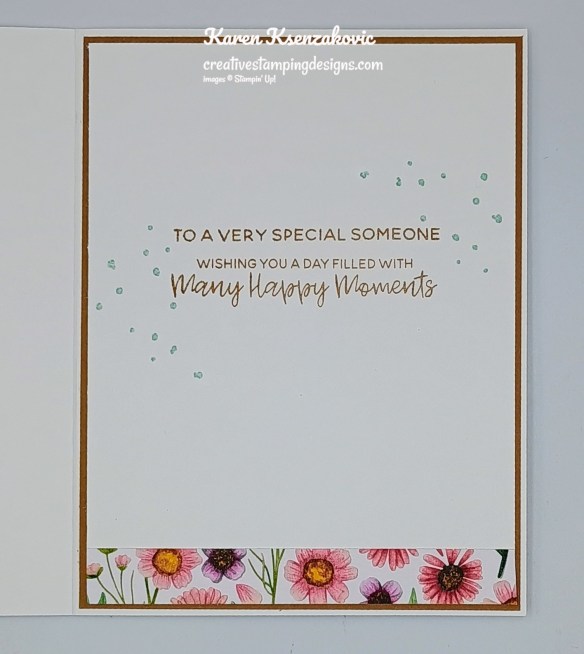
Stamp the sentiment from the Simply Said stamp set in Secret Sea Ink on a panel of Basic White. Adhere a panel of Peaceful Garden DSP to the bottom of the panel. Adhere the Basic White panel to a Cloud Cover mat then to the inside of the Secret Sea card base. Add a couple of the Hues of Blue Flowers by the sentiment.
Decorate a Basic White Medium Envelope to complete the card. Adhere a strip of Peaceful Garden DSP to the envelope front and a panel to the envelope flap.
Thank you for stopping by my blog today. Now that you’ve seen my card, let’s get on with the hop! Click the button below to hop over to see what Akiko has created. Happy Hopping!!
Just in case you get lost along the way, here is a list of the team members involved in the hop today.
If you need any stamping supplies, I’d love to be your Demonstrator. Just click HERE to go directly to my online store or drop me an email if you have any questions.
Basic Beige Cardstock 3 1/2″ x 4 1/2″(embossed panel)
Basic White Cardstock 4″ x 5 /4″(inner liner)
Cloud Cover Cardstock 3 5/8″ x 4 5/8″(embossed panel mat), 2 1/2″ x 4″(card front panel mat), 4 1/8″ x 5 3/8″(inner liner mat)
Secret Sea Cardstock 4 1/4″ x 11″(card base scored & folded at 5 1/2″), 2 1/4″ x 2 1/4″(sentiment)
Peaceful Garden Designer Series Paper 4 1/8″ x 5 3/8″(card front), 2″ x 5 3/8″ & 2 3/8″ x 3 7/8″(card front panels), 1/2″ x 4″(inner liner), 1/2″ x 6″ & 2 1/4″ x 6″(envelope)
Peaceful Garden Glimmer Paper 2 1/4″ x 2 1/4″(sentiment mat)
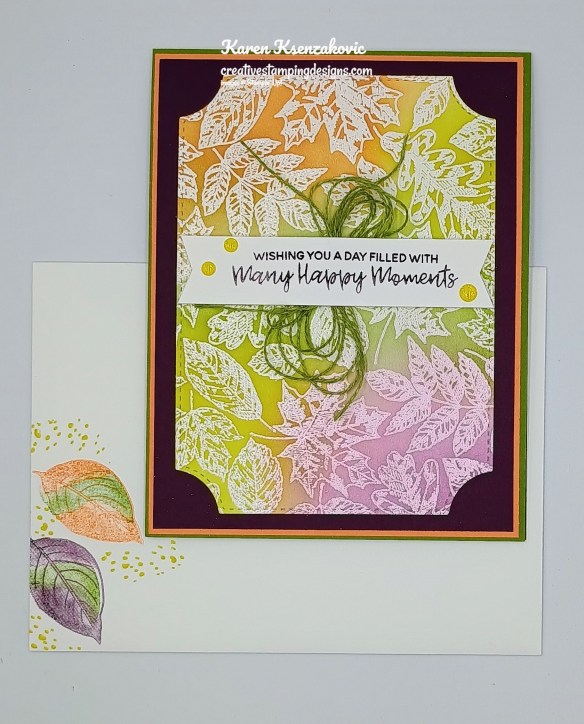
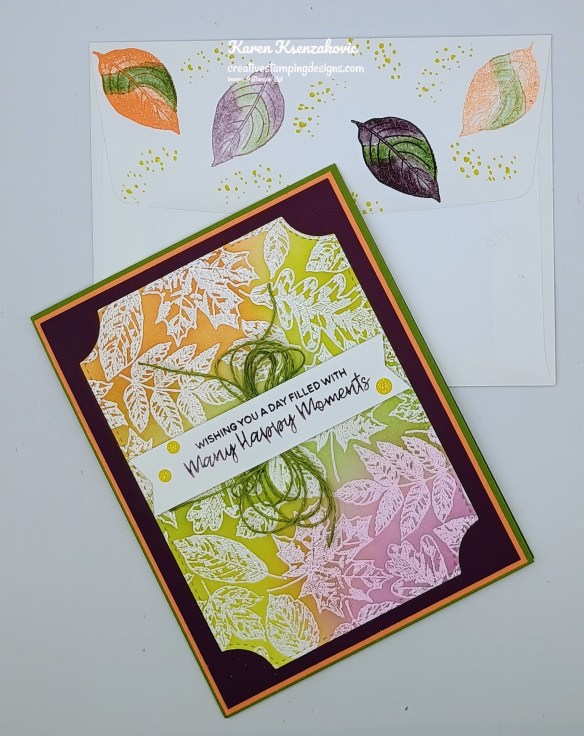
Good Saturday morning stamping friends and welcome to the weekend. Do you have some plans in the works yet? I’ll be at work all day today.
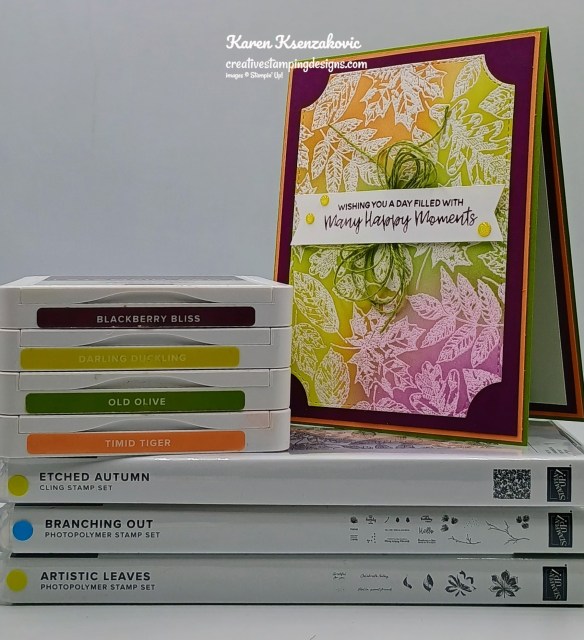
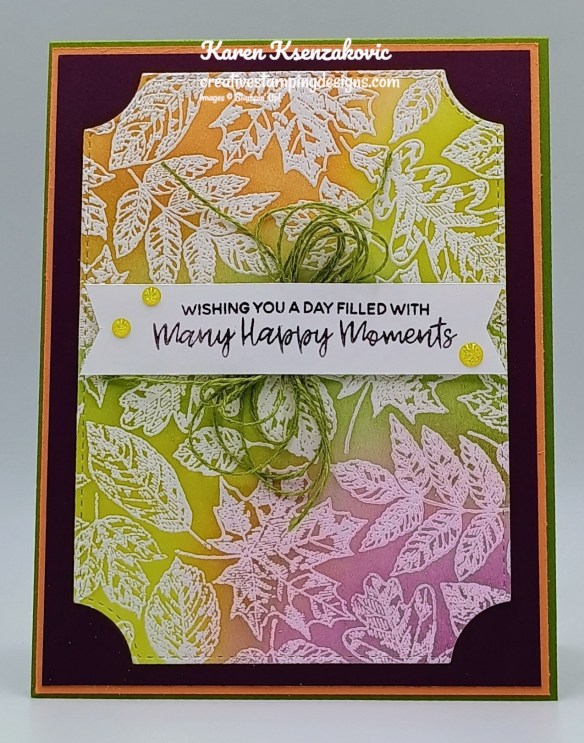
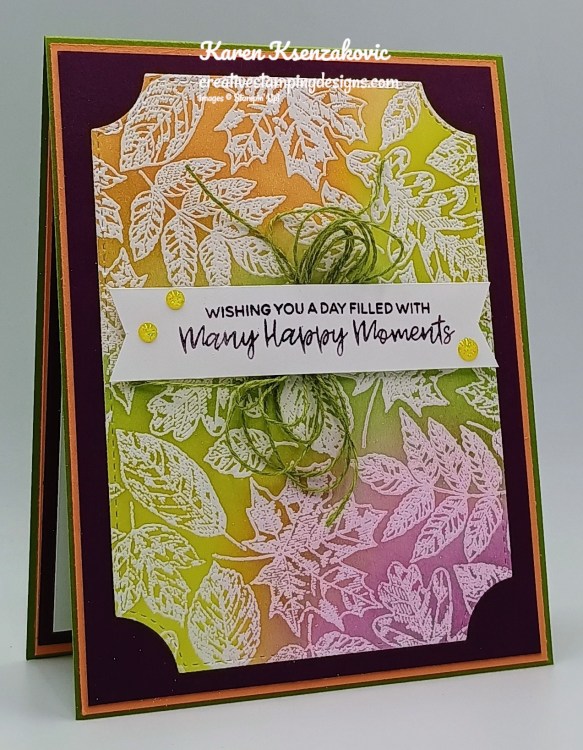
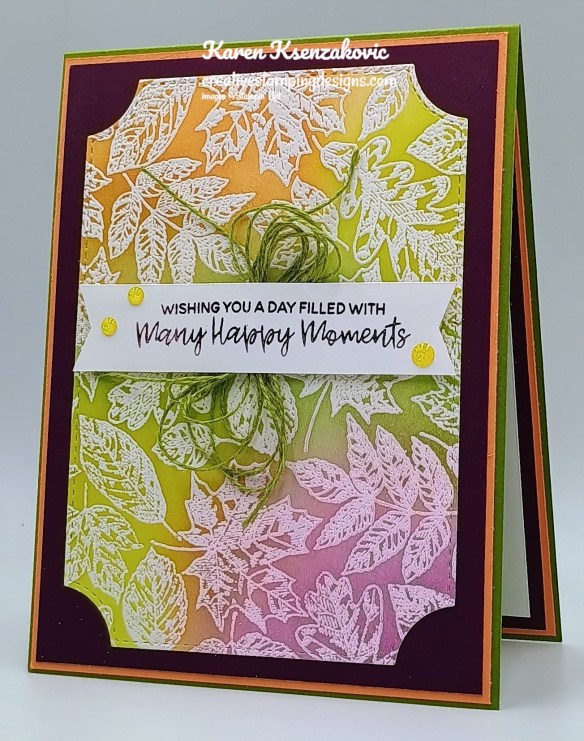
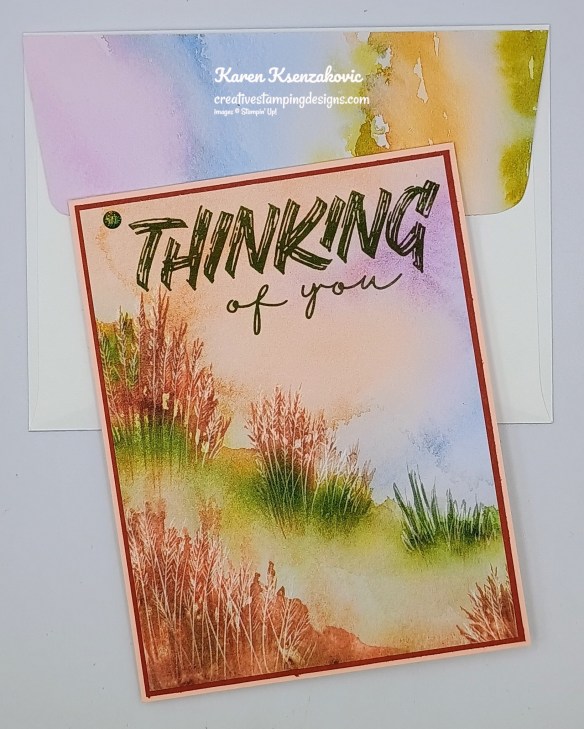
Today’s card uses the Emboss Resist Technique. If you’d like to see a quick video on how I made this card, Click Here to go to my Instagram Reels. Here’s my card for today.
I used the Stampin’ Up! Etched Autumn Cling Stamp Set along with the Stampin’ Up! Branching Out Bundle and Stampin’ Up! Artistic Leaves Photopolymer Stamp Set for my card today.
Stamp the Etched Autumn image on a panel of Basic White in Versamark Ink. Sprinkle image with White Embossing Powder and set it using the Heat Tool.
Using the Small Blending Brushes, add Blackberry Bliss, Darling Duckling, Old Olive and Timid Tiger Inks a little at a time. Remember you can always add more ink, but you can’t remove it. Wipe image with a tissue when you are done adding color to remove it from the embossed areas. Cut the image out with the largest Branching Out Dies. Adhere the colored panel to a Blackberry Bliss mat with Stampin’ Seal. Adhere the layered panel to a Timid Tiger mat with Stampin’ Seal. Adhere the layered panel to an Old Olive card base with Liquid Glue.
Stamp the sentiment from the Stampin’ Up! Branching Out Photopolymer Stamp Set in Blackberry Bliss Ink on a panel of Basic White. Cut the ends into a banner using snips. Tie a multi-loop bow with the Old Olive Linen Thread. Adhere the bow to the card front with a Glue Dot. Adhere the sentiment over the bow with Stampin’ Dimensionals. Add a few of the Low-Profile Sparkling Dots to the card front.
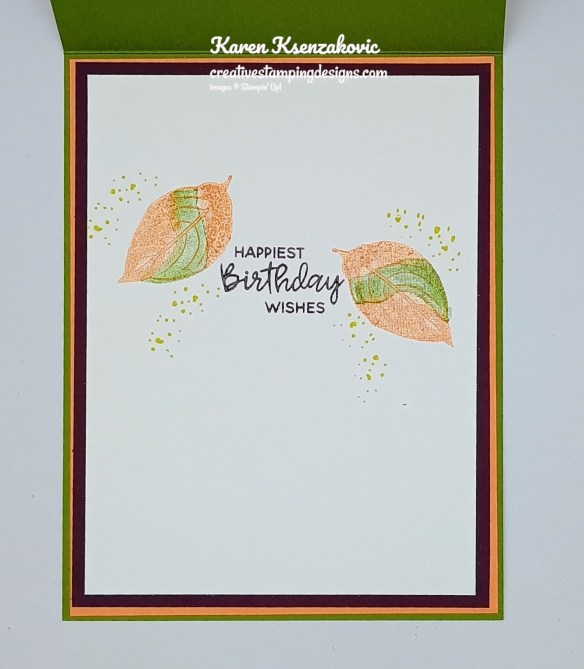
Stamp the sentiment from the Branching Out stamp set in Blackberry Bliss Ink on a pane of Basic White. Stamp the smaller leaf image from the Artistic Leaves stamp set in Timid Tiger Ink, stamping off once on scrap paper, on either side of the sentiment. Stamp the leaf highlight image from the Artistic Leaves stamp set in Old Olive Ink, stamping off once on scrap paper, over the detailed image. Stamp the splatter image from the Artistic Leaves stamp set in Darling Duckling Ink around the leaves. Adhere the Basic White panel to a Blackberry Bliss mat, then to a Timid Tiger mat and to the inside of the Old Olive card base.
Decorate a Basic White Medium Envelope to finish the card. Stamp the smaller leaf image from the Artistic Leaves stamp set on the envelope front and flap in Blackberry Bliss and Timid Tiger Inks. Stamp the highlight image from the Artistic Leaves stamp set in Old Olive Ink and the splatter image in Darling Duckling Ink.
Thank you for stopping by my blog today. I hope you like the card and will give it a try. Happy Stamping!!
If you need any stamping supplies, I’d love to be your Demonstrator. Just click HERE to go directly to my online store or drop me an email if you have any questions.
Stampin’ Up! BEST JOINING SPECIAL EVER coming soon – October 1 – 31
Crafting is even more fun with community, and there’s never been a better time to join. Become a demonstrator and enjoy all the perks that come with that, like a 20–25% product discount, exclusive early access to the latest releases and catalogs, the opportunity to earn a modest supplemental income, the chance to attend incredible training and crafting events, and so much more! Have you ever thought about joining the Stampin’ Up! community? Are you into scrapbooking and have you seen all the new scrapbook products Stampin’ Up! has? Is your wish/want list pretty long and do you order often? Wouldn’t you love to get all these products at a discount? If you answer was yes to any or all of these questions, why not consider joining the Stampin’ Up! community between Octobr 1-31, and save on everything you buy? Are you new to stamping and don’t know where to start, but would like to join to save? Ask me for help, I’m here to help and assist you anyway that I can. OCTOBER is the best time ever to join!! The best part is you can put November Online Exclusive preorder items in the Starter Kit. Contact me and we can talk about signing you up. There’s never an obligation to sell, you can join to enjoy the discount for yourself.
From October 1 to 31, anyone who purchases the Starter Kit can choose between two amazing offers. In addition to FREE shipping, FREE business supplies, and a FREE Paper Pumpkin kit, you can either get $125 worth of products for just $35 OR $189 worth of products for just $99!
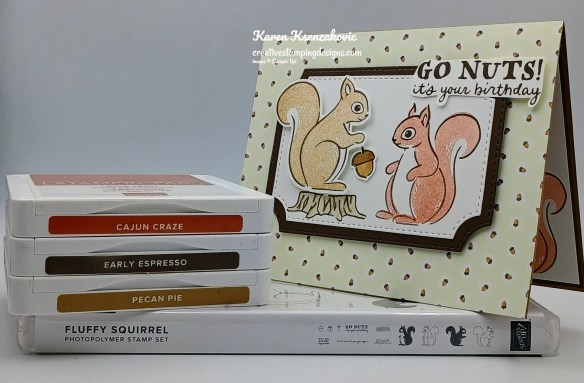
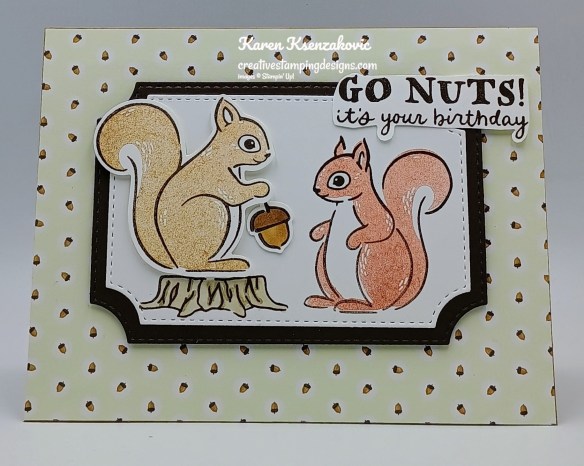
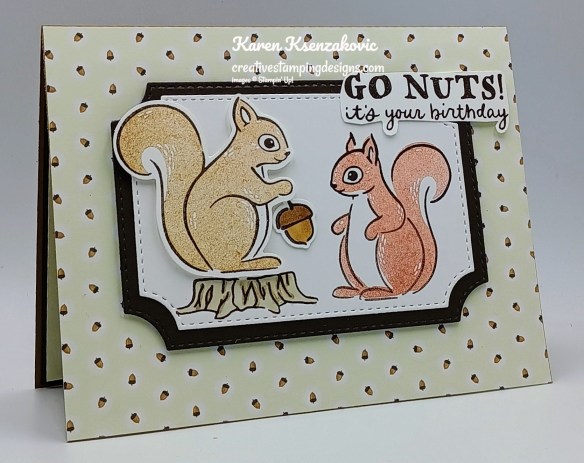
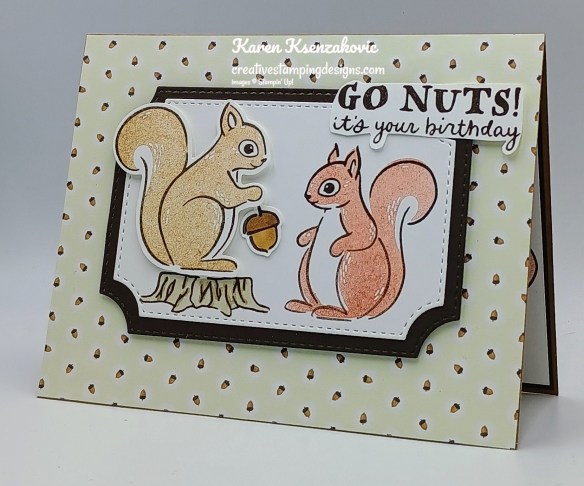
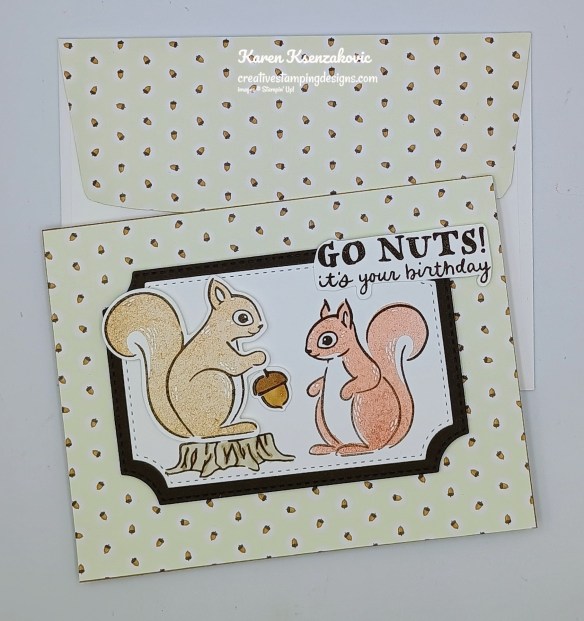
Good Thursday morning stamping friends and welcome to our Happy Inkin’ Thursday Blog Hop. If you are starting with me, thank you. I hope you will stop by everyone’s blog to see what they have created this week. If you are hopping over from Mary’s blog, thank you for stopping by. This week we have Theme Challenge. If you’d like to see a quick video of how I made this card, Click Here to go to my Instagram Reels. Here is my card using this week’s theme.
I used the new Stampin’ Up! Fluffy Squirrel Bundle along with the Branching Out Dies and Weekend Adventure Designer Series Paper for my card today.
We have an Autumn Theme for today’s challenge.
Adhere a panel of Weekend Adventure DSP to a Pecan Pie card base with Stampin’ Seal. Using the Branching Out Dies, cut panels of Basic White and Early Espresso. On the Basic White die cut, stamp the outlined squirrel image from the Stampin’ Up! Fluffy Squirrel Photopolymer Stamp Set in Early Espresso Ink. Stamp the solid squirrel image from the Fluffy Squirrel stamp set in Cajun Craze Ink, stamping off once on scrap paper, over the outlined image.
Stamp the tree stump image from the Fluffy Squirrel stamp set in Early Espresso Ink on the left side of the panel. Color the image with Crumb Cake Stampin’ Blends Markers. On the panel of Basic White, stamp the outlined squirrel and acorn images from the Fluffy Squirrel stamp set in Early Espresso Ink. Stamp the solid squirrel image from the Fluffy Squirrel stamp set in Pecan Pie Ink, stamping off once on scrap paper, over the outlined image. Using the Fluffy Squirrel Builder Punch, punch out the squirrel and acorn images. Adhere the squirrel image on the tree stump with Stampin’ Dimensionals. Adhere the acorn image in the squirrels’ paws using a Glue Dot. Adhere the artwork to the Early Espresso die cut with Stampin’ Seal.
Adhere the layered panel to the card front using Stampin’ Dimensionals. Stamp the sentiment from the Fluffy Squirrel stamp set in Early Espresso Ink on the Basic White panel. Fussy cut the sentiment using snips. Adhere the sentiment to the card front with Stampin’ Dimensionals.
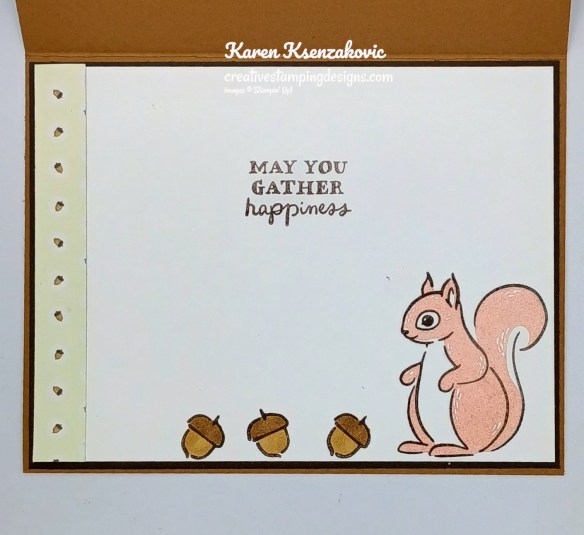
On a panel of Basic White, stamp the sentiment from the Fluffy Squirrel stamp set in Early Espresso Ink. Stamp the outlined squirrel and acorn images from the Fluffy Squirrel stamp set in Early Espresso Ink on the bottom of the panel. Stamp the solid squirrel image from the Fluffy Squirrel stamp set in Cajun Craze Ink, stamping off once on scrap paper, over the outlined image. Color the acorns using the Pecan Pie Stampin’ Blends Markers. Adhere a panel of Weekend Adventure DSP to the side of the panel. Adhere the Basic White panel to an Early Espresso mat then to the inside of the Pecan Pie card base.
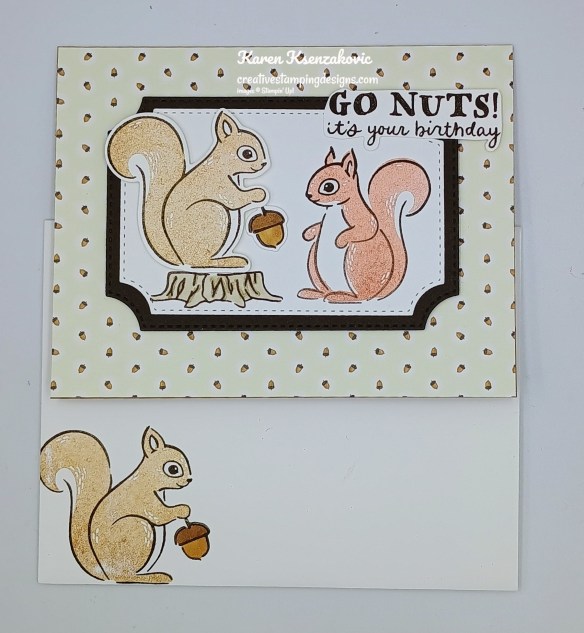
To complete the card, decorate a Basic White Medium Envelope. Stamp the outlined squirrel image from the Fluffy Squirrel stamp set in Early Espresso Ink on the envelope front. Stamp the solid squirrel image in Pecan Pie, stamping off once on scrap paper, over the outlined images. Stamp the acorn image from the Fluffy Squirrel stamp set in Early Espresso Ink in the squirrels’ paws. Color the image with Pecan Pie Stampin’ Blends Markers. Adhere a panel of Weekend Adventure DSP to the envelope flap.
Thank you for stopping by my blog today. Now that you’ve seen my card, let’s get on with the hop! Click the button below to hop over to see what Akiko has created. Happy Hopping!!
Just in case you get lost along the way, here is a list of the team members involved in the hop today.
If you need any stamping supplies, I’d love to be your Demonstrator. Just click HERE to go directly to my online store or drop me an email if you have any questions.
Good Thursday morning stamping friends and welcome to our Happy Inkin’ Thursday Blog Hop. If you are starting with me, thank you. I hope you will stop by everyone’s blog to see what they have created this week. If you are hopping over from Mary’s blog, thank you for stopping by. This week we have Color Challenge. If you’d like to see a quick video of how I made this card, Click Here to go to my Instagram Reels. Here is my card using this week’s colors.
I used the new Stamping Up! Branching Out Bundle along with the new Online Exclusive Gathering Leaves Embossing Folder (both items will be available Sept 3rd) and the Floral Impressions Designer Series Paper for my card today.
These are our colors for this week.
Emboss Basic White card front using the Gathering Leaves EF. Adhere the embossed panel to a Pecan Pie mat with Liquid Glue. Adhere 2 panels of Floral Impressions DSP to coordinating Pecan Pie mats with Stampin’ Seal. Adhere the layered panel to a Basic White Thick card base with Liquid Glue.
Adhere the larger DSP layered panel to the card front with Liquid Glue. Adhere the smaller DSP layered panel to the card front, overlapping the 1st panel, with Liquid Glue. Using the Branching Out Dies, cut the sprig die from a panel of Old Olive. Adhere the sprig to a Pecan Pie mat. Trim off excess. Adhere the layered strip to the card front.
On a panel of Basic White, stamp the sentiment from the Stampin’ Up! Branching Out Photopolymer Stamp Set in Pecan Pie Ink. Using the smallest Branching Out Dies, cut the top portion of the sentiment. Move the die to the desired size, matching up the dashes, and cut the bottom portion of the sentiment. Adhere the sentiment to the card front with Stampin’ Dimensionals. Add a few 2025-2027 In-Color Flat Pearls to the card front.
Stamp the sentiment from the Branching Out stamp set in Pecan Pie Ink on a panel of Basic White. Stamp the splatter image from the Branching Out stamp set in Pool Party Ink on either side of the sentiment. Adhere a panel of Floral Impressions DSP to the bottom of the panel. Adhere the Basic White panel to a Pecan Pie mat then to the inside of the Basic White Thick card base.
Decorate a Basic White Medium Envelope to compete your card. Adhere a strip of the Floral Impressions DSP to the envelope front and a panel to the envelope flap.
Thank you for stopping by my blog today. Now that you’ve seen my card, let’s get on with the hop! Click the button below to hop over to see what Akiko has created. Happy Hopping!!
Just in case you get lost along the way, here is a list of the team members involved in the hop today.
If you need any stamping supplies, I’d love to be your Demonstrator. Just click HERE to go directly to my online store or drop me an email if you have any questions.
Starting August 5, select products that feature the new 2025–2027 In Colors™ are 15% off! This is a great opportunity to purchase new In Color products at a discount, so grab products you love—like ink, two-tone cardstock, and Designer Series Paper—and get everything you need to create projects that showcase Stampin’ Up!’s amazing color coordination!
Promotion Details:
Sales Period: August 5–31
Ordering Deadline: August 31, 2025, at 11:59 p.m. (MT)
Sale includes select inks, cardstock, Designer Series Paper, embellishments, and other products that include these new In Colors. Only products featured on the 2025–2027 In Colors page are included in this promotion.
Products are available only while supplies last.
You can find the 2025-2027 In Color sale items that will be on sale beginning August 5 right here! Get your list ready and shop early for the best selection!
Basic White Cardstock (2) 4″ x 5 1/4(card front & inner liner), 1 1/2″ x 2 1/2″(sentiment)
Basic White Tick Cardstock 5 1/2″ x 8 1/2″(card base scored & folded at 4 1/4″)
Old Olive Cardstock 1″ x 5″(die cut)
Pecan Pie Cardstock (2) – 4 1/8″ x 5 3/8″(card front & inner liner mats), 3″ x 4 3/4& 3″ x 3 1/2″(card front panel mats), 1/2″ x 4 1/8″(die cut mat)
Floral Impressions Designer Series Paper 2 7/8″ x 4 5/8″ & 2 7/8″ x 2 3/8″(card front panels), 3/8″ x 4″(inner liner), 1/2″ x 6″ & 2 1/4″ x 6″(envelope)
Good HOT Tuesday morning stamping friends. It’s supposed to hit just about 100 here in NJ today with the real feel of 110. Add the humidity and poor air quality to that and you have an inside crafting day. I did head out for a quick walk early this morning before the heat got too bad.
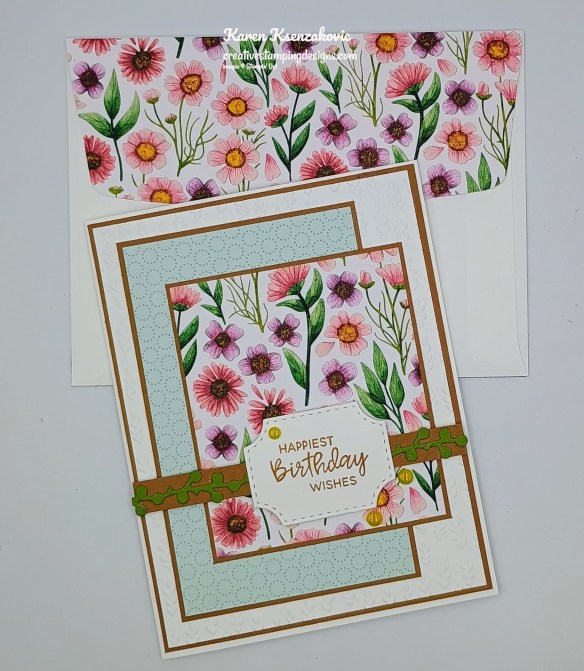
I have a super quick and easy card for you today for those times when you are heading out the door and realize you forgot the birthday card. I think I put this one together in less than 10 minutes. The stamp set I used along with some of the beautiful DSP makes a perfect quick card that others will think you took much longer to make. It took me longer to take the pictures than to make it. Here’s my card for today.
I used the Stampin’ Up! Layered Thoughts Photopolymer Stamp Set and the Thoughtful Journey 6 x 6 Designer Series Paper for my card today.
Stamp the sentiments from the Layered Thoughts stamp set in Mossy Meadow Ink on a panel of Thoughtful Journey DSP.
Adhere the stamped panel to a Cajun Craze mat with Stampin’ Seal. Adhere the layered panel to a Petal Pink card base with Stampin’ Seal.
Add a Low-Profile Sparkle Dot to the card front.
On a panel of Basic White, stamp the sentiment from the Layered Thoughts stamp set in Mossy Meadow Ink. Adhere a panel of Thoughtful Journey DSP to the bottom of the panel Adhere the Basic White panel to a Cajun Craze mat then to the inside of the Petal Pink card base.
Finish your card by decorating a Basic White Medium Envelope. Adhere a strip of the Thoughtful Journey DSP to the envelope front and a panel to the envelope flap.
Thank you for stopping by my blog today. I hope you like the card and will give it a try. Happy Stamping!!
If you need any stamping supplies, I’d love to be your Demonstrator. Just click HERE to go directly to my online store or drop me an email if you have any questions.
Starting August 5, select products that feature the new 2025–2027 In Colors™ are 15% off! This is a great opportunity to purchase new In Color products at a discount, so grab products you love—like ink, two-tone cardstock, and Designer Series Paper—and get everything you need to create projects that showcase Stampin’ Up!’s amazing color coordination!
Promotion Details:
Sales Period: August 5–31
Ordering Deadline: August 31, 2025, at 11:59 p.m. (MT)
Sale includes select inks, cardstock, Designer Series Paper, embellishments, and other products that include these new In Colors. Only products featured on the 2025–2027 In Colors page are included in this promotion.
Products are available only while supplies last.
You can find the 2025-2027 In Color sale items that will be on sale beginning August 5 right here! Get your list ready and shop early for the best selection!
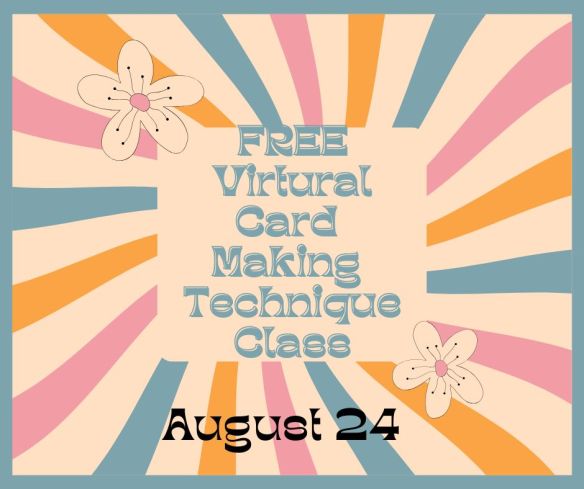
Registration Open for our August Online Technique Class
Tara Carpenter, Nicole Bloxom and I are teaming up to offer a fun Technique Online Zoom Class. We will be creating 6 different cards using 6 different techniques. This class is free with a $50 purchase from my Online Store. We will supply a list of supplies we are going to be using in the next couple days. We decided to open registration early so you can take advantage of the Free Shipping and my Double Rewards and also earn a free class.
The class requirements and What You Will Receive:
Visit my Online Store and place a $50 or more order before tax and shipping.
Zoom class with complete step by step instructions to complete each card as we go.
PDF with detailed directions and photos
A Link to the recorded class after we are done so you can watch it again and make more cards.
Here is a list of just some of the items that Tara, Nicole and I will be using.
Charming Day Bundle
Elements of Text stamp set
Artistic Leaves Stamp Set
Two-Tone Cardstock
Fluid 100 Watercolor Paper
Iridescent Treat Bags
Stampin’ Spritzer
Wow Basics Embossing Powder
Heat Tool
Floral Charm DSP
Adhesive Sheets
Stylish Shapes Dies
A week before the class I will send you the complete PDF of the cards so you can cut all your cardstock and gather your supplies, so you are ready to go. We will NOT be cutting cardstock live. Everyone’s cards will be unique since you will pick which color cardstock and ink you want to use for each card.
The class will be held on Sunday August 24th from 1pm – 5pm Eastern Time via Zoom. This will allow everyone all over the United States to participate live!
I will email you the Zoom link to the class a few days before the event.
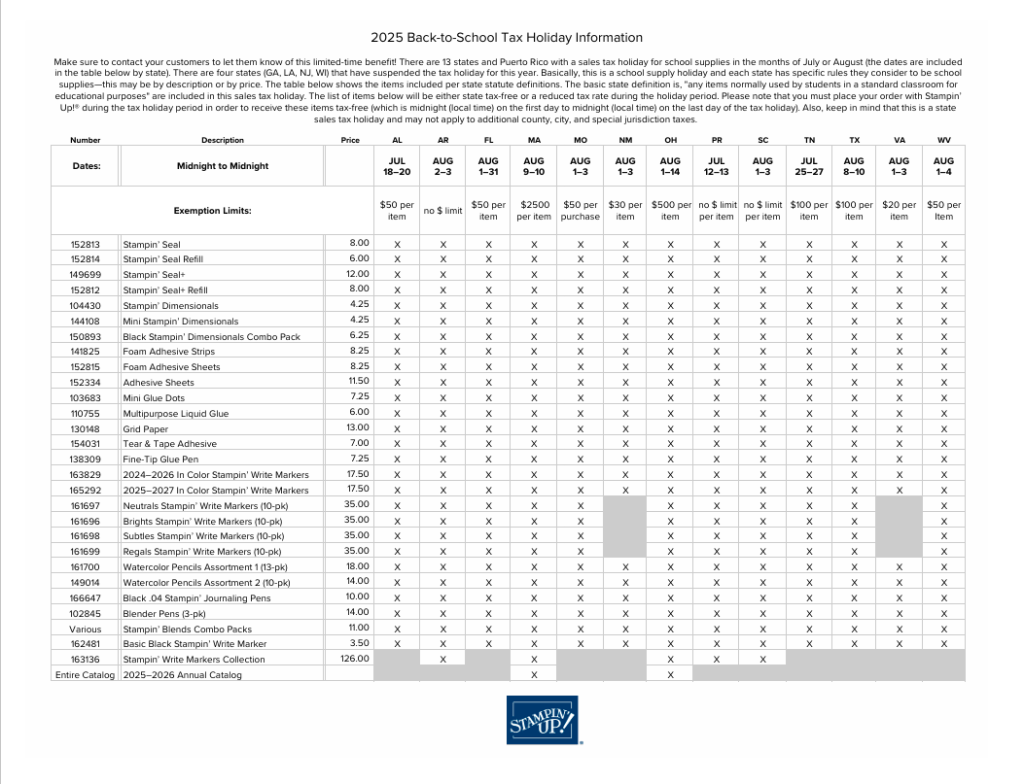
Twelve states and Puerto Rico are having Back-to-School Sales Tax Holidays this year and some Stampin’ Up! items qualify for the tax break in those states!
The states with upcoming tax holidays are: Alabama, Arkansas, Florida, Massachusetts, Missouri, New Mexico, Ohio, South Carolina, Tennessee, Texas, Virginia and West Virginia. So if you live in one of those states or Puerto Rico, take a second to download the spreadsheet below and mark your calendar!
Please note that you must place your order with Stampin’ Up! during the tax holiday period in your state in order to receive these items tax-free (which is midnight on the first day to midnight on the last day of the tax holiday). Also, keep in mind that this is a state sales tax holiday; the state statute may not apply to county, city, and special jurisdiction taxes.
For those wondering about Georgia, Illinois, Louisiana, New Jersey, and Wisconsin, those states have suspended the sales tax holiday this year.
Good Saturday morning stamping friends, welcome to the weekend. What kind of plans do you have for the weekend? I’ll be working all day today and tomorrow Tara and I will be holding our Sweet Jar of Joy Online Zoom class. We’re super excited about this class and can’t wait to make the cards with everyone who signed up.
I played with some Two-Tone cardstock for today’s card. If you’d like to see a quick video of how I made this card, Click Here to go to my Instagram Reels. Here’s my card for today.
I used the Stampin’ Up! With You IN Mind Photopolymer Stamp Set along with the Stampin’ Up! Paper Tags Cling Stamp Set, Pressed Flowers Embossing Folder and Blackberry Bliss Two-Tone Cardstock for my card today.
Emboss a panel of Blackberry Bliss Tow-Tone cardstock using the Pressed Flowers EF. Stamp the sentiment from With You in Mind stamp set in Versamark Ink on the top of the panel. Sprinkle the sentiment with White Embossing Powder and set it with the Heat Tool.
With a very fine piece of sandpaper or a craft sanding block, lightly go over the embossed portion of the card front to bring out the core white. Adhere the embossed panel to a Basic White mat.
Wrap a piece of White 1/4″ Starter Ribbon around the layered panel and tie a bow. Adhere the layered panel to a Basic White Thick card base with Stampin’ Dimensionals. Add a few Iridescent Faceted Gems to the card front.
Stamp the sentiment from the Paper Tags stamp set in Blackberry Bliss Ink on a panel of Basic White. Adhere the panel of Blackberry Bliss Two-Tone Cardstock to the bottom of the panel. Adhere the Basic White panel to a Blackberry Bliss mat then to the inside of the Basic White Thick card base.
Finish your card by decorating a Basic White Medium Envelope. Stamp the sentiment from Paper Tags stamp set in Blackberry Bliss Ink on the envelope front. Emboss a panel of the Blackberry Bliss Tow-Tone cardstock using the Pressed Flowers EF. Use the sanding block to lighten the image and adhere it to the envelope flap.
Thank you for stopping by my blog today. I hope you like the card and will give it a try. Happy Stamping!!
If you need any stamping supplies, I’d love to be your Demonstrator. Just click HERE to go directly to my online store or drop me an email if you have any questions.
Registration Open for our August Online Technique Class
Tara Carpenter, Nicole Bloxom and I are teaming up to offer a fun Technique Online Zoom Class. We will be creating 6 different cards using 6 different techniques. This class is free with a $50 purchase from my Online Store. We will supply a list of supplies we are going to be using in the next couple days. We decided to open registration early so you can take advantage of the Free Shipping and my Double Rewards and also earn a free class.
The class requirements and What You Will Receive:
Visit my Online Store and place a $50 or more order before tax and shipping.
Zoom class with complete step by step instructions to complete each card as we go.
PDF with detailed directions and photos
A Link to the recorded class after we are done so you can watch it again and make more cards.
A week before the class I will send you the complete PDF of the cards so you can cut all your cardstock and gather your supplies, so you are ready to go. We will NOT be cutting cardstock live. Everyone’s cards will be unique since you will pick which color cardstock and ink you want to use for each card.
The class will be held on Sunday August 24th from 1pm – 5pm Eastern Time via Zoom. This will allow everyone all over the United States to participate live!
I will email you the Zoom link to the class a few days before the event.
Twelve states and Puerto Rico are having Back-to-School Sales Tax Holidays this year and some Stampin’ Up! items qualify for the tax break in those states!
The states with upcoming tax holidays are: Alabama, Arkansas, Florida, Massachusetts, Missouri, New Mexico, Ohio, South Carolina, Tennessee, Texas, Virginia and West Virginia. So if you live in one of those states or Puerto Rico, take a second to download the spreadsheet below and mark your calendar!
Please note that you must place your order with Stampin’ Up! during the tax holiday period in your state in order to receive these items tax-free (which is midnight on the first day to midnight on the last day of the tax holiday). Also, keep in mind that this is a state sales tax holiday; the state statute may not apply to county, city, and special jurisdiction taxes.
For those wondering about Georgia, Illinois, Louisiana, New Jersey, and Wisconsin, those states have suspended the sales tax holiday this year.


![Basic Black 8-1/2" X 11" Cardstock [ 121045 ]](https://assets1.tamsnetwork.com/images/EC042017NF/121045s.jpg "Basic Black 8-1/2\" X 11\" Cardstock [ 121045 ]")
![Basic White 8 1/2" X 11" Cardstock [ 166780 ]](https://assets1.tamsnetwork.com/images/EC042017NF/166780s.jpg "Basic White 8 1/2\" X 11\" Cardstock [ 166780 ]")
![Pretty In Pink 8 1/2" X 11" Cardstock [ 163793 ]](https://assets1.tamsnetwork.com/images/EC042017NF/163793s.jpg "Pretty In Pink 8 1/2\" X 11\" Cardstock [ 163793 ]")
![Pretty In Pink Classic Stampin Pad [ 163807 ]](https://assets1.tamsnetwork.com/images/EC042017NF/163807s.jpg "Pretty In Pink Classic Stampin Pad [ 163807 ]")
![Small Blending Brushes [ 160518 ]](https://assets1.tamsnetwork.com/images/EC042017NF/160518s.jpg "Small Blending Brushes [ 160518 ]")
![Tuxedo Black Memento Ink Pad [ 132708 ]](https://assets1.tamsnetwork.com/images/EC042017NF/132708s.jpg "Tuxedo Black Memento Ink Pad [ 132708 ]")
![Versamark Pad [ 102283 ]](https://assets1.tamsnetwork.com/images/EC042017NF/102283s.jpg "Versamark Pad [ 102283 ]")
![Basics Wow! Embossing Powder [ 165679 ]](https://assets1.tamsnetwork.com/images/EC042017NF/165679s.jpg "Basics Wow! Embossing Powder [ 165679 ]")
![Heat Tool (Us And Canada) [ 129053 ]](https://assets1.tamsnetwork.com/images/EC042017NF/129053s.jpg "Heat Tool (Us And Canada) [ 129053 ]")
![Baker's Twine Essentials Pack [ 155475 ]](https://assets1.tamsnetwork.com/images/EC042017NF/155475s.jpg "Baker's Twine Essentials Pack [ 155475 ]")
![2024 2026 In Color™ Flat Pearls [ 165266 ]](https://assets1.tamsnetwork.com/images/EC042017NF/165266s.jpg "2024 2026 In Color™ Flat Pearls [ 165266 ]")
![Basic White Medium Envelopes [ 159236 ]](https://assets1.tamsnetwork.com/images/EC042017NF/159236s.jpg "Basic White Medium Envelopes [ 159236 ]")

![Adhesive Sheets [ 152334 ]](https://assets1.tamsnetwork.com/images/EC042017NF/152334s.jpg "Adhesive Sheets [ 152334 ]")


![Take Your Pick [ 144107 ]](https://assets1.tamsnetwork.com/images/EC042017NF/144107s.jpg "Take Your Pick [ 144107 ]")


![Pop Up Petals Photopolymer Stamp Set (English) [ 167041 ]](https://assets1.tamsnetwork.com/images/EC042017NF/167041s.jpg "Pop Up Petals Photopolymer Stamp Set (English) [ 167041 ]")
![Gray Granite 8-1/2" X 11" Cardstock [ 146983 ]](https://assets1.tamsnetwork.com/images/EC042017NF/146983s.jpg "Gray Granite 8-1/2\" X 11\" Cardstock [ 146983 ]")
![Lost Lagoon 8-1/2" X 11" Cardstock [ 133679 ]](https://assets1.tamsnetwork.com/images/EC042017NF/133679s.jpg "Lost Lagoon 8-1/2\" X 11\" Cardstock [ 133679 ]")
![Everyday Happiness 12" X 12" (30.5 X 30.5 Cm) Designer Series Paper [ 166632 ]](https://assets1.tamsnetwork.com/images/EC042017NF/166632s.jpg "Everyday Happiness 12\" X 12\" (30.5 X 30.5 Cm) Designer Series Paper [ 166632 ]")
![Gray Granite Classic Stampin' Pad [ 147118 ]](https://assets1.tamsnetwork.com/images/EC042017NF/147118s.jpg "Gray Granite Classic Stampin' Pad [ 147118 ]")
![Pretty Peacock Classic Stampin’ Pad [ 150083 ]](https://assets1.tamsnetwork.com/images/EC042017NF/150083s.jpg "Pretty Peacock Classic Stampin’ Pad [ 150083 ]")
![Lost Lagoon Stampin’ Blends Combo Pack [ 161680 ]](https://assets1.tamsnetwork.com/images/EC042017NF/161680s.jpg "Lost Lagoon Stampin’ Blends Combo Pack [ 161680 ]")
![Pretty Peacock Stampin’ Blends Combo Pack [ 161676 ]](https://assets1.tamsnetwork.com/images/EC042017NF/161676s.jpg "Pretty Peacock Stampin’ Blends Combo Pack [ 161676 ]")
![Clear Wink Of Stella Glitter Brush [ 141897 ]](https://assets1.tamsnetwork.com/images/EC042017NF/141897s.jpg "Clear Wink Of Stella Glitter Brush [ 141897 ]")
![Exposed Brick 3 D Embossing Folder [ 161600 ]](https://assets1.tamsnetwork.com/images/EC042017NF/161600s.jpg "Exposed Brick 3 D Embossing Folder [ 161600 ]")
![Iridescent Pearl Basic Jewels [ 158987 ]](https://assets1.tamsnetwork.com/images/EC042017NF/158987s.jpg "Iridescent Pearl Basic Jewels [ 158987 ]")


![Charming Day Bundle (English) [ 166136 ]](https://assets1.tamsnetwork.com/images/EC042017NF/166136s.jpg "Charming Day Bundle (English) [ 166136 ]")
![Charming Day Cling Stamp Set (English) [ 166126 ]](https://assets1.tamsnetwork.com/images/EC042017NF/166126s.jpg "Charming Day Cling Stamp Set (English) [ 166126 ]")
![Charming Day Dies [ 166135 ]](https://assets1.tamsnetwork.com/images/EC042017NF/166135s.jpg "Charming Day Dies [ 166135 ]")
![Words Of Beauty Bundle (English) [ 167090 ]](https://assets1.tamsnetwork.com/images/EC042017NF/167090s.jpg "Words Of Beauty Bundle (English) [ 167090 ]")
![Words Of Beauty Photopolymer Stamp Set (English) [ 167083 ]](https://assets1.tamsnetwork.com/images/EC042017NF/167083s.jpg "Words Of Beauty Photopolymer Stamp Set (English) [ 167083 ]")
![Words Of Beauty Dies (English) [ 167089 ]](https://assets1.tamsnetwork.com/images/EC042017NF/167089s.jpg "Words Of Beauty Dies (English) [ 167089 ]")
![Night Of Navy 8-1/2" X 11" Cardstock [ 100867 ]](https://assets1.tamsnetwork.com/images/EC042017NF/100867s.jpg "Night Of Navy 8-1/2\" X 11\" Cardstock [ 100867 ]")
![Old Olive 8-1/2" X 11" Cardstock [ 100702 ]](https://assets1.tamsnetwork.com/images/EC042017NF/100702s.jpg "Old Olive 8-1/2\" X 11\" Cardstock [ 100702 ]")
![Timid Tiger 8 1/2" X 11" Cardstock [ 165626 ]](https://assets1.tamsnetwork.com/images/EC042017NF/165626s.jpg "Timid Tiger 8 1/2\" X 11\" Cardstock [ 165626 ]")
![Floral Charm 12" X 12" (30.5 X 30.5 Cm) Designer Series Paper [ 166125 ]](https://assets1.tamsnetwork.com/images/EC042017NF/166125s.jpg "Floral Charm 12\" X 12\" (30.5 X 30.5 Cm) Designer Series Paper [ 166125 ]")
![Night Of Navy Classic Stampin' Pad [ 147110 ]](https://assets1.tamsnetwork.com/images/EC042017NF/147110s.jpg "Night Of Navy Classic Stampin' Pad [ 147110 ]")
![Night Of Navy Stampin' Blends Combo Pack [ 154891 ]](https://assets1.tamsnetwork.com/images/EC042017NF/154891s.jpg "Night Of Navy Stampin' Blends Combo Pack [ 154891 ]")
![Old Olive Stampin' Blends Combo Pack [ 154892 ]](https://assets1.tamsnetwork.com/images/EC042017NF/154892s.jpg "Old Olive Stampin' Blends Combo Pack [ 154892 ]")
![Petal Pink Stampin' Blends Combo Pack [ 154893 ]](https://assets1.tamsnetwork.com/images/EC042017NF/154893s.jpg "Petal Pink Stampin' Blends Combo Pack [ 154893 ]")
![Timid Tiger Stampin’ Blends Combo Pack [ 165291 ]](https://assets1.tamsnetwork.com/images/EC042017NF/165291s.jpg "Timid Tiger Stampin’ Blends Combo Pack [ 165291 ]")
![Beautiful Pattern 3 D Embossing Folder [ 167097 ]](https://assets1.tamsnetwork.com/images/EC042017NF/167097s.jpg "Beautiful Pattern 3 D Embossing Folder [ 167097 ]")
![Charming Shimmer Faceted Dots [ 166139 ]](https://assets1.tamsnetwork.com/images/EC042017NF/166139s.jpg "Charming Shimmer Faceted Dots [ 166139 ]")


![Banner Sayings Photopolymer Stamp Set (English) [ 167044 ]](https://assets1.tamsnetwork.com/images/EC042017NF/167044s.jpg "Banner Sayings Photopolymer Stamp Set (English) [ 167044 ]")
![Nests Of Winter 12" X 12" (30.5 X 30.5 Cm) Designer Series Paper [ 164183 ]](https://assets1.tamsnetwork.com/images/EC042017NF/164183s.jpg "Nests Of Winter 12\" X 12\" (30.5 X 30.5 Cm) Designer Series Paper [ 164183 ]")
![Textured Notes Dies [ 165555 ]](https://assets1.tamsnetwork.com/images/EC042017NF/165555s.jpg "Textured Notes Dies [ 165555 ]")

![Simply Said Mix & Match Photopolymer Stamp Set (English) [ 163756 ]](https://assets1.tamsnetwork.com/images/EC042017NF/163756s.jpg "Simply Said Mix & Match Photopolymer Stamp Set (English) [ 163756 ]")
![Basic Beige 8 1/2" X 11" Cardstock [ 164511 ]](https://assets1.tamsnetwork.com/images/EC042017NF/164511s.jpg "Basic Beige 8 1/2\" X 11\" Cardstock [ 164511 ]")
![Cloud Cover 8 1/2" X 11" Cardstock [ 165621 ]](https://assets1.tamsnetwork.com/images/EC042017NF/165621s.jpg "Cloud Cover 8 1/2\" X 11\" Cardstock [ 165621 ]")
![Secret Sea 8 1/2" X 11" Cardstock [ 165624 ]](https://assets1.tamsnetwork.com/images/EC042017NF/165624s.jpg "Secret Sea 8 1/2\" X 11\" Cardstock [ 165624 ]")
![Peaceful Garden 12" X 12" (30.5 X 30.5 Cm) Designer Series Paper [ 165917 ]](https://assets1.tamsnetwork.com/images/EC042017NF/165917s.jpg "Peaceful Garden 12\" X 12\" (30.5 X 30.5 Cm) Designer Series Paper [ 165917 ]")
![Peaceful Garden 12" X 12" (30.5 X 30.5 Cm) Glimmer Paper [ 165929 ]](https://assets1.tamsnetwork.com/images/EC042017NF/165929s.jpg "Peaceful Garden 12\" X 12\" (30.5 X 30.5 Cm) Glimmer Paper [ 165929 ]")
![Secret Sea Classic Stampin' Pad [ 165285 ]](https://assets1.tamsnetwork.com/images/EC042017NF/165285s.jpg "Secret Sea Classic Stampin' Pad [ 165285 ]")
![Peaceful Greenery 3 D Embossing Folder [ 165928 ]](https://assets1.tamsnetwork.com/images/EC042017NF/165928s.jpg "Peaceful Greenery 3 D Embossing Folder [ 165928 ]")
![1-3/4" (4.4 Cm) Circle Punch [ 119850 ]](https://assets1.tamsnetwork.com/images/EC042017NF/119850s.jpg "1-3/4\" (4.4 Cm) Circle Punch [ 119850 ]")
![1 7/8" (4.8 Cm) Circle Punch [ 165259 ]](https://assets1.tamsnetwork.com/images/EC042017NF/165259s.jpg "1 7/8\" (4.8 Cm) Circle Punch [ 165259 ]")
![Hues Of Blue Flowers [ 165930 ]](https://assets1.tamsnetwork.com/images/EC042017NF/165930s.jpg "Hues Of Blue Flowers [ 165930 ]")
![Misty Moonlight & Silver Edged 1/2" (1.3 Cm) Ribbon [ 165931 ]](https://assets1.tamsnetwork.com/images/EC042017NF/165931s.jpg "Misty Moonlight & Silver Edged 1/2\" (1.3 Cm) Ribbon [ 165931 ]")


![Etched Autumn Cling Stamp Set [ 166082 ]](https://assets1.tamsnetwork.com/images/EC042017NF/166082s.jpg "Etched Autumn Cling Stamp Set [ 166082 ]")
![Branching Out Bundle (English) [ 165776 ]](https://assets1.tamsnetwork.com/images/EC042017NF/165776s.jpg "Branching Out Bundle (English) [ 165776 ]")
![Branching Out Photopolymer Stamp Set (English) [ 165771 ]](https://assets1.tamsnetwork.com/images/EC042017NF/165771s.jpg "Branching Out Photopolymer Stamp Set (English) [ 165771 ]")
![Branching Out Dies [ 165775 ]](https://assets1.tamsnetwork.com/images/EC042017NF/165775s.jpg "Branching Out Dies [ 165775 ]")
![Artistic Leaves Photopolymer Stamp Set (English) [ 166162 ]](https://assets1.tamsnetwork.com/images/EC042017NF/166162s.jpg "Artistic Leaves Photopolymer Stamp Set (English) [ 166162 ]")
![Blackberry Bliss 8-1/2" X 11" Cardstock [ 133675 ]](https://assets1.tamsnetwork.com/images/EC042017NF/133675s.jpg "Blackberry Bliss 8-1/2\" X 11\" Cardstock [ 133675 ]")
![Blackberry Bliss Classic Stampin' Pad [ 147092 ]](https://assets1.tamsnetwork.com/images/EC042017NF/147092s.jpg "Blackberry Bliss Classic Stampin' Pad [ 147092 ]")
![Darling Duckling Classic Stampin' Pad [ 165277 ]](https://assets1.tamsnetwork.com/images/EC042017NF/165277s.jpg "Darling Duckling Classic Stampin' Pad [ 165277 ]")
![Old Olive Classic Stampin' Pad [ 147090 ]](https://assets1.tamsnetwork.com/images/EC042017NF/147090s.jpg "Old Olive Classic Stampin' Pad [ 147090 ]")
![Timid Tiger Classic Stampin' Pad [ 165278 ]](https://assets1.tamsnetwork.com/images/EC042017NF/165278s.jpg "Timid Tiger Classic Stampin' Pad [ 165278 ]")
![Early Espresso & Old Olive Linen Thread Pack [ 165986 ]](https://assets1.tamsnetwork.com/images/EC042017NF/165986s.jpg "Early Espresso & Old Olive Linen Thread Pack [ 165986 ]")
![Low Profile Sparkle Dots [ 166157 ]](https://assets1.tamsnetwork.com/images/EC042017NF/166157s.jpg "Low Profile Sparkle Dots [ 166157 ]")


![Early Espresso 8-1/2" X 11" Cardstock [ 119686 ]](https://assets1.tamsnetwork.com/images/EC042017NF/119686s.jpg "Early Espresso 8-1/2\" X 11\" Cardstock [ 119686 ]")
![Pecan Pie 8 1/2" X 11" Cardstock [ 161717 ]](https://assets1.tamsnetwork.com/images/EC042017NF/161717s.jpg "Pecan Pie 8 1/2\" X 11\" Cardstock [ 161717 ]")
![Weekend Adventures 12" X 12" (30.5 X 30.5 Cm) Designer Series Paper [ 167312 ]](https://assets1.tamsnetwork.com/images/EC042017NF/167312s.jpg "Weekend Adventures 12\" X 12\" (30.5 X 30.5 Cm) Designer Series Paper [ 167312 ]")
![Cajun Craze Classic Stampin' Pad [ 147085 ]](https://assets1.tamsnetwork.com/images/EC042017NF/147085s.jpg "Cajun Craze Classic Stampin' Pad [ 147085 ]")
![Early Espresso Classic Stampin' Pad [ 147114 ]](https://assets1.tamsnetwork.com/images/EC042017NF/147114s.jpg "Early Espresso Classic Stampin' Pad [ 147114 ]")
![Pecan Pie Classic Stampin' Pad [ 161665 ]](https://assets1.tamsnetwork.com/images/EC042017NF/161665s.jpg "Pecan Pie Classic Stampin' Pad [ 161665 ]")
![Crumb Cake Stampin' Blends Combo Pack [ 154882 ]](https://assets1.tamsnetwork.com/images/EC042017NF/154882s.jpg "Crumb Cake Stampin' Blends Combo Pack [ 154882 ]")
![Pecan Pie Stampin’ Blends Combo Pack [ 161674 ]](https://assets1.tamsnetwork.com/images/EC042017NF/161674s.jpg "Pecan Pie Stampin’ Blends Combo Pack [ 161674 ]")


![Basic White 8 1/2" X 11" Thick Cardstock [ 159229 ]](https://assets1.tamsnetwork.com/images/EC042017NF/159229s.jpg "Basic White 8 1/2\" X 11\" Thick Cardstock [ 159229 ]")
![Floral Impressions 12" X 12" (30.5 X 30.5 Cm) Designer Series Paper [ 165603 ]](https://assets1.tamsnetwork.com/images/EC042017NF/165603s.jpg "Floral Impressions 12\" X 12\" (30.5 X 30.5 Cm) Designer Series Paper [ 165603 ]")
![Pool Party Classic Stampin' Pad [ 147107 ]](https://assets1.tamsnetwork.com/images/EC042017NF/147107s.jpg "Pool Party Classic Stampin' Pad [ 147107 ]")
![2025–2027 In Color™ Flat Pearls [ 165192 ]](https://assets1.tamsnetwork.com/images/EC042017NF/165192s.jpg "2025–2027 In Color™ Flat Pearls [ 165192 ]")


![Layered Thoughts Photopolymer Stamp Set (English) [ 165346 ]](https://assets1.tamsnetwork.com/images/EC042017NF/165346s.jpg "Layered Thoughts Photopolymer Stamp Set (English) [ 165346 ]")
![Cajun Craze 8-1/2" X 11" Cardstock [ 119684 ]](https://assets1.tamsnetwork.com/images/EC042017NF/119684s.jpg "Cajun Craze 8-1/2\" X 11\" Cardstock [ 119684 ]")
![Petal Pink 8-1/2" X 11" Cardstock [ 146985 ]](https://assets1.tamsnetwork.com/images/EC042017NF/146985s.jpg "Petal Pink 8-1/2\" X 11\" Cardstock [ 146985 ]")
![Thoughtful Journey 6" X 6" (15.2 X 15.2 Cm) Designer Series Paper [ 163303 ]](https://assets1.tamsnetwork.com/images/EC042017NF/163303s.jpg "Thoughtful Journey 6\" X 6\" (15.2 X 15.2 Cm) Designer Series Paper [ 163303 ]")
![Mossy Meadow Classic Stampin' Pad [ 147111 ]](https://assets1.tamsnetwork.com/images/EC042017NF/147111s.jpg "Mossy Meadow Classic Stampin' Pad [ 147111 ]")


![With You In Mind Photopolymer Stamp Set (English) [ 164747 ]](https://assets1.tamsnetwork.com/images/EC042017NF/164747s.jpg "With You In Mind Photopolymer Stamp Set (English) [ 164747 ]")
![Paper Tags Cling Stamp Set (English) [ 165454 ]](https://assets1.tamsnetwork.com/images/EC042017NF/165454s.jpg "Paper Tags Cling Stamp Set (English) [ 165454 ]")
![Blackberry Bliss 12" X 12" (30.5 X 30.5 Cm) Two Tone Cardstock [ 166678 ]](https://assets1.tamsnetwork.com/images/EC042017NF/166678s.jpg "Blackberry Bliss 12\" X 12\" (30.5 X 30.5 Cm) Two Tone Cardstock [ 166678 ]")
![Pressed Flowers Embossing Folder [ 165614 ]](https://assets1.tamsnetwork.com/images/EC042017NF/165614s.jpg "Pressed Flowers Embossing Folder [ 165614 ]")
![Misty Moonlight & White 1/4" (6.4 Mm) Starter Ribbon Pack [ 165276 ]](https://assets1.tamsnetwork.com/images/EC042017NF/165276s.jpg "Misty Moonlight & White 1/4\" (6.4 Mm) Starter Ribbon Pack [ 165276 ]")
![Iridescent Faceted Gems [ 163368 ]](https://assets1.tamsnetwork.com/images/EC042017NF/163368s.jpg "Iridescent Faceted Gems [ 163368 ]")

