Stampin’ Up! Banner Sayings for Fun Fold Friday

Good Friday morning stamping friends and welcome to my fun fold Friday. I hope you all had a great week and are looking forward to the weekend.

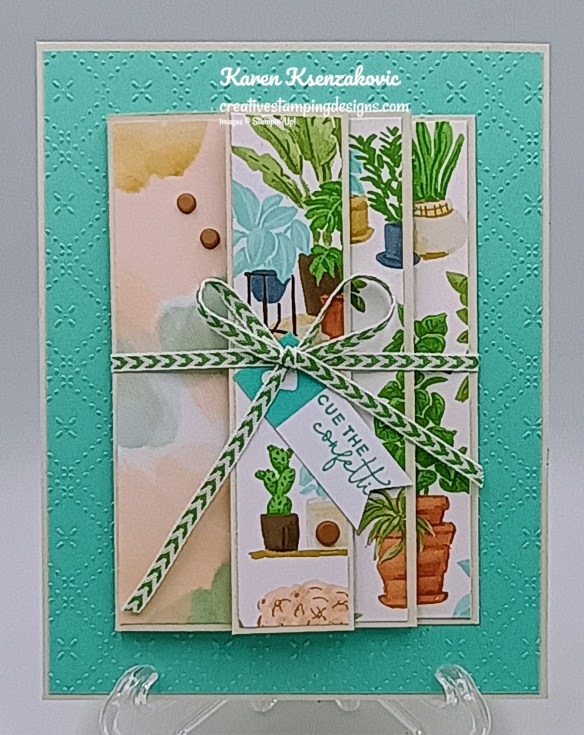
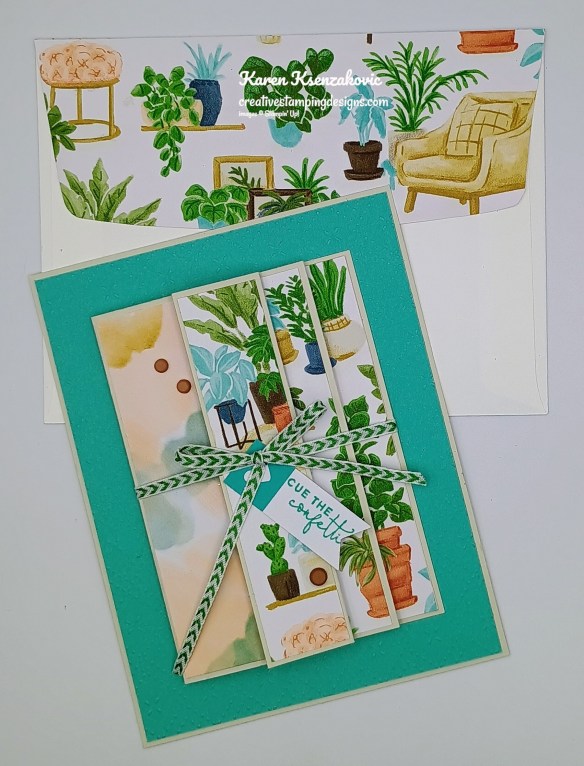
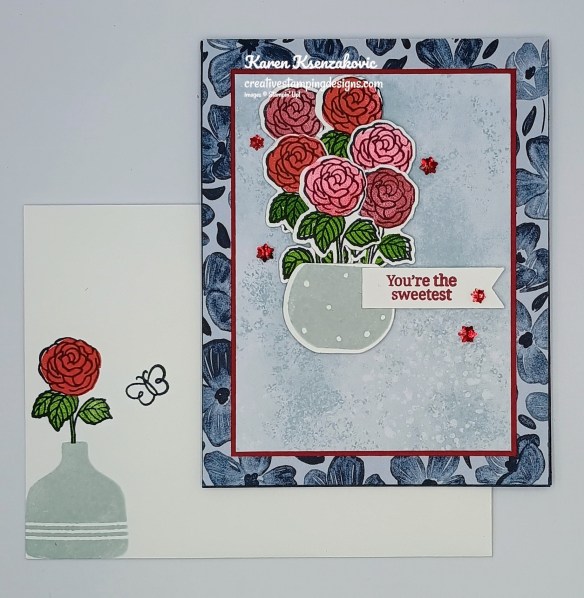
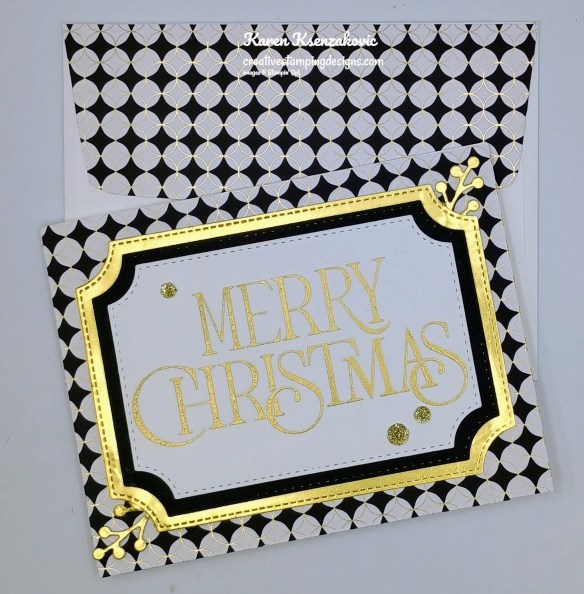
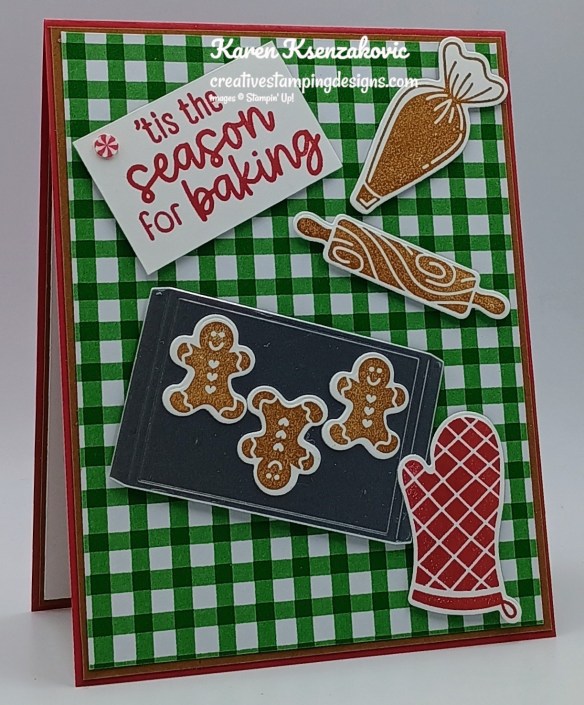
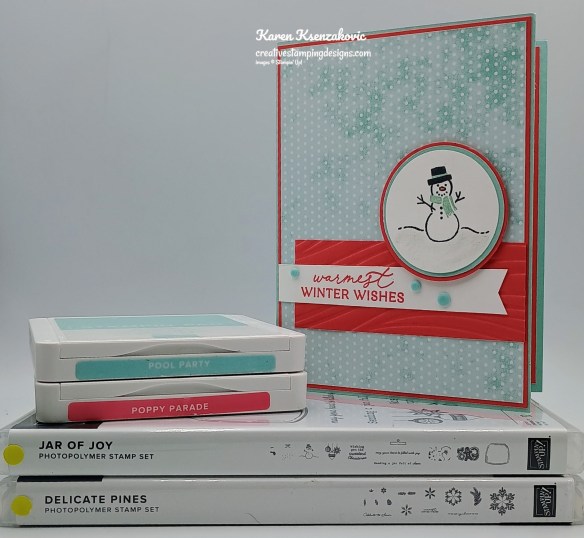
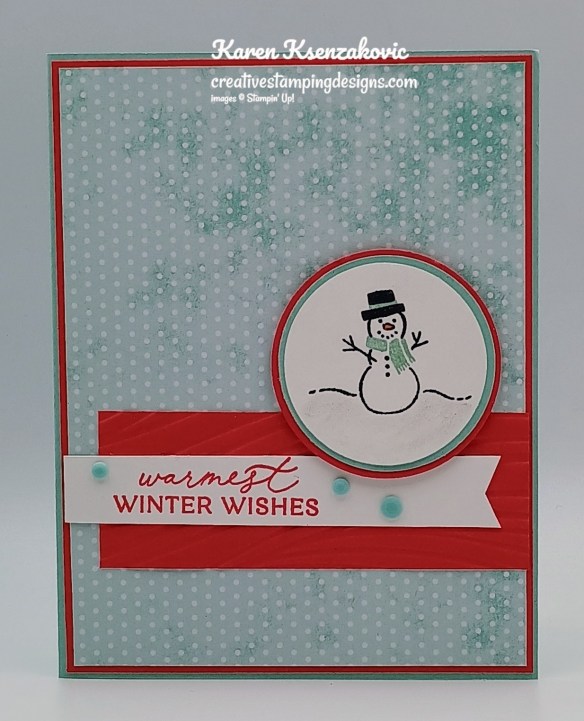
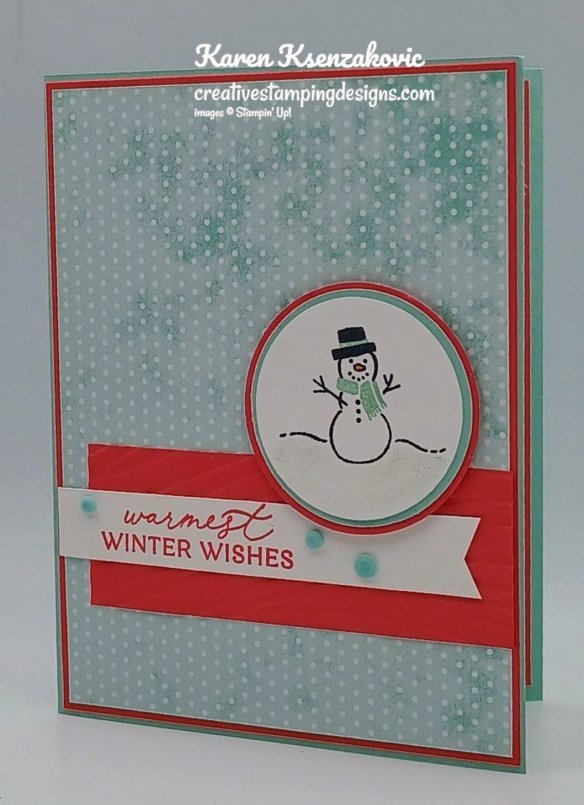
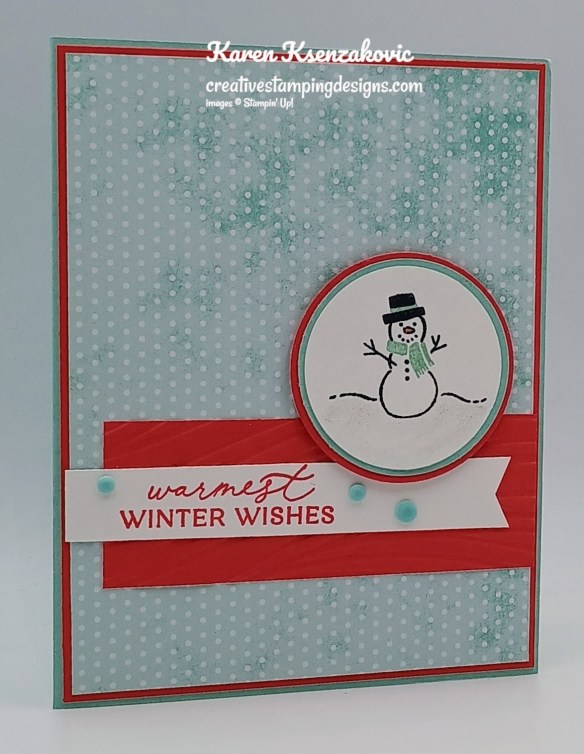
Today’s card it the one I made live yesterday on my YouTube channel. If you were able to hop on to watch, thank you!! If you weren’t and would like to watch my video you can see it Here. The measurements are below so that you can watch and stamp along with me. Here’s my card for today.

Stampin' Up! Banner Sayings Fun Fold 1 creativestampingdesigns.com

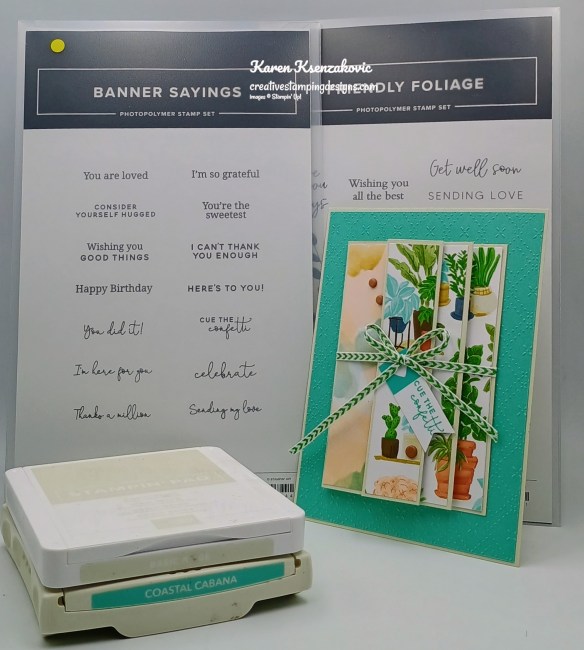
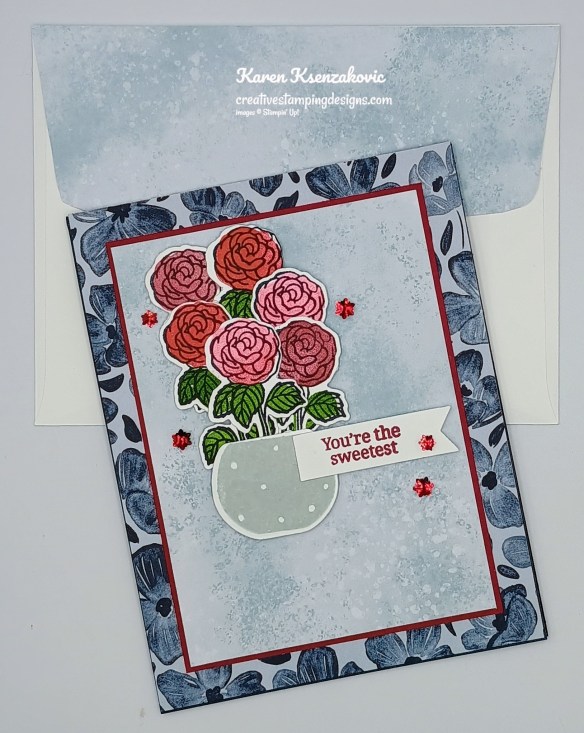
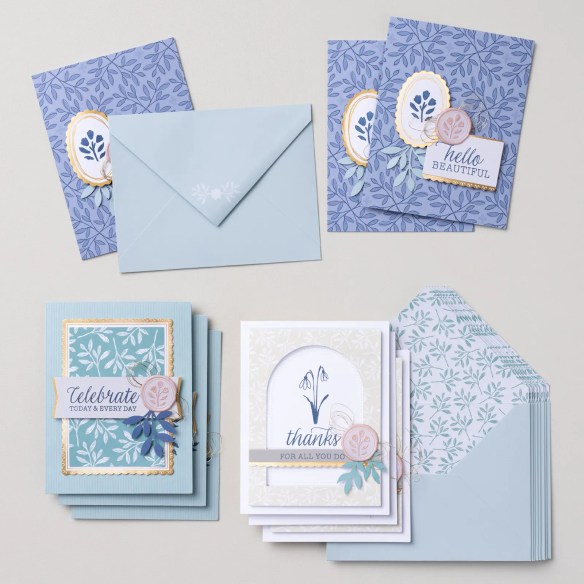
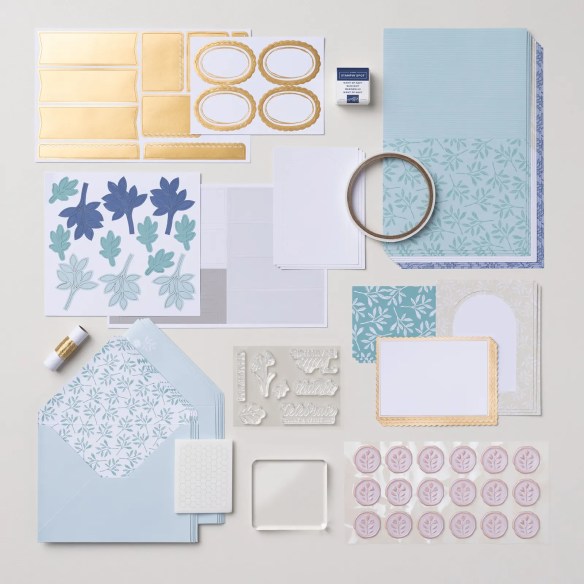
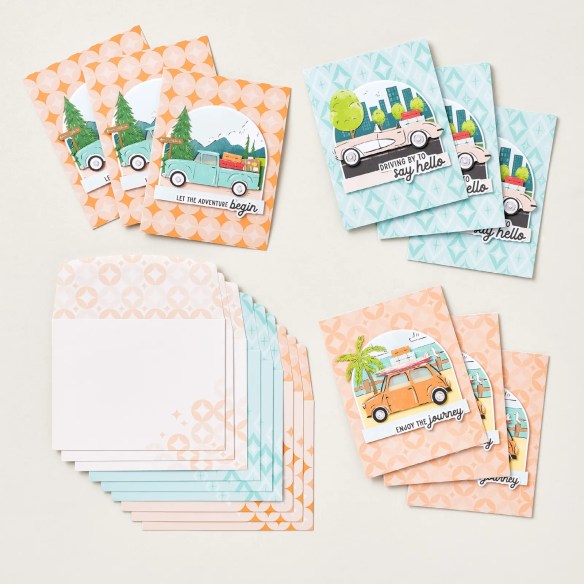
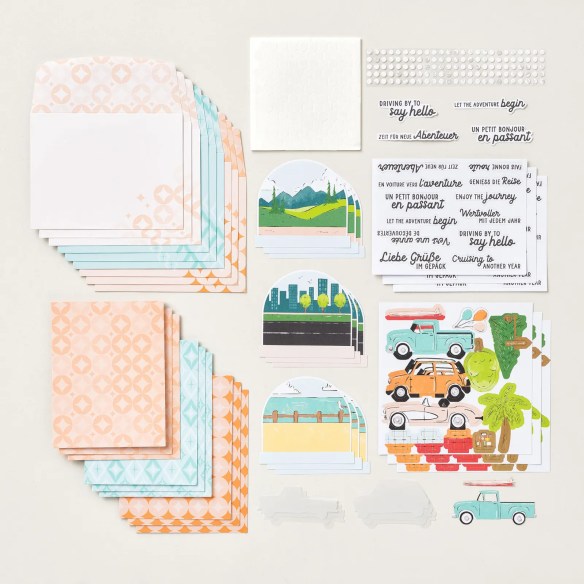
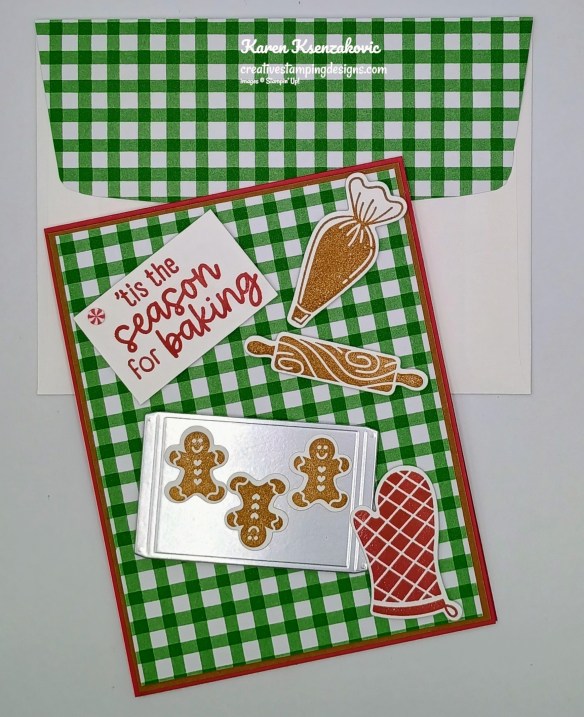
I used the new Stampin’ Up! Online Exclusive Banner Sayings Photopolymer Stamp Set along with the Hobby Haven Specialty Designer Series Paper, Beautiful Pattern 3D Embossing Folder and Stampin’ Up! Friendly Foliage Photopolymer Stamp Set for my card today.

Stampin' Up! Banner Sayings Fun Fold 2 creativestampingdesigns.com

Emboss the panel of Coastal Cabana using the Beautiful Pattern EF. Adhere the embossed panel to the front of the Basic Beige panel.

Stampin' Up! Banner Sayings Fun Fold 3 creativestampingdesigns.com

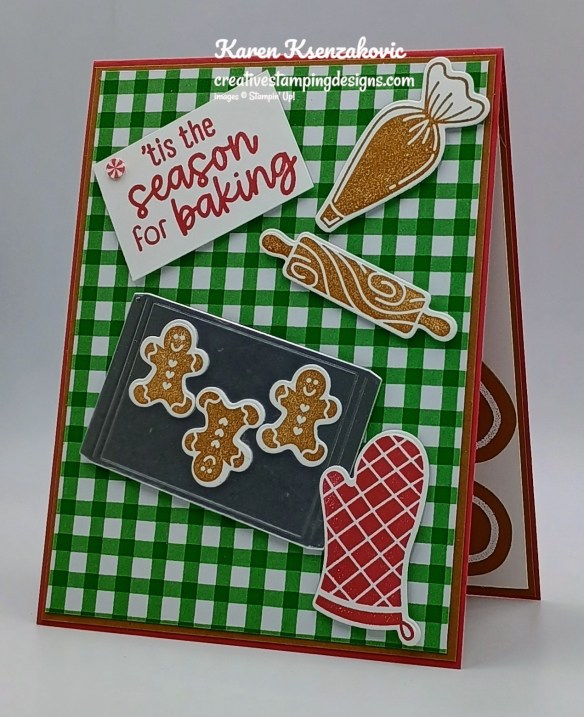
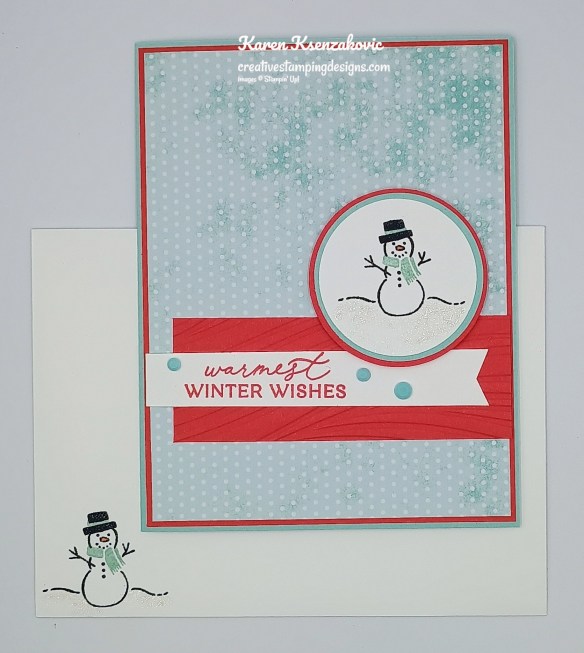
Fold the Basic Beige as listed below in an accordion fashion. When cutting the DSP, if it’s directional, start by cutting from the left side in the order of the measurements I have below Adhere the panels of Hobby Haven DSP to the front of the scored & folded panel, all except the 5/8″ x 4 1/8″ panel and the extra 1 7/8″ x 4 1/8″ panel. Adhere the extra 1 7/8″ x 4 1/8″ panel of Hobby Haven DSP to the back of the folded panel between the 1st & 2nd score lines.

Stampin' Up! Banner Sayings Fun Fold 4 creativestampingdesigns.com

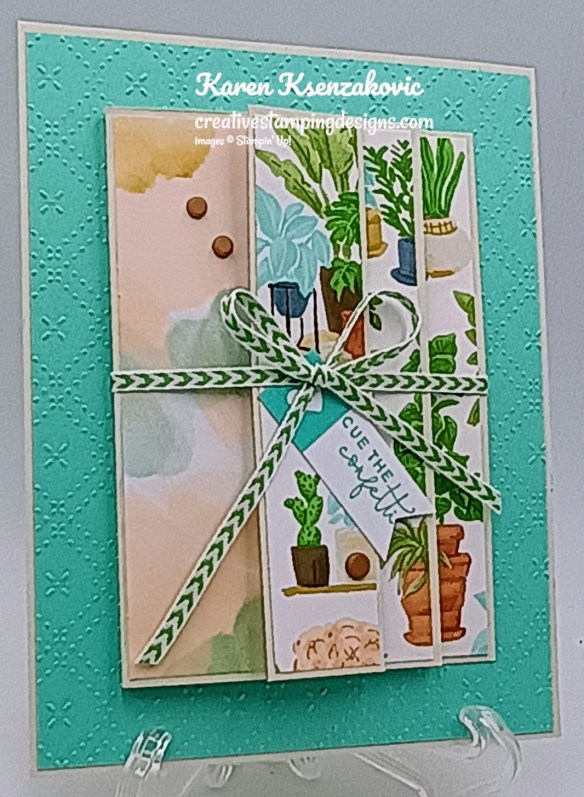
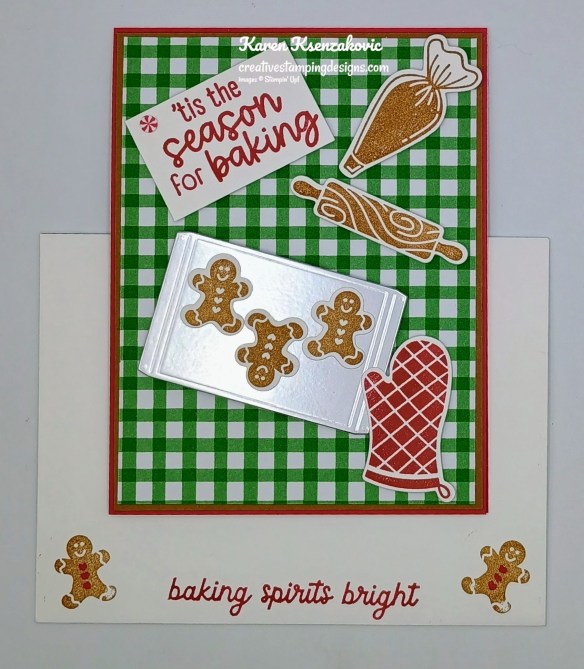
Fold the panel up on the score lines. Wrap a piece of the Garden Green & White 1/8″ Chevron Ribbon around the panel and tie a bow. Adhere the folded panel to the card front

Stampin' Up! Banner Sayings Fun Fold 5 creativestampingdesigns.com

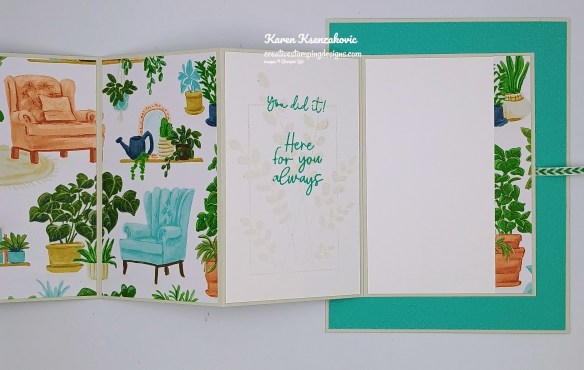
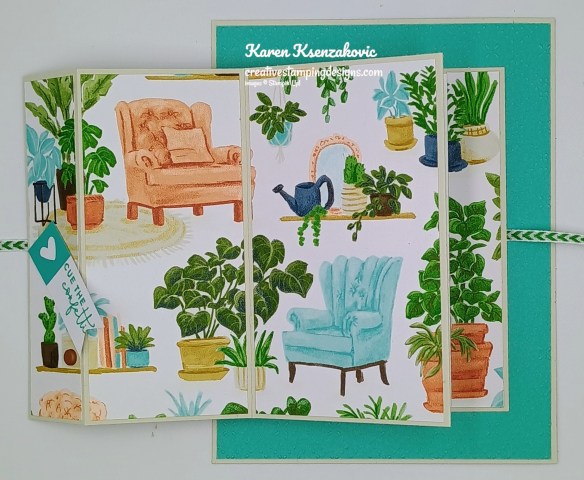
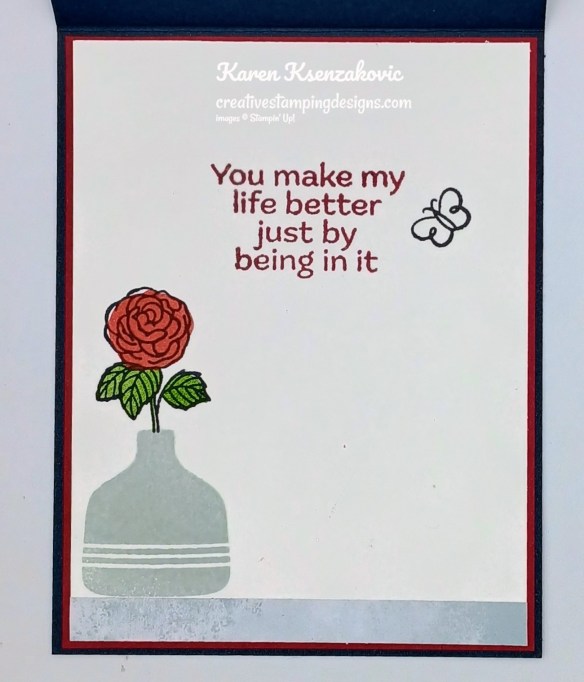
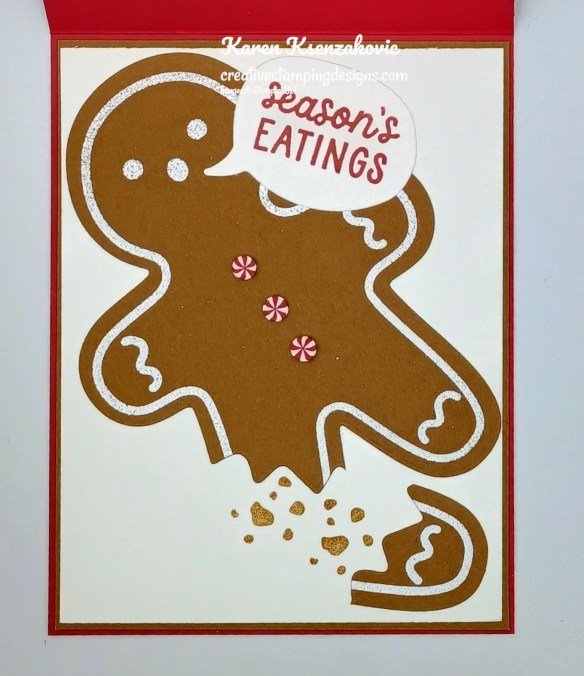
Adhere the 5/8″ panel of Hobby Haven DSP to the right side of the 2 7/8″ x 4 1/8″ panel of Basic White. Adhere the Basic White panel to the inside right section of the folded panel. Stamp the framed foliage image from the Friendly Foliage stamp set in Basic Beige Ink, stamping off once on scrap paper on the 2 3/8″ x 4 1/8″ panel of Basic White. Stamp the sentiment from the Friendly Foliage stamp set in Coastal Cabana Ink over the foliage. Adhere the Basic White panel to the inside left of the folded panel. Fold the panel and tie a bow. Add a few Earthy Matte Dots to the card front.

Stampin' Up! Banner Sayings Fun Fold 6 creativestampingdesigns.com

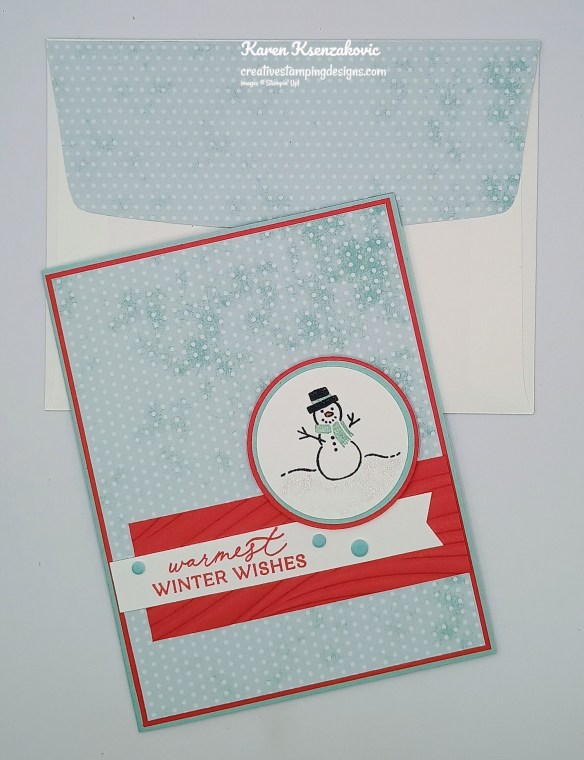
Decorate a Basic White Medium Envelope to finish your card. Stamp the foliage image from the Friendly Foliage stamp set in Coastal Cabana Ink on the envelope front. Adhere a panel of Hobby Haven DSP to the envelope flap.

Stampin' Up! Banner Sayings Fun Fold 7 creativestampingdesigns.com

Thank you for stopping by my blog today. I hope you liked my card and will give it a try. I hope you will CASE this card and please feel free to post it in the comments of my Facebook page under my post. I’d love to see your take it. You can watch my video on my YouTube Channel Here.

If you watch this on my YouTube channel, please remember to subscribe so that you will get notified when a new video goes live. Thank you to those that have subscribed already. Happy Stamping!!

*********************************************************************************************************

If you need any stamping supplies, I’d love to be your Demonstrator. Just click HERE to go directly to my online store or drop me an email if you have any questions. 

*********************************************************************************************************

Card stock cuts for this project:

  • Basic Beige Cardstock 4 1/4″ x 5 1/2″(card base), 4 1/4″ x 11″(front panel scored & folded at 1″, 3″, 5 1/2″ &*8″)
  • Basic White Cardstock 2 7/8″ x 4 1/8″ & 2 3/8″ x 4 1/8″(inner liners)
  • Coastal Cabana Cardstock 4 1/8″ x 5 3/8″(embossed panel)
  • Hobby Haven Specialty Designer Series Paper 7/8″ x 4 1/8″, 1 7/8″ x 4 1/8″, 2 3/8″ x 4 1/8″ & 5/8″ x 4 1/8″ (front scored panel pieces), 1 7/8″ x 4 1/8″(different pattern of the same pack of DSP), 2 1/4″ x 6″(envelope flap)

*********************************************************************************************************

Product List

Stampin’ Up! Pop-Up Petals for The Happy Inkin’ Thursday Blog Hop

Good Thursday morning stamping friends and welcome to our Happy Inkin’ Thursday Blog Hop. If you are starting with me, thank you. I hope you will stop by everyone’s blog to see what they have created this week. If you are hopping over from Mary’s blog, thank you for stopping by. This week we have Sketch Challenge. If you’d like to see a quick video on how I made this card, Click Here to go to my Instagram Reels. Here is my card using this week’s sketch.

Stampin' Up! Pop-Up! Petals 1 creativestampingdesigns.com

I used the new Stampin Up! Online Exclusives Pop-Up Petals Bundle along with Stampin’ Up! Banner Sayings Bundle and 2025-2027 In-Color 6 X 6 Designer Series Paper for my card today.

This is our sketch for this week

My colors are from Sunday Stamps Challenge #372, Winter Warmth

Stampin' Up! Pop-Up! Petals 2 creativestampingdesigns.com

Adhere a panel of 2025-2027 In-Color DSP to a Secret Sea card base. Adhere a smaller panel of the 2025-2027 In-Color DSP to a Cherry Cobbler mat. Adhere the layered panel to the card front.

Stampin' Up! Pop-Up! Petals 3 creativestampingdesigns.com

On a panel of Basic White, stamp the small flowerpot from the Stampin’ Up! Pop- Up! Petals Photopolymer Stamp Set in Cloud Cover Ink. Stamp the outlined rose image from the Pop-Up! Petals stamp set in Tuxedo Black Ink 6 times. Stamp the solid leaf image from the Pop-Up! Petals stamp set in Old Olive Ink over the outlined images. Stamp 2 of the solid flower images from the Pop-Up! Petals stamp set in Cherry Cobbler Ink, 2 of the solid flower images in Poppy Parade and 2 of the solid flower images in Poppy Parade stamped off once on scrap paper. Arrange the flower in the flowerpot using Glue Dots and adhere the arrangement to the card front with Stampin’ Dimensionals.

Stampin' Up! Pop-Up! Petals 4 creativestampingdesigns.com

On a panel of Basic White, stamp the sentiment from the Stampin Up! Banner Sayings Photopolymer Stamp Set in Cherry Cobbler Ink. Cut the sentiment out using the Banner Sayings Punch. Adhere the banner to the card front with Stampin’ Dimensionals. Add a few Faceted Snowflakes to the card front.

Stampin' Up! Pop-Up! Petals 5 creativestampingdesigns.com

On a panel of Basic White, stamp the sentiment from the Pop-Up! Petals stamp set in Cherry Cobbler Ink. Adhere a strip of 2025-2027 In-Color DSP to the bottom of the panel. Stamp the vase image from the Pop-Up! Petals stamp set in Cloud Cover Ink on the bottom of the panel. Stamp the outlined rose and the butterfly images from the Pop-Up! Petals stamp set in Tuxedo Black Ink. Stamp the solid leaf image from the Pop-Up! Petals stamp set in Old Olive Ink over the outlined image. Stamp the solid flower image in Poppy Parade Ink over the outlined mage. Adhere the Basic White panel to a Cherry Cobbler mat then to the inside of the Secret Sea card base.

Stampin' Up! Pop-Up! Petals 6 creativestampingdesigns.com

Decorate a Basic White Medium Envelope to complete the card. Stamp the vase image from the Pop-Up! Petals stamp set in Cloud Cover Ink on the envelope front. Stamp the outlined rose and butterfly images in Tuxedo Black Ink. Stamp the solid leaf image in Old Olive and the solid flower image in Cherry Cobbler Ink over the outlined image. Adhere a panel of 2025-2027 In-Color DSP to the envelope flap.

Stampin' Up! Pop-Up! Petals 7 creativestampingdesigns.com

Thank you for stopping by my blog today.  Now that you’ve seen my card, let’s get on with the hop!  Click the button below to hop over to see what Akiko created. Happy Hopping!!

Just in case you get lost along the way, here is a list of the team members involved in the hop today.

Amy Koenders

Mary Deatherage

Karen Ksenzakovic You Are Here

Akiko Sudano

Tara Carpenter

Terry Lynn Bright

Nicole Bloxom

*********************************************************************************************************

If you need any stamping supplies, I’d love to be your Demonstrator. Just click HERE to go directly to my online store or drop me an email if you have any questions. 

*********************************************************************************************************

Card stock cuts for this project:

  • Basic White Cardstock (2) – 4″ x 5 1/4″(artwork & inner liner), 1″ x 3″(sentiment)
  • Cherry Cobbler Cardstock 3 1/2″ x 4 3/4″(card front panel mat),. 4 1/8″ x 5 3/8″(inner liner mat)
  • Secret Sea Cardstock 4 1/4″ x 11″(card base scored & folded at 5 1/2″)
  • 2025-2027 In-Color 6 x 6 Designer Series Paper 4 1/4″ x 5 1/2″(card front), 3 3/8″ 4 5/8″(card front panel), 1/2″ x 4″(inner liner), 2 1/4″ x 6″(envelope flap)

*********************************************************************************************************

Product List

Stampin’ Up! Merry Christmas in Gold & 2 New Kits Available

Good Wednesday morning stamping friends. We’re halfway through the week already. I have this feeling November is going to fly by just like October did. We had our Stamp Camp Class at my home last night. Everyone had a lot of fun creating cards and laughing. I decided with how hectic December always is, especially since Thanksgiving is so late this year again, we’re going to skip our December class and resume in January. So, since we’re skipping a month, the ladies made 5 cards last night, 2 which were fun folds.

I have a quick card for you today This is one of those Christmas cards that’s easy to reproduce a lot of in a short amount of time. If you’d like to see a quick video on how I made this card, Click Here to go to my Instagram Reels. Here’s my card for today.

Stampin Up! Merry Christmas in Gold 1 creativestmpingdesigns.com

I used the Stampin’ Up! Merry Christmas Photopolymer Stamp Set along with the Modern Christmas Specialty Designer Series Paper, Branching Out Dies and Stampin’ Up! Pine Tree Trimmings Photopolymer Stamp Set for my card today.

Stampin Up! Merry Christmas in Gold 2 creativestmpingdesigns.com

Adhere a panel of Modern Christmas DSP to a Basic White Thick card base.

Stampin Up! Merry Christmas in Gold 3 creativestmpingdesigns.com

Cut panels of Basic Black and Gold Foil using the largest & 2nd largest Branching Out Dies. Cut the sprig die from the Branching Out Dies from the panel of Gold Foil. On a panel of Basic White, stamp the sentiment from the Merry Christmas stamp set in Versamark Ink. Sprinkle the image with Gold Embossing Powder and set it using the Heat Tool. Cut the sentiment panel out using the 3rd largest Branching Out Dies.

Stampin Up! Merry Christmas in Gold 4 creativestmpingdesigns.com

Adhere the sentiment to the Basic Black die cut mat then to the Gold Foil die cut mat. Adhere the sprig to the back of the layered panel. Adhere the layered panel to the Basic White card base. Add a few Traditional Sparkling Sequins to the card front.

Stampin Up! Merry Christmas in Gold 5 creativestmpingdesigns.com

Stamp the sentiment from the Pine Tree Trimmings stamp set in Tuxedo Black Ink on a panel of Basic White. Stamp the tree image from Pine Tree Trimmings stamp set in Tuxedo Black Ink on the bottom of the panel. Stamp the star image from Pine Tree Trimmings stamp set in Versamark Ink on top of the tree. Sprinkle the image with Gold Embossing Powder and set it using the Heat Tool. Adhere the Basic White panel to a Basic Black mat and Gold Foil mat, then to the inside of the Basic White Thick card base

Stampin Up! Merry Christmas in Gold 6 creativestmpingdesigns.com

Decorate a Basic White Medium Envelope to finish the card. Stamp the tree image from Pine Tree Trimmings stamp set in Tuxedo Black Ink on the envelope front. Stamp the star image from Pine Tree Trimmings stamp set in Versamark Ink on top of the tree. Sprinkle the star with Gold Embossing Powder and set it using the Heat Tool Adhere a panel of Modern Christmas DSP to the envelope flap.

Stampin Up! Merry Christmas in Gold 7 creativestmpingdesigns.com

Thank you for stopping by my blog today. I hope you like the card and will give it a try. Happy Stamping!!

*********************************************************************************************************

If you need any stamping supplies, I’d love to be your Demonstrator. Just click HERE to go directly to my online store or drop me an email if you have any questions. 

*********************************************************************************************************

2 New Kits Available

Kits Collections include designed projects that come in a range of project types. They are perfect for new crafters, busy crafters, or crafters who want quick and easy projects.

Everyday Beauty Kit

Create the perfect card for any occasion using the all-inclusive Everyday Beauty Kit. This kit comes with everything you need to make three unique card designs: printed card bases and coordinating envelopes with lovely botanical patterns, precut paper pieces, timeless faux wax seals, shimmering metallic thread, and a versatile stamp set that you can use on countless other projects.

DETAILS
– Makes 9 cards: 3 each of 3 designs
– Folded card size: 5-1/2″ x 4-1/4″ (14 x 10.8 cm)
– Colors: Basic Beige, gold, Gray Granite, Lost Lagoon, Night of Navy, Petal Pink
– Also available in French and German

Kit includes one of each item listed below.
– Everyday Beauty Photopolymer Stamp Set
– Clear stamp block
– Night of Navy Classic Stampin’ Spot
– Step-by-step instructions
– 9 printed envelopes
– Faux wax seal stickers
– Metallic thread
– Adhesive

#166808

++++++++++++++++++++++++++++++++++++++++++++++++++++++++++++++++++++++

Adventure Awaits Kit

Let your creativity take the driver’s seat with the Adventure Awaits Kit. Coast in the retro colors and hand-drawn artwork that can be either feminine or masculine. With printed sentiments, precut paper, and vellum details, this kit comes with everything you need to make nine cute cards.

DETAILS
– Makes 9 cards: 3 each of 3 designs
– Folded card size: 5-1/2″ x 4-1/4″ (14 x 10.8 cm)
– Colors: Basic Black, Coastal Cabana, Crushed Curry, Garden Green, Granny Apple Green, Pecan Pie, Petal Pink, Poppy Parade, Pretty Peacock, Timid Tiger
– Sentiments printed in English, French, and German

Kit includes one of each item listed below.
– Step-by-step instructions
– 9 printed envelopes
– Vellum
– Adhesive

#167235

*********************************************************************************************************

Stampin’ Up! Craft Class

The Brushed with Beauty Craft Class will stream live on November 20 and will feature the Brushed with Beauty Suite Collection. The class will be available for purchase before and after the live stream. This is open to everyone. Want to sign up to be a demonstrator and get your discount? Contact me today at creativestampingdesigns@gmail.com and I’ll help you and answer any questions you may have. You can add the suite of products for this class to your starter kit.

You can order the class product and additional supplies needed so you have everything ready to go before you view the class starting November 4th from my Online Store.

Here are the class details:

  • Available for Purchase: November 4
  • Price: $30 (Suite not included)
  • Live Stream: November 20 at 2:00 p.m. (MT)
  • Where: An exclusive Facebook page
  • Class: Brushed with Beauty Craft Class (170074)
    • You can watch live or view the on-demand recording at your convenience.
  • Product: Brushed with Beauty Suite Collection (167100)
  • Language: The class will be presented in English.
  • Video on Demand: Stampin’ Up! will record this live class, which will be available as a video on demand right after the live stream. Videos with English, French, German, and Dutch captioning will be available through the Facebook page one week after the live stream.

Look for the class in the online store beginning November 4th!!  As a little bonus, the class will be considered a regular store item, so you’ll earn Stampin’ Rewards from Stampin’ Up! (if you’ve opted in to the program) when you purchase it and the class fee will count toward your order total for my Creative Stamping Designs Reward Points from me!!

*********************************************************************************************************

Card stock cuts for this project:

  • Basic Black Cardstock 3 1/2″ x 5″(sentiment mat), 3 7/8″ x 5 1/8″(inner liner mat)
  • Basic White Cardstock 3 1/4″ x 4 1/2″(sentiment), 4″ x 5 1/4″(inner liner)
  • Basic White Thick Cardstock 5 1/2″ x 8 1/2″(card base scored & folded at 4 `1/4″)
  • Modern Christmas Specialty Designer Series Paper 4 1/4″ x 5 1/2″(card front), 2 1/4″ x 6″(envelope)
  • Gold Foil Sheet 4″ x 5 1/4″(sentiment & inner liner mat)

*********************************************************************************************************

Product List

Stampin’ Up! New Online Exclusives Available – 2 New Kits Available – Craft Class

Good Tuesday morning stamping friends. Today’s the day you’ve been waiting for, The NEW Online Exclusives are now available to purchase. There are also 2 new Kits available, and you can sign up for the November Craft Class

You can finally order the new Online Exclusives that you’ve been seeing projects made with. If you would like a hard copy of the booklet (like I do), you can click on the image below so you can get your hands on it. There are some awesome new products in it, and you can start ordering them TODAY!! Just head over to my Online Store to order them and while you’re there, check out the new Kits too.

*********************************************************************************************************

2 New Kits Available

Kits Collections include designed projects that come in a range of project types. They are perfect for new crafters, busy crafters, or crafters who want quick and easy projects.

Everyday Beauty Kit

Create the perfect card for any occasion using the all-inclusive Everyday Beauty Kit. This kit comes with everything you need to make three unique card designs: printed card bases and coordinating envelopes with lovely botanical patterns, precut paper pieces, timeless faux wax seals, shimmering metallic thread, and a versatile stamp set that you can use on countless other projects.

DETAILS
– Makes 9 cards: 3 each of 3 designs
– Folded card size: 5-1/2″ x 4-1/4″ (14 x 10.8 cm)
– Colors: Basic Beige, gold, Gray Granite, Lost Lagoon, Night of Navy, Petal Pink
– Also available in French and German

Kit includes one of each item listed below.
– Everyday Beauty Photopolymer Stamp Set
– Clear stamp block
– Night of Navy Classic Stampin’ Spot
– Step-by-step instructions
– 9 printed envelopes
– Faux wax seal stickers
– Metallic thread
– Adhesive

#166808

https://www.youtube.com/embed/jv6A-K9hnTw?version=3&rel=1&showsearch=0&showinfo=1&iv_load_policy=1&fs=1&hl=en&autohide=2&wmode=transparent

++++++++++++++++++++++++++++++++++++++++++++++++++++++++++++++++++++++

Adventure Awaits Kit

Let your creativity take the driver’s seat with the Adventure Awaits Kit. Coast in the retro colors and hand-drawn artwork that can be either feminine or masculine. With printed sentiments, precut paper, and vellum details, this kit comes with everything you need to make nine cute cards.

DETAILS
– Makes 9 cards: 3 each of 3 designs
– Folded card size: 5-1/2″ x 4-1/4″ (14 x 10.8 cm)
– Colors: Basic Black, Coastal Cabana, Crushed Curry, Garden Green, Granny Apple Green, Pecan Pie, Petal Pink, Poppy Parade, Pretty Peacock, Timid Tiger
– Sentiments printed in English, French, and German

Kit includes one of each item listed below.
– Step-by-step instructions
– 9 printed envelopes
– Vellum
– Adhesive

#167235

*********************************************************************************************************

Stampin’ Up! Craft Class

The Brushed with Beauty Craft Class will stream live on November 20 and will feature the Brushed with Beauty Suite Collection. The class will be available for purchase before and after the live stream. This is open to everyone. Want to sign up to be a demonstrator and get your discount? Contact me today at creativestampingdesigns@gmail.com and I’ll help you and answer any questions you may have. You can add the suite of products for this class to your starter kit.

You can order the class product and additional supplies needed so you have everything ready to go before you view the class starting November 4th from my Online Store.

Here are the class details:

  • Available for Purchase: November 4
  • Price: $30 (Suite not included)
  • Live Stream: November 20 at 2:00 p.m. (MT)
  • Where: An exclusive Facebook page
  • Class: Brushed with Beauty Craft Class (170074)
    • You can watch live or view the on-demand recording at your convenience.
  • Product: Brushed with Beauty Suite Collection (167100)
  • Language: The class will be presented in English.
  • Video on Demand: Stampin’ Up! will record this live class, which will be available as a video on demand right after the live stream. Videos with English, French, German, and Dutch captioning will be available through the Facebook page one week after the live stream.

Look for the class in the online store beginning November 4th!!  As a little bonus, the class will be considered a regular store item, so you’ll earn Stampin’ Rewards from Stampin’ Up! (if you’ve opted in to the program) when you purchase it and the class fee will count toward your order total for my Creative Stamping Designs Reward Points from me!!

*********************************************************************************************************

If you need any stamping supplies, I’d love to be your Demonstrator. Just click HERE to go directly to my online store or drop me an email if you have any questions. 

Stampin’ Up! Handmade Treats

Good Sunday morning stamping friends. I hope you are all having a wonderful weekend. I’ll be at work again all day today, what kind of plans do you have?

I played with a couple fun sets for my card today. This card fits in with what my holidays are like. Here’s my card for today.

Stampin' Up! Homemade Treats Gingerbread Man 1 creativestampingdesigns.com

I used the Stampin’ Up! Homemade Treats Bundle along with the Christmas Tags & More Mix & Match 6 x 6 Specialty Designer Series Paper and Stampin’ Up! gingerbread Man Bundle for my card today.

Stampin' Up! Homemade Treats Gingerbread Man 2 creativestampingdesigns.com

Adhere a panel of Christmas Tags & More DSP to a Pecan Pie mat. Adhere the layered panel to the Real Red card base.

Stampin' Up! Homemade Treats Gingerbread Man 3 creativestampingdesigns.com

On a panel of Basic White, stamp the gingerbread man, rolling pin and pastry bag images from the Stampin’ Up! Homemade Treats Cling Stamp Set in Pecan Pie Ink. Stamp the oven mit image from the Homemade Treats stamp set in Real Red Ink. Cut the mages out using the Homemade Treats Dies. Cut the cookie sheet die from a panel of Silver Foil using the Homemade Treats Dies. Adhere the gingerbread men to the cookie sheet. Adhere all the die cut pieces to the card front with Stampin Dimensionals.

Stampin' Up! Homemade Treats Gingerbread Man 4 creativestampingdesigns.com

On a panel of Basic White, stamp the sentiment from the Homemade Treats stamp set in Real Red Ink. Adhere the sentiment to the card front with Stampin’ Dimensionals. Add a Real Red & White Adhesive-Backed Peppermint to the sentiment.

Stampin' Up! Homemade Treats Gingerbread Man 5 creativestampingdesigns.com

Stamp the large gingerbread man and the gingerbread man’s face from the Stampin’ Up! Gingerbread Man Photopolymer Stamp Set in Versamark Ink on a panel of Pecan Pie. Sprinkle the image with White Embossing Powder and set it with the Heat Tool. Cut the image out with the Gingerbread Man Dies. Use the Zigzag die from the Gingerbread Man Dies to cut off his leg. Stamp the crumb image from the Gingerbread Man stamp set in Pecan Pie on the bottom of a Basic White panel. Adhere the gingerbread man to the Basic White panel. Adhere the cut off leg piece to the bottom of the panel. On the panel of Basic White, stamp the sentiment from the Gingerbread Man stamp set in Real Red Ink and cut the sentiment out using bubble die from the Gingerbread Man Dies. Adhere the sentiment to the gingerbread man. Add a few Real Red & White Adhesive-Backed Peppermints to the gingerbread man. Adhere the Basic White panel to a Pecan Pie mat then to the inside of the Real Red card base.

Stampin' Up! Homemade Treats Gingerbread Man 6 creativestampingdesigns.com

Decorate a Basic white Medium Envelope to finish your card. Stamp the sentiment from the Gingerbread Man stamp set in Real Red Ink on the envelope front. Stamp the small gingerbread man from the Homemade Treats stamp set on either side of the sentiment. Adhere a panel of Christmas Tags & More DSP to the envelope flap.

Stampin' Up! Homemade Treats Gingerbread Man 7 creativestampingdesigns.com

Thank you for stopping by my blog today. I hope you like the card and will give it a try. Happy Stamping!!

*********************************************************************************************************

If you need any stamping supplies, I’d love to be your Demonstrator. Just click HERE to go directly to my online store or drop me an email if you have any questions. 

********************************************************************************************************

Card stock cuts for this project:

  • Basic White Cardstock (20 – 4″ x 5 1/4″(artwork & inner liner), 1 1/4″ x 2″(sentiment)
  • Pecan Pie Cardstock (2) – 4 1/8″ x 5 3/8″(card front & inner liner mats), 3 3/4″ x 5 1/2″(die cut),
  • Real Red Cardstock 4 1/4″ x 11″(card base scored & folded at 5 1/2″)
  • Christmas Tags & More Mix & Match 6 x 6 Specialty Designer Series Paper 4″ x 5 1/4″(card front), 2 1/4″ x 6″(envelope flap)
  • Silver Foil Sheet 2″ x 3″(die cut)

*********************************************************************************************************

Product List

Stampin’ Up! Jar of Joy Snowman

Good Saturday morning stamping friends welcome to the weekend and HAPPY NOVEMBER!!! I’m still trying to figure out where October went. I hope you’re starting to make some plans for the weekend. It’s the 1st of the month and I’ll be in the office doing my bills and hopefully finish them early enough to get them to the post office.

I have a quick card for you today using 2 colors that I never thought i would like this much together. If you’d like to see a quick video on how I made this card, Click Here to go to my Instagram Reels. Here’s my card for today.

Stampin' Up! Jar of Joy Snowman 1 creativestampingdesigns.com

I used the Stampin’ Up! Jar of Joy Photopolymer Stamp Set along with the North Pole Delivery Specialty Designer Series Paper, Soft Waves 3D Embossing Folder, Stampin’ Up! Delicate Pines Photopolymer Stamp Set and Circle Punches for my card today.

Stampin' Up! Jar of Joy Snowman 2 creativestampingdesigns.com

Adhere a panel of North Pole Delivery DSP to a Poppy Parade mat. Adhere the layered panel to a Pool Party card base.

Stampin' Up! Jar of Joy Snowman 3 creativestampingdesigns.com

Emboss a panel of Poppy Parade using the Soft Waves EF. Adhere the embossed panel to the card front. On a panel of Basic White, stamp the sentiment from Delicate Pines stamp set in Poppy Parade Ink. Cut the ends into a banner using scissors. Adhere the banner to the card front over the embossed panel.

Stampin' Up! Jar of Joy Snowman 4 creativestampingdesigns.com

Cut a panel of Basic White using the 1 3/4″ Circle Punch. Cut a panel of Pool Party using the 1 7/8″ Circle Punch. Cut a panel of Poppy Parade using the 2″ Circle Punch. On the Basic White circle, stamp the snowman image from the Jar of Joy stamp set in Tuxedo Black Ink. Stamp the scarf and hat trim image from the Jar of Joy stamp set in Pool Party Ink over the snowman image. Add Clear Wink of Stella to the snow below the snowman. Adhere the Basic White circle to the Pool Party circle. Adhere the layered panel to the Poppy Parade circle. Adhere the layered panel to the card front with Stampin’ Dimensionals. Add a few Dear Dots to the card front.

Stampin' Up! Jar of Joy Snowman 5 creativestampingdesigns.com

On a panel of Basic White stamp the sentiment from the Delicate Pines stamp set in Poppy Parade Ink. Adhere a panel of North Pole Delivery DSP to the bottom of the panel. Stamp the snowman image from the Jar of Joy stamp set in Tuxedo Black Ink on the bottom of the panel. Stamp the scarf & hat trim image from the Jar of Joy stamp set in Pool Party Ink over the snowman image. Stamp the snow image next to the sentiment in Pool Party Ink. Adhere the Basic White panel to a Poppy Parade mat then to the inside of the Pool party card base.

Stampin' Up! Jar of Joy Snowman 6 creativestampingdesigns.com

Decorate a Basic White Medium Envelope to finish the card. Stamp the snowman image from the Jar of Joy stamp set in Tuxedo Black Ink on the envelope front. Stamp the scarf & hat trim image in Pool Party Ink. Adhere a panel of North Pole Delivery DSP to the envelope flap.

Stampin' Up! Jar of Joy Snowman 7 creativestampingdesigns.com

Thank you for stopping by my blog today. I hope you like the card and will give it a try. Happy Stamping!!

*********************************************************************************************************

If you need any stamping supplies, I’d love to be your Demonstrator. Just click HERE to go directly to my online store or drop me an email if you have any questions. 

********************************************************************************************************

Card stock cuts for this project:

  • Basic White Cardstock 2″ x 2″(artwork), 5/8″ x 4″(sentiment), 3 3/4″ x 5″(inner liner)
  • Pool Party Cardstock 5 1/2″ x 8 1/2″(card base scored & folded at 4 1/4″, 2 1/4″ x 2 1/4″(artwork mat)
  • Poppy Parade Cardstock 4 1/8″ x 5 3/8″(card front mat), 2 1/2″ x 2 1/2″(artwork mat), 1 3/8″ x 3 3/4″(embossed panel), 4″ x 5 1/”(inner liner mat)
  • North Pole Deliver Designer Series Paper 4″ x 5 1/4″(card front), 1/2″ x 3 3/4″(inner liner), 2 1.4″ x 6″(envelope)

*********************************************************************************************************

Product List