

Good Tuesday morning my stamping friends welcome to Amy’s Inkin’ Krew Team Blog Hop. It’s the 2nd Tuesday of the month so that means Blog Hop Day!! If you are starting with me, be sure to hop around to see everyone’s beautiful projects. If you’ve hopped over from Karen’s blog, welcome to my blog and thank you for stopping by. The theme this month is “Love”. If you’d like to see a quick video on how I made this card, Click Here to go to my Instagram Reels. Here’s my card for today.

I used the Stampin’ Up! Bee My Valentine Stamp Set along with the Hearts of Love 3D Embossing Folder, Turtle-y Cute Designer Series Paper, Stylish Shapes Dies and Nested Essentials Dies for my card today.
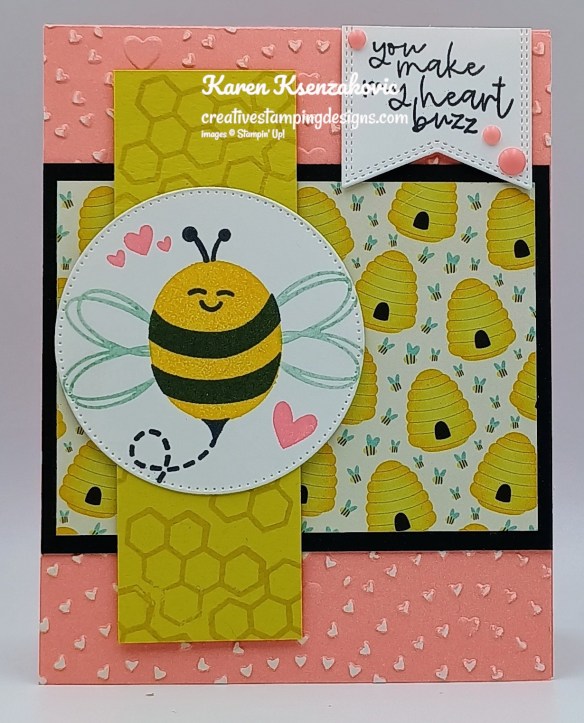
Emboss a panel of Flirty Flamingo Two-Tone Cardstock using the Hearts of Love EF. Using a sanding block, go over the embossed panel. Adhere the embossed panel to a Flirty Flamingo card base. Adhere a panel of Turtle-y Cute DSP to a Basic Black mat. Adhere the layered panel to the card front.
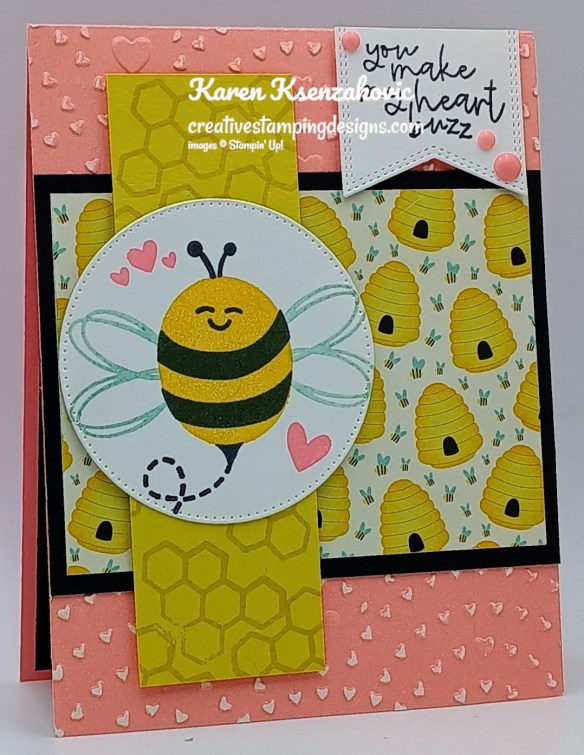
Stamp the honeycomb image from the Bee My Valentine stamp set in Darling Duckling Ink on a panel of Darling Duckling. Cut a panel of Basic White using the 2nd largest circle from the Stylish Shapes Dies. Stamp the bumble bee body image from the Bee My Valentine stamp set in Daffodil Delight Ink, the stripes, antenna, face and dashed images in Tuxedo Black Ink. Stamp the wings in Pool Party Ink and the hearts in Flirty Flamingo Ink. Adhere the die cut to the panel of Darling Duckling. Adhere the layered panel to the card front with Stamin’ Dimensionals.
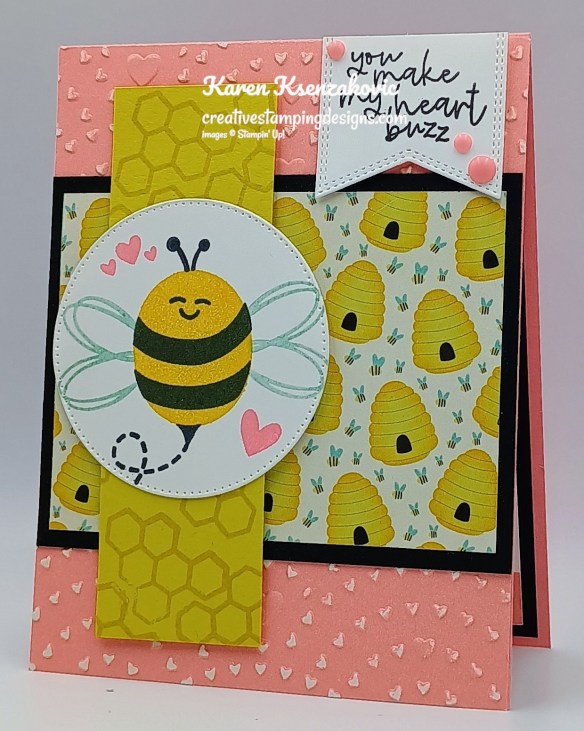
On a panel of Basic White, stamp the sentiment from the Bee My Valentine stamp set in Tuxedo Black Ink. Cut the sentiment out using the banner from the Nested Essentials Dies. Adhere the sentiment using Stampin’ Dimensionals. Add a few Rainbow Adhesive-Backed Dots to the card front.
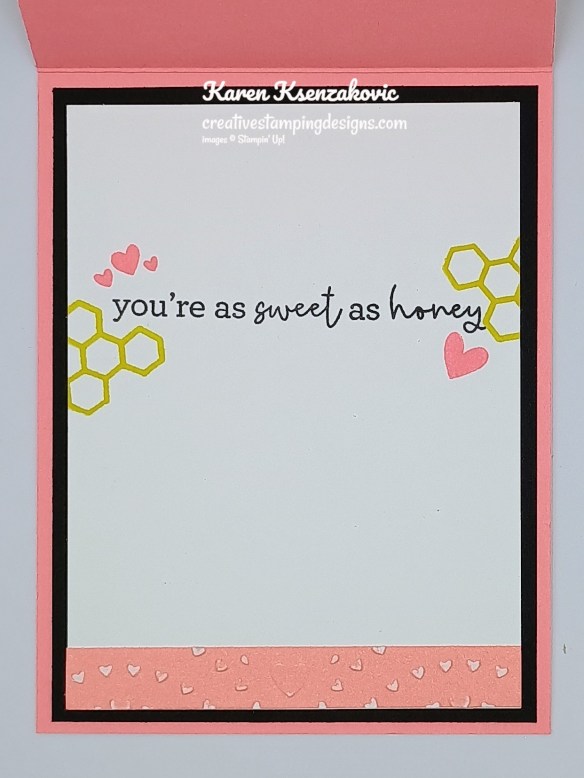
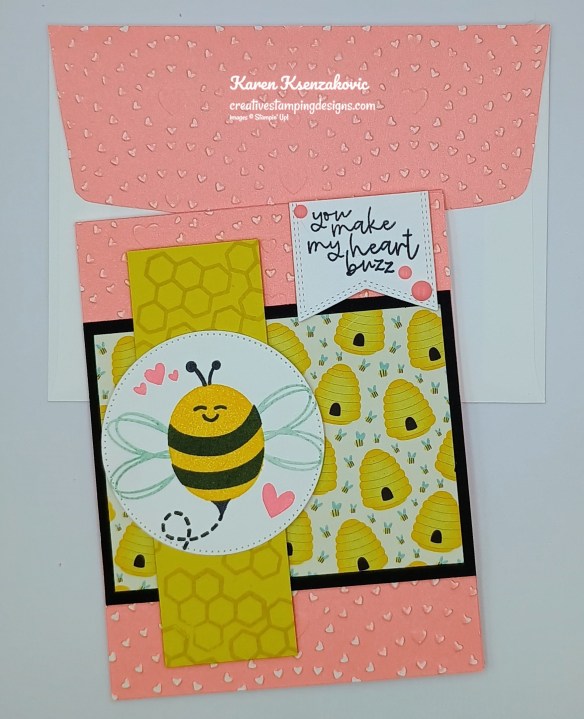
Stamp the sentiment from Bee My Valentine stamp set in Tuxedo Black Ink on a panel of Basic White. Stamp the honeycomb image from the Bee My Valentine stamp set in Darling Duckling Ink next to the sentiment. Stamp the heart images in Flirty Flamingo Ink. Emboss a strip of Flirty Flamingo Two-Tone CS using the Hearts of Love EF, go over it with a sanding block and adhere it to the bottom of the panel. Adhere the Basic Whtie panel to a Basic Black mat then to the inside of the Flirty Flamingo card base.
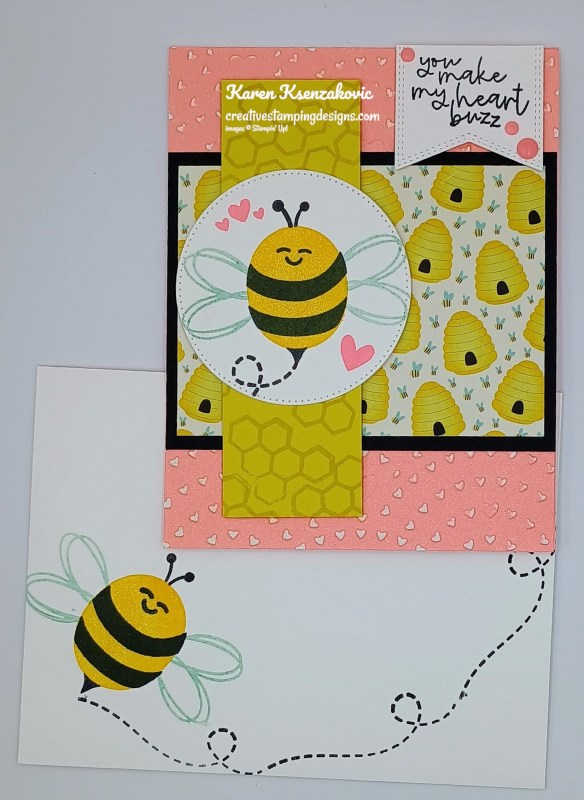
Decorate a Basic White Medium Envelope to complete your card. Stamp the bee image on the front of the envelope the same as for the card. Adhere an embossed panel of Flirty Flamingo Two-Tone CAS to the envelope flap.
Thank you for stopping by my blog today. Now that you’ve seen my card, let’s get on with the hop! Click on the Next Blog button to move on to Charlene’s project. Happy Hopping.

Just in case you get lost along the way, here is a list of the team members involved in the hop today.
- Karen Finkle
- Karen Ksenzakovic You Are Here
- Charlene Tackvic
- Nicole Bloxom
- Tara Carpenter
- Christie King
- Mary Deatherage
- Ann Louise Fodgaard
- Amy Koenders
*********************************************************************************************************
If you need any stamping supplies, I’d love to be your Demonstrator. Just click HERE to go directly to my online store or drop me an email if you have any questions.
*********************************************************************************************************
Card stock cuts for this project:
- Basic Black Cardstock 3 1/4″ x 4 1/4″ panel, 4″ x 5 1/4″(inner liner mat)
- Basic White Cardstock 3″ x 3″ panel, 1 1/2″ x 2″ panel, 3 3/4″ x 5″ (inner linre)
- Darling Duckling Cardstock 1 1/2″ x 4 3/4″ panel
- Flirty Flamingo Cardstock 4 1/4″ x 11″ (card base scored & folded at 5 1/2″)
- Flirty Flamingo Two-Tone Cardstock 4 1/4″ x 5 1/2″(card front), 1/2″ x 3 3/4″ panel, 2 1/4″ x 6″ panel
- Turtle-y Cute Designer Series Paper 3″ x 4″ panel
*********************************************************************************************************
Product List
![Bee My Valentine Photopolymer Stamp Set (English) [ 162547 ]](https://assets1.tamsnetwork.com/images/EC042017NF/162547s.jpg "Bee My Valentine Photopolymer Stamp Set (English) [ 162547 ]")
![Basic Black 8-1/2" X 11" Cardstock [ 121045 ]](https://assets1.tamsnetwork.com/images/EC042017NF/121045s.jpg "Basic Black 8-1/2\" X 11\" Cardstock [ 121045 ]")
![Basic White 8 1/2" X 11" Cardstock [ 166780 ]](https://assets1.tamsnetwork.com/images/EC042017NF/166780s.jpg "Basic White 8 1/2\" X 11\" Cardstock [ 166780 ]")
![Darling Duckling 8 1/2" X 11" Cardstock [ 165622 ]](https://assets1.tamsnetwork.com/images/EC042017NF/165622s.jpg "Darling Duckling 8 1/2\" X 11\" Cardstock [ 165622 ]")
![Flirty Flamingo 8-1/2" X 11" Cardstock [ 141416 ]](https://assets1.tamsnetwork.com/images/EC042017NF/141416s.jpg "Flirty Flamingo 8-1/2\" X 11\" Cardstock [ 141416 ]")
![Flirty Flamingo 12" X 12" (30.5 X 30.5 Cm) Two Tone Cardstock [ 166667 ]](https://assets1.tamsnetwork.com/images/EC042017NF/166667s.jpg "Flirty Flamingo 12\" X 12\" (30.5 X 30.5 Cm) Two Tone Cardstock [ 166667 ]")
![Turtle Y Cute 12" X 12" (30.5 X 30.5 Cm) Designer Series Paper [ 165221 ]](https://assets1.tamsnetwork.com/images/EC042017NF/165221s.jpg "Turtle Y Cute 12\" X 12\" (30.5 X 30.5 Cm) Designer Series Paper [ 165221 ]")
![Daffodil Delight Classic Stampin' Pad [ 147094 ]](https://assets1.tamsnetwork.com/images/EC042017NF/147094s.jpg "Daffodil Delight Classic Stampin' Pad [ 147094 ]")
![Darling Duckling Classic Stampin' Pad [ 165277 ]](https://assets1.tamsnetwork.com/images/EC042017NF/165277s.jpg "Darling Duckling Classic Stampin' Pad [ 165277 ]")
![Flirty Flamingo Classic Stampin' Pad [ 147052 ]](https://assets1.tamsnetwork.com/images/EC042017NF/147052s.jpg "Flirty Flamingo Classic Stampin' Pad [ 147052 ]")
![Pool Party Classic Stampin' Pad [ 147107 ]](https://assets1.tamsnetwork.com/images/EC042017NF/147107s.jpg "Pool Party Classic Stampin' Pad [ 147107 ]")
![Tuxedo Black Memento Ink Pad [ 132708 ]](https://assets1.tamsnetwork.com/images/EC042017NF/132708s.jpg "Tuxedo Black Memento Ink Pad [ 132708 ]")
![Hearts Of Love 3 D Embossing Folder [ 167071 ]](https://assets1.tamsnetwork.com/images/EC042017NF/167071s.jpg "Hearts Of Love 3 D Embossing Folder [ 167071 ]")
![Nested Essentials Dies [ 161597 ]](https://assets1.tamsnetwork.com/images/EC042017NF/161597s.jpg "Nested Essentials Dies [ 161597 ]")
![Stylish Shapes Dies [ 159183 ]](https://assets1.tamsnetwork.com/images/EC042017NF/159183s.jpg "Stylish Shapes Dies [ 159183 ]")
![Rainbow Adhesive Backed Dots [ 162758 ]](https://assets1.tamsnetwork.com/images/EC042017NF/162758s.jpg "Rainbow Adhesive Backed Dots [ 162758 ]")
![Basic White Medium Envelopes [ 159236 ]](https://assets1.tamsnetwork.com/images/EC042017NF/159236s.jpg "Basic White Medium Envelopes [ 159236 ]")


![Tear & Tape Adhesive [ 154031 ]](https://assets1.tamsnetwork.com/images/EC042017NF/154031s.jpg "Tear & Tape Adhesive [ 154031 ]")


![Take Your Pick [ 144107 ]](https://assets1.tamsnetwork.com/images/EC042017NF/144107s.jpg "Take Your Pick [ 144107 ]")


![With You In Mind Photopolymer Stamp Set (English) [ 164747 ]](https://assets1.tamsnetwork.com/images/EC042017NF/164747s.jpg "With You In Mind Photopolymer Stamp Set (English) [ 164747 ]")
![Textured Notes Bundle (English) [ 165556 ]](https://assets1.tamsnetwork.com/images/EC042017NF/165556s.jpg "Textured Notes Bundle (English) [ 165556 ]")
![Textured Notes Cling Stamp Set (English) [ 165548 ]](https://assets1.tamsnetwork.com/images/EC042017NF/165548s.jpg "Textured Notes Cling Stamp Set (English) [ 165548 ]")
![Textured Notes Dies [ 165555 ]](https://assets1.tamsnetwork.com/images/EC042017NF/165555s.jpg "Textured Notes Dies [ 165555 ]")
![Shaded Spruce 8-1/2" X 11" Cardstock [ 146981 ]](https://assets1.tamsnetwork.com/images/EC042017NF/146981s.jpg "Shaded Spruce 8-1/2\" X 11\" Cardstock [ 146981 ]")
![Soft Sea Foam 8-1/2" X 11" Cardstock [ 146988 ]](https://assets1.tamsnetwork.com/images/EC042017NF/146988s.jpg "Soft Sea Foam 8-1/2\" X 11\" Cardstock [ 146988 ]")
![Shaded Spruce Classic Stampin' Pad [ 147088 ]](https://assets1.tamsnetwork.com/images/EC042017NF/147088s.jpg "Shaded Spruce Classic Stampin' Pad [ 147088 ]")
![Soft Sea Foam Classic Stampin' Pad [ 147102 ]](https://assets1.tamsnetwork.com/images/EC042017NF/147102s.jpg "Soft Sea Foam Classic Stampin' Pad [ 147102 ]")
![Shades Of Green Hexagons [ 165233 ]](https://assets1.tamsnetwork.com/images/EC042017NF/165233s.jpg "Shades Of Green Hexagons [ 165233 ]")
![Shaded Spruce & Soft Sea Foam 1/2" (1.3 Cm) Ribbon [ 165234 ]](https://assets1.tamsnetwork.com/images/EC042017NF/165234s.jpg "Shaded Spruce & Soft Sea Foam 1/2\" (1.3 Cm) Ribbon [ 165234 ]")


